Go Back
For this copycat Raising Cane's chicken fingers recipe, you will need: - 1 lb chicken tenders - 1 cup buttermilk - 1 tablespoon hot sauce (optional) - 1 cup all-purpose flour - 1 teaspoon paprika - 1 teaspoon garlic powder - 1 teaspoon onion powder - 1 teaspoon salt - 1/2 teaspoon black pepper - 1/2 teaspoon cayenne pepper (adjust for spice preference) - Oil for frying These ingredients form the base of our crispy chicken fingers. The buttermilk adds moisture and flavor, while the spices in the flour mix give that tasty crunch. You can also add some fun flavors to your chicken: - Hot sauce (to the buttermilk) - Herbs like thyme or oregano for extra taste Feel free to play with these options. They can help you make the dish your own. To complete your meal, serve with these sauces: - Ranch dressing - Honey mustard - BBQ sauce These sauces enhance the flavor of the chicken fingers. I love dipping mine in ranch for that classic taste. Enjoy experimenting! {{ingredient_image_1}} Start by mixing buttermilk and hot sauce in a medium bowl. This gives the chicken flavor and moisture. Add one pound of chicken tenders to the bowl. Make sure they are fully covered. Cover the bowl and place it in the fridge. Let it marinate for at least an hour. If you have time, let it sit overnight. This step is key for juicy chicken fingers. While the chicken marinates, grab another bowl. In this bowl, whisk together one cup of all-purpose flour, one teaspoon of paprika, one teaspoon of garlic powder, one teaspoon of onion powder, one teaspoon of salt, half a teaspoon of black pepper, and half a teaspoon of cayenne pepper. Mix well until all the spices are evenly distributed. This coating brings amazing flavor and crunch to your chicken. Heat oil in a deep skillet over medium-high heat. Aim for about an inch of oil. You know it’s ready when a drop of the flour mixture sizzles in the oil. Take the marinated chicken out of the fridge. Let any extra buttermilk drip off. Dredge each chicken tender in your flour mixture. Make sure to coat each piece well. Carefully place the coated chicken in the hot oil. Fry them in batches to avoid crowding. Cook for 5-7 minutes on each side. You want them golden brown and cooked through. The inside should reach 165°F. Once done, remove the chicken and drain them on a wire rack or paper towels. Enjoy your crispy chicken fingers! To get crispy chicken fingers, follow these steps: - Use cold buttermilk. It helps the coating stick better. - Marinate the chicken for at least one hour. This adds flavor and moisture. - Coat each tender well in the flour mix. Do not rush this step. - Fry in small batches. This keeps the oil hot for crispiness. - Let the chicken rest on a wire rack. This keeps it crispy as it cools. Avoid these common mistakes for the best results: - Skipping the marinade. This can lead to dry chicken. - Overcrowding the pan. It cools the oil and makes chicken soggy. - Not heating the oil enough. Check with a drop of batter; it should sizzle. - Using too much oil. An inch is perfect for frying chicken fingers. Serve your chicken fingers with these ideas: - Pair with crinkle-cut fries for a classic combo. - Offer a variety of dips, like ranch or honey mustard. - Add a fresh salad on the side for balance. - Garnish with fresh parsley for a pop of color. - Use a fun platter to make the meal look more inviting. Pro Tips Marinate for Flavor: Allowing the chicken to marinate in buttermilk for at least an hour (or overnight) enhances its flavor and tenderness. Double Dredge for Extra Crispiness: For an extra crispy coating, consider dipping the chicken tenders back into the buttermilk after the first flour coating, then dredging again in the flour mixture. Oil Temperature Matters: Keep an eye on the oil temperature while frying. If it's too hot, the coating will burn before the chicken is cooked through; if it's too cool, the tenders will absorb excess oil and become greasy. Rest After Frying: Let the fried chicken tenders rest on a wire rack instead of paper towels to maintain their crispiness by allowing air to circulate around them. {{image_2}} To spice things up, I suggest adding extra hot sauce. Mix one tablespoon of hot sauce into the buttermilk. You can also add more cayenne pepper to the flour mix. This will give your chicken fingers a nice kick. Adjust the spice level to fit your taste. If you want it really hot, go for two teaspoons. If you need a gluten-free meal, swap the all-purpose flour for gluten-free flour. You can also use rice flour for a lighter coating. Just make sure your chicken tenders are gluten-free. Check the labels on your buttermilk or choose a gluten-free alternative. This way, everyone can enjoy these tasty chicken fingers! For a healthier twist, try baking the chicken fingers. Preheat your oven to 425°F (220°C). After coating the chicken, place them on a baking sheet lined with parchment paper. Spray a little oil on top to help them crisp up. Bake for about 20-25 minutes, flipping halfway. This method cuts down on oil but still gives you that crunch! After enjoying your chicken fingers, let them cool down. Place any leftovers in an airtight container. You can store them in the fridge for up to three days. Keeping them sealed helps maintain their flavor and texture. If you want to enjoy them later, follow the next steps! To reheat your chicken fingers, use an oven or air fryer. Preheat your oven to 350°F (175°C). Place the chicken on a baking sheet lined with parchment paper. Heat for about 10-15 minutes, or until they are warm and crispy. An air fryer works great too! Just heat at 375°F (190°C) for about 5-7 minutes. This keeps them crunchy! If you have extra chicken fingers, freezing is a great option. First, let them cool completely. Arrange them in a single layer on a baking sheet and freeze for about an hour. Once frozen, transfer them to a freezer bag. Be sure to remove all air before sealing. You can freeze them for up to three months. When ready to eat, reheat directly from the freezer using the oven or air fryer. Enjoy your homemade treat anytime! Yes, you can use chicken breasts. Just cut them into strips. Make sure each piece is similar in size. This helps them cook evenly. Chicken breasts might be less juicy than tenders. Still, they will taste great if you follow the recipe. You can make these chicken fingers healthier in a few ways. First, use whole wheat flour instead of all-purpose flour. This adds fiber. You can also bake them instead of frying. Coat the chicken with a thin layer of oil and place them on a baking sheet. Bake at 400°F for about 20 minutes. Turn them halfway through for even crispiness. Lastly, serve with fresh veggies or a salad instead of fries. The best oil for frying chicken is one with a high smoke point. Oils like canola, peanut, or vegetable oil work well. These oils can handle high heat without burning. This helps achieve that perfect crispy texture. Make sure to keep the oil at the right temperature for best results. You want it hot enough to sizzle when you add the chicken. In this post, we explored the best ways to make chicken fingers. We covered the main ingredients, optional additions, and tasty dips. You learned step-by-step how to marinate, coat, and fry your chicken. I shared tips for perfect crispiness and common mistakes to avoid. Variations, like spicy and gluten-free options, offer great twists. Finally, you now know how to store and reheat any leftovers. Enjoy your chicken fingers, and remember, practice makes perfect!

Crispy Chicken Finger Delight

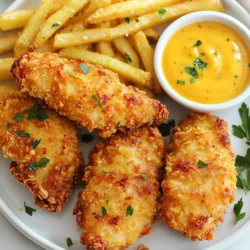
Deliciously crispy chicken tenders marinated in buttermilk and coated with a flavorful spice mix.
Prep Time 15 minutes
Cook Time 30 minutes
Total Time 1 hour 30 minutes
Course Main Course
Cuisine American
Servings 4
Calories 350 kcal

Ingredients
  

  • 1 lb chicken tenders
  • 1 cup buttermilk
  • 1 tablespoon hot sauce (optional)
  • 1 cup all-purpose flour
  • 1 teaspoon paprika
  • 1 teaspoon garlic powder
  • 1 teaspoon onion powder
  • 1 teaspoon salt
  • 0.5 teaspoon black pepper
  • 0.5 teaspoon cayenne pepper
  • as needed Oil for frying

Instructions
 

  • In a medium bowl, combine the buttermilk and hot sauce, if using. Add the chicken tenders to the bowl, ensuring they are fully submerged. Cover and refrigerate for at least 1 hour (or overnight for best flavor).
  • In another bowl, whisk together the flour, paprika, garlic powder, onion powder, salt, black pepper, and cayenne pepper.
  • Heat a deep skillet or frying pan over medium-high heat and fill it with about an inch of oil. The oil is ready when a drop of batter sizzles in it.
  • Remove the chicken from the buttermilk, letting the excess drip off. Dredge each tender in the flour mixture, ensuring each piece is evenly coated.
  • Carefully place the coated chicken tenders in the hot oil, cooking in batches to avoid overcrowding. Fry for 5-7 minutes per side or until golden brown and fully cooked (internal temperature should reach 165°F/75°C).
  • Once cooked, remove the tenders from the oil and set them on a wire rack or paper towels to drain excess oil.

Notes

Serve with crinkle-cut fries and a tangy dipping sauce. Garnish with fresh parsley.
Keyword appetizer, chicken, crispy, fried, tenders