If you’re craving a unique dessert that combines the best of peach pie and flaky pastry, you’re in for a treat! Today, I’ll guide you through making Peach Pie Cruffins—delightfully easy and oh-so-tasty. With just a few simple ingredients and easy steps, you can impress friends and family with this sweet creation. Grab your baking items, and let’s dive into this delicious recipe!
Ingredients
All-Purpose Flour & Sugar
To start, we need two main dry ingredients: all-purpose flour and granulated sugar.
– 2 cups all-purpose flour
– 1/2 cup granulated sugar
These two ingredients form the base of our cruffins. The flour gives structure, while the sugar adds sweetness. Using all-purpose flour works best for a light and fluffy texture.
Baking Powder & Salt
Next, we add baking powder and salt.
– 1 tablespoon baking powder
– 1/2 teaspoon salt
Baking powder helps the cruffins rise. The salt adds flavor, making the sweetness pop. Always measure these carefully for the best results.
Wet Ingredients & Peaches
Now, we combine our wet ingredients and the star of the show: peaches.
– 1/2 cup unsalted butter, melted and cooled
– 1/2 cup whole milk
– 1 large egg
– 1 teaspoon vanilla extract
– 2 ripe peaches, peeled and diced
– 1 teaspoon cinnamon
– 1 tablespoon cornstarch
– 1 tablespoon lemon juice
The butter, milk, egg, and vanilla create a rich, moist dough. The peaches have a juicy flavor that shines through. Tossing the diced peaches with lemon juice, cinnamon, and cornstarch makes a tasty filling. The cornstarch helps thicken the juices, making the filling less runny.
These ingredients combine to create a delightful dessert.
Step-by-Step Instructions
Preheat the Oven & Prepare the Muffin Tin
First, set your oven to 375°F (190°C). This is the perfect temperature for baking. While the oven heats, take a muffin tin and grease it with melted butter. This will help the cruffins pop out easily later.
Prepare the Peach Filling
Next, grab two ripe peaches. Peel and dice them into small pieces. In a bowl, mix the diced peaches with lemon juice, cinnamon, and cornstarch. Toss everything well and let it sit. This step helps the flavors blend together.
Make the Cruffin Dough
Now, let’s make the dough. In a large bowl, whisk together 2 cups of all-purpose flour, 1/2 cup of granulated sugar, 1 tablespoon of baking powder, and 1/2 teaspoon of salt. In a separate bowl, mix 1/2 cup of melted butter, 1/2 cup of whole milk, 1 large egg, and 1 teaspoon of vanilla extract. Combine these wet ingredients well.
Combine Wet and Dry Ingredients
Pour the wet mix into the dry ingredients. Stir gently until just combined. It’s okay to have some lumps. Overmixing can make the dough tough, and we want it soft and fluffy.
Shape and Layer the Cruffins
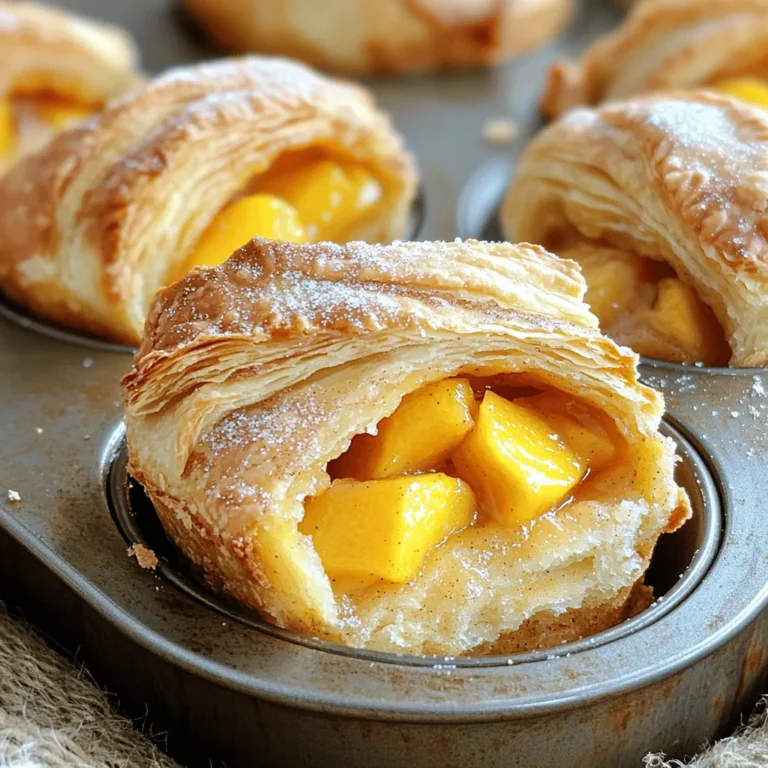
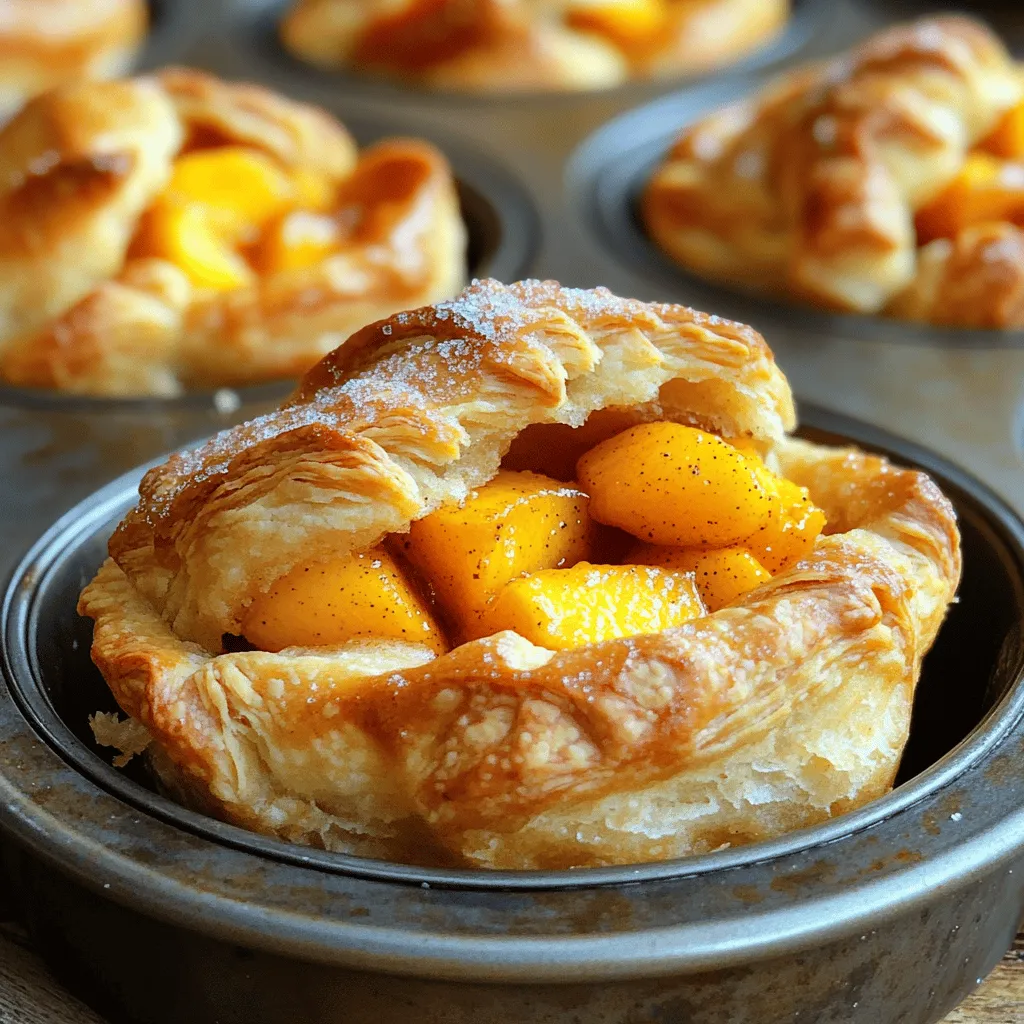
On a floured surface, roll out the dough. Aim for a rectangle about 1/4 inch thick. Brush it lightly with melted butter. Evenly sprinkle the peach filling over the dough. Starting from one long side, roll the dough tightly into a log. Slice the log into 12 equal pieces.
Bake and Cool
Place each piece into the greased muffin tin with the cut side facing up. Scatter any leftover peach filling on top of each cruffin. Sprinkle turbinado sugar for a crunchy topping. Bake for 20-25 minutes until golden brown. Let them cool in the tin for about 5 minutes before moving to a wire rack. Enjoy warm or at room temperature.
Tips & Tricks
Perfecting the Dough
To make the best dough, use cold butter. Cold butter creates flaky layers. Mix the dry ingredients well. This ensures even flavor. When adding wet ingredients, mix gently. Overmixing can make the dough tough. A few lumps are okay; they won’t harm the texture. Chill the dough for about 30 minutes if you can. A cool dough helps with shaping.
Best Techniques for Layering
Layering is key for a nice cruffin. Roll the dough into a rectangle, about 1/4 inch thick. Brush melted butter on the dough. This adds flavor and helps layers stick. Sprinkle the peach filling evenly to avoid clumps. Roll the dough tightly to keep the layers intact. Slice the log into equal pieces for even baking. Place each piece cut-side up in the muffin tin. This way, you see those lovely layers.
Serving Suggestions
Serve Peach Pie Cruffins warm for a delightful treat. They taste great on their own. Add a scoop of vanilla ice cream for extra fun. A drizzle of caramel sauce makes them even better. You can also dust them with powdered sugar for a fancy touch. Pair with coffee or tea for a lovely afternoon snack.
Variations
Different Fruit Alternatives
You can switch out peaches for other fruits. Try using blueberries, strawberries, or apples. Each fruit adds a unique taste. For apples, add a bit more cinnamon. For berries, keep the filling simple and sweet. This makes a fun twist on the classic recipe.
Gluten-Free Options
For a gluten-free version, swap all-purpose flour with a gluten-free blend. Make sure it has xanthan gum for better texture. You can also use almond flour or coconut flour. Adjust the liquid slightly since these flours absorb more moisture. This way, everyone can enjoy cruffins!
Flavor Enhancements (e.g., spices)
Add spices to the filling for extra flavor. Try nutmeg or allspice alongside cinnamon. You can also mix in some ginger for warmth. A splash of vanilla extract in the filling makes it even better. Don’t hesitate to get creative with these enhancements!
Storage Info
Storing Leftover Cruffins
After you bake the Peach Pie Cruffins, you may have some left. Store them in an airtight container. Keep the container at room temperature for up to two days. They taste best when fresh, but they can last a little longer.
Reheating Tips
To enjoy your cruffins warm again, preheat your oven to 350°F (175°C). Place the cruffins on a baking sheet. Heat them for about 5-8 minutes. This way, they’ll become warm and a bit crispy on the outside again.
Freezing Instructions
If you want to save some for later, freezing is great! Wrap each cruffin in plastic wrap. Then, place them in a freezer bag. They can stay in the freezer for up to three months. When you’re ready to eat, thaw them overnight in the fridge and reheat as mentioned above.
FAQs
What are Peach Pie Cruffins?
Peach Pie Cruffins are a fun twist on the classic muffin. They mix the flaky texture of a croissant with the sweet filling of peach pie. You get a soft, buttery outside and a juicy peach inside. Each bite feels like a warm hug from summer. They are perfect for breakfast or dessert.
Can I use canned peaches?
Yes, you can use canned peaches. Just make sure to drain them well before mixing. This keeps the filling from being too wet. Canned peaches are sweet and easy to use. They can save you time when making this recipe.
How do I know when the cruffins are done?
To check if the cruffins are done, look for a golden brown color. They should puff up nicely. You can also insert a toothpick into the center. If it comes out clean, your cruffins are ready. The smell will also fill your kitchen with a sweet aroma.
Where can I buy Peach Pie Cruffins?
You can find Peach Pie Cruffins at some local bakeries or cafes.It’s simple and fun to make. You’ll enjoy the fresh taste right from your oven.
How to make Peach Pie Cruffins more decadent?
To make your Peach Pie Cruffins more decadent, try adding cream cheese to the filling. You can also drizzle a vanilla glaze on top after baking. For extra crunch, sprinkle nuts or oats on the filling. These small touches will elevate your dessert and impress your guests.
You learned how to make delicious Peach Pie Cruffins today. We covered the key ingredients, step-by-step instructions, and useful tips. Remember, using fresh peaches or trying different fruits can change your cruffins’ taste. Storing them properly will keep them fresh longer. You can easily reheat or freeze for later. Enjoy experimenting with variations, and don’t hesitate to get creative. Now, it’s time for you to bake and share your tasty creations!

