Sushi cups are a fun and easy way to enjoy sushi without the fuss. If you love sushi, these cups are perfect for you. With simple ingredients and quick steps, I’ll guide you through creating delightful sushi cups that impress. Whether for a party or a quick meal, you’ll learn tips for freshness and storage. Let’s dive into this tasty adventure together and make sushi cups a new favorite!
Why I Love This Recipe
- Creative Presentation: The muffin tin creates adorable sushi cups, making them a fun and unique dish for gatherings.
Ingredients
List of Ingredients
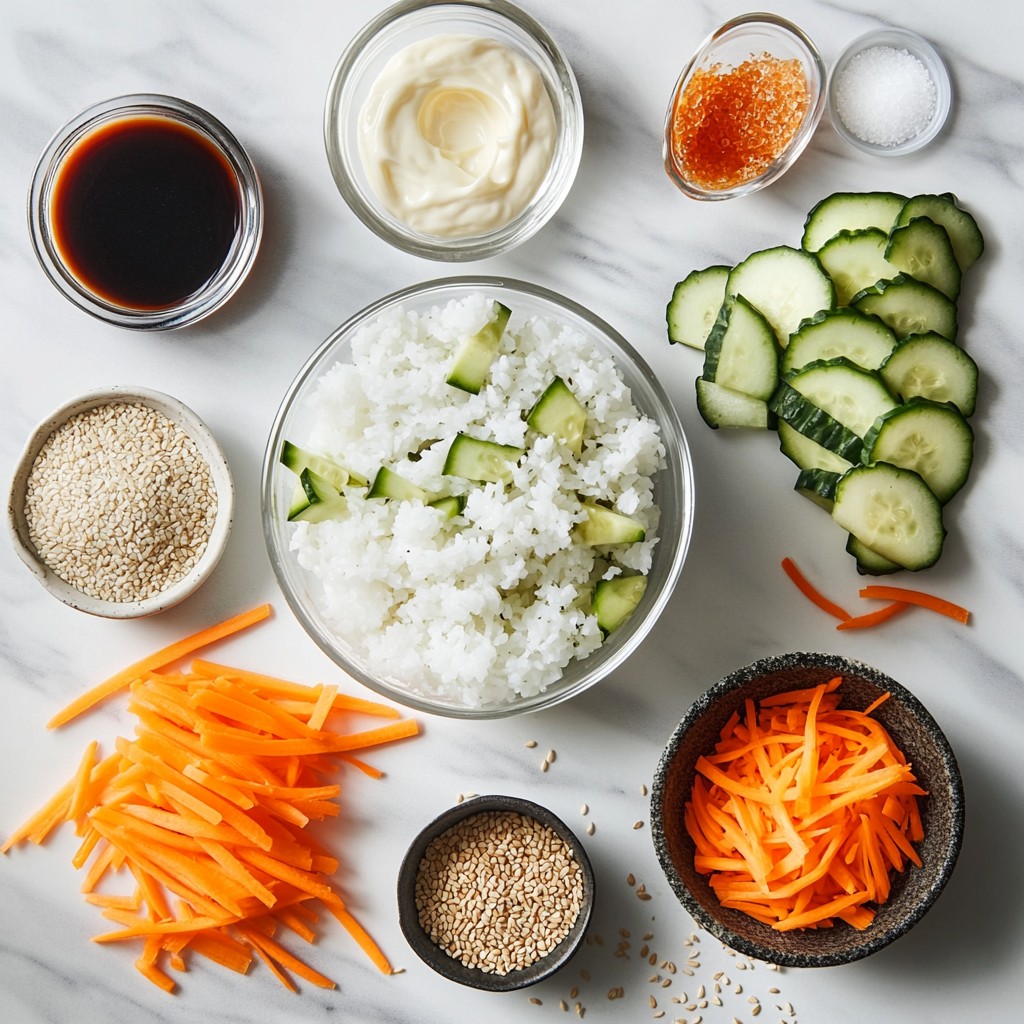
- 1 cup sushi rice
- 1 ¼ cups water
- 1 tablespoon rice vinegar
- 1 tablespoon sugar
- ½ teaspoon salt
- 1 cucumber, thinly sliced
- 1 carrot, julienned
- ½ avocado, sliced
- 4 ounces imitation crab or cooked shrimp, chopped
- ¼ cup mayonnaise (preferably Kewpie for extra flavor)
- 1 teaspoon sriracha (optional)
- Nori sheets, cut into small squares for garnish
- Sesame seeds for topping
Substitutions and Alternatives
You can swap sushi rice for brown rice or quinoa. These options give a healthier twist. For protein, use tofu or cooked chicken. Instead of crab or shrimp, try grilled vegetables for a vegetarian version. You might replace mayonnaise with yogurt for a lighter taste.
Tips for Freshness and Quality
Always use fresh ingredients for the best taste. Store vegetables in a cool place before use. Rinse the rice well to keep it from being gummy. After cooking, let the rice cool completely for better texture. If you make sushi cups ahead of time, keep them in the fridge until you serve. This keeps them firm and fresh.
Step-by-Step Instructions
Preparing the Sushi Rice
To start, you need to rinse the rice. Place one cup of sushi rice in a fine-mesh strainer. Rinse it under cold water until the water runs clear. This step cleans the rice and helps it cook better. Next, combine the rinsed rice with 1 ¼ cups of water in a medium saucepan. Bring it to a boil over medium heat. Once boiling, reduce the heat and cover it. Let it simmer for 15-20 minutes until the water is gone. After that, remove it from heat and let it sit covered for 10 minutes. This helps the rice finish cooking and become fluffy.
Now, it’s time to season the rice. In a small bowl, whisk 1 tablespoon of rice vinegar, 1 tablespoon of sugar, and ½ teaspoon of salt until dissolved. Gently fold this mixture into the cooked rice. Use a fork to fluff the rice. Let it cool to room temperature before using it.
Making the Fillings
While the rice cools, prepare the fillings. Start with 1 cucumber; slice it thinly. Then, take 1 carrot and julienne it into thin strips. Next, slice ½ an avocado. For the protein, chop 4 ounces of imitation crab or cooked shrimp. In a bowl, mix the chopped crab or shrimp with ¼ cup of mayonnaise. If you want a little heat, add 1 teaspoon of sriracha. This mix adds flavor and creaminess to your cups.
Assembling the Sushi Cups
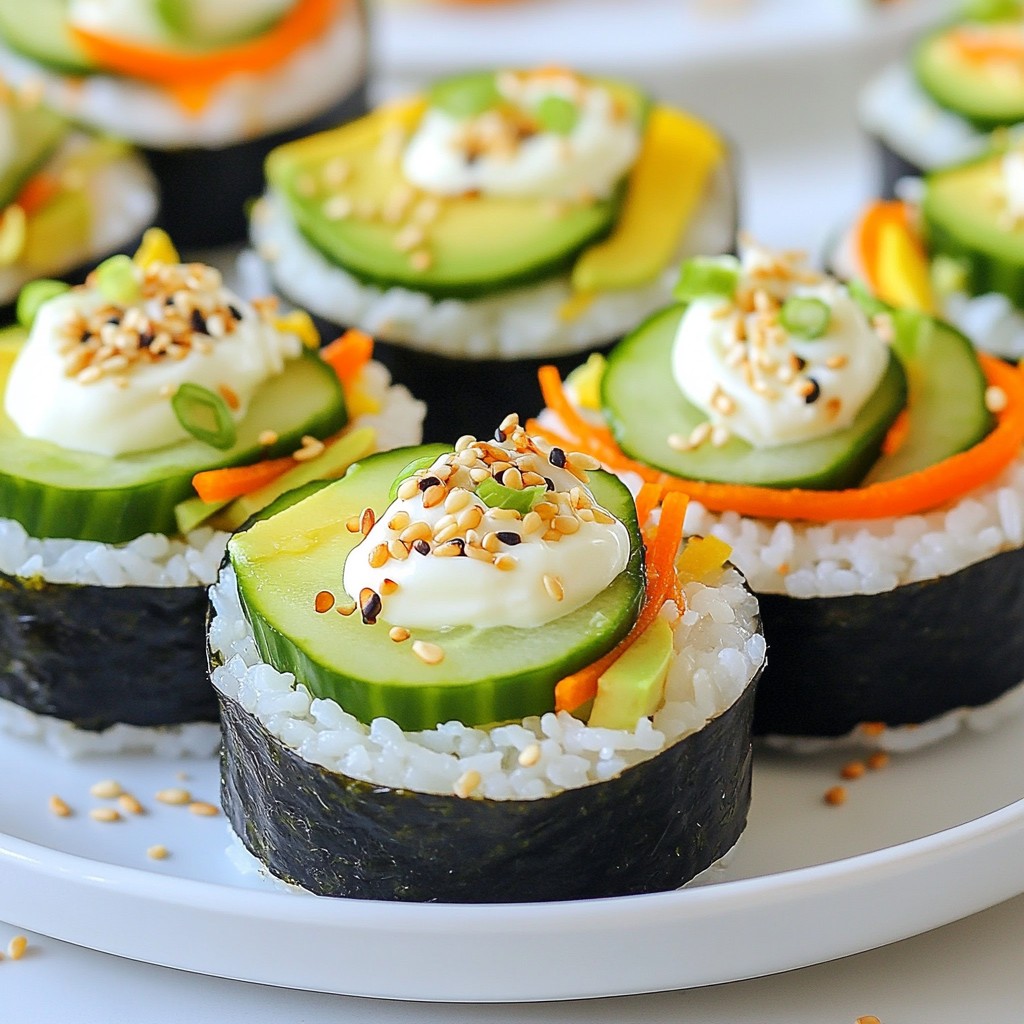
Now it’s time to assemble these delightful sushi cups. Grab a muffin tin and lightly spray it with cooking oil to prevent sticking. Take some sushi rice and press it into the bottom and up the sides of each muffin cup. Shape it into a small cup.
Start layering the fillings. Place a layer of cucumber and carrot in each rice cup. Then, add a scoop of the crab or shrimp mixture. Finally, top each cup with a slice of avocado. For a nice touch, sprinkle sesame seeds on top. You can also add a small piece of nori for decoration.
To finish, chill the sushi cups in the refrigerator for about 15-30 minutes. This helps them firm up and makes them ready to serve.
Tips & Tricks
Achieving Perfectly Cooked Sushi Rice
To make sushi cups, perfect rice is a must. Start by rinsing the sushi rice well. Use a fine-mesh strainer and cold water. Rinse until the water runs clear. This step removes excess starch. It helps the rice stay fluffy. After rinsing, cook the rice with 1 ¼ cups of water. Bring it to a boil, then reduce to a simmer. Cover the pot and let it cook for 15-20 minutes. Once the water is gone, let the rice sit for 10 minutes. This resting time lets the rice absorb moisture. Then, mix rice vinegar, sugar, and salt into the rice. This seasoning gives the rice a tangy taste.
Flavor Enhancements for Fillings
You can jazz up the flavors of your fillings. For the crab or shrimp, mix it with mayonnaise. I recommend using Kewpie mayonnaise for a richer flavor. You can also add sriracha for a spicy kick. If you prefer milder flavors, skip the sriracha. Adding fresh veggies like cucumber and carrot adds crunch and color. Avocado gives a creamy texture. Consider adding a squeeze of lemon juice for brightness. These simple tweaks make your sushi cups burst with flavor.
Presentation Ideas for Serving
How you present your sushi cups can impress your guests. Use a muffin tin to shape the rice cups. After they chill, they will hold their shape well. To serve, place the cups on a colorful platter. Sprinkle sesame seeds on top for a nice touch. You can also add small pieces of nori as garnish. For an extra pop, top with microgreens or sprouts. These additions not only look great but also add flavor. Each cup can be a little work of art!
Pro Tips
- Rinse the Rice: Always rinse your sushi rice thoroughly until the water runs clear. This step removes excess starch, ensuring your rice is perfectly sticky and not gummy.
- Cool the Rice: Let the seasoned rice cool to room temperature before assembling your cups. This prevents the fillings from wilting and keeps everything fresh.
- Customize Your Fillings: Feel free to experiment with different fillings! You can use fresh seafood, tofu, or a variety of vegetables to suit your taste.
- Chill for Best Texture: Chilling the assembled sushi cups for at least 30 minutes will help them hold their shape better and enhance the flavors.
Variations
Different Fillings: Vegetarian and Seafood Options
You can customize your sushi cups with many fillings. For a vegetarian option, try using tofu, bell peppers, or radishes. These add great taste and color. You could also add pickled vegetables for more crunch. If you prefer seafood, imitation crab or shrimp works well. You can even mix different seafood for a fun twist.
Sauce Alternatives for Extra Flavor
Sauces can make your sushi cups even better. Instead of mayonnaise, you can use Greek yogurt for a healthier choice. A splash of soy sauce or a drizzle of teriyaki sauce adds a bold taste. If you like spice, try adding wasabi or chili oil. Each sauce will change the flavor and give you new ideas.
Creative Serving Suggestions for Events
When serving sushi cups at events, make them fun and appealing. Use colorful plates or platters. You can also garnish with edible flowers or microgreens for a fancy touch. For a party, set up a sushi cup bar. Let guests choose their own fillings and sauces. This way, everyone can enjoy their own creation.
Storage Info
Storing Leftover Sushi Cups
After enjoying your sushi cups, you may have some left. Store them in an airtight container. Place a damp paper towel inside to keep the rice moist. This helps prevent the rice from drying out. The sushi cups can last in the fridge for about two days. Avoid stacking them, as this can make them mushy.
Reheating Tips
Sushi cups are best served cold, but you can reheat them if needed. Use a microwave-safe plate. Heat on low power for 15 to 20 seconds. Check if they are warm enough. Be careful not to overheat. Overheating can change the rice texture and flavor.
Best Practices for Meal Prep
Meal prep can make your life easier. Cook a big batch of sushi rice and store it in the fridge. Prepare your fillings ahead of time, too. Chopped veggies and proteins can stay fresh for a few days. When you are ready to eat, just assemble the cups. This method saves time and keeps your meals fresh.
FAQs
What types of containers can be used for sushi cups?
You can use a muffin tin for sushi cups. It gives a nice shape. Silicone molds work well too. They make it easy to pop out the cups. If you want something different, try small ramekins or dessert cups. These work well for serving too. Just ensure they are the right size to hold the rice and fillings.
Can you make sushi cups ahead of time?
Yes, you can make sushi cups ahead of time. It’s best to prepare them a few hours before serving. Store them in the fridge to keep them fresh. However, don’t add avocado until right before serving. This keeps the avocado from turning brown. You can also prepare the rice and fillings earlier and assemble them later. It saves time and keeps everything fresh.
What are the best fillings for sushi cups?
The best fillings for sushi cups are varied and tasty. You can use imitation crab or cooked shrimp for protein. Fresh veggies like cucumber and carrot add crunch. Sliced avocado brings creaminess. For a spicy kick, mix sriracha with mayo. You can also add thinly sliced radishes or pickled ginger. Experiment with different flavors and textures for fun!
This blog post covered everything you need to make sushi cups. We discussed the key ingredients, preparation steps, and smart tips to enhance flavor and presentation. With options for both vegetarians and seafood lovers, there's a filling for everyone. You learned how to store leftovers and reheat them, ensuring no waste. Making sushi cups is fun and rewarding; you can impress family and friends with your skills. Get creative and enjoy this tasty dish! Now, gather your ingredients and start making delicious sushi cups today.