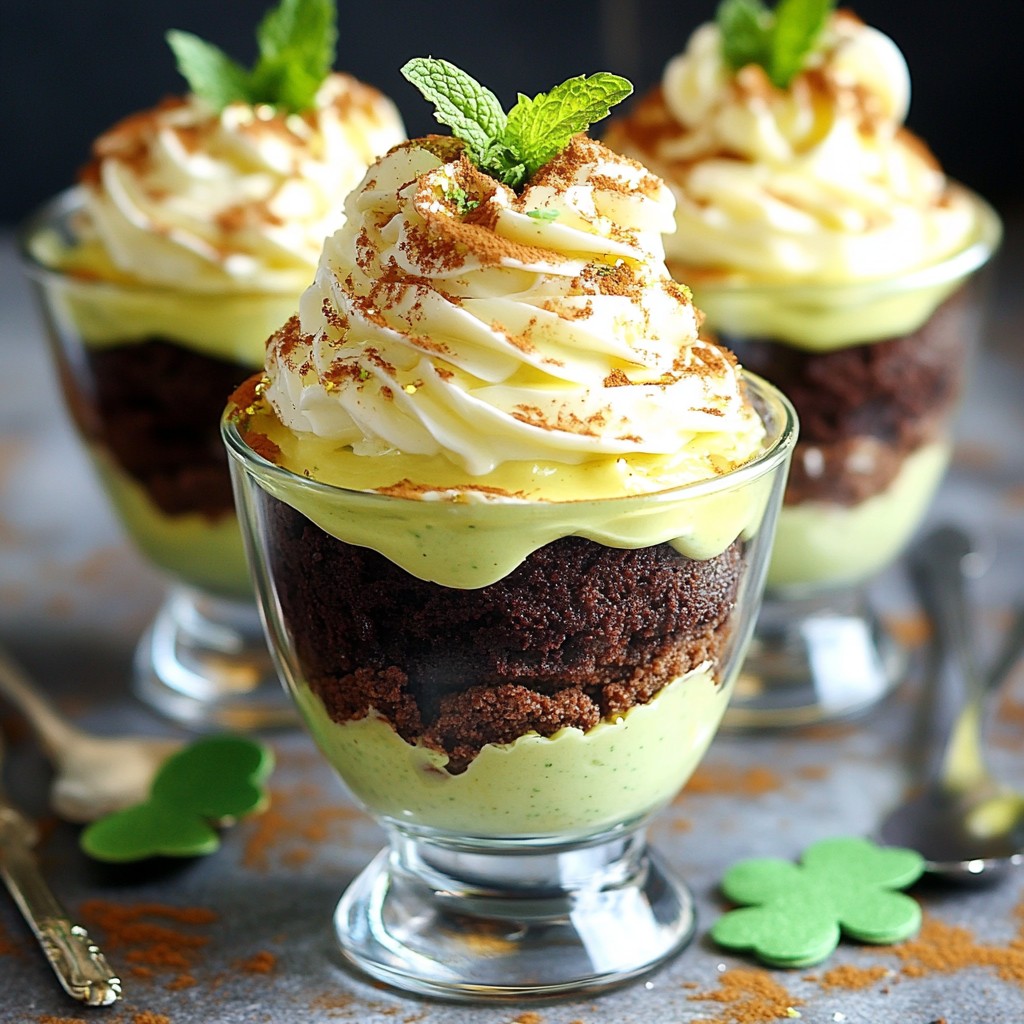
Get ready to celebrate St. Patrick’s Day with a dessert that dazzles! My St. Patrick’s Day Brownie Trifle combines rich brownies, creamy whipped cream, and festive toppings. It's easy to make and perfect for any party. Whether you're an expert chef or a beginner, you’ll find tips and tricks to create this layered delight. Join me as we whip up this fun, festive treat that everyone will love!
Why I Love This Recipe
- Festive Delight: This Brownie Trifle is perfect for St. Patrick's Day celebrations with its vibrant green layers and fun presentation.
- Decadent Layers: Indulge in the rich combination of fudgy brownies, creamy pudding, and fluffy whipped cream that creates a delightful texture in every bite.
- Easy to Assemble: With simple ingredients and straightforward layering, this trifle is a quick and enjoyable dessert to put together, even for novice bakers.
- Customizable Fun: Feel free to get creative with the toppings and layers, allowing each person to personalize their dessert with their favorite flavors.
Ingredients
Essential Ingredients for St. Patrick’s Day Brownie Trifle
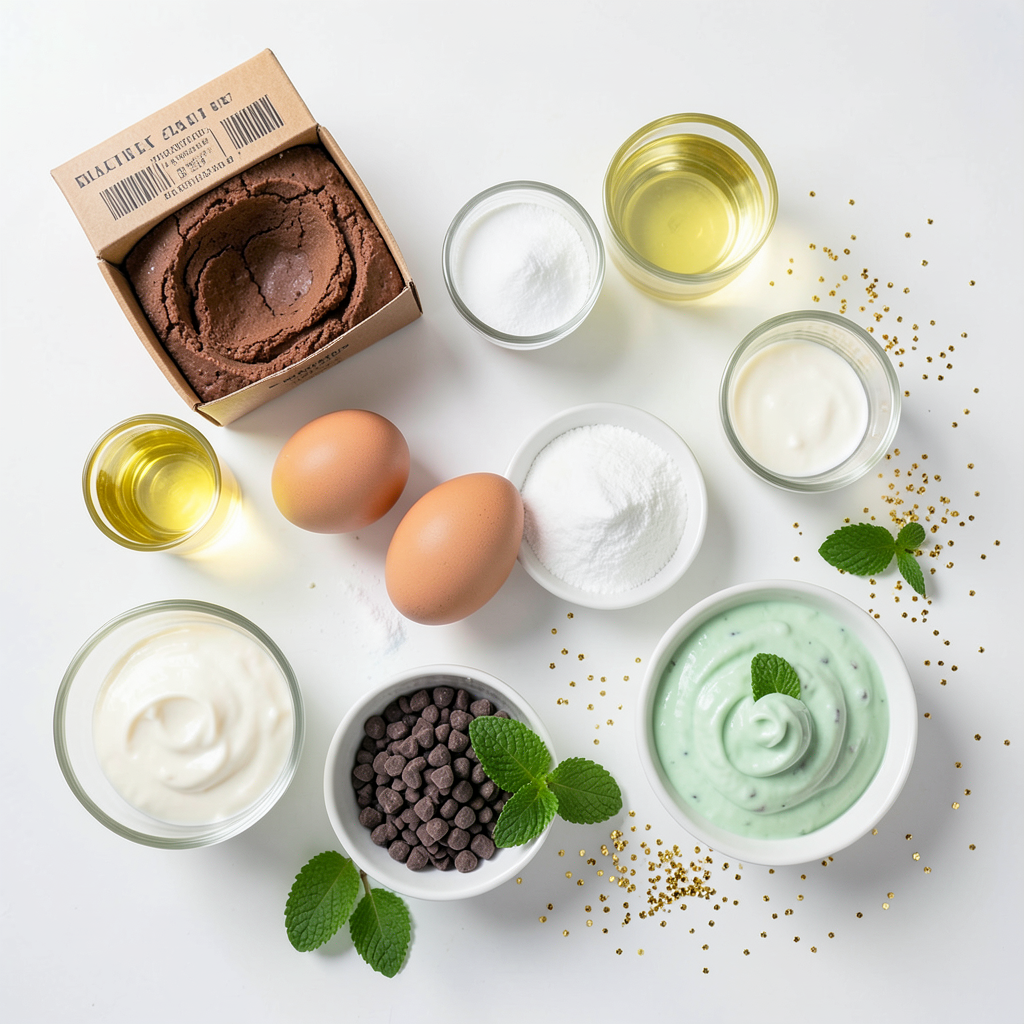
To create a tasty St. Patrick’s Day brownie trifle, gather these key ingredients:
- 1 box (18.4 oz) brownie mix
- 1/2 cup vegetable oil
- 2 large eggs
- 1/4 cup water
- 2 cups heavy cream
- 1/2 cup powdered sugar
- 1 teaspoon vanilla extract
- 1 cup mint chocolate chips
- 2 cups creamy mint chocolate or vanilla pudding
- 2 cups green-colored whipped topping
- Fresh mint leaves for garnish
- Edible gold glitter (optional)
Each ingredient plays a role in making your trifle delightful. The brownie mix gives a rich base, while the mint chocolate pudding adds flavor and a fun twist.
Optional Garnishes for Festive Touch
Garnishes can elevate your trifle’s look and taste. Here are a few you might choose:
- Fresh mint leaves for a pop of color
- Edible gold glitter for a festive sparkle
- Extra mint chocolate chips for added crunch
These touches make your trifle stand out and impress your guests.
Tips for Ingredient Substitutions
If you need to swap some ingredients, here are some ideas:
- Use applesauce instead of oil for a lighter brownie.
- Try egg substitutes like flaxseed meal for a vegan option.
- Use whipped coconut cream in place of heavy cream for a dairy-free version.
These substitutions keep the joy of making this trifle while catering to different diets. Adjust the recipe to fit your needs, and enjoy!
Step-by-Step Instructions
Prepping the Brownies
Start by preheating your oven to 350°F (175°C). Grab a large bowl and mix the brownie mix, vegetable oil, eggs, and water. Stir until smooth. Pour the batter into a greased 9x9-inch baking dish. Bake for 20 to 25 minutes. Check with a toothpick; it should come out clean. Once done, let the brownies cool completely. Then, cut them into bite-sized pieces. This will make layering easier and more fun.
Preparing the Whipped Cream
While the brownies cool, let’s make the whipped cream. In a medium bowl, add heavy cream, powdered sugar, and vanilla extract. Use a hand mixer to beat the mixture. Mix until you see soft peaks. This creamy treat adds a light touch to your trifle. Set it aside until you are ready to layer.
Layering the Trifle
Now comes the exciting part: layering! In a clear trifle dish or individual cups, start with a layer of brownie pieces. This will be your base. Next, add a layer of mint chocolate pudding. Follow that with a layer of whipped cream. Then, sprinkle mint chocolate chips over the whipped cream. Repeat these layers until you reach the top. End with a layer of whipped cream. For a festive finish, top with green-colored whipped topping. Add fresh mint leaves and a sprinkle of edible gold glitter if you like. This will make your trifle shine!
Tips & Tricks
How to Achieve Perfect Brownie Texture
To make great brownies, you need to follow the box instructions. Use the right amount of vegetable oil, eggs, and water. Mix these well. Bake at 350°F for 20-25 minutes. Check doneness with a toothpick; it should come out clean. Let the brownies cool completely before cutting. This keeps the texture soft and moist. Cutting them too soon can make them crumbly.
Whipped Cream Tips for Best Results
For fluffy whipped cream, keep your bowl and beaters cold. Chill them in the fridge for 10-15 minutes. Use heavy cream for best results. Mix it with powdered sugar and vanilla extract. Beat until soft peaks form. Don’t overbeat, or it turns to butter. Soft peaks hold their shape well and blend nicely in your trifle.
Presentation Tips for a Festive Look
To make your trifle pop, use clear glass cups. This shows off the lovely layers. Start with golden brownie pieces on the bottom. Add bright green pudding next. Top with fluffy whipped cream and mint chocolate chips. Finish with green-colored whipped topping. Add fresh mint leaves and a sprinkle of edible gold glitter. This adds charm and makes it festive for St. Patrick’s Day!
Pro Tips
- Perfect Brownies: For fudgier brownies, slightly underbake them. Remove from the oven when a toothpick inserted in the center comes out with a few moist crumbs.
- Layering Technique: When layering the trifle, use a spatula to spread each layer evenly. This will help create distinct layers and make the trifle visually appealing.
- Make Ahead: You can prepare the brownie base and whipped cream a day in advance. Assemble the trifle the day you plan to serve it for the freshest taste.
- Garnishing: For an extra festive touch, lightly dust the top with cocoa powder or crushed mint chocolate chips before serving.
Variations
Alternative Flavor Combinations
You can switch up the flavors in your trifle. Try using chocolate or caramel pudding instead of mint chocolate. For a fruity twist, use strawberry or raspberry pudding. You can even layer in fresh berries between the brownies. This adds a nice pop of color and flavor.
Using Different Types of Pudding
Feel free to experiment with pudding types. Vanilla pudding pairs well with the rich brownies. Chocolate pudding adds more chocolatey goodness. For a fun texture, use tapioca or rice pudding. Just make sure the pudding you choose complements the brownies.
Gluten-Free or Dairy-Free Options
If you need gluten-free brownies, use a gluten-free brownie mix. Many brands offer these options now. For a dairy-free trifle, use coconut cream in place of heavy cream. You can also find dairy-free pudding mixes. Just make sure to check the labels for any hidden dairy.
Storage Info
How to Store Leftover Brownie Trifle
To store leftover brownie trifle, cover it tightly with plastic wrap or a lid. This keeps the layers fresh and prevents them from drying out. If you used individual cups, just cover each one. You can keep it in the fridge for up to three days.
Freezing Tips for Longer Storage
Freezing a trifle is not the best idea, as it can change the texture. However, you can freeze the brownies separately. Just wrap them well and store them in a freezer bag. They will stay fresh for about three months. When ready to use, thaw them in the fridge overnight before assembling your trifle.
Shelf Life and Best Practices
The shelf life of your brownie trifle in the fridge is three days. To enjoy the best taste, serve it fresh. Always check for any signs of spoilage before eating. If it looks or smells off, it’s best to toss it.
FAQs
Can I make the trifle ahead of time?
Yes, you can make the trifle ahead of time. Prepare it a day in advance. Just store it in the fridge. The layers will meld together, making it even tastier. I recommend waiting to add the green-colored whipped topping until just before serving. This will keep it looking fresh.
What can be used instead of mint chocolate chips?
If you don’t have mint chocolate chips, use regular chocolate chips. You can also use crushed cookies for a fun crunch. Another great option is to add white chocolate chips. They will give a nice contrast to the dark brownie. Feel free to experiment with different flavors.
How can I make the dessert less sweet?
To make the trifle less sweet, reduce the powdered sugar in the whipped cream. You can also use unsweetened cocoa powder in the brownie mix. Another option is to use a sugar substitute in the pudding. Adding a pinch of salt can balance the sweetness too. These tips will help you enjoy this treat without it being too sweet.
You now have a clear plan for making a St. Patrick’s Day brownie trifle. We covered essential ingredients, preparation steps, and tips for a perfect dessert. I shared variations to suit different diets and how to store leftovers. Remember, the key is to layer your flavors and get creative! Enjoy this festive treat, and make it your own. Your guests will love it, and you’ll feel proud of your creation. Dive in, and have fun making this delicious dessert!