Get ready to indulge in a sweet treat that’s fun to make! OREO Cookie Ball Pops are a delightful, no-bake dessert perfect for any occasion. With simple ingredients and easy steps, you can create these tasty bites that everyone will love. Whether you're hosting a party or just want a snack, these cookie pops will satisfy your cravings. Let’s dive into how to make them and impress your friends!
Why I Love This Recipe
- Fun to Make: These cookie ball pops are not only delicious but also a fun activity to do with kids or friends!
- Perfect for Any Occasion: Whether it's a birthday party, holiday gathering, or just a sweet treat, these pops are always a hit!
- Customizable: You can easily change the toppings or chocolate to match your theme or preference!
- Easy to Store: These treats can be made ahead of time and stored in the freezer, making them perfect for planning ahead!
Ingredients
List of Ingredients
To make OREO Cookie Ball Pops, you need:
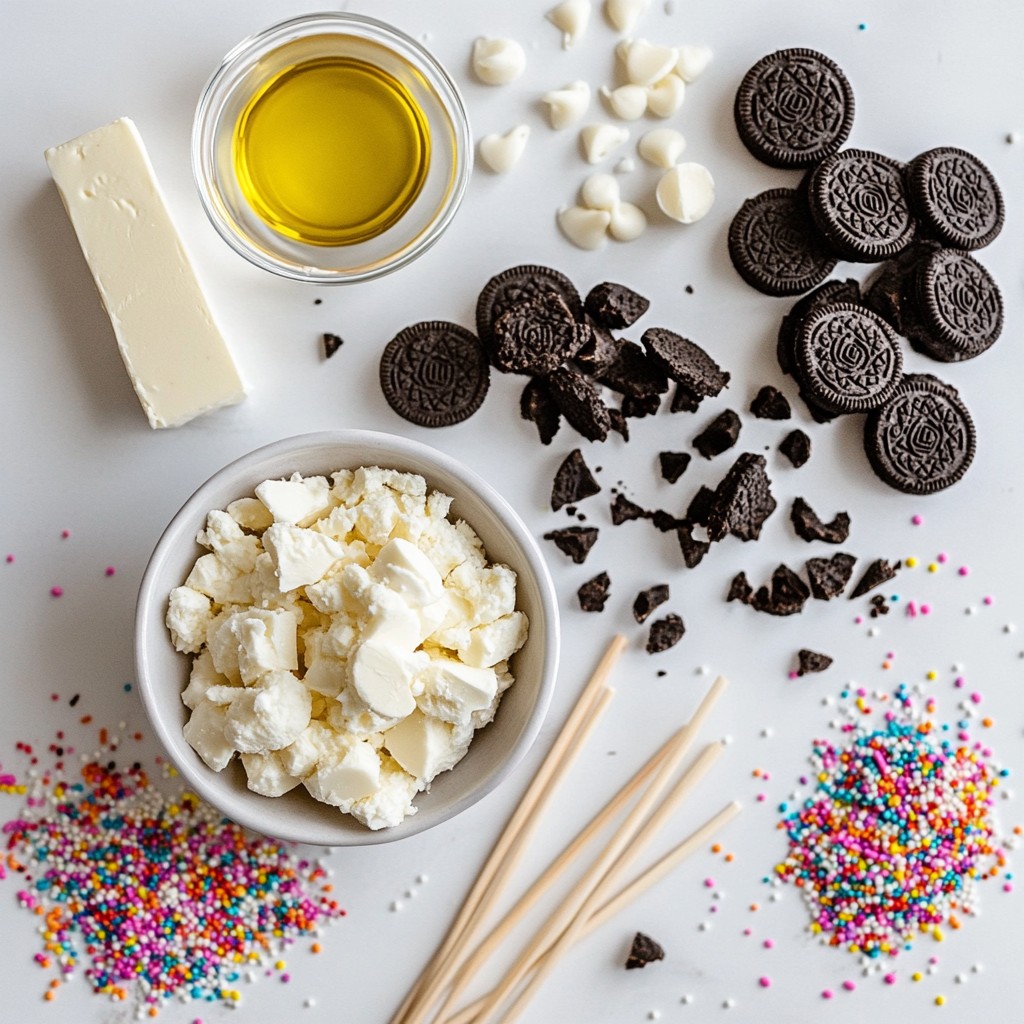
- 1 package (14.3 oz) Oreo cookies, crushed
- 8 oz cream cheese, softened
- 1 cup white chocolate chips
- 1 tablespoon coconut oil
- Sprinkles or crushed Oreos for garnish
- Lollipop sticks
Ingredient Substitutions
If you want to swap out some ingredients, here are some ideas:
- Use any chocolate sandwich cookies instead of Oreos for a twist.
- For a dairy-free option, try vegan cream cheese.
- Swap white chocolate chips with dark or milk chocolate chips.
- If you don’t have coconut oil, use vegetable oil instead.
Recommended Tools and Equipment
To make this recipe, gather these tools:
- A large mixing bowl for combining ingredients.
- A baking sheet lined with parchment paper for easy cleanup.
- A microwave-safe bowl to melt the chocolate.
- A spoon or spatula for mixing.
- A freezer to firm up the cookie balls before dipping.
Step-by-Step Instructions
Preparation of the Cookie Mixture
First, take a large mixing bowl. Add one package of crushed OREO cookies and eight ounces of softened cream cheese. Mix these two until smooth. This should take a minute or two. You want all the cookie bits to blend in well with the cream cheese.
Forming the Cookie Balls
Now, use your hands to form small balls from the mixture. Each ball should be about one inch wide. Place these cookie balls on a baking sheet lined with parchment paper. Next, insert a lollipop stick into the center of each ball. Push it in halfway to give it good support.
Melting and Dipping in Chocolate
While the cookie balls chill in the freezer for 15-20 minutes, melt the white chocolate chips. Use a microwave-safe bowl and add one tablespoon of coconut oil to the chips. Heat them in 30-second bursts, stirring in between, until they are smooth. Once the cookie balls are firm, dip each one into the melted chocolate. Let any excess chocolate drip off. While the chocolate is still wet, sprinkle the tops with colorful sprinkles or crushed OREOs. Place the dipped cookie pops back on the baking sheet. Freeze them again for about 10 minutes to set. Enjoy your OREO Cookie Ball Pops!
Tips & Tricks
How to Achieve the Perfect Consistency
To get the best texture for your OREO Cookie Ball Pops, mix the crushed cookies and cream cheese well. You want a smooth, thick mixture, not too dry or too wet. If it feels crumbly, add a little more cream cheese. If it's too sticky, add more crushed cookies. This balance helps shape the balls nicely.
Common Mistakes to Avoid
One common mistake is not freezing the cookie balls long enough. If they’re too soft, they may fall apart when dipped in chocolate. Make sure to freeze them for at least 15-20 minutes. Another mistake is not inserting the sticks deep enough. They should go in halfway for good support. Lastly, avoid rushing the chocolate melting. Take your time to stir often for a smooth dip.
Presentation Ideas for Serving
For a fun display, use a styrofoam block to hold the pops upright. You can also place them in a glass jar or a decorative bowl. Adding colorful sprinkles or crushed Oreos on top makes them pop visually. For parties, consider using themed decorations like mini flags or custom labels. This adds a personal touch and makes your treats more inviting.
Pro Tips
- Chill Your Mixture: Ensure your Oreo and cream cheese mixture is well-chilled before shaping into balls for easier handling.
- Use Quality Chocolate: Opt for high-quality white chocolate chips for a smoother melting process and superior taste.
- Customize Your Coating: Experiment with different toppings like crushed nuts or colorful candy melts for a unique look and flavor.
- Store Properly: Keep the finished pops in an airtight container in the freezer to maintain freshness and flavor.
Variations
Different Coatings (Chocolate, Sprinkles, Nuts)
You can change how your OREO Cookie Ball Pops look and taste. Try different coatings!
- Chocolate: Use milk, dark, or white chocolate for a rich flavor.
- Sprinkles: Add colorful sprinkles for fun or themed colors.
- Nuts: Chop your favorite nuts for added crunch. They also add a nice look.
Flavor Variations (Mint, Peanut Butter, etc.)
You can make these pops even more fun with different flavors.
- Mint: Add mint extract to the cookie mix for a fresh twist.
- Peanut Butter: Mix in peanut butter for a nutty flavor.
- Chocolate Mint: Combine mint extract and chocolate coating for a classic combo.
Themed Decorations for Holidays or Events
Make your OREO Cookie Ball Pops fit any occasion. You can get creative!
- Holidays: Use red and green sprinkles for Christmas or pastel colors for Easter.
- Birthdays: Add colorful sprinkles and fun cake toppers for a festive look.
- Halloween: Use orange and black sprinkles or even shape them like pumpkins!
These fun ideas will help you enjoy your OREO Cookie Ball Pops in new ways!
Storage Info
How to Store Leftover OREO Cookie Ball Pops
To store leftover OREO Cookie Ball Pops, place them in an airtight container. Keep the container in the fridge. This helps keep the pops fresh and tasty. Layer the pops with parchment paper to prevent sticking. Try to eat them within a week for the best flavor.
Freezing Instructions
You can freeze OREO Cookie Ball Pops if you want to save them for later. First, freeze the pops for about 10 minutes to set. Then, wrap each pop in plastic wrap. Place the wrapped pops in a freezer-safe bag or container. They can last in the freezer for up to three months. When ready to eat, thaw them in the fridge for a few hours.
Shelf Life Information
OREO Cookie Ball Pops stay fresh in the fridge for about one week. If they are frozen, they can last up to three months. Keep an eye out for any changes in smell or texture. This ensures you enjoy the best taste. Always check the pops before serving to ensure they are still good.
FAQs
Can I use different types of cookies for this recipe?
Yes, you can use other cookies! Try chocolate chip, peanut butter, or even ginger snaps. Each cookie gives a unique flavor. Just crush them well, so they mix easily with the cream cheese. Experimenting with cookies can lead to fun new treats.
How long do OREO Cookie Ball Pops last in the fridge?
OREO Cookie Ball Pops stay fresh in the fridge for about one week. Store them in an airtight container to keep them moist. If you notice them drying out, they are best enjoyed right away.
Can I make these ahead of time for a party?
Yes, you can make these ahead! Prepare them one or two days in advance. Just keep them in the fridge until your event. This allows you to enjoy the party without stress.
What can I use instead of cream cheese?
If you want a swap for cream cheese, try mascarpone cheese or Greek yogurt. Both will give a tasty result. You can also use vegan cream cheese for a dairy-free option.
You learned about making OREO Cookie Ball Pops, from ingredients to storage. We covered ingredient swaps, tools, and step-by-step guidelines. I shared tips to avoid mistakes and ideas for fun variations and decorations.
Store these delights properly to enjoy later. They stay fresh in the fridge or freezer. Now you can impress friends at your next event with these tasty treats. Enjoy your cookie-making journey!