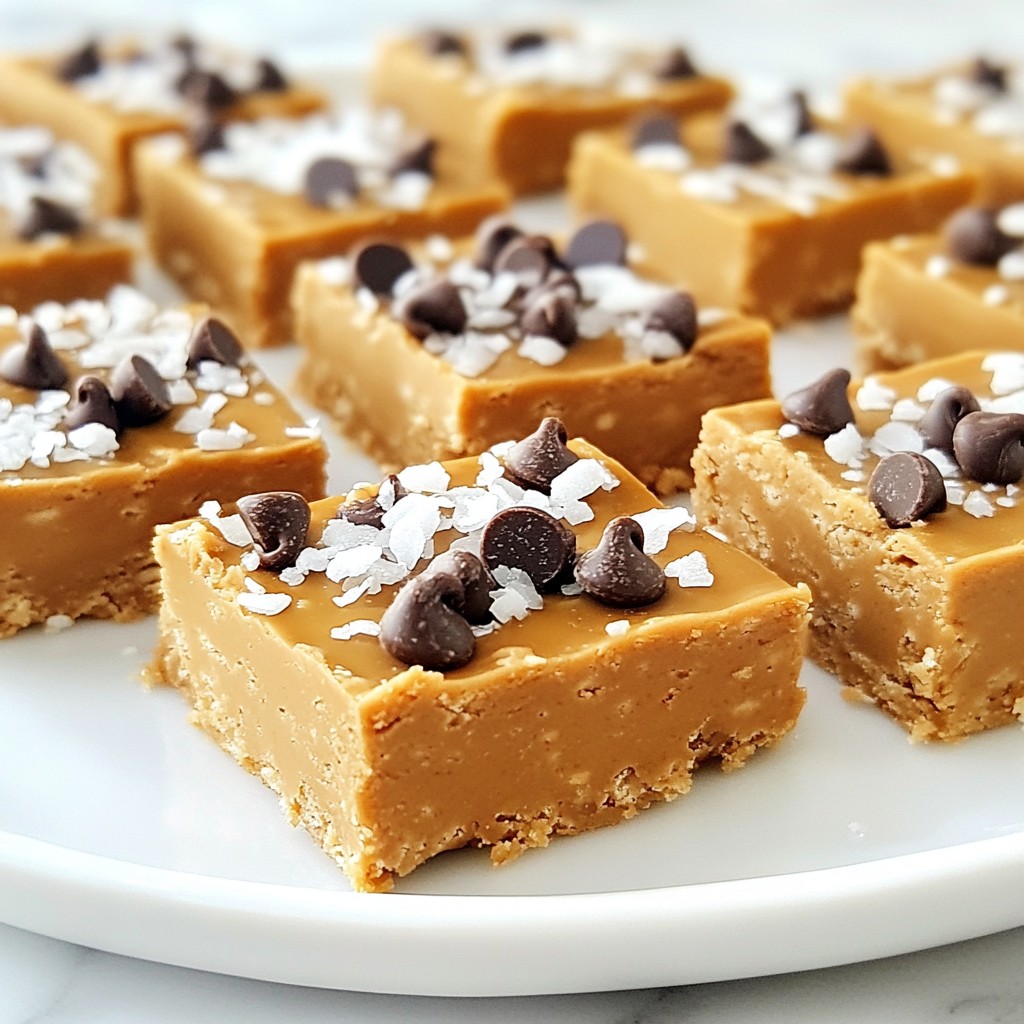
Get ready to indulge in a sweet treat that’s both easy and fun! My No-Bake Peanut Butter Bars are the perfect snack for any time of day. They require no baking, just simple mixing and chilling. With rich peanut butter and a few pantry staples, you’ll create a delicious dessert in no time. Are you ready to get started? Let’s make this easy recipe together!
Why I Love This Recipe
- Quick and Easy: This recipe requires just 10 minutes of prep time, making it perfect for busy days or last-minute snacks.
- Healthy Ingredients: Using natural peanut butter and rolled oats, these bars offer a nutritious option that satisfies your sweet cravings.
- Customizable: Feel free to mix in your favorite add-ins like nuts or dried fruits to make these bars your own!
- No Baking Required: These bars are a no-bake treat, so you can enjoy them without turning on the oven.
Ingredients
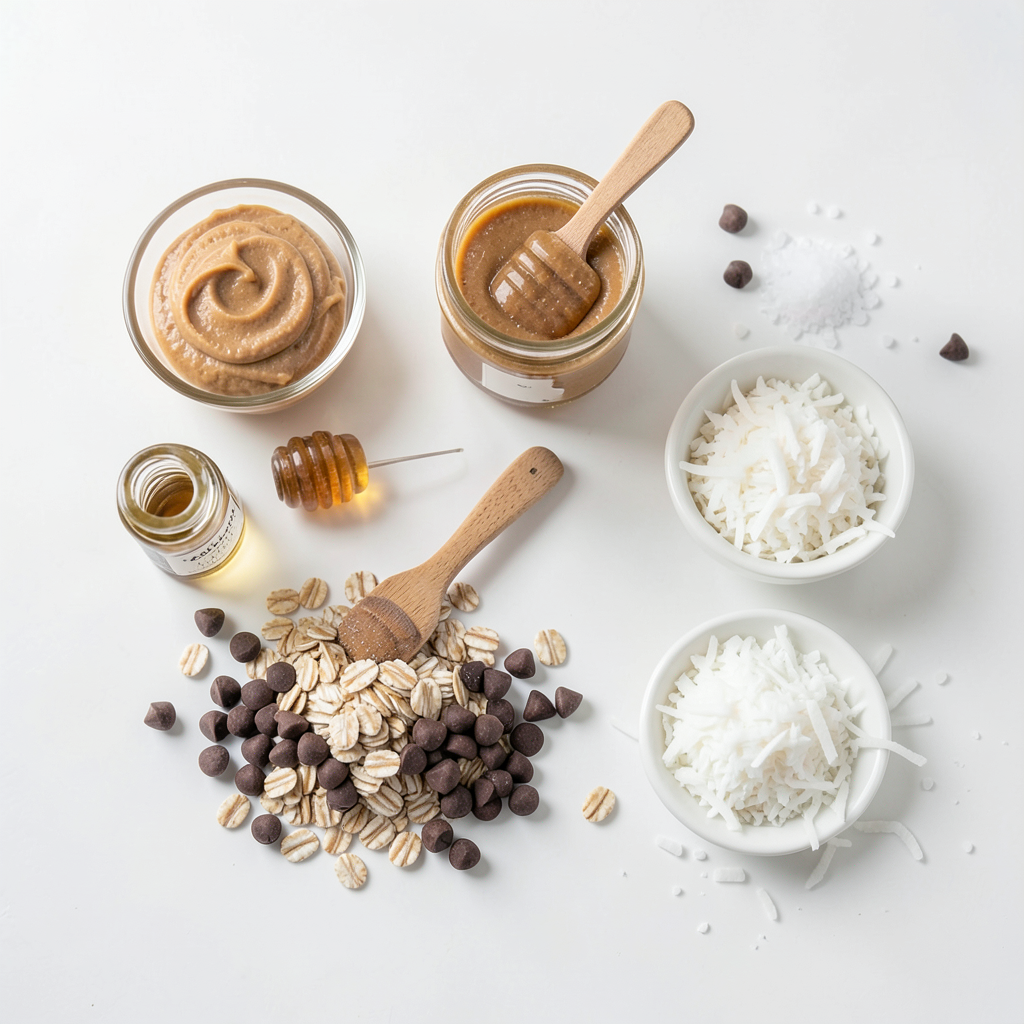
Complete list of ingredients
To make no-bake peanut butter bars, you need these simple items:
- 1 cup natural peanut butter (smooth or crunchy)
- 1/2 cup honey or maple syrup
- 1 teaspoon vanilla extract
- 2 cups rolled oats
- 1/2 cup chocolate chips (dark or semi-sweet)
- 1/4 cup shredded coconut (unsweetened)
- A pinch of sea salt
Substitutions and alternatives
You can switch some ingredients if needed. Here are a few ideas:
- For peanut butter, try almond butter or cashew butter.
- Instead of honey, use agave syrup or brown rice syrup.
- If you don’t like coconut, leave it out or swap it for chopped nuts.
- Use gluten-free oats for a gluten-free version of the bars.
Suggested brands or types of products
Choosing good brands makes a difference. Here are some I recommend:
- For peanut butter, look for brands like Smucker’s or Justin’s.
- Use raw honey from local markets for a fresh taste.
- Bob’s Red Mill offers great rolled oats that are hearty and tasty.
- For chocolate chips, Ghirardelli or Enjoy Life are top choices.
Step-by-Step Instructions
Preparation process overview
Making no-bake peanut butter bars is simple and fun. You only need a few steps. First, gather your ingredients. You will need peanut butter, honey or maple syrup, vanilla, oats, chocolate chips, coconut, and sea salt. This recipe takes about 10 minutes to prep. After this, you will chill the bars for 1-2 hours.
Detailed mixing instructions
1. Start by taking a medium-sized mixing bowl. Add 1 cup of peanut butter, 1/2 cup of honey or maple syrup, and 1 teaspoon of vanilla extract.
2. Mix these ingredients until they are smooth and fully combined.
3. Next, add 2 cups of rolled oats, 1/2 cup of chocolate chips, 1/4 cup of shredded coconut, and a pinch of sea salt.
4. Stir everything together. Make sure the oats are well coated with the peanut butter mixture.
Tips for pressing the mixture
To press the mixture into the baking dish, line an 8x8-inch dish with parchment paper. Leave some paper hanging over the edges. This will help you lift the bars out later. Transfer the mixture into the dish. Use the back of a spatula or your hands to press it down evenly. Apply firm pressure to create a tight layer. If you like, sprinkle extra chocolate chips on top. Press them down gently into the bars before chilling.
Tips & Tricks
How to achieve the best texture
To get the best texture for your no-bake peanut butter bars, use natural peanut butter. This type has no added oils, which helps the bars hold together well. You can mix smooth or crunchy peanut butter based on your taste. For a bit of chew, add extra rolled oats. Press the mixture firmly into the pan. This step ensures a dense and satisfying bar.
Recommended storage methods
Store your bars in an airtight container. This helps keep them fresh. You can place them in the fridge for up to a week. If you want to store them longer, freeze the bars. Wrap them tightly in plastic wrap, then place them in a freezer bag. They can last for up to three months in the freezer. Just thaw them in the fridge before enjoying.
Serving suggestions and pairings
These bars are great as a snack or dessert. You can serve them with fresh fruit, like bananas or apples. Pairing them with yogurt also adds a nice touch. For a fun twist, drizzle melted chocolate on top before serving. You can even add a sprinkle of sea salt for extra flavor. Share them with friends or keep them all for yourself!
Pro Tips
- Use Creamy Peanut Butter: For a smoother texture, opt for creamy peanut butter instead of crunchy. This will help the bars hold together better.
- Chill for Best Results: Allow the bars to chill in the refrigerator for the full 2 hours. This ensures they are firm enough to cut without crumbling.
- Customize Your Mix-Ins: Feel free to add other ingredients like nuts, seeds, or dried fruit for added flavor and nutrition.
- Storage Tips: Keep the bars in an airtight container in the fridge to maintain freshness, and consider freezing them for longer storage.
Variations
Flavor combinations and add-ins
You can change up the flavor of your no-bake peanut butter bars easily. Here are some fun ideas:
- Add nuts: Chopped almonds or walnuts boost crunch and flavor.
- Mix in seeds: Sunflower seeds or chia seeds can add nutrition.
- Use different chocolate: Try white chocolate chips for a sweet twist.
- Include dried fruit: Raisins or cranberries add sweetness and chewiness.
These simple changes can make your bars unique and fun.
Dietary alternatives (vegan, gluten-free)
Making these bars for special diets is easy. To make them vegan:
- Swap honey: Use maple syrup instead of honey.
- Check chocolate: Make sure your chocolate chips are dairy-free.
For gluten-free options:
- Choose certified gluten-free oats: This ensures no gluten contamination.
With these swaps, everyone can enjoy these tasty treats!
Seasonal variations (holiday themes)
You can also make your bars match the season. For fall, add pumpkin spice to the mix. This gives a warm flavor that feels cozy. In winter, sprinkle in some peppermint extract for a festive touch.
For summer, try adding fresh berries on top. They add a burst of flavor and color.
These festive twists make your no-bake peanut butter bars perfect for any occasion!
Storage Info
Best practices for freshness
To keep your no-bake peanut butter bars fresh, store them in an airtight container. I recommend placing parchment paper between layers. This helps prevent sticking. Always keep them in the refrigerator. If stored properly, they stay tasty longer.
Shelf life of no-bake bars
These bars last about a week in the fridge. After that, they may lose their flavor and texture. If you notice changes, it's best to toss them. Always check for signs of spoilage before eating.
Freezing options and reheating tips
You can freeze your no-bake bars for up to three months. Wrap each bar in plastic wrap and place them in a freezer-safe bag. When you're ready to eat, let them thaw in the fridge for a few hours. Avoid microwaving, as it can change the texture. Enjoy your bars fresh for the best taste!
FAQs
Can I use other nut butters?
Yes, you can use other nut butters. Almond butter and cashew butter work well. They give a different taste but still taste great. Just make sure the nut butter is smooth. This helps the bars hold together better.
How do I make these bars vegan?
To make these bars vegan, use maple syrup instead of honey. Use a nut butter that is vegan-friendly, like almond or cashew butter. Check the chocolate chips too. Some brands are not vegan. Look for dairy-free chocolate chips to keep it all vegan.
What can I substitute for honey or maple syrup?
You can use agave nectar as a substitute for honey or maple syrup. Brown rice syrup is another good option. Both will keep the bars sweet and moist. If you want them sugar-free, try date syrup. It adds sweetness without refined sugar.
This article covered all you need for making no-bake bars. You learned the best ingredients and substitutions. I shared step-by-step instructions for easy mixing and pressing. Tips and tricks helped you achieve the best texture. Exploring variations lets you make bars for any diet or season. Finally, storage tips ensure your bars stay fresh. Enjoy your no-bake creation and share it with friends!