If you love zesty desserts but dread the oven, you’re in for a treat! No Bake Mini Lemon Cheesecakes are the perfect solution. These adorable bites boast a creamy, tangy flavor and are super simple to whip up. In this post, I will guide you through each step, from crust to garnish, ensuring your dessert shines at any gathering. Let’s dive into this delicious recipe and make your sweet tooth smile!
Ingredients
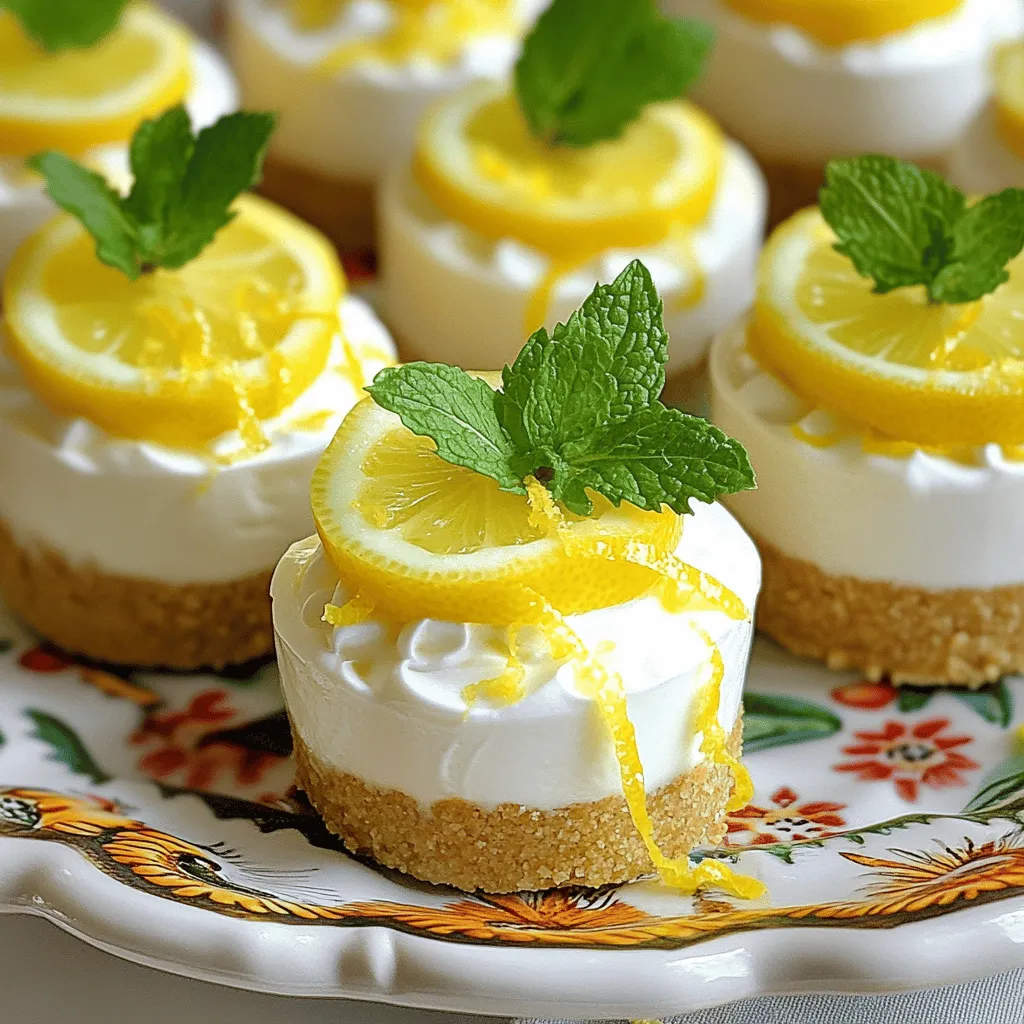
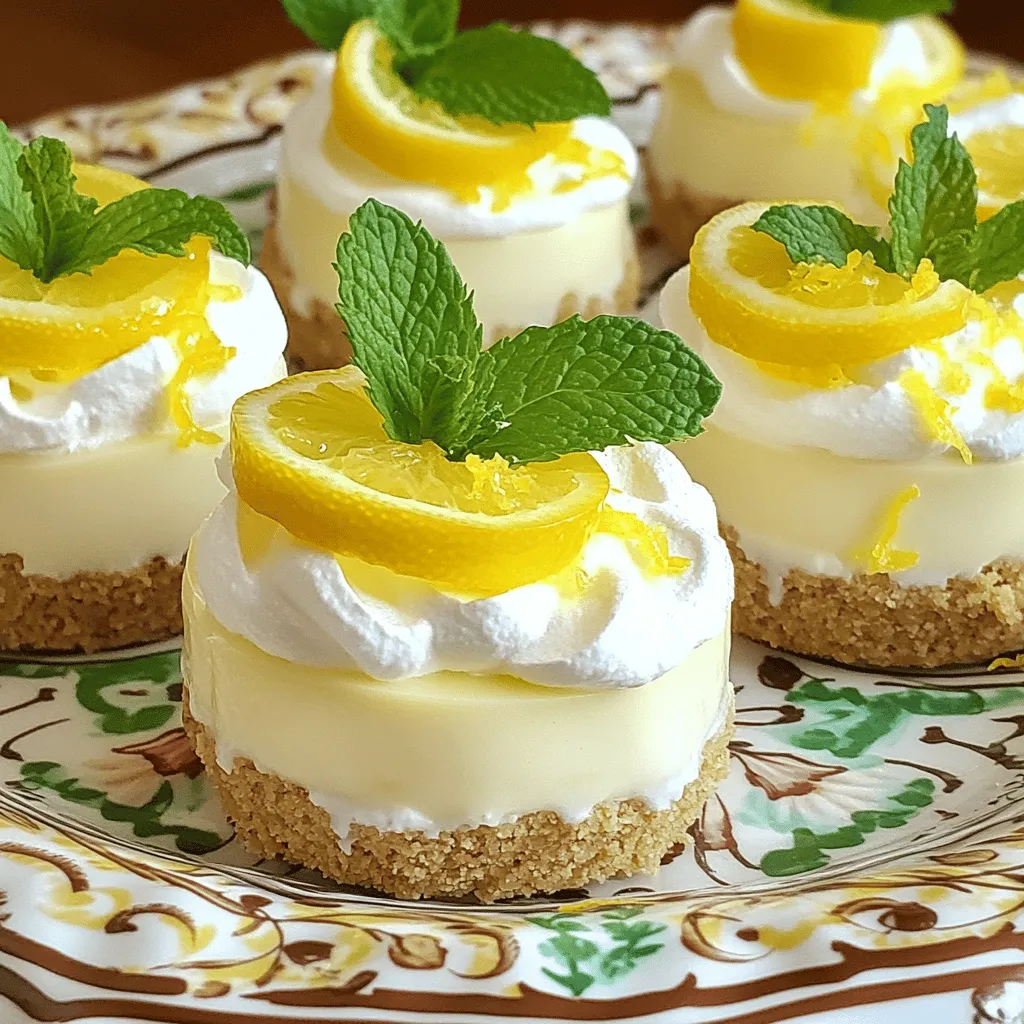
Required ingredients for No Bake Mini Lemon Cheesecakes
To make these tasty treats, you’ll need:
– 1 cup graham cracker crumbs
– 4 tablespoons unsalted butter, melted
– 2 cups cream cheese, softened
– 1 cup powdered sugar
– 1 cup fresh lemon juice (about 4-5 lemons)
– Zest of 2 lemons
– 1 teaspoon vanilla extract
– 1 cup whipped cream (store-bought or homemade)
These ingredients create a creamy and zesty filling, balanced by a sweet crust. The fresh lemon juice and zest give these cheesecakes a bright flavor that everyone loves.
Optional garnishes and toppings
For added flavor and flair, consider these toppings:
– Fresh mint leaves
– Lemon slices
– Extra lemon zest
These garnishes not only look nice but also boost the lemony taste. They make each bite even more special.
Potential ingredient substitutions
You can swap some ingredients to fit your needs:
– Use gluten-free graham crackers for a gluten-free option.
– Cream cheese can be replaced with Greek yogurt for a lighter option.
– Store-bought whipped topping works if you’re short on time.
Feel free to get creative with these swaps. Adjusting the ingredients can help you make the recipe your own while still keeping it delicious.
Step-by-Step Instructions
Preparation of the crust
To start, gather your ingredients. You need graham cracker crumbs and melted butter. In a bowl, mix the crumbs and butter until you see a sandy texture. This will be the base for your cheesecakes. Take mini cupcake liners or small tart shells. Press the crumb mixture firmly into the bottoms. Make sure it covers the entire base. After that, place them in the fridge. This helps the crust become firm.
Making the cheesecake filling
Next, you’ll make the filling. In a clean bowl, add softened cream cheese. Beat it with a mixer until smooth and creamy. Then, you’ll slowly add powdered sugar. Mix until it blends well. Now, pour in fresh lemon juice. Don’t forget the lemon zest and vanilla extract! Mix again until you have a creamy filling. Finally, fold in the whipped cream gently. This step adds nice airiness to the filling.
Assembling the cheesecakes
Now it’s time to assemble your cheesecakes! Take the crusts from the fridge. Spoon or pipe the cheesecake filling into each crust. Fill them just above the edge for a nice look. After that, you need to refrigerate them again. Let them chill for at least 4 hours. Once set, take them out. Garnish with fresh mint leaves and lemon slices. This adds color and flavor.
Tips & Tricks
How to achieve the best texture
To get a smooth and creamy texture, use softened cream cheese. Cold cream cheese will make lumps. Mixing the cream cheese first helps combine it well. When adding lemon juice, do it slowly. This keeps the filling from becoming too runny. Fold in the whipped cream gently. This adds air and lightness to your cheesecake.
Common mistakes to avoid
One common mistake is not measuring ingredients correctly. Use measuring cups and spoons for accuracy. Another mistake is not chilling the crust long enough. A firm crust holds the filling better. Lastly, don’t skip the lemon zest. It adds a fresh bite that brightens the flavor.
Recommended serving and presentation ideas
Serve these mini cheesecakes chilled for the best taste. Use a decorative platter to show them off. Garnish with fresh mint leaves and lemon slices. Drizzle extra lemon zest over the top for flair. You can also add some colorful berries for a fun touch. For a personal twist, try adding different toppings like chocolate shavings or coconut flakes. Enjoy the process of making these treats as much as eating them!
Variations
Alternative flavors for the cheesecake
You can switch up the flavor of these cheesecakes for fun. Try using lime juice instead of lemon for a zesty twist. You can also use orange juice and zest for a sweet, sunny flavor. If you love berries, add some mashed strawberries or blueberries into the filling. These changes keep the recipe fresh and exciting.
Gluten-free options for the crust
If you need a gluten-free crust, it’s easy to make. Substitute graham cracker crumbs with gluten-free cookies or almond flour. Mix these with melted butter just like the original recipe. Press the mixture into the cups. This way, everyone can enjoy the cheesecakes without worry.
Tips for making mini cheesecakes in different sizes
Want to make larger cheesecakes? You can! Just use a regular pie dish or springform pan. Adjust the cooking time accordingly. Keep an eye on the cheesecakes as they set. For bite-sized versions, use a mini muffin tin. This variation is great for parties or gatherings. Just remember to adjust the filling amounts based on your pan size.
Storage Info
How to store No Bake Mini Lemon Cheesecakes
Store your mini lemon cheesecakes in an airtight container. This keeps them fresh. You can place them in the fridge for easy access. It is best to keep them chilled until serving. Avoid stacking them to prevent crushing.
Shelf life and freezing recommendations
These tasty cheesecakes last for about 5 days in the fridge. If you want to keep them longer, you can freeze them. For freezing, wrap each cheesecake in plastic wrap. Then place them in a freezer-safe bag. They can last up to 2 months in the freezer.
Thawing instructions for frozen cheesecakes
To thaw frozen cheesecakes, move them to the fridge for a few hours. This gentle thawing keeps the texture smooth. You can also thaw them at room temperature for about 30 minutes. Just make sure not to leave them out too long. Enjoy your mini treats!
FAQs
Can I use bottled lemon juice instead of fresh?
Yes, you can use bottled lemon juice. However, fresh lemon juice tastes better. It has a bright flavor that enhances the cheesecake. Fresh lemons also add zest, giving your dessert a pop. For the best taste, I recommend using fresh juice when possible.
How long do the cheesecakes need to set?
The mini cheesecakes need to set for at least four hours. This time helps them firm up nicely. If you can, leave them overnight in the fridge. More time means a better texture and flavor.
Can I make this recipe in advance?
Yes, you can make these cheesecakes in advance. They keep well in the fridge for up to three days. Just make sure to cover them tightly. You can also freeze them for up to a month. Thaw them in the fridge before serving.
No Bake Mini Lemon Cheesecakes are simple and fun to make. We covered ingredients, steps, and tips. You learned how to make the crust and fill them perfectly. Plus, you saw alternatives for flavors and gluten-free needs.
With proper storage, these desserts stay fresh for longer. Now, you can create these tasty treats with ease. Enjoy making them for friends and family!