Get ready to impress your holiday guests with No-Bake Grinch Oreo Truffles! These fun, festive treats are easy to make and pack a delightful flavor punch. With just a few simple steps, you’ll create an eye-catching dessert that’s sure to spread holiday cheer. Whether you’re hosting a party or looking for a sweet gift, this recipe is perfect. Let’s dive in and turn Oreos into a festive delight!
Why I Love This Recipe
- Festive Flavor: The combination of Oreos and peppermint creates a deliciously festive treat that's perfect for the holiday season.
- No Baking Required: This recipe is easy and quick since it requires no baking, making it perfect for busy holiday schedules.
- Customizable Toppings: You can personalize these truffles with different sprinkles or drizzle options, adding a fun touch to your holiday dessert table.
- Great for Sharing: With this recipe yielding 20 truffles, it's a fantastic option for sharing at parties or giving as festive gifts.
Ingredients
Main Ingredients Overview
For these No-Bake Grinch Oreo Truffles, you need just a few key items:
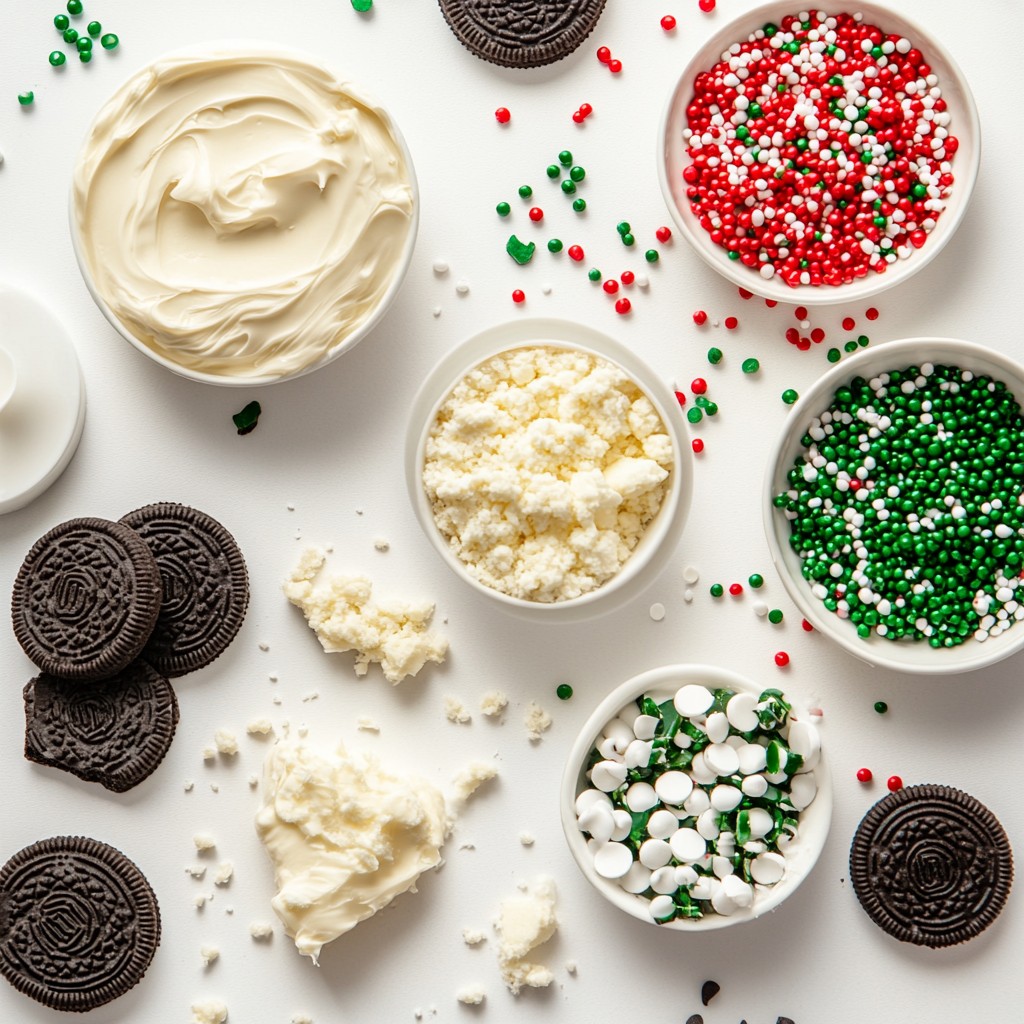
- 2 cups Oreo cookies, finely crushed
- 1 cup cream cheese, softened
- 1 cup green candy melts
- 1/4 cup white chocolate chips
- 1 teaspoon peppermint extract
- Red and green sprinkles for decoration
These ingredients come together to create a rich, creamy filling that captures the spirit of the season. The crushed Oreos provide a delightful crunch, while the cream cheese adds creaminess. The green candy melts give that festive Grinch look. Don't forget the sprinkle of red and green for a fun touch!
Optional Ingredients for Variations
You can make these truffles even more fun by adding some optional ingredients:
- Flavored extracts like vanilla or almond for extra taste
- Different types of crushed cookies for varied flavors
- Food coloring to match your holiday theme
Feel free to get creative! The goal is to make these truffles your own while keeping them festive and tasty.
Recommended Tools for Preparation
To make your truffles, have these tools handy:
- Mixing bowl
- Fork or small scoop for shaping
- Parchment paper for easy cleanup
- Microwave-safe bowl for melting chocolate
- Baking sheet for chilling truffles
Having the right tools makes the process smoother. You’ll enjoy making these truffles even more when you have everything ready.
Step-by-Step Instructions
Preparing the Cookie Mixture
First, gather your ingredients. You need 2 cups of finely crushed Oreo cookies and 1 cup of softened cream cheese. In a mixing bowl, combine the crushed cookies and cream cheese. Use a spatula or your hands to mix until it looks like dough. Add 1 teaspoon of peppermint extract to the mixture. This gives a nice minty taste. Mix well to ensure the peppermint blends in.
Shaping the Truffles
Now, it's time to shape the truffles. With your hands, take small amounts of the mixture. Roll each piece into a ball about 1 inch wide. Place the balls on a parchment-lined baking sheet. This step helps keep them from sticking. Once you shape all the truffles, place the baking sheet in the fridge for about 30 minutes. This helps them firm up and makes the next steps easier.
Melting and Coating Techniques
While the truffles chill, melt the green candy melts. Follow the package instructions for the best result. Once melted, dip each chilled truffle into the green candy. Use a fork to help coat them evenly. Let any extra candy drip off before putting them back on the parchment. While the coating is still wet, sprinkle red and green sprinkles on top. This adds a festive touch. Let the truffles harden at room temperature. You can also place them back in the fridge for about 15 minutes.
Finally, melt the white chocolate chips in a microwave-safe bowl. Drizzle this over the truffles for a nice finish. Once the chocolate sets, your No-Bake Grinch Oreo Truffles are ready to enjoy!
Tips & Tricks
How to Achieve Perfect Consistency
To get the best texture, mix the crushed Oreo cookies and cream cheese well. You want a dough-like feel, not too dry or too wet. If it feels crumbly, add a little more cream cheese. If it’s too sticky, a touch more crushed cookies can help. Forming the balls should be easy. If they stick to your hands, chill the mix for a bit before shaping.
Best Practices for Melting Chocolate
When melting chocolate, use a microwave or double boiler. For the microwave, heat in short bursts of 15 seconds. Stir after each burst to avoid burning. When using a double boiler, keep the water simmering, not boiling. This gentle heat helps the chocolate melt evenly. Always make sure your bowl is dry. Water can make chocolate seize up.
Decorating Ideas for Festive Appeal
For a festive look, add red and green sprinkles while the chocolate is wet. I love using holiday-themed sprinkles for extra cheer. Drizzling white chocolate on top adds a nice touch too. You can also use edible glitter for sparkle. Arrange your truffles in a festive box or plate for a stunning display. These tips will make your truffles the star of any holiday gathering!
Pro Tips
- Use Room Temperature Cream Cheese: Make sure your cream cheese is softened to room temperature for easier mixing and a smoother texture.
- Chill the Mixture: If the mixture is too sticky to handle, refrigerate it for a few minutes to make it easier to roll into balls.
- Perfectly Melted Candy Coating: Melt your candy melts in intervals to avoid overheating; stir in between to achieve a smooth consistency.
- Creative Decorations: Get creative with your sprinkles! Use edible glitter or themed decorations to match your holiday party.
Variations
Different Flavor Options
You can easily change the flavor of the No-Bake Grinch Oreo Truffles. Instead of using regular Oreo cookies, try different types. Use mint Oreos for a stronger mint taste. You can also use peanut butter Oreos for a rich, nutty flavor. If you want something fruity, use lemon Oreos for a zesty twist. Each option gives a new spin on this festive treat.
Alternative Toppings
Toppings can make your truffles even more fun. Instead of just red and green sprinkles, think outside the box. Use crushed candy canes for a minty crunch. Or try mini chocolate chips for extra sweetness. You can even drizzle melted dark chocolate on top for a bold contrast. Get creative with toppings to make each truffle unique and festive.
Gluten-Free and Vegan Substitutions
If you need gluten-free or vegan options, there are easy swaps. Look for gluten-free Oreo cookies instead of regular ones. For the cream cheese, use a vegan cream cheese alternative. This way, everyone can enjoy these treats. Just make sure to check the labels on the candy melts and chocolate chips to ensure they are vegan-friendly. These small changes keep the joy of the holidays alive for everyone.
Storage Info
Best Storage Practices
To keep your No-Bake Grinch Oreo Truffles fresh, store them in an airtight container. This helps prevent them from drying out. Place a layer of parchment paper between layers of truffles. This keeps them from sticking together.
Shelf Life of Truffles
These truffles last about one week in the fridge. If you want to keep them longer, consider freezing them. The flavor and texture remain great when stored properly.
Freezing Instructions
To freeze your truffles, first, let them cool completely. Place them on a baking sheet and freeze for about one hour. Once frozen, transfer them to a freezer-safe bag. Remove as much air as possible to prevent freezer burn. These truffles can last up to three months in the freezer. When you are ready to eat them, thaw them in the fridge overnight. Enjoy the festive taste anytime!
FAQs
Can I make these truffles in advance?
Yes, you can make these truffles ahead of time. They taste great after a day or two. Just store them in the fridge. Use an airtight container to keep them fresh. They can last up to a week. If you want to prepare for a party, these truffles are perfect.
How do I fix a lumpy chocolate coating?
If your chocolate coating is lumpy, don't worry. First, make sure your chocolate melts are heated slowly. If they get too hot, they can clump. Try adding a small amount of vegetable oil. This will help make the chocolate smoother. Stir it in well until it looks shiny.
Can I use homemade Oreo cookies?
You can use homemade Oreo cookies, but it may change the taste. The store-bought version has a certain crunch and creaminess that works well. If you make your own, be sure to crush them finely. This will help create a good texture for the truffles.
In this blog post, we explored how to make delicious truffles. We covered the main ingredients and optional variations to suit your taste. I shared step-by-step instructions, tips for perfect consistency, and storage info to keep them fresh. Truffles offer endless flavor options and fun ways to decorate. Whether you stick to classic recipes or try new twists, you can create treats that impress everyone. Enjoy experimenting with your own ideas and share these truffles with loved ones. Happy cooking!