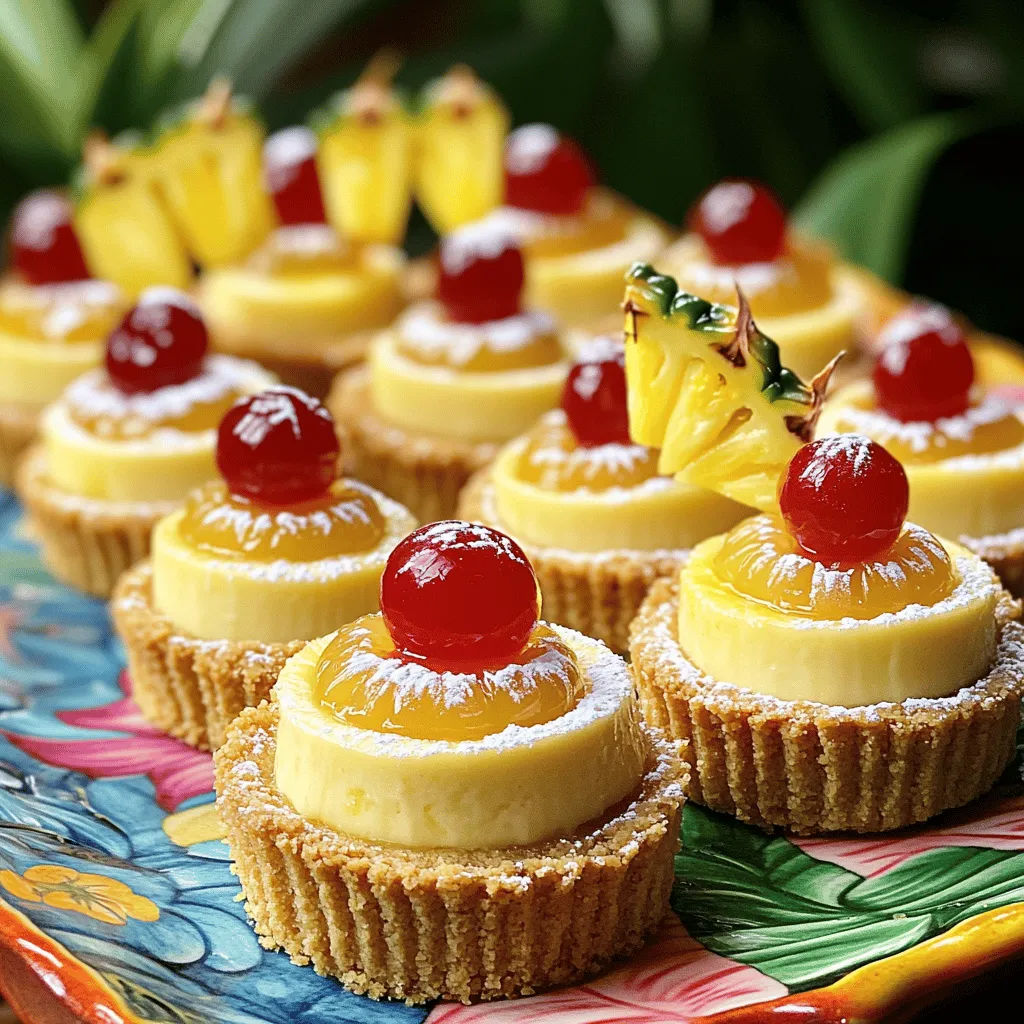
Are you ready to indulge in a sweet treat that’s as cute as it is delicious? Mini Pineapple Upside-Down Cheesecakes are the perfect combination of creamy and fruity goodness. In this post, I’ll show you how to make these delightful desserts step-by-step. From the crust to the topping, I’ll share tips and tricks for perfecting your mini cheesecakes every time. Let’s dive into the fun and tasty world of mini cheesecakes!
Ingredients
Main Ingredients for Mini Pineapple Upside-Down Cheesecakes
To make these tasty mini cheesecakes, you’ll need:
– 1 cup crushed graham crackers
– 1/4 cup unsalted butter, melted
– 1/4 cup brown sugar
– 8 oz cream cheese, softened
– 1/2 cup sugar
– 1 tsp vanilla extract
– 1/2 cup sour cream
– 2 large eggs
– 1 cup fresh pineapple, chopped
These ingredients create a sweet and creamy base with a crunchy crust. The fresh pineapple adds a burst of flavor.
Additional Ingredients for Topping
For the topping, gather:
– Fresh pineapple slices
– Maraschino cherries for garnish
These toppings add a nice look and extra flavor to each cheesecake. They bring a fun tropical vibe.
Equipment Needed
To make this recipe, you will need:
– 12-cup muffin tin
– Paper liners
– Mixing bowls
– Electric mixer
– Measuring cups and spoons
Having the right tools makes the process smooth. This setup helps you create delightful mini treats.
Step-by-Step Instructions
Prepping the Graham Cracker Crust
Start by preheating your oven to 325°F (160°C). Line a 12-cup muffin tin with paper liners. In a mixing bowl, combine 1 cup of crushed graham crackers, 1/4 cup of melted unsalted butter, and 1/4 cup of brown sugar. Mix until it looks like wet sand. Now, divide this mixture evenly among the muffin cups. Press down firmly to create a solid crust at the bottom. This step sets up a great base for your cheesecakes.
Making the Cheesecake Filling
In a large bowl, beat 8 oz of softened cream cheese using an electric mixer. Mix until it’s smooth. Slowly add in 1/2 cup of sugar and 1 tsp of vanilla extract. Keep mixing until creamy. Next, add 1/2 cup of sour cream and stir until just combined. Now, add in 2 large eggs one at a time. Mix on low speed to avoid overmixing. Finally, gently fold in 1 cup of chopped fresh pineapple. This adds a sweet and juicy flavor to your filling.
Baking and Cooling Process
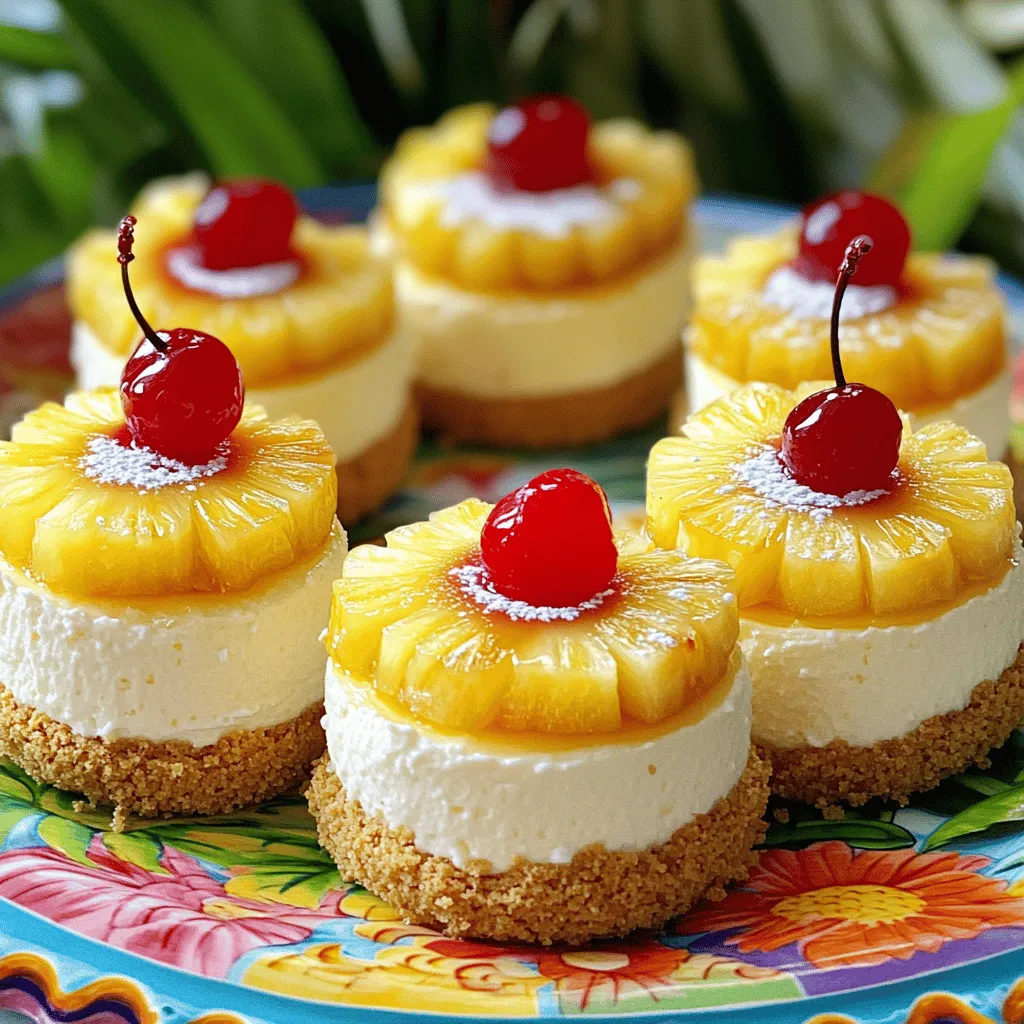
Pour the cheesecake mixture over the graham cracker crusts in each muffin cup. Fill them about 3/4 full. Bake for 20-25 minutes. The edges should be set, but the center can still jiggle a bit. Once done, take the cheesecakes out of the oven. Let them cool to room temperature. Then, refrigerate for at least 4 hours, or until they are firm. After chilling, carefully flip the cheesecakes upside down on a serving platter. Add a slice of fresh pineapple and a maraschino cherry on top for a beautiful finish.
Tips & Tricks
Best Practices for Cream Cheese
Using cream cheese is key for a rich taste. Always let it sit at room temperature. This helps it mix well. Softened cream cheese blends smoothly, giving your cheesecake a creamy texture. If it’s too cold, lumps can form. To avoid this, beat it alone first. Mix until it’s light and fluffy before adding other ingredients. This step ensures a nice, even batter.
How to Avoid Cracks in Cheesecakes
Cracks can ruin the look of your mini cheesecakes. To prevent this, avoid overmixing. Overmixing introduces too much air, leading to cracks as they bake. Use a low speed when adding eggs. Bake them slowly at a lower temperature. This helps them set evenly. Lastly, let them cool slowly in the oven after baking. Cracking happens when a cheesecake cools too fast.
Presentation Tips for Serving
Make your mini cheesecakes look stunning. Use a colorful platter to catch the eye. Arrange them neatly and add details. Drizzle some pineapple juice around them for flair. Dusting with powdered sugar adds a nice touch too. For garnish, place a slice of fresh pineapple and a maraschino cherry on top. This creates a fun and tropical vibe. Enjoy your delightful treats!
Variations
Different Fruit Toppings
You can switch up the fruit toppings for fun. Try using peaches or cherries. Strawberries can add a nice twist too. Each fruit brings a new flavor. You can even mix fruits for a colorful look. Just remember to slice them thin for the best presentation.
Gluten-Free Options
If you want a gluten-free version, use gluten-free graham crackers. They work just as well for the crust. Also, make sure your cream cheese is gluten-free. This way, you can enjoy the same great taste without worry.
Alternative Sweeteners
If you prefer less sugar, use honey or agave syrup. These can replace regular sugar in the filling. For a low-calorie option, try a sugar substitute like stevia. Adjust the amount based on your taste. Each sweetener can change the flavor slightly, so experiment to find your favorite.Enjoy making your mini pineapple upside-down cheesecakes!
Storage Info
Refrigerating Mini Cheesecakes
You can store your mini cheesecakes in the fridge. Place them in an airtight container. They stay fresh for up to five days. Chill them until you are ready to serve. This keeps them creamy and delicious. Avoid leaving them out at room temperature for too long. If you want to keep the toppings fresh, add them just before serving.
Freezing Instructions
Freezing is another great option for these mini treats. Wrap each cheesecake tightly in plastic wrap. Then place them in a freezer-safe bag. They can last up to three months in the freezer. When you want to enjoy one, remove it from the freezer. Let it thaw in the fridge overnight. This way, the texture stays nice and creamy.
Shelf Life Tips
For the best taste, eat these mini cheesecakes within five days if refrigerated. They will lose their flavor and texture over time. If you freeze them, make sure to label the bags. This helps keep track of when you made them. Enjoy them at their best by following these storage tips.
FAQs
Can I use canned pineapple for this recipe?
Yes, you can use canned pineapple. Just make sure to drain it well. Canned pineapple can save time and still taste great. Fresh is best, but canned works in a pinch. Just check for added sugars if you’re watching your intake.
How can I make these cheesecakes dairy-free?
To make these cheesecakes dairy-free, swap cream cheese with a dairy-free alternative. Use coconut cream or cashew cream for a tasty option. Replace sour cream with dairy-free yogurt too. You can find many brands in stores that taste delicious and work well.
What do I do if my cheesecakes crack during baking?
If your cheesecakes crack, don’t panic! This can happen if the oven is too hot. Always bake at a low temperature. Also, avoid overmixing the batter, as this adds air. Lastly, let them cool slowly in the oven after baking. This helps prevent cracks.
In this post, we explored mini pineapple upside-down cheesecakes. We covered the ingredients, equipment, and step-by-step instructions to create this tasty treat. I shared tips for best practices and served up creative variations. You now know how to store these desserts and answered common questions.
Enjoy making these cheesecakes and impress your friends. You can customize them and make them your own!