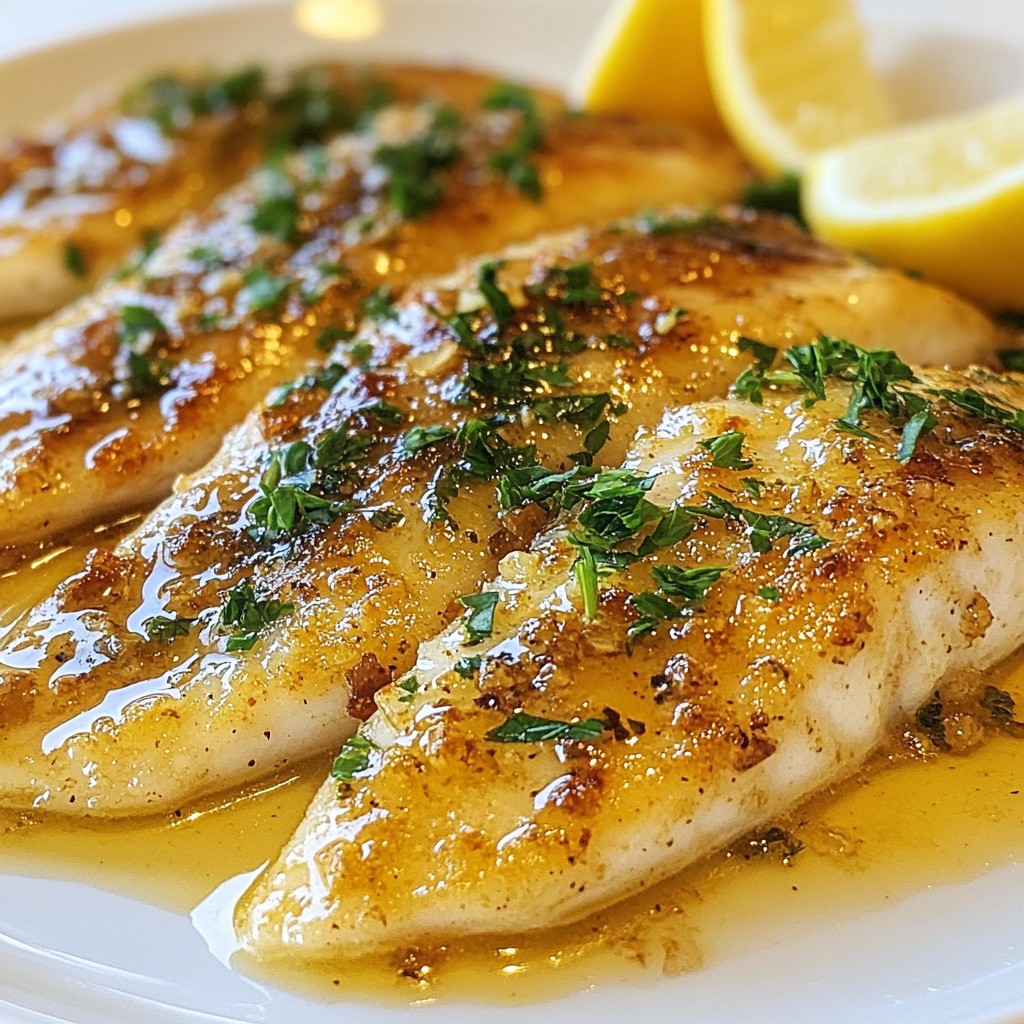
If you're hunting for a quick and delicious meal, garlic butter oven-baked tilapia is the answer! This dish combines tender tilapia fillets with a rich, buttery garlic sauce that will delight your taste buds. It's simple to make and packed with flavor. In just a few steps, you’ll have a gourmet dinner ready to impress. Let's dive into the ingredients and get cooking!
Why I Love This Recipe
- Quick and Easy: This recipe comes together in just 25 minutes, making it perfect for busy weeknights.
- Flavorful Combination: The garlic butter, lemon, and herbs create a delightful and aromatic flavor that complements the tilapia perfectly.
- Healthy Option: Tilapia is a lean source of protein, and this dish is packed with fresh ingredients, making it a nutritious choice.
- Versatile Serving: Pair this tilapia with your favorite sides like vegetables or rice for a well-rounded meal.
Ingredients
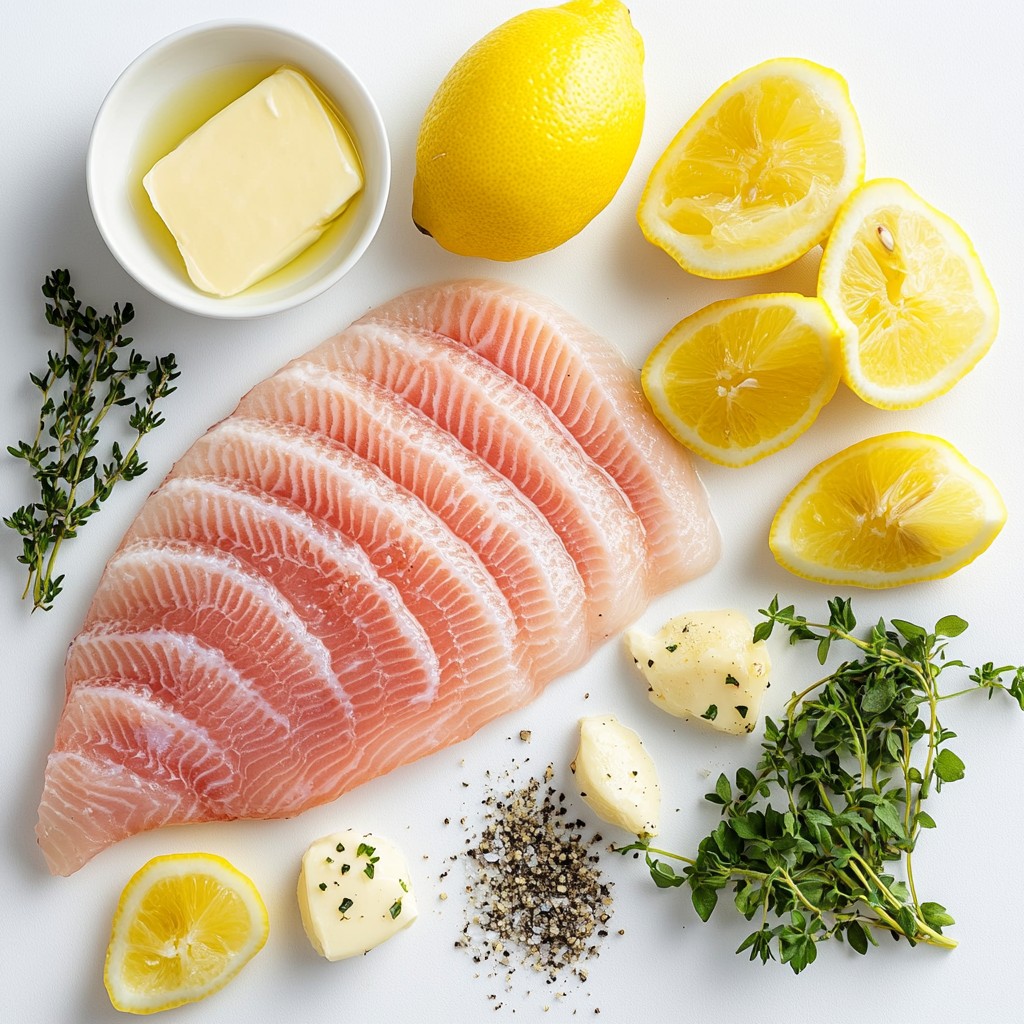
List of Ingredients
- 4 tilapia fillets
- 4 tablespoons unsalted butter, melted
- 4 cloves garlic, minced
- 1 teaspoon lemon zest
- 2 tablespoons fresh lemon juice
- 1 teaspoon dried oregano
- 1 teaspoon dried thyme
- Salt and pepper to taste
- Fresh parsley, chopped (for garnish)
- Lemon wedges (for serving)
Gathering the right ingredients makes all the difference. Start with fresh tilapia fillets. The fish should look moist and smell clean. Next, you will need unsalted butter, which gives a rich taste. Garlic is a must; it adds a punch to the dish.
Lemon zest and juice brighten the flavor. Dried oregano and thyme bring in warm, earthy notes. Don't forget salt and pepper to enhance all the flavors. For a lovely finish, fresh parsley will add color and taste.
Lemon wedges on the side give an extra kick. They bring out the best in the fish. Each ingredient plays a role in making this dish shine. When you have these ingredients ready, you’re set for a tasty meal!
Step-by-Step Instructions
Preheating the Oven
Set your oven to 400°F (200°C). Preheating helps cook the fish evenly. It makes sure the tilapia will be tender and flaky when it’s done.
Preparing the Garlic Butter Mixture
In a small bowl, mix together 4 tablespoons of melted butter, 4 minced garlic cloves, 1 teaspoon of lemon zest, and 2 tablespoons of fresh lemon juice. Add 1 teaspoon each of dried oregano and dried thyme. Season with salt and pepper to taste. This mixture creates a rich, flavorful sauce that adds zest to the fish.
Arranging Tilapia Fillets
Place your 4 tilapia fillets in a baking dish. Make sure they are in a single layer. This helps them cook well and soak up the garlic butter.
Adding the Garlic Butter
Pour the garlic butter mixture evenly over the tilapia fillets. Use a spoon to ensure each fillet is well coated. This step is key for getting that delicious, buttery flavor into every bite.
Baking the Tilapia
Bake in your preheated oven for about 15-20 minutes. The tilapia is done when it flakes easily with a fork and the fish looks opaque. Keep an eye on it so it doesn't overcook.
Final Touches
Remove the baking dish from the oven and let it sit for a couple of minutes. Garnish with freshly chopped parsley for a pop of color. Serve with lemon wedges on the side for an extra burst of flavor. Enjoy your beautiful, tasty meal!
Tips & Tricks
Achieving Perfectly Baked Tilapia
To get the best tilapia, bake it for 15 to 20 minutes. If your fillets are thicker, add a few extra minutes. Look for the fish to flake easily with a fork. If it looks opaque, it's ready to eat!
Enhancing Flavor
You can try adding other spices or herbs to the garlic butter mix. A pinch of paprika gives a nice kick. Fresh dill or basil can add a fresh taste. You could even sprinkle some red pepper flakes for heat. Experiment with what you like!
Presentation Tips
For a beautiful serving, lay the tilapia on a large platter. Drizzle any leftover garlic butter over the top. Scatter fresh parsley for a pop of color. Serve it with lemon wedges and a side of green veggies or fluffy rice. This will make your meal look and taste great!
Pro Tips
- Fresh Ingredients: Always use fresh garlic and herbs for the best flavor in your garlic butter sauce.
- Even Cooking: Ensure the tilapia fillets are of similar thickness to promote even cooking throughout.
- Resting Time: Allow the tilapia to sit for a couple of minutes after baking; this helps the flavors settle.
- Customize Flavor: Feel free to experiment with other herbs like dill or basil to customize the flavor to your liking.
Variations
Using Different Fish
You can swap tilapia for other fish if you like. Cod, haddock, or snapper work well too. These fish have a mild taste like tilapia. They also absorb flavors nicely. Try using salmon for a richer, buttery experience. Just remember to adjust the cooking time. Thicker fish will need a bit longer in the oven.
Flavor Infusions
Want to change up the taste? Consider adding new herbs or spices. Try fresh basil or dill for a fresh twist. You could also use smoked paprika for a little heat. If you like a kick, add red pepper flakes. Experimenting with flavors keeps the dish exciting. Don't be afraid to mix and match to find your favorite taste.
Cooking Method Alternatives
Grilling or pan-searing are great ways to cook this dish too. For grilling, preheat your grill and oil the grates. Cook the fish for about 4-5 minutes on each side. For pan-searing, heat some butter in a skillet. Cook each fillet for about 3-4 minutes per side until golden brown. Both methods give a nice crust and keep the fish juicy.
Storage Info
Refrigeration Guidelines
To store leftover garlic butter tilapia, place it in an airtight container. This keeps the fish fresh. Make sure to refrigerate it within two hours of cooking. It will stay good for up to three days. When you want to eat it again, you can enjoy it cold or warm.
Reheating Instructions
The best way to reheat tilapia is in the oven. Set your oven to 350°F (175°C). Place the tilapia on a baking sheet. Cover it with foil to keep it moist. Heat for about 10 minutes, or until it is warm. You can also use a microwave. Heat it in short bursts of 30 seconds. Check often to avoid overcooking.
Freezing Tips
If you want to freeze your tilapia, wrap each fillet tightly in plastic wrap. Then, place them in a freezer bag. Remove as much air as you can. Frozen tilapia can last for about three months. When you're ready to eat it, move the fillets to the fridge to thaw overnight. For quick thawing, you can use cold water. Just seal the fillets in a bag and submerge them in water for about an hour.
FAQs
Can I use frozen tilapia fillets?
Yes, you can use frozen tilapia fillets. Just make sure to thaw them first. Place the frozen fillets in the fridge overnight for safe thawing. If you're short on time, you can also use a cold-water method. Place the fillets in a sealed bag. Submerge them in a bowl of cold water for about an hour. Once thawed, be sure to pat them dry before cooking.
What side dishes pair well with garlic butter tilapia?
Garlic butter tilapia goes well with many sides. Here are a few ideas:
- Steamed broccoli or asparagus
- Fluffy white rice or quinoa
- Roasted potatoes or sweet potatoes
- A fresh green salad with lemon vinaigrette
- Garlic bread for a tasty addition
How do I know when tilapia is cooked?
You can tell tilapia is cooked when it flakes easily with a fork. The color should change from translucent to opaque. The internal temperature should reach 145°F (63°C). If you see the fish is firm and white, it's ready to eat!
Can I substitute ingredients?
Yes, you can substitute some ingredients based on your needs. If you have a dairy allergy, use olive oil instead of butter. For garlic lovers, try adding more minced garlic. If you want a different flavor, swap out lemon zest for lime zest. Fresh herbs like basil or cilantro can also work well.
Is tilapia a healthy fish choice?
Tilapia is a healthy fish option. It is low in calories and high in protein. A 4-ounce serving has about 26 grams of protein and only 120 calories. It also contains healthy fats and essential vitamins like vitamin B12 and selenium. Eating fish like tilapia can support heart health and brain function.
Baking tilapia with garlic butter is simple and delicious. We covered the ingredients, steps, and even tips to enhance the dish. You can try different fish or cooking methods for variety. Don't forget to store leftovers properly for later enjoyment. With all this knowledge, you’re ready to impress your family. Enjoy your tasty meal and the fun of cooking!