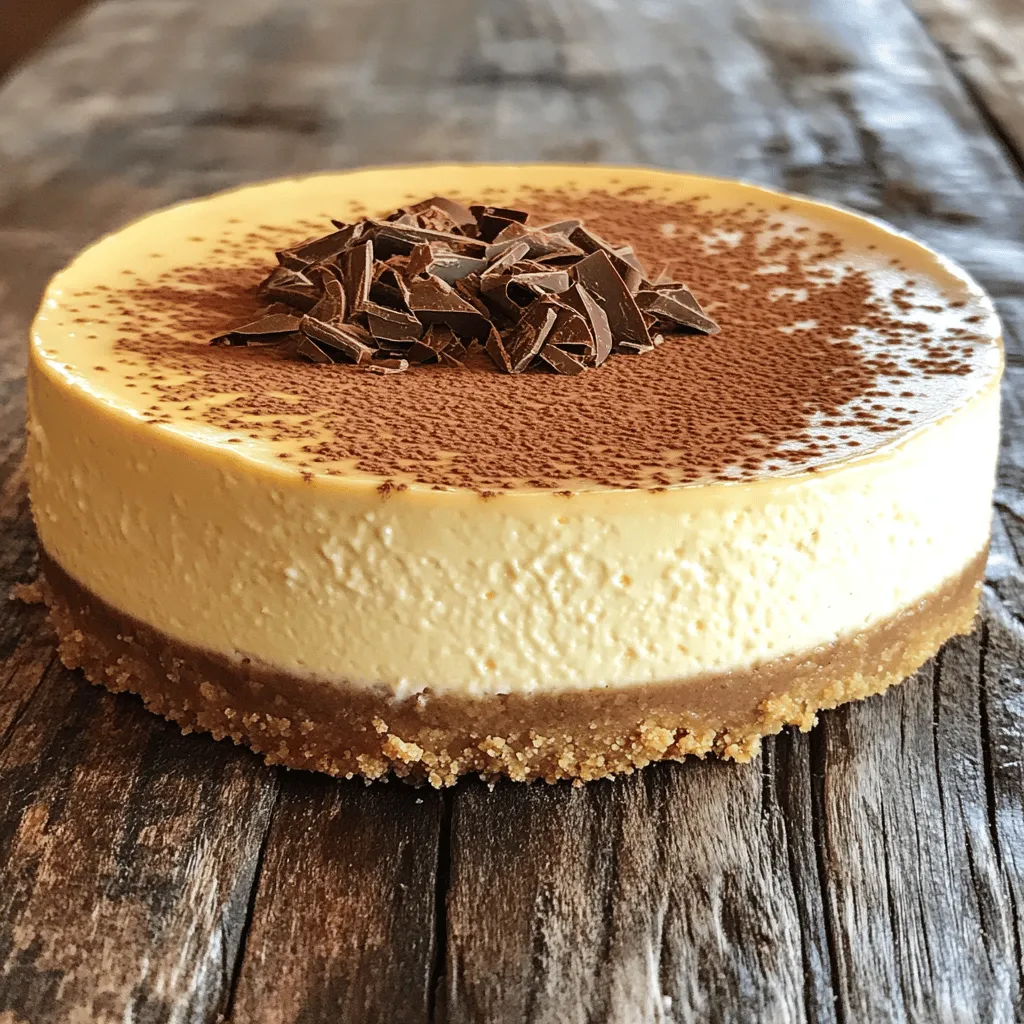
Craving something sweet and rich? You’re in the right place! My Creamy Coffee Cheesecake is an irresistible dessert delight that combines the bold flavors of coffee with a smooth, creamy filling. Perfect for any gathering or a cozy night in, this cheesecake is sure to impress. Follow my simple steps and tips to create a treat that will leave your taste buds wanting more. Let’s dive in and make magic happen in your kitchen!
Ingredients
List of Ingredients
To make this creamy coffee cheesecake, you will need the following ingredients:
– 1 ½ cups graham cracker crumbs
– ½ cup unsalted butter, melted
– 2 cups cream cheese, softened
– 1 cup granulated sugar
– 1 cup sour cream
– 3 large eggs
– ½ cup strong brewed coffee, cooled
– 1 tablespoon instant coffee granules
– 1 teaspoon vanilla extract
– ½ teaspoon salt
– Cocoa powder for dusting (optional)
– Chocolate shavings for garnish (optional)
Measurements and Substitutes
Each ingredient has a specific role. If you want to change something, here are some ideas:
– Graham cracker crumbs: You can use cookie crumbs or crushed nuts.
– Unsalted butter: Coconut oil is a good substitute.
– Cream cheese: Neufchâtel cheese works well for a lighter option.
– Granulated sugar: You can sweeten with brown sugar or a sugar substitute.
– Sour cream: Greek yogurt is a good swap for tanginess.
– Strong brewed coffee: Use espresso for a bolder taste.
– Instant coffee granules: You can leave it out if you prefer a milder flavor.
Recommended Brands or Types
Using good-quality ingredients makes a difference. Here are my favorites:
– Graham cracker crumbs: Nabisco is a classic choice.
– Cream cheese: Philadelphia brand is rich and creamy.
– Granulated sugar: Domino sugar is reliable and widely available.
– Instant coffee granules: I prefer Medaglia d’Oro for its strong flavor.
– Cocoa powder: Ghirardelli is rich and adds depth.
With these ingredients, you can create a delicious creamy coffee cheesecake that will impress anyone.
Step-by-Step Instructions
Preparation of the Crust
To start, you need to prepare the crust. Grab a medium bowl and combine:
– 1 ½ cups graham cracker crumbs
– ½ cup unsalted butter, melted
Mix these until they are well combined. Next, press this crumbly mixture firmly into the bottom of a 9-inch springform pan. Make sure it is even and packed tightly. This step is key to a sturdy crust.
Making the Cheesecake Filling
Now, let’s whip up the cheesecake filling. In a large mixing bowl, beat:
– 2 cups cream cheese, softened
Use an electric mixer to make it smooth. Slowly add in:
– 1 cup granulated sugar
Keep beating until fluffy. Then, mix in:
– 1 cup sour cream
Make sure everything is well combined. Next, add in the eggs one at a time, mixing well after each addition. In a separate cup, dissolve:
– 1 tablespoon instant coffee granules in
– ½ cup strong brewed coffee, cooled
Now pour this coffee mixture into the cream cheese blend along with:
– 1 teaspoon vanilla extract
– ½ teaspoon salt
Mix until everything is smooth and creamy.
Baking and Cooling Process
Pour the cheesecake filling over the prepared crust. Smooth the top with a spatula. Bake in a preheated oven at 325°F (160°C) for about 50 to 60 minutes. The center should be set but still slightly jiggly.
Once done, turn off the oven and crack the door open. Let the cheesecake cool in the oven for about 1 hour. This helps prevent cracks. After cooling, transfer the cheesecake to the fridge. Chill for at least 4 hours or overnight for the best texture.
Dust the top with cocoa powder and add chocolate shavings before serving, if you like.Enjoy your creamy coffee cheesecake!
Tips & Tricks
Achieving the Perfect Creamy Texture
To get that smooth, creamy texture, start with softened cream cheese. Cold cream cheese will not blend well. Use an electric mixer for best results. Beat it until it’s fluffy and no lumps remain. Mixing in the sour cream adds richness and creaminess too. Make sure to incorporate each egg one at a time. This step helps keep your filling smooth.
Preventing Cracks in the Cheesecake
Cracks can ruin the look of your cheesecake. To avoid them, let the cheesecake cool slowly. After baking, turn off the oven and crack the door open. This lets the cheesecake cool down gradually. Chill the cheesecake in the fridge for at least four hours, or overnight. A longer chilling time helps it set and reduces cracking.
Serving Suggestions and Presentation
When ready to serve, dust the top with cocoa powder. It adds a nice touch. Use a sharp knife to slice clean pieces. Garnish with chocolate shavings for extra flair. This makes your cheesecake look fancy. You can also pair it with whipped cream or fresh berries. These toppings add flavor and color, making your dessert even more tempting.

Variations
Flavor Variations
You can play with flavors for your cheesecake. A mocha flavor is a great choice. Just mix in some cocoa powder and more coffee. This adds a rich chocolate taste. If you prefer a classic twist, try vanilla. Simply replace the instant coffee with more vanilla extract. This makes a smooth and creamy dessert that everyone loves!
Alternate Crust Options
While graham cracker crust is popular, you can switch it up. Try using Oreo cookies for a chocolatey base. Just crush them and mix with melted butter. You can also use almond flour for a gluten-free option. This gives a nutty flavor and works well with coffee.
Toppings and Add-Ins
Toppings can make your cheesecake even better. Try adding nuts for crunch. Chopped walnuts or pecans work well. For fruit lovers, fresh berries are a nice touch. They add color and contrast. You can also drizzle caramel or chocolate sauce on top. This makes your cheesecake look fancy and taste divine!
Storage Info
Best Practices for Storing Cheesecake
To keep your creamy coffee cheesecake fresh, store it in the fridge. Use an airtight container or wrap it tightly with plastic wrap. This helps maintain its rich flavor and creamy texture. Always place it on a flat surface to avoid any damage. If you have leftovers, try to consume them within five days for the best taste.
Freezing Instructions
You can freeze this cheesecake for longer storage. First, let it cool completely and chill in the fridge. Then, wrap it tightly in plastic wrap. For added protection, place it in a freezer-safe container. This way, it can stay fresh for up to three months. When you’re ready to eat, thaw it overnight in the fridge before serving.
Reheating Tips
Reheating cheesecake isn’t always necessary. If you enjoy it cold, serve it straight from the fridge. If you prefer it slightly warm, place a slice in the microwave for about 10-15 seconds. Keep a close eye on it to avoid overheating. Enjoy your cheesecake plain or with your favorite toppings!
FAQs
How to fix a cracked cheesecake?
If your cheesecake cracks, don’t panic! You can hide cracks with toppings. Use whipped cream or a chocolate ganache. If cracks are deep, cover them with a layer of cocoa powder. This makes it look pretty while adding flavor.
Can I make this recipe ahead of time?
Yes, you can make this cheesecake a day in advance. Making it ahead helps the flavors blend well. Just store it in the fridge after it cools. It will taste even better the next day.
What can I substitute for coffee?
If you don’t like coffee, try using strong brewed tea. Chai or matcha works well. For a sweet option, use chocolate milk instead. This gives you a rich flavor without coffee.
How long does cheesecake last in the fridge?
Cheesecake can last about five days in the fridge. Keep it covered tightly to prevent drying out. If you don’t eat it all, you can freeze it for longer storage. Just thaw it in the fridge before serving.
In this blog post, I covered the key elements of making a great cheesecake. We started with the right ingredients and measurements, ensuring you can customize your dessert with ease. I shared step-by-step instructions for preparing the crust, filling, and the baking process. Tips for a creamy texture and avoiding cracks came next, along with variation ideas and storage tips. Remember, cheesecake is versatile and fun to make. Enjoy experimenting to find your perfect flavor and presentation! Happy baking!