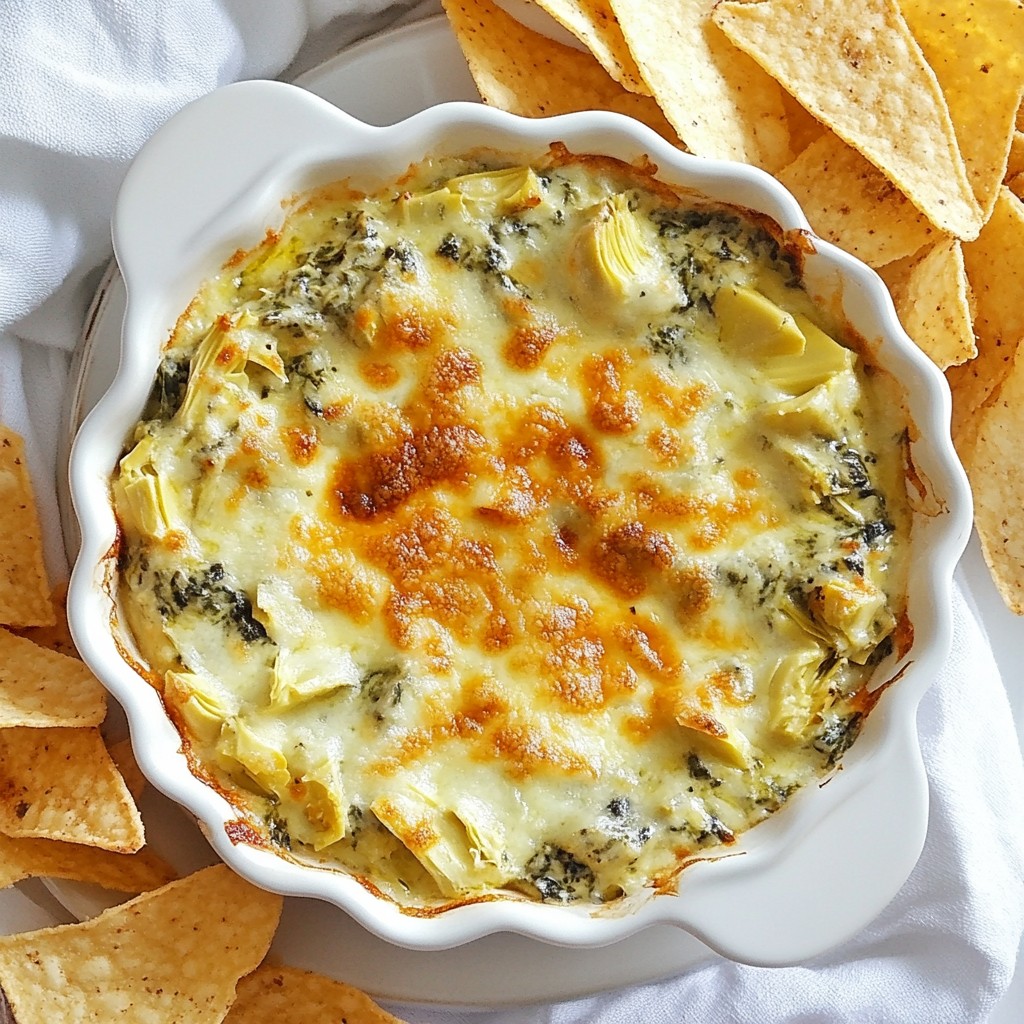
Looking for a delicious snack that never fails to impress? Let me introduce you to Cheesy Spinach Artichoke Dip! This creamy delight combines melted cheeses and savory vegetables for a flavor explosion. Perfect for game days, parties, or an easy weeknight treat, this dip is quick to whip up and even easier to devour. Join me as we dive into the ingredients, steps, and tips that make this dish a guaranteed hit!
Why I Love This Recipe
- Delicious Flavor Combination: The rich creaminess of the cheeses blends perfectly with the earthy flavors of spinach and artichokes, creating a dip that's hard to resist.
- Easy to Prepare: This dip comes together in just a few simple steps, making it perfect for a quick appetizer or snack before a meal.
- Bake to Perfection: Baking the dip allows the cheeses to melt and bubble while achieving a golden crust, enhancing both flavor and texture.
- Versatile Serving Options: Whether paired with tortilla chips, sliced baguette, or fresh vegetables, this dip complements a variety of dippers for a crowd-pleasing dish.
Ingredients
This Cheesy Spinach Artichoke Dip is all about rich flavors and creamy goodness. Here’s what you need to make it:
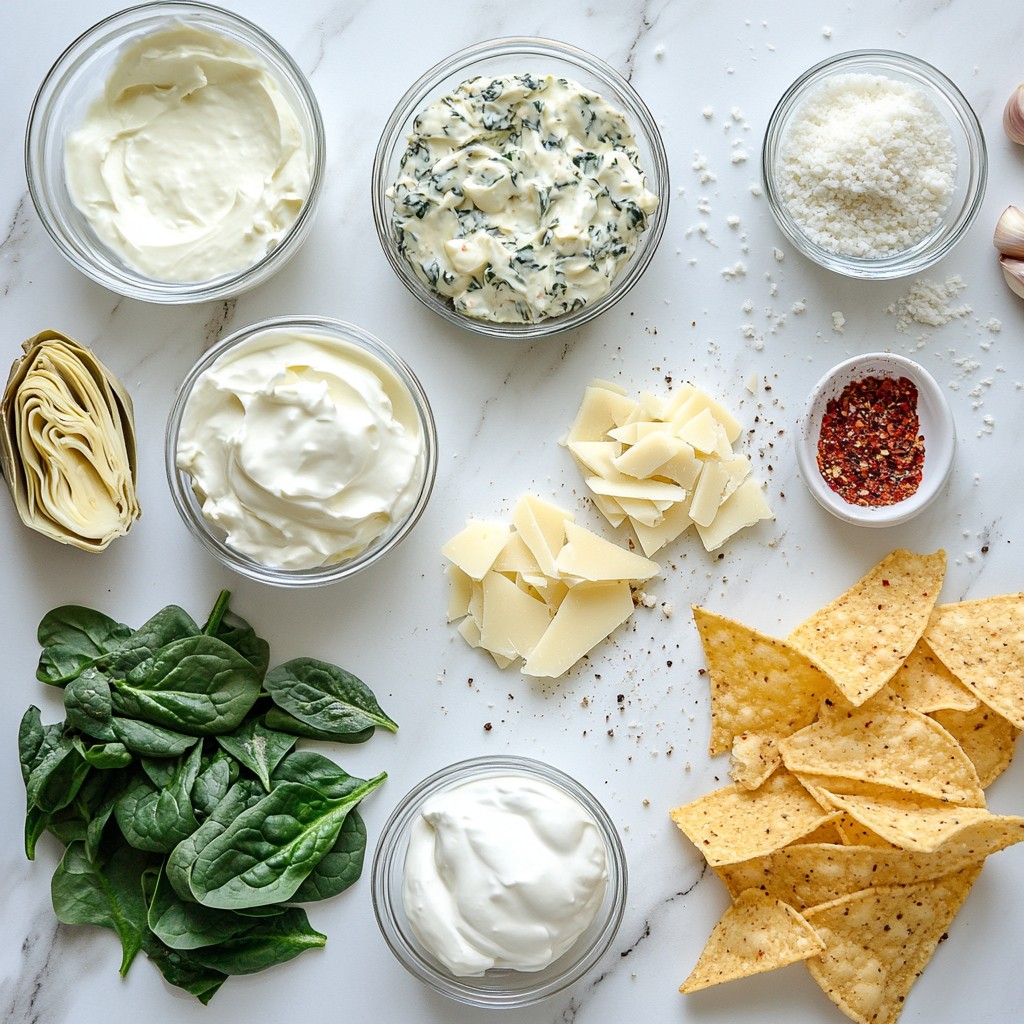
- 1 cup frozen spinach, thawed and drained
- 1 cup canned artichoke hearts, drained and chopped
- 1 cup cream cheese, softened
- 1/2 cup sour cream
- 1 cup mayonnaise
- 1 cup shredded mozzarella cheese
- 1/2 cup grated Parmesan cheese
- 2 cloves garlic, minced
- 1 teaspoon onion powder
- 1/2 teaspoon paprika
- Salt and pepper to taste
- Tortilla chips or bread for serving
Each ingredient plays a key role. The frozen spinach gives a nice green color and earthy taste. The artichoke hearts add a unique texture and flavor. Cream cheese, sour cream, and mayonnaise create a smooth and creamy base.
Mozzarella and Parmesan cheeses bring a melty richness. Garlic, onion powder, and paprika add a tasty kick. Finally, you can adjust salt and pepper to suit your taste.
Serve this dip with tortilla chips or bread. It makes for a perfect snack or party treat.
Step-by-Step Instructions
Preparing the Dip
1. Preheating the oven: Start by preheating your oven to 350°F (175°C). This step is key for cooking the dip evenly.
2. Mixing the creamy base: In a large bowl, blend 1 cup of softened cream cheese, 1/2 cup of sour cream, and 1 cup of mayonnaise. Mix until it is smooth and creamy.
3. Incorporating spinach and artichokes: Add 1 cup of thawed and drained frozen spinach and 1 cup of chopped canned artichoke hearts to the bowl. Stir in 2 cloves of minced garlic, 1 teaspoon of onion powder, and 1/2 teaspoon of paprika. Mix well until everything is combined.
Combining Ingredients
1. Firing up the flavors with spices: Season the mixture with salt and pepper to taste. This step enhances the flavors in your dip.
2. Adding cheeses and seasoning: Fold in 1 cup of shredded mozzarella and 1/2 cup of grated Parmesan cheese. Ensure all the ingredients are well mixed for a delicious result.
Baking and Serving
1. Transferring to a baking dish: Pour the dip mixture into a baking dish and spread it out evenly. This helps it cook evenly.
2. Baking time and tips for doneness: Bake in the oven for 25-30 minutes. The dip is ready when it is bubbling and golden brown on top.
3. Cooling tips before serving: Once baked, remove it from the oven and let it cool for a few minutes. This makes it easier to serve and enjoy.
Tips & Tricks
Perfecting the Dip
To get the creamiest texture, use softened cream cheese. This helps blend well. Mixing in sour cream and mayonnaise also adds to the creaminess. For flavor boosts, try adding a squeeze of lemon juice or a dash of hot sauce. You can swap in different cheeses too. Creamy goat cheese or sharp cheddar can add a fun twist.
Preparation Tips
You can make this dip ahead of time. Just prepare it, cover it, and store it in the fridge. Before baking, let it sit out for about 15 minutes. This helps it warm up. When you reheat it, do so gently in the oven. Heat at 350°F until hot and bubbly. This keeps the texture smooth and creamy.
Presentation Tips
For a stunning look, garnish with fresh parsley or more paprika. Serve the dip hot with tortilla chips or sliced baguette. Arrange the chips around the dip for a nice touch. You can even add some colorful veggies for crunch. This makes your dish pop and draws people in.
Pro Tips
- Thaw Your Spinach Properly: Ensure you thoroughly thaw and drain your frozen spinach to avoid excess moisture, which can make the dip watery.
- Mix Cheeses for Extra Flavor: Feel free to blend different types of cheeses, such as cheddar or gouda, with the mozzarella for a richer taste.
- Serve Immediately: For the best flavor and texture, serve the dip hot straight out of the oven, as it tends to thicken as it cools.
- Garnish Creatively: Enhance your presentation by garnishing the dip with fresh herbs like basil or cilantro, and add a drizzle of olive oil for extra richness.
Variations
Cheese Variations
You can change up the cheese in this dip easily. Try using cream cheese mixed with sharp cheddar for a bolder taste. You can also use feta for a tangy kick. Adding spices can boost flavor too. A pinch of cayenne pepper or chili powder can add warmth.
Healthier Options
Want to make it lighter? Use Greek yogurt instead of sour cream and mayo. This swap gives you creaminess with less fat. For a vegan version, use cashew cream or a store-bought vegan cream cheese. You can also add nutritional yeast for a cheesy flavor without dairy.
Flavor Additions
Incorporating herbs can really take this dip up a notch. Fresh basil or thyme adds a nice touch. You could also stir in sun-dried tomatoes for sweetness or crispy bacon for a savory crunch. These mix-ins create a unique twist on the classic dip.
Storage Info
How to Store Leftovers
To keep your Cheesy Spinach Artichoke Dip fresh, store it in the fridge right after serving. Put it in an airtight container. This will help keep the dip from drying out. I suggest using glass containers or plastic ones with tight lids. Make sure the container is clean and dry before you store the dip.
Freezing the Dip
You can also freeze the dip for later use. To do this, let it cool completely first. Then, place it in a freezer-safe container. Leave some space at the top for expansion. For best results, use the dip within three months. When you want to eat it, take it out of the freezer and thaw it in the fridge overnight. To reheat, put it in the oven at 350°F (175°C) until it is hot and bubbly, about 20-25 minutes.
Shelf Life
In the fridge, your Cheesy Spinach Artichoke Dip will last about 3-4 days. Check for any signs of spoilage before eating. If you see mold or if the dip smells off, it’s best to throw it away. Always trust your senses!
FAQs
Can I make Cheesy Spinach Artichoke Dip in advance?
Yes, you can make this dip ahead of time. Prepare the dip and place it in a baking dish. Cover it tightly with plastic wrap or foil. Store it in the fridge for up to 2 days. When ready to bake, remove the cover and let it sit at room temperature for about 15 minutes. Then, bake it as directed until bubbly and golden. This makes it easy for parties or gatherings.
What can I serve with Cheesy Spinach Artichoke Dip?
Cheesy Spinach Artichoke Dip pairs well with many snacks. Here are some ideas:
- Tortilla chips
- Sliced baguette
- Pita chips
- Vegetables like carrots, celery, and bell peppers
- Crackers
You can arrange these around the dip for a colorful and fun display.
Can I use fresh spinach instead of frozen?
Yes, fresh spinach works great too. Use about 4 cups of fresh spinach. First, wash and chop it. Then, sauté it in a pan until wilted. Drain any excess water before adding it to the dip. This keeps the flavor strong and the texture perfect.
This cheesy spinach artichoke dip is simple and delicious. We covered the key ingredients, easy steps, and helpful tips. You can personalize it with different cheeses or flavors. Remember to store leftovers properly to keep them fresh. This dish is perfect for gatherings and can be made ahead. Try it with tortilla chips or bread for a tasty treat. Dive into this dip and impress your guests with your cooking skills. Enjoy your time in the kitchen!