Craving a tasty snack? My Cheesy Pizza Pockets recipe is just what you need! This simple, fun dish is perfect for lunch or dinner. With gooey cheese and your favorite toppings, these pockets hit the spot. In my guide, I’ll share easy steps, ingredient swaps, and tips for that perfect crispy crust. Let’s get cooking and bring the pizzeria to your kitchen!
Why I Love This Recipe
- Easy to Make: These cheesy pizza pockets are a breeze to prepare, making them perfect for a quick weeknight dinner or a fun weekend snack.
- Customizable: Fill the pockets with your favorite toppings, whether it's pepperoni, veggies, or an extra layer of cheese, to suit everyone's taste.
- Perfect for Dipping: Serve these pockets with extra pizza sauce for dipping, adding an extra layer of flavor to every bite.
- Family-Friendly: Kids and adults alike will love these cheesy treats, making them a hit for family gatherings or parties.
Ingredients
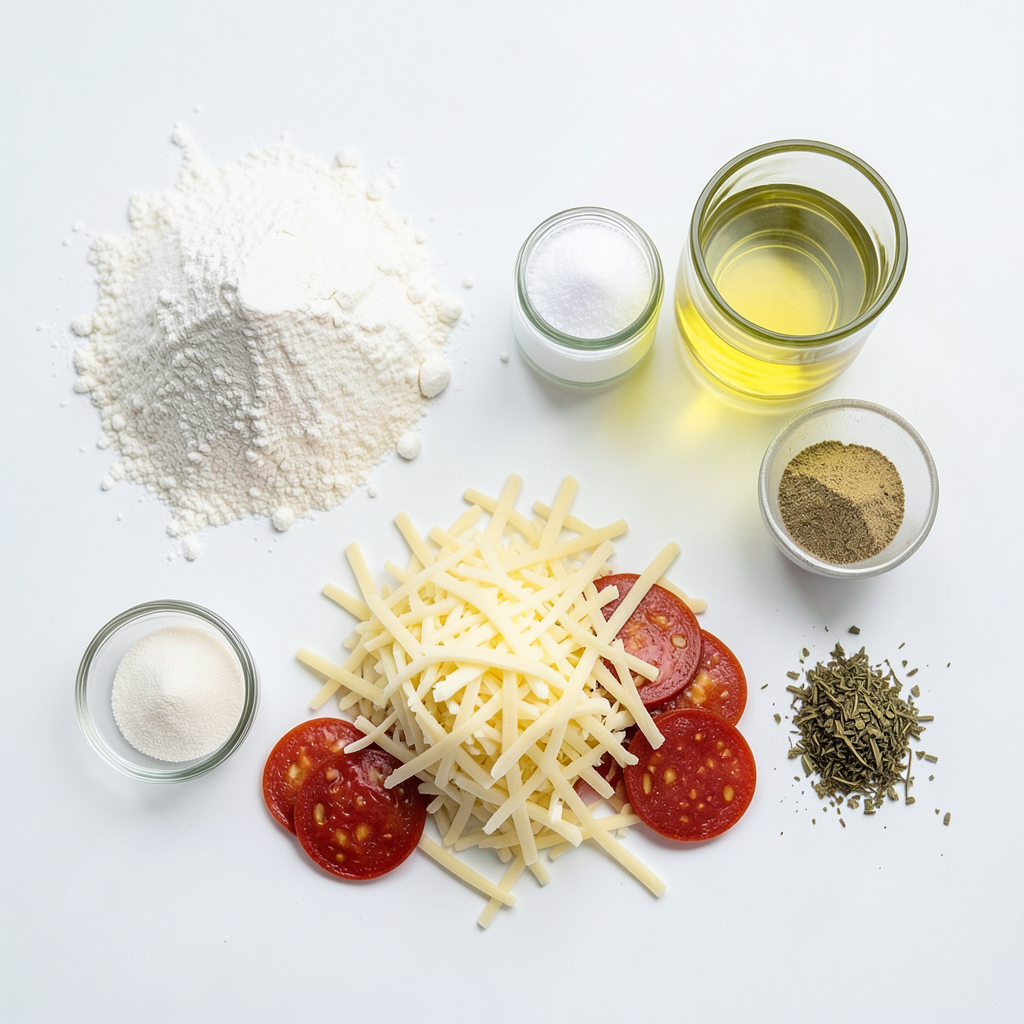
List of ingredients for homemade Cheesy Pizza Pockets
- 2 cups all-purpose flour
- 1 tablespoon baking powder
- 1 teaspoon salt
- 1 tablespoon olive oil
- 3/4 cup water (adjust as needed)
- 1 cup shredded mozzarella cheese
- 1/2 cup pizza sauce (store-bought or homemade)
- 1/2 cup pepperoni slices (or any toppings of choice)
- 1 teaspoon dried oregano
- 1/2 teaspoon garlic powder
- Olive oil for brushing
- Optional: extra cheese for topping
Substitutions for common ingredients
If you run out of all-purpose flour, you can use whole wheat flour. For a gluten-free option, try a gluten-free flour blend. If you don't have mozzarella cheese, cheddar or provolone works well. Instead of pizza sauce, use marinara or even pesto.
Suggested toppings for extra flavor
You can customize your pizza pockets with many toppings. Try adding cooked sausage or diced bell peppers. Mushrooms, olives, or fresh basil also add great taste. For a spicy kick, include jalapeños or red pepper flakes. Don't forget to sprinkle extra cheese on top for a gooey finish!
Step-by-Step Instructions
Detailed steps to make the dough
To make the dough, start with a large bowl. Add 2 cups of all-purpose flour, 1 tablespoon of baking powder, and 1 teaspoon of salt. Mix these dry ingredients well with a spoon. Next, pour in 1 tablespoon of olive oil. Gradually add 3/4 cup of water while stirring. Mix until a dough forms. If the dough is sticky, add more flour. Knead the dough on a floured surface for about 5 minutes. You want the dough to be smooth and soft. Once done, cover it with a damp cloth and let it rest for 15 minutes. This resting time helps the dough relax, making it easier to roll out.
Guidelines for filling and sealing the pockets
After resting, roll out the dough on a floured surface. Aim for about 1/4-inch thick. Use a round cutter or a glass to cut out circles, about 4 to 5 inches in diameter. For each circle, place 1 tablespoon of pizza sauce in the center. Then, add a generous amount of shredded mozzarella cheese, about 1 cup total for all the pockets. Next, sprinkle some pepperoni slices or your favorite toppings on top. Add a pinch of dried oregano and 1/2 teaspoon of garlic powder for extra flavor. Now, fold the dough over to form a half-moon shape. Use a fork to crimp the edges tightly. This step keeps the filling inside while baking.
Baking instructions for perfect texture
Now, it’s time to bake the pockets. Preheat your oven to 400°F (200°C). Line a baking sheet with parchment paper to prevent sticking. Place the filled pockets on the prepared sheet. Brush the tops with olive oil for a golden finish. If you like, sprinkle on extra cheese for even more flavor. Bake the pockets in the oven for 15 to 20 minutes. They should turn golden brown and crispy. Once baked, let them cool for a bit. Serve with extra pizza sauce for dipping. Enjoy your cheesy pizza pockets!
Tips & Tricks
How to achieve a crispy crust
To get a crispy crust, start with a hot oven. Preheat it to 400°F. Use parchment paper on your baking sheet. This helps the bottoms crisp up without sticking. Brush the tops with olive oil before baking. This adds flavor and helps with browning. Bake until they turn golden brown. Keep an eye on them, as ovens vary.
Best practices for dough consistency
For the best dough, use the right amount of flour. Start with 2 cups, then adjust if needed. If the dough is sticky, add a little more flour. Knead it for about 5 minutes until smooth. After kneading, let it rest for 15 minutes. This helps the dough relax, making it easier to roll out.
Serving suggestions for enhanced flavor
Serve your pizza pockets with extra pizza sauce for dipping. You can also sprinkle some fresh herbs on top. Basil or parsley adds a nice touch. For a spicy kick, try adding crushed red pepper flakes. Pair them with a side salad for a complete meal. Enjoy your delicious cheesy pizza pockets!
Pro Tips
- Use Cold Water: Starting with cold water helps to keep the dough firm, resulting in a flakier crust.
- Experiment with Fillings: Feel free to customize your pizza pockets with different cheeses, vegetables, or proteins for variety.
- Seal Well: Ensure that the edges are crimped tightly to prevent the cheese and sauce from leaking during baking.
- Serve Fresh: These pockets are best enjoyed fresh out of the oven while the cheese is gooey and the crust is crispy.
Variations
Vegetarian options for Cheesy Pizza Pockets
You can easily make vegetarian Cheesy Pizza Pockets. Just swap out the pepperoni for veggies. Try using bell peppers, mushrooms, or spinach. These add great flavor and nutrition. You can also add olives or artichokes for more taste. Mix and match your favorite veggies to find your perfect combo.
Alternative cheeses and toppings
If you want to try different cheeses, use cheddar or provolone. Both melt well and add unique flavors. You can also mix cheeses for a more complex taste. For toppings, consider adding cooked sausage or chicken if you prefer meat. You can even add fresh basil or arugula after baking for a fresh touch.
Gluten-free options for the dough
Making gluten-free Cheesy Pizza Pockets is simple too. Use gluten-free flour instead of all-purpose flour. You might need to adjust the water amount to get the right dough texture. Always check the flour package for specific instructions. Another option is to use store-bought gluten-free dough for quick prep. This way, everyone can enjoy these tasty pockets!
Storage Info
How to store leftover pizza pockets
After enjoying your cheesy pizza pockets, let them cool completely. Place them in an airtight container. This helps keep them fresh. You can store them in the fridge for up to three days. If you want them to last longer, freezing is a great choice.
Reheating instructions for best results
To reheat your pizza pockets, preheat your oven to 350°F (175°C). Place the pockets on a baking sheet. Heat for about 10-15 minutes. This method keeps the crust crispy. You can also use a microwave if you’re in a hurry. Just heat for about 30 seconds to 1 minute. The crust won't be as crispy, but they will be warm.
Freezing techniques for meal prep
To freeze your pizza pockets, first, let them cool completely. Wrap each pocket in plastic wrap. Place them in a freezer-safe bag or container. Label with the date. They can last in the freezer for up to three months. When ready to eat, thaw them in the fridge overnight. Then, reheat as mentioned above. Enjoy your homemade pizza pockets anytime!
FAQs
What can I use instead of mozzarella cheese?
You can use other cheeses like cheddar or provolone. These cheeses melt well. You can also try a mix of cheeses for extra flavor. If you want a dairy-free option, use vegan cheese. Make sure it melts nicely for the best results.
How long do Cheesy Pizza Pockets last in the fridge?
Cheesy Pizza Pockets can last about 3 to 4 days in the fridge. Store them in an airtight container. This keeps them fresh and tasty. If you want to enjoy them longer, freezing is a good option.
Can I make these pizza pockets in advance?
Yes, you can make these pizza pockets ahead of time. Prepare the dough and fillings, then assemble the pockets. Store them in the fridge until you're ready to bake. You can also freeze them unbaked. Just bake them directly from the freezer when you’re ready.
Making Cheesy Pizza Pockets is simple. You learned the key ingredients, substitutions, and tasty toppings. I shared each step for making, filling, and baking them. You now know tips for a crispy crust and dough consistency, plus fun variations. Storing leftovers is easy, and I covered how to reheat and freeze them well.
Enjoy trying these ideas to make your own amazing Cheesy Pizza Pockets! You can impress everyone and have fun cooking.