Skip to content
DisclaimerTerms Of UseGDPR PolicyCookie Policy

flavorsprint

  • Home
  • Drinks
  • Appetizers
  • Dinner
  • Dessert
  • About
  • Contact
  • Privacy Policy
DisclaimerTerms Of UseGDPR PolicyCookie Policy

Lillian

- 1/4 cup fresh key lime juice - 16 oz cream cheese, softened - 1 cup sour cream Fresh ingredients are key to this recipe. Key lime juice gives the cheesecakes their unique tart flavor. If you can’t find key limes, regular limes work well too. Cream cheese adds that creamy texture. Make sure it’s softened to mix easily. Sour cream adds a nice tang and helps balance the sweetness. - 1 1/2 cups graham cracker crumbs - 1/4 cup unsalted butter, melted - 1/3 cup sugar The crust is simple but very tasty. Graham cracker crumbs provide a sweet and crunchy base. Melted unsalted butter helps bind the crumbs together. Sugar adds sweetness and enhances the flavor of the crust. Mixing these together gives you a perfect base for your mini cheesecakes. - Whipped cream - Lime slices - Additional lime zest Toppings make your mini cheesecakes look beautiful. A dollop of whipped cream on top adds richness. Lime slices provide a pop of color. Adding lime zest gives an extra burst of flavor. You can get creative with your toppings to make each cheesecake special. For the full recipe, check the earlier section on the ingredients. 1. Preheat the oven: Start by preheating your oven to 325°F (160°C). This is key for a crispy crust. 2. Combine crust ingredients: In a bowl, mix 1 1/2 cups of graham cracker crumbs, 1/3 cup of sugar, and 1/4 cup of melted unsalted butter. Stir until all crumbs are coated. 3. Press into muffin tin: Line a muffin tin with cupcake liners. Pack 2 tablespoons of the crumb mixture into each cup. 1. Beat cream cheese and sugar: In a large bowl, beat 16 oz of softened cream cheese with 1/2 cup of sugar. Mix until it is smooth and creamy. 2. Incorporate eggs and lime elements: Add in 1 cup of sour cream, 3 large eggs (one at a time), 1/4 cup of fresh key lime juice, the zest of 2 key limes, and 1 teaspoon of vanilla extract. Mix until all ingredients blend well. 1. Fill the crusts with filling: Spoon the cheesecake mixture over the cooled crusts, filling each cup almost to the top. 2. Bake to perfection: Bake in the oven for about 18 to 20 minutes. The centers should jiggle slightly when done. 3. Chill for the best texture: Let them cool to room temperature, then transfer to the fridge. Chill for at least 4 hours, or overnight for the best results. You can find the complete instructions in the Full Recipe. Enjoy your baking! To make your mini key lime pie cheesecakes perfect, focus on the texture. The filling should be smooth and creamy. Mix the cream cheese and sugar well. You want no lumps! When you add the eggs, do it one at a time. This helps keep the filling light. For baking time, keep an eye on the cheesecakes. Bake them at 325°F for 18 to 20 minutes. You want the centers to be just set. They may look a bit jiggly. That’s okay! They will firm up as they cool. Presentation matters! Use a nice plate to showcase your mini cheesecakes. Top each one with a swirl of whipped cream. Add a slice of lime on top. A sprinkle of lime zest adds color and flavor. Pair these treats with fresh fruit or a light salad. They work well with a cold glass of iced tea or lemonade. The citrus flavors complement each other nicely. Cracks can ruin the look of your cheesecakes. To prevent this, do not overmix the filling. Also, avoid opening the oven door too early. Let them cool slowly in the oven after baking. To ensure your cheesecakes set properly, chill them in the fridge for at least 4 hours. For best results, let them chill overnight. This helps the flavors meld and the texture smooth out. If they still seem soft after chilling, they may need more time in the fridge. For the full recipe, check out the detailed steps provided earlier. {{image_2}} You can change the flavor of these mini key lime pie cheesecakes to suit your taste. - Using different citrus fruits: Try using lemon, orange, or grapefruit juice instead of lime. Each fruit adds a unique twist to your cheesecakes. For a sweeter option, use blood orange juice for a hint of sweetness and a beautiful color. - Incorporating chocolate or berries: Add melted chocolate to the filling for a rich flavor. You can also mix in fresh or frozen berries like raspberries or blueberries for a fruity delight. Just be sure to adjust the sugar to balance the flavors. These cheesecakes can fit many dietary needs. - Gluten-free options: Use gluten-free graham cracker crumbs for the crust. Many brands offer great alternatives that taste just as good. - Vegan adaptations: Replace cream cheese with a plant-based version and use non-dairy yogurt instead of sour cream. Swap eggs for flaxseed meal mixed with water or silken tofu for a creamy texture. You can easily modify the size of these cheesecakes. - Mini vs. full-size cheesecake: If you prefer a larger dessert, use a springform pan instead of muffin tins. Just remember to adjust the baking time to ensure it cooks evenly. - Adjusting recipe for larger batches: Simply double or triple the ingredients to make more servings. Use a larger muffin tin or multiple pans to bake all at once. For the complete recipe, check out the Full Recipe. To keep your mini key lime pie cheesecakes fresh, store them in the fridge. Place them in an airtight container. This helps keep moisture out and flavor in. If you want to enjoy them later, you can freeze them too. Wrap each cheesecake in plastic wrap, then place them in a freezer bag. This keeps them safe from freezer burn. How long do they last? In the fridge, your cheesecakes will stay fresh for about five days. If you freeze them, they can last up to three months. What are the signs of spoilage? Look for any off smells or changes in color. If the texture looks odd or you see mold, it’s best to toss them. For the best taste, serve your leftovers cold. If you prefer them warm, use the oven. Preheat it to 300°F (150°C) and place the cheesecakes in for about 10 minutes. Use a clean storage container to keep them in the fridge or freezer. A glass container works great, as it seals tightly and keeps them fresh longer. For the full recipe, check out the [Full Recipe]. To make these mini cheesecakes, follow these steps: 1. Preheat the Oven: Set your oven to 325°F (160°C). 2. Make the Crust: In a bowl, mix 1 1/2 cups of graham cracker crumbs, 1/3 cup sugar, and 1/4 cup melted butter. Stir until the crumbs are coated. 3. Prepare Muffin Tin: Line a muffin tin with cupcake liners. Press about 2 tablespoons of the crumb mixture into each cup. 4. Bake the Crust: Bake for about 8 minutes until golden. Let them cool. 5. Prepare the Filling: Beat 16 oz of softened cream cheese with 1/2 cup sugar until smooth. 6. Add Ingredients: Mix in 1 cup sour cream, 3 eggs (one at a time), 1/4 cup key lime juice, lime zest, and 1 teaspoon vanilla. 7. Fill the Cups: Spoon the filling over the cooled crusts, filling almost to the top. 8. Bake the Cheesecakes: Bake for 18-20 minutes until the centers jiggle slightly. Let them cool to room temperature. 9. Chill: Refrigerate for at least 4 hours, or overnight for best results. 10. Serve: Top with whipped cream, a lime slice, and zest before serving. Recommended Tools: - Muffin tin - Mixing bowls - Electric mixer - Measuring cups and spoons Yes, you can use regular limes in this recipe. Key limes are smaller and have a unique tartness. Using regular limes will change the flavor slightly. Substitution Suggestions: - Use equal amounts of regular lime juice. - Adjust the sugar based on your taste preference, as regular limes can be more tart. Each mini cheesecake contains about 180 calories. Caloric Breakdown: - Calories: 180 - Total Fat: 10g - Saturated Fat: 5g - Carbohydrates: 20g - Sugar: 12g - Protein: 3g Key Nutrients per Serving: - Calcium: 45 mg - Vitamin C: 5 mg For the full recipe, refer to the section above. In this blog post, we explored how to make mini key lime pie cheesecakes. We covered ingredients like fresh key lime juice, cream cheese, and a tasty graham cracker crust. I shared step-by-step instructions, from preparing the crust to baking and chilling the cheesecakes. We also discussed tips for perfecting your dish, fun variations, and proper storage methods. These desserts are a delicious treat for any occasion. With practice, you can create a tasty and impressive dessert that everyone will love. Enjoy your baking journey!

Mini Key Lime Pie Cheesecakes Delicious and Easy Treat

If you crave a sweet, tangy treat that’s easy to make, you’re in the right spot! Mini Key Lime Pie

- 1 cup orzo pasta - 1 cup cherry tomatoes, halved - 1 bell pepper (red, yellow, or orange), diced - 1 cup cucumber, diced - 1 cup broccoli florets, blanched - 1/4 cup red onion, finely chopped - 1/4 cup feta cheese, crumbled (optional) - 1/4 cup olives, sliced - 1/4 cup fresh parsley, chopped - 3 tablespoons olive oil - 2 tablespoons lemon juice - 1 teaspoon dried oregano - Salt and pepper to taste Rainbow Orzo Salad is not just colorful; it's healthy, too. Each serving has about 200 calories. You'll get about 5 grams of protein, 8 grams of fat, and 30 grams of carbs. The fresh veggies give you vitamins and minerals. For example, cucumbers help with hydration. Broccoli is rich in fiber and vitamins C and K. Using olives adds healthy fats, while feta cheese gives a tasty kick. Overall, this salad is a great choice for anyone looking to eat well. You can find the full recipe in the previous section. Enjoy your time making this vibrant dish! First, fill a pot with water and add salt. Bring the water to a boil. Add 1 cup of orzo pasta to the boiling water. Cook the orzo for about 8-10 minutes. Stir occasionally to keep it from sticking. You want the orzo to be al dente, which means it should be firm but not hard. Once done, drain the orzo and rinse it under cold water. This stops the cooking and cools it down for the salad. Next, wash your vegetables well under cold water. For the cherry tomatoes, cut them in half. Dice your bell pepper into small pieces. For the cucumber, make sure to remove the skin if you prefer. Cut it into small cubes too. To prepare the broccoli, bring a small pot of water to a boil. Add the broccoli florets and cook for about 2-3 minutes. This is called blanching. After that, place the broccoli in cold water to keep its bright green color. Now it's time to combine everything. In a large bowl, add the cherry tomatoes, bell pepper, cucumber, blanched broccoli, and 1/4 cup of red onion. Make sure all the pieces are evenly mixed. Next, add the cooled orzo to the vegetable mix. Gently stir to combine everything well. In a small bowl, whisk together 3 tablespoons of olive oil, 2 tablespoons of lemon juice, 1 teaspoon of dried oregano, salt, and pepper. Pour this dressing over the salad. Toss the salad gently so that the dressing coats every bit of it. If you like, sprinkle 1/4 cup of crumbled feta cheese on top. Serve it in a large bowl. For the best flavor, refrigerate the salad for at least 30 minutes before enjoying. For the full recipe, refer to the section above. To make the Rainbow Orzo Salad shine, use fresh ingredients. Fresh herbs add a bright touch. They bring out flavors better than dried herbs. For example, use fresh parsley instead of dried. It gives a crisp taste that enhances the salad. Pair this salad with grilled chicken or fish. It complements their flavors well. You can serve it in a big bowl. Add a sprinkle of parsley and some extra cherry tomatoes on top for color. To store, keep it in an airtight container in the fridge. It stays fresh for a few days. Want to add protein? Cooked chicken or beans work great. They make the salad more filling and hearty. You can also swap out vegetables based on the season. Try zucchini in summer or roasted squash in fall. This keeps the salad exciting and fresh. For the full recipe, check out the complete guide! {{image_2}} To give your Rainbow Orzo Salad a Mediterranean twist, try adding artichokes and sun-dried tomatoes. These ingredients add a rich flavor and texture. You can mix in marinated artichokes for extra zest. Sun-dried tomatoes bring a sweet and tangy taste that pairs well with the salad's freshness. Mixing different cheese options can also enhance this version. Try feta or goat cheese for creaminess. They add a nice contrast to the crunchy veggies. If you want a vegan version, simply omit the feta cheese. You can substitute it with avocado or tahini. Both options will add creaminess and flavor. For protein alternatives, consider chickpeas or lentils. These options will make your salad filling and nutritious. They are also easy to mix into the salad, making it a hearty meal. Using seasonal veggies makes this salad even better. For summer, try zucchini or cherry tomatoes for extra sweetness. In the fall, you can add kale or butternut squash for a warm touch. Dressing variations based on seasons can also enhance flavor. In spring, use a light lemon vinaigrette. In winter, a balsamic glaze can warm up the dish. Always adjust your ingredients to match what’s fresh and available. Store your Rainbow Orzo Salad in the fridge. Use an airtight container. This keeps it fresh and safe. Make sure the salad is cool before sealing it. I suggest using glass containers. They do not retain odors and are easy to clean. Can you freeze Rainbow Orzo Salad? Yes, but it’s not ideal. Freezing can change the texture of the vegetables. If you decide to freeze it, use a freezer-safe container. Leave some space for expansion. To thaw, place the container in the fridge overnight. This keeps the salad from getting too watery. How long will the salad last? In the fridge, it lasts about three to five days. Signs of spoilage include a sour smell and slimy vegetables. If you see these signs, it’s best to toss it out. For the best taste, enjoy your Rainbow Orzo Salad fresh. If you follow these tips, you'll keep it tasty and safe to eat! For more details, check the Full Recipe. To make Rainbow Orzo Salad, start by cooking the orzo pasta. Boil water with salt and add the orzo. Cook it until it's just right, then drain and rinse it. In a big bowl, mix cherry tomatoes, diced bell pepper, cucumber, blanched broccoli, red onion, olives, and parsley. Add the cooled orzo to this mix. In a small bowl, whisk olive oil, lemon juice, oregano, salt, and pepper to make a dressing. Pour this dressing over the salad and toss to mix. If you want, sprinkle feta cheese on top and toss lightly. Chill in the fridge for about 30 minutes to blend the flavors. You can find the full recipe above for detailed steps. Yes, you can prep Rainbow Orzo Salad ahead of time. Make it a few hours before serving for the best flavor. Keep the salad in the fridge to stay fresh. If you add feta cheese, do it right before serving so it stays fresh. This way, the salad tastes even better as the flavors blend together. Rainbow Orzo Salad pairs well with many main dishes. You can serve it with grilled chicken or fish for a full meal. For a vegetarian option, try it with roasted vegetables or a hearty bean dish. It also goes great with wraps or sandwiches. You can even serve it as a side at a barbecue or picnic. Regular orzo pasta is not gluten-free. However, you can find gluten-free orzo made from rice or corn. These options work well and taste good too. Just cook them as you would regular orzo. This way, everyone can enjoy the Rainbow Orzo Salad! Rainbow Orzo Salad is vibrant and packed with flavor. We covered its ingredients, from fresh vegetables to a simple dressing. I shared step-by-step instructions to help you cook orzo and mix the salad perfectly. You learned tips to enhance taste and variations to suit any diet. Now you can enjoy this salad as a side or main dish. Try different veggies and proteins to make it your own. With these easy steps, you can whip up a healthy meal anytime. Enjoy every colorful bite!

Rainbow Orzo Salad Fresh and Healthy Recipe Guide

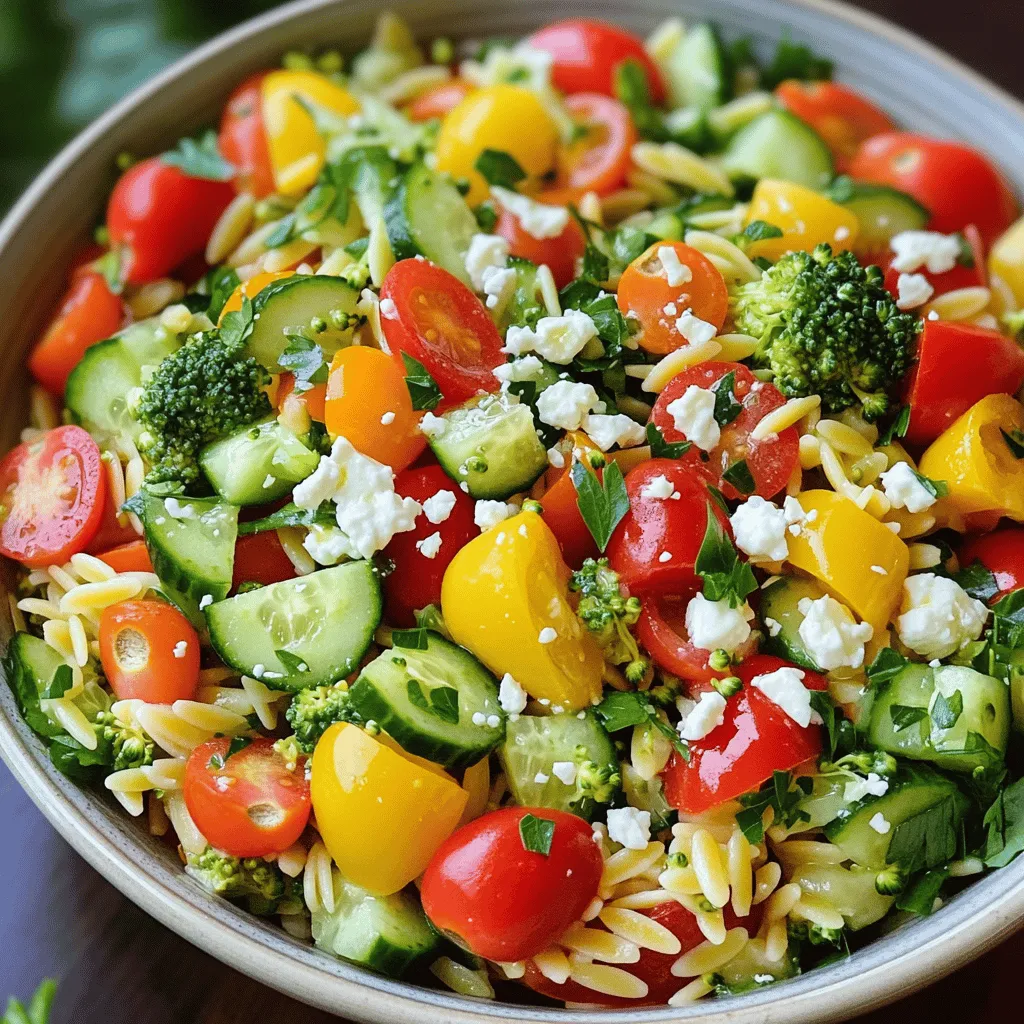
Get ready to brighten up your meals with a Rainbow Orzo Salad! This fresh and healthy recipe is packed with

- 4 boneless, skinless chicken breasts - 1/4 cup fresh orange juice - 1/4 cup fresh lime juice - 2 tablespoons olive oil - 2 tablespoons honey - 3 cloves garlic, minced - 1 teaspoon ground cumin - 1 teaspoon smoked paprika - Salt and pepper to taste - Zest of 1 lime - Zest of 1 orange - Fresh cilantro, for garnish To make Grilled Key West Chicken with Citrus Marinade, you'll need some key ingredients. Start with four boneless, skinless chicken breasts. These are your main protein. Next, grab a quarter cup of fresh orange juice and a quarter cup of fresh lime juice. These juices bring bright flavor to the dish. For the marinade, you'll need two tablespoons of olive oil. This adds richness and helps the flavors blend. Two tablespoons of honey sweeten the mix and balance the acidity. Don't forget three cloves of minced garlic for a punch of flavor. Now, let’s add spices. You will need a teaspoon of ground cumin and a teaspoon of smoked paprika. These spices give the chicken a warm, smoky taste. Add salt and pepper to your liking. Don’t forget the zest of one lime and one orange. The zest adds fresh citrus notes that elevate the dish. Finally, you'll want fresh cilantro for garnish. This adds a pop of color and flavor when serving. For the full recipe, check out the details above. To start, gather your ingredients for the marinade. You need fresh orange juice, lime juice, olive oil, honey, garlic, ground cumin, smoked paprika, and the zest of both a lime and an orange. In a mixing bowl, combine the orange juice and lime juice. Add the olive oil, honey, and minced garlic. Then, sprinkle in the cumin and smoked paprika. Finally, add the lime and orange zest. Whisk everything together until it blends well. This citrus marinade gives the chicken a bright, fresh taste. It’s simple but packed with flavor. Next, take your chicken breasts and place them in a resealable plastic bag or a shallow dish. Pour the citrus marinade over the chicken, making sure every piece gets coated. Seal the bag tightly or cover your dish. Refrigerate the chicken for at least one hour. For the best flavor, let it marinate for two to four hours. This step is key. It allows the chicken to soak in all those zesty flavors. Before grilling, preheat your grill to medium-high heat. Once hot, take the marinated chicken out of the fridge. Let any excess marinade drip off, and then discard the marinade. Place the chicken on the grill. Cook each side for about six to seven minutes. You want the chicken to reach an internal temperature of 165°F. This ensures it’s safe to eat and juicy. When done, take the chicken off the grill and let it rest for five minutes. This helps the juices redistribute, making it more tender. Slice the chicken and serve it hot. Garnish with fresh cilantro for a lovely touch. For the full recipe, check the details above. To make your citrus marinade just right, start by tasting it. If you want more sweetness, add a bit more honey. If you like it tangy, squeeze in more lime juice. Balance is key. You can also add spices like chili flakes for a kick. This way, you create a flavor that fits your taste. When grilling, heat your grill to medium-high. To prevent sticking, oil the grill grates before placing the chicken on them. Use tongs to turn the chicken, which helps keep the juices in. For great grill marks, do not move the chicken around too much. Let it sit on one side for about 6-7 minutes before flipping. After grilling, let the chicken rest for 5 minutes. This helps the juices settle, making each bite tender and juicy. For presentation, slice the chicken and arrange it on a nice platter. Add fresh cilantro and citrus slices for color. This makes your dish look as good as it tastes. For a meal, serve it with grilled veggies or a salad. You can find the full recipe earlier in the article. {{image_2}} If you want to switch things up, consider using pork or tofu. Both can soak up the citrus marinade well. For pork, use boneless chops or tenderloin. The marinade will keep the meat juicy and flavorful. For tofu, press it to remove excess water. Then, cut it into cubes or slices. Marinate the tofu for at least an hour. This will give you a tasty plant-based option that still feels like a feast. Adding new spices can elevate the dish. Try mixing in fresh herbs like cilantro or mint. You can also add a hint of heat with red pepper flakes. For a unique twist, swap lime juice for grapefruit juice. This adds a sweet and tart flavor that pairs nicely with the chicken. Experimenting can lead to new favorite tastes! Do not worry if you do not have a grill. Baking or pan-searing works great too. For baking, preheat your oven to 400°F (200°C). Place the marinated chicken on a baking sheet lined with parchment paper. Bake for 25-30 minutes, or until the chicken reaches 165°F (75°C). For pan-searing, heat a skillet over medium-high heat. Add a bit of oil and cook the chicken for 6-7 minutes on each side. This gives a nice crust while keeping the inside juicy. Now you have several ways to enjoy Grilled Key West Chicken with Citrus Marinade. Check out the Full Recipe for all the details! You can keep marinated chicken in the fridge for up to two days. This helps the flavors soak in. If you want the best taste, try to use it within 24 hours. Make sure it’s in a sealed bag or container to avoid any mess. To freeze grilled chicken, first let it cool completely. Wrap each piece tightly in plastic wrap. Then, place them in a freezer-safe bag. Write the date on the bag. The grilled chicken will stay fresh for up to three months. When you're ready to eat it, just thaw it in the fridge overnight. To reheat grilled chicken, use the oven or stovetop. If using the oven, set it to 350°F. Place the chicken in a baking dish, add a splash of water, and cover it with foil. This keeps it moist. Heat for about 15-20 minutes or until warm. On the stovetop, use low heat and cover the pan. This also helps avoid drying out your chicken. Enjoy it just like fresh! For the best flavor, you should marinate the chicken for at least 1 hour. However, I recommend 2 to 4 hours. This allows the chicken to soak up the citrus flavors and spices. If you have time, marinating overnight works wonders too. Just remember to keep the chicken in the fridge while it marinates. Yes, you can use frozen chicken for this recipe. Just remember to thaw it first. It’s best to thaw the chicken in the fridge overnight. After thawing, you can follow the same marinating steps. This will keep the chicken juicy and flavorful. Key West Chicken pairs well with many sides. Here are some great ideas: - Grilled vegetables, like zucchini and bell peppers - A fresh garden salad with citrus dressing - Rice, particularly coconut or jasmine rice - Black beans or corn salad for a tropical touch These sides will complement the bright flavors of the chicken. Enjoy your meal with family and friends! For the complete recipe, check out the Full Recipe. You learned how to make a tasty Key West chicken dish. We covered ingredients, marinade steps, and grilling tips. Remember to adjust the marinade to your taste and let the chicken rest. If you want to switch proteins or cooking methods, plenty of options exist. Store any leftovers properly, so they stay fresh. This recipe is simple and delicious, perfect for any meal. Now, get cooking and enjoy your flavorful dish!

Grilled Key West Chicken with Citrus Marinade Delight

Are you ready to fire up your grill and impress your friends? My Grilled Key West Chicken with Citrus Marinade

- 1 ½ cups graham cracker crumbs - ½ cup unsalted butter, melted - 2 cups cream cheese, softened - 1 cup granulated sugar - 3 large eggs - 1 cup sour cream - ½ cup passion fruit pulp (from fresh passion fruits or canned) - 1 tablespoon vanilla extract - 1 tablespoon lemon juice - Fresh passion fruits, for garnish The ingredients for passion fruit cheesecake are simple yet essential. First, we use graham cracker crumbs for the crust. Mixing them with melted butter gives a rich flavor. The cream cheese makes the cheesecake creamy and smooth. Granulated sugar adds sweetness, while eggs help it set. Sour cream enhances the texture and adds a slight tang. Passion fruit pulp is the star here. It brings a tropical taste and bright color. Vanilla extract adds warmth, and lemon juice balances the sweetness. Finally, fresh passion fruits make a lovely garnish, adding beauty and flavor. - Alternative crust options: You can use crushed cookies like Oreos or digestive biscuits. They work well for a sweet crust. - Dairy-free cream cheese alternatives: Look for vegan cream cheese made from nuts or soy. This keeps the dessert creamy without dairy. - Sweetener substitutions: If you prefer, you can use honey or maple syrup instead of sugar. Just adjust the amount since they are sweeter. These substitutions let you enjoy cheesecake while meeting your dietary needs. Try them out for a delicious twist! For the full recipe, check the details provided. 1. First, preheat the oven to 325°F (160°C). Grease a 9-inch springform pan with cooking spray or butter. This step helps the cheesecake come out easily. 2. In a bowl, mix 1 ½ cups of graham cracker crumbs with ½ cup of melted butter. Stir until the crumbs look like wet sand. 3. Press this mixture firmly into the bottom of the springform pan. Make sure it is even and compact. 4. Bake the crust in the oven for about 10 minutes. After that, let it cool while you make the filling. 1. In a large mixing bowl, add 2 cups of softened cream cheese. Beat it with an electric mixer until it is smooth and creamy. This makes the base of your cheesecake. 2. Gradually mix in 1 cup of granulated sugar. Keep mixing until it is fully blended. 3. Add 3 large eggs, one at a time. Mix well after each egg. This helps the mixture stay fluffy. 4. Now, add 1 cup of sour cream, ½ cup of passion fruit pulp, 1 tablespoon of vanilla extract, and 1 tablespoon of lemon juice. Mix until everything is smooth and creamy. 1. Pour the cheesecake filling over the cooled crust. Use a spatula to smooth the top. 2. Bake the cheesecake for 50-60 minutes. The edges should be set, but the center can still be a bit wobbly. 3. Turn off the oven and crack the door open slightly. Let the cheesecake cool in the oven for about 1 hour. This helps prevent cracking. 4. After cooling, refrigerate the cheesecake for at least 4 hours or overnight. This step makes it firm and easy to slice. - Overmixing the filling: When you mix too much, air bubbles form. This can cause cracks while baking. To avoid this, mix until just combined. - Not cooling the cheesecake properly: If you skip cooling, your cheesecake can crack or have a wet texture. Always cool it slowly in the oven after baking. - Ideal mixing methods: Use a hand mixer on low speed. This helps keep the mixture smooth without adding air. Start with the cream cheese first to avoid lumps. - Temperature considerations for ingredients: Make sure all ingredients are at room temperature. This helps them blend smoothly. Use softened cream cheese for the best texture. - Presentation ideas for garnishing: For a stunning look, top each slice with a spoonful of fresh passion fruit pulp. You can also add halved fresh passion fruits on top. This adds color and flavor. - Recommended pairings with drinks or toppings: Pair your cheesecake with a light dessert wine or a refreshing iced tea. A dollop of whipped cream or a scoop of vanilla ice cream works well too. For more information, check the Full Recipe to guide you through every step. {{image_2}} You can change the flavor of your passion fruit cheesecake in fun ways. Adding chocolate makes it rich and sweet. You can use dark chocolate or white chocolate. Other fruits also work well, like mango or berries. Just mix in the puree with the passion fruit pulp. You can also change the sweetness. If you like it less sweet, cut back on the sugar. For a sweeter taste, add a bit more honey or agave syrup. If you need a gluten-free version, use gluten-free graham cracker crumbs for the crust. These crumbs work just like regular ones. If you want a vegan cheesecake, replace cream cheese with a dairy-free cream cheese alternative. You can also swap eggs with flax seeds or silken tofu. These swaps will keep the texture creamy and delicious. You can dress up your cheesecake with seasonal fruits. In summer, try fresh berries or peaches as a topping. In fall, add caramelized apples or pears. For the holidays, consider using spiced fruits like cranberry or orange zest. These adaptations will make your cheesecake fit any season perfectly. For the full recipe, check the link provided. To keep your cheesecake fresh, store it in the fridge. Use an airtight container to avoid moisture loss. You can also cover it tightly with plastic wrap. This helps keep it from absorbing other odors. If you want to save it for longer, freezing is a good option. Wrap the cheesecake in plastic wrap and then in aluminum foil. This keeps it safe from freezer burn. You can freeze it for up to three months. In the fridge, your passion fruit cheesecake lasts about five to seven days. Make sure it stays covered to maintain freshness. Look for signs of spoilage, such as a sour smell or mold. If the texture becomes grainy or watery, it’s best to toss it. You usually serve cheesecake cold. If you want it warm, gently reheat it in the oven. Set the temperature to 200°F (93°C) and heat for about 10 minutes. This helps maintain its creamy texture. If you prefer it chilled, enjoy it straight from the fridge. You can drizzle more passion fruit pulp on each slice for added flavor. For the best experience, always slice with a hot knife for clean cuts. This makes your cheesecake look beautiful. You can find the Full Recipe for more details on making this delightful dessert. If you can't find passion fruit pulp, try using mango puree or guava puree. Both bring a fruity taste and sweetness. You can also mix orange juice with a little lemon juice for a tangy twist. Yes, you can use a regular pie pan. Just keep in mind that you won’t be able to remove the sides easily. You may need to slice it directly from the pan. The cheesecake is done when the edges are set and the center jiggles slightly. It will firm up as it cools. Yes, you can use silken tofu to replace eggs. Blend it until smooth and add it to the filling. This keeps the texture rich and creamy. Absolutely! Berries, kiwi, and mango work great. They add color and flavor. Just make sure to arrange them nicely on top. Chill the cheesecake for at least four hours, or overnight for the best texture. This helps it set and enhances the flavors. For the complete recipe, check the Full Recipe section. You now know how to make a delicious cheesecake with passion fruit. We covered the ingredients, step-by-step instructions, and helpful tips. Remember to avoid common mistakes and try different variations to suit your taste. Store your cheesecake properly for the best flavor and texture. Trust your cooking skills and enjoy making this treat! Share your creations with friends and family. Happy baking!

Passion Fruit Cheesecake Delightful and Easy Recipe

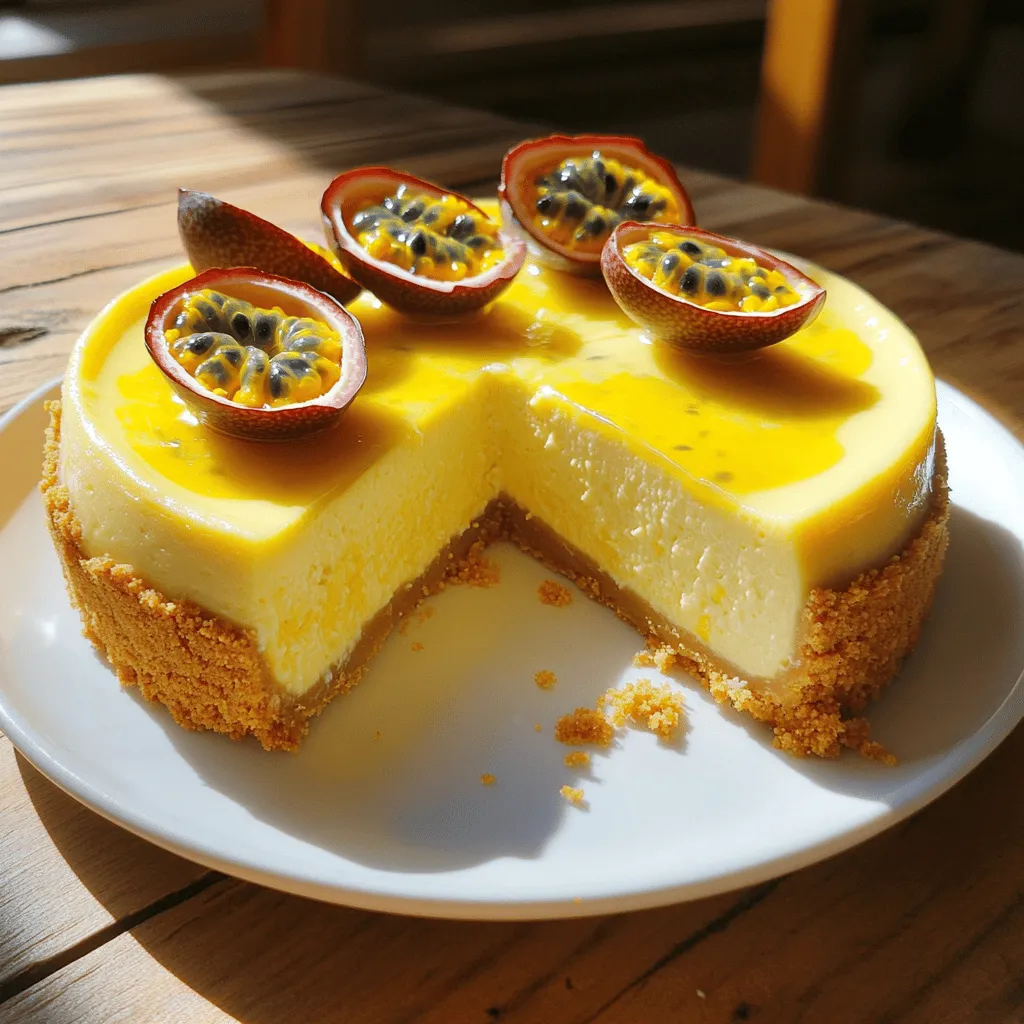
Are you ready to impress your friends with a scrumptious dessert? This Passion Fruit Cheesecake is not just easy to

To create these delicious donuts with strawberries, you need a few simple items. Gather these ingredients to get started on your tasty treat: - 2 cups all-purpose flour - 1 cup granulated sugar - 1 tablespoon baking powder - ½ teaspoon salt - 2 large eggs - ½ cup whole milk - ¼ cup unsalted butter, melted - 1 teaspoon vanilla extract - 1 cup fresh strawberries, pureed - ½ cup powdered sugar (for glaze) - Extra sliced strawberries for garnish These ingredients work together to create soft, fluffy donuts with a sweet strawberry flavor. The fresh strawberries add a burst of color and taste. You can find these items at your local grocery store. Feel free to get creative with your strawberries! Using fresh ones makes a big difference. You can also find great tips in the Full Recipe to help you along the way. 1. Preheat your oven to 350°F (175°C). This step warms the oven for even baking. 2. Grease your donut pan with non-stick spray. This helps the donuts come out easily. 3. In a large bowl, mix the dry ingredients: - 2 cups all-purpose flour - 1 cup granulated sugar - 1 tablespoon baking powder - ½ teaspoon salt Stir until all the ingredients blend well. 4. In another bowl, whisk together the wet ingredients: - 2 large eggs - ½ cup whole milk - ¼ cup unsalted butter, melted - 1 teaspoon vanilla extract - 1 cup fresh strawberries, pureed Mix until smooth. 5. Pour the wet mix into the dry mix. Stir gently until just combined. It's okay if there are a few lumps. 6. Fill each donut mold about ¾ full with the batter. You can use a piping bag or a zip-top bag with a cut corner for this. 7. Bake your donuts for 12-15 minutes. Check with a toothpick; it should come out clean. 1. Let the donuts cool in the pan for about 5 minutes. This makes them easier to handle. 2. Move them to a wire rack to cool completely. 3. For the glaze, whisk together: - ½ cup powdered sugar Add a little water to reach a smooth consistency. 4. Dunk each cooled donut into the glaze. Let the excess glaze drip off. 5. While the glaze is still wet, decorate with extra sliced strawberries for a fresh touch. 6. Allow the glaze to set for a few minutes before you enjoy them. For the full recipe, you can refer to the previous section. Enjoy making these delightful treats! Avoiding overmixing Mix the wet and dry ingredients just until they come together. You want some lumps to stay. Overmixing makes the donuts tough. This is key for soft, fluffy donuts. Ensuring even baking Fill each donut mold about ¾ full. This helps them rise evenly. If they are too full, they may overflow. Keep an eye on the baking time. Toothpicks are great for checking doneness. Adding more strawberry puree You can add extra strawberry puree for a stronger flavor. It makes the donuts more fruity and fun. Use fresh strawberries for the best taste. Blend them until smooth for a great addition. Experimenting with different glazes Try different glazes for unique flavors. You can mix in lemon juice or vanilla to the glaze. This adds a nice twist. A chocolate glaze also pairs well with strawberry donuts. Don't be afraid to get creative! For the full recipe, check out the complete instructions above! {{image_2}} Chocolate Strawberry Donuts You can turn your strawberry donuts into a chocolate delight. Just add cocoa powder to the batter. I suggest using ¼ cup of cocoa powder to keep the balance. The rich chocolate flavor pairs well with the sweet strawberries. You can also drizzle melted chocolate on top for extra flavor. Strawberry Lemon Donuts For a bright twist, try strawberry lemon donuts. Add zest from one lemon to your batter. This adds a fresh kick that brightens the sweet strawberries. You can also make a lemon glaze by mixing powdered sugar with fresh lemon juice. This makes the donuts taste refreshing and light. Gluten-Free Options If you need gluten-free donuts, swap all-purpose flour for a gluten-free blend. Many blends work well for baking. Make sure it has xanthan gum, which helps with texture. This change keeps your donuts soft and yummy while being gluten-free. Vegan Adaptations To make these donuts vegan, use plant-based milk instead of whole milk. You can replace eggs with flaxseed meal. Just mix 1 tablespoon of flaxseed meal with 2.5 tablespoons of water and let it sit for a few minutes. This mixture mimics the binding power of eggs. Use vegan butter in place of regular butter for a dairy-free treat. For the full recipe, check out the Strawberry Bliss Donuts section above! To keep your donuts fresh, store them at room temperature in an airtight container. This method works well for short-term storage. Donuts taste best when eaten fresh, but they can last for about two days this way. If you want to keep your donuts for a longer time, refrigerate them. Wrap each donut in plastic wrap and place them in a sealed container. This helps retain moisture and flavor. Refrigerated donuts can stay fresh for up to a week. Freezing donuts is a great way to save them for later. Here’s how to do it correctly: - Allow the donuts to cool completely after baking. - Wrap each donut tightly in plastic wrap. - Place the wrapped donuts in a freezer-safe bag or container. To thaw, take the donuts out of the freezer and leave them at room temperature for about 1-2 hours. You can also warm them in the oven at a low temperature for a few minutes. This way, they taste fresh and delicious, just like when you first made them. For the full recipe, check out the Strawberry Bliss Donuts. Can I use frozen strawberries? Yes, you can use frozen strawberries. Just thaw them first. Drain any excess water. This keeps the batter from getting too wet. Puree the strawberries as you would with fresh ones. How can I make these donuts healthier? To make these donuts healthier, swap out some ingredients. Use whole wheat flour instead of all-purpose flour. You can also reduce the sugar by using natural sweeteners like honey or maple syrup. Consider using Greek yogurt in place of butter for a lighter touch. What’s the best way to garnish the donuts? The best way to garnish the donuts is to use fresh sliced strawberries. They add color and flavor. You can sprinkle some chopped nuts for crunch. A drizzle of dark chocolate can also add a nice touch. Why did my donuts sink? Donuts may sink if the batter is too heavy or overmixed. Ensure you mix until just combined. Also, check your oven temperature. An oven that is too cool can lead to sinking donuts. How can I make the glaze thicker? To make the glaze thicker, add more powdered sugar. Start with a small amount and mix well. If you want to keep it smooth, avoid adding too much liquid. Where to buy fresh strawberries? You can buy fresh strawberries at local farmers' markets. Grocery stores also have them in the produce section. Look for bright red berries that are firm and fragrant. Recommended cafes for donut lovers For donut lovers, visit local cafes known for their unique flavors. Try places that use fresh ingredients and seasonal fruits. Ask friends or check online reviews to find the best spots in your area. This blog covered how to make delicious strawberry donuts. I shared the key ingredients, easy steps, and tips for perfecting your recipe. You can also try new flavors and dietary options. Remember, storing them correctly keeps your donuts fresh longer. Don’t hesitate to experiment and make this recipe your own. Enjoy making these treats, and share them with friends! They’ll love the taste and effort you put into baking.

Delicious Donuts with Strawberries Easy Homemade Treat

Are you ready to whip up a sweet treat? My Delicious Donuts with Strawberries recipe brings joy to your kitchen.

To make Peach Bruschetta with Whipped Ricotta, gather these items: - 1 baguette, sliced into 1/2-inch thick pieces - 3 ripe peaches, diced - 1 cup ricotta cheese - 1 tablespoon honey - 1 tablespoon lemon juice - 2 tablespoons fresh basil, finely chopped - Salt and pepper to taste - Balsamic glaze for drizzling When choosing peaches, look for ones that are firm but slightly soft. The color should be rich and vibrant. Check for a sweet scent, which means they are ripe. Avoid peaches with bruises or blemishes. If they are not ripe, leave them at room temperature for a few days. Once ripe, store them in the fridge to keep them fresh. If you need a substitute for ricotta cheese, try cottage cheese or cream cheese. Both options work well and add creaminess. For a lighter choice, use Greek yogurt. Each substitute changes the flavor slightly but still tastes great. You can mix in a bit of honey or lemon juice to enhance the taste. To start, gather your ingredients for the ricotta mix. In a medium bowl, add 1 cup of ricotta cheese, 1 tablespoon of honey, and 1 tablespoon of lemon juice. Use a whisk or a fork to mix them together. You want this to be smooth and creamy. Taste it and add a pinch of salt and pepper. This will bring out the flavors. Set the bowl aside for now. Next, let’s toast the baguette. Preheat your oven to 400°F (200°C). Take your baguette and slice it into pieces about 1/2-inch thick. Lay the slices on a baking sheet. Brush each slice lightly with olive oil. This adds flavor and helps them crisp up. Place the baking sheet in the oven for about 5 to 7 minutes. Keep an eye on them until they turn golden brown and crispy. Now, it’s time to mix the peaches. Take 3 ripe peaches and dice them into small pieces. In a separate bowl, toss the diced peaches with 2 tablespoons of finely chopped fresh basil. Add a pinch of salt and a bit of pepper to taste. This mix will add a fresh burst of flavor. Now you are ready to put everything together. For the full recipe, check out the instructions above. First, you need to spread the ricotta. Take the smooth, whipped ricotta mixture from your bowl. Use a butter knife or a small spatula. Grab a toasted baguette slice and cover it with a generous layer of ricotta. Make sure to reach the edges. This creamy base helps hold the peaches. Next, it's time for the peach mixture. Take your diced peaches and basil blend. Spoon this mixture onto the ricotta-covered baguette. Spread it evenly over the ricotta. The sweet peaches and fresh basil create a delightful flavor. Each bite should burst with freshness. Finally, add the balsamic glaze. Grab your bottle and drizzle it over the top of each bruschetta. This adds a sweet and tangy touch. It balances the creaminess of the ricotta and the sweetness of the peaches. Now, your peach bruschetta with whipped ricotta is ready! Enjoy it fresh for the best taste. For the full recipe, check out the instructions above. {{image_2}} To get the best toast, use fresh baguette slices. Brush each slice with olive oil. Make sure to preheat your oven to 400°F (200°C). Place the slices on a baking sheet. Bake for about 5 to 7 minutes. You want them golden brown and crispy. Keep an eye on them to avoid burning. Perfectly toasted bread gives a great base for the toppings. Seasoning is key for great flavor. Use a pinch of salt and pepper in the ricotta. This brings out the creaminess of the cheese. For the peach mixture, add salt and pepper too. This helps balance the sweetness of the peaches. You can also add fresh herbs like basil. These herbs enhance the taste and freshness of your dish. Make your bruschetta look as good as it tastes. Use a nice platter to arrange the pieces. Drizzle balsamic glaze over the top for a shiny finish. You can also sprinkle some extra basil leaves for color. The contrast of colors makes the dish more appealing. A well-presented plate makes the meal feel special. For the full recipe, check out the detailed steps above. You can swap peaches for other fruits. Try ripe nectarines or juicy plums. Both fruits add a sweet touch. In fall, apples work well. They bring a nice crunch. Use pears for a gentle flavor. Each fruit will change the taste, making it unique. For a heartier option, add proteins or nuts. Chopped prosciutto gives a savory kick. Crumbled bacon adds a smoky flavor. You can also sprinkle toasted almonds or walnuts for crunch. These add texture and richness to each bite. Just remember to keep the flavor balance in mind. Ricotta is creamy and mild, but you can explore other cheeses. Goat cheese offers a tangy twist. Cream cheese can give a rich texture, too. For a sharper flavor, use feta. Each cheese brings its own charm. Mix and match based on your taste preferences. For the full recipe, check out Peach Bliss Bruschetta. It's a delightful treat you’ll love! Store any leftover peach bruschetta in an airtight container. Place it in the fridge. The bread will get soft over time, but the flavors will still be great. You can eat it cold, but I prefer to reheat it. To reheat, place the bruschetta in a 350°F oven for a few minutes. This will help revive the crispiness. Yes, you can prepare the whipped ricotta and mix the peaches ahead of time. Store them separately in the fridge. I recommend toasting the baguette just before serving. This keeps it crispy and fresh. You can assemble the bruschetta right before your guests arrive. It will taste best that way. What can I use instead of peaches? You can use other fruits like nectarines or strawberries. They add a nice twist. How long does the whipped ricotta last? The whipped ricotta lasts about three days in the fridge. Just make sure it stays covered. Can I use store-bought ricotta? Yes, store-bought ricotta works well. Just whip it up with honey and lemon juice for flavor. Is this recipe good for parties? Definitely! It’s simple to make and looks great on a platter. Guests will love it. For the full recipe, reference the Peach Bliss Bruschetta. This blog post highlights how to make delicious peach bruschetta using fresh peaches and ricotta cheese. You learned about selecting the best peaches and how to prepare the ricotta. We covered step-by-step directions for toasting the baguette and mixing the peach filling. In my final thoughts, remember to balance flavors and try different toppings. Enjoy experimenting with seasonal fruits or various cheeses. Store any leftovers properly to keep them fresh. Enjoy your peach bruschetta and impress your friends and family!

Peach Bruschetta with Whipped Ricotta Delightful Treat

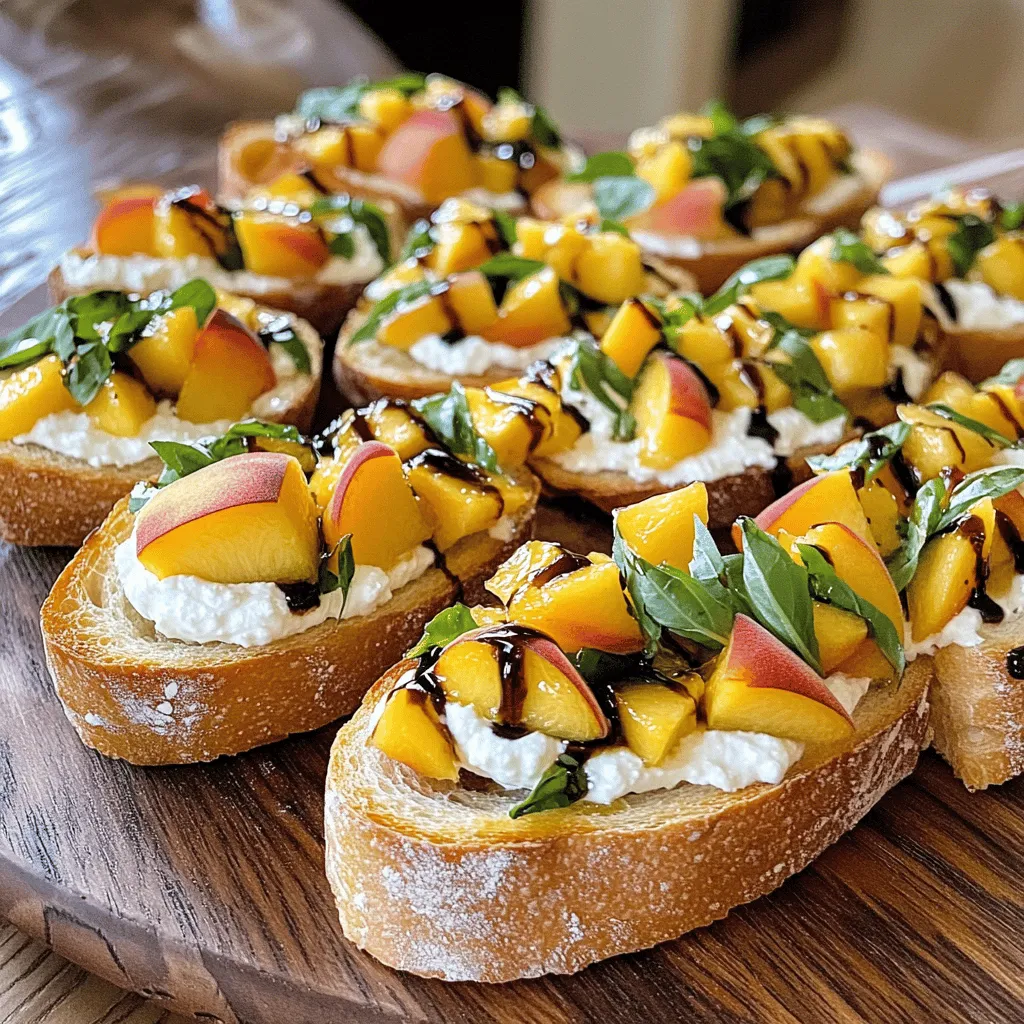
If you’re looking for a fresh and tasty treat, peach bruschetta with whipped ricotta is it! This dish combines sweet,

- 4 medium carrots (julienned) - 1 bell pepper (red or yellow, thinly sliced) - 1 small cucumber (julienned) - 3 green onions (chopped) - 2 tablespoons sesame oil - 1 tablespoon soy sauce - 1 tablespoon rice vinegar - 1 teaspoon sugar - 1 teaspoon garlic (minced) - 1 teaspoon ginger (grated) - Salt to taste - 1 tablespoon sesame seeds - 1 tablespoon chili flakes (for added spice) Korean carrot salad is fresh and bright. The main stars are the vegetables. You will use four medium carrots, a bell pepper, a cucumber, and green onions. Julienne the carrots and cucumber for a nice crunch. Thinly slice the bell pepper. Chop the green onions for a burst of flavor. The dressing is simple yet tasty. You need sesame oil, soy sauce, rice vinegar, sugar, garlic, ginger, and salt. Whisk these together in a bowl. This dressing brings everything to life. For an extra touch, you can add sesame seeds and chili flakes. The seeds give a nutty taste. The chili adds a little heat if you like spice. This salad is not just easy to make; it is also very colorful. The bright colors make it a feast for your eyes. For the full recipe, check out the Korean Crunchy Carrot Salad 🥕🥗. Enjoy making this delightful dish! - First, wash and peel the carrots. This step is key for a clean flavor. - Next, julienne the carrots into thin strips. Use a sharp knife or mandoline for best results. - Now, slice the bell pepper and cucumber into thin, uniform pieces. This makes every bite a joy. - In a large bowl, combine the carrots, bell pepper, cucumber, and green onions. Mix the colors for a vibrant look. - In a small bowl, whisk together the dressing ingredients. This includes sesame oil, soy sauce, rice vinegar, sugar, minced garlic, and grated ginger. For heat, add chili flakes. - Pour the dressing over the mixed vegetables. Toss gently to coat each piece well. - Let the salad sit for 15-20 minutes before serving. This allows the flavors to blend. Enjoy the refreshing crunch of your Korean carrot salad! For a complete view of the recipe, check the Full Recipe section. To get the best flavor in your Korean carrot salad, let it marinate. When you let the salad sit, the flavors mix well. I suggest at least 15-20 minutes. This time allows the carrots to soak up the dressing and taste better. Also, adjust the seasoning to fit your taste. If you like it saltier, add a bit more soy sauce. If you want a hint of sweetness, add a touch more sugar. Serving your salad well makes it more inviting. You can use a large bowl or individual plates. This lets everyone enjoy their own portion. For a finishing touch, sprinkle extra sesame seeds on top. You can also add some thin slices of cucumber or bell pepper around the edge. This adds color and makes the dish pop. Having the right tools makes cooking easier. For this salad, you need a sharp knife or a mandoline for julienning the carrots and cucumber. A large mixing bowl is key for combining all the ingredients. You’ll also want a small bowl for whisking the dressing. For serving, use tongs or a large spoon to help dish out the salad. These tools will help you prepare and serve with ease. {{image_2}} You can make Korean carrot salad more filling by adding protein. Options include cooked chicken, tofu, or shrimp. These ingredients add texture and flavor. For chicken, use grilled or rotisserie for ease. Tofu should be firm and sautéed for a nice texture. Shrimp should be cooked until pink and juicy. Choose what you like best! If you love heat, you can spice up the salad. Increase the chili flakes for a stronger kick. This will make the salad exciting. You can also add sliced jalapeños or other peppers. This gives the salad a fresh burst of flavor. Adjust the spice level to match your taste. Feel free to swap out some veggies! You can use radishes or cabbage instead of carrots. This will change the texture and taste. Using different vegetables keeps the salad fresh. If you want a different oil flavor, try olive oil in place of sesame oil. This will give a new twist to the dish. Store your leftover Korean carrot salad in an airtight container. This keeps it fresh and tasty. You can enjoy it for up to three days in the fridge. After that, the veggies may lose their crunch. Can you freeze Korean carrot salad? Yes, but it’s not ideal. Freezing changes the texture of the carrots. If you choose to freeze it, place the salad in a freezer-safe container. When you’re ready to eat, thaw it in the fridge overnight. This helps keep flavors intact. How long does the salad last in the fridge? The salad can last up to three days in the fridge. If you see any signs of spoilage, like a weird smell or mushiness, toss it out. Always trust your senses when it comes to food safety. Korean Carrot Salad stands out due to its unique flavor blend. The key ingredients include fresh carrots, bell pepper, and cucumber. These veggies give it a bright crunch. The dressing combines sesame oil, soy sauce, and rice vinegar, which adds depth. Garlic and ginger bring warmth, while sesame seeds add a nutty finish. The balance of sweet, salty, and tangy makes it special. Unlike other salads, it has a delightful crunch and vibrant taste that excites your palate. Yes, you can make Korean Carrot Salad ahead of time. It tastes even better after the flavors meld together. I recommend preparing it about 30 minutes before serving. This allows the veggies to soak up the dressing. Just make sure to store it in the fridge. If you prepare it too far ahead, the carrots may lose their crunch. You can also keep the dressing separate until you're ready to serve. Korean Carrot Salad pairs well with many dishes. It complements grilled meats like chicken or beef. You can serve it alongside rice or noodles for a full meal. It also works great as a side dish for Korean BBQ. The salad's fresh crunch balances rich flavors. For a light lunch, enjoy it with a simple soup. The options are endless, making it a versatile choice for any meal. For complete instructions, refer to the Full Recipe "Korean Crunchy Carrot Salad 🥕🥗". To make Korean Carrot Salad, gather fresh produce like carrots, bell pepper, and cucumber. Create a flavorful dressing using sesame oil, soy sauce, and garlic. Follow simple steps: prepare vegetables, mix them, and let them sit. Adding protein or extra spice can enhance the dish. Store leftovers correctly for the best taste. This refreshing salad is easy and versatile, perfect for any meal. Enjoy experimenting with flavors and sharing with friends!

Korean Carrot Salad Crunchy and Refreshing Delight

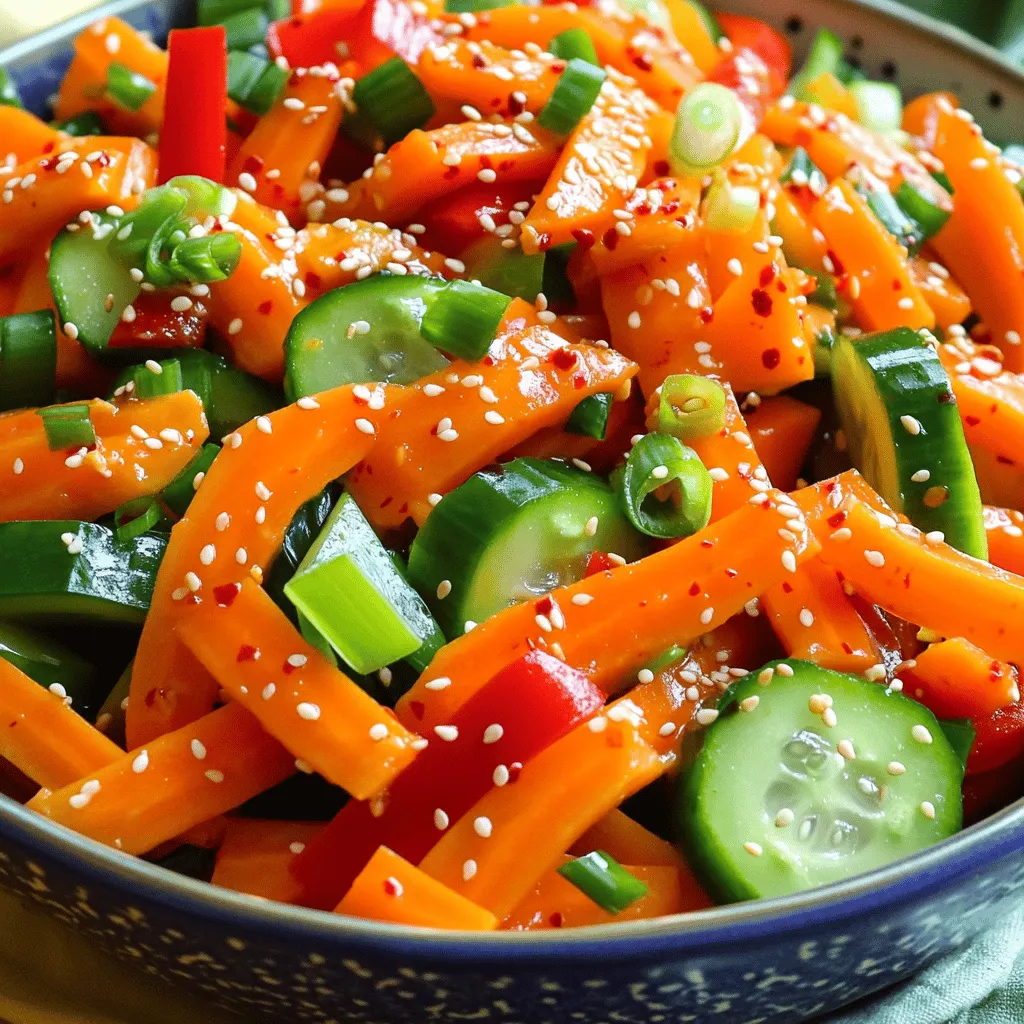
If you’re looking for a fresh and crunchy dish, Korean Carrot Salad is a perfect choice! This vibrant salad is

- Rice paper wrappers - Cooked shrimp (or tofu) - Vermicelli noodles - Fresh herbs (mint and basil) These main filling ingredients create a fresh and vibrant base for your summer salad rolls. Rice paper wrappers are light and make a perfect outer layer. They soak up the flavors around them. If you prefer a vegetarian option, use tofu instead of shrimp. The vermicelli noodles add a nice texture. Fresh herbs like mint and basil elevate the taste. They add bright notes that pair well with the sauce. - Shredded carrots - Cucumber (julienned) - Red bell pepper (julienned) - Avocado (sliced) The vegetables add crunch and color to your rolls. Shredded carrots bring sweetness and a lovely orange hue. Cucumbers, when julienned, provide a refreshing bite. Red bell peppers add a vibrant crunch. Lastly, avocado brings creaminess to each bite. Together, they make your salad rolls not only look good but taste good. - Creamy peanut butter - Soy sauce - Lime juice - Honey or maple syrup - Grated ginger - Water to thin sauce The Thai peanut sauce is the star of this dish. Creamy peanut butter gives it richness. Soy sauce adds a savory depth. Lime juice brightens the flavors, while honey or maple syrup adds sweetness. Grated ginger gives it a bit of spice. If the sauce is too thick, just add water to thin it. This sauce ties all the flavors together. For the full recipe, you can follow the outlined steps in detail. Start by washing all your fresh vegetables and herbs. I like to use a clean cutting board for this. Set them aside on your work surface. Next, cook the vermicelli noodles according to the package. Drain them well when they're done. This step is key for a good texture in your rolls. In a medium bowl, combine the creamy peanut butter, soy sauce, lime juice, honey or maple syrup, and grated ginger. Stir well until the mixture is smooth. If your sauce feels thick, add water a little at a time. Keep mixing until you reach the right consistency. This sauce adds a rich flavor that brings everything together. Fill a large shallow dish with warm water. Dip one rice paper wrapper into the water for about 10-15 seconds. You want it to soften but not break. Carefully lay the wrapper flat on a clean surface. In the center, layer a small amount of vermicelli noodles, 2-3 shrimp halves or tofu, fresh mint, basil, carrots, cucumber, red bell pepper, and a slice of avocado. Now, fold the sides of the rice paper over the filling. Roll it from the bottom up to enclose everything. Make sure to tuck in the ends as you roll. Repeat this process with the rest of your ingredients. Arrange the salad rolls on a platter. Serve these rolls with your Thai peanut sauce for dipping and sprinkle sesame seeds on top for a nice finish. Enjoy your fresh and tasty summer salad rolls! For full details, check the Full Recipe. To wrap your salad rolls well, start with a soft rice paper. Soak each wrapper in warm water for 10-15 seconds. Place it on a flat surface. Add a small amount of filling in the center. Fold the sides over the filling, then roll tightly from the bottom. Common mistakes include overfilling or rolling too loosely. Overfilling can cause the wrapper to tear. A loose roll will let the filling escape. Keep the filling small and tight for the best roll. If you want vegetarian options, use tofu instead of shrimp. Tofu absorbs flavors well and adds protein. You can also try tempeh for a different texture. For other protein choices, shrimp works great. You can also use chicken or crab for a twist. Each protein adds its unique flavor and texture. To boost flavor, add fresh herbs like cilantro or Thai basil. A sprinkle of lime zest can brighten the rolls. You can also add a pinch of chili flakes for heat. For serving, try pairing the rolls with a tangy dipping sauce like sweet chili sauce. It adds a nice contrast to the creamy peanut sauce. Arrange the rolls on a platter for a beautiful presentation. For the full recipe, check out the [Full Recipe]. {{image_2}} You can change up the filling in your summer salad rolls easily. Try different proteins like crab, chicken, or even tempeh for a vegetarian twist. Each adds a unique taste and texture. When it comes to veggies, go for seasonal choices. Bell peppers and carrots are great, but don’t miss out on snap peas or zucchini. These options add crunch and freshness. You can also use colorful produce to make your rolls pop. To spice up the peanut sauce, add chili paste or sriracha. This gives it a kick that many enjoy. If you want a tropical taste, toss in some mango puree or diced pineapple. The sweet fruit balances the rich peanut flavor and adds a fun twist. Consider mixing in lime zest for a bright taste. It brings out the freshness of the herbs and veggies. If you want to try something different, consider hoisin sauce or sweet chili sauce. Both offer a great alternative to peanut sauce. They each have a sweet and savory flavor that pairs well with the rolls. For a nut-free option, use tahini or a simple soy sauce blend. You can mix soy sauce with rice vinegar and sesame oil for a tasty dip. This way, everyone can enjoy your summer salad rolls! For the full recipe, check out the Full Recipe section. To keep your salad rolls fresh, store them in an airtight container. Place a damp paper towel in the container to help maintain moisture. This keeps the rice paper from drying out. You can enjoy leftover salad rolls for up to two days in the fridge. If they start to feel tough, they may lose their appeal. For the Thai peanut sauce, transfer any unused sauce to a clean jar. Seal it tightly and place it in the fridge. The sauce will stay fresh for about one week. If you want to use it later, you can reheat it on low heat in a small pot. Add a little water to thin it if it gets too thick while warming. Yes, you can freeze salad rolls! However, it's best to freeze them without the sauce. Wrap each roll tightly in plastic wrap and place them in a freezer bag. They can last for up to three months in the freezer. When you're ready to eat, thaw them in the fridge overnight. Enjoy them fresh, or use them in a fun dish! To make rice paper wrappers less sticky, soak them in warm water. Use a shallow dish like a pie plate. Dip each wrapper for 10-15 seconds. This softens them for easy rolling. If they stick, try using less water or a non-stick surface. A damp towel can help too. Yes, you can prepare salad rolls in advance. However, they are best when fresh. If you make them early, store them in an airtight container. Place parchment paper between the rolls to stop sticking. Keep them in the fridge. They can last for up to one day. Serve Summer Salad Rolls chilled. Arrange them on a platter for a nice look. Drizzle the Thai peanut sauce on top or serve it on the side. Adding sesame seeds gives a nice touch. You can also garnish with extra herbs for flavor and color. Yes, you can use a different sauce if you want. Try hoisin sauce, soy sauce, or a spicy sriracha mix. You can also make a sweet chili sauce for a different twist. The key is to choose a sauce that complements the fresh ingredients in the rolls. For the full recipe, check the earlier section. In this blog, we explored how to make fresh salad rolls. We covered key ingredients like rice paper, shrimp, veggies, and a creamy peanut sauce. You learned to prepare, assemble, and store your rolls for best taste. Don't forget the tips for rolling and flavor twists to keep it fun! Experiment with different fillings and sauces to suit your taste. Enjoy making these delicious rolls that are easy to share and always a hit!

Summer Salad Rolls with Thai Peanut Sauce Delight

Dive into the fresh and vibrant world of summer salad rolls with Thai peanut sauce! These delightful wraps are perfect

To make a tasty Vanilla Panna Cotta, you need: - 2 cups heavy cream - 1 cup whole milk - 1/2 cup granulated sugar - 2 teaspoons pure vanilla extract - 2 1/2 teaspoons powdered gelatin - 3 tablespoons cold water For the berry compote, gather: - 1 cup mixed berries (strawberries, blueberries, raspberries) - 1 tablespoon honey - 1 teaspoon lemon juice - A pinch of salt If you want a lighter version, use coconut cream instead of heavy cream. This keeps the dish creamy and rich. For a healthier sweetener, try using maple syrup or a sugar substitute. Both options work well and can change the flavor nicely. You will need a few simple tools to make this dish: - Small mixing bowls - Measuring cups and spoons - A whisk or spoon for mixing - A saucepan for heating - Ramekins or dessert cups for serving - A small saucepan for the berry compote These tools make it easy to prepare and serve your Vanilla Panna Cotta with Berry Compote. You can find the Full Recipe online for more detailed steps and tips! To start with the panna cotta, we need to bloom the gelatin. - First, sprinkle the powdered gelatin over 3 tablespoons of cold water. - Let it sit for about 5 to 10 minutes. This helps the gelatin absorb the water. Next, we combine the cream and sweeteners. - In a medium saucepan, mix together 2 cups of heavy cream, 1 cup of whole milk, and 1/2 cup of granulated sugar. - Add 2 teaspoons of pure vanilla extract and a pinch of salt. - Heat this mixture over medium-low heat. Stir it gently, but do not let it boil. Once the mixture is warm, we add the bloomed gelatin. - Remove the saucepan from the heat and stir in the bloomed gelatin. - Keep mixing until the gelatin is fully dissolved. Now, we need to cool and refrigerate the panna cotta. - Allow the mixture to cool for about 10 minutes. - Pour it into small ramekins or dessert cups, filling them about three-quarters full. - Place them in the fridge for at least four hours, or until they set firm. While the panna cotta sets, let’s make the berry compote. - In a small saucepan, combine 1 cup of mixed berries, 1 tablespoon of honey, and 1 teaspoon of lemon juice. - Cook over medium heat for about 8 to 10 minutes. Stir gently until the berries soften and create a thick syrup. For the right syrup consistency, keep an eye on the cooking time. - If it gets too thick, you can add a splash of water to loosen it. - Allow the compote to cool before using it on the panna cotta. Now you have a delicious dessert ready to impress! For the complete recipe, check the Full Recipe link. To get the best texture, control the temperature of your cream mixture. Heat it gently until warm, but do not boil. This step is key. Once you mix in the gelatin, it should dissolve completely. For the panna cotta to set well, you need to refrigerate it for at least four hours. I suggest leaving it overnight for the best results. When serving, you want your panna cotta to look stunning. I like to garnish it with a mint leaf or a fresh berry. This adds color and freshness. You can also serve panna cotta with other desserts. It pairs well with cookies or chocolate treats. This way, you create a lovely dessert platter for your guests. One common mistake is overheating the cream mixture. If you bring it to a boil, the panna cotta may not set. Another mistake is not letting it refrigerate long enough. Without enough time, it won't firm up properly. Always make sure to follow the time guidelines for the best outcome. {{image_2}} You can change the flavor of panna cotta easily. Try using different extracts. Almond or coconut extracts add a nice twist. You can also mix in other flavors like coffee or citrus. Just add these flavors when you heat the cream. This way, they blend well. Feel free to switch up the berries in your compote. Use seasonal fruits like peaches, cherries, or figs. They can bring a new taste to your dish. Adding herbs or spices can also spice things up. Mint or basil can give your compote a fresh kick. A pinch of cinnamon adds warmth and depth. If you need a vegan option, use coconut milk instead of cream. Agar-agar is a great substitute for gelatin. For a sugar-free treat, try using stevia or monk fruit. These options keep the dish tasty without the sugar. Low-carb followers can skip the honey and use a low-carb sweetener. This keeps the dessert light and delicious. For the complete recipe, check out the Full Recipe for Vanilla Panna Cotta with Berry Compote. To keep your panna cotta fresh, cover it with plastic wrap or a lid. Place it in the fridge for safe storage. It should stay good for a few days. The berry compote can also go in the fridge. Store it in an airtight container. It should last about a week. You can freeze panna cotta, but it may change in texture. If you want to try it, place it in a freezer-safe container. When you’re ready to eat, let it thaw slowly in the fridge. This helps keep the creamy texture you love. In the fridge, panna cotta lasts about 4 to 5 days. If it starts to smell or look strange, toss it out. For the berry compote, check for mold or off smells. If you see or smell anything weird, it’s best to throw it away. You can serve panna cotta in many fun ways. First, think about your plates. A white plate makes the dessert pop. Next, add a garnish. A fresh mint leaf looks nice. You can also add an extra berry on top for color. Drizzle some berry compote over the panna cotta right before serving. This adds flavor and looks great. Yes, panna cotta is great to make ahead. You can prepare it a day in advance. Just keep it in the fridge. It stays fresh and tasty. This makes it easy for parties or special meals. To check if panna cotta is set, gently shake the ramekin. It should jiggle slightly but not be liquid. If it wobbles a bit, it's ready. You can also insert a toothpick into the panna cotta. If it comes out clean, it is set. You can find the Full Recipe for Vanilla Panna Cotta with Berry Compote [here](#). In this blog post, I shared how to make Vanilla Panna Cotta with Berry Compote. You learned about the needed ingredients and their substitutions. I outlined the step-by-step instructions for cooking and setting the panna cotta. I also included tips for texture, serving, and common mistakes. Lastly, I provided storage options to keep your dessert fresh. Remember, cooking is fun and rewarding. Enjoy creating this creamy dessert your way!

Delicious Vanilla Panna Cotta with Berry Compote Recipe

Are you ready to impress your friends with an easy and tasty dessert? This Delicious Vanilla Panna Cotta with Berry

- 1 large burrata cheese - 2 cups mixed heirloom cherry tomatoes, halved - 1 ripe avocado, diced - 1/4 cup fresh basil leaves, torn Burrata cheese is creamy and rich. It adds a luxurious touch to your salad. Heirloom cherry tomatoes bring a burst of color and sweetness. They pair well with the creamy cheese. Ripe avocado adds a smooth texture and healthy fats. Fresh basil leaves give your salad a fragrant, herbaceous kick. - 2 tablespoons extra-virgin olive oil - 1 tablespoon balsamic glaze - Salt and freshly ground black pepper, to taste - 1/4 cup toasted pine nuts (optional for added crunch) Extra-virgin olive oil enhances flavors. It gives the salad a smooth finish. Balsamic glaze adds sweetness and tang. Salt and black pepper season your salad perfectly. For a nice crunch, add toasted pine nuts. They bring a delightful texture and nutty flavor. - Caloric content: About 300 calories per serving - Macronutrient breakdown: - Protein: 10 grams - Carbohydrates: 15 grams - Fat: 25 grams This salad is not only tasty but also nutritious. The burrata provides protein and healthy fats. Tomatoes and avocado offer vitamins and minerals. Overall, it’s a well-balanced dish. For the full recipe, you can check below. To start, mix the halved cherry tomatoes and diced avocado in a large bowl. You want bright colors and fresh flavors. Next, add the torn fresh basil leaves. Gently toss them together, but be careful not to mash the avocado. The tomatoes and avocado should be well combined with the basil for a tasty base. Now it’s time to dress your salad. Drizzle extra-virgin olive oil and balsamic glaze over the mix. This adds rich flavor. Season with salt and freshly ground black pepper to taste. Stir carefully to combine all the ingredients, ensuring the avocado stays intact. This dressing brings the salad to life. Once dressed, transfer the salad mixture onto a serving platter. Create a small well in the center. This is where the burrata will go. Gently lift the burrata cheese and place it in that well. Use a knife to make a small cut on top. This lets the creamy insides spill out onto the salad, adding a luxurious touch. If you like, sprinkle toasted pine nuts around the burrata for extra crunch. Finally, finish with a light drizzle of olive oil over the burrata and a sprinkle of salt. This recipe makes a beautiful salad that looks and tastes amazing. You can find the full recipe in the link provided. - Selecting ripe avocados and tomatoes: Choose avocados that feel slightly soft when you squeeze them. Look for tomatoes that are bright and firm. Heirloom cherry tomatoes should have rich colors. They should smell sweet and fresh. - Storing fresh basil: Keep basil in a glass of water, like a bouquet. Cover it loosely with a bag. This keeps it fresh for longer. You can also store it in the fridge wrapped in a damp paper towel. - Ideal serving dish options: Use a wide, shallow bowl for the salad. This shows off the colors and shapes of the ingredients. A large platter works well too. - Pairing ideas with bread: Serve your salad with crusty bread or baguette slices. The bread complements the creamy burrata and adds crunch. - Suggestions for herbs and spices: Add fresh oregano or thyme for more flavor. A sprinkle of crushed red pepper can add a nice kick. - Options for additional crunch: Toasted pine nuts add a lovely crunch. You can also use chopped walnuts or sunflower seeds for variety. For the full recipe, check out the Burrata Bliss Salad. {{image_2}} You can change the cheese in your burrata salad. Try fresh mozzarella or burrini for a twist. Both add a creamy texture. If you want a stronger flavor, use feta or goat cheese instead. Each will give a unique taste. Seasonal vegetables can also enhance your salad. In summer, add sweet corn or bell peppers for crunch. In fall, roasted butternut squash or beets add warmth. These swaps make the salad fresh and exciting. Add citrus zest or juice to brighten your salad. A squeeze of lemon or lime gives a tangy kick. You can also use orange or grapefruit for a sweet twist. This small change makes the dish pop with flavor. Different vinegars can transform your salad, too. Use red wine or apple cider vinegar for a fruity note. For a bold flavor, try sherry or balsamic vinegar. Experimenting with vinegars adds depth and interest to your dish. To make the salad vegan-friendly, swap burrata for a nut-based cheese. Cashew cheese or tofu can mimic the creamy texture. This way, everyone can enjoy the salad, regardless of their diet. If you need gluten-free options, this salad is already a great choice. Just ensure any bread served on the side is gluten-free. This simple swap allows everyone to savor the flavors without worry. For the full recipe, check out the Burrata Bliss Salad. To keep your salad fresh, refrigerate leftovers right away. Place them in an airtight container. This helps keep flavors intact and prevents spoilage. Use glass or plastic containers with tight lids for best results. If you want to save parts of the salad for later, consider freezing some components. You can freeze diced avocado, but it may change texture. For tomatoes and basil, I suggest using them fresh. Reheat any components gently in a skillet if needed. Burrata cheese lasts about five days in the fridge. Always check for freshness before use. Heirloom tomatoes can stay fresh for about a week. Fresh basil should be used within three days for the best flavor. Store basil in a glass of water, like flowers, to keep it vibrant. Burrata cheese is a fresh Italian cheese. It has a soft outer shell made of mozzarella. Inside, it is filled with creamy stracciatella. Burrata comes from Apulia, a region in Southern Italy. This cheese has a rich, buttery taste. It pairs well with many dishes, making it popular worldwide. Yes, you can prepare parts of burrata salad in advance. Chop the tomatoes and avocado a few hours before serving. Keep them in the fridge to stay fresh. You can mix the olive oil, balsamic glaze, salt, and pepper in a jar. Just shake it before using. Add the burrata cheese just before serving to keep it creamy. Burrata salad pairs well with crusty bread. You can also serve it with a light white wine or sparkling water. For an extra touch, add olives or cured meats on the side. These add flavor and texture to your meal. Burrata salad is a healthy choice. It contains vitamins from tomatoes and avocados. The cheese offers protein and healthy fats. Olive oil adds heart-healthy monounsaturated fats. Just watch the portion size, as burrata is rich. Overall, it's a balanced dish that can fit into a healthy diet. Burrata salad is a simple recipe packed with flavor. You mix ripe tomatoes, avocado, and fresh basil. Drizzle with olive oil and balsamic glaze for taste. Optionally, add nuts or spices for extra crunch. Each ingredient brings its own benefits, and this dish highlights them. You can easily adapt it to fit your diet. Remember, fresh ingredients make the best salad. Enjoy creating your burrata salad today!

Burrata Salad Delight Fresh and Flavorful Recipe

Are you ready to elevate your meal with a burst of flavor? In this post, I’ll show you how to

Older posts
Newer posts
← Previous Page1 … Page4 Page5 Page6 … Page40 Next →

dsad

© 2025 flavorsprint • Built with GeneratePress

Our Policies

  • Copyright Policy
  • Cookie Policy
  • GDPR Policy
  • Privacy Policy
  • Disclaimer
  • Terms Of Use

More Information

  • Home
  • About
  • Contact
  • Appetizers
  • Dessert
  • Dinner
  • Drinks
©2025, flavorsprint About Back To Top