Skip to content
DisclaimerTerms Of UseGDPR PolicyCookie Policy

flavorsprint

  • Home
  • Drinks
  • Appetizers
  • Dinner
  • Dessert
  • About
  • Contact
  • Privacy Policy
DisclaimerTerms Of UseGDPR PolicyCookie Policy

Lillian

- 1 lb boneless chicken breast, cut into bite-sized pieces - 1 cup bell peppers (red, green, yellow), diced - 1 cup pineapple chunks (fresh or canned) - 1/4 cup soy sauce - 1/4 cup apple cider vinegar - 1/4 cup brown sugar - 1 tablespoon cornstarch - 1/4 cup water - 1/2 cup onion, chopped - 1 clove garlic, minced - Salt and pepper, to taste - Sesame seeds, for garnish - Fresh cilantro, for garnish In this recipe for sweet and sour chicken, you will find vibrant colors and flavors. The chicken is the star, but the veggies add crunch. Using fresh bell peppers and pineapple gives the dish a great taste. You can also use canned pineapple if fresh isn't available. The sauce is where the magic happens. Soy sauce brings saltiness, while apple cider vinegar adds tang. Brown sugar balances these flavors with sweetness. Cornstarch thickens the sauce, making it cling to the chicken and veggies. The water helps blend everything well. For seasoning, onion and garlic offer a strong base. Salt and pepper enhance the flavors. Garnishing with sesame seeds and fresh cilantro adds a lovely touch. You can check out the Full Recipe for detailed instructions. Enjoy cooking! Combine these ingredients in a medium bowl: - 1/4 cup soy sauce - 1/4 cup apple cider vinegar - 1/4 cup brown sugar - 1 tablespoon cornstarch - 1/4 cup water Whisk until smooth. This sauce brings the sweet and sour taste to life. Next, heat 2 tablespoons of vegetable oil in a large skillet over medium-high heat. Add 1/2 cup chopped onion and 1 clove minced garlic. Sauté for about 2 minutes. You want them to smell good and be soft. Add 1 pound of chicken pieces to the skillet. Season with salt and pepper. Cook for 5 to 7 minutes. Make sure the chicken is browned and cooked through. This step gives your dish a nice base. Now, stir in 1 cup of diced bell peppers and 1 cup of pineapple chunks. Cook for another 3 to 4 minutes. The peppers should get tender. Finally, pour the sauce over the chicken and veggies. Stir well to coat everything. Cook for 3 to 5 minutes until the sauce thickens and bubbles. This step makes your meal extra yummy. For the full recipe, refer to the Sweet and Sour Chicken Delight. Enjoy your cooking! To get golden-brown chicken, start with dry pieces. Pat the chicken with paper towels. This helps it sear well. Heat your oil until hot but not smoking. Add the chicken in a single layer. Don't crowd the pan. This way, it cooks evenly and gets crispy. Flip it only when the bottom is brown. This gives a nice crust. You can play with the sauce to fit your taste. If you want it sweeter, add more brown sugar. For more tang, use extra vinegar. You can also try using pineapple juice. This adds a nice fruity flavor. Just remember to taste as you go. Adjust the sauce until it feels perfect for you. Presentation makes a big difference. Serve the chicken over fluffy white rice or jasmine rice. This adds a nice base. Garnish with sesame seeds and fresh cilantro. This adds color and flavor. You can also add sliced green onions. It makes your dish look even better. Enjoy your beautiful meal! {{image_2}} You can switch chicken for shrimp or tofu. Shrimp cooks fast and adds a nice texture. Tofu absorbs flavors well and suits plant-based diets. Both options enhance the sweet and sour taste. Consider adding more veggies for color and nutrients. Broccoli brings crunch and a healthy boost. Snap peas add sweetness and freshness. You can mix in carrots or zucchini too. Just chop them small to cook evenly. You have choices when it comes to sauce. Homemade sauce lets you control flavors. You can adjust sweetness or tanginess easily. Store-bought options save time but may have added sugar. Try different brands for unique tastes. For a twist, add a bit of chili paste for heat. Check the [Full Recipe] for more ideas. To store leftover sweet and sour chicken, place it in an airtight container. This helps keep it fresh and prevents smells from mixing in your fridge. Let the chicken cool to room temperature first. Then, seal the container tightly and store it in the fridge. It can stay good for up to four days. If you want to freeze your sweet and sour chicken, use a freezer-safe container or heavy-duty freezer bag. First, let the dish cool completely. Then, portion it out to make reheating easier. When ready to eat, thaw it in the fridge overnight. To reheat, place it in a skillet over medium heat. Add a splash of water or broth to keep it moist. Stir it often until heated through. This way, you keep the texture nice and tender. Leftover sweet and sour chicken can last in the fridge for about four days. If you freeze it, it stays good for about three months. After that, the taste and texture may change. Always check for signs of spoilage before eating. If it looks or smells off, it's best to toss it. Enjoy your delicious leftovers safely! For the full recipe, check out the earlier sections. Sweet and sour chicken combines simple, tasty ingredients. The main items include: - 1 lb boneless chicken breast, cut into bite-sized pieces - 1 cup diced bell peppers (red, green, yellow) - 1 cup pineapple chunks (fresh or canned) - 1/2 cup chopped onion - 1 clove minced garlic - 1/4 cup soy sauce - 1/4 cup apple cider vinegar - 1/4 cup brown sugar - 1 tablespoon cornstarch - 1/4 cup water - 2 tablespoons vegetable oil - Salt and pepper, to taste - Sesame seeds and fresh cilantro for garnish To prepare, you mix the sauce ingredients, cook the chicken, and add the veggies. The dish gets its sweet and tangy flavor from the sauce made with soy sauce, vinegar, and brown sugar. You can make sweet and sour chicken healthier by: - Using skinless chicken breast instead of thighs for less fat. - Reducing the amount of brown sugar or using a sugar substitute. - Adding more vegetables like broccoli or snap peas for extra nutrients. - Baking or grilling the chicken instead of frying it. These small changes can cut calories while keeping the dish tasty and satisfying. Yes, you can prepare sweet and sour chicken ahead of time. Here’s how: - Cook the chicken and vegetables as usual. - Prepare the sauce but do not add it yet. - Store the cooked chicken and veggies in the fridge. - When ready to serve, heat the chicken and veggies in a pan. Then pour in the sauce and cook until it thickens. This method saves time on busy days and keeps your meal fresh. For the full recipe, check the link above. In summary, this blog post guides you through making sweet and sour chicken. We covered main ingredients, sauce preparation, cooking steps, and tips for perfect flavor. You can customize the dish with different proteins or vegetables to suit your taste. Store leftovers properly for the best texture. This recipe is easy and fun to make. Enjoy each bite, knowing you created a delicious meal at home. Cooking can be simple and rewarding if you follow these steps. Now, it’s time to cook and impress your guests!

Sweet and Sour Chicken Flavorful and Easy Recipe

Are you ready to whip up a dish that’s both sweet and savory? My Sweet and Sour Chicken recipe is

To make this creamy coffee cheesecake, you will need the following ingredients: - 1 ½ cups graham cracker crumbs - ½ cup unsalted butter, melted - 2 cups cream cheese, softened - 1 cup granulated sugar - 1 cup sour cream - 3 large eggs - ½ cup strong brewed coffee, cooled - 1 tablespoon instant coffee granules - 1 teaspoon vanilla extract - ½ teaspoon salt - Cocoa powder for dusting (optional) - Chocolate shavings for garnish (optional) Each ingredient has a specific role. If you want to change something, here are some ideas: - Graham cracker crumbs: You can use cookie crumbs or crushed nuts. - Unsalted butter: Coconut oil is a good substitute. - Cream cheese: Neufchâtel cheese works well for a lighter option. - Granulated sugar: You can sweeten with brown sugar or a sugar substitute. - Sour cream: Greek yogurt is a good swap for tanginess. - Strong brewed coffee: Use espresso for a bolder taste. - Instant coffee granules: You can leave it out if you prefer a milder flavor. Using good-quality ingredients makes a difference. Here are my favorites: - Graham cracker crumbs: Nabisco is a classic choice. - Cream cheese: Philadelphia brand is rich and creamy. - Granulated sugar: Domino sugar is reliable and widely available. - Instant coffee granules: I prefer Medaglia d'Oro for its strong flavor. - Cocoa powder: Ghirardelli is rich and adds depth. With these ingredients, you can create a delicious creamy coffee cheesecake that will impress anyone. Check out the Full Recipe to get started! To start, you need to prepare the crust. Grab a medium bowl and combine: - 1 ½ cups graham cracker crumbs - ½ cup unsalted butter, melted Mix these until they are well combined. Next, press this crumbly mixture firmly into the bottom of a 9-inch springform pan. Make sure it is even and packed tightly. This step is key to a sturdy crust. Now, let’s whip up the cheesecake filling. In a large mixing bowl, beat: - 2 cups cream cheese, softened Use an electric mixer to make it smooth. Slowly add in: - 1 cup granulated sugar Keep beating until fluffy. Then, mix in: - 1 cup sour cream Make sure everything is well combined. Next, add in the eggs one at a time, mixing well after each addition. In a separate cup, dissolve: - 1 tablespoon instant coffee granules in - ½ cup strong brewed coffee, cooled Now pour this coffee mixture into the cream cheese blend along with: - 1 teaspoon vanilla extract - ½ teaspoon salt Mix until everything is smooth and creamy. Pour the cheesecake filling over the prepared crust. Smooth the top with a spatula. Bake in a preheated oven at 325°F (160°C) for about 50 to 60 minutes. The center should be set but still slightly jiggly. Once done, turn off the oven and crack the door open. Let the cheesecake cool in the oven for about 1 hour. This helps prevent cracks. After cooling, transfer the cheesecake to the fridge. Chill for at least 4 hours or overnight for the best texture. Dust the top with cocoa powder and add chocolate shavings before serving, if you like. For the full recipe, check out the section above. Enjoy your creamy coffee cheesecake! To get that smooth, creamy texture, start with softened cream cheese. Cold cream cheese will not blend well. Use an electric mixer for best results. Beat it until it's fluffy and no lumps remain. Mixing in the sour cream adds richness and creaminess too. Make sure to incorporate each egg one at a time. This step helps keep your filling smooth. Cracks can ruin the look of your cheesecake. To avoid them, let the cheesecake cool slowly. After baking, turn off the oven and crack the door open. This lets the cheesecake cool down gradually. Chill the cheesecake in the fridge for at least four hours, or overnight. A longer chilling time helps it set and reduces cracking. When ready to serve, dust the top with cocoa powder. It adds a nice touch. Use a sharp knife to slice clean pieces. Garnish with chocolate shavings for extra flair. This makes your cheesecake look fancy. You can also pair it with whipped cream or fresh berries. These toppings add flavor and color, making your dessert even more tempting. For the full experience, check out the Full Recipe. {{image_2}} You can play with flavors for your cheesecake. A mocha flavor is a great choice. Just mix in some cocoa powder and more coffee. This adds a rich chocolate taste. If you prefer a classic twist, try vanilla. Simply replace the instant coffee with more vanilla extract. This makes a smooth and creamy dessert that everyone loves! While graham cracker crust is popular, you can switch it up. Try using Oreo cookies for a chocolatey base. Just crush them and mix with melted butter. You can also use almond flour for a gluten-free option. This gives a nutty flavor and works well with coffee. Toppings can make your cheesecake even better. Try adding nuts for crunch. Chopped walnuts or pecans work well. For fruit lovers, fresh berries are a nice touch. They add color and contrast. You can also drizzle caramel or chocolate sauce on top. This makes your cheesecake look fancy and taste divine! Check out the full recipe for more delicious ideas! To keep your creamy coffee cheesecake fresh, store it in the fridge. Use an airtight container or wrap it tightly with plastic wrap. This helps maintain its rich flavor and creamy texture. Always place it on a flat surface to avoid any damage. If you have leftovers, try to consume them within five days for the best taste. You can freeze this cheesecake for longer storage. First, let it cool completely and chill in the fridge. Then, wrap it tightly in plastic wrap. For added protection, place it in a freezer-safe container. This way, it can stay fresh for up to three months. When you're ready to eat, thaw it overnight in the fridge before serving. Reheating cheesecake isn't always necessary. If you enjoy it cold, serve it straight from the fridge. If you prefer it slightly warm, place a slice in the microwave for about 10-15 seconds. Keep a close eye on it to avoid overheating. Enjoy your cheesecake plain or with your favorite toppings! For the full recipe, check out the complete guide to making this delicious dessert. If your cheesecake cracks, don’t panic! You can hide cracks with toppings. Use whipped cream or a chocolate ganache. If cracks are deep, cover them with a layer of cocoa powder. This makes it look pretty while adding flavor. Yes, you can make this cheesecake a day in advance. Making it ahead helps the flavors blend well. Just store it in the fridge after it cools. It will taste even better the next day. If you don’t like coffee, try using strong brewed tea. Chai or matcha works well. For a sweet option, use chocolate milk instead. This gives you a rich flavor without coffee. Cheesecake can last about five days in the fridge. Keep it covered tightly to prevent drying out. If you don’t eat it all, you can freeze it for longer storage. Just thaw it in the fridge before serving. For the full recipe, check out the Creamy Coffee Cheesecake section above. In this blog post, I covered the key elements of making a great cheesecake. We started with the right ingredients and measurements, ensuring you can customize your dessert with ease. I shared step-by-step instructions for preparing the crust, filling, and the baking process. Tips for a creamy texture and avoiding cracks came next, along with variation ideas and storage tips. Remember, cheesecake is versatile and fun to make. Enjoy experimenting to find your perfect flavor and presentation! Happy baking!

Creamy Coffee Cheesecake Irresistible Dessert Delight

Craving something sweet and rich? You’re in the right place! My Creamy Coffee Cheesecake is an irresistible dessert delight that

- 8 oz fettuccine pasta - 1 lb shrimp, peeled and deveined - 4 tablespoons unsalted butter - 4 cloves garlic, minced - 1 cup heavy cream - 1 cup grated Parmesan cheese - Salt and black pepper to taste - 1 tablespoon chopped fresh parsley (for garnish) - 1 teaspoon lemon juice - Pinch of red pepper flakes (optional) When I make Garlic Alfredo Pasta with Shrimp, I focus on the fresh ingredients. Fettuccine pasta gives this dish a great base. The shrimp should be peeled and deveined for the best flavor. I love using unsalted butter; it lets the other flavors shine. Garlic, minced finely, adds a lovely aroma. For the sauce, heavy cream creates that rich, creamy texture we all enjoy. Grated Parmesan cheese brings a salty, nutty flavor. Salt and black pepper are key for seasoning. To finish, I add fresh parsley for color and lemon juice for brightness. A pinch of red pepper flakes can add a nice kick, too. You can find the full recipe above for detailed steps and tips! To make the perfect Garlic Alfredo Pasta, start by boiling water. Use a large pot and add a good amount of salt. This helps flavor the pasta. Once the water boils, add the fettuccine. Cook it according to the package instructions until it is al dente. This means it should be firm but not hard. To check this, taste a piece. After cooking, save 1/2 cup of the pasta water. This water has starch, which helps thicken the sauce. Drain the pasta and set it aside. It will be ready for the creamy sauce. Now, let’s cook the shrimp. In a large skillet, melt 2 tablespoons of butter over medium heat. Add the minced garlic and let it cook for about 1 minute. You want it to smell great but not burn. Next, raise the heat to medium-high. Add the shrimp to the pan. Cook each side for about 2-3 minutes. The shrimp should turn pink and opaque. Season with salt and black pepper. If you like a little spice, add red pepper flakes too. Once cooked, take the shrimp out and set them aside. In the same skillet, lower the heat to medium. Add the remaining 2 tablespoons of butter. Once it melts, pour in the heavy cream. Stir this mix gently and let it simmer for 2-3 minutes. You want it to thicken slightly. Next, gradually add the grated Parmesan cheese. Whisk it in until it’s melted and smooth. If the sauce is too thick, use the reserved pasta water to adjust the consistency. This makes it creamy and perfect for coating the pasta. It’s time to mix everything! Add the cooked fettuccine and shrimp back into the skillet. Toss them together so the pasta and shrimp are well coated in the creamy sauce. Squeeze in some lemon juice for brightness. Taste and add more salt or pepper if needed. To serve, plate the pasta and shrimp generously. Garnish with chopped fresh parsley for a pop of color. This dish looks beautiful and tastes even better. Enjoy your Garlic Alfredo Pasta with Shrimp! For the complete recipe, check out the Full Recipe section. To make a smooth and creamy Alfredo sauce, avoid some common mistakes. First, do not cook the sauce on high heat. This can cause the cream to separate. Instead, keep it on medium heat. Another pitfall is adding cheese too fast. Gradually whisk in the Parmesan cheese. This helps it melt evenly. If your sauce gets too thick, add a bit of reserved pasta water. This will bring back the creaminess. When serving, garnish your pasta with chopped fresh parsley. This adds a nice color and flavor. You can also sprinkle more Parmesan cheese on top. It makes the dish look extra special. Pair your Garlic Alfredo Pasta with a side salad. A light salad balances the rich flavors of the pasta. Garlic bread is another great option. The crusty bread helps scoop up the creamy sauce. For leftovers, store your pasta in an airtight container. Keep it in the fridge for up to three days. To reheat, warm it on low heat in a skillet. Add a splash of milk or cream to keep it creamy. Stir often to avoid burning. You can also use the microwave, but heat it in short bursts. Stir in between to ensure even heating. Remember, Alfredo sauce does not freeze well. So, try to enjoy your pasta fresh! For the complete recipe, check the Full Recipe section! {{image_2}} You can switch shrimp for chicken or veggies. Chicken offers a hearty touch. Veggies like bell peppers or zucchini can make it lighter. For the sauce, use cashew cream or almond milk for a dairy-free option. This keeps the dish creamy while catering to dietary needs. Want more flavor? Try adding red pepper flakes. They bring a nice heat to the rich sauce. You can also toss in fresh spinach or broccoli. These veggies add color and nutrients. Their bright flavors will balance the creaminess of the dish. Get creative with how you serve this dish. You can bake it in a skillet for a fun twist. This adds a crispy top that everyone will love. If you follow a gluten-free diet, use gluten-free pasta. This way, everyone can enjoy the creamy delight of Garlic Alfredo Pasta with Shrimp. For the full recipe, check out the details above. Each serving of Garlic Alfredo Pasta with Shrimp has about 600 calories. You get a good amount of protein from shrimp and cheese. This dish also gives you vitamins A and B12. The heavy cream adds calcium, which is important for strong bones. You can make this dish lighter by using whole wheat pasta. You can also swap heavy cream for low-fat milk or a non-dairy milk. Using less butter will cut down on calories. Adding more shrimp can boost protein while keeping calories lower. To create a wholesome meal, pair your pasta with a fresh green salad. Add tomatoes, cucumbers, and bell peppers for crunch and color. You can also cook some spinach or broccoli to mix in. These veggies add fiber and vitamins. They make your meal more filling and nutritious. For the full recipe, check out the Garlic Shrimp Alfredo Delight. To stop your sauce from separating, keep the heat low. High heat can cause the cream to break apart. Always add the cheese slowly while whisking. This helps mix everything smoothly. If the sauce gets too thick, use some reserved pasta water to adjust the texture. This tip ensures a creamy and well-blended sauce. Yes, you can use frozen shrimp. First, thaw them properly. Place the shrimp in cold water for about 15-20 minutes. Drain and pat them dry before cooking. This step helps them cook evenly. Frozen shrimp can still taste great in Garlic Alfredo Pasta with Shrimp. To prep ahead of time, cook the pasta and shrimp but keep them separate. Make the sauce and let it cool. Store each in airtight containers in the fridge. When you’re ready to serve, reheat them gently. This method helps keep the flavors fresh and delicious. For a complete meal, consider serving a light salad or garlic bread. A Caesar salad pairs well and adds crunch. You could also offer steamed veggies like broccoli or asparagus. These sides balance the rich flavors of the pasta and shrimp. To reheat leftovers, use a skillet over low heat. Add a splash of cream or pasta water to help keep the sauce creamy. Stir often to prevent sticking. Avoid the microwave, as it can make the shrimp rubbery. This method maintains the dish's texture and flavor best. Garlic Alfredo Pasta with Shrimp combines simple ingredients for a tasty dish. You start with fettuccine and shrimp, then blend in garlic, cream, and cheese. Following careful cooking tips ensures a creamy sauce. Explore flavor variations or side dishes to make it your own. Remember, preparation is key for a delicious meal. Enjoy your cooking and share this excellent recipe with friends. It’s easy and fun!

Garlic Alfredo Pasta with Shrimp Creamy Delight

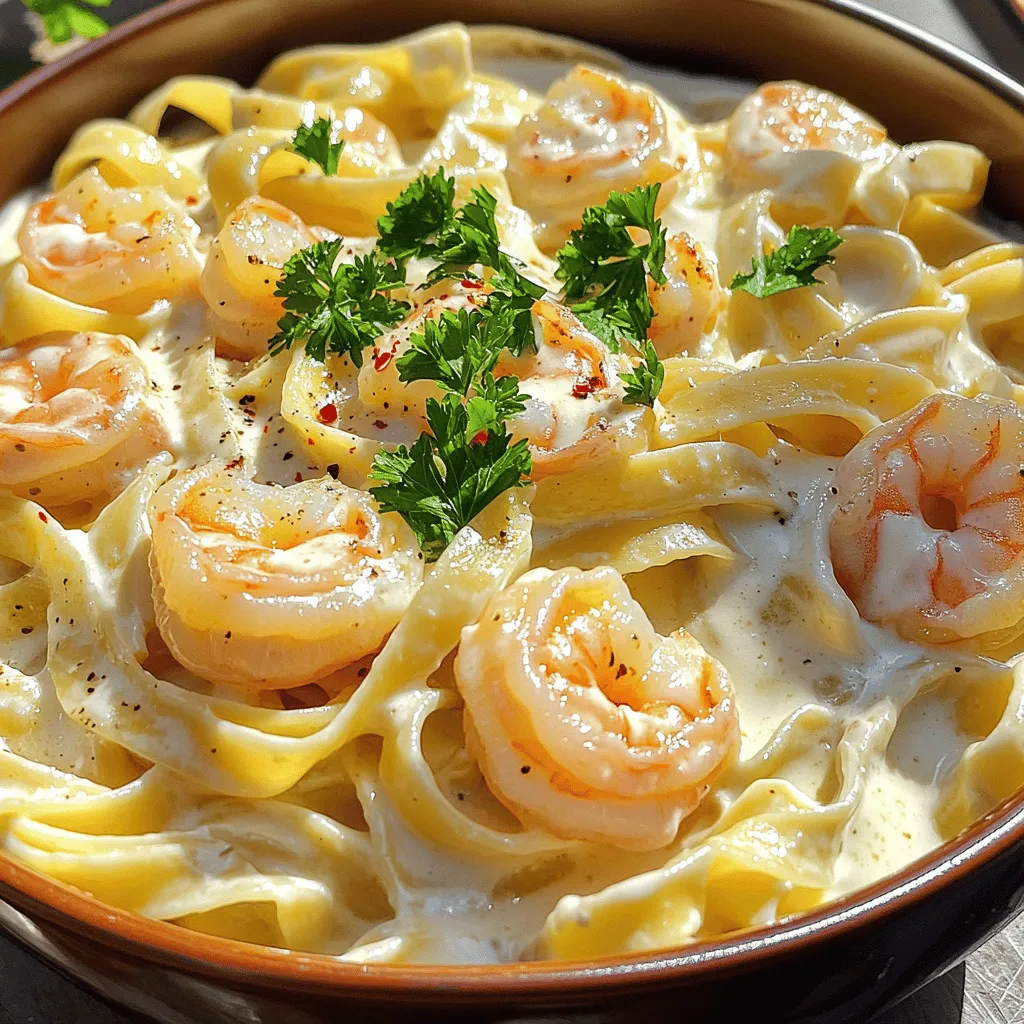
If you’re craving a quick and creamy dinner, Garlic Alfredo Pasta with Shrimp is the answer! In just a few

For a tasty crab pasta salad, you will need: - 8 oz (225g) pasta (like rotini or fusilli) - 1 cup cooked crab meat (fresh or canned) - 1/2 cup cherry tomatoes, halved - 1/4 cup red bell pepper, diced - 1/4 cup celery, finely chopped - 1/4 cup red onion, finely chopped - 1/2 cup mayonnaise - 2 tablespoons lemon juice - 1 tablespoon Dijon mustard - Salt and pepper to taste - 1 tablespoon fresh dill, chopped (or 1 teaspoon dried dill) - Optional: 1/4 cup sweet corn, drained These ingredients blend well. They bring great taste and texture to the dish. The pasta serves as a base, and the crab adds a lovely seafood flavor. You can use fresh crab for a richer taste or canned for convenience. You can add more ingredients to boost flavor: - Avocado for creaminess - Cucumber for crunch - Capers for a briny kick - Fresh herbs like parsley or basil These extras can enhance the salad. They allow you to customize it to your liking. If you crave a bit of spice, try adding jalapeños or a dash of hot sauce. Choosing the right crab meat is key: - Look for fresh crab meat with a clean, sweet smell. - Check the color; it should be opaque and look moist. - Avoid any meat that appears dry or has a strong odor. For the best flavor, buy crab from a trusted source. If you choose canned crab, pick high-quality brands. Always check the label for freshness and quality. You want the best for your crab pasta salad. For the complete recipe, refer to the Full Recipe. To start, you need to cook the pasta. I like using rotini or fusilli. First, boil a pot of salted water. Once it boils, add the pasta. Cook it according to the package instructions until it's al dente. This means it should be firm but not hard. When done, drain the pasta and rinse it under cold water. This stops the cooking. Next, let's make the dressing. In a medium bowl, whisk together the mayonnaise, lemon juice, and Dijon mustard. Add salt and pepper to taste. Make sure to mix it well until smooth. Finally, stir in the fresh dill. This adds a bright flavor that pairs well with crab. Now, we combine everything for the salad. In a large bowl, add the cooled pasta. Then, mix in the crab meat, cherry tomatoes, red bell pepper, celery, and red onion. If you like, you can add sweet corn too. Pour the dressing over the salad and gently toss it all together. Make sure everything is coated well. Cover the bowl and chill it for at least 30 minutes. This helps the flavors blend together. You can find the complete steps in the Full Recipe section. To get the best texture in your crab pasta salad, cook the pasta just right. Aim for al dente, which means it should be firm but not hard. Rinse it with cold water right after cooking. This stops the cooking and keeps the pasta from getting mushy. You want the pasta to hold its shape well in the salad. To make your crab pasta salad even tastier, consider adding some extras. Fresh herbs like parsley or chives can brighten up the dish. A pinch of red pepper flakes adds a nice kick. For a touch of sweetness, you can toss in some diced cucumber or sweet corn. These add-ins give texture and flavor. Each bite becomes a new delight! Presentation matters! Serve your crab pasta salad in a large bowl or individual cups. This makes it easy for guests to grab a portion. Garnish with extra dill and lemon wedges on top. It not only looks good but also adds a fresh zest. You can enjoy it as a light lunch, a side dish for dinner, or at a picnic. With such versatility, it always shines at any gathering! {{image_2}} You can use many pasta types for crab pasta salad. Rotini and fusilli work well. They hold the dressing nicely. Other great options include penne, farfalle, or even macaroni. Each type gives a different look and feel. Choose one that you enjoy! You can easily customize this crab pasta salad. Swap out the crab for shrimp or lobster if you prefer. If you want a vegetarian option, use chickpeas for protein. You can also change the veggies. Try cucumber, bell pepper, or even avocado for a twist. For gluten-free pasta salad, choose gluten-free pasta. Many brands make great options now. If you want fewer calories, use Greek yogurt instead of mayonnaise. This swap keeps the creaminess while cutting calories. You can add more veggies to bulk up the salad without adding many calories. The [Full Recipe] gives you all the details to create your own version! To keep your crab pasta salad fresh, store it in an airtight container. Glass or plastic works well. Avoid using metal containers, as they can react with the ingredients. Place the container in the fridge right after serving. This keeps it cool and safe to eat later. Crab pasta salad can last 3 to 4 days in the fridge. Make sure it stays covered. If the salad has been sitting out for more than two hours, it's best to throw it away. Always trust your eyes and nose; if it looks or smells off, don’t eat it. You can enjoy crab pasta salad cold or at room temperature. If you prefer it warm, heat it gently in a pan. Avoid the microwave, as it can make the pasta mushy. Add a splash of lemon juice to brighten the flavors when reheating. For the best taste, I recommend serving it cold as per the [Full Recipe]. Yes, you can use canned crab meat. It saves time and is easy to find. Canned crab still tastes great in the salad. Just make sure to drain it well before use. This helps avoid excess liquid in your dish. If you want a fresher taste, opt for fresh crab meat when possible. It will enhance the flavors and texture. Crab pasta salad pairs well with many sides. Here are a few great options: - Garlic bread - Fresh green salad - Grilled vegetables - Potato chips - Fruit salad These sides add variety and make your meal more enjoyable. Choose sides that balance the rich flavors of the crab pasta salad. To make a lighter crab pasta salad, swap regular mayonnaise for Greek yogurt. This change cuts calories while adding creaminess. You can also use whole wheat pasta for extra fiber. Adding more veggies like spinach or cucumbers can boost freshness and volume. Lastly, reduce the amount of dressing to keep it light. Enjoy a fresh and tasty dish without the extra calories! For the complete recipe, check out the [Full Recipe]. This blog post explored how to create a crab pasta salad that stands out. We covered key ingredients and tips for choosing fresh crab meat. The step-by-step instructions ensure you cook the pasta and make the dressing just right. With variations and storage tips, you can customize and keep your salad fresh. In the end, crab pasta salad offers joy in every bite, making it a perfect dish for any meal. Enjoy experimenting and sharing your delicious creation!

Crab Pasta Salad Fresh and Flavorful Delight

Crab Pasta Salad is a fresh and flavorful delight that can brighten any meal. Whether you’re planning a summer picnic

- 4 bone-in, skin-on chicken thighs - 1 cup long-grain rice - 2 tablespoons olive oil - 1 medium onion, diced - 2 cloves garlic, minced - 1 bell pepper (any color), diced - 2 cups chicken broth - 1 teaspoon paprika - 1 teaspoon dried thyme - 1 teaspoon black pepper - Salt to taste - 1 cup frozen peas and carrots mix - Fresh parsley, chopped (for garnish) In this recipe, you will find simple yet essential ingredients. The chicken thighs provide rich flavor. The rice acts as a comforting base that absorbs all the good juices. Olive oil helps to sear the chicken, locking in moisture. The vegetables add depth. Onions bring sweetness, while garlic gives a nice kick. Bell peppers add color and crunch. You can use any color pepper you like. Chicken broth is a key player. It adds richness and helps cook the rice perfectly. Spices like paprika, thyme, and black pepper boost the flavor. Salt is needed to balance everything. Lastly, the peas and carrots add color and nutrition. They are easy to use since they come frozen. The chopped parsley is for garnish. It adds a fresh touch to your dish. You can find the full recipe at the end of this article. - Heat olive oil in a large skillet over medium heat. - Sear chicken thighs until browned. Begin by heating your olive oil in a large skillet. Use medium heat to make sure the oil warms up nicely. Season your chicken thighs with salt, black pepper, and paprika. Place them skin-side down in the skillet. Sear the chicken for about 6 to 7 minutes. This gives it a nice, crispy skin. After that, flip the chicken and cook for another 5 minutes. Take the chicken out and set it aside. This step locks in lots of flavor. - Add onion, bell pepper, and garlic to the skillet. - Sauté until vegetables are soft. In the same skillet, add your diced onion, bell pepper, and minced garlic. The leftover oil and juices from the chicken will add great taste. Sauté these until they become soft. This usually takes about 5 minutes. You want to see the onions turn translucent. This mix makes your dish smell amazing. - Stir in rice and let it toast. - Pour in chicken broth, add seasonings, and place chicken on top. - Cover and simmer. Next, stir in the rice and let it toast for a minute or two. This helps the rice soak up the flavors. Pour in the chicken broth and add your dried thyme. Mix everything well and place the seared chicken thighs on top of the rice. Cover the skillet and let it simmer for 25 minutes. This allows the rice to cook and absorb all those tasty juices. - Add frozen peas and carrots and cover again. - Cook until rice is tender and chicken is cooked through. After 25 minutes, it’s time to add the frozen peas and carrots. Place them right on top of the chicken; don’t stir. Cover the skillet again and cook for another 5 minutes. This will steam the veggies and keep them bright. Check that the rice is tender and the chicken is cooked through. The internal temperature should reach 165°F. That’s it! You’ve made a comforting, hearty meal that is sure to please. For the full recipe, refer to the earlier section. - Ensure chicken reaches an internal temperature of 165°F. - Let the dish sit covered before serving for better flavor melding. Cooking chicken can be tricky, but a meat thermometer makes it easy. Insert it into the thickest part of the thigh. If it reads 165°F, your chicken is safe and juicy. Letting the dish rest before serving allows the flavors to mix well. It makes each bite taste better. - Experiment with spices like cayenne or Italian herbs. - Add a splash of lemon juice for brightness. To elevate your dish, try adding cayenne pepper for heat. Italian herbs can give it a nice herbal note. A splash of lemon juice adds brightness and balances the savory flavors. Just a little can make a big difference. - Serve in shallow bowls with a sprinkle of parsley. - Use fresh lemon wedges for color and flavor. Serving your dish can make it look special. Use shallow bowls to show off the chicken and rice. A sprinkle of fresh parsley adds a pop of color. Also, place a lemon wedge on the side for a fresh touch. It looks great and adds flavor. Want to make it even more special? Check out the Full Recipe for more tips! {{image_2}} When you make smothered chicken and rice, you can try many fun changes. These variations keep the meal exciting and tasty. - You can use boneless chicken thighs or breasts instead of bone-in. - For a vegetarian meal, consider tofu or seitan. They soak up flavors well. - Swap long-grain rice for brown rice for a nuttier taste. - Cauliflower rice works great too if you want a low-carb option. - Jasmine or basmati rice adds a unique flavor twist. - Add sweet corn or crunchy green beans to boost the nutrients. - For an earthy taste, toss in some mushrooms. They blend well with the dish. These variations make your smothered chicken and rice even more special. You can find the Full Recipe to get started! Store your leftover smothered chicken and rice in an airtight container. It stays fresh for up to 4 days. This way, you can enjoy it later without losing flavor. If you want to keep it longer, freeze the dish in individual portions. This method works well for up to 3 months. Just label the containers with the date before putting them in the freezer. To reheat, you can use a skillet or the microwave. In a skillet, add a splash of chicken broth to keep it moist. Heat until it gets warm throughout. If you use the microwave, heat it until it is hot. Enjoy your meal like it was just made! To check if the chicken is fully cooked, use a meat thermometer. The internal temperature should reach 165°F. This ensures the chicken is safe to eat and juicy. If you don't have a thermometer, cut into the chicken. The meat should be white, not pink. Yes, you can prepare Smothered Chicken and Rice ahead of time. Cook the dish, let it cool, and store it in the fridge. When you're ready to eat, simply reheat it. The flavors will deepen, making it even tastier. Smothered Chicken and Rice pairs well with a side salad or steamed vegetables. A fresh green salad adds crunch and brightness. Steamed vegetables like broccoli or green beans bring color and nutrition to your meal. They balance the rich flavors of the chicken and rice. For the full recipe, check out the details above. This blog post shared easy steps to make smothered chicken and rice. You learned about the key ingredients like chicken thighs, rice, and tasty veggies. Following my instructions, you can create a hearty meal that's full of flavor. Remember, you can swap ingredients to fit your taste. This meal is great for lunch or dinner. Make it ahead or enjoy it fresh. I hope you feel inspired to try this dish and get creative!

Smothered Chicken and Rice Hearty Comfort Meal

Are you ready for a meal that warms the heart and fills the belly? Smothered Chicken and Rice is the

- 1 cup graham cracker crumbs - 1/4 cup sugar - 1/2 cup unsalted butter, melted - 1 (8 oz) package cream cheese, softened - 1 cup powdered sugar - 1 teaspoon vanilla extract - 1 cup heavy whipping cream - 2 ripe bananas, sliced - 1/4 cup chocolate shavings or cocoa powder for garnish - If you want a different crust, use crushed cookies or nuts instead of graham cracker crumbs. - For sugar, you can swap in honey or maple syrup for a healthier twist. - If you need a dairy-free option, use a plant-based cream cheese. To start, you will make the graham cracker crust. Take a medium bowl and mix 1 cup of graham cracker crumbs, 1/4 cup of sugar, and 1/2 cup of melted unsalted butter. Stir until it looks like wet sand. This is the base for your mini pies. Next, grab a mini muffin tin. Take the crumb mixture and press it into the bottom and up the sides of each cup. Make sure it's even. Place the tin in the refrigerator for about 30 minutes. This helps the crust set nicely. Now, let’s make the cream cheese filling. In a mixing bowl, beat 1 (8 oz) package of softened cream cheese with 1 cup of powdered sugar and 1 teaspoon of vanilla extract. Mix until it is smooth and creamy. In another bowl, whip 1 cup of heavy cream until you see soft peaks. Gently fold this whipped cream into your cream cheese mixture. This makes it light and fluffy, which is perfect for your pies. Once the crusts are set, it’s time to layer the bananas. Take 2 ripe bananas and slice them. Place a layer of these banana slices at the bottom of each crust. Now, fill each mini pie with the cream cheese mixture. Spoon it in until it reaches the top. For the final touch, you can garnish your pies. Use 1/4 cup of chocolate shavings or a dusting of cocoa powder. This adds a nice look and flavor. After assembling, refrigerate the mini pies for 1 to 2 hours. This ensures they taste their best. If you want the full recipe, check the Full Recipe section. To whip cream well, start with cold tools. Use a chilled bowl and beaters. Whip on medium speed until soft peaks form. Don't over-whip; it can turn buttery. For a smooth filling, beat cream cheese first. Combine it with powdered sugar until it's fluffy. Then, gently fold in whipped cream. This keeps the mix light and airy. Mini banana cream pies pair well with coffee or tea. The sweetness works great with a dark brew. For a fancy touch, use clear cups for serving. Layer the pie to show off the filling and bananas. Add a sprig of mint on top for color. This small detail impresses guests. Prep components ahead of time. You can make the crust and filling a day early. Store them separately in the fridge. If you’re short on time, use store-bought crusts. They save time without losing flavor. Just fill them with the cream cheese mixture and add bananas. {{image_2}} You can easily switch up the flavors in these mini pies. Adding peanut butter or chocolate can give a rich twist. Just mix in a bit of peanut butter with the cream cheese filling. If you prefer chocolate, stir in some cocoa powder or melted chocolate. Both options enhance the flavor while keeping it simple. Incorporating other fruits is another fun way to vary this recipe. You can add berries, mango, or even pineapple. Just slice the fruit thinly and layer it with the bananas. This not only changes the taste but also adds color to your pies. If you follow a keto diet, you can make some easy changes. Use almond flour instead of graham cracker crumbs. Substitute the sugar with a keto-friendly sweetener. This keeps the pie low in carbs but still delicious. For vegan options, swap the cream cheese for a plant-based version. Coconut cream can replace heavy whipping cream. Make sure to use a vegan butter for the crust. These changes make the recipe friendly for those who avoid animal products. You can adjust the size of your pies based on your needs. To make larger pies, use a regular pie dish instead of a mini muffin tin. Just keep an eye on the setting time in the fridge. For events or parties, making miniature sizes is a great idea. You can use a smaller muffin tin or even shot glasses. This makes serving easy and fun for guests. Everyone loves a small treat! To keep your mini banana cream pies fresh, store them in the fridge. Place them in an airtight container. They will stay fresh for about 3 days. The colder temperature helps maintain their creamy texture. Yes, you can freeze these mini pies. To freeze them, wrap each pie tightly in plastic wrap. Place them in a freezer-safe bag or container. They can last up to 2 months in the freezer without losing flavor. To thaw frozen pies, take them out and place them in the fridge overnight. This method helps keep their texture smooth. Avoid thawing them at room temperature, as this can make them soggy. Enjoy them chilled for the best taste! Yes, you can try other crusts! If you want a gluten-free option, use almond flour or gluten-free graham crackers. For a cookie crust, crushed Oreos work well too. You can even use crushed nuts mixed with butter for a crunchy base. Each crust brings a unique taste and texture to the mini pies. Mini pies should not sit out for more than two hours. After that, they can spoil. Always keep them cool, especially on warm days. If you are serving them at a party, keep them in the fridge until it's time to eat. This keeps them fresh and safe for your guests. You can garnish these mini pies in fun ways. Try topping them with whipped cream for a classic look. Adding chocolate shavings gives a nice touch, too. You could also use fresh banana slices or a sprinkle of cinnamon. Get creative! Your garnish can add flavor and make the pies look even more tempting. In this post, I shared a simple recipe for delicious mini pies. We covered essential ingredients, like graham crackers and cream cheese, along with helpful substitutions. The step-by-step instructions made pie making easy. I also included tips for texture and serving. Consider all the fun variations you can try. Remember, you can store leftovers in the fridge or freezer. With this knowledge, you can impress friends and family. Now go ahead, create delightful mini pies, and enjoy the smiles they bring!

No-Bake Mini Banana Cream Pies Delicious and Simple

Craving a sweet treat that’s both easy and delightful? Look no further! My No-Bake Mini Banana Cream Pies are perfect

To create these delicious carrot cake bars, you need simple ingredients. Here’s what you will need: - 2 cups grated carrots (about 3-4 medium carrots) - 1 cup all-purpose flour - 1 cup almond flour - 1 teaspoon baking powder - 1/2 teaspoon baking soda - 1 teaspoon ground cinnamon - 1/2 teaspoon ground nutmeg - 1/4 teaspoon salt - 1/2 cup granulated sugar - 1/2 cup packed brown sugar - 1/2 cup vegetable oil - 3 large eggs - 1 teaspoon vanilla extract - 1/2 cup crushed pineapple, drained - 1/2 cup chopped walnuts or pecans (optional) - 1/2 cup raisins (optional) - 1 cup cream cheese frosting (store-bought or homemade) These ingredients blend well together to make a moist and flavorful treat. Grated carrots add natural sweetness and moisture. The mix of flours gives the bars a nice texture. If you want to enhance the flavor of your carrot cake bars, consider adding: - 1/2 cup chopped nuts (like walnuts or pecans) - 1/2 cup raisins - A pinch of ginger for some spice - Some orange zest for a fresh taste These flavors complement the carrots and create a richer taste. You can mix and match these options based on what you like. If you have allergies or dietary needs, here are some easy swaps: - Use gluten-free flour blend instead of all-purpose flour. - Replace almond flour with oat flour or coconut flour. - Substitute eggs with flax eggs (1 tablespoon ground flaxseed + 2.5 tablespoons water per egg). - Use a dairy-free cream cheese for frosting. These substitutions keep the spirit of the recipe while making it safe for everyone. Always check labels for allergens when trying new products. For the full recipe, you can refer to the note above. First, preheat your oven to 350°F (175°C). This step warms your oven for even baking. Next, grab a 9x13 inch baking pan. Grease it well or line it with parchment paper. This makes removing the bars much easier later. In a large bowl, add the following dry ingredients: - 1 cup all-purpose flour - 1 cup almond flour - 1 teaspoon baking powder - 1/2 teaspoon baking soda - 1 teaspoon ground cinnamon - 1/2 teaspoon ground nutmeg - 1/4 teaspoon salt Stir these together until they are well mixed. This blend gives the bars their nice texture and flavor. In another bowl, mix together: - 1/2 cup granulated sugar - 1/2 cup packed brown sugar - 1/2 cup vegetable oil Whisk this mixture until it is smooth. Then, add in three large eggs, one at a time. Make sure to whisk after each egg. Next, stir in 1 teaspoon vanilla extract and 1/2 cup drained crushed pineapple. This mix adds moisture and sweetness to your bars. Now, slowly fold the dry mix into the wet mix. Do this gently to avoid overmixing. Once combined, add in: - 2 cups grated carrots - 1/2 cup chopped walnuts or pecans (optional) - 1/2 cup raisins (optional) Pour the batter into your prepared pan. Spread it out evenly. Bake for 25-30 minutes. To check if they’re done, insert a toothpick into the center. If it comes out clean, they are ready! Once baked, let the cake bars cool in the pan on a wire rack for about 15 minutes. After that, remove them from the pan to cool completely. Spread 1 cup of cream cheese frosting over the top. For an extra touch, dust with cinnamon or add edible flowers. Cut into squares or rectangles and serve. Enjoy this simple and tasty treat! For the complete recipe, check out the Full Recipe. To keep your carrot cake bars moist, do not overmix the batter. Mix until no dry spots remain. Also, avoid baking too long. Check for doneness with a toothpick. If it comes out clean, your bars are ready. You can also add crushed pineapple, which adds moisture and flavor. To ensure even baking, use an oven thermometer. This helps you know if your oven runs hot or cold. Rotate the baking pan halfway through the baking time. This makes sure all sides bake evenly. Lastly, let the bars cool in the pan for a bit before moving them. For smooth cream cheese frosting, use room temperature cheese. Whip it until fluffy before adding sugar. Gradually add sugar to avoid clumps. If it's too thick, add a splash of milk. If you want extra flavor, add a touch of vanilla or lemon juice. This makes the frosting extra tasty! You can find the full recipe at the top of the article. {{image_2}} You can make these carrot cake bars a bit healthier. Swap all-purpose flour for whole wheat flour. This change adds fiber and nutrients. You can also cut the sugar in half. Use a mix of granulated sugar and a natural sweetener like honey or maple syrup. This way, you can enjoy the same great taste with less sugar. Adding spices can elevate your carrot cake bars. Try a pinch of ginger or cardamom for a warm kick. You might also consider adding vanilla bean paste instead of vanilla extract. This change gives a deeper flavor. Don't forget to add some orange zest for a fresh twist. It pairs well with the carrots and adds bright notes. For a gluten-free version, use a blend of gluten-free flours. Almond flour and coconut flour can work well together. If you want to make these bars vegan, replace eggs with flax eggs. Mix one tablespoon of ground flaxseed with three tablespoons of water. Let it sit until it thickens. You can also use applesauce or mashed bananas as a binding agent. These swaps let everyone enjoy this delightful treat! For more tips on making these variations, check out the Full Recipe. To store your carrot cake bars, use an airtight container. This keeps them fresh and moist. Place parchment paper between layers to prevent sticking. You can also cover the bars with plastic wrap. This method works well if you plan to eat them soon. When stored properly, carrot cake bars last about 5 days at room temperature. If you place them in the fridge, they can last up to 7 days. The flavors deepen as they sit, making each bite even more delicious. If you want to keep them longer, freezing is a great option. Wrap each bar tightly in plastic wrap. Then, place them in a freezer-safe bag or container. They can last up to 3 months in the freezer. To enjoy, thaw them in the fridge overnight or at room temperature for a few hours. For more details, check out the Full Recipe. Yes, you can make these carrot cake bars ahead of time. Bake them, cool them, and frost them. Store them in an airtight container in the fridge. They will stay fresh for about 3 to 5 days. This makes them great for parties or gatherings. If you don't have almond flour, use more all-purpose flour instead. You can also use oat flour or coconut flour if you prefer. Just remember, using a different flour may change the texture a bit. You can check if the bars are done by inserting a toothpick in the center. If it comes out clean or with a few crumbs, they are ready. Baking usually takes about 25 to 30 minutes. Keep an eye on them towards the end. Absolutely! You can use any frosting you like. Cream cheese frosting is classic, but vanilla or chocolate buttercream works well too. You can even try a simple glaze made with powdered sugar and milk for a lighter touch. These bars pair well with a hot cup of tea or coffee. A scoop of vanilla ice cream on the side adds a nice touch. Fresh fruits like berries or a slice of orange also complement the flavors beautifully. For more ideas, check out the Full Recipe. These carrot cake bars are simple and fun to make. You learned about the key ingredients, easy steps, and helpful tips to create a moist treat. You can even customize the bars to fit different diets. Remember to store them well for lasting freshness. Baking is all about enjoying the process. So gather your ingredients and start baking. You’ll create something delicious that everyone will love!

Decadent Carrot Cake Bars Simple and Irresistible Treat

Are you ready to indulge in a treat that’s both simple and, yes, irresistible? These Decadent Carrot Cake Bars combine

- 2 cups all-purpose flour - 3/4 cup shredded mozzarella cheese - 1/4 cup grated Parmesan cheese These three main ingredients create a great base for cheese breadsticks. The all-purpose flour gives the bread a nice structure. The mozzarella adds a stretchy, cheesy texture. Parmesan brings a sharp, salty flavor that makes each bite special. - 1 teaspoon dried Italian herbs - 1 tablespoon fresh parsley - 1/2 teaspoon garlic powder You can make your cheese breadsticks even better with these add-ins. Dried Italian herbs, like oregano or basil, boost the flavor. Fresh parsley adds a bright touch and looks nice. Garlic powder gives a warm, savory taste that many love. - Mixing bowls - Baking sheet - Parchment paper Gather these tools before you start. Mixing bowls help you combine the ingredients easily. A baking sheet is where your breadsticks will bake. Parchment paper prevents sticking and makes cleanup simple. For the full recipe, check out the Cheesy Herb Breadsticks section. 1. Preheating the oven: Start by preheating your oven to 425°F (220°C). This step ensures your breadsticks bake evenly and become golden brown. 2. Mixing dry ingredients: In a large mixing bowl, combine 2 cups of all-purpose flour, 1 tablespoon of baking powder, 1/2 teaspoon of garlic powder, and 1 teaspoon of salt. Add 1 teaspoon of dried Italian herbs. Whisk them together until they mix well. 3. Incorporating wet ingredients: In a separate bowl, mix 1/2 cup of milk and 1/4 cup of olive oil. Pour this mixture into the dry ingredients. Stir gently until just combined. Be careful not to overmix; you want a soft dough. 1. Kneading the dough: Dust your work surface with flour. Turn the dough out and knead it gently for about one minute. The dough should come together but remain soft. 2. Rolling out the dough: Roll the dough into a rectangle about 1/2 inch thick. Try to keep it even for uniform baking. 3. Cutting into strips: Use a knife or pizza cutter to cut the dough into strips about 1 inch wide. Place these strips on a lined baking sheet, leaving some space between them. 1. Baking duration and temperature: Bake your breadsticks in the preheated oven for 12-15 minutes. They should turn a nice golden brown. 2. Cooling the breadsticks: Once baked, remove them from the oven. Let them cool on the baking sheet for a few minutes. This helps them firm up. 3. Garnishing with parsley: Before serving, sprinkle 1 tablespoon of fresh chopped parsley over the warm breadsticks. This adds a pop of color and flavor. Now that you know how to make these delicious cheese breadsticks, check out the Full Recipe for a detailed guide! Enjoy your cooking journey! To get the best texture for your cheese breadsticks, you must avoid overmixing. When you mix the dough, stop as soon as you see no dry flour. Overmixing makes dough tough. This is not what you want. Kneading is also key. Gently knead the dough for just one minute. Too much kneading can make your breadsticks hard. You want them soft and fluffy. Want to boost the flavor? Add herbs and spices! Dried Italian herbs like oregano and basil work well. You can also use rosemary or thyme for a twist. For cheese, try using different types. Cheddar adds a sharp taste. Gouda brings a rich creaminess. Feel free to mix cheeses for fun flavors. When serving cheese breadsticks, think about gatherings. Arrange them on a nice platter. You can even sprinkle some fresh herbs on top for color. Dips are a great way to enhance the experience. Serve cheese breadsticks with marinara sauce or ranch dressing. These dips add more flavor and make them fun to eat. For the full recipe, check out the Cheesy Herb Breadsticks recipe. Enjoy making these tasty treats! {{image_2}} You can change the cheese in the recipe to suit your taste. Cheddar adds a sharp flavor. Gouda gives a creamy richness. If you want a stronger taste, try blue cheese or feta. For a dairy-free option, use vegan cheese. Many brands offer great substitutes that melt well. Just ensure the dairy-free cheese has a similar texture to mozzarella. Want to spice things up? Add jalapeños or chili flakes for heat. Just mix them into the dough. You can also add sun-dried tomatoes or olives for a savory kick. Chop them finely and fold them into the dough. They add a burst of flavor in every bite. You can change the shape for fun. Try twisting the dough into spirals for cheese breadstick twists. They look great and taste amazing! Another idea is to make stuffed cheese breadsticks. Roll out the dough, add cheese and herbs, then seal them up. Bake until golden for a cheesy surprise inside. For the full recipe, check out the Cheesy Herb Breadsticks. After making cheese breadsticks, store any leftovers in an airtight container. This keeps them fresh and tasty. If you want to refrigerate them, they will last about three days. For longer storage, freeze them. In the freezer, they can last up to three months. Just wrap them tightly in plastic wrap before placing them in a freezer bag. To enjoy your cheese breadsticks again, reheating is key. The best way to do this is in the oven. Preheat your oven to 350°F (175°C). Place the breadsticks on a baking sheet and heat for about 5-7 minutes. This method helps to keep them crispy. You can also use a toaster oven for the same effect. Avoid microwaving them, as this can make them chewy. Cheese breadsticks are best enjoyed fresh but can last a little while. When stored properly, they stay good for three days in the fridge. If you freeze them, they maintain their quality for up to three months. For the best results, check the freshness of your ingredients. Always use fresh cheese and herbs for great flavor. Cheese breadsticks are tasty snacks made from dough mixed with cheese. They are crispy and cheesy, perfect for dipping. This treat likely comes from Italian cuisine, where bread and cheese are popular. Many people serve them as appetizers or side dishes. You can find cheese breadsticks in restaurants and homes worldwide. Their rich flavor and fun shape make them a favorite. Yes, you can prepare cheese breadsticks ahead of time! Here’s how: - Make the dough: Follow the recipe steps until you shape the dough. - Wrap it up: Wrap the dough tightly in plastic wrap. - Refrigerate: Store it in the fridge for up to 24 hours. - Bake when ready: When you’re ready, roll and cut the dough, then bake as directed. This way, you save time and still enjoy warm, cheesy breadsticks. To get those perfect crispy cheese breadsticks, try these tips: - Use less milk: A drier dough helps with crunch. - Roll thin: Make your breadsticks about 1/2 inch thick for better baking. - Bake longer: Keep an eye on them and bake until golden brown. - Cool properly: Let them cool on a wire rack to keep them crispy. With these steps, you’ll have wonderfully crunchy cheese breadsticks every time! Cheese breadsticks are simple and fun to make. This recipe guides you through key ingredients, easy steps, and helpful tips. You learned about optional add-ins to boost flavor and variations to keep it fresh. Remember, the right cheese and herbs make a big difference. With proper storage, you can enjoy these delights later. So, roll up your sleeves and try this tasty treat at home. You’ll impress your friends and family with your cooking skills. Let's bake some delicious cheese breadsticks today!

Cheese Breadsticks Flavorful and Easy to Make Recipe

Are you ready to elevate your snack game with a simple yet delicious recipe? Cheese breadsticks are not just a

- 1 cup all-purpose flour - 1 teaspoon baking powder - 1/2 teaspoon baking soda - 1/4 teaspoon salt - 1/2 cup unsalted butter, softened - 1 cup granulated sugar - 2 large eggs - 1 teaspoon vanilla extract - 1/2 cup milk - 2 cups whole milk - 1/2 cup granulated sugar - 1/4 cup cornstarch - 3 large egg yolks - 2 tablespoons unsalted butter - 1 teaspoon vanilla extract - 4 oz semi-sweet chocolate, chopped - 1/2 cup heavy cream - 1 tablespoon unsalted butter When I create these Boston Cream Pie Cupcakes, I love how simple yet tasty the ingredients are. Each bite brings a mix of sweet and creamy flavors. For the cupcakes, I use basic staples that I often have at home. The flour, baking powder, and eggs come together to form a soft, airy base. The butter and sugar add richness and sweetness. Don't forget the milk and vanilla; they enhance every flavor. For the pastry cream, whole milk is key. It gives the filling a rich and smooth texture. The sugar and cornstarch help it thicken nicely. Egg yolks add creaminess, while butter and vanilla make it irresistible. The chocolate ganache is the final touch. Semi-sweet chocolate brings a deep flavor, while heavy cream smooths it out. A little butter adds shine and richness. I find that using fresh ingredients makes a big difference. These cupcakes are fun to make and even more fun to eat! If you want to try this recipe, check out the Full Recipe for complete steps. - Preheat the oven to 350°F (175°C) and line a muffin tin with cupcake liners. - In a medium bowl, whisk the flour, baking powder, baking soda, and salt together. - In a large mixing bowl, cream the softened butter and sugar until light and fluffy. - Beat in the eggs one at a time, then add the vanilla extract. - Gradually add the flour mixture and milk, starting and ending with the flour. - Mix until just combined; do not overmix. - Divide the batter evenly among the cupcake liners, filling each about 2/3 full. - Bake for 18-20 minutes, or until a toothpick comes out clean. - Cool completely on a wire rack before filling with pastry cream. - In a medium saucepan, heat the whole milk over medium heat until it nearly boils. - In another bowl, whisk together sugar, cornstarch, and egg yolks. - Slowly pour a small amount of hot milk into the egg mixture to temper it, then whisk until smooth. - Pour the tempered mixture back into the saucepan with the remaining milk. - Stir over medium heat until thickened, about 5-7 minutes. - Remove from heat, add butter and vanilla, and mix until smooth. - Let it cool, then refrigerate until chilled. - For the ganache, chop chocolate and place it in a bowl. - Heat the heavy cream until it simmers, then pour it over the chocolate. - Let sit for a minute, then whisk until smooth. Stir in the butter until melted. - Once cupcakes are cool, use a small knife or cupcake corer to remove the center. - Fill each cavity with chilled pastry cream using a piping bag or spoon. - Dip the tops of each filled cupcake into the chocolate ganache or drizzle it over the cupcakes. - Allow the ganache to set before serving. For the full recipe, refer to the earlier section on ingredients. To make great cupcakes, do not overmix the batter. Overmixing can make your cupcakes dense. Mix just until the ingredients combine. This keeps them light and fluffy. Also, allow enough cooling time for the cupcakes before filling them. If they are warm, the pastry cream will melt, and you won't get that nice filling. You can add a dash of almond extract to the pastry cream. This small change gives it a lovely flavor boost. Also, consider using whole eggs instead of just yolks. Whole eggs make the mixing easier and save time. This way, you can whip up the cream without fussing with separate egg parts. For a nice touch, use chocolate shavings or powdered sugar to decorate the tops. This adds elegance and looks fun. You can also try different piping techniques for the ganache. Swirling or drizzling can create unique designs. Get creative and have fun with it! For the full recipe, check out the instructions provided above. {{image_2}} You can easily change up the flavor of your cupcakes. For a fresh twist, try lemon Boston cream pie cupcakes. Just add lemon zest to the batter. The lemon adds a bright taste that pairs well with the pastry cream. Another fun option is to make coffee-flavored cupcakes. Simply mix in instant coffee granules into the batter. This gives the cupcakes a rich, deep flavor that coffee lovers will adore. If you need a gluten-free choice, almond flour works great. Substitute the all-purpose flour with almond flour for a nutty flavor. For those who avoid dairy, you can swap butter and milk. Use coconut oil instead of butter and almond milk in place of regular milk. This way, everyone can enjoy these tasty treats. You can also play with the toppings to make these cupcakes special. Instead of chocolate ganache, try cream cheese frosting. This adds a tangy flavor that balances the sweetness. Another idea is to sprinkle sea salt over the chocolate ganache. The salt enhances the chocolate flavor and adds a nice crunch. These small changes make your Boston cream pie cupcakes stand out. For the full recipe, click here. After baking, let your cupcakes cool completely. Then, keep them in an airtight container at room temperature. They will stay fresh for up to 2 days. If your cupcakes are filled with pastry cream, put them in the fridge. This will help them last longer. You can freeze your Boston Cream Pie Cupcakes for up to 1 month. First, wrap each cupcake tightly in plastic wrap. Then, place them in a freezer bag or container. When you're ready to eat them, remove the cupcakes from the freezer. Let them thaw in the fridge overnight or at room temperature for a few hours. If you want to enjoy your cupcakes warm, you can reheat them. For the microwave, heat each cupcake for about 10-15 seconds. Check to see if they are warm enough. If you use an oven, preheat it to 350°F (175°C). Place the cupcakes in for about 5 minutes. This way, they won’t dry out, and you’ll still enjoy their soft texture. Yes, you can make the pastry cream a day before. Store it in the fridge. Just cover it with plastic wrap to prevent a skin from forming. When you are ready to use it, just stir it a bit to make it smooth. To boost the chocolate flavor, add cocoa powder to the batter. You can also use dark chocolate in the ganache. For a richer taste, try adding chocolate chips in the batter too. If you lack cupcake liners, you can grease the muffin tin directly. Use cooking spray or butter to coat the tin well. You can also cut parchment paper into circles for a quick fix. To check if your cupcakes are done, use a toothpick. Insert it in the center, and if it comes out clean, they are ready. You can also look for a slight golden color on the tops. These cupcakes combine simple ingredients and steps to create a delicious treat. You learned how to make soft cupcakes, rich pastry cream, and smooth ganache. I shared tips for baking and decorating your creations. Remember, you can customize flavors and toppings to your liking. Whether you choose to be classic or adventurous, these cupcakes are sure to impress. Enjoy baking, sharing, and tasting your delightful treats!

Delicious Boston Cream Pie Cupcakes Easy and Fun Treat

If you love dessert, you’ll adore these Delicious Boston Cream Pie Cupcakes! They combine the creamy goodness of pastry cream

- 1 cup couscous - 1 1/4 cups vegetable broth (or water) - 1 tablespoon olive oil - Zest of 1 lemon - 1/4 cup freshly grated Parmesan cheese - 2 tablespoons fresh parsley, chopped - Salt and pepper to taste - 1/2 teaspoon garlic powder - A pinch of red pepper flakes (optional) To make Lemon Parmesan Couscous, gather these simple ingredients. Couscous is a quick-cooking grain that absorbs flavors well. The vegetable broth adds depth, while olive oil keeps everything moist. The lemon zest brings a bright, fresh taste. Parmesan cheese adds a savory touch. Fresh parsley gives a nice color and flavor. You can also add other herbs like thyme or basil for more flavor. Chopped vegetables such as bell peppers or spinach can make it heartier. Feel free to get creative! - Other herbs (like thyme or basil) - Vegetables (e.g., bell peppers or spinach) - Gluten-Free Options: Use quinoa or rice instead of couscous. - Vegan Substitutions: Replace Parmesan with nutritional yeast or a vegan cheese. This recipe is flexible! You can easily adjust it to fit your needs. Whether you want to go vegan or gluten-free, you can still enjoy this tasty dish. Check the [Full Recipe] for more details! - Gather all ingredients: You need couscous, broth, olive oil, lemon zest, Parmesan, parsley, salt, pepper, garlic powder, and red pepper flakes. - Prepare your cooking space: Clear a counter area and get your tools ready, like measuring cups and a mixing bowl. - Heat the Broth: In a saucepan, bring the vegetable broth to a boil over medium heat. - Prepare the Couscous: In a large mixing bowl, mix the couscous with garlic powder. When the broth is boiling, pour it over the couscous. Cover the bowl tightly and let it sit for about five minutes. - Fluff and Add Ingredients: After five minutes, uncover the bowl. Use a fork to fluff the couscous. Stir in the olive oil, lemon zest, grated Parmesan cheese, and chopped parsley until well mixed. - Serving Suggestions: Transfer the couscous to a vibrant serving dish. Add extra parsley and a sprinkle of Parmesan on top. - Presentation Tips: Garnish with fresh lemon slices for a burst of color. Serve warm for the best taste. Enjoy this easy dish with your favorite protein or as a light meal. For the full recipe, check out the details above. - How to properly fluff couscous To fluff couscous, use a fork. Gently stir the grains after they absorb the liquid. This method helps separate the grains and adds a light texture. Avoid using a spoon, as it can mash the couscous. - Adjusting the consistency of couscous If your couscous is too dry, add a splash of warm water or broth. Stir well and let it sit for a few minutes. For a moister dish, add slightly more liquid when you first cook it. - Recommended herbs and spices Fresh herbs like parsley or basil brighten the dish. You can also add thyme for an earthy taste or dill for a unique flavor twist. Garlic powder adds depth, while red pepper flakes give it a hint of heat. - Ideas for other add-ins Try adding diced vegetables like bell peppers or spinach for more color and nutrition. Nuts like pine nuts or almonds add crunch. You can also mix in beans for extra protein. - Overcooking couscous Be careful not to overcook couscous. Follow the recommended cooking time, usually around five minutes. Overcooked couscous becomes mushy and loses its fluffy texture. - Using incorrect liquid ratios The right liquid ratio is key. For every cup of couscous, use 1 1/4 cups of broth or water. Too much liquid will make it soggy, while too little will leave it dry. Stick to this ratio for the best results. For detailed steps on making this dish, check out the Full Recipe. {{image_2}} You can change your Lemon Parmesan Couscous based on the seasons. In spring, add fresh asparagus and peas. This makes the dish bright and colorful. The crunch of the peas and the tender asparagus mix well with the couscous. In fall, try adding roasted butternut squash. The sweet flavor of the squash gives a warm touch. It adds a lovely texture that pairs well with the lemon and cheese. You can also change the style of your dish. For a Mediterranean twist, add olives and sun-dried tomatoes. This gives your couscous a salty and tangy flavor. The olives add a nice briny taste, while the tomatoes bring in sweetness. If you want an Asian fusion, add soy sauce and sesame oil. This adds a savory depth that is both unique and tasty. The sesame oil brings a nutty aroma that elevates the dish. This couscous works great as a side dish. It pairs well with grilled chicken or fish. The bright lemon taste cuts through rich proteins nicely. You can also make it a hearty salad. Just mix in some greens, like spinach or arugula, and protein. This makes it a full meal. You can enjoy it warm or cold, making it perfect for any time of year. For the full recipe, check out the complete guide to making this delightful dish! To store leftovers, place the couscous in an airtight container. This keeps it fresh and prevents it from drying out. You can enjoy your Lemon Parmesan Couscous for up to three days in the fridge. After that, it may lose flavor and texture. You can freeze couscous for longer storage. First, let it cool completely. Then, place it in a freezer-safe bag or container. Squeeze out excess air to avoid freezer burn. When you want to eat it, thaw it overnight in the fridge. For quick use, you can also microwave it directly from the freezer. To reheat, you can use a microwave or stovetop. If microwaving, add a splash of water to keep it moist. Heat it in short bursts, stirring in between. On the stovetop, warm it gently in a pan over low heat. This helps maintain the flavor and texture. Enjoy your delicious couscous as if it were freshly made! Cooked couscous can last about 3 to 5 days in the fridge. Make sure to store it in an airtight container. This will help keep it fresh and prevent it from drying out. Yes, you can make Lemon Parmesan Couscous ahead of time. Prepare it and let it cool before storing. You can easily reheat it later for a quick meal. Couscous is not gluten-free. It is made from wheat, so those with gluten sensitivities should avoid it. If you need gluten-free options, consider using quinoa or rice instead. Absolutely! You can use nutritional yeast or a vegan cheese. These options will give you a similar flavor without animal products. Serve Lemon Parmesan Couscous warm or at room temperature. You can garnish it with extra lemon zest, parsley, or even toasted nuts. This adds a nice touch of color and crunch. For the full recipe, check out the detailed instructions above. You learned about making Lemon Parmesan Couscous using simple steps and tasty ingredients. We covered cooking techniques, seasonal twists, and even storage tips. Couscous is fun to customize, so don’t be afraid to try new flavors. Remember, the key is to keep it fluffy and avoid overcooking. With these tips, you can create a dish that’s not just easy, but also delicious and versatile. Enjoy experimenting with couscous in your kitchen!

Lemon Parmesan Couscous Tasty and Simple Recipe

Looking for a quick and tasty dish? My Lemon Parmesan Couscous recipe is just what you need. With simple ingredients

Older posts
Newer posts
← Previous Page1 … Page34 Page35 Page36 … Page40 Next →

dsad

© 2025 flavorsprint • Built with GeneratePress

Our Policies

  • Copyright Policy
  • Cookie Policy
  • GDPR Policy
  • Privacy Policy
  • Disclaimer
  • Terms Of Use

More Information

  • Home
  • About
  • Contact
  • Appetizers
  • Dessert
  • Dinner
  • Drinks
©2025, flavorsprint About Back To Top