Skip to content
DisclaimerTerms Of UseGDPR PolicyCookie Policy

flavorsprint

  • Home
  • Drinks
  • Appetizers
  • Dinner
  • Dessert
  • About
  • Contact
  • Privacy Policy
DisclaimerTerms Of UseGDPR PolicyCookie Policy

Lillian

- 1 lb ground beef (80/20) - 4 slices of Swiss cheese - 1 large onion, thinly sliced - 4 slices of rye bread - 4 tablespoons butter, softened - 1 ½ tablespoons mayonnaise - 1 tablespoon ketchup - 1 teaspoon Dijon mustard - 1 teaspoon pickle relish - Lettuce - Tomato This recipe is simple yet packed with flavor. You need good quality ingredients to make a great patty melt. Ground beef is the star here. I suggest using an 80/20 blend for the best flavor and juiciness. Swiss cheese melts beautifully and adds a creamy touch. Choose fresh onions for the best caramelization. Rye bread gives a nice flavor base, and butter adds richness. The secret sauce is where the magic happens. A mix of mayonnaise, ketchup, Dijon mustard, and pickle relish brings tang and creaminess. You can adjust the sauce to your liking. Try adding extra relish if you like it tangy. For a fresh touch, add optional garnishes like lettuce and tomato. They bring color and crunch. With these ingredients, you’ll have a delicious patty melt ready to impress your family or friends. For the full recipe, check out the complete guide. To make the secret sauce, start with a small bowl. Mix together: - 1 ½ tablespoons mayonnaise - 1 tablespoon ketchup - 1 teaspoon Dijon mustard - 1 teaspoon pickle relish Stir well and taste. Adjust seasoning if needed. Set it aside for later. This sauce adds a rich flavor to the patty melt. Next, take a skillet and heat it over medium. Add 1 tablespoon of butter. Once it melts, add the thinly sliced onion. Sauté for about 10 to 15 minutes. Cook until the onions turn golden brown and caramelized. They should be sweet and soft. Remove from the skillet and set aside. Now, grab a bowl. Combine the ground beef with: - 1 tablespoon Worcestershire sauce - Salt and black pepper to taste Mix it well. Shape this mixture into two patties, each about ½ inch thick. Next, heat the same skillet over medium-high heat. If needed, add a little more butter. Cook the patties for 4 to 5 minutes on each side. Cook until they reach the doneness you like. In the last minute of cooking, add a slice of Swiss cheese on each patty to melt. Take four slices of rye bread. Spread softened butter on one side of each slice. On the unbuttered side, spread a good amount of the secret sauce. Place one melted patty on two slices. Add the caramelized onions on top. Close with another slice of bread, buttered side out. Wipe the skillet clean. Place it back on medium heat. Grill each assembled patty melt for about 3 to 4 minutes on each side. Look for a golden brown and crispy exterior. You can press down a little with a spatula for even browning. When they are crispy and golden, remove them from the heat. Slice each patty melt in half and place them on a serving plate. For a fresh touch, feel free to add lettuce and tomato as a garnish. Enjoy your meal! For a great patty melt, start with the right beef. I suggest using 80/20 ground beef. This blend has enough fat to keep your patties juicy. Make patties about ½-inch thick. Cook them for 4-5 minutes per side. Adjust the time for how you like your meat. Aim for medium if you want a nice pink center. Always season your beef well with salt and black pepper. The secret sauce makes the patty melt special. You can tweak it for more flavor. Add a dash of hot sauce for spice. A sprinkle of garlic powder gives it a nice kick. If you like tang, try adding a bit of lemon juice. Mix these extras into your sauce for a fun twist. Keep tasting until it’s just right for you. Bread choice matters in a patty melt. I love rye bread for its flavor. It holds up well when grilled. You can also use sourdough or whole wheat. Each option brings a unique taste. Make sure your bread is sturdy to hold all those juicy layers. Butter the outer sides before grilling for that perfect golden crust. For the full recipe, check the details above to make your own delicious patty melt! {{image_2}} If you want to switch up the cheese, try cheddar or pepper jack. These cheeses add a nice kick. Gouda melts well too, giving a rich flavor. Mixing cheeses can also create a unique taste. Experiment and find what you love best! You can make this patty melt with turkey or chicken. Ground turkey offers a lighter option. For a veggie choice, try black bean or lentil patties. They can be just as tasty and filling. Each option gives a fresh twist to this classic dish. To make a healthier patty melt, use lean ground beef or turkey. Whole-grain rye bread adds fiber and nutrients. You can also swap regular butter for a healthier spread. Consider using less cheese or low-fat options. These changes keep flavor while cutting calories. To keep your patty melts fresh, store any leftovers in the fridge. Wrap them tightly in plastic wrap or foil. You can also place them in an airtight container. Make sure to eat leftovers within three days for the best taste. When reheating, you want to keep the bread crispy. Use a skillet over medium heat. Place the patty melt in the skillet for about 3-4 minutes on each side. This method warms the inside and keeps the outside crunchy. You can also use an oven at 350°F for about 10-15 minutes. If you want to freeze cooked patty melts, wrap each one in plastic wrap. Then, place them in a freezer bag. This helps prevent freezer burn. You can freeze them for up to three months. To reheat, thaw in the fridge overnight, then follow the reheating guidelines. Enjoy your patty melt anytime! For the complete recipe, check out the Full Recipe section above. For juicy patties, I recommend using ground beef with an 80/20 ratio. This means 80% lean meat and 20% fat. The fat keeps the meat moist and adds flavor. Look for high-quality beef from local farms or markets. Fresh beef will taste better and give a nice texture. Avoid leaner cuts, as they may dry out during cooking. Yes, you can make the secret sauce ahead of time! Store it in an airtight container in the fridge. It stays fresh for up to a week. This makes prep easier when cooking. Just give it a stir before using to mix the flavors. Patty melts go great with many sides! Here are some tasty options: - Crispy French fries - Sweet potato fries - Coleslaw - Pickles - Salad with light dressing These sides add crunch and balance the rich flavors of the melt. You can easily adjust this recipe for dietary needs. Here are some ideas: - For gluten-free, use gluten-free bread. - For dairy-free, try vegan cheese or skip the cheese. - If you want a leaner option, use ground turkey or chicken. Experiment with different toppings like avocado or spicy sauce to suit your taste. In this article, we explored how to make delicious patty melts. We covered main ingredients, including ground beef and Swiss cheese. You learned how to prepare the secret sauce and cook your patties just right. The assembly and grilling steps help create the perfect melt. Experiment with variations like different cheeses or healthy swaps. Use our tips for storage and reheating to enjoy leftovers. With these ideas and instructions, you can make scrumptious patty melts at home. Enjoy your cooking journey!

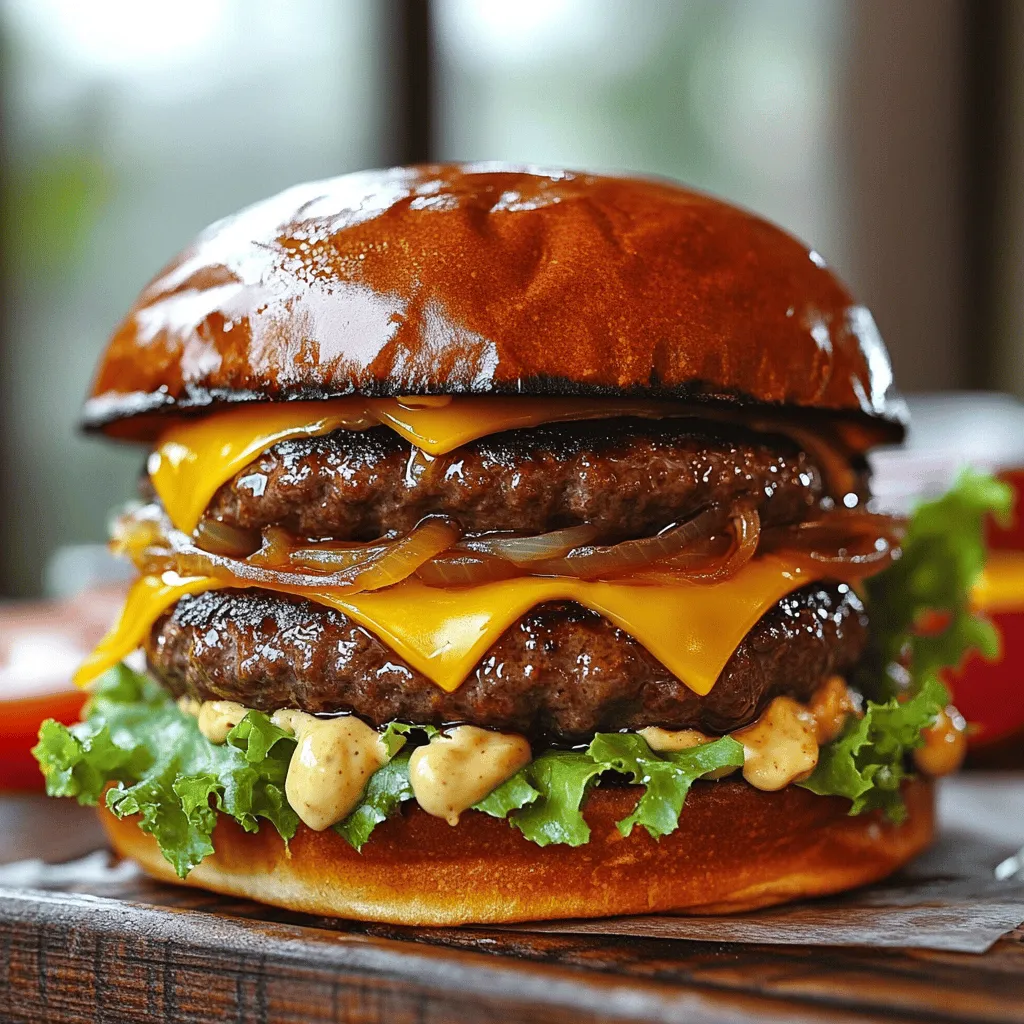
Patty Melt with Secret Sauce Deliciously Simple Recipe

Ready for a mouthwatering twist on a classic dish? My Patty Melt with Secret Sauce recipe is both delicious and

- 1 can (21 oz) cherry pie filling - 1 can (15 oz) crushed pineapple, drained - 1 box (15.25 oz) chocolate cake mix - 1 cup chopped walnuts (optional) - 1 cup (2 sticks) unsalted butter, melted - 1 cup sweetened shredded coconut (optional) - Whipped cream for serving - Maraschino cherries for garnish To make a great Black Forest Dump Cake, I love using simple ingredients. You start with cherry pie filling. It adds a sweet and tart flavor. Next, you’ll need crushed pineapple. This gives the cake a tropical twist. The chocolate cake mix is the star here. It makes everything rich and yummy. If you want a crunchy bite, add chopped walnuts. Shredded coconut gives it a fun texture, too. You’ll need melted unsalted butter to moisten the cake mix. It helps create that perfect golden top. Finally, for serving, whipped cream and maraschino cherries are musts. They make the dessert look fancy and taste delicious. You can find the full recipe above for easy reference. Enjoy this simple and tasty dessert! 1. Preheat your oven to 350°F (175°C) and grease a 9x13-inch baking pan. This will help the cake come out easily. 2. Spread the cherry pie filling evenly on the bottom of the prepared pan. Make sure it covers the base well. 3. Layer the drained crushed pineapple on top of the cherry filling. This adds a nice fruity flavor. 4. Sprinkle the chocolate cake mix evenly over the fruit layers without mixing it in. The dry mix will create a great texture. 5. If using walnuts and shredded coconut, sprinkle them evenly on top of the cake mix. These add crunch and flavor. 6. Drizzle the melted butter over the entire surface. Make sure to cover as much of the dry cake mix as you can. Do not stir it! 1. Bake in the preheated oven for about 40-45 minutes. The top should turn golden brown. 2. Check for doneness by inserting a toothpick into the cake. It should come out clean. 3. Allow to cool slightly before serving. This helps the flavors settle. 4. Serve warm with a dollop of whipped cream on top. Add a maraschino cherry for a fun garnish. For the complete recipe, check the [Full Recipe]. To ensure even baking and a great texture, spread the cherry pie filling evenly. Layer the crushed pineapple on top without mixing. This helps keep the flavors distinct. When you add the cake mix, sprinkle it gently over the fruits. Avoid stirring the layers. This keeps the cake moist and fluffy. To check for doneness, look for a golden brown top. Insert a toothpick into the center. If it comes out clean, the cake is ready. If it has batter on it, give it a few more minutes. Always trust your instincts when baking. To serve Black Forest Dump Cake, cut it into squares. A warm slice pairs well with whipped cream. Add a maraschino cherry on top for a pop of color. For alternative toppings, try adding chocolate syrup or fresh berries. You can even use ice cream for a fun twist. This cake is versatile, so feel free to get creative with your toppings. {{image_2}} You can switch up the fruit in your Black Forest Dump Cake. Instead of cherry pie filling, try blueberries or strawberries. Both fruits add a fresh flavor. They also pop with color and taste great. You can even mix fruits for a unique twist. If you need a gluten-free option, use a gluten-free chocolate cake mix. Many brands offer this now. You can find them in most grocery stores. Just check the box for gluten-free labeling. This way, you can enjoy this dessert without worry. To enhance the taste, consider adding spices or extracts. A dash of cinnamon can bring warmth. A splash of vanilla extract can deepen the flavors too. Both options will make your cake extra special. For a fun presentation, layer whipped cream on top after baking. Add some maraschino cherries for a pop of color. You can also sprinkle extra nuts or coconut on top for added texture. These small touches will wow your guests. For the full recipe, check out the [Full Recipe]. To keep your Black Forest Dump Cake fresh, use an airtight container. This helps keep moisture in and prevents the cake from drying out. You can also wrap it well with plastic wrap. Store leftover cake in the fridge. It will stay good for about 3 to 5 days. When you want to enjoy your cake again, you have a few options. The best method is to use the oven. Preheat your oven to 350°F (175°C). Put a slice of cake on a baking sheet. Cover it with foil to keep it moist. Bake for about 10 to 15 minutes. You can also use a microwave. Heat a slice for about 20 to 30 seconds. Just make sure not to overheat it. Enjoy your warm, tasty dessert! Black Forest Dump Cake is a fun and tasty dessert. It mixes rich chocolate and sweet cherries. This dish comes from the famous Black Forest region in Germany. The name reflects its use of cherries and chocolate, which are key to the original Black Forest cake. In this dump cake, you layer simple ingredients, making it quick and easy. Yes, you can make Black Forest Dump Cake ahead. Prepare the cake, but don’t bake it right away. Cover it and keep it in the fridge. When you are ready, just pop it in the oven. You can also bake it ahead and store it in the fridge for up to three days. Just warm it up before serving. You can serve many things with Black Forest Dump Cake. Whipped cream on top makes it extra special. You can also add maraschino cherries for a fun touch. For drinks, try coffee or milk. Both pair nicely with the sweet flavors. If you want more dessert, serve it with ice cream. The cold ice cream balances the warm cake. This blog post shared the tasty recipe for Black Forest Dump Cake. You learned about the ingredients, baking steps, and creative serving ideas. I also highlighted useful tips, ingredient swaps, and storage methods. Try making this cake with your favorite fruits, or add spices for extra flavor. Whatever you choose, this dessert will delight your taste buds. Enjoy this easy cake at your next gathering or treat yourself at home. Happy baking!

Black Forest Dump Cake Simple and Tasty Dessert

If you’re craving a quick and delicious dessert, you’ve got to try Black Forest Dump Cake! This simple recipe combines

- Chicken - For this dish, I use 500g of boneless chicken thighs. They stay juicy and tender. You can cut them into bite-sized pieces for easy cooking and eating. - Marinade Components - The marinade gives the chicken its bold flavor. You need: - 4 tablespoons of soy sauce - 1 tablespoon of oyster sauce - 1 tablespoon of freshly cracked black pepper - 6 cloves of minced garlic - 1 tablespoon of minced ginger - 2 tablespoons of sesame oil - 1 tablespoon of cooking oil (canola or vegetable) - This mix adds depth and a nice kick. - Vegetables & Garnishes - To add color and texture, include: - 1 sliced bell pepper (red or green) - 1 sliced onion - 2 chopped green onions for garnish - Sesame seeds for garnish - These fresh ingredients brighten up the dish and make it more appealing. For the full recipe, check out the details above. Marinating the Chicken Start by cutting your chicken thighs into bite-sized pieces. Place the chicken in a bowl. Add soy sauce, oyster sauce, minced garlic, ginger, and black pepper. Mix well to coat all pieces. Let this marinate for at least 30 minutes. If you have time, let it sit for up to 2 hours for a richer taste. Cooking the Chicken Grab a large skillet or wok. Heat cooking oil and sesame oil over medium-high heat. When the oil is hot, add the marinated chicken. Spread it in a single layer. Let it sear for about 4 to 5 minutes until it's golden brown on one side. Then, flip the chicken pieces. Adding Vegetables Now, add sliced onion and bell pepper to the skillet. Stir-fry these with the chicken for another 4 to 5 minutes. Cook everything until the chicken is fully done and the vegetables are tender-crisp. Taste it to check for seasoning. You can add more black pepper or soy sauce if you like. Remove from heat. Garnish with chopped green onions and sesame seeds before serving. This sweet, savory dish is perfect for family dinners. You can find the Full Recipe for more details. Marination Time Suggestions For the best flavor, marinate the chicken for at least 30 minutes. If you have time, let it sit for up to 2 hours. This helps the chicken soak up all the tasty sauces and spices. Searing Techniques Searing is key to getting a nice crust. Heat your pan well before adding the chicken. Place the chicken in a single layer. Don't crowd the pan. Sear for about 4-5 minutes until it's golden brown. This locks in moisture and flavor. Ideal Cooking Temperature Cook your chicken on medium-high heat. This ensures that it cooks through without burning. Use a meat thermometer to check the internal temp. It should reach 165°F (75°C). This guarantees juicy, safe-to-eat chicken every time. These tips will help you make a great Garlic Black Pepper Chicken. For the full recipe, check out the details above. {{image_2}} Alternative Meats You can swap chicken thighs for other meats. Pork or beef works well. You can also try shrimp or tofu for a tasty twist. These changes keep the dish exciting and flavorful. Vegetable Options Feel free to change the vegetables. Broccoli, snap peas, or carrots add crunch and color. Mushrooms or zucchini bring a different taste. Mix and match to your liking for fun flavors. Spice Level Adjustments Want more heat? Add chili flakes or fresh chopped chili. For less spice, reduce black pepper or skip it altogether. This dish can fit your taste and spice level perfectly. For the full recipe, check out the Garlic Black Pepper Chicken details. To keep your Garlic Black Pepper Chicken fresh, use these methods: - Refrigeration: Place leftovers in an airtight container. They will stay good for about 3-4 days in the fridge. Make sure to cool the chicken before sealing it. - Freezing Methods: For longer storage, freeze the chicken. Use a freezer-safe bag or container. Remove as much air as possible. It can last for up to 3 months. Label the container with the date. This helps you track how long it's been in the freezer. Reheating your Garlic Black Pepper Chicken is easy. Here’s how: - Microwave: Place chicken in a microwave-safe dish. Cover it with a lid or microwave-safe wrap. Heat in short bursts of 30 seconds. Stir in between until hot. - Stovetop: Heat a skillet over low heat. Add a little oil or water to prevent sticking. Add the chicken and cover the pan. Stir occasionally until warmed through. For the full experience of this dish, you might want to try the Full Recipe. To make Garlic Black Pepper Chicken spicier, you can add more black pepper. Use a mix of black pepper and crushed red pepper for extra heat. You can also include fresh chili peppers or chili paste. Adjust the amount to fit your taste. Spiciness can enhance the flavor and make it more exciting. Yes, you can use chicken breast instead of thighs. Chicken breast is leaner and cooks faster. Just be careful not to overcook it. The result will still be tasty and full of flavor. Adjust the marination time if needed, as chicken breast may need less time to soak up the sauce. Garlic Black Pepper Chicken goes well with many side dishes. Here are a few great options: - Steamed rice - Fried rice - Stir-fried vegetables - Noodles - A fresh salad These sides balance the rich flavors of the chicken and make the meal complete. For the full recipe, check out the complete guide to Garlic Black Pepper Chicken! In this blog post, we covered how to make Garlic Black Pepper Chicken. We explored the main ingredients and preparation steps. You also learned tips to enhance flavor and ways to swap ingredients for variations. Additionally, I shared how to store leftovers safely and answered common questions. Garlic Black Pepper Chicken is a fun dish to make. I hope you enjoy trying it!

Garlic Black Pepper Chicken Flavorful and Simple Meal

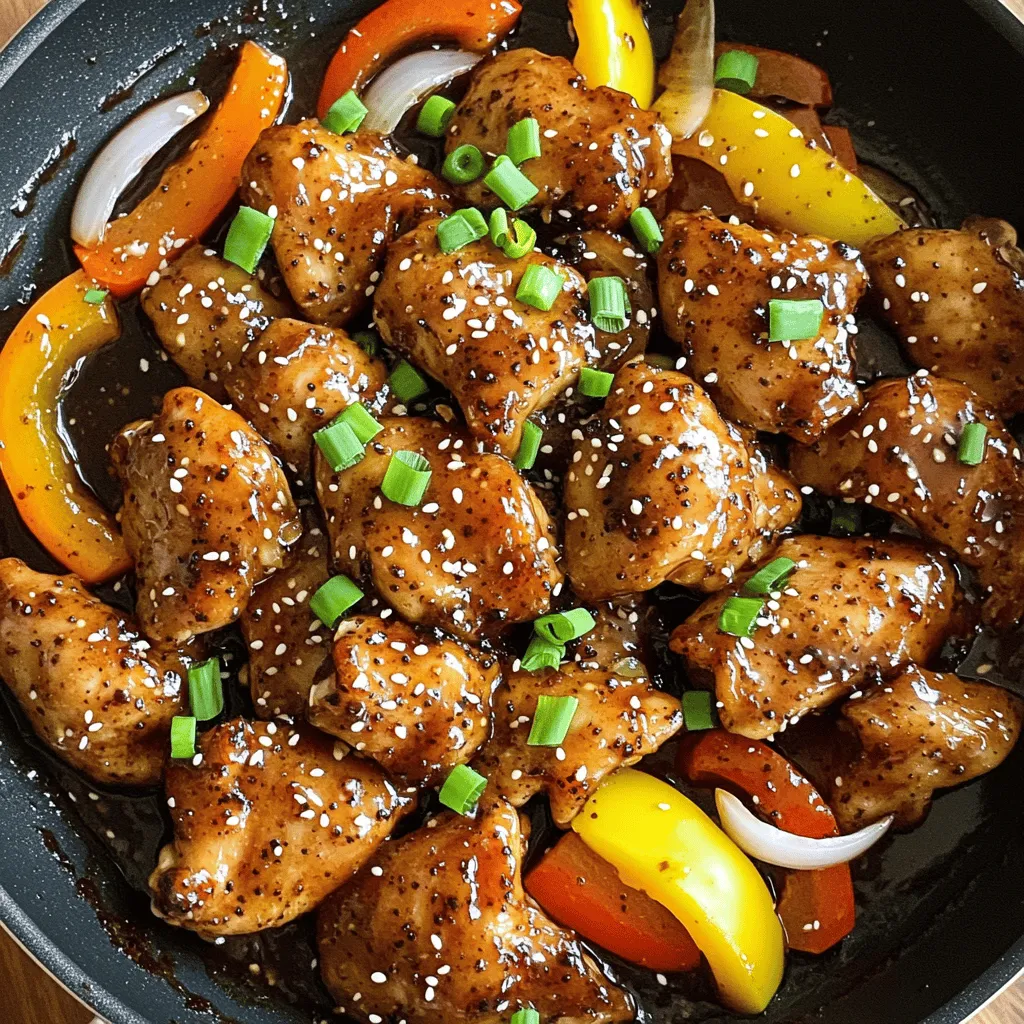
Looking for a tasty and easy meal? You’re in the right place! Garlic Black Pepper Chicken is a flavor-packed dish

To make the Ultimate Cheese Dog Pizza Sandwich, you will need these fresh ingredients: - Hot dog sausages - Mozzarella cheese - Pizza sauce - Shredded cheddar cheese - Pepperoni slices - Diced bell peppers - Sliced black olives - Olive oil - Garlic powder - Italian seasoning - Bread options (ciabatta or Texas toast) - Fresh basil leaves for garnish Gathering these ingredients is the first step to a tasty meal. Each ingredient brings its own flavor to the sandwich. The hot dog sausages add a savory base, while the mozzarella cheese gives that gooey, melty goodness. The pizza sauce ties all the flavors together with its tangy zest. Don’t forget the toppings! Pepperoni, diced bell peppers, and black olives add great texture and taste. Fresh basil leaves can uplift the dish with a burst of freshness. Choosing the right bread matters too. Ciabatta or Texas toast gives a sturdy base. It holds all the yummy fillings without falling apart. For the full recipe, check out the details above. This sandwich is sure to impress everyone at your table! - Preheat your oven to 375°F (190°C). - Cook the hot dog sausages in a skillet. Brown them for about 5-7 minutes. - Slice the cooked hot dogs lengthwise so they lay flat. - In a bowl, mix pizza sauce, garlic powder, and Italian seasoning. Set this aside. - Spread the pizza sauce mixture on one side of each bread slice. - On two of the bread slices, place the sliced hot dogs cut side up. - Layer mozzarella cheese, then add pepperoni, bell peppers, and black olives. - Sprinkle shredded cheddar cheese on top. Close the sandwiches with the other bread slices. - Place the sandwiches on a baking sheet. - Bake them for about 10-12 minutes. Look for golden bread and melting cheese. - Once done, cool for a minute. Slice each sandwich diagonally and serve. You can follow the Full Recipe for a detailed guide that brings this dish to life! - Optimal cooking times and temperatures For the best results, set your oven to 375°F (190°C). Bake the sandwiches for 10-12 minutes. This ensures the bread turns golden and the cheese melts perfectly. - Cheese melting techniques Use a mix of mozzarella and cheddar cheese. Mozzarella gives that stringy pull, while cheddar adds a rich taste. Layer the cheeses well, and cover them with toppings to help melt evenly. - Adjusting seasonings for taste Customize your flavors! Add more garlic powder or Italian seasoning to the sauce. You can also sprinkle some on top before baking for extra flavor. Taste as you go to find your perfect blend. - Side dish options Pair your sandwich with crispy fries or a fresh salad. These sides balance the richness of the cheese dog pizza sandwich. - Dipping sauces to enhance flavor Try marinara sauce or ranch dressing for dipping. They add a fun twist and extra flavor to each bite. {{image_2}} To make your Ultimate Cheese Dog Pizza Sandwich even better, try swapping some ingredients. - Alternative cheeses to try: Instead of mozzarella, you can use provolone or gouda. These cheeses add a unique taste. - Different meats or vegetarian options: You can replace hot dogs with turkey sausages or veggie dogs. For a meat-free option, try grilled mushrooms or zucchini slices. You can boost the flavor of your sandwich with a few simple changes. - Adding spices or herbs to the sauce: Mix in crushed red pepper flakes for heat. Fresh parsley or oregano can brighten up the sauce. - Unique toppings to experiment with: Consider jalapeños for spice, or even pineapple for a sweet twist. Caramelized onions can add depth to your flavors. These variations and enhancements will help you create a sandwich that matches your taste. Try out new ideas until you find your favorite combination. Remember, cooking is all about fun and creativity! For the full recipe, check out the Ultimate Cheese Dog Pizza Sandwich. To keep your Ultimate Cheese Dog Pizza Sandwich fresh, let it cool first. Place the sandwich in an airtight container. This helps maintain its flavor and texture. Store it in the fridge if you want it to last a few days. You can keep it for up to three days this way. If you plan to store it longer, consider freezing it. Wrap it tightly in plastic wrap and then in aluminum foil. This will help avoid freezer burn. When you want to enjoy your leftovers, there are great ways to reheat them. The oven works best for this type of sandwich. Preheat your oven to 350°F (175°C). Place the sandwich on a baking sheet and cover it with foil. Bake for about 10-15 minutes. This keeps the bread crispy and warms the cheese nicely. If you prefer using a microwave, be cautious. Place the sandwich on a microwave-safe plate. Heat it in short bursts, about 30 seconds at a time. Check often to avoid sogginess. The oven method gives a better texture, but the microwave is quick if you’re in a hurry. The best bread for a cheese dog pizza sandwich is thick and sturdy. I recommend using ciabatta or Texas toast. These types hold up well to the sauce and toppings. They give a nice crunch when toasted. Plus, they add flavor to your sandwich. If you want a softer bite, use a thicker white bread. Just make sure it’s not too flimsy. Yes, you can make this sandwich in an air fryer! It’s quick and easy. Just assemble your sandwich as usual. Preheat your air fryer to 375°F (190°C). Place the sandwich in the basket. Cook for about 8-10 minutes. Check often to avoid burning. Your sandwich will come out crispy and the cheese will melt perfectly. To make this recipe gluten-free, swap regular bread for gluten-free bread. Many stores sell gluten-free options. You can also use wrap-style bread made from rice or corn. Make sure the hot dogs and sauces are gluten-free too. Always check labels for hidden gluten. This way, everyone can enjoy this tasty sandwich. - What cheese works best? Try different cheeses like provolone or pepper jack. Each adds unique flavors. - Can I add veggies? Definitely! Spinach, mushrooms, or jalapeños work great in this sandwich. - What about sauces? Experiment with BBQ sauce or ranch dressing. These can add a fun twist. - How do I store leftovers? Keep leftovers in an airtight container in the fridge. They last about 2 days. - Can I grill the sandwich? Yes! Grilling gives it a nice smoky flavor. Just use a skillet or panini press. For the full recipe, check out the Ultimate Cheese Dog Pizza Sandwich. This blog post guides you through making a fun cheese dog pizza sandwich. You learned about ingredients, preparation, and baking steps. I shared tips for perfecting your sandwich and variations to try. Remember to store leftovers properly and reheat for the best taste. Now, get creative with toppings and enjoy these sandwiches. They are perfect for gatherings or a quick meal. You'll impress family and friends with this tasty recipe!

Ultimate Cheese Dog Pizza Sandwich Recipe Delight

Are you ready to make the Ultimate Cheese Dog Pizza Sandwich? This delicious dish combines all your favorites: juicy hot

To make this tasty dish, you need some key items. Here’s what you will need: - 2 cans of refrigerated biscuit dough - 1 cup cooked sausage, crumbled (Italian or breakfast sausage works well) - 6 large eggs, beaten - 1 cup shredded cheddar cheese - 1/2 cup milk - 1/4 teaspoon garlic powder - 1/4 teaspoon onion powder - Salt and pepper to taste - 2 tablespoons melted butter - Fresh chives or parsley, chopped, for garnish These items come together to create a warm and cheesy delight. The biscuit dough forms the base, while the sausage adds a savory touch. Eggs and cheese bring it all together, making it rich and tasty. Choosing the right brands can enhance your monkey bread. For biscuit dough, I recommend Pillsbury or Grands! They offer flaky and soft biscuits. For sausage, look for brands like Johnsonville or Jimmy Dean. They provide great flavor and quality. Always check for fresh options, as freshness boosts the taste. You can easily adapt this recipe for different diets. Here are some ideas: - Use gluten-free biscuit dough if you have a gluten allergy. - Swap out the sausage for a plant-based option like Beyond Meat. - For a lighter option, use egg whites instead of whole eggs. - If you’re lactose intolerant, try dairy-free cheese or omit it entirely. These swaps allow you to enjoy the dish while meeting your dietary needs. Just remember to keep the main flavors intact for a delicious result. You can find the full recipe linked earlier for more details on making this dish. Start by gathering all your ingredients. You will need biscuit dough, sausage, eggs, cheese, and spices. Cut each biscuit into quarters. This makes them easy to mix and pull apart later. Measure out the sausage, cheese, and spices. Having everything ready makes cooking fun and easy. Heat a large skillet over medium heat. Add the crumbled sausage to the skillet. Cook it until it turns brown and is fully cooked. This step adds great flavor to your monkey bread. Once it is done, remove it from the heat. Let it cool for a moment while you mix other ingredients. In a mixing bowl, whisk the eggs with milk, garlic powder, onion powder, and any salt or pepper. This blend makes the base of your dish. In another large bowl, combine the biscuit pieces and cooked sausage. Pour the egg mixture over the biscuit and sausage. Toss everything until it is coated well. Finally, fold in the shredded cheese. This adds a nice creamy texture. Pour the mixture into a greased bundt pan. Spread it out evenly, making sure there are no gaps. Drizzle melted butter over the top for extra flavor. Bake in your preheated oven for 25-30 minutes. Look for a golden brown top. To check if it's done, insert a toothpick in the center. If it comes out clean, it’s ready. Let it cool for 5 minutes before flipping it onto a plate. Garnish with chopped chives or parsley. Now, it’s time to pull apart and enjoy this tasty treat! For the complete recipe, see the Full Recipe. To get the best monkey bread, timing is key. Bake your creation for 25 to 30 minutes. Watch for a golden brown top. A toothpick should come out clean when it's ready. If you see it browning too fast, cover it with foil. This way, it cooks evenly without burning. Make sure to mix all the ingredients well. Cut the biscuit dough into small, even pieces. This helps them cook at the same time. When you pour the mixture into the bundt pan, spread it evenly. This ensures every bite is full of flavor. Serve your monkey bread warm for the best taste. Pair it with a fresh salad or some fruit. You can also add a side of spicy ketchup or hot sauce for a kick. For a fun twist, try serving it with a creamy dip. Enjoy it at brunch or as a snack during game day. Check out the Full Recipe for more tips! {{image_2}} You can easily make a vegetarian version of this dish. Simply swap the sausage for cooked mushrooms or a meat substitute. You could also use a mix of sautéed peppers and onions. This adds nice flavor and keeps it hearty. You can use the same steps from the Full Recipe, just replace the meat. Cheese plays a huge role in this recipe's flavor. Cheddar is great, but feel free to experiment. Try using Monterey Jack for a creamier taste. Feta cheese adds a tangy kick. You can even mix different cheeses for extra depth. Just keep the total amount of cheese the same. Adding veggies is a smart way to boost taste and nutrition. Chopped spinach or kale can add a fresh touch. You can also include diced tomatoes or zucchini. Just sauté these first to soften them. Fold them into the mixture with the cheese. This will make your monkey bread colorful and tasty! I love making extra monkey bread. To store leftovers, let it cool first. Wrap the cooled bread in plastic wrap or foil. You can also keep it in an airtight container. This keeps it fresh for up to three days in the fridge. When you want to enjoy your leftover monkey bread, preheat your oven to 350°F (175°C). Place the monkey bread on a baking tray. Cover it with foil to prevent it from drying out. Heat for about 10-15 minutes. If you're in a hurry, you can use the microwave. Heat it in 30-second bursts until warm. Freezing is a great way to save this dish. Cut the monkey bread into pieces. Wrap each piece tightly in plastic wrap, then in foil. Store them in a freezer bag. This way, it stays good for up to three months. When ready to eat, thaw in the fridge overnight. Reheat it in the oven or microwave. For the full recipe, check out the earlier section! Yes, you can make this dish ahead. You can prepare the mixture and place it in the bundt pan. Cover it well and store it in the fridge overnight. When you're ready, just bake it in the morning. This method saves time and makes breakfast easy and fun. This monkey bread pairs well with a fresh fruit salad. You can also serve it with a side of crispy bacon. A light salad adds a nice crunch, too. For drinks, coffee or fresh juice works perfectly. These options balance the rich flavors of the monkey bread. You can check if it's done by using a toothpick. Insert the toothpick in the center of the bread. If it comes out clean, the monkey bread is ready. The top should also be golden brown. Let it cool for a few minutes before serving to enhance the flavor. For the full recipe, refer to the instructions above. This article explored how to make Sausage Egg and Cheese Monkey Bread. We discussed essential ingredients, step-by-step instructions, and helpful tips. I shared storage advice and variations for different tastes. You can easily adapt this recipe for your needs. Whether you stick to classic flavors or try new ones, it’s all about your choices. Enjoy creating this fun dish for breakfast or brunch. Happy cooking!

Sausage Egg and Cheese Monkey Bread Flavorful Treat

Get ready for a breakfast game changer! This Sausage Egg and Cheese Monkey Bread is a flavorful treat that’s fun

- 1 cup lump crab meat, drained - 1/2 cup cream cheese, softened - 1/4 cup mayonnaise - 1/4 cup grated Parmesan cheese - 1 tablespoon Dijon mustard - 1 tablespoon lemon juice - 1 teaspoon Old Bay seasoning - 1/2 teaspoon garlic powder - 1/4 teaspoon cayenne pepper (optional for heat) - 1/4 cup green onions, finely chopped - 1 package (1 sleeve) of buttery crackers, crushed - Fresh parsley for garnish I love using lump crab meat for these bites. It gives a rich taste and a nice texture. Cream cheese and mayonnaise make a creamy base. They blend well and help hold everything together. You can’t skip the Old Bay seasoning. It gives that classic crab flavor that everyone loves. You can change the flavor with different seasonings. Add more lemon juice for tang. Try fresh herbs like dill or cilantro for a twist. For cheese, you can swap in cheddar or gouda for a different taste. If you have dietary needs, there are swaps you can make. Use gluten-free crackers to keep it safe for gluten-free diets. For a dairy-free version, look for vegan cheese and mayo. Each change can make these crab bites fit your needs while keeping them tasty. For the full recipe, check out the details above! First, you need to preheat your oven to 350°F (175°C). This step is key for even cooking. While that heats up, line a baking sheet with parchment paper. This paper keeps the crab bites from sticking, making cleanup a breeze. In a mixing bowl, start with cream cheese and add mayonnaise, Parmesan cheese, Dijon mustard, lemon juice, Old Bay seasoning, garlic powder, and cayenne pepper if you like some heat. Mix it all together until it’s smooth. To get that perfect texture, make sure your cream cheese is soft. This helps everything blend nicely. Now it’s time to fold in the lump crab meat and green onions. Be gentle! You don’t want to break the crab too much. In a shallow bowl, pour in the crushed buttery crackers. Using a tablespoon, scoop the crab mixture and form it into small balls. Roll each ball in the crackers until fully coated. Place them on your baking sheet with some space between them. Bake your crab bites for about 20-25 minutes. You want them to be golden brown and heated through. Once done, let them cool for a bit before moving them to a serving platter. Enjoy these tasty bites warm! For the Full Recipe, check out the details above. For the best flavor, adjust your seasonings. You can add more Old Bay seasoning or a splash of hot sauce for a kick. Fresh herbs like dill or chives can elevate the taste, too. When it comes to texture, you want a nice crunch. Use crushed crackers as a coating. Panko breadcrumbs also work well if you want an extra crispy bite. Bake them until golden brown for that perfect crunch. Dipping sauces can make your crab bites shine. I love serving them with cocktail sauce or zesty lemon aioli. You can also try a creamy ranch or spicy sriracha mayo. For a complete meal, pair these bites with a fresh salad or some roasted veggies. You can also serve them on a platter with a variety of sauces. This way, friends and family can pick their favorite. Enjoy making these bites a star at your next gathering! {{image_2}} You can make baked crab bites even more exciting with flavor twists. Try adding spicy elements like jalapeños or a splash of hot sauce. This brings a nice kick to each bite. You can also change the cheese. Instead of just Parmesan, think about using cheddar or a creamy goat cheese. Fresh herbs, like dill or chives, can add a fresh taste. These changes can help you create a unique dish. For those watching carbs, you can use alternatives. Swap regular cream cheese for a low-carb version. You can also use crushed pork rinds instead of crackers. They add crunch without the carbs. If you want a vegan option, use plant-based crab substitutes. Cream cheese can be replaced with vegan cream cheese. Mayonnaise can also be swapped for a vegan brand. These changes keep the flavor but fit different diets. Each variation keeps the spirit of the baked crab bites while catering to your needs. Enjoy experimenting with these ideas! To keep your Baked Crab Bites fresh, store them in an airtight container. Place a paper towel at the bottom of the container to absorb moisture. Seal the lid tightly to avoid air exposure. You can refrigerate them for up to three days. For longer storage, I recommend freezing them. Wrap each crab bite in plastic wrap, then place them in a freezer bag. This helps prevent freezer burn. Properly stored, they can last up to three months in the freezer. When you're ready to enjoy leftovers, reheating them right is key. You can use an oven or an air fryer for the best results. Preheat your oven to 350°F (175°C). Place the crab bites on a baking sheet. Heat them for about 10-15 minutes until they're warm and crispy again. If using an air fryer, set it to 350°F (175°C) and heat for about 5-7 minutes. This keeps the texture nice and crunchy. Avoid using a microwave, as it makes them soggy. Yes, you can use canned crab meat. Canned crab is convenient and saves time. It also has a longer shelf life. However, fresh crab often tastes better. Fresh crab has a sweeter flavor and a firmer texture. Canned crab can be mushy and less flavorful. When using canned crab, drain it well to remove excess liquid. This way, your crab bites stay creamy but not soggy. To add heat, try using cayenne pepper or hot sauce. You can mix these spices into the creamy base. For a bolder kick, add diced jalapeños. Another option is to sprinkle red pepper flakes on top before baking. Adjust the spice to suit your taste. Start with a small amount and add more if needed. This way, you can control the heat level in your baked crab bites. Baked crab bites pair well with many sides and drinks. Serve them with cocktail sauce for dipping. A zesty lemon aioli is also a great choice. For sides, think about a fresh salad or crunchy veggies. These add a nice contrast to the rich crab bites. For drinks, try white wine or a light beer. Both complement the flavors in the crab bites well. You can find the complete Baked Crab Bites recipe [here](#). This will guide you through each step to make these tasty bites. Enjoy cooking and impressing your friends and family! Baked crab bites are fun to make and delicious to eat. We covered all the essentials, from the key ingredients like crab meat and cream cheese to options for making them fit your diet. The step-by-step guide showed how to prep, mix, shape, and bake perfectly. With tips for extra flavor and even variations, you can create your ideal crab bite. Store leftovers well and reheat carefully for best results. Enjoy your tasty creation and impress everyone with your skills!

Tasty Baked Crab Bites Quick and Easy Appetizer

Looking for a quick and tasty appetizer that will impress your guests? Baked crab bites are just the dish you

To make Macarona Bechamel, gather these ingredients: - 250g macaroni pasta - 2 tablespoons olive oil - 1 onion, finely chopped - 3 garlic cloves, minced - 500g ground beef or chicken - 1 teaspoon paprika - Salt and pepper to taste - 400g canned crushed tomatoes - 2 cups milk - 3 tablespoons butter - 3 tablespoons all-purpose flour - 1 cup grated mozzarella cheese - 1/2 cup grated Parmesan cheese - Fresh parsley for garnish You can easily swap some ingredients for this dish. If you want a lighter option, use ground turkey instead of beef or chicken. For a vegetarian twist, replace meat with mushrooms or lentils. If you don't have paprika, try using chili powder for a kick. Use any cheese you like if you run out of mozzarella or Parmesan. Almond milk can stand in for regular milk if you need a dairy-free option. To prepare this rich and creamy pasta, you’ll need a few basic tools: - Large pot for boiling pasta - Large skillet for making the meat sauce - Medium saucepan for the bechamel sauce - Whisk for mixing the sauces - Mixing bowl for combining ingredients - Baking dish for the final bake This equipment helps you create a fantastic Macarona Bechamel. For the full recipe, check the detailed instructions above. Start by boiling a large pot of salted water. Once it is bubbling, add 250g of macaroni pasta. Cook the pasta according to the package instructions until it is al dente. This usually takes about 8-10 minutes. After cooking, drain the pasta in a colander and set it aside. Next, heat 2 tablespoons of olive oil in a large skillet over medium heat. Add 1 finely chopped onion and 3 minced garlic cloves. Sauté them until they become soft and translucent, about 3-4 minutes. Then, add 500g of ground beef or chicken. Use a spoon to break the meat into small pieces. Cook until it is nicely browned, which should take around 5-7 minutes. Season the meat with 1 teaspoon of paprika, salt, and pepper. Pour in 400g of canned crushed tomatoes. Let it simmer for about 10 minutes, stirring occasionally, until the sauce thickens slightly. For the creamy bechamel sauce, melt 3 tablespoons of butter in a saucepan over medium heat. Once melted, whisk in 3 tablespoons of all-purpose flour. Cook this mixture for about 2 minutes to form a roux. Gradually add 2 cups of milk, whisking constantly to avoid lumps. Keep stirring until the sauce thickens, which usually takes about 5 minutes. Once thick, remove it from heat and mix in 1 cup of grated mozzarella and 1/2 cup of grated Parmesan cheese until they melt into the sauce. In a large mixing bowl, combine the cooked macaroni, meat sauce, and bechamel sauce. Stir everything together until well mixed. Preheat your oven to 200°C (400°F). Transfer the pasta mixture into a baking dish, spreading it evenly. Top it with the remaining mozzarella and Parmesan cheese. Bake in the preheated oven for 20-25 minutes, until the top is golden and bubbly. Finally, let it cool for a few minutes before serving. Garnish with fresh parsley for a pop of color. For the full recipe, check out the details provided above. To make a great bechamel sauce, start with a good roux. Melt 3 tablespoons of butter in a pan over medium heat. Add 3 tablespoons of flour and stir for about two minutes. This step cooks the flour and gives your sauce a nice base. Slowly pour in 2 cups of milk, whisking constantly. This helps avoid lumps. Keep stirring until the sauce thickens, which takes about five minutes. For extra flavor, add a pinch of salt, pepper, or nutmeg. If your bechamel sauce is lumpy, don’t worry! Just use a hand blender to smooth it out. If it’s too thick, whisk in a little more milk until you get the right consistency. If it tastes bland, add salt or cheese to enhance the flavor. Always taste your sauce as you go. This dish is best served hot and fresh from the oven. Garnish with fresh parsley for a pop of color. Pair it with a simple green salad or garlic bread for a complete meal. You can also add extra cheese on top before baking for a cheesy crust. Want to make it a bit spicy? Add some chili flakes to the meat sauce for a kick! For the complete recipe, check out the [Full Recipe]. {{image_2}} You can make a tasty vegetarian version of Macarona Bechamel. Instead of meat, use a mix of veggies like mushrooms, zucchini, and spinach. Start by sautéing your chosen vegetables in olive oil. You can follow the same steps for the meat sauce, just skip the meat. This variation keeps the creamy texture and rich flavor. Plus, it’s colorful and full of nutrients. For a spicy kick, add red pepper flakes or diced jalapeños. You can mix these into the meat sauce or the bechamel sauce. If you love heat, consider using spicy sausage instead of beef or chicken. This adds depth and flavor. You can also sprinkle some hot sauce on top before serving. This version is sure to wake up your taste buds. Looking to amp up the cheese flavor? You can mix different types of cheese into the bechamel. Try using gouda, cheddar, or even feta. Each cheese brings its own unique taste. You can also sprinkle more cheese on top before baking for a crispy, cheesy crust. This variation makes your dish extra rich and indulgent. Don’t forget to check out the Full Recipe for more ideas! After you enjoy your Macarona Bechamel, let it cool. Place any leftovers in an airtight container. This helps keep flavors fresh. Store it in the fridge for up to three days. If you want to save it longer, freezing is a great option. To freeze Macarona Bechamel, use a freezer-safe container. Make sure the dish is completely cool. It can stay frozen for about three months. For best results, separate it into smaller portions. This makes it easier to thaw and reheat later. Label each container with the date, so you know when to use it. When you’re ready to eat your frozen Macarona Bechamel, first thaw it overnight in the fridge. You can reheat it in the oven or on the stove. If using the oven, preheat to 180°C (350°F). Cover the dish with foil to keep it moist. Bake for about 20 minutes. If reheating on the stove, add a splash of milk to prevent it from drying out. Warm it over low heat, stirring occasionally until hot. Enjoy your rich and creamy pasta again! For the full recipe, check the complete details above. Macarona Bechamel is a creamy pasta dish. It combines macaroni, meat, and a rich bechamel sauce. This dish hails from Mediterranean cuisine, often enjoyed in many homes. The bechamel sauce is made from butter, flour, and milk. It gives the dish a smooth, velvety texture. You can add cheese for extra flavor, making it even more delightful. Yes, you can prepare Macarona Bechamel in advance. Make the meat sauce and bechamel sauce separately. Cook the macaroni but do not combine everything yet. Store the sauces and pasta in the fridge. When you are ready to eat, mix them, then bake. This method saves time and allows flavors to meld. Just remember to bake it until it’s hot and bubbly! To make Macarona Bechamel healthier, consider these tips: - Use whole wheat macaroni for more fiber. - Replace ground beef with lean turkey or chicken. - Add vegetables like spinach or bell peppers to boost nutrition. - Use low-fat milk in the bechamel sauce. - Opt for less cheese or use a lighter cheese option. These simple swaps will keep the dish tasty while making it healthier! Macarona Bechamel is a tasty dish full of flavors and textures. You learned about the key ingredients and how to make the sauces. The cooking steps are clear and easy to follow. Don't forget my tips for a perfect bechamel sauce. You can even make fun variations to suit your taste. Store your leftovers well to enjoy later. This dish is simple and rewarding, perfect for sharing with family and friends. Dive in, and enjoy your cooking journey!

Macarona Bechamel Rich and Creamy Pasta Recipe

Are you ready to dive into the world of Macarona Bechamel? This rich and creamy pasta dish will warm your

To make the best Chinese fried rice, you need the right ingredients. Here’s what you will need: - 3 cups cooked jasmine rice (preferably chilled) - 2 tablespoons vegetable oil - 2 large eggs, beaten - 1 cup mixed vegetables (carrots, peas, and corn) - 1 small onion, finely chopped - 2 green onions, sliced - 3 cloves garlic, minced - 2 tablespoons soy sauce - 1 tablespoon oyster sauce (or hoisin sauce for a vegetarian version) - 1 teaspoon sesame oil - Salt and pepper to taste - Fresh cilantro for garnish (optional) Using chilled rice is key. It helps prevent clumping. Fresh veggies add color and a nice crunch. You can add extra flavors to your fried rice. Consider these options: - Additional sauces like sriracha or chili paste for heat - Spices such as five-spice powder for more flavor - Protein additions like chicken, shrimp, or tofu for a heartier dish These extras let you make the dish your own. Each option brings a new twist to this classic meal. For a full recipe, check out the Ultimate Chinese Fried Rice. To start, you need chilled rice. Cold rice works best for fried rice. It helps keep the grains separate. If you can, use rice that was cooked the day before. This way, it won’t turn mushy when you fry it. Next, prep your vegetables ahead of time. Chop your onion, garlic, and other veggies before cooking. This makes the cooking process smooth. You won’t rush or burn anything. Having everything ready ensures you can focus on flavor. Now, let’s cook! Heat the vegetable oil in a wok over medium-high heat. Once the oil is hot, add your chopped onion and minced garlic. Stir them often until the onion turns clear. This takes about 2-3 minutes. Push the onion and garlic to one side of the pan. Pour in the beaten eggs. Scramble them well until fully cooked. Then, mix the eggs with the onion and garlic. Add your mixed vegetables next. Stir and cook for another 2-3 minutes. You want them heated through and soft. Now it’s time for the chilled rice. Break up any clumps using a spatula. Add the rice to the pan and mix it well with the veggies. Coat everything with oil. Drizzle in the soy sauce, oyster sauce (or hoisin), and sesame oil. Stir continuously for about 3-4 minutes. This helps all the flavors blend. Finally, season with salt and pepper to taste. Add the sliced green onions and stir again. You want everything to be hot and mixed well. Once cooked, it’s time to serve. Garnish with fresh cilantro if you like. This adds a nice touch of color and flavor. For portion sizes, plan on about one cup of fried rice per person. This recipe serves four people easily. Enjoy your delicious Chinese fried rice! For the full recipe, check out the Ultimate Chinese Fried Rice. - Overcooking the vegetables: This can make them mushy. Keep the crunch by cooking them just until tender. - Choosing the wrong type of rice: Use jasmine rice or long-grain rice. They hold their shape better and add great texture. - How to achieve restaurant-quality fried rice: Start with cold, day-old rice. Fresh rice is too sticky. Break up clumps before cooking. - Importance of heat and timing: Use high heat to fry the rice quickly. This keeps it from steaming and getting soggy. Stir-fry in small batches for the best results. Now, you can make fried rice that tastes like it came from a restaurant! Enjoy cooking and experimenting with flavors! {{image_2}} You can easily make fried rice vegetarian or vegan. Just swap out meats for plant-based proteins. Tofu is a great choice. It adds texture and protein. You can also use tempeh or seitan for added flavor. For sauces, choose hoisin instead of oyster sauce for a vegan dish. This gives the rice a sweet taste. You can also mix in soy sauce for saltiness. If you prefer just veggies, try vegetable-only fried rice. Use a mix of your favorite vegetables. Carrots, peas, and bell peppers work well. This adds color and crunch. You can also add mushrooms for a meaty feel. Fried rice can change a lot in taste based on where it comes from. Each region has its own twist. For example, Yangzhou fried rice is famous. It usually has shrimp, egg, and vegetables. The flavors are light and fresh. In Cantonese style, you might find more soy sauce. This gives it a darker color and saltier taste. Szechuan fried rice often has spice. It may include chili oil or hot peppers. You could also try Hokkien fried rice. It often has a mix of seafood and a rich soy sauce base. Each style shows off unique flavors and cooking methods. Explore these variations to find your favorite. Each bite can take you on a different journey through China. You can find more details in the Full Recipe. To keep your fried rice fresh, let it cool first. Spread it out on a plate. This helps it cool down fast. Once it’s cool, place it in a container. Use a tight-sealing container to keep it fresh. Glass containers work well. They prevent odors and keep food tasty. Store the rice in the fridge. It will last about three to four days. If you want to keep it longer, consider freezing it. Use freezer-safe bags or containers. Squeeze out the air to avoid freezer burn. Label the bag with the date, so you remember when you made it. When reheating your fried rice, keep the texture in mind. The best method is to use a skillet or wok. Heat a small amount of oil in the pan. Add the rice and stir it often. This method helps keep the rice from getting soggy. If the rice feels dry, add a splash of water or broth. This step helps bring back moisture. Cover the pan for a few minutes. This helps steam the rice gently. Check to make sure it’s hot throughout. Enjoy your fried rice just as good as when it was fresh! I love using jasmine rice for fried rice. It has a light, floral scent. Jasmine rice cooks well and stays fluffy. Its texture is perfect for frying. Other types, like long-grain, can also work. However, jasmine rice gives the best flavor and texture. Yes, you can freeze Chinese fried rice! Here’s how: 1. Let the fried rice cool down completely. 2. Portion it into airtight containers or freezer bags. 3. Remove as much air as possible. 4. Label the bags with the date. 5. Freeze for up to three months. To thaw, place it in the fridge overnight. You can also microwave it directly from the freezer. Just add a splash of water to keep it moist. You can make fried rice healthier by: - Using brown rice instead of white rice for more fiber. - Reducing the amount of oil you use. - Adding more vegetables like bell peppers and broccoli. - Using low-sodium soy sauce to cut down on salt. These changes keep the taste while making it better for you. To boost the flavor, try adding: - A dash of chili oil for some heat. - A sprinkle of sesame seeds for crunch. - Fresh herbs like cilantro or basil for freshness. - A squeeze of lime juice to brighten up the dish. These ingredients give your fried rice an exciting twist. For the Ultimate Chinese Fried Rice recipe, check out [Full Recipe]. It's packed with flavor and easy to make! In this post, we covered how to make the best Chinese fried rice. We talked about essential and optional ingredients, like cooked jasmine rice and mixed vegetables. You learned step-by-step instructions for cooking in a wok and tips to avoid common mistakes. We explored variations like vegetarian options and regional styles. Finally, we discussed storing and reheating leftovers. Now you're ready to make a delicious dish! Enjoy the process and impress your friends and family with your fried rice skills.

Best Chinese Fried Rice Simple and Flavorful Recipe

Are you ready to elevate your dinner game? This simple and flavorful Chinese fried rice recipe will impress your family

- 1 pound large shrimp, peeled and deveined - 4 cloves garlic, minced - 1 cup heavy cream - 1 tablespoon olive oil - 1 tablespoon butter - 1 teaspoon paprika - Salt and pepper to taste - 2 tablespoons fresh parsley, chopped (for garnish) - 1 lemon, juiced In this dish, shrimp are the star. I love using large shrimp because they stay juicy and tender when cooked. Make sure to peel and devein them for a better texture. Garlic adds a punch of flavor. In this recipe, we use four cloves, minced finely to release their aroma. The sauce comes from heavy cream. It makes the dish rich and smooth. I choose heavy cream for its creamy texture, but you can try alternatives too. Olive oil and butter create a great base for cooking. The butter gives a nice flavor while the oil helps prevent burning. For seasoning, a teaspoon of paprika adds warmth. Adjust the salt and pepper to suit your taste. Fresh parsley not only looks nice but adds a fresh taste. A squeeze of lemon juice at the end brightens every bite. You can find the full recipe above to enjoy this creamy garlic shrimp dish at home! First, let's prepare the shrimp. I like to start by peeling and deveining the shrimp. This makes them clean and ready to cook. You can use fresh or frozen shrimp, but thaw frozen shrimp beforehand. Next, mince the garlic finely. This step is crucial since garlic adds great flavor. Finally, chop the parsley for garnish. It adds a lovely touch to your dish. Now, heat a tablespoon of olive oil and a tablespoon of butter in a large skillet over medium heat. Wait until the butter melts and starts bubbling. This is when you add the minced garlic. Sauté it for about 1-2 minutes. Be careful not to burn the garlic; you want it fragrant. Next, increase the heat to medium-high and add the shrimp to the skillet. Sprinkle paprika, salt, and pepper over them. Cook the shrimp for about 2-3 minutes on each side. They should turn pink and opaque when done. After that, reduce the heat to medium-low. Pour in 1 cup of heavy cream and stir it all together. Let it simmer for about 3-4 minutes. You want the sauce to thicken slightly. Stir occasionally to keep everything mixed well. Squeeze the juice of one lemon into the skillet. This adds a nice brightness to the dish. Stir it well and taste the sauce. Adjust the seasoning if needed. Finally, remove the skillet from the heat. Garnish your dish with the fresh parsley you chopped earlier. This adds color and flavor. Serve your creamy garlic shrimp warm. Enjoy your meal with some crusty bread or over pasta for a complete dish. For the full recipe, refer to the earlier sections. - Optimal shrimp cooking time: Cook your shrimp for about 2-3 minutes on each side. Look for a pink color and opaque look. This shows they are done. Overcooking will make them tough. Watch closely for perfect shrimp! - How to prevent overcooking garlic: Sauté garlic for only 1-2 minutes. You want it fragrant, not brown. Burnt garlic can ruin your dish. Stir it well and keep an eye on it! - Achieving the perfect creamy consistency: Pour in the heavy cream and let it simmer. Stir occasionally. This helps it thicken just right. You want a rich, smooth sauce that clings to the shrimp. - Flavor adjustments with additional spices: Add spices like cayenne for heat or herbs for freshness. Consider a splash of white wine for added depth. Taste as you go to find your perfect blend. These tips will help you master the Easy Creamy Garlic Shrimp recipe. If you need more details, check the Full Recipe! {{image_2}} You can easily switch up the proteins in this dish. If you prefer something different, try using scallops or chicken. Both options cook well and soak up the creamy sauce nicely. For a lighter choice, shrimp remains the star, but scallops add a sweet touch. If you want a vegan option, use coconut cream instead of heavy cream. It provides a rich texture and a hint of coconut flavor. Tofu is another great alternative; it absorbs flavors well. Just be sure to cube it and sauté it until golden for the best taste. Adding more veggies can boost the dish's nutrition and taste. Spinach wilts beautifully in the creamy sauce and adds color. Bell peppers give a nice crunch and sweetness. Simply toss them in with the shrimp to cook until tender. Herbs can elevate your creamy garlic shrimp even more. Fresh basil adds a sweet, aromatic touch, while thyme gives an earthy flavor. You can sprinkle them in right before serving for the best results. They offer a fresh contrast to the rich creaminess of the dish. For the full recipe, check out the complete guide to making this dish. Store leftover creamy garlic shrimp in an airtight container. This keeps the dish fresh. You can keep it in the fridge for up to three days. Make sure it cools down before putting it away. This helps prevent bacteria growth. For longer storage, you can freeze creamy garlic shrimp. Place it in a freezer-safe container or bag. Remove as much air as possible to prevent freezer burn. It can last in the freezer for up to three months. When you're ready to eat it, thaw in the fridge overnight. Reheat it gently on the stove over low heat. Stir often to keep it creamy and prevent sticking. You can also add a splash of cream if it seems too thick. Enjoy the rich flavors again! For the full recipe, check out the link above. How to make creamy garlic shrimp from scratch? Making creamy garlic shrimp is easy. Start by heating olive oil and butter in a skillet. Add minced garlic and cook until fragrant. Next, add shrimp and season with paprika, salt, and pepper. Cook until shrimp turn pink. Pour in heavy cream and let it simmer. Finally, add lemon juice and garnish with parsley. For the full recipe, check the earlier section. Can I use frozen shrimp for this recipe? Yes, you can use frozen shrimp! Just make sure to thaw them first. You can do this overnight in the fridge or quickly in cold water. Once thawed, pat them dry before cooking. What can I serve with creamy garlic shrimp? Creamy garlic shrimp pairs well with many sides. You can serve it over pasta, rice, or quinoa. It also goes great with garlic bread or a fresh salad. Can I use a different type of cream? Absolutely! You can use half-and-half or even sour cream. Just remember that using lighter cream may change the dish's richness. What can replace shrimp in this recipe? If you want to replace shrimp, try scallops or chicken. Tofu is a great vegan option too. Just adjust the cooking times to ensure everything cooks through. This blog post showed you how to make creamy garlic shrimp. You learned about the main ingredients, cooking steps, and helpful tips. You can swap ingredients to suit your taste. Whether you want to store it or serve it, our guide has you covered. Now, it's time for you to make this dish. Enjoy the flavors and impress your friends!

Easy Creamy Garlic Shrimp Quick and Flavorful Dish

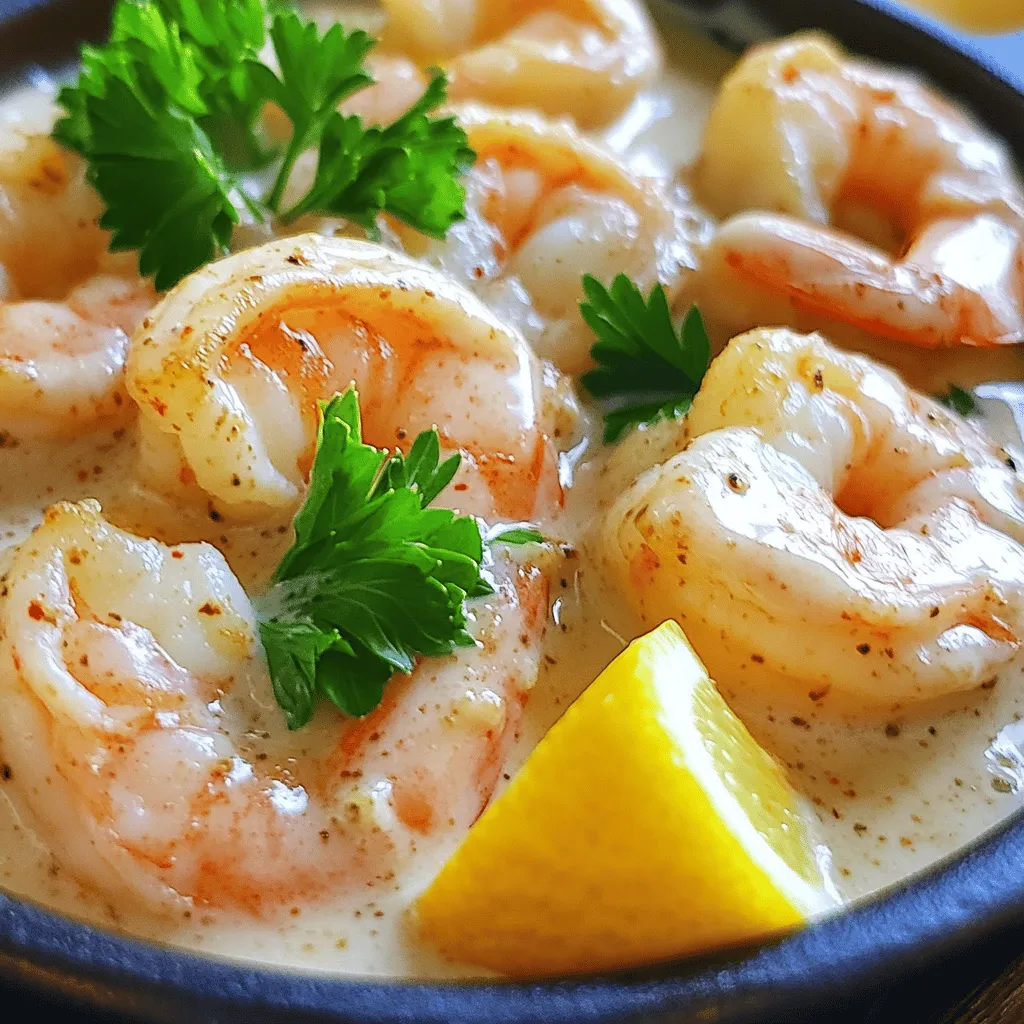
If you’re craving a quick and tasty meal, you’ve come to the right place! My Easy Creamy Garlic Shrimp is

- 4 boneless, skinless chicken breasts - 4 slices of Swiss cheese - 4 slices of ham (or turkey for a lighter option) - 1 cup all-purpose flour - 2 large eggs, beaten - 1 cup breadcrumbs (panko preferred for extra crunch) - 1 teaspoon garlic powder - 1 teaspoon onion powder - 1 teaspoon paprika - Salt and pepper to taste - 1 cup heavy cream - 1 tablespoon Dijon mustard - 1 tablespoon fresh parsley, chopped (for garnish) In this recipe, the main ingredients work together to create a rich flavor. Chicken breasts serve as your protein base, while Swiss cheese adds creaminess. The ham or turkey gives that classic Cordon Bleu taste. For the breading, I suggest using panko breadcrumbs for a crunchier finish. The seasoning mix of garlic powder, onion powder, and paprika gives the chicken depth. Next, let’s discuss the creamy sauce. Heavy cream forms the base, making it luscious, while Dijon mustard adds a tangy kick. Fresh parsley brightens the dish and adds a pop of color. For the full recipe and steps, check out the *Full Recipe*. This dish is not just easy; it’s a crowd-pleaser that impresses your guests. Enjoy your cooking! Preheat your oven to 375°F (190°C). This step ensures even cooking. Next, place each chicken breast between two sheets of plastic wrap. Use a meat mallet to pound them gently. Aim for a thickness of about ½ inch. This helps the chicken cook evenly. Season both sides of the chicken breasts. Sprinkle salt, pepper, garlic powder, onion powder, and paprika. These spices add great flavor. Now, it’s time to layer ham and cheese. Take one flattened chicken breast and lay a slice of ham on top. Next, place a slice of Swiss cheese over the ham. Roll it up tightly, starting from the wider end. Secure the roll with toothpicks to keep it together. Repeat this process for all chicken breasts. This method creates a delicious filling. Set up a breading station. In one bowl, place all-purpose flour. In another bowl, add beaten eggs. In the third bowl, put breadcrumbs. Dredge each chicken roll in flour first. Shake off any excess flour. Then, dip it in the egg wash. Finally, coat it with breadcrumbs. Make sure each roll is fully covered. This breading gives a crispy texture. Heat olive oil in a large oven-safe skillet over medium-high heat. Once hot, add the breaded chicken rolls. Sear until golden brown on all sides, about 3-4 minutes per side. This step adds flavor and color. After searing, transfer the skillet to the preheated oven. Bake for 20-25 minutes. Ensure the chicken reaches an internal temperature of 165°F (75°C). While the chicken bakes, prepare the creamy sauce. In a small saucepan, heat heavy cream over medium heat. Stir in Dijon mustard for a tangy flavor. Season with salt and pepper to taste. Cook until warmed through and slightly thickened. This sauce adds richness to the dish. Once the chicken is done baking, remove it from the oven. Let it rest for a few minutes before cutting. This resting time keeps the juices inside. Serve the chicken rolls with the creamy sauce poured over them. Garnish with chopped parsley for a pop of color. For the full recipe with detailed steps, refer to the Complete Recipe section. To make sure your chicken rolls stay juicy, don't overcook them. Cook them just until they reach 165°F (75°C). This keeps the meat tender and moist. Also, pound the chicken evenly. This helps it cook at the same rate. For even cooking, use a skillet that can go in the oven. Sear the chicken rolls on medium-high heat for a nice crust. Then, bake them for the right amount of time. To boost flavor in your creamy sauce, try adding a pinch of nutmeg or a dash of cayenne pepper. These spices can make a big difference. You can also add fresh herbs like thyme or rosemary for extra taste. If you want some heat, add a bit of hot sauce or chili flakes. Just start with a little. You can always add more if needed. When serving, place the chicken rolls on a nice plate. Pour the creamy sauce over them in a zigzag pattern. This looks fancy and appetizing. For garnishing, sprinkle some fresh parsley on top. It adds color and a fresh taste. You can also add lemon wedges on the side. They give a nice pop of flavor. Try this full recipe for a delicious meal! {{image_2}} You can make Creamy Chicken Cordon Bleu even healthier. Try using turkey instead of ham. Turkey has less fat and is just as tasty. You could also use chicken thighs for more flavor. They stay juicy and tender during cooking. For dairy, you can switch to low-fat cream. This change cuts calories while keeping it creamy. Want to spice things up? Add fresh herbs like thyme or basil to the sauce. They bring a bright taste to the dish. You can also try different cheeses. Cheddar or gouda can add a fun twist. If you're adventurous, use prosciutto instead of ham. It gives a savory kick and depth of flavor. If you're gluten-free, you can swap regular breadcrumbs for gluten-free ones. Look for brands that are light and crunchy. For Dijon mustard, try whole grain mustard. It adds a nice texture and a different flavor. These swaps make the dish fit your needs while keeping it delicious. For the full recipe, check out the detailed steps above. To store leftovers, let the chicken cool first. Place it in an airtight container. This keeps out air and moisture. I recommend using glass or plastic containers with tight lids. They help keep the chicken fresh. To freeze cooked rolls, let them cool completely. Wrap each roll in plastic wrap. Then, place them in a freezer-safe bag. This keeps them from freezer burn. When you want to eat them, thaw in the fridge overnight. Reheat in the oven at 350°F (175°C) for about 15-20 minutes. Check that the chicken is heated through. In the fridge, your leftovers last about 3-4 days. Always check for signs of spoilage, like an off smell. If it looks or smells bad, toss it out. For safety, don’t eat leftovers that sit longer than 4 days. Enjoy your Creamy Chicken Cordon Bleu at its best! Chicken Cordon Bleu is a classic dish. It features chicken, ham, and cheese. You wrap the chicken around the ham and cheese, then bread it. After frying, you bake it until it’s golden. The result is a tasty blend of flavors. The creamy sauce adds richness and warmth. Yes, you can prepare this dish ahead of time. You can bread and roll the chicken and store it in the fridge. Just cover it tightly with plastic wrap. You can also make the creamy sauce early. Simply reheat it when you are ready to serve. This makes cooking easier on busy days. Many sides go well with Creamy Chicken Cordon Bleu. Here are some great options: - Steamed green beans - Roasted vegetables - Garlic mashed potatoes - A fresh garden salad These sides balance the richness of the chicken. They add color and nutrition to your meal. The chicken is done when it reaches the right temperature. Use a meat thermometer for accuracy. The internal temperature should be 165°F (75°C). This ensures that the chicken is safe to eat. Always check the thickest part of the chicken. Yes, you can make changes for food allergies. Here are some common swaps: - Use turkey instead of ham for a lighter option. - Try gluten-free breadcrumbs if you need to avoid gluten. - Substitute dairy-free cream for heavy cream if needed. These options let you enjoy the dish without worry. We covered the essential ingredients for Creamy Chicken Cordon Bleu, including chicken, Swiss cheese, and ham. The step-by-step instructions guide you through prepping, assembling, and cooking. I shared tips to enhance flavor and ensure your chicken stays juicy. You can explore variations and storage options too. This dish is not just tasty; it’s also versatile and easy to make. With these guidelines, you can create a delicious meal to impress anyone. Enjoy making this classic recipe that brings comfort to your table.

Creamy Chicken Cordon Bleu Delightful and Easy Recipe

Are you ready to elevate your dinner game? This Creamy Chicken Cordon Bleu recipe is both delightful and easy to

Older posts
Newer posts
← Previous Page1 … Page33 Page34 Page35 … Page40 Next →

dsad

© 2025 flavorsprint • Built with GeneratePress

Our Policies

  • Copyright Policy
  • Cookie Policy
  • GDPR Policy
  • Privacy Policy
  • Disclaimer
  • Terms Of Use

More Information

  • Home
  • About
  • Contact
  • Appetizers
  • Dessert
  • Dinner
  • Drinks
©2025, flavorsprint About Back To Top