Skip to content
DisclaimerTerms Of UseGDPR PolicyCookie Policy

flavorsprint

  • Home
  • Drinks
  • Appetizers
  • Dinner
  • Dessert
  • About
  • Contact
  • Privacy Policy
DisclaimerTerms Of UseGDPR PolicyCookie Policy

Lillian

To make French onion burgers, you need a few key ingredients: - 1 lb ground beef (80/20): This fat content keeps the burgers juicy. - 1 large yellow onion, thinly sliced: Sweet and savory, it adds flavor. - 2 tablespoons unsalted butter: For cooking the onions to golden perfection. - 1 tablespoon olive oil: Helps brown the onions nicely. - 1 teaspoon sugar: Enhances the sweetness of the onions. - 1 teaspoon garlic powder: Adds depth to the beef. - Salt and pepper to taste: Essential for seasoning. - 4 slices of Swiss cheese: Melts perfectly on the burgers. - 4 burger buns (preferably brioche): Soft and buttery for a great bite. - Fresh thyme leaves, for garnish: Adds a fresh touch. You can customize your French onion burgers with these: - Suggested toppings: Consider adding lettuce, tomatoes, or pickles for crunch. - Best side dishes: Crispy fries or a light salad pair well. Feel free to explore different combinations to make your meal unique! Start by cooking the onions slowly. Use a skillet on medium heat. Melt two tablespoons of butter with one tablespoon of olive oil. Add the thinly sliced onions, one teaspoon of sugar, and a pinch of salt. Stir them every few minutes. Cook for about 25 minutes. You want them golden brown and soft. Tips for perfect caramelization: - Use yellow onions for sweetness. - Keep the heat steady; too high can burn them. - Be patient; good things take time. Next, grab one pound of ground beef. I like an 80/20 blend for juiciness. In a bowl, mix the beef with one teaspoon of garlic powder, salt, and pepper. Divide the mixture into four equal parts. Tips on patty size and seasoning: - Make the patties a bit larger than the buns. - Press a small dent in the center to avoid puffing while cooking. Heat your grill or skillet on medium-high. Cook the patties for about 4-5 minutes on each side. For medium doneness, add a slice of Swiss cheese on top during the last minute. Cover the pan to help the cheese melt. Cooking times and methods: - Grill gives a nice char. - Skillet keeps them juicy. Now, assemble your burgers. Start with a toasted bun. Place a cheesy patty on top. Add the caramelized onions generously. Finish with fresh thyme leaves for a pop of flavor. Layering ingredients properly: - Bun, patty, onions, thyme, and then the top bun. Presentation tips: - Use a wooden board for serving. - Pair with crispy fries or a fresh salad. This method creates a juicy and flavorful delight. Enjoy every bite of your French onion burger! To ensure a juicy burger, cook at the right temperature. Aim for medium heat. This keeps the meat tender and prevents it from drying out. Use a meat thermometer for best results. The center should reach 160°F for medium doneness. Let your burgers rest for five minutes after cooking. This helps keep the juices inside and makes each bite flavorful. You can switch up the cheese for different tastes. Try sharp cheddar or creamy brie. Each cheese brings its own unique flavor. You can also add spices like smoked paprika or cayenne for a kick. For homemade sauces, mix mayo with garlic or BBQ sauce with mustard. These small changes can make your burger stand out. Use a cast-iron skillet for a perfect sear. It retains heat well and cooks evenly. A grill works great too, giving a nice smoky flavor. Make sure to have a good spatula for flipping burgers. A meat thermometer is also key to checking doneness. Lastly, keep a basting brush handy for adding sauces while cooking. {{image_2}} To make French onion burgers healthier, consider these options: - Use lean meats like turkey or chicken. - Try plant-based options like black bean patties. - Choose gluten-free buns made from almond flour or rice flour. These choices reduce calories and cater to various diets. Lean meats cut fat, while plant-based patties offer fiber and protein. Gluten-free buns let everyone enjoy this dish. You can enhance your French onion burgers with different flavors. Here are some ideas: - Use sweet onions like Vidalia for a milder taste. - Red onions add a sharp bite to your burger. - Try adding spices like smoked paprika or cayenne for heat. - Fresh herbs like basil or oregano can give your burger a fresh twist. Experimenting with onions and spices can make each burger unique. French onion burgers can take on flavors from around the world. Here’s how: - Add some Asian flair with soy sauce and ginger in the beef. - For a Mexican twist, mix taco seasoning into the patties. - Top with jalapeños and guacamole for a spicy kick. These twists will surprise your guests and keep things exciting. Explore different cuisines and let your taste buds guide you! After enjoying your French onion burgers, you might have some left. To store uneaten burgers, first, let them cool down. Place the patties and toppings in separate containers. This keeps flavors fresh. Use airtight containers to keep moisture in. If you have burger buns, store them in a bag or container too. Keep everything in the fridge for up to three days. To reheat your burgers, keep them moist. Use the oven to warm them up. Set the oven to 350°F (175°C). Place the burgers on a baking tray for about 10 minutes. Cover them with foil to keep moisture in. For buns, wrap them in foil too. Heat them in the oven for about 5 minutes until warm. If you want to save burgers for later, freezing is a great option. To freeze patties, place them on a baking sheet. Freeze them for an hour, then transfer to a freezer bag. This prevents them from sticking together. For onions, let them cool and then freeze in a separate bag. When ready to eat, thaw everything in the fridge overnight for the best taste. French onion burgers are a special twist on the classic burger. They blend juicy beef patties with sweet, caramelized onions and melted Swiss cheese. This dish captures the essence of French onion soup in burger form. The layers of flavor create a taste that is both rich and satisfying. The toasted brioche bun adds a nice crunch and sweetness to each bite. If you want a meat-free option, try using ground turkey or chicken. These lean meats still work well with caramelized onions and cheese. You can also use plant-based burger patties made from beans or lentils. These alternatives keep the same great flavor while catering to different diets. Yes, you can prepare French onion burgers ahead of time. Cook the patties and caramelized onions in advance. Store them in airtight containers in the fridge. You can keep them for up to three days. When you’re ready to eat, just reheat the patties and onions. This saves time and makes meal prep easy. You can find the full recipe for French onion burgers in the section above. This recipe provides all the steps you need to create these delicious burgers at home. In this blog post, we explored how to make delicious French onion burgers. We covered key ingredients like ground beef, onions, and seasoning. You learned how to caramelize onions, form patties, and cook burgers perfectly. We highlighted tips for achieving great flavor and suggested fun variations. Now, with these steps and tips, you can create mouth-watering burgers at home. Experiment with flavors, enjoy the process, and impress your friends and family with your cooking skills!

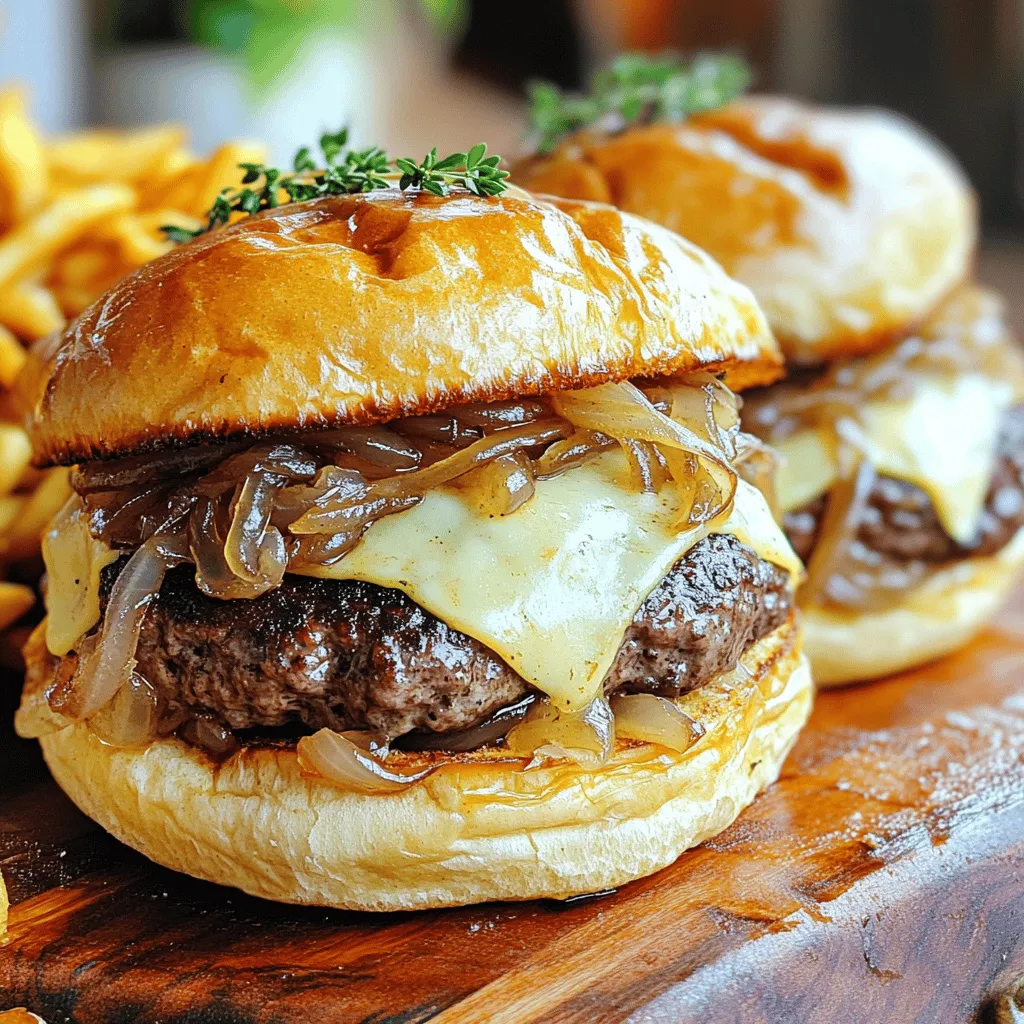
French Onion Burgers Juicy and Flavorful Delight

Do you crave a burger that bursts with flavor? Look no further than French Onion Burgers! This tasty blend of

To make a Caramel Banana Cream Trifle, gather these simple ingredients: - 3 ripe bananas, sliced - 1 cup heavy cream - ½ cup caramel sauce (store-bought or homemade) - 1 cup vanilla pudding - 1 cup ladyfinger cookies or sponge cake, crumbled - 1 teaspoon vanilla extract - ¼ cup toasted walnuts or pecans, chopped - A pinch of sea salt You can swap some ingredients for a twist. Use whipped topping instead of heavy cream. This shortcut saves time but still tastes great. If you don’t have ladyfinger cookies, use graham crackers or crumbled cake instead. For a nut-free option, leave out the walnuts or pecans. You can also use almond or coconut milk for a dairy-free pudding. Fresh ingredients make a big difference in taste. When choosing bananas, pick ones that are ripe but not too soft. Look for heavy cream that is cold and fresh. Check the pudding mix for quality; instant pudding works well. For nuts, choose toasted ones for extra flavor. A good caramel sauce can be found at most grocery stores, or you can make your own for a richer taste. Always buy in small amounts to ensure freshness. For the full recipe, check out the Caramel Banana Cream Trifle section. To start, grab a mixing bowl. Add 1 cup of heavy cream to it. Use an electric mixer to whip the cream until you see soft peaks. This takes a few minutes. Next, add 1 teaspoon of vanilla extract. Keep whipping until you get stiff peaks. This means the cream holds its shape well. You can set the whipped cream aside for now. Now, let's build our trifle. Take a large trifle dish or clear cups for individual servings. Start with a layer of crumbled ladyfinger cookies or sponge cake at the bottom. This will give our trifle a nice base. Next, spoon in a layer of vanilla pudding. Smooth it out with a spatula to make it even. Then, add a layer of sliced bananas. Drizzle some caramel sauce over the bananas. Finally, spread the whipped cream over the bananas gently. You will repeat these layers until the dish is full. Make sure to end with a big layer of whipped cream on top. Once your trifle is layered, it’s time to chill. Cover the dish with plastic wrap and place it in the fridge. Let it chill for at least 2 hours. This helps the flavors mix well. When it's time to serve, drizzle more caramel sauce on top. Sprinkle chopped walnuts or pecans for extra crunch. A pinch of sea salt adds a nice contrast too. Serve the trifle cold and enjoy this delightful treat! For the full recipe, check the details above. To make great whipped cream, start with chilled tools. Use a cold bowl and beaters. This keeps the cream from warming up too fast. Whip the heavy cream until soft peaks form. Then, add vanilla extract. Continue whipping until you see stiff peaks. This means your cream will hold its shape well. For the best trifle, layer your ingredients carefully. Start with crumbled cookies at the bottom. This gives a nice texture. Follow with a smooth layer of pudding. Make sure to spread it evenly. Add the bananas next, then drizzle caramel sauce on top. Finally, add whipped cream. Repeat the layers until you reach the top. Finish with whipped cream and a sprinkle of nuts. To make your trifle stand out, add a pinch of sea salt to the whipped cream. This enhances the sweetness. You can also mix a bit of caramel sauce into the pudding for extra flavor. If you like, add a splash of rum or banana liqueur to the layer of bananas. This will give a fun twist to your trifle. For the full recipe, check out the details mentioned earlier. {{image_2}} You can change the fruit in your trifle for fun flavors. Try using strawberries, blueberries, or peaches. Each fruit adds its own taste and color. For a tropical twist, add mango or pineapple. Mix and match to find your favorite combo. Just remember to keep the bananas for that classic flavor. While caramel sauce shines in this recipe, you can switch it up. Use chocolate sauce for a rich, sweet layer. A berry sauce can add a fresh and tangy taste. You can also try a butterscotch sauce for a sweet twist. Each sauce makes the dessert unique and tasty. You can easily adapt this recipe for different diets. For a dairy-free version, use coconut cream and dairy-free pudding. If you want a lower-sugar treat, choose sugar-free pudding and a lighter sauce. Gluten-free options are available, too; just use gluten-free cookies or cake. These changes keep the trifle delicious while meeting your needs. To keep your Caramel Banana Cream Trifle fresh, cover it tightly with plastic wrap. Place it in the fridge. It will stay good for up to three days. The bananas may brown a bit, but the flavor will still be great. If you want to avoid browning, add a bit of lemon juice to the bananas before layering. Freezing the trifle is not ideal due to the cream and bananas. The texture changes when frozen. If you want to freeze it, consider only freezing the pudding and cream. Store them in an airtight container. The cookies will become soggy when defrosted. You do not need to reheat the trifle since it is served cold. When serving, give it a gentle stir to mix the layers if they have settled. Use a large spoon or spatula to scoop out portions. Always serve it chilled for the best taste. You can add fresh toppings, like whipped cream or extra caramel, for a fun touch. Yes, you can use whipped topping. It saves time and is easy to find. However, using heavy cream gives a richer taste. The texture will also be different, but it still works. You can let the trifle sit for up to 4 hours. This time allows the layers to blend. If you let it sit too long, the cookies or cake may get soggy. Yes, you can make the trifle a day in advance. Just cover it well and chill in the fridge. This helps the flavors mix beautifully. Absolutely! Strawberries, blueberries, or peaches work great. Just slice them and layer them like bananas. This adds color and different flavors to your trifle. Serve the trifle chilled, in clear glass dishes. This shows off the pretty layers. A small sprig of mint on top makes it look fancy. Yes, store-bought pudding is a quick option. Just choose vanilla or banana flavor for best results. This can save you some time in the kitchen. You can use crumbled sponge cake or even graham crackers. Both options work well in layering. Just make sure they soak up some of the pudding and cream. In this post, we discussed how to make a delicious trifle. We covered the best ingredients and some fun ways to switch them up. You learned step-by-step how to prepare, layer, and chill your trifle. I shared tips for perfect whipped cream and ways to enhance flavors. We also explored different variations and how to store leftovers. Remember, a great trifle brings joy to any occasion. Now, you can impress your friends and family with your new trifle skills! Enjoy your tasty creation and keep experimenting!

Caramel Banana Cream Trifle Delightful and Easy Dessert

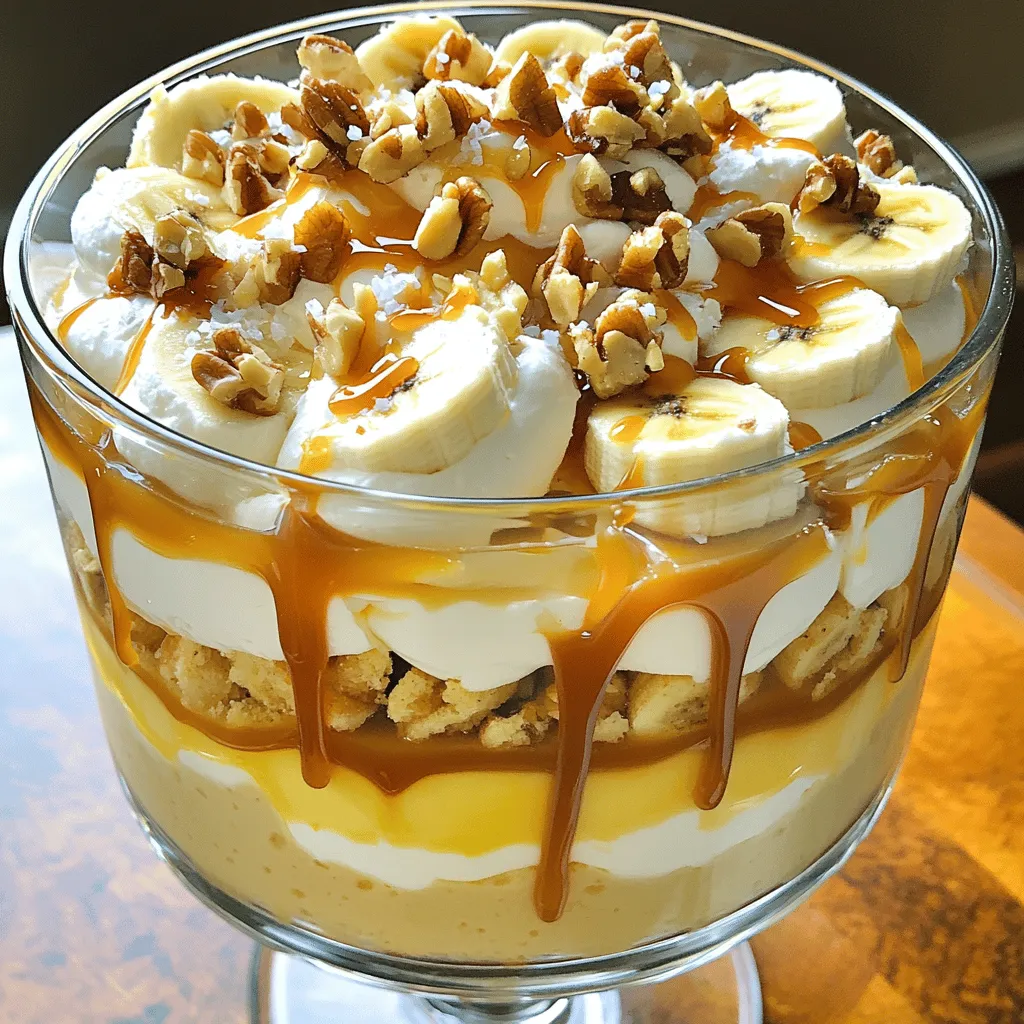
Are you ready for a dessert that impresses without the fuss? The Caramel Banana Cream Trifle combines creamy layers of

To make delicious Crock Pot Beef Tips and Gravy, you need a few key ingredients: - Beef sirloin: 2 pounds, cut into 1-inch cubes - Olive oil: 1 tablespoon for searing - Onion: 1 large, finely chopped - Garlic: 3 cloves, minced - Beef broth: 2 cups for a rich flavor - Mushrooms: 1 cup, sliced (optional, but adds depth) - Worcestershire sauce: 2 tablespoons for umami - Dried thyme: 1 teaspoon for herb flavor - Paprika: 1 teaspoon for a hint of spice - Black pepper: 1 teaspoon to enhance taste - Salt: 1 teaspoon for seasoning - Cornstarch: 2 tablespoons mixed with 2 tablespoons cold water (for thickening) - Fresh parsley: chopped, for garnish These ingredients work together to create a comforting dish. Each one plays a role in building flavor and texture. You can also add mushrooms for extra richness. Serve this dish over mashed potatoes or rice, and don’t forget to garnish with parsley. It adds a nice touch. For the full recipe, check out the complete instructions in the section above. Searing the beef for flavor First, heat olive oil in a large skillet. Add 2 pounds of beef sirloin cut into 1-inch cubes. Sear the beef for about 5-7 minutes, turning to brown all sides. This step adds deep flavor to your beef tips. Once the beef is browned, transfer it to the slow cooker. Adding vegetables to the slow cooker Next, in the same skillet, add 1 large chopped onion and 3 minced garlic cloves. Sauté until the onion is soft and clear, which takes about 3-4 minutes. This step adds sweetness and depth. Then, pour this mixture into the slow cooker with the beef. Combining ingredients in the slow cooker Pour 2 cups of beef broth over the beef and onion mix. Add 1 cup of sliced mushrooms if you like. Then, stir in 2 tablespoons of Worcestershire sauce, 1 teaspoon of dried thyme, 1 teaspoon of paprika, and 1 teaspoon each of black pepper and salt. Mix well to ensure every piece is coated. Adjusting cooking time and settings Cover the slow cooker and set it to cook. You can choose low for 6-8 hours or high for 3-4 hours. The beef should be tender when done. This slow cooking helps all flavors blend beautifully. Creating a cornstarch slurry Once the beef is cooked, it’s time to thicken the gravy. In a small bowl, mix 2 tablespoons of cornstarch with 2 tablespoons of cold water. Stir until smooth; this is your slurry. Final cooking for perfect consistency Add the slurry to the slow cooker and stir it into the beef mix. Cook on high for another 15-30 minutes. This will give you that rich, thick gravy we all love, making the dish perfect for serving. For the full recipe, check the link. Enjoy your delicious meal! When picking beef, choose sirloin for the best taste and tenderness. Look for bright red meat with a bit of marbling. This marbling adds flavor and keeps the beef juicy during cooking. To enhance flavor profiles, sear the beef first. This adds a deep, rich taste that blends well with the gravy. Don’t skip the garlic and onion; they bring a sweet and savory base. Adding Worcestershire sauce also boosts the umami flavor, making each bite delightful. One common mistake is not browning the beef. If you skip this step, your dish may lack depth. Also, don’t overload the slow cooker. This can lead to uneven cooking. Stick to the ingredient amounts in the Full Recipe for the best results. If your gravy is too thin, mix cornstarch with cold water to create a slurry. Stir this into the slow cooker. Cook on high for 15-30 minutes to thicken it up. If the beef isn’t tender, it may need more time. Always check the texture before serving. Serve your beef tips over mashed potatoes or rice. This helps soak up the tasty gravy. You can also add steamed vegetables for color and nutrition. For a lovely touch, sprinkle fresh parsley on top for presentation. For a cozy meal, pair it with crusty bread on the side. This allows you to scoop up every last bit of gravy. Enjoy your delicious dinner! {{image_2}} You can switch the beef for other meats. Chicken or pork works well. Just adjust the cooking time. You can also use plant-based options. Tofu or tempeh can add protein and flavor. For vegetables, feel free to get creative. Carrots, bell peppers, and green beans are great choices. You can add them in the last hour of cooking for a fresh taste. Potatoes can also be cooked with the beef. They absorb the gravy and become soft and tasty. Seasonings can change the whole dish. If you want something spicy, add cayenne pepper or chili powder. For a sweeter touch, use a bit of brown sugar. You can also try herbs like rosemary or basil for a fresh flavor. If you want a taste from another culture, consider adding soy sauce for Asian flair. Or, use taco seasoning for a fun twist. Each change can take you to a new culinary adventure. You can also make this dish on the stovetop. Just sear the beef in a pot, then add the other ingredients. Simmer on low heat for about two hours. This method gives you the same rich flavors in less time. For those with an Instant Pot, it’s simple too. Sear the beef first, then add all the ingredients. Cook on high pressure for about 30 minutes. This way, you get tender beef and thick gravy fast. For the full recipe, check the details above. Enjoy making your own variations! To store your leftover beef tips and gravy, let them cool first. This step keeps the food safe. Once cool, put them in airtight containers. Glass or plastic containers work well. Make sure to seal them tightly. This keeps out air and moisture. For freezing, use freezer-safe containers. These help keep the beef tips fresh. You can also use heavy-duty freezer bags. Squeeze out the air before sealing. To thaw, place the container in the fridge overnight. Reheat gently on the stove or in the microwave. Stir well to ensure even heating. In the fridge, your beef tips last about 3 to 4 days. If you freeze them, they can stay good for up to 3 months. Always check for signs of spoilage. If you see any mold or strange smells, toss it out. Keeping food safe is key to enjoying your meals. Yes, you can make this dish without mushrooms. If you want a similar taste, use chopped bell peppers or zucchini. Both add great flavor and texture. You could also skip the mushrooms entirely and increase the onion. This will give you a nice base for the gravy. If your gravy isn't thickening, don't worry! Here are a few quick tips: - Mix more cornstarch with water and add it to the slow cooker. - Let it cook longer on high, which can help it thicken. - Try mashing some of the beef or vegetables to add body to the gravy. - If all else fails, you can simmer it on the stove until it thickens. To serve fewer people, simply cut the ingredients in half. Use 1 pound of beef and reduce the broth and seasonings accordingly. You can also adjust cooking time slightly. Check for doneness around the same time as the full recipe, but be sure to taste for tenderness. This way, you still enjoy all the flavors without wasting food. For the full recipe, refer to the section above. In this blog post, we covered how to make delicious beef tips from start to finish. We discussed choosing the best ingredients, cooking steps, and tips for a great dish. Remember to avoid common mistakes and explore different variations for unique flavors. Storing leftovers properly keeps them fresh for future meals. Keep this guide handy as you create your tasty beef tips. Cooking can be simple and fun, and experimenting can lead to great new favorites! Enjoy every bite you create!

Crock Pot Beef Tips and Gravy Delicious Dinner Meal

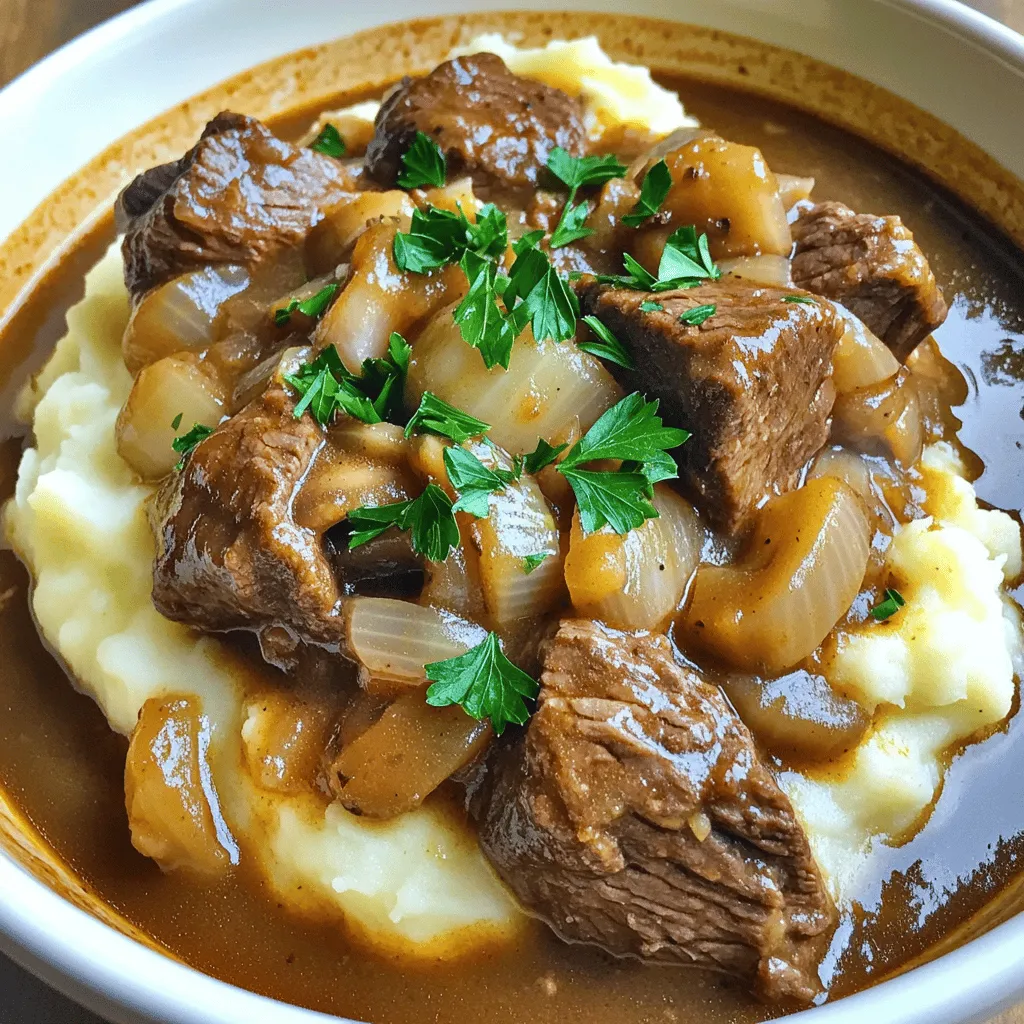
Are you ready to savor a meal that melts in your mouth? This Crock Pot Beef Tips and Gravy recipe

- 12 oz (340g) pasta of your choice - 1 cup ricotta cheese - 1 cup cherry tomatoes, halved - 1 small onion, finely chopped - 3 cloves garlic, minced - 1/4 cup fresh basil, chopped - 1/4 cup grated Parmesan cheese - 2 tablespoons olive oil - Salt and pepper to taste - Crushed red pepper flakes (optional) When I make Creamy Ricotta and Tomato Pasta, I love to choose pasta that suits my mood. You can pick spaghetti, fettuccine, or penne. Each type gives a unique touch to the dish. Ricotta cheese adds creaminess that melts in your mouth. The cherry tomatoes burst with flavor as they cook, making every bite special. - Alternative pasta options: You can use whole wheat or gluten-free pasta for a healthier option. - Vegan ricotta alternatives: Try using cashew cream or tofu blended with lemon juice for a vegan version. - Low-sodium seasoning options: Use herbs like oregano and thyme instead of salt for flavor without the sodium. These swaps keep the dish delicious and cater to different diets. You can still enjoy the creamy texture and rich flavors, no matter your preferences. Start by boiling water in a big pot. Make sure to add a good amount of salt. This salt helps flavor the pasta. Cook the pasta until it is al dente. This means it should be firm but not hard. Usually, this takes about 8 to 10 minutes. Always check the package for exact timing. Before you drain the pasta, save one cup of the pasta water. This water will help make your sauce creamy later. Use olive oil to sauté the onions. It adds a nice flavor. Heat the oil in a large skillet over medium heat. Add the finely chopped onions first. Sauté them for about 3 to 4 minutes. You want them soft and see-through. Then, add the minced garlic. Cook it for one more minute. Make sure to stir so the garlic does not burn. Now, it's time to add the halved cherry tomatoes. Sprinkle in some salt and pepper. If you like heat, add crushed red pepper flakes. Cook the tomatoes for about 5 to 7 minutes. They should soften and burst open. Once that happens, lower the heat. Add the ricotta cheese into the skillet. Stir gently to mix it in. If the mixture feels too thick, add some of the reserved pasta water. This will help you get the creamy consistency you want. Once the ricotta is mixed in, add the cooked pasta to the skillet. Toss it gently. You want the pasta to be coated evenly in the creamy sauce. Cook everything together for another 2 to 3 minutes to heat through. For a nice touch, stir in the chopped basil and grated Parmesan cheese. Adjust the flavor with extra salt and pepper if needed. Serve your pasta in shallow bowls. Garnish with more basil, a sprinkle of Parmesan, and a drizzle of olive oil. This makes it look and taste even better. Enjoy your creamy ricotta and tomato pasta! To avoid a lumpy ricotta mixture, start with room temperature ricotta. This helps it blend smoothly. When you add the ricotta to the skillet, stir gently. If it feels too thick, add pasta water. This water helps to thin the mixture and gives it a silky feel. To lift the flavors, add fresh herbs like basil or parsley. You can also use spices like black pepper or garlic powder for extra kick. If you want more color on your plate, serve with a side salad. A simple green salad pairs well and adds crunch. One common mistake is overcooking the pasta. Cook it just until al dente. This keeps the pasta firm and helps it hold sauce better. Another mistake is skipping the seasoning. Always taste your dish before serving. A little salt and pepper can make a big difference. {{image_2}} You can easily change this dish to suit your taste. Adding protein like chicken or shrimp is a great option. Just cook the protein in the skillet before adding the tomatoes. This adds flavor and texture. You can also incorporate other vegetables. Think about adding spinach, zucchini, or bell peppers. These will boost nutrients and color. Cook them along with the onions for the best results. Choosing the right pasta shape is key for this dish. Spaghetti, fettuccine, or penne work well. Each shape holds the sauce differently. If you need gluten-free options, you have choices too. Look for pasta made from rice or chickpeas. These will not only fit your diet but also taste great. Switching up the cheese can change the whole dish. Instead of ricotta, try goat cheese or cream cheese. Each brings a unique flavor and creaminess. You can also modify the spice level. Want it mild? Skip the crushed red pepper flakes. Prefer heat? Add more flakes or even some chili oil. This lets you control the flavor to match your mood. For the full recipe, check out the earlier section. Keep your creamy ricotta and tomato pasta fresh by using airtight containers. Glass or plastic containers with tight lids work best. Store the leftovers in the fridge for up to three days. After that, the pasta may lose its flavor and texture. To reheat pasta, use a skillet over low heat. Add a splash of water or some olive oil. This keeps the pasta moist and helps it heat evenly. You can also use a microwave. Cover the dish with a lid or a damp paper towel to avoid a dried-out texture. If you want to freeze creamy pasta dishes, make sure to cool it first. Place it in freezer-safe bags or containers, removing as much air as possible. It can stay frozen for up to three months. When you're ready to eat, thaw it overnight in the fridge. Reheat it gently on the stove, adding a little water or olive oil for creaminess. You can serve this pasta with a variety of sides. Here are some ideas: - Garlic bread: It adds crunch and flavor. - Roasted vegetables: They bring a nice balance. - Steamed broccoli: A healthy green option. For salad pairings, consider: - Caesar salad: The creamy dressing complements the pasta. - Caprese salad: Fresh tomatoes and basil match well. - Mixed greens: A simple salad brightens the meal. Yes, you can prepare this dish in advance. Here’s how to get ready: - Cook the pasta and let it cool. - Make the sauce and store it separately in the fridge. For best reheating, follow these tips: - Use a skillet to warm the pasta over low heat. - Add a splash of pasta water to keep it creamy. Absolutely! This recipe is great for kids. Here are some adjustments for picky eaters: - Use less garlic and spice for a milder taste. - Try adding veggies they like, like peas or bell peppers. Nutritional benefits for children include: - Protein from ricotta for growth. - Vitamins from tomatoes for health. You can find the full recipe for Creamy Ricotta and Tomato Pasta in the recipe section above. This pasta dish combines tasty ingredients like ricotta, cherry tomatoes, and herbs. You learned how to cook pasta, sauté aromatic veggies, and mix in flavors. Remember to avoid common mistakes, like overcooking or skipping seasoning. Try different pasta types and protein to keep it fresh. Store leftovers properly to enjoy later. With these tips, you can create a delicious meal your family will love. Enjoy cooking and make this dish your own for everyone to savor.

Creamy Ricotta and Tomato Pasta Rich and Flavorful Dish

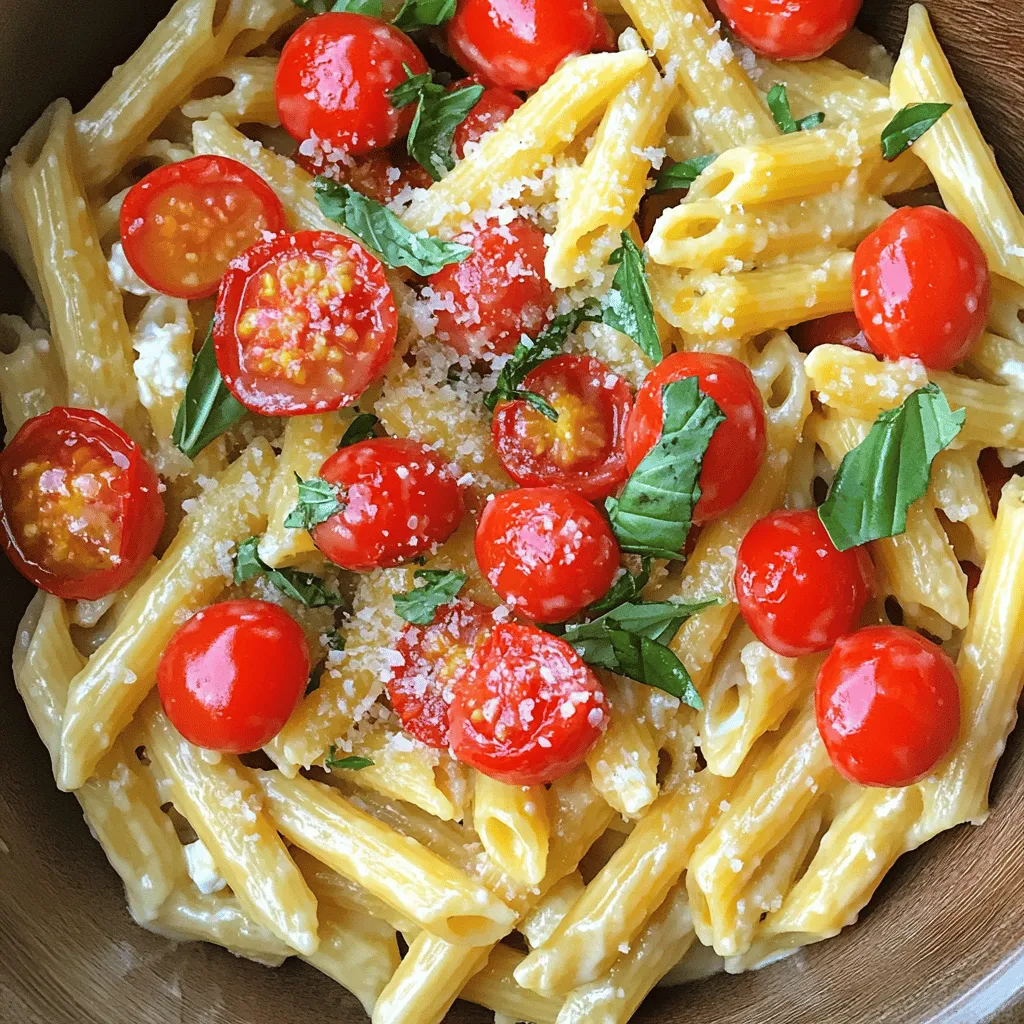
Are you ready to elevate your pasta game? This Creamy Ricotta and Tomato Pasta is rich, flavorful, and oh-so-easy to

To make a delightful Shrimp Pasta Salad with Italian Dressing, gather these fresh ingredients: - 8 oz rotini pasta - 1 lb shrimp, peeled and deveined - 1 cup cherry tomatoes, halved - 1 cup cucumber, diced - ½ cup bell pepper, diced - ¼ cup red onion, finely chopped - 1 cup Italian dressing (store-bought or homemade) - 2 tablespoons lemon juice - 1 teaspoon garlic powder - Salt and pepper to taste - Fresh parsley or basil for garnish These ingredients create a colorful and tasty salad. The rotini pasta holds the dressing well. The shrimp adds protein, while the veggies give crunch and flavor. You can use any bell pepper you like. Cherry tomatoes bring a burst of sweetness. When choosing your Italian dressing, look for one with good flavor. You can make it at home if you prefer. Just mix olive oil, vinegar, herbs, and spices. The lemon juice adds a bright touch to the dish. Garnishing with fresh herbs like parsley or basil makes the salad look pretty. It also adds a fresh taste. You’ll love how easy it is to combine these ingredients for a tasty meal. For detailed steps and cooking tips, check out the Full Recipe. To start, boil water in a large pot. Add a pinch of salt. This helps the pasta taste better. Next, cook the rotini pasta according to the package instructions until it is al dente, or firm to the bite. This usually takes about 8 to 10 minutes. Once cooked, drain the pasta in a colander. Rinsing it under cold water stops the cooking process. It helps keep the pasta from getting sticky. Set it aside while you prepare the shrimp. Now, let’s cook the shrimp. Heat a skillet over medium heat and add a splash of olive oil. When the oil is hot, add the shrimp. Cook them for 2 to 3 minutes on each side. You know they are done when they turn pink and opaque. While they cook, sprinkle garlic powder, salt, and pepper on them for extra flavor. Once cooked, remove the shrimp from heat and let them cool. In a large mixing bowl, combine the cooled rotini pasta, cooked shrimp, cherry tomatoes, cucumber, bell pepper, and red onion. This mix adds bright colors and fresh flavors. Next, drizzle the Italian dressing over the pasta and add the lemon juice. Toss everything together gently. Make sure each piece gets coated in the dressing for the best taste. For the best flavor, chill the salad in the refrigerator for at least 30 minutes. This allows the flavors to meld together. It also makes the salad refreshing to eat. Serve it cold or at room temperature. Garnish with fresh parsley or basil for a pop of color. Enjoy your shrimp pasta salad! You can find the full recipe above for more details. To boost flavor, taste your dish as you go. If it seems bland, add more Italian dressing or lemon juice. This salad shines with a balance of tanginess and freshness. For a homemade Italian dressing, mix olive oil, vinegar, garlic, and Italian herbs. This gives your salad a personal touch. You can adjust the spices to match your taste. To avoid overcooking shrimp, watch them closely. Cook until they turn pink, usually about 2-3 minutes per side. Overcooked shrimp become tough. Prep ingredients ahead of time. Chop your veggies and chill your dressing for the best flavor. This makes assembling the salad quick and easy. Garnish your shrimp pasta salad with fresh parsley or basil for color. You can also add lemon wedges for a bright look. Serve in a large bowl for potlucks. It invites everyone to dig in. For meals, consider individual bowls for a classy touch. {{image_2}} You can make this shrimp pasta salad even better with fun add-ins. Try adding olives for a salty kick. Avocado gives a creamy texture and a boost of flavor. You can also mix in some spinach or arugula for extra greens. If you want a different protein, chicken works great. Just grill or bake it first. Tofu is a good choice for a vegetarian option. Make sure to press the tofu to remove extra water. You can switch up the dressing for a new taste. A homemade Italian dressing is easy to make. Just mix olive oil, vinegar, herbs, and spices. It’s fresh and bright! Other dressing options include vinaigrette or a creamy Greek dressing. Each one will change the flavor of the salad in a fun way. If you need gluten-free options, use gluten-free pasta. Many brands have great choices that taste just as good. You can also make a low-carb version. Substitute pasta with zucchini noodles or cauliflower rice. These options keep the salad light and healthy. Feel free to explore these variations to make the dish your own! For the full recipe, check out the Shrimp Pasta Salad with Italian Zest. To keep your shrimp pasta salad fresh, store it in an airtight container. This helps prevent any odors from other foods in your fridge. Make sure to seal it well. The shrimp pasta salad stays good for about 3 to 4 days in the fridge. You may notice the flavors blend more over time, which can make it taste even better! Can you freeze shrimp pasta salad? Yes, but it’s not ideal. Freezing can change the texture of shrimp and vegetables. If you must freeze it, place it in a freezer-safe bag or container. This way, it keeps the best quality. To reheat after freezing, let it thaw in the fridge overnight. After thawing, mix it gently with fresh dressing to restore some flavor. Enjoy your meal! It takes about 15 minutes to prep and 30 minutes to chill. The total time is 45 minutes. This includes cooking the pasta and shrimp and mixing all the fresh ingredients. Yes, you can make this salad ahead of time. I suggest making it a few hours in advance. This allows the flavors to blend well. Store it in the fridge until serving. Just remember to add the garnish right before serving for freshness. You can serve this salad with various dishes. Here are some ideas: - Grilled chicken or fish - Garlic bread - A light green salad - Fresh fruit salad These sides add balance and variety to your meal. Yes, you can use other types of pasta. Here are some great alternatives: - Penne - Fusilli - Farfalle Each type has a different shape and texture. Try them to find your favorite! This shrimp pasta salad combines fresh veggies, tender shrimp, and zesty dressing. You learned how to cook pasta and shrimp for the perfect mix. I shared tips to boost flavor and make it visually appealing. You can store leftovers easily, and I showed you how. This recipe is flexible, so feel free to swap ingredients. Enjoy making it your own. Your kitchen adventures can be fun and tasty!

Shrimp Pasta Salad with Italian Dressing Delight

Are you ready to whip up a refreshing dish that packs a punch? This Shrimp Pasta Salad with Italian Dressing

- Ribeye steak - Provolone cheese or Cheez Whiz - Hoagie rolls The ribeye steak is the star of this sandwich. Its rich flavor and tenderness make it a perfect choice. I recommend using thin slices for the best texture. Provolone cheese adds a creamy touch, but Cheez Whiz gives it that classic cheesesteak taste. Hoagie rolls are important too; they hold everything together while staying soft and chewy. - Jalapeños for heat - Garlic powder and seasoning Want to spice things up? Sliced jalapeños add a nice kick. Garlic powder can enhance the flavor profile too. A little seasoning goes a long way in making your cheesesteak stand out. - French fries - Simple salad Pair your cheesesteak with crispy French fries for a classic combo. A simple salad can balance the richness of the sandwich. These sides make your meal feel complete and satisfying. For the complete recipe, check out the Full Recipe link. To make a great cheesesteak, start by seasoning the ribeye steak. Use salt, pepper, and garlic powder for flavor. Mix these well. For the best taste, let the steak sit for a few minutes after seasoning. When slicing the steak, keep it thin. A sharp knife works best. Cut against the grain. This makes the meat tender. Thin slices also cook faster, giving you a juicy bite. Next, it’s time to cook the onions and bell peppers. Heat olive oil in your skillet over medium-high heat. Add the sliced onions and bell peppers. Stir and sauté them for about 3-4 minutes. They should soften but not lose their crunch. Keep an eye on the timing. You want them to be tender but still have some bite. Once they are ready, push them to one side of the skillet. This makes room for the steak. Now for the fun part: assembling the sandwich! After cooking the steak, mix it with the veggies in the skillet. Then, place slices of provolone cheese over the mixture. Cover the skillet for about 2 minutes. This helps the cheese melt perfectly. While the cheese melts, toast your hoagie rolls. You can use another skillet or a toaster. Lightly toasting adds a nice crunch. Finally, scoop the cheesy steak and veggies onto each hoagie roll. If you like spice, add sliced jalapeños on top. Enjoy your Ultimate Cheesesteak Sandwich! For the complete recipe, check out the Full Recipe. When picking ribeye steak, look for bright red color. This shows freshness. You want good marbling, which means fat streaks inside the meat. This fat makes your cheesesteak juicy. A thickness of about 1/4 inch works best for cooking. Thin slices cook quickly and are tender. For cooking cheesesteaks, I recommend using a cast iron skillet. It holds heat well and gives a nice sear. A non-stick skillet is good too but may not give the same flavor. Use a sturdy spatula to flip and mix the meat and veggies. Cover the skillet while the cheese melts. This helps the cheese melt evenly. To add depth, sprinkle some spices on your steak. Garlic powder enhances the taste. You can also try smoked paprika for a twist. For toppings, classic choices include sautéed onions and peppers. Add jalapeños if you like heat. Mustard or hot sauce can be great condiments too. These tips will make your cheesesteak even more tasty. {{image_2}} The cheesesteak has roots in Philadelphia, but many places have their own spin. The classic Philly cheesesteak uses ribeye and provolone cheese, served on a soft hoagie roll. Other regions might use different meats or toppings. For example, some areas favor chicken or even pork. You can also find unique blends of cheese, like cheddar or mozzarella, in different states. If you want a meatless option, try a veggie cheesesteak. Use mushrooms and peppers instead of meat for a tasty twist. While provolone is popular, you can switch it up. Cheddar brings a sharp taste. American cheese melts smoothly and adds creaminess. Want to get creative? Add toppings like sautéed mushrooms, fresh spinach, or even crispy bacon. These choices let you make a cheesesteak that fits your taste. You can build your sandwich with flavors you love. If you enjoy spice, there are many ways to add heat. You can slice fresh jalapeños for a kick. If jalapeños are too hot, try sweet banana peppers instead. You can also use hot sauce to control the heat. Just a few drops can make a big difference. Adjust the heat to suit your taste buds. Making your cheesesteak just right is all about personal choice. For the full recipe, check out the Ultimate Cheesesteak Sandwich 🥩. To keep your leftover cheesesteaks fresh, wrap them tightly in plastic wrap or foil. Store them in an airtight container. This helps to lock in moisture and flavor. Always refrigerate the sandwiches for best results. When ready to eat, you can reheat them in the oven or on a skillet. This keeps the bread crispy and the filling hot. Avoid using a microwave, as it can make the bread soggy. Yes, you can freeze the cheesesteak filling. Just let it cool first. Place the filling in a freezer-safe bag or container. Make sure to remove as much air as possible. This prevents freezer burn. You can freeze the filling for up to three months. When ready to use, thaw it in the fridge overnight. Then, reheat it on the stove or in the oven. Homemade cheesesteaks can last in the fridge for about three to four days. Look for signs of spoilage like a sour smell or mold. If the meat looks dry or discolored, it’s best to discard it. Always trust your senses! To enjoy the best taste, eat your cheesesteaks within this recommended timeline. The best cut for cheesesteaks is ribeye steak. It has great fat marbling, which makes it juicy and flavorful. Thinly slice the ribeye for easy cooking. You can also use sirloin, but ribeye is the classic choice. For the best taste, always choose fresh, high-quality meat. Yes, you can make cheesesteaks in advance! Cook the steak and vegetables, then let them cool. Store them in an airtight container in the fridge for up to three days. When ready to eat, reheat the mixture gently in a skillet. This way, you can enjoy a quick and tasty meal. To get the best cheese melt, cover the skillet after adding cheese. This traps heat and helps the cheese melt evenly. Provolone cheese melts well, but Cheez Whiz gives that classic taste. You can also add a splash of water in the skillet before covering to create steam, which helps the cheese melt faster. Avoid using thick cuts of meat; they won’t cook evenly. Also, don’t overcrowd the skillet, as this can steam the meat instead of browning it. Lastly, remember to season your meat well! This adds flavor and makes your cheesesteak taste great. Follow the Full Recipe for a perfect result every time. To make the ultimate cheesesteak, focus on ribeye, cheese, and fresh rolls. You can add jalapeños or spices for extra flavor. Cooking techniques and equipment play a vital role in getting it just right. Explore fun variations like regional styles or unique toppings to personalize your sandwich. Finally, store leftovers properly to keep them tasty. With these tips, you're ready to create your perfect cheesesteak, satisfying cravings and impressing friends. Enjoy each bite and share your masterpiece!

Ultimate Cheesesteak Sandwich Flavorful and Delicious Meal

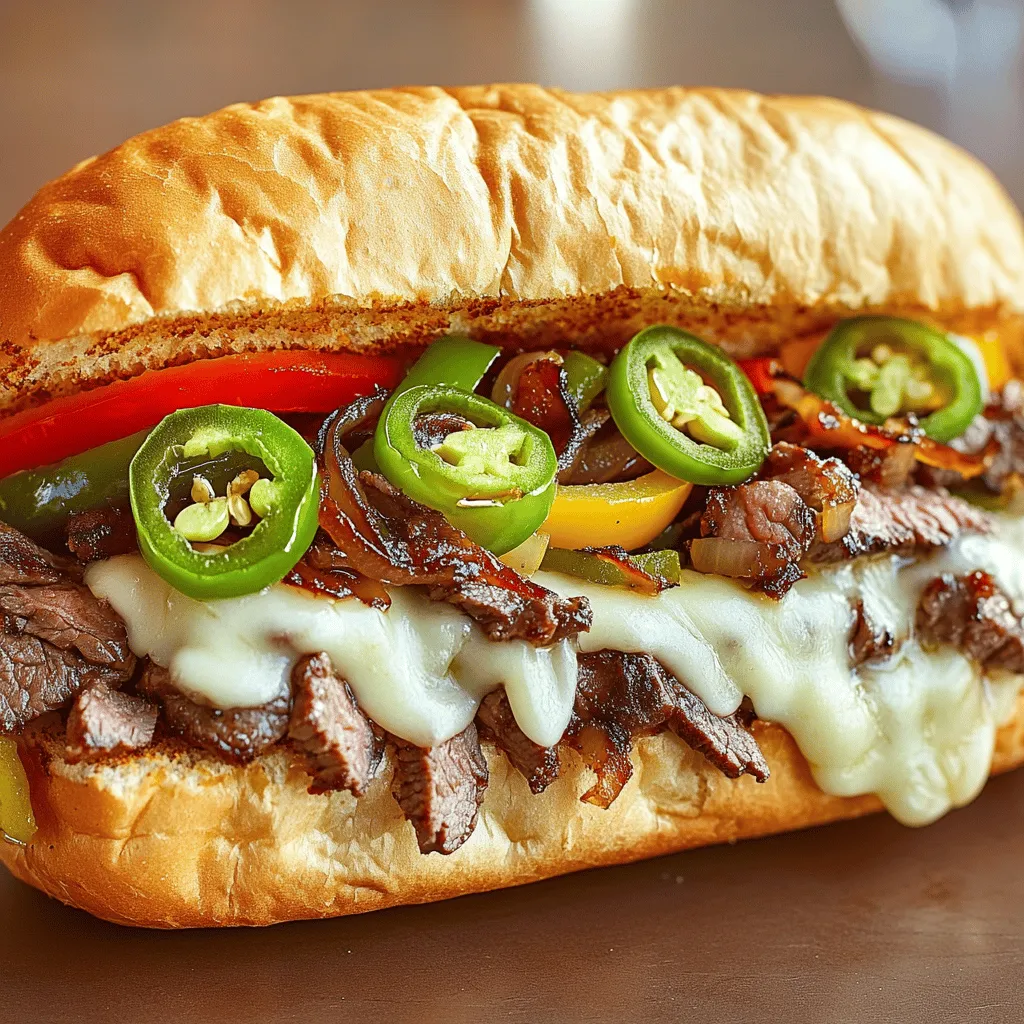
If you’re craving an epic sandwich, the Ultimate Cheesesteak is your answer! I’ll guide you through creating this flavorful and

To make the Calypso Rum Cake, gather these key ingredients: - 1 ½ cups all-purpose flour - 1 cup granulated sugar - ½ cup unsalted butter, softened - 2 large eggs - ½ cup coconut milk - ½ cup crushed pineapple, drained - 1 teaspoon baking powder - 1 teaspoon baking soda - 1 teaspoon vanilla extract - ¼ teaspoon salt - ½ teaspoon almond extract - ¼ cup shredded coconut (for topping) - ½ cup chopped walnuts or pecans (optional) These ingredients create a moist, flavorful cake that sings of tropical vibes and sweet memories. If you need substitutions, here are some ideas: - Use whole wheat flour for a nutty flavor and more fiber. - Swap coconut milk for almond milk or regular milk if you prefer. - You can replace unsalted butter with coconut oil for a richer taste. - For a vegan option, use flax eggs (1 tablespoon ground flaxseed mixed with 3 tablespoons water for each egg). - If you want a nut-free cake, skip the walnuts or pecans. These alternatives can help you adapt the recipe to your taste or dietary needs. You will need a few basic tools to make this cake: - Mixing bowls for combining ingredients - A whisk or electric mixer for beating the batter - A 9-inch round cake pan or bundt pan for baking - Measuring cups and spoons for accuracy - A spatula for smoothing the batter - A wire rack for cooling the cake Having the right tools will make your baking experience smooth and enjoyable. Don't forget to check the Full Recipe for detailed steps! Start by gathering your ingredients. You need all-purpose flour, granulated sugar, unsalted butter, and eggs. In a large bowl, cream the softened butter and sugar together. Mix until it looks light and fluffy. This step adds air, making the cake soft. Next, add the eggs one at a time. Mix well after each egg. This helps the batter blend nicely. In another bowl, whisk the flour, baking powder, baking soda, and salt. Now, slowly add this dry mix to the butter mix. Alternate this with coconut milk. This method keeps the batter smooth. After mixing, gently fold in the crushed pineapple, vanilla, almond extract, and nuts if you like. Be careful not to overmix. Preheat your oven to 350°F (175°C). Grease and flour a 9-inch round or bundt pan. Once your batter is ready, pour it into the pan. Smooth the top with a spatula. Sprinkle shredded coconut on top. This adds a nice touch. Bake for 30 to 35 minutes. Check if it’s done by inserting a toothpick into the center. If it comes out clean, your cake is ready! Once baked, take the cake out of the oven. Let it cool in the pan for 10 minutes. This step helps it firm up. Then, invert it onto a wire rack to cool completely. For a nice finish, dust the cake with powdered sugar or drizzle a glaze made of powdered sugar and coconut milk. You can also add slices of tropical fruit for a festive look. Enjoy your creation! To enhance flavor and texture in your Calypso Rum Cake, choose a good-quality rum. The rum adds depth and warmth. Use about 1/4 cup of rum to keep the cake moist. Mix the rum into the batter after adding the wet ingredients. This will let the rum blend well with the cake. You can also soak the cake with a rum syrup after baking for extra flavor. Just combine equal parts rum and sugar, simmer until dissolved, then brush it on the warm cake. Avoid overmixing the batter. This can make the cake tough. Mix until just combined for a light texture. Also, be careful with the oven temperature. An oven that is too hot can burn the cake. Use an oven thermometer to check accuracy. Always let the cake cool in the pan for 10 minutes. This helps it release easily without breaking. Lastly, don’t skip greasing the pan. It keeps your cake from sticking. Presentation can elevate your cake. After cooling, dust it with powdered sugar for a simple look. You can also drizzle a glaze made from powdered sugar and coconut milk for shine. For a tropical feel, top with fresh fruit like mango or pineapple slices. Arrange the fruit artfully around the cake. Shredded coconut adds a festive touch. Use a cake stand to display it nicely during special occasions. This adds charm to any gathering. {{image_2}} You can play with flavors in Calypso Rum Cake. Adding spices can change the whole cake. For example, try adding a pinch of nutmeg or cinnamon. They give warmth and depth. You can also mix in different fruits. Mango, banana, or even grated orange zest can add a fresh twist. Each fruit brings its own charm. Experiment and see what you love best. If you have dietary needs, don’t worry. This cake can fit many diets. For a gluten-free option, use a gluten-free flour blend. Make sure it has xanthan gum for texture. You can also make it vegan. Substitute eggs with applesauce or flaxseed meal. Use coconut oil instead of butter. For a low-sugar cake, try a sugar substitute like stevia. Each choice keeps the cake tasty while meeting your needs. Calypso Rum Cake shines at many events. It’s great for birthdays or family gatherings. The tropical flavors bring a fun vibe. Serve it at summer barbecues or beach parties. People love a slice after a big meal. It also makes a lovely gift for holidays. Share this cake with friends and family, and watch their smiles grow! To keep your Calypso Rum Cake fresh, wrap it well. Use plastic wrap or foil. Store it in an airtight container at room temperature. This helps preserve moisture and flavor. If your kitchen is warm, consider refrigerating it. Just remember that cold can dry it out. For long-term storage, freeze slices. This way, you can enjoy a piece anytime! When you want to enjoy leftovers, reheat your cake gently. Use the microwave for quick heating. Place a slice on a plate and cover it with a damp paper towel. Heat it for about 10 to 15 seconds. For oven reheating, preheat to 300°F (150°C). Wrap the cake in foil and warm for about 10 minutes. This keeps the cake moist and tasty. Your Calypso Rum Cake lasts about 4 to 5 days at room temperature. If stored in the fridge, it can last up to a week. Always check for signs of spoilage. Look for mold or an off smell. If it feels dry or hard, it’s time to toss it. For frozen cake, it can stay good for about 3 months. Just thaw it in the fridge before enjoying! Calypso rum cake has roots in the Caribbean. It blends rich flavors with a festive spirit. Many cultures celebrate with this cake during holidays and special events. The cake often includes rum, tropical fruits, and spices. It symbolizes fun and joy, making it a perfect treat for gatherings. People enjoy it for its moist texture and delightful taste. Yes, you can make Calypso rum cake ahead of time. This cake actually tastes better after a day or two. To prepare in advance, bake the cake, then cool it completely. Wrap it tightly in plastic wrap. Store it in the fridge for up to a week. You can also freeze it for longer storage. Just thaw it in the fridge before serving. The rum flavor in the cake is present but not overpowering. It adds depth and warmth to the dish. The baking process cooks out some alcohol, but you still get that great taste. If you want a stronger flavor, you can brush the cake with extra rum after baking. This enhances the overall experience while keeping it balanced and enjoyable. This blog post covered the key parts of making a great Calypso Rum Cake. I shared important ingredients, helpful tips, and useful tools. You learned how to prepare, bake, cool, and serve your cake. We also explored creative flavor twists and variations to suit dietary needs. Remember to store your cake properly to keep it fresh. By following these steps, you can bake with confidence and impress your friends. Enjoy your baking adventure and celebrate every delicious bite!

Calypso Rum Cake Delightful Recipe to Savor Today

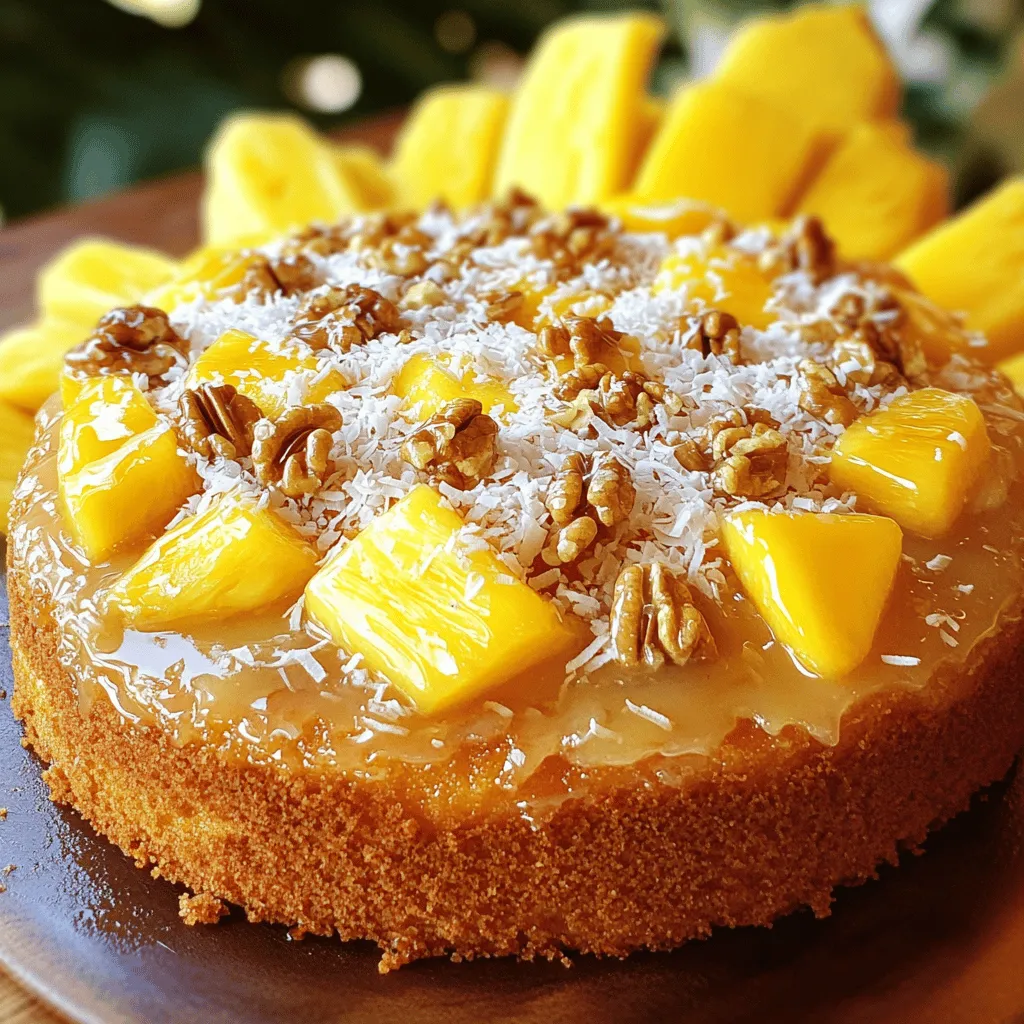
Are you ready to treat yourself to a slice of paradise? Calypso Rum Cake is a delightful dessert that brings

Here is the list of ingredients you will need for the Street Corn Chicken Rice Bowl: - 1 cup uncooked jasmine rice - 2 cups chicken broth - 2 cups cooked chicken, shredded (can use rotisserie) - 1 cup corn kernels (fresh, frozen, or canned) - 1 red bell pepper, diced - 1/2 red onion, finely chopped - 1 avocado, sliced - 1/4 cup fresh cilantro, chopped - 1/2 cup crumbled feta cheese - 1 tablespoon olive oil - 1 teaspoon garlic powder - 1 teaspoon chili powder - Salt and pepper to taste - 2 tablespoons lime juice - Optional: hot sauce for serving These ingredients come together to create a tasty and colorful meal. The jasmine rice forms a soft base, while the chicken and corn mix adds protein and sweetness. Fresh veggies and herbs bring brightness and crunch, making each bite a delight. Don't forget to check the Full Recipe for more detailed instructions on how to prepare this dish! - Combine 1 cup of jasmine rice and 2 cups of chicken broth in a medium pot. - Bring the mixture to a boil, then lower the heat. - Cover and let it simmer for about 15-18 minutes until fluffy. - Once done, remove from heat and keep it covered for 5 more minutes. - In a large skillet, heat 1 tablespoon of olive oil over medium heat. - Add 1 cup of corn kernels, 1 diced red bell pepper, and 1/2 finely chopped red onion. - Sauté these ingredients for about 5-7 minutes until they are tender. - Season the sautéed mixture with 1 teaspoon of garlic powder, 1 teaspoon of chili powder, salt, and pepper. - Stir well and cook for another 2 minutes to blend the flavors. - Add in 2 cups of shredded chicken and drizzle 2 tablespoons of lime juice. - Mix everything until the chicken is heated through and flavors combine well. For the full recipe, check out the complete instructions above! - Use high-quality chicken broth for better flavor. - Let rice sit covered after cooking for fluffiness. Using a good chicken broth makes a big difference. It adds a rich taste to the rice. Softer rice gives you a nice base for all the toppings. This step helps keep the rice light and airy. - Serve in colorful bowls for visual appeal. - Garnish with lime wedges and cilantro for freshness. Bright bowls make your meal pop. They bring life to your table. Adding lime wedges gives a fresh zing. Cilantro adds a nice green touch and taste. - Overcooking the rice or veggies. - Skipping the seasoning step. Watch the cooking times closely. Overcooked rice turns mushy. Vegetables lose their crunch and flavor. Always season your food well. This step brings all the flavors to life. {{image_2}} When it comes to the Street Corn Chicken Rice Bowl, variations can bring new life to this dish. You can easily switch up proteins, ingredients, and flavors to suit your taste. You can substitute chicken with shrimp or tofu. Shrimp adds a sweet, briny flavor, while tofu gives a nice texture. If you want a smoky touch, use grilled chicken instead. The char from the grill enhances the overall taste and makes each bite exciting. For cheese lovers, try swapping feta for cotija cheese. Cotija has a crumbly texture and a saltier taste. If you want a dairy-free option, just omit the cheese altogether. You can also use brown rice instead of jasmine rice. Brown rice adds more fiber and nutrients. It makes the bowl healthier without losing flavor. Want some heat? Add jalapeños to the mix. They provide a spicy kick that balances the sweetness of the corn. You can also include black beans for extra protein and fiber. They add heartiness and make the dish more filling. For the full experience, check out the Full Recipe. Store your Street Corn Chicken Rice Bowl in airtight containers for up to 4 days. This way, you keep the flavors fresh. Before eating, check for any signs of spoilage. Label the containers with the date you made the dish for easy tracking. You can freeze individual portions of your rice bowl for up to 3 months. This makes meal prep easy! Just pack the portions in freezer-safe containers. When you want a quick meal, reheat them in the microwave. It's a simple way to enjoy this dish later. To reheat, add a splash of chicken broth or water. This keeps the rice from drying out. Cover your bowl with a wet paper towel while reheating. It helps steam the food, making it warm and tasty. Enjoy your meal without the worry of it being too dry! You can use basmati rice or quinoa. Both options cook well and taste great. Basmati adds a nutty flavor, while quinoa boosts protein. Try them for a fun twist on your dish! Yes, you can easily make this dish vegetarian. Just swap the chicken for beans. Use vegetable broth instead of chicken broth for cooking. This keeps all the flavors while making it plant-based. Want some heat? Add more chili powder to the mix. You can also toss in fresh jalapeños for a kick. Adjust the spice level to your liking and enjoy the warmth! Each serving has about 450 calories. It packs around 30 grams of protein, which is great for muscle repair. You'll also get vitamins from the veggies and healthy fats from the avocado and feta. To make it a one-pot meal, cook the rice in the same pot as the chicken and veggies. Just add everything in the pot after cooking the rice. This saves time and clean-up while keeping flavors rich. In this post, we explored a tasty chicken and rice dish. You learned about the key ingredients like jasmine rice, chicken, corn, and spices. I shared step-by-step instructions to cook and combine these items. Tips helped you avoid common mistakes, while variations gave you ideas to switch things up. Finally, I explained storage options for meal prep. Enjoy making this dish and experimenting with flavors! It’s simple, fun, and delicious.

Street Corn Chicken Rice Bowl Flavorful and Easy Meal

Craving a meal that’s easy to make and bursting with flavor? Dive into my Street Corn Chicken Rice Bowl! This

To make baked macaroni and cheese, you need five main items: - 2 cups elbow macaroni - 4 cups shredded sharp cheddar cheese - 1 cup grated Parmesan cheese - 4 tablespoons unsalted butter - 4 cups whole milk These ingredients create a creamy and rich dish. Elbow macaroni is the classic choice. It holds the cheese sauce well, making every bite flavorful. Sharp cheddar gives depth, while Parmesan adds a nice touch of saltiness. You can enhance your dish with a few optional ingredients: - 1 teaspoon Dijon mustard - 1/2 teaspoon garlic powder - 1/2 teaspoon onion powder - Salt and pepper to taste These add-ins can boost flavor without much fuss. Dijon mustard brings a slight tang. Garlic and onion powder add warmth. Adjust salt and pepper to fit your taste. For a crispy top, use these ingredients: - 1 cup breadcrumbs (panko preferred for extra crunch) - 1 tablespoon olive oil - Fresh parsley, chopped (for garnish) Panko breadcrumbs create a delightful crunch. Mixing them with olive oil helps them brown nicely when baked. Fresh parsley adds a pop of color and freshness to the dish. For the full recipe, check out the linked section above. - Preheat the oven to 350°F (175°C). - Cook elbow macaroni in salted boiling water. Start by heating your oven. This step helps your dish cook evenly. While the oven heats, prepare your pasta. Boil water and add salt. Then, cook the elbow macaroni until it is al dente. This means it will still have a bit of bite. Drain the macaroni and set it aside. - Create the roux with butter and flour. - Gradually whisk in whole milk until thickened. - Incorporate cheeses and seasonings into the sauce. Next, let’s make the cheese sauce. In a large pot, melt the butter over medium heat. Add the flour and stir it well. This mix is called a roux. Cook it for about two minutes until it bubbles. Slowly add the whole milk while whisking. This helps prevent lumps. Keep stirring until the sauce thickens, which takes about 5-7 minutes. Once thickened, add the cheeses and seasonings. Stir until everything is melted and creamy. - Combine macaroni with cheese sauce and transfer to baking dish. - Prepare and sprinkle breadcrumbs on top. - Bake until golden and crispy. Now it’s time to combine. Pour the cheese sauce over the macaroni. Mix it well so every piece gets coated. Transfer this mix into a greased baking dish. In a small bowl, mix the breadcrumbs with olive oil. Sprinkle this mix over the macaroni. Bake your dish for 25-30 minutes. You want the top to be golden and crispy. Once done, let it cool for five minutes before serving. Enjoy your creamy dreamy baked macaroni and cheese! For more detailed steps, check out the Full Recipe. To make the best baked macaroni and cheese, start with high-quality cheese. It adds a rich taste that makes each bite special. I prefer sharp cheddar for its bold flavor. Mixing it with Parmesan gives a nice depth too. Be careful not to overcook the macaroni. Cook it just until al dente, which means it should still have a little bite. This keeps the texture perfect after baking. If you overcook it, the pasta can turn mushy. To create a creamy cheese sauce without lumps, use a roux. Start by melting butter and whisking in flour. Then, add milk slowly while whisking constantly. This method helps make the sauce smooth and thick. Cook it until it coats the back of a spoon nicely. For the best texture, follow the suggested cooking times in the recipe. When baking, aim for about 25 to 30 minutes. This allows the top to get crispy while keeping the inside cheesy and creamy. Pair your baked macaroni and cheese with simple side dishes. A fresh green salad adds crunch and lightness. Roasted vegetables are great too. They provide a nice contrast to the creamy dish. To reheat, place leftovers in the oven at 350°F (175°C). This helps keep the texture just right. Cover the dish with foil to prevent it from drying out. Enjoy your creamy dream with every bite! Don't forget to check out the Full Recipe for all the details. {{image_2}} You can switch up your cheese for a different taste. Gouda adds a smoky flavor. Fontina melts beautifully and makes the dish creamy. If you need gluten-free options, look for gluten-free pasta and breadcrumbs. Many brands make great choices that taste amazing. Want some heat? Add spices like paprika or cayenne. Just a little can make a big difference. You can also mix in vegetables. Broccoli adds color and nutrition, while tomatoes give a fresh taste. These veggies make your dish more fun and healthy. Get creative with themes! For a BBQ twist, stir in pulled pork. This adds a savory touch. For a Mediterranean vibe, try olives and feta. These ingredients give a unique flavor that will impress your friends. For more ideas, check out the Full Recipe for Creamy Dreamy Baked Macaroni and Cheese. Store leftovers in an airtight container. Place it in the fridge right after it cools. Baked macaroni and cheese stays good for up to three days. Make sure to reheat only what you will eat. You can freeze baked macaroni and cheese for longer storage. Use a freezer-safe container or wrap it tightly in plastic wrap. It lasts for about three months in the freezer. To reheat, thaw it in the fridge overnight. Then, bake it at 350°F (175°C) until heated through. For cheese, keep it in the fridge in its original packaging. It stays fresh for about a week after opening. Store pasta in a cool, dry place like a pantry. Uncooked pasta can last for one to two years if sealed well. Always check for any signs of spoilage before use. How long does baked macaroni and cheese last in the fridge? Baked macaroni and cheese can last about 3 to 5 days in the fridge. Store it in an airtight container. When ready to eat, just reheat it in the oven or microwave for best results. Can I make baked macaroni and cheese ahead of time? Yes, you can make baked macaroni and cheese ahead of time. Prepare the dish up to the baking step, then cover and chill it. When you're ready to bake, just pop it in the oven. You may need to extend the cooking time slightly. What can I do if my cheese sauce is too thin? If your cheese sauce is too thin, you can thicken it. Mix a little cornstarch with water, then stir it into the sauce. Heat it on low, stirring until it thickens. Another option is to add more cheese, which will help thicken the sauce as it melts. How do I know when my baked macaroni and cheese is done? Your baked macaroni and cheese is done when the top is golden and crispy. You can also check for bubbling around the edges. A thermometer should read 165°F (74°C) in the center. Can I use non-dairy milk for the cheese sauce? Yes, you can use non-dairy milk like almond or oat milk in the cheese sauce. Just choose a variety that has a creamy texture. This will help mimic the richness of whole milk. What is the best type of pasta for macaroni and cheese? Elbow macaroni is the classic choice for macaroni and cheese. Its shape holds the cheese sauce well. You can also try shells or cavatappi for a fun twist. In this blog post, we explored the essential ingredients and steps to create macaroni and cheese. From cooking perfect elbow macaroni to making a creamy cheese sauce, every detail counts. You can customize your dish with various add-ins and toppings. I shared tips on storing leftovers and suggested fun variations. With these steps and insights, you can master baked macaroni and cheese. Enjoy delicious meals with your loved ones, and don’t hesitate to get creative in the kitchen!

Baked Macaroni and Cheese Comfort Food Made Simple

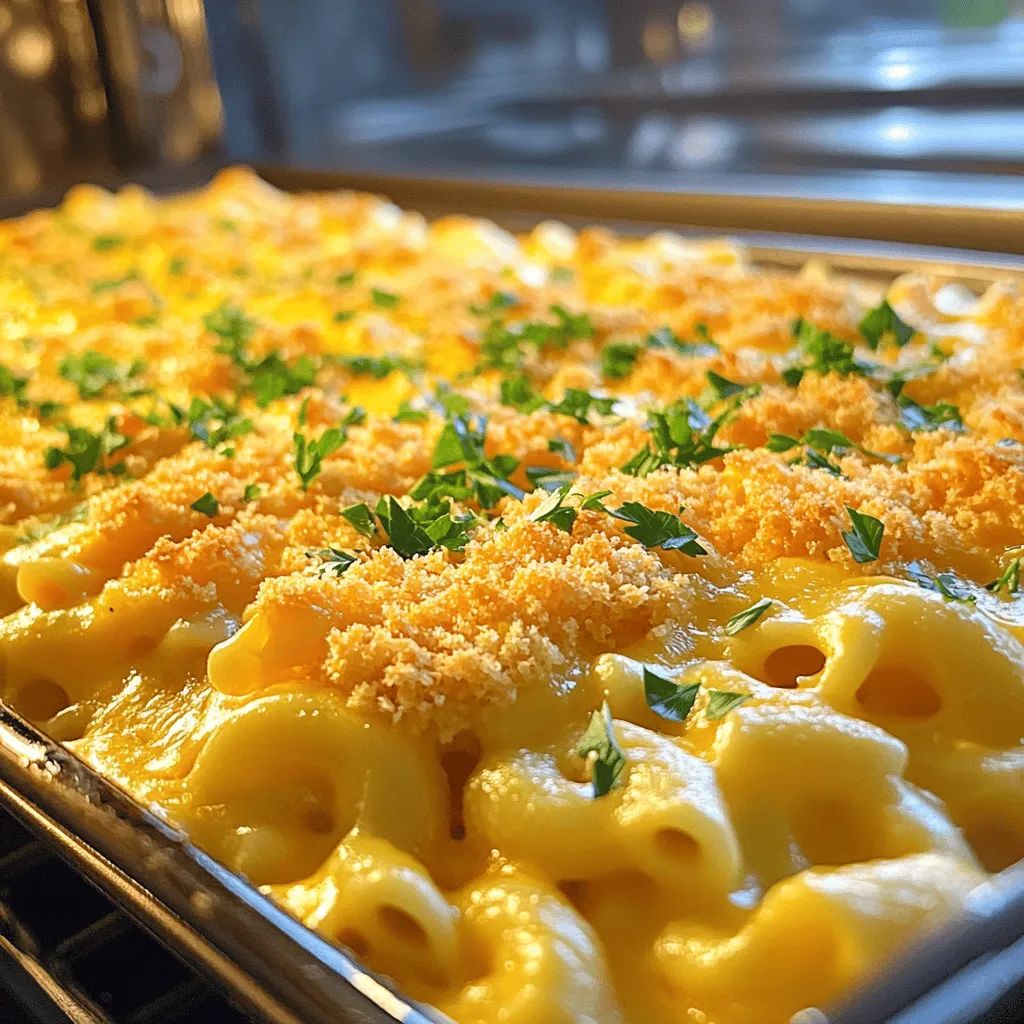
If you crave a warm, cheesy dish that feels like a big hug, you’ve come to the right place! In

- 300g spaghetti or linguine - 200g mixed seafood (shrimp, scallops, mussels) - 4 cloves garlic, minced - 1 small onion, finely chopped - 3 tablespoons olive oil - 1 teaspoon red pepper flakes (optional) - 1 cup cherry tomatoes, halved - 1/2 cup fish or seafood stock - 2 tablespoons fresh parsley, chopped - Zest and juice of 1 lemon - Salt and pepper to taste - Grated Parmesan cheese for serving (optional) Gather these ingredients before you start. Fresh seafood makes a big difference. The garlic and onion give the dish its base flavor. Olive oil adds richness. Red pepper flakes can give a nice kick. You can skip them if you prefer mild flavors. Cherry tomatoes add sweetness and a pop of color. The seafood stock enhances the dish’s taste. Once you have everything ready, you can move on to cooking. For the full recipe, check out the detailed steps. It’s simple, quick, and packed with flavor. 1. Start by bringing a large pot of salted water to a boil. This step is key for flavor. 2. Add 300g of spaghetti or linguine to the boiling water. Cook it according to package instructions. You want it to be al dente, which means it should still have a little bite. 3. Once cooked, reserve 1 cup of pasta water. This water is useful for the sauce later. Drain the rest of the water. 1. In a large skillet over medium heat, pour in 3 tablespoons of olive oil. Let it heat up. 2. Add 1 small onion, finely chopped. Sauté it until softened, about 3-4 minutes. 3. Now, stir in 4 cloves of minced garlic and 1 teaspoon of red pepper flakes. Cook for another 1-2 minutes. Be careful not to burn the garlic, or it will taste bitter. 4. Next, add 200g of mixed seafood. This can include shrimp, scallops, and mussels. Cook for 3-4 minutes. Stir occasionally until the seafood turns opaque and is fully cooked. 1. Add 1 cup of halved cherry tomatoes and 1/2 cup of seafood stock to the skillet. Bring the mix to a simmer. Let it cook for 2-3 minutes, allowing the flavors to blend. 2. Toss in the cooked pasta. Mix everything well. If the sauce is too thick, add some reserved pasta water until it reaches your desired consistency. 3. Finally, stir in the zest and juice of 1 lemon, along with 2 tablespoons of chopped fresh parsley. Season with salt and pepper to taste. Using these steps, you can create a Seafood Pasta in Garlic Sauce that is both savory and easy to make. For the full recipe, check out the details provided earlier. To make your seafood pasta sing, start with fresh seafood. Look for shrimp that smell like the ocean, firm scallops, and shiny mussels. Fresh seafood makes a big difference in taste. Don't forget about pasta water. It’s not just salty; it’s packed with starch. This adds creaminess to your sauce. Reserve a cup before you drain the pasta. You can use it to adjust the sauce later. Serving is just as important as cooking. Use warm bowls to keep the dish nice and hot. This makes a big impact. Arrange the seafood nicely on top of the pasta for a beautiful look. Garnish with fresh parsley and a lemon wedge. The green adds color, and the lemon gives a fresh scent. This small touch makes your dish pop! One mistake to avoid is overcooking seafood. It can become rubbery and tough. Cook it just until it turns opaque. This keeps it tender and flavorful. Another mistake is burning garlic. Garlic can go from sweet to bitter quickly. Cook it on medium heat and watch closely. If it starts to brown, take it off the heat fast. For the full recipe, refer to the earlier section. {{image_2}} You can use many types of pasta for seafood pasta. Spaghetti and linguine are classic choices. But don't stop there! Fettuccine or penne also work well. Each pasta type brings its own texture and flavor. If you need a gluten-free option, try brown rice pasta or chickpea pasta. These alternatives taste great and keep the dish light. Feel free to mix up your seafood too. Crab or lobster adds a rich taste that many love. You can also combine shrimp with scallops and mussels for a seafood feast. This mix gives you layers of flavor and texture. If you’re adventurous, add clams or squid for extra variety. The key is to cook your seafood just right, so it remains tender and juicy. If you want to go vegan, it's easy to swap seafood for veggies. Try using zucchini, bell peppers, or mushrooms. These add delightful flavors and textures. For the sauce, you can use a mix of vegetable broth and olive oil. This keeps the dish rich and tasty. To give it a seafood-like flavor, add a touch of seaweed or nutritional yeast. You’ll still enjoy a delicious meal! For the full recipe, check out the Seafood Pasta Delight. Seafood pasta can last up to three days in the fridge. It's best to store it in an airtight container. I recommend using glass containers as they help keep flavors fresh. Make sure to let the pasta cool before sealing it. This helps prevent condensation, which can make the pasta soggy. To reheat seafood pasta without losing texture, use a skillet on low heat. Add a splash of water or broth to keep it moist. Stir gently until heated through, which usually takes about five minutes. You can also use a microwave. Heat in short bursts of 30 seconds, stirring in between. Yes, you can freeze seafood pasta! However, it’s best to freeze it without the sauce. For best results, store it in freezer-safe bags. Remove as much air as possible before sealing. When ready to eat, thaw it overnight in the fridge. Reheat in a skillet or microwave until hot. Yes, you can use frozen seafood. It offers convenience and saves time. Frozen seafood is often frozen soon after it is caught, keeping it fresh. However, it may lose some texture after thawing. Fresh seafood usually tastes better. If using frozen seafood, remember to thaw it in the fridge overnight. Drain any excess water before cooking. Pair seafood pasta with a simple green salad. A side of garlic bread also works well. You could add roasted vegetables for extra flavor. These sides complement the dish without overpowering it. A glass of white wine can enhance your meal, too. To control the oil, use less olive oil when cooking. Start with one tablespoon and add more if needed. You can also add more seafood stock or pasta water to thin the sauce. Balance the flavors with lemon juice and zest. This adds brightness without excess oil. Yes, seafood pasta is great for meal prep. Cook and store it in airtight containers. It lasts about three days in the fridge. Reheat gently to avoid overcooking the seafood. You can also prepare the sauce ahead of time. Just cook the pasta fresh when you are ready to eat. This seafood pasta dish is simple and tasty. We covered all the key ingredients and steps. You learned how to cook it perfectly and avoid common mistakes. The tips on enhancing flavor and presentation will impress anyone. We also explored storage and reheating options to keep leftovers fresh. Try making variations like gluten-free pasta or vegan options. With these tips, you can enjoy this dish many ways. Cooking seafood pasta can be fun and rewarding. You’ll impress your family and friends with delicious results. Enjoy your culinary journey!

Seafood Pasta in Garlic Sauce Savory and Easy Meal

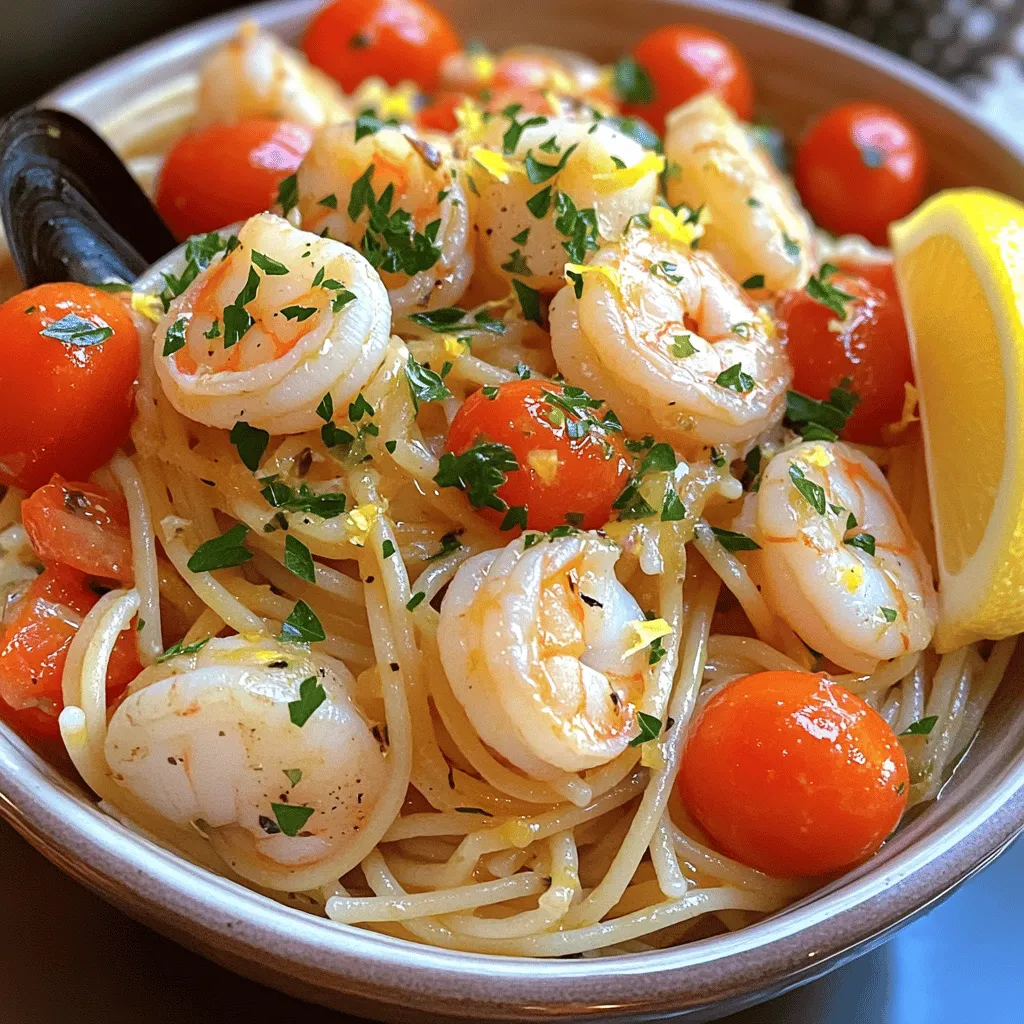
Are you craving a simple yet delicious meal? Let me introduce you to Seafood Pasta in Garlic Sauce. This dish

Older posts
Newer posts
← Previous Page1 … Page32 Page33 Page34 … Page41 Next →

dsad

© 2025 flavorsprint • Built with GeneratePress

Our Policies

  • Copyright Policy
  • Cookie Policy
  • GDPR Policy
  • Privacy Policy
  • Disclaimer
  • Terms Of Use

More Information

  • Home
  • About
  • Contact
  • Appetizers
  • Dessert
  • Dinner
  • Drinks
©2025, flavorsprint About Back To Top