
Carrot Soufflé Delight Flavorful and Light Recipe
Are you ready to impress your family with a simple yet delightful dish? My Carrot Soufflé recipe is light, flavorful,
Are you ready to impress your family with a simple yet delightful dish? My Carrot Soufflé recipe is light, flavorful,
![- Chicken and Pasta Requirements - 2 chicken breasts, boneless and skinless - 8 oz penne pasta - Sauce Components - 1 cup buffalo sauce (homemade or store-bought) - 2 tablespoons olive oil - 1 tablespoon garlic powder - Salt and pepper to taste - Optional Garnishes - 1 cup cherry tomatoes, halved - 1 cup corn kernels (fresh or frozen) - 1 cup shredded mozzarella cheese - 1/2 cup blue cheese crumbles - Fresh parsley, chopped (for garnish) This recipe is so simple and quick to make. You can easily find all these ingredients at your local store. Using fresh chicken gives the best flavor. The buffalo sauce adds that spicy kick, while the cheese adds creaminess. I love to include cherry tomatoes and corn for a burst of sweetness. The parsley on top makes it pretty and fresh. For the full recipe, you can check the cooking details. To start, I season the chicken breasts with olive oil, garlic powder, salt, and pepper. This simple mix adds great flavor. I preheat the grill to medium-high heat. The key here is to make sure the grill is hot enough. I grill the chicken for about 6-7 minutes on each side. Always check that it reaches an internal temperature of 165°F. This ensures the chicken is safe to eat and juicy. While the chicken is grilling, I cook the penne pasta. I follow the package instructions carefully, cooking it to al dente. Al dente means the pasta is firm but not hard. I drain the pasta and set it aside. This keeps it from getting mushy while I finish the dish. Now comes the fun part! I mix the cooked penne pasta with the grilled chicken and buffalo sauce in a large bowl. I add halved cherry tomatoes, corn, and shredded mozzarella cheese. I toss everything until it's well combined. To make sure all the pasta gets coated, I gently stir it. I want every bite to be full of flavor. For the full recipe, check the detailed instructions to make this dish perfectly. Recommended Marinades Using a marinade makes chicken juicy and flavorful. I love a simple mix of olive oil and buffalo sauce. Let the chicken soak for at least 30 minutes. This adds great taste and moisture. Chicken Cut Selection Boneless, skinless chicken breasts work best for this dish. They grill evenly and cook quickly. You can also use chicken thighs for extra flavor and tenderness. Additional Seasoning Options Want to spice it up? Try adding smoked paprika or cayenne pepper. These spices give a nice depth to the flavor. You can also use herbs like oregano or thyme for a fresh kick. Balancing Spiciness with Creaminess Buffalo sauce can be hot! To balance it, add creamy ingredients. A dollop of sour cream or Greek yogurt helps tone down the heat. Mix in some shredded cheese for extra richness. Serving Suggestions Serve the pasta in a deep bowl. Top it with extra parsley and a few slices of grilled chicken. This makes it look colorful and inviting. Ideal Pairings for a Complete Meal Pair your Grilled Buffalo Chicken Pasta with crusty bread or a fresh salad. These sides complement the pasta well and add freshness. You can also serve some extra buffalo sauce on the side for those who want more heat. {{image_2}} You can make this dish healthier in a few easy ways. First, try using whole wheat or gluten-free pasta. Whole wheat pasta adds fiber, making your meal more filling. Gluten-free pasta is great for those with gluten sensitivities. Both options keep the taste yummy while being more nutritious. Next, consider low-calorie buffalo sauce options. Many brands offer lighter sauces that still pack a punch. You can also make your own sauce using hot sauce and vinegar. This way, you control the heat and calories. If you want a vegetarian version, swap the chicken for tofu or veggies. Tofu absorbs flavors well, making it a great substitute. Simply grill or sauté it until it’s golden. You can use bell peppers, zucchini, or mushrooms for added flavor and texture. Adjusting flavors is easy, too. Since veggies don’t have the same taste as chicken, add spices like smoked paprika or cumin. This gives your dish a nice kick without missing the meat. Adding more vegetables boosts nutrition. You can mix in spinach, broccoli, or bell peppers. They add color and crunch while making your meal healthier. You can also experiment with different cheeses. Try using feta or pepper jack for a unique twist. Each cheese brings its own flavor, so feel free to get creative! For the full recipe, check out the [Full Recipe]. To keep your Grilled Buffalo Chicken Pasta fresh, follow these steps: - Best Practices for Refrigeration: Store the pasta in an airtight container. It can stay fresh in the fridge for 3 to 5 days. Make sure it cools down before sealing the container. This helps prevent moisture buildup, keeping your pasta from becoming soggy. - Freezing Options and Techniques: You can freeze the pasta for up to 3 months. Divide it into portions for easy thawing. Use freezer-safe bags or containers. Remove as much air as possible to avoid freezer burn. When ready to eat, thaw it overnight in the fridge. Reheating your Grilled Buffalo Chicken Pasta requires care: - Methods for Keeping Pasta Moist: Use the microwave or stovetop. If using the microwave, add a splash of water. This helps steam the pasta, keeping it moist. Stir the pasta halfway through heating. On the stovetop, warm it on low heat and add a little olive oil. - Tips to Avoid Overcooking: Heat just until warm. Overheating can make pasta mushy. Check every minute or so. You want it hot but not cooked again. Enjoy it just like you made it fresh! For the best results, grill chicken breasts at medium-high heat. This temperature helps cook the chicken evenly. Grill for about 6 to 7 minutes on each side. Check that it reaches an internal temperature of 165°F. This ensures the chicken is safe to eat while staying juicy. Grilling chicken well is key for great pasta. The smoky flavor adds depth to your dish. Always let the chicken rest for a few minutes after grilling. This helps the juices redistribute, making it more tender. Yes, you can! Many pasta types work well in this dish. Try rotini, fusilli, or even spaghetti. Each will change the texture but still taste great. Just remember to cook the pasta to al dente. This keeps it firm and helps it hold the sauce better. If you want a healthier option, consider whole wheat or gluten-free pasta. These alternatives can add extra nutrients or fit dietary needs. The key is to enjoy your meal while making it your own. To add more heat, increase the buffalo sauce amount. You can start with an extra tablespoon. Mix it in with the pasta before serving. This will give your dish a nice kick without overpowering it. Another option is to add diced jalapeños or crushed red pepper flakes. Both add heat but adjust based on your taste. If you're unsure, start small and add more as needed. Balance the spice with creamy blue cheese to keep it tasty. For the full recipe and cooking details, check out the Grilled Buffalo Chicken Pasta recipe. It has everything you need to make this dish amazing. This blog post outlined how to create a tasty chicken pasta dish. You learned about key ingredients, from chicken and sauce to optional garnishes. We covered step-by-step cooking methods for grilling chicken and perfecting pasta. Tips on enhancing flavor and unique variations added fun to your meal. Remember, storage is key for leftovers, and reheating properly keeps it delicious. Use these insights to impress at your next dinner. Enjoy your cooking adventure!](https://flavorsprint.com/wp-content/uploads/2025/06/7231f573-30cd-4154-8657-b56065b2030c.webp)
Are you craving a quick and tasty meal? Grilled Buffalo Chicken Pasta combines the bold flavors of buffalo sauce with
![To make a tasty French Quarter cheese spread, you need a few key ingredients: - 8 oz cream cheese, softened - 1 cup shredded sharp cheddar cheese - 1/2 cup crumbled feta cheese - 1/4 cup sour cream - 1/4 cup mayonnaise - 2 green onions, finely chopped - 1/2 teaspoon garlic powder - 1 teaspoon Cajun seasoning - Salt and pepper to taste - Fresh parsley for garnish These ingredients blend well together. The cream cheese gives it a smooth base. Sharp cheddar adds a nice bite. Feta cheese brings a salty tang. Sour cream and mayo add creaminess. Green onions and garlic powder give a fresh flavor. Cajun seasoning adds a kick. Finally, parsley makes it pretty. If you want to change things up, here are some alternative ingredients: - Low-fat substitutes: Use low-fat cream cheese and yogurt in place of sour cream and mayo. - Vegan options: Swap cream cheese for a nut-based spread. Use vegan mayo and skip the cheese. - Flavor variations: Add jalapeños for heat or herbs like dill for freshness. These alternatives keep the spirit of the dish. You can still enjoy a delicious spread while making it your own. You can check the [Full Recipe] for more details. Mixing the cheese base Start by taking 8 ounces of softened cream cheese. Place it in a mixing bowl. Beat it with a hand mixer until it is smooth and creamy. This step is key for a great texture. Incorporating additional ingredients Next, add 1 cup of shredded sharp cheddar cheese and 1/2 cup of crumbled feta cheese. Then, mix in 1/4 cup of sour cream and 1/4 cup of mayonnaise. Blend these well until everything combines into a rich cheese base. Adjusting seasoning Now for the flavor! Stir in 2 finely chopped green onions, 1/2 teaspoon of garlic powder, and 1 teaspoon of Cajun seasoning. Sprinkle salt and pepper to taste. This will elevate the dish. Don’t forget to taste and adjust the seasoning if needed. Garnishing tips To make your cheese spread shine, garnish it with fresh parsley. This adds a nice touch and a pop of color. You might also sprinkle extra green onions on top for added flavor. Ideal serving dishes and utensils Serve this spread in a bowl, which makes it easy for guests to dip. Use a platter with an assortment of crackers, sliced baguette, and vegetable sticks. These pair well with the creamy cheese spread. You can also use small spoons for easy serving. For the full recipe, check the main article. Enjoy creating your French Quarter Cheese Spread! To make your French Quarter cheese spread shine, focus on balancing seasonings. Start with the Cajun seasoning. It adds a unique kick. If you want more heat, add a bit extra. Taste as you go to find the right mix. Next, think about creaminess. You want a smooth spread but not too runny. The cream cheese gives a great base. Adding sour cream and mayo helps too. If you want it creamier, use more sour cream. For a thicker spread, cut back on the mayo. Proper storage is key to keeping your spread fresh. Place it in an airtight container. This keeps moisture out and flavors in. It can last about five days in the fridge. If you want to reheat, do it gently. Microwave in short bursts. Stir in between to avoid hot spots. You want it warm but not too hot. This way, the cheese stays creamy. Make sure to try the [Full Recipe] for more details! {{image_2}} You can make your French Quarter Cheese Spread unique with simple tweaks. Here are some ideas: - Spicy addition ideas: Add diced jalapeños or hot sauce for heat. A dash of cayenne pepper gives a nice kick too. - Herb variations: Fresh herbs boost flavor. Try chopped chives, dill, or basil for a fresh twist. - Alternative cheese options: Swap sharp cheddar for pepper jack or gouda. Creamy goat cheese can add richness. These small changes let you personalize the spread to your taste. The right sides make your cheese spread shine. Here are my top picks: - Best crackers and bread choices: Serve with crunchy water crackers or toasted baguette slices. Pita chips also work great. - Complementary beverages: Pair with chilled white wine or a light beer. Sparkling water with lemon is a refreshing non-alcoholic choice. These pairings make your cheese spread even more enjoyable for your guests. Enjoy the flavors and feel free to explore! You can find the best ingredients for French Quarter cheese spread at local grocery stores. Look for cream cheese and cheddar cheese in the dairy aisle. Specialty food stores often carry high-quality feta cheese too. These stores may also have Cajun seasoning, green onions, and fresh parsley. If you want a premade version, check the deli section of your local market. Some stores offer a delicious, ready-to-eat cheese spread. Local farmers' markets are great for fresh herbs and vegetables. They may even have unique cheese options to try. If you prefer shopping online, several retailers have great options. Websites like Amazon, Walmart, and specialty food sites carry all the ingredients. You can easily compare prices and find the best deals. Buying online can save you time, especially if you need several items at once. Just make sure to check shipping costs. Some sites offer free shipping on orders over a certain amount. This can help you save even more while stocking up on ingredients for your French Quarter cheese spread. How to make French Quarter Cheese Spread from scratch? To make this cheese spread from scratch, gather your ingredients. You will need cream cheese, sharp cheddar, feta, sour cream, mayonnaise, green onions, garlic powder, and Cajun seasoning. Start by softening the cream cheese. Then, beat it until smooth. Gradually mix in the other cheeses and add the sour cream and mayonnaise. Stir in green onions and seasonings. Chill for one hour and serve. You can find the full recipe above for more details. Can I make this spread ahead of time? Yes, you can make this spread ahead of time. It tastes even better after chilling overnight. Just cover it tightly with plastic wrap after mixing. This helps the flavors blend well. You can store it in the fridge for up to three days. What are the best pairings for this cheese spread? This cheese spread pairs well with many items. Try serving it with an assortment of crackers, sliced baguette, or fresh vegetable sticks. You can also add some fruit for a sweet touch. For drinks, a crisp white wine or a refreshing iced tea works great. Caloric content and serving size Each serving of this cheese spread contains about 150 calories. The recipe serves 6 to 8 people. You can adjust the serving size based on your needs. Allergen information (gluten, dairy, etc.) This spread contains dairy, so it is not suitable for those with lactose issues. It also has gluten if served with traditional crackers. Opt for gluten-free crackers if needed. Always check labels to ensure safety for allergies. In this post, we explored how to make a delicious French Quarter Cheese Spread. We discussed key ingredients like cream cheese and sharp cheddar. You learned about alternatives, preparation steps, and serving tips. I shared ways to perfect the flavor and how to store your spread. With these insights, you can create a tasty spread for any occasion. Try different flavors and pairing options to make it your own. Enjoy sharing your creation with friends and family!](https://flavorsprint.com/wp-content/uploads/2025/06/0aed79ca-b64d-49f7-beb7-9d878e622428.webp)
If you crave a dish that’s simple yet packed with flavor, you’re in the right place! In this post, I’ll
![- 2 cups cooked rice (white or brown) - 2 cups shredded cooked chicken (rotisserie chicken works great) - 1 large onion, thinly sliced - 2 tablespoons butter - 3 cloves garlic, minced - 2 cups beef broth (low sodium) - 1 teaspoon dried thyme - 1 teaspoon dried rosemary - 1 cup shredded Gruyère cheese (or Swiss cheese) - 1 cup heavy cream - Salt and pepper to taste - Fresh parsley, chopped (for garnish) For this French Onion Chicken Rice Bake, I love using cooked rice as my base. You can use white or brown rice, whatever you have on hand. Next, shredded chicken makes it easy. I often grab a rotisserie chicken for this. It's quick and adds great flavor. The onions are key. When you thinly slice one large onion and cook it, it becomes sweet and savory. The magic happens when you caramelize them in butter. Add minced garlic to the mix for even more flavor. Now, let’s talk about beef broth. I use low-sodium broth to control the salt level. This keeps our bake tasty but not too salty. We can't forget the seasonings! Dried thyme and rosemary add depth. Gruyère cheese melts beautifully and gives a rich taste. I also use heavy cream for creaminess. Remember to season with salt and pepper to your liking. Finally, a sprinkle of fresh parsley makes it pretty! You can find the full recipe for this dish at the end of the article. - Preheat the oven to 375°F (190°C). - In a large skillet, melt 2 tablespoons of butter over medium heat. - Add 1 large, thinly sliced onion to the skillet. Cook the onion, stirring often. - Keep cooking until the onions turn caramelized and golden brown. This takes about 15-20 minutes. - In the last minute, stir in 3 cloves of minced garlic. Season with salt and pepper. - In a large mixing bowl, combine 2 cups of cooked rice, 2 cups of shredded chicken, and the caramelized onions. - Pour in 2 cups of beef broth and 1 cup of heavy cream. - Add 1 teaspoon of dried thyme and 1 teaspoon of dried rosemary. - Mix well and stir in half of the 1 cup of shredded cheese. - Transfer the mixture into a greased 9x13-inch baking dish. Spread it out evenly. - Sprinkle the remaining cheese on top. - Cover the dish with aluminum foil. Bake in the preheated oven for 25 minutes. - After 25 minutes, remove the foil. Bake for an additional 15-20 minutes, until the cheese is bubbly and golden. - Let it sit for 5 minutes before serving. Garnish with fresh parsley. This dish is not just tasty; it fills the kitchen with warm, inviting smells. For the full recipe, check out the previous section! How to properly caramelize onions To get sweet, golden onions, slice them thin. Use a large skillet and melt butter over medium heat. Add onions and stir often. Cook for 15-20 minutes. When they turn a deep brown, add minced garlic. This brings out the flavor. Season with salt and pepper. Choosing the right type of chicken I love using rotisserie chicken for this dish. It saves time and adds great taste. You can also cook your chicken at home. Just bake or boil it until done. Shred it and add to the rice bake. Suggested herbs and spices to use Dried thyme and rosemary work great in this dish. They add warmth and depth. You can also try sage or oregano for a new twist. Fresh herbs like parsley make it bright. Add them just before serving for the best flavor. Best cheese alternatives Gruyère cheese gives a nice melt and flavor. If you can’t find it, Swiss cheese is a good choice. Cheddar adds sharpness, while mozzarella keeps it mild. Use what you have and experiment! Garnishing suggestions Fresh parsley adds color and a fresh taste. Chop it finely and sprinkle it on top. You can also add crispy onion bits for crunch. A drizzle of olive oil makes it shine. Serving ideas Serve this bake with a simple side salad. A green salad with vinaigrette is perfect. You can also pair it with some crusty bread. This makes for a cozy family meal. For the full recipe, visit [Full Recipe]. {{image_2}} You can change the rice type in this bake. Both white and brown rice work well. If you want to try something fun, use wild rice or quinoa. These options add great texture and flavor. For the broth, beef broth is classic, but you can swap it out. Use vegetable broth for a lighter taste. This keeps the dish tasty while making it vegetarian-friendly. Add extra veggies for a boost of taste. Mushrooms work great in this recipe. You can also toss in bell peppers, spinach, or carrots. These add color and nutrients. Cheese blends can change the whole vibe. Gruyère is delicious, but try mozzarella or cheddar too. Mixing two or more types can create a rich, creamy layer of flavor. If you prefer slow cooking, this dish adapts easily. Just combine all the ingredients in your slow cooker. Let it cook on low for about 6 hours. It will be lovely and warm when done. You can also make this in an Instant Pot. Cook on high pressure for 10 minutes. Let it release naturally for 5 minutes before serving. This method saves time and keeps everything moist. For more details, you can check the Full Recipe. To store leftovers, let the dish cool down first. Place it in an airtight container. This keeps the flavors fresh. You can refrigerate it for up to three days. Make sure to check for any signs of spoilage before eating. Freezing is a great way to save extra portions. Start by letting the dish cool completely. Portion it into freezer-safe containers or bags. Be sure to label them with the date. You can freeze the dish for up to three months. To thaw, move it to the fridge overnight. When you’re ready to enjoy it again, the best way to reheat is in the oven. Preheat it to 350°F (175°C). Cover the dish with foil to keep it moist. Heat for about 20-25 minutes. You can also use a microwave for quick reheating. Just be sure to add a splash of broth or cream to keep it flavorful. Enjoy each bite like the first time! If you want a lighter option, try using half-and-half. It gives a nice creaminess but with less fat. You can also mix one cup of milk with two tablespoons of butter for a similar effect. This mix keeps the flavor rich without being too heavy. Yes, you can use uncooked chicken. Just make sure to cut it into small pieces. You will need to increase the cooking time. Bake it covered for about 40 minutes, then check if it's fully cooked. Chicken should reach an internal temp of 165°F (75°C). The dish is ready when the cheese is bubbly and golden brown on top. You can also check the rice. It should be soft and hot throughout. If you see steam rising when you cut into it, that’s a good sign too. Yes, you can prepare this dish in advance. Just follow the recipe, but do not bake it right away. Cover it tightly and keep it in the fridge for up to 24 hours. When you’re ready, bake it as directed. This makes it easy for busy days. For the full recipe, refer to the earlier section. This dish combines cooked rice, chicken, and caramelized onions for a cozy meal. You prepare it in simple steps and can customize it with different flavors and ingredients. Tips help you elevate the taste and ensure a great presentation. You can also store leftovers easily for future meals. Enjoy experimenting with this recipe, and make it your own. You’ll love how comforting and delicious it is!](https://flavorsprint.com/wp-content/uploads/2025/06/c51cdd10-06d3-43a3-acb3-3fa33f91b5d3.webp)
Looking for a cozy family meal that warms your heart and fills your belly? This French Onion Chicken Rice Bake
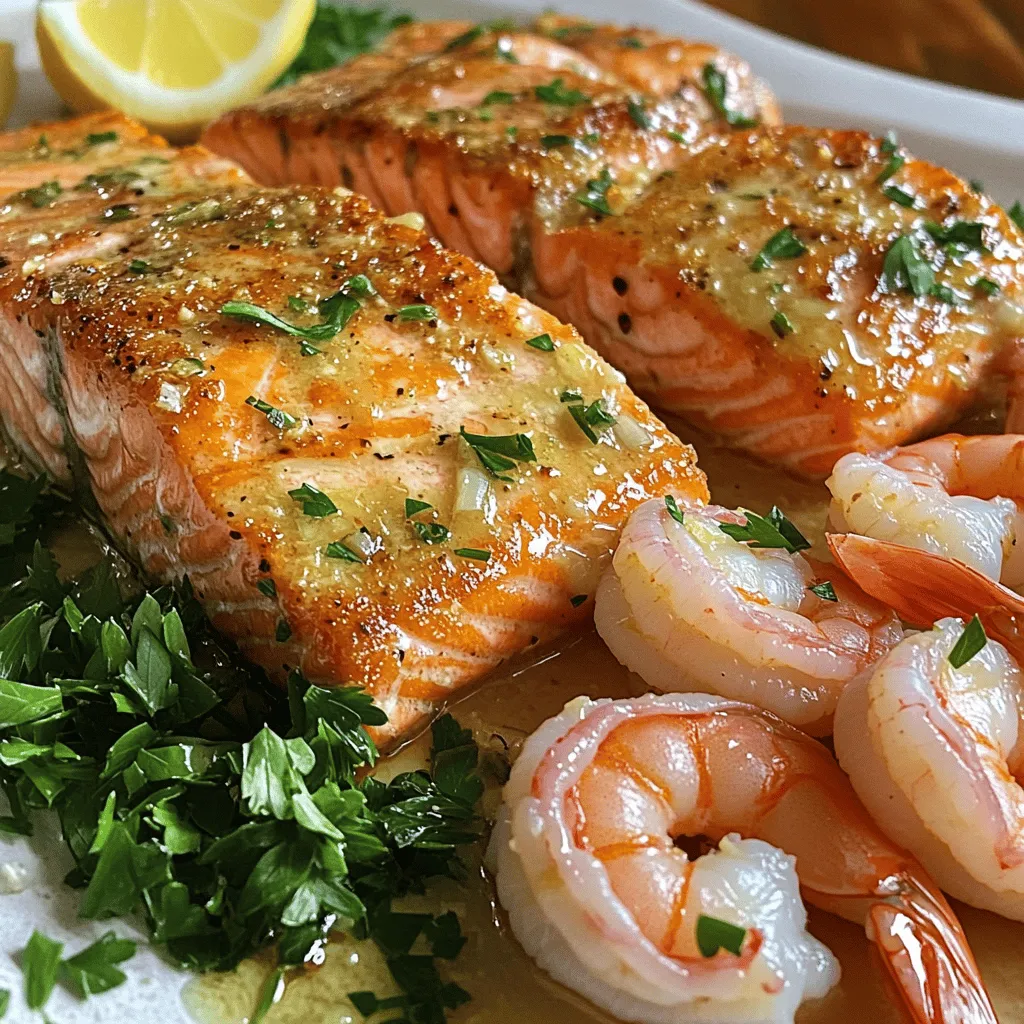
Ready to elevate your dinner game? This simple recipe for Salmon Shrimp Garlic Sauce packs a punch of flavor that’s
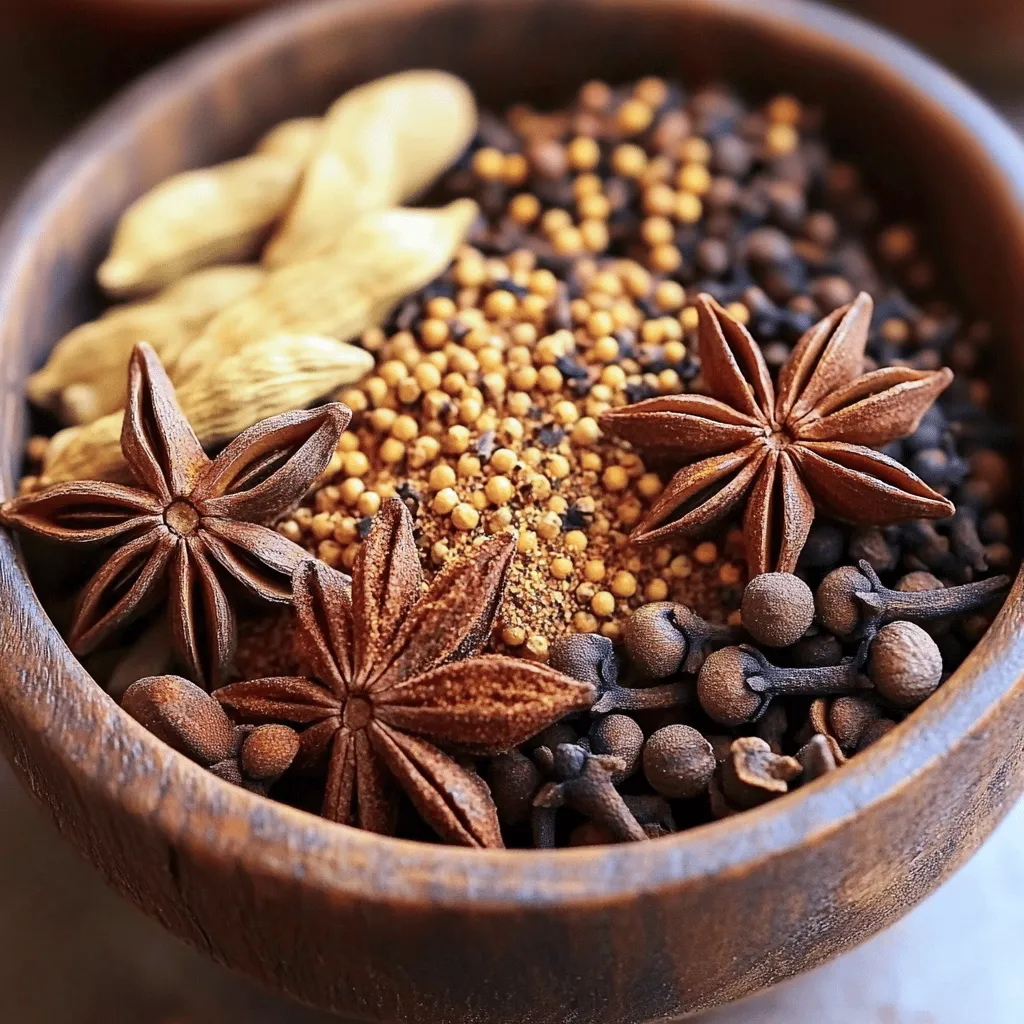
Are you ready to elevate your cooking game? Chinese Five Spice Powder is a blend of flavors that can make
![- 4 boneless, skinless chicken breasts - 1 cup grated Parmesan cheese - 1 cup panko breadcrumbs - 2 cloves garlic, minced - 2 tablespoons fresh parsley, chopped - 1 teaspoon Italian seasoning - 1/2 teaspoon black pepper - 1/2 teaspoon salt - 1/4 cup all-purpose flour - 2 large eggs, beaten - Olive oil or cooking spray for baking When I prepare Parmesan crusted chicken, I focus on fresh ingredients. The chicken breasts should be boneless and skinless for easy cooking. I love using grated Parmesan cheese for its rich flavor. Panko breadcrumbs add a great crunch to the dish. Garlic gives it a nice kick, while parsley adds freshness. Italian seasoning, black pepper, and salt enhance the overall taste. Flour helps the coating stick, and eggs bind everything together. For a healthier touch, you can use olive oil or cooking spray to bake the chicken. This dish is not just simple; it’s packed with flavor. Enjoy the process of gathering these ingredients for a delicious meal! - Calories per serving: Approximately 400 - Protein: 34 grams - Fat: 20 grams - Carbohydrates: 20 grams - Dietary notes: You can use gluten-free breadcrumbs for a gluten-free option. This meal is filling and nutritious. Each serving delivers high protein, making it great for muscle repair. The fat content mainly comes from the cheese and oil. If you're watching carbs, this dish fits well into a balanced diet. To begin, you need to prepare the chicken breasts. Take four boneless, skinless chicken breasts. Rinse them under cold water. Then, place them on a clean cutting board. Use a paper towel to pat them dry. This is important because moisture can make the crust soggy. Dry chicken helps the coating stick better. Now, let’s set up the dredging station. You need three shallow dishes. In the first dish, put 1/4 cup of all-purpose flour. In the second dish, add two large beaten eggs. In the third dish, mix together 1 cup of grated Parmesan cheese, 1 cup of panko breadcrumbs, minced garlic, chopped parsley, Italian seasoning, black pepper, and salt. Coat each chicken breast in flour first. Shake off any extra flour. This keeps the coating light. Next, dip the floured chicken in the eggs. Make sure it is fully coated. Finally, press the chicken into the Parmesan breadcrumb mixture. Coat both sides well for a crunchy crust. Preheat your oven to 400°F (200°C). Lightly grease a baking sheet with olive oil or cooking spray. Place the coated chicken breasts on the baking sheet. Space them evenly to ensure even cooking. Drizzle a little olive oil over each piece for extra crispiness. Bake the chicken for 25 to 30 minutes. Check for doneness by cutting into the thickest part. The chicken should be cooked through and the crust should be golden brown. This is how you achieve a delicious, crunchy Parmesan crust. For more details, see the Full Recipe. To get a nice, crispy crust on your Parmesan crusted chicken, use panko breadcrumbs. They are lighter and crunchier than regular breadcrumbs. - Technique for Crispiness: Press the chicken firmly into the panko mix. This step makes sure the crust sticks well. - Panko vs. Regular Breadcrumbs: Panko has larger flakes, which add more texture. Regular breadcrumbs can make the crust dense and less crispy. Thaw your chicken properly for the best results. - Best Practices for Thawing Chicken: Always thaw in the fridge overnight. This keeps the chicken safe and maintains its flavor. - Recommended Marinating Methods: For added flavor, marinate the chicken in olive oil and herbs for at least 30 minutes. Pair your chicken with tasty side dishes to make a complete meal. - Ideas for Side Dishes: Roasted vegetables, mashed potatoes, or a fresh salad work great. - Garnishing Techniques for Presentation: Add fresh parsley or lemon slices on the side. This adds color and invites people to dig in. For the full recipe, you can refer to the complete instructions. {{image_2}} You can change the taste of Parmesan crusted chicken by adding herbs and spices. Try mixing in some dried oregano or thyme for a fresh twist. You can also use smoked paprika for a warm flavor. If you want a spicy kick, add a dash of cayenne pepper or crushed red pepper flakes. When it comes to cheese, Parmesan isn't the only option. You can use Pecorino Romano for a sharper taste. For a milder flavor, try using mozzarella or even cheddar. Each cheese brings a unique flavor profile. Feel free to experiment with blends to find your favorite. You can cook Parmesan crusted chicken in different ways. An air fryer gives you a quick option. Preheat your air fryer to 375°F (190°C). Place the coated chicken in the basket, leaving space between pieces. Cook for about 15-20 minutes. Check for a golden crust and doneness. If you prefer stovetop cooking, heat some olive oil in a skillet over medium heat. Cook the chicken for about 5-7 minutes on each side. This method gives you a nice, crispy crust. It’s a great option if you want to keep things quick and delicious. If you need gluten-free options, substitute panko with gluten-free breadcrumbs. These work just as well for that crispy coating. You can also use crushed nuts, like almonds or walnuts, for a different texture and flavor. For a healthier version, try baking instead of frying. You can use less oil and still achieve a crispy crust. Another option is to use skinless chicken thighs for more flavor and tenderness while still keeping it healthy. These small changes make a big difference in nutrition. For the full recipe, check out the [Full Recipe]. To keep your Parmesan crusted chicken fresh, store leftovers promptly. Place the chicken in an airtight container. This helps keep moisture in and prevents drying. Use glass or plastic containers with tight lids for best results. Make sure the chicken cools before sealing. You can keep it in the fridge for up to three days. When it's time to enjoy leftovers, reheating is key. The oven is the best method for keeping that crispy crust. Preheat your oven to 350°F (175°C). Place the chicken on a baking sheet and heat for about 10-15 minutes. If you must use a microwave, do so with caution. Microwaves can make the crust soggy. Try covering the chicken with a paper towel to help retain some moisture. If you want to save some for later, freezing is a great option. For unbaked chicken, wrap each piece tightly in plastic wrap. Then, place them in a freezer bag. You can freeze it for up to three months. For baked chicken, let it cool completely before freezing. Wrap it the same way as unbaked. When ready to cook, thaw it overnight in the fridge before reheating. This helps ensure even cooking and keeps it juicy. How long to bake Parmesan crusted chicken? You should bake Parmesan crusted chicken for 25 to 30 minutes. The chicken is done when it reaches 165°F (75°C) inside. A golden crust shows it's ready and crispy. Can I make this recipe ahead of time? Yes, you can prep the chicken ahead. Coat it, then cover and refrigerate for a few hours. Bake it when you’re ready to eat. This saves time for busy days. What should I serve with Parmesan crusted chicken? This chicken pairs well with many sides. Try roasted vegetables or a fresh salad. Mashed potatoes or rice also make good options. Keep it colorful and tasty! Can I use chicken thighs instead of breasts? Absolutely! Chicken thighs work well for this dish. They stay juicy and tender during cooking. Just adjust the baking time slightly if they are thicker. What’s the best way to season the chicken? I suggest using salt and pepper as a base. You can add any herbs you like. Italian seasoning complements the cheese well. A simple garlic rub also adds great flavor. Is Parmesan crusted chicken healthy? Parmesan crusted chicken can be a healthy choice. Chicken is high in protein and low in carbs. Just watch the cheese and breadcrumbs if you’re counting calories. Can this recipe be made keto-friendly? Yes, you can easily make it keto-friendly. Use almond flour instead of regular flour. Choose low-carb breadcrumbs for the crust. This keeps the taste while lowering carbs. Check the [Full Recipe] for all the details! This post covered how to make Parmesan crusted chicken. You learned about key ingredients, step-by-step instructions, and smart tips for success. We also discussed variations and storage, plus answered common questions. In my view, this dish is a winner. It’s easy to prepare and full of flavor. Try it out, and enjoy the delicious results with your loved ones!](https://flavorsprint.com/wp-content/uploads/2025/06/14cf4f6a-9243-4835-be01-c003170e6119.webp)
If you’re searching for a dish that’s both flavorful and easy to make, look no further! My Parmesan Crusted Chicken
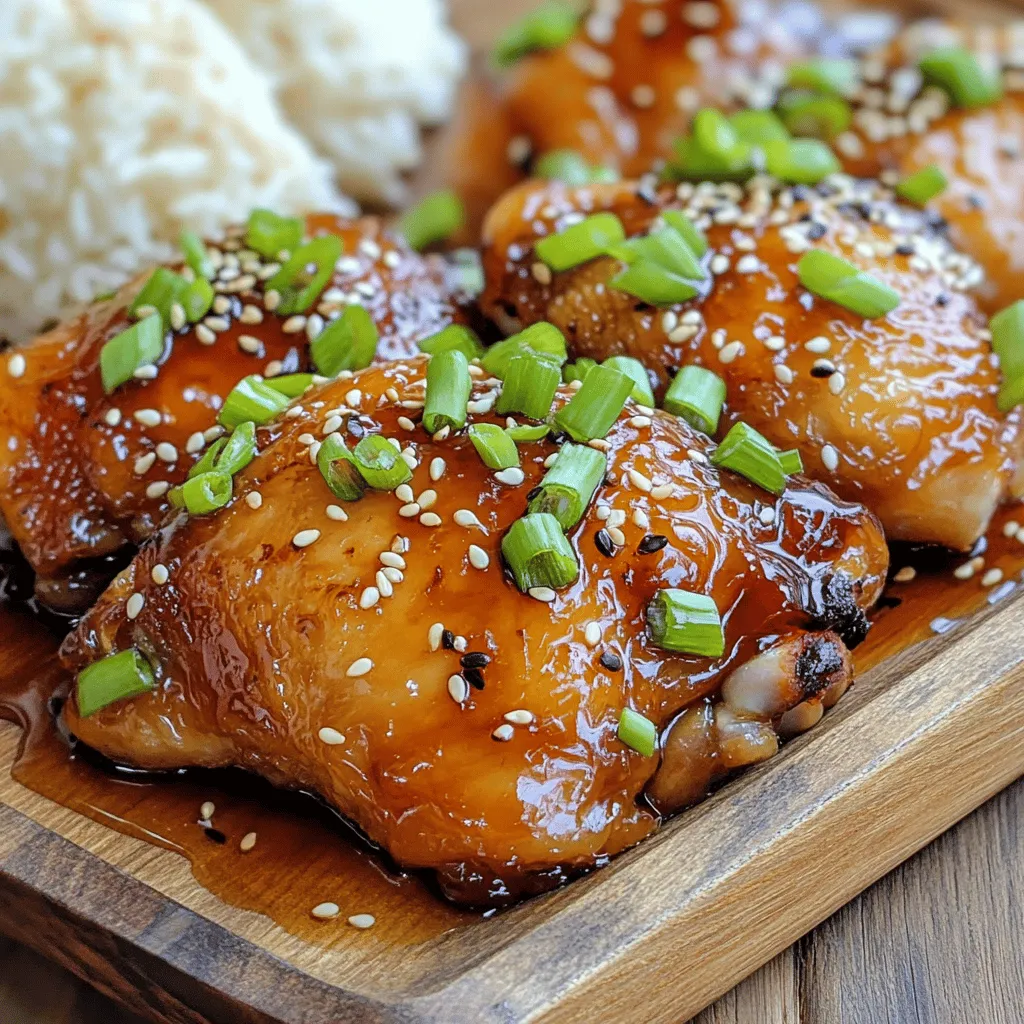
Are you craving a dish that’s sweet, savory, and incredibly easy to make? Look no further! My Sticky Honey Garlic
![To make crispy baked sweet potato fries, you need: - 2 large sweet potatoes, peeled and cut into thin strips - 2 tablespoons olive oil - 1 tablespoon cornstarch - 1 teaspoon paprika - 1 teaspoon garlic powder - 1 teaspoon onion powder - 1/2 teaspoon salt - 1/4 teaspoon black pepper - Optional: Fresh herbs (like parsley) for garnish When measuring, use dry measuring cups for solid ingredients. For liquids, use a liquid measuring cup. A kitchen scale can help if you want exact weights. For the sweet potatoes, cut them evenly. This helps them cook at the same rate. Thin fries get crispier than thick ones. Using fresh sweet potatoes makes a big difference. Look for firm, smooth ones with no bruises. Good olive oil enhances flavor and helps with crispiness. Fresh spices like paprika and garlic powder can bring out the best taste. Quality ingredients lead to better results. They make your fries more enjoyable! For the full recipe, follow the steps above. To make crispy baked sweet potato fries, start by gathering your ingredients. You need two large sweet potatoes, olive oil, cornstarch, and some spices. First, peel the sweet potatoes and cut them into thin strips. Thin strips help them cook faster and get crispy. In a large bowl, toss the fries with two tablespoons of olive oil. Make sure each fry gets a nice coat of oil. Now, add one tablespoon of cornstarch and the spices: one teaspoon each of paprika, garlic powder, and onion powder. Also, add half a teaspoon of salt and a quarter teaspoon of black pepper. Mix well to coat all the fries evenly. Preheat your oven to 425°F (220°C). This high heat will help the fries turn crispy. Line a baking sheet with parchment paper to prevent sticking. Spread the fries on the sheet in a single layer. Avoid crowding them together, as this can make them soggy. Bake them for 25-30 minutes. Flip the fries halfway through to ensure even cooking. You want them golden brown and crispy all over. After baking, let them cool for a few minutes. This helps them firm up even more. These sweet potato fries are tasty on their own, but you can spice them up! Serve them with your favorite dipping sauce, like ketchup or ranch. You can also add fresh herbs like parsley for a pop of color and flavor. Feel free to try out different dips to find your favorite. For a fun twist, serve them as a side with burgers or sandwiches. For the complete recipe, check out the [Full Recipe]. To get crispy baked sweet potato fries, follow these steps: - Cut the sweet potatoes into thin strips. Thin fries cook better. - Toss the fries in olive oil. This helps them crisp up nicely. - Use cornstarch in your mix. It helps absorb moisture and adds crunch. - Spread the fries out on the baking sheet. This keeps them from steaming. - Flip them halfway through baking. This ensures even cooking and browning. Many people make mistakes when baking sweet potato fries. Here are some to watch for: - Don't overcrowd the baking sheet. This traps steam and makes them soggy. - Avoid cutting fries too thick. Thick fries take longer to cook and won't crisp. - Skipping the cornstarch is a big no. It is key for that crunch. - Not preheating the oven can lead to soft fries. Always preheat! Dipping sauces can make your fries even better. Here are some great options: - Classic ketchup is always a hit. - Try a creamy ranch for a cool flavor. - Sweet chili sauce adds a fun kick. - Homemade garlic aioli is rich and tasty. - Enjoy them with a spicy sriracha mayo for heat. Explore the full recipe to enjoy crispy baked sweet potato fries in your kitchen! {{image_2}} You can change the flavor of your sweet potato fries easily. Use different spices to create fun tastes. For a spicy kick, try cayenne pepper. If you love herbs, mix in dried oregano or thyme. For a sweet twist, cinnamon adds a nice touch. You can also use taco seasoning for a zesty flavor. Each option gives your fries a unique taste. Sweet potatoes can be cut into various shapes. Classic fries are great, but have you tried wedges? They are thicker and hold more flavor. You can also make curly fries using a spiral cutter. This fun shape adds crunch and makes them special. Each style brings its own texture and taste to your dish. Mixing in other veggies makes your fries even better. Carrots and zucchini work well with sweet potatoes. Cut them into similar sizes for even cooking. You can even add bell peppers for a colorful plate. This mix not only adds flavor but also boosts nutrition. Your snack becomes more exciting and healthy with each added veggie. For the full recipe, check out the steps above. To store leftover fries, let them cool completely. Then, place them in an airtight container. Use parchment paper to separate layers if needed. This helps keep them crispy. Store the container in the fridge for best results. For the best taste, reheat fries in the oven. Preheat your oven to 400°F (200°C). Spread the fries on a baking sheet. Bake for about 10-15 minutes or until hot and crispy. You can also use an air fryer for quick reheating. Set it to 350°F (175°C) and cook for about 5-7 minutes. These crispy baked sweet potato fries can last in the fridge for up to 3 days. If you want to keep them longer, consider freezing them. Frozen fries can last for about 2 months. Just make sure to store them in a freezer-safe bag. Yes, you can use regular potatoes. However, sweet potatoes have a sweeter taste. They also have more nutrients, like vitamin A. If you choose regular potatoes, try Yukon Gold or Russets. They will give you a nice flavor, but the texture may differ. The key is to cut them into similar sizes to ensure they cook evenly. You can tell the fries are done by their color and texture. Look for a golden brown color. They should also feel crispy to the touch. If you flip them halfway through baking, this helps them cook evenly. A good way to test is to poke one with a fork. If it’s soft inside and crisp outside, they are ready to eat! You can prep the sweet potato fries ahead. Cut them and store them in the fridge for up to 24 hours. Just remember to toss them with olive oil and spices right before baking. This keeps them fresh and tasty. You can also bake them in advance, let them cool, and then store in an airtight container. Just reheat them in the oven to regain that crispy texture. For the full recipe, check out the earlier section! This article covered the key steps to make perfect sweet potato fries. We explored vital ingredients and measurement tips. I shared tricks for getting crispy fries and common mistakes to avoid. You learned how to serve them with tasty dips. In the end, quality ingredients and proper techniques can make a big difference. Enjoy your fries with flavor and variety!](https://flavorsprint.com/wp-content/uploads/2025/06/4ed13f3d-7660-4cf5-a2f7-8b40d7d049a3.webp)
Looking for a quick snack that’s easy and delicious? You’ve found it! Crispy baked sweet potato fries are not just

Are you craving a delicious, flavorful dish that’s easy to make? Look no further! My Easy Chicken Tikka Masala recipe
