Skip to content
DisclaimerTerms Of UseGDPR PolicyCookie Policy

flavorsprint

  • Home
  • Drinks
  • Appetizers
  • Dinner
  • Dessert
  • About
  • Contact
  • Privacy Policy
DisclaimerTerms Of UseGDPR PolicyCookie Policy

Lillian

To make Buffalo cauliflower wings, you need a few key items. Here’s what you will need: - 1 medium head of cauliflower, cut into florets - 1 cup all-purpose flour - 1 cup almond milk (or any plant-based milk) - 1 teaspoon garlic powder - 1 teaspoon onion powder - 1 teaspoon smoked paprika - 1/2 teaspoon salt - 1/2 teaspoon black pepper - 1 cup buffalo sauce (store-bought or homemade) - 2 tablespoons melted vegan butter (optional for richness) These ingredients come together to create a tasty vegan snack. The cauliflower serves as the base. It’s crunchy and absorbs the flavors well. The flour and almond milk make a batter that coats the florets. The seasoning in the batter makes these wings extra flavorful. Garlic powder and onion powder add depth to the taste. Smoked paprika gives a nice smoky hint. Salt and black pepper enhance all the flavors. Mixing these spices into the batter is easy. Just whisk them together with the flour and almond milk until smooth. You can make your dish even better with some garnishes and dips. Fresh parsley, chopped finely, adds a nice touch. It brings color and freshness to your wings. For dipping sauces, consider ranch or blue cheese dressing. These sauces pair perfectly with the spicy buffalo flavor. You can serve celery and carrot sticks on the side for crunch. For the full recipe, check the Full Recipe section. To make Buffalo cauliflower wings, you need some basic steps. First, preheat your oven to 450°F (232°C). This makes sure your wings bake nicely. Next, gather your ingredients. You will need a head of cauliflower, flour, almond milk, and some spices. These will help create a tasty batter that sticks to the cauliflower. 1. Preheat Oven: Start by preheating your oven. Use parchment paper on a baking sheet. 2. Prepare the Batter: In a bowl, mix the flour, almond milk, garlic powder, onion powder, smoked paprika, salt, and black pepper. Whisk it until smooth. 3. Coat Cauliflower: Take each cauliflower floret and dip it into the batter. Let the excess batter drip off. Lay the coated florets on the baking sheet. 4. Bake: Place the baking sheet in the oven. Bake for 25-30 minutes. Flip the florets halfway through. This helps them get golden and crispy. 5. Prepare Buffalo Sauce: In a bowl, mix the buffalo sauce with melted vegan butter. This adds some richness to the flavor. 6. Coat with Sauce: Once the cauliflower is done, take it out of the oven. Toss the florets in the buffalo sauce mixture. 7. Final Bake: Put the coated wings back into the oven. Bake for an additional 10-15 minutes. This will help set the sauce and add some char. 8. Serve: Let the wings cool for a few minutes. Garnish with fresh parsley before serving. To get those perfect crispy wings, follow these tips: - Use Parchment Paper: This keeps the wings from sticking. - Space the Florets: Make sure your cauliflower has room on the baking sheet. Crowding them can lead to steaming instead of crisping. - Flip Halfway: Turning the wings helps them cook evenly and become golden on all sides. Now, you're ready to make delicious Buffalo cauliflower wings! For the full recipe, check the above details. To get that perfect crunch, follow these tips. First, make sure your oven is hot. Preheat it to 450°F (232°C). A hot oven helps the wings crisp up well. Second, coat the cauliflower evenly with the batter. If it is too thick, it won’t get crispy. Lastly, bake the wings on a parchment-lined sheet. This allows hot air to circulate and crisps the edges. Many people make mistakes that can ruin their wings. One common error is overcrowding the baking sheet. If the florets are too close, they will steam instead of crisp. Another mistake is not flipping the wings halfway through cooking. Flipping helps both sides cook evenly. Lastly, don’t skip the final bake with the buffalo sauce. This step adds flavor and a nice char. Coating is key to great Buffalo Cauliflower Wings. Start with dry florets. This helps the batter stick better. When you dip each piece, let the excess batter drip off. This step prevents soggy wings. You can also try double-coating for extra crunch. Dip the coated florets back in the batter, then into breadcrumbs. This extra layer adds texture and helps them stay crispy after baking. For the full recipe, check out the amazing details to make these tasty wings. {{image_2}} If you love heat, try adding more spice. You can mix extra hot sauce into the batter. Simply add one tablespoon of cayenne pepper. This gives your wings an extra kick. You can also serve them with a side of spicy ranch dressing. This adds more flavor and heat to your meal. For a sweeter twist, mix honey or maple syrup with your buffalo sauce. Use about two tablespoons for a nice balance. This makes a tasty sweet and spicy flavor that pairs well with the cauliflower. You can also sprinkle some brown sugar in the batter for added sweetness. This version is perfect for those who enjoy a touch of sweetness in their wings. To make your Buffalo Cauliflower Wings gluten-free, swap the all-purpose flour. Use a gluten-free flour blend instead. You can also use almond flour or chickpea flour. Both options work well to coat the cauliflower. Be sure to check the buffalo sauce too. Some brands contain gluten, so look for a gluten-free label to ensure your dish stays safe for all diets. For the full recipe, check the earlier section. Enjoy your cooking experience! To keep your leftover Buffalo Cauliflower Wings fresh, place them in an airtight container. Make sure to let them cool completely before sealing. This helps prevent moisture buildup. Store them in the fridge for up to three days. If you want to enjoy them later, consider freezing them. For the best taste, reheat your wings in the oven. Preheat your oven to 350°F (175°C). Place the wings on a baking sheet. Bake them for about 10-15 minutes. This method helps keep them crispy. You can also use an air fryer for quick reheating. Set the air fryer to 350°F (175°C) and cook for about 5-7 minutes. If you want to freeze your wings, first let them cool down. Then, place them in a single layer on a baking sheet. Freeze them for about one hour. Once frozen, transfer the wings to a freezer-safe bag or container. This method prevents them from sticking together. You can store them for up to three months. When ready to eat, thaw them overnight in the fridge before reheating. Enjoy your Buffalo Cauliflower Wings any time! Buffalo cauliflower wings are a tasty snack made from cauliflower. They are cut into small pieces called florets. You dip these florets in a batter and bake them until they get crispy. After baking, you coat them in spicy buffalo sauce. They give you that hot wing flavor but are plant-based. Yes, buffalo cauliflower wings are vegan if you use plant-based milk and sauce. The main ingredients are cauliflower, flour, and seasonings. You can skip any animal products, like dairy, to keep them vegan. This recipe uses almond milk and vegan butter for added richness. To make them spicier, add more buffalo sauce or use a hotter sauce. You can mix in cayenne pepper or hot sauce to the batter too. If you prefer them milder, reduce the buffalo sauce or use a milder version. You can also serve them with a cooling dip, like ranch or blue cheese. Yes, you can prepare buffalo cauliflower wings ahead of time. You can coat the florets in batter and bake them. Then, store the baked wings in the fridge. When you’re ready to eat, just coat them in the buffalo sauce and bake again for a quick snack. This makes them perfect for parties or game days. For the full recipe, check out the complete instructions above. In this post, we covered how to make Buffalo cauliflower wings. We looked at the main ingredients, seasoning, and garnishes that enhance the flavor. I shared step-by-step instructions to help you bake the perfect crispy wings. You learned tips for achieving the best texture and avoiding mistakes. We also discussed tasty variations and how to store leftovers effectively. Now, you can enjoy a healthier, delicious twist on classic wings anytime!

Buffalo Cauliflower Wings Flavorful and Easy Recipe

If you’re craving a tasty snack that’s both healthy and satisfying, you have to try Buffalo Cauliflower Wings. They pack

- 24 Oreo cookies, crushed - 1/4 cup unsalted butter, melted - 2 cups cream cheese, softened - 1 cup powdered sugar - 1 teaspoon vanilla extract - 1 cup heavy whipping cream - 12 Oreo cookies, chopped (for filling) - Extra Oreos for garnish I love using simple ingredients for this No Bake Oreo Cheesecake. Each one plays a key role in making it rich and tasty. The Oreo cookies form the base and add great flavor. Mixing them with melted butter makes a perfect crust. You’ll need cream cheese for the filling, which brings a creamy texture. The powdered sugar sweetens the mix. A touch of vanilla extract adds a nice aroma that lifts the other flavors. Heavy whipping cream is essential too. It gives the cheesecake its lightness and airiness. When you chop some Oreo cookies to fold into the filling, it brings delightful bites of cookie in every slice. Of course, we save extra Oreos for the top, making it look fancy. - Springform pan - Mixing bowls - Electric mixer - Rubber spatula Using the right tools is crucial. A springform pan helps you easily remove the cheesecake later. Mixing bowls allow you to combine ingredients well. An electric mixer makes beating the cream cheese quick and easy. Finally, a rubber spatula helps you gently fold the whipped cream without losing air. For the Full Recipe, follow my clear steps and enjoy this simple and irresistible treat! First, take your 24 crushed Oreo cookies and mix them with 1/4 cup melted butter. Stir until it looks like wet sand. Next, grab a 9-inch springform pan. Press the Oreo mixture firmly into the bottom of the pan. This will form your crust. Once you finish, put the pan in the freezer. Let it chill while you make the filling. Now, take 2 cups of softened cream cheese. In a large bowl, beat the cream cheese until it is smooth. Gradually add in 1 cup of powdered sugar and 1 teaspoon of vanilla extract. Mix well until it is all combined and creamy. This step is key for a rich filling. In another bowl, pour in 1 cup of heavy whipping cream. Whip it until stiff peaks form. This means the cream should hold its shape well. Now, gently fold the whipped cream into the cream cheese mixture. Be careful not to deflate it. Then, stir in 12 chopped Oreo cookies. Pour this delicious filling over your chilled crust. Smooth out the top with a spatula. Cover the cheesecake with plastic wrap. Refrigerate it for at least 4 hours or until it sets. When ready, garnish with extra Oreos for a fancy touch. For the full recipe, check the earlier section! To get the best texture in your No Bake Oreo Cheesecake, start with softened cream cheese. Cold cream cheese will not mix well. It can make your cheesecake lumpy. Leave it out for about 30 minutes before you start. When whipping the cream, use a cold bowl and beaters. This helps the cream whip faster and to a better consistency. Whip until you see stiff peaks. This adds lightness to your cheesecake. A pinch of salt can make your cheesecake taste even better. It balances the sweetness and brings out the flavors. Try using different types of Oreos, like mint or peanut butter. Each type gives a new twist to the classic flavor. You might even mix them for a special treat. Top your cheesecake with chocolate sauce, fresh fruit, or whipped cream. These toppings add color and flavor. For a stunning dessert, slice the cheesecake and arrange the pieces on a nice plate. Use extra Oreos as a garnish. This makes your cheesecake look as good as it tastes. {{image_2}} When making No Bake Oreo Cheesecake, you can change it up to match your taste. Here are some fun ideas. 1. Mint Oreo Version: Use Mint Oreos instead of regular ones. This adds a fresh mint taste that pairs well with cream cheese. 2. Peanut Butter Oreo Option: Swap in Peanut Butter Oreos. This brings a rich, nutty flavor that makes the cheesecake even more decadent. 1. Use of Chocolate Graham Crackers: For a twist, use chocolate graham crackers instead of Oreos. This enhances the chocolate flavor and adds a new texture. 2. Gluten-Free Cookie Options: If you need a gluten-free treat, try gluten-free Oreos or cookie crumbs. This way, everyone can enjoy this dessert. 1. Dairy-Free Cream Cheese Alternatives: Use dairy-free cream cheese if you're avoiding dairy. Brands like Tofutti or Kite Hill work well and keep the cheesecake creamy. 2. Using Sugar Substitutes for a Healthier Option: If you're cutting back on sugar, try using a sugar substitute like Stevia or erythritol. This keeps the cheesecake sweet without the extra calories. Feel free to mix and match these variations to create a No Bake Oreo Cheesecake that fits your taste! Check the Full Recipe for detailed steps. To keep your No Bake Oreo Cheesecake fresh, store it in the fridge. Use an airtight container or cover the cheesecake with plastic wrap. This helps keep it moist and tasty. It will stay fresh for up to five days in the fridge. Always check for any off smells or changes in texture before eating. You can freeze your cheesecake if you want to save some for later. First, let it set in the fridge for at least four hours. Then, wrap it tightly in plastic wrap and foil to prevent freezer burn. When ready to eat, thaw it in the fridge overnight. You can keep it frozen for up to three months. To enjoy your cheesecake at its best, eat it within five days. After that, it may lose its creamy texture and flavor. If you see any signs of spoilage, like mold or a sour smell, it's best to toss it. Keeping it in the proper containers helps maintain its yummy taste and texture. For the complete recipe, you can refer to the [Full Recipe]. Yes, you can make this cheesecake up to two days ahead. Prepare it and chill it in the fridge. Just keep it covered well. This way, the flavors deepen, and it stays fresh. You can also freeze it for up to a month. If you freeze it, let it thaw in the fridge overnight before serving. This makes it easy to enjoy any time. You should refrigerate the cheesecake for at least four hours. This chilling time helps it set properly. For the best results, try to chill it overnight. The longer it sits, the firmer and tastier it becomes. This waiting time is key to a perfect slice. Yes! You can use other cookies to change the flavor. Chocolate graham crackers work well for a deeper taste. Vanilla wafers add a nice touch, too. If you like a crunch, try using gingersnaps. Each cookie will give a different flavor and texture to your cheesecake. So, feel free to get creative! This blog post covered how to make a No Bake Oreo Cheesecake. We detailed the key ingredients and tools needed for success. I shared step-by-step instructions for the crust, filling, and chilling processes. Tips for flavor, texture, and presentation help ensure a tasty outcome. I also presented variations to suit different tastes and preferences. Finally, I provided storage info for optimal freshness. Now, you’re ready to create a delightful dessert that satisfies everyone! Enjoy your cheesecake and all the delicious bites that come with it.

No Bake Oreo Cheesecake Simple and Irresistible Treat

Craving a dessert that’s easy and delicious? You’ll love this No Bake Oreo Cheesecake! It’s rich, creamy, and made with

When making Cinnamon Sugar Donut Muffins, you need a handful of simple ingredients. Here’s what you will use: - 1 ½ cups all-purpose flour - ½ cup granulated sugar - 2 teaspoons baking powder - ½ teaspoon baking soda - ½ teaspoon salt - 1 teaspoon ground cinnamon (plus extra for topping) - 1 large egg - ½ cup buttermilk (or milk with 1 teaspoon vinegar) - ⅓ cup vegetable oil - 1 teaspoon vanilla extract - ¼ cup unsalted butter, melted (for coating) - ½ cup sugar mixed with 1 tablespoon ground cinnamon (for coating) These ingredients create a lovely mix. They blend well to give you soft, sweet muffins with a crunchy, cinnamon-sugar topping. The buttermilk adds richness, while the baking powder and baking soda help the muffins rise perfectly. You’ll love the aroma of cinnamon as you bake. For a full exploration of how to make these delightful treats, check out the Full Recipe. - Preheat your oven to 350°F (175°C). - Grease a muffin tin or line it with muffin liners. - In a medium bowl, whisk together: - 1 ½ cups all-purpose flour - ½ cup granulated sugar - 2 teaspoons baking powder - ½ teaspoon baking soda - ½ teaspoon salt - 1 teaspoon ground cinnamon Mix until all the dry ingredients are well combined. This step builds the base for our muffins. - In another bowl, beat one large egg. - Then add: - ½ cup buttermilk (or milk mixed with 1 teaspoon vinegar) - ⅓ cup vegetable oil - 1 teaspoon vanilla extract Stir until everything is smooth and blended. This creates a rich, flavorful mix. - Pour the wet ingredients into the dry ingredients. - Mix until combined. Be careful not to overmix; some lumps are just fine. This keeps your muffins light and fluffy. - Divide the batter among the muffin cups. - Fill each cup about two-thirds full. This lets the muffins rise nicely without spilling over. - Bake in the preheated oven for 15-18 minutes. - Check doneness by inserting a toothpick into the center. If it comes out clean, the muffins are ready. - While the muffins cool for five minutes, prepare a cinnamon-sugar mix. - In a small bowl, combine: - ½ cup sugar - 1 tablespoon ground cinnamon - Dip the tops of each muffin in melted butter. - Roll them in the cinnamon-sugar mixture to coat. This gives each muffin that irresistible sweet crunch. For the full recipe, check out the details above! To make your muffins great, avoid overmixing the batter. Overmixing makes muffins tough. Mix until just combined, and it's okay if some lumps remain. Also, check your oven temperature. Use an oven thermometer to confirm it’s accurate. A wrong temperature can lead to uneven baking. These muffins shine when paired with coffee or milk. They make a perfect snack at any time. For serving, use decorative plates to add a special touch. A sprinkle of extra cinnamon sugar on top looks inviting and tasty. For a healthier twist, consider using whole wheat flour. This option adds fiber and nutrients. You can also reduce the sugar slightly. It's a simple way to enjoy your muffins while still keeping them delicious. {{image_2}} You can make these muffins even more fun! Here are a few ideas: - Add chocolate chips: This gives a sweet and rich twist. Dark or milk chocolate works well. - Incorporate nuts: Try adding chopped pecans or walnuts for a crunchy texture. They add flavor and a nice bite. Want to change things up for dietary needs? Here are two great options: - Substitute buttermilk: Use plant-based milk for a dairy-free version. Almond or oat milk can work perfectly. - Use coconut oil: Swap vegetable oil with coconut oil. This adds a hint of coconut flavor and richness to your muffins. These simple variations allow you to customize your cinnamon sugar donut muffins. Check out the Full Recipe for all the details! You can keep your muffins fresh by storing them in an airtight container. They will stay good at room temperature for up to 3 days. This way, they remain soft and tasty, ready for your next snack. For longer storage, freeze your muffins in a freezer-safe bag. They will last for up to 3 months. When you're ready to enjoy one, simply reheat it in the microwave or oven. This makes it easy to have a warm muffin anytime you crave a sweet treat. You can make these muffins healthier by using whole grain flour. This adds fiber and nutrients. Another option is to reduce the sugar content. You can cut the sugar by a third without losing flavor. Yes, you can substitute several ingredients in this recipe. For example, use plant-based milk instead of buttermilk. You can also use coconut oil instead of vegetable oil. These swaps keep the muffins tasty and fun. Yes, you can transform this muffin recipe into mini donuts. Just adjust the baking time to about 10-12 minutes. A mini donut pan will help you shape them perfectly. If your donuts turn out dry, first check your baking times. Overbaking can dry them out. Ensure you measure your wet ingredients accurately. A little extra buttermilk can help add moisture, too. This blog covered how to make delicious cinnamon sugar donut muffins. We looked at key ingredients, step-by-step instructions, and storage tips. Adding extras like chocolate or nuts can make them unique. Remember, the right baking time and avoiding overmixing are crucial. These muffins are great with coffee or milk. Try different twists to suit your taste. Enjoy fresh or stored muffins for a delicious treat!

Cinnamon Sugar Donut Muffins Irresistible and Easy Recipe

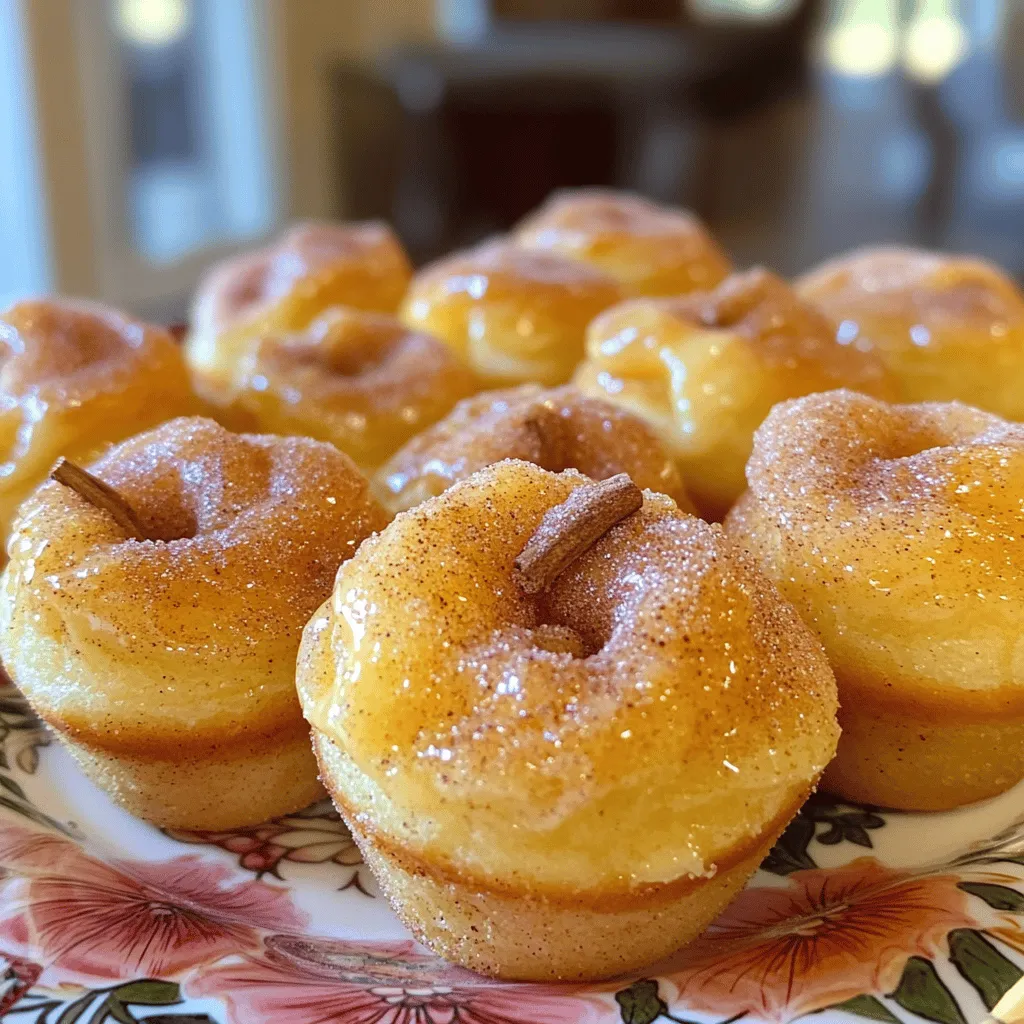
Get ready to indulge in a delightful treat with my easy Cinnamon Sugar Donut Muffins recipe! These soft, sweet muffins

To make this dish, gather these key ingredients: - 2 tablespoons olive oil - 1 pound boneless, skinless chicken breast, cut into bite-sized pieces - 1 tablespoon Cajun seasoning - Salt and pepper to taste - 1 medium onion, diced - 3 cloves garlic, minced - 1 red bell pepper, diced - 1 green bell pepper, diced - 1 cup diced tomatoes (canned or fresh) - 2 cups chicken broth - 8 ounces penne pasta - 1 cup heavy cream - 1 cup shredded cheddar cheese - 1 green onion, sliced for garnish - Fresh parsley, chopped for garnish These ingredients blend together to create a rich flavor. The Cajun seasoning adds a spicy kick. The cream and cheese bring a smooth texture that makes each bite enjoyable. You can elevate the dish with these tasty add-ins: - 1 cup cooked shrimp for a seafood twist - 1 cup diced zucchini or squash for extra veggies - A handful of spinach for color and nutrients - A dash of hot sauce for those who love heat - Chopped bacon for a smoky flavor These options allow you to personalize your pasta. You can mix and match to suit your taste. If you have dietary needs or preferences, here are some swaps: - Use turkey or tofu instead of chicken for a lighter option. - Swap heavy cream for coconut milk for a dairy-free version. - Opt for gluten-free pasta for a gluten-free meal. - Use vegetable broth instead of chicken broth for a vegetarian option. Making these changes can help you enjoy this dish no matter your diet. You can still savor the rich flavors of One Pot Cajun Chicken Pasta. For the full recipe, check out the link. Start by heating 2 tablespoons of olive oil in a large pot over medium-high heat. Next, season 1 pound of chicken breast, cut into bite-sized pieces, with 1 tablespoon of Cajun seasoning, salt, and pepper. Cook the chicken in the pot until browned on all sides, about 5-7 minutes. Once browned, remove the chicken and set it aside. In the same pot, add a diced medium onion, 3 minced garlic cloves, and 1 each of diced red and green bell peppers. Sauté these for about 3-4 minutes until the veggies soften. Pour in 1 cup of diced tomatoes and mix well. Now, add 2 cups of chicken broth and bring it to a simmer. Stir in 8 ounces of penne pasta along with the browned chicken. Cover the pot and cook for 10-12 minutes. Stir occasionally until the pasta is al dente and has absorbed most of the liquid. To finish, lower the heat and stir in 1 cup of heavy cream and 1 cup of shredded cheddar cheese. Cook for another 2-3 minutes until the cheese melts and the sauce is creamy. Adjust the seasoning with salt and pepper if needed. If you use an Instant Pot, brown the chicken on the sauté setting. Then, follow the same steps but cook the pasta under high pressure for 4 minutes. Use a quick release method to finish. For slow cookers, brown the chicken first in a pan. Transfer everything to the slow cooker and cook on low for 4-6 hours. Add the cream and cheese in the last 30 minutes. To prevent overcooking, keep an eye on the pasta. Stir it occasionally to avoid sticking. Pasta should be al dente, which takes about 10-12 minutes. If you prefer softer pasta, you can cook it a bit longer. Just remember to check frequently! For the best results, let the dish sit for a few minutes after cooking. This allows it to thicken nicely. Enjoy your meal with a sprinkle of green onions and parsley for extra flair! When making One Pot Cajun Chicken Pasta, avoid overcooking the chicken. Cook it just until browned. If you overcook it, it can get dry and tough. Another mistake is under-seasoning the dish. Cajun seasoning is key, so don’t hold back. Make sure to stir the pasta often. This keeps it from sticking to the bottom of the pot. Also, remember to check the pasta for doneness. It should be al dente, which means it’s firm but not hard. Lastly, do not skip the heavy cream. It adds the creamy texture that makes this dish special. To kick up the heat, add more Cajun seasoning. You can also add diced jalapeños or a dash of hot sauce. If you prefer it milder, reduce the Cajun seasoning by half. Using less can help keep the flavors without the heat. You can also replace the cheddar cheese with a milder cheese like mozzarella. This will make the dish creamy but less spicy. Taste as you go to find the right balance for you. One Pot Cajun Chicken Pasta pairs well with a light salad. A simple green salad with vinaigrette will balance the rich flavors. You can also serve it with garlic bread. The bread is perfect for soaking up the creamy sauce. For a heartier meal, add roasted vegetables on the side. Roasting brings out their natural sweetness. If you want a refreshing drink, pair it with iced tea or lemonade. These drinks will complement the spices nicely. For the full recipe, check out the One Pot Cajun Chicken Pasta. {{image_2}} To make a vegetarian version, skip the chicken. Use hearty veggies like mushrooms, zucchini, and spinach. These add texture and flavor. You can still use the same spices. The Cajun seasoning brings a nice kick. Cook the veggies in olive oil until soft. Then, follow the same steps as the original recipe. The pasta will soak up all those great flavors. If you love seafood, add shrimp or scallops. Start by cooking the seafood in olive oil. Remove it once it’s cooked. Follow the main recipe, adding seafood back at the end. This way, the seafood stays tender. You can also use crab or crawfish for a unique twist. Just adjust the cooking time to make sure it cooks perfectly. For a creamy Cajun pasta bake, make the dish as usual. After mixing in the cheese, transfer it to a baking dish. Top with more cheese and breadcrumbs for a crunchy top. Bake at 350°F for 20 minutes. This gives you a crispy layer and creamy inside. Serve it hot for a comforting meal. You can find the full recipe for more details. To store your One Pot Cajun Chicken Pasta, let it cool first. Place it in an airtight container. Make sure to press out the air before sealing. This helps keep it fresh. You can store it in the fridge for up to three days. When you're ready to eat, you can reheat the pasta on the stove or microwave. If using the stove, add a splash of chicken broth to help it stay moist. Stir frequently over low heat until warm. If using a microwave, cover the bowl with a lid or plastic wrap. Heat in short bursts, stirring in between, until hot. If you want to freeze your pasta, do it as soon as it cools. Use freezer-safe containers or bags. Label them with the date. This dish can last up to three months in the freezer. To thaw, move it to the fridge overnight before reheating. Cajun seasoning is a mix of spices. It often includes paprika, garlic powder, and cayenne pepper. This blend gives dishes a bold and spicy flavor. It comes from Louisiana cooking. You can buy it pre-made or mix your own at home. Yes, you can use other pasta shapes. Bowtie, fusilli, or even spaghetti work well. Just make sure to adjust the cooking time. Each pasta shape has a different cooking time. Always check the package for directions. You can prepare the dish in advance. Cook everything, but leave out the cream and cheese. Store it in the fridge for up to three days. When ready, heat it up and add the cream and cheese. This keeps the sauce fresh and creamy. You can serve this dish with a simple salad. A green salad with a light dressing works well. Garlic bread is also a great side. It complements the pasta's rich flavors. Yes, this dish is great for meal prep. It stores well in containers for lunch or dinner. Just remember to cool it before sealing. Reheat it in the microwave or on the stove. Enjoy a tasty meal any day! For the full recipe, refer to the One Pot Cajun Chicken Pasta. In this article, we explored how to make One Pot Cajun Chicken Pasta. We covered essential ingredients, cooking steps, and helpful tips to perfect your dish. You can tweak flavors and even adapt it for dietary needs. Whether you want a creamy bake or a veggie option, there's a recipe for you. With proper storage and reheating tips, you can enjoy this meal multiple times. Dive into your kitchen and make this flavorful dish today!

One Pot Cajun Chicken Pasta Flavorful Dinner Idea

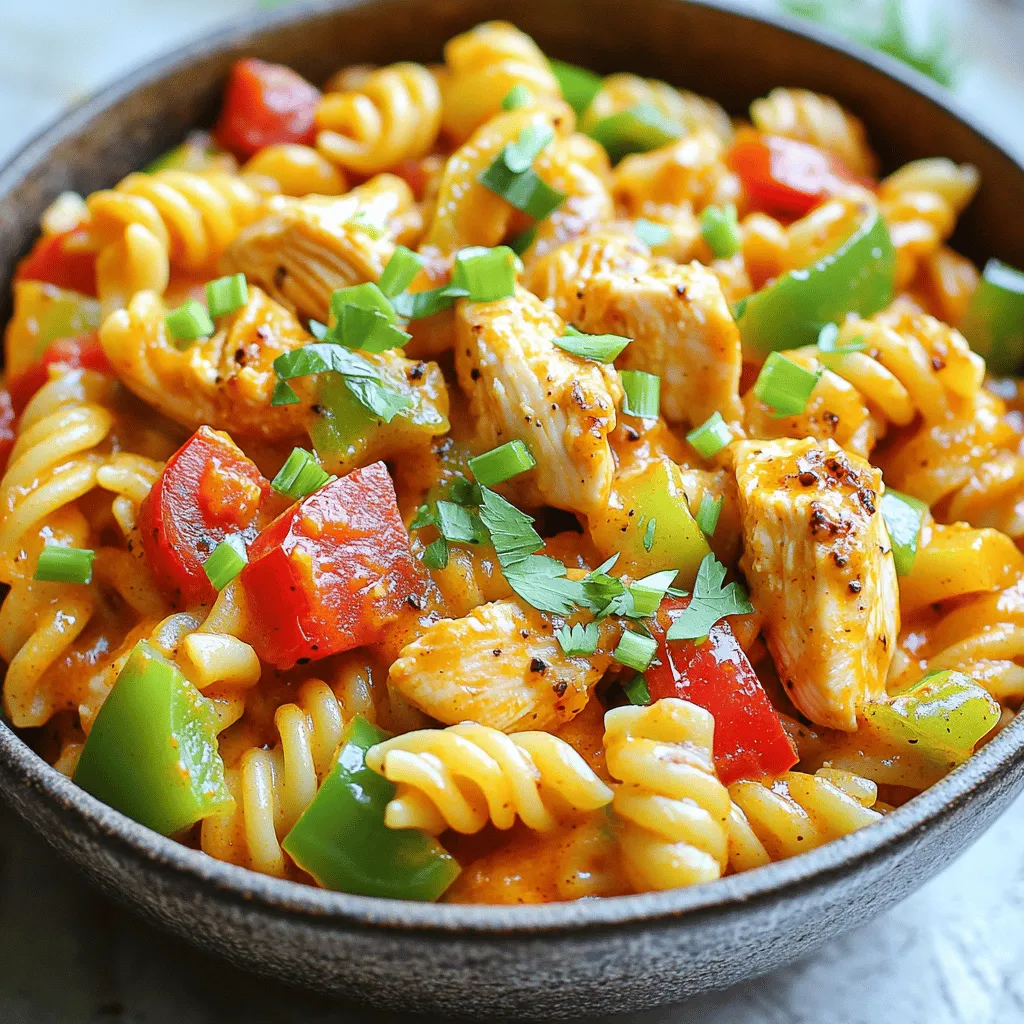
Looking for a dinner that’s quick, easy, and packed with flavor? You’re in the right place! My One Pot Cajun

- 4 large russet potatoes, thinly sliced - 2 cups sharp cheddar cheese, grated - 1 cup heavy cream - 1 cup milk - 1 medium onion, finely chopped - 3 cloves garlic, minced - 2 tablespoons unsalted butter - 2 teaspoons fresh thyme leaves (or 1 teaspoon dried thyme) - Salt and pepper to taste - 1/4 teaspoon cayenne pepper (optional for a kick) - 1/4 cup Parmesan cheese, grated (for topping) You can swap heavy cream for half-and-half or whole milk for a lighter dish. If you want to change the cheese, try gouda or mozzarella for a different taste. For a low-carb option, use cauliflower instead of potatoes. This keeps the dish creamy and flavorful. You can mix and match these ideas to make your own special version. First, preheat your oven to 375°F (190°C). Grease a 9x13 inch baking dish with a bit of butter. This helps the potatoes not stick. Next, chop one medium onion and mince three cloves of garlic. In a medium saucepan, melt two tablespoons of unsalted butter over medium heat. Add the onion and garlic, and sauté for about five minutes. You want the onion to look clear, not brown. Then, stir in one cup of heavy cream, one cup of milk, and two teaspoons of fresh thyme leaves. Season with salt, pepper, and a pinch of cayenne for some heat. Heat this mix until it just starts to simmer, then take it off the heat. Now it's time to layer the potatoes. Take four large russet potatoes and slice them thinly. Place half of the potato slices evenly in the bottom of the greased dish. Then, sprinkle half of the grated sharp cheddar cheese over the potatoes. Pour half of the cream mixture over this layer. Make sure it covers the potatoes. Repeat these layers with the remaining potatoes, cheese, and cream. This layering technique makes each bite creamy and cheesy. Cover the baking dish with aluminum foil. Bake it in the preheated oven for 45 minutes. This helps cook the potatoes and keep them tender. After 45 minutes, carefully take off the foil. Sprinkle a quarter cup of grated Parmesan cheese on top. Bake it uncovered for another 15 to 20 minutes. The top should turn golden and bubbly. Once it’s done, let the casserole cool for about 10 minutes before you serve it. This will help the layers set and makes it easier to cut. Enjoy your cheesy scalloped potatoes! For more details, check the Full Recipe. Layering plays a big role in the creaminess of your dish. Start with a layer of potatoes, then cheese, and cream. This method helps each layer soak up flavors. Make sure to let the layers sit for a few minutes. This soaking time allows the flavors to meld. For the best texture, use russet potatoes. They are starchy and create a smooth finish. To achieve that perfect golden topping, broil the cheese at the end of baking. This step gives you a nice, crispy texture. Keep an eye on it to avoid burning. You can also add breadcrumbs on top before broiling. Breadcrumbs add a delightful crunch to each bite. Mix them with a little melted butter for extra flavor. Cheesy scalloped potatoes pair well with many dishes. They are great with roasted meats or a fresh salad. You can also serve them with grilled vegetables for a colorful plate. For added flair, sprinkle fresh herbs on top before serving. Chopped parsley or thyme enhances the dish’s look and aroma. For the complete recipe, check the [Full Recipe]. {{image_2}} You can change the flavor of your Cheesy Scalloped Potatoes by mixing different cheeses. Try mixing sharp cheddar with gouda for a creamy, rich taste. Mozzarella brings a nice stretch and mild flavor. If you want something bold, use blue cheese. It adds a unique tang that surprises your taste buds. You can make Cheesy Scalloped Potatoes even better by adding vegetables. Spinach or broccoli works well for added nutrition. Diced ham or crispy bacon gives a savory touch that many love. These additions create a heartier dish while keeping it fun and tasty. Herbs can really boost the flavor of your dish. Fresh thyme adds a nice earthy taste, while rosemary gives a touch of sweetness. If you like heat, consider cayenne pepper. Just a pinch can give your dish a spicy kick without overpowering the cheese. Enjoy exploring these variations to find your favorite mix! To keep your cheesy scalloped potatoes fresh, let them cool first. Once they are cool, transfer the leftovers to an airtight container. This helps to lock in flavor and moisture. Store them in the fridge for up to four days. Do not forget to label the container with the date! When you want to enjoy the leftovers, use the oven for the best results. Preheat your oven to 350°F (175°C). Place the potatoes in an oven-safe dish. Cover them with foil to keep them moist. Heat for about 20-25 minutes, or until warmed through. If you want to keep that creamy texture, add a splash of milk or cream before reheating. You can freeze cheesy scalloped potatoes too! To freeze, let them cool completely first. Then, cut them into portions and wrap each piece tightly in plastic wrap. Place the wrapped portions in a freezer-safe bag. They can last up to three months in the freezer. When you’re ready to enjoy them, thaw them overnight in the fridge. Reheat in the oven following the instructions above for a delicious meal. For the full recipe, check out the earlier section! Yes, you can prepare Cheesy Scalloped Potatoes in advance. This dish tastes even better after resting. To make ahead, follow these tips: - Prepare the layers as directed. - Cover the dish tightly with foil. - Store it in the fridge for up to 24 hours. - When ready, bake it straight from the fridge. - Just add an extra 10-15 minutes to the baking time. Russet potatoes are the best choice for scalloped potatoes. They have a high starch content, which adds a creamy texture. Here are a few other good options: - Yukon Gold potatoes for a buttery flavor. - Red potatoes for a firmer bite. - Fingerling potatoes for a unique shape. Choose the type you like best for a tasty result. Yes, you can easily make Cheesy Scalloped Potatoes gluten-free. Here are some alternatives: - Use gluten-free flour to thicken the cream sauce if needed. - Check the cheese labels to ensure they are gluten-free. - Always select gluten-free broth if you’re adding any. With these adjustments, everyone can enjoy this dish! For the complete recipe, see the Full Recipe section. Cheesy scalloped potatoes are a delicious and versatile dish. We explored ingredients, prep steps, and tips for the best result. You can adapt this recipe by trying different cheeses or adding vegetables. Remember to store leftovers properly to enjoy later. With the right techniques and simple tweaks, your cheesy scalloped potatoes will impress everyone. Now, gather your ingredients and start cooking! Enjoy every creamy bite.

Cheesy Scalloped Potatoes Creamy and Comforting Side

Looking for a side dish that’s both cheesy and comforting? You’ve found it! Cheesy scalloped potatoes are rich, creamy, and

- 2 cups all-purpose flour - 1 cup granulated sugar - 1/2 teaspoon baking soda - 1 teaspoon baking powder - 1/2 teaspoon salt - 1/2 cup unsalted butter, softened - 2 large eggs - 1 teaspoon vanilla extract - 1 cup buttermilk (or substitute with 1 cup milk + 1 tablespoon lemon juice) - Zest of 1 lemon - 1 cup fresh blueberries (or frozen, if out of season) - 1 tablespoon lemon juice (for extra brightness) - Optional: 1 tablespoon coarse sugar for topping Making Lemon Blueberry Bread is simple, but using fresh ingredients is key. The flour gives the bread its structure. Sugar adds sweetness and helps with browning. Baking soda and baking powder provide lift. Salt balances the flavors. Butter makes the bread rich and moist. Eggs bind everything together and add richness. Vanilla extract enhances the flavor. Buttermilk keeps the bread tender and adds a slight tang. Lemon zest and juice brighten the taste and give a fresh burst. Fresh blueberries add a sweet, juicy touch. If blueberries are not in season, frozen ones work well too. The optional coarse sugar topping adds a nice crunch and looks great. - 9x5-inch loaf pan - Mixing bowls - Electric mixer - Whisk - Rubber spatula You’ll need a loaf pan for baking. Mixing bowls help you combine ingredients easily. An electric mixer makes creaming butter and sugar a breeze. A whisk will help mix dry ingredients well. A rubber spatula is great for folding in blueberries without breaking them. This recipe comes together smoothly with these tools. You’ll create a delicious bread that’s fresh and flavorful. For the full recipe, check out the details above! Set your oven to 350°F (175°C). This cooks the bread evenly. Grease and flour a 9x5-inch loaf pan. You can also use parchment paper for easy removal. In a medium bowl, whisk together the flour, baking powder, baking soda, and salt. This mix adds rise and texture to your bread. Set it aside for now. In a large mixing bowl, beat the softened butter and granulated sugar with an electric mixer. Mix for about 3-4 minutes. The mix should look light and fluffy. This step is key for a soft loaf. Now, add the eggs one at a time. Mix well after each egg. Then, stir in the vanilla extract and lemon zest. This adds flavor and richness to your bread. Gradually add the dry mix to the wet mix. Alternate it with the buttermilk. Start and end with the flour mix. Stir until just combined. Overmixing can make your bread tough, so be careful. Gently fold in the blueberries and lemon juice. Use a rubber spatula to avoid breaking the berries. This keeps your bread colorful and juicy. Pour the batter into your prepared loaf pan. If you want, sprinkle the top with coarse sugar for a nice crunch. Bake in the oven for 55-65 minutes. Check doneness with a toothpick; it should come out clean. After baking, let the bread cool in the pan for about 10 minutes. Then transfer it to a wire rack to cool completely. Slice and serve. Enjoy the fresh flavors of lemon and blueberry in every bite. For a beautiful display, serve slices on a wooden board with powdered sugar and fresh berries on the side. To bake the perfect Lemon Blueberry Bread, follow these simple tips: - Use room temperature ingredients: This helps everything mix evenly. - Don't overmix the batter: Stir just until combined to keep the bread light. - Check the oven temperature: An oven thermometer ensures accurate baking. - Let it cool: Cool the bread in the pan for 10 minutes before removing. You can adjust the recipe based on your needs: - Gluten-free flour: Use a gluten-free blend for a gluten-free option. - Dairy-free milk: Substitute buttermilk with almond or oat milk. - Coconut oil: Swap butter with melted coconut oil for a dairy-free choice. - Maple syrup: Replace sugar with maple syrup for a different sweetness. To boost the flavor of your Lemon Blueberry Bread: - Add spices: Try a pinch of cinnamon or nutmeg for warmth. - Use more lemon zest: More zest brings a stronger lemon flavor. - Try different berries: Mix in raspberries or blackberries for a new twist. - Add nuts: Chopped walnuts or pecans add a nice crunch and flavor. These tips can help you create a delightful Lemon Blueberry Bread that stands out. For a complete guide, check the Full Recipe. {{image_2}} To make this lemon blueberry bread gluten-free, you can swap the all-purpose flour with a gluten-free blend. Look for a mix that has xanthan gum in it. This will help the bread hold its shape. Use the same amount of gluten-free flour as the recipe calls for. Keep an eye on the baking time, as gluten-free bread may cook faster. Test the bread with a toothpick to check if it is done. If you enjoy a bit of crunch, consider adding nuts. Chopped walnuts or pecans work well in this recipe. Mix in about half a cup of nuts when you fold in the blueberries. This will add a nice texture and flavor. You can also toast the nuts lightly before adding them for an extra boost of taste. You can easily turn this recipe into muffins. Pour the batter into a muffin tin instead of a loaf pan. Fill each cup about two-thirds full. Bake at the same temperature for 20-25 minutes. Check for doneness with a toothpick. Muffins will cook faster, and you can enjoy a fun and portable version of this delightful treat. For added flair, top them with a sprinkle of coarse sugar before baking. For the full recipe, refer to the earlier section. To keep your lemon blueberry bread fresh for a few days, store it in an airtight container. This helps lock in moisture. You can also wrap it in plastic wrap or aluminum foil. Keep it at room temperature for the best taste. Avoid placing it in the fridge, as cool air can dry it out. If you want, you can add a slice of bread to keep it moist. If you want to save your bread for later, freezing is a great option. First, let the bread cool completely. Wrap it tightly in plastic wrap, then in aluminum foil. This double wrap prevents freezer burn. Label with the date for easy reference. It can stay in the freezer for up to three months. When you are ready to eat, thaw it in the fridge overnight. To warm up slices without drying them out, use a microwave or oven. For the microwave, place a slice on a plate and cover it with a damp paper towel. Heat for about 10 to 15 seconds. If you prefer the oven, preheat to 350°F (175°C). Wrap the slice in foil and heat for about 10 minutes. This keeps the bread soft and tasty. Enjoy your delicious lemon blueberry bread! You will know the bread is done by checking a few signs. First, look for a golden-brown top. The bread should also spring back when you gently press it. Insert a toothpick into the center. If it comes out clean or with a few crumbs, your bread is ready. If it has wet batter on it, bake for a few more minutes. Yes, you can use frozen blueberries. They work well in this recipe. Just remember to add them straight from the freezer. This helps them keep their shape. If they thaw first, they might turn mushy. You may want to coat them lightly in flour before adding them to the batter. This helps keep them from sinking to the bottom. You can serve many things with Lemon Blueberry Bread. A spread of cream cheese or butter makes a tasty addition. A drizzle of honey or maple syrup also pairs well. For a fresh touch, add some sliced strawberries or a dollop of whipped cream. You can enjoy it with tea or coffee as a lovely snack. Lemon Blueberry Bread can last for about 3 to 5 days at room temperature. Keep it in an airtight container to keep it fresh. If you see any mold or if it smells off, it is best to throw it away. For longer storage, you can freeze the bread. It can last up to 3 months in the freezer. Yes, you can make this recipe vegan easily. Replace the eggs with flax eggs or applesauce. For the butter, use coconut oil or any plant-based butter. You can also use almond milk or soy milk instead of buttermilk. These swaps keep the bread moist and tasty without any animal products. You now have all the steps and tips to make Lemon Blueberry Bread. Remember the key ingredients: flour, butter, sugar, and, of course, fresh blueberries. Use the kitchen tools wisely to get the best result. Baking takes patience, so be sure to cool your bread before serving. Experiment with variations like muffins or gluten-free options. Storage tricks will help keep your bread fresh longer. With practice, you will make a treat that everyone loves. Enjoy your baking adventure!

Lemon Blueberry Bread Fresh and Flavorful Delight

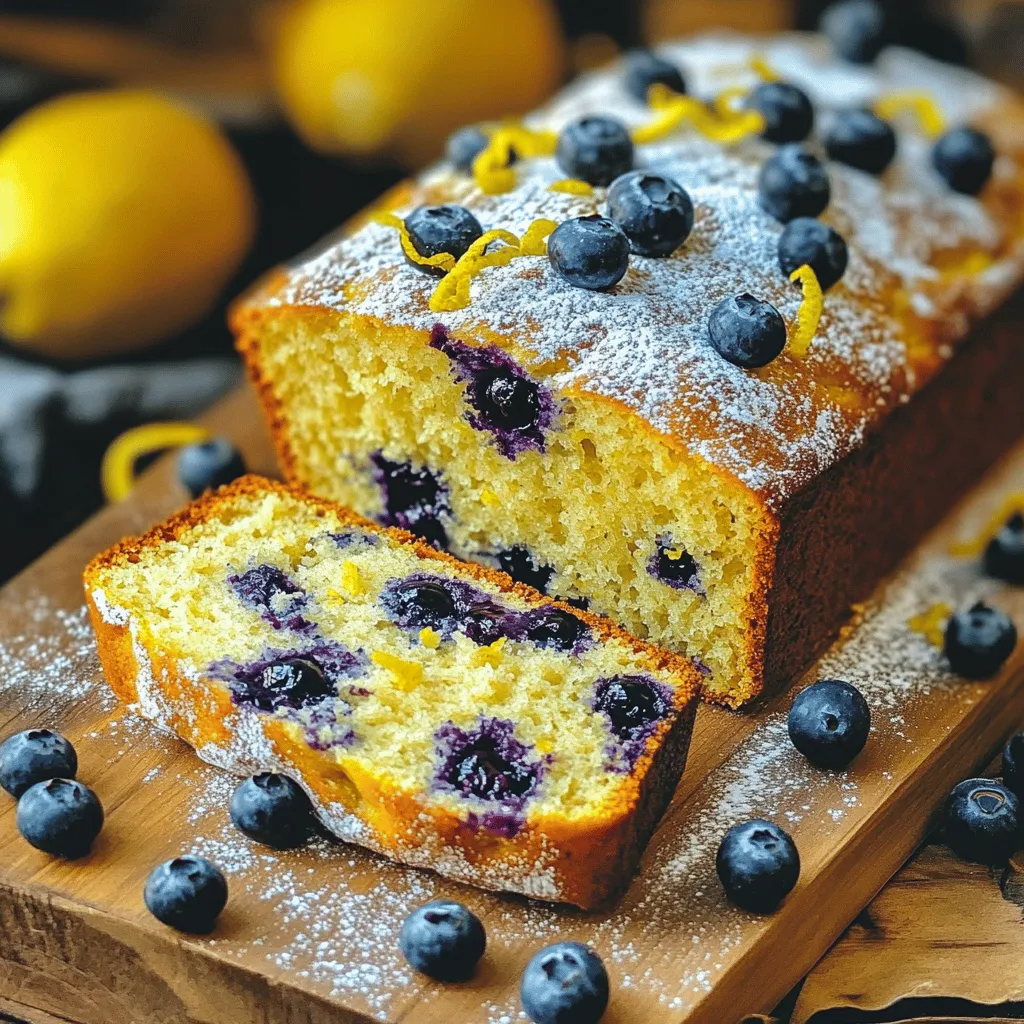
Are you ready to bake a treat that bursts with flavor? In this post, I’ll show you how to make

To make delicious Mississippi Mud Potatoes, gather these ingredients: - 4 medium russet potatoes, scrubbed and pierced with a fork - ½ cup unsalted butter, melted - ½ cup sour cream - 1 cup shredded sharp cheddar cheese - 1 cup cooked and crumbled beef or sausage (optional) - ½ cup green onions, chopped - ¼ cup crispy fried onions - 3 tablespoons cocoa powder - 1 teaspoon garlic powder - 1 teaspoon onion powder - Salt and pepper to taste You can customize your potatoes by adding other toppings. Consider jalapeños for heat or bacon bits for extra flavor. These options can make your dish unique. Using fresh ingredients makes a big difference. Choose potatoes that feel firm and have smooth skin. Look for fresh green onions that are vibrant and crisp. As for cheese, I recommend using a high-quality sharp cheddar like Tillamook or Cabot. They melt beautifully and add great flavor. Fresh butter is key too. It elevates the taste of your filling. 1. Preheat your oven to 400°F (200°C). This step gets your oven hot and ready for baking. 2. Bake the potatoes. Place the pierced russet potatoes directly on the oven rack. Bake them for about 45-50 minutes. They should be tender when you poke them with a fork. 3. Prepare the filling mixture. While the potatoes bake, grab a large mixing bowl. Combine the melted butter, sour cream, shredded cheddar cheese, and any crumbled beef or sausage you want to add. Then, toss in chopped green onions, cocoa powder, garlic powder, onion powder, salt, and pepper. Mix everything well until it's nice and smooth. 4. Cut and scoop the potatoes. Once the potatoes are done baking, take them out of the oven. Carefully slice each potato in half lengthwise. Use a spoon to scoop out some of the insides. Leave enough potato to form a shell. 5. Mix the scooped potato. Add the scooped-out potato flesh to your filling mixture. Stir it all together until everything is well incorporated. 6. Fill and top the potatoes. Spoon the filling back into each potato half. Fill them generously! Then, sprinkle crispy fried onions on top for some added crunch. 7. Final baking details. Place the loaded potatoes back in the oven. Bake them for an additional 10-15 minutes. This step warms the filling and gives the tops a nice golden color. Now, you are ready to enjoy your delicious Mississippi Mud Potatoes! For the complete recipe, check out the Full Recipe. - Avoid Overbaking: Check your potatoes at 45 minutes. They should be soft but not mushy. - Don’t Skip the Fork: Piercing the potatoes allows steam to escape. This helps them cook evenly. - Mix Well: When preparing your filling, stir until it’s smooth. This ensures every bite is tasty. - Leave Enough Flesh: When scooping, leave a bit of potato in the skin. This helps keep the shape and adds flavor. - Perfect Pairings: Serve your Mississippi Mud Potatoes with a crisp salad. A simple coleslaw adds a nice crunch. - Beverage Choices: Enjoy with a cold iced tea or a light beer. Both balance the rich flavors of the dish. - Add a Twist: For a fun twist, serve with a side of ranch dressing for dipping. It adds zest and extra flavor. For the full recipe, be sure to check out the detailed steps provided earlier. {{image_2}} You can easily make Mississippi Mud Potatoes gluten-free. Just use gluten-free butter and check your spices. For a vegetarian version, skip the beef or sausage. You can replace it with cooked lentils or black beans for protein. These swaps keep the dish tasty and satisfying. To make your potatoes even better, try adding spices like smoked paprika or cumin. These give a nice depth of flavor. You can also add toppings like diced jalapeños for heat or fresh herbs for brightness. Cheese lovers can mix in more cheddar or try pepper jack for a kick. If you want more crunch, top with chopped nuts or extra crispy fried onions. These options let you explore new tastes while enjoying this comforting dish. To keep your Mississippi Mud Potatoes fresh, store them in the fridge. First, let the potatoes cool down to room temperature. Then, place them in an airtight container. This keeps them from drying out or picking up other flavors. They can last up to three days in the fridge. If you want to save them for later, freezing is a great option. Wrap each potato tightly in plastic wrap. Then, place them in a freezer bag. Be sure to squeeze out any air before sealing. This helps prevent freezer burn. When stored this way, they can last for up to three months. When it's time to enjoy your leftovers, you want them warm and moist. One way to reheat is in the oven. Preheat the oven to 350°F (175°C). Wrap each potato in aluminum foil to keep them from drying out. Heat for about 20-25 minutes. Another method is using the microwave. Place the potato on a microwave-safe plate. Cover it with a damp paper towel. Heat in short bursts of 1-2 minutes. Check often to avoid overheating. This keeps the filling nice and moist. Enjoy your delicious Mississippi Mud Potatoes again! For the full recipe, check back to the earlier section. How do I make Mississippi Mud Potatoes from scratch? To make Mississippi Mud Potatoes, start by baking russet potatoes. Preheat your oven to 400°F (200°C). Pierce four scrubbed potatoes with a fork and bake them for 45-50 minutes. While they bake, mix melted butter, sour cream, shredded cheddar, and optional crumbled beef in a bowl. After baking, slice the potatoes, scoop out some flesh, and mix it with the filling. Spoon the mixture back into the shells, top with crispy fried onions, and bake again for 10-15 minutes. For the full recipe, check the earlier section. Can I substitute ingredients in this recipe? Yes, you can swap ingredients. Use different types of cheese or omit the meat. You can also try other toppings like jalapeños or bacon bits. Just keep the main flavors balanced. What is the best way to reheat leftover Mississippi Mud Potatoes? Reheat leftovers in the oven for the best texture. Set the oven to 350°F (175°C) and warm them for 15-20 minutes. Cover them with foil to keep moisture in. You can also microwave them for quick reheating, but the oven gives better results. What is the origin of Mississippi Mud Potatoes? Mississippi Mud Potatoes have roots in Southern cooking. They take inspiration from the famous Mississippi mud pie, a rich chocolate dessert. This dish blends savory and sweet flavors, creating a unique potato dish. Can I prepare Mississippi Mud Potatoes in advance? You can prepare the filling ahead of time. Bake the potatoes and mix the filling, then store them separately in the fridge. Assemble and bake them just before serving. This saves you time and keeps the flavors fresh. What's the best way to serve Mississippi Mud Potatoes? Serve these potatoes on a rustic wooden board for a fun look. Add a sprinkle of cheddar and some green onions on top for color. Pair them with a fresh salad or coleslaw for a complete meal. Are Mississippi Mud Potatoes a healthy dish? Mississippi Mud Potatoes can be part of a balanced meal. They contain potatoes, which are a good source of carbs. However, the butter and cheese add calories. Enjoy them in moderation, and consider adding veggies to boost their healthiness. In this blog post, we explored the full journey of making Mississippi Mud Potatoes. We covered the needed ingredients, how to prepare, assemble, and bake them perfectly. I shared tips to avoid mistakes and tasty ways to serve them. We also discussed variations for different diets and how to store any leftovers. In my view, mastering this dish brings comfort and joy. Enjoy making it your own and sharing with others. Your kitchen adventures await!

Mississippi Mud Potatoes Simple and Tasty Recipe

Ready to dive into a delicious twist on a classic comfort dish? Mississippi Mud Potatoes are simple, tasty, and sure

- 1 lb chicken tenderloins - 1 cup buttermilk - 1 teaspoon hot sauce (optional) - 1 cup all-purpose flour - 1/2 cup seasoned breadcrumbs - 1/2 teaspoon garlic powder - 1/2 teaspoon onion powder - 1 teaspoon paprika - 1 teaspoon dried oregano - Salt and pepper to taste - Oil for frying These simple ingredients make crispy chicken tenders easy to prepare. The buttermilk adds moisture and flavor, while the seasoned breadcrumbs give a crunchy texture. You can customize the spices to match your taste. Each serving has around 400 calories. The breakdown includes: - Protein: 25g - Fat: 20g - Carbohydrates: 30g These chicken tenders provide a good balance of protein and carbs. They are perfect for a filling meal. - Large bowl - Skillet - Paper towels These tools help you mix, fry, and drain the chicken tenders. You can find most of these in any home kitchen. For the full recipe and detailed steps, check out the Full Recipe. To start, you need to marinate the chicken tenderloins. In a large bowl, combine 1 cup of buttermilk with 1 teaspoon of hot sauce, if you want some heat. This mix makes the chicken juicy and flavorful. Place the chicken tenderloins in the buttermilk mixture. Let them marinate in the fridge for at least 30 minutes. This step is key for tender, tasty chicken. Next, we prepare the coating. In another bowl, mix together 1 cup of all-purpose flour, 1/2 cup of seasoned breadcrumbs, 1/2 teaspoon of garlic powder, 1/2 teaspoon of onion powder, 1 teaspoon of paprika, and 1 teaspoon of dried oregano. Don’t forget to add salt and pepper to taste. Stir well to blend all the flavors. Once mixed, you can coat the chicken. Now, let’s cook the chicken tenders. Heat oil in a large skillet over medium-high heat. Aim for about 350°F. You need enough oil to cover the bottom of the pan. Remove the chicken from the buttermilk and let the excess drip off. Dredge each tender in the flour mixture. Make sure each piece is well-coated and shake off any extra flour. Once the oil is hot, carefully place the chicken tenders in the skillet. Fry them for 4-5 minutes on each side until they are golden brown and cooked through. You may need to fry in batches to avoid overcrowding. After frying, move the cooked tenders to a paper towel-lined plate to drain off the excess oil. Enjoy them hot with your favorite dipping sauces! For the full recipe, visit the linked section above. To make your chicken tenders extra crispy, fry them at 350°F. This temperature cooks the chicken well while giving a golden crust. Use a kitchen thermometer to check the oil’s heat. When your tenders finish frying, place them on a wire rack. This allows air to flow around them and keeps them crispy. Avoid using a plate, as it can trap steam and make them soggy. One mistake is letting the tenders sit too long before frying. This can lead to soggy chicken. Always fry them right after coating. Another common error is cooking with oil that is not hot enough. If the oil is too cool, the chicken will absorb oil and become greasy. Always test the oil with a small piece of bread. If it bubbles and browns in about 60 seconds, it’s ready. For the best dips, pair your tenders with honey mustard or ranch dressing. These add a creamy, tangy flavor. You can also try BBQ sauce for a smoky kick. As for sides, serve with crispy fries or a fresh salad. A nice coleslaw can add a crunchy contrast to your meal. These choices enhance the meal and make it more enjoyable. For the complete recipe, check out the Full Recipe. {{image_2}} To spice up your chicken tenders, add different spices or hot sauces. You can mix cayenne pepper, chili powder, or even a smoky chipotle sauce into your flour mixture. This gives the tenders a kick that many people love. For an extra zesty flavor, try marinating the chicken in buttermilk mixed with hot sauce. The longer you marinate, the spicier the tenders will be. Everyone enjoys a little heat, right? If you want a healthier version, try baking the chicken tenders. Preheat your oven to 400°F. After dredging the chicken in your flour mix, place them on a baking sheet lined with parchment paper. Lightly spray the chicken with cooking oil. Bake for 20-25 minutes, flipping halfway through. This method keeps the chicken crispy while using less oil. It’s a win-win for health! For a gluten-free version, substitute the all-purpose flour with almond flour or a gluten-free flour blend. You can also use gluten-free breadcrumbs for the coating. Just make sure to check the labels on all your ingredients to avoid allergens. This way, everyone can enjoy crispy chicken tenders, no matter their dietary needs. To keep your crispy chicken tenders fresh, store them in the fridge. Use an airtight container. Place a paper towel in the container to absorb moisture. This helps maintain their crunch. You can store them for up to three days. When ready to eat, check for any off smells before reheating. Freezing is a great option if you want to save some tenders for later. First, let the cooked tenders cool completely. Then, place them in a single layer on a baking sheet. Freeze them for about an hour. Once frozen, transfer them to a freezer-safe bag. Label the bag with the date. They can last for up to three months. When ready to eat, skip the thawing for best results. To reheat your chicken tenders, use your oven or air fryer. Preheat your oven to 375°F. Place the tenders on a baking sheet and cover them with foil. Heat for about 10-15 minutes. You can also use an air fryer. Set it to 350°F and heat for about 5-7 minutes. This helps keep them crispy. Avoid using a microwave, as it makes them soggy. Marinate the chicken for at least 30 minutes. This helps the flavors soak in. For even better taste, marinate for up to 12 hours. The longer time gives the chicken a tender and juicy texture. Use oils with a high smoke point for frying chicken. Good choices include vegetable oil, canola oil, or peanut oil. These oils won’t burn as easily. They also help create a crispy outside. Yes, you can air fry chicken tenders! Preheat your air fryer to 400°F. Spray the basket with oil to prevent sticking. Place the tenders in a single layer. Cook for about 10-12 minutes. Flip halfway through for even cooking. Popular dipping sauces for chicken tenders include: - Honey mustard - Ranch dressing - Barbecue sauce - Buffalo sauce You can make these sauces at home or buy them ready-made. They add a tasty twist to your meal. Want to try making honey mustard? Just mix equal parts honey and mustard! For the full recipe, check out the complete instructions mentioned earlier! You now know how to make crispy chicken tenders at home. We covered the needed ingredients, cooking steps, and tips for success. You learned about variations for spicy, baked, and gluten-free options. Proper storage methods help keep tenders fresh, ensuring you enjoy them later. With these easy steps and ideas, you can create delicious chicken tenders anytime. Dive into this cooking adventure, and impress your friends and family with your tasty results.

Crispy Chicken Tenders Perfect for Any Meal

If you crave crispy chicken tenders, you’re in the right place! These tenders are perfect for lunch, dinner, or even

- 1 pound large shrimp, peeled and deveined - 4 tablespoons unsalted butter - 4 cloves garlic, minced - 1 lemon, juiced and zested - 1/4 teaspoon red pepper flakes (optional) - 1 tablespoon fresh parsley, chopped - Salt and pepper to taste When making Lemon Garlic Butter Shrimp, each ingredient plays a key role. Fresh shrimp should be plump and firm. The butter gives a rich taste, while garlic adds depth. Lemon brightens the dish and balances the flavors. For those who like heat, red pepper flakes add a nice kick. Fresh parsley not only looks good but also adds a hint of freshness. You can swap unsalted butter for olive oil or ghee if needed. If you're out of garlic, garlic powder can work in a pinch. For shrimp, you can use medium or small shrimp. If you want to add more flavor, try fresh herbs like dill or basil. Other garnishes like grated Parmesan or chopped nuts can also enhance the meal. To choose fresh shrimp, look for shells that are shiny and smell like the ocean. Avoid shrimp that smell sour or have dark spots. Always use fresh lemon juice for the best flavor. Bottled lemon juice lacks the bright taste of fresh juice. A zester helps you get the perfect zest without the bitter white pith. To start, gather your ingredients. You will need: - 1 pound large shrimp, peeled and deveined - 4 tablespoons unsalted butter - 4 cloves garlic, minced - 1 lemon, juiced and zested - 1/4 teaspoon red pepper flakes (optional) - 1 tablespoon fresh parsley, chopped - Salt and pepper to taste Before cooking shrimp, rinse them under cold water. Pat them dry with paper towels. This step helps to keep the shrimp firm while cooking. For tools, grab a large skillet, spatula, and a lemon juicer. You will also want measuring spoons. Now, let’s cook. First, place the skillet on medium heat. Add the butter and let it melt. Watch for it to froth. Next, add the minced garlic. Stir for about one minute. You want it fragrant but not brown. Increase the heat to medium-high. Carefully add the shrimp in a single layer. Season with salt, pepper, and red pepper flakes if desired. Cook for 2-3 minutes without stirring. When they turn pink, flip them over. Squeeze in the lemon juice and add lemon zest to the skillet. Let the shrimp cook for another 1-2 minutes. They should be opaque and fully cooked. Remove from heat and sprinkle with parsley for a touch of color. For serving, think about side dishes that pair well. Crusty bread is great for dipping in the sauce. Fluffy rice or pasta works too. To make your dish look nice, use a large white platter. Drizzle the buttery garlic sauce over the shrimp. Add some extra lemon slices and parsley on top for color. This adds a nice touch and makes it look appealing. To get a great sear on the shrimp, use high heat. Heat the pan until hot before adding the butter. This helps the shrimp cook quickly and evenly. When you add the shrimp, leave space between them. This allows them to brown nicely instead of steaming. To avoid overcooking shrimp, watch the color closely. Cook them until they turn pink and opaque. This usually takes 2 to 3 minutes per side. If they curl up tightly, they may be overdone. Remove them from heat as soon as they are cooked through. Add more flavor to your dish by mixing in fresh herbs. Basil or cilantro can give a nice twist. You can also try adding a splash of white wine or a dash of soy sauce. These additions bring a deeper taste. Pair your shrimp with a side of crusty bread or fluffy rice. These sides soak up the delicious garlic butter sauce. You can also serve a fresh salad to balance the meal. One common mistake is cooking shrimp too long. If they sit in the pan too long, they become tough and rubbery. Always keep an eye on the cooking time. Look for signs of undercooked shrimp. They will be grey or translucent. Overcooked shrimp will look white and curled. If you see these signs, adjust your cooking time next time. {{image_2}} You can easily make Lemon Garlic Butter Shrimp gluten-free by using gluten-free butter. For a dairy-free version, swap the butter for olive oil or a vegan butter. This keeps the dish rich without the dairy. If you want to lower sodium, use less salt and choose unsalted butter. This way, you control the flavor while keeping it healthy. Adding herbs can change the taste of this dish. Try fresh basil, thyme, or even dill for a new twist. Each herb brings its own unique flavor. You can also explore different spices. Paprika or cumin can add warmth. For a zesty change, swap lemon for lime or orange juice. Each citrus option brightens the dish in a fun way. Do you want to pair your shrimp with pasta or rice? Both options taste great! Shrimp with pasta gives a classic feel. It’s perfect for a cozy dinner. Shrimp with rice absorbs all the tasty sauce. It’s filling and satisfying. You can also add vegetables to boost nutrition. Toss in spinach, bell peppers, or broccoli. These add color and crunch to your meal. For the full recipe, check out the details above. To store your Lemon Garlic Butter Shrimp, let it cool first. Then, place it in an airtight container. This helps keep the flavors fresh. You should refrigerate the leftovers right away. They stay good in the fridge for up to 3 days. If you wait longer, the shrimp may lose its taste and texture. When it comes to reheating, you want to keep the shrimp juicy. The best way is to use the stovetop. Heat a pan over low to medium heat. Add a splash of butter or a bit of lemon juice. This keeps the flavor strong. Stir the shrimp often until heated through. If you use a microwave, go slow. Heat in short bursts, about 30 seconds at a time. This way, you avoid overcooking. Stir in between heating times to help it warm evenly. Yes, you can freeze Lemon Garlic Butter Shrimp! To do this, let it cool completely. Place it in a freezer-safe bag or container. Squeeze out any air to prevent freezer burn. It can last up to 3 months in the freezer. When ready to eat, thaw it in the fridge overnight. After that, follow the reheating instructions above. This way, you can enjoy a quick meal even weeks later! You can tell shrimp are cooked when they change color. They should turn pink and curl slightly. The flesh should be opaque and firm. Avoid overcooking shrimp, as they can turn tough. Cook them just until they reach this stage for the best texture. Yes, you can prepare Lemon Garlic Butter Shrimp ahead of time. Cook it fully and store it in the fridge for up to two days. To reheat, warm it gently in a skillet over low heat. This dish holds up well, but the shrimp may lose some freshness if stored too long. For sides, consider serving rice or pasta to soak up the sauce. A fresh salad also pairs well. For drinks, a crisp white wine or a refreshing lemonade complements the dish nicely. You can create a full meal by adding crusty bread for dipping in the buttery sauce. This blog post offers a complete guide to preparing Lemon Garlic Butter Shrimp. We covered ingredients, preparation, cooking, and storage tips. Remember to choose fresh shrimp and avoid common mistakes to ensure success. You can adjust flavors and make variations for dietary needs. With this knowledge, you'll impress everyone at your table. Embrace the joy of cooking this dish and make it your own. Happy cooking!

Lemon Garlic Butter Shrimp Flavorful and Quick Meal

Looking for a quick and flavorful dinner? Lemon Garlic Butter Shrimp is your answer! This dish packs a punch with

To make Chinese vegetable egg noodles, you need fresh and tasty ingredients. Here’s a detailed list: - 8 ounces egg noodles - 2 tablespoons vegetable oil - 3 cloves garlic, minced - 1 inch ginger, grated - 1 cup bell peppers (red and yellow), julienned - 1 cup carrots, julienned - 1 cup broccoli florets - 1 cup snow peas - 3 green onions, chopped - 3 tablespoons soy sauce - 1 tablespoon sesame oil - Salt and pepper to taste - Sesame seeds for garnish The key components here are the egg noodles and colorful vegetables. Egg noodles give the dish a rich flavor and chewy texture. The vegetables not only add color but also crunch and nutrition. You can customize this dish easily. Consider adding optional items like sliced mushrooms, bean sprouts, or baby corn. These can enhance flavors and textures in your dish. You can also swap out soy sauce for tamari for a gluten-free option. By using fresh ingredients, you ensure a vibrant and delicious meal. Explore your local market for the freshest choices. To start, bring a large pot of salted water to a boil. Add the 8 ounces of egg noodles. Cook them according to the package instructions until they are al dente. This usually takes about 5-7 minutes. Once cooked, drain the noodles in a colander and set them aside. Make sure not to rinse them, as you want the starch to stay on the noodles for better flavor. Next, grab a large wok or skillet. Heat 2 tablespoons of vegetable oil over medium-high heat until it shimmers. This is the right time to add the aromatics. Toss in 3 cloves of minced garlic and 1 inch of grated ginger. Stir quickly for about 30 seconds. You want to release those wonderful smells without burning them. Now it’s time to add the vegetables. Toss in 1 cup each of julienned bell peppers (both red and yellow), julienned carrots, broccoli florets, and snow peas. Stir-fry these for about 4-5 minutes. You want the vegetables to be tender but still crisp. Once the vegetables are ready, it’s time to add the noodles. Add the cooked egg noodles to the pan along with 3 tablespoons of soy sauce and 1 tablespoon of sesame oil. Toss everything together well. Make sure the noodles are coated with the sauce. Season with salt and pepper to taste. Finally, stir in 3 chopped green onions and remove the pan from heat. For the finishing touch, plate your noodles and sprinkle sesame seeds on top for garnish. Enjoy your flavorful dish! For the full recipe, check out the complete instructions. To keep your vegetables crunchy, use high heat. This helps them cook quickly. Stir them fast to avoid sogginess. You want them bright and crisp, not soft and mushy. Always cut your vegetables smaller. They will cook more evenly. Using a wok is great for this dish. The shape allows heat to circulate better. Want to boost the flavor? Try adding a splash of oyster sauce! It adds a rich taste. You can also mix in some chili paste for heat. A bit of vinegar can brighten the flavors too. If you prefer, toss in some sesame seeds while cooking. They add a nutty taste that works well with the noodles. Garnishing makes your dish pop! Use sesame seeds to add texture. Sprinkle them right before serving. Green onions are perfect for color and flavor. Chop them finely and scatter on top. For extra flair, try a drizzle of sesame oil. It enhances the aroma and taste. These small touches make a big difference! This dish is simple, but these tips will elevate your cooking. For more detailed instructions, check the Full Recipe. {{image_2}} You can easily add protein to your Chinese vegetable egg noodles. Chicken, shrimp, or tofu works great. For chicken, use thin slices and cook them before adding the vegetables. Shrimp adds a nice touch and cooks quickly. If you prefer a plant-based option, cubed tofu is perfect. Just sauté it until golden brown before mixing in with the noodles. Feel free to switch up the vegetables in this dish. If you don’t have bell peppers, try zucchini or mushrooms. You can also use spinach or kale for a different look. Cauliflower is another fun option. The key is to keep the colors vibrant and the crunch intact. This keeps the dish exciting and allows you to use what you have on hand. If you want a change from egg noodles, rice noodles are a great alternative. They soak up flavors well and offer a different texture. You could also use gluten-free noodles if you have dietary needs. Just remember to adjust the cooking time based on the type of noodles you choose. Each option gives the dish a unique twist while keeping it delicious. For the full recipe, check out the details above. To keep your Chinese vegetable egg noodles fresh, first let them cool completely. Then, transfer them to an airtight container. Place a piece of parchment paper between layers to prevent sticking. Store the container in the fridge. When you want to eat them, simply reheat in a skillet over medium heat. You can add a splash of water or soy sauce to help them warm up. Stir often until they are hot. If you want to freeze the dish, follow these steps. First, allow the noodles to cool completely. Then, portion them into freezer-safe bags or containers. Squeeze out as much air as possible to avoid freezer burn. Label the bags with the date and contents. You can freeze them for up to three months. To reheat, thaw in the fridge overnight. Then, heat in a pan or microwave, adding a bit of water if needed. Properly stored, the dish stays fresh in the fridge for about three to four days. In the freezer, it can last up to three months. Always check for any off smells or changes in texture before eating leftovers. Enjoy your flavorful meal without worry! Yes, you can prepare Chinese vegetable egg noodles ahead of time. Cook the noodles and stir-fry the vegetables as directed. Let them cool, then store them in the fridge. They will stay fresh for up to three days. When ready to serve, simply reheat in a pan over medium heat. Add a splash of soy sauce to keep them moist. These flavorful noodles pair well with many dishes. Consider serving them with: - Sweet and sour chicken - Stir-fried beef with broccoli - Crispy tofu with sesame sauce - A simple hot and sour soup These options will add variety and balance to your meal. Absolutely! This recipe is quite flexible: - Vegetarian: The noodles and veggies are naturally vegetarian. - Vegan: Simply omit the egg noodles and use a vegan noodle option. - Gluten-free: Substitute egg noodles with rice noodles for a gluten-free meal. Feel free to adjust the recipe to meet your dietary needs while still enjoying this tasty dish. In this post, we explored making Chinese vegetable egg noodles. We covered the key ingredients, cooking steps, and tips for the perfect stir-fry. You learned about optional protein and veggie swaps, plus best ways to store leftovers. Experimenting with flavors can elevate your dish. With this recipe, you'll serve a tasty meal that's easy to customize. Enjoy your cooking journey and share your variations. Simple steps lead to delicious results, and I hope you feel inspired to try it today!

Chinese Vegetable Egg Noodles Flavorful and Simple Dish

Looking for a quick and tasty dinner? Chinese Vegetable Egg Noodles are perfect for you! This dish mixes fresh veggies

Older posts
Newer posts
← Previous Page1 … Page25 Page26 Page27 … Page41 Next →

dsad

© 2025 flavorsprint • Built with GeneratePress

Our Policies

  • Copyright Policy
  • Cookie Policy
  • GDPR Policy
  • Privacy Policy
  • Disclaimer
  • Terms Of Use

More Information

  • Home
  • About
  • Contact
  • Appetizers
  • Dessert
  • Dinner
  • Drinks
©2025, flavorsprint About Back To Top