Skip to content
DisclaimerTerms Of UseGDPR PolicyCookie Policy

flavorsprint

  • Home
  • Drinks
  • Appetizers
  • Dinner
  • Dessert
  • About
  • Contact
  • Privacy Policy
DisclaimerTerms Of UseGDPR PolicyCookie Policy

Lillian

To make this dish, you need a few key items. Here’s what you will need: - 8 large sea scallops, patted dry - 8 oz linguine or spaghetti - 4 tablespoons unsalted butter - 4 cloves garlic, minced - 1 teaspoon red pepper flakes (adjust to taste) - ½ cup cherry tomatoes, halved - 2 cups fresh spinach - Salt and pepper to taste - 2 tablespoons fresh parsley, chopped (for garnish) - 1 tablespoon lemon juice - Zest of 1 lemon You can get creative with your dish by adding some extra ingredients. Here are a few ideas: - A splash of white wine for depth - Capers for a briny kick - Fresh basil or thyme for added herbal notes When you choose scallops, freshness is key. Look for these signs: - They should smell like the ocean, not fishy. - The meat should be firm and slightly translucent. - Avoid scallops that are dry or have brown spots. - If possible, buy from a trusted local fishmonger. Using fresh scallops will make your dish shine. For the full recipe, check out the detailed steps to create this delightful meal. Start by boiling a large pot of salted water. This adds flavor to your pasta. Once the water is boiling, add 8 ounces of linguine or spaghetti. Cook it according to the package instructions until it is al dente. Al dente means it is firm to the bite. After cooking, set aside ½ cup of pasta water. Then, drain the pasta and let it rest. For the best seared scallops, you need to dry them well. Use a paper towel to pat 8 large sea scallops until they are dry. This step helps achieve a nice crust. Season both sides with salt and pepper. Heat 2 tablespoons of unsalted butter in a large skillet over medium-high heat. When the butter is hot, add the scallops in a single layer. Do not overcrowd the pan; this keeps the heat high. Sear each side for 2-3 minutes until golden brown. They should look beautiful and cooked through. Remove them from the skillet and set aside. In the same skillet, lower the heat to medium. Add the remaining 2 tablespoons of butter. Once melted, add 4 minced garlic cloves and 1 teaspoon of red pepper flakes. Sauté for about 1 minute until the garlic smells good. Next, add ½ cup of halved cherry tomatoes. Cook them for 2 minutes until they soften. Then, toss in 2 cups of fresh spinach and cook until it wilts. Now, add the cooked pasta along with that reserved pasta water, 1 tablespoon of lemon juice, and the zest of 1 lemon. Mix everything well to combine the flavors. Season with salt and pepper to taste. You can find the full recipe with all the details in the previous section. Enjoy your cooking! To sear scallops well, start with dry scallops. Pat them with paper towels until no moisture remains. This helps them brown nicely. Season both sides with salt and pepper. Heat a skillet over medium-high heat. Add two tablespoons of butter. When it is hot, add the scallops. Give them space; don’t crowd the pan. Sear for about 2-3 minutes. Flip them when they are golden. Cook the other side for another 2-3 minutes. They should be firm yet slightly translucent inside. Garlic pasta shines with fresh ingredients. Begin with good-quality garlic. Mince four cloves to release their flavor. Use unsalted butter to control the saltiness. Red pepper flakes add a nice kick. Adjust the amount to your taste. Cherry tomatoes bring sweetness and color. Cook them until they soften. Fresh spinach wilts quickly, adding a lovely green touch. Always save some pasta water. It helps the sauce cling to the pasta. Presentation makes a dish pop. Use deep bowls for serving. Place a mound of garlic pasta first. Arrange the scallops on top, showing off their golden crust. For a fresh touch, sprinkle parsley over the dish. Add a lemon wedge on the side. This adds color and lets guests brighten their meal if they wish. For the full recipe, you can check the details provided earlier. {{image_2}} If you want to change up the greens in your dish, you have many options. Kale works great if you want a heartier taste. Just chop it finely and add it to the skillet with the garlic. Arugula adds a nice peppery kick. Toss it in at the very end to keep its fresh flavor. Swiss chard is another good choice. Cook it until it's wilted for a delicious twist. Each green brings its own taste and texture to the dish. If you want to add more protein, shrimp or chicken are perfect choices. For shrimp, use large ones and sauté them just like the scallops. They only need a few minutes to cook through. If you prefer chicken, try using thin chicken breasts. Cook them in the skillet first, and then set them aside. You can add them back in with the pasta sauce for a hearty meal. Both options pair well with the garlic sauce. If you need a gluten-free option, there are many pasta types to choose from. Look for gluten-free linguine or spaghetti made from rice or corn. They cook similarly to regular pasta. Zucchini noodles are another fun option. Just spiralize fresh zucchini and sauté it for a few minutes. It’s a low-carb choice and adds a fresh taste. Whichever substitute you pick, you can still enjoy this delicious dish without gluten. For the full recipe, check out the detailed instructions above! To store leftover scallops over garlic pasta, place it in an airtight container. Make sure to cool the dish to room temperature first. Seal the container tightly to keep out air. You can store it in the fridge for up to three days. If you wait longer, the scallops may lose their flavor and texture. When reheating, use the stovetop for best results. Place the pasta in a pan over low heat. Add a splash of water or a bit of butter to keep it moist. Stir gently until heated through, about five minutes. Avoid the microwave, as it can make the scallops rubbery. If you want to save the dish for later, freezing is an option. However, I recommend freezing only the pasta and sauce. Scallops do not freeze well. To freeze, place the cooled pasta in a freezer-safe bag. Remove as much air as possible. It can last up to three months in the freezer. When ready to eat, thaw it overnight in the fridge before reheating. For the best flavor, use the Full Recipe for fresh scallops when you serve it again. You can tell when scallops are done by checking their color. They should be a nice golden brown on the outside. The inside should be opaque and firm to the touch. If the scallops feel soft or mushy, they need more time. Cook them for about 2-3 minutes on each side. Watch closely to avoid overcooking. Overcooked scallops become tough and chewy. Yes, you can make parts of this dish in advance. Cook the pasta and prepare the garlic sauce ahead of time. Store them separately in the fridge. When you're ready to serve, just reheat the sauce and pasta together. Sear the scallops fresh for the best taste. This way, you keep their lovely texture. Seared scallops over garlic pasta pair well with many sides. A fresh green salad with a light vinaigrette complements the dish nicely. You can also serve some crusty bread to soak up any sauce. For a fun twist, a side of roasted asparagus or sautéed zucchini adds color and flavor. These options enhance your meal and make it more complete. In this post, we covered how to make seared scallops over garlic pasta. We discussed essential and optional ingredients, tips for selecting fresh scallops, and detailed cooking steps. I shared tricks to perfect scallops and enhance flavor in your dish. Also, we explored variations and storage tips. Remember, with practice, you can master this dish. Enjoy the delicious meal and impress your guests!

Seared Scallops Over Garlic Pasta Simple and Tasty Dish

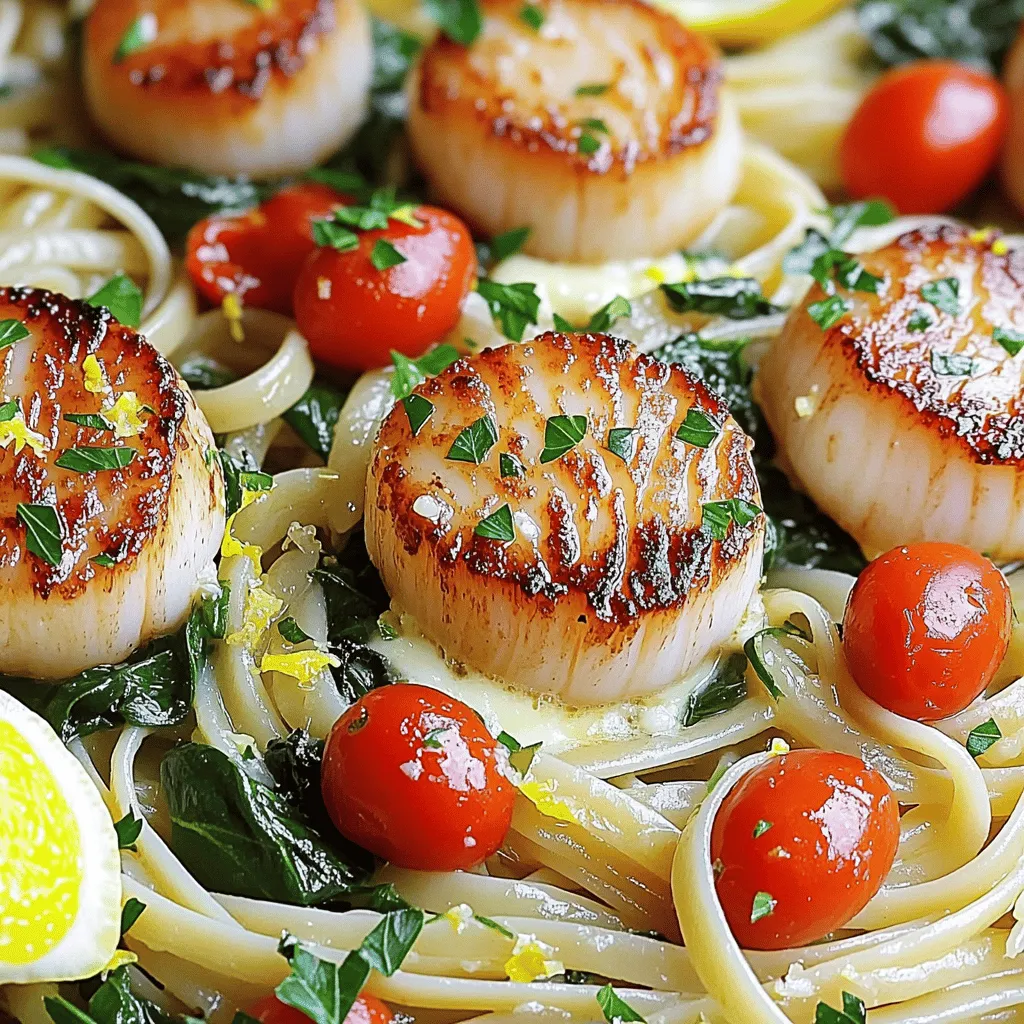
If you’re craving a meal that’s both quick and delicious, seared scallops over garlic pasta is the answer. This simple

For this savory dish, you need: - 4 boneless, skinless chicken breasts - 1/4 cup honey - 1/4 cup unsalted butter - 4 cloves garlic, minced - 1 teaspoon soy sauce - 1/2 teaspoon crushed red pepper flakes (optional for a kick) - Salt and pepper to taste - Fresh parsley, chopped for garnish I choose boneless, skinless chicken breasts for their lean meat and quick cooking. Honey gives a sweet touch, while unsalted butter adds richness. Fresh garlic brings a bold flavor. You can adjust the red pepper flakes for spice lovers! If you need swaps, here are some ideas: - For honey, use agave syrup or maple syrup. - Instead of regular butter, try olive oil or coconut oil. - Fresh garlic can be replaced with garlic powder. Use 1/8 teaspoon per clove. These alternatives won't change the dish much but can fit your needs. To boost flavor, consider these: - Fresh herbs like thyme or rosemary. - Spices such as paprika or cumin for a twist. For garnishing, fresh parsley brightens the dish. You can also use green onions or sesame seeds for a fun look. Each adds a nice touch to your honey butter garlic chicken! 1. First, season the chicken breasts. Use salt and pepper on both sides. This adds basic flavor. 2. Next, grab a large skillet. Place it on the stove and set the heat to medium. 1. Start by melting the butter in the skillet. Watch for it to fully melt but not brown. 2. Now, add the minced garlic. Sauté it for 1-2 minutes until it smells great. 3. In a bowl, mix the honey, soy sauce, and red pepper flakes if you like heat. Stir until combined. 4. Increase the heat to medium-high. Carefully add the seasoned chicken breasts to the skillet. 5. Cook the chicken for about 5-6 minutes on each side. Look for a golden brown color. The chicken should reach 165°F (75°C) inside. 1. Once the chicken is done, reduce the heat to low. Spoon the honey garlic sauce over the chicken. 2. Let it simmer for 2-3 minutes. This helps the chicken soak up the sauce flavors. 3. Remove the skillet from the heat. Let the chicken rest for a few minutes. This keeps it juicy. 4. Finally, garnish the chicken with fresh chopped parsley before serving. Enjoy your delicious honey butter garlic chicken! For more detailed instructions, check out the Full Recipe. To ensure juicy chicken, start with good quality meat. Choose boneless, skinless chicken breasts for the best results. Season them well with salt and pepper. This adds flavor and helps keep the chicken moist. Perfect browning methods involve heating your skillet before adding the chicken. Use medium-high heat for a nice golden color. Don't overcrowd the pan; cook in batches if needed. This allows the chicken to sear properly and develop a rich flavor. To add depth to the sauce, balance the sweetness of honey with soy sauce. This gives a savory touch to your chicken. You can also add a splash of lemon juice for freshness. For a more complex taste, consider using fresh herbs like thyme or rosemary. Incorporating spice adds an exciting kick. Crushed red pepper flakes work well if you want heat. Start small; you can always add more. Experiment with other spices like smoked paprika or cayenne for different flavor profiles. Ideal pairings for the dish include fluffy rice or creamy mashed potatoes. The honey garlic sauce pairs well with both. Roasted vegetables like broccoli or carrots add color and nutrition. They also soak up the sauce, making every bite delicious. For plating tips, slice the chicken for a beautiful presentation. Drizzle the sauce over the top and sprinkle with fresh parsley. This adds a pop of color and freshness. Serve on a warm plate to keep everything inviting. For more details, check the Full Recipe. {{image_2}} To make spicy honey butter garlic chicken, you can add heat with extra spices. A great choice is crushed red pepper flakes. Just toss in half a teaspoon when you mix the sauce. If you want more heat, add fresh chili peppers. Jalapeños or serranos work well. Each type brings its unique flavor and spice level. You can also include sautéed veggies in your dish. Bell peppers, zucchini, or broccoli add color and taste. Start by cooking the veggies in the skillet before the chicken. This way, they soak up the honey garlic sauce. Roasted vegetable combinations are also great. Try mixing carrots, sweet potatoes, and Brussels sprouts. Roasting brings out their natural sweetness and pairs well with the honey garlic sauce. If you want to switch things up, consider alternative proteins. You can substitute chicken with pork or turkey. Just adjust the cooking time as needed. For a vegetarian option, use tofu or tempeh. Marinate the tofu in the honey garlic sauce for flavor. Cook it until it’s crispy and golden. This way, you keep the dish tasty and satisfying. For the full recipe, check out the Honey Butter Garlic Chicken. To keep your honey butter garlic chicken tasty, follow these steps. Allow the chicken to cool down first. Once cool, place it in an airtight container. This helps keep the chicken fresh and prevents drying out. For best results, store it in the fridge. Enjoy it within three days for the best flavor. When you are ready to eat leftovers, reheating is key. The oven is best for keeping flavor. Preheat it to 350°F (175°C). Place the chicken in a baking dish and cover it with foil. Heat for about 15-20 minutes. If you use a microwave, place the chicken on a microwave-safe plate. Heat for 1-2 minutes, checking every 30 seconds. This helps avoid overcooking. You can freeze honey butter garlic chicken for later. Wrap each piece tightly in plastic wrap. Then, place it in a freezer bag. Remove as much air as possible before sealing. This keeps the chicken fresh for up to three months. To thaw, move it to the fridge overnight. Reheat it using the oven or microwave, as mentioned above. Enjoy your delicious meal anytime! For the full recipe, check out the Honey Butter Garlic Chicken 🧄 recipe above. Honey butter garlic chicken is a tasty dish that blends sweet and savory flavors. It features chicken cooked in a rich honey-garlic sauce. This dish is popular due to its simple ingredients and quick cooking time. Many people love it because it tastes great and is easy to make at home. Cooking honey butter garlic chicken takes about 30 minutes. You need about 10 minutes for prep and 20 minutes for cooking. This makes it a quick meal for busy nights. You can have a delicious dinner on the table in no time. Yes, you can make honey butter garlic chicken in advance! This dish holds up well in the fridge. You can prepare it the night before and store it in an airtight container. When you’re ready, just reheat it on the stove or in the microwave. Enjoy it with rice or veggies for a quick meal! For the detailed steps, check the Full Recipe. This blog post covers how to make honey butter garlic chicken. You learned about the key ingredients, preparation steps, and cooking techniques. We explored tips for flavoring, garnishing, and serving the dish. I shared variations with spice and vegetables, plus storage options for leftovers. You now have the tools to create a delicious meal. Enjoy your cooking journey with this tasty recipe. Your kitchen will shine with flavors and warmth.

Savory Honey Butter Garlic Chicken Easy Recipe

Do you crave a dish that’s both sweet and savory? Look no further! This Savory Honey Butter Garlic Chicken recipe

- Pasta: I recommend using penne or rotini. These shapes hold the dressing well. - Proteins: You can use cooked chicken and crispy bacon. Turkey bacon works great too! - Fresh Vegetables: Use cherry tomatoes, diced cucumber, and finely chopped red onion. These add color and crunch. - Cheese: Shredded cheddar cheese gives a rich flavor. Use about half a cup for best taste. - Dressing Components: The dressing needs mayonnaise, Dijon mustard, ranch dressing, and lemon juice. These create a creamy, tangy mix. This combination of ingredients makes the club sandwich pasta salad easy and flavorful. You can find the full recipe above to guide you through every step. Enjoy your cooking! To make your pasta just right, start by boiling water in a large pot. Add a pinch of salt to the water. This helps the pasta have flavor. Once the water boils, add 8 oz of penne or rotini pasta. Cook it according to the package instructions. Usually, this takes about 8 to 10 minutes. You want the pasta to be al dente, which means it should be firm but not hard. When the pasta is cooked, drain it in a colander. Rinse it under cold water. This stops the cooking process and cools it down quickly. Make sure to shake off any extra water. Now, let’s mix everything together. In a large mixing bowl, add the cooled pasta. Then, add 1 cup of diced cooked chicken and 1 cup of chopped cooked bacon. You can use turkey bacon if you prefer. Next, toss in 1/2 cup of halved cherry tomatoes, 1/2 cup of diced cucumber, and 1/4 cup of finely chopped red onion. Finally, sprinkle in 1/2 cup of shredded cheddar cheese. For even mixing, add the ingredients in this order: pasta first, then proteins, followed by the veggies and cheese. This helps distribute everything well. For the dressing, grab a small bowl. Mix together 1/2 cup of mayonnaise, 1 tablespoon of Dijon mustard, 2 tablespoons of ranch dressing, and 1 tablespoon of lemon juice. Add salt and pepper to taste. Whisk everything together until it is smooth and creamy. You can adjust the dressing ratio based on your taste. If you like it tangier, add more lemon juice or mustard. Pour the dressing over the pasta mixture and toss gently. Make sure every piece is coated well. For the full recipe, check the details above. To make your Club Sandwich Pasta Salad taste great, focus on seasoning. Use salt and pepper to enhance the flavors. You can also add garlic powder or smoked paprika for extra depth. Always taste your salad before serving. This helps you adjust the flavors to your liking. Letting the salad chill is key. It allows the flavors to mix and develop. Aim for at least 30 minutes in the fridge. If you have time, chill it longer for an even better taste. For gatherings, get creative with your serving. Use a large, clear bowl to show off the colorful salad. You can also serve individual portions in small cups for a fun touch. Adding fresh parsley on top gives a nice pop of color. Try adding some crackers or breadsticks on the side. They pair well with the creamy texture of the salad. This adds a crunch that everyone will enjoy. Feel free to customize your salad for dietary needs. If you want a vegetarian option, swap out chicken and bacon for chickpeas or more veggies. You can also use a dairy-free cheese if needed. For extra variety, think about toppings. Add sliced olives, bell peppers, or even avocado. These mix-ins can change the flavor and make each bite unique. {{image_2}} You can switch up the protein in your Club Sandwich Pasta Salad to match your taste. For a vegetarian option, try using chickpeas or black beans. These add a nice texture and protein boost. You can also use grilled vegetables, like zucchini or bell peppers, for a fresh twist. If you prefer meat, turkey is a great choice. It has a milder flavor than chicken but still offers that savory kick. Ham is another option, bringing a different taste to the salad. You can even mix and match proteins. Combining chicken, turkey, and bacon can create a hearty delight. The type of pasta you choose can change the whole dish. I love using penne or rotini because they hold the dressing well. But you can also try fusilli or farfalle for a fun look. For a healthier option, whole grain pasta adds more fiber. If you're gluten-free, use rice or quinoa pasta. These work well and keep the dish light. Just make sure to cook them according to package instructions for the best texture. While the dressing in the Full Recipe is creamy and tasty, you can switch it up anytime. A light vinaigrette can add a fresh zing. Mix olive oil, vinegar, and a bit of mustard for a simple dressing. To enhance flavors, add fresh herbs like basil or dill. Spices like paprika or garlic powder can also give the salad a nice kick. Don't be afraid to experiment until you find your perfect mix! To keep your Club Sandwich Pasta Salad fresh, use airtight containers. Glass containers work great. They help keep the salad cold and prevent spills. You can also use plastic containers if they seal well. Store the salad in the fridge right after serving. This helps keep it safe to eat. Your pasta salad will stay fresh for about 3 to 5 days in the fridge. After this time, it may not taste as good. Signs your salad has gone bad include a sour smell or a change in color. If you see mold or the salad looks slimy, it is best to throw it away. If you want to enjoy the salad warm, heat it gently. Use a microwave on low power to avoid drying it out. Add a splash of dressing to keep it moist. If you prefer it cold, chill it in the fridge before serving. This keeps the flavors bright and fresh. Yes, you can make this salad ahead of time. It tastes even better after sitting for a few hours. I usually prepare it the day before a picnic or party. Just store it in the fridge in an airtight container. You can keep this pasta salad in the fridge for about 3 to 5 days. Make sure it's in a sealed container. If it starts to smell off or looks funny, it’s best to toss it. Absolutely! You can try other dressings like Italian or a simple vinaigrette. Each dressing will give the salad a different taste. I love using a lemon vinaigrette for a fresh twist. This salad pairs well with fresh fruit, garlic bread, or a light soup. You can also serve it with veggie sticks and dip for a crunchy side. Choose sides that complement the flavors in the salad. Yes, this salad is great for meal prep. You can portion it out into containers for easy lunches. Just remember to store the dressing separately if you want it extra fresh. Check the full recipe for guidance on making this delicious dish! The blog post covered how to create a tasty Club Sandwich Pasta Salad. You learned about the right ingredients, like types of pasta, proteins, and veggies. We explored steps for cooking the pasta and mixing in the flavors. I shared tips to enhance taste and make the dish visually appealing. Remember, there are many ways to customize your salad to fit your needs. Enjoy making this dish for yourself or a group. Happy cooking!

Club Sandwich Pasta Salad Easy and Flavorful Recipe

Looking for a fun twist on a classic? My Club Sandwich Pasta Salad is the perfect blend of flavors and

- 8 oz elbow macaroni - 2 cups milk - 2 tablespoons butter - 2 tablespoons all-purpose flour - 1 teaspoon garlic powder - 2 cups shredded pepper jack cheese - 1 cup sharp cheddar cheese, shredded - 1 teaspoon onion powder - 1 teaspoon Dijon mustard - 1/2 teaspoon smoked paprika - Salt and pepper to taste - 1/2 cup breadcrumbs (optional for topping) - 2 tablespoons chopped fresh cilantro (for garnish) The main ingredients form the base of the dish. Elbow macaroni gives the mac and cheese its familiar shape and texture. The butter and flour create a roux, which helps thicken the cheese sauce. Milk adds creaminess, while garlic powder boosts flavor. Now, let's talk cheese. Pepper jack cheese brings a nice heat, while sharp cheddar adds depth. Together, they create a rich and flavorful sauce. For seasoning, onion powder, Dijon mustard, and smoked paprika enhance the taste. Salt and pepper balance everything out. If you like a crispy top, use breadcrumbs. Fresh cilantro adds a bright touch as a garnish. This pepper jack mac and cheese dish is creamy and hearty. You can find the full recipe above to guide you through the steps! - Bring a large pot of salted water to a boil. - Add 8 oz of elbow macaroni. - Cook according to package directions until al dente. - Drain and set aside. - In the same pot, melt 2 tablespoons of butter over medium heat. - Whisk in 2 tablespoons of all-purpose flour. - Add 1 teaspoon of garlic powder, 1 teaspoon of onion powder, and 1/2 teaspoon of smoked paprika. - Cook for 1-2 minutes, stirring continuously until it forms a light paste. - Gradually whisk in 2 cups of milk, ensuring there are no lumps. - Continue whisking until the mixture thickens and bubbles, about 5-7 minutes. - Stir in 2 cups of shredded pepper jack cheese and 1 cup of sharp cheddar cheese until melted and smooth. - Add the drained macaroni to the cheese sauce. - Stir well to coat all the pasta in the sauce. - If you want a crispy topping, preheat the oven to 350°F (175°C). - Transfer the mac and cheese to a baking dish. - Sprinkle 1/2 cup of breadcrumbs on top. - Bake for 15-20 minutes, or until golden and crispy. For the complete recipe, check out the Full Recipe link! To make a great cheese sauce, I always use freshly grated cheese. It melts better and gives a smooth texture. Pre-shredded cheese has additives that can prevent smooth melting. Whisk continuously while adding milk. This helps avoid lumps in your sauce. If you stop whisking, the sauce might clump together. Not everyone loves heat. You can substitute other cheeses to make it milder. Creamy mozzarella or mild gouda works well. For those who crave spice, add jalapeños. Slice them thin and mix them into the cheese sauce. This will give you that extra kick. I love to pair my mac and cheese with a fresh side salad. The crunch of greens balances the creamy dish. You can also serve it with crusty bread. This bread is perfect for soaking up all that delicious cheese sauce. Enjoy your meal with friends and family! {{image_2}} You can make your Pepper Jack Mac and Cheese even better by adding veggies. Spinach or broccoli works great for extra nutrition. They add color and texture too. You can also include sautéed onions or bell peppers. These veggies bring sweetness and flavor. They make this dish healthier and more filling. Want to make it heartier? Add some protein! Cooked chicken, bacon, or shrimp are perfect choices. They add great taste and will satisfy your hunger. You can also use ground beef or sausage. This makes the dish more filling and turns it into a full meal. If you prefer a vegan version, you can swap out dairy ingredients for plant-based ones. Use almond milk or coconut milk instead of regular milk. For the cheese flavor, try nutritional yeast. It gives a great cheesy taste without using dairy. You can still enjoy this creamy dish while keeping it plant-based. For more ideas, check out the Full Recipe. After you enjoy your Pepper Jack Mac and Cheese, store any leftovers in an airtight container. This keeps the dish fresh. It will last for up to 3-4 days in the fridge. Make sure to let it cool before sealing the container. This helps prevent condensation and sogginess. You can freeze this dish too! Portion it out and place it in freezer-safe containers. It will stay good for up to 2 months. When you want to eat it, just take out a portion and let it thaw in the fridge overnight. To reheat your mac and cheese, you can use either the microwave or the stovetop. If it looks dry, add a splash of milk to help restore its creaminess. Heat it until it's warm throughout, and enjoy your delicious meal again! Yes, feel free to mix and match with other cheeses. You could try mozzarella for creaminess or gouda for a smoky touch. Cheddar also works well and adds a classic taste. Each choice will give your dish a unique flavor. Experimenting with different cheeses can make this recipe fun and exciting! To tone down the spice, reduce or omit the pepper jack cheese. You can swap in a milder cheese, like mozzarella or mild cheddar. These options still keep the creaminess but cut the heat. Taste as you go to find the right balance for your palate. Yes, it stores well and can be portioned out for meals. After cooking, let it cool before placing it in airtight containers. This way, you can enjoy it for up to 3-4 days. Just reheat in the microwave or on the stovetop, adding a splash of milk if needed. Prep time is 10 minutes, with a total cook time of 30 minutes. This makes it a great option for busy weeknights. You can whip up a comforting bowl of Pepper Jack Mac and Cheese in no time! For the full recipe, check the detailed instructions above. This blog post shared a simple and tasty mac and cheese recipe. We covered the ingredients, step-by-step instructions, and tips for the best results. You can customize this dish with veggies or proteins to suit your taste. Storing and reheating options make it perfect for meal prep. Whether you're a newbie or an expert, this recipe will please everyone. Enjoy cooking this classic comfort food and make it your own!

Pepper Jack Mac and Cheese Creamy and Hearty Dish

Looking for a warm, creamy dish that packs a spicy kick? Try my Pepper Jack Mac and Cheese! This hearty

To make Chocolate Easter Bark with Mini Eggs, you need the following items: - 200g dark chocolate, coarsely chopped - 200g milk chocolate, coarsely chopped - 100g white chocolate, coarsely chopped - 150g mini chocolate eggs (like Cadbury Mini Eggs) - 50g crushed nuts, such as almonds or hazelnuts - 1/4 teaspoon sea salt (optional) You can swap some ingredients based on your taste. Try these: - Use semi-sweet chocolate instead of dark chocolate for a sweeter bark. - Milk chocolate can be replaced with white chocolate for a creamier taste. - Instead of mini eggs, use colorful jelly beans or dried fruit for a fun twist. Choose the best chocolate for great taste. Here are some tips: - Look for chocolate with a high cocoa content. Aim for 60% or higher in dark chocolate. - Buy chocolate from brands known for quality. Good brands often have better flavor. - Avoid chocolate with added fillers or artificial flavors. This ensures a rich, true taste. Using quality ingredients makes your Chocolate Easter Bark a delightful treat. If you want the full recipe, check out the complete details above. First, get your baking sheet ready. You will need a sheet that is about 12x16 inches. Line it with parchment paper. This helps the chocolate not to stick. Make sure to smooth out the paper so there are no wrinkles. Now, let’s melt the chocolate. Start with the dark chocolate. Take 200g of dark chocolate and put it in a microwave-safe bowl. Heat it in the microwave for 20 seconds. Stir the chocolate, then heat again. Keep doing this until it is fully melted and smooth. Next, do the same with the milk chocolate. Use another bowl for 200g of milk chocolate. Repeat the same heating method. Once melted, it should be smooth and shiny. Finally, melt 100g of white chocolate in a separate bowl. Follow the same steps. This white chocolate will add a lovely swirl later. Once all the chocolate is melted, it’s time to layer. Start with the dark chocolate. Pour it onto the parchment paper and spread it evenly. Aim for about 1/4 inch thick. Pour the melted milk chocolate over the dark layer. Use a spatula to spread it gently. Now for the fun part! Drizzle the melted white chocolate over the milk chocolate. Take a toothpick or skewer and swirl it through both layers. This will create a beautiful marbled effect. Next, sprinkle the mini chocolate eggs and crushed nuts on top. Press them down lightly so they stick into the chocolate. If you like, add a sprinkle of sea salt for a tasty touch. Finally, place the baking sheet in the fridge for about one hour. This lets the chocolate set. Once firm, lift the bark off the parchment and break it into pieces. For the full recipe, check the recipe section above. To melt chocolate well, I use a microwave or a double boiler. The microwave is faster. Place chocolate in a bowl and microwave in 20-second bursts. Stir after each burst. This keeps the heat even. Stop when it is mostly melted. The heat will finish the job. If you prefer a double boiler, fill a pot with water. Place a heat-safe bowl on top. Stir the chocolate until smooth. This method prevents burning. To create a perfect swirl, you need to drizzle the white chocolate. After layering the milk chocolate, melt the white chocolate. Use a spoon to drizzle it over the milk chocolate. Then, take a toothpick or skewer. Gently twist it through both chocolate layers. Make sure not to mix too much. You want a nice marbled effect, not a solid color. One common mistake is overheating the chocolate. This can make it thick and grainy. Always melt chocolate slowly and stir often. Another mistake is not pressing toppings into the chocolate. Press mini eggs and nuts down gently. This helps them stick when the chocolate hardens. Lastly, avoid skipping the parchment paper. It makes removal easy and keeps your treat intact. For the full recipe, check above. {{image_2}} You can add fun flavors to your chocolate bark. Try vanilla or almond extract for a nice twist. Just a few drops can change the taste. You can also use spices like cinnamon or nutmeg for warmth. Mix these in when melting the chocolate for even flavor. Get creative with your toppings! Instead of mini eggs, use dried fruits like cranberries or apricots. They add chewiness and a fruity taste. You could also try other candies, like gummy bears or caramel pieces. Just make sure they fit well on the chocolate. Press them in gently for the best hold. If you want a vegan option, swap regular chocolate for dairy-free chocolate. Many brands offer tasty dark or milk alternatives. You can also use nuts or seeds for crunch without dairy. Just check the labels to ensure they fit your dietary needs. These simple swaps keep the treat delicious for everyone. For the full recipe, make sure to check out the Chocolate Easter Bark with Mini Eggs. After making your chocolate bark, let it cool completely. Once cool, break it into pieces. Place the pieces in a single layer on a plate. Cover them with plastic wrap or foil. This keeps them fresh. If you want to store more pieces, use an airtight container. The best containers for storing chocolate bark are glass jars or plastic storage boxes. Choose containers that fit well, so the bark does not move around. Avoid using containers with strong odors. This can change the taste of the chocolate. Make sure the container is clean and dry before adding the bark. Chocolate bark lasts about two weeks at room temperature. If you want to keep it longer, freeze it. Wrap each piece in plastic wrap and place them in a freezer bag. Make sure to remove as much air as possible. This helps prevent freezer burn. When ready to eat, let the bark thaw in the fridge. Enjoy fresh, tasty chocolate bark anytime! For the full recipe, check the section above. Chocolate bark usually takes about 1 hour to set in the fridge. The time might change based on how thick the layers are. If you spread the chocolate thinly, it might set faster. Always check to make sure it’s firm before breaking it apart. Yes, you can use any type of chocolate you like! Dark, milk, or white chocolate all work well. You can also mix in your favorite candies. Try using peanut butter cups, caramel candies, or even dried fruit for fun twists. Just keep the ratios similar to the full recipe. If your chocolate seizes, don’t panic! You can rescue it by adding a small amount of vegetable oil or warm cream. Stir well until it smooths out. Next time, make sure to melt the chocolate slowly. Avoid any water getting into the bowl. To cut chocolate bark easily, use a sharp knife. Start by lifting the bark from the parchment paper. Place it on a cutting board. Score the bark lightly with the knife to make lines. Then press down gently to break it into pieces. This method keeps the edges neat! This blog covered all you need to know about making chocolate bark. We discussed ingredients, tips for quality, and step-by-step instructions for melting and layering chocolate. I shared ways to avoid mistakes and build your skills. You learned about fun variations and how to store your treats well. Remember, chocolate bark is fun to make and eat. With these tips, you’ll create perfect bark every time. Happy baking!

Chocolate Easter Bark with Mini Eggs Delightful Treat

Easter is just around the corner, and what better way to celebrate than with Chocolate Easter Bark with Mini Eggs?

To make crispy potato pancakes, you need the right ingredients. Here’s what you’ll need: - 3 large russet potatoes, peeled and grated - 1 small onion, finely chopped - 2 large eggs - 1/3 cup all-purpose flour - 1 teaspoon baking powder - 1 teaspoon garlic powder - 1/2 teaspoon salt - 1/4 teaspoon black pepper - 1/2 teaspoon smoked paprika (for a unique flavor) - Vegetable oil for frying Each ingredient plays a key role. The russet potatoes give a fluffy inside, while the egg helps bind the mixture. Flour adds structure, and the spices create depth. You can make your pancakes even better with garnishes and dips. Consider these options: - Fresh herbs like chives or parsley - Suggested accompaniments such as sour cream or applesauce Garnishing with herbs adds color and freshness. Dipping in sour cream or applesauce balances the flavors and enhances the experience. For the full recipe, check out the details above. Start by peeling your russet potatoes. Use a box grater to grate them finely. After grating, place the potatoes in a clean kitchen towel. Squeeze the towel tightly to remove as much moisture as you can. This step is very important. Moisture will make your pancakes soggy. Aim for dry, fluffy potatoes to get that perfect crunch. In a large bowl, combine the grated potatoes with the chopped onion. Now, add the eggs, flour, baking powder, garlic powder, salt, black pepper, and smoked paprika. Mix everything well. You want a thick batter that sticks together but is not too wet. If it feels too loose, add a bit more flour. This mix is where the magic begins. Heat about 1/4 inch of vegetable oil in a large skillet over medium heat. To check if the oil is hot, drop a small spoonful of the potato mix into the oil. It should sizzle right away. Use a 1/4 cup measure to scoop out the mixture. Place it in the hot oil and flatten it slightly. Fry for about 3-4 minutes on each side. Look for a golden brown color and crispy edges. Once done, move them to a plate lined with paper towels to soak up extra oil. Continue until all the mix is cooked. Enjoy your crispy potato pancakes hot! If you want, garnish with fresh herbs for a nice touch. Check out the Full Recipe for more details. For crispy potato pancakes, drying the potatoes is key. After grating, place them in a clean kitchen towel. Squeeze out as much moisture as you can. This step helps remove excess water, giving you that crunch you want. Next, pay attention to oil temperature. Heat your oil in a skillet over medium heat until hot. A good test is to drop a small spoonful of the batter into the oil. If it sizzles right away, the oil is hot enough. This helps the pancakes fry evenly and get that golden color. If your pancakes turn soggy, don’t worry! You can fix this. First, ensure that you dry the potatoes well. If they still feel wet, use a little more flour in the batter. This will absorb moisture and help with crispiness. Adjusting the batter consistency is also important. If your batter is too runny, add a bit more flour. A thicker batter will hold up better while frying. This simple fix can make all the difference in your crispy potato pancakes. For the full recipe, check out the detailed steps to make this dish perfect every time! {{image_2}} You can easily change the taste of your crispy potato pancakes. Adding cheese is a great start. Try mixing in shredded cheddar or feta for a creamy texture. Herbs also add a fresh flavor. I recommend chopped chives or parsley. They brighten each bite. If you want to spice things up, consider adding jalapeños. These peppers give a nice kick. You can also add cooked bacon bits for a smoky flavor. Get creative with your mix-ins! If you need gluten-free options, use alternative flours. Almond flour or rice flour works well in this recipe. They help keep the pancakes crispy too. For a vegan version, skip the eggs. You can use flaxseed meal mixed with water as a substitute. Just mix one tablespoon of flaxseed meal with three tablespoons of water. Let it sit for a few minutes. This mix helps bind the ingredients together. You won’t miss the eggs at all! Explore these options to make the dish your own. For the full recipe, check out the details above! To keep your crispy potato pancakes fresh, use a few simple steps. First, let them cool completely. This helps prevent moisture buildup. After cooling, place the pancakes in a single layer on a plate or tray. Cover them with plastic wrap or aluminum foil. You can store them in the fridge for up to three days. If you want to keep them longer, consider freezing them. In that case, use parchment paper between layers to avoid sticking. When it's time to enjoy your leftovers, reheating is key. You can use either an oven or a skillet. For the oven method, preheat it to 375°F (190°C). Place the pancakes on a baking sheet lined with parchment paper. Bake for about 10-15 minutes, or until they are hot and crispy again. If you prefer the skillet, heat a small amount of oil over medium heat. Add the pancakes and cook for about 3-4 minutes on each side. This helps restore that delicious crunch. For the full recipe, check out the Crispy Potato Pancakes section above! To make potato pancakes crispy, start by removing moisture from the grated potatoes. You can do this by squeezing the grated potatoes in a clean kitchen towel. This step is important. Less moisture means more crunch! Also, use a hot oil for frying. The oil should sizzle when you add the batter. Fry in small batches. This helps keep the oil hot and gives you that golden crust. Yes, you can freeze crispy potato pancakes. Allow them to cool completely first. Then, place them in a single layer on a baking sheet. Freeze until solid. Once frozen, transfer them to a freezer bag or container. To thaw, take them out of the bag and let them sit at room temperature. Reheat them in the oven to regain their crispiness. For the best potato pancakes, use russet potatoes. They have a high starch content, giving you a fluffy inside and a crispy outside. Yukon Gold potatoes are another good choice. They add a creamy texture and great flavor. Avoid waxy potatoes, as they can make the pancakes too moist. For the full recipe, check out the Crispy Potato Pancakes section. You learned how to make crispy potato pancakes with key ingredients like russet potatoes, onions, and seasoning. I shared step-by-step instructions to help you prepare, mix, and cook them perfectly. Tips on achieving crispiness and troubleshooting issues were provided, along with variations and storage info for your convenience. Enjoy experimenting with these ideas. You can make delicious pancakes that suit your taste. Happy cooking!

Crispy Potato Pancakes Perfectly Golden and Crunchy

Do you crave crispy, golden potato pancakes that are sure to impress? You’ve come to the right place. In today’s

- 4 boneless, skinless chicken breasts - 1/4 cup honey - 1/4 cup Dijon mustard - 2 tablespoons olive oil - 3 cloves garlic, minced - 1 teaspoon dried thyme - 1 teaspoon smoked paprika - Salt and pepper to taste - Fresh parsley, chopped (for garnish) Gather these ingredients for a tasty Honey Mustard Chicken. Each item plays a key role. The chicken gives a juicy base. Honey adds sweetness, while mustard brings a tangy kick. Olive oil helps keep the chicken moist during cooking. For flavor, garlic adds depth. Thyme gives a warm herbal note. Smoked paprika adds a hint of smokiness. Salt and pepper enhance all the flavors. Lastly, don’t forget the parsley. It makes the dish look fresh and bright. You can find the full recipe with all details to make this meal shine! First, gather your ingredients. In a medium bowl, whisk together: - 1/4 cup honey - 1/4 cup Dijon mustard - 2 tablespoons olive oil - 3 cloves garlic, minced - 1 teaspoon dried thyme - 1 teaspoon smoked paprika - Salt and pepper to taste Mix until smooth. This mixture will be your marinade. It combines sweet and tangy flavors. Next, take your chicken breasts. Place them in a large resealable plastic bag or a shallow dish. Pour the marinade over the chicken. Make sure each piece gets coated well. Seal the bag or cover the dish. Refrigerate for at least 30 minutes. For more flavor, you can marinate for up to 2 hours. Now it’s time to cook! Preheat your grill to medium-high heat or your oven to 400°F (200°C). Remove the chicken from the marinade. Let the excess marinade drip off; discard the leftover marinade. If you're grilling, cook the chicken for 6-7 minutes on each side. The internal temperature should reach 165°F (74°C). If baking, place the chicken on a baking sheet. Bake for 25-30 minutes, or until fully cooked. After cooking, let the chicken rest for 5 minutes. This helps keep it juicy. Slice the chicken and garnish with freshly chopped parsley before serving. Enjoy your sweet and zesty Honey Mustard Chicken! For the full recipe, check the details above. - Make sure your chicken is at room temperature before cooking. This helps it cook evenly. - Use a meat thermometer. It gives you the exact temperature. Aim for 165°F (74°C) for safe eating. - Marinate chicken for at least 30 minutes. Two hours gives it more flavor. - Don’t over-marinate. Too much time can make the chicken mushy. - Serve Honey Mustard Chicken with rice or quinoa for a hearty meal. - Roasted vegetables or a fresh salad pair well, adding color and crunch. - Consider mashed potatoes for a comforting touch. Feel free to explore the [Full Recipe](#) for all the details! {{image_2}} If you want to switch up the sweetness, try using maple syrup or agave nectar. Both options add a unique flavor. They also keep the dish sweet. Maple syrup gives a rich, earthy taste. Agave nectar is lighter and less intense. You can use them in the same amount as honey in the recipe. You can experiment with different types of mustard. Honey mustard adds a sweet and tangy flavor. Yellow mustard, on the other hand, is more sharp and vinegary. Using yellow mustard changes the taste of the chicken. If you want a milder flavor, go for yellow mustard. For a sweeter dish, stick with honey mustard. If you like spice, add chili flakes or sriracha to the marinade. A pinch of chili flakes gives a nice kick. Sriracha adds heat and a bit of garlic flavor. Start with a small amount and taste as you go. This way, you control the heat level. Adjust it to your liking for a bold twist. Honey Mustard Chicken lasts up to four days in the fridge. Make sure to store it in an airtight container. This keeps the chicken fresh and prevents any odors from other foods. Always let it cool down before storing it. To freeze Honey Mustard Chicken, wrap it tightly in plastic wrap. Place it in a freezer-safe bag or container. This way, you can store it for up to three months. When you’re ready to eat, thaw it in the fridge overnight. Reheat it in the oven at 350°F (175°C) until it’s hot all the way through. You can use leftover Honey Mustard Chicken in many ways. Chop it up and add it to salads for a tasty meal. You can also mix it into wraps or sandwiches for lunch. Another fun idea is to serve it over rice with veggies for a quick dinner. For more ideas, check the Full Recipe for inspiration! To keep the chicken juicy, start by marinating it. Use the honey mustard marinade from the recipe. This mix adds flavor and moisture. Make sure to marinate for at least 30 minutes. If you can, let it sit for up to 2 hours. This gives the flavors time to soak in. Also, cook the chicken to the right temperature. Check for an internal temp of 165°F (74°C). Overcooking can dry it out, so watch closely. Let it rest for about 5 minutes after cooking. This helps the juices stay inside. Yes, you can use skin-on chicken. Skin adds extra flavor and helps keep moisture in. Just remember the cooking time might change. Skin-on pieces may take a bit longer to cook through. So, always check the internal temp to ensure it is done. If using thighs or drumsticks, adjust the marinade amount. Skin-on chicken can be richer. You may want to dial back the oil for balance. If you don’t have Dijon mustard, you can try yellow mustard. It has a milder taste. Honey mustard can also work, but it makes the dish sweeter. If you want a spicier kick, use whole grain mustard. This adds texture and depth to the flavor. You can even mix a bit of vinegar with regular mustard. This can mimic the tanginess of Dijon. Making this recipe gluten-free is simple. Use gluten-free Dijon mustard, which is often available in stores. Also, check the olive oil and any spices for gluten-free labels. For a gluten-free marinade, you can replace Dijon with a mix of honey and vinegar. This keeps the sweet and tangy flavor. Your chicken will still taste great! This blog post covered the key ingredients and steps for making Honey Mustard Chicken. You learned how to create a flavorful marinade using honey, Dijon mustard, and seasonings. I also shared tips for cooking perfectly juicy chicken and ideas for storing leftovers. Remember, you can customize this dish with different sweeteners or spicy additions. As you try this recipe, enjoy experimenting and making it your own. Simple meals can bring great taste to your table!

Honey Mustard Chicken Easy Recipe for Dinner

Looking for a quick and tasty dinner idea? Honey Mustard Chicken is the answer. This easy recipe brings great flavors

- 8 oz fettuccine pasta - 1 lb sea scallops, cleaned and patted dry - 2 tablespoons olive oil - 3 cloves garlic, minced - 1 cup heavy cream - 1/2 cup grated Parmigiano-Reggiano cheese - 1 teaspoon lemon zest - 1 tablespoon fresh lemon juice - 1/4 teaspoon red pepper flakes - Salt and pepper to taste - Fresh parsley, chopped, for garnish The main ingredients for this creamy scallop pasta are simple yet fresh. First, you need fettuccine pasta, which gives a nice bite. For the star of the dish, use sea scallops. They are sweet and tender. You want to clean and dry them well to sear perfectly. You will also need olive oil, which adds flavor and helps sear the scallops. Garlic brings a warm aroma to the dish. Heavy cream makes the sauce rich and smooth. For optional ingredients, consider adding Parmigiano-Reggiano cheese for a cheesy twist. Lemon zest and juice add brightness. If you like a little heat, red pepper flakes are great. Don’t forget to season with salt and pepper. Lastly, fresh parsley makes a lovely garnish. This is the base for a delightful meal. For the full recipe, check out the full instructions. - Boil salted water in a large pot. - Cook the fettuccine according to package instructions. - Reserve 1/2 cup of pasta water, then drain the pasta. - Heat 2 tablespoons of olive oil in a skillet over medium-high heat. - Season the scallops with salt and pepper. - Add the scallops to the pan in a single layer. - Sear for 2-3 minutes on each side until golden brown. - Remove scallops from the skillet and set aside. - Lower the heat to medium in the same skillet. - Add 3 minced garlic cloves and sauté for about 30 seconds. - Stir in 1 cup of heavy cream and let it simmer for 2-3 minutes. - Add 1/2 cup grated Parmigiano-Reggiano cheese, 1 teaspoon lemon zest, and 1 tablespoon fresh lemon juice. - Mix until the cheese melts and the sauce is smooth. - If the sauce is thick, gradually add reserved pasta water until desired consistency. - Toss the fettuccine in the creamy sauce until well coated. - Gently fold in the seared scallops. - Adjust seasoning with salt and pepper to taste. - Plate the creamy scallop pasta in shallow bowls. - Garnish with freshly chopped parsley before serving. For the full recipe, check the detailed instructions above. To get a great sear on your scallops, use dry scallops. They have less moisture and create a nice crust. If your scallops are wet, pat them dry with a paper towel. This helps them brown better. Also, avoid overcrowding the pan. If your skillet is too full, the scallops will steam instead of sear. Cook them in batches if needed. This will give you that golden look and taste. If your sauce is too thick, use reserved pasta water to adjust it. Start with a little and stir it in. Keep adding until you reach the right creaminess. Be careful not to overcook the sauce. Let it simmer gently. This keeps the flavors fresh and bright. Stir often to prevent sticking or burning. You can try different seasonings to boost flavor. Fresh herbs like basil or thyme work great. You can also add a pinch of nutmeg for warmth. Adding vegetables like spinach or sun-dried tomatoes gives your dish more texture. They add color and taste, making your meal even better. For more ideas, check the Full Recipe for flavor tips. {{image_2}} You can switch out heavy cream for half-and-half or coconut cream. These options can make the dish lighter or add a unique flavor. If you're looking for different pasta types, try penne or linguine. Each shape holds the sauce differently, adding a fun twist to your meal. Want to boost the taste? Add fresh herbs like basil or dill. They bring a fresh pop to the dish. You can also mix in proteins like shrimp or chicken. This way, you create a heartier meal that still tastes great. For gluten-free options, use gluten-free pasta made from rice or corn. This swap keeps the dish just as tasty. If you're looking for vegan adaptations, replace cream with cashew cream or a rich plant-based milk. You can also skip the cheese or use a vegan cheese alternative. These changes keep the flavor while meeting dietary needs. Store your creamy scallop pasta in an airtight container. This keeps it fresh longer. You can use glass or plastic containers with tight-fitting lids. For best taste, eat leftovers within 3 days. To reheat, use a low heat on the stove. Add a splash of cream or reserved pasta water. This helps keep the sauce creamy. Stir gently to avoid clumping. You can also use the microwave. Heat in short bursts, stirring in between. This method warms it evenly without drying the pasta out. You can use sea or bay scallops. Sea scallops are larger and meatier. They have a sweet taste and firm texture. Bay scallops are smaller and more tender. They work well in lighter dishes. For creamy scallop pasta, I prefer sea scallops. Their size and flavor shine in this dish. Yes, you can prepare parts of this dish ahead. Cook the pasta and scallops, then store them separately. Keep them in airtight containers in the fridge. When ready to eat, reheat each part. Use medium heat to avoid overcooking. I recommend eating the dish fresh for the best taste. To lighten up this creamy scallop pasta, try using half-and-half instead of heavy cream. You can also reduce the cheese amount. Adding more veggies can help too. Fresh spinach or zucchini give great taste and texture. These changes keep the dish tasty but cut some calories. Freezing creamy scallop pasta is not the best choice. The cream can separate and change texture. If you must freeze it, do so without the scallops. Store the pasta and sauce in separate containers. Thaw in the fridge overnight before reheating. Gently warm it up and add scallops fresh. This keeps the dish creamy and delicious. For the full recipe, check the earlier sections. You now have a simple guide to make creamy scallop pasta. We covered key ingredients, step-by-step cooking, and tips for the best flavor. You can mix it up with different ingredients or store leftovers easily. This dish is not just tasty; it’s also flexible. Enjoy cooking your creamy scallop pasta, and feel free to get creative with flavors or swaps. Your kitchen is now a place for delicious meals!

Creamy Scallop Pasta Luscious and Simple Recipe

Want to impress your family or friends with a dish that’s both rich and simple? This Creamy Scallop Pasta recipe

To make a great loaded baked potato casserole, you need a few key ingredients: - 4 large russet potatoes, peeled and diced - 1 cup sour cream - 1/2 cup cream cheese, softened - 1 cup shredded sharp cheddar cheese - 1/2 cup crumbled feta cheese - 1/2 cup cooked and crumbled turkey bacon (or plant-based bacon) - 1/4 cup green onions, sliced - 1 teaspoon garlic powder - 1 teaspoon onion powder - Salt and pepper to taste - 1/2 cup breadcrumbs (optional, for topping) - 2 tablespoons olive oil (or melted butter) These ingredients blend together to create a creamy and cheesy dish that everyone will love. The potatoes serve as the base, while the cheeses add richness. The toppings like bacon and green onions give it a fun twist. Feel free to get creative with your toppings! Here are a few ideas: - Bacon: Use regular bacon, turkey bacon, or even plant-based bacon. - Cheese: Try different cheeses like gouda or pepper jack for a kick. - Herbs: Add fresh herbs like chives or thyme for extra flavor. - Breadcrumbs: Mix in some spices or parmesan for a tasty topping. You can also swap the sour cream with Greek yogurt for a lighter option. Each change can make the dish your own. If you have dietary needs, this recipe can adapt easily: - Gluten-Free: Use gluten-free breadcrumbs or skip them altogether. - Vegan: Replace dairy with plant-based cream cheese and cheese. - Low-Carb: Substitute potatoes with cauliflower for a lighter version. This dish can cater to various diets while still being delicious. Just choose the ingredients that work best for you. For the full recipe, check out the details above. Start by gathering all your ingredients. You will need russet potatoes, sour cream, cream cheese, and cheeses. Don't forget the green onions and turkey bacon! Next, preheat your oven to 400°F (200°C). Lightly grease a 9x13 inch baking dish to prevent sticking. Now, peel and dice the potatoes into small cubes. In a large pot, boil these potatoes in salted water. Cook them until they are fork-tender, which takes about 15-20 minutes. Once done, drain the potatoes well and return them to the pot. Using a potato masher or fork, mash the warm potatoes until smooth. This texture will help the casserole hold together. Then, add the sour cream, cream cheese, half of the sharp cheddar cheese, feta cheese, and crumbled turkey bacon. Also, mix in the sliced green onions, garlic powder, onion powder, and season with salt and pepper. Stir until everything is well combined. Next, transfer the potato mixture into your prepared baking dish. Spread it out evenly to ensure even cooking. This step is important for a good bake. Now, sprinkle the remaining shredded cheddar cheese on top. If you want a crunchy topping, mix the breadcrumbs with olive oil. Then, sprinkle this on top of the cheese layer. Place the casserole in the preheated oven. Bake for 25-30 minutes or until the cheese bubbles and the top turns golden brown. This will give that perfect cheesy crust we all love. After baking, allow the casserole to cool for a few minutes before serving. For a beautiful presentation, garnish with extra sliced green onions and a dollop of sour cream. Enjoy your loaded baked potato casserole, a delicious comfort dish that warms the heart! If you want to know the full recipe, check out the [Full Recipe]. To get the best texture in your Loaded Baked Potato Casserole, start with russet potatoes. They are starchy and creamy when cooked. Boil them until fork-tender. This takes about 15-20 minutes. After draining, mash them while they are still warm. This helps create a smooth mix. Adding sour cream and cream cheese adds creaminess. Mix them well to avoid lumps. If you want a bit of crunch, sprinkle breadcrumbs on top before baking. If you have leftovers, store them in an airtight container. This keeps them fresh for up to four days in the fridge. Make sure to let the casserole cool down before sealing it. To reheat, place it in the oven at 350°F (175°C) until warmed through. You can also microwave portions, but the oven keeps the top crispy. If you want to keep it longer, freeze the casserole. It stays good for about three months. Just wrap it tightly in plastic wrap. Flavor is key in this dish. I love using garlic powder and onion powder for a savory boost. Adding salt and pepper to taste is important too. You can also experiment with other seasonings. Try smoked paprika for a hint of smokiness. Fresh herbs like parsley or chives can brighten the dish. For added zing, a bit of hot sauce can make it exciting. Mix and match seasonings to find your perfect flavor. For more ideas, check out the Full Recipe. {{image_2}} You can easily make this casserole vegetarian or vegan. For a vegetarian dish, skip the turkey bacon. Use plant-based bacon or extra cheese for flavor. To make it vegan, substitute sour cream and cream cheese with vegan versions. Nutritional yeast can add a cheesy taste. You can also use vegan cheese instead of regular cheese. Switching up ingredients can give this dish a new twist. Try using sweet potatoes for a sweeter taste. Instead of cheddar, you can use gouda or pepper jack for a kick. Add cooked broccoli or spinach for extra nutrients. If you want a smokier flavor, use smoked paprika. You can also mix in herbs like thyme or rosemary for added depth. This casserole pairs well with many sides. Serve it with a fresh green salad or roasted veggies. It also goes great with grilled chicken or steak. For a fun twist, try serving it in individual ramekins. Garnish with fresh herbs or a drizzle of olive oil. You can find the full recipe for this delicious comfort dish to explore even more ideas! After you make your Loaded Baked Potato Casserole, let it cool. Once cool, cover it with plastic wrap or a lid. Store it in the fridge for up to four days. This way, you keep the flavor and texture intact. If you want to keep it fresh longer, use an airtight container. You can freeze your casserole for later use. First, let it cool completely. Then, cut it into portions. Wrap each piece in plastic wrap and place them in a freezer bag. Be sure to remove as much air as possible. It can last in the freezer for up to three months. When you’re ready to eat, just thaw it in the fridge overnight before reheating. To reheat, you have two options: oven or microwave. For the oven, preheat it to 350°F (175°C). Place the casserole in an oven-safe dish and cover it with foil. Bake for about 20-30 minutes, or until hot. If you prefer the microwave, heat it in short bursts of 1-2 minutes. Stir in between to ensure even heating. Enjoy your delicious meal just like the first time! To make loaded baked potato casserole, start by peeling and dicing four large russet potatoes. Boil them in salted water until they are fork-tender. This usually takes about 15 to 20 minutes. Drain the potatoes and mash them until smooth. Next, mix in one cup of sour cream, half a cup of cream cheese, and one cup of shredded sharp cheddar cheese. Then, add half a cup of crumbled feta cheese, half a cup of cooked turkey bacon, and sliced green onions. Add one teaspoon each of garlic powder and onion powder. Don't forget to add salt and pepper to taste. Transfer the mixture to a greased baking dish, top with more cheddar cheese, and bake at 400°F for 25 to 30 minutes. For a nice crunch, you can add breadcrumbs mixed with olive oil. Yes, you can make this casserole in an Instant Pot or slow cooker. For the Instant Pot, cook the diced potatoes on high pressure for about 10 minutes. After cooking, mash the potatoes as usual and follow the same mixing steps. For a slow cooker, add the diced potatoes and other ingredients directly to the pot. Cook on low for 4 to 6 hours or until the potatoes are tender. You can still finish it in the oven for that lovely golden top, or serve it directly from the slow cooker. Absolutely! You can prepare the casserole ahead of time. Simply follow the recipe, but stop before baking. Cover it tightly with plastic wrap and store it in the fridge for up to 24 hours. When you're ready to cook, just remove the wrap and bake as directed. This makes it perfect for busy days or special events. For even longer storage, consider freezing it. Just make sure to let it cool fully before wrapping and freezing. This blog post covered everything you need for a loaded baked potato casserole. We talked about main ingredients, flavors, and dietary options. I walked you through simple steps for preparing and cooking this dish. We discussed tips for the best texture and storage methods for leftovers. You also learned about fun variations and how to reheat your casserole. Try making this dish, and enjoy its tasty goodness. Your family will love it!

Loaded Baked Potato Casserole Delicious Comfort Dish

Are you craving a warm, hearty dish that comforts the soul? Look no further! This Loaded Baked Potato Casserole is

To make this Easy Chicken Alfredo Bake, you will need a few simple ingredients. Here’s the list: - 2 cups cooked pasta (penne or rotini) - 2 cups cooked chicken breast, shredded - 2 cups Alfredo sauce (store-bought or homemade) - 1 cup broccoli florets, steamed - 1 cup shredded mozzarella cheese - 1/2 cup grated Parmesan cheese - 1 teaspoon garlic powder - 1 teaspoon Italian seasoning - Salt and pepper to taste - Fresh parsley, chopped for garnish Each ingredient adds its own charm. The pasta gives a nice base, while the chicken offers protein. The Alfredo sauce makes everything creamy and rich. Broccoli brings color and a hint of health. Cheeses add that warm, melty goodness we all love. Garlic powder and Italian seasoning provide great flavor. Don’t forget the salt and pepper to balance it all out! This dish is not just for dinner; it’s perfect for a cozy gathering. You can find the Full Recipe above to ensure you gather everything you need before you start cooking. - Preheat the oven to 350°F (175°C). - In a large mixing bowl, combine: - 2 cups cooked pasta (penne or rotini) - 2 cups cooked chicken breast, shredded - 1 cup broccoli florets, steamed - 2 cups Alfredo sauce (store-bought or homemade) - Mix until all the ingredients are evenly coated. - Add: - 1 teaspoon garlic powder - 1 teaspoon Italian seasoning - Salt and pepper to taste - Stir well to combine. - Pour the mixture into a greased 9x13-inch baking dish. - Smooth out the top with a spatula. - Sprinkle: - 1 cup shredded mozzarella cheese - 1/2 cup grated Parmesan cheese - Cover the dish with aluminum foil. - Bake for 20 minutes. - Remove the foil and bake for an additional 10-15 minutes. - Look for bubbly, golden cheese. - Let the dish cool for a few minutes. - Garnish with fresh parsley. - Cut into portions for serving. For the full recipe and more details, check the Full Recipe. Enjoy your cheesy, comforting dish! - Use rotini for better sauce coverage. Rotini’s twists trap sauce well. - Opt for homemade Alfredo for richer flavor. Fresh ingredients make a big difference. - Pair with garlic bread and salad. This adds crunch and freshness to each bite. - Serve with extra Parmesan on the side. It lets everyone add their own cheesy touch. - Overcooking the pasta initially. This can make the final dish mushy and unappealing. - Not letting the dish cool before serving. Cooling helps the sauce set and makes it easier to cut. For more details, check out the Full Recipe to make this dish shine! {{image_2}} You can change the main protein in this dish. Substitute chicken with turkey or shrimp. Both options add a nice twist. You can also use whole wheat pasta for a healthier choice. This simple swap boosts fiber without losing taste. If you need to avoid gluten, use gluten-free pasta. It works well and keeps the dish tasty. For a vegan version, try plant-based Alfredo and cheese. This makes the dish creamy while keeping it dairy-free. Want some extra kick? Add red pepper flakes for heat. This small change makes a big impact. You can also include sautéed mushrooms or bell peppers. These add depth and texture to your Easy Chicken Alfredo Bake. For the full recipe, check out the details above. After you enjoy your Easy Chicken Alfredo Bake, store leftovers in an airtight container. This keeps the dish fresh for up to 3 days. When you're ready to eat, reheat it in the oven. This helps maintain the dish's creamy texture and gooey cheese. You can freeze any extra portions of your Alfredo bake. Just make sure to store them in a freezer-safe container. It will stay good for up to 3 months. When you're ready to enjoy it again, thaw the dish overnight in the fridge. This makes reheating simple and even. For the best results, reheat your Alfredo bake in the oven. This ensures the dish warms evenly. Before you put it in the oven, add a splash of milk. This step keeps the sauce creamy and delicious. It lasts up to 3 days when stored properly. To keep it fresh, place it in an airtight container. This helps prevent any odors from mixing in your fridge. Yes, you can assemble it a day before and bake when ready. This makes it great for busy days. Just cover it tightly and store it in the fridge. When you’re ready, bake it as usual. Garlic bread, side salads, or steamed vegetables are great options. Garlic bread adds a nice crunch. A simple salad brings freshness. Steamed veggies add color and nutrients. Yes, feel free to experiment with cheeses like Gouda or Fontina. Each cheese adds its own flavor twist. Mixing cheeses can make your dish even tastier. Try them out to find your favorite blend. You now have a simple and tasty Easy Chicken Alfredo Bake recipe. This dish combines pasta, chicken, and creamy Alfredo sauce for a winner meal. Remember to use fresh ingredients and follow the steps for perfect results. Don't forget the options to change ingredients based on taste or diet. Whether you make it for dinner or leftovers, it’s sure to please everyone. Enjoy your cooking and have fun creating variations that suit your family best.

Easy Chicken Alfredo Bake Cheesy and Comforting Dish

Are you ready for a comforting meal that’s simple to make? My Easy Chicken Alfredo Bake combines tender chicken, creamy

Older posts
Newer posts
← Previous Page1 … Page24 Page25 Page26 … Page41 Next →

dsad

© 2025 flavorsprint • Built with GeneratePress

Our Policies

  • Copyright Policy
  • Cookie Policy
  • GDPR Policy
  • Privacy Policy
  • Disclaimer
  • Terms Of Use

More Information

  • Home
  • About
  • Contact
  • Appetizers
  • Dessert
  • Dinner
  • Drinks
©2025, flavorsprint About Back To Top