Skip to content
DisclaimerTerms Of UseGDPR PolicyCookie Policy

flavorsprint

  • Home
  • Drinks
  • Appetizers
  • Dinner
  • Dessert
  • About
  • Contact
  • Privacy Policy
DisclaimerTerms Of UseGDPR PolicyCookie Policy

Lillian

To make a great pimento cheese tomato pie, you need simple yet tasty ingredients. Here’s what you need: - 1 pre-made pie crust (store-bought or homemade) - 2 cups shredded sharp cheddar cheese - 1 cup pimento cheese (store-bought or homemade) - 3 medium tomatoes, sliced - 1/2 cup mayonnaise - 1 tablespoon Dijon mustard - 1 teaspoon garlic powder - 1 teaspoon onion powder - Salt and pepper to taste - 1/4 cup chopped fresh basil (plus extra for garnish) - 1/2 cup breadcrumbs (optional, for topping) - Olive oil for drizzling The pie crust acts as the base. You can choose a store-bought one for quick prep or make your own for a personal touch. The sharp cheddar and pimento cheese deliver rich flavors that blend well together. Fresh tomatoes add a juicy, vibrant taste. The mayonnaise and Dijon mustard add creaminess and a slight tang. Garlic and onion powder enhance the dish’s depth. Basil offers a fresh kick, and breadcrumbs can add a nice crunch if you choose to use them. You can mix and match these ingredients to suit your taste. This recipe captures the essence of summer in every slice. For the complete recipe, you can refer to the Full Recipe section. 1. Preheat the Oven: Start by preheating your oven to 375°F (190°C). This setting ensures even cooking for the pie. 2. Prepare the Pie Crust: Take your pre-made pie crust and place it in a 9-inch pie plate. Press it gently against the sides to form a nice shape. Prick the bottom with a fork. This helps prevent bubbling. Bake according to the package instructions until it turns lightly golden, about 10 minutes. After baking, let it cool slightly. 3. Make the Filling: In a mixing bowl, combine 2 cups of shredded sharp cheddar cheese, 1 cup of pimento cheese, 1/2 cup of mayonnaise, 1 tablespoon of Dijon mustard, 1 teaspoon of garlic powder, and 1 teaspoon of onion powder. Add salt and pepper to taste. Mix everything until well combined and creamy. 4. Layer the Ingredients: Spread half of the cheese mixture evenly over the bottom of the cooled pie crust. Next, layer 3 medium sliced tomatoes on top. Repeat with the remaining cheese mixture and another layer of tomato slices. This ensures every bite is cheesy and tomatoey. 5. Top it Off: If you want a crunchy topping, mix 1/2 cup of breadcrumbs with a drizzle of olive oil. Sprinkle this mixture evenly over the pie. This step adds a delightful crunch. 6. Bake: Place the pie in your preheated oven. Bake for 25-30 minutes, or until the top is golden brown and the cheese is bubbly. 7. Cool and Garnish: After baking, allow the pie to cool for about 10 minutes. This helps set the filling. Before serving, garnish with fresh basil for a pop of color and flavor. For the full recipe, be sure to check the complete details to guide you through this delightful dish. Enjoy your cooking! Choosing the right cheese is key. I love using sharp cheddar for its bold taste. Pimento cheese adds creaminess and a hint of spice. Experiment with different brands to find your favorite flavor. Layering your ingredients is important for a great pie. Start with half of the cheese mix on the crust. Then, add a layer of fresh tomato slices. This keeps the tomatoes from getting too soggy. Repeat the layers to build flavor and texture. Baking tips can help you achieve the perfect pie crust and filling. Pre-bake your crust for a golden finish. Make sure it cools a bit before filling it. Bake the pie until the top is golden and bubbly. This usually takes about 25-30 minutes. For an extra crunch, mix breadcrumbs with olive oil. Sprinkle this mix on top before baking to add texture. Following these tips will help you create a tasty Pimento Cheese Tomato Pie that everyone will love. For the full recipe, check out the section above. {{image_2}} You can make this dish your own with a few tweaks. First, try different cheese options. Maybe use a mix of mozzarella and gouda. This gives a creamy texture and rich taste. Next, think about adding vegetables or proteins. You could add spinach or cooked bacon. This makes the pie more filling and adds new flavors. Don’t forget about herbs and spices! Adding fresh basil or thyme can elevate the taste. For a kick, sprinkle in some cayenne pepper or red pepper flakes. These simple changes keep your pimento cheese tomato pie exciting and fun. Explore your options and enjoy the process! For the complete guide, check the Full Recipe. When you have leftover Pimento Cheese Tomato Pie, proper storage is key. Keep it in the fridge for up to three days. Wrap it tightly in plastic wrap or place it in an airtight container. This helps keep the flavors fresh. If you want to save it for later, freezing is a great option. Slice the pie first, then wrap each piece in plastic wrap. Place the wrapped slices in a freezer bag. This way, you can pull out one slice at a time. The pie can freeze well for up to three months. To reheat, take the pie out of the fridge or freezer. If it's frozen, let it thaw overnight in the fridge. Preheat your oven to 350°F (175°C). Place the pie on a baking sheet and cover it with aluminum foil. Heat for about 20-25 minutes. This keeps the pie moist and prevents burning. For slices, you can reheat them in the microwave too. Heat on low for about 30 seconds. Check if it’s warm enough, and add more time if needed. Enjoy your delicious pie just like the first time! What can I substitute for pimento cheese? If you don’t have pimento cheese, you can use cream cheese mixed with diced pimentos. Another option is to blend cheddar cheese with roasted red peppers. Both will add a nice taste. Can I make this dish ahead of time? Yes, you can prepare the pie a day in advance. Just make the filling and layer it in the crust. Cover it and keep it in the fridge. When you’re ready, bake it as directed. What's the best way to slice and serve the pie? Let the pie cool for about ten minutes before slicing. This makes it easier to cut. Use a sharp knife for clean slices. Serve it warm or at room temperature. It pairs well with a salad or some fresh bread. For the complete recipe, check out the [Full Recipe]. We explored how to make a delicious pimento cheese tomato pie. I shared essential ingredients, step-by-step instructions, and helpful tips. You can customize your pie with various cheeses and add-ins. Proper storage ensures your leftovers stay great for later. Remember, this dish is easy and fun to make, perfect for any meal. Enjoy the rich flavors and share with friends. Your kitchen will be the place to gather for good food! Keep experimenting and make it your own. A tasty pie awaits!

Pimento Cheese Tomato Pie Flavorful and Simple Dish

Are you ready for a dish that bursts with flavor and is super easy to make? Let me introduce you

To make Parmesan Yellow Squash Fritters, you will need a few simple items. Here is the complete list of ingredients: - 2 medium yellow squashes, grated - 1/2 teaspoon salt - 1/2 cup all-purpose flour - 1/2 cup grated Parmesan cheese - 2 large eggs - 1/4 cup green onions, finely chopped - 1 teaspoon garlic powder - 1/2 teaspoon black pepper - 1/4 teaspoon cayenne pepper (optional) - 1/4 cup olive oil (for frying) These ingredients come together to create a delightful dish. The yellow squash gives a fresh taste and nice texture. Grating the squash is key. It helps release moisture, which we need to manage for crispy fritters. The Parmesan cheese adds a rich flavor. Don’t skip it! It melts and forms a lovely crust when frying. The eggs act as a binder, holding everything together. Green onions bring a burst of color and taste. Garlic powder enhances the flavor profile, while black and cayenne peppers add a hint of spice. You can skip the cayenne if you prefer a milder taste. Lastly, the olive oil is essential for frying. It gives the fritters that golden brown look and a crispy bite. For the full recipe, check out the details above. 1. Drawing out moisture from yellow squash: Start by grating the yellow squashes. Place them in a bowl and sprinkle with salt. Let them sit for about 10 minutes. The salt pulls out the moisture. This step is key for crispy fritters. 2. Combining dry and wet ingredients: In a separate bowl, whisk together the flour, Parmesan cheese, eggs, green onions, garlic powder, black pepper, and cayenne pepper if desired. Make sure everything mixes well. 3. Mixing and folding batter: After squeezing the squash to remove the moisture, add it to the dry mixture. Gently fold the squash into the batter until combined. You want everything to blend nicely without over-mixing. 1. Heating oil and frying fritters: In a large skillet, heat the olive oil over medium heat. When the oil is hot, scoop about 2 tablespoons of the batter for each fritter. Flatten them slightly with the back of the spoon. 2. Monitoring cooking time for perfect crispiness: Fry the fritters for 3-4 minutes on each side. Look for a golden brown color. Adjust the heat if they cook too fast. You want crispy, not burnt fritters. 3. Draining excess oil: Once the fritters are cooked, place them on a plate lined with paper towels. This helps absorb any excess oil. Serve them warm for the best taste. Follow this step-by-step guide to make your Parmesan Yellow Squash Fritters crispy and delightful. For the complete recipe, check the Full Recipe section. To get the best texture for your Parmesan yellow squash fritters, start with squeezing out moisture. This step is key. If you don’t remove the moisture, your fritters will turn out soggy. After grating the yellow squash, sprinkle it with salt and let it sit for about ten minutes. This draws out the moisture. Once it's ready, take a clean kitchen towel and squeeze out the excess liquid. Next, pay attention to the frying temperature. Heat the olive oil in your skillet over medium heat. If the oil is too hot, the fritters will burn on the outside and stay raw inside. If it's too cool, they will soak up too much oil. The ideal frying temperature is around 350°F. You can test this by dropping a small piece of batter into the oil. If it sizzles right away, you’re good to go! When it comes to serving, think about dips that go well with these fritters. Greek yogurt makes a cool and creamy dip. You can also try a spicy sriracha mayo for a kick. For garnishing, fresh herbs add a nice touch. Chopped parsley or cilantro can brighten the dish and make it more appealing. You can also sprinkle extra grated Parmesan on top for added flavor. Serve the fritters warm on a colorful plate to make them pop! For the full recipe, check out the complete recipe section above. {{image_2}} You can switch the cheese in this recipe. Try feta or mozzarella for a different taste. If you want a stronger flavor, use aged cheddar. You can also add fresh herbs like basil or parsley. These herbs will give your fritters a fresh twist. For a spicy kick, include diced jalapeños or red pepper flakes. These add-ins make the dish fun and exciting. If you need a gluten-free option, substitute all-purpose flour with almond flour or a gluten-free blend. This keeps the fritters crispy while being friendly to gluten-free diets. For a vegan version, replace the eggs with flaxseed meal. Mix 1 tablespoon of flaxseed with 2.5 tablespoons of water. Let it sit for a few minutes until it thickens. This will help bind the fritters together. You can also use nutritional yeast in place of Parmesan for a cheesy flavor. This makes your fritters vegan while still being tasty. For the full recipe, check out the detailed steps above. To keep your Parmesan yellow squash fritters fresh, store them in the fridge. Place them in an airtight container. This helps prevent them from drying out. Enjoy them for up to three days. To reheat fritters and keep them crispy, use an oven. Preheat your oven to 375°F (190°C). Place the fritters on a baking sheet and warm them for about 10 minutes. This method brings back their crunchiness. You can also reheat them in a skillet over medium heat for a few minutes on each side. You can freeze these fritters for later use. Freeze them before cooking for the best results. After making the batter, scoop out the fritters onto a baking sheet. Freeze the fritters for about an hour until solid. Then, transfer them to a freezer-safe bag. If you prefer freezing cooked fritters, let them cool first. Place them in a single layer in a freezer-safe container. For the best taste, use them within two months. When you are ready to eat, reheat them in the oven. Can I use zucchini instead of yellow squash? Yes, you can use zucchini. They have a similar texture and taste. Just remember to squeeze out moisture as you would with yellow squash. This step is key for crispy fritters. How can I make these fritters more flavorful? Add fresh herbs like basil or parsley. You could also mix in spices like cumin or smoked paprika. These will enhance the taste and give your fritters a unique twist. Consider using different cheeses, too, for extra flavor. What are some side dishes that pair well with Parmesan Yellow Squash Fritters? Try serving them with a fresh salad or a tangy yogurt dip. They also go great with a side of roasted vegetables. For a heartier meal, serve them alongside grilled chicken or fish. Why are my fritters falling apart? Fritters can fall apart if there's too much moisture. Make sure to squeeze the squash well. Also, ensure you use enough flour to bind everything together. Lastly, let the batter rest for a few minutes before frying. How to fix soggy fritters? If your fritters are soggy, they likely have excess moisture. You can fix this by frying them a bit longer. If you notice they are still soggy after cooking, try placing them on a paper towel to absorb some oil. You can also bake them in the oven briefly to help crisp them up. In this blog post, we explored how to make delicious Parmesan Yellow Squash Fritters. We covered the ingredients, step-by-step instructions, and helpful tips for perfect texture. You learned about variations, dietary adaptations, and best storage methods. These fritters are easy to make and great for everyone. Enjoy them fresh or as a fun snack. With a few tweaks, you can make this recipe work for any diet. Try it out, and enjoy your cooking!

Parmesan Yellow Squash Fritters Crispy and Delightful

If you’re looking for a tasty way to use fresh yellow squash, you’ve come to the right place! My Parmesan

To make a perfect easy peach cobbler with fresh peaches, gather these ingredients: - 4 fresh peaches, pitted and sliced - 1 cup granulated sugar, divided - 1 teaspoon vanilla extract - 1 tablespoon lemon juice - 1 teaspoon ground cinnamon - 1 cup all-purpose flour - 1 tablespoon baking powder - 1/2 teaspoon salt - 1 cup whole milk - 1/2 cup unsalted butter, melted - 1/2 teaspoon nutmeg The fresh peaches are key to this recipe. Their sweet and juicy flesh gives the cobbler a delightful flavor. The lemon juice adds brightness, while the cinnamon and nutmeg enhance the overall taste. For this recipe, you will need: - A 9x9-inch baking dish, which is perfect for even baking. - Mixing bowls for combining ingredients. - A whisk or spoon for stirring. - A knife for slicing the peaches. These tools make the process smooth and enjoyable. You’ll find that having the right tools on hand helps bring your peach cobbler to life. For the full recipe, check out the earlier instructions. To make the peach cobbler, start by preparing the peaches. Wash them well. Slice the peaches in half, remove the pit, and cut them into thin slices. You want about four peaches for this recipe. Next, grab a mixing bowl. In this bowl, combine the sliced peaches, 1/2 cup of sugar, one teaspoon of vanilla extract, one tablespoon of lemon juice, and one teaspoon of ground cinnamon. Gently toss the peaches to coat them evenly. Let them sit for about 10-15 minutes. This step helps the peaches release their natural juices. Now, let's mix the dry ingredients. In another bowl, whisk together one cup of all-purpose flour, one tablespoon of baking powder, 1/2 teaspoon of salt, and the remaining 1/2 cup of sugar. This mixture is key to the cobbler's texture. Slowly pour in one cup of whole milk and 1/2 cup of melted unsalted butter into the dry mix. Stir until just combined. Do not over mix; a few lumps are okay. Before you bake, preheat your oven to 350°F (175°C). Preheating helps the cobbler cook evenly. Now, grease a 9x9-inch baking dish. Pour the batter into the bottom of the dish without stirring. This creates a base for the peaches. Spoon the peach mixture, along with all the juices, evenly over the batter. Sprinkle 1/2 teaspoon of nutmeg on top for added flavor. Bake the cobbler for 35-40 minutes. It's done when the top is golden brown and a toothpick inserted in the center comes out clean. Once baked, take the cobbler out of the oven. Allow it to cool for a few minutes before serving. This short cooling time helps set the cobbler. For serving, use a spoon to dish out the cobbler into bowls. I like to add a scoop of vanilla ice cream on top. A sprinkle of cinnamon makes it extra special. Enjoy your peachy paradise! When making peach cobbler, avoid some common pitfalls. One big issue is overmixing your batter. You want it just mixed, not smooth. This keeps your crust light and flaky. Another problem is not using enough fruit. The right amount of peaches makes your cobbler juicy and sweet. Aim for a balance between batter and fruit. To get the perfect crust, keep your butter cold. Use cold milk too. This helps the batter rise well. Pour the batter into a greased dish without stirring. This helps create a lovely layer. When the peaches bake, they sink into the batter for a delightful surprise. Spices can take your peach cobbler to the next level. Try adding nutmeg or allspice for warmth. You can also add a pinch of cardamom for a unique twist. Don’t forget to sprinkle some cinnamon on top before baking. It gives a lovely aroma. Pair your cobbler with toppings. A scoop of vanilla ice cream is a classic choice. The cold creaminess contrasts well with the warm cobbler. You can also try whipped cream or a drizzle of caramel. These toppings make every bite extra special. For a fun twist, add a sprinkle of toasted nuts for crunch. {{image_2}} You can switch things up with other fruits in your cobbler. Berries, like blueberries or raspberries, work great. You can also use apples or pears. For a fun twist, try mixing fruits together! When using seasonal fruits, adjust the sugar. Some fruits are sweeter than peaches. For example, use less sugar with ripe apples. Always taste your fruit mixture first. This way, you can find the right balance for your cobbler. If you need a gluten-free cobbler, swap the all-purpose flour for a gluten-free blend. Many blends work well in baking. Just check the package for the right amount to use. For a vegan option, replace the milk with almond or oat milk. Use melted coconut oil instead of butter. Both changes keep the cobbler moist and tasty. Enjoy your peachy delight with these easy swaps! For the full recipe, check out the Peachy Paradise Cobbler section. To store leftover cobbler, let it cool first. Then, cover it tightly. I like to use plastic wrap or foil. You can also place it in an airtight container. This helps keep the moisture in. Store it in the fridge for up to three days. If you want to keep it longer, freeze it. Wrap it well in plastic wrap and foil before freezing. It can last for up to three months. To reheat your cobbler, preheat your oven to 350°F (175°C). Place the cobbler in an oven-safe dish. Cover it with foil to keep it moist. Heat it for about 20 minutes. Check it to make sure it's warm all the way through. You can also microwave it. Just heat a slice on a plate for about 30 seconds. If you want to serve leftovers in a fun way, top them with yogurt or whipped cream. You might also try adding fresh fruit or nuts for a tasty twist. Enjoy your peachy delight! For the Full Recipe, check the earlier section. How do I know when the cobbler is done? You can tell when the cobbler is done by checking the top. It should look golden brown and firm. Insert a toothpick in the center. If it comes out clean, your cobbler is ready. The edges should bubble slightly, too. Can I use canned peaches instead of fresh? Yes, you can use canned peaches. Just drain them well before using. Fresh peaches give a better taste and texture. But canned ones work in a pinch. They can save time and still make a tasty dessert. Why is my cobbler soggy? A soggy cobbler often comes from too much liquid. This can happen if the peaches are overripe or if you don’t drain canned peaches well. To fix this, try adding a bit more flour to the batter. You can also use a thicker peach filling next time. What to do if the cobbler is too dry? If your cobbler turns out dry, it may need more liquid. You can add a splash of milk or water to the batter before baking. You could also serve it with a scoop of ice cream or a drizzle of cream. This will help add moisture. Best sides to pair with peach cobbler Peach cobbler shines on its own, but pairing it with vanilla ice cream is a classic choice. Whipped cream or yogurt also work well. Serve it warm for the best taste. You can add a sprinkle of cinnamon for extra flavor. Ideal occasions for serving the dessert Peach cobbler is perfect for summer picnics and family gatherings. It also fits well at holiday meals, like Thanksgiving. You can serve it at birthday parties or casual dinners. It’s a crowd-pleaser and is easy to share. Enjoy this sweet treat at any time! For the complete recipe, check out the Full Recipe section. This blog post covered everything you need for a delicious peach cobbler. I shared details on ingredients, tools, and step-by-step instructions for perfection. Plus, I included tips to enhance flavor and avoid common mistakes. Don’t forget about fun variations, dietary options, and storage tips. With these insights, you're ready to bake a tasty treat. Enjoy learning and experimenting with your peach cobbler, and feel free to make it your own! Happy baking!

Easy Peach Cobbler with Fresh Peaches Delight

Are you ready to whip up a dessert that bursts with flavor? This Easy Peach Cobbler with Fresh Peaches is

You can use any pasta you love. I recommend fettuccine or spaghetti. They hold the sauce well. You can also try whole wheat or gluten-free pasta. Each option gives a unique taste. Remember to cook it al dente for the best texture. For this recipe, I use yellow zucchini. They have a sweet flavor and bright color. Look for firm zucchinis with smooth skin. Avoid ones with soft spots or blemishes. You can slice them thin for even cooking. This helps them blend nicely with the pasta. Heavy cream makes the sauce rich and smooth. If you want a dairy-free option, use coconut cream. It adds a nice sweetness. For cheese, I love grated Parmesan. It melts well and adds depth. Nutritional yeast works for a dairy-free choice. It gives a cheesy flavor without the dairy. Check out the Full Recipe for more details on making this creamy dish! Start cooking your pasta first. Bring a large pot of salted water to a boil. Add 8 ounces of your favorite pasta, like fettuccine or spaghetti. Cook until it feels firm but tender, or 'al dente.' This usually takes about 8-10 minutes. When done, drain the pasta and save half a cup of the cooking water. Set the pasta aside while you prepare the sauce. Next, grab two medium yellow zucchinis. Slice them thinly; this helps them cook quickly. Heat one tablespoon of olive oil in a large skillet over medium heat. Once hot, add two cloves of minced garlic. Sauté for about one minute until the garlic smells amazing. Now, add the sliced zucchinis to the skillet. Cook them for about 5-7 minutes. Stir occasionally until they are tender but still bright yellow. Now, let’s make the sauce. Pour in one cup of heavy cream and stir well. Allow it to simmer for a couple of minutes. This lets the sauce thicken slightly. After that, add one cup of grated Parmesan cheese and one teaspoon of lemon zest. Mix until the cheese melts and the sauce becomes creamy. If it’s too thick, add some of that reserved pasta water until it’s just right. - Combining Pasta and Sauce: Finally, add the cooked pasta to the skillet. Toss everything together so the pasta is coated with the creamy sauce. Season with salt and black pepper to taste. Serve the pasta hot and garnish it with fresh basil leaves. For more cooking details, check the Full Recipe. To make your sauce creamy, start with the right amount of heavy cream. Use one cup for a rich flavor. If the sauce gets too thick, add a bit of the reserved pasta water. This simple trick helps adjust the texture without losing flavor. Stir well until everything is smooth and well-mixed. Watch the heat; too high can cause it to separate. Keep stirring gently as it simmers. For extra flavor, try adding fresh herbs. Basil or parsley can brighten the dish. A squeeze of fresh lemon juice adds zing and balances the creaminess. You can also mix in some red pepper flakes for heat. Garlic is key, so don’t skip it. It gives depth and richness to the sauce. Taste as you go; it helps you find the right balance. How you serve your pasta matters. Twirl the pasta on a fork and place it in the center of the plate. This creates an inviting look. Drizzle a little olive oil on top for shine. Finish with a sprinkle of extra Parmesan and some fresh basil leaves. These small touches make your meal look gourmet. For a fun twist, serve in a bowl or on a cutting board for a rustic feel. For the full recipe, check out the Creamy Yellow Zucchini Pasta . {{image_2}} If you want a dairy-free version, it’s easy to switch out some ingredients. Use coconut cream instead of heavy cream. It gives a nice, rich taste without any dairy. For cheese, try nutritional yeast. It has a nutty flavor and adds a cheesy vibe to the dish. You can even toss in some cashew cream for added creaminess. This option keeps the dish light and fresh! Want to make this dish more filling? You can add protein easily. Grilled chicken works well if you like meat. Just slice it up and mix it in with the pasta. Shrimp is a great option, too. Sauté them in the skillet with garlic for extra flavor. For a vegetarian choice, add chickpeas or white beans. They bring protein and texture to your meal. To change the flavor profile, think about adding herbs and spices. Fresh basil is great, but you can also use parsley or thyme. A pinch of red pepper flakes can add a bit of heat. If you want a tangy twist, add a splash of balsamic vinegar. For a richer taste, try some sun-dried tomatoes. Each of these tweaks can make your creamy yellow zucchini pasta exciting and new. For the full recipe, check out the Creamy Yellow Zucchini Pasta section. After enjoying your creamy yellow zucchini pasta, you may have some leftovers. Store them in an airtight container. This keeps the flavors fresh and prevents drying out. Place the container in the fridge. The pasta will stay good for 3 to 4 days. Always let it cool first before sealing. To reheat, use a skillet over medium heat. Add a splash of water or broth to keep it moist. Stir often to heat evenly. You can also use the microwave. Just cover it to trap steam. Heat in short bursts, and stir between intervals. This helps avoid hotspots that can dry out the pasta. If you want to freeze this dish, it’s best to do so before adding the cream. Cook the pasta and zucchini, then cool them. Pack them tightly in a freezer-safe bag. Label the bag with the date. You can freeze it for up to 2 months. When ready to eat, thaw it overnight in the fridge. Then, heat and add the cream for a fresh taste. For the full recipe, check out the earlier section. Yes, you can use many other vegetables. Think about using spinach, broccoli, or bell peppers. These add great taste and color. Just chop them small and cook them with the zucchini. Each veggie will change the flavor a bit. Feel free to mix and match based on what you have. If you want a lighter option, use coconut cream. It adds a nice, rich flavor. You can also try using a mix of milk and a bit of butter. This gives a creamy feel without heavy cream. For dairy-free, almond or cashew cream works well too. Just choose what fits your diet best. To make this dish gluten-free, select gluten-free pasta. Many brands offer tasty options made from rice or chickpeas. You can find these in most grocery stores. Just cook them as you would regular pasta. The rest of the recipe stays the same. Enjoy this flavorful dish without worry! For the full recipe, check out the details above. This blog post covered how to make a creamy pasta dish. We discussed the best pasta and zucchini choices, plus cream and cheese options. You learned step-by-step how to cook each ingredient and mix them well. I shared tips for a creamy texture and ways to make your dish shine. Finally, I offered storage advice and answered common questions. Try these ideas for a tasty meal your family will love. You can easily customize and enjoy this dish over and over again!

Creamy Yellow Zucchini Pasta Flavorful and Easy Meal

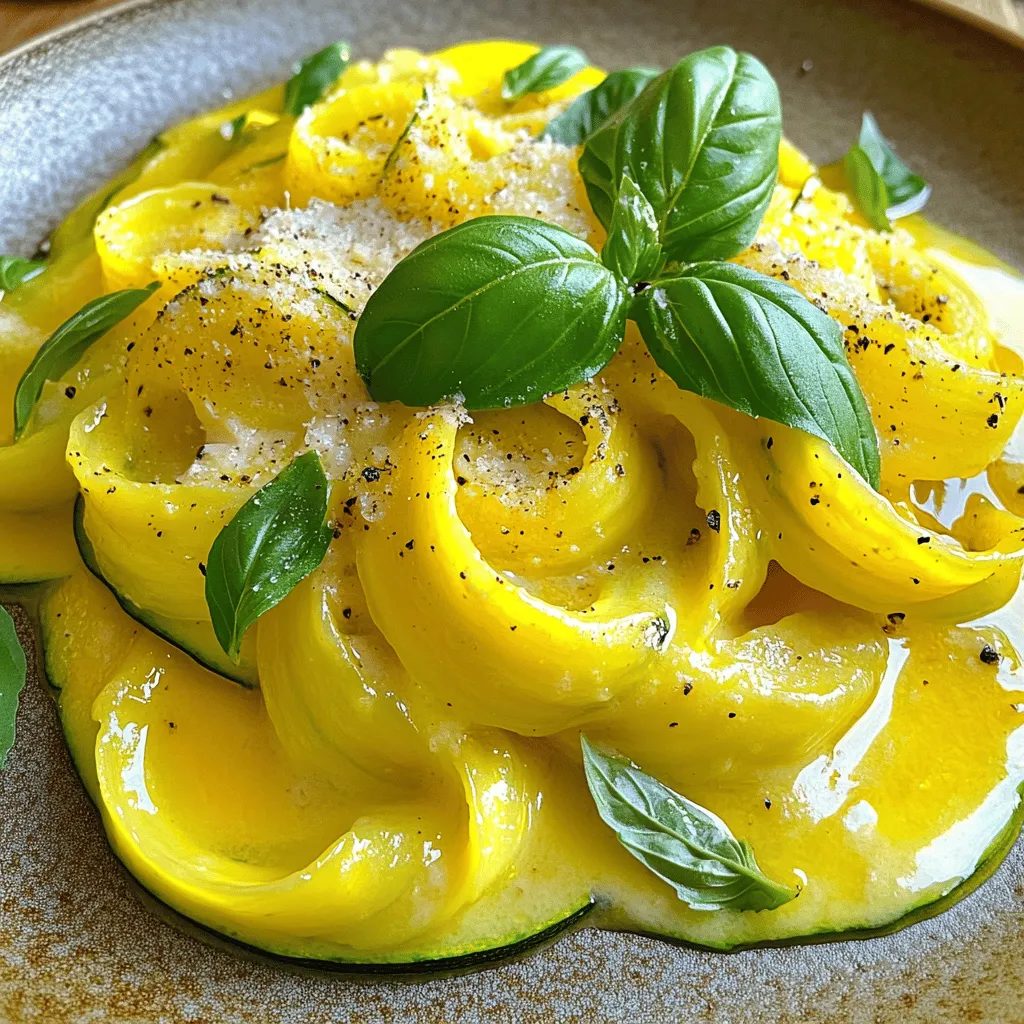
Do you want a tasty dinner that’s quick and simple? Look no further than creamy yellow zucchini pasta! This dish

- 6 ripe peaches, peeled and sliced - 1 cup granulated sugar, divided - 1 teaspoon cinnamon - 2 tablespoons lemon juice To make the best peach cobbler, start with fresh, ripe peaches. They should smell sweet and feel slightly soft. The sugar balances the tartness of the peaches. You can adjust it slightly based on your taste. Cinnamon adds warmth, while lemon juice gives a zesty kick. - 1 cup all-purpose flour - 1 tablespoon baking powder - 1/2 teaspoon salt - 1 cup milk - 1/4 cup unsalted butter, melted - 1 teaspoon vanilla extract The flour gives structure to the cobbler. Baking powder helps it rise, making it light. Salt enhances all the flavors. Milk brings moisture, while melted butter adds richness. The vanilla extract adds a lovely aroma that compliments the peaches perfectly. - Whipped cream - Vanilla ice cream Serving peach cobbler warm is key. A scoop of vanilla ice cream or a dollop of whipped cream takes it to the next level. The cold cream melts into the warm cobbler, creating a delicious contrast. You can even drizzle some peach syrup from the baking dish on top for an extra treat! If you want the full recipe, check it out here: Ultimate Peach Cobbler! - Start by peeling and slicing 6 ripe peaches. - In a large bowl, toss the peaches with 1/2 cup of sugar, 1 teaspoon of cinnamon, and 2 tablespoons of lemon juice. - Make sure the peaches are well coated. - Transfer this peach mixture into a greased 9x13-inch baking dish. - In another bowl, whisk together 1 cup of all-purpose flour, 1/2 cup of sugar, 1 tablespoon of baking powder, and 1/2 teaspoon of salt. - Next, mix in 1 cup of milk, 1/4 cup of melted butter, and 1 teaspoon of vanilla extract. - Stir until just combined. It's okay if there are a few lumps. Don't overmix! - Spoon the batter evenly over the peaches. Do not stir the layers together. - Bake in the preheated oven at 375°F for 40-45 minutes. - The cobbler is done when it's golden brown and a toothpick comes out clean from the biscuit layer. Once out of the oven, let it cool for about 10 minutes. You can find the full recipe [here](#). Enjoy your delicious peach cobbler! Use freestone peaches for easy slicing. They separate cleanly from the pit. Clingstone peaches stick to the pit, making them harder to work with. Look for peaches that feel firm but have a slight give when gently squeezed. They should smell sweet and fruity. For the best flavor, choose peaches in season, usually from late spring to early fall. This ensures you get the juiciest and most flavorful fruit. To keep your cobbler fluffy, avoid overmixing the batter. Stir just enough to combine the ingredients. A few lumps are fine. This helps the cobbler rise nicely and stay light. Use a 9x13-inch baking dish for the best results. This size allows for even baking and gives you a perfect balance of filling and topping. Add spices like nutmeg or ginger to boost the flavor of your cobbler. Just a pinch can make a big difference. You can also try fresh herbs like mint or basil for a unique twist. Chop them finely and mix them in with the peaches or sprinkle on top before serving. These small changes can elevate your peach cobbler into a delightful treat. For the full recipe, check out the Ultimate Peach Cobbler. {{image_2}} You can switch peaches for other fruits. Berries, like blueberries or raspberries, work great. Apples also make a tasty cobbler. They add a crisp bite. Combining fruits gives a fun twist. Try mixing peaches with blackberries for a new flavor. Each fruit brings its unique taste and texture. If you need gluten-free, use almond flour or coconut flour. Both give a nice texture. You may need to adjust the amount of liquid. Start with less liquid and add more as needed. This keeps the cobbler moist while avoiding a soggy base. Always check the package for the right ratio when using gluten-free flour. Want a little crunch? Try a crumb topping. Mix oats, flour, and brown sugar for a sweet, crunchy layer. You can even add nuts. Walnuts or pecans add a great bite. Just sprinkle them on top before baking. This variation gives your cobbler an extra flavor dimension that everyone will love. For the full recipe, check the Ultimate Peach Cobbler section. To keep your peach cobbler fresh, place it in the fridge. Use an airtight container or cover it tightly with plastic wrap. This helps prevent it from drying out or absorbing other smells. Stored correctly, your cobbler will last about 3 to 4 days. When you're ready to enjoy your cobbler again, the best way to reheat it is in the oven. Preheat the oven to 350°F (175°C). Place the cobbler in an oven-safe dish and cover it with foil. Heat for about 15 to 20 minutes. This method helps keep the topping crisp. If you prefer using a microwave, heat it in short bursts. Be careful not to overheat, as this can make the cobbler soggy. If you want to save your peach cobbler for later, freezing is a great option. First, let it cool completely. Then, wrap it tightly in plastic wrap and aluminum foil, or use a freezer-safe container. It can last up to 3 months in the freezer. When you’re ready to eat it, thaw it in the fridge overnight. To reheat, you can follow the oven method mentioned above. Enjoy the same great taste as the first day! Yes, you can use canned peaches. They save time and are easy to find. Canned peaches are often softer and sweeter than fresh ones. This means your cobbler will taste different. Pros of canned peaches: - Convenient and quick - Consistent sweetness Cons of canned peaches: - Texture may be mushy - Less fresh flavor If you choose canned peaches, drain them well. This helps avoid excess liquid in the cobbler. Check the color and texture. The top should be golden brown. You can use a toothpick to test it. Insert the toothpick into the batter. If it comes out clean, the cobbler is ready. Look for bubbling around the edges. This shows that the fruit and batter cooked well. If you see these signs, your cobbler is done! You can prepare some parts ahead. Slice the peaches and mix them with sugar and spices. Store this mix in the fridge for up to a day. For the batter, it is best to make it fresh. If you store it, it may lose its fluffiness. Storing tips: - Keep the peach mix in an airtight container. - Bake the cobbler just before serving. This keeps it warm and fresh when you are ready to enjoy it! To sum it up, this blog post guides you through making an easy peach cobbler. You learned about the main ingredients, step-by-step instructions, tips for success, and variations to try. Remember, the best peaches make a big difference in flavor. You can also explore different fruits or gluten-free options. Storing leftovers thoughtfully keeps them tasty. Enjoying your homemade cobbler is worth the effort, and it’s sure to impress everyone! Start baking and share your delicious results.

Ultimate Peach Cobbler Delight for Every Occasion

Are you ready to impress with the Ultimate Peach Cobbler Delight? This warm, sweet treat is easy to make and

- 2 cups fresh peaches, sliced - 2 tablespoons brown sugar - 1 teaspoon cinnamon - 1 tablespoon lemon juice Fresh peaches are the star of this dish. They bring sweetness and flavor to the cheesecake. Roasting them adds depth, making each bite even better. You can choose ripe, juicy peaches for the best taste. The brown sugar and cinnamon mix well with the peaches. The lemon juice helps balance the sweetness. - 1 ½ cups graham cracker crumbs - ½ cup unsalted butter, melted The crust is simple but key to a great cheesecake. I use graham cracker crumbs because they add a nice crunch. Mixing them with melted butter makes the crust stick together. Press it down firmly in the pan for a solid base. - 3 (8 oz) packages cream cheese, softened - 1 cup granulated sugar - 3 large eggs - 1 teaspoon vanilla extract - 1 cup sour cream - ½ cup all-purpose flour - Sliced almonds or pecans for garnish (optional) The filling is creamy and rich. Start with softened cream cheese, so it mixes well. Sugar sweetens the filling, while eggs give it structure. Vanilla and sour cream add flavor and smoothness. Flour helps to hold everything together. You can sprinkle some nuts on top for crunch. This adds texture and makes it look pretty. For the full recipe, check the detailed instructions above. First, preheat your oven to 400°F (200°C). This step is key for getting those peaches nice and caramelized. In a bowl, combine 2 cups of sliced peaches, 2 tablespoons of brown sugar, 1 teaspoon of cinnamon, and 1 tablespoon of lemon juice. Toss everything together until the peaches are well coated. Spread this mixture onto a baking sheet in an even layer. Roast the peaches in the oven for about 15-20 minutes. They should be soft and smell sweet. Once done, let them cool slightly. While the peaches roast, it's time to make the crust. Grab a bowl and mix 1 ½ cups of graham cracker crumbs with ½ cup of melted unsalted butter. Stir until everything is well combined. Press this mixture firmly into the bottom of a 9-inch springform pan. Make sure it is even and compact. Bake the crust for 10 minutes. After baking, take it out and let it cool completely. For the cheesecake filling, start with a large mixing bowl. Beat together 3 packages (8 oz each) of softened cream cheese and 1 cup of granulated sugar until the mixture is smooth and creamy. Next, add 3 large eggs one at a time, mixing thoroughly after each addition. Then mix in 1 teaspoon of vanilla extract and 1 cup of sour cream. Finally, add ½ cup of all-purpose flour, making sure there are no lumps. Gently fold in the roasted peaches, but save a few slices for later. Now, pour the cheesecake filling into the cooled crust and smooth the top with a spatula. Bake in the oven at 325°F (160°C) for 50-60 minutes. The center should set but still jiggle slightly. Turn off the oven and crack the door. Let the cheesecake cool slowly for an hour. After that, refrigerate it for at least 4 hours, or overnight if you can wait. For the full recipe, check out the complete details. To get a smooth and creamy cheesecake, use room temperature ingredients. Cold cream cheese clumps together and makes it hard to mix. Let your cream cheese sit out for 30 minutes before using it. This small step helps your batter come together well. Cooling your cheesecake slowly is key to avoid cracks. After baking, turn off the oven and crack the door. Let it cool in the oven for about an hour. This gradual cooling keeps the temperature even and helps your cheesecake stay intact. You can add more flavor to your cheesecake. Try adding a pinch of nutmeg or ginger for warmth. A splash of almond extract can also enhance the taste. These little changes can make a big difference. For toppings, think about fresh whipped cream or a drizzle of honey. You could also use some caramel sauce for extra sweetness. Sliced almonds or pecans add a nice crunch and look pretty on top. A common mistake is overmixing the batter. Mixing too much can add air, which makes the cheesecake rise and fall. Mix just until combined for the best texture. Another mistake is not cooling the cheesecake properly. Rushing to cool it can lead to cracks. Always let it cool slowly as mentioned earlier. This extra time pays off with a beautiful, smooth cheesecake. {{image_2}} You can use different seasonal fruits for your cobbler cheesecake. Try fresh blueberries, ripe strawberries, or even sweet cherries. Each fruit brings its own unique taste. Mixing fruits can create a more complex flavor. For example, combining peaches with blackberries gives a sweet and tart balance. You can also use frozen fruits if fresh ones are not available. Just make sure to thaw and drain them first. If you need a gluten-free version, there are simple swaps you can make. Use gluten-free graham cracker crumbs for the crust. You can also try almond flour or oats as a base. Check the labels to ensure all your other ingredients are gluten-free. This way, everyone can enjoy this delicious dessert. To make this cheesecake dairy-free, substitute cream cheese with a plant-based version. Look for brands made from nuts or soy. For sour cream, you can use coconut cream or cashew cream instead. Non-dairy milk also works well in this recipe. Almond or oat milk can add extra flavor without the dairy. These swaps keep the cheesecake creamy and tasty. To keep your roasted peach cobbler cheesecake fresh, use an airtight container. Glass or plastic containers work well. Cover the cheesecake tightly with plastic wrap before placing it in the container. This keeps moisture out and flavors in. You can freeze the cheesecake if you want to store it longer. Freezing helps keep it fresh, but it changes the texture a bit. To freeze, wrap the cheesecake tightly in plastic wrap. Then, place it in a freezer-safe bag. When you're ready to eat, thaw it in the fridge overnight. Serve it chilled for the best taste. In the fridge, the cheesecake lasts about 5 to 7 days. If you see any mold or smell an off odor, it's time to toss it. Always check for signs of spoilage before serving. Enjoy your delicious treat while it's fresh! For the full recipe, check the section above. Yes, you can make this cheesecake a day or two in advance. I recommend storing it in the fridge. Cover it well with plastic wrap or foil. This keeps it fresh and ready to serve when you need it. Just remember to allow it to chill for at least four hours after baking. For the best taste, serve it cold after it's fully set. Cracking can happen, but it's easy to fix. First, ensure you use room temperature cream cheese. This helps mix smoothly. Slow baking is key. Bake it at a low temperature and avoid opening the oven door. If you see cracks, you can cover them with toppings like whipped cream or fruit. This makes it look nice again. Yes, you can adapt it for different diets. For a vegan version, use vegan cream cheese and egg replacements. For a gluten-free option, use gluten-free graham crackers for the crust. You can also look for gluten-free flour. These swaps still keep it tasty and fun. Enjoy these variations while keeping the spirit of the dish intact! This article covered a delightful recipe for Roasted Peach Cobbler Cheesecake. We explored fresh ingredients, made a creamy filling, and baked a tasty crust. You learned how to avoid common mistakes and enhance flavor with tips provided. Variations let you adapt to your taste and dietary needs. Storing your cake properly helps maintain its freshness. Creating this cheesecake can be fun and rewarding. Now, you can impress friends and family with a delicious treat they’ll love. Enjoy baking!

Roasted Peach Cobbler Cheesecake Simple and Delicious

Get ready to indulge in a dessert that combines the best flavors of summer and creamy cheesecake! My Roasted Peach

- 2 medium yellow squash - 1 tablespoon olive oil - Seasoning elements: garlic powder, smoked paprika, salt, black pepper - Optional: cayenne pepper, grated Parmesan cheese - Air fryer - Sharp knife or mandoline slicer - Mixing bowl - Low-calorie snack alternative - High in vitamin C and other nutrients When making air fryer squash, you start with fresh, yellow squash. It is the main star of this dish. You want two medium-sized squash, as they will give you the right amount of chips. Slice them thinly, about 1/8-inch thick. A sharp knife or mandoline slicer works best for even pieces. Next, you'll need olive oil. One tablespoon coats the squash nicely without being too oily. It helps the seasoning stick and makes the chips crispy. Now, let’s talk about flavor. You will add garlic powder and smoked paprika for a tasty kick. Use one teaspoon of each. Then, season with salt and black pepper. Half a teaspoon of salt and a quarter teaspoon of black pepper will enhance the flavor. If you like heat, add a pinch of cayenne pepper. For a cheesy twist, sprinkle on two tablespoons of grated Parmesan cheese. This recipe is not just tasty; it's also good for you. Squash is low in calories and packed with vitamin C. Enjoy these chips as a healthy snack or a side dish. You can serve them with a dip for extra fun. Don't forget to check the Full Recipe for all the steps! - First, preheat your air fryer to 375°F (190°C). This helps the squash cook evenly. - Next, slice the squash thinly. Aim for about 1/8 inch thick. Thin slices get crispy. - In a large bowl, combine the sliced squash with 1 tablespoon of olive oil. Add 1 teaspoon of garlic powder, 1 teaspoon of smoked paprika, 1/2 teaspoon of salt, 1/4 teaspoon of black pepper, and 1/4 teaspoon of cayenne pepper if you like heat. Toss the squash well until it’s covered in the mix. - Now, arrange the squash slices in the air fryer basket. Make sure they are in a single layer. Avoid stacking them to get the best crunch. - Air fry the squash for 8-10 minutes. Halfway through, shake the basket gently. This helps them cook evenly and get crispy. - After cooking, remove the chips and let them cool for a few minutes. They will crisp up more as they cool. - For serving, use a colorful bowl lined with parchment paper. Pair it with a yummy dip like yogurt ranch or spicy salsa. - To ensure they stay crispy, avoid covering the chips. Enjoy your tasty snack! To get that crunchy bite, slice your squash evenly. Aim for thin, uniform pieces. This helps them cook at the same rate. Thicker slices may not crisp up well. Use your air fryer wisely. Arrange the squash in a single layer in the basket. Avoid crowding to let air flow freely. This keeps them from steaming. If you have a lot of squash, fry them in batches. Feel free to mix up the flavors! Try adding different seasonings. For a spicy kick, use chili powder or cumin. For a sweeter taste, sprinkle cinnamon. Dips can make your squash even better. Pair them with yogurt-based sauces, guacamole, or salsa. A good dip can add new flavors to your snack. Sometimes, your squash may not cook well. If you find under-cooked pieces, cook them a bit longer. Check them after a few extra minutes. If your chips turn out soggy, don’t worry. Let them cool for a few minutes. This helps them crisp up more. You can also pop them back in the air fryer for a few minutes. For the full recipe, check out the details in our earlier section. {{image_2}} You can use many types of squash for this recipe. Zucchini works well and has a mild taste. Butternut squash gives a sweeter flavor. Both can make tasty, crispy snacks. Just slice them thinly like yellow squash. Cook them the same way, and enjoy the differences! You can make your air fryer squash sweet or savory. For a sweet twist, sprinkle cinnamon and sugar on the squash. This adds a warm, cozy flavor. If you prefer savory, use Italian herbs like oregano and basil. You can mix and match flavors to find your favorite. Get creative, and taste the fun! Want to make your snack more filling? Add proteins like chickpeas or shredded chicken. Toss cooked chickpeas with the squash for added crunch. Shredded chicken can give a hearty taste. Both options boost nutrition and make your snack more satisfying. Enjoy your air fryer squash with a protein twist! To keep your squash chips crispy, use an airtight container. Glass or plastic containers work well. You can also use a resealable bag. Make sure to remove as much air as possible. This helps prevent moisture. If you want extra crunch, add a paper towel inside the container. It absorbs moisture and keeps the chips fresh. When you want to enjoy your leftovers, reheating is key. The best way to reheat squash chips is in the air fryer. Set it to 350°F (175°C) for about 3-5 minutes. This method helps the chips regain their crunch. You can also use an oven. Place them on a baking sheet and heat at the same temperature. Avoid using a microwave. It can make the chips soggy. You can store air fryer squash chips for up to 3 days. After this, they may lose their crispiness. Keep them in the fridge to help prolong freshness. For the best taste, eat them within two days. Enjoy your crispy air fryer squash chips from the [Full Recipe] while they are still fresh! Yes, you can use many vegetables in the air fryer. Here are some great options: - Zucchini: Similar to squash, zucchini crisps up nicely. - Sweet potatoes: Cut them into thin rounds for a sweet treat. - Carrots: They can become crunchy and sweet when air-fried. - Bell peppers: Slice them thin for a colorful, tasty snack. - Eggplant: Thin rounds become crispy and flavorful. You can use your favorite veggies to create different flavors. To keep the squash crispy, follow these tips: - Slice thinly: Aim for even, thin slices. This helps them cook faster. - Dry well: Pat the slices dry with a paper towel before cooking. This removes extra moisture. - Don’t overcrowd: Place the slices in a single layer in the basket. This ensures hot air can circulate. These steps will help you achieve the perfect crunch every time. To make more squash chips, just follow these steps: - Double the ingredients: Use 4 squash instead of 2. Adjust the seasonings as needed. - Cook in batches: Air fry the squash in smaller amounts. This keeps them crisp. - Check cooking time: Larger batches may take a minute or two longer. Keep an eye on them. Scaling up is easy, and you won’t lose quality. Cleaning your air fryer is simple if you follow these steps: 1. Unplug and cool: Always unplug the air fryer and let it cool down fully. 2. Remove the basket: Take out the basket and any trays. 3. Wash with warm soapy water: Use a sponge or cloth to clean all parts. Avoid abrasive pads. 4. Wipe the inside: Use a damp cloth to wipe the interior. This removes any food particles. 5. Dry completely: Let all parts dry before reassembling. Keeping it clean helps your air fryer last longer and work better. Air frying squash is a simple and tasty way to snack healthy. We covered essential ingredients, tools, and steps to make delicious air-fried squash chips. You learned how to achieve the perfect crunch and even explored fun variations. Remember to store leftovers correctly for maximum freshness. With these tips, you can enjoy a nutritious snack that fits your taste. Try it out, and enjoy the process of making your own crispy chips!

Air Fryer Squash Crispy and Flavorful Snack Recipe

Are you craving a tasty, healthy snack that’s easy to make? Look no further! This Air Fryer Squash recipe transforms

To make yellow squash bread, you will need these simple ingredients: - 2 cups grated yellow squash (about 1 medium squash) - 1 cup all-purpose flour - 1 cup whole wheat flour - 1 teaspoon baking powder - 1/2 teaspoon baking soda - 1/2 teaspoon salt - 1 teaspoon ground cinnamon - 1/2 teaspoon ground nutmeg - 1/2 cup granulated sugar - 1/2 cup brown sugar, packed - 2 large eggs - 1/3 cup vegetable oil (or melted coconut oil) - 1 teaspoon vanilla extract - 1/2 cup chopped walnuts or pecans (optional) - 1/2 cup raisins or dried cranberries (optional) You can easily swap some ingredients for other options. Here are a few ideas: - Use almond flour instead of all-purpose flour for a nutty taste. - Replace whole wheat flour with oat flour for a gluten-free choice. - Swap granulated sugar with honey or maple syrup for a natural sweetener. - If you don’t have eggs, try using applesauce or a flaxseed mix. - Use any nut or seed you like in place of walnuts or pecans. Yellow squash is not just tasty; it's also good for you! Here are some benefits: - Low in calories: Great for weight control. - High in vitamins: Packed with vitamins A and C for healthy skin. - Rich in fiber: Helps with digestion and keeps you full. - Hydrating: Contains a lot of water, keeping you refreshed. - Antioxidants: Helps protect your body from damage. With these ingredients and their benefits, you can create a dish that is both delicious and nutritious. For the full recipe, check out the detailed instructions provided earlier. To start, gather your ingredients. You will need: - 2 cups grated yellow squash (about 1 medium squash) - 1 cup all-purpose flour - 1 cup whole wheat flour - 1 teaspoon baking powder - 1/2 teaspoon baking soda - 1/2 teaspoon salt - 1 teaspoon ground cinnamon - 1/2 teaspoon ground nutmeg - 1/2 cup granulated sugar - 1/2 cup brown sugar, packed - 2 large eggs - 1/3 cup vegetable oil (or melted coconut oil) - 1 teaspoon vanilla extract - 1/2 cup chopped walnuts or pecans (optional) - 1/2 cup raisins or dried cranberries (optional) Begin by preheating your oven to 350°F (175°C). Grease a 9x5-inch loaf pan. If you prefer, line the bottom with parchment paper. Next, in a large bowl, mix the grated squash, granulated sugar, brown sugar, eggs, vegetable oil, and vanilla. Stir until everything is well combined. In another bowl, mix the all-purpose flour, whole wheat flour, baking powder, baking soda, salt, cinnamon, and nutmeg. Combine these dry ingredients evenly. Slowly add the dry mix to the wet squash mix. Stir gently until just combined. Be careful not to over-mix. If you like, fold in nuts or dried fruit at this point. Once your batter is ready, pour it into the prepared loaf pan. Smooth out the top with a spatula. Place the pan in your preheated oven. Bake for 50 to 60 minutes. To check if it's done, insert a toothpick into the center. If it comes out clean, the bread is ready. After baking, let the bread cool in the pan for about 10 minutes. Then, transfer it to a wire rack to cool completely. One common mistake is over-mixing the batter. This can make the bread tough. Mix just until you see no dry flour. Another mistake is not checking the oven temperature. An oven that’s too hot can burn the bread. Always use an oven thermometer for accuracy. Also, watch the baking time. If you take it out too soon, the center may be raw. Lastly, avoid skipping the cooling time. This helps the bread set and makes slicing easier. Follow these steps, and your yellow squash bread will be a hit! For the full recipe and more tips, refer to the complete guide. To make your yellow squash bread moist, use fresh squash. Grate it fine, then squeeze out some water. This step helps keep the bread light. Adding eggs also boosts moisture. They bind and enrich the batter. If you want extra moisture, use applesauce or yogurt. These ingredients add flavor, too. Keep an eye on baking time. Overbaking can dry out your loaf. Check with a toothpick around 50 minutes. If it comes out clean, your bread is done. Spices can make a big difference. I love to use ground cinnamon and nutmeg. These spices bring warmth and depth. You can also try adding ginger or allspice for a twist. If you like it sweet, sprinkle a little more sugar in the batter. For a savory touch, consider herbs like thyme or rosemary. They blend well with the squash. Don’t forget to taste your batter before baking. Adjust the spices to fit your preference. Having the right tools makes baking easier. A good box grater is key for shredding squash quickly. Use mixing bowls that are easy to hold and clean. A spatula helps fold in nuts or fruits smoothly. For measuring, use dry and liquid measuring cups. This ensures accuracy in your recipe. A whisk is great for blending dry ingredients without lumps. Finally, a reliable loaf pan helps create that perfect shape. If you have parchment paper, line your pan for easy removal. Check out the Full Recipe for more tips! {{image_2}} You can make yellow squash bread even better by adding nuts or seeds. Try walnuts or pecans for a nice crunch. You can also use sunflower seeds or pumpkin seeds. These add texture and nutrition. Just fold in half a cup of your choice before baking. This small change makes a big difference in taste. Adding fruits can brighten up your squash bread. You can mix in raisins or dried cranberries. They add sweetness and chewiness. For a fresh twist, try diced apples or mashed bananas. These fruits bring moisture and flavor. Just use about half a cup, and mix them into the batter. The result will be a fruity delight! If you need a gluten-free option, you can adapt the recipe easily. Substitute all-purpose flour with a gluten-free blend. Make sure it has xanthan gum for the right texture. You can also use almond flour or coconut flour. Each gives a unique flavor. Just adjust the liquid slightly, as these flours absorb moisture differently. This way, everyone can enjoy delicious yellow squash bread! For the complete recipe, check out the Full Recipe section. To keep your yellow squash bread fresh, wrap it tightly in plastic wrap. You can also use aluminum foil. Store it in a cool, dry place. If you want it to last longer, place it in the fridge. This will keep it moist and tasty for up to a week. If you want to save some bread for later, freezing works great. First, let the bread cool completely. Next, slice it into pieces. Wrap each slice in plastic wrap, then place them in a freezer bag. This way, you can take out just what you need. It can stay in the freezer for up to three months. When you're ready to enjoy your yellow squash bread, reheating is simple. For the best results, use the oven. Preheat it to 350°F (175°C). Unwrap the bread and place it on a baking sheet. Heat for about 10 to 15 minutes. You can also microwave a slice for 20 to 30 seconds. Enjoy your warm and delicious bread! Yellow squash bread can last about 3 to 5 days at room temperature. Store it in an airtight container to keep it fresh. If you want it to last longer, place it in the fridge. In the fridge, it can stay good for up to a week. Yes, you can use frozen yellow squash for this recipe. Just thaw it first and drain any excess water. This helps keep the bread from getting too wet. Frozen squash is a great option when fresh squash is not available. Yellow squash bread tastes great on its own. You can enjoy it plain or with toppings. Try spreading some butter or cream cheese on a warm slice. Adding a sprinkle of chopped nuts or a drizzle of honey can enhance the flavor. For a fun twist, pair it with a fruit jam or a scoop of ice cream. Check out the Full Recipe for more ideas! Yellow squash bread is a tasty treat that uses simple ingredients and steps. We discussed how to prepare, bake, and store this delightful bread. Remember to keep your loaf moist and flavorful by using the right tools and spices. You can also try different nuts or fruits to change things up. With these tips, you can enjoy this dish for days. Keep experimenting and sharing your results. Happy baking!

Yellow Squash Bread Simple and Delicious Recipe

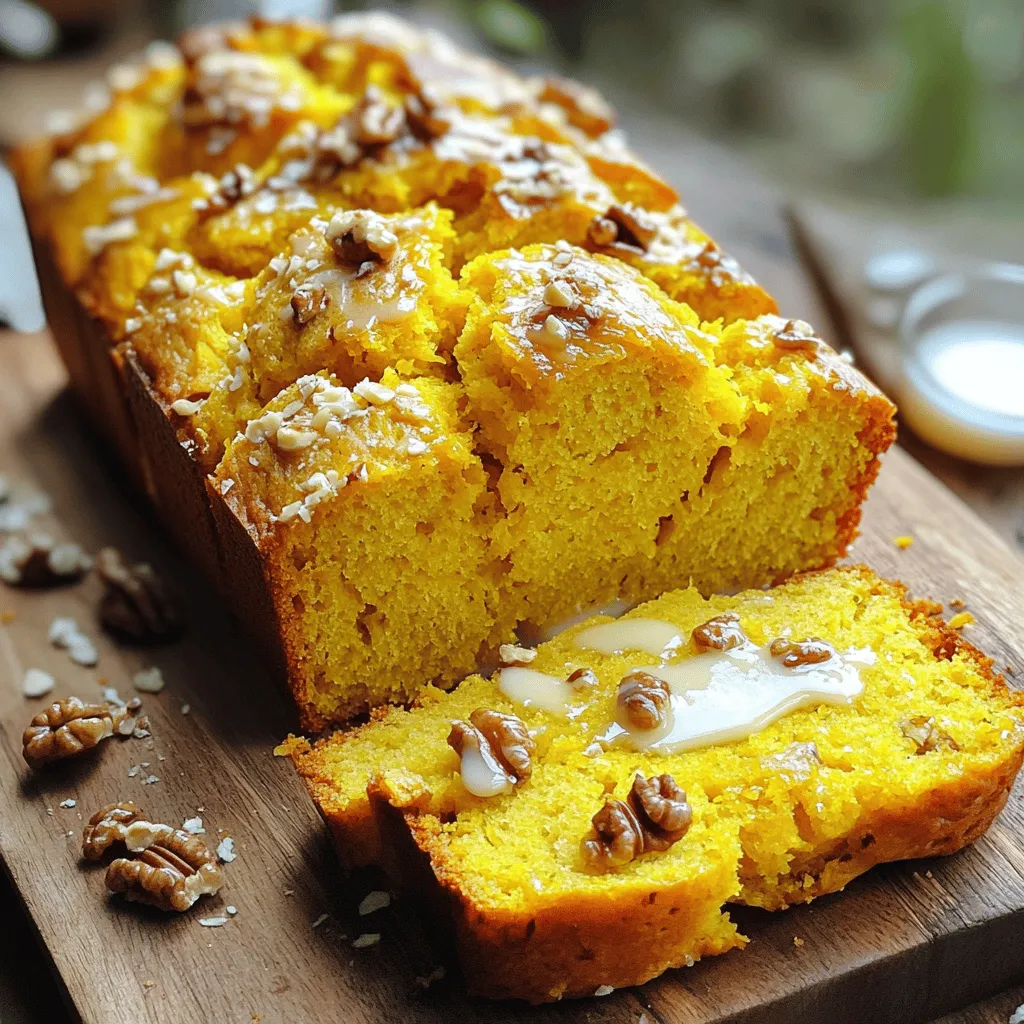
If you’re looking for a tasty way to use yellow squash, this simple and delicious recipe for Yellow Squash Bread

To make a tasty grilled peach salad, start with these simple ingredients: - 4 ripe peaches, halved and pitted - 4 cups mixed greens (arugula, spinach, and baby kale) - 1/2 cup crumbled feta cheese - 1/4 cup walnuts, toasted - 1/4 red onion, thinly sliced - 2 tablespoons balsamic glaze - 2 tablespoons olive oil - Salt and pepper to taste - Fresh basil leaves for garnish These ingredients work together to create a fresh and flavorful dish. The peaches bring a sweet taste, while the greens add crunch. Feta cheese adds creaminess, and walnuts give a nice bite. The balsamic glaze ties all the flavors together. You can find the full recipe to guide you in creating this delightful salad. Enjoy the process of gathering these fresh items! To grill peaches for maximum flavor, start with ripe ones. Look for peaches that yield slightly when gently pressed. These will have the best taste. Cut the peaches in half and remove the pit. Brush the cut sides with olive oil. This helps prevent sticking and adds flavor. When grilling, place the peaches cut-side down on a preheated grill. Grill over medium heat for 4-5 minutes. You want nice grill marks and a soft texture. Flip and grill for another 2-3 minutes. For slicing, let the peaches cool for a couple of minutes. Then, cut them into wedges. This makes it easy to add to your salad. Combine the ingredients seamlessly for a beautiful dish. Start with a large bowl. Add the mixed greens, sliced red onion, and toasted walnuts. Toss the greens gently to mix them. This keeps the salad light and airy. Next, add the grilled peach wedges to the bowl. Sprinkle crumbled feta cheese over the top. Drizzle balsamic glaze and a little olive oil. Season with salt and pepper to taste. For tossing, use a light hand. You want to coat everything without breaking the peaches. For presentation, transfer the salad to a large serving platter. Garnish with fresh basil leaves for color and flavor. Pair this salad with grilled chicken or fish for a complete meal. The sweet peaches and salty feta make a great combo with protein. Enjoy your fresh and flavorful grilled peach salad! To get the best grilled peaches, aim for medium heat. This helps the peaches cook evenly. If the grill is too hot, they may burn. You want nice grill marks and soft fruit. To prevent sticking, brush the cut sides of the peaches with olive oil. This simple step makes a big difference. You can also oil the grill grates before adding the peaches. For added protein, consider grilled chicken or shrimp. Both options blend well with the salad. You can also use chickpeas for a vegetarian choice. Dressings matter too! A lemon vinaigrette or honey mustard dressing works great. They enhance the sweetness of the peaches. Fresh herbs boost flavor in this dish. Try basil or mint for a bright touch. A sprinkle of black pepper adds a nice kick too. Balancing sweetness and acidity is key. Use lemon juice to cut through the sweetness of the peaches. This creates a lovely harmony of flavors. For the full recipe, check out the cooking guide. {{image_2}} You can get creative with the fruit in your salad. Try using nectarines or pears instead of peaches. Both fruits offer a sweet flavor and a juicy texture. They work well on the grill and add a fun twist. You can also swap nuts for different textures. Try pecans or almonds for a new crunch. For a vegan version, just skip the cheese. The salad stays tasty and fresh without it. If you need a gluten-free option, ensure your nuts and dressings are safe for your diet. Many balsamic glazes are gluten-free, but always check the label for peace of mind. Want to add more zing? Consider adding citrus! Squeeze fresh lemon or lime juice over the salad for a bright taste. You can also mix in extra veggies, like bell peppers or cucumbers. They add crunch and color, making your dish even more appealing. For the full recipe, check out the complete guide to making this delightful salad! To keep your grilled peach salad fresh, follow these storage tips: - Store mixed greens and grilled peaches separately. This helps prevent sogginess. - Use an airtight container for the greens. This keeps them crisp. - Place the grilled peaches in a separate container. Make sure it's sealed well. - If you can, eat the salad within two days for the best taste. Can you freeze the salad? No, I don’t recommend freezing the whole salad. The greens will get mushy. However, you can freeze the peaches. Here’s how: - Slice the grilled peaches and place them in a single layer on a tray. - Freeze them for about two hours until they are solid. - Once frozen, transfer the peaches to a freezer bag. Remove excess air before sealing. - Label the bag with the date and use within three months for the best flavor. Understanding how long your ingredients last is key: - Grilled peaches can last about three to five days in the fridge. - Mixed greens should stay fresh for up to a week if stored properly. - Watch for signs of spoilage: wilted greens, off smells, or mold. These signs mean it’s time to toss the salad. Enjoy your grilled peach salad fresh for the best taste! To find ripe peaches, look for a few signs. First, check the color. Ripe peaches should have a rich yellow or golden hue. Next, feel the peach. It should yield slightly to gentle pressure. Finally, smell the peach. A sweet, fragrant scent indicates ripeness. If the peaches are hard, let them sit at room temperature for a few days. Yes, you can use canned or frozen peaches, but fresh peaches taste best. If you use canned peaches, choose those packed in juice, not syrup. Drain them well before grilling. For frozen peaches, thaw them first. Keep in mind, grilled texture may be softer than fresh peaches. Feta cheese works great in this salad. It adds a nice salty flavor that balances the sweetness of the peaches. Goat cheese is another good option, offering a creamy texture. Both cheeses complement the other salad ingredients very well. Grilled peaches last for about three days in the fridge. Store them in an airtight container to keep them fresh. If they start to brown or become mushy, it’s best to toss them. Enjoy them while they taste their best! You can use a grill pan or a broiler if you don’t have a grill. For a grill pan, preheat it on medium heat and add a little oil. Place the peach halves cut-side down and cook until grill marks appear. For a broiler, place peaches on a baking sheet and broil for a few minutes, watching closely to avoid burning. For a full recipe on grilled peach salad, check out the detailed instructions above! This article covered how to make a delicious grilled peach salad. You learned about the key ingredients, from ripe peaches to mixed greens and feta. We also shared step-by-step instructions, tips for grilling, and ways to personalize your salad. Remember, you can adjust flavors and ingredients to match your taste. Enjoy this fresh, healthy dish any time of year. A well-made salad not only nourishes but also brings joy. Try it out and share your own twists!

Grilled Peach Salad Fresh and Flavorful Delight

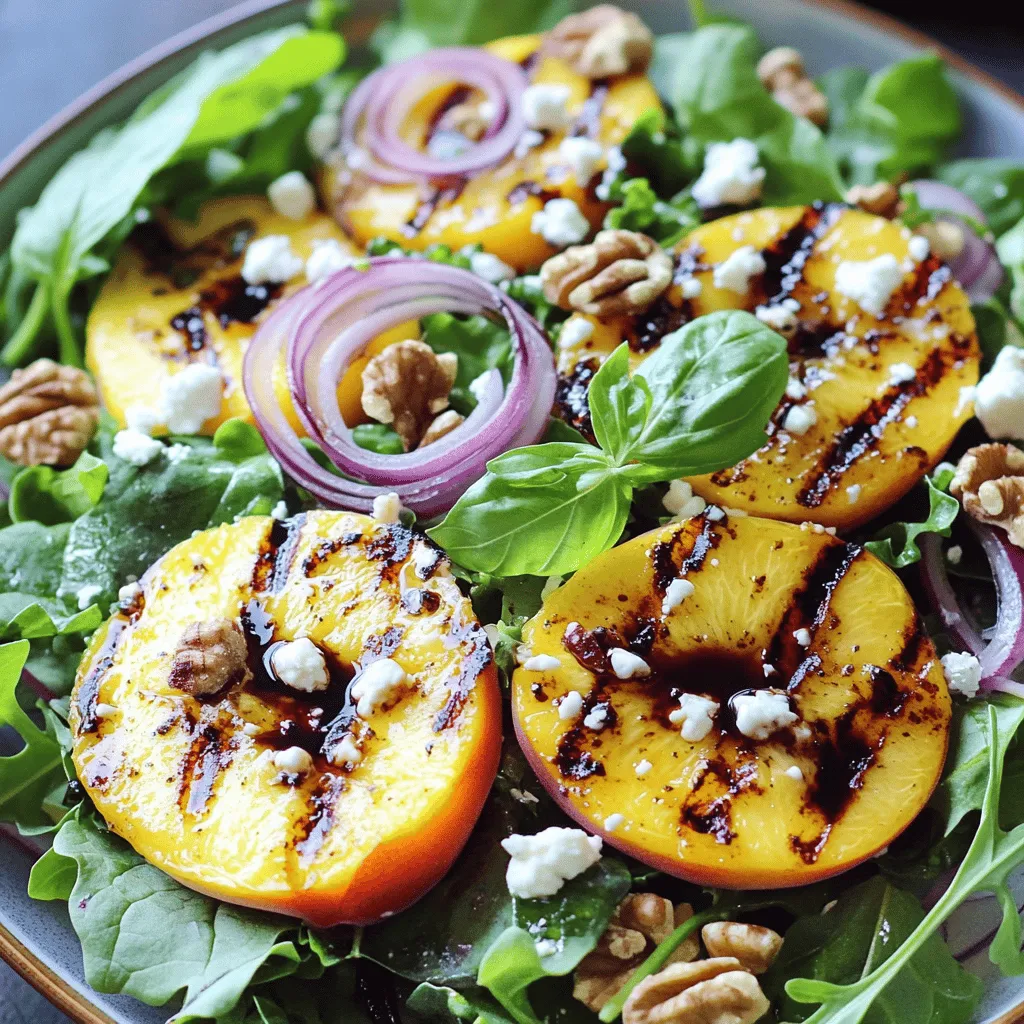
Grilled Peach Salad is a fresh and tasty dish that everyone will love. It brings together juicy peaches, mixed greens,

- 2 medium zucchinis, sliced into half-moons - 2 medium yellow squashes, sliced into half-moons - 3 tablespoons olive oil - 3 cloves garlic, minced - 1 teaspoon smoked paprika - 1 teaspoon dried oregano - Salt and freshly ground black pepper to taste - 1 lemon, zested and juiced - 1/4 cup grated Parmesan cheese - Fresh parsley, chopped (for garnish) Roasted zucchini and summer squash shine with simple yet bold flavors. The fresh produce brings a light crunch and a touch of sweetness. The olive oil helps the veggies caramelize, making them golden and tender. Garlic adds a savory kick that elevates the dish. Smoked paprika brings depth to the mix. It has a rich, smoky taste that transforms the vegetables. Dried oregano gives a hint of earthiness. Salt and freshly ground black pepper enhance each bite. If you want to brighten the dish, lemon zest and juice add a tart twist. For a creamy finish, sprinkle Parmesan cheese on top. Fresh parsley not only adds color but also a fresh taste. This recipe is versatile and fun! You can mix in your favorite herbs or spices. Explore different flavors and find your perfect blend. If you want the full recipe, check out the Zesty Roasted Zucchini and Summer Squash. Enjoy your cooking! - Set temperature to 425°F (220°C). - Combine zucchinis and yellow squashes in a large mixing bowl. - Add olive oil, minced garlic, smoked paprika, dried oregano, salt, and pepper. - Mix well, coating each piece of vegetable. This step adds tons of flavor! - Spread the vegetable mixture onto a baking sheet lined with parchment paper. - Make sure the pieces are in a single layer. This helps them roast evenly. - Cook for about 20-25 minutes, tossing halfway through. - Check for a nice golden color. They should be tender and sweet. - Drizzle with lemon juice, sprinkle lemon zest, and add Parmesan cheese if desired. - These fresh notes elevate the dish, making it taste bright and fresh. For the full recipe, check out the Zesty Roasted Zucchini and Summer Squash! To get the best roast, set your oven to 425°F (220°C). This heat helps the zucchini and squash brown nicely. Place your baking sheet in the center of the oven. This spot ensures even heat around your veggies. Don’t overcrowd the pan; space helps them roast, not steam. Toss them halfway through cooking for even browning. Want to kick up the flavor? Try adding cumin or coriander for warmth. A pinch of cayenne adds heat if you like spice. Fresh herbs like thyme or rosemary can give a fragrant twist. For a tangy kick, mix in some balsamic vinegar before roasting. These spices and herbs will make your roasted veggies pop! Garnish your dish for a stunning look. A sprinkle of fresh parsley adds color and freshness. For a touch of elegance, use lemon zest on top. Serve your roasted zucchini and squash on a bright plate. This makes the colors stand out. You can also drizzle a bit of olive oil for shine. A beautiful dish makes every meal feel special. Check out the Full Recipe for more tips! {{image_2}} You can roast many other vegetables with zucchini and squash. Here are some great options: - Bell peppers - Eggplant - Carrots - Red onions - Mushrooms These vegetables add more color and flavor to your dish. Each one brings a unique taste that complements zucchini and squash. To make this recipe vegan, simply leave out the Parmesan cheese. You can replace it with nutritional yeast. This will give a cheesy flavor without dairy. You can also try adding tahini or a sprinkle of cashew cheese. These options keep the dish rich and tasty. Seasonal herbs can bring fresh flavors to your roasted veggies. Try adding: - Fresh basil - Thyme - Rosemary - Dill These herbs enhance the taste of the dish. You can toss them in before roasting or sprinkle them on top after. For a citrus kick, add some lemon zest or orange zest just before serving. These small changes can elevate your meal. Check the Full Recipe for more tips! After you enjoy your roasted zucchini and summer squash, store any leftovers in the fridge. Use an airtight container to keep them fresh. This helps prevent them from drying out. You can store them for about 3 to 4 days. When you’re ready to eat, just take them out and reheat. To freeze your roasted zucchini and summer squash, let them cool first. Then, place them in a single layer on a baking sheet. Freeze for about 1 to 2 hours. Once frozen, transfer them to a freezer-safe bag. Make sure to remove as much air as you can. They can stay good in the freezer for up to 3 months. When you want to enjoy your leftovers, try these reheating methods: - Oven: Preheat your oven to 350°F (175°C) and bake for 10-15 minutes. This helps keep them crisp. - Microwave: Place them on a microwave-safe plate and heat for 1-2 minutes. Check every 30 seconds to avoid overcooking. - Skillet: Heat a bit of olive oil in a skillet over medium heat. Add the squash and cook for about 5 minutes, stirring often. This method helps retain their flavor and texture. For the full recipe, check the earlier sections. Roast zucchini and summer squash for 20-25 minutes. This time gives you soft, tender veggies. Check them halfway through and give them a toss. This helps them cook evenly and get a nice caramelization. Yes, you can! Try adding basil, thyme, or rosemary for a fresh twist. For heat, add red pepper flakes or chili powder. You can also mix in some lemon pepper for a zesty kick. Get creative and find what flavors you love! Roasted zucchini and squash go well with grilled chicken or fish. They also complement quinoa or brown rice nicely. For a hearty meal, serve them alongside a rich pasta dish. The flavors blend well and make a great plate. Yes, this recipe is gluten-free! All the ingredients used are safe for those avoiding gluten. Just check any optional toppings, like Parmesan cheese, to ensure they meet your needs. Enjoy this dish without worry! Roasting zucchinis and squash offers a tasty way to enjoy fresh produce. You learned how to prepare and season these vegetables for a delicious dish. Remember, you can tweak flavors, use other vegetables, and even make it vegan. Store leftovers properly to enjoy later. Explore different seasoning and pairing options to keep meals exciting. By following this guide, you'll create a colorful and flavorful addition to any table. Happy cooking!

Roasted Zucchini and Summer Squash Flavor Boost

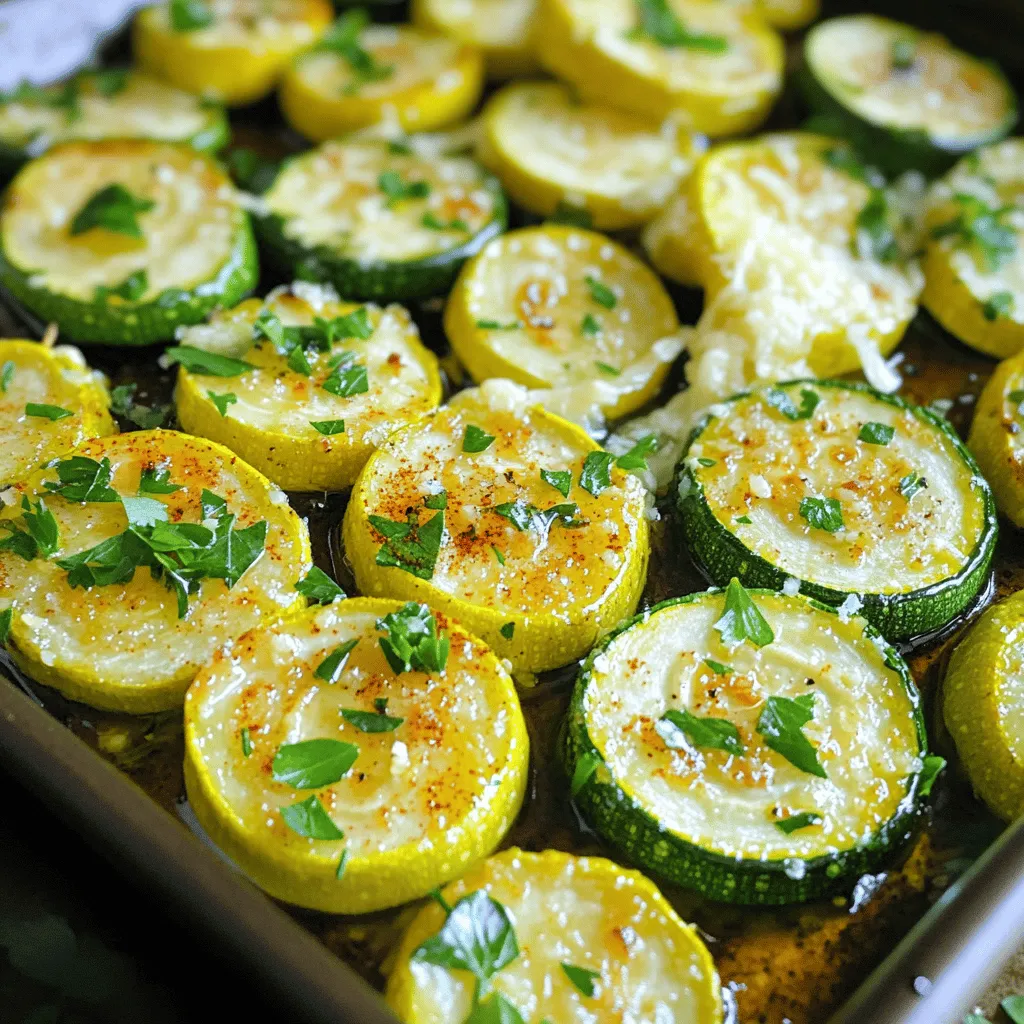
Looking to elevate your summer veggies? Roasted zucchini and summer squash are just what you need! In this post, I’ll

Older posts
Newer posts
← Previous Page1 … Page19 Page20 Page21 … Page43 Next →

dsad

© 2025 flavorsprint • Built with GeneratePress

Our Policies

  • Copyright Policy
  • Cookie Policy
  • GDPR Policy
  • Privacy Policy
  • Disclaimer
  • Terms Of Use

More Information

  • Home
  • About
  • Contact
  • Appetizers
  • Dessert
  • Dinner
  • Drinks
©2025, flavorsprint About Back To Top