Skip to content
DisclaimerTerms Of UseGDPR PolicyCookie Policy

flavorsprint

  • Home
  • Drinks
  • Appetizers
  • Dinner
  • Dessert
  • About
  • Contact
  • Privacy Policy
DisclaimerTerms Of UseGDPR PolicyCookie Policy

Lillian

- Fresh lemon juice - Granulated sugar - Cold water - Coconut milk or milk of choice - Heavy whipping cream - Strawberries for puree - Ice cubes - Mint leaves for garnish Choosing the best lemons When picking lemons, look for bright yellow ones. They should feel heavy for their size. This means they have more juice. Avoid lemons with dull or green spots. Fresh lemons give the best flavor. Alternatives to granulated sugar If you want a healthier option, try honey or agave syrup. They add sweetness without refined sugar. You can also use stevia for a low-calorie choice. Adjust the amount based on your taste. Dairy-free substitutes for creamy texture Coconut milk is a great choice for that creamy taste. Almond milk or oat milk also works well. They make the drink smooth and tasty. If you want it extra rich, choose a thicker plant-based cream. 1. Mixing lemon juice and sugar Start by squeezing about 4 to 6 fresh lemons. You need 1 cup of lemon juice. Pour the juice into a pitcher. Add 1/2 cup of granulated sugar. Stir the mix until the sugar fully dissolves. This step is key for a sweet base. 2. Whipping cream technique Next, take 1 cup of heavy whipping cream. Use an electric mixer to whip it. Beat the cream until you see soft peaks form. This usually takes a few minutes. Then, gently fold in 1 cup of coconut milk. Make sure to mix carefully to keep it fluffy. 3. Layering the drink in a glass Now, grab a glass and fill it with ice cubes. Pour in your lemonade mixture until the glass is about half full. Then, add a layer of pureed strawberries on top of the lemonade. Finally, spoon the whipped cream mixture over the strawberry layer. This creates a lovely, fluffy cap. - How to present your whipped pink lemonade Serve in clear glasses to show off the layers. Add a mint leaf on top for color and freshness. This small touch makes your drink look special. - Making it a party drink You can make a big batch in a pitcher. Set up a drink station for guests. Provide fun straws, extra mint, and even fruit slices. This way, everyone can customize their own drink. - Drinkware recommendations Use tall, clear glasses for a stunning look. Mason jars also add a fun, rustic vibe. Choose drinkware that fits your style and the occasion. To get that perfect creaminess in your whipped pink lemonade, focus on two main steps: whipping and folding. - Whipping cream techniques: Start with cold heavy cream. Cold cream whips better. Use an electric mixer on medium speed. Whip until you see soft peaks. This means the cream holds its shape but still looks fluffy. - Folding methods for combining ingredients: After you whip the cream, don’t stir it too hard. Use a spatula to fold in the coconut milk gently. This keeps the air in the cream, making it light and fluffy. You can customize your whipped pink lemonade to match your taste. Here are some ideas: - Ideas for customizing flavor: Add more strawberry puree for a fruitier taste. You can also mix in a splash of vanilla or a hint of almond extract for a unique twist. - Alternative sweeteners to try: If you want to reduce sugar, try honey, agave syrup, or stevia. Each will give a different flavor. Adjust slowly to find what you like best. For the full recipe, check out the detailed instructions above. {{image_2}} You can play with flavors in whipped pink lemonade. Try adding different fruit purees for a twist. - Raspberry Puree: Swap strawberries for raspberries for a tart kick. - Peach Puree: Use ripe peaches for a sweet, juicy flavor. - Mango Puree: Add mango for a tropical vibe. You can also infuse herbs for extra flavor. Mint and basil pair well with lemon. Just muddle a few leaves in the lemonade before adding ice. This adds a fresh taste and a lovely aroma. You can make a vegan whipped pink lemonade. Replace heavy cream with coconut whipped cream. Use almond milk or oat milk instead of cow's milk. This keeps the drink creamy and delicious without dairy. If you want low-calorie or sugar-free options, try these tips: - Use a sugar substitute like stevia or monk fruit. - You can also reduce the amount of sugar in the recipe. - Choose unsweetened coconut milk to cut calories. These variations let everyone enjoy this refreshing drink! For the complete recipe, check out the Full Recipe section. To keep your whipped pink lemonade fresh, store it in the fridge. Use a glass jar or a pitcher with a lid. These containers help to keep flavors strong. If you have leftovers, seal them well. This prevents the drink from absorbing other odors. In the refrigerator, this drink lasts about three days. After that, it may lose its flavor and creaminess. Check for signs of freshness. If it smells sour or looks separated, it’s time to toss it. Enjoy your whipped pink lemonade while it’s at its best! You can find the full recipe above. Can I use bottled lemon juice instead of fresh? Yes, you can use bottled lemon juice. However, fresh lemons taste better. Bottled juice may lack flavor. If you choose bottled juice, pick a high-quality brand. How can I make whipped pink lemonade with less sugar? To lower sugar, use less granulated sugar. You can also try a natural sweetener, like honey or agave. Adjust the amount based on your taste preference. Can I freeze whipped pink lemonade for later use? Freezing whipped pink lemonade is possible, but it may lose some texture. To freeze, pour it into an airtight container. Thaw in the fridge before serving. What are the nutritional facts? Nutritional facts can vary based on your choices. A serving has about 200 calories, 10 grams of fat, and 30 grams of sugar. Adjust the ingredients for more accurate nutrition. Can I make this in advance? You can prepare the lemonade base ahead of time. Mix the lemon juice and sugar, and store in the fridge. Add whipped cream and strawberries just before serving. How to customize for children’s parties? For kids, make it fun! Use colorful straws and fun cups. You can add more fruit puree or use flavored sparkling water. Kids love bright colors and tasty flavors. For the full recipe, check out the Whipped Pink Lemonade section. In this post, I shared how to make a refreshing whipped pink lemonade. You learned about the key ingredients and tips for choosing the best options. Following step-by-step instructions, you can whip up this tasty drink easily. I also covered serving ideas, variations, storage tips, and answers to common questions. Enjoy this drink on warm days, or make it for a party. With simple tweaks, you can make it just how you like. Get ready to impress your friends and family with this delightful treat!

Whipped Pink Lemonade Refreshing Summer Delight

Are you ready to sip on something sweet and creamy this summer? Whipped Pink Lemonade is the perfect treat to

To create a tasty hot honey chicken bowl, you need the right ingredients. Here’s what you will need: - 2 boneless, skinless chicken breasts - 1 cup cooked jasmine rice - 1 cup broccoli florets - 1 red bell pepper, sliced - 1 medium carrot, julienned - 2 tablespoons olive oil - 3 tablespoons hot honey (store-bought or homemade) - 1 tablespoon soy sauce - 1 teaspoon garlic powder - 1 teaspoon onion powder - Salt and pepper to taste - Sesame seeds for garnish - Fresh cilantro, chopped, for garnish These ingredients work together to give you a balanced meal. The chicken provides protein, while the veggies add vitamins. The rice acts as a great base. You can choose between homemade hot honey and store-bought. Benefits of homemade hot honey: - You control the heat level. - You can use your preferred honey type. - It’s fresh and free from preservatives. Tips for choosing store-bought hot honey: - Look for brands that use natural ingredients. - Check the heat level on the label. - Choose one with no artificial flavors. Opting for homemade hot honey can make your bowl stand out. However, store-bought is convenient when you're short on time. Knowing the nutritional content helps you make informed choices. Caloric content per serving: - Approximately 500 calories per bowl. Macronutrient breakdown: - Protein: 30 grams - Carbohydrates: 50 grams - Fat: 15 grams These numbers can vary based on your ingredients. Always check your specific items to ensure accuracy. Enjoy your hot honey chicken bowls without guilt, knowing they are packed with flavor and nutrients. For the complete recipe, check out the Full Recipe section. To start, you need to create the marinade. In a small bowl, mix the hot honey, soy sauce, garlic powder, onion powder, salt, and pepper. This mixture adds flavor and a touch of sweetness. Next, put the chicken breasts in a resealable bag or a shallow dish. Pour the marinade over the chicken. Make sure the chicken is well coated. Let it marinate for at least 15-30 minutes. If you have time, marinating overnight in the fridge gives even more flavor. When you're ready to cook, preheat your oven to 400°F (200°C). While the oven heats, prepare the vegetables. Toss the broccoli, red bell pepper, and carrot in a bowl with olive oil, salt, and pepper. Spread them evenly on a baking sheet. Once the chicken is marinated, place it on another baking sheet. Roast both the chicken and vegetables in the oven for about 20-25 minutes. Check that the chicken reaches an internal temperature of 165°F (75°C). The vegetables should be tender and bright. Now, it's time to assemble your bowls. Start with a base of jasmine rice. It’s fluffy and pairs well with the chicken. Top the rice with sliced chicken and the roasted vegetables. Drizzle some extra hot honey over the top for added sweetness and heat. For the finishing touch, garnish with sesame seeds and chopped cilantro. This adds flavor and a nice pop of color. Enjoy your delicious Hot Honey Chicken Bowls! For the complete recipe, refer to the Full Recipe section. To make your hot honey chicken really shine, marination is key. Marinate your chicken for at least 15 minutes. For more flavor, aim for a few hours or overnight. This helps the chicken absorb all those tasty spices and hot honey. Use a resealable bag for easy coating and cleanup. When cooking, keep the heat steady. Roast your chicken at 400°F (200°C). This temperature cooks the chicken evenly. Make sure to check the internal temperature. It should reach 165°F (75°C) to be safe to eat. Let the chicken rest for a few minutes before slicing. This keeps it juicy. Hot honey chicken bowls are great with various sides. Serve them with jasmine rice as a base. You can also add a fresh salad or pickled veggies for crunch. Roasted sweet potatoes or corn can complement the meal nicely. For drinks, iced tea or lemonade works well. If you like beer, try a light lager. You might also enjoy a spicy dipping sauce on the side. It adds extra heat and flavor. One big mistake is overcooking the chicken. This can make it dry and tough. Always check the temperature with a meat thermometer. Another mistake is skipping the marination step. Without marination, the chicken will lack flavor. Take the time to let it soak in the marinade. It makes a world of difference. For the full recipe, check out the Hot Honey Chicken Bowls section above. {{image_2}} You can switch up the protein in your hot honey chicken bowls. Try using tofu for a tasty vegan option. Shrimp also works well, adding a nice seafood twist. Each protein brings its own flavor. You can also change the vegetables. Instead of broccoli, try snap peas or zucchini. You can even add corn for some sweetness. Each veggie gives a new texture and flavor. To make your dish even better, experiment with spices. Add smoked paprika for a smoky taste. You can also try cumin for warmth. A pinch of cayenne pepper adds extra heat. Another fun idea is to use different types of honey. Clover honey is sweet and mild. If you like strong flavors, try orange blossom honey. Each honey adds a unique twist. Making this dish gluten-free is easy. Just use tamari instead of soy sauce. This swap keeps all the flavor without gluten. For a vegan version, swap chicken for chickpeas or tempeh. Use maple syrup instead of hot honey. This keeps it sweet and delicious while being plant-based. If you’re watching carbs, try cauliflower rice instead of jasmine rice. This keeps your meal light yet filling. You can enjoy hot honey chicken bowls in many ways! To keep your Hot Honey Chicken Bowls fresh, store them in airtight containers. Let the bowls cool to room temperature before sealing. This helps reduce moisture, which can lead to sogginess. When stored properly, your leftovers can last up to three days in the fridge. When you’re ready to enjoy your leftovers, reheat the chicken and rice in the microwave. Use a microwave-safe dish and cover it with a lid or a damp paper towel. This keeps moisture in and prevents the chicken from drying out. For the vegetables, consider reheating them in a skillet over low heat. This method helps avoid mushy textures. Stir occasionally until heated through. If you want to save a meal for later, you can freeze the assembled bowls. Use freezer-safe containers and leave some space at the top to allow for expansion. For best results, freeze the bowls without the garnishes. When you’re ready to eat, thaw the bowl in the fridge overnight. Reheat it in the microwave or oven until hot. Enjoy your Hot Honey Chicken Bowls anytime, even after freezing. You can tell if chicken is cooked by checking its internal temperature. The safe temperature is 165°F (75°C). Use a meat thermometer to ensure accuracy. If you do not have one, cut into the chicken. The meat should be opaque and the juices should run clear. Yes, you can prepare hot honey chicken bowls in advance. Cook the chicken and veggies ahead of time. Store them in the fridge for up to three days. You can also marinate the chicken a day before cooking for extra flavor. Just assemble the bowls when you’re ready to eat. I recommend using jasmine rice for hot honey chicken bowls. It has a lovely aroma and pairs well with the dish. Brown rice is another good option if you want more fiber. Other varieties like basmati or white rice can work too, but jasmine is my favorite. You can buy hot honey at many grocery stores or online. Look in the condiment aisle. If you want to make your own, mix honey with chili flakes or hot sauce. This way, you can control the heat level to fit your taste. To add more heat, you can include spicy ingredients. Try adding sliced jalapeños or a dash of cayenne pepper. You can also use spicy sauces like sriracha or chili paste. Experiment with these options to find your perfect level of spice. This article covered how to make tasty hot honey chicken bowls. We discussed key ingredients, homemade hot honey tips, and nutritional info. I shared step-by-step cooking instructions, plus helpful tips to perfect your dish. You learned about variations and how to store leftovers. Hot honey chicken bowls are easy to make and fun to customize. With the right techniques, you’ll enjoy a delicious meal that satisfies your taste buds. Enjoy experimenting with flavors, and don’t be afraid to make it your own!

Hot Honey Chicken Bowls Flavorful and Satisfying Meal

Are you ready for a meal that’s bursting with flavor and satisfaction? Hot Honey Chicken Bowls combine juicy chicken, colorful

- 4 medium zucchinis - 1 cup breadcrumbs - 1/2 cup grated Parmesan cheese - 1 cup shredded mozzarella cheese - 2 large eggs - 1 teaspoon garlic powder - 1 teaspoon onion powder - 1 teaspoon dried oregano - Salt and pepper to taste - 2 tablespoons olive oil - Fresh basil leaves for garnish To make Baked Zucchini Parmesan, you need fresh and simple ingredients. Start with 4 medium zucchinis. Slice them into 1/4-inch rounds. They should be tender yet firm. You will also need 1 cup of breadcrumbs. Panko breadcrumbs give a great crunch, but regular ones work too. Next, grab 1/2 cup of grated Parmesan cheese. This cheese adds a salty flavor that everyone loves. You will also use 1 cup of shredded mozzarella cheese. Mozzarella melts beautifully, making your dish gooey and delicious. For binding, you'll need 2 large eggs. These help the coating stick to the zucchini slices. Now, let’s spice things up! Use 1 teaspoon of garlic powder for flavor. Add 1 teaspoon of onion powder for depth. Sprinkle in 1 teaspoon of dried oregano for that herby taste. Don’t forget to season with salt and pepper to taste. Finally, you’ll need 2 tablespoons of olive oil to make everything crispy. Fresh basil leaves are great for garnish. They add a pop of color and a fresh taste. You can find the full recipe to make this dish easily. - Preheat your oven to 400°F (200°C). - Prepare the baking sheet with parchment paper. Start by setting your oven to 400°F. This high heat helps the zucchini get crispy. While it warms up, line a baking sheet with parchment paper. This step keeps the zucchini from sticking. - Combine breadcrumbs and seasoning. - Whisk the eggs in a separate bowl. - Dip and coat each zucchini slice. Next, grab a shallow bowl. In it, mix the breadcrumbs, grated Parmesan, garlic powder, onion powder, oregano, salt, and pepper. Stir well so every crumb is seasoned. In another bowl, whisk the eggs until they look smooth. Now, take each zucchini slice. Dip it into the egg, letting the extra drip off. Then, coat it in the breadcrumb mix. Press down gently so the crumbs stick. This coating gives the zucchini its crunch. - Arrange the coated zucchini on the baking sheet. - Drizzle with olive oil. - Bake and add mozzarella cheese. Place the coated slices on the prepared baking sheet. Make sure they are not touching. This helps them cook evenly. Drizzle a little olive oil over them. This oil helps with crispiness. Now, bake in the preheated oven for 20-25 minutes. Flip the slices halfway through for even cooking. You want them golden brown and tender. After baking, take them out and sprinkle mozzarella on top. Return to the oven for another 5 minutes. This melts the cheese, making it bubbly and delicious. For full details, check the Full Recipe. To make your Baked Zucchini Parmesan super crunchy, use panko breadcrumbs. They add great texture. Spread the zucchini slices out evenly on the baking sheet. This helps them cook nicely and prevents sogginess. You can change the spice level to fit your taste. If you like heat, add some red pepper flakes. For more flavor, toss in extra herbs like thyme or basil. Fresh herbs can really elevate the dish. Make your dish look fresh by garnishing with basil leaves. They add a nice pop of color. Serve your zucchini with a side of marinara sauce for dipping or a fresh salad for balance. These simple touches make the meal more inviting. {{image_2}} You can switch up the cheese in this dish. Instead of Parmesan, try using Cheddar for a sharper flavor. Gouda melts well and adds a creamy texture. If you prefer vegan options, use cashew cheese or nutritional yeast. These alternatives keep the taste rich while meeting dietary needs. Want to spice things up? Add paprika or cayenne for a kick of heat. You can also mix in other vegetables. Diced bell peppers or mushrooms work great for a colorful medley. This not only boosts flavor but also adds more nutrients. Looking for a quick way to cook? Try an air fryer. It gives a similar crunch without the wait. You can also grill the zucchini for a smoky flavor. Just brush the slices with olive oil and place them on the grill. Both methods keep your dish tasty and fun. For the full recipe, check out the detailed steps. To store your baked zucchini parmesan, let it cool completely. Place it in an airtight container. This will keep the dish fresh. Use parchment paper between layers to avoid sticking. In the fridge, it will last for 3 to 5 days. You can also freeze baked zucchini parmesan for later. First, let it cool down. Then, wrap each piece tightly in plastic wrap. Place the wrapped pieces in a freezer bag. This method helps keep the flavor intact. It will stay good for about 2 to 3 months. To use, thaw it overnight in the fridge before reheating. When reheating, choose the oven for the best results. Preheat it to 350°F (175°C). Place the zucchini on a baking sheet and cover it with foil. This keeps it moist. Bake for about 15 minutes, or until heated through. If you use a microwave, heat in short intervals. This can make it soggy, so be careful. For crispiness, you can finish it in a hot oven for a few minutes. Yes, you can use yellow squash. Yellow squash has a similar taste and texture to zucchini. Both have a mild flavor that lets the spices shine. However, yellow squash is a bit sweeter. You may notice a slight difference in crunch. Use the same slicing method for even cooking. Both options will make a delicious dish! This recipe is not gluten-free due to the breadcrumbs. However, you can easily make it gluten-free. Simply replace regular breadcrumbs with gluten-free ones. Look for brands that use rice flour or cornmeal. These options give great crunch and flavor. You won’t miss the gluten at all! Baked Zucchini Parmesan pairs well with many dishes. You can serve it with a fresh salad. A simple Caesar or mixed green salad works great. Pasta is another good choice. Try serving it with marinara sauce for added flavor. Grilled chicken or fish also complements this dish nicely. For a light meal, enjoy it with a side of roasted vegetables. The options are endless! For the complete recipe, check out the Full Recipe. This blog post covered the delicious Baked Zucchini Parmesan recipe. We shared the main ingredients, step-by-step instructions, and tips for perfect results. You also learned about fun variations and storage methods. In closing, this dish is easy to make and tasty to eat. Try customizing it to your taste. Enjoy creating your own version and share it with friends!

Baked Zucchini Parmesan Crunchy and Flavorful Dish

Are you looking for a tasty way to enjoy zucchini? This Baked Zucchini Parmesan is your answer! With its crunchy

To make fig jam, start with fresh figs. You need 2 pounds of ripe figs. Remove the stems and cut the figs into quarters. The figs should be sweet and fragrant. If they are not fresh, the jam will not taste good. Wash them gently under cool water. Then, pat them dry with a clean towel. Fresh figs bring a natural sweetness to the jam. Next, you need sugar. Use 1 cup of granulated sugar. Sugar helps the jam set and adds sweetness. It balances the figs' flavor perfectly. You can adjust the sugar based on your taste. If you prefer a less sweet jam, use less sugar. However, don't go too low, or the jam may not set well. To enhance the jam, add some flavor. You will need 1/4 cup of fresh lemon juice. This adds brightness and acidity. Next, include 1 teaspoon of vanilla extract for warmth. For a hint of spice, add 1/2 teaspoon of ground cinnamon. Lastly, use a pinch of salt to balance the flavors. These ingredients make your fig jam more complex and tasty. For the full recipe, check out the section above. Start by washing the figs gently. Remove the stems and cut the figs into quarters. This helps them cook evenly. You want to use fresh, ripe figs for the best flavor. Let the figs sit with sugar for 30 minutes. This allows them to release their natural juices, making your jam sweeter. In a large saucepan, mix the quartered figs and sugar. After 30 minutes, add lemon juice, vanilla, cinnamon, and salt. Stir this mixture well. Place the saucepan over medium heat and bring it to a gentle boil. Stir this often to stop it from sticking. Once it boils, lower the heat and let it simmer for 30 to 40 minutes. Stir occasionally, watching for the mixture to thicken. To check if your jam is ready, drop a spoonful onto a cold plate. Let it sit for a moment. If it holds its shape, it’s done! If it’s too runny, cook it for another 5 to 10 minutes. Once thick enough, remove it from the heat and let it cool a bit. Now, transfer the hot fig jam into sterilized jars while it’s still warm. Seal the jars tightly and let them cool completely at room temperature before putting them in the fridge. For the full recipe, check the main article. To keep your fig jam fresh, you need clean jars. Start by washing jars and lids in hot, soapy water. Rinse them well. Next, place them in a large pot of water. Bring the water to a boil. Let the jars boil for 10 minutes. Remove them carefully and let them air dry. This process kills germs and helps your jam last longer. Getting the right thickness for your jam is key. Stir the mixture often while it cooks. Check the jam by dropping a spoonful on a cold plate. If it holds its shape, you're good to go. If it’s too runny, keep cooking for a few more minutes. Patience is important here; the longer you cook, the thicker it gets. One mistake is not using enough sugar. Sugar helps with flavor and preservation. Another issue is not stirring enough. This can cause burning, which ruins the flavor. Lastly, avoid overcooking the jam. It can turn too thick and lose its fresh taste. Follow the steps in the Full Recipe for best results. Enjoy your homemade fig jam! {{image_2}} You can easily mix other fruits into your fig jam. Strawberries add a nice zip. Peaches bring a sweet touch. Raspberries lend a tart flavor. To do this, simply chop the fruit and add it to your fig mixture. Use equal amounts of fruit for balanced taste. This way, you create a fun twist on the classic recipe. Get creative by adding different flavors to your fig jam. You might try herbs like thyme or rosemary. They add a fresh taste that pairs well with figs. Spices like ginger or cardamom can also enhance the jam's depth. To infuse these flavors, add them during cooking. Just remember to strain them out before jarring. If you want a healthier jam, try using sugar alternatives. Honey or maple syrup can replace granulated sugar. Both add a natural sweetness and unique taste. You can also use agave nectar as a low-glycemic option. Just adjust the amount based on your taste preference. This keeps the jam delicious while lowering sugar content. To store your homemade fig jam well, jar sealing is key. First, use clean, sterilized jars. Fill each jar while the jam is still hot. Leave about a quarter-inch of space at the top. Wipe any jam from the rim. This step keeps the seal tight. Next, place the lid on and screw it down firmly. If you hear a pop, it means the jar sealed well. Store your sealed jars in a cool, dark place. A pantry or cupboard works well. Avoid direct sunlight, as it can affect flavor. Once you open a jar, keep it in the fridge. Use it within a few weeks for the best taste. If you want to keep it longer, consider freezing it. Just leave some space in the jar for expansion. Homemade fig jam can last for about a year when sealed properly. If you store it in the fridge after opening, it stays good for 2 to 3 weeks. Always check for signs of spoilage, like mold or off smells. If you see any, discard the jam. For the best flavor and quality, enjoy your fig jam within a few months. For the full recipe, refer to the recipe section above. Homemade fig jam can last up to one year if stored correctly. Store it in a cool, dark place. Once opened, keep it in the fridge for about three weeks. Yes, you can use dried figs, but the taste and texture will change. Soak dried figs in warm water for about 30 minutes. This helps them soften and release their natural sugars. Fig jam is very versatile. You can use it on toast, in yogurt, or with cheese. It also makes a great topping for pancakes, waffles, or ice cream. Yes, you can can fig jam for longer storage. Follow proper canning methods. Make sure to sterilize your jars and lids. This way, you can enjoy your jam for many months. In this article, we covered how to make homemade fig jam. We looked at fresh figs and what you need. The step-by-step guide showed you how to prep, cook, and check the jam. Tips helped avoid common mistakes, while variations let you add unique flavors. Lastly, we discussed storage and answered your top questions about shelf life and uses. Making fig jam is fun and satisfying. Enjoy your tasty creation!

Homemade Fig Jam Simple and Flavorful Recipe

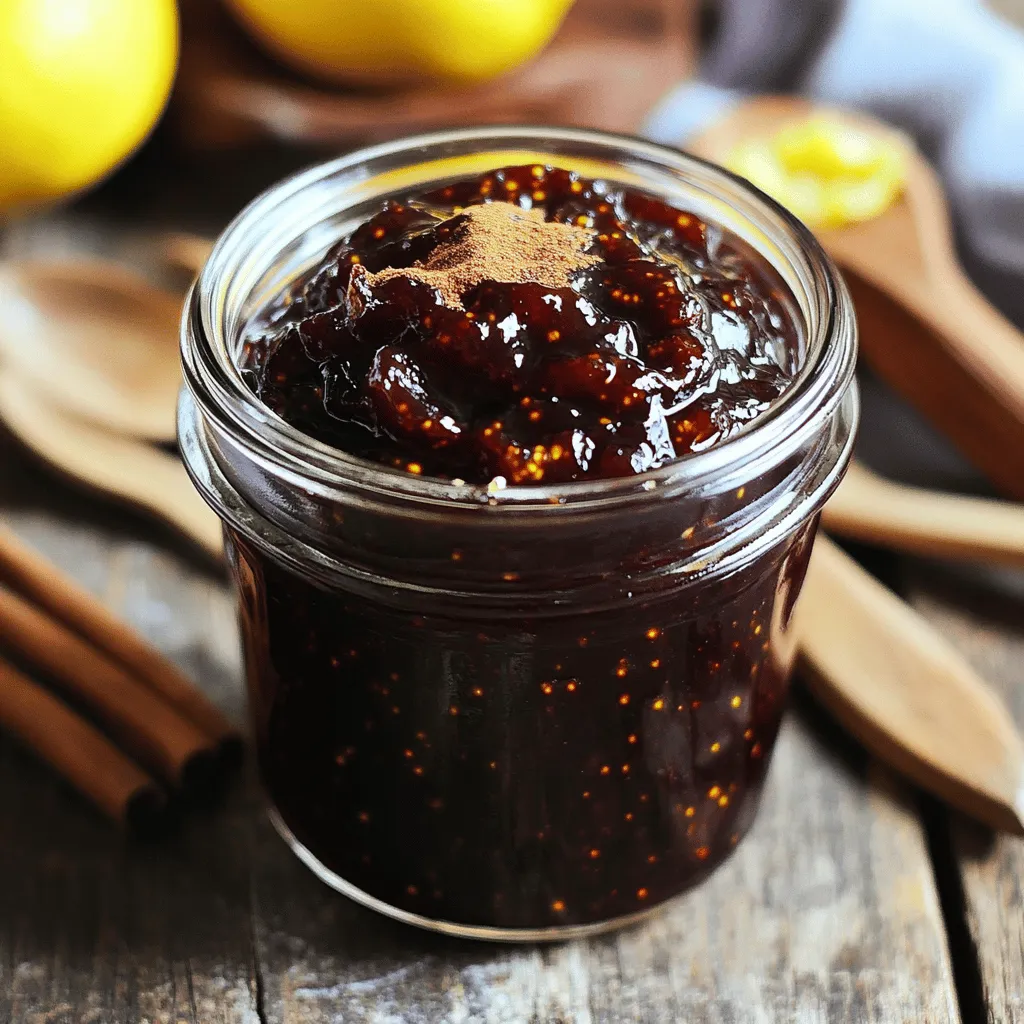
Are you ready to elevate your breakfast game with a sweet treat? Making homemade fig jam is easy and rewarding.

For this recipe, you need 2 pounds of fresh figs. Choose ripe figs for the best flavor. Remove the stems and cut them into quarters. Ripe figs have a sweet smell and feel soft to the touch. If you can, pick them from a local tree. The fresher the figs, the better your preserves will taste. You will need 1 cup of granulated sugar. This sugar helps balance the fig's natural sweetness. It also aids in thickening the preserves. You can adjust the sugar if you like it sweeter or less sweet. Some people use honey or agave as alternatives, but sugar gives the best results here. To make your fig preserves pop, add flavor. Use 1 tablespoon of lemon juice for brightness. A teaspoon of vanilla extract adds depth. For warmth, include 1/2 teaspoon of ground cinnamon. Finally, a pinch of salt enhances all the flavors. These ingredients work together to create a rich and delicious taste in your preserves. For the full recipe, make sure to check the cooking steps. First, wash the figs gently. This step removes any dirt or bugs. Next, remove the stems and cut the figs into quarters. Quartering helps them cook evenly. Place the prepared figs in a large bowl, ready for cooking. In a large pot, mix 1 cup of water and 1 cup of sugar. Heat this mixture on medium heat. Stir it until the sugar fully dissolves. Once dissolved, add the quartered figs. Bring the mixture to a gentle boil. When it boils, lower the heat to let it simmer. Stir the mixture often. This helps prevent sticking. Let it cook for about 45 minutes. After that time, add lemon juice, vanilla extract, cinnamon, and salt. Stir well to blend all the flavors. Now, continue cooking for an additional 30 to 40 minutes. You want the mixture to thicken to a jam-like texture. To check if the preserves are ready, use a cold plate. Place a small spoonful of the mixture on the plate. Wait for a minute. If it holds its shape and does not spread much, your preserves are done. If not, keep cooking and test again. Once ready, remove the pot from heat. Let it cool slightly before transferring the preserves to clean, sterilized jars. Seal them tightly for storage. For the full recipe, check out Grandma’s Fig Preserves 🥳. When making fig preserves, start with ripe figs for the best flavor. Fresh figs are sweet and juicy. Wash them gently, and remove any stems. Use a large pot to give the figs space to cook. Stir the mixture often to avoid burning. Keep your heat low once it simmers. This slow cooking helps the figs break down well. To get the right texture, you need patience. After cooking for about 45 minutes, add lemon juice and vanilla. The lemon helps balance the sweetness. To check if your figs are ready, take a spoonful and place it on a cold plate. If it holds its shape, it’s perfect. If it’s runny, cook it a little longer. Sometimes, your fig preserves may turn out too thick or too thin. If it’s too thick, add a bit of water and heat gently. If it’s too thin, simmer longer until it thickens. If your figs are not sweet enough, mix in a little more sugar. Always taste as you go. This helps you adjust flavors while cooking. These tips will guide you to make Grandma’s fig preserves just right! For the full recipe, check the detailed instructions above. {{image_2}} You can add spices to your fig preserves for a warm twist. Try adding cinnamon, nutmeg, or even cardamom. These spices bring a cozy flavor that makes the preserves special. Just mix in one teaspoon of your chosen spice when you add the lemon juice. This small change can take your preserves to the next level. Citrus fruits bring bright notes to fig preserves. You can use orange, lemon, or even grapefruit. Zest the fruit before juicing it. Add one tablespoon of zest and two tablespoons of juice during cooking. This method brightens up the flavor and adds a zing that balances the sweetness of the figs. Nuts add crunch and fun to your preserves. Walnuts, pecans, or almonds work best. Chop them finely and mix them in during the last 10 minutes of cooking. This addition creates a delightful texture that contrasts with the smoothness of the figs. Remember to toast the nuts lightly for extra flavor before adding them. Explore these variations to make Grandma's Fig Preserves even more exciting! For the full recipe, check the earlier section. To store your fig preserves, you can can them. Start with clean jars and lids. After cooking, pour the hot fig mixture into the jars. Leave about half an inch of space at the top. Wipe the rims to remove any spills. Seal the jars tightly with the lids. Process them in a water bath canner for about 10 minutes. This method keeps your preserves safe for a long time. Always check the seals after cooling. If a lid pops back, it’s not sealed. When stored properly in a cool, dark place, fig preserves can last for up to one year. Once opened, store the jar in the fridge. They will stay fresh for about three weeks. Always check for any signs of spoilage, like mold or off smells. If you see or smell anything strange, it's best to throw it out. If you want to save some fig preserves for later, freezing is a great option. Use freezer-safe containers or bags. Leave some space for expansion as the preserves freeze. They can last for about six months in the freezer. To use them, simply thaw in the fridge overnight. This method works well and keeps the flavor intact. You can still enjoy Grandma’s fig preserves even months later! For the full recipe, check the recipe section above. To check if your fig preserves are done, use a cold plate. Place a small spoonful of the preserves on the plate. Wait one minute. If it holds its shape and doesn’t spread much, it’s ready. This means the mixture has thickened well. Make sure to test it about five minutes before you plan to jar them. Fig preserves are very versatile. You can spread them on toast or biscuits for breakfast. They work great on cheese boards. Use them as a topping for yogurt or ice cream. They also add flavor to meat dishes like pork or chicken. The sweet taste pairs well with many foods. If you don’t have fresh figs, dried figs are a good option. Just soak them in water for a few hours. You can also use other fruits like peaches or plums. Keep in mind that these fruits will change the flavor. Adjust the sugar in the recipe based on the fruit's sweetness. Homemade fig preserves can last up to a year when stored correctly. Use sterilized jars to keep them fresh. Once opened, keep them in the fridge. They should last for about three months once opened. Always check for signs of spoilage before using. You can reduce the sugar, but the flavor may change. Use natural sweeteners like honey or maple syrup. Keep in mind that the preserves might not thicken as well. You can also use sugar substitutes, but follow the package instructions for amounts. Yes, you can double the recipe. Just make sure you have a large enough pot. The cooking time may be a bit longer, so keep an eye on the mixture. Always test for doneness before jarring. If your fig preserves are too runny, you can cook them longer. Return them to the heat and simmer for a bit more time. This will help thicken the mixture. You can also add a bit of pectin if needed. Just follow the package instructions for best results. Yes, you can use frozen figs. Just thaw them and drain any extra water before cooking. The texture might be softer than fresh figs, but they will still taste great. Make sure to adjust the sugar based on their sweetness. Fig preserves can be a healthy option. They are rich in fiber and antioxidants. However, they do contain sugar, so enjoy them in moderation. Pairing them with whole grains can boost their health benefits. We covered how to make delicious fig preserves. Starting with fresh figs, we explored sweeteners and flavor options. I detailed the steps for preparing and cooking your preserves. I also shared tips for the best cooking practices and how to ensure your preserves have the right texture. You can try exciting variations, like spiced or citrus-infused versions. Finally, I provided storage methods and answered common questions. Now, with these insights, you're ready to create your own tasty fig preserves! Enjoy your cooking!

Grandma’s Fig Preserves Simple and Delicious Recipe

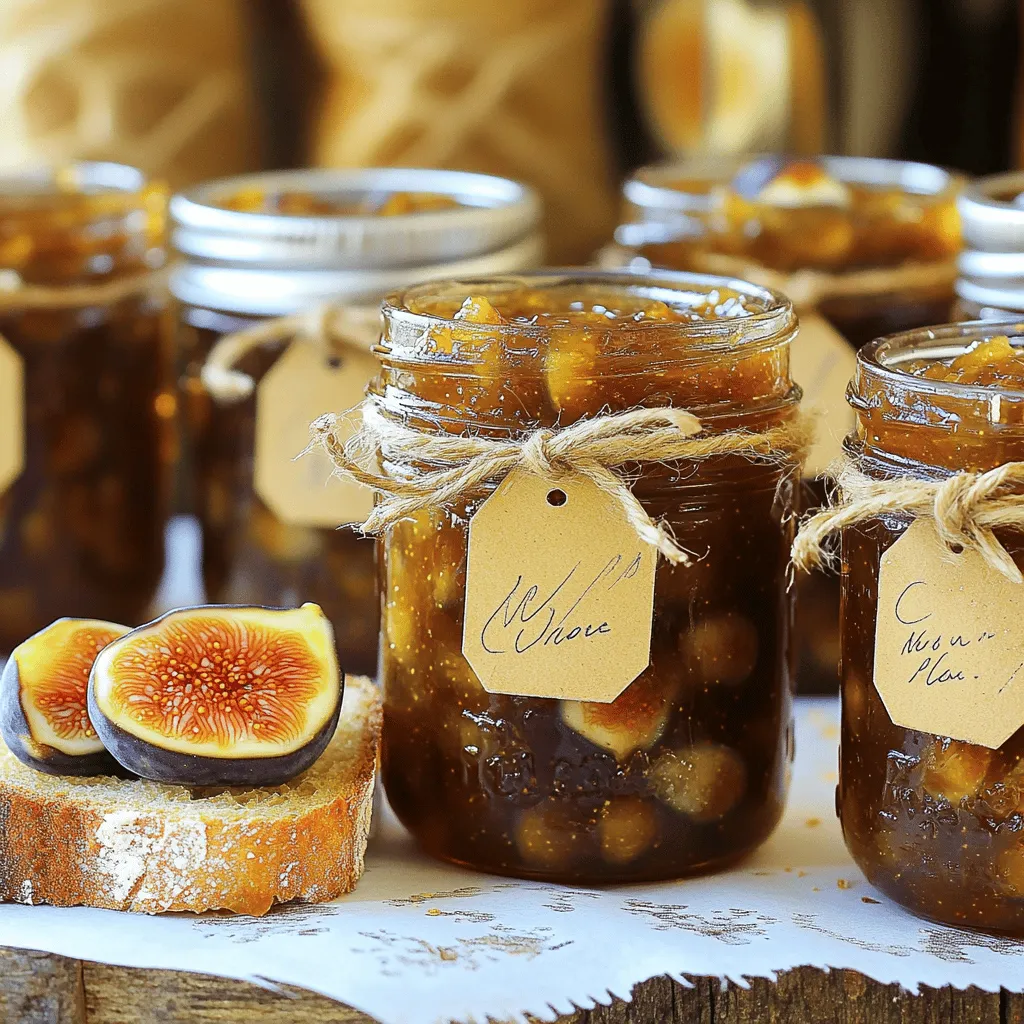
Welcome to my kitchen! Today, I’m excited to share Grandma’s Fig Preserves recipe. This simple and tasty treat captures summer

- 2 cups all-purpose flour - 1/2 cup unsalted butter, chilled and cubed - 1/2 teaspoon sea salt - 1/4 cup cold water - 4 medium heirloom tomatoes, sliced - 1 teaspoon sea salt (for tomatoes) - 1 cup shredded sharp cheddar cheese - 1 cup crumbled feta cheese - 1 tablespoon fresh basil, chopped - 1 tablespoon fresh thyme, chopped - 1/2 teaspoon black pepper - 1/4 teaspoon cayenne pepper - 1 cup mayonnaise - 1 teaspoon Dijon mustard - 9-inch pie dish - Rolling pin - Mixing bowls - Colander To make the Southern-Style Tomato Pie, you need simple ingredients. The crust needs flour, butter, sea salt, and cold water. For the filling, heirloom tomatoes are key. You also need cheese, herbs, and some spices. The cheese adds flavor, while the herbs bring freshness. You can use any pie dish, but I love a 9-inch one. A rolling pin helps to roll the dough evenly. Mixing bowls are a must for combining ingredients. A colander is handy for draining the tomatoes. The mix of sharp cheddar and feta gives the pie a rich taste. Fresh basil and thyme add a lovely aroma. Don't forget the cayenne for a slight kick! These ingredients come together to create a pie that is both flavorful and comforting. For the complete recipe, check out the Full Recipe link. To start, mix 2 cups of all-purpose flour and 1/2 teaspoon of sea salt in a big bowl. Next, cut in 1/2 cup of chilled, cubed butter. You want the mix to look like coarse crumbs. Then, slowly add 1/4 cup of cold water. Stir until a dough forms. Wrap the dough in plastic wrap and chill it for at least 30 minutes. This step helps the crust stay flaky. Slice 4 medium heirloom tomatoes. Sprinkle 1 teaspoon of sea salt on the slices. This will help draw out extra moisture. Let them drain in a colander for about 15 to 20 minutes. This step is key to avoid a soggy pie. Preheat your oven to 400°F (200°C). Roll out the chilled dough on a floured surface. Make it into a 12-inch circle. Fit the dough into a 9-inch pie dish, trimming any extra. Now, layer half of the sliced tomatoes in the crust. Sprinkle half of the shredded sharp cheddar and crumbled feta cheese on top. Add fresh basil and thyme. Then, place the rest of the tomatoes in. Sprinkle black and cayenne pepper. Top with the remaining cheese. In a bowl, mix 1 cup of mayonnaise and 1 teaspoon of Dijon mustard. Spread this topping evenly over the pie. Bake it in the oven for 30 to 35 minutes. Look for a golden brown and bubbly top. Let the pie cool for 10 to 15 minutes before slicing. This helps it set and makes serving easier. How do you know when the pie is done? You can tell the pie is ready when the top turns golden brown. Look for bubbly cheese, too. This shows that all the flavors meld together nicely. What are the best methods for cooling? Once you take the pie out of the oven, let it cool for about 10-15 minutes. This short time helps the pie set, making it easier to slice. If you can, let it cool on a wire rack. This keeps the bottom crust crisp. How can you add herbs and spices for a unique twist? Using fresh herbs like basil and thyme gives your pie a bright flavor. You can also try adding oregano or rosemary for a different taste. Just sprinkle a little in with the tomatoes for that fresh kick. What cheese substitutions can change the taste? If you want a different flavor, try using mozzarella or gouda in place of cheddar. Each cheese brings its own character. For a creamier texture, you can mix in some ricotta. Experiment to find your favorite blend! For the full recipe, check out the detailed instructions for making this delightful dish. {{image_2}} You can make this pie even more colorful. Swap out some tomatoes with vegetables. Zucchini, bell peppers, or spinach add great taste. You can mix in roasted garlic for a rich flavor. Just remember to drain any extra moisture. This step keeps your pie from getting soggy. You can also add different cheeses. Goat cheese or mozzarella can be tasty options. They give a nice twist to the dish. I love to play with flavors, and this keeps things fresh! If you need a gluten-free option, you’re in luck! Use gluten-free flour for the crust. Many brands work well without changing the taste. You can also try a store-bought gluten-free crust. They come ready to use and save time. Just check the package for specific baking instructions. To make it even easier, use a pie dish that fits well. This will help the pie bake evenly. Gluten-free can be just as delicious, so don’t be afraid to try it! For the Full Recipe, check out my complete guide on making Southern-Style Heirloom Tomato Pie. To keep your Southern-Style Tomato Pie fresh, let it cool first. After cooling, cover it tightly with plastic wrap or foil. Store it in the fridge for up to three days. When you're ready to enjoy it again, reheat it in the oven. Preheat the oven to 350°F (175°C). Place the slice on a baking sheet and heat for about 15 minutes. This helps the crust stay crisp and warm. To freeze your pie, first, let it cool completely. Wrap it well in plastic wrap and then in aluminum foil. This double-wrap protects against freezer burn. You can freeze it for up to three months. When you want to eat it, thaw it in the fridge overnight. To warm it up, bake it at 350°F (175°C) for about 25-30 minutes. This will make it taste fresh and delicious. For a full recipe, check the earlier section. You can use other tasty tomato types. Some good choices are: - Ripe beefsteak tomatoes - Juicy Roma tomatoes - Flavorful cherry tomatoes Each type has its own taste, but they will still work well in your pie. Just make sure they are fresh and ripe. Yes, you can prepare the pie ahead of time. Here are some tips: - Make the crust and fill it, then cover it well with plastic wrap. - You can freeze the unbaked pie for up to three months. Just remember to thaw it overnight in the fridge before baking. - If you bake it first, let it cool fully, then wrap it tightly. You can store it in the fridge for a few days. To reheat your pie, follow these methods: - Preheat your oven to 350°F (175°C). Bake the pie for about 15-20 minutes. - You can also use the microwave. Heat on medium for 1-2 minutes. Keep in mind that the oven method keeps the crust crisp. For the complete Southern-Style Heirloom Tomato Pie recipe, check out the [Full Recipe]. The blog post covered all you need for making a Southern-Style Tomato Pie. We discussed ingredients, equipment, and step-by-step instructions. I shared tips on baking and flavor enhancements. You can explore vegetarian and gluten-free options, too. Finally, I provided storage and reheating methods for leftovers. Enjoy creating this dish. It’s simple, tasty, and perfect for sharing. I hope these tips inspire you to try. Happy baking!

Southern-Style Tomato Pie Flavorful and Simple Delight

If you’re looking for a warm and tasty dish that screams Southern comfort, you’ve come to the right place! Southern-Style

To make the best peach cobbler, you need these key ingredients: - 4 ripe peaches, peeled and sliced - 1 cup granulated sugar, divided - 1 teaspoon cinnamon - 1 tablespoon lemon juice - 1 cup all-purpose flour - 1 tablespoon baking powder - 1/2 teaspoon salt - 1 cup milk - 1/2 cup unsalted butter, melted - 1 teaspoon vanilla extract - 1/4 cup brown sugar (for extra caramelization) These ingredients work together to create a sweet, warm treat. The peaches provide the fresh flavor, while the sugar and cinnamon add sweetness and spice. You can customize your peach cobbler with optional add-ins: - Chopped nuts for a crunch - A splash of almond extract for extra flavor - Fresh berries like blueberries or raspberries for a twist These add-ins can enhance the taste and texture of your cobbler. Feel free to experiment! If you don’t have an ingredient, here are some substitutions: - Use nectarines or plums instead of peaches for a different fruit flavor. - Swap granulated sugar with coconut sugar for a lower glycemic index. - Almond milk or oat milk can replace regular milk for a dairy-free option. These substitutions can help you adapt the recipe to what you have at home. Remember, cooking is all about making it work for you! For the full recipe, check out the Peachy Dream Cobbler. Start by preheating your oven to 350°F (175°C). This step warms the oven for the perfect bake. Next, take four ripe peaches, peel, and slice them. In a mixing bowl, combine the sliced peaches with 1/2 cup of granulated sugar, cinnamon, and lemon juice. Stir gently to coat the peaches. This step makes the peaches juicy and sweet. Let this mixture sit aside for a bit. This allows the peaches to soak in the flavors. In another bowl, mix 1 cup of all-purpose flour, 1 tablespoon of baking powder, salt, and the remaining 1/2 cup of sugar. In a separate bowl, combine 1 cup of milk, 1/2 cup of melted unsalted butter, and 1 teaspoon of vanilla extract. Mix these until they blend well. Pour this wet mixture into the dry ingredients. Stir just until mixed; a few lumps are okay. Take a greased 9x13 inch baking dish and pour the batter into it. Spread it evenly across the dish. Now, spoon the peach mixture on top, including any juices. This step keeps the cobbler moist and flavorful. Sprinkle 1/4 cup of brown sugar over the top for a sweet crust. Now, place the dish in your preheated oven. Bake for 45-50 minutes. You want it to be golden brown and bubbly. To check if it’s ready, insert a toothpick in the center. If it comes out clean, your cobbler is done. The top should be golden, and the edges should look crispy. If it needs more time, check every five minutes until it is perfect. With these steps, you'll create a beautiful peach cobbler everyone will love. For the full recipe, check the detailed instructions above. To make the best peach cobbler, use ripe peaches. They add natural sweetness. Slice them evenly for a consistent bake. Let them sit with sugar and lemon juice. This makes them juicier and enhances flavor. Mix the batter gently; lumps are okay. Overmixing can lead to a tough texture. Pour the batter into a greased dish. This prevents sticking and helps with cleanup. Avoid using under ripe or overripe peaches. They can ruin the taste and texture. Don't skip the lemon juice. It brightens flavors and balances sweetness. Also, resist the urge to bake at a higher temperature. This can burn the top while leaving the middle raw. Lastly, don’t forget to sprinkle brown sugar on top. It creates a sweet, crunchy crust. You’ll need a few basic items for this recipe: - Mixing bowls - Whisk - Measuring cups and spoons - A sharp knife for slicing peaches - A 9x13 inch baking dish - An oven preheated to 350°F (175°C) These tools help ensure a smooth cooking process. For the complete recipe, refer to the Full Recipe. {{image_2}} To make a gluten-free peach cobbler, swap all-purpose flour for a gluten-free blend. You can find many good mixes at stores. Just make sure to check the label for safe ingredients. This simple switch keeps the taste and texture delicious. Your friends will love it just as much! Peach cobbler is tasty on its own, but adding other fruits can enhance the flavor. You can mix in berries like blueberries or raspberries. These fruits add a nice tartness that balances the sweet peaches. Try using apples or cherries for a twist. Each fruit brings a unique taste, making your cobbler fun and exciting! Want to kick up the flavor of your cobbler? You can add spices like nutmeg or ginger. A pinch of nutmeg gives a warm touch, while ginger adds a fresh zing. For a deeper taste, try a splash of almond extract instead of vanilla. You can also sprinkle some oats on top for a crunchy finish. These simple changes bring new life to a classic dessert. For the full recipe, check out the Peachy Dream Cobbler section. After you enjoy your peach cobbler, store the leftovers. Let it cool first. Then, cover it with plastic wrap or foil. You can also use an airtight container. Keep it in the fridge for up to four days. This keeps the cobbler fresh and tasty. When you want to enjoy your peach cobbler again, reheating is easy. Preheat your oven to 350°F (175°C). Place the cobbler in an oven-safe dish. Cover it with foil to keep it moist. Heat for about 15 to 20 minutes. You can also microwave a single serving for about 30 to 60 seconds. Just watch it so it doesn’t get too hot. Freezing peach cobbler is a great way to save it for later. First, let it cool completely. Then, cut it into portions. Wrap each piece in plastic wrap. Place the wrapped pieces in a freezer bag. Make sure to remove as much air as possible. You can freeze it for up to three months. When you are ready to eat, thaw it in the fridge overnight. Then, reheat it as described above. Enjoy every bite of your Easy Peach Cobbler with the Full Recipe! Yes, you can use canned peaches. They are a great shortcut. Just make sure to drain them well. This helps keep your cobbler from getting too soggy. Canned peaches have sugar, so you may want to cut back on the sugar in the recipe. This keeps your dessert from being too sweet. The cobbler is done when it looks golden brown on top. You can check it by inserting a toothpick in the center. If it comes out clean, your cobbler is ready. The filling should bubble around the edges. Let it cool a bit before serving. This helps the flavors settle. I love serving peach cobbler warm. It’s perfect with a scoop of vanilla ice cream. You can also add a sprinkle of cinnamon on top for extra flavor. Serve it in bowls to show off its beauty. This dish is best enjoyed fresh, but leftovers taste good too. For the full recipe, check out Peachy Dream Cobbler. Peach cobbler is a warm and tasty treat that anyone can enjoy. We covered the main ingredients, baking steps, and tips for the best results. You learned how to swap ingredients and even make gluten-free versions. Storing and reheating are also simple tasks. With these tools, you’re ready to impress friends and family. Remember, practice makes perfect. Enjoy your peach cobbler adventure!

Easy Peach Cobbler Delightful Dessert for Everyone

If you love sweet treats, you’ll adore this Easy Peach Cobbler! This recipe is simple, quick, and perfect for any

- 2 cups all-purpose flour - 1 teaspoon baking powder - 1 teaspoon baking soda - 1/2 teaspoon salt - 1 teaspoon ground cinnamon - 1/2 teaspoon nutmeg - 1/2 cup granulated sugar - 1/2 cup brown sugar, packed - 3 large eggs - 1 cup vegetable oil - 2 teaspoons vanilla extract - 2 cups grated zucchini (about 2 medium zucchinis) - Zest of 1 lemon - 1 cup walnuts, chopped - 1/2 cup raisins (optional) You need high-quality ingredients for great zucchini bread. Fresh zucchini gives the best flavor. Use ripe zucchinis; they should feel firm. The nuts add a nice crunch. Walnuts are my favorite, but you can choose other nuts too. You can also add some fun flavors. Try pecans or hazelnuts if you want a twist. Extra spices like ginger or cardamom can boost the taste too. For the full recipe, check the section titled Full Recipe. Enjoy making this tasty treat! - Preheat oven to 350°F (175°C). - Grease or line a 9x5 inch loaf pan. To start, I always preheat my oven first. This way, your bread bakes evenly. Greasing the pan helps the bread not stick. You can also use parchment paper for easy removal. - Combine flour, baking powder, baking soda, salt, cinnamon, and nutmeg. Next, I mix all the dry ingredients in a medium bowl. Make sure to whisk well so everything blends. This mix gives your bread great flavor and rise. - Whisk together sugars, eggs, oil, and vanilla extract. - Incorporate grated zucchini and lemon zest. In a large bowl, I whisk the sugars with eggs, oil, and vanilla. This creates a fluffy texture. Then, I add in grated zucchini and lemon zest. The zucchini keeps the bread moist, and the lemon adds a bright taste. - Gradually fold dry ingredients into the wet mixture. I slowly add the dry mix into the wet mixture. It’s important to fold gently. Some lumps are okay; they add character to your bread. - Gently fold in the chopped walnuts and optional raisins. Now comes the fun part! I fold in the chopped walnuts. If you like, add raisins too. They add sweetness and chewiness to the bread. - Pour batter into prepared pan and bake for 55-65 minutes. Finally, pour the batter into the loaf pan. Spread it evenly. Bake it in your preheated oven for 55 to 65 minutes. Check with a toothpick; it should come out clean. Your kitchen will smell amazing! For the full recipe, refer to the earlier sections. Enjoy the baking! To make sure your zucchini bread stays moist, start with freshly grated zucchini. The fresh zucchini holds more moisture than store-bought, pre-grated options. Next, avoid overmixing the batter. Mix just until the dry ingredients and wet ingredients combine. Some lumps are okay. This helps keep the bread light and airy. You can make your zucchini bread even more tasty by adding zest from citrus fruits like lemon or orange. This gives a bright flavor that pairs well with the walnuts. You might also try adding extra spices, like ginger or cardamom, for a twist. Serve your bread with a cream cheese spread. This adds a rich and creamy touch that everyone will love. If your bread turns out undercooked, return it to the oven. Cover it with foil to prevent browning. Bake for 10 more minutes and check again. If your zucchini bread sinks, it may be due to too much moisture. To store it properly, let it cool completely. Wrap it tightly in plastic wrap. This helps keep it fresh and prevents further sinking. {{image_2}} You can make zucchini bread healthier in simple ways. First, try using whole wheat flour instead of all-purpose flour. Whole wheat flour adds fiber and nutrients to your bread. It gives a slightly nutty taste, which pairs well with zucchini. Another great tip is substituting oil with applesauce. Applesauce keeps the bread moist and lowers fat content. It also adds natural sweetness without extra sugar. This swap works well in many baked goods, so feel free to experiment! Zucchini bread is fun because you can mix in different flavors. You might enjoy chocolate chip zucchini bread. Just add a cup of chocolate chips to the batter. This gives a sweet twist that kids love! Adding dried fruits can also change the taste. For example, try adding cranberries or raisins. These fruits add a chewy texture and a burst of flavor. You can even mix and match your favorite fruits to create unique combinations. For the full recipe, visit the section above. Enjoy baking! You can store zucchini bread at room temperature or in the fridge. If you plan to eat it within a few days, room temperature works well. Just place it on a plate or in a bread box. Keep it covered, so it stays soft. If you want it to last longer, put it in the fridge. Wrap it tightly in plastic wrap or foil. This keeps moisture in and prevents it from drying out. However, this may change the texture slightly. To freeze your zucchini bread, let it cool completely first. Then, slice it into pieces. Wrap each slice in plastic wrap. This protects it from freezer burn. You can also use freezer bags. Just push out as much air as you can before sealing. When you want to eat it, remove a slice from the freezer. You can thaw it in the fridge overnight. For a quick option, use the microwave. Heat it for about 20 seconds. This will give you a warm, tasty piece of bread. You can find the full recipe for making this delicious zucchini bread with walnuts earlier in the article. Yes, you can use frozen zucchini. First, thaw it in the fridge overnight. After that, drain any extra water. Frozen zucchini has more moisture, so you may want to reduce the oil slightly. This keeps your bread from getting too soggy. No, peeling zucchini is not necessary. The skin adds texture and nutrients. Some people prefer to peel it for a smoother bread. It really comes down to personal taste. If you like a chunkier texture, keep the skin on. If you want a lighter feel, feel free to peel it. Absolutely! You can use pecans, hazelnuts, or almonds instead of walnuts. Each nut will add its own flavor and crunch. For a sweeter touch, consider using macadamia nuts. Just make sure to chop them finely for even distribution in the batter. Zucchini bread lasts about 3 days at room temperature. Store it in an airtight container to keep it fresh. If you place it in the fridge, it can last for up to a week. For longer storage, freeze it. Just wrap it well in plastic wrap or foil. Yes, you can make mini loaves! Use mini loaf pans and adjust the baking time. Bake them for about 25-30 minutes. Check them with a toothpick to ensure they are done. Mini loaves are great for sharing or gifting! For the full recipe, refer to the detailed instructions above. You learned about the key ingredients for making delicious zucchini bread. We covered mixing methods, optional add-ins, and baking tips. Remember to avoid overmixing for a moist, tender loaf. You can also try different nuts and spices for unique flavors. With the right storage practices, your zucchini bread stays fresh longer. Now, get in the kitchen and enjoy your baking adventure!

Zucchini Bread with Walnuts Tasty and Easy Recipe

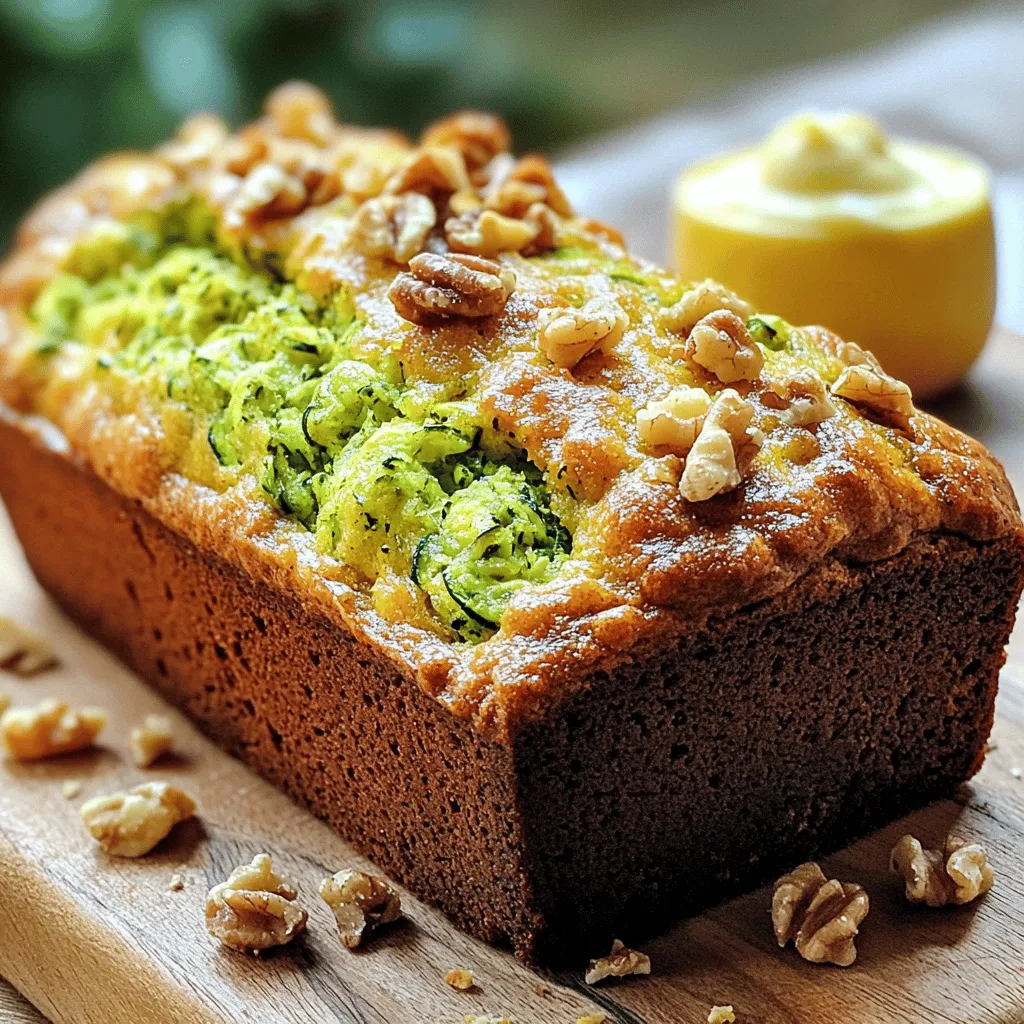
Craving a warm, home-baked treat? Try my Zucchini Bread with Walnuts! This easy recipe combines moist zucchini, crunchy walnuts, and

- 3 ripe peaches, sliced - 4 cups arugula or mixed greens - 1/2 cup crumbled feta cheese - 1/4 cup chopped walnuts, toasted - 1/4 cup red onion, thinly sliced - 1/4 cup balsamic vinegar - 2 tablespoons olive oil - 1 tablespoon honey - Salt and pepper to taste When making this salad, fresh peaches are key. Look for peaches that are slightly soft to the touch but not mushy. The flavor of ripe peaches adds a sweet burst to each bite. Next, choose arugula for a peppery kick, or mix greens for a milder taste. Feta cheese brings a creamy tang, while toasted walnuts add a nice crunch. The dressing is simple yet flavorful. Balsamic vinegar adds acidity, and olive oil gives a smooth texture. Honey sweetens the mix, but feel free to adjust it to your taste. Salt and pepper enhance all the flavors, so don't skip them! - Caloric breakdown per serving: Approximately 250 calories - Key vitamins and minerals: Vitamins A, C, and K; calcium; healthy fats This salad is not just tasty but also packed with nutrients. Peaches provide vitamins A and C, which are great for skin health. Feta cheese adds calcium, while walnuts contribute healthy fats. - Look for peaches that feel slightly soft when pressed. - Check for a sweet aroma; this shows they are ripe. - Avoid peaches with bruises or dark spots. You can find the best peaches at local farmers' markets or grocery stores. Seasonality matters, so buy them during summer for the best flavor. Always ask the vendor for advice if you're unsure! Explore the [Full Recipe] for step-by-step instructions to create this delicious salad. Start by washing your peaches. Use cool water to rinse them well. This removes dirt and pesticides. Next, slice the peaches into thin pieces. Aim for even slices for a nice look. Set these aside for later. Now, let’s prepare the salad greens. If you use arugula, rinse it too. Shake off the excess water. If you choose mixed greens, do the same. In a large bowl, combine the greens with the peach slices. Mix them gently to avoid bruising the peaches. Next, add the crumbled feta cheese. The creamy cheese adds a nice touch. Then, sprinkle in the toasted walnuts for crunch. These give the salad a satisfying texture. For the balsamic dressing, gather your ingredients. You will need balsamic vinegar, olive oil, honey, salt, and pepper. In a small bowl, add the vinegar and olive oil. Use two tablespoons of oil for the right balance. Add a tablespoon of honey for sweetness. Sprinkle in salt and pepper to taste. Whisk these together until they blend well. This technique helps mix oil and vinegar, creating a smooth dressing. Drizzle the dressing over your salad mixture. Toss everything gently to coat the ingredients. Make sure the flavors mix well without breaking the peaches. Now, it’s time to add a garnish. Top the salad with thinly sliced red onions. This adds a lovely pop of color and flavor. For a final touch, sprinkle extra feta cheese on top. Serve your salad immediately for the best taste. You can find the Full Recipe to guide you through each step. To make your salad look stunning, serve it on a large platter. Arrange the peach slices in a circle. Scatter the greens around the peaches for a colorful look. Drizzle extra balsamic glaze on top for that finishing touch. A sprinkle of fresh herbs adds a nice pop too. You can easily change the sweetness of the dressing. If you like it sweeter, add more honey. For a zesty kick, squeeze in some lemon juice. Adding fresh herbs like basil or mint can enhance the flavor. Just chop them finely and mix them in. One big mistake is overdressing the salad. Too much dressing can drown the flavors. Use just enough to coat the greens lightly. Another mistake is using unripe or overly soft peaches. Look for peaches that are firm but slightly soft to the touch. They should smell sweet and fragrant. This ensures the best taste and texture in your salad. {{image_2}} You can change the cheese for different flavors. Goat cheese adds creaminess. Blue cheese offers a strong taste. Both work well with peaches. For nuts, try almonds or pecans. They add crunch and flavor too. Just toast them for the best taste. In spring, you can add strawberries or asparagus. Strawberries add sweetness and color. Asparagus brings a fresh, green bite. In fall, consider apples and candied pecans. Apples give a crisp texture. Candied pecans add a sweet crunch that pairs well with peaches. You can switch up the dressing for variety. A citrus vinaigrette brightens the salad. It pairs well with the sweetness of peaches. Yogurt-based dressings bring creaminess and tang. They create a different flavor profile. Feel free to explore these options to keep your salad fresh and exciting. Don't forget to check the Full Recipe for more details! Store leftover salad in an airtight container. Glass containers work best, but plastic is fine too. Keep the salad in the fridge for up to three days. The greens will stay fresh and crisp if you store them dry. If the salad has dressing, eat it within two days for the best taste. You can prepare salad parts ahead of time. Slice the peaches and store them in lemon juice to keep them bright. Wash and dry the greens and store them in the fridge. You can also crumble the feta cheese and toast the walnuts in advance. On busy days, simply toss everything together with the dressing for a quick meal. I do not recommend freezing the salad. The greens will turn soggy when thawed. However, you can freeze peach slices. Cut the peaches and place them in a single layer on a baking sheet. Once frozen, transfer the slices to a freezer bag. Use them later in smoothies or as a topping for yogurt. You can store Savory Summer Peach Salad in the fridge for up to three days. Keep it in an airtight container. This helps keep the salad fresh. The peaches may soften a bit, but the flavors will still shine. If you want the best taste, eat it sooner rather than later. Yes, you can make this salad in advance. Prep the ingredients the night before. Slice the peaches and onions, and store them separately. Mix the greens and feta cheese ahead of time. Combine everything just before serving for the best texture and flavor. This salad goes well with grilled chicken or fish. You can serve it with a side of crusty bread. It also pairs nicely with a light pasta dish. For a vegetarian option, try serving it with quinoa or a grain bowl. Yes, this salad is naturally gluten-free. All the ingredients, including the dressing, are free from gluten. Just ensure that any added ingredients or sides you choose are also gluten-free. Enjoy this salad guilt-free! This blog post covers how to make a delicious Savory Summer Peach Salad. You learned about the ingredients, preparation steps, and tips to enhance flavor and presentation. Always select ripe peaches for the best taste. Avoid common mistakes to keep your salad fresh and tasty. Remember, there are many ways to customize this dish. Enjoy experimenting with variations and don’t hesitate to prep ahead for busy days. Your salad skills are key to impressing friends and family. Dive in and make this refreshing salad today!

Savory Summer Peach Salad Fresh and Flavorful Delight

Looking for a refreshing salad that captures summer’s essence? My Savory Summer Peach Salad blends juicy peaches, crisp greens, and

- 4 ripe peaches, halved and pitted - 4 tablespoons honey - 1 teaspoon cinnamon - 1 tablespoon olive oil - Pinch of sea salt - Fresh basil or mint leaves for garnish - Vanilla ice cream or Greek yogurt for serving (optional) Using fresh ingredients makes a big difference in flavor. Ripe peaches are sweet and juicy. They bring out the best in this dish. Fresh honey adds rich sweetness. Good quality olive oil enhances the taste. Always pick the best ingredients for the best results. When you choose peaches, look for a few signs. First, they should feel slightly soft when you press them. This means they are ripe and ready to eat. Next, check for a golden yellow color. Avoid peaches that are overly green or have dark spots. Finally, smell the peaches. They should have a sweet aroma. This shows they’re ripe and full of flavor. When you select the right peaches, your honey roasted peaches will shine. For the full recipe, follow the steps I provided above. Start by preheating your oven to 400°F (200°C). This step is key for roasting. The hot air will cook the peaches evenly. A hot oven helps to caramelize the honey and cinnamon, making the dish sweet and tasty. Next, take your ripe peaches. Slice each peach in half and remove the pit. Place them cut-side up in a baking dish. This position helps the honey soak in well. Drizzle 4 tablespoons of honey over each peach half. Make sure every piece gets a nice layer of honey. Sprinkle 1 teaspoon of cinnamon and a pinch of sea salt on top. This mix adds great flavor. Lightly brush the cut sides with 1 tablespoon of olive oil. This step helps them caramelize and brown nicely. Now, place the baking dish in your preheated oven. Roast the peaches for 20-25 minutes. They should become tender and the edges will caramelize. When done, remove the dish from the oven. Let the peaches cool slightly before serving. For a special touch, serve the warm peaches with vanilla ice cream or Greek yogurt. Don’t forget to garnish with fresh basil or mint leaves. This extra step makes your dish look beautiful and taste even better. For the complete recipe, check the Full Recipe section. To get those lovely caramelized edges on your peaches, follow a few steps. Start with ripe peaches. They should feel slightly soft. Cut the peaches in half and remove the pits. Brush the cut sides with olive oil. This oil helps them brown nicely. Drizzle honey over each peach half. The honey will melt and mix with the juices. Sprinkle cinnamon and a pinch of sea salt on top. The salt enhances the sweetness. Roast them at 400°F (200°C) for 20-25 minutes. Look for a golden color and tender texture. This is your sign of perfect caramelization. If you like your peaches sweeter, add more honey. You can also try a mix of honey and brown sugar. This blend gives a deeper flavor. Taste the peaches after roasting. If they need more sweetness, drizzle extra honey on top. Remember, the ripeness of the peaches affects sweetness too. Ripe peaches are naturally sweet. If your peaches are not ripe enough, add a bit more honey. Always taste and adjust to your liking for the best result. Presentation is key to a great dish. After roasting, let the peaches cool slightly. Serve them warm on a nice plate. A scoop of vanilla ice cream or Greek yogurt pairs well. Add a sprig of fresh basil or mint leaves for color. This contrast makes the dish pop. You can also sprinkle some chopped nuts on top for crunch. Nuts add texture and flavor. Try different garnishes to find what you like best. These small touches make your dessert look and taste gourmet. For the full recipe, check out the complete section above. {{image_2}} You can add nuts or granola to your honey roasted peaches. Almonds, walnuts, or pecans add crunch and flavor. Simply sprinkle them on top before serving. Granola gives a nice texture and sweetness. It also makes your dessert look beautiful. While honey shines in this recipe, other sweeteners work too. Maple syrup is a great choice. It adds a rich, warm flavor. You can also try agave syrup for a lighter taste. Just adjust the amount to keep the sweetness right. I love pairing honey roasted peaches with ice cream. Vanilla ice cream is a classic choice. It offers a cool contrast to warm peaches. You can also serve them with Greek yogurt for a creamy touch. Top it all off with fresh basil or mint for a pop of color. For a fun twist, consider serving these peaches with pound cake or shortcake. You can create a lovely layered dessert that pleases everyone. For the complete details, check the Full Recipe. To store leftover roasted peaches, place them in an airtight container. Keep them in the fridge. They stay fresh for up to three days. Make sure to let them cool completely before sealing. This helps keep their sweet taste and soft texture. Reheating roasted peaches is simple. Preheat your oven to 350°F (175°C). Place the peaches on a baking sheet. Heat them for about 10 minutes. You can also microwave them for 30 seconds. This warms them up without losing flavor. Enjoy them warm, just like when they came out of the oven. Freezing roasted peaches is a great way to save them. First, let the peaches cool completely. Then, place them in a single layer on a baking sheet. Freeze them for about two hours. After they freeze, transfer them to a freezer bag. Press out any air and seal tightly. They can last up to six months in the freezer. When you're ready to use them, just thaw in the fridge overnight. Yes, you can use canned peaches. Choose peaches packed in juice, not syrup. Drain them well before using. Canned peaches may cook faster than fresh ones, so keep an eye on them. They will still taste sweet and delicious in this dish. To make this dish vegan, replace honey with maple syrup or agave nectar. Both options will add sweetness. You can also skip the ice cream and use dairy-free yogurt or coconut cream. This way, you can enjoy a tasty vegan treat. Honey roasted peaches are nutritious and tasty. Peaches are high in vitamins A and C. They support healthy skin and boost your immune system. Honey adds antioxidants and can help soothe a sore throat. This dessert is a tasty way to enjoy fruit while getting great health benefits. Roasting peaches is simple and rewarding. We discussed key ingredients, focusing on fresh peaches. Choosing ripe fruit is vital for flavor. I shared tips for roasting, achieving perfect caramelization, and options for variations. Store your leftovers wisely, and reheating is easy. You can even freeze for later use. Remember, this dish can suit many diets. Enjoy trying new twists that fit your taste! Happy cooking!

Honey Roasted Peaches Sweet and Juicy Dessert Recipe

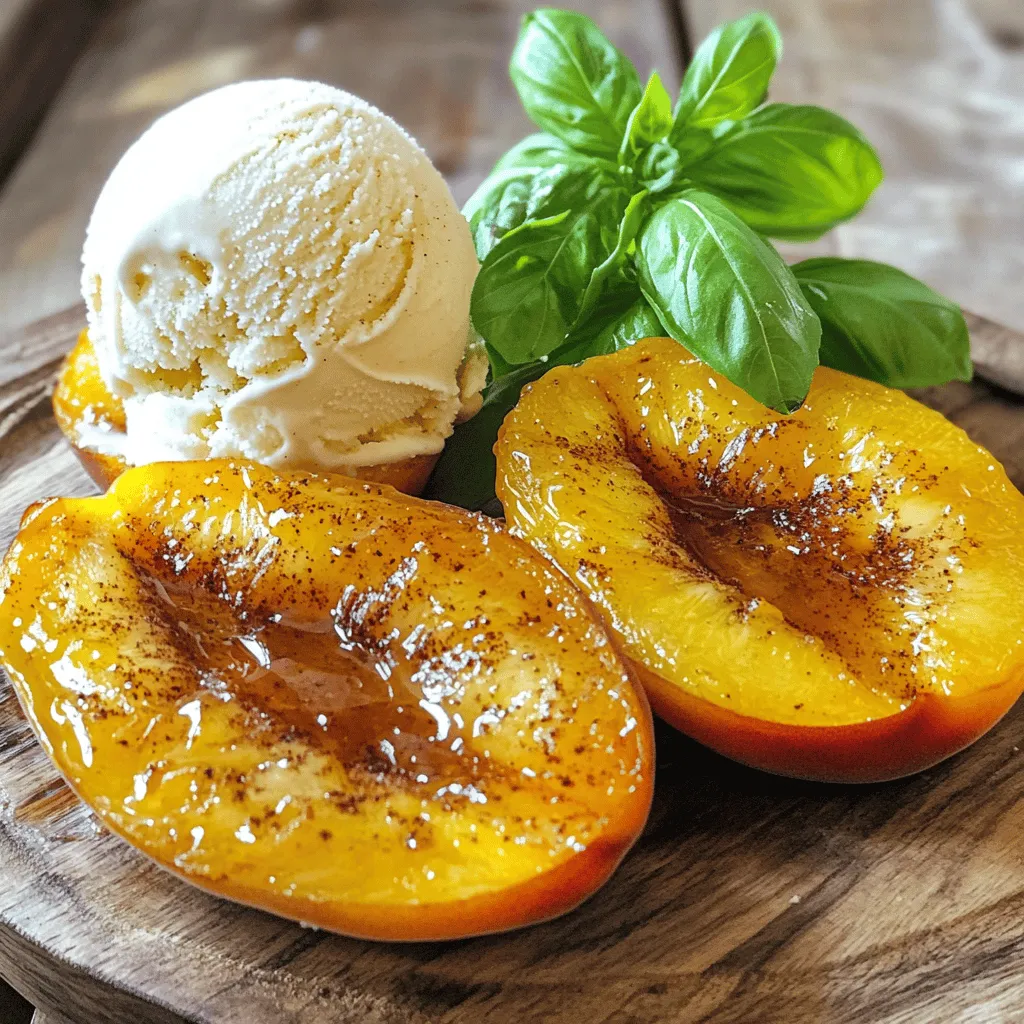
Looking for a sweet and juicy dessert that’s simple to make? Honey roasted peaches are just the treat you need!

Older posts
Newer posts
← Previous Page1 … Page15 Page16 Page17 … Page42 Next →

dsad

© 2025 flavorsprint • Built with GeneratePress

Our Policies

  • Copyright Policy
  • Cookie Policy
  • GDPR Policy
  • Privacy Policy
  • Disclaimer
  • Terms Of Use

More Information

  • Home
  • About
  • Contact
  • Appetizers
  • Dessert
  • Dinner
  • Drinks
©2025, flavorsprint About Back To Top