Skip to content
DisclaimerTerms Of UseGDPR PolicyCookie Policy

flavorsprint

  • Home
  • Drinks
  • Appetizers
  • Dinner
  • Dessert
  • About
  • Contact
  • Privacy Policy
DisclaimerTerms Of UseGDPR PolicyCookie Policy

Lillian

To make the Jennifer Aniston Salad, gather these fresh items: - 1 cup quinoa, rinsed - 2 cups water - 1 can (15 oz) chickpeas, drained and rinsed - 1 cucumber, diced - 1 red bell pepper, diced - 1/4 cup red onion, finely chopped - 1/2 cup parsley, chopped - 1/4 cup feta cheese, crumbled - 1/4 cup olive oil - 2 tablespoons lemon juice - Salt and pepper to taste This salad is not only tasty but also packed with nutrients. One serving contains: - Calories: about 270 - Protein: 10 grams - Carbohydrates: 30 grams - Fiber: 7 grams - Fat: 12 grams This meal is filling without being heavy. Each ingredient in this salad brings health perks: - Quinoa: High in protein and fiber, it helps keep you full. - Chickpeas: They provide protein and are great for heart health. - Cucumber: This veggie hydrates and is low in calories. - Red bell pepper: Packed with vitamins A and C, it boosts your immune system. - Parsley: This herb supports digestion and adds flavor. - Feta cheese: It gives a creamy texture and adds calcium. - Olive oil: A source of healthy fats, it can reduce inflammation. - Lemon juice: It adds zest and is rich in vitamin C. Together, these ingredients make a great meal that supports your health. For the full recipe, check it out. Start by rinsing the quinoa. This helps remove its natural coating, called saponin, which can taste bitter. In a medium pot, mix 1 cup of rinsed quinoa with 2 cups of water. Turn the heat to high and bring it to a boil. Once boiling, lower the heat. Cover the pot and let it simmer for about 15 minutes. The quinoa is done when all the water is absorbed. Use a fork to fluff it and set it aside to cool. In a large mixing bowl, add the drained chickpeas, diced cucumber, diced red bell pepper, finely chopped red onion, and chopped parsley. These ingredients add color, crunch, and nutrients to your salad. Once the quinoa cools down, add it to the bowl with other ingredients. This mix is full of flavor and texture. In a small bowl, whisk together 1/4 cup of olive oil, 2 tablespoons of lemon juice, and salt and pepper to taste. This dressing brings all the flavors together. Pour the dressing over the salad. Gently toss everything to combine. Finally, sprinkle 1/4 cup of crumbled feta cheese on top. Mix lightly to incorporate the cheese. Let the salad sit for about 10 to 15 minutes before serving. This allows the flavors to meld beautifully. For the full recipe, check out the details above! To make great quinoa, use a 1:2 ratio of quinoa to water. Rinse the quinoa well before cooking. This step removes a bitter coating called saponin. Bring the water to a boil, then lower the heat. Cover the pot and let it simmer for about 15 minutes. When the water is gone, fluff the quinoa with a fork. Let it cool before mixing it into the salad. If you have leftover Jennifer Aniston Salad, store it in an airtight container. Put it in the fridge and eat it within three days. The flavors will deepen as it sits. If you want to keep the feta cheese fresh, store it separately. This keeps the salad from getting soggy. Serve the salad in a large bowl for sharing. You can also plate it as single servings. Add a sprinkle of fresh parsley on top for a pop of color. A lemon wedge on the side adds a nice touch. This salad is great as a light meal or a side dish. You can pair it with grilled chicken or fish for more protein. For the full recipe, check out the earlier section. {{image_2}} For those with allergies, this salad is easy to adjust. If you're allergic to chickpeas, try black beans or lentils. You can swap feta cheese for a dairy-free cheese or omit it for a vegan option. If you're sensitive to gluten, quinoa is a great choice since it is gluten-free. For those avoiding nuts, you can skip the nuts altogether or use seeds like pumpkin or sunflower seeds for crunch. You can make this salad your own with fun add-ins. Consider adding sliced avocado for creaminess or cherry tomatoes for a burst of flavor. Adding roasted nuts can give a nice crunch. If you like spice, throw in some diced jalapeños or a sprinkle of red pepper flakes. Fresh herbs like mint or basil can enhance the taste and make it more vibrant. The dressing is key to the salad's flavor. If you want a different taste, try balsamic vinegar instead of lemon juice. A yogurt dressing can add creaminess and tang. For a spicy kick, mix in some sriracha or hot sauce. You can also use store-bought dressings like tahini or a citrus vinaigrette to save time. Each option gives a new twist to this delightful dish. Remember, you can always refer to the Full Recipe for the original version! To store Jennifer Aniston Salad, place it in an airtight container. This keeps it fresh and tasty. You can store it in the fridge for up to three days. To keep your salad ingredients fresh, wash and dry them well before mixing. Store the dressing separately. This helps prevent sogginess. You can add the dressing right before serving. This salad is best served cold. If you need to warm it, heat the quinoa separately. Avoid reheating the salad itself, as it may lose its fresh taste and texture. Jennifer Aniston Salad is a fresh and tasty dish. It features quinoa, chickpeas, and colorful veggies. You mix in cucumber, bell pepper, onion, and parsley. Feta cheese adds creaminess, while olive oil and lemon juice give it a zesty kick. This salad is both healthy and filling, perfect for lunch or dinner. It became popular because Jennifer Aniston loves it, and many people enjoy its bright flavors. Yes, you can prepare this salad in advance. Make it a few hours before serving. Just keep it in the fridge to stay fresh. If you want to make it a day ahead, that works too. Just wait to add the feta cheese until right before you serve it. This keeps it from getting soggy. Yes, Jennifer Aniston Salad is gluten-free. The main ingredients, like quinoa and chickpeas, do not contain gluten. This makes it a great choice for those with gluten sensitivities. Always check labels on your ingredients to be safe. Enjoy this salad without worry! You can find the Full Recipe online for easy reference. This blog covered the Jennifer Aniston Salad, from ingredients to storage. We explored the key ingredients, their health benefits, and how to prepare the dish step by step. I shared valuable tips for cooking quinoa and storing your salad properly. With various options available, you can easily customize this salad to suit your taste. Whether you decide to prepare it ahead or serve it fresh, it’s a delicious choice. Enjoy making your own twist on this popular salad!

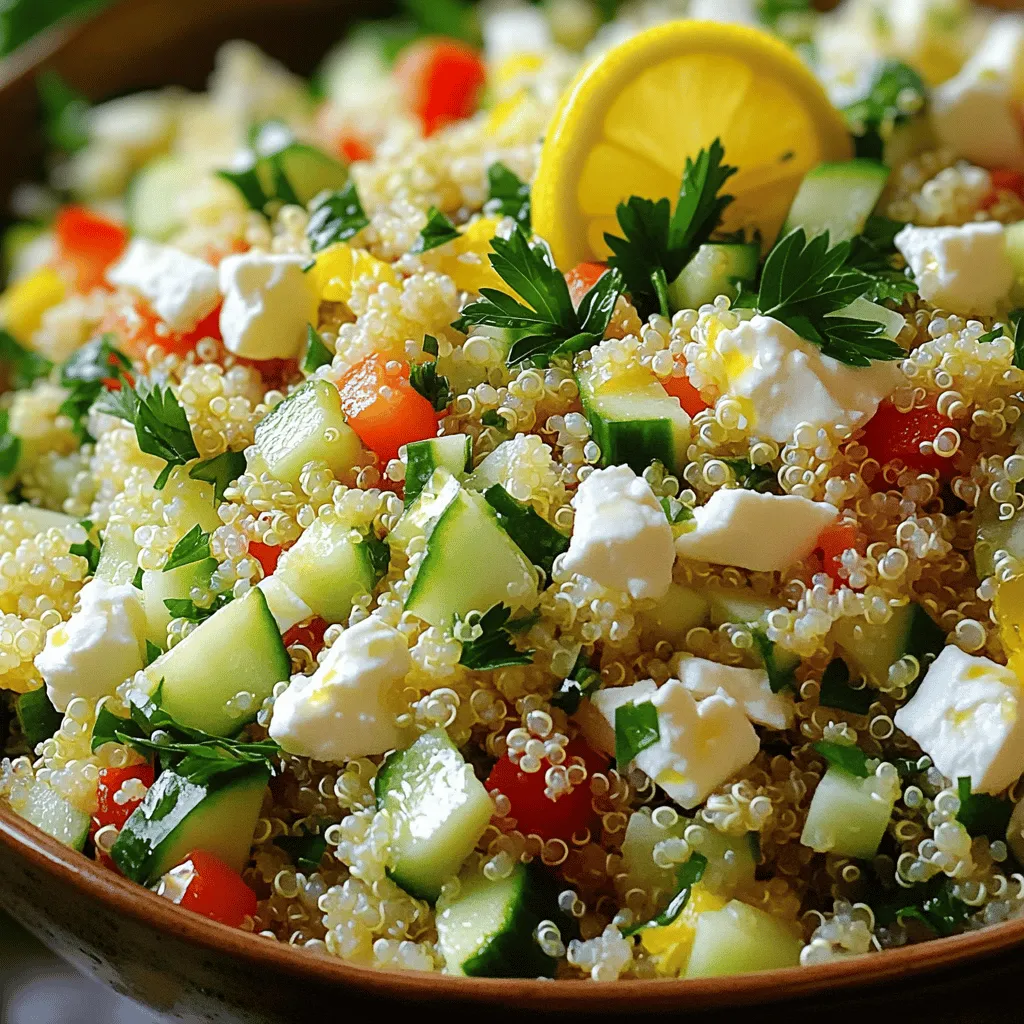
Jennifer Aniston Salad Delightful and Healthy Treat

Looking for a delicious and healthy salad? You’re in the right place! The Jennifer Aniston Salad is full of fresh

- 1 pound large shrimp, peeled and deveined - 1 cup uncooked jasmine rice - 1 ½ cups vegetable broth or water - 1 tablespoon olive oil - 1 teaspoon garlic powder - 1 teaspoon paprika - Salt and pepper to taste - 1 cup diced pineapple (fresh or canned) - ½ red bell pepper, finely chopped - ¼ red onion, finely chopped - 1 tablespoon lime juice - ¼ cup fresh cilantro, chopped To make a great shrimp rice bowl, start with fresh large shrimp. They give a nice flavor and texture. Use jasmine rice for its fragrant aroma and soft bite. Cooking it in vegetable broth adds depth to the dish. The seasonings are simple yet vital. Olive oil helps the shrimp cook well without sticking. Garlic powder and paprika bring warmth and richness. Don’t forget salt and pepper to taste. These will enhance all the flavors in your bowl. For the pineapple salsa, use fresh or canned pineapple. The sweetness balances the savory shrimp. Red bell pepper and red onion add crunch and color. Lime juice brightens everything up. Fresh cilantro ties the salsa together with its unique flavor. You can find the full recipe above for detailed cooking steps. - First, rinse the jasmine rice under cold water. - Next, combine the rice and vegetable broth in a saucepan. - Bring the mixture to a boil, then lower the heat. - Cover the saucepan and let it simmer for about 15 minutes. - Once done, remove it from heat and let it sit for 5 minutes. - Fluff the rice with a fork to make it light and airy. - Take the large shrimp and season them with garlic powder, paprika, salt, and pepper. - Heat olive oil in a large skillet over medium heat. - Add the seasoned shrimp to the skillet. - Cook the shrimp for 2-3 minutes on each side. - The shrimp should turn pink and opaque when cooked. - Once done, remove the shrimp from heat and set aside. - In a mixing bowl, combine diced pineapple, red bell pepper, and red onion. - Add lime juice and chopped cilantro to the bowl. - Mix everything well and season with a little salt to taste. - Adjust the seasoning based on your preference. Follow these steps, and you will create a flavorful shrimp rice bowl with vibrant pineapple salsa. For detailed measurements and more details, please check the Full Recipe. To cook shrimp just right, timing is key. Cook large shrimp for 2-3 minutes on each side. They should turn pink and opaque. If they curl tightly, they are overcooked. Aim for a slight curve, which means they are perfect. Add more flavor with simple seasonings. Try a pinch of cayenne for heat or add fresh herbs like basil. For a deeper taste, marinate shrimp in lime juice and spices for 30 minutes. This makes the shrimp extra tasty. Common mistakes can lead to mushy rice. Avoid stirring while it cooks, as this makes rice sticky. Use a 1:1.5 ratio of rice to water for jasmine rice. This means one cup of rice needs one and a half cups of broth. Let it sit after cooking to absorb steam. This will make the rice fluffy and light. Check out the Full Recipe for more details on creating this delicious shrimp rice bowl. {{image_2}} If you want a change from shrimp, try chicken or tofu. Chicken works well because it absorbs flavors nicely. Use the same spices and cook it until golden brown. Tofu is a great plant-based choice. Press it to remove excess water, then cube it. Sauté until crispy for a satisfying bite. You can also use fish like salmon or tilapia. These options add a different texture and flavor. You can swap jasmine rice for quinoa or brown rice. Quinoa is high in protein and cooks quickly. Brown rice gives a nutty taste and is more filling. If you want a low-carb option, try cauliflower rice. Simply pulse cauliflower in a food processor, then sauté it. This option is light and still delicious. Each grain offers a unique twist to the dish. For the salsa, get creative with fruits. Instead of pineapple, use mango or kiwi. Both add sweetness and color. You can also use seasonal fruits like strawberries in summer. They give a fresh taste that brightens the dish. Adjust the lime juice based on the fruit’s sweetness. This way, you can make the salsa your own. Store your shrimp rice bowl in airtight containers. Glass or plastic containers work well. Keep it in the fridge for up to three days. Make sure the shrimp and rice are cool before sealing. This helps keep them fresh and tasty. Reheat rice and shrimp in a microwave or on the stove. If you use a microwave, add a splash of water. This helps keep the rice moist. Heat in short bursts, stirring in between. For the stove, use low heat. Stir often to avoid overcooking the shrimp. They can get tough if heated too long. You can freeze the shrimp and rice separately for better results. Let them cool completely before freezing. Use freezer-safe bags or containers. Store the pineapple salsa in the fridge, as it does not freeze well. When ready to eat, thaw in the fridge overnight. Reheat the shrimp and rice as mentioned above for best taste. Yes, you can use frozen shrimp. It is a great option if fresh shrimp is not available. To thaw frozen shrimp, place them in the fridge overnight or run them under cold water for about 10-15 minutes. Drain and pat them dry before cooking. When cooking, follow the same steps as for fresh shrimp. Make sure they reach a pink and opaque color. This ensures they are cooked through and safe to eat. If you need a substitute for jasmine rice, there are many options. You can use basmati rice for a similar texture and flavor. Brown rice is a healthy choice and adds fiber. Quinoa is great for a gluten-free option and cooks quickly. For a low-carb meal, try cauliflower rice. It has a mild taste and absorbs flavors well. The spice level of this dish is mild. The shrimp are seasoned with garlic powder and paprika, which adds flavor without much heat. If you like it spicier, you can add jalapeño slices to the bowl. You can also sprinkle some red pepper flakes over the finished dish. Adjust the spice to match your taste! We covered a tasty shrimp dish with fluffy jasmine rice and fresh pineapple salsa. Use the right ingredients and seasonings for great flavor. Follow my steps to cook shrimp perfectly and make a vibrant salsa. Remember, you can switch proteins or grains to suit your taste. Store leftovers properly so you can enjoy this meal later. Whether it’s a weeknight dinner or a fun weekend project, these tips will help you succeed. Enjoy the cooking experience and share it with loved ones!

Savory Shrimp Rice Bowl with Pineapple Salsa Recipe

Are you ready to savor something special? This Savory Shrimp Rice Bowl with Pineapple Salsa brings together bright flavors and

- 1 ripe mango, diced - 2 ripe avocados, diced - 1 cup cherry tomatoes, halved - 1 small red onion, finely chopped - 1 red bell pepper, diced - 3 tablespoons fresh lime juice - 2 tablespoons olive oil - 1 tablespoon honey or agave syrup - Salt and pepper, to taste - 1 jalapeño, deseeded and minced - Fresh cilantro, for garnish This vibrant avocado mango salad combines fresh flavors and colors. You will love how ripe mango and creamy avocados work together. The sweet cherry tomatoes add a juicy pop, while the red onion and red bell pepper give a crunchy texture. For the dressing, fresh lime juice adds a tangy flavor that brightens the dish. Olive oil makes it smooth, while honey or agave syrup brings in a hint of sweetness. Don't forget salt and pepper to enhance all the flavors. If you like some heat, add a minced jalapeño. It adds a spicy kick that pairs well with the fruity salad. Lastly, fresh cilantro is a perfect garnish to finish off this dish. You can find the full recipe above for more detailed steps to create this delightful salad. - Combine diced mango and avocados in a large bowl. - Add the halved cherry tomatoes, chopped red onion, diced red bell pepper, and minced jalapeño (if desired) to the bowl. - In a small bowl, prepare the lime dressing. Whisk together fresh lime juice, olive oil, honey, salt, and pepper until smooth. - Pour the dressing over the salad ingredients. - Gently toss the salad to coat everything evenly with the dressing. - Taste the salad and adjust seasoning if needed. Add more salt, pepper, or lime juice to suit your taste. - Let the salad sit for about 10 minutes in the fridge. This time helps the flavors meld together. - Serve the salad in a clear bowl for a beautiful display of colors. - Just before serving, garnish with fresh cilantro and lime wedges for a pop of color and extra flavor. For the complete details on how to create this delightful salad, check out the Full Recipe. - Selecting perfectly ripe avocados: Look for avocados that yield slightly when you press them. They should not feel mushy. A ripe avocado has a dark green or black skin. If they are hard, let them ripen on the counter for a few days. - Picking the right mango: Choose a mango that is slightly soft to the touch. It should have a sweet aroma at the stem end. The skin color varies, but it should be mostly yellow or orange. Avoid mangoes with dark spots or wrinkles. - Tomato varieties for added flavor: Use sweet cherry tomatoes for a burst of flavor. They add color and sweetness to the salad. You can also try grape tomatoes or heirloom varieties for different tastes and textures. - Use freshly squeezed lime juice: Fresh juice brightens the salad. It adds a zesty kick that pairs well with the smooth avocado and sweet mango. Bottled juice lacks the same bold flavor. - Experiment with herbs and spices: Fresh cilantro adds a nice touch. For a spicy twist, try adding fresh chopped mint or a pinch of cumin. These flavors can elevate your salad and make it unique. - How to prevent avocado from browning: To keep your avocado green, add lime juice as soon as you cut it. The acidity helps slow down browning. Store any leftover salad in an airtight container to keep it fresh. - Keeping ingredients fresh before mixing: Chop your veggies right before serving. If you prepare in advance, store each ingredient separately. This method maintains the crispness of each item and avoids sogginess. For the full recipe, check out the details above. {{image_2}} You can boost this salad with protein for a filling meal. Grilled chicken or shrimp adds great flavor. Simply slice the chicken or shrimp and toss it in. For a vegetarian option, add black beans or chickpeas. They give a nice texture and protein punch. Fruits change with the seasons, so feel free to mix it up! Pineapple or berries can bring a fresh twist. Both fruits add sweetness and a fun texture. You can also play with the dressing. Try lemon or orange juice for a different citrus flavor. Each option will change the taste while keeping it bright. This salad works well with grilled meats or fish. It adds a bright contrast to savory dishes. You can serve it as a side dish or make it the main event. It’s perfect for picnics or summer dinners. Just pair it with your favorite protein for a complete meal. For the full recipe, check back to the main section to get all the details. To keep your avocado mango salad fresh, store leftovers in the fridge. Use an airtight container. This prevents air from getting in and keeps your salad crisp. If you don't have an airtight container, wrap it tightly with plastic wrap. Your salad stays fresh in the fridge for about two days. After that, the avocados may brown, and the salad may lose its taste. Look for signs of spoilage, like an off smell or a mushy texture. If you see these signs, it’s time to toss the salad. I do not recommend freezing this salad. Freezing alters the texture of the avocados and mangoes. If you must freeze it, keep the dressing separate. You can freeze the veggies and fruits for a short time, but they won’t be the same once thawed. Always check for quality before eating. To make this salad, follow these simple steps: 1. Combine Ingredients: In a large bowl, mix 1 ripe mango and 2 ripe avocados. Be gentle to keep the avocado intact. 2. Add Veggies: Toss in 1 cup halved cherry tomatoes, 1 small finely chopped red onion, and 1 diced red bell pepper. If you like spice, add 1 minced jalapeño. 3. Make Dressing: In a small bowl, whisk together 3 tablespoons fresh lime juice, 2 tablespoons olive oil, and 1 tablespoon honey. Add salt and pepper to taste. 4. Mix Together: Pour the dressing over the salad. Gently toss to coat all ingredients. 5. Taste and Adjust: Sample the salad. Add more salt, pepper, or lime juice if needed. 6. Chill: Cover and let it sit in the fridge for 10 minutes. This helps the flavors blend. 7. Garnish: Just before serving, add fresh cilantro for a nice touch. You can find the full recipe in the section above. Yes, you can prepare this salad in advance! - Prep Time: Make the salad up to 2 hours before serving. - Storage: Keep it in the fridge, covered to stay fresh. - Serving: Add the lime dressing just before serving. This keeps the salad crisp and bright. Avocado mango salad pairs well with many dishes. Consider these options: - Grilled Chicken: The juicy flavors complement each other. - Fish Tacos: The salad adds freshness to spicy tacos. - Quinoa: A healthy, filling side option. - Chips and Salsa: For a fun snack or appetizer. These pairings enhance the meal and delight your guests! This blog covered how to make a refreshing avocado mango salad. We talked about key ingredients, dressing tips, and ways to serve it. You can enhance flavor and add proteins for variety. Store leftovers well to keep them fresh. This salad is fun and easy to make. You can enjoy it as a main or side dish. Feel free to experiment with ingredients and flavors. Enjoy every vibrant bite of this tasty dish!

Vibrant Avocado Mango Salad with Lime Dressing Recipe

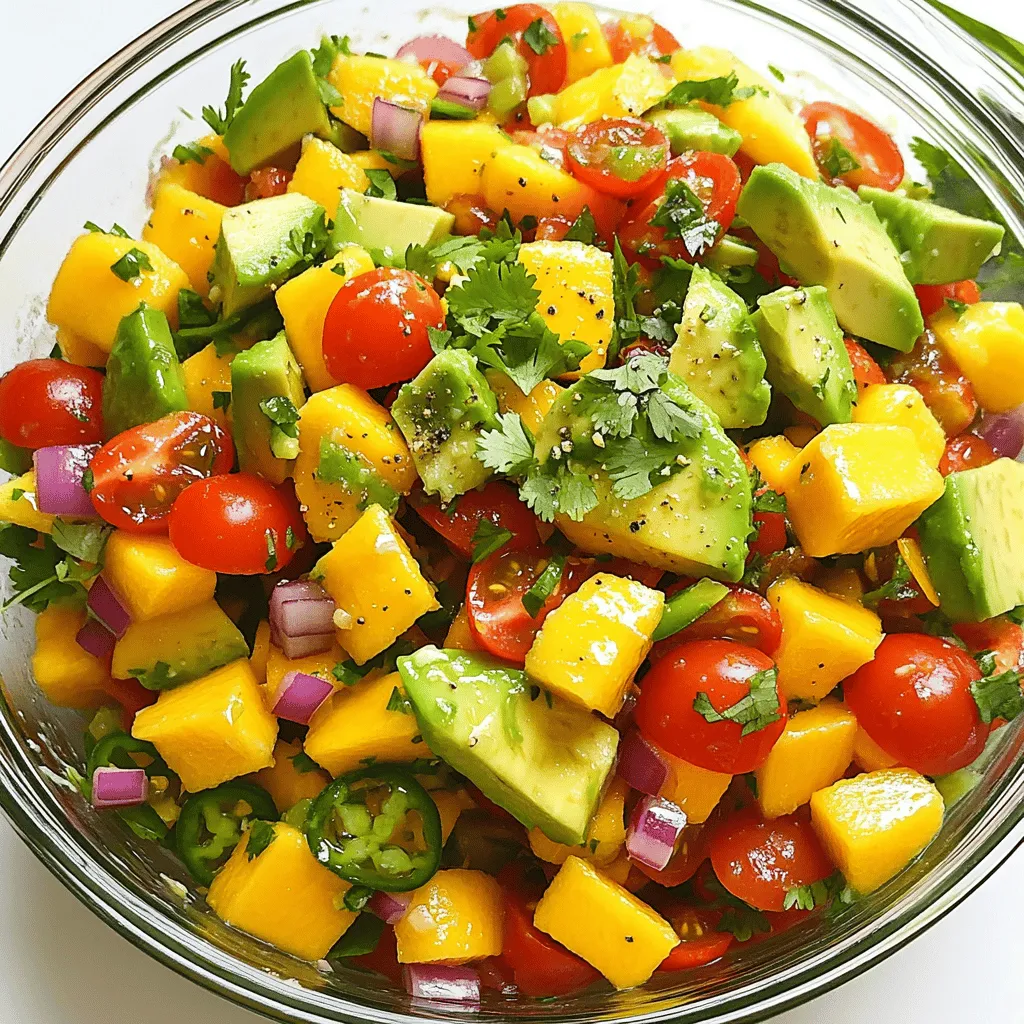
Looking for a refreshing dish that’s bursting with flavor? This Vibrant Avocado Mango Salad with Lime Dressing is the perfect

To make Greek chicken bowls, you need simple, fresh ingredients that pack a punch. Here’s what you’ll need: - 2 boneless, skinless chicken breasts - 2 tablespoons olive oil - 2 teaspoons dried oregano - 1 teaspoon garlic powder - 1 teaspoon paprika - Salt and pepper to taste - 1 cup cooked quinoa - 1 cup cherry tomatoes, halved - 1 cucumber, diced - 1 red onion, thinly sliced - 1 bell pepper (any color), diced - 1 cup feta cheese, crumbled - ½ cup Kalamata olives, pitted and halved - ½ cup tzatziki sauce for drizzling - Fresh parsley for garnish These ingredients come together to create a tasty and healthy meal. The chicken marinates in olive oil and spices, making it juicy and flavorful. The fresh veggies add crunch and color, while the feta and olives provide a rich taste. I love how the tzatziki sauce brings everything together with its cool, creamy texture. For the full recipe, check out the detailed instructions above. Enjoy creating these vibrant bowls! Marinating the chicken Start by mixing the olive oil, oregano, garlic powder, paprika, salt, and pepper in a bowl. This marinade packs lots of flavors. Coat the chicken breasts well, making sure they are fully covered. Place them on a baking sheet lined with parchment paper. Let them sit for a few minutes so they soak up the marinade. Baking the chicken Now, preheat your oven to 400°F (200°C). Bake the marinated chicken for about 25-30 minutes. The chicken is done when it reaches 165°F (75°C) inside. Once baked, let it cool before slicing. This step helps keep the juices in. Preparing the quinoa While the chicken bakes, it's time to prepare the quinoa. Cook it according to the package instructions. After it's ready, fluff it with a fork for the best texture. Set it aside for later. Mixing the vegetable ingredients In a large mixing bowl, combine the halved cherry tomatoes, diced cucumber, sliced red onion, and diced bell pepper. Toss them with salt and pepper to taste. This fresh mix adds crunch and color to your bowls. Final assembly of Greek chicken bowls Now it’s time to put everything together. Start with a scoop of quinoa at the bottom of each bowl. Top it with sliced chicken, the fresh vegetable mix, crumbled feta cheese, and Kalamata olives. Drizzle tzatziki sauce over the top and garnish with fresh parsley. This assembly makes each bite a burst of flavor. For the complete details, check the Full Recipe. To bake chicken perfectly, start by preheating your oven to 400°F (200°C). This high heat helps the chicken cook evenly. Marinate your chicken breasts in olive oil, oregano, garlic powder, and paprika. Let them sit for at least 30 minutes. This step adds great flavor. When you place the chicken on the baking sheet, make sure it is not crowded. This allows the heat to circulate and cook the chicken well. Bake for about 25 to 30 minutes. Check the internal temperature; it should be 165°F (75°C) to ensure it is safe to eat. Let it rest for a few minutes before slicing. This keeps the juices in. To fluff your quinoa for the best texture, cook it according to package instructions. After it's done, take a fork and gently stir it. This helps separate the grains, making it light and fluffy. Quinoa should have a nice bite and not be mushy. For ideal bowl presentations, use colorful ceramic bowls. This makes your meal look vibrant. Start with a base of quinoa, then layer on the sliced chicken. Add fresh veggies and sprinkle feta cheese on top. Finish with Kalamata olives and a drizzle of tzatziki sauce. Pair your Greek chicken bowls with refreshing drinks. A crisp lemonade or iced tea complements the flavors well. For sides, consider serving a light Greek salad or some warm pita bread. This adds variety and enhances your meal experience. For the complete recipe, check out the Full Recipe. {{image_2}} You can switch out the chicken for other proteins. Tofu works well for a vegan option. Shrimp adds a nice twist, too. Just adjust your cooking time. You can also change the grain base. Instead of quinoa, try brown rice for a heartier bite. Couscous is quick and fluffy, making it a great choice. To boost flavor, add more herbs and spices. Fresh dill or mint can brighten up your dish. A sprinkle of cayenne pepper gives it a nice kick. Different sauces can take your Greek chicken bowls to new heights. Swap tzatziki for hummus for a creamy texture. A drizzle of tahini adds depth and a nutty flavor. For the Full Recipe, check out the detailed instructions to make these flavor-packed bowls. To keep your Greek chicken bowls fresh, follow these tips: - Store leftovers in airtight containers. - Separate the chicken, quinoa, and veggies if possible. - Place tzatziki sauce in a small container to prevent sogginess. When stored correctly, your Greek chicken bowl will stay fresh for about 3 days in the fridge. The chicken and quinoa can hold up well, but veggies may lose crunch over time. You can freeze Greek chicken bowls for later enjoyment. Here’s how: 1. Cool the bowls before freezing to avoid ice crystals. 2. Use freezer-safe containers or bags. 3. Label them with the date for easy tracking. To reheat, thaw overnight in the fridge. Then, warm in the microwave or oven until heated through. This way, you can enjoy a tasty meal at your convenience! How to make Greek chicken bowls in advance? You can prep Greek chicken bowls ahead of time. Cook the chicken and quinoa first. Let them cool, then store in separate containers. Chop the veggies and keep them fresh in the fridge. When ready to eat, just assemble your bowls. This keeps everything crisp and tasty. What to serve with Greek chicken bowls? Greek chicken bowls are great on their own, but you can add sides. A fresh Greek salad pairs well. Pita bread or roasted veggies are also good choices. You could try some tzatziki with pita chips for extra flavor. Caloric and macronutrient breakdown per serving Each serving of Greek chicken bowls has around 450 calories. It offers about 30 grams of protein, 20 grams of fat, and 40 grams of carbs. This makes it a balanced meal. Dietary considerations These bowls are gluten-free if made with quinoa. You can also make them low-carb. Just skip the quinoa or use cauliflower rice. This way, you can enjoy the flavors without the extra carbs. For more details and tips, check out the Full Recipe. This blog post shared how to make tasty Greek chicken bowls. We discussed key ingredients, like chicken, olive oil, and fresh veggies. I walked you through marinating, baking, and mixing everything. You now know helpful tips, variations, and storage methods. In closing, these bowls are simple and fun to make. You can adjust them to fit your taste. Enjoy your delicious meals and share with others!

Greek Chicken Bowls Packed with Flavor and Freshness

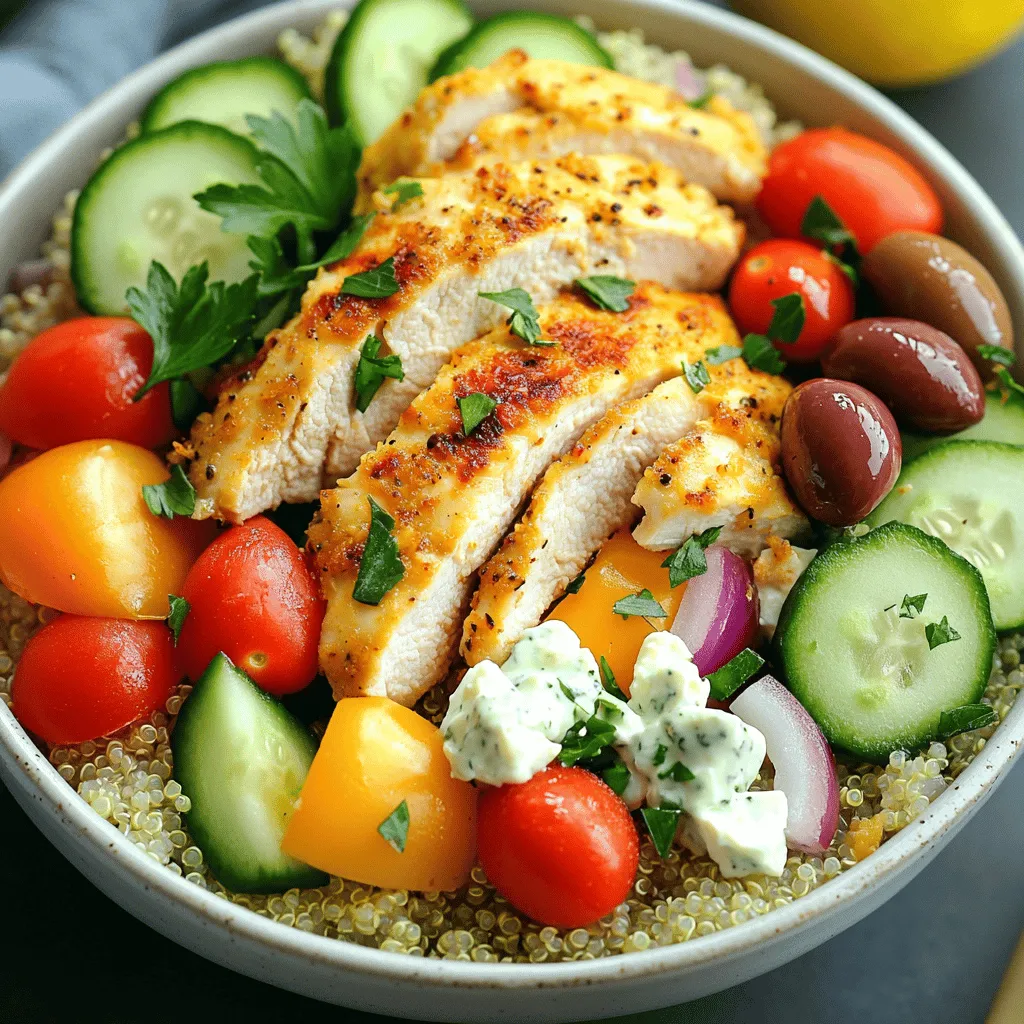
If you’re looking for a meal that bursts with flavor and freshness, try these Greek Chicken Bowls. They combine tender

- 1 ½ cups heavy cream - ½ cup whole milk - ⅓ cup granulated sugar - Zest of 2 lemons - 2 tablespoons lemon juice - 1 packet (0.25 oz) unflavored gelatin - 3 tablespoons cold water - 1 teaspoon vanilla extract - Fresh berries (strawberries, blueberries, raspberries) for topping - Fresh mint leaves for garnish (optional) For this recipe, I use exact amounts to get the best taste. Here are the details: - Heavy cream: 1 ½ cups gives a rich base. - Whole milk: ½ cup balances the creaminess. - Granulated sugar: ⅓ cup adds the right sweetness. - Lemon zest: Use the zest of 2 lemons for that bright flavor. - Lemon juice: 2 tablespoons brings acidity to cut through the cream. - Unflavored gelatin: 1 packet helps the panna cotta set. - Cold water: 3 tablespoons helps bloom the gelatin. - Vanilla extract: 1 teaspoon adds warmth to the flavor. - Fresh berries: Top with your choice of strawberries, blueberries, or raspberries. - Fresh mint leaves: Optional for a pop of color and taste. For those with dietary needs, here are some substitutes: - Dairy-free: Use coconut cream and almond milk. - Gelatin-free: Try agar-agar as a plant-based option. - Low-sugar: Use a sugar substitute that works for baking. This recipe is simple and can fit many diets. Adjust the ingredients to make it your own! For the full recipe, check the details above. To start, gather your heavy cream, whole milk, sugar, and lemon zest. Pour these into a medium saucepan. Heat the mixture over medium heat. Stir it gently as it warms. You want the sugar to dissolve fully. Be careful not to let it boil. If you see bubbles, reduce the heat. The goal is a hot mixture, not boiling. Next, take your unflavored gelatin and sprinkle it over cold water in a small bowl. Let it sit for about five minutes. This step is called blooming. It helps the gelatin dissolve evenly later. This step is key to a smooth panna cotta. If you skip it, your dessert may not set properly. Now, your cream mixture should be hot. Remove it from the heat. Stir in the lemon juice, vanilla extract, and the bloomed gelatin. Mix well until all the gelatin dissolves. To ensure a silky texture, strain the mixture through a fine sieve into a bowl. This step removes the zest and any lumps. Pour the smooth mixture into individual serving glasses or ramekins. Allow them to cool to room temperature. Then, cover them with plastic wrap. Place the glasses in the fridge for at least four hours. This time is crucial for the panna cotta to set well. The longer it chills, the firmer it will become. Enjoy your delicious dessert when it's ready! For the full recipe, please refer to the recipe section. To make the best panna cotta, avoid common mistakes. One mistake is boiling the cream mixture. Heat it gently to ensure a smooth texture. Another mistake is not letting the gelatin bloom. This step is key for a creamy finish. For tools, use a medium saucepan and a whisk. A fine sieve helps strain the mixture. Individual serving glasses or ramekins, like small jars, work great for serving. They also showcase the panna cotta's creamy look. Serve your panna cotta in clear glasses. This shows off the lovely layers. Top each one with fresh berries. Strawberries, blueberries, and raspberries add color and flavor. Arrange them nicely for a beautiful presentation. For garnish, consider a sprig of mint. It adds freshness and a pop of green. A light dusting of powdered sugar can also enhance the look. You can add fun flavors to your panna cotta. Try infusing herbs like basil or thyme for a twist. Just add them to the cream mixture while heating. Strain them out before pouring into glasses. Spices like cardamom or ginger can also enhance the taste. Use sparingly to keep the lemon flavor front and center. For a unique touch, consider adding a splash of fruit puree or liqueur before serving. This can create a delightful surprise in every bite. For the Full Recipe, check the main article section. Enjoy your creamy delight! {{image_2}} If you want to mix it up, consider different flavors for your panna cotta. Chocolate panna cotta is rich and creamy. Just swap some heavy cream for melted chocolate. You can also try coffee panna cotta by adding brewed coffee to the cream mixture. Seasonal fruits work well too. In spring, use fresh strawberries or cherries. In summer, blueberries and raspberries shine. In fall, add poached pears or figs for a warm touch. These swaps keep the dessert exciting. For those who follow a vegan diet, you can make panna cotta without dairy. Use coconut cream or almond milk instead of heavy cream and milk. Agar-agar can replace gelatin for a plant-based thickener. If you want a low-sugar option, consider using stevia or monk fruit sweetener. Adjust the amount to your taste. This way, you can enjoy a lighter version without losing flavor. Explore these variations to make your lemon panna cotta with berries fit your needs. Check out the Full Recipe for more ideas on how to adapt this dessert. To keep your leftover panna cotta fresh, place it in an airtight container. This helps prevent any odors from the fridge. If you used glasses, cover them tightly with plastic wrap. Make sure the panna cotta is fully chilled before storing. This keeps its creamy texture intact. Panna cotta stays fresh in the fridge for about 3 to 5 days. After that, it may lose flavor and texture. Signs that your panna cotta should no longer be consumed include changes in smell or texture. If you see any mold or separation, it's best to toss it. Always trust your senses for food safety. Panna cotta is an Italian dessert. It means "cooked cream." This creamy treat has a soft, silky texture. You make it from cream, milk, and sugar. It often has flavors like vanilla or citrus. Panna cotta is simple and can be dressed up with fruits. To check if your panna cotta is ready, gently shake it. It should wobble but not slosh. If it looks jiggly and firm, it’s set. You can also insert a toothpick. If it comes out clean, your panna cotta is good to go. Yes, panna cotta is perfect for meal prep! You can make it a day or two before serving. Just store it in the fridge, covered. This way, you save time on busy days. For more details on advance prep, check out the Full Recipe. You can use frozen berries, but fresh is better. Fresh berries taste bright and juicy. They add a nice pop to your panna cotta. If you use frozen, let them thaw first. This helps keep the texture nice. In this blog post, we covered how to make panna cotta from scratch. You learned about the key ingredients, including heavy cream, lemon juice, and fresh berries. We provided step-by-step instructions to ensure your panna cotta sets perfectly. Remember, practice makes perfect. Explore flavor variations and dietary alternatives to fit your needs. Enjoy the process and impress others with this delightful dessert. With these tips, you can master panna cotta and create a treat everyone will love.

Lemon Panna Cotta with Berries Simple and Creamy Delight

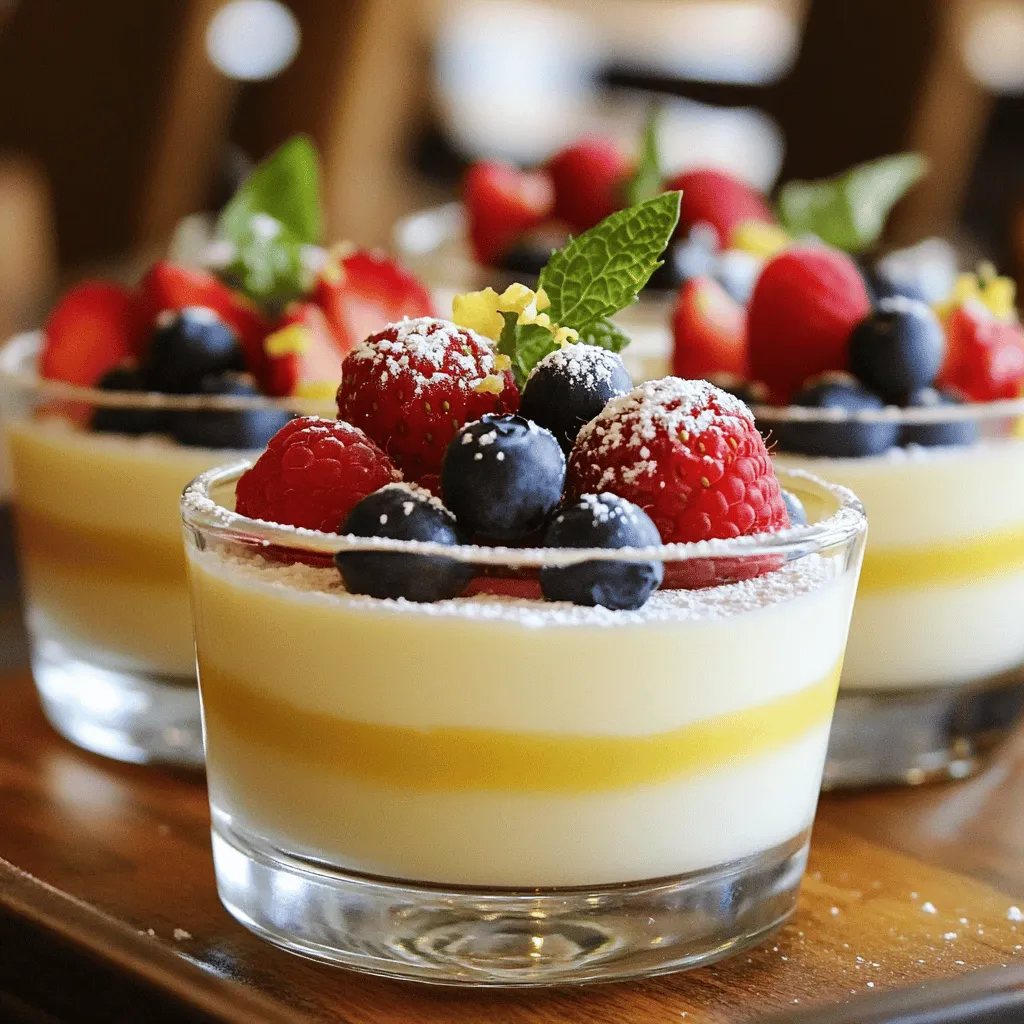
Looking for a simple yet elegant dessert? My Lemon Panna Cotta with Berries is the answer! This creamy delight offers

- 8 oz (225 g) spaghetti or your favorite pasta - 2 medium zucchinis, spiralized or thinly sliced - 1 cup heavy cream (or coconut cream for dairy-free) - 2 tablespoons olive oil - 2 cloves garlic, minced - Zest and juice of 1 lemon - 1/2 cup grated Parmesan cheese (or nutritional yeast for vegan) - Salt and freshly cracked black pepper - Fresh basil leaves for garnish In this creamy zucchini lemon pasta, I love to keep it simple yet flavorful. The main ingredients shine through. Pasta acts as a delicious canvas. Zucchini adds a nice crunch and freshness. Heavy cream or coconut cream gives a rich, velvety touch. For flavor, I always use good olive oil. Minced garlic brings warmth and aroma. The zest and juice of lemon brighten the dish. It’s all about balance here. Toppings make a difference too. Parmesan cheese adds a savory bite. For those who prefer vegan options, nutritional yeast works wonders. A sprinkle of salt and pepper brings out all the flavors. Fresh basil leaves add a pop of color and taste as a garnish. If you want the full experience, check out the Full Recipe. Enjoy these bright, fresh flavors in every bite! - Bring a large pot of salted water to a boil. - Cook spaghetti according to package instructions until al dente. Cooking pasta is the first step. Salting the water adds flavor. Use a timer to avoid overcooking. Once al dente, save half a cup of that starchy water. This will help later! - Heat olive oil in a skillet over medium heat. - Add minced garlic and sauté until fragrant. - Cook zucchini until tender yet crisp. Next, sauté the zucchini. Heat olive oil in your skillet. Add minced garlic for flavor. Cook it for about 30 seconds. Then, add the zucchini. Stir it for about three to four minutes. You want it tender but still a bit crisp. - Lower heat and add heavy cream with lemon zest and juice. - Allow mixture to simmer while stirring frequently. Once the zucchini is ready, it's time for the sauce. Lower the heat and add heavy cream. Stir in lemon zest and juice for a bright taste. Let it simmer for two to three minutes. Keep stirring. - Toss the drained pasta in the skillet with creamy sauce. - Adjust consistency with reserved pasta water if needed. Now, add the drained pasta to the skillet. Toss it in the creamy sauce until fully coated. If the sauce is too thick, use the reserved pasta water to adjust it. Just add a little at a time. - Stir in grated Parmesan cheese until melted. - Season with salt and black pepper to taste. Stir in grated Parmesan cheese. Mix well until the cheese melts into the sauce. Taste it and season with salt and black pepper. Adjust to your liking. - Garnish with fresh basil leaves and extra lemon zest. Finally, it’s time to plate your dish. Serve the pasta in bowls. Garnish with fresh basil leaves and a touch of lemon zest. This adds a nice pop of color and flavor. For the full recipe, check out the detailed steps and tips! To get the right creamy texture in your pasta, use pasta water. Before you drain your pasta, save about 1/2 cup of the cooking water. This water has starch, which helps thicken your sauce. If your sauce gets too thick, add a bit of this water back in. Mix it in slowly until you reach your desired creaminess. Mixing cheeses can create a rich flavor. I love using both Parmesan and a bit of goat cheese. The Parmesan adds a salty kick, while the goat cheese gives a creamy tang. You can also try adding a sprinkle of feta for a unique twist. This combo makes each bite more exciting. To save time, prepare the zucchini while the pasta cooks. Start boiling your water and adding the pasta. In a separate skillet, heat your olive oil. When the pasta has about five minutes left, add the zucchini to the skillet. This way, both will finish cooking at the same time. It’s quick and keeps everything fresh. For the full recipe, check out the detailed steps to make this dish perfectly! {{image_2}} You can easily make this dish vegan. Just swap the heavy cream for coconut cream. This gives a rich, creamy taste without dairy. For cheese, use nutritional yeast instead of Parmesan. Nutritional yeast adds a cheesy flavor while keeping it plant-based. If you need a gluten-free version, don’t worry! Many pasta options are gluten-free. Look for pasta made from rice, quinoa, or lentils. These alternatives work well and taste great in this dish. They will provide a satisfying meal without gluten. Want to add some protein? You can mix in grilled chicken or shrimp. Both options will make the dish heartier. Cooking the protein separately and adding it just before serving keeps everything fresh. You can also add spinach or cherry tomatoes for extra flavor and nutrients. To store Creamy Zucchini Lemon Pasta in the fridge, let it cool first. Place it in an airtight container. This helps keep it fresh. You can enjoy leftovers for up to three days. Just make sure to seal the container well to prevent moisture loss. When reheating, keep the pasta creamy. Use a skillet over low heat. Add a splash of water or cream to help with this. Stir the pasta gently as it warms. This way, you avoid drying it out. You can also use a microwave if you're in a hurry. Just heat in short bursts and stir often. Yes, you can freeze this dish! Allow the pasta to cool completely. Then, portion it into freezer-safe bags or containers. Remove as much air as possible. It can last for about two months in the freezer. When you're ready to eat, thaw it overnight in the fridge. Reheat it gently with some added cream for the best texture. To add heat to this creamy zucchini lemon pasta, you can try a few simple options: - Add red pepper flakes to the sautéed garlic for a quick kick. - Mix in some diced fresh chili peppers while cooking the zucchini. - Use a spicy flavored olive oil instead of regular olive oil. - Top the dish with a drizzle of hot sauce before serving. If you need a substitute for Parmesan cheese, here are some great options: - Pecorino Romano cheese gives a similar flavor. - Nutritional yeast is a great dairy-free choice and adds a cheesy taste. - Grated mozzarella can provide a creamy texture. - For a nutty flavor, try grating some cashew cheese. To keep your zucchini crisp, follow these tips: - Sauté zucchini just until it is tender, about 3-4 minutes. - Avoid overcrowding the pan when cooking. This helps them cook evenly. - Use medium heat so they cook without getting mushy. - Consider adding them to the pan after the garlic has cooked for a bit. Yes! You can use various types of pasta for this recipe. Here are some ideas: - Penne or fusilli can hold the sauce well. - Whole wheat pasta adds extra fiber and nutrients. - Gluten-free pasta is a great option if needed. - Try spiralized veggies like zucchini or butternut squash for a lighter dish. For the full recipe, check out the Full Recipe section! This recipe gives you a creamy and tasty pasta dish with fresh zucchini and lemon. You learned about the main ingredients, cooking steps, and variations. You can customize this meal to fit your needs, whether you want it vegan or gluten-free. Remember, the key to success is balancing flavors and textures. Enjoy experimenting with this recipe, and make it your own!

Creamy Zucchini Lemon Pasta Easy and Flavorful Recipe

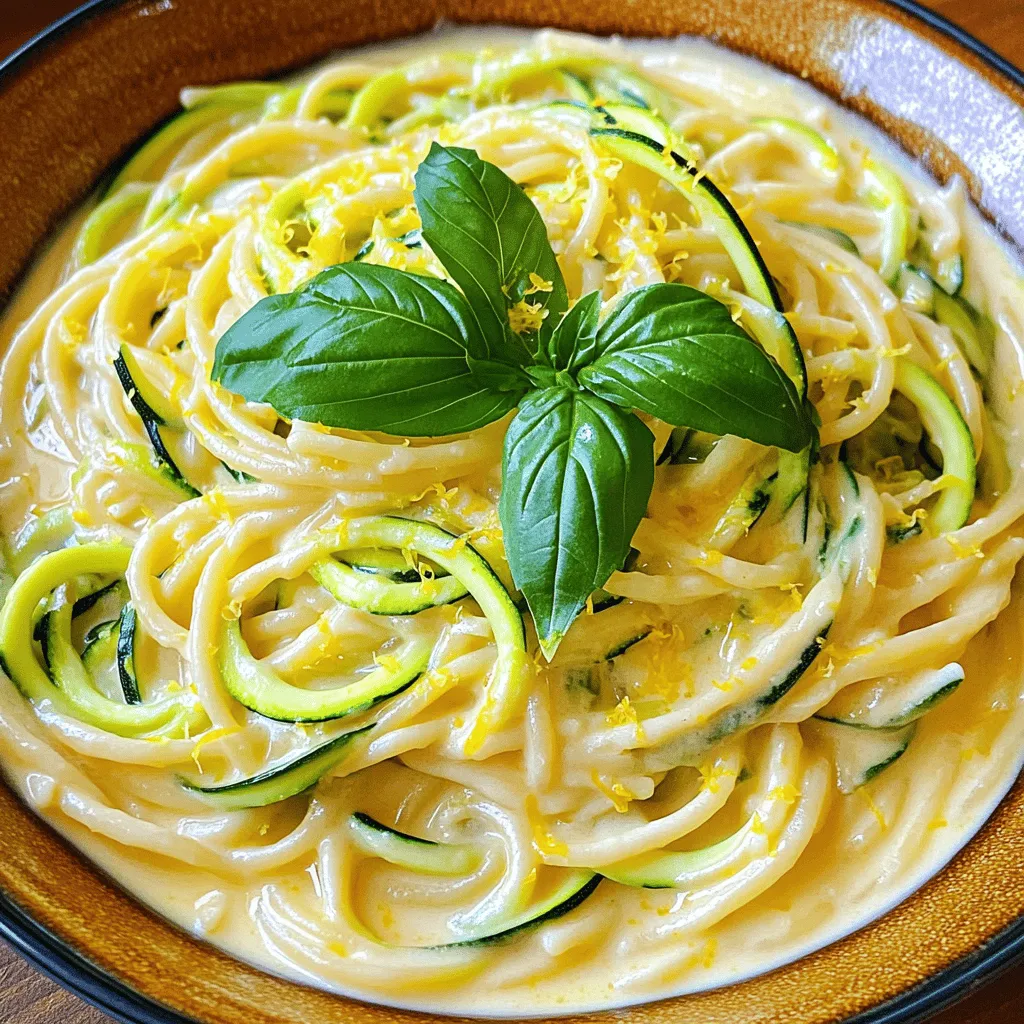
If you crave a simple dish that’s bursting with flavor, you’re in for a treat! My Creamy Zucchini Lemon Pasta

To make Asian chicken skewers with honey garlic sauce, gather these main ingredients: - 1 lb chicken breast, cut into 1-inch cubes - 3 tablespoons soy sauce - 2 tablespoons sesame oil - 1 tablespoon fresh ginger, minced - 3 cloves garlic, minced - 2 tablespoons honey - 1 tablespoon rice vinegar - 1 tablespoon cornstarch - 1 teaspoon red pepper flakes (optional, for heat) - Wooden or metal skewers These ingredients create a tasty marinade that makes the chicken juicy and full of flavor. In addition to the main ingredients, you’ll need these pantry staples: - Soy sauce - Sesame oil - Honey - Rice vinegar - Cornstarch These items are easy to find and often already in your kitchen. You can enhance the dish with these optional garnishes: - 1 green onion, finely chopped - Sesame seeds These garnishes add color and crunch to your skewers. You can find the Full Recipe to get all the details on how to put it all together. To start, gather all your ingredients. In a medium bowl, mix the soy sauce, sesame oil, fresh ginger, minced garlic, honey, rice vinegar, and red pepper flakes. Whisk until it combines well. This mixture is your marinade. It adds great flavor to the chicken. Next, take your chicken breast. Cut it into 1-inch cubes for even cooking. Place the chicken in a resealable bag or a shallow dish. Pour the marinade over the chicken. Seal the bag or cover the dish. Let it chill in the fridge for at least 30 minutes. This allows the chicken to soak up the flavors. Now, it’s time to grill! Preheat your grill or grill pan on medium-high heat. If you use wooden skewers, soak them in water for 30 minutes to stop burning. Remove the chicken from the marinade, letting any extra drip off. Discard the marinade. Thread the chicken onto the skewers, leaving space between pieces. This helps with even cooking. Grill the skewers for 10-12 minutes. Turn them often until the chicken is cooked. Look for nice grill marks. While grilling, you can make the honey garlic sauce. In a small saucepan, whisk together the leftover marinade and cornstarch. Heat it on medium until it thickens. Drizzle this sauce over the cooked skewers. Finally, garnish with chopped green onions and sesame seeds. Serve these tasty skewers on a platter with extra sauce. Enjoy your meal! For more details, check the Full Recipe. Marinating chicken adds great taste. I suggest at least 30 minutes. For deeper flavor, marinate for up to 4 hours. The longer it sits, the more flavor it picks up. Just don’t go overboard. If you marinate too long, the meat can get mushy. When skewering, keep chicken cubes uniform in size. This helps them cook evenly. Leave a little space between each piece on the skewer. It allows heat to circulate. If you use wooden skewers, soak them in water first. This prevents burning on the grill. Metal skewers are great too, but be careful; they can get hot! To get those beautiful grill marks, preheat your grill well. Aim for medium-high heat. Once you place the skewers down, don’t move them for a few minutes. Flip them only when they release easily. This helps create those nice, dark grill marks. Grill for about 10-12 minutes, turning occasionally for even cooking. For more details, check the Full Recipe. {{image_2}} You can swap chicken for many proteins. Try shrimp or tofu for a twist. Pork works well too. Each option brings a new flavor. Just adjust cooking times. Shrimp cooks fast, while tofu takes longer to soak up the marinade. Feel free to change the marinade to match your taste. Soy sauce is great, but try teriyaki sauce for a sweeter touch. You might mix in lime juice for a citrus kick. Adding sriracha can give a spicy edge. Experiment with what you enjoy most. To enhance the taste, add spices and herbs to your skewers. Fresh cilantro or basil can brighten the dish. A sprinkle of five-spice powder brings warmth. Try adding chili flakes for heat. Each addition makes your skewers unique and delicious. Check out the Full Recipe for more ideas! After enjoying your Asian chicken skewers, store any leftovers in an airtight container. This keeps the chicken fresh and tasty. Try to refrigerate the skewers within two hours of cooking. They will stay good for about three days. To keep the flavor, store the honey garlic sauce separately. This way, your skewers won’t get soggy. If you want to save your skewers for later, freezing is a great option. First, let the cooked skewers cool completely. Then, wrap them tightly in plastic wrap. After that, place them in a freezer-safe bag or container. Properly stored, they can last for up to three months. When you’re ready to eat, just thaw them in the fridge overnight before reheating. Reheating your chicken skewers can bring back their grilled flavor. For the best results, use an oven. Preheat it to 350°F (175°C). Place the skewers on a baking tray and cover them with foil. Heat for about 10-15 minutes until warm. You can also use a microwave, but be careful not to overcook them. Drizzle a bit of honey garlic sauce on top before serving to keep them juicy. For the full recipe, check out the instructions above! To make Asian chicken skewers with honey garlic sauce, gather your ingredients. You need chicken breast, soy sauce, sesame oil, ginger, garlic, honey, rice vinegar, cornstarch, red pepper flakes, green onion, and sesame seeds. First, mix the soy sauce, sesame oil, ginger, garlic, honey, rice vinegar, and red pepper flakes in a bowl. This is your marinade. Next, cut the chicken into cubes and place it in a bag. Pour the marinade over the chicken. Seal the bag and refrigerate for at least 30 minutes. After marinating, thread the chicken onto skewers and grill them for 10-12 minutes. Drizzle the thickened honey garlic sauce over the skewers. For the full recipe, check the section above. Asian chicken skewers go well with many sides. Try serving them with steamed rice for a filling meal. A fresh side salad adds crunch and color. You can also serve them with stir-fried vegetables for a tasty balance. For a lighter option, consider cucumber salad or pickled veggies. Each of these sides enhances the flavors of the skewers. Yes, you can substitute some ingredients in the marinade. If you don't have sesame oil, use olive oil or vegetable oil. For a different flavor, try using lime juice instead of rice vinegar. You can replace honey with maple syrup for a vegan option. If you prefer less heat, skip the red pepper flakes or use a milder chili powder. Feel free to explore flavors that suit your taste. The best grill temperature for chicken skewers is medium-high heat. This ensures the chicken cooks through while getting nice grill marks. Aim for around 400°F to 450°F. If your grill has a thermometer, use it to monitor the heat. If you don’t have a thermometer, test the heat by holding your hand above the grill. You should be able to hold it there for just 4-5 seconds before it feels too hot. In this post, we explored how to make delicious chicken skewers. We covered the key ingredients and essential pantry staples. I shared step-by-step instructions for marinating and grilling. You gained tips for flavor, presentation, and storage. Remember, you can switch proteins and marinades for fun variations. With these easy steps, you will impress your friends at your next BBQ. Enjoy your cooking adventure and savor each bite!

Asian Chicken Skewers with Honey Garlic Sauce Delight

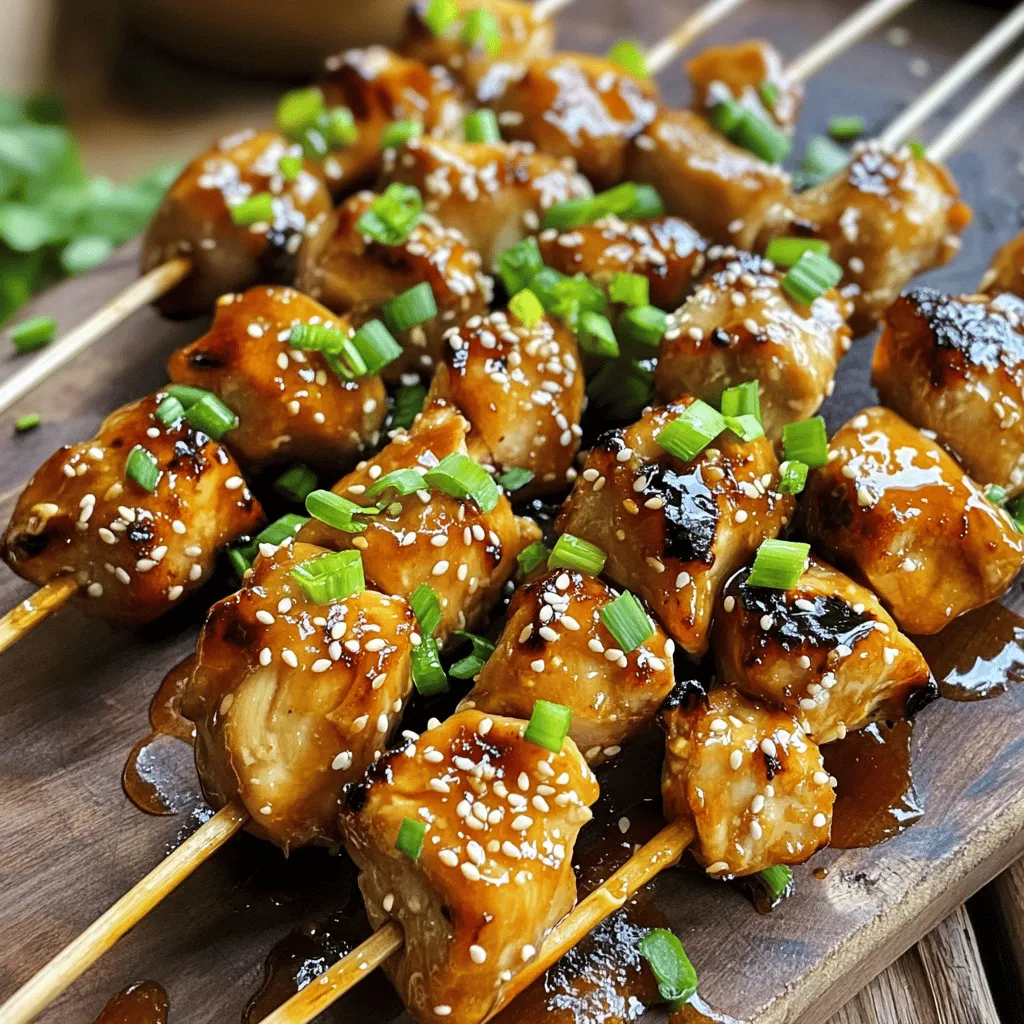
Ready to fire up your grill? Asian Chicken Skewers with Honey Garlic Sauce bring bold flavors you can’t resist. I’ll

Chicken and Fruit Components For this dish, you need: - 4 boneless, skinless chicken breasts - 1 ripe mango, peeled and diced - 1 cup fresh pineapple, diced The chicken is the star. It becomes juicy and tender when grilled. The mango and pineapple add natural sweetness and tropical flair. Together, they create a bright and vibrant taste. Marinade Ingredients The marinade brings all the flavors together. You will need: - 1 tablespoon olive oil - 2 tablespoons soy sauce - 1 tablespoon honey - 1 teaspoon garlic powder - 1 teaspoon ginger powder - Juice of 1 lime - Salt and pepper to taste Each ingredient plays a key role. Olive oil keeps the chicken moist. Soy sauce adds a salty kick. Honey brings sweetness, while garlic and ginger add depth. Lime juice balances the flavors with a zesty touch. Garnish Options For garnish, consider: - Fresh cilantro (optional) Cilantro adds a fresh note to the dish. It also makes your plate look colorful and appealing. For the full recipe, refer to the earlier section. To make the marinade, start by mixing the ingredients. In a bowl, combine the olive oil, soy sauce, honey, garlic powder, ginger powder, lime juice, salt, and pepper. Whisk until well blended. This mix will give your chicken great flavor. Next, coat the chicken. Place the boneless, skinless chicken breasts into the marinade. Ensure the chicken is well-covered. Cover the bowl and refrigerate for at least 30 minutes. This step is key for a tasty dish. Now, it’s time to preheat the grill. Set it to medium-high heat. This helps the chicken cook evenly and develop nice grill marks. For cooking, remove the chicken from the marinade. Place it on the grill. Cook each side for about 6-8 minutes. Check that the internal temperature reaches 165°F (75°C). Brush the chicken with the marinade during grilling for extra flavor. While the chicken cooks, you can sauté the mango and pineapple. In the last few minutes on the grill, add the reserved diced mango and pineapple. Grill them until they are lightly charred. This adds a sweet touch to the dish. Once the chicken is ready, take it off the grill. Let it rest for a few minutes before slicing. Serve the grilled chicken topped with the sautéed mango and pineapple. If you like, add fresh cilantro on top for a nice pop of color. Enjoy your delicious meal! For the complete process, check the Full Recipe. For great flavor, soak the chicken in the marinade. This helps the taste get deep inside the meat. The best way to soak is to use a zip-top bag. Make sure the chicken gets coated well. Recommended Marination Time: Marinate the chicken for at least 30 minutes. If you have more time, go for 2 hours. Longer marination gives richer flavor, but don’t go over 4 hours. To get perfect grill marks, preheat your grill to medium-high heat. Place the chicken on the grill and don't move it for the first few minutes. This helps form those nice lines. Ensuring Juicy Chicken: Cook the chicken for about 6-8 minutes on each side. Use a meat thermometer to check for doneness. The chicken should reach 165°F (75°C). Let it rest for a few minutes before slicing. This keeps it juicy. Pair the grilled chicken with fresh sides to enhance the meal. Try a simple green salad or roasted vegetables. Rice or quinoa also works well. Flavor Pairings: For drinks, consider sweet iced tea or coconut water. Both balance the flavors of the chicken and fruit. Enjoy your meal with a splash of fun! If you want the full recipe, check out the [Full Recipe]. {{image_2}} You can play with fruits in this recipe. Try using different tropical fruits. They add unique flavors. Here are some great options: - Papaya - Kiwi - Passion fruit - Coconut Using seasonal fruits makes this dish fun and fresh. In summer, berries work well. In fall, try pears or apples. Each fruit brings its own taste and texture. You can cook this dish in different ways. If you don't have a grill, use your oven. Here’s how: 1. Preheat your oven to 400°F (200°C). 2. Place the marinated chicken on a baking sheet. 3. Bake for 25 to 30 minutes, or until the chicken is cooked through. An air fryer is also a great choice. It gives you crispy chicken: 1. Preheat your air fryer to 375°F (190°C). 2. Cook the chicken for 15 to 20 minutes, flipping halfway through. Both methods create juicy chicken with a slightly different texture. You can easily adjust this recipe to fit your diet. To make it gluten-free, switch soy sauce for coconut aminos. This keeps the flavor but removes gluten. If you want to cut sugar, use less honey. You can replace it with a sugar-free sweetener. This change keeps your dish tasty without added sugars. These variations help you customize your Grilled Mango Pineapple Chicken. Always feel free to mix and match! For the full recipe, check out the Grilled Mango Pineapple Chicken section above. To keep your grilled mango pineapple chicken fresh, store it well. The best practice for refrigeration is to place it in an airtight container. This helps prevent moisture loss. Make sure the chicken cools down to room temperature first. Then, seal it tightly. Use it within three days for the best taste. For freezing, wrap the chicken tightly in plastic wrap, then place it in a freezer bag. Remove as much air as possible. This way, the chicken stays juicy. You can freeze it for up to three months. Just remember to label the bag with the date. When you reheat, you want to keep the chicken moist. The best methods are using the oven or a skillet. If using the oven, preheat it to 350°F (175°C). Place the chicken in a baking dish with a splash of water. Cover it with foil to trap steam. Heat for about 15-20 minutes. If you prefer a skillet, put the chicken in over medium heat. Add a bit of water or broth for moisture. Cook for about 5-7 minutes, flipping halfway. Always check that the chicken reaches an internal temperature of 165°F (75°C) before serving. To ensure the chicken is safe to eat, check the internal temperature. The chicken must reach at least 165°F (75°C). Use a meat thermometer to confirm this. You can also look for visual cues. The chicken should be white throughout, with no pink at the center. Juices should run clear when you cut into it. Yes, you can use different types of chicken. Chicken thighs or drumsticks work well too. They may add more flavor and moisture. If you use thighs, adjust your cooking time. Thighs might take a bit longer to cook, about 8-10 minutes on each side. Always check their internal temperature to be safe. Grilled Mango Pineapple Chicken pairs well with various sides. Popular options include rice, quinoa, or a fresh salad. Seasonal vegetables enhance the meal’s freshness. Consider grilling zucchini, bell peppers, or corn on the cob. These bright flavors complement the sweet chicken well. For more ideas, check the Full Recipe to balance your meal perfectly. This blog post covered a tasty grilled mango pineapple chicken recipe. You learned about the key ingredients, step-by-step cooking methods, and helpful tips. We explored fun variations to suit your taste and dietary needs. Proper storage and reheating tips ensured no food goes to waste. Enjoy cooking this dish, and let the flavors shine. Your meals can be simple and delicious! Keep experimenting with new ingredients for more fun. Happy cooking!

Grilled Mango Pineapple Chicken Flavorful Summer Dish

Craving a delicious summer dish? My Grilled Mango Pineapple Chicken is here to thrill your taste buds! This recipe combines

- Ripe Melon Varieties: Cantaloupe or Honeydew - Coconut Milk as a base - Sugar and flavorings To make melon ice cream, start with ripe melons. Cantaloupe and honeydew work best. Look for melons that smell sweet and have a slight give when pressed. This ensures they are juicy and full of flavor. Next, use coconut milk. This creamy base adds a tropical taste. It also makes the ice cream rich and smooth. You can use full-fat coconut milk for a creamier texture or light coconut milk for a lighter option. You will also need sugar. It sweetens the ice cream and brings out the melon flavor. Vanilla extract and lime juice are great flavorings. They add depth and brightness to the mix. A pinch of salt balances the sweetness. - Mint, melon balls or toasted coconut flakes When serving, add some fun toppings. Fresh mint gives a nice burst of flavor. Melon balls add a cute and tasty touch. Toasted coconut flakes offer extra crunch and sweetness. These toppings not only enhance flavor but also make your dessert look beautiful. For the full recipe, check the section above. Enjoy your refreshing melon ice cream! Start by gathering your ingredients. You need ripe melon, coconut milk, sugar, vanilla, lime juice, and salt. 1. Blending ingredients: In a blender, add the chopped melon, coconut milk, sugar, vanilla extract, lime juice, and salt. Blend until the mixture is smooth and creamy. This takes about one minute. 2. Adjusting sweetness: After blending, taste the mixture. If you want it sweeter, add more sugar. Blend again until combined. This step is key for the perfect flavor. Now, let's chill and churn our mixture. 1. Refrigeration time: Pour the blended mixture into a bowl. Cover it and place it in the fridge for about 30 minutes. This helps it chill before churning. 2. Ice cream maker instructions: Once chilled, transfer the mixture to your ice cream maker. Churn it according to the manufacturer’s instructions. This usually takes about 20 to 30 minutes until it reaches a soft-serve consistency. 3. Alternative freezing method if no ice cream maker: If you don’t have an ice cream maker, don't worry! Pour the mixture into a shallow dish and place it in the freezer. Every 30 minutes, stir and scrape the mixture with a fork. Do this for about 3 to 4 hours until it is fully frozen and creamy. Once your ice cream is ready, scoop it into bowls or waffle cones. You can add toppings like chopped mint, melon balls, or toasted coconut flakes for extra flavor. Enjoy your homemade melon ice cream! For a complete guide, check out the Full Recipe. To get smooth and creamy melon ice cream, start with ripe melons. Ripe fruit gives the best flavors and texture. Cut your melon into small pieces before blending. This helps it blend easily. Use a blender on a high setting to ensure no lumps remain. Temperature matters too! Chill your melon and coconut milk before blending. Cold ingredients help create a creamy texture. If your mixture is warm, it may not blend well. You can make your melon ice cream even better by adding new flavors. Try a little lime zest for a fresh kick. Fresh herbs like mint can add a nice touch too. Just a small amount can change the taste. Balancing sweetness is key. If your melon is very sweet, use less sugar. Adding lime juice helps balance the flavors. The acidity cuts through the sweetness and makes the ice cream refreshing. Use these tips to enhance your melon ice cream experience! For the complete process, check the Full Recipe. {{image_2}} You can switch up the melon in your ice cream. Watermelon gives a juicy twist. It adds a nice sweetness and bright color. You can also mix different melons. Try cantaloupe with honeydew. The blend creates a fun flavor. Each bite will be unique and refreshing. For a dairy-free treat, use almond milk or soy milk. These options work well and keep it creamy. You can also choose a sweetener like maple syrup or agave. These choices add flavor without dairy. Adjust to your taste for the perfect sweet balance. To keep your melon ice cream fresh, freeze it right after making it. Homemade melon ice cream tastes best within two weeks. After that, ice crystals can form, and the texture can change. Use an airtight container for storage. This helps prevent freezer burn. A shallow dish works well too, as it helps the ice cream freeze faster. * Freezing duration: Best eaten within two weeks. * Container recommendations: Use an airtight container or a shallow dish. Thawing is key for maintaining creaminess. To defrost, take it out of the freezer and let it sit at room temperature for about 10 minutes. This will soften it without losing its smooth texture. Avoid using a microwave, as this can make the ice cream grainy. Always serve it cold for the best experience. * How to defrost: Let it sit at room temperature for 10 minutes. * Avoid: Do not use the microwave for thawing. Melon ice cream has simple, fresh ingredients. Here’s what you need: - 3 cups ripe melon (cantaloupe or honeydew), chopped - 1 cup coconut milk - 1/2 cup granulated sugar - 1 teaspoon vanilla extract - 1 tablespoon fresh lime juice - A pinch of salt These ingredients blend together to create a sweet and creamy treat. The melon gives a fruity flavor while the coconut milk adds a nice creaminess. Homemade melon ice cream can last about two weeks in the freezer. After that, it may start to lose flavor and texture. Signs of spoilage include ice crystals forming or a change in color. If it seems off, it’s best to toss it out. Yes, you can make melon ice cream without an ice cream maker! Simply pour the blended mixture into a shallow dish. Place it in the freezer, and stir every 30 minutes. This helps make it creamy and smooth. It may take about 3-4 hours to reach the right consistency. You can find pre-made melon ice cream at many grocery stores. Look for brands like Haagen-Dazs or Ben & Jerry's. Local ice cream shops may also offer unique flavors. Check the freezer section for a fun treat. Melon ice cream has some health benefits. Melons are low in calories and high in water, keeping you hydrated. They also have vitamins A and C, which are good for your skin and immune system. Enjoying this treat allows you to indulge while still being mindful of nutrition. Melon ice cream is easy and fun to make. You can use ripe cantaloupe or honeydew. Blend with coconut milk, sugar, and your favorite flavorings. Don't forget optional toppings like mint and toasted coconut for extra flair. Perfect the texture by ensuring all ingredients are cold when blending. You can try other melons or go dairy-free with alternatives. Store it well, and remember to thaw carefully for the best taste. Enjoy your homemade treat and the joy of experimenting with flavors!

Melon Ice Cream Refreshing Dessert for Summer Fun

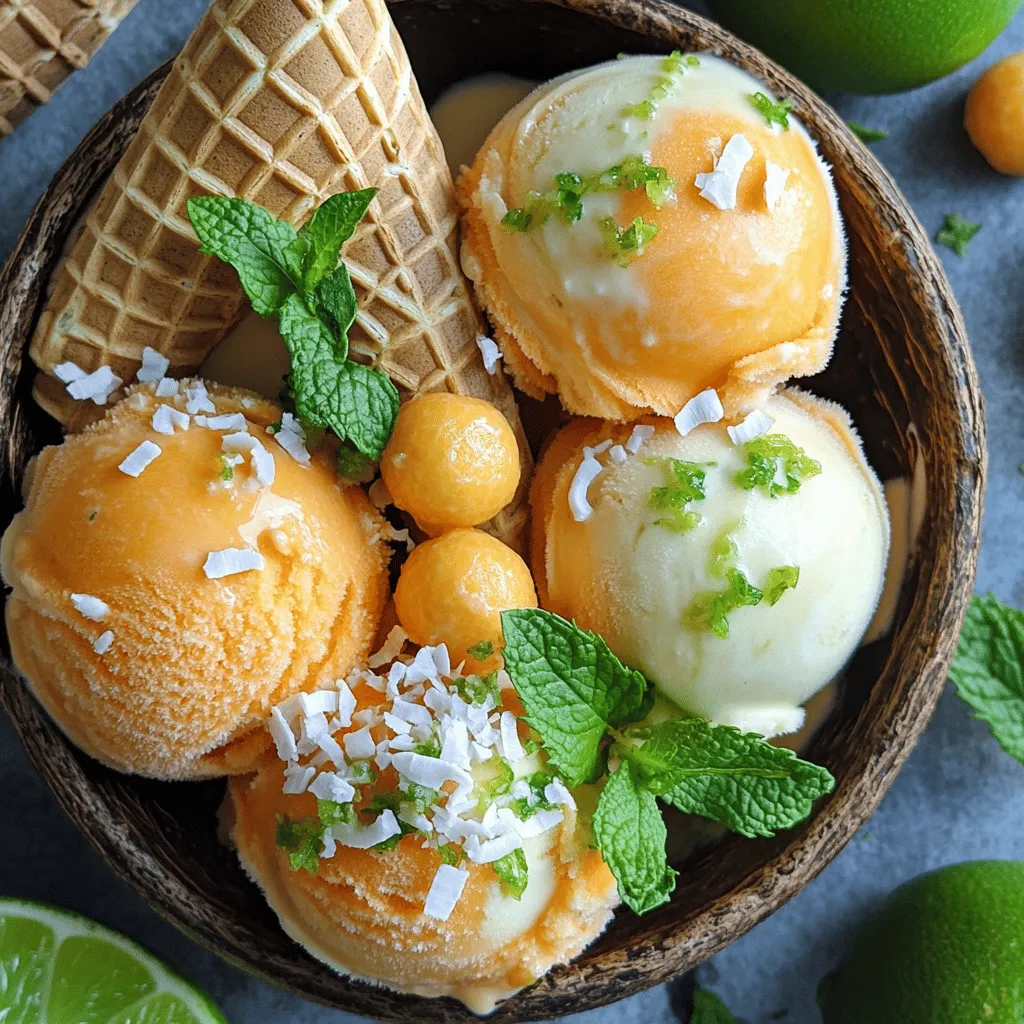
When the sun shines bright, nothing beats a scoop of delicious melon ice cream. This refreshing dessert is easy to

- 4 ripe peaches, peeled and diced - 1/2 cup coconut milk - 1/4 cup maple syrup - 1 tablespoon lemon juice - 1 teaspoon fresh ginger, grated - Pinch of salt - Slices of fresh peach - Mint sprigs - Blender or food processor - Shallow dish or baking pan In making dairy-free peach sorbet, you need a few simple ingredients. The peaches are the star of this treat. Choose ripe peaches to get the sweetest flavor. Coconut milk gives the sorbet its creamy texture without any dairy. Maple syrup adds sweetness, while lemon juice brightens the taste. Fresh ginger gives a nice kick, and a pinch of salt enhances all the flavors. You can add some garnishes if you want. Fresh peach slices look pretty and taste great. A sprig of mint adds a nice touch too! To blend everything smoothly, a good blender or food processor works best. After mixing, pour the blend into a shallow dish or baking pan to freeze. These tools make the process easy and fun! For the full recipe, check out the instructions in the next section. Start by peeling your ripe peaches. Make sure to choose peaches that are soft and sweet. After peeling, dice them into smaller pieces. This helps the blending process. Next, place the diced peaches into a blender or food processor. Add the following ingredients: - 1/2 cup coconut milk - 1/4 cup maple syrup - 1 tablespoon lemon juice - 1 teaspoon fresh ginger, grated - Pinch of salt These ingredients create a delicious mix. The coconut milk adds creaminess, while the maple syrup gives sweetness. The lemon juice and ginger add a nice zing. Now it’s time to blend. Turn on your blender and mix the ingredients until smooth. You want a creamy texture with no fruit chunks. If it tastes too tart, add more maple syrup to sweeten it. Once blended, pour the mixture into a shallow dish or baking pan. Spread it out evenly. This helps it freeze faster. Place the dish in the freezer and let it freeze for about 2 hours. After 2 hours, check your sorbet. The edges should start to solidify. Take the dish out of the freezer. Use a fork to scrape and stir the mixture. This breaks up any icy parts. Return the dish to the freezer. Wait another 2 to 3 hours. You want the sorbet to be firm but still scoopable. Before serving, let it sit at room temperature for a few minutes. This softens it, making it easier to scoop. Serve in chilled bowls or cones. You can add a slice of fresh peach or a sprig of mint for a nice touch. Enjoy your creamy and simple dairy-free peach sorbet! - Tips for selecting ripe peaches: Choose peaches that feel soft but not mushy. The skin should have a nice blush. Ripe peaches smell sweet and fragrant. If you can find local peaches, they often taste best. - Adjusting sweetness levels: Taste the blended mixture before freezing. If it needs more sweetness, add maple syrup. Start with small amounts, and blend again. You want it sweet but not overly sugary. - Adding spices or extracts: For a twist, add a pinch of cinnamon or nutmeg. You can also try vanilla extract for a richer taste. Ginger adds a nice spice, too. - Incorporating other fruits: Mix in berries for added tartness. Mango or pineapple can bring a tropical vibe. Just remember to keep the fruit ratios balanced. - Fixing sorbet that is too icy: If your sorbet is too icy, let it sit at room temp for a few minutes before scooping. You can also blend it again before serving to smooth it out. - Adjusting frozen texture: If the sorbet is too hard, scrape it with a fork after two hours in the freezer. This helps break up icy bits and gives it a smoother texture. {{image_2}} You can mix peaches with other fruits for fun flavors. Berries like strawberries and blueberries pair well with peaches. This mix adds sweetness and a burst of color. You can also use tropical fruits like mango or pineapple. These fruits will bring a bright, sunny taste to your sorbet. If you want to change the sweetness, try using agave syrup or honey. Both options give a unique flavor. For those avoiding sugar, you can find sugar-free sweeteners. Just remember to adjust the amount based on your taste. To make your sorbet more interesting, add herbs like basil or mint. These herbs give the sorbet a fresh kick. You can also infuse it with different citrus juices. A splash of lime or orange juice can really brighten the flavors. Explore these variations to find your perfect sorbet! For the full recipe, check out the Sweet Summer Peach Sorbet. To keep your dairy-free peach sorbet fresh, store it in the freezer. Use an airtight container or a shallow dish to hold the sorbet. This way, it won’t absorb any unwanted odors. Cover the top with plastic wrap before sealing the lid. This extra layer keeps moisture out and flavor in. For the best taste, eat your sorbet within two weeks. After that, it may lose some flavor and texture. Check for signs of freezer burn, like icy crystals on the surface. If you see these, the texture may be affected, but it is still safe to eat. Yes, you can re-freeze sorbet if it starts to melt. But, this may change the texture. To restore the texture, use a fork to break up the sorbet after it melts. Stir it well and refreeze. This will help bring back some creaminess. For more tips, you can check the Full Recipe for a perfect sorbet experience. To make dairy-free peach sorbet, start with ripe peaches. Peel and dice them. Place the diced peaches in a blender. Add coconut milk, maple syrup, lemon juice, grated ginger, and a pinch of salt. Blend until smooth. Pour the mix into a shallow dish. Freeze for about two hours. When it starts to freeze, scrape it with a fork. This breaks up icy bits. Freeze again for two to three hours until firm. Yes, you can use frozen peaches! They are a great option. If using frozen peaches, let them thaw a bit first. Drain excess liquid before blending. This keeps the sorbet from being too watery. The taste will still be delicious, and you won't lose that peach flavor. If you don't want coconut milk, try almond milk or cashew milk. These nut-based milks work well. You can also use oat milk for a creamy texture. Just choose unsweetened versions to keep the flavor balanced. Each option will change the taste slightly, but the sorbet will still be good. Yes, this sorbet is vegan-friendly! All the ingredients are plant-based. Peaches, coconut milk, and maple syrup are all vegan. You can enjoy this treat without any animal products. This makes it a great choice for everyone, regardless of diet. This blog post covered everything you need to make tasty dairy-free peach sorbet. We started with the simple ingredients: ripe peaches, coconut milk, and maple syrup. Then, I gave you step-by-step instructions to create the perfect texture. I shared tips for flavors and storage to ensure your sorbet stays fresh. Experimenting with fruits and sweeteners can lead to new treats. By following these steps, you’ll make a delicious dessert that everyone can enjoy. Get ready to impress your friends and family with your sorbet-making skills!

Dairy-Free Peach Sorbet Creamy and Simple Treat

Craving a refreshing treat? You’re in the right place! This Dairy-Free Peach Sorbet is creamy, simple, and perfect for hot

Older posts
Page1 Page2 … Page39 Next →

dsad

© 2025 flavorsprint • Built with GeneratePress

Our Policies

  • Copyright Policy
  • Cookie Policy
  • GDPR Policy
  • Privacy Policy
  • Disclaimer
  • Terms Of Use

More Information

  • Home
  • About
  • Contact
  • Appetizers
  • Dessert
  • Dinner
  • Drinks
©2025, flavorsprint About Back To Top