Skip to content
DisclaimerTerms Of UseGDPR PolicyCookie Policy

flavorsprint

  • Home
  • Drinks
  • Appetizers
  • Dinner
  • Dessert
  • About
  • Contact
  • Privacy Policy
DisclaimerTerms Of UseGDPR PolicyCookie Policy

Lillian

To make a great seafood bisque, you need fresh seafood. Choose a mix for rich flavor. I suggest: - 1 lb mixed seafood (shrimp, scallops, and crab meat) This mix gives you different textures and tastes. The shrimp adds sweetness, scallops bring creaminess, and crab meat adds depth. Always use high-quality seafood for the best results. The base of your bisque is important. It starts with fresh vegetables. I use: - 1 medium onion, diced - 2 carrots, diced - 2 stalks celery, diced - 3 cloves garlic, minced These veggies add sweetness and depth. The onion and garlic create a savory aroma. Carrots and celery add a nice crunch. Cook them until soft to enhance the flavors. Seasoning brings everything together. For this bisque, I use: - 4 cups seafood stock (or vegetable stock) - 1 cup heavy cream - 2 tablespoons tomato paste - 1 tablespoon olive oil - 1 teaspoon Old Bay seasoning - Salt and pepper to taste - Fresh chives, for garnish The Old Bay seasoning adds a classic seafood flavor. Tomato paste gives it a slight sweetness and rich color. Finally, fresh chives add a pop of color and a mild onion taste. For the full recipe, check out the entire guide. Enjoy creating this comforting dish! Start by heating olive oil in a large pot over medium heat. Add diced onion, carrots, and celery. Cook until soft, about 5 to 7 minutes. This mix gives your bisque a great base. Next, stir in minced garlic and tomato paste. Cook for 2 minutes until it smells nice. Then, pour in the seafood stock. Bring it to a gentle simmer. Add Old Bay seasoning and let it simmer for 15 minutes. This step builds the flavor. Once your base is ready, it’s time for the seafood. Add the mixed seafood, which includes shrimp, scallops, and crab meat. Cook for 5 to 7 minutes, or until the seafood is just cooked. Be careful not to overcook it. Overcooked seafood can be tough and chewy. Now, reduce the heat to low. Slowly stir in the heavy cream. Allow it to heat through without boiling for about 5 minutes. This adds richness to your bisque. After that, use an immersion blender to blend the mixture until smooth and creamy. If you don’t have one, transfer it to a regular blender in batches, then return it to the pot. Adjust the seasoning with salt and pepper as needed. Finally, ladle the bisque into bowls and sprinkle fresh chives on top. For the full recipe, check out the instructions previously mentioned. Enjoy your creamy seafood bisque! To get that rich, creamy texture in seafood bisque, you must blend it well. After cooking, use an immersion blender. This tool helps mix the soup smoothly. If you don’t have one, carefully blend in batches using a regular blender. Make sure to let it cool slightly first. This step is key to avoid splashes. The result should be silky and luxurious, making each bite delightful. Many people make simple errors when cooking this dish. One common mistake is overcooking the seafood. Cook it just until it turns opaque. Overcooked seafood can become tough and rubbery. Another mistake is not seasoning enough. Always taste your bisque as you go. Adjust salt, pepper, and Old Bay seasoning to your liking. Lastly, don’t skip the blending step. Leaving chunks can ruin the creamy quality. You can switch things up with different seafood. Try adding lobster or mussels for a unique twist. If you want a smoky flavor, add smoked paprika. For a spicy kick, toss in a pinch of cayenne pepper. You can also explore different creamy bases. Coconut milk adds a fun tropical vibe. Each variation can take your bisque to a new level. Interested in the full recipe? Check out the [Full Recipe]. {{image_2}} You can change the seafood in your bisque. I often use shrimp, scallops, and crab meat. But you can also add lobster, clams, or mussels. Each type brings its own flavor. If you want a richer taste, choose lobster. For a milder flavor, clams work well. Mixing seafood creates a lovely depth in the dish. Just make sure to adjust cooking times based on what you use. While heavy cream gives a rich taste, you can try other bases. Coconut milk adds a tropical twist. It makes the bisque lighter and dairy-free. For a healthier option, use almond milk or oat milk. These choices alter the flavor but still create a creamy texture. If you want a thicker base, try adding cashew cream. Soak cashews overnight, blend them with water, and mix them in. If you enjoy heat, spice up your bisque. Add a pinch of cayenne pepper or red pepper flakes. This will give your dish a nice kick. You can also use fresh jalapeños or chipotle for more depth. Just be careful not to overpower the seafood flavor. Start with a small amount, then taste and adjust. This twist makes the bisque exciting and new. For the full recipe, check out the complete instructions above. After making your seafood bisque, let it cool down. You can store it in the fridge. Use an airtight container. It stays fresh for about 3 to 4 days. When you want to eat it again, just reheat it on the stove over low heat. Stir it often to keep it from burning. If you want to keep it longer, freeze your bisque. Pour it into freezer-safe bags or containers. Remove as much air as you can. This helps prevent freezer burn. It can last for up to 3 months in the freezer. When you're ready to enjoy it, defrost it in the fridge overnight. Then, reheat it on the stove. Add a splash of cream to bring back the rich taste. For short-term storage, glass containers work well. They won’t stain and are easy to clean. For freezing, use heavy-duty freezer bags or plastic containers. Make sure they are labeled with the date. This way, you can keep track of how long it has been in the freezer. Keeping your seafood bisque fresh is key to enjoying every creamy bite. For the full recipe, you can find it earlier in this article. Seafood bisque comes from France. It started as a dish for fishermen. They used leftover shells and fish. The term "bisque" refers to the creamy texture. It became popular as chefs refined it. Today, it is a favorite comfort dish worldwide. Yes, you can make seafood bisque ahead of time. It tastes even better after resting. Just cook the bisque and let it cool. Store it in the fridge for up to three days. When ready to serve, reheat it on low heat. To make seafood bisque gluten-free, use gluten-free stock. Ensure that all seasonings are gluten-free. You can also skip the thickening agent if you prefer. This way, you keep the flavor without gluten. Yes, frozen seafood works great in bisque. Just thaw it before cooking. It saves time and is often more convenient. The taste will still be rich and delicious. Serve seafood bisque with crusty bread or a fresh salad. A light white wine pairs well too. These sides enhance the creamy flavors of the bisque. Store leftover bisque in an airtight container. Keep it in the fridge for up to three days. If you want to keep it longer, freeze it for up to three months. Remember to cool it completely before freezing. Yes! Feel free to mix in your favorite seafood. You can add mussels, clams, or even fish. Just adjust cooking time for different seafood. More variety can make the bisque even more exciting. The total time to make seafood bisque is about 45 minutes. This includes prep and cooking. It’s a quick meal for a cozy night in. Seafood bisque can fit many diets. You can adapt it for dairy-free or low-carb diets. Just make simple swaps in the recipe. This way, everyone can enjoy it. For the full recipe, check out the details above. In this blog post, we explored key seafood ingredients, vegetables, and seasonings needed for a great dish. I shared step-by-step instructions, from creating a solid base to adding seafood and blending it all together. We also discussed tips to perfect your bisque and common mistakes to avoid. Lastly, I provided storage tips and answered frequent questions. Seafood bisque is fun to make and enjoy. With these tips, you can create your own delicious version. Dive in and savor the rich flavors of your creation!

Seafood Bisque Rich and Creamy Comfort Dish

If you’re craving a dish that warms your soul, look no further than seafood bisque. This rich and creamy comfort

- 2 cups cooked chicken, shredded - 1 cup heavy cream - 1 cup shredded mozzarella cheese - 1 cup broccoli florets, steamed - 1/2 cup cream cheese, softened - 1/2 cup Parmesan cheese, grated - 1 teaspoon garlic powder - 1 teaspoon onion powder - 1 teaspoon Italian seasoning - Salt and pepper to taste - 1/4 cup chopped fresh parsley (for garnish) This keto chicken casserole bake is simple and full of flavor. Each ingredient plays a key role. The cooked chicken serves as the base, giving protein and heartiness. Heavy cream adds richness and helps bind it all together. Mozzarella cheese melts beautifully, creating a creamy top layer. I love using steamed broccoli. It adds color and nutrients. Cream cheese makes the dish extra smooth. Grated Parmesan provides a salty kick that brings it all together. The spices—garlic powder, onion powder, and Italian seasoning—are essential. They add depth and a touch of warmth. Salt and pepper enhance the flavors, making everything pop. Finally, fresh parsley gives a bright finish, making the dish visually appealing. Gather these ingredients before you start. It makes the cooking process smooth and fun. Trust me, you will love how simple it is to create this tasty meal! {{ingredient_image_1}} To start, gather all your ingredients. You need shredded chicken, heavy cream, and cream cheese. Don't forget the mozzarella and Parmesan cheese. Also, have garlic powder, onion powder, and Italian seasoning ready. You will need salt, pepper, and fresh parsley for garnish. 1. Preheat your oven to 350°F (175°C). This helps the casserole cook evenly. 2. In a large bowl, mix the shredded chicken, steamed broccoli, heavy cream, and cream cheese. Add half of the mozzarella cheese. Make sure to stir well until everything blends nicely. Next, season your mixture. Add the garlic powder, onion powder, Italian seasoning, salt, and pepper. Stir until evenly mixed. This step adds a lot of flavor to your casserole. 1. Transfer the mixture into a greased 9x13 inch baking dish. Spread it out evenly to ensure even cooking. 2. Sprinkle the rest of the mozzarella cheese and the grated Parmesan cheese on top. Cover the mixture completely with cheese; this creates a nice, cheesy crust. 3. Bake in the preheated oven for 25-30 minutes. Look for bubbly and golden brown cheese as a sign it’s ready. Once done, take it out of the oven. Let it rest for about 5 minutes. This helps the flavors settle. For a lovely finish, garnish your casserole with chopped fresh parsley. It adds a pop of color and freshness. Serve it hot and enjoy! This dish pairs well with a simple salad or a side of steamed veggies. You can also serve it with keto-friendly bread for a complete meal. To make the best keto chicken casserole, start with cooked chicken. Shredded chicken works best. Use high-quality ingredients for rich flavor. Mix the chicken with the heavy cream and cream cheese. This makes it creamy and smooth. Don't skimp on the seasoning. Garlic, onion, and Italian spices add great taste. Spread the mixture evenly in your baking dish. This helps it cook well. Top with mozzarella and Parmesan cheese. This gives a nice, cheesy crust. Bake until the cheese is golden brown and bubbly. Let it cool for a few minutes before serving. This helps the flavors settle. One common mistake is not seasoning enough. Taste your mix before baking. Adjust salt and pepper as needed. Another mistake is using tough chicken. Always use tender, cooked chicken for a better texture. Don’t overbake your casserole. Keep an eye on it. Remove it from the oven when the cheese is bubbly. If you leave it too long, the dish can dry out. Lastly, avoid using frozen broccoli. Fresh or steamed broccoli gives the best taste and texture. To boost flavor, try adding different herbs. Fresh thyme or rosemary can add depth. You can also mix in some sautéed onions or peppers for extra veggies. For texture, consider adding nuts or seeds. Chopped almonds or sunflower seeds can give a nice crunch. A squeeze of lemon juice before serving can brighten the dish. Finally, don’t forget the garnish. Fresh parsley adds color and a touch of freshness. Enjoy your delicious keto chicken casserole! Pro Tips Use Rotisserie Chicken: For a quicker prep time, consider using store-bought rotisserie chicken. It saves time and adds great flavor to your casserole. Customize Your Veggies: Feel free to swap out broccoli for your favorite low-carb vegetables like spinach, zucchini, or cauliflower for variation. Cheese Variations: Experiment with different cheeses like cheddar or gouda for a unique taste. Mixing cheeses can elevate the flavor profile of your dish. Let It Rest: Allowing the casserole to rest for a few minutes before serving helps the flavors meld and makes it easier to cut into portions. {{image_2}} You can change up the veggies in your casserole. Try using cauliflower, bell peppers, or spinach. Cauliflower works great as a base. It adds texture and keeps it low in carbs. Bell peppers add crunch and a sweet taste. Spinach gives a nice green color and extra nutrients. Mix and match to find your favorite blend. Cheese is key in this dish. While mozzarella is classic, you can use others too. Cheddar cheese brings a sharp flavor that many love. Gouda adds a creamy and smoky taste. Cream cheese can also enhance texture. Play with different cheeses to find the blend you like best. Just keep it low-carb! If you want to switch up the protein, go ahead! Cooked turkey or ham can replace chicken. These meats offer a new flavor while staying keto-friendly. You could also use tofu for a vegetarian option. Just make sure to season it well, as tofu absorbs flavors. Each protein option can create a new twist on this hearty dish. You can keep your Keto Chicken Casserole Bake in the fridge. Store it in an airtight container. Make sure it cools down first. It will stay fresh for up to four days. When you are ready to eat, just take it out. If you want to freeze it, let it cool completely. Place it in a freezer-safe container. You can freeze it for up to three months. When ready to eat, thaw it in the fridge overnight before reheating. To reheat, use the oven for best results. Preheat it to 350°F (175°C). Place the casserole in an oven-safe dish. Cover it with foil to keep it moist. Heat for about 20-25 minutes. You can also use a microwave. Heat it in short bursts, stirring in between. Keto chicken casserole is a low-carb dish. It features shredded chicken and creamy cheese. This dish often includes vegetables like broccoli. It is baked until bubbly and golden. The casserole is perfect for anyone on a keto diet. It helps you enjoy comfort food without the carbs. Yes, you can use rotisserie chicken. It saves time and adds flavor. Just shred the chicken before mixing it in. This option makes the dish even easier to prepare. Plus, it keeps the meal tasty and juicy. This dish has about 6 grams of carbs per serving. Most of the carbs come from broccoli. The other ingredients are low in carbs too. This makes the casserole a great choice for keto diets. Always check labels for exact counts. To make this dish dairy-free, swap out the cheese. Use dairy-free cream cheese and cheese alternatives. You can also try coconut cream for a creamy base. This keeps the dish rich and flavorful without dairy. Adjust seasonings to enhance the taste. This blog post shows you how to make a tasty keto chicken casserole. We covered key ingredients, step-by-step cooking, and helpful tips to perfect your dish. You can also explore flavor variations and storage options. Remember, you can make this dish your own by swapping ingredients as needed. Enjoy your cooking journey and the delicious results!

Keto Chicken Casserole Bake Flavorful and Simple Dish

Looking for a tasty dish that’s both keto-friendly and easy to make? You’re in the right place! This Keto Chicken

- 1 lb boneless, skinless chicken thighs - 4 cups chicken broth - 1 medium onion - 2 cloves garlic - 3 medium carrots - 2 stalks celery - 1 cup frozen peas - 1 cup heavy cream (or coconut cream) - 1 teaspoon dried thyme - 1 teaspoon dried rosemary - Salt and pepper to taste - 1 cup refrigerated biscuit dough (or homemade) In this recipe, chicken thighs form the heart of the dish. They are juicy and tender, which gives the soup a rich flavor. The broth adds depth, making each bite comforting. The vegetables bring color and texture. Onions and garlic add a savory base. Carrots and celery add sweetness and crunch. Frozen peas bring a burst of green and freshness. The creamy base is what makes this soup special. Heavy cream creates a smooth texture, while thyme and rosemary add warmth. Adjust salt and pepper to make it just right for your taste. Finally, the biscuit dough gives the soup its charm. It creates fluffy dumplings that soak up the flavors. You can use store-bought dough or make your own for an extra touch. This combination of ingredients makes for a hearty, flavorful one-pot meal. Each element works together to create a cozy dish perfect for any day. {{ingredient_image_1}} First, heat the olive oil in a large pot over medium heat. Add the diced chicken thighs. Season them with salt and pepper. Cook the chicken until it is browned, about 5-7 minutes. Once done, remove the chicken from the pot and set it aside. In the same pot, add the chopped onion, garlic, carrots, and celery. Sauté the veggies until they begin to soften, about 5 minutes. This step builds a great base for your soup. Now, pour in the chicken broth and stir to mix well. Return the cooked chicken to the pot. Add the frozen peas, thyme, and rosemary. Bring the soup to a simmer and let it cook for about 10 minutes. This allows the flavors to meld together. Stir in the heavy cream and bring the soup back to a gentle simmer. Adjust the seasoning with salt and pepper to taste. Next, drop the biscuit pieces into the soup. Let them cook for about 7-10 minutes until they are fluffy and cooked through. Once the biscuits are ready, remove the pot from heat. Ladle the soup into bowls and garnish with fresh parsley before serving. Enjoy this warm, comforting dish! To make this soup shine, fresh herbs are key. I recommend adding fresh thyme and parsley right before serving. These herbs boost the flavor and add a lovely aroma. Cook the chicken until it turns golden brown. This step gives depth to the soup. If you skip this, you miss out on rich taste. If you want a dairy-free version, switch heavy cream for coconut cream. This swap keeps the soup creamy and adds a hint of sweetness. It works well with all the other flavors. To achieve the best biscuit texture, let the pieces cook in the soup. This allows them to soak up the broth and become fluffy. Keep an eye on them; they need about 7 to 10 minutes. You want soft, pillowy bites that complement the soup. Pro Tips Use Fresh Herbs: Fresh thyme and rosemary can elevate the flavor profile of the soup. Add them just before serving for a vibrant taste. Customize the Vegetables: Feel free to add other vegetables like potatoes or corn for extra nutrition and flavor. Perfect Biscuit Texture: Avoid overcooking the biscuit pieces; they should be fluffy and slightly golden for the best texture. Make Ahead: This soup can be made in advance and stored in the refrigerator. Just reheat and add fresh biscuits when serving. {{image_2}} You can boost the soup's nutrition by adding more vegetables. Seasonal veggies work best. Try adding diced zucchini in summer or butternut squash in fall. Both add great flavor and texture. You can also toss in a handful of spinach or kale. Just stir them in during the last few minutes of cooking. This keeps them bright and fresh. If you want to switch things up, use chicken breast instead of thighs. Cook it the same way, but adjust the time. You can also use rotisserie chicken for a quick meal. Just shred the meat and stir it in after the broth. This saves time and gives a nice flavor. To make your soup even tastier, add spices like paprika or bay leaves. Paprika brings a warm flavor, while bay leaves add depth. Just remember to remove the bay leaves before serving. You can also experiment with herbs like oregano or basil. These small changes can make a big difference in taste. You can keep One Pot Chicken Pot Pie Soup in the fridge for about 3 to 4 days. Make sure to store it in an airtight container. This helps keep it fresh and tasty. If you want to enjoy it later, just reheat it on the stove or in the microwave. To freeze the soup, let it cool first. Then, pour it into a freezer-safe container. Leave some space at the top for expansion. You can freeze it for up to 3 months. When you're ready to eat, move it to the fridge overnight to thaw. For quick reheating, you can put it directly in a pot on low heat. Stir often until it's hot. One Pot Chicken Pot Pie Soup is great for meal prep. You can make a big batch on the weekend. Store it in smaller containers for easy lunches or dinners. This way, you have quick meals ready to go. Just reheat and enjoy! Yes, you can use chicken breast in this soup. Chicken breast is leaner than thighs. This change may alter the soup's flavor and texture. The soup may be less rich, but it will still be tasty. Just cook the chicken until it is fully done. To thicken the soup more, try these methods: - Add more cream: Stir in extra heavy cream for extra richness. - Use a cornstarch slurry: Mix cornstarch with water, then add it to the soup. - Blend some soup: Take out a cup of soup, blend it, and return it. - Add mashed potatoes: Mix in some mashed potatoes for a hearty texture. Yes, this recipe is great for meal prep! It stores well in the fridge for up to four days. Just let the soup cool before you store it. You can also freeze it for up to three months. Reheat it on the stove or in the microwave when you're ready to eat. You can serve this soup with: - Crusty bread: A slice of crusty bread pairs well. - Salad: A fresh green salad adds crunch and color. - Cheese: Sprinkle some cheese on top for extra flavor. - Crackers: Serve with crackers for a fun crunch. This soup is a meal on its own, but these sides make it even better! This blog post covered how to make a delicious Chicken Pot Pie Soup. We explored ingredients like chicken, veggies, and herbs. I shared step-by-step instructions to ensure your soup turns out great. You learned tips for flavor, variations for creativity, and storage info for leftovers. Feel free to try different veggies or proteins to fit your taste. Enjoy making this cozy dish that warms both the body and soul!

One Pot Chicken Pot Pie Soup Flavorful Comfort Meal

Looking for a warm, cozy meal that hits the spot? Try my One Pot Chicken Pot Pie Soup! It’s creamy,

To make a tasty Jalapeno Popper Dip, gather these main ingredients: - 2 cups cream cheese, softened - 1 cup sour cream - 1 cup shredded cheddar cheese - 1 cup shredded mozzarella cheese - ½ cup pickled jalapeños, chopped - ½ cup fresh jalapeños, diced - ½ teaspoon garlic powder - ½ teaspoon onion powder - Salt and pepper to taste - ½ cup crispy panko breadcrumbs - 2 tablespoons olive oil - Fresh cilantro, chopped for garnish These ingredients create a creamy and flavorful dip that packs a punch. The cream cheese and sour cream give it a smooth base. The cheddar and mozzarella add richness and melty goodness. The jalapeños bring heat and a nice crunch. You can customize the dip with these optional ingredients: - Cooked bacon bits for extra flavor - Diced bell peppers for added color - Green onions for freshness - Creamy ranch dressing for a tangy twist Feel free to mix and match these options. Each addition can change the flavor and texture. This lets you create a dip that suits your taste. If you have dietary restrictions, consider these substitutions: - Use a dairy-free cream cheese for a vegan option. - Swap sour cream for Greek yogurt for a lighter dip. - Choose low-fat cheeses to reduce calories. - Use gluten-free breadcrumbs if needed. These substitutions help you enjoy the dip while sticking to your diet. No matter how you adjust, the dip remains delicious. For the full recipe, check out the cooking instructions. Start by preheating your oven to 350°F (175°C). This step is key for even baking. While the oven heats up, gather your ingredients. You will need 2 cups of softened cream cheese, 1 cup of sour cream, and both cheddar and mozzarella cheeses. In a large bowl, mix the cream cheese and sour cream. Add the shredded cheeses and blend until smooth. This mixture should be creamy and thick. Next, fold in the chopped pickled jalapeños and fresh jalapeños. The fresh ones add heat. Sprinkle in garlic powder, onion powder, salt, and pepper. Mix well to ensure every bite is packed with flavor. Now, transfer this cheesy goodness into a greased baking dish. Smooth the top with a spatula for a nice finish. It's time to add the final touch before baking. In a small bowl, combine ½ cup of panko breadcrumbs with 2 tablespoons of olive oil. Mix until the breadcrumbs are coated. This will give your dip a lovely crunchy top. Sprinkle the breadcrumb mixture evenly over your dip. Place the baking dish in the oven and bake for 25 to 30 minutes. Watch for the top to turn golden brown and bubbly. This is when the magic happens! Once your dip is done baking, take it out and let it cool for a few minutes. This cooling time is important for safe serving. Just before serving, garnish with fresh chopped cilantro. This adds a burst of color and fresh flavor. Serve warm with tortilla chips on the side. You can also add extra sliced jalapeños for those who crave more heat. Enjoy your creamy and flavorful delight! For the full recipe, refer to the section above. To get a creamy dip, start with softened cream cheese. If it's too cold, it won't mix well. I like to let it sit out for about 30 minutes. Mix it with sour cream and cheeses in a big bowl. This makes a smooth base. Make sure to blend until no lumps remain. This step is key for that dreamy texture we all love. Jalapeños can be mild or very hot. If you want less heat, use more pickled jalapeños and fewer fresh ones. You can also remove the seeds from fresh jalapeños. For a spicier dip, keep the seeds and add more fresh jalapeños. Always taste as you go to find the right balance for your group. This dip shines at parties, game days, and family gatherings. Serve it warm with tortilla chips or sliced veggies for a fun twist. You can also use it as a topping for nachos. For a fancy touch, serve it in a colorful bowl and sprinkle cilantro on top. This dip is a crowd-pleaser and works for any event! For the full recipe, check out the details above. {{image_2}} You can create a tasty vegetarian version of jalapeno popper dip. Simply swap out the cheeses for plant-based options. Use vegan cream cheese and vegan sour cream. This keeps the dip creamy and flavorful without the dairy. You can also add in some chopped bell peppers for extra crunch. This variation is perfect for those who avoid animal products. If you love heat, try adding more jalapeños or spicy peppers. You can mix in diced serrano or habanero peppers for an extra kick. Another option is to add a splash of hot sauce to the mix. This gives your dip a bold flavor that will impress your friends. Just be careful not to overdo it, as too much spice can overpower the creamy texture. For a refreshing twist, consider making a cold jalapeno popper dip. This version is great for summer gatherings. Start with the same base of cream cheese and sour cream. Then, mix in diced jalapeños, green onions, and fresh herbs like cilantro. Serve it with fresh veggies or crackers. This dip is light and perfect for hot days. For the full recipe, check out the [Full Recipe]. To store leftover jalapeño popper dip, let it cool first. Place it in an airtight container. This way, you keep the dip fresh for up to three days. Make sure to seal it well. If you want, I recommend using glass containers. They help keep flavors intact. When you're ready to enjoy the dip again, preheat your oven to 350°F (175°C). Transfer the dip into a baking dish if it’s not already there. Cover it with foil to prevent dryness. Heat for about 15 to 20 minutes. You can also use the microwave. Warm it in short bursts, stirring in between. This way, it heats evenly. If you want to save the dip for later, freezing works great! Make sure it cools completely first. Then, place it in a freezer-safe container. Leave some space at the top for expansion. It can last up to three months in the freezer. When you’re ready to use it, thaw it overnight in the fridge. After thawing, follow the reheating instructions to enjoy your creamy dip again. Yes, you can make this dip ahead of time. Prepare the dip and store it in the fridge. Cover it well to keep it fresh. When you're ready, bake it as the recipe says. This will save you time on party day. You can serve this dip with many tasty options. Here are some ideas: - Tortilla chips - Sliced veggies like carrots and celery - Pita bread or crackers - Breadsticks - Fresh jalapeños as a spicy option These choices will make your dip even more fun and tasty. Yes, you can make some simple swaps. Try these tips: - Use low-fat cream cheese and sour cream for a lighter version. - Add more veggies like spinach or bell peppers for extra nutrients. - Swap regular cheese for a lower-fat option. These changes can help you enjoy the dip while keeping it healthier without losing flavor. For the full recipe, check out the details above! You learned how to make Jalapeno Popper Dip, from ingredients to serving. You can customize it with optional ingredients and find swaps for dietary needs. The steps for prep, baking, and serving ensure success every time. Tips helped you achieve the right texture and heat level for any crowd. Think about all the ways you can enjoy this dip. Whether at a party or a quiet night, it’ll impress. Make it yours and have fun sharing this tasty dish with friends and family. Enjoy your flavorful creation!

Jalapeno Popper Dip Creamy and Flavorful Delight

If you love bold flavors and creamy textures, you’ll adore this Jalapeno Popper Dip. It’s a simple dish that brings

To make these funfetti cupcakes, gather these main ingredients: - 1 ½ cups all-purpose flour - 1 cup granulated sugar - ½ cup unsalted butter, softened - 2 large eggs - ½ cup whole milk - 2 teaspoons vanilla extract - 1 ½ teaspoons baking powder - ¼ teaspoon salt - ½ cup rainbow sprinkles (plus extra for topping) These ingredients create the perfect base for soft, fluffy cupcakes. The butter gives richness, while the sugar adds sweetness. The eggs provide structure, and the milk keeps the batter moist. For the funfetti frosting, you’ll need: - 1 cup powdered sugar - 2 tablespoons unsalted butter, softened - 2-3 tablespoons milk - ½ teaspoon vanilla extract This frosting is creamy and sweet. The powdered sugar gives it that perfect sweetness, while the butter adds a rich flavor. The milk helps achieve the right consistency for easy spreading. When baking, the quality of your ingredients matters. Use fresh eggs and unsalted butter for the best flavor. Always measure your flour correctly. Too much flour can make cupcakes dry. I recommend using real vanilla extract instead of imitation. It enhances the flavor significantly. Also, choose high-quality rainbow sprinkles. They add a pop of color and fun to your cupcakes. For the full recipe, check out the detailed steps in the full recipe section! Start by preheating your oven to 350°F (175°C). Line a cupcake tray with cupcake liners. In a large bowl, combine the softened butter and granulated sugar. Use a mixer to beat them until the mixture is light and fluffy, about 3 to 5 minutes. Next, add the eggs one at a time. Mix well after each egg. Then, pour in the vanilla extract and blend until it is well combined. In another bowl, whisk together the all-purpose flour, baking powder, and salt. Gradually mix the dry ingredients into the wet mixture. Alternate adding the milk with the flour mixture. Remember to start and end with the flour. Mix until everything is just combined. Finally, gently fold in the rainbow sprinkles. This adds that fun and colorful touch to your cupcakes. Now, it’s time to bake! Divide the batter evenly among the cupcake liners. Fill them about two-thirds full. Place the tray in your preheated oven. Bake for 18 to 20 minutes. To check if they are done, insert a toothpick into the center. If it comes out clean, your cupcakes are ready. Once baked, let the cupcakes cool in the tray for 5 minutes. After that, move them to a wire rack to cool completely. For the frosting, start by beating the softened butter in a bowl until it is creamy. Gradually add the powdered sugar while mixing. Next, pour in the milk and vanilla extract. Mix until the frosting is smooth and fluffy. If it’s too thick, add a bit more milk. If it’s too thin, add more powdered sugar. Once your cupcakes are cool, frost them with your desired amount of frosting. Don’t forget to add extra rainbow sprinkles on top for that festive flair! For the full recipe, check the provided link. Enjoy your delightful homemade Funfetti cupcakes! To get soft and fluffy cupcakes, start with room temperature ingredients. This helps them mix better. Make sure you cream the butter and sugar well. This adds air that makes the cupcakes rise. When you mix in the flour, do it gently. Over-mixing can make them tough. Lastly, use a toothpick to check for doneness. If it comes out clean, your cupcakes are ready. For fun and colorful cupcakes, use different types of sprinkles. You can mix in mini chocolate chips or chopped fruit too. For frosting, swirl it on with a piping bag for a fancy look. You can also top with whipped cream for a light finish. For a twist, drizzle melted chocolate or caramel over the frosting. A sprinkle of sea salt can add a nice contrast. One common mistake is not measuring ingredients correctly. Use measuring cups for accuracy. Another mistake is not letting the cupcakes cool before frosting. This can melt your frosting and make a mess. Lastly, be careful not to open the oven too soon. This can cause the cupcakes to sink. Following these tips will help you bake perfect Funfetti cupcakes every time. For the full recipe, check the detailed instructions provided. {{image_2}} You can change up the Funfetti cupcakes in fun ways. Try adding lemon zest for a fresh twist. Almond extract adds a nice nutty flavor. You can swap in chocolate chips for a rich treat. Mix in seasonal sprinkles for a holiday vibe. Want a surprise inside? Add a dollop of jam before baking! If you need to make these cupcakes allergy-friendly, it's easy. Use gluten-free flour to make them gluten-free. Swap the eggs for applesauce or mashed bananas for a vegan option. Coconut milk works well for those who can't have dairy. For nut allergies, check sprinkles to ensure they are safe. Frosting can change the whole cupcake vibe! Try cream cheese frosting for a tangy twist. Chocolate ganache offers a rich, smooth topping. For a lighter touch, whipped cream is great too. You can even use fruit purees for a fresh, fruity frosting. Get creative with flavors to match your style! For the full recipe, check out the detailed steps above. Store your leftover Funfetti cupcakes in an airtight container. This keeps them fresh and moist. You can also place them in a zip-top bag. Make sure to remove as much air as possible. Keep the cupcakes at room temperature for up to three days. If you want them to last longer, refrigerate them. Freezing cupcakes is easy and great for later treats. First, let the cupcakes cool completely. Wrap each one in plastic wrap. Then, place them in a freezer-safe bag. They can last up to three months in the freezer. When ready to enjoy, thaw them at room temperature for a few hours. To keep your Funfetti cupcakes fresh, avoid direct sunlight and heat. A cool, dry place is best. If you have frosted cupcakes, store them in the fridge. Just remember to let them come to room temperature before serving. This will help the frosting regain its softness. Yes, you can use cake mix for Funfetti cupcakes. It saves time and effort. Just add rainbow sprinkles to the mix before baking. This way, you still get that colorful surprise inside. Funfetti cupcakes last about 3 to 4 days at room temperature. Keep them in an airtight container to keep them fresh. If you refrigerate them, they can last up to a week. Just remember to bring them back to room temperature before serving. If you need an egg substitute, use unsweetened applesauce or mashed bananas. For each egg, use ¼ cup of applesauce or ½ a banana. This keeps the cupcakes moist and adds a touch of sweetness. Funfetti cupcakes first appeared in the 1980s. They became popular thanks to a brand that made cake mix with colorful sprinkles. They bring joy and fun to any celebration, making them a favorite for birthdays and parties. Yes, you can make these cupcakes ahead of time. Bake and cool them, then store them in an airtight container. Frost them on the day you plan to serve for the best taste. You can also freeze them for up to 3 months without frosting. Just thaw and frost when ready to enjoy! For the full recipe, check out the details above. In this blog post, we explored how to make delightful Funfetti cupcakes from scratch. We covered the essential ingredients, step-by-step instructions, and tips for perfecting texture and flavor. We also discussed fun variations and how to store your treats for freshness. Baking should bring joy and creativity. Use these ideas to impress friends and family. Now, enjoy your baking and have fun with these colorful cupcakes!

Homemade Funfetti Cupcakes Delightful and Easy Recipe

If you love colorful, fun treats, you’ll adore these Homemade Funfetti Cupcakes! This simple recipe combines vanilla goodness with sprinkles

To make Garlic Butter Steak Parmesan Rigatoni, you need a few simple ingredients. Here’s the list: - 8 oz rigatoni pasta - 1 lb sirloin steak, trimmed and cut into bite-sized cubes - 4 tablespoons unsalted butter - 4 cloves garlic, minced - 1 teaspoon Italian seasoning - 1 cup heavy cream - 1 cup grated Parmesan cheese - Salt and pepper to taste - Fresh parsley, chopped (for garnish) Each ingredient plays a key role in creating rich and tasty flavors. The rigatoni pasta gives a hearty base. The sirloin steak adds protein and depth. Garlic and butter create a fragrant sauce. Heavy cream and Parmesan cheese make everything creamy and indulgent. Fresh parsley adds a pop of color and freshness. For the full recipe, check out the delicious steps that follow to bring this dish to life. - Bring salted water to a boil. - Cook rigatoni according to package instructions. - Drain and set aside. Cooking the pasta is simple. Start by bringing a large pot of salted water to a rolling boil. The salt adds flavor to the pasta as it cooks. Once the water is boiling, add the rigatoni. Follow the package instructions for the best cooking time. You want the pasta to be al dente, which means it should be firm but not hard. After cooking, drain the pasta in a colander. Be careful, as the steam can be hot. Set the rigatoni aside for later. - Melt butter in a skillet. - Season and sear steak cubes. - Remove from skillet. Next, grab a large skillet and melt some butter over medium-high heat. The butter adds a rich flavor. Cut your sirloin steak into bite-sized cubes. Season them with salt, pepper, and Italian seasoning. This adds a delicious taste to the meat. Once the butter is hot, add the steak cubes. Sear the steak for about 3 to 4 minutes. You want them to be browned on the outside but still juicy inside. After searing, remove the steak from the skillet and set it aside. - Lower heat and add remaining butter. - Sauté minced garlic. - Add heavy cream and simmer. In the same skillet, lower the heat. Add the rest of the butter and let it melt. Once melted, add the minced garlic. Sauté the garlic for about 1 to 2 minutes. You want it to become fragrant but not brown. Next, pour in the heavy cream. Bring the mixture to a gentle simmer. Heavy cream makes the sauce rich and smooth. Stir in the grated Parmesan cheese until it melts and the sauce becomes creamy. If it seems too thick, add a splash of pasta water to thin it out. - Stir in Parmesan cheese. - Reintroduce steak and rigatoni. - Adjust seasoning and mix thoroughly. Now, it's time to bring everything together. Add the cooked rigatoni into the skillet. Then, add the seared steak back in as well. Gently toss everything together. Make sure the pasta and steak are well-coated with the sauce. Taste it and adjust the seasoning with more salt or pepper if needed. - Plate the dish. - Garnish with parsley and extra Parmesan. To serve, plate the rigatoni and steak mixture into bowls. Garnish with fresh chopped parsley for a pop of color. You can also sprinkle extra Parmesan cheese on top for added flavor. Enjoy your Garlic Butter Steak Parmesan Rigatoni! This dish is rich and tasty, perfect for any occasion. For the complete recipe, check out [Full Recipe]. To cook rigatoni just right, start with plenty of salted water. The salt adds flavor. Bring the water to a rolling boil before adding the rigatoni. Cook it according to the package instructions. Check for al dente doneness about two minutes before the time is up. You want it firm but not hard. Drain the rigatoni, but save a cup of the water. This water helps if your sauce gets too thick. To make your dish even tastier, think about adding more seasonings. A pinch of red pepper flakes gives it a nice kick. You can also stir in some fresh herbs like basil or oregano. If you want to play with sauces, try a splash of marinara or creamy pesto. For cheese, consider using pecorino or a sharp cheddar alongside Parmesan. Mixing different cheeses adds depth and richness to the flavor. For great steak, choose cuts like sirloin, ribeye, or filet mignon. These are juicy and tender. When cooking, make sure your skillet is hot. This helps sear the meat quickly. Season the steak well with salt and pepper before cooking. For doneness, use a meat thermometer. Aim for 130°F for medium-rare or 140°F for medium. Let the steak rest for a few minutes before cutting. This keeps it juicy. For the full recipe, check out the complete details above. {{image_2}} You can swap out steak for many other meats. Chicken breast works well. It cooks fast and stays juicy. Pork tenderloin is another great option. Just remember to cook it until it's no longer pink. If you want a vegetarian version, try mushrooms. They add a nice, hearty texture. Tofu is another choice. It soaks up flavors well. Just make sure to press it first to remove extra water. If you need a gluten-free version, use gluten-free rigatoni. Many brands offer this option now. Cook it just like regular pasta. You may need to watch the cooking time, as it can differ. For the sauce, check that your heavy cream has no additives. Some brands add thickeners that may contain gluten. Adding veggies boosts nutrition and flavor. Spinach and broccoli are great choices. They cook quickly, so add them in the last few minutes. Zucchini and bell peppers add color and taste. Slice them thinly for quick cooking. If using carrots, cut them small or steam them first. This way, they soften enough to mix in well. To store leftovers in the fridge, let the dish cool. Place it in an airtight container. This keeps the flavors and prevents spills. For reheating, use the microwave or stovetop. Add a splash of water for moisture if needed. Heat until warm, but don’t overcook the steak. If you want to freeze the dish, portion it into smaller containers. This makes it easier to thaw later. Make sure to leave some space in the container for expansion. To defrost properly, move the container to the fridge the night before. This gives it time to thaw slowly and safely. The recommended timeframe for food safety is three to four days in the fridge. In the freezer, the dish can last up to three months. After that, flavors may fade, even if it's safe to eat. Always check for any signs of spoilage before consuming. For more detailed cooking actions, you can check the Full Recipe. Yes, you can use other pasta shapes! Here are some great options: - Penne: This pasta holds the sauce well. - Fusilli: The spirals grab the garlic butter sauce nicely. - Farfalle: These bow-tie shapes add a fun twist. - Spaghetti: A classic choice that always works. Try what you have at home! To kick up the heat, consider these ideas: - Red pepper flakes: Add them to the garlic butter. - Hot sauce: Drizzle some into the sauce for a zesty punch. - Spicy sausage: Mix in some cooked, crumbled sausage for warmth. - Jalapeños: Fresh or pickled jalapeños can add a nice kick. Adjust the spice to match your taste! Pair this dish with some tasty sides: - Side salad: A fresh green salad balances the rich flavors. - Garlic bread: Perfect for soaking up the extra sauce. - Roasted vegetables: Add color and nutrition to your meal. - Steamed asparagus: This adds a nice crunch and complements the meal. These sides will elevate your dining experience! This recipe is rich and delicious, but it can be modified for health: - Use whole wheat pasta: This adds fiber. - Reduce butter: Cut back on butter for a lighter sauce. - Add veggies: Include spinach or mushrooms for nutrients. - Choose leaner steak: Opt for flank steak or filet mignon. Making these changes can help balance the dish! For the full recipe, check out the details above. This blog post covered a tasty Garlic Butter Steak Parmesan Rigatoni recipe. You learned what ingredients to gather and how to cook them step by step. We explored tips for perfecting the dish and even gave variations for different diets. Remember, you can customize the recipe with veggies or other meats. Don’t hesitate to experiment with flavors. Enjoy the process, and make it your own! Happy cooking!

Garlic Butter Steak Parmesan Rigatoni Rich and Tasty

If you’re craving a meal that delights your taste buds, you’ve come to the right place! Garlic Butter Steak Parmesan

- 3 medium potatoes, peeled and cubed - 1 cup shredded mozzarella cheese - ½ cup grated Parmesan cheese - 1 small onion, finely chopped - 2 cloves garlic, minced - 1 teaspoon dried oregano - 1 teaspoon paprika - ½ teaspoon black pepper - Salt to taste - 1 cup breadcrumbs - 1 large egg, beaten - Oil for frying Gathering the right ingredients is key to making yummy potato cheese balls. Start with three medium potatoes. Choose firm potatoes for the best texture. Peel and cube them into even pieces for uniform cooking. Next, add one cup of shredded mozzarella cheese. This cheese melts beautifully and adds creaminess. For added flavor, include half a cup of grated Parmesan cheese. It brings a nice salty kick. A small onion and two cloves of garlic will enhance the taste. Chop the onion finely and mince the garlic for even distribution. Use one teaspoon of dried oregano and one teaspoon of paprika to spice things up. These add depth to your flavor. Don’t forget to include half a teaspoon of black pepper and salt to taste. For coating, use one cup of breadcrumbs for a crispy texture. One large beaten egg will help the breadcrumbs stick. Finally, you’ll need oil for frying. Choose a neutral oil like canola or vegetable oil for the best results. If you want to switch up the flavors, try using cheddar or feta cheese instead of mozzarella or Parmesan. For a vegan option, substitute the cheese with cashew cheese. Replace the egg with a flaxseed mixture for binding. When selecting potatoes, look for ones that are firm and free of blemishes. Freshness matters, so check the sell-by date on your cheese. Herbs should be vibrant and fragrant. Fresh ingredients make your snack taste even better. How to boil and mash potatoes Boil the potatoes in salted water. Cut them into cubes for faster cooking. Cook them for 15-20 minutes. You want them tender, so stick a fork in them. If the fork goes in easily, they are done. Drain the water and let them cool for a bit. Then, mash them in a bowl until they are smooth. Key signs that potatoes are cooked The potatoes should feel soft when you poke them with a fork. They should not be hard or crunchy. If they fall apart easily, they are perfect for mashing. Combining cheese and seasonings properly In your bowl of mashed potatoes, add the cheese and seasonings. Use shredded mozzarella and grated Parmesan for the best taste. Chop the onion and mince the garlic before adding them in. Mix everything together until it is well combined. Texture tips for the perfect mixture The mixture should feel thick but not dry. If it is too moist, add a little more cheese or breadcrumbs. You want it to hold its shape when you form the balls. Best practices for shaping uniform balls Take about 2 tablespoons of the mixture in your hands. Roll it into a ball. Make sure the balls are about the same size for even cooking. Place them on a plate as you shape them. How to achieve a crispy coating To coat the balls, dip each one in the beaten egg first. Then roll them in breadcrumbs. This will give them a nice, crunchy crust when frying. Make sure each ball is well-coated to avoid soggy spots. Tips for oil temperature and frying technique Heat oil in a deep frying pan over medium heat. You want it to reach about 350°F (175°C). Use a thermometer to check the temperature. If you don’t have one, drop a small piece of bread in the oil. If it sizzles and browns, the oil is ready. How to avoid soggy or greasy balls Fry the potato cheese balls in small batches. This helps keep the oil temperature steady. Fry them for about 3-4 minutes per side. They should turn golden brown and be crispy. Remove them using a slotted spoon and place them on paper towels. This will help absorb extra oil. For the full recipe, check out the complete instructions. When you make Yummy Potato Cheese Balls, avoid these common mistakes: - Overcooking potatoes: This makes mashing hard. Cook until tender. - Not mixing well: Ensure all ingredients blend fully for a great taste. - Too much oil: Keep oil at the right temperature. Too hot burns the balls. Essential kitchen tools you need: - Large pot for boiling potatoes. - Mixing bowl for combining ingredients. - Slotted spoon to remove balls from hot oil. - Deep frying pan to fry the balls evenly. The best dips to pair with potato cheese balls include: - Marinara sauce: This classic adds a nice tang. - Ranch dressing: Creamy and cool, it complements well. - Sour cream: A simple choice that balances flavors. For a visually appealing presentation, try these plating ideas: - Use a rustic wooden board for a casual look. - Garnish with fresh herbs, like parsley or basil. - Arrange in a circle with dips in the center for fun. To elevate your dish, consider these extra seasonings: - Chili powder: Adds heat and depth. - Cumin: Gives a warm, earthy flavor. - Garlic powder: Enhances the garlic taste. Suggestions for herbs or spices to add: - Chopped fresh cilantro: Brightens the flavor. - Basil: Adds a hint of sweetness. - Thyme: Offers a subtle earthiness. For the full recipe, check the detailed steps to create these yummy potato cheese balls. {{image_2}} You can mix different cheeses for fun flavors. Try feta and goat cheese for a tangy twist. Both cheeses add creaminess and depth. If you want heat, use pepper jack or spicy cheddar. These cheeses give your potato cheese balls an exciting kick. Experiment with unique combinations to find your favorite! You can bake potato cheese balls for a healthier option. Preheat your oven to 400°F (200°C). Place the balls on a baking sheet and spray them with oil. Bake for 20-25 minutes until golden brown, flipping halfway. Baking gives a crunchy outside with less oil. Frying, however, produces a crispier texture. Use oil heated to 350°F (175°C) for frying. Each method has its perks, so choose what you prefer! Want to add more flavor? Toss in some veggies! Spinach or bell peppers mix well with the potatoes. They bring color and nutrition to the dish. You can also add protein, like bacon bits or cooked chicken. These additions make your potato cheese balls even heartier. Enjoy experimenting with flavors to match your taste! Store your leftover potato cheese balls in an airtight container. Use a container that fits snugly to keep them from drying out. This helps maintain their texture and taste. You can store them in the fridge for up to three days. If you can’t eat them right away, freezing is a good option. To freeze uncooked potato cheese balls, place them on a baking sheet. Make sure they don't touch each other. Freeze them for about an hour, then transfer them into a freezer-safe bag. They can stay frozen for up to three months. For cooked potato cheese balls, let them cool first. Then, follow the same steps for freezing. When you're ready to eat, thaw them in the fridge overnight for the best taste. For the best results, reheat cooked potato cheese balls in the oven. Preheat your oven to 350°F (175°C). Place the balls on a baking sheet for even heating. Reheat for about 10-12 minutes. This keeps them crispy. Avoid using the microwave. It can make them soggy and less tasty. Always check to ensure they are hot all the way through before serving. Yes, you can make potato cheese balls ahead of time. Here’s how: - Prep the mixture: You can prepare the potato mixture and form the balls. - Chill them: Place the formed balls on a tray and chill in the fridge for about 30 minutes. - Fry later: When you’re ready, simply fry them straight from the fridge. This helps them keep their shape. Serve your potato cheese balls with tasty dips. Here are some great options: - Marinara sauce: A classic choice that adds a nice tang. - Ranch dressing: Creamy and cool, it pairs well with the crunch. - Sour cream: Simple and rich, it complements the flavors nicely. You can tell when they are done frying by these signs: - Color: Look for a golden brown color on the outside. - Texture: They should feel crispy when you touch them. - Timing: Fry them for about 3-4 minutes per side for perfect results. Yes! You can make gluten-free potato cheese balls easily. Here’s what to do: - Use gluten-free breadcrumbs: Look for brands made from rice or corn. - Adapt the recipe: Check labels for any other ingredients to ensure they're gluten-free. In this post, I covered how to make delicious potato cheese balls. You learned about key ingredients like potatoes and cheeses. I shared helpful tips for preparation, cooking methods, and storing leftovers. Remember, using quality ingredients makes a huge difference in taste. With these recipes and variations, you can customize your potato cheese balls to match your taste. Enjoy experimenting in the kitchen and make this dish your own! Happy cooking!

Yummy Potato Cheese Balls Crunchy and Flavorful Snack

Are you ready to dive into a crispy, cheesy delight? Potato cheese balls are the perfect snack for any occasion.

- 1 lb ground beef - 1 medium onion, diced - 2 cloves garlic, minced - 1 cup mushrooms, sliced - 1 cup frozen mixed vegetables (peas, carrots, corn) - 1 tablespoon Worcestershire sauce - 1 cup beef broth - 1 teaspoon dried thyme - 1 teaspoon dried oregano - Salt and pepper to taste - 1 cup all-purpose flour - 1 tablespoon baking powder - 1/2 teaspoon garlic powder - 1 cup shredded cheddar cheese - 1/2 cup milk - 1/4 cup butter, melted - Fresh parsley - Additional cheese When making Cheddar Bay Beef Cobbler, each ingredient plays an important role in the dish's flavor and texture. Ground beef is the star of the show. It gives your cobbler a hearty base. I love to use lean ground beef for a nice balance of flavor and health. Next, the vegetables add color and nutrients. Onions and garlic bring a savory aroma to the dish. Mushrooms add a rich, earthy flavor, while mixed veggies add a pop of sweetness. Don't skip the Worcestershire sauce; it packs a punch of umami. The herbs—thyme and oregano—bring depth to your beef mix. Salt and pepper are essential for balancing flavors. Moving to the topping, the flour, baking powder, and garlic powder create that perfect biscuit-like crust. Shredded cheddar cheese makes it even better, adding richness and flavor. Finally, milk and melted butter ensure your topping is soft and golden. For a fresh finish, I suggest garnishing with chopped parsley and extra cheese. They add a nice touch of color and flavor. This dish is not just about filling your stomach; it's about creating a flavor experience. Enjoy the cooking journey with these ingredients! For the complete method, check the Full Recipe. 1. Browning the ground beef Start by heating a large skillet over medium heat. Add your ground beef to the pan. Cook it until it turns brown. This usually takes about 5 to 7 minutes. Make sure to break it apart with a spoon as it cooks. Drain any extra fat from the skillet. 2. Adding vegetables and seasoning Next, add the diced onion and minced garlic to the skillet. Sauté these until the onion is soft and clear, around 3 to 4 minutes. Then, mix in the sliced mushrooms. Cook them for another 2 to 3 minutes until they become tender. After that, stir in the frozen mixed vegetables, Worcestershire sauce, beef broth, thyme, oregano, salt, and pepper. Bring this mixture to a simmer and let it cook for about 5 minutes. This helps all the flavors blend well. 1. Combining dry ingredients In a separate bowl, mix the all-purpose flour, baking powder, garlic powder, and a pinch of salt. Stir these dry ingredients together until they are well combined. Then, add the shredded cheddar cheese and mix it in. 2. Mixing wet ingredients In another bowl, combine the milk and melted butter. Stir these wet ingredients together. Gradually pour this mixture into the dry ingredients. Stir gently until just combined. Be careful not to overmix; we want a nice, fluffy topping. 1. Layering the beef mixture and topping Pour the beef mixture into a 9x13 inch baking dish. Spread it evenly across the bottom. Then, drop spoonfuls of the cobbler topping over the beef mixture. Leave some gaps so the topping can expand during baking. 2. Baking instructions Preheat your oven to 400°F (200°C). Place the baking dish in the oven and bake for 25 to 30 minutes. The cobbler topping should be golden brown and cooked through. After baking, let it cool for a few minutes before serving. You can garnish with fresh chopped parsley to add a nice touch. For a full recipe, refer back to the beginning. Enjoy your Cheddar Bay Beef Cobbler! To get that golden-brown topping, watch your oven temp. Bake at 400°F for best results. Check it around the 25-minute mark. If it looks pale, let it bake a bit longer. The topping should rise and turn a nice golden color. For a flavorful beef mix, seasoning is key. Use salt and pepper generously. Worcestershire sauce adds depth to the beef. Don't skip the thyme and oregano; they bring a warm, earthy taste. Mix in the veggies early to let their flavors blend. For cooking, I recommend a large, heavy skillet. This helps brown the beef evenly. A 9x13 inch baking dish is perfect for the cobbler. It holds the beef and topping just right. Have a spatula and mixing bowls ready. A whisk can help combine dry and wet ingredients smoothly. Make sure to have measuring cups handy for accuracy. Pair your Cheddar Bay Beef Cobbler with a simple green salad. The freshness balances the rich flavors. You can also serve it with crusty bread for a hearty meal. For drinks, try iced tea or lemonade. They add a nice contrast to the dish's warmth. Top with fresh parsley for a splash of color and taste. This dish is comfort food that warms the heart. It’s sure to be a family favorite. If you want the full recipe, check the details above. {{image_2}} You can easily swap the ground beef for other proteins. Turkey or chicken works great. These options keep the dish light but still tasty. If you want a meat-free meal, try lentils or chickpeas. They add protein and flavor without meat. You can also use mushrooms as a base for a vegetarian option. They bring a great umami taste to the dish. Spicing things up can make your Cheddar Bay Beef Cobbler even better. Adding a pinch of cayenne pepper or smoked paprika gives it a nice kick. You can also stir in some hot sauce for extra heat. If you like sweet flavors, a touch of barbecue sauce can work wonders. For toppings, think beyond traditional biscuits. You can sprinkle crushed crackers or even crispy fried onions on top before baking. This adds crunch and a new taste layer. Try using different cheeses too, like pepper jack for a spicy twist or gouda for a smoky flavor. These simple changes can elevate your cobbler to a new level. For the full recipe, check the earlier section. To keep your Cheddar Bay Beef Cobbler fresh, use airtight containers. Glass containers work well. They do not absorb smells and keep your food safe. You can also use plastic containers. Make sure they seal tightly. Store your leftovers in the fridge. They stay good for up to three days. When reheating, I recommend the oven. It warms food evenly and keeps the topping crispy. Set your oven to 350°F (175°C). Place the cobbler in a baking dish and cover with foil. Heat for about 20 minutes. If you use the microwave, be careful. The topping can get soggy. Heat it in short bursts, about one minute at a time. Check often to avoid overcooking. Enjoy your meal warm and tasty! What can I use instead of ground beef? You can use ground turkey or chicken. These options give a leaner dish. If you want a vegetarian meal, try lentils or black beans. Both add great taste and texture. Can I freeze Cheddar Bay Beef Cobbler? Yes, you can freeze it! Just let it cool down first. Place it in an airtight container. It lasts up to three months in the freezer. Thaw it in the fridge overnight before reheating. What is the difference between cobbler and casserole? A cobbler has a biscuit topping, while a casserole has a more solid layer. Cobbler is often sweeter, but this savory dish is a fun twist. Both are baked in a dish and full of flavor. How do I ensure the cobbler topping is fluffy? To keep the topping fluffy, don’t overmix the dough. Combine wet and dry ingredients gently. This helps the topping rise well and stay light. Use baking powder to boost the fluffiness, too. Cooking for more or fewer servings To cook for more people, double the ingredients. Use a larger dish and bake longer. For fewer servings, cut the recipe in half. Adjust baking time as needed. Adjusting for dietary restrictions For gluten-free needs, swap all-purpose flour for a gluten-free mix. You can use dairy-free milk and cheese for lactose issues. Always check ingredient labels for hidden allergens. Check out the Full Recipe for all the delicious details! In this post, we covered how to make a delicious Cheddar Bay Beef Cobbler. We looked at the main ingredients, step-by-step instructions, and tips for perfecting your dish. You can easily swap ingredients to suit your taste and store leftovers properly. This recipe is simple and versatile, making it a great meal for any day. I encourage you to try making it yourself. Enjoy the tasty flavors and share it with friends!

Cheddar Bay Beef Cobbler Flavorful Comfort Meal

Looking for a cozy meal that bursts with flavor? Look no further! My Cheddar Bay Beef Cobbler combines juicy ground

- 1 lb ground turkey - 1 medium onion, chopped - 2 cloves garlic, minced - 1 bell pepper, chopped - 1 medium carrot, diced - 1 medium zucchini, diced - 1 can (15 oz) kidney beans, drained and rinsed - 1 can (15 oz) black beans, drained and rinsed - 1 can (28 oz) crushed tomatoes - 2 cups vegetable broth The heart of this dish is the ground turkey. It is lean and packed with protein. The colorful vegetables add nutrients and flavor. You can use any bell pepper you like. The beans bring a creamy texture that balances the spices. Crushed tomatoes and broth give it a warm, rich base. - 2 tablespoons chili powder - 1 teaspoon cumin - 1 teaspoon smoked paprika - 1/2 teaspoon cayenne pepper (optional) These spices are key to a great chili. Chili powder gives the dish its classic flavor. Cumin adds a warm, earthy note. Smoked paprika gives it a hint of smokiness. If you like heat, add cayenne for a spicy kick. - Fresh cilantro or parsley - Optional toppings: sour cream, cheese Garnishes add a pop of color and flavor. Fresh cilantro or parsley brightens the dish. Sour cream or cheese can add creaminess and richness. You can mix and match toppings to fit your taste. The right garnish makes your chili even more enjoyable! {{ingredient_image_1}} Start by heating olive oil in a large pot over medium heat. Add the chopped onion and sauté for about 2-3 minutes. You want the onion to turn translucent. Next, add the minced garlic, chopped bell pepper, and diced carrot. Cook these veggies for about 5 minutes until they are tender. Now, push the veggies to the sides of the pot. Add the ground turkey in the center. Cook it until browned, which takes about 5-7 minutes. Use a wooden spoon to break up the meat. This helps it cook evenly and prevents clumps. Once the turkey is browned, stir in the diced zucchini, drained kidney beans, and black beans. Make sure everything is mixed well. Pour in the crushed tomatoes and vegetable broth next. Add the chili powder, cumin, smoked paprika, and cayenne pepper if you like some heat. Stir everything together. Increase the heat to bring it to a simmer. Then, reduce the heat to low, cover, and let it simmer for 30-40 minutes. Remember to stir occasionally. Taste the chili and adjust the seasoning as needed before serving. You can easily change the spice level in your chili. Start with a small amount of cayenne pepper. If you want more heat, add a bit more. You can also use other spices like crushed red pepper or hot sauce. Remember, it's best to add heat slowly. You can always add more but can't take it out! Layering flavors makes your chili taste great. Start by sautéing your onion and garlic until they are soft. This brings out their sweetness. Then, add spices like cumin and smoked paprika early in the cooking. This lets the spices bloom and adds depth. You can also try adding a splash of lime juice at the end. This brightens the dish and adds freshness. You can cook this chili on the stovetop or in a slow cooker. The stovetop method is quicker. You can have dinner ready in about an hour. Just follow the steps closely. If you choose a slow cooker, let it cook on low for 6-8 hours. This method gives the flavors more time to mix. Either way, you'll end up with a tasty chili! Pro Tips Enhance Flavor: Add a splash of apple cider vinegar or a squeeze of lime juice just before serving to elevate the flavors. Make it Ahead: This chili tastes even better the next day, so consider making it in advance and reheating for a quick meal. Spice It Up: If you love heat, try adding diced jalapeños or chipotle in adobo sauce for a smoky kick. Vegetable Variations: Feel free to add other vegetables like sweet potatoes, corn, or spinach for added nutrition and flavor. {{image_2}} You can change up the beans in this recipe. Instead of kidney and black beans, try chickpeas or pinto beans. Each one brings a new taste and texture. You can also swap in seasonal veggies. Butternut squash, corn, or sweet potatoes work well in fall. In summer, add fresh tomatoes or bell peppers. These changes keep the chili feeling fresh and fun. If you want to switch the meat, ground chicken or beef are great picks. They cook similarly to turkey and taste amazing. For a plant-based option, use lentils or a meat substitute made from soy. Just be sure to adjust cooking times. You want everything to cook evenly and taste great. Adding unique spices can change your chili completely. Try a dash of cinnamon or cocoa for warmth. You can also use different chili powders, like chipotle, to add smokiness. Want some heat? Mix in hot sauce or jalapeños. Experiment with sauces like Worcestershire or soy sauce for depth. These twists make your chili special and your own. To store your Ground Turkey Harvest Chili, let it cool first. This step helps keep the chili fresh. Once cool, transfer it to an airtight container. You can store it in the fridge for up to four days. When you want to eat it, just scoop out the amount you need. If you want to save your chili for later, freezing is a great option. Place the cooled chili in freezer-safe bags or containers. Remove as much air as possible to prevent freezer burn. Your chili will stay good in the freezer for about three months. Label the bags with the date for easy tracking. To reheat your chili, you can use the stove or microwave. If you choose the stove, pour the chili into a pot. Heat it over medium heat, stirring often until hot. For the microwave, place it in a bowl and cover it. Heat in short bursts, stirring in between, until it’s warm. This keeps the flavors and texture just right. Enjoy your delicious chili! Ground Turkey Harvest Chili can last for 3 to 4 days in the fridge. Store it in an airtight container. This keeps the chili fresh and safe to eat. To enjoy it at its best, cool it down before placing it in the fridge. If you notice any off smells or changes in texture, it's best to toss it out. Yes, you can make this chili ahead of time. Prepping in advance helps the flavors blend better. It also saves you time on busy days. You can cook it, let it cool, and store it. Just reheat when you're ready to eat. Making it ahead also means you can enjoy a hearty meal without the fuss during the week. There are many tasty options to serve with Ground Turkey Harvest Chili. Here are a few ideas: - Cornbread for a sweet, soft touch. - Rice to soak up the delicious chili. - Fresh salad for a crunchy contrast. - Tortilla chips for a fun, crispy side. - A dollop of sour cream or Greek yogurt for creaminess. These sides add variety and enhance your meal experience! This blog post covered all you need to know about making Ground Turkey Harvest Chili. We explored key ingredients and spices for flavor. You learned how to prepare the base, cook the turkey, and combine everything for the perfect chili. I shared tips for adjusting spice levels and enhancing taste. You can even try variations with different proteins or vegetables. In the end, don’t hesitate to make this recipe your own. Enjoy your cooking!

Ground Turkey Harvest Chili Hearty and Flavorful Dish

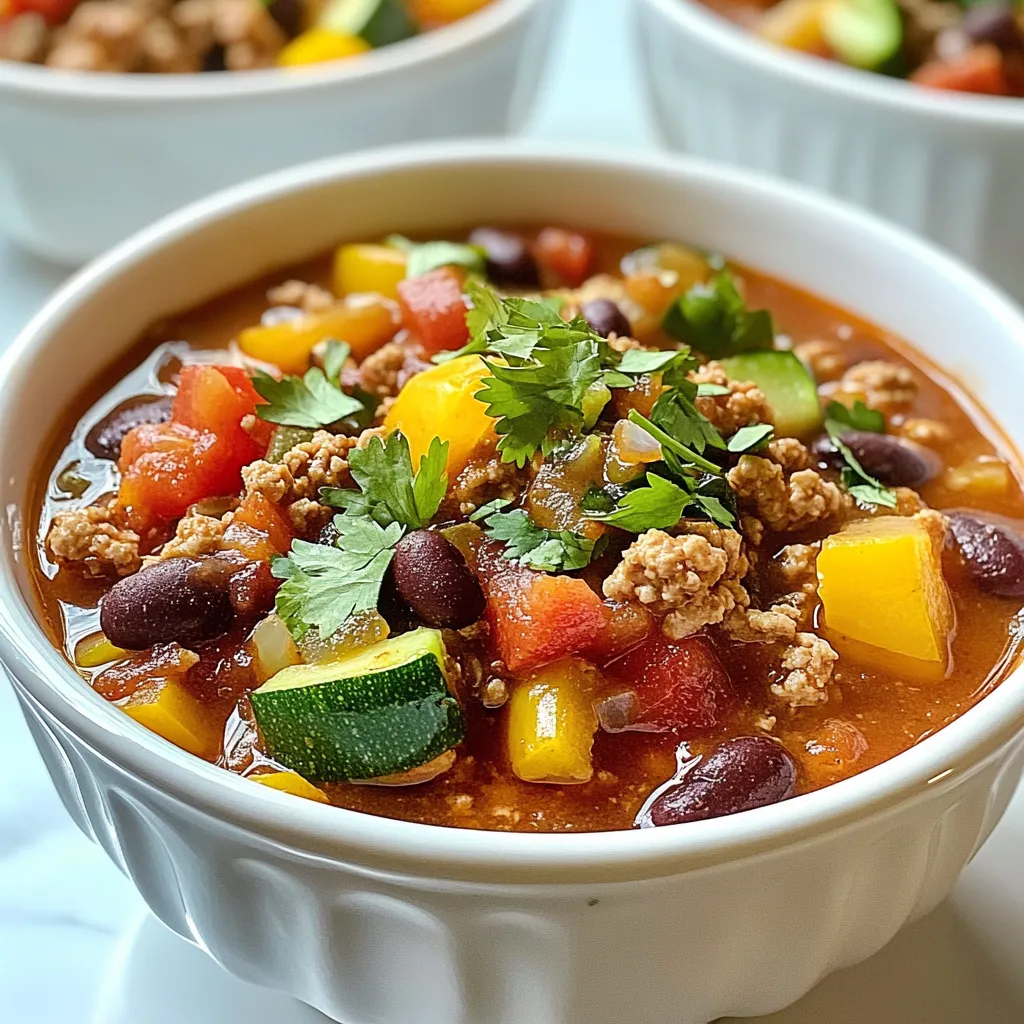
Are you ready for a dish that warms your soul and excites your taste buds? Ground Turkey Harvest Chili is

To make these tasty cinnamon roll cookies, you need these key ingredients: - 2 cups all-purpose flour - 1 teaspoon baking powder - 1/2 teaspoon baking soda - 1/2 teaspoon salt - 1 tablespoon ground cinnamon - 3/4 cup unsalted butter, softened - 1 cup brown sugar, packed - 1/4 cup granulated sugar - 1 large egg - 1 teaspoon vanilla extract - 1/2 cup pecans or walnuts, chopped (optional) These ingredients form the base of your cookies. The flour gives them structure. The baking powder and baking soda help them rise. Cinnamon adds warmth and flavor. Butter, brown sugar, and granulated sugar create a sweet base. The egg binds everything together, and vanilla gives a nice aroma. You can add nuts for crunch, but it is not a must. For the icing, you will need: - 1 cup powdered sugar - 2 tablespoons milk This icing is simple but adds a sweet touch. You mix powdered sugar with milk until smooth. Adjust the milk if you want it thicker or thinner. This icing makes your cookies look pretty and taste even better. Using the right ingredients is key to making your cinnamon roll cookies a hit. Each one plays an important role, ensuring your cookies are sweet, soft, and full of flavor. {{ingredient_image_1}} - First, preheat your oven to 350°F (175°C). Line a baking sheet with parchment paper. - In a medium bowl, whisk together 2 cups of flour, 1 teaspoon of baking powder, 1/2 teaspoon of baking soda, 1/2 teaspoon of salt, and 1 tablespoon of ground cinnamon. Set this mixture aside. - Take a large mixing bowl and cream together 3/4 cup of softened unsalted butter, 1 cup of packed brown sugar, and 1/4 cup of granulated sugar. Mix until light and fluffy, which takes about 2-3 minutes. - Now, add 1 large egg and 1 teaspoon of vanilla extract to the butter mixture. Mix well until everything is fully combined. - Gradually add the dry mixture to the wet mixture. Mix until just combined to keep your cookies soft. - If you like, fold in 1/2 cup of chopped pecans or walnuts for some extra crunch. - Scoop tablespoon-sized amounts of dough and roll them into balls. Place the balls on your prepared baking sheet, making sure to space them about 2 inches apart. - Bake your cookies in the preheated oven for 10-12 minutes. The edges should be lightly golden, while the centers stay soft. - While your cookies cool, you can make the icing. In a small bowl, whisk together 1 cup of powdered sugar and 2 tablespoons of milk until smooth. - If you want a different consistency, you can adjust it by adding more milk until it suits your taste. To achieve the perfect cookie texture, follow these steps: - Use room-temperature butter for a soft, creamy mix. - Mix the dough until just combined. Overmixing can make cookies tough. - Always check your oven temperature with an oven thermometer. An accurate temp ensures even baking. Presentation is key! Here are some ideas: - Arrange cookies on a colorful plate. - Dust with a little extra cinnamon for a warm touch. - Add a sprig of mint for a pop of color. For added flavor, try drizzling chocolate over the icing or adding a sprinkle of sea salt. How do you know when the cookies are done? - Look for lightly golden edges while the center stays soft. - Cool on a wire rack for the best texture. This helps cookies firm up without drying out. Pro Tips Chill the Dough: For thicker cookies, chill the dough for at least 30 minutes before baking. This helps the cookies maintain their shape and enhances the flavors. Use Fresh Spices: Make sure your ground cinnamon is fresh for the best flavor. Old spices can lose their potency and affect the taste of your cookies. Don’t Overbake: Keep an eye on the cookies as they bake. Remove them from the oven when the edges are golden but the centers are still soft for a chewy texture. Customize Your Nuts: Feel free to swap pecans or walnuts with your favorite nuts, or even omit them altogether for a nut-free version of these delicious cookies. {{image_2}} You can change the flavor of your cinnamon roll cookies in fun ways. One great twist is to add chocolate chips. Just fold in one cup of chocolate chips into the dough. This adds a rich taste to your cookies. You can also try maple-flavored icing. Instead of plain milk in the icing, use maple syrup. This gives your cookies a sweet, unique flavor. If you need a nut-free option, skip the pecans or walnuts. These cookies still taste great without them. Sometimes you want to change ingredients to fit your needs. You can substitute brown sugar with coconut sugar. This gives a different flavor but works well. For flours, try using whole wheat flour instead of all-purpose flour. This option makes the cookies a bit heartier. If you want dairy-free cookies, use vegan butter and almond milk. This keeps the cookies soft and tasty without any dairy. You can make these cookies special for the holidays. Add spices like nutmeg or ginger for a festive twist. These spices give warmth and cheer to the cookies. You can also add dried fruits. Chopped dried cranberries or raisins fit well. They add flavor and chewiness, making the cookies even more delightful. Store your cinnamon roll cookies at room temperature for best texture. Place them in an airtight container. This keeps them soft and fresh. If you live in a humid area, refrigeration can help. However, cold air may change the texture a bit. So, use it only if needed. To freeze uncooked dough, scoop and roll it into balls. Place the dough balls on a baking sheet. Freeze them for about an hour. Once solid, transfer them into a zip-top bag. Seal it well and label it. You can bake them straight from the freezer! For baked cookies, let them cool completely first. Then, layer them with parchment paper in an airtight container. This way, they won’t stick together. Seal the container tightly and freeze. These cookies can last about a week at room temperature. You can extend their life to three months if frozen. Check for signs of spoilage, like off smells or hard texture. If they feel dry, they may not taste as good. Enjoy your cookies while they’re fresh! Yes, you can make these cookies vegan. Use plant-based butter instead of regular butter. For the egg, replace it with a flax egg. Mix one tablespoon of ground flaxseed with three tablespoons of water. Let it sit for five minutes to thicken. This keeps the dough moist and helps it bind. If your dough feels sticky, add a little more flour. Start with one tablespoon at a time. Mix it in gently until the dough is easier to handle. Make sure not to add too much flour, as it can change the cookie texture. Absolutely! You can use any nuts you like. Almonds, hazelnuts, or even pecans work well. Just chop them up into small pieces before adding them to the dough. This adds a nice crunch and flavor. To thicken the icing, add more powdered sugar. If it’s too thick, mix in a bit more milk. Keep adjusting until it reaches the right consistency for drizzling or spreading. It should be smooth but not runny. Yes, you can make gluten-free cinnamon roll cookies. Use a gluten-free flour blend instead of all-purpose flour. Make sure the blend has xanthan gum, which helps with texture. This way, everyone can enjoy these tasty treats! In this post, I guided you through making delicious cinnamon roll cookies. We covered essential ingredients, step-by-step instructions, and baking tips. I shared variations, storage methods, and answers to common questions. Remember, baking is fun and creative. Feel free to experiment with flavors and ingredients. With practice, you'll perfect your cookie skills. Enjoy sharing your tasty treats with friends and family!

Cinnamon Roll Cookies Savory and Sweet Delight

If you love the warm, cozy flavors of cinnamon rolls, you’ll adore these Cinnamon Roll Cookies! This recipe combines the

Older posts
Newer posts
← Previous Page1 … Page98 Page99 Page100 … Page115 Next →

dsad

© 2025 flavorsprint • Built with GeneratePress

Our Policies

  • Copyright Policy
  • Cookie Policy
  • GDPR Policy
  • Privacy Policy
  • Disclaimer
  • Terms Of Use

More Information

  • Home
  • About
  • Contact
  • Appetizers
  • Dessert
  • Dinner
  • Drinks
©2025, flavorsprint About Back To Top