Skip to content
DisclaimerTerms Of UseGDPR PolicyCookie Policy

flavorsprint

  • Home
  • Drinks
  • Appetizers
  • Dinner
  • Dessert
  • About
  • Contact
  • Privacy Policy
DisclaimerTerms Of UseGDPR PolicyCookie Policy

Lillian

To create a Peanut Butter Chocolate Cream Pie, you need simple yet delightful ingredients. Here’s the list: - 1 pre-baked graham cracker pie crust - 1 cup creamy peanut butter - 1 cup powdered sugar - 1 cup heavy whipping cream - 1 teaspoon vanilla extract - 8 oz cream cheese, softened - 1 cup semi-sweet chocolate chips - 1/2 cup milk - 1/4 cup chocolate shavings (for garnish) - Sea salt for garnish Each ingredient plays a key role in making this pie rich and creamy. The graham cracker crust gives a nice crunch. Cream cheese adds a tangy touch, while peanut butter offers a rich flavor. The heavy cream helps to create a light texture. I love using powdered sugar because it blends smoothly, giving no grainy texture. Semi-sweet chocolate chips provide a perfect balance of sweetness and richness. Finally, a sprinkle of sea salt enhances all the flavors beautifully. For the full details on how to make this pie, check out the Full Recipe. - Beat cream cheese until smooth. - Mix in peanut butter and powdered sugar. - Whip heavy cream with vanilla until stiff peaks form. To start, you want the cream cheese soft and smooth. I use an electric mixer for this. It makes the job easy and fast. Once smooth, add the creamy peanut butter. The powdered sugar comes next. Mix well until you see no lumps. This mixture should be rich and creamy. Next, take a clean bowl and whip the heavy cream. Add the vanilla extract for flavor. Keep beating until stiff peaks form. This means the cream holds its shape. It adds a lovely lightness to the pie. - Fold whipped cream into peanut mixture. - Melt chocolate and milk together. - Layer peanut butter and chocolate mixtures in the pie crust. Now, gently fold the whipped cream into the peanut mixture. Use a spatula to keep it light. You want to blend it without losing air. This gives the pie a nice texture. Then, melt your chocolate with milk. Use a microwave-safe bowl. Heat it in short bursts, stirring often. You want it smooth and shiny. Grab your pre-baked graham cracker crust. Pour half of the peanut butter mix into it. Next, add a layer of the melted chocolate. Repeat with the rest of the peanut butter mix. Smooth it out with a spatula. - Spread remaining peanut butter mixture on top. - Add final layer of chocolate. - Refrigerate for at least 4 hours. For the final touch, spread the rest of the peanut butter mix on top. Then, pour the last layer of melted chocolate over it. This creates a delicious finish. Now, it’s time to chill. Cover the pie and place it in the fridge. Let it set for at least 4 hours. This helps all the flavors blend and firm up. When ready, you’ll have a rich and creamy treat. Enjoy this Peanut Butter Chocolate Cream Pie! Check out the Full Recipe for more details. To get a smooth texture, start by beating the cream cheese well. Use an electric mixer for the best results. Make sure the cream cheese is softened. This step is key to avoid lumps. After mixing in peanut butter and powdered sugar, fold the whipped cream gently. This keeps the mixture light and fluffy. Chilling time is also vital. Let the pie set in the fridge for at least four hours. This helps the layers firm up and flavors blend well. Want more peanut flavor? Try adding a splash of peanut oil. You can also mix in crushed peanuts. For chocolate, always choose high-quality semi-sweet chips. Good chocolate makes a big difference. Look for brands that list cocoa as the first ingredient. This ensures rich flavor in every bite. When it's time to slice, use a sharp knife. Dip it in hot water for easy cuts. This helps you get even pieces. Serve on chilled plates for a nice touch. For garnishing, top with chocolate shavings and a sprinkle of sea salt. This adds a fun crunch and makes the pie look fancy. You can also drizzle extra melted chocolate on top for a delicious finish. Try these tips to wow your guests! {{image_2}} You can switch up the crust to add fun flavors. - Chocolate cookie crust gives a richer taste. - Almond meal makes a healthier option. Just mix it with some melted butter. It adds a nice nutty flavor too. Want to make it even tastier? Try adding layers. - Banana layer brings a sweet twist. Slice ripe bananas and add them before the chocolate layer. - You can also explore different nut butters. Almond or cashew butter can change the taste and texture. You can adjust this pie to fit various diets. - For a gluten-free crust, use crushed nuts or gluten-free cookies. - There are vegan alternatives for cream cheese and whipped cream. Look for coconut cream or cashew cream to keep it creamy without dairy. These fun changes can help you create your perfect Peanut Butter Chocolate Cream Pie. Check the Full Recipe for more details! To keep your Peanut Butter Chocolate Cream Pie fresh, store it in the fridge. Place it in an airtight container or cover it tightly with plastic wrap. This helps prevent the pie from drying out. For long-term storage, you can freeze the pie. Wrap it in plastic wrap, then in aluminum foil. This keeps out air and prevents freezer burn. The pie lasts about four days in the fridge. After that, it may lose taste and texture. Look for signs that the pie has gone bad. If you see mold or if it smells off, it’s best to throw it away. Check the crust too; it should be firm and not soggy. If you froze the pie, thaw it overnight in the fridge. This keeps it from getting too soft. Before serving, you can freshen it up. Add a dollop of whipped cream on top or drizzle extra melted chocolate. This makes it look and taste amazing. You can use coconut cream or whipped topping instead of heavy cream. Coconut cream gives a nice flavor, while whipped topping adds lightness. Both options work well in this pie. Yes, you can use natural peanut butter. However, it may change the texture and flavor a bit. Natural peanut butter can be runnier, which makes the pie less firm. The pie is set when it feels firm to the touch. You can gently press the top with your finger. It should spring back slightly. Also, the edges will look more solid than the center. You can definitely make this pie ahead of time. It stores well in the fridge for up to three days. Just cover it well to keep it fresh. To slice the pie cleanly, use a sharp knife. Dip the knife in hot water first, then wipe it dry. This helps make smooth cuts through the layers. This blog post covered a delicious peanut butter pie recipe. You learned about key ingredients, step-by-step instructions, and helpful tips for success. Variations and storage ideas enhance your options. Remember, take your time mixing and chilling for the best texture. With the right techniques, you can make a pie that impresses everyone. Enjoy creating this tasty dessert that brings joy to any occasion.

Peanut Butter Chocolate Cream Pie Decadent Delight

If you love the rich taste of peanut butter and chocolate, you’re in for a treat! This Peanut Butter Chocolate

- 2 cups of all-purpose flour - 1/2 cup unsalted butter, chilled and cubed - 1/4 teaspoon salt - 4-5 tablespoons cold water - 4 medium potatoes, peeled and thinly sliced - 2 large leeks, cleaned and sliced (white and light green parts) - 1 cup grated Gruyere cheese - 1 cup heavy cream - 2 large eggs - Salt and pepper to taste - Fresh thyme leaves for garnish When you gather your ingredients, measure them carefully. For the flour, use a dry measuring cup. Scoop the flour and level it off with a knife. For butter, ensure it is cold for a flaky crust. Leeks should be cleaned well to remove dirt. Slice them thinly to ensure even cooking. Choose firm potatoes with no bruises. Look for leeks that are bright and crisp. Avoid any that feel soft or have brown spots. For Gruyere cheese, select a block instead of pre-grated to ensure better melting. Fresh thyme should smell fragrant, and the leaves should be vibrant. These steps will help your pie taste great! First, you need to make the pie crust. In a mixing bowl, combine 2 cups of all-purpose flour and 1/4 teaspoon salt. Then, add 1/2 cup of chilled, cubed unsalted butter. Use your fingers or a pastry cutter to mix until you see coarse crumbs. Gradually add cold water, about 4 to 5 tablespoons, one tablespoon at a time. Keep mixing until the dough starts to come together. Form the dough into a disc, wrap it in plastic wrap, and chill it for at least 30 minutes. Next, let's sauté the leeks. Heat a splash of olive oil or butter in a skillet over medium heat. Add 2 large, cleaned, and sliced leeks. Cook them for about 5 minutes until they are soft and slightly caramelized. Remember to add a pinch of salt and pepper for flavor. This step brings out their natural sweetness and adds depth to your pie. Now, it's time to layer the pie. Preheat your oven to 375°F (190°C). Roll out the chilled crust to fit a greased pie dish. Press the crust into the bottom and sides of the dish. Place half of the sliced potatoes in the crust. Then, add half of the sautéed leeks and sprinkle with 1 cup of grated Gruyere cheese. Repeat these layers with the remaining ingredients. In a bowl, whisk together 1 cup of heavy cream, 2 large eggs, salt, and pepper. Pour this mixture evenly over the layers. Bake the pie for 45-50 minutes until the top is golden brown and the filling is set. After baking, let the pie cool for 10-15 minutes before slicing. Enjoy your savory potato pie with leeks and Gruyere! Find the full recipe for more details. When making potato pie, a few errors can happen. First, avoid cutting the potatoes too thick. Thin slices cook better and create a creamy texture. Second, don’t skip sautéing the leeks. This step brings out their sweet flavor. Lastly, be careful not to overfill the pie. Too much filling can cause overflow during baking. You can boost the taste of your potato pie in simple ways. Try adding garlic while sautéing the leeks for an extra kick. Fresh herbs like rosemary or oregano also work wonders. If you want a bolder flavor, mix in some smoked paprika or cayenne pepper. These spices add warmth without overpowering the dish. Serve your potato pie with flair. Cut neat slices and place them on a rustic wooden board. Garnish each slice with fresh thyme leaves for a pop of color. For added charm, drizzle a bit of olive oil around the edge of the serving board. Pair your pie with a light salad for a complete meal. Don’t forget to check the Full Recipe for more tips! {{image_2}} You can switch some ingredients to change the flavor. Use sweet potatoes instead of regular potatoes. They add a nice sweetness. Instead of Gruyere, try cheddar or feta. Each cheese brings its own taste to the pie. If you don’t have leeks, onions work well too. They add a great flavor to the mix. Want to spice things up? Add cooked bacon or ham for a savory kick. You can also toss in some spinach or kale for added greens. These ingredients make the pie heartier and more colorful. Try adding herbs like dill or rosemary for a fresh twist. They can brighten the dish with new flavors. To keep this dish vegetarian, skip the meat and focus on veggies. Add mushrooms for a nice earthy taste. You could also use different cheeses like goat cheese or mozzarella. This keeps the pie creamy while adding unique flavors. Consider using plant-based cream for a dairy-free option. It still tastes great and fits the vegetarian theme. Store leftover potato pie in an airtight container. Make sure to cool it to room temperature first. Place the pie in the fridge, where it will last for about 3 to 4 days. If you want to enjoy it later, consider freezing it. To reheat the pie, preheat your oven to 350°F (175°C). Place the pie on a baking sheet. Cover it with foil to keep it from browning too much. Heat for about 20-25 minutes, or until warm. You can also use the microwave, heating slices for about 1-2 minutes. To freeze the potato pie, let it cool completely. Wrap it tightly in plastic wrap, then foil. This helps prevent freezer burn. It can be stored in the freezer for up to 3 months. When you’re ready to eat it, thaw it overnight in the fridge before reheating. For the full recipe, check out the Savory Potato & Leek Gruyere Pie. You can serve many tasty sides with potato pie. A fresh green salad pairs well. A light vinaigrette adds a nice touch. Roasted vegetables also make a great side. Try carrots, zucchini, or Brussels sprouts for color and flavor. A simple soup, like tomato or vegetable, works too. This adds warmth and comfort to your meal. To make a flakier crust, use cold ingredients. Chill your butter and water before mixing. You can even chill your flour for extra coldness. Don’t overwork the dough; mix just until combined. This keeps the crust tender. You can also use a food processor for quick mixing. Lastly, let the dough rest in the fridge before rolling it out. This helps to relax the gluten. Yes, you can prepare the potato pie ahead of time. You can make the crust a day before. Store it wrapped in plastic in the fridge. You can also layer the filling the night before. Just cover the pie with plastic wrap and chill. When ready, pour the cream mixture over and bake. This makes it easy for a busy day. Enjoy the flavors that deepen overnight! We explored the best ingredients for potato pie, from measurements to quality tips. I shared step-by-step instructions to help you prepare the pie crust and sauté the leeks. We looked at tips to avoid common mistakes and ways to enhance flavors. You learned about variations to make the pie unique. Finally, we covered storage tips to keep your leftovers fresh. Enjoy making your potato pie, and have fun experimenting with flavors and ingredients!

Savory Potato Pie with Leeks & Gruyere Recipe

Looking for a dish that’s warm, cheesy, and full of flavor? Look no further! This savory potato pie with leeks

- 1 cup all-purpose flour - 3/4 cup granulated sugar - 2 cups fresh strawberries To create a delicious strawberry shortcake dessert roll, these ingredients are key. All-purpose flour gives the roll its structure. Granulated sugar adds sweetness and helps the cake rise. Fresh strawberries are the star of this dish, providing a burst of flavor. - Fresh mint leaves - Additional powdered sugar While the roll is delightful on its own, garnishes can elevate it. Fresh mint leaves add a pop of color and freshness. A dusting of powdered sugar offers a sweet touch and makes it look fancy. - Jelly roll pan - Hand mixer - Mixing bowls Using the right tools makes cooking easier. A jelly roll pan helps the cake bake evenly and makes rolling simple. A hand mixer speeds up the process of whipping cream and mixing batter. Mixing bowls are essential for combining ingredients without mess. For the complete recipe, check the [Full Recipe]. 1. Whisk together dry ingredients: Start by taking a medium bowl. Add 1 cup of all-purpose flour, 1 teaspoon of baking powder, and 1/4 teaspoon of salt. Whisk these dry items until they blend well. This step is key for a light cake. 2. Beat eggs and sugar until frothy: In a large mixing bowl, crack 3 large eggs. Use a hand mixer on high speed. Beat the eggs for about 1 minute. Then, add 3/4 cup of granulated sugar. Keep beating for 2 more minutes. You want the mix to turn thick and lemon-colored. 3. Combine wet ingredients with dry ingredients: Pour in 1 teaspoon of vanilla extract and 1/4 cup of milk. Mix until everything is smooth. Now, gently fold in the flour mixture. Use a spatula and be careful not to overmix. This keeps your cake light and fluffy. 1. Pour batter into the jelly roll pan: Prepare your jelly roll pan by lining it with parchment paper. Make sure to leave some paper hanging over the edges. This helps with easy removal. Next, pour the batter into the pan. Spread it evenly with a spatula. 2. Bake until golden and springy: Place the pan in your preheated oven set to 350°F (175°C). Bake the cake for 12 to 15 minutes. It should spring back when you touch it lightly. 1. Invert onto a powdered sugar-dusted towel: Once baked, remove the pan from the oven. Quickly turn the cake out onto a clean kitchen towel that you dusted with powdered sugar. This prevents sticking. 2. Cool while rolled to maintain shape: Start rolling the cake up with the towel from the short end. This helps the cake keep its form. Let it cool while still rolled for about 30 minutes. This step is crucial for a beautiful presentation later. Now you can move on to the next steps in the Full Recipe! To get a soft and fluffy cake, do not overmix. When you combine the flour, baking powder, and salt with the wet mix, use gentle motions. Stop mixing as soon as you see no dry flour. This keeps the cake light. Proper cooling is key too. After baking, turn the cake onto a powdered sugar-dusted towel. Roll it up right away. This helps it hold its shape while cooling. Let it sit rolled for about 30 minutes. This step makes it easier to fill and roll later. To make whipped cream with stiff peaks, start with cold heavy cream. Beat it on medium speed until it thickens. When it starts to thicken, add powdered sugar and vanilla extract. Continue mixing until you see peaks that stand up straight. You can also change up the flavor. Try adding a bit of lemon zest for a fresh twist. Or, add cocoa powder for a chocolatey touch. These little changes can make your dessert unique. When slicing the dessert roll, use a sharp knife. Cut slowly to keep the layers intact. Aim for even slices, about one inch thick. This makes each piece look nice on a plate. For garnishes, you can add more whipped cream on top. Place fresh strawberries and mint leaves around the roll. This not only looks pretty, but it also adds flavor. For even more flair, sprinkle a bit of powdered sugar on top. This gives a lovely finishing touch. {{image_2}} You can switch up the berries for fun. Raspberries add a tart kick. Blueberries bring a nice sweetness. Mixing multiple berries gives a rainbow of flavors. Try a mix of strawberries, blueberries, and raspberries. This blend tastes great and looks beautiful. Want to jazz up the flavor? Add lemon zest for a fresh, bright taste. Almond extract adds a lovely nutty note. If you love chocolate, try a chocolate version. Substitute some flour with cocoa powder. This twist makes the dessert even more exciting. If you need gluten-free options, use almond flour instead of regular flour. It works well and keeps the cake light. For a vegan twist, swap heavy cream with coconut cream. Whip it just like regular cream. You will still get that fluffy goodness. These changes let everyone enjoy this treat. For the full recipe, check the details above. To keep your dessert roll fresh, refrigerate it. Wrap it tightly in plastic wrap. This helps keep moisture in. Place it in an airtight container. This will prevent it from drying out. Refrigerate for up to three days. If you want to freeze the dessert roll, wrap it well. Use plastic wrap first, then aluminum foil. This prevents freezer burn. When ready to eat, thaw it in the fridge overnight. Enjoy it within three months for best taste. The dessert roll lasts up to three days in the fridge. If frozen, it can last up to three months. You can use leftover cake in many ways. Crumble it over ice cream for a treat. Or, layer it in a parfait with yogurt and berries. Don’t let any of it go to waste! For the full recipe, check out the Strawberry Shortcake Dessert Roll. Yes, you can make this dessert roll a day ahead. This will actually help the flavors blend well. Here are some tips to do it right: - Bake the cake and let it cool completely. - Roll it up in the towel as usual. - Wrap it tightly with plastic wrap. This keeps it fresh. - Store it in the fridge until you're ready to serve. When ready, just unroll, add the cream and strawberries, and roll it back up! If you need a substitute for heavy cream, there are a few options: - Use half-and-half for a lighter version. - Try coconut cream for a dairy-free option. - Blend silken tofu with a bit of milk for a vegan option. Each choice will give a different taste but will still work well in the dessert. To check if your cake is done, use these simple techniques: - Press lightly in the center. If it springs back, it’s ready. - Insert a toothpick in the center. If it comes out clean, the cake is done. - The edges might pull away slightly from the pan, which is a good sign. Make sure not to overbake, or the cake can dry out. If your cake cracks, don’t worry! You can still fix it. Here’s what to do: - Use a thin layer of whipped cream to cover the crack. This will help hide it. - Roll it carefully. If it cracks, just patch it up with more cream. - Serve it with extra strawberries on top. It will look beautiful! Remember, small cracks are normal and won't affect the taste! You’ve learned how to make a delicious Strawberry Shortcake Dessert Roll. We covered essential ingredients and optional garnishes. We discussed the baking process and rolling techniques to perfect your cake. Tips for texture and whipped cream ensured your dessert stands out. We also explored fun variations and storage methods to keep it fresh. Enjoy making this dessert, knowing you can adapt it to your taste. Try new flavors or share leftovers creatively. Your baking skills will impress everyone!

Strawberry Shortcake Dessert Roll Delightful Recipe

Are you ready to impress your friends and family with a stunning dessert? This Strawberry Shortcake Dessert Roll is the

To make the ultimate BLT sandwich, you need fresh ingredients. Here’s what you need: - 8 slices of thick-cut sourdough bread - 6 slices of crispy lettuce (such as romaine or butter lettuce) - 8 slices of heirloom tomatoes, preferably different colors - 8 slices of crispy turkey bacon (or your favorite bacon substitute) - 1 avocado, sliced - ¼ cup mayonnaise - 1 tablespoon Dijon mustard - Salt and freshly cracked black pepper to taste - Optional: microgreens for garnish These ingredients combine to create a tasty and colorful sandwich. The thick sourdough holds the filling well. The heirloom tomatoes add sweetness and color. Turkey bacon gives the crunch you want in every bite. When picking ingredients, look for quality. For tomatoes, choose firm ones that are brightly colored. This ensures they are ripe and flavorful. For lettuce, look for crisp leaves without brown spots. Freshness matters, as it makes your sandwich taste better. If you can, buy local produce. This supports farmers and often means fresher options. For the bacon, try to find brands that use natural ingredients. This way, you avoid unwanted additives. If you are using avocado, check for ripeness. It should yield slightly when you press it gently. You can easily make swaps based on your diet. If you want to avoid meat, use a plant-based bacon. There are many tasty options available. For gluten-free diets, you can use gluten-free bread. There are great brands that offer good texture and flavor. If you don’t like mayonnaise, try hummus or avocado spread instead. These options add creaminess without using mayo. You can even spice up the spread with garlic or herbs. Feel free to customize your sandwich to fit your taste. For the full recipe, check out the Ultimate BLT Sandwich details. To start, place a skillet on medium heat. Lay the turkey bacon in the skillet. Cook it until it's crispy, about 5-7 minutes on each side. Keep an eye on it so it doesn’t burn. Once done, take the bacon out and put it on paper towels. This will help soak up any extra grease. Crispy turkey bacon adds a great crunch to your sandwich. While the bacon cooks, you can toast the sourdough bread. You can use a toaster or a skillet for this. If using a skillet, heat it on medium. Place the slices in the skillet and toast them until they are golden brown. This step adds a nice crunch and warm texture to your sandwich. Toasting also enhances the bread's flavor, making it more delicious. Now, let’s make the spread. In a small bowl, combine the mayonnaise and Dijon mustard. Use a spoon to mix them well. Add a pinch of salt and freshly cracked black pepper to taste. This spread adds a creamy and tangy flavor to the sandwich. Once mixed, set it aside until you're ready to build your sandwich. For the full recipe, check out the Ultimate BLT Sandwich guide. To build the best BLT, focus on layers. Start with the bacon. Lay down four slices on the first piece of bread. Next, add two slices of heirloom tomatoes. Choose colorful ones for a fun look. Then, place the crispy lettuce on top. Finish with slices of avocado for creaminess. This order keeps the sandwich balanced and tasty. Toasting your sourdough right is key. Use a toaster or a skillet. Keep the heat medium so the bread browns evenly. Check the bread often to avoid burning. Aim for a golden color. This gives a crunchy bite and holds the fillings well. Always toast right before serving for the best taste. Seasoning makes a big difference. After you layer the tomatoes and avocado, sprinkle a little salt and fresh black pepper. This boosts the flavor of each bite. You can also mix herbs into your mayo for a twist. Try dill or chives for extra zing. These simple steps can elevate your BLT to a gourmet level. For a complete guide, refer to the Full Recipe. {{image_2}} You can change the bread for your BLT. While sourdough is great, try ciabatta or whole grain. These breads add their own taste and texture. If you want a lighter choice, use lettuce wraps. They keep the sandwich fresh and fun. Mix it up with different veggies. You can use arugula instead of lettuce for a peppery kick. Swap heirloom tomatoes for sun-dried tomatoes for a richer flavor. Want a creamy touch? Add slices of fresh mozzarella or goat cheese. Each choice gives your sandwich a new twist. To make your BLT heartier, add more protein. Grilled chicken or smoked turkey fits nicely. You can also use fried eggs for a breakfast twist. For extra flavor, try adding jalapeños or pickles. These little extras can take your sandwich to the next level. Enjoy experimenting with your Ultimate BLT Sandwich. You can find the Full Recipe to guide you! If you have leftover sandwiches, wrap them tightly in plastic wrap. This helps keep them fresh. You can also use an airtight container. Store them in the fridge for up to two days. This way, they stay tasty and safe to eat. To keep your ingredients fresh, store them separately. Keep lettuce and tomatoes in the fridge. Use a paper towel to absorb moisture. This prevents sogginess. For bacon, store it in an airtight container. It lasts longer this way. If you slice your avocado, sprinkle lemon juice on it. This stops it from browning. To reheat your bacon and keep it crispy, use the oven. Preheat it to 350°F (175°C). Place the bacon on a baking sheet. Heat for about 5-10 minutes. This method helps maintain its crunch. You can also use a skillet over medium heat. Just warm it gently to avoid burning. Enjoy your Ultimate BLT Sandwich fresh and crispy! For the full recipe, check the Ultimate BLT Sandwich section. The best bacon for a BLT is thick-cut bacon. I love using crispy turkey bacon. It has a great flavor and is lighter. If you want classic, go for pork bacon. Look for a brand that is smoked for a deeper taste. Cook it until it’s nice and crispy. This makes the sandwich crunchy and satisfying. Yes, you can make a tasty vegetarian BLT! Use crispy eggplant or tempeh bacon instead of meat. They both add great texture. You can also try smoked tofu. For the rest, keep the lettuce, tomatoes, and mayo. This way, you still enjoy the classic flavors in a new way. To keep your bread from getting soggy, toast it well. Use thick slices of sourdough or ciabatta. Apply the mayo mixture just before stacking the ingredients. Also, layer the lettuce first. This acts as a barrier and helps keep moisture away from the bread. Some great side dishes for a BLT include potato chips or fries. A simple side salad works well too. Pick a light dressing for balance. You can also serve pickles or coleslaw for a crunchy bite. These sides add variety and make your meal complete. For the full recipe, check out the Ultimate BLT Sandwich details above. We explored how to create the ultimate BLT sandwich. You learned about key ingredients, preparation steps, and helpful tips. Don’t forget to pick fresh ingredients and customize your sandwich to fit your taste. Remember, a great BLT starts with quality bacon and ends with perfect layering. Store any leftovers properly to keep the flavors intact. Enjoy experimenting with your new knowledge. Your perfect BLT awaits!

Ultimate BLT Sandwich Fresh and Simple Recipe Guide

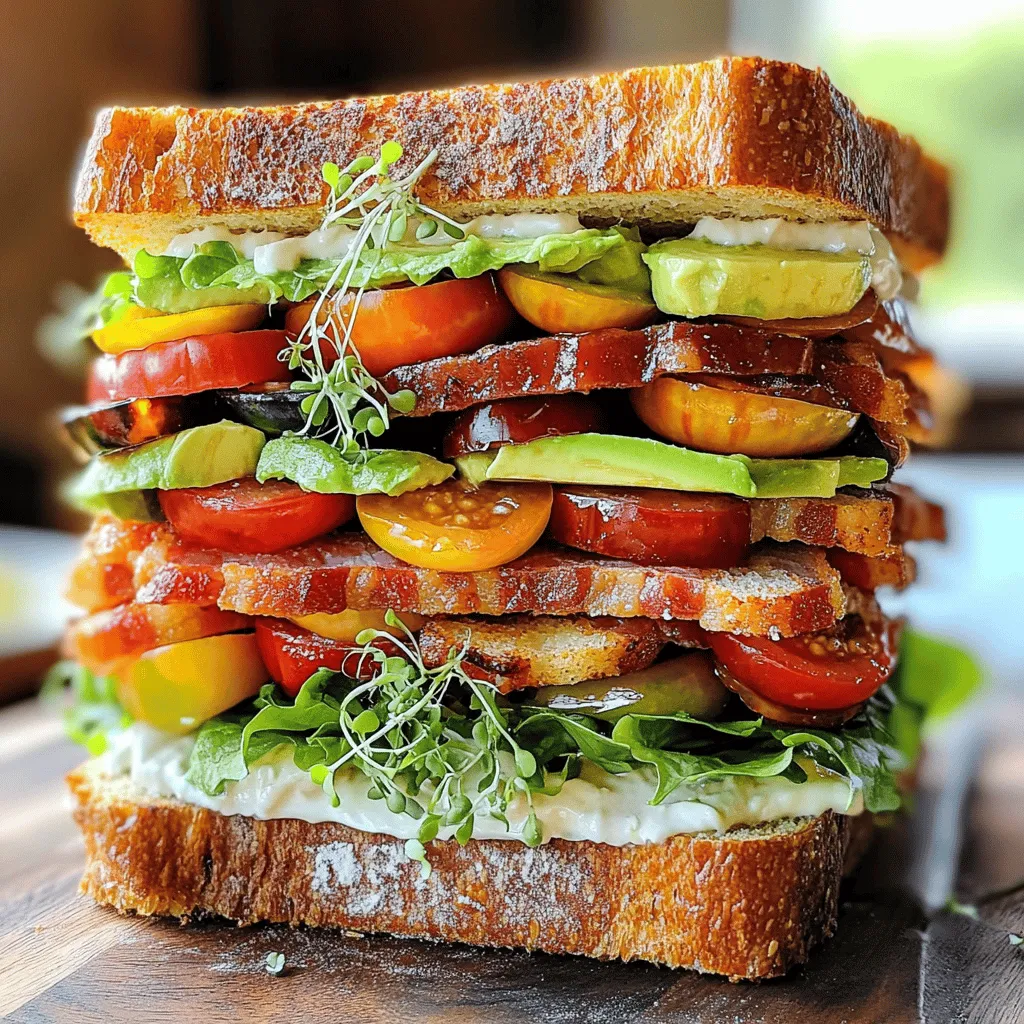
Are you ready to elevate your sandwich game? The Ultimate BLT Sandwich is fresh, simple, and downright delicious! In this

For the Cajun Chicken Orzo Skillet, you need one pound of boneless, skinless chicken breasts. Dice the chicken into bite-sized pieces. Add one tablespoon of Cajun seasoning to give it that spicy kick. Toss the chicken with the seasoning until it is well coated. This step is key for flavor. Next, you will need two tablespoons of olive oil. Heat this in your skillet. Chop one medium onion finely. Dice one bell pepper, either red or green, based on your taste. You will also need two cloves of garlic, minced. Sauté these ingredients together until they soften and smell wonderful. The mix of onion, bell pepper, and garlic adds depth to your dish. For the pasta, grab one cup of orzo. This small pasta cooks quickly and absorbs flavors well. You will also need four cups of chicken broth to cook the orzo. Add it to the skillet after toasting the orzo. Don't forget one can of diced tomatoes, 14 ounces, with juice. Finally, include one cup of frozen peas and a half teaspoon of paprika. The broth and tomatoes give the dish a rich base, while the peas add color and nutrition. {{ingredient_image_1}} Start by taking 1 pound of boneless, skinless chicken breasts. Dice them into small pieces. In a bowl, mix the chicken with 1 tablespoon of Cajun seasoning. Make sure all the pieces are coated well. This seasoning gives the chicken its bold flavor. In a large skillet, heat 2 tablespoons of olive oil over medium-high heat. Add the seasoned chicken to the skillet. Cook it for about 5 to 7 minutes, or until it turns brown and is fully cooked. Once done, remove the chicken from the skillet and set it aside. In the same skillet, add a finely chopped medium onion and a diced bell pepper. You can use red or green. Sauté them for about 3 to 4 minutes until they are soft. Then, add 2 cloves of minced garlic and cook for 1 more minute. This step creates a tasty base for the dish. Next, stir in 1 cup of orzo pasta. Toast the orzo for 2 minutes while stirring often. This gives it a nice golden color. Now, pour in 4 cups of chicken broth and 1 can of diced tomatoes, including the juice. Bring the mixture to a boil, then lower the heat to a simmer. Return the cooked chicken to the skillet. Add 1 cup of frozen peas and 1/2 teaspoon of paprika. Cover the skillet and cook for 12 to 15 minutes. Stir occasionally and add more chicken broth if needed. The orzo should be al dente and most of the liquid absorbed. Finally, season with salt and pepper to your taste. Remove from heat and garnish with freshly chopped parsley before serving. To boost the Cajun taste, use fresh spices. If you can, make your own Cajun mix. Combine paprika, cayenne, garlic powder, and oregano. You can adjust the heat level to suit your taste. Also, let the chicken marinate in the seasoning for at least 30 minutes. This adds more flavor. Orzo cooks quickly, so keep an eye on it. Stir it often to prevent sticking. If the orzo absorbs too much liquid, add more broth. This will help keep it creamy. Always taste as you go. This ensures you get the right texture. Garnish your dish with fresh parsley for color and freshness. You can also add lemon zest for a zesty kick. For a richer flavor, consider crumbled feta cheese. This adds creaminess and balances the spices. A squeeze of lemon juice on top brightens the dish too. Enjoy customizing your meal with these simple touches! Pro Tips Use Fresh Ingredients: For the best flavor, use fresh vegetables and herbs whenever possible. Fresh ingredients can elevate the dish significantly. Adjust Spice Level: If you're sensitive to spice, start with half the Cajun seasoning and adjust to your taste. You can always add more, but it's hard to tone it down! One-Pot Wonder: This dish can be made in a single skillet, making clean-up a breeze. Just be sure to stir occasionally to prevent sticking. Leftover Potential: This dish stores well in the fridge for up to three days. Reheat gently on the stove with a splash of chicken broth for moisture. {{image_2}} You can switch the chicken for other proteins. Try shrimp or sausage. They add great flavor. Cook them in the same way as the chicken. You can also use tofu for a vegetarian option. Just make sure it’s firm tofu. This gives a nice texture. Feel free to add more veggies to the dish. Zucchini and mushrooms work well. You can also toss in spinach or kale for added nutrients. Just chop them up and add them when you sauté the onion and bell pepper. This keeps them fresh and colorful. Adjust the heat to match your taste. Use more Cajun seasoning for a spicy kick. If you prefer mild, add less. You can also mix in other spices like smoked paprika or cayenne for a twist. Taste as you go to find your perfect balance. After enjoying your Cajun Chicken Orzo Skillet, let the leftovers cool. Place them in an airtight container. Store it in the fridge for up to three days. This helps keep flavors fresh. If you want to eat it later, make sure to seal it well. When you’re ready to enjoy your leftovers, heat them gently. You can use a microwave or a skillet. If using a microwave, cover the dish to keep moisture in. Heat in short bursts, stirring in between. If using a skillet, add a splash of chicken broth. This keeps the orzo from drying out. Stir until heated through. To freeze the Cajun Chicken Orzo Skillet, let it cool completely first. Divide it into portions and use freezer-safe bags or containers. Label them with the date. It can stay in the freezer for up to three months. When you want to eat it, thaw it in the fridge overnight before reheating. If you cannot find orzo, use small pasta shapes like ditalini or couscous. You can also try rice or quinoa. Keep in mind that cooking times may vary. Check the package for guidance. Adjust the liquid if needed to ensure a tasty dish. To make this dish gluten-free, use gluten-free orzo or any gluten-free pasta. You can also replace chicken broth with a gluten-free version. Double-check the Cajun seasoning, as some brands may contain gluten. With these swaps, you can enjoy the flavors without worry. Yes, you can prepare this meal in advance. Cook the Cajun Chicken Orzo Skillet and let it cool. Store it in an airtight container in the fridge for up to three days. Reheat it on the stove or in the microwave when ready to serve. This makes it perfect for meal prep! In this article, we explored how to make a tasty Cajun chicken dish. We covered the key ingredients, from the chicken and veggies to the pasta and broth. I shared simple steps for preparing the chicken, sautéing the vegetables, and cooking the orzo. You learned tips for flavor and storage, plus ideas for variations. Cooking Cajun chicken can be fun and flexible. Enjoy the journey and make it your own!

Cajun Chicken Orzo Skillet Flavorful One-Pan Meal

Craving a one-pan meal that bursts with flavor? Let me introduce you to Cajun Chicken Orzo Skillet! This dish combines

For a tasty Bolognese, gather these key ingredients: - 1 lb ground beef - 1 lb ground turkey - 1 large onion, finely chopped - 3 cloves garlic, minced - 2 carrots, diced - 2 celery stalks, diced - 1 can (28 oz) crushed tomatoes - 2 tablespoons tomato paste - 1 teaspoon dried oregano - 1 teaspoon dried basil - 1/2 teaspoon red pepper flakes (optional) - Salt and pepper to taste - 2 tablespoons olive oil - 1 cup vegetable or chicken broth - Cooked spaghetti or pasta of choice These ingredients form the heart of the dish. The meat gives richness, while the veggies add texture and flavor. Want to enhance the taste? Consider adding: - 1/2 cup red wine for depth - 1 tablespoon balsamic vinegar for sweetness - Fresh herbs like thyme or parsley These options can elevate your sauce. Each one brings a new layer of taste to your meal. To make your dish shine, top it with: - Fresh basil leaves - Grated Parmesan cheese These garnishes add brightness and creaminess. They make every bite pop with flavor. {{ingredient_image_1}} Start by heating 2 tablespoons of olive oil in a large skillet over medium heat. Add 1 finely chopped onion, 2 diced carrots, and 2 diced celery stalks. Sauté these for about 5-7 minutes. You want the veggies to be tender and the onions to be translucent. This step builds the base flavor for your sauce. Next, add 1 pound of ground beef and 1 pound of ground turkey to the skillet. Break the meat apart with a spatula. Cook until the meat is browned and no longer pink, which takes about 7-10 minutes. This gives the sauce a rich flavor and texture. Now, stir in 3 minced garlic cloves, 1 teaspoon of dried oregano, 1 teaspoon of dried basil, and 1/2 teaspoon of red pepper flakes, if you want some heat. Cook for another minute until you smell the garlic. This adds depth to your sauce. Pour in 1 can of crushed tomatoes (28 oz) and add 2 tablespoons of tomato paste. Stir everything together to combine well. The tomatoes bring a bright flavor and help thicken the sauce. Next, pour in 1 cup of vegetable or chicken broth. Bring the mixture to a simmer. This helps blend all the flavors together. Reduce the heat to low and let it simmer uncovered for 20-30 minutes, stirring now and then. This allows the sauce to thicken and deepen in flavor. Taste the sauce and add salt and pepper to your liking. Serve the Bolognese sauce over cooked spaghetti or your favorite pasta. Don’t forget to garnish with fresh basil leaves and a sprinkle of grated Parmesan cheese for a delicious finish. - Use a food processor to chop veggies fast. - Brown the meat in batches for even cooking. - Keep a can of crushed tomatoes handy for quick sauce. - Use pre-cooked pasta to save time. - Make enough sauce to freeze for later meals. - Add a splash of red wine for depth. - Use fresh herbs if you have them; they make a big difference. - A bit of sugar can balance the acidity of the tomatoes. - Stir in a tablespoon of butter before serving for richness. - Top with freshly grated cheese for extra flavor. - Don’t rush the simmering; let the flavors develop. - Avoid overcooking the vegetables; they should remain tender. - Watch the salt; taste the sauce before adding more. - Don’t forget to break up the meat well while cooking. - Skipping the fresh herbs can make the dish bland. Pro Tips Use a Mix of Meats: Combining ground beef and turkey not only enhances the flavor but also adds a nice texture to the sauce. Let It Simmer: A longer simmer time allows the flavors to meld beautifully, so don’t rush this step! Season Gradually: Taste as you go! Adjust the salt and pepper to your preference throughout the cooking process. Save the Pasta Water: Reserve some pasta cooking water to add to the sauce if it’s too thick; this will help the sauce adhere better to the pasta. {{image_2}} For a meatless Bolognese, use lentils or mushrooms. Both add great texture and flavor. You can also use crumbled tofu for protein. Replace the broth with vegetable broth for a vegan option. Add more spices to boost the taste. Try a mix of herbs like thyme or rosemary for a fresh kick. You can mix meats for a richer flavor. Ground beef and turkey work well together. You might also try ground pork or chicken. Each type brings its own taste and texture. If you prefer a leaner dish, use only ground turkey. For a bolder flavor, add some Italian sausage. For gluten-free pasta, use rice or corn-based options. These pastas cook differently, so check the package. Zucchini noodles are a fun, healthy choice too. They add color and crunch to your dish. Just sauté them lightly before adding the sauce. This keeps them from getting soggy. To keep your Bolognese tasty, store it quickly. Let it cool first. Use a clean, airtight container. Fill it with the sauce and pasta. If you mix them, the pasta may get soggy. Label the container with the date. This helps you track how long it lasts. When reheating, use a pot or skillet. Add a splash of broth or water. This keeps the sauce moist. Heat over low to medium heat. Stir often to avoid burning. You can also microwave it. Use a microwave-safe bowl and cover it. This keeps moisture in and heats evenly. If you want to save some for later, freezing works great. Use a freezer-safe container or bag. Leave some space for expansion. You can freeze the sauce alone or with pasta. It will last up to three months in the freezer. When ready to eat, thaw it overnight in the fridge. Reheat as mentioned above. Enjoy your easy meal anytime! You can serve Simple Weeknight Bolognese with spaghetti or any pasta you like. Garlic bread pairs well too. A side salad adds freshness and crunch. For a fun twist, try serving it over polenta. You can also enjoy it with crusty bread for dipping. Bolognese sauce lasts about 3 to 4 days in the fridge. Store it in an airtight container for best results. Yes, you can make Bolognese sauce in advance. It tastes even better after sitting for a day. Just cool it down and store it in the fridge. Reheat it on the stove when you're ready to eat. Yes, you can make a low-carb version of Bolognese. Use zucchini noodles or spaghetti squash instead of pasta. You can also add more mushrooms for a hearty texture without the carbs. To add more vegetables, you can include bell peppers, mushrooms, or spinach. Just chop them finely and add them when you sauté the onions. You can also add canned mushrooms or diced zucchini for extra flavor and nutrition. This blog post covers a simple weeknight Bolognese recipe. We explored key and optional ingredients, garnishes, and detailed cooking steps. I shared tips for busy nights, flavor boosts, and common mistakes. Variations include vegetarian options and gluten-free pasta. Lastly, I provided storage tips and answered common questions. Cooking Bolognese can be easy and fun. You can enjoy a delicious meal without stress. Give it a try and make it your own!

Simple Weeknight Bolognese Quick and Tasty Meal

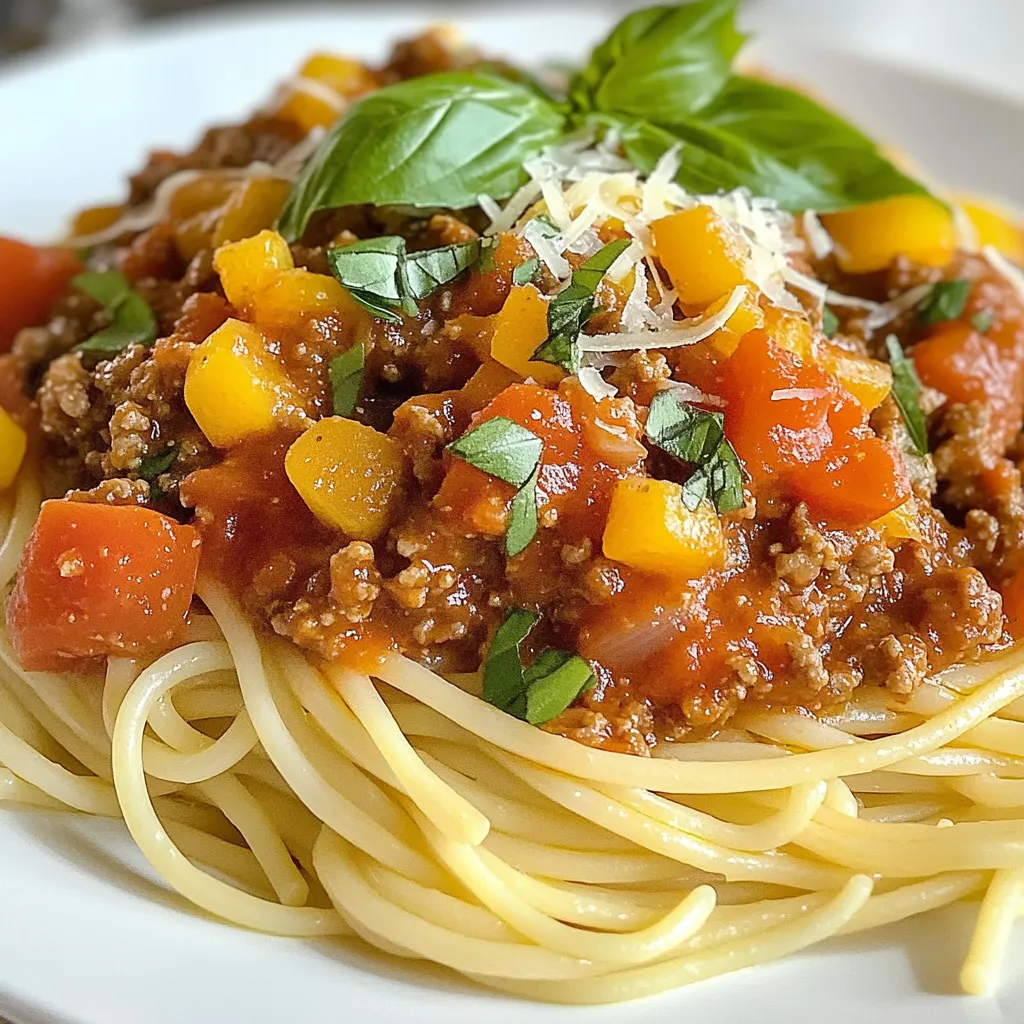
Craving a quick and tasty meal? My Simple Weeknight Bolognese is here to save your dinner! This rich, hearty sauce

To make the sweet potato berry breakfast boats, start with 2 medium sweet potatoes. Choose ones that feel firm and heavy. Their skin should be smooth and free of blemishes. Sweet potatoes are naturally sweet and full of nutrients. They give a nice base for our tasty toppings. For the berry topping, you will need 1 cup of mixed berries. Use blueberries, raspberries, and strawberries for the best flavors. Fresh berries are juicy and full of vitamins. They add bright colors and a sweet-tart taste to the dish. You can also use frozen berries if fresh ones are not available. You will need a few toppings to make your boats even better. First, add 1/2 cup of Greek yogurt, either vanilla or plain. This adds creaminess and protein. Then, drizzle 2 tablespoons of honey or maple syrup for sweetness. Sprinkle 1 teaspoon of cinnamon for warmth. Lastly, use 1/4 cup of granola and 2 tablespoons of chopped nuts, like almonds or walnuts, for crunch. Fresh mint leaves will add a pop of color and flavor. You can find the full recipe [here]. First, you need to wash the sweet potatoes. Make sure they are clean. Next, poke holes in them with a fork. This helps them cook evenly. Then, place the sweet potatoes on a baking sheet. Preheat your oven to 400°F (200°C). Bake the sweet potatoes for 45-60 minutes. They should feel soft when you poke them with a fork. While the sweet potatoes bake, let’s work on the berry topping. Take a medium bowl and add your mixed berries. You can use blueberries, raspberries, and strawberries. Add honey or maple syrup to sweeten them. Sprinkle in some cinnamon for flavor. Gently toss the berries so the syrup coats them well. Set this bowl aside for later. Once the sweet potatoes are done, take them out of the oven. Let them cool for a few minutes. Carefully cut each sweet potato in half lengthwise. Scoop out a bit of the inside to make a “boat.” Leave enough flesh to keep the skin strong. Now, add a big scoop of Greek yogurt to each half. Next, top the yogurt with the berry mixture. For the final touch, sprinkle granola and chopped nuts on top. Don’t forget the fresh mint leaves for garnish. Your Sweet Potato Berry Breakfast Boats are now ready to enjoy! You can find the full recipe to guide you through these steps. Pick sweet potatoes that feel heavy for their size. Look for smooth skin. Avoid any with dark spots or cracks. The color should be a rich orange. These will taste sweeter and cook better. You can make these breakfast boats your own! Try different fruits like bananas or peaches. You can swap Greek yogurt for dairy-free options, too. Add seeds or coconut flakes for crunch. Don't forget spices like nutmeg for extra flavor. Bake sweet potatoes until they are tender. Poke them with a fork first. This helps steam escape and cooks them evenly. If you want faster cooking, try microwaving them first. Just cook on high for about five minutes. Then bake to get that nice, crispy skin. {{image_2}} You can easily make this recipe vegan. Replace Greek yogurt with coconut yogurt. Use maple syrup instead of honey for sweetness. This keeps the creamy texture while making it plant-based. Feel free to mix in your favorite fruits. Try bananas, peaches, or apples for a twist. You can even add dried fruits like raisins or cranberries. Each fruit brings a new flavor to your breakfast boats. Want more protein? Add a scoop of your favorite protein powder to the yogurt. You can also use silken tofu blended with a bit of vanilla. Sprinkle some chia seeds on top for an extra protein boost. These changes make your breakfast more filling and nutritious. For the full recipe, check out the Sweet Potato Berry Breakfast Boats. After enjoying your sweet potato berry breakfast boats, you may have some left. To store them, place any uneaten halves in an airtight container. Keep them in the fridge. They stay fresh for up to three days. If you want to keep them longer, consider freezing them. Wrap each half in plastic wrap and then in foil. This method helps prevent freezer burn. When you're ready to eat your leftovers, you can reheat them easily. For the best results, use the oven. Preheat your oven to 350°F (175°C). Place the breakfast boats on a baking sheet. Heat them for about 15-20 minutes until warm. If you're in a hurry, use the microwave. Heat them for 1-2 minutes, checking to avoid overheating. Meal prep makes mornings easier. Start by baking extra sweet potatoes at the beginning of the week. Store them in the fridge until you're ready to use them. You can also prepare the berry topping ahead of time. Mix your berries, honey, and cinnamon, then store in a container. This way, you can assemble your breakfast boats quickly when you need a nutritious meal. For the best taste, eat them fresh but enjoy your prepped ingredients throughout the week! For the full recipe, check the complete guide. Yes, you can use other potatoes. However, sweet potatoes shine in this recipe. They add natural sweetness and creaminess. If you choose regular potatoes, like Yukon Gold, they may work. Just keep in mind that the flavor and texture will change. Sweet potatoes are rich in vitamins, and they bring a lovely color to your plate. If you don’t have Greek yogurt, try any plain yogurt. You can also use dairy-free yogurt made from almond or coconut. For a creamy touch, consider cottage cheese. Each choice will change the taste slightly, but they all work well. Just make sure to pick a flavor you enjoy for the best result. These breakfast boats last about three days in the fridge. Store them in an airtight container to keep them fresh. If you want to keep them longer, consider freezing them. Just reheat them when you're ready to enjoy. They taste great warm and still pack a nutritious punch! In this article, we explored making tasty breakfast boats with sweet potatoes and berries. I shared step-by-step instructions to help you prep, cook, and assemble your breakfast. Tips and tricks can help you pick the best ingredients and customize your dish. There are also options for vegan and high-protein variations, along with storage tips for leftovers. Enjoy creating a fun and healthy breakfast that fits your taste! Make these boats your go-to breakfast for a great start to your day.

Sweet Potato Berry Breakfast Boats Flavorful Treat

Start your mornings off right with these Sweet Potato Berry Breakfast Boats! This fun dish is both tasty and healthy.

To make Creamy Cowboy Butter Chicken Pasta, gather these tasty ingredients: - Diced chicken breasts - Farfalle or bowtie pasta - Unsalted butter - Minced garlic - Spices: smoked paprika, cayenne pepper, onion powder - Heavy cream - Shredded sharp cheddar cheese - Cherry tomatoes - Fresh parsley - Salt and pepper Each ingredient plays a key role in creating this flavorful dish. The diced chicken breasts give protein and heartiness. Farfalle or bowtie pasta adds fun shapes and texture. Unsalted butter is vital for richness and flavor. Minced garlic brings a savory aroma that excites the senses. Spices like smoked paprika and cayenne pepper add warmth and a hint of heat. Onion powder enhances the savory notes. Heavy cream makes the sauce creamy and lush. Shredded sharp cheddar cheese melts beautifully into the sauce, providing a cheesy goodness. Cherry tomatoes bring a burst of freshness. Fresh parsley adds a pop of green and bright flavor. Finally, salt and pepper elevate all these flavors. You can find the full recipe for Creamy Cowboy Butter Chicken Pasta to guide you through the cooking process. Enjoy the journey of creating this delightful dish! To start, boil salted water in a large pot. It needs to be at a rolling boil. Add the farfalle pasta and cook it according to the package instructions. Aim for that perfect al dente texture, which usually takes about 8-10 minutes. Once cooked, drain the pasta, but save 1 cup of that pasta water. You might need it later! Next, season the diced chicken breasts. Use salt, pepper, and a pinch of smoked paprika. In a large skillet, melt half a cup of butter over medium heat. When the butter is hot, add the chicken. Sauté it for about 6-8 minutes until golden brown and cooked through. Once done, remove the chicken from the skillet and set it aside. Now, let’s make the cowboy butter sauce. In the same skillet, add the remaining half cup of butter and let it melt. Once melted, toss in the minced garlic. Sauté for about 1 minute until it smells great. Then, stir in the smoked paprika, cayenne pepper, and onion powder. Cook this mixture for another minute to blend those wonderful flavors. Slowly pour in the heavy cream and stir to mix everything well. Next, add the shredded cheddar cheese. Watch it melt into the sauce! If the sauce seems too thick, use some of that reserved pasta water to reach your desired consistency. Now, return the cooked chicken to the skillet and toss in the pasta. Mix everything together until it's all coated in that creamy sauce. Add the halved cherry tomatoes and cook for another 2-3 minutes until everything is heated through. Finally, remove the skillet from heat. Stir in the chopped parsley to add a nice fresh touch. Taste your dish and adjust the seasoning with salt and pepper if needed. Serve the creamy cowboy butter chicken pasta in deep bowls. For a special touch, add extra parsley and a sprinkle of cheddar cheese on top. Pair it with garlic bread for a comforting meal! For the full recipe, check it out [here](#). How do you know when pasta is al dente? You should taste it! Al dente means "to the tooth." The pasta should be firm but not hard. It should have a slight bite. Follow package instructions for cooking time, but start checking a minute or two early. Prevent pasta from sticking by using plenty of water. A big pot helps. Add salt to the boiling water. This adds flavor and helps keep the pasta separate. Stir the pasta a few times while it cooks. This also helps it stay loose. What spices can boost the flavor? Try adding Italian herbs like oregano or basil. A pinch of red pepper flakes can add some heat. You can also sprinkle in some garlic powder for extra depth. To make the sauce creamier, you can use more heavy cream. You can also add cream cheese for a rich texture. Stir in some grated Parmesan cheese to enhance the flavor further. What are the best dishes to serve this pasta? Deep bowls work well for creamy pasta. They catch the sauce nicely. You can also use wide plates to show off the colors of the dish. For garnishes, fresh parsley adds a bright touch. A sprinkle of extra cheddar cheese makes it look tempting. You can also add a few cherry tomato halves on top for color. This makes the dish pop and look appetizing. For the full recipe, check out the complete guide. {{image_2}} You can switch up the pasta for this dish. If you can't find farfalle, try penne or rotini. Both hold sauce well and taste great. If you're looking for gluten-free options, consider using gluten-free pasta. Brands now offer tasty choices made from rice or quinoa. These pastas cook well and blend nicely with the sauce. Want to change the protein? Shrimp works wonderfully in this recipe. Cook them until pink and add them just as you would the chicken. You can also use sausage for a heartier flavor. Just slice it and sauté before adding it to the sauce. For a vegetarian spin, chickpeas are a fantastic substitute. They add protein and pair well with the creamy sauce. Just drain and rinse them, then mix them in at the end. To switch up the taste, add barbecue sauce to the creamy mix. This gives a smoky flavor that pairs well with chicken. Feel free to mix in different cheeses too. Gouda or mozzarella will give a nice twist and melt beautifully. Try blending cheeses for a gourmet touch. These variations let you customize your creamy cowboy butter chicken pasta. Enjoy exploring new flavors! For the complete recipe, check the Full Recipe section. To keep your creamy cowboy butter chicken pasta fresh, store it in an airtight container. This helps keep moisture in and prevents it from absorbing other smells in your fridge. Place it in the fridge within two hours after cooking. You can safely store it for up to three days. When you are ready to enjoy your leftovers, reheating them gently is key. The best method is to use a skillet on low heat. Add a splash of milk or extra cream to keep the sauce creamy. Stir often to prevent sticking. Another option is to use the microwave. Place the pasta in a microwave-safe dish and cover it with a damp paper towel. Heat in short bursts, stirring in between, until warm. This helps keep the creaminess intact. Cowboy butter is a rich, flavorful sauce. It blends butter with garlic and spices. You can use it on meats, veggies, and pasta. This sauce adds a kick to any dish. It's perfect for adding flavor to grilled foods or pasta. Yes, you can prepare this dish ahead. Cook the pasta and chicken first. Make the cowboy butter sauce separately. Store each part in airtight containers. Keep in the fridge for up to three days. To serve, just reheat and mix together. To make this recipe dairy-free, use plant-based butter. Substitute heavy cream with coconut cream or almond milk. For cheese, try nutritional yeast or dairy-free cheese. These swaps will keep the dish creamy and tasty. Yes, this recipe works great for meal prepping. Portion the cooked pasta and chicken into containers. Add the cowboy butter sauce on top. Store in the fridge for easy lunches or dinners. Reheat in the microwave when ready to eat. Check out the Full Recipe for more details. Creamy Cowboy Butter Chicken Pasta combines delicious chicken and pasta in a creamy sauce. You learned how to cook it with easy steps. We also shared tips on making it even better and ways to switch up the recipe. In short, this dish is tasty and adaptable for all. Try it out and enjoy!

Creamy Cowboy Butter Chicken Pasta Delightful Dinner

Looking for a dinner that feels both rich and cozy? Let me introduce you to Creamy Cowboy Butter Chicken Pasta.

When making 20-Minute Spicy Thai Noodles, you need fresh and vibrant ingredients. They work together to create a tasty dish. Here’s what you’ll need: - Rice Noodles (8 oz) - Vegetable Oil (2 tablespoons) - Garlic (2 cloves, minced) - Ginger (1-inch piece, grated) - Red Bell Pepper (1, thinly sliced) - Snap Peas (1 cup, trimmed) - Carrot (1, julienned) - Green Onions (3, chopped) - Soy Sauce (1 tablespoon) - Chili Paste (2 tablespoons, adjust for spice level) - Lime Juice (1 tablespoon) - Fresh Cilantro (for garnish) - Crushed Peanuts (for garnish) - Sesame Seeds (for garnish) These ingredients bring the dish to life. The rice noodles serve as the base, while the vegetables add color and crunch. Garlic and ginger provide a warm, spicy flavor. Soy sauce and chili paste create a rich umami taste. Lime juice gives it a refreshing kick. Once you gather these ingredients, you can start cooking. You will enjoy a quick and flavorful meal that packs a punch. Check the [Full Recipe](#) for detailed steps. To start, you need to cook the rice noodles. Boil water in a large pot. Add the noodles and cook until they are al dente, about 5 to 7 minutes. Check the package for specific times. Once done, drain the noodles in a colander. Rinse them under cool water to stop the cooking process. This will help keep them firm. Set them aside for later. Next, it's time to stir-fry. Heat vegetable oil in a large skillet or wok over medium-high heat. Add minced garlic and grated ginger. Sauté them for about 30 seconds. You want them fragrant, not burnt. Then, toss in the sliced red bell pepper, snap peas, and julienned carrot. Stir-fry for about 3 to 4 minutes. The goal is to keep the vegetables tender-crisp. Now, it’s time to combine everything. Lower the heat to medium and add the cooked noodles to the skillet. Pour in the soy sauce, chili paste, and lime juice. Toss everything together well. Make sure the noodles coat with the sauces. Cook until everything is heated through. Finally, mix in half of the chopped green onions. Serve the spicy Thai noodles in bowls and enjoy this quick, flavorful meal! For the full recipe, refer to the earlier section. To cook rice noodles al dente, follow the package instructions closely. Usually, it takes about 5 minutes. You want them to have a slight bite. This texture holds up well when you stir-fry them. To avoid a mushy texture, make sure to drain the noodles right after cooking. Rinse them under cold water for a few seconds. This stops the cooking process and keeps them firm. If you want to modify the chili paste, start with one tablespoon. Taste it after you mix it in. You can always add more if you like heat. Balancing flavors with lime juice is key. The lime adds brightness and cuts through the spice. A squeeze of lime can really enhance the dish. For the best accompaniments, serve your spicy Thai noodles with fresh cucumber slices or a side of spring rolls. These add crunch and freshness. Plating is important. Use shallow bowls for a nice look. Arrange the noodles neatly and top them with fresh cilantro and crushed peanuts. This makes your meal not just tasty but also beautiful. For the full recipe, check out the 20-Minute Spicy Thai Noodles. {{image_2}} You can switch out veggies for a different taste. Try using broccoli or bok choy instead of snap peas. These add crunch and flavor. If you want a milder dish, bell peppers work great too. For gluten-free options, use rice noodles made from brown rice or even zucchini noodles. They keep the dish light and tasty. Adding protein makes this meal more filling. You can use chicken, shrimp, or tofu. If you choose chicken, cut it into small pieces. Cook it for about 5-6 minutes until it’s no longer pink. For shrimp, just toss them in for 3-4 minutes until they turn pink and curl. Tofu is a great choice too. Cube it and sauté for around 5 minutes until golden. To kick up the flavor, consider adding more spices. A pinch of crushed red pepper or a dash of cumin can add depth. Fresh herbs like basil or mint bring a fresh taste. You can also switch up your sauces. Instead of soy sauce, try tamari for a gluten-free option. Mixing in a bit of peanut sauce gives a rich, nutty flavor. Check out the Full Recipe for more ideas! To keep your spicy Thai noodles fresh, store them in an airtight container. This keeps moisture in and prevents them from drying out. Place the container in the fridge. Your leftovers will stay good for about three days. After that, the flavors may fade. When you’re ready to eat, reheat your noodles gently. You can use a skillet over low heat. Add a splash of water or broth to help add moisture back into the noodles. Stir them often until they are heated through. You can also use the microwave. Place the noodles in a bowl with a bit of water. Cover it and heat for about one to two minutes, stirring halfway. If you want to save your spicy Thai noodles for later, you can freeze them. Before freezing, let them cool completely. Then, pack them into a freezer-safe bag or container. Press out as much air as possible. They can be stored in the freezer for up to three months. When you are ready to eat, thaw them in the fridge overnight. Reheat using the methods above to enjoy a quick meal again. For the full recipe, check the earlier section. Spicy Thai noodles can last about three to four days in the fridge. Make sure to store them in an airtight container. This helps keep them fresh and tasty. Yes, you can easily make this recipe vegan. For the soy sauce, use a gluten-free option if needed. Replace the chili paste with a vegan version. You can also add tofu for protein. Use vegetable broth instead of any fish sauce to keep the flavor strong. These noodles pair well with many sides. Try spring rolls for a tasty starter. A light cucumber salad can add freshness. You can also serve them with a bowl of miso soup. Each of these options brings out the flavors of the noodles. For the full recipe, check out the earlier section! In summary, we explored the ingredients and steps to create delicious spicy Thai noodles. You learned how to cook rice noodles properly and sauté flavorful garlic and ginger. We also discussed tips for achieving perfect noodles, adjusting spice levels, and presenting your dish beautifully. With easy variations, you can customize this recipe to fit your taste. Enjoy making these noodles, and don't shy away from adding your favorite proteins or veggies! You’ll impress your family and friends with this quick and tasty meal.

20-Minute Spicy Thai Noodles Quick and Flavorful Meal

Craving a quick and tasty meal? Dive into these 20-Minute Spicy Thai Noodles! Packed with vibrant flavors and fresh veggies,

- 1 medium butternut squash, peeled and diced - 1 cup Arborio rice - 1 small onion, finely chopped - 3 cloves garlic, minced - 4 cups vegetable broth, warmed - 1 cup almond milk (or any plant-based milk) - 2 tablespoons nutritional yeast - 2 tablespoons olive oil - 1 teaspoon dried thyme - Salt and pepper to taste - Fresh parsley, chopped (for garnish) For a twist, add sautéed mushrooms or spinach for extra flavor and nutrition. Each serving of this creamy dish contains about 300 calories. It provides essential vitamins and minerals from the squash. The nutritional yeast adds B vitamins and a cheesy flavor without dairy. If you have nut allergies, swap almond milk for oat or soy milk. For added flavor, consider fresh herbs like basil or rosemary. Using vegetable stock with herbs can also brighten the taste. 1. Start by heating olive oil in a large pot over medium heat. 2. Add the finely chopped onion and sauté for about 3-4 minutes until it turns soft. 3. Next, stir in minced garlic and diced butternut squash. Cook for around 5 minutes. The squash should start to soften. 4. Now, add Arborio rice to the pot. Stir it well so each grain gets coated with oil. 5. Toast the rice for about 2 minutes. You want it to look slightly clear around the edges. 6. Pour in one ladle of warm vegetable broth. Stir continuously until the liquid is mostly absorbed. 7. Keep adding broth one ladle at a time. Stir often. Let each addition be absorbed before the next. This will take about 18-20 minutes. 8. When the rice is creamy and al dente, add almond milk and nutritional yeast. Mix well. 9. Season with thyme, salt, and pepper. Stir until everything is heated through. 10. Remove from heat and let it sit for a few minutes. This helps the flavors mix better. Stirring is key to making risotto creamy. It helps release the starch from the rice, giving that rich texture we love. Always use warm broth; it keeps the cooking process steady and smooth. To bring out the best flavors, sauté vegetables slowly. This method allows their natural sugars to caramelize. For the risotto, keep the heat medium. This lets the rice cook evenly without burning. When you add the broth, do it slowly. This helps the rice absorb the liquid better. Stirring helps create that creamy texture we desire. If it looks too dry, add a little more broth. You want it creamy, not soupy. I recommend taking photos at each cooking step. This not only helps you track your process but also makes it more fun! For plating, serve the risotto in shallow bowls. Top with chopped parsley and a sprinkle of nutritional yeast. A drizzle of olive oil can make it look fancy and add flavor. For the best results, use colorful plates. This makes the dish pop and look inviting. Enjoy the process of making your vegan butternut squash risotto! - Overcooking the rice: This can ruin the texture. Keep an eye on the rice as you stir. You want it creamy but still slightly firm, known as al dente. If you lose track of time, you'll have mushy risotto. - Not stirring enough during cooking: Stirring is key to a great risotto. It helps the rice release its starches, creating that creamy texture. Make sure to stir often, especially as you add the broth. - Best practices for seasoning: Start with a good base of salt and pepper. Use fresh herbs like thyme for a pop of flavor. Taste as you cook, and adjust your seasonings to your liking. - Suggestions for ingredient swaps that can enhance the dish: Try adding a splash of white wine for depth. You can also mix in sautéed mushrooms or spinach for extra nutrition. Nutritional yeast gives a cheesy flavor, but you can swap it with vegan cheese if you prefer. - Recommended pots and utensils: Use a heavy-bottomed pot for even heat. A wooden spoon is great for stirring, as it won’t scratch your pot. - How to choose the right type of rice for risotto: Arborio rice is the best choice due to its high starch content. This helps achieve that creamy risotto texture. You can also use Carnaroli or Vialone Nano if you want to experiment. For more details, check out the Full Recipe for Vegan Butternut Squash Risotto. {{image_2}} You can change the butternut squash for other seasonal vegetables. Try pumpkin for a sweeter taste. Mushrooms add a nice earthiness to the dish. Spinach brings bright color and nutrients. Just remember to cook them until tender before mixing into the risotto. If you need a gluten-free option, use gluten-free vegetable broth. You can also swap Arborio rice for another gluten-free grain, like quinoa. For a richer dish, mix in plant-based cream or cashew cream. This adds more creaminess and flavor to your risotto. Pair your risotto with a simple green salad. A light vinaigrette complements the dish well. If you enjoy wine, a crisp white wine like Sauvignon Blanc works nicely. It balances the flavors and enhances the meal. For a heartier option, serve with roasted vegetables on the side. Check the Full Recipe for more ideas on making this dish your own. After you make your Vegan Butternut Squash Risotto, let it cool. Put it in an airtight container. You can keep it in the fridge for up to three days. If you have a lot of leftovers, divide them into smaller portions. This makes it easy to reheat just what you need. To reheat risotto, use a pot on low heat. Add a splash of vegetable broth or almond milk while stirring. This helps bring back its creaminess. You can also use the microwave, but be sure to cover the bowl. Heat in short bursts and stir in between. Yes, you can freeze risotto! First, let it cool completely. Then, put it in a freezer-safe container. It will stay good for up to three months. To thaw, move it to the fridge overnight. Reheat it on the stove with a little broth or milk to restore the creaminess. For the full recipe, check out the [Full Recipe]. To make your risotto creamy, use Arborio rice. This rice type has a lot of starch. Stir the rice often while adding broth. The stirring helps release the starch, making the dish smooth. Adding almond milk at the end also boosts the creaminess. Remember to let the dish sit for a few minutes to let flavors blend. Yes, you can prepare the risotto in advance. Cook it fully, then cool it down. Store it in a container in the fridge for up to three days. When you're ready to eat, reheat it slowly on the stove. Add a splash of vegetable broth or almond milk to restore the creamy texture. This risotto pairs well with many sides. Try a fresh green salad with lemon vinaigrette. Roasted Brussels sprouts or sautéed spinach work nicely too. For protein, serve it with grilled tofu or chickpeas. You can also enjoy it with crusty bread for a complete meal. You can find the full recipe for Vegan Butternut Squash Risotto in the Full Recipe section. This section provides all the details you need to create this comforting dish. This blog post covered everything you need to make a great Vegan Butternut Squash Risotto. We discussed ingredients, including measurements and substitutions. I shared detailed cooking steps and tips to avoid common mistakes. You learned about variations with seasonal ingredients and how to serve the dish. Finally, I provided storage info to keep your leftovers fresh. With these insights, you can create a delicious risotto that suits your taste and dietary needs. Enjoy experimenting in the kitchen and delighting your family with this comforting dish!

Vegan Butternut Squash Risotto Creamy Comfort Dish

Looking for a comforting, creamy dish that’s vegan and delicious? You’ll love my Vegan Butternut Squash Risotto! This simple recipe

Older posts
Newer posts
← Previous Page1 … Page97 Page98 Page99 … Page115 Next →

dsad

© 2025 flavorsprint • Built with GeneratePress

Our Policies

  • Copyright Policy
  • Cookie Policy
  • GDPR Policy
  • Privacy Policy
  • Disclaimer
  • Terms Of Use

More Information

  • Home
  • About
  • Contact
  • Appetizers
  • Dessert
  • Dinner
  • Drinks
©2025, flavorsprint About Back To Top