Skip to content
DisclaimerTerms Of UseGDPR PolicyCookie Policy

flavorsprint

  • Home
  • Drinks
  • Appetizers
  • Dinner
  • Dessert
  • About
  • Contact
  • Privacy Policy
DisclaimerTerms Of UseGDPR PolicyCookie Policy

Lillian

Gathering the right ingredients makes this Chicken Fajita Casserole shine. Here’s what you need: - 2 cups cooked chicken, shredded - 1 red bell pepper, sliced - 1 green bell pepper, sliced - 1 large onion, sliced - 1 can (15 oz) black beans, drained and rinsed - 1 cup corn kernels (fresh, frozen, or canned) - 1 teaspoon chili powder - 1 teaspoon cumin - 1 teaspoon paprika - 1/2 teaspoon garlic powder - 1/2 teaspoon onion powder - 1/4 teaspoon black pepper - 1 cup salsa (mild or hot, to preference) - 2 cups shredded cheese (cheddar or Mexican blend) - 6 small tortillas, cut into wedges - Fresh cilantro for garnish (optional) Each ingredient brings its own flavor. The cooked chicken gives a hearty base. Bell peppers add crunch and sweetness. The black beans bring protein and texture. Corn adds a touch of sweetness, and the spices give it that fajita kick. Salsa ties everything together with its tangy goodness, while cheese adds creaminess. Tortilla wedges create layers and soak up all the tasty juices. Don't forget the cilantro for a fresh finish! {{ingredient_image_1}} Start by preheating your oven to 375°F (190°C). This step is key. A hot oven helps the casserole cook evenly. In a large bowl, mix the following: - 2 cups cooked chicken, shredded - 1 sliced red bell pepper - 1 sliced green bell pepper - 1 sliced large onion - 1 can (15 oz) black beans, drained and rinsed - 1 cup corn kernels - 1 teaspoon chili powder - 1 teaspoon cumin - 1 teaspoon paprika - 1/2 teaspoon garlic powder - 1/2 teaspoon onion powder - 1/4 teaspoon black pepper Stir until everything is well combined. The spices will add great flavor. Grab a 9x13-inch baking dish. Spread half of the tortilla wedges on the bottom. This gives a tasty base. Then add half of the chicken and vegetable mix over the tortillas. Pour half of the salsa on top, then sprinkle a third of the cheese. Repeat this layering: the rest of the tortilla wedges, chicken mixture, salsa, and top with the remaining cheese. Cover the baking dish with aluminum foil. Bake it in the preheated oven for 25 minutes. After 25 minutes, take off the foil and bake for another 15 minutes. Watch for the cheese to bubble and turn golden. This step makes the dish extra appealing. Let the casserole cool slightly before serving. You can garnish it with fresh cilantro if you like. This adds a fresh touch. Serve it with a side salad or some guacamole for a complete meal. Enjoy the blend of flavors! Shredding chicken can be easy if you have the right tools. Use two forks. Place the chicken on a cutting board. Hold one fork in each hand. Pull the chicken apart with the forks. This method gives you nice, even pieces. You can also use your hands if the chicken is cool enough. For best results, shred the chicken while it is warm. This makes it easier to handle. You can personalize your seasoning to match your taste. If you like spice, add more chili powder or fresh jalapeños. If you prefer a milder flavor, use less spice. You can experiment with herbs like oregano or thyme. A squeeze of lime juice can add a fresh twist. Taste as you go to find what you love best. Cheese can change the taste and texture of your casserole. Cheddar brings a sharp flavor, while a Mexican blend adds a creamy touch. Try pepper jack for a spicy kick. If you want a lighter option, use reduced-fat cheese. Each choice will give your dish a different vibe. Don’t shy away from mixing cheeses for depth in flavor. Layering is key to a great casserole. Start with tortilla wedges at the bottom. This creates a strong base. Spread half of the chicken mix on top. Follow with salsa and cheese. Repeat these layers carefully. Make sure to cover everything well. This helps all the flavors blend while baking. Aim for three layers for a hearty dish. Pro Tips Use Leftover Chicken: This casserole is a perfect way to use up leftover rotisserie chicken or any cooked chicken you have on hand. Customize Your Vegetables: Feel free to swap or add any vegetables you like, such as zucchini or mushrooms, to make it even more colorful and nutritious. Spice It Up: Adjust the level of heat by choosing a spicier salsa or adding fresh jalapeños for an extra kick. Make Ahead: Prepare the casserole in advance and store it in the refrigerator. Just bake it when you're ready to serve! {{image_2}} You can easily make a vegetarian version of the chicken fajita casserole. Start by swapping the chicken for 2 cups of cooked quinoa or lentils. These options add protein and texture. Use the same mix of veggies, like bell peppers and onions. You can also add extra beans and corn for more flavor. This dish stays just as tasty without meat. If you love heat, make a spicy version! Use hot salsa instead of mild. Add a diced jalapeño or two for a kick. You can also sprinkle in some cayenne pepper or crushed red pepper flakes. These changes will make each bite exciting and full of flavor. Feel free to swap ingredients to fit your taste. Instead of black beans, try pinto beans or kidney beans. If you don't like corn, you can skip it or add diced zucchini. Use your favorite cheese, like pepper jack for a creamy heat. Adjust the spices too; add more chili powder or cumin if you enjoy bolder flavors. The beauty of this dish is its flexibility! To store your Chicken Fajita Casserole, let it cool first. Transfer it to an airtight container. This helps keep it fresh. You can also cover the baking dish with plastic wrap or foil. Stored this way, it stays good for about 3 to 4 days in the fridge. If you want to save it for later, freezing is a great option. Cut the casserole into portions. Wrap each piece tightly with plastic wrap, then foil. This prevents freezer burn. You can freeze it for up to 3 months. When you're ready to eat, just thaw it in the fridge overnight. To reheat, preheat your oven to 350°F (175°C). Place the casserole in an oven-safe dish. Cover it with foil to keep it moist. Heat for about 20-25 minutes, or until it's hot all the way through. You can also microwave it in short bursts, stirring in between. Enjoy it warm for a tasty meal! Yes, you can use rotisserie chicken. It saves time and adds great flavor. Just shred the chicken and mix it into your casserole. This option makes meal prep super easy. If you want to skip tortillas, you can use rice or even zucchini slices. Both options work well. They give a different texture but still taste great. The casserole can last about 3 to 4 days in the fridge. Make sure to store it in an airtight container. This helps keep it fresh and tasty for your next meal. Yes, you can make this dish ahead of time. Prepare everything, then cover and store it in the fridge. Bake it just before serving. This makes it a perfect meal for busy nights. You can serve this casserole with a simple salad or some tortilla chips. A dollop of sour cream or guacamole adds extra flavor, too. Enjoy your meal with fresh toppings for the best experience. This blog post covered how to make a Chicken Fajita Casserole. We explored the ingredients, step-by-step instructions, and many helpful tips. You learned about variations and how to store leftovers. This dish is easy to make and fun to eat. Feel free to get creative with the recipe and make it your own. Enjoy each bite and share it with family and friends. Use these tips to impress everyone with your cooking skills!

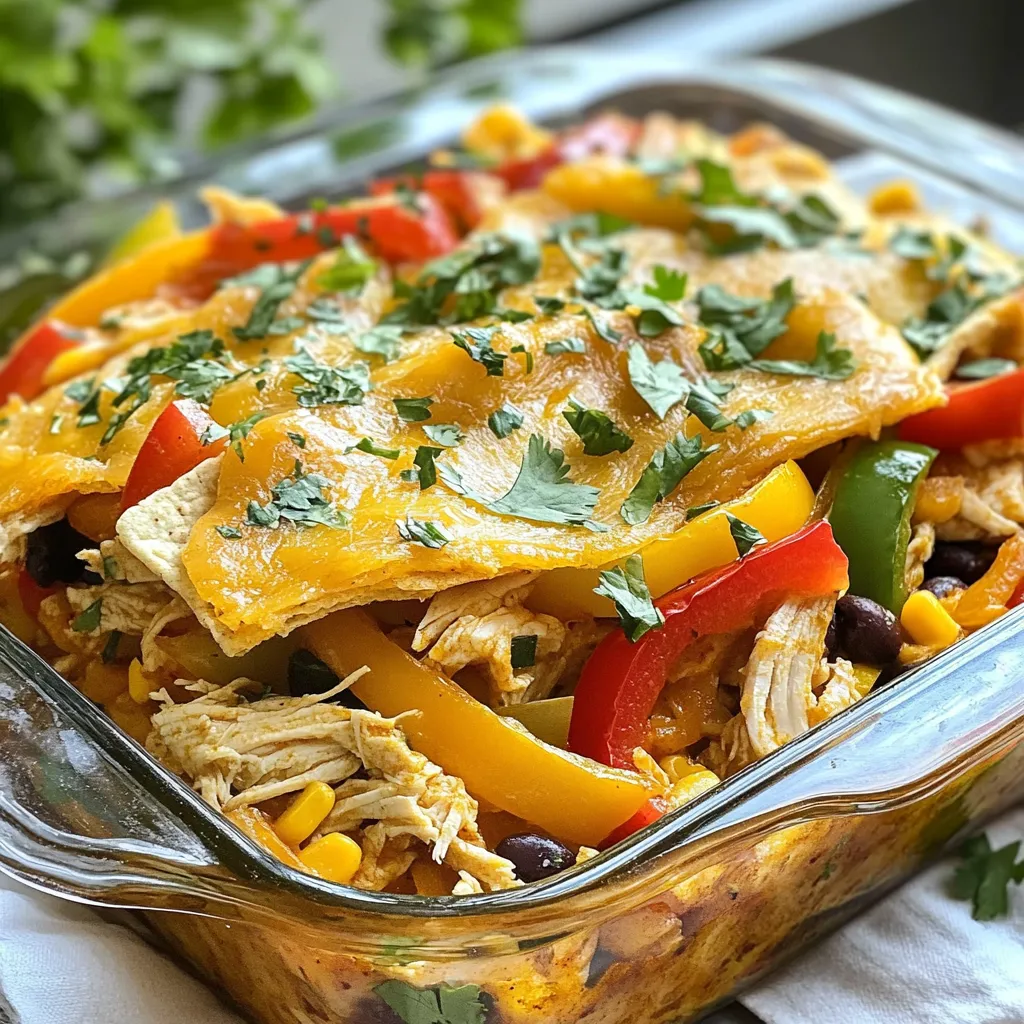
Chicken Fajita Casserole Flavorful Kitchen Delight

If you love bold flavors and easy meals, you’re in for a treat! My Chicken Fajita Casserole mixes tender chicken,

To make a Texas Chocolate Pecan Pie, you need simple yet rich ingredients. Here’s what you will need: - 1 pre-made pie crust (9 inches) - 1 cup pecans, toasted and chopped - 1 cup semi-sweet chocolate chips - 3/4 cup granulated sugar - 1/4 cup brown sugar, packed - 1/2 cup light corn syrup - 3 large eggs - 1/4 cup unsalted butter, melted - 1 teaspoon vanilla extract - 1/4 teaspoon salt - Additional chocolate chips and pecans for topping Each ingredient plays a key role. The pre-made pie crust saves time and provides a flaky base. The pecans add crunch and nutty flavor. Semi-sweet chocolate chips give a sweet depth. The sugars balance the flavors while the corn syrup adds a lovely texture. Eggs help bind everything together. Unsalted butter adds richness, and vanilla enhances the overall taste. A pinch of salt brings out the sweetness, making it all come together beautifully. Feel free to customize by adding different nuts or chocolate types if you like! {{ingredient_image_1}} - Preheat the oven to 350°F (175°C). - Prepare the pre-made pie crust in a 9-inch pie pan. Use a fork to poke a few holes in the bottom. This helps avoid bubbles during baking. - In a large mixing bowl, combine the granulated sugar, brown sugar, light corn syrup, melted butter, and vanilla extract. Whisk these ingredients well until they blend smoothly. - Next, add the eggs one at a time. Make sure to whisk after each egg until the mixture is smooth. Stir in the salt at this stage. - Gently fold in the chopped pecans and semi-sweet chocolate chips. Mix until everything is evenly combined. - Pour the filling into the prepared pie crust. Sprinkle some extra chocolate chips and pecans on top for a nice touch. - Bake the pie in the preheated oven for 50-55 minutes. Look for the filling to be set in the center with lightly browned edges. - Once done, remove the pie from the oven. Allow it to cool on a wire rack for at least 1 hour. This cooling time helps the filling set nicely. To make a great Texas Chocolate Pecan Pie, start with the crust. I poke holes in the bottom of the pie crust. This helps it avoid bubbling up. Preheat your oven to 350°F (175°C). Bake for 50-55 minutes. The pie should be set in the center. The edges should look lightly brown. Presentation matters! I love to serve this pie with a dollop of whipped cream. A scoop of vanilla ice cream goes well too. This adds a great contrast to the rich filling. You can also sprinkle extra pecans or chocolate chips on top. This makes it look fancy! Keep leftovers in the fridge. Cover the pie with plastic wrap. This keeps it fresh for up to four days. To reheat, slice a piece and warm it in the microwave. Heat it for about 20-30 seconds. Enjoy it warm for the best taste! Pro Tips Use Fresh Pecans: Opt for fresh, high-quality pecans for the best flavor and texture. Toast Your Nuts: Toasting the pecans enhances their flavor, adding a delightful crunch to your pie. Check for Doneness: Ensure the pie is set in the center by gently shaking it; it should not wobble excessively. Cool Before Serving: Allow the pie to cool completely to help the filling firm up, making it easier to slice. {{image_2}} You can change the taste of your Texas Chocolate Pecan Pie by using different types of chocolate. Dark chocolate adds a rich taste, while milk chocolate gives a sweet touch. Try mixing both for a fun balance. You can also add other nuts, like almonds, for extra crunch. This mix creates a unique flavor twist. If you need a gluten-free option, use a gluten-free pie crust. Many stores sell these ready-made. You can also make your own by using almond flour or gluten-free flour blends. For those following a vegan diet, swap eggs with flaxseed or chia seeds. Use plant-based butter and a vegan pie crust. These changes keep the pie delicious and friendly for everyone. You can serve Texas Chocolate Pecan Pie warm or chilled. Warm pie brings out the chocolate flavor, while chilled pie offers a refreshing bite. Both ways taste great! This pie is perfect for special occasions like holidays or birthdays. You can also enjoy it as a sweet treat any day. It’s a versatile dessert that fits any mood or event. - Sweet Treats Bakery: Known for its rich chocolate pecan pie, this bakery uses fresh, local ingredients. Their pies are both sweet and nutty, making each bite a delight. - The Pie Hole: This charming spot serves Texas chocolate pecan pies that are always a hit. Their flaky crust and gooey filling leave customers coming back for more. - Pecan Pie Palace: A local favorite, offering pies made with high-quality pecans. Their chocolate pecan pie has a unique twist with a hint of espresso. - Texas BBQ and Pie Co.: Famous for its smoked meats and desserts, their chocolate pecan pie is a must-try. Patrons rave about the balance of chocolate and pecans. - Southern Comfort Café: This café serves traditional Texas dishes, including a delicious chocolate pecan pie. Guests love the homemade feel and rich flavors. - Lone Star Pies: Known for their classic Texas desserts, this restaurant offers a chocolate pecan pie that stands out. Their generous portions leave you satisfied and happy. - Goldbelly: You can order Texas chocolate pecan pie from various bakeries online. They ship pies nationwide, ensuring they arrive fresh. - Texas Pecan Pie Co.: This site specializes in shipping authentic Texas pies. They have rave reviews for taste and quality. Expect a rich, flavorful pie right at your door. - Etsy: Some local bakers sell their pies on Etsy. You can find unique flavors and homemade touches. Shipping times vary, but the taste is worth the wait. How do I know when the pie is done baking? The pie is done when the center is set and edges are lightly browned. You can gently shake the pie. If it wobbles slightly but is mostly firm, it's ready. Can I make Texas Chocolate Pecan Pie in advance? Yes, you can make this pie a day ahead. Just store it in the fridge. Let it cool completely before covering it. The flavors will meld nicely overnight. What can I use instead of corn syrup? You can use maple syrup or honey as a substitute. Both add sweetness and flavor. Keep in mind that the taste may change slightly with these options. Can I use different nuts? Absolutely! You can use walnuts or almonds if you prefer. Each nut will bring a unique flavor and crunch. Just make sure they are chopped to similar sizes. What if I don’t have a pre-made pie crust? If you don’t have a pre-made crust, you can make your own. Use flour, butter, and water to create a simple dough. Roll it out and fit it into your pie pan. Do I need to blind-bake the crust before filling? No, you do not need to blind-bake the crust. The filling will cook the crust perfectly during baking. Just poke holes in the bottom to prevent bubbles. How can I prevent the filling from boiling over? To prevent boiling over, pour the filling slowly. Do not overfill the crust. Leave a little space at the top for the filling to expand while baking. In this article, we covered how to make Texas Chocolate Pecan Pie. You learned about the key ingredients, step-by-step instructions, and helpful tips for baking and serving. We also explored variations and local bakeries where you can enjoy this dessert. Remember, a homemade pie often tastes better than store-bought. With practice, you can impress yourself and your guests with this classic treat. Enjoy making this pie and savoring every bite!

Texas Chocolate Pecan Pie Delightful and Rich Recipe

Are you ready to indulge in a slice of Texas Chocolate Pecan Pie? This delightful dessert combines rich chocolate with

- 8 oz lo mein noodles - 1 cup broccoli florets - 1 cup bell pepper, julienned (any color) - 1 medium carrot, julienned - 1 cup sugar snap peas - 3 cloves garlic, minced - 1 inch ginger, grated - 2 tablespoons sesame oil Lo mein noodles are the heart of this dish. They are soft and chewy. Fresh vegetables bring color and crunch. Broccoli adds a nice green touch. Bell peppers add sweetness. Carrots give a bit of crunch. Sugar snap peas are crisp and sweet. For flavor, garlic and ginger are key. They add warmth and depth. - 3 tablespoons soy sauce (or tamari for gluten-free) - 1 tablespoon hoisin sauce - 1 teaspoon chili paste (adjust to taste) Sauces make the dish shine. Soy sauce or tamari gives a salty base. Hoisin sauce adds sweetness. Chili paste brings heat. Adjust the chili to fit your taste. This balance adds layers of flavor. - Sesame seeds - Chopped green onions Garnishes add a final touch. Sesame seeds give a nutty flavor. Chopped green onions add freshness and color. These small details make your dish look and taste great. {{ingredient_image_1}} First, bring a large pot of salted water to a boil. This helps the noodles cook evenly. Next, add 8 oz of lo mein noodles. Cook them according to the package instructions until they are al dente. Al dente means the noodles are firm to the bite. After cooking, drain the noodles and rinse them with cold water. This stops the cooking process and keeps them from sticking. Set the noodles aside for later use. While the noodles cook, grab a small bowl. In this bowl, mix together 3 tablespoons of soy sauce, 1 tablespoon of hoisin sauce, and 1 teaspoon of chili paste. Stir well until everything combines smoothly. Set this sauce aside, as it will add flavor to your stir-fry. Now, it's time to heat things up. In a large skillet or wok, pour in 2 tablespoons of sesame oil. Heat it over medium-high heat. Once hot, add 3 cloves of minced garlic and 1 inch of grated ginger. Sauté these for about 30 seconds. You want to release their wonderful aroma. Next, toss in 1 cup of broccoli florets, 1 cup of julienned bell pepper, 1 medium julienned carrot, and 1 cup of sugar snap peas. Stir-fry these veggies for 5 to 7 minutes. You want them to be tender but still crisp. Once your veggies are ready, it’s time to add the noodles. Toss in the cooked lo mein noodles along with the stir-fry sauce you prepared. Mix everything together for another 2 to 3 minutes. This step ensures the noodles are heated through and coated in sauce. Before serving, stir in 2 chopped green onions. This adds a fresh crunch. For plating, serve the veggie lo mein in a large bowl or individual dishes. Sprinkle sesame seeds on top for a nice finish. You might also consider adding some edible flowers for extra color. Enjoy your simple and satisfying meal! To cook lo mein noodles, start with plenty of water. This helps keep the noodles from sticking. Here are some tips: - Preventing sticking: Use a large pot with salted water. Stir the noodles often while cooking. This keeps them from clumping together. - Rinsing techniques: After cooking, drain the noodles in a colander. Rinse them with cold water. This stops the cooking and helps them stay firm. Flavor and texture are key to a great stir-fry. Here’s how to make your dish pop: - Adjusting spice levels: Start with a small amount of chili paste. You can always add more later. This way, you control the heat. - Timing for crisp vegetables: Add the veggies in the right order. Start with the broccoli and carrots, as they take longer to cook. Add the sugar snap peas last for a nice crunch. You can make your Veggie Lo Mein even better by adding some protein and fresh veggies: - Adding protein options: Tofu or tempeh are great choices. They soak up flavors well and add texture. - Using seasonal vegetables: Choose vegetables that are fresh and in season. This not only boosts flavor but also adds more nutrients to your meal. Think about bell peppers, zucchini, or mushrooms for extra color and taste. Pro Tips Prep Your Ingredients: To make the cooking process smoother, chop all your vegetables and measure out your sauces before starting. This ensures everything is ready to go when you're stir-frying. Don’t Overcook the Veggies: Stir-frying is all about maintaining the crunch! Cook your vegetables until they are just tender to keep their vibrant color and nutrients intact. Use High Heat: For the best stir-fry results, make sure your skillet or wok is hot before adding ingredients. This helps to sear the vegetables quickly, enhancing flavor and texture. Customize Your Sauce: Feel free to adjust the stir-fry sauce to your taste. Adding a splash of rice vinegar or a hint of sesame oil can elevate the flavors even more. {{image_2}} You can mix up your Veggie Lo Mein with different veggies. Use what you love or what’s in season. Try zucchini, mushrooms, or spinach. They add flavor and color. Seasonal choices make the dish fresh and fun. Don’t be afraid to get creative! If you need a gluten-free meal, swap lo mein noodles for rice noodles. They work great and taste amazing. Also, use gluten-free soy sauce or tamari. This keeps the flavor while meeting your needs. You won’t miss the gluten at all! Want to add some protein? Chicken, shrimp, or tofu are all great choices. Cook your protein first, then set it aside. Add it back in with the noodles and sauce. This makes your meal heartier. It’s a simple way to make it more filling! Store leftover veggie lo mein in airtight containers. Use glass or plastic containers. They keep food fresh and safe. Fill the container with lo mein and seal it tight. Keep it in the fridge. Eat leftovers within three days for the best taste. To reheat, use a skillet or a microwave. For the skillet, add a splash of water. Heat it over low to medium heat. Stir often to keep the noodles from sticking. In the microwave, cover the bowl with a damp paper towel. Heat for 1-2 minutes, stirring halfway through. This keeps the veggies crisp and the noodles soft. You can freeze veggie lo mein, but it's best to do this before adding green onions. Cool the dish completely. Place it in freezer-safe bags. Squeeze out the air and seal tightly. Label the bag with the date. When ready to eat, thaw it overnight in the fridge. Reheat it in a skillet for the best texture. Yes, you can use other noodles. Try using rice noodles or even spaghetti. Both options work well. If you want a lower-carb meal, try zucchini noodles. This dish is quite healthy. It includes fresh veggies like broccoli and bell peppers. These vegetables provide vitamins and fiber. Lo mein noodles offer carbs for energy. The sauce adds flavor without too many calories. The spice level depends on your taste. The recipe includes chili paste, which adds heat. To make it less spicy, use less chili paste. If you want it spicier, add more. Adjust to what you like! In this blog post, we explored how to make a delicious Veggie Lo Mein Stir-Fry. We discussed key ingredients like lo mein noodles, fresh veggies, and tasty sauces. The step-by-step guide helped you prepare the dish smoothly. Tips on cooking noodles and enhancing flavors made it easier. We also covered storage and answered common questions. Remember, cooking is fun and can be tailored to your taste. Enjoy your stir-fry!

Veggie Lo Mein Stir-Fry Simple and Satisfying Meal

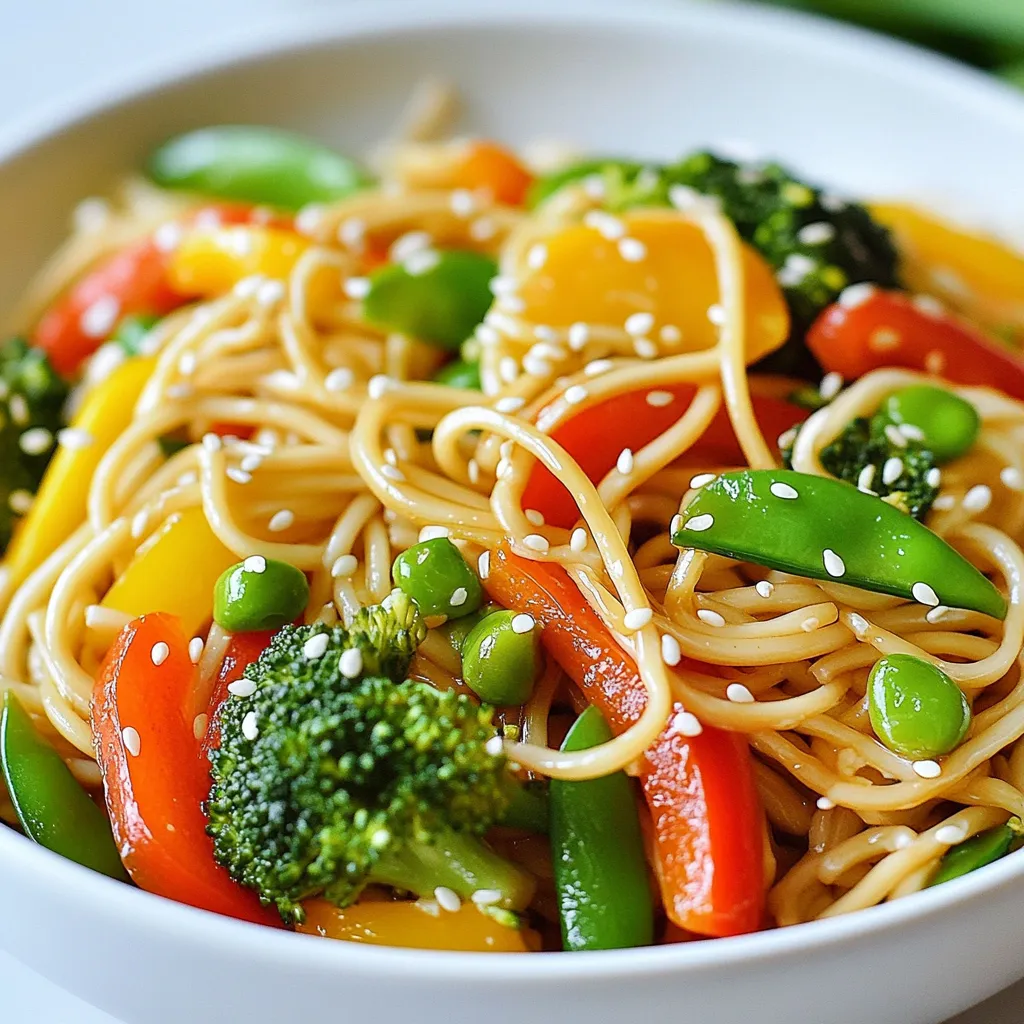
Are you craving a quick, satisfying meal that’s packed with flavor? This Veggie Lo Mein Stir-Fry is your answer. With

To make these thick and delightful cookies, you need: - 2 cups all-purpose flour - 1 teaspoon baking soda - 1/2 teaspoon salt - 1 cup unsalted butter, softened - 3/4 cup brown sugar, packed - 3/4 cup granulated sugar - 2 large eggs - 2 teaspoons vanilla extract - 1 cup semi-sweet chocolate chips - 1 cup milk chocolate chips - 1/2 cup chopped walnuts (optional) - Flaky sea salt for topping These ingredients create a rich base for your cookies. The mix of semi-sweet and milk chocolate chips gives a great flavor contrast. You can enhance your cookies by adding: - 1/2 cup chopped walnuts - Extra chocolate chips for a richer taste - A dash of cinnamon for warmth These optional ingredients add texture and flavor. Feel free to mix and match based on what you love. If you lack some ingredients, here are some swaps: - Use light brown sugar instead of granulated sugar for a deeper flavor. - Swap unsalted butter with coconut oil for a dairy-free version. - Replace eggs with flaxseed or applesauce for a vegan option. These substitutions keep the cookies tasty. Just remember that each change can slightly alter the final texture. {{ingredient_image_1}} To start, gather all your ingredients. You will need: - 2 cups all-purpose flour - 1 teaspoon baking soda - 1/2 teaspoon salt - 1 cup unsalted butter, softened - 3/4 cup brown sugar, packed - 3/4 cup granulated sugar - 2 large eggs - 2 teaspoons vanilla extract - 1 cup semi-sweet chocolate chips - 1 cup milk chocolate chips - 1/2 cup chopped walnuts (optional) - Flaky sea salt for topping First, preheat your oven to 350°F (175°C). Line two baking sheets with parchment paper. This helps prevent sticking and makes cleanup easier. Next, in a medium bowl, whisk together the flour, baking soda, and salt. Set this bowl aside for now. In a large mixing bowl, cream the softened butter with both sugars. Mix until it's light and fluffy, which should take about 2-3 minutes. This step adds air and helps cookies rise. Once mixed, add the eggs one at a time. Be sure to mix well after each egg. Then, stir in the vanilla extract. Gradually mix the dry ingredients into the wet mixture. Stir until just combined. Over-mixing can make cookies tough, so be gentle! Now, fold in the semi-sweet and milk chocolate chips. If you want, add in the chopped walnuts for some crunch. Using a cookie scoop or a tablespoon, drop generous mounds of dough onto your prepared baking sheets. Make sure to leave space between each cookie. They will spread a little as they bake. Sprinkle a light pinch of flaky sea salt on top of each mound of cookie dough. This enhances the flavor and adds a nice finish. Bake the cookies for 12-15 minutes. The edges should turn lightly golden, but the centers should stay soft. After baking, remove the sheets from the oven. Let the cookies cool on the baking sheet for 5 minutes. This helps them set before moving. Carefully transfer the cookies to a wire rack to cool completely. For a fun touch, serve the cookies on a decorative plate. You can even drizzle melted chocolate on top for extra flair. Enjoy them warm with a glass of milk! To get that thick and chewy cookie, use softened butter. Cream it well with the sugars. This step adds air, which helps the cookie rise. Don’t skip the resting time; letting the dough chill for 30 minutes makes a huge difference. Cold dough also helps keep the cookies thick. One big mistake is over-mixing the dough. Mix just until combined; too much mixing can make cookies tough. Also, don’t skip the flaky sea salt on top. It adds a nice contrast to the sweet chocolate. Lastly, avoid pressing the cookies flat before baking. Let them keep their shape! Look at the edges first. They should be golden brown. The center might look soft, and that’s okay. Remember, cookies continue to cook on the baking sheet after you take them out. If they look too baked, they can turn dry. Trust your eyes and take them out a bit early if needed! Pro Tips Chill the Dough: For thicker cookies, chill the dough for at least 30 minutes before baking. This helps the cookies hold their shape and enhances the flavor. Use Quality Chocolate: Opt for high-quality chocolate chips for the best flavor. A mix of semi-sweet and milk chocolate creates a delicious contrast. Don’t Overbake: Keep an eye on your cookies while baking. They should be golden around the edges but still soft in the center to maintain a chewy texture. Experiment with Add-ins: Feel free to add in your favorite nuts, dried fruits, or even a sprinkle of espresso powder for an extra flavor boost. {{image_2}} You can make these cookies gluten-free easily. Substitute all-purpose flour with a gluten-free blend. Look for blends that include xanthan gum, as it helps with texture. Follow the same steps in the recipe. Your cookies will still taste great! Want to mix it up? Try adding fun flavors! You can include: - 1/2 cup of shredded coconut - 1/2 cup of dried fruit like cranberries or cherries - 1 teaspoon of espresso powder for a coffee kick These add-ins will make your cookies unique and tasty. If you love chocolate, switch it up! Use different types of chocolate chips. You can try: - Dark chocolate chips for a richer taste - White chocolate chips for a sweeter treat - Even peanut butter chips for a fun twist Mix and match to create your perfect cookie! To keep your thick two chip chocolate chip cookies fresh, use an airtight container. Place a piece of wax paper between layers to prevent sticking. Store them at room temperature for up to five days. If you want them to last longer, consider freezing them. Freezing cookies is easy and a great way to save some for later. First, let the cookies cool completely. Then, place them in a single layer on a baking sheet. Freeze for about an hour, or until firm. After that, transfer them to a freezer bag. They can stay in the freezer for up to three months. To enjoy your cookies warm again, preheat your oven to 350°F (175°C). Place the cookies on a baking sheet and heat for about 5-10 minutes. This warms them up and brings back that fresh-baked taste. You can also use the microwave for a quick fix. Heat each cookie for about 10-15 seconds. Enjoy! Yes, you can use just one type of chocolate chip. If you prefer, use semi-sweet or milk chocolate. The flavor will change slightly but will still taste great. I love the mix of both chips for added texture and taste. But if you want a richer chocolate flavor, go with dark chocolate chips. To make cookies thick and chewy, use more flour and less baking soda. The right ratio of butter and sugar helps too. Chilling the dough before baking also helps keep them thick. When you scoop the dough, make big mounds. This keeps the cookies from spreading too much in the oven. To stop cookies from spreading too much, chill the dough for at least 30 minutes. Use a cookie scoop to keep the size even. Also, make sure your oven is at the right temperature. If it’s too hot, the cookies will spread fast. Lastly, don’t skip the parchment paper; it helps the cookies hold their shape. In this post, we covered key ingredients and how to bake cookies perfectly. I shared steps for preparation, baking, and cooling. I also listed tips to avoid common mistakes and achieve a great texture. You can even explore fun variations and storage tips. Remember, baking is all about practice. Keep experimenting with flavors and techniques. Enjoy the journey of making the best cookies your way!

Thick Two Chip Chocolate Chip Cookies Delightfully Simple

If you’re craving a cookie that’s thick, chewy, and packed with flavor, you’ve come to the right place! My Thick

- 4 medium sweet potatoes, peeled and cut into 1-inch cubes - 1/4 cup pure maple syrup - 2 tablespoons olive oil - 1 teaspoon cinnamon - 1/2 teaspoon nutmeg - Salt and pepper to taste - 1/4 cup pecans, roughly chopped - Fresh parsley, chopped for garnish You can swap maple syrup for honey or agave syrup if needed. For nuts, try walnuts or almonds instead of pecans. If you want to use oil, avocado oil works well. Each serving has about 200 calories. It offers 3 grams of protein, 8 grams of fat, and 36 grams of carbs. Sweet potatoes are high in fiber and packed with vitamins A and C. They also help support eye health and boost your immune system. {{ingredient_image_1}} 1. Prepping sweet potatoes Start by peeling the sweet potatoes. Then cut them into 1-inch cubes. This size helps them cook evenly. Make sure to use a sharp knife for safety. 2. Coating mixture preparation In a large bowl, combine the sweet potato cubes with olive oil and pure maple syrup. Add cinnamon, nutmeg, salt, and pepper. Mix well until every piece is coated. This mixture gives the sweet potatoes a sweet and warm flavor. 1. Key roasting tips Preheat your oven to 400°F (200°C). Line a baking sheet with parchment paper to prevent sticking. Spread the sweet potatoes in a single layer. This ensures they roast well without steaming. 2. Importance of stirring halfway Roast the sweet potatoes for 25-30 minutes. Make sure to stir them halfway through cooking. This helps them caramelize on all sides and adds to their flavor. Keep an eye on them to avoid burning. 1. Best ways to present the dish Once cooked, let the sweet potatoes cool for a few minutes. Garnish with chopped fresh parsley for a pop of color. Serve them warm on a nice platter to impress your guests. 2. Complementary sides and mains Maple roasted sweet potatoes pair well with grilled chicken or fish. You can also serve them alongside a fresh salad. They make a great side for any meal, adding warmth and color to your plate. To get the best caramelization, use pure maple syrup. Its high sugar content helps the sweet potatoes brown nicely. A higher oven temperature also aids this process. Set your oven to 400°F (200°C). This temperature ensures the sweet potatoes cook well and get that golden edge. Want to add more flavor? Try adding minced garlic or fresh herbs like thyme or rosemary. They bring a fresh taste that complements sweet potatoes. You can also mix in spices like cumin or paprika for a kick. These additions make the dish unique and fun! If your sweet potatoes are larger or smaller, adjust the cooking time. Larger pieces may need a few extra minutes. Smaller cubes will cook faster, so check them after 20 minutes. Remember that every oven can cook a bit differently, so watch closely. Pro Tips Choose the Right Sweet Potatoes: Look for firm sweet potatoes with smooth skin and no blemishes for the best flavor and texture. Maple Syrup Quality Matters: Use pure maple syrup for a richer taste; avoid imitation syrups for better flavor in your dish. Adjust Sweetness: Feel free to adjust the amount of maple syrup based on your sweetness preference or the natural sweetness of the sweet potatoes. Experiment with Spices: Try adding a pinch of ginger or allspice for an extra layer of flavor that complements the sweetness of the potatoes. {{image_2}} You can make this recipe vegan and gluten-free easily. Use pure maple syrup as your sweetener. Sweet potatoes are naturally gluten-free, so they fit right in. For a plant-based twist, skip the pecans or use sunflower seeds instead. This option keeps the dish crunchy and nut-free, perfect for those with allergies. Want to add some savory flavor? Try adding crispy bacon or prosciutto. The saltiness from the meat pairs well with the sweet potatoes. You can also mix in different herbs like rosemary or thyme. These herbs bring a new depth to the dish. Spice lovers can add paprika or cayenne for extra heat. You can mix in seasonal vegetables for a fresh twist. Carrots or Brussels sprouts work great with sweet potatoes. Want a fun holiday touch? Add mini marshmallows on top before roasting. They create a sweet, gooey layer that kids love. This variation brings a festive vibe to your meal. To keep your maple roasted sweet potatoes fresh, use airtight containers. Glass or plastic containers work well. Make sure to let the sweet potatoes cool before sealing them. Store them in the fridge. They stay fresh for about three to five days. When reheating, aim to keep the texture nice. The oven is best for this. Preheat it to 350°F (175°C). Spread the sweet potatoes on a baking sheet. Heat for about 10-15 minutes. If you use a microwave, cover them with a damp paper towel. This keeps moisture in but may not keep them as crispy. If you want to freeze your sweet potatoes, let them cool completely first. Place them in freezer-safe bags. Remove as much air as possible. They will freeze well for up to three months. To thaw, move them to the fridge overnight. Reheat in the oven or microwave, following the tips above to keep the texture. You can tell sweet potatoes are ready by looking for a golden-brown color. They should be tender and caramelized on the edges. To test for tenderness, use a fork or knife. If it easily pierces the sweet potato, it’s done. If not, let them roast a bit longer. Yes, you can prep the sweet potatoes in advance. Cut and coat them with olive oil and spices. Store them in the fridge for up to 24 hours. When you are ready to cook, just spread them on a baking sheet and roast. To reheat, cook in the oven at 350°F (175°C) for about 10 minutes. If you don’t have maple syrup, you can use honey or agave syrup. Brown sugar also works well, but use less since it is sweeter. Adjust the olive oil to keep the balance right. These options still give a nice sweetness and flavor to your dish. In this post, we covered key ingredients for a delicious sweet potato dish, including substitutions and health benefits. I shared step-by-step instructions for preparation, roasting, and serving. You learned tips for perfect caramelization and flavor enhancements along with variations for dietary needs. Finally, I offered storage and reheating tips. Use these insights to create a tasty and healthy meal. Enjoy the journey of cooking and make the most of your sweet potatoes!

Maple Roasted Sweet Potatoes Flavorful Side Dish Recipe

Looking for a tasty side dish? Maple roasted sweet potatoes are perfect! This easy recipe blends natural sweetness with a

- 1 lb boneless, skinless chicken breast, diced - 1 cup cauliflower florets - 1 cup low-sodium chicken broth - 1/2 cup plain Greek yogurt - 1 tablespoon olive oil - 3 cloves garlic, minced - 1 teaspoon onion powder - 1 teaspoon dried thyme - Salt and pepper to taste - 1 tablespoon nutritional yeast (optional for cheesy flavor) - Additional vegetables like carrots or bell peppers - Herbs for freshness (e.g., parsley or basil) To create my Healthy Low Calorie Creamy Chicken, I focus on fresh and wholesome ingredients. The main star is the boneless, skinless chicken breast. It provides lean protein, which is great for muscle health. I add cauliflower florets to give the dish a creamy texture without heavy cream. The Greek yogurt adds a rich, tangy flavor while keeping the calories low. For seasonings, olive oil and garlic bring depth to the dish. I often use onion powder and dried thyme to enhance the flavor. Salt and pepper are basic but essential to make everything pop. If you want a cheesy flavor without the calories, sprinkle in some nutritional yeast. I love to personalize this recipe. You can toss in extra vegetables like carrots or bell peppers for added nutrition. Fresh herbs like parsley or basil can brighten up the dish. These optional add-ins make the meal even more colorful and tasty. {{ingredient_image_1}} - In a large pot, heat 1 tablespoon of olive oil over medium heat. - Add 3 cloves of minced garlic and sauté for about 1 minute until fragrant. - Next, add 1 pound of diced chicken breast. - Season the chicken with salt, pepper, 1 teaspoon of onion powder, and 1 teaspoon of dried thyme. - Cook for about 5-6 minutes until the chicken is browned and cooked through. - Add 1 cup of cauliflower florets and 1 cup of low-sodium chicken broth to the pot. - Bring the mixture to a boil, then reduce the heat. - Let it simmer for about 10 minutes, until the cauliflower is tender. - Once the cauliflower is cooked, remove the pot from the heat. - Use an immersion blender to blend the mixture until smooth. - If you don't have an immersion blender, transfer it to a regular blender in batches. - Return the smooth mixture to low heat. - Stir in 1/2 cup of plain Greek yogurt and nutritional yeast if you want a cheesy flavor. - Finally, add 1 cup of chopped spinach and cook for an additional 2-3 minutes until the spinach is wilted. - Taste and adjust seasoning if needed, adding more salt or pepper as desired. To achieve a smooth and creamy texture, use an immersion blender. This tool blends the dish right in the pot. It saves time and reduces cleanup. If you don’t have one, a regular blender works well too. Just be careful when transferring hot liquid. You can adjust the dish’s thickness easily. Add more chicken broth for a thinner sauce. If you prefer a thicker texture, mix in more Greek yogurt. This adds creaminess without many calories. Don't shy away from spices and herbs. They can transform your dish. Try adding paprika for a bit of heat. Fresh herbs like parsley or basil can brighten the flavor. Mix and match to find what you enjoy. Balancing seasoning is key. Taste your dish as you cook. Add salt and pepper gradually. This helps you avoid over-seasoning. Remember, you can always add more, but you can’t take it away! Pair your creamy chicken with healthy sides. Whole-grain rice or quinoa works great. Both add fiber and nutrients. You can also serve it with a side of steamed veggies for extra color and crunch. For a beautiful presentation, serve the chicken in individual bowls. Garnish with fresh parsley or a sprinkle of black pepper. This adds a pop of color and makes the dish more appealing. Pro Tips Use Fresh Ingredients: Fresh garlic and spinach will enhance the flavor of the dish significantly compared to dried or frozen options. Adjust Consistency: If you prefer a thicker sauce, add less broth. For a thinner consistency, gradually incorporate more broth until desired. Experiment with Spices: Feel free to add other spices like paprika or cayenne for an extra kick, or switch out the thyme for herbs like rosemary or oregano. Store Leftovers Properly: To keep the creamy chicken fresh, store in an airtight container in the refrigerator for up to 3 days, and reheat gently on the stove. {{image_2}} You can swap chicken for turkey if you like. Turkey has a similar taste and is low in fat. Tofu is a great vegan choice. It absorbs flavors well and adds protein. For a creamy vegan dish, try plant-based yogurt. It gives a rich taste without dairy. Want to add a zing? A splash of lemon juice does wonders. It brightens the dish and brings freshness. If you crave heat, add red pepper flakes. They give a nice kick that many enjoy. You can mix and match flavors to suit your taste. Choosing low-fat yogurt is a smart move. It cuts calories while keeping the creaminess. You can also use less olive oil. Try steaming or baking instead of frying. These methods maintain flavor without adding extra fat. Experiment to find what you like best! To keep your creamy chicken fresh, use airtight containers. Glass containers work well since they seal tight. You can also use plastic containers. Make sure to cool the dish before sealing. This helps avoid moisture build-up. Store it in the fridge right away. You can freeze creamy chicken for later. First, let it cool completely. Then, pour it into freezer-safe bags or containers. Remove as much air as possible. Label with the date before placing it in the freezer. To thaw, move it to the fridge overnight. Reheat it in a pot over low heat. Stir often to ensure even heating. This dish can stay fresh in the fridge for about 3-4 days. If frozen, it lasts about 2-3 months. Look for signs of spoilage, like a sour smell or discoloration. If you see any signs, it’s best to throw it away. Enjoy your creamy chicken while it’s still fresh! Yes, you can. To make this dish dairy-free, replace Greek yogurt with a dairy-free yogurt. Look for options made from coconut or almond. They give a creamy texture and keep the flavor. You can swap cauliflower with broccoli or zucchini. Both vegetables work well and add a nice texture. They also blend smoothly and keep the dish light. To spice things up, add red pepper flakes or chopped jalapeños. You can also mix in hot sauce while cooking. Adjust to your taste for the perfect kick. - Other common user inquiries include asking about meal prep tips and how to store leftovers. For meal prep, you can chop the chicken and veggies ahead of time. Store them in the fridge for easy cooking later. For leftovers, keep them in an airtight container for up to three days. This recipe combines easy ingredients like chicken and cauliflower into a creamy dish. We covered the main steps, from sautéing garlic to blending flavors smoothly. I shared tips to enhance texture and flavor, making your meal even better. You can also explore variations using different proteins or spices. Storing leftovers properly can save you time and reduce waste. Enjoy this recipe and make it your own. Happy cooking!

Healthy Low Calorie Creamy Chicken Delightful Dish

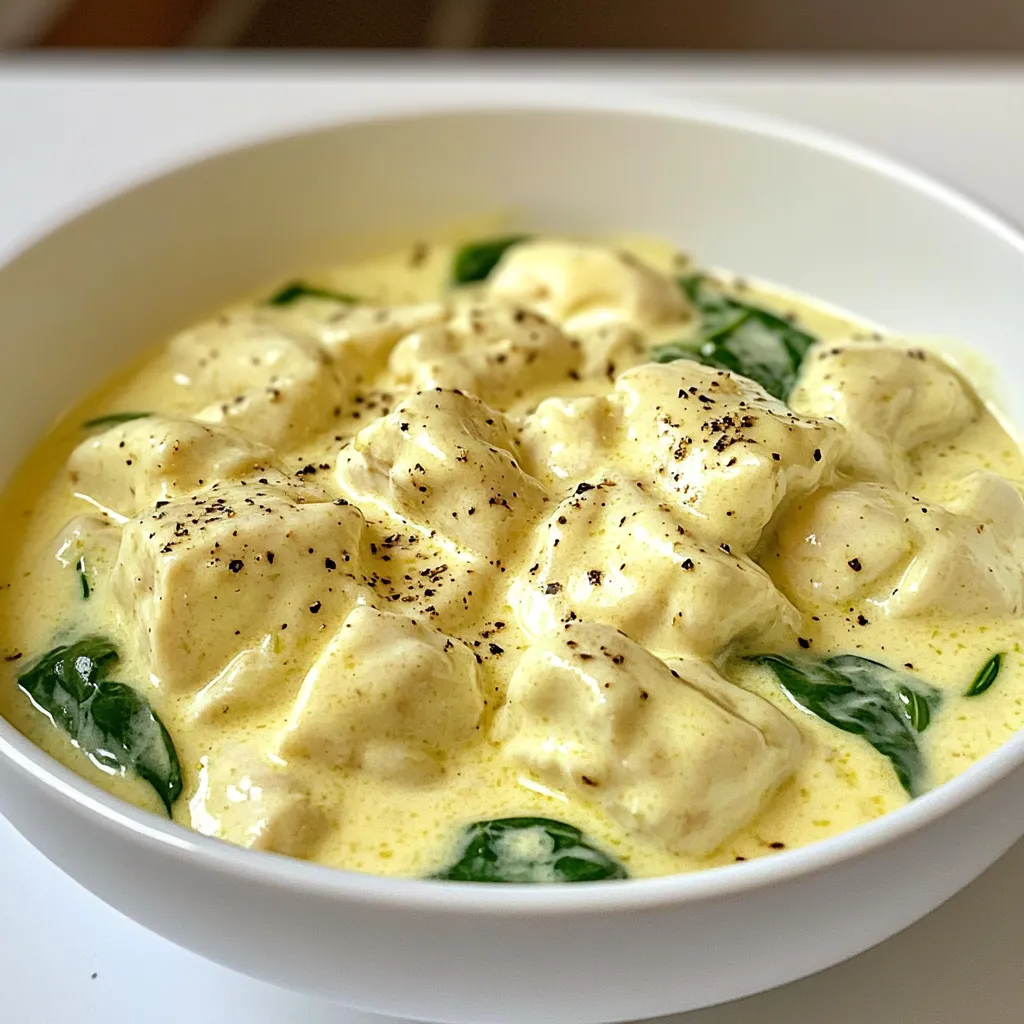
Are you looking for a meal that’s both tasty and healthy? Discover my recipe for Healthy Low Calorie Creamy Chicken

To make Three-Mushroom Alfredo Rigatoni, gather these key ingredients. Each one plays a big role in the dish. - 12 oz rigatoni pasta - 1 tablespoon olive oil - 1 small yellow onion, finely chopped - 2 cloves garlic, minced - 4 oz cremini mushrooms, sliced - 4 oz shiitake mushrooms, sliced - 4 oz portobello mushrooms, diced - 1 cup heavy cream - 1 cup grated Parmesan cheese - 1 teaspoon dried thyme - Salt and black pepper to taste - Fresh parsley, chopped (for garnish) Each ingredient adds flavor and texture. Rigatoni gives a nice base with its ridges. Olive oil helps in cooking and adds richness. The onion and garlic create a fragrant start. The three types of mushrooms bring earthy notes and umami. Heavy cream makes the sauce thick and rich. Parmesan cheese adds a salty, nutty taste. Dried thyme enhances the flavor with a hint of herbiness. Remember to season with salt and black pepper. The fresh parsley at the end adds a bright pop of color and freshness. Enjoy the journey of flavors as you gather these items! {{ingredient_image_1}} - Start by boiling a large pot of water. - Add a generous amount of salt to the water. - Cook the rigatoni for 10-12 minutes until it is al dente. - Drain the pasta and set it aside. - Remember to save 1 cup of the pasta water for later. - In a large skillet, heat 1 tablespoon of olive oil over medium heat. - Add 1 small chopped yellow onion. Cook for 3-4 minutes until it turns translucent. - Next, mix in 2 cloves of minced garlic. Cook for another minute until you smell the aroma. - Use 4 oz each of cremini and shiitake mushrooms, sliced, and 4 oz portobello mushrooms, diced. - Stir in the mushrooms and cook for 8-10 minutes. - Keep stirring and watch for the mushrooms to soften and release their juices. - Pour in 1 cup of heavy cream and bring it to a gentle simmer. - Turn down the heat and stir in 1 cup of grated Parmesan cheese. - If the sauce is thick, slowly add reserved pasta water until it reaches the right texture. - Add the cooked rigatoni to the Alfredo sauce. - Toss gently to coat the pasta well with the creamy sauce. - Cook for an extra 2 minutes over low heat to blend the flavors. - Serve the pasta hot, garnished with chopped fresh parsley. Enjoy! To make your sauce creamy, use heavy cream. It gives a rich taste. Add Parmesan cheese slowly. This helps it melt well. If it feels too thick, add some reserved pasta water. This will help adjust the thickness. For flavor, season with salt and black pepper. Try using fresh herbs for a bright touch. Fresh parsley brings a nice pop. Dried thyme works well but has a different taste. Cooking mushrooms right is key. They should be tender and juicy. Sauté them for about 8-10 minutes. Stir them often to avoid burning. For pasta, cook it al dente. This means it should be firm when you bite. Use a large pot for boiling. This helps keep pasta from sticking. A wide skillet helps cook the sauce evenly. Pair your rigatoni with a fresh salad. A simple green salad balances the meal. For garnish, sprinkle more Parmesan cheese on top. Fresh parsley adds color and flavor. If you like wine, try a light white wine. A Chardonnay or Pinot Grigio pairs nicely with this dish. Enjoy your meal with a side of crusty bread for dipping! Pro Tips Use Fresh Mushrooms: For the best flavor and texture, opt for fresh mushrooms rather than canned. Fresh varieties enhance the dish with a rich umami taste. Reserve Pasta Water: Always reserve a cup of pasta water before draining. This starchy water is perfect for adjusting the sauce's consistency without losing flavor. Low and Slow Cream Sauce: When adding cream to the skillet, keep the heat low to prevent it from curdling. This ensures a smooth and creamy Alfredo sauce. Garnish for Flavor: Don't skip the fresh parsley garnish! It adds a pop of color and a fresh flavor contrast that brightens the rich Alfredo sauce. {{image_2}} You can boost flavor and nutrition by adding vegetables. Spinach or kale adds color and nutrients to your dish. Simply toss them in during the last few minutes of cooking. Seasonal vegetables like zucchini or bell peppers can also enhance your meal. Roasting vegetables like asparagus or cherry tomatoes brings out their natural sweetness. Just add them to the skillet before the mushrooms. For extra protein, consider adding grilled chicken or shrimp. These options pair well with the creamy sauce. If you prefer plant-based options, tofu works great. You can sauté it until golden, then mix it in. Different cheese options can also change the flavor. Try using goat cheese or a dairy-free alternative for a twist. Want to kick it up a notch? Add red pepper flakes for heat. A pinch goes a long way! Infusing garlic or shallots into the sauce adds depth. Simply sauté them with the onions for a richer taste. Consider adding white wine to the sauce. It helps balance the creaminess and adds a nice tang. Store leftovers in an airtight container. This keeps the flavors fresh. The dish stays good in the fridge for about 3 days. Make sure to let it cool first before sealing. You can freeze portions of the pasta and sauce. Use a freezer-safe container. This helps keep the meal tasty. It can last up to 3 months. When you’re ready to eat, thaw it overnight in the fridge. Reheat the rigatoni in a skillet over low heat. Add a splash of cream or water to keep it moist. Stir often to avoid burning. You can also use a microwave, but cover it to trap steam. This helps keep the texture creamy and smooth. Yes, you can use other pasta shapes. Penne, fusilli, or farfalle work well too. Each pasta shape has a unique feel and texture that can change your dish. If you choose a smaller pasta, reduce the cooking time. For larger shapes, keep an eye on the cooking time to ensure it's perfect. This dish is not vegan as is. You can swap heavy cream for coconut cream or cashew cream. Use nutritional yeast instead of Parmesan for a cheesy flavor. Look for vegan pasta, which is often egg-free. These swaps keep the taste rich while making it vegan-friendly. To make this dish gluten-free, choose gluten-free rigatoni. Many brands offer great options made from rice or lentils. For the sauce, ensure the heavy cream and other ingredients are free from gluten. Check labels to avoid any hidden gluten sources. This blog post took you through making a delicious rigatoni Alfredo. We covered key ingredients, cooking steps, tips, and variations to make it your own. Remember, you can add veggies, proteins, or spices for extra flavor. Storing leftovers is easy, whether in the fridge or freezer. The recipe caters to dietary needs too, with options for gluten-free or vegan choices. Enjoy your creamy pasta dish today! You’ll have a tasty meal ready in no time.

Three-Mushroom Alfredo Rigatoni Creamy Comfort Dish

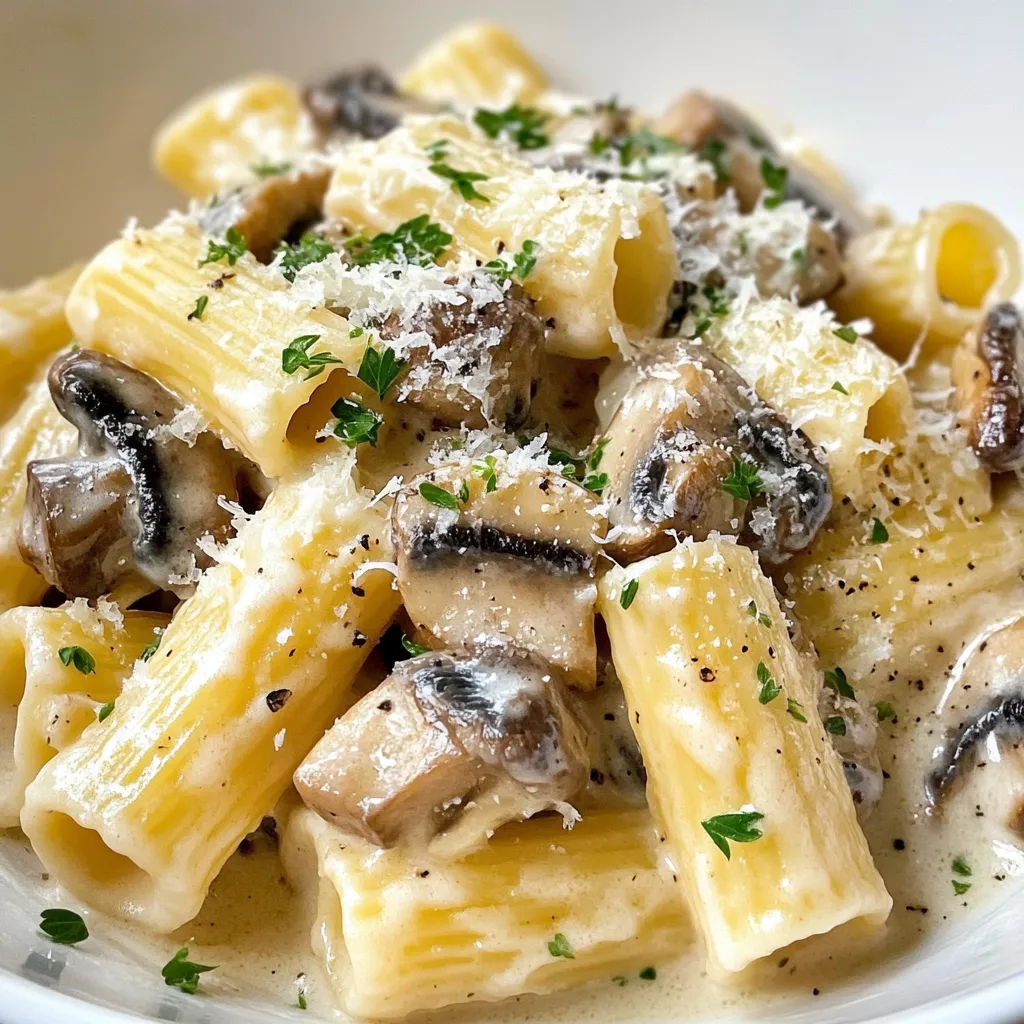
Welcome to your new favorite comfort food! This Three-Mushroom Alfredo Rigatoni combines creamy sauce with three delicious types of mushrooms.

Newer posts
← Previous Page1 … Page94 Page95

dsad

© 2025 flavorsprint • Built with GeneratePress

Our Policies

  • Copyright Policy
  • Cookie Policy
  • GDPR Policy
  • Privacy Policy
  • Disclaimer
  • Terms Of Use

More Information

  • Home
  • About
  • Contact
  • Appetizers
  • Dessert
  • Dinner
  • Drinks
©2025, flavorsprint About Back To Top