Skip to content
DisclaimerTerms Of UseGDPR PolicyCookie Policy

flavorsprint

  • Home
  • Drinks
  • Appetizers
  • Dinner
  • Dessert
  • About
  • Contact
  • Privacy Policy
DisclaimerTerms Of UseGDPR PolicyCookie Policy

Lillian

- Shrimp: Use 1 pound of large shrimp, peeled and deveined. They should be fresh or thawed if frozen. - Dairy Components: You will need ¾ cup of heavy cream and ½ cup of grated Parmesan cheese. These create the rich, creamy base. - Herbs and Spices: One teaspoon of Italian seasoning adds depth. Fresh basil for garnish brings a nice touch. - Alternatives for Heavy Cream: You can use half-and-half for a lighter option. Coconut milk works well for a dairy-free version. - Shrimp Variants: You may use scallops or chicken if you prefer. Both offer a nice change in texture. - Fresh vs. Dried Herbs: Fresh herbs give vivid flavor, but dried herbs can also work. Just use about one-third the amount of dried herbs. For the full recipe, check out the Creamy Tuscan Shrimp ! Sautéing the Shrimp Perfectly First, grab a large skillet. Heat the olive oil on medium-high. Add the shrimp to the skillet. Season them with salt and pepper. Cook for 2-3 minutes on each side. You want the shrimp to turn pink and opaque. Once done, remove them from the skillet and set aside. Cooking the Aromatics: Garlic and Tomatoes In the same skillet, add the minced garlic. Cook it for about one minute until it smells great. Then, toss in the halved cherry tomatoes. Add the Italian seasoning next. Sauté this mix for 3-4 minutes. You want the tomatoes to soften. Making the Creamy Sauce Now, pour in the heavy cream. Bring the mixture to a simmer. Stir in the grated Parmesan cheese. Mix it until it melts and combines well. Final Combination and Serving Prep Next, stir in the fresh spinach. Cook it for another 2-3 minutes. You want it to wilt down. Now, return the cooked shrimp to the skillet. Toss everything in the creamy sauce until heated through. Check the seasoning and adjust with salt and pepper if needed. When done, remove from heat. Garnish with fresh basil before serving. For the full recipe, check out the details above. Achieving the Perfect Creamy Texture To get a creamy sauce, use heavy cream. It adds richness and smoothness. After adding the cream, let it simmer. This helps it thicken nicely. Stir in the Parmesan cheese slowly. This ensures it melts well and blends into the sauce. If the sauce is too thick, add a splash of broth or water. This keeps it creamy but not too heavy. Avoiding Overcooked Shrimp Shrimp cook quickly, so watch them closely. Cook them for just 2-3 minutes on each side. They should turn pink and opaque. If you cook them too long, they can get tough. Take them out of the pan as soon as they are done. You can add them back later when mixing with the sauce. Garnishing Ideas with Fresh Basil Fresh basil adds a pop of color and flavor. Tear the leaves and sprinkle them on top. This makes your dish look inviting. You can also add a few whole leaves for a nice touch. This little step can impress your guests! Serving Suggestions and Pairings Creamy Tuscan shrimp pairs well with many sides. Try it with pasta for a hearty meal. Rice also works nicely to soak up the sauce. Add a side salad for crunch and freshness. You can find the full recipe to get all the details for this delightful dish! {{image_2}} You can make Creamy Tuscan Shrimp even better by adding vegetables. Try bell peppers for a sweet crunch. Zucchini or asparagus works well, too. Sauté them along with garlic and tomatoes. This boosts flavor and adds color to your dish. Other great options include mushrooms or artichokes. Just remember to cook them until soft. Spices and herbs can change the flavor a lot! For a zestier kick, add red pepper flakes. You can also swap in fresh thyme or parsley for a different taste. If you love garlic, try adding more minced garlic for a bolder flavor. Just keep experimenting to find your favorite mix! This recipe is naturally gluten-free! The main ingredients do not contain gluten. Just be sure to use gluten-free pasta or serve it over rice for a complete meal. Enjoy it without any worries if you follow a gluten-free diet. To make this dish dairy-free, swap heavy cream for coconut milk or cashew cream. These options give a creamy texture without dairy. Instead of Parmesan cheese, use nutritional yeast for a cheesy flavor. You won’t miss the dairy at all, and it will still taste great! Store your leftover creamy Tuscan shrimp in a sealed container. Keep it in the fridge for up to three days. If you want it to last longer, freeze it for up to two months. When freezing, make sure to use an airtight container. This helps avoid freezer burn. To reheat, use a skillet over low heat. This keeps the shrimp tender and the sauce creamy. Stir gently to heat evenly. If the sauce looks too thick, add a splash of cream or broth. You can also use the microwave. Heat in short bursts, stirring in between. Enjoy this delightful dish again with fresh flavor and texture! For the full recipe, check out the details above. Can I use frozen shrimp for this recipe? Yes, you can use frozen shrimp. Just thaw them first. Place the shrimp in the fridge overnight or run them under cold water for quick thawing. This will help keep them tender. How can I make this dish spicier? To add heat, try using red pepper flakes. You can also add diced jalapeños. Start with a small amount and adjust as you like. This will give your dish a nice kick. What is the best way to clean and devein shrimp? First, rinse the shrimp under cold water. Hold the shrimp in one hand. Use the other hand to pull off the shell. Then, use a knife to cut along the back. Remove the dark vein carefully. Rinse the shrimp again to ensure they are clean. Can I use other types of seafood in this recipe? Yes, you can use scallops or fish instead of shrimp. Just make sure to adjust the cooking time. Fish cooks faster than shrimp, so check for doneness often. You can still enjoy all the creamy goodness with other seafood! Check out the Full Recipe for more ideas. You’ve learned about making creamy Tuscan shrimp, from choosing the right shrimp to cooking techniques. We explored substitutes and variations to fit your tastes and diet. Whether you want a spicy kick or a veggie boost, options abound. Proper storage and reheating ensure your dish stays delicious. Now it's time to create your own creamy dish! Embrace your creativity in the kitchen and enjoy the rewards.

Creamy Tuscan Shrimp Delightful Dinner Recipe

Looking to impress with dinner tonight? My Creamy Tuscan Shrimp recipe is easy and delicious. You’ll find juicy shrimp, rich

- Ground beef (1 lb) - Nacho cheese sauce (1 cup) - Shredded cheddar cheese (1 cup) - Diced tomatoes (1 cup) - Black olives (1/2 cup) - Green onions (1/4 cup) - Large flour tortillas (4) - Olive oil (1 tablespoon) - Taco seasoning (1 teaspoon) - Salt and pepper to taste Gathering these ingredients is the first step to making your Nacho Cheese Beef Wrap. The ground beef gives a hearty base that pairs well with the cheesy sauce. I love using nacho cheese sauce for that gooey, rich taste. It's easy and adds a big flavor punch. The shredded cheddar cheese melts beautifully on top, adding a classic taste. Diced tomatoes bring freshness and a juicy bite. Black olives give a nice saltiness and texture. Don't forget the green onions; they add a crisp finish that elevates each bite. For the wrap, large flour tortillas are best. They hold all the fillings without breaking. A little olive oil helps the beef cook nicely, while taco seasoning gives it that classic flavor. Adjust the salt and pepper to your taste for a perfect balance. With this list, you're ready to create a delicious meal that everyone will love. If you want the full details, check out the Full Recipe. - Heat 1 tablespoon of olive oil in a large skillet over medium heat. - Add 1 pound of ground beef to the skillet. Season it with 1 teaspoon of taco seasoning, salt, and pepper. - Cook the beef for about 5 to 7 minutes. Break it apart with a spatula as it cooks. You want it browned and fully cooked. - After the beef is done, drain any excess fat from the skillet. - Stir in 1 cup of nacho cheese sauce. Mix it well until the beef is covered and heated through. - Warm 4 large flour tortillas in a skillet or microwave until they are soft and pliable. - Place a tortilla flat on a plate. Spoon a generous amount of the cheesy beef mixture into the center. - Top the mixture with 1 cup of shredded cheddar cheese, 1 cup of diced tomatoes, 1/2 cup of sliced black olives, and 1/4 cup of chopped green onions. - Carefully fold the sides of the tortilla over the filling. Then roll it up tightly from the bottom to the top to form a wrap. - For a crispy finish, return the wraps to the skillet. Grill them on each side until golden brown, about 2 minutes per side. - Serve them warm. Enjoy with sour cream and salsa on the side for dipping. To keep your wraps from falling apart, use large tortillas. They hold more filling and are easier to fold. When you fill the wrap, don't overstuff it. A good amount is about one cup of filling. This makes rolling easier and less messy. Always fold the sides in first, then roll from the bottom up. This method locks in the filling. For even heat distribution, warm your tortillas before filling them. You can use a skillet or microwave. This makes them soft and flexible. If you want a crispy finish, grill the wraps after rolling. Cook them for about two minutes on each side until golden brown. To boost flavor, try adding spices like cumin or smoked paprika. These spices add warmth and depth. You can also mix in some diced jalapeños for heat. For a fresh touch, include chopped cilantro or lime juice. These add brightness to the dish. When it comes to cheese, don’t just stick to cheddar. You can mix in pepper jack for a spicy kick or mozzarella for a creamy texture. A blend of cheeses gives your wraps an exciting twist. For sides, serve your nacho cheese beef wraps with fresh salsa and guacamole. These add a nice contrast to the cheesy beef. You might also enjoy chips for crunch. If you're feeling creative, cut the wraps into bite-sized pieces. This makes them great for sharing at parties. You can even serve them on a platter with various dips. This adds fun and flair to your meal. Try these tips for a delicious experience. Enjoy! {{image_2}} You can easily make this wrap vegetarian. Instead of ground beef, try using beans or grilled veggies. Black beans add protein and fiber. Grilled bell peppers and zucchini bring great flavor and texture. You can mix and match your favorite vegetables too. This way, you keep the wrap tasty and healthy. Cheese is key to a great wrap. While cheddar is classic, you might want to try different cheese types. Pepper jack adds a spicy kick. Mozzarella offers a nice creamy texture. You can even mix cheeses for a fun flavor twist. Experiment to find what you love best. Taco seasoning is great, but you have options. You can adjust the spice level to suit your taste. Try adding cumin or smoked paprika for a deeper flavor. Fresh herbs like cilantro or parsley can brighten the dish. Don't be afraid to play with spices to create your perfect wrap. To keep your nacho cheese beef wraps fresh, store them in an airtight container. This helps prevent moisture loss. Place the wraps in the fridge within two hours of cooking. They are safe to eat for up to three days. If you wait longer, the flavor and texture may change. When it's time to eat leftovers, you can reheat them in different ways. The microwave is quick but may make the wraps soggy. To keep them crispy, use a skillet. Heat the skillet over medium heat. Place the wraps in the skillet for about three to four minutes on each side. This method keeps the texture and flavor intact. For more ideas, check out the Full Recipe for nacho cheese beef wraps! You can use corn tortillas for a gluten-free option. They add a nice texture. Lettuce wraps are another great choice. They are fresh and light, perfect for a low-carb meal. Try large spinach or collard greens too. These leafy greens work well if you want something healthy. Yes, you can freeze them. Wrap each one in plastic wrap and place in a freezer bag. Store them for up to three months. To thaw, place them in the fridge overnight. You can also heat them straight from the freezer in the oven. Add diced jalapeños to the beef mixture. You can also use a spicy nacho cheese sauce. Try adding hot sauce or chili powder to the beef. For an extra kick, sprinkle cayenne pepper on top before serving. You can add guacamole for a creamy twist. Fresh cilantro brings bright flavor. Crumbled queso fresco adds a nice touch. Try diced avocado for extra creaminess. Pickled red onions give a tangy crunch you’ll love. Yes, this recipe is great for meal prep. Prepare the beef mixture ahead of time and store it in the fridge. You can also pre-fill the tortillas, just leave the toppings off until serving. Store wraps in an airtight container for easy grab-and-go meals. You learned how to make easy Nacho Cheese Beef Wraps. Use ground beef, cheese sauce, and tortillas as your base. Add fresh toppings to boost flavor. Remember to keep your wraps tight and grill for crispiness if you like. Consider variations for different diets. Store leftovers safely and use them later. This recipe is flexible and fun. Enjoy your cooking and make it your own!

Nacho Cheese Beef Wrap Flavorful and Easy Recipe

If you’re craving a quick and tasty meal, the Nacho Cheese Beef Wrap is your answer! This easy recipe combines

- Boneless chicken thighs - Creamy peanut butter - Soy sauce The heart of this dish is boneless chicken thighs. They stay tender and juicy when cooked. Creamy peanut butter gives that rich, nutty flavor. Soy sauce adds a nice salty touch that balances the dish perfectly. - Honey - Sesame oil - Garlic and ginger Honey brings sweetness to the mix, cutting through the saltiness. Sesame oil adds a hint of nuttiness. Garlic and ginger give a strong aroma and flavor that makes the dish shine. - Red bell pepper - Snap peas - Green onions Red bell pepper adds color and a sweet crunch. Snap peas give a fresh bite. Green onions are perfect for garnish and add a pop of flavor on top of your meal. For the full recipe, check out the Peanut Butter Chicken Delight. To make the peanut sauce, start by gathering your ingredients. In a mixing bowl, combine these items: - 1/2 cup creamy peanut butter - 1/4 cup soy sauce - 2 tablespoons honey - 1 tablespoon sesame oil - 3 cloves garlic, minced - 1 tablespoon ginger, grated - 1 teaspoon chili flakes - 1 cup coconut milk Next, whisk these ingredients together until smooth. This helps blend all the flavors well. A smooth sauce makes for a better dish. Now, heat a large skillet or wok over medium heat. Add a little oil to the pan. Place the chicken pieces in the skillet. Sauté the chicken until it turns golden brown. This should take about 5-7 minutes. Make sure the chicken is cooked through. You can check this by cutting a piece to see if it's no longer pink inside. Once the chicken is ready, it’s time to add the peanut sauce. Pour the sauce into the skillet, stirring well to coat the chicken evenly. Bring it to a gentle simmer. Now, add the sliced red bell pepper and snap peas. Cook for an additional 3-4 minutes. You want the vegetables to be tender, but still crisp. This adds a nice texture to the dish. Finally, serve the Peanut Butter Chicken over jasmine rice. Garnish it with chopped green onions for a fresh touch. Enjoy your delicious meal! For the complete recipe, check out the [Full Recipe]. To make your Peanut Butter Chicken shine, you can adjust the sweetness and saltiness. If you want it sweeter, add more honey. If it needs more salt, a splash of soy sauce works well. Always taste as you go! For a creamier sauce, blend the peanut butter and coconut milk thoroughly. You want it smooth, so whisk until there are no lumps. If you want even more creaminess, try adding a splash of chicken broth. When sautéing chicken, keep the heat on medium. This helps the chicken cook evenly without burning. Cook until it's browned and no longer pink inside. This usually takes about 5-7 minutes. To keep your vegetables crunchy, add them at the end. After the chicken is done, toss in the bell pepper and snap peas. Cook them for just a few minutes until they are bright and tender, but still crisp. Peanut Butter Chicken goes great with jasmine rice. The rice soaks up the sauce, making each bite tasty. You can also serve it with steamed broccoli or a fresh salad for a nice crunch. For garnishing, sprinkle chopped green onions on top. This adds color and a fresh taste. You can also add crushed peanuts for a fun crunch. Enjoy your dish, and feel free to share your own twists! {{image_2}} You can switch things up with different ingredients. If you're not a fan of peanut butter, try almond butter. It gives a nutty flavor that's just as rich. For proteins, consider using tofu or shrimp instead of chicken. Both options are tasty and will soak up the peanut sauce well. Want to spice things up? Add chili powder or fresh jalapeños for some heat. You can also try using different veggies. Broccoli, carrots, or even bok choy can add a fun twist. Each vegetable will bring its own flavor and texture to the dish. If you're looking for gluten-free options, use tamari instead of soy sauce. This simple swap keeps the dish safe for gluten-free diets. For those watching carbs, you can serve the dish with cauliflower rice. It pairs well and keeps the meal light. You can explore the [Full Recipe] to see how all these variations fit into the main dish. To keep your Peanut Butter Chicken fresh, store it in an airtight container. This helps prevent moisture loss and keeps the flavors intact. It is best to refrigerate it within two hours of cooking. This way, you avoid any food safety risks. In the fridge, your dish lasts for about 3 to 4 days. Always check for any off smells or changes in color before eating. If you want to freeze Peanut Butter Chicken, start by letting it cool completely. Then, portion it into freezer-safe bags or containers. Make sure to remove as much air as possible to prevent freezer burn. This dish can be frozen for up to three months. When you are ready to eat it, thaw it overnight in the fridge. For reheating, warm it gently on the stove or in the microwave. Stir well to ensure even heating. For meal prep, choose containers that are microwave-safe and stackable. This makes it easy to store and reheat. I recommend pairing your Peanut Butter Chicken with jasmine rice for a complete meal. You can also add steamed veggies like broccoli or carrots for extra nutrients. This way, you have a balanced dish ready to enjoy any day of the week. Check out the Full Recipe to get started! You can use plant-based alternatives like tofu or tempeh. Both soak up flavors well. For a seafood twist, shrimp works nicely too. If you use tofu, press it first to remove excess water. For tempeh, steam it briefly to soften. Yes, you can prepare this dish ahead of time. Cook the chicken and sauce, then store them separately. This keeps the chicken juicy and the sauce fresh. To store, place the chicken and sauce in airtight containers. Refrigerate for up to three days. When ready to eat, reheat in a skillet over medium heat. Peanut Butter Chicken goes great with jasmine rice. The rice absorbs the rich sauce. You might also serve it with steamed broccoli or a fresh salad. For drinks, iced tea or coconut water complement the dish well. Enjoy your meal! This article covered rich, tasty peanut butter chicken. We explored key ingredients, step-by-step cooking, and tips for perfect flavor. You can easily swap ingredients for different diets or flavors. Remember to store leftovers properly and enjoy meal prep ideas. This dish is simple, fun, and perfect for any meal. You’ll impress your friends and family with its taste and your skills in the kitchen. Cook, share, and enjoy!

Peanut Butter Chicken Flavorful and Easy Recipe Guide

Ready to spice up your dinner? Peanut Butter Chicken is a fun and easy dish that will make your taste

- 12 oz fusilli pasta - 1 cup cherry tomatoes, halved - 1 cup fresh mozzarella balls (bocconcini), drained - 1 cup marinated artichoke hearts, chopped - 1/2 cup Kalamata olives, pitted and halved - 1/4 cup sun-dried tomatoes, chopped - 1/4 cup extra virgin olive oil - 2 tablespoons balsamic vinegar - 1 teaspoon garlic powder - Salt and pepper to taste When making Tuscan Pasta Salad, pick fresh and tasty ingredients. The fusilli pasta acts as a great base. It holds the dressing well and gives nice bites. Cherry tomatoes add sweetness and color. Fresh mozzarella brings creaminess to the salad. Next, add marinated artichoke hearts for a tangy twist. Kalamata olives enhance the flavor with their salty kick. Sun-dried tomatoes provide a chewy texture and rich taste. For the dressing, use high-quality extra virgin olive oil. It adds a fruity flavor. Balsamic vinegar brings a hint of sweetness. Garlic powder gives depth. Remember to season with salt and pepper to suit your taste. Check the Full Recipe for more details on making this delightful dish. Enjoy each bite of this vibrant salad! Begin by boiling a large pot of water. Add the fusilli pasta to the pot. Cook it according to the package instructions until it is al dente. This usually takes about 8 to 10 minutes. Once done, drain the pasta in a colander. Rinse it under cold water until it cools down completely. This helps stop the cooking process and keeps the pasta from getting sticky. In a large mixing bowl, add the cooled pasta. Then, toss in the cherry tomatoes, mozzarella balls, chopped artichokes, halved olives, and sun-dried tomatoes. Mixing these fresh and vibrant ingredients creates a colorful base for your salad. In a separate bowl, whisk together the olive oil, balsamic vinegar, garlic powder, salt, and pepper. This dressing will bring all the flavors together. Pour it over the pasta salad mixture. Toss everything gently to coat the pasta and veggies well. Gently fold in the torn basil leaves. This adds a fresh and aromatic touch. Let the salad sit for about 15 minutes. This rest time allows the flavors to meld together beautifully. Serve your Tuscan Pasta Salad chilled or at room temperature for the best taste. For the full recipe, check out Tuscan Delight Pasta Salad! To get the best texture, cook your fusilli pasta until it is al dente. This means it should be firm but not hard. After cooking, rinse the pasta in cold water. This step stops the cooking process and helps prevent sticking. Fresh herbs make a big difference. Use bright basil or parsley for a fresh taste. Let the salad sit for 15 minutes before serving. This allows the flavors to mix and become even better. For a pretty touch, serve your salad with extra cherry tomatoes and fresh basil on top. It adds color and makes it look inviting. Pair your salad with crusty bread. This makes your meal feel complete and satisfying. For the full recipe, check out the Tuscan Delight Pasta Salad . {{image_2}} You can swap fusilli for rotini or penne pasta. These shapes hold the dressing well. If you want more protein, try adding grilled chicken or shrimp. Both options add a nice texture and flavor. Feel free to experiment with dressings. A lemon vinaigrette brings a fresh twist. A creamy dressing can add richness. You can also replace balsamic vinegar with red wine vinegar. This change gives the salad a different, tangy taste. Add seasonal veggies for a fresh taste. Zucchini or bell peppers work great in summer. Roasted or fresh corn adds sweetness. It makes the salad colorful and even more delicious. For the full recipe, check the earlier section! Store your Tuscan Pasta Salad in an airtight container in the fridge. It will stay fresh for up to 3 days. Keeping it sealed helps maintain flavor and texture. Freezing this salad is not a good idea. The pasta will change texture and become mushy when thawed. Enjoy it fresh instead! You can serve the salad cold for a refreshing bite. If you prefer, let it come to room temperature before serving. This allows the flavors to shine. For the best taste, enjoy it as is or after a short rest. Tuscan Pasta Salad can last for up to 3 days when properly sealed. Make sure to store it in an airtight container. This keeps it fresh and tasty. Yes, preparing the salad a few hours in advance allows flavors to meld better. I often make it in the morning for lunch later. The longer it sits, the more the flavors blend. You can use capers or leave them out if you're not a fan. Olives add a nice briny taste, but capers work well too. If you skip them, add a little extra salt. To make it gluten-free, use gluten-free pasta options. Many brands offer great choices that taste just as good. Check the package for cooking times as they may vary. Fresh basil is recommended for the best flavor, but dried basil can work in a pinch. If using dried, use less since it's more concentrated. A little goes a long way! This Tuscan Pasta Salad is easy to make and full of flavor. You learned about key ingredients like fusilli pasta, cherry tomatoes, and mozzarella. The dressing adds a tasty touch, while tips for perfect texture and presentation enhance your dish. Experiment with variations to keep it exciting. Remember, it's best served fresh, but it can last in the fridge for up to three days. Enjoy your delicious salad, and have fun customizing it to your liking!

Tuscan Pasta Salad Flavorful and Easy Recipe

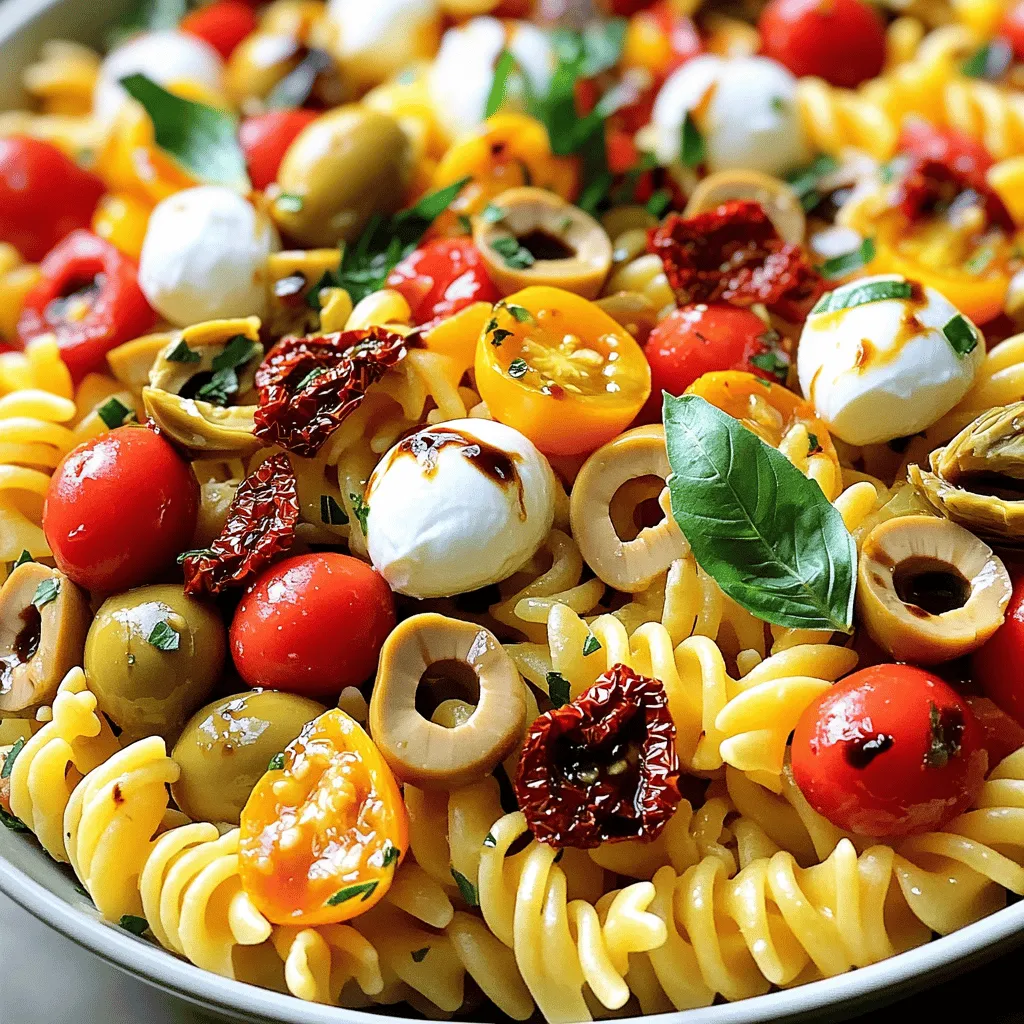
If you’re craving a dish that bursts with flavor, you’ll love this Tuscan Pasta Salad. It’s easy to prepare and

To create a delightful Baileys French Toast, you need the right ingredients. Here’s what you will need: - Thick-cut brioche bread - Whole milk - Heavy cream - Large eggs - Maple syrup - Vanilla extract - Instant coffee granules - Ground cinnamon - Butter for greasing - Powdered sugar for dusting - Fresh berries for garnish These ingredients come together to make a rich and tasty meal. The brioche adds a soft texture. The milk and cream give a creamy base. Eggs help bind everything together. Maple syrup and vanilla bring sweet flavor. Instant coffee and cinnamon add depth. Butter greases your cooking surface for perfect browning. Lastly, powdered sugar and berries make your dish look beautiful. You can find the full recipe [here](#). Enjoy making this easy and fun dish! Start by grabbing a large mixing bowl. In this bowl, whisk together the whole milk, heavy cream, and large eggs. Make sure they blend well. This mixture forms the base of your French toast. Next, it’s time to add some flavor. Pour in two tablespoons of maple syrup for sweetness. Add one teaspoon of vanilla extract for that cozy flavor. Then, mix in one teaspoon of instant coffee granules. This gives your dish a delightful twist. Finally, sprinkle in half a teaspoon of ground cinnamon. Whisk everything until it’s fully combined. Your mixture should look smooth and creamy. Now, heat a large skillet or griddle over medium heat. Add a pat of butter to grease the surface. This will help your French toast cook evenly and add rich flavor. Take each slice of brioche bread and dip it into your egg mixture. Let it soak for a few seconds on each side. You want it saturated but not falling apart. Once the skillet is hot, place the soaked bread slices onto it. Cook for about three to four minutes per side. Look for a nice golden brown color and a crispy texture. Repeat this process for all your slices, adding more butter to the skillet as needed. After cooking, transfer the French toast onto plates. Here comes the fun part! Dust the top with powdered sugar for a sweet touch. If you like, garnish with fresh berries for color and flavor. For an extra treat, drizzle more maple syrup on top. This adds a lovely sweetness that pairs perfectly with the creamy richness of the toast. Enjoy your Baileys French toast delight! For a full recipe, check out the details above. Soaking bread is key to great French toast. You want it to soak well but not break apart. Use thick-cut brioche for the best results. Dip each slice into the egg mixture for about 10-15 seconds. Turn it gently to coat both sides fully. This will give you a good, rich flavor. Heat control is crucial when cooking French toast. Keep your skillet at medium heat. Too hot, and the outside burns, while the inside stays raw. Look for a golden color on each side. It should take about 3-4 minutes. If it's browning too quickly, reduce the heat a bit. To boost flavor, consider adding a pinch of nutmeg or a splash of almond extract. These can elevate your dish. For toppings, fresh berries are a great choice. You can also drizzle honey or extra maple syrup on top. Powdered sugar adds a nice touch, too. For a special twist, try a dollop of whipped cream. {{image_2}} When making Baileys French Toast, bread choice matters. You can use thick-cut brioche, but there are fun alternatives. Challah gives a rich taste. It's soft and fluffy, perfect for soaking. Sourdough adds a tangy twist that you might love. If you need a gluten-free option, look for gluten-free bread. Many brands offer bread that works well in French toast recipes. Just make sure it’s thick enough to hold the batter without falling apart. Want to mix it up? Try adding different flavors to your French toast. You can infuse the batter with flavored teas. A chai tea base adds spice and warmth. If you love liqueurs, consider using hazelnut or orange liqueur. These flavors brighten up the dish in a unique way. Seasonal variations are also fun. In the fall, add pumpkin spice to the batter. It brings a cozy, festive vibe to your breakfast. You can play with flavors to match the season or your mood. Let’s talk about how to serve your Baileys French Toast. One fun idea is to turn it into a brunch casserole. Layer slices of soaked bread in a baking dish, pour the batter over, and bake. This method is great for serving a crowd. You could also explore savory variations. Add cheese, herbs, or cooked bacon to the batter for a tasty twist. This savory approach will surprise your guests and make breakfast exciting. For a full recipe and detailed steps, check out the [Full Recipe]. To keep your Baileys French Toast fresh, refrigerate it. Place it in an airtight container. This helps keep moisture in and prevents it from drying out. Baileys French Toast can last for about 2-3 days in the fridge. When you are ready to enjoy the leftovers, reheat them for the best taste. You can use a skillet or microwave. If using a skillet, heat it on medium-low. Add a bit of butter and warm each slice for about 2-3 minutes on each side. This will make it crispy again. If you prefer the microwave, heat it in 30-second intervals. Check often to avoid overheating. Yes, you can freeze French toast! This is great for meal prep. To freeze, let your Baileys French Toast cool completely. Then, place slices in a single layer on a baking sheet. Once frozen, transfer them to a freezer-safe bag. Remove as much air as possible to prevent freezer burn. It can last up to 2 months in the freezer. When you want to eat it, you can reheat straight from the freezer. Bake it in the oven at 350°F (175°C) for about 15-20 minutes. If you prefer a quicker method, use the microwave. Heat slices for 1-2 minutes, checking often. Serve warm and enjoy! You can easily swap Baileys Irish Cream for a non-alcoholic option. Use a mix of cream, milk, and coffee flavoring. This gives you a similar taste without the alcohol. You can also try using Irish cream-flavored coffee creamer. It works great in this recipe. The best bread for French toast is thick-cut brioche. It absorbs the egg mixture well. You can also use challah or sourdough. These breads add great flavor and texture. Look for bread that is a bit stale for best results. Fresh bread can fall apart when soaked. Baileys French Toast can last 3 to 4 days in the fridge. Store it in an airtight container. Look for signs of spoilage like a sour smell or change in texture. If it smells off, it’s best to throw it away. Baileys French Toast is a delicious treat made with rich ingredients. We covered how to prepare the mixture, cook the toast, and serve it perfectly. Tips helped you get the best flavor and texture. You learned about different bread types and how to store leftovers. Enjoy this dish with friends and family. It’s perfect for any brunch or cozy breakfast. I hope you try these ideas and make them your own!

Baileys French Toast Delight Full of Flavor Taste

Are you ready to elevate your breakfast game? Baileys French Toast Delight is here to take your morning routine into

- 1 lb ground beef (80/20) - 4 slices of Swiss cheese - 1 large onion, thinly sliced - 4 slices of rye bread - 4 tablespoons butter, softened - 1 ½ tablespoons mayonnaise - 1 tablespoon ketchup - 1 teaspoon Dijon mustard - 1 teaspoon pickle relish - Lettuce - Tomato This recipe is simple yet packed with flavor. You need good quality ingredients to make a great patty melt. Ground beef is the star here. I suggest using an 80/20 blend for the best flavor and juiciness. Swiss cheese melts beautifully and adds a creamy touch. Choose fresh onions for the best caramelization. Rye bread gives a nice flavor base, and butter adds richness. The secret sauce is where the magic happens. A mix of mayonnaise, ketchup, Dijon mustard, and pickle relish brings tang and creaminess. You can adjust the sauce to your liking. Try adding extra relish if you like it tangy. For a fresh touch, add optional garnishes like lettuce and tomato. They bring color and crunch. With these ingredients, you’ll have a delicious patty melt ready to impress your family or friends. For the full recipe, check out the complete guide. To make the secret sauce, start with a small bowl. Mix together: - 1 ½ tablespoons mayonnaise - 1 tablespoon ketchup - 1 teaspoon Dijon mustard - 1 teaspoon pickle relish Stir well and taste. Adjust seasoning if needed. Set it aside for later. This sauce adds a rich flavor to the patty melt. Next, take a skillet and heat it over medium. Add 1 tablespoon of butter. Once it melts, add the thinly sliced onion. Sauté for about 10 to 15 minutes. Cook until the onions turn golden brown and caramelized. They should be sweet and soft. Remove from the skillet and set aside. Now, grab a bowl. Combine the ground beef with: - 1 tablespoon Worcestershire sauce - Salt and black pepper to taste Mix it well. Shape this mixture into two patties, each about ½ inch thick. Next, heat the same skillet over medium-high heat. If needed, add a little more butter. Cook the patties for 4 to 5 minutes on each side. Cook until they reach the doneness you like. In the last minute of cooking, add a slice of Swiss cheese on each patty to melt. Take four slices of rye bread. Spread softened butter on one side of each slice. On the unbuttered side, spread a good amount of the secret sauce. Place one melted patty on two slices. Add the caramelized onions on top. Close with another slice of bread, buttered side out. Wipe the skillet clean. Place it back on medium heat. Grill each assembled patty melt for about 3 to 4 minutes on each side. Look for a golden brown and crispy exterior. You can press down a little with a spatula for even browning. When they are crispy and golden, remove them from the heat. Slice each patty melt in half and place them on a serving plate. For a fresh touch, feel free to add lettuce and tomato as a garnish. Enjoy your meal! For a great patty melt, start with the right beef. I suggest using 80/20 ground beef. This blend has enough fat to keep your patties juicy. Make patties about ½-inch thick. Cook them for 4-5 minutes per side. Adjust the time for how you like your meat. Aim for medium if you want a nice pink center. Always season your beef well with salt and black pepper. The secret sauce makes the patty melt special. You can tweak it for more flavor. Add a dash of hot sauce for spice. A sprinkle of garlic powder gives it a nice kick. If you like tang, try adding a bit of lemon juice. Mix these extras into your sauce for a fun twist. Keep tasting until it’s just right for you. Bread choice matters in a patty melt. I love rye bread for its flavor. It holds up well when grilled. You can also use sourdough or whole wheat. Each option brings a unique taste. Make sure your bread is sturdy to hold all those juicy layers. Butter the outer sides before grilling for that perfect golden crust. For the full recipe, check the details above to make your own delicious patty melt! {{image_2}} If you want to switch up the cheese, try cheddar or pepper jack. These cheeses add a nice kick. Gouda melts well too, giving a rich flavor. Mixing cheeses can also create a unique taste. Experiment and find what you love best! You can make this patty melt with turkey or chicken. Ground turkey offers a lighter option. For a veggie choice, try black bean or lentil patties. They can be just as tasty and filling. Each option gives a fresh twist to this classic dish. To make a healthier patty melt, use lean ground beef or turkey. Whole-grain rye bread adds fiber and nutrients. You can also swap regular butter for a healthier spread. Consider using less cheese or low-fat options. These changes keep flavor while cutting calories. To keep your patty melts fresh, store any leftovers in the fridge. Wrap them tightly in plastic wrap or foil. You can also place them in an airtight container. Make sure to eat leftovers within three days for the best taste. When reheating, you want to keep the bread crispy. Use a skillet over medium heat. Place the patty melt in the skillet for about 3-4 minutes on each side. This method warms the inside and keeps the outside crunchy. You can also use an oven at 350°F for about 10-15 minutes. If you want to freeze cooked patty melts, wrap each one in plastic wrap. Then, place them in a freezer bag. This helps prevent freezer burn. You can freeze them for up to three months. To reheat, thaw in the fridge overnight, then follow the reheating guidelines. Enjoy your patty melt anytime! For the complete recipe, check out the Full Recipe section above. For juicy patties, I recommend using ground beef with an 80/20 ratio. This means 80% lean meat and 20% fat. The fat keeps the meat moist and adds flavor. Look for high-quality beef from local farms or markets. Fresh beef will taste better and give a nice texture. Avoid leaner cuts, as they may dry out during cooking. Yes, you can make the secret sauce ahead of time! Store it in an airtight container in the fridge. It stays fresh for up to a week. This makes prep easier when cooking. Just give it a stir before using to mix the flavors. Patty melts go great with many sides! Here are some tasty options: - Crispy French fries - Sweet potato fries - Coleslaw - Pickles - Salad with light dressing These sides add crunch and balance the rich flavors of the melt. You can easily adjust this recipe for dietary needs. Here are some ideas: - For gluten-free, use gluten-free bread. - For dairy-free, try vegan cheese or skip the cheese. - If you want a leaner option, use ground turkey or chicken. Experiment with different toppings like avocado or spicy sauce to suit your taste. In this article, we explored how to make delicious patty melts. We covered main ingredients, including ground beef and Swiss cheese. You learned how to prepare the secret sauce and cook your patties just right. The assembly and grilling steps help create the perfect melt. Experiment with variations like different cheeses or healthy swaps. Use our tips for storage and reheating to enjoy leftovers. With these ideas and instructions, you can make scrumptious patty melts at home. Enjoy your cooking journey!

Patty Melt with Secret Sauce Deliciously Simple Recipe

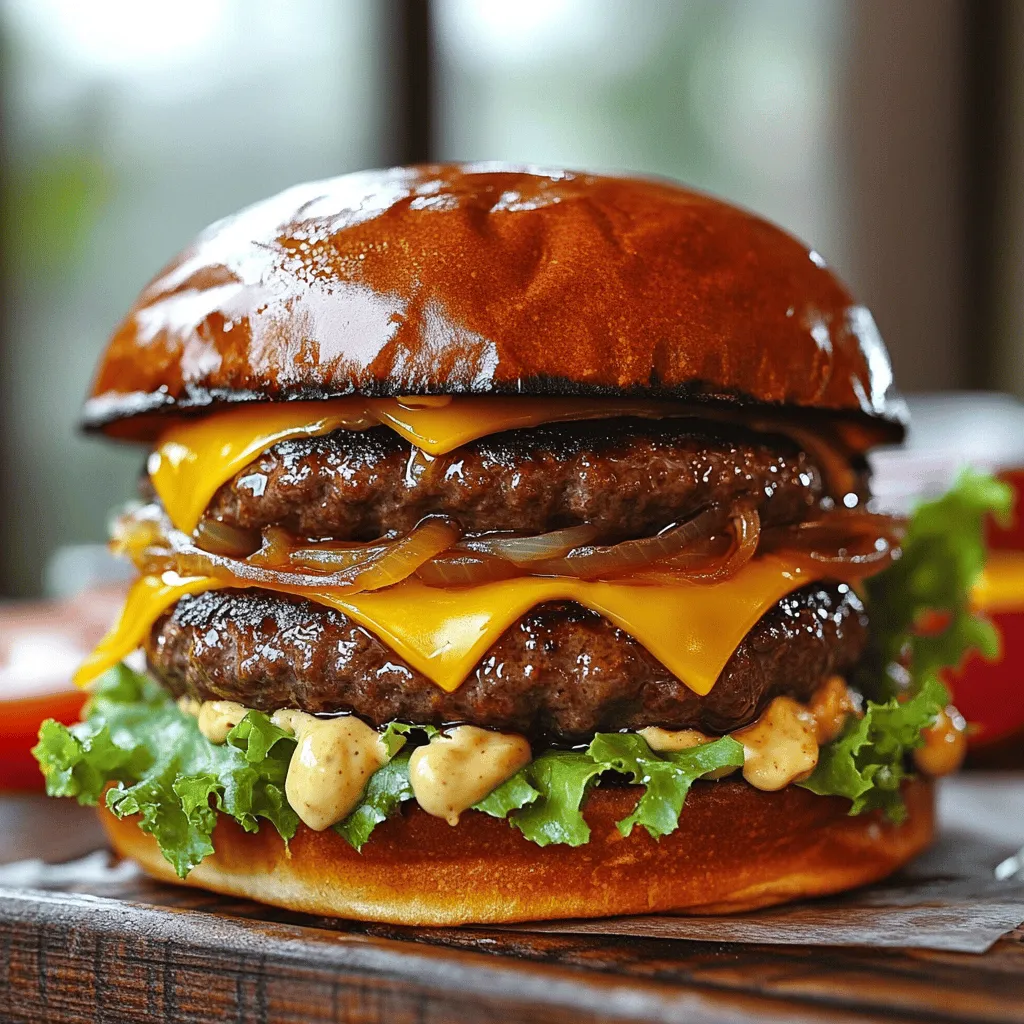
Ready for a mouthwatering twist on a classic dish? My Patty Melt with Secret Sauce recipe is both delicious and

- 1 can (21 oz) cherry pie filling - 1 can (15 oz) crushed pineapple, drained - 1 box (15.25 oz) chocolate cake mix - 1 cup chopped walnuts (optional) - 1 cup (2 sticks) unsalted butter, melted - 1 cup sweetened shredded coconut (optional) - Whipped cream for serving - Maraschino cherries for garnish To make a great Black Forest Dump Cake, I love using simple ingredients. You start with cherry pie filling. It adds a sweet and tart flavor. Next, you’ll need crushed pineapple. This gives the cake a tropical twist. The chocolate cake mix is the star here. It makes everything rich and yummy. If you want a crunchy bite, add chopped walnuts. Shredded coconut gives it a fun texture, too. You’ll need melted unsalted butter to moisten the cake mix. It helps create that perfect golden top. Finally, for serving, whipped cream and maraschino cherries are musts. They make the dessert look fancy and taste delicious. You can find the full recipe above for easy reference. Enjoy this simple and tasty dessert! 1. Preheat your oven to 350°F (175°C) and grease a 9x13-inch baking pan. This will help the cake come out easily. 2. Spread the cherry pie filling evenly on the bottom of the prepared pan. Make sure it covers the base well. 3. Layer the drained crushed pineapple on top of the cherry filling. This adds a nice fruity flavor. 4. Sprinkle the chocolate cake mix evenly over the fruit layers without mixing it in. The dry mix will create a great texture. 5. If using walnuts and shredded coconut, sprinkle them evenly on top of the cake mix. These add crunch and flavor. 6. Drizzle the melted butter over the entire surface. Make sure to cover as much of the dry cake mix as you can. Do not stir it! 1. Bake in the preheated oven for about 40-45 minutes. The top should turn golden brown. 2. Check for doneness by inserting a toothpick into the cake. It should come out clean. 3. Allow to cool slightly before serving. This helps the flavors settle. 4. Serve warm with a dollop of whipped cream on top. Add a maraschino cherry for a fun garnish. For the complete recipe, check the [Full Recipe]. To ensure even baking and a great texture, spread the cherry pie filling evenly. Layer the crushed pineapple on top without mixing. This helps keep the flavors distinct. When you add the cake mix, sprinkle it gently over the fruits. Avoid stirring the layers. This keeps the cake moist and fluffy. To check for doneness, look for a golden brown top. Insert a toothpick into the center. If it comes out clean, the cake is ready. If it has batter on it, give it a few more minutes. Always trust your instincts when baking. To serve Black Forest Dump Cake, cut it into squares. A warm slice pairs well with whipped cream. Add a maraschino cherry on top for a pop of color. For alternative toppings, try adding chocolate syrup or fresh berries. You can even use ice cream for a fun twist. This cake is versatile, so feel free to get creative with your toppings. {{image_2}} You can switch up the fruit in your Black Forest Dump Cake. Instead of cherry pie filling, try blueberries or strawberries. Both fruits add a fresh flavor. They also pop with color and taste great. You can even mix fruits for a unique twist. If you need a gluten-free option, use a gluten-free chocolate cake mix. Many brands offer this now. You can find them in most grocery stores. Just check the box for gluten-free labeling. This way, you can enjoy this dessert without worry. To enhance the taste, consider adding spices or extracts. A dash of cinnamon can bring warmth. A splash of vanilla extract can deepen the flavors too. Both options will make your cake extra special. For a fun presentation, layer whipped cream on top after baking. Add some maraschino cherries for a pop of color. You can also sprinkle extra nuts or coconut on top for added texture. These small touches will wow your guests. For the full recipe, check out the [Full Recipe]. To keep your Black Forest Dump Cake fresh, use an airtight container. This helps keep moisture in and prevents the cake from drying out. You can also wrap it well with plastic wrap. Store leftover cake in the fridge. It will stay good for about 3 to 5 days. When you want to enjoy your cake again, you have a few options. The best method is to use the oven. Preheat your oven to 350°F (175°C). Put a slice of cake on a baking sheet. Cover it with foil to keep it moist. Bake for about 10 to 15 minutes. You can also use a microwave. Heat a slice for about 20 to 30 seconds. Just make sure not to overheat it. Enjoy your warm, tasty dessert! Black Forest Dump Cake is a fun and tasty dessert. It mixes rich chocolate and sweet cherries. This dish comes from the famous Black Forest region in Germany. The name reflects its use of cherries and chocolate, which are key to the original Black Forest cake. In this dump cake, you layer simple ingredients, making it quick and easy. Yes, you can make Black Forest Dump Cake ahead. Prepare the cake, but don’t bake it right away. Cover it and keep it in the fridge. When you are ready, just pop it in the oven. You can also bake it ahead and store it in the fridge for up to three days. Just warm it up before serving. You can serve many things with Black Forest Dump Cake. Whipped cream on top makes it extra special. You can also add maraschino cherries for a fun touch. For drinks, try coffee or milk. Both pair nicely with the sweet flavors. If you want more dessert, serve it with ice cream. The cold ice cream balances the warm cake. This blog post shared the tasty recipe for Black Forest Dump Cake. You learned about the ingredients, baking steps, and creative serving ideas. I also highlighted useful tips, ingredient swaps, and storage methods. Try making this cake with your favorite fruits, or add spices for extra flavor. Whatever you choose, this dessert will delight your taste buds. Enjoy this easy cake at your next gathering or treat yourself at home. Happy baking!

Black Forest Dump Cake Simple and Tasty Dessert

If you’re craving a quick and delicious dessert, you’ve got to try Black Forest Dump Cake! This simple recipe combines

- Chicken - For this dish, I use 500g of boneless chicken thighs. They stay juicy and tender. You can cut them into bite-sized pieces for easy cooking and eating. - Marinade Components - The marinade gives the chicken its bold flavor. You need: - 4 tablespoons of soy sauce - 1 tablespoon of oyster sauce - 1 tablespoon of freshly cracked black pepper - 6 cloves of minced garlic - 1 tablespoon of minced ginger - 2 tablespoons of sesame oil - 1 tablespoon of cooking oil (canola or vegetable) - This mix adds depth and a nice kick. - Vegetables & Garnishes - To add color and texture, include: - 1 sliced bell pepper (red or green) - 1 sliced onion - 2 chopped green onions for garnish - Sesame seeds for garnish - These fresh ingredients brighten up the dish and make it more appealing. For the full recipe, check out the details above. Marinating the Chicken Start by cutting your chicken thighs into bite-sized pieces. Place the chicken in a bowl. Add soy sauce, oyster sauce, minced garlic, ginger, and black pepper. Mix well to coat all pieces. Let this marinate for at least 30 minutes. If you have time, let it sit for up to 2 hours for a richer taste. Cooking the Chicken Grab a large skillet or wok. Heat cooking oil and sesame oil over medium-high heat. When the oil is hot, add the marinated chicken. Spread it in a single layer. Let it sear for about 4 to 5 minutes until it's golden brown on one side. Then, flip the chicken pieces. Adding Vegetables Now, add sliced onion and bell pepper to the skillet. Stir-fry these with the chicken for another 4 to 5 minutes. Cook everything until the chicken is fully done and the vegetables are tender-crisp. Taste it to check for seasoning. You can add more black pepper or soy sauce if you like. Remove from heat. Garnish with chopped green onions and sesame seeds before serving. This sweet, savory dish is perfect for family dinners. You can find the Full Recipe for more details. Marination Time Suggestions For the best flavor, marinate the chicken for at least 30 minutes. If you have time, let it sit for up to 2 hours. This helps the chicken soak up all the tasty sauces and spices. Searing Techniques Searing is key to getting a nice crust. Heat your pan well before adding the chicken. Place the chicken in a single layer. Don't crowd the pan. Sear for about 4-5 minutes until it's golden brown. This locks in moisture and flavor. Ideal Cooking Temperature Cook your chicken on medium-high heat. This ensures that it cooks through without burning. Use a meat thermometer to check the internal temp. It should reach 165°F (75°C). This guarantees juicy, safe-to-eat chicken every time. These tips will help you make a great Garlic Black Pepper Chicken. For the full recipe, check out the details above. {{image_2}} Alternative Meats You can swap chicken thighs for other meats. Pork or beef works well. You can also try shrimp or tofu for a tasty twist. These changes keep the dish exciting and flavorful. Vegetable Options Feel free to change the vegetables. Broccoli, snap peas, or carrots add crunch and color. Mushrooms or zucchini bring a different taste. Mix and match to your liking for fun flavors. Spice Level Adjustments Want more heat? Add chili flakes or fresh chopped chili. For less spice, reduce black pepper or skip it altogether. This dish can fit your taste and spice level perfectly. For the full recipe, check out the Garlic Black Pepper Chicken details. To keep your Garlic Black Pepper Chicken fresh, use these methods: - Refrigeration: Place leftovers in an airtight container. They will stay good for about 3-4 days in the fridge. Make sure to cool the chicken before sealing it. - Freezing Methods: For longer storage, freeze the chicken. Use a freezer-safe bag or container. Remove as much air as possible. It can last for up to 3 months. Label the container with the date. This helps you track how long it's been in the freezer. Reheating your Garlic Black Pepper Chicken is easy. Here’s how: - Microwave: Place chicken in a microwave-safe dish. Cover it with a lid or microwave-safe wrap. Heat in short bursts of 30 seconds. Stir in between until hot. - Stovetop: Heat a skillet over low heat. Add a little oil or water to prevent sticking. Add the chicken and cover the pan. Stir occasionally until warmed through. For the full experience of this dish, you might want to try the Full Recipe. To make Garlic Black Pepper Chicken spicier, you can add more black pepper. Use a mix of black pepper and crushed red pepper for extra heat. You can also include fresh chili peppers or chili paste. Adjust the amount to fit your taste. Spiciness can enhance the flavor and make it more exciting. Yes, you can use chicken breast instead of thighs. Chicken breast is leaner and cooks faster. Just be careful not to overcook it. The result will still be tasty and full of flavor. Adjust the marination time if needed, as chicken breast may need less time to soak up the sauce. Garlic Black Pepper Chicken goes well with many side dishes. Here are a few great options: - Steamed rice - Fried rice - Stir-fried vegetables - Noodles - A fresh salad These sides balance the rich flavors of the chicken and make the meal complete. For the full recipe, check out the complete guide to Garlic Black Pepper Chicken! In this blog post, we covered how to make Garlic Black Pepper Chicken. We explored the main ingredients and preparation steps. You also learned tips to enhance flavor and ways to swap ingredients for variations. Additionally, I shared how to store leftovers safely and answered common questions. Garlic Black Pepper Chicken is a fun dish to make. I hope you enjoy trying it!

Garlic Black Pepper Chicken Flavorful and Simple Meal

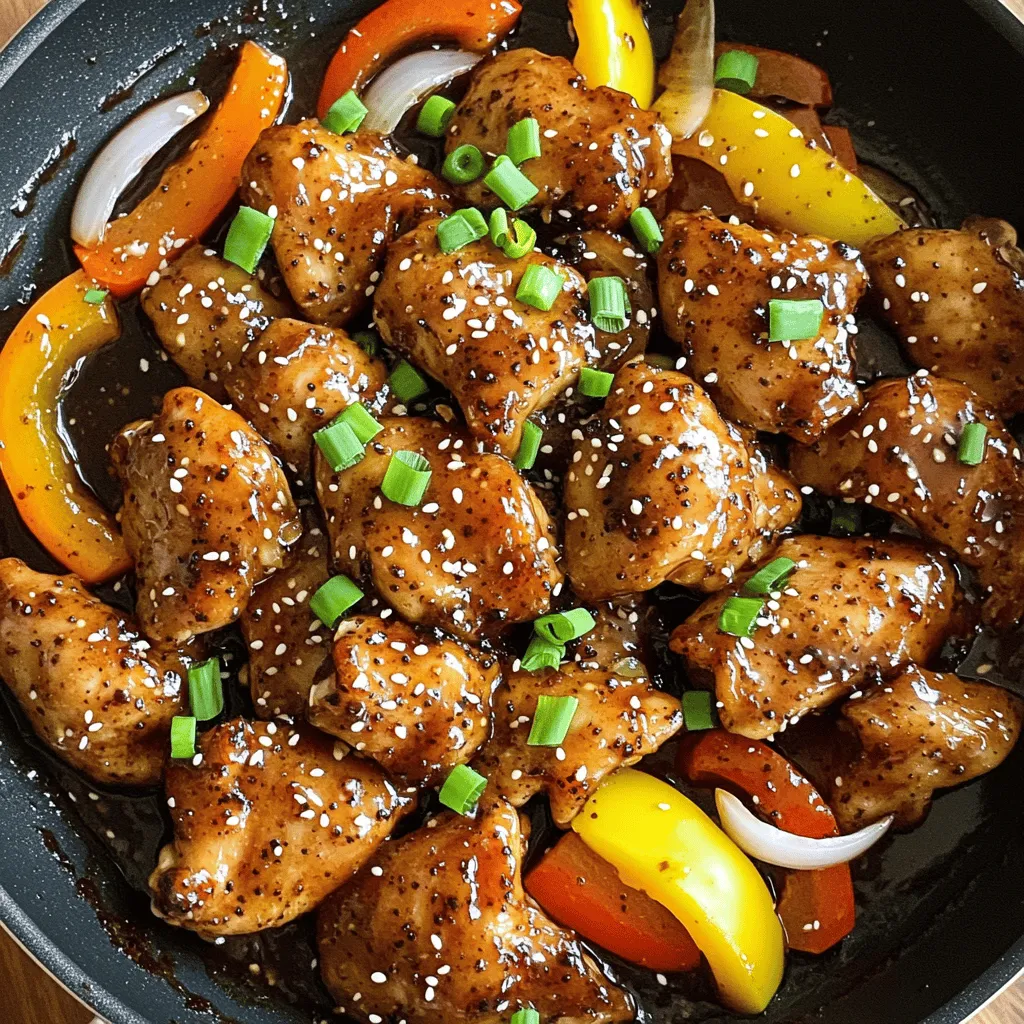
Looking for a tasty and easy meal? You’re in the right place! Garlic Black Pepper Chicken is a flavor-packed dish

To make the Ultimate Cheese Dog Pizza Sandwich, you will need these fresh ingredients: - Hot dog sausages - Mozzarella cheese - Pizza sauce - Shredded cheddar cheese - Pepperoni slices - Diced bell peppers - Sliced black olives - Olive oil - Garlic powder - Italian seasoning - Bread options (ciabatta or Texas toast) - Fresh basil leaves for garnish Gathering these ingredients is the first step to a tasty meal. Each ingredient brings its own flavor to the sandwich. The hot dog sausages add a savory base, while the mozzarella cheese gives that gooey, melty goodness. The pizza sauce ties all the flavors together with its tangy zest. Don’t forget the toppings! Pepperoni, diced bell peppers, and black olives add great texture and taste. Fresh basil leaves can uplift the dish with a burst of freshness. Choosing the right bread matters too. Ciabatta or Texas toast gives a sturdy base. It holds all the yummy fillings without falling apart. For the full recipe, check out the details above. This sandwich is sure to impress everyone at your table! - Preheat your oven to 375°F (190°C). - Cook the hot dog sausages in a skillet. Brown them for about 5-7 minutes. - Slice the cooked hot dogs lengthwise so they lay flat. - In a bowl, mix pizza sauce, garlic powder, and Italian seasoning. Set this aside. - Spread the pizza sauce mixture on one side of each bread slice. - On two of the bread slices, place the sliced hot dogs cut side up. - Layer mozzarella cheese, then add pepperoni, bell peppers, and black olives. - Sprinkle shredded cheddar cheese on top. Close the sandwiches with the other bread slices. - Place the sandwiches on a baking sheet. - Bake them for about 10-12 minutes. Look for golden bread and melting cheese. - Once done, cool for a minute. Slice each sandwich diagonally and serve. You can follow the Full Recipe for a detailed guide that brings this dish to life! - Optimal cooking times and temperatures For the best results, set your oven to 375°F (190°C). Bake the sandwiches for 10-12 minutes. This ensures the bread turns golden and the cheese melts perfectly. - Cheese melting techniques Use a mix of mozzarella and cheddar cheese. Mozzarella gives that stringy pull, while cheddar adds a rich taste. Layer the cheeses well, and cover them with toppings to help melt evenly. - Adjusting seasonings for taste Customize your flavors! Add more garlic powder or Italian seasoning to the sauce. You can also sprinkle some on top before baking for extra flavor. Taste as you go to find your perfect blend. - Side dish options Pair your sandwich with crispy fries or a fresh salad. These sides balance the richness of the cheese dog pizza sandwich. - Dipping sauces to enhance flavor Try marinara sauce or ranch dressing for dipping. They add a fun twist and extra flavor to each bite. {{image_2}} To make your Ultimate Cheese Dog Pizza Sandwich even better, try swapping some ingredients. - Alternative cheeses to try: Instead of mozzarella, you can use provolone or gouda. These cheeses add a unique taste. - Different meats or vegetarian options: You can replace hot dogs with turkey sausages or veggie dogs. For a meat-free option, try grilled mushrooms or zucchini slices. You can boost the flavor of your sandwich with a few simple changes. - Adding spices or herbs to the sauce: Mix in crushed red pepper flakes for heat. Fresh parsley or oregano can brighten up the sauce. - Unique toppings to experiment with: Consider jalapeños for spice, or even pineapple for a sweet twist. Caramelized onions can add depth to your flavors. These variations and enhancements will help you create a sandwich that matches your taste. Try out new ideas until you find your favorite combination. Remember, cooking is all about fun and creativity! For the full recipe, check out the Ultimate Cheese Dog Pizza Sandwich. To keep your Ultimate Cheese Dog Pizza Sandwich fresh, let it cool first. Place the sandwich in an airtight container. This helps maintain its flavor and texture. Store it in the fridge if you want it to last a few days. You can keep it for up to three days this way. If you plan to store it longer, consider freezing it. Wrap it tightly in plastic wrap and then in aluminum foil. This will help avoid freezer burn. When you want to enjoy your leftovers, there are great ways to reheat them. The oven works best for this type of sandwich. Preheat your oven to 350°F (175°C). Place the sandwich on a baking sheet and cover it with foil. Bake for about 10-15 minutes. This keeps the bread crispy and warms the cheese nicely. If you prefer using a microwave, be cautious. Place the sandwich on a microwave-safe plate. Heat it in short bursts, about 30 seconds at a time. Check often to avoid sogginess. The oven method gives a better texture, but the microwave is quick if you’re in a hurry. The best bread for a cheese dog pizza sandwich is thick and sturdy. I recommend using ciabatta or Texas toast. These types hold up well to the sauce and toppings. They give a nice crunch when toasted. Plus, they add flavor to your sandwich. If you want a softer bite, use a thicker white bread. Just make sure it’s not too flimsy. Yes, you can make this sandwich in an air fryer! It’s quick and easy. Just assemble your sandwich as usual. Preheat your air fryer to 375°F (190°C). Place the sandwich in the basket. Cook for about 8-10 minutes. Check often to avoid burning. Your sandwich will come out crispy and the cheese will melt perfectly. To make this recipe gluten-free, swap regular bread for gluten-free bread. Many stores sell gluten-free options. You can also use wrap-style bread made from rice or corn. Make sure the hot dogs and sauces are gluten-free too. Always check labels for hidden gluten. This way, everyone can enjoy this tasty sandwich. - What cheese works best? Try different cheeses like provolone or pepper jack. Each adds unique flavors. - Can I add veggies? Definitely! Spinach, mushrooms, or jalapeños work great in this sandwich. - What about sauces? Experiment with BBQ sauce or ranch dressing. These can add a fun twist. - How do I store leftovers? Keep leftovers in an airtight container in the fridge. They last about 2 days. - Can I grill the sandwich? Yes! Grilling gives it a nice smoky flavor. Just use a skillet or panini press. For the full recipe, check out the Ultimate Cheese Dog Pizza Sandwich. This blog post guides you through making a fun cheese dog pizza sandwich. You learned about ingredients, preparation, and baking steps. I shared tips for perfecting your sandwich and variations to try. Remember to store leftovers properly and reheat for the best taste. Now, get creative with toppings and enjoy these sandwiches. They are perfect for gatherings or a quick meal. You'll impress family and friends with this tasty recipe!

Ultimate Cheese Dog Pizza Sandwich Recipe Delight

Are you ready to make the Ultimate Cheese Dog Pizza Sandwich? This delicious dish combines all your favorites: juicy hot

To make this tasty dish, you need some key items. Here’s what you will need: - 2 cans of refrigerated biscuit dough - 1 cup cooked sausage, crumbled (Italian or breakfast sausage works well) - 6 large eggs, beaten - 1 cup shredded cheddar cheese - 1/2 cup milk - 1/4 teaspoon garlic powder - 1/4 teaspoon onion powder - Salt and pepper to taste - 2 tablespoons melted butter - Fresh chives or parsley, chopped, for garnish These items come together to create a warm and cheesy delight. The biscuit dough forms the base, while the sausage adds a savory touch. Eggs and cheese bring it all together, making it rich and tasty. Choosing the right brands can enhance your monkey bread. For biscuit dough, I recommend Pillsbury or Grands! They offer flaky and soft biscuits. For sausage, look for brands like Johnsonville or Jimmy Dean. They provide great flavor and quality. Always check for fresh options, as freshness boosts the taste. You can easily adapt this recipe for different diets. Here are some ideas: - Use gluten-free biscuit dough if you have a gluten allergy. - Swap out the sausage for a plant-based option like Beyond Meat. - For a lighter option, use egg whites instead of whole eggs. - If you’re lactose intolerant, try dairy-free cheese or omit it entirely. These swaps allow you to enjoy the dish while meeting your dietary needs. Just remember to keep the main flavors intact for a delicious result. You can find the full recipe linked earlier for more details on making this dish. Start by gathering all your ingredients. You will need biscuit dough, sausage, eggs, cheese, and spices. Cut each biscuit into quarters. This makes them easy to mix and pull apart later. Measure out the sausage, cheese, and spices. Having everything ready makes cooking fun and easy. Heat a large skillet over medium heat. Add the crumbled sausage to the skillet. Cook it until it turns brown and is fully cooked. This step adds great flavor to your monkey bread. Once it is done, remove it from the heat. Let it cool for a moment while you mix other ingredients. In a mixing bowl, whisk the eggs with milk, garlic powder, onion powder, and any salt or pepper. This blend makes the base of your dish. In another large bowl, combine the biscuit pieces and cooked sausage. Pour the egg mixture over the biscuit and sausage. Toss everything until it is coated well. Finally, fold in the shredded cheese. This adds a nice creamy texture. Pour the mixture into a greased bundt pan. Spread it out evenly, making sure there are no gaps. Drizzle melted butter over the top for extra flavor. Bake in your preheated oven for 25-30 minutes. Look for a golden brown top. To check if it's done, insert a toothpick in the center. If it comes out clean, it’s ready. Let it cool for 5 minutes before flipping it onto a plate. Garnish with chopped chives or parsley. Now, it’s time to pull apart and enjoy this tasty treat! For the complete recipe, see the Full Recipe. To get the best monkey bread, timing is key. Bake your creation for 25 to 30 minutes. Watch for a golden brown top. A toothpick should come out clean when it's ready. If you see it browning too fast, cover it with foil. This way, it cooks evenly without burning. Make sure to mix all the ingredients well. Cut the biscuit dough into small, even pieces. This helps them cook at the same time. When you pour the mixture into the bundt pan, spread it evenly. This ensures every bite is full of flavor. Serve your monkey bread warm for the best taste. Pair it with a fresh salad or some fruit. You can also add a side of spicy ketchup or hot sauce for a kick. For a fun twist, try serving it with a creamy dip. Enjoy it at brunch or as a snack during game day. Check out the Full Recipe for more tips! {{image_2}} You can easily make a vegetarian version of this dish. Simply swap the sausage for cooked mushrooms or a meat substitute. You could also use a mix of sautéed peppers and onions. This adds nice flavor and keeps it hearty. You can use the same steps from the Full Recipe, just replace the meat. Cheese plays a huge role in this recipe's flavor. Cheddar is great, but feel free to experiment. Try using Monterey Jack for a creamier taste. Feta cheese adds a tangy kick. You can even mix different cheeses for extra depth. Just keep the total amount of cheese the same. Adding veggies is a smart way to boost taste and nutrition. Chopped spinach or kale can add a fresh touch. You can also include diced tomatoes or zucchini. Just sauté these first to soften them. Fold them into the mixture with the cheese. This will make your monkey bread colorful and tasty! I love making extra monkey bread. To store leftovers, let it cool first. Wrap the cooled bread in plastic wrap or foil. You can also keep it in an airtight container. This keeps it fresh for up to three days in the fridge. When you want to enjoy your leftover monkey bread, preheat your oven to 350°F (175°C). Place the monkey bread on a baking tray. Cover it with foil to prevent it from drying out. Heat for about 10-15 minutes. If you're in a hurry, you can use the microwave. Heat it in 30-second bursts until warm. Freezing is a great way to save this dish. Cut the monkey bread into pieces. Wrap each piece tightly in plastic wrap, then in foil. Store them in a freezer bag. This way, it stays good for up to three months. When ready to eat, thaw in the fridge overnight. Reheat it in the oven or microwave. For the full recipe, check out the earlier section! Yes, you can make this dish ahead. You can prepare the mixture and place it in the bundt pan. Cover it well and store it in the fridge overnight. When you're ready, just bake it in the morning. This method saves time and makes breakfast easy and fun. This monkey bread pairs well with a fresh fruit salad. You can also serve it with a side of crispy bacon. A light salad adds a nice crunch, too. For drinks, coffee or fresh juice works perfectly. These options balance the rich flavors of the monkey bread. You can check if it's done by using a toothpick. Insert the toothpick in the center of the bread. If it comes out clean, the monkey bread is ready. The top should also be golden brown. Let it cool for a few minutes before serving to enhance the flavor. For the full recipe, refer to the instructions above. This article explored how to make Sausage Egg and Cheese Monkey Bread. We discussed essential ingredients, step-by-step instructions, and helpful tips. I shared storage advice and variations for different tastes. You can easily adapt this recipe for your needs. Whether you stick to classic flavors or try new ones, it’s all about your choices. Enjoy creating this fun dish for breakfast or brunch. Happy cooking!

Sausage Egg and Cheese Monkey Bread Flavorful Treat

Get ready for a breakfast game changer! This Sausage Egg and Cheese Monkey Bread is a flavorful treat that’s fun

Older posts
Newer posts
← Previous Page1 … Page85 Page86 Page87 … Page93 Next →

dsad

© 2025 flavorsprint • Built with GeneratePress

Our Policies

  • Copyright Policy
  • Cookie Policy
  • GDPR Policy
  • Privacy Policy
  • Disclaimer
  • Terms Of Use

More Information

  • Home
  • About
  • Contact
  • Appetizers
  • Dessert
  • Dinner
  • Drinks
©2025, flavorsprint About Back To Top