![To make a great Italian pasta salad, you need some key items. Here are the must-have ingredients: - 2 cups rotini pasta - 1 cup cherry tomatoes, halved - 1 cup cucumber, diced - 1/2 cup red onion, finely chopped - 1/2 cup black olives, sliced - 1/2 cup mozzarella balls, halved - 1/4 cup fresh basil, chopped These ingredients blend well to create a colorful and tasty dish. The rotini pasta holds the dressing nicely, while the veggies add crunch and freshness. Feel free to get creative! You can add more items to boost the taste. Consider these optional add-ins: - 1/2 cup bell peppers, diced - 1/2 cup artichoke hearts, chopped - 1/4 cup sun-dried tomatoes, chopped - 1/4 cup Parmesan cheese, grated These add-ins can enhance the flavor and texture. Experiment and see what you like best! The dressing is vital for flavor. Here’s what you'll need: - 1/4 cup olive oil - 2 tablespoons balsamic vinegar - 1 teaspoon dried oregano - 1/2 teaspoon garlic powder - Salt and pepper, to taste Mix these dressing ingredients to create a zesty blend. This will tie all the flavors together beautifully. For the full recipe, check out the complete guide. Start by boiling water in a large pot. Once it boils, add the rotini pasta. Cook it until it is al dente, which usually takes about 8-10 minutes. This means it should still have a slight bite when you chew it. After cooking, drain the pasta in a colander. Rinse it under cold water. This stops the cooking process and cools the pasta down quickly. Set it aside while you prepare the vegetables. Grab a large mixing bowl. In it, add the halved cherry tomatoes, diced cucumber, finely chopped red onion, sliced black olives, and halved mozzarella balls. These colorful veggies will give your salad a fresh taste. Make sure to mix them well so they are evenly distributed. This also helps the flavors blend together. Now, take the cooled pasta and add it to the bowl with the vegetables. Gently toss everything together. In a small bowl, whisk together the olive oil, balsamic vinegar, dried oregano, garlic powder, and a pinch of salt and pepper. Pour this dressing over the pasta salad. Toss gently again until all the ingredients are well coated. Finally, fold in the chopped fresh basil. This adds a lovely aroma and taste. Cover the bowl with plastic wrap or a lid. Refrigerate for at least 30 minutes. This helps all the flavors meld together, making your salad even better. For the full recipe, check out the instructions above. To cook pasta right, start with a big pot of water. Use about 4 quarts for every pound. Add a good amount of salt; it helps the pasta taste better. Bring the water to a rolling boil before adding the pasta. Stir the pasta right away so it doesn't stick. Cook it until it's al dente, which means it has a firm bite. Always check the package for the right cooking time. After cooking, drain the pasta and rinse it with cold water. This stops the cooking and keeps it from getting mushy. If you have pasta salad left over, store it in an airtight container. This keeps it fresh and tasty. Refrigerate it as soon as you can. It will stay good for about three days. If you want to keep it longer, you can freeze it. Just make sure to use a freezer-safe container. When ready to eat, thaw it in the fridge overnight. You can add a little olive oil to freshen up the flavors after thawing. To make your pasta salad extra special, try adding more herbs. Fresh herbs like parsley or dill can add a nice touch. You can also mix in some cheese, like feta or parmesan. It adds creaminess and depth. For a little kick, consider adding a pinch of red pepper flakes. If you want it sweeter, toss in some chopped bell peppers or a bit of honey in the dressing. Finally, don't be shy with the dressing; a little more can really lift the dish. For the full recipe, check out Italian Pasta Party Salad. {{image_2}} You can easily make Italian pasta salad vegetarian. Just skip the meat and add more veggies. Try bell peppers, artichoke hearts, or spinach. These ingredients add color and taste. You might also like to add nuts or seeds for crunch. This salad still tastes great without meat! For a gluten-free version, use gluten-free pasta. Many brands offer tasty options made from rice or corn. You can still use all the same vegetables and dressing. This way, everyone can enjoy the salad. It will be just as colorful and full of flavor. Adding protein makes your pasta salad more filling. You can use cooked chicken, canned tuna, or even beans. Chickpeas are a great choice for a plant-based option. Just mix in your protein after combining the pasta and veggies. This addition gives you more nutrients and keeps your meal balanced. You can find the full recipe to get started on your Italian pasta salad today! To store leftover pasta salad, place it in an airtight container. This keeps the salad fresh and tasty. Make sure to refrigerate it right away. Leftovers will last for about three to five days. If you see any changes in smell or color, it’s best to toss it. If you want to freeze your pasta salad, it's best to do so without dressing. The dressing can change the texture when thawed. To freeze, use a freezer-safe container and fill it to leave some space for expansion. You can store it for up to three months. When you're ready to eat, just thaw it in the fridge overnight. For the best storage, use glass containers with tight lids. They help keep your pasta salad fresh and prevent odors. Plastic containers are fine, too, but choose ones that are BPA-free. If you want to take it on the go, mason jars work great for single servings. The best type of pasta to use is rotini. Its twisty shape holds the dressing and toppings well. Other good choices are fusilli or penne. These shapes add fun and texture to your salad. Yes, you can make Italian Pasta Salad ahead of time. It actually tastes better when chilled for a while. I recommend making it a few hours or even a day before serving. Just store it in the fridge. Italian Pasta Salad lasts about three to five days in the fridge. Make sure to keep it in an airtight container. If you notice any strange smells or colors, it’s best to toss it. You can easily swap ingredients in this salad. Use whole wheat pasta for a healthier option. Instead of mozzarella, try feta or goat cheese. If you don’t have black olives, green olives work too. To make your pasta salad more colorful, add bell peppers or carrots. Cherry tomatoes already add a nice pop. You can also use colorful pasta, like spinach or beet pasta. Fresh herbs like parsley or cilantro can brighten it up too. For the full recipe, check out the [Full Recipe]. Italian pasta salad is easy to make with fresh ingredients and simple steps. You can mix different vegetables, proteins, and dressings for a tasty dish. Remember, cooking pasta well and storing leftovers correctly keep your salad fresh and enjoyable. Try variations like vegetarian or gluten-free options to suit your diet. Feel free to explore flavors and colors to make it your own. With a few tips and tricks, you will create a delightful meal that everyone will love. Enjoy your cooking!](https://flavorsprint.com/wp-content/uploads/2025/06/3cc0237d-97dc-4ff1-9826-3a1d973a9f56.webp)
Italian Pasta Salad Flavorful and Easy Recipe Guide
Are you ready to whip up a dish that delights your taste buds? My Italian Pasta Salad is both flavorful
Are you ready to whip up a dish that delights your taste buds? My Italian Pasta Salad is both flavorful
![- Rice vermicelli noodles (mei fun) - Protein options (shrimp, chicken, or tofu) - Fresh vegetables (bean sprouts, carrots, bell peppers, and snap peas) To make Singapore Chow Mei Fun Noodles, you need a few key ingredients. First, the rice vermicelli noodles, or mei fun, serve as the dish's base. They soak up flavors well and add a delightful texture. Next, you can choose a protein. Shrimp is a popular choice, but chicken or tofu work too. Then, gather fresh vegetables. Bean sprouts, carrots, bell peppers, and snap peas bring both crunch and color. - Curry powder, soy sauce, sesame oil - Garlic and green onions Seasonings are what elevate this dish. You’ll need curry powder for a warm spice. Soy sauce adds saltiness and depth, while sesame oil gives a nutty flavor. Garlic adds a strong aroma, and green onions bring freshness. Together, they create a perfect harmony. - Fresh cilantro, chili flakes - Suggested sauces (sweet chili, hoisin) For extra flair, consider adding fresh cilantro as a garnish. It brightens the dish. If you like heat, sprinkle on chili flakes. You can also serve it with sweet chili or hoisin sauce on the side. These options allow you to customize each bite. For the full recipe, refer to the [Full Recipe]. Start by soaking the mei fun noodles. Place them in hot water for about 10 minutes. You want them soft, not mushy. Once they’re ready, drain and set them aside. Here’s a tip: Make sure to separate the noodles gently as you soak them. This helps avoid clumping later. The right texture is key for this dish, so don’t rush this step. Now it’s time to cook the shrimp. Heat 1 tablespoon of vegetable oil in your wok over medium-high heat. Add the shrimp and sauté until they turn pink. This takes about 2-3 minutes. Once done, remove them from the wok and set aside. Next, let’s cook the vegetables. Add another tablespoon of vegetable oil to the same wok. Toss in the minced garlic and sauté for around 30 seconds. You want it fragrant, but not burnt. Then, add the mixed vegetables and bean sprouts. Cook these for about 2-3 minutes. They should be tender but still crisp. Now comes the fun part! Add the soaked mei fun noodles back into the wok. Toss in the cooked shrimp too. Sprinkle curry powder, soy sauce, sesame oil, and sugar over the top. Mix everything gently but well. You want the noodles to be coated in that delicious flavor. Here’s a helpful tip: Use tongs or chopsticks to toss the noodles. This helps keep them intact while ensuring even seasoning. Taste your dish and adjust with salt, pepper, and chili flakes if you want more heat. Cook for another 1-2 minutes until everything is hot. Enjoy the vibrant colors and smells of your Singapore Chow Mei Fun Noodles! For the complete cooking steps, check out the Full Recipe. - Overcooking the shrimp: Shrimp cooks fast. Sauté just until pink. If you cook too long, they'll become tough. - Not soaking noodles properly: Soak mei fun in hot water for ten minutes. This makes them soft and easy to stir-fry. Don't skip this step. - How to balance seasoning: Start with the basics: soy sauce and curry powder. Taste as you go. Add a pinch of salt, and adjust to your liking. - Suggestions for a spicier dish: For heat, add chili flakes or chopped fresh chilies. You can mix them in while cooking for a warm kick. - Prepping ingredients in advance: Chop veggies and clean shrimp ahead of time. This makes cooking quick and simple. - Cooking in bulk for meal prep: Make a larger batch to save time. Store leftovers in the fridge for tasty meals later. Enjoy them within three days for the best taste. For the Full Recipe, refer to the detailed instructions to create this tasty dish. {{image_2}} You can easily make Singapore Chow Mei Fun noodles vegetarian or vegan. Start by replacing shrimp with tofu or tempeh. Tofu absorbs flavors well, giving your dish a nice taste. Tempeh adds a nutty flavor and chewy texture. Both options work great. Adding more vegetables is another way to enhance your dish. You can use bell peppers, zucchini, or broccoli. Get creative with seasonal veggies for fresh flavors. This not only boosts nutrition but also makes your meal colorful. Singaporean Chow Mei Fun noodles differ from other Asian noodle dishes. Singaporean versions often have curry powder, giving them a unique taste. Other Asian noodle dishes may focus on soy sauce or sesame oil instead. This difference in flavor sets Singaporean noodles apart. To add a personal touch, you can use local ingredients. For example, add fresh herbs from your garden or spices from a local market. This gives your dish a unique twist and connects you to your community. When serving Singapore Chow Mei Fun noodles, consider pairing them with sides. Spring rolls or dumplings work well as tasty additions. You can also serve them with chili sauce or soy sauce for extra flavor. For drink pairings, I suggest iced tea or a light beer. Both drinks complement the dish without overpowering its flavors. Enjoying your meal with the right drink can elevate the whole experience. To keep your Singapore Chow Mei Fun Noodles fresh, follow these tips: - Refrigerating Leftovers: Allow the noodles to cool first. Place them in an airtight container. They stay fresh for up to three days. - Freezing Noodles: You can freeze leftovers, but they may lose some texture. Use a freezer-safe bag and remove as much air as possible. They can last up to one month. Reheating is easy if you follow these steps: - Best Methods: Use a wok or skillet over low heat. Add a splash of water or oil to keep them moist. Stir often to heat evenly. - Common Mistakes: Avoid using a microwave. It can make the noodles rubbery. Also, don’t overheat them. This can dry them out. Knowing how long your dish lasts is key: - Leftovers Storage: Properly stored leftovers can last for three days in the fridge and one month in the freezer. - Signs of Spoilage: Check for off smells, slimy texture, or discoloration. If you see any of these, throw them away. For a complete cooking guide, check the Full Recipe. Singapore Chow Mei Fun Noodles is a popular dish from Singapore. It features thin rice noodles called mei fun, shrimp, and fresh veggies. The dish gets its bold flavor from curry powder, soy sauce, and garlic. This dish is quick, easy, and full of taste. You will enjoy the mix of savory and spicy flavors that make it unique. Yes, you can use other noodles. Some good substitutes are rice noodles or even egg noodles. However, using different noodles may change the texture. Mei fun is thin and soft, while other noodles can be thicker or chewier. This might affect how the sauce sticks to the noodles. You can find this dish in many Asian restaurants. Look for places that focus on Singaporean or Malaysian food. A good tip is to ask for chef specials. They often prepare authentic versions of this dish that highlight its true flavors. Yes, you can make Singapore Chow Mei Fun Noodles ahead of time. It works well for meal prep. To do this, cook the dish and let it cool. Store it in an airtight container in the fridge. When ready to eat, just reheat in a pan or microwave. Make sure to add a splash of water to keep it moist. For a detailed cooking guide, check out the Full Recipe for Spicy Singapore Chow Mei Fun Noodles. This resource will help you create this dish step by step, making it simple and fun! In this post, we explored how to make Singapore Chow Mei Fun Noodles. We covered key ingredients like rice vermicelli, protein options, and fresh veggies. You learned about cooking tips, common mistakes, and how to enhance flavor. To wrap it up, this dish is versatile and can be tailored to your taste. Experiment with different proteins, veggies, and sauces. Enjoy creating your own spin on this tasty meal!](https://flavorsprint.com/wp-content/uploads/2025/06/9e763a35-0a11-4a17-8e18-c38ef8a51cb8.webp)
Looking for a quick and tasty meal? Singapore Chow Mei Fun Noodles is the answer! This dish features rice vermicelli
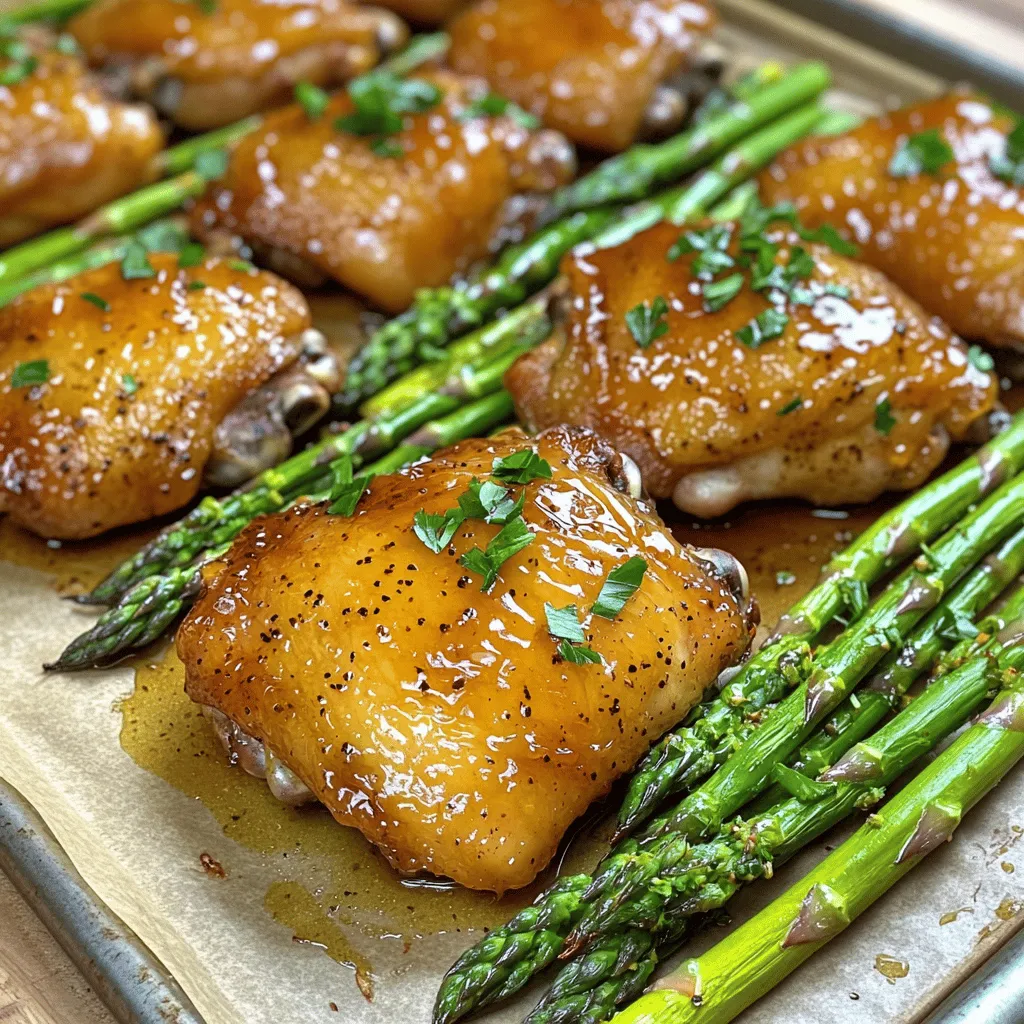
Are you ready to elevate your dinner routine? Today, I’m sharing my delicious Truffle Honey Chicken with Asparagus recipe that

Are you ready to indulge in a dessert that’s as creamy as it is dreamy? In this post, I’ll share
![- 1 can (16 oz) refrigerated pizza dough - 1 cup marinara sauce - 1 ½ cups shredded mozzarella cheese - ½ cup sliced pepperoni - ¼ cup chopped bell peppers (red or green) - ¼ cup sliced black olives - 1 teaspoon dried oregano - 1 teaspoon garlic powder - Cooking spray - Fresh basil leaves for garnish (optional) What can I use instead of pizza dough? You can use puff pastry, biscuit dough, or even naan bread. Each option brings a unique taste and texture. What cheese can I use? If you want to switch it up, try cheddar, provolone, or a blend of cheeses. This gives your cupcakes a rich flavor. Can I add more veggies? Absolutely! Spinach, mushrooms, or zucchini can add great taste. Mix and match to find your favorite combo. These mini deep dish pizza cupcakes are easy to make. You can find the full recipe above. Enjoy every bite! - Preheat your oven to 400°F (200°C). - Prepare the muffin tin with cooking spray. Start by heating your oven. This ensures even cooking. While the oven warms, grab your muffin tin. Spray it with cooking spray. This helps the pizzas come out easily after baking. - Rolling out pizza dough and cutting circles. - Assembling fillings in dough cups. Next, roll out the pizza dough. Use a lightly floured surface. Aim for about ¼ inch thick. Cut circles, about 4 inches in diameter, using a large cookie cutter or glass. Now it’s time to put the dough in the muffin tin. Gently press each circle into the cups. Make sure to cover the bottom and sides well. Once the dough is ready, fill each cup. Spoon in a tablespoon of marinara sauce. Add about 2 tablespoons of shredded mozzarella cheese next. Then, layer on the pepperoni, bell peppers, and black olives. Top off with a little more cheese. Finally, sprinkle dried oregano and garlic powder on top. - Baking times and temperature considerations. - Tips for achieving golden-brown crust. Place the muffin tin in your preheated oven. Bake for about 15-18 minutes. Watch for a golden-brown color and bubbly cheese. To get that perfect crust, avoid opening the oven door too often. This keeps the heat in. When they are done, let the cupcakes cool for a few minutes. Gently lift them out of the tin. Enjoy them warm for the best taste! For the full recipe, check out the complete guide to make these delightful mini deep dish pizza cupcakes. To get the best mini deep dish pizza cupcakes, follow these tips. First, ensure even baking. Place your muffin tin in the center of the oven. This allows hot air to circulate all around. Rotate the pan halfway through baking for even color. This simple step prevents some cupcakes from burning while others remain undercooked. Next, cheese overflow can ruin the fun. Use just the right amount of cheese. I suggest about two tablespoons in each cup. This amount gives you gooey cheese without the mess. If you do see cheese bubbling over, you can use a baking sheet under the tin. It catches any drips and keeps your oven clean. These pizza cupcakes are fun to serve! Pair them with dips like ranch or marinara. A fresh salad on the side adds color and crunch. For a fun touch, you can stack them on a stand, so they look like a tower of pizza joy. You can also use cute cupcake liners to make them pop on any table. Avoid overfilling the cups. It’s tempting to pack in more toppings, but too much can cause spills. Stick to a few toppings per cupcake. This keeps them neat and tasty. Another common mistake is using cold ingredients. Always let your cheese and sauce sit at room temperature. Cold ingredients can make the dough tough. Warm ingredients help everything blend perfectly. For the full recipe, check out [Full Recipe]. {{image_2}} There are many ways to mix flavors in mini deep dish pizza cupcakes. For a vegetarian option, skip the meat. Use extra veggies like mushrooms, spinach, or zucchini. These add taste and color. You can also use different herbs. Try basil or thyme for a fresh twist. If you want a spicy kick, add jalapeños. Slice them thin and sprinkle them on top. They will give your cupcakes a nice heat. You can also try spicy sausage for a meaty option. Just be ready for the extra spice! The fillings give you a lot of room to be creative. Think about using different meats. For example, cooked sausage or diced ham can change the flavor. You can even mix meats for a fun surprise. Cheese is another fun area to explore. Instead of just mozzarella, try cheddar or provolone. Mixing these can give your cupcakes a rich taste. You can also blend in some cream cheese for a creamy texture. Not everyone can eat regular dough or cheese. For gluten-free dough, look for pre-made options in stores. You can even make your own with gluten-free flour. Just follow a recipe for best results. For those who avoid dairy, there are many cheese options. Look for dairy-free cheese brands that melt well. They can taste great in your mini deep dish pizza cupcakes. Always check the labels to make sure they fit your needs. You can find the full recipe for these delightful treats to try out all these variations! After you enjoy your mini deep dish pizza cupcakes, store any leftovers. Place them in an airtight container. Use parchment paper to separate layers if needed. Refrigerate them right away. They stay fresh for up to three days. To reheat, use your oven for the best results. Preheat it to 350°F (175°C). Place the cupcakes on a baking sheet. Heat for about 10-15 minutes until warm. You can also use a microwave. Just heat for 30 seconds at a time until hot. You can freeze these cupcakes before or after baking. If freezing before baking, assemble them fully. Cover the muffin tin with plastic wrap. Freeze for up to two months. When ready to bake, remove the wrap. Bake straight from the freezer. Just add a few extra minutes to the baking time. If you freeze them after baking, let them cool first. Then place them in a container. They will last for about two months in the freezer. To thaw, move them to the fridge overnight. Reheat as mentioned above. This keeps the taste fresh and yummy. For the full recipe, check out the detailed steps provided above. Mini deep dish pizza cupcakes are small, tasty bites that mix pizza and cupcake styles. They use pizza dough to create a cup shape, holding all the classic pizza toppings. Unlike traditional pizza, which has a flat crust, these cupcakes have a thicker crust that is soft inside and crispy outside. Each cupcake is filled with marinara sauce, cheese, and your favorite toppings, making them fun and easy to eat. You can keep leftovers in the fridge for up to 3 days. Store them in an airtight container to keep them fresh. If you want to save them longer, consider freezing the cupcakes. They can stay good in the freezer for up to 2 months. Yes, you can prepare the cupcakes ahead of time. You can assemble them and store them in the fridge for up to 24 hours before baking. If you want to freeze them, do so before you bake. Just thaw them in the fridge and bake when you’re ready to enjoy. Absolutely! Mini deep dish pizza cupcakes are perfect for parties and gatherings. They are easy to serve and fun for guests to eat. You can place them on a platter for a buffet-style meal. Offer a variety of toppings to please everyone. If you love mini deep dish pizza cupcakes, you can find more recipes online or in cookbooks. Look for websites that focus on quick and easy meals. You can also explore blogs that specialize in fun and unique pizza recipes. For a full recipe, check out the Mini Deep Dish Pizza Cupcakes recipe. In this post, we explored how to make delicious mini deep dish pizza cupcakes using simple ingredients. We discussed substitutions, preparation steps, and baking tips to help you create a perfect dish. I shared ways to avoid common mistakes and suggested various flavors and fillings. Remember these cupcakes are great for parties or a fun family meal. Try different combinations to make your own unique recipe. Enjoy your cooking adventure, and let these cupcakes bring joy to your table!](https://flavorsprint.com/wp-content/uploads/2025/06/f01b204b-3b2e-4e34-9c33-b7f7f587bcd1.webp)
Craving a twist on your favorite comfort food? Meet Mini Deep Dish Pizza Cupcakes! These cute, bite-sized treats are packed
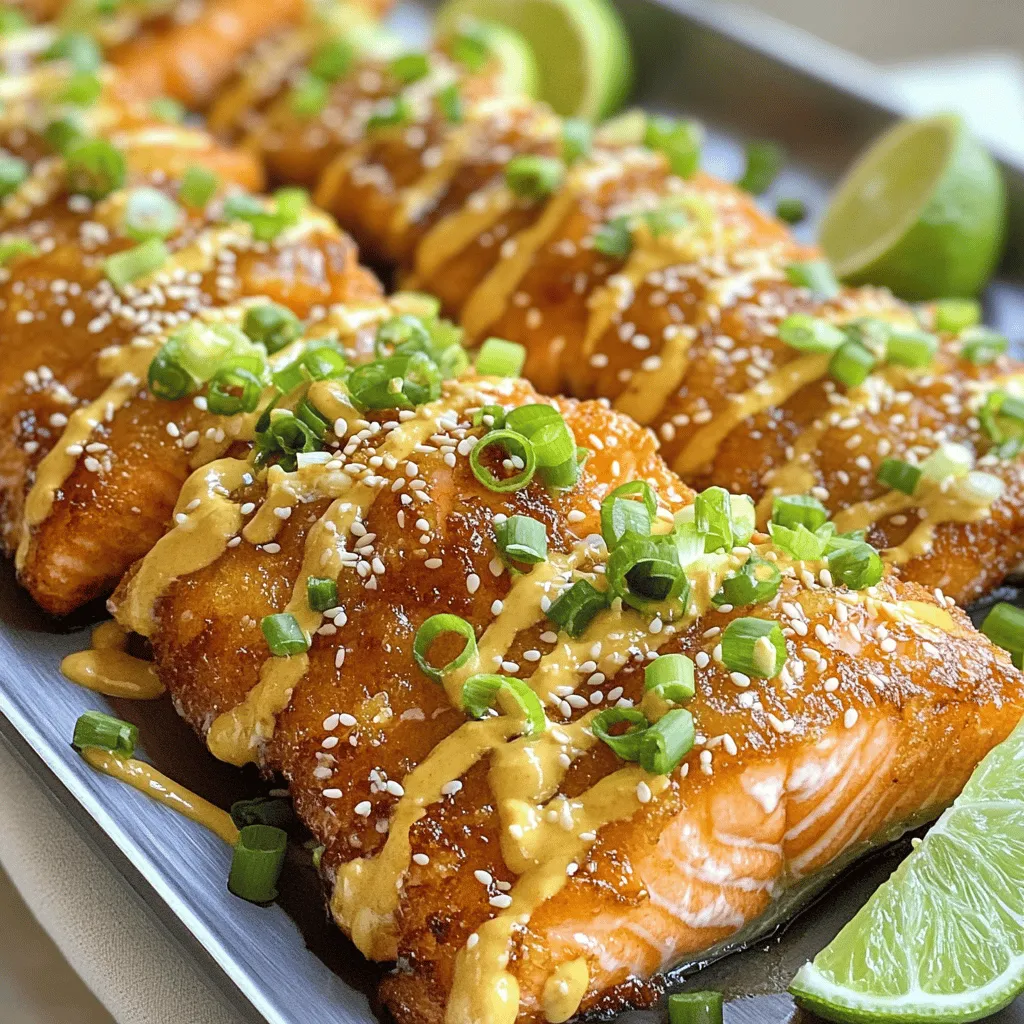
Get ready to excite your taste buds with Bang Bang Salmon! This dish combines tender salmon fillets with a delightfully
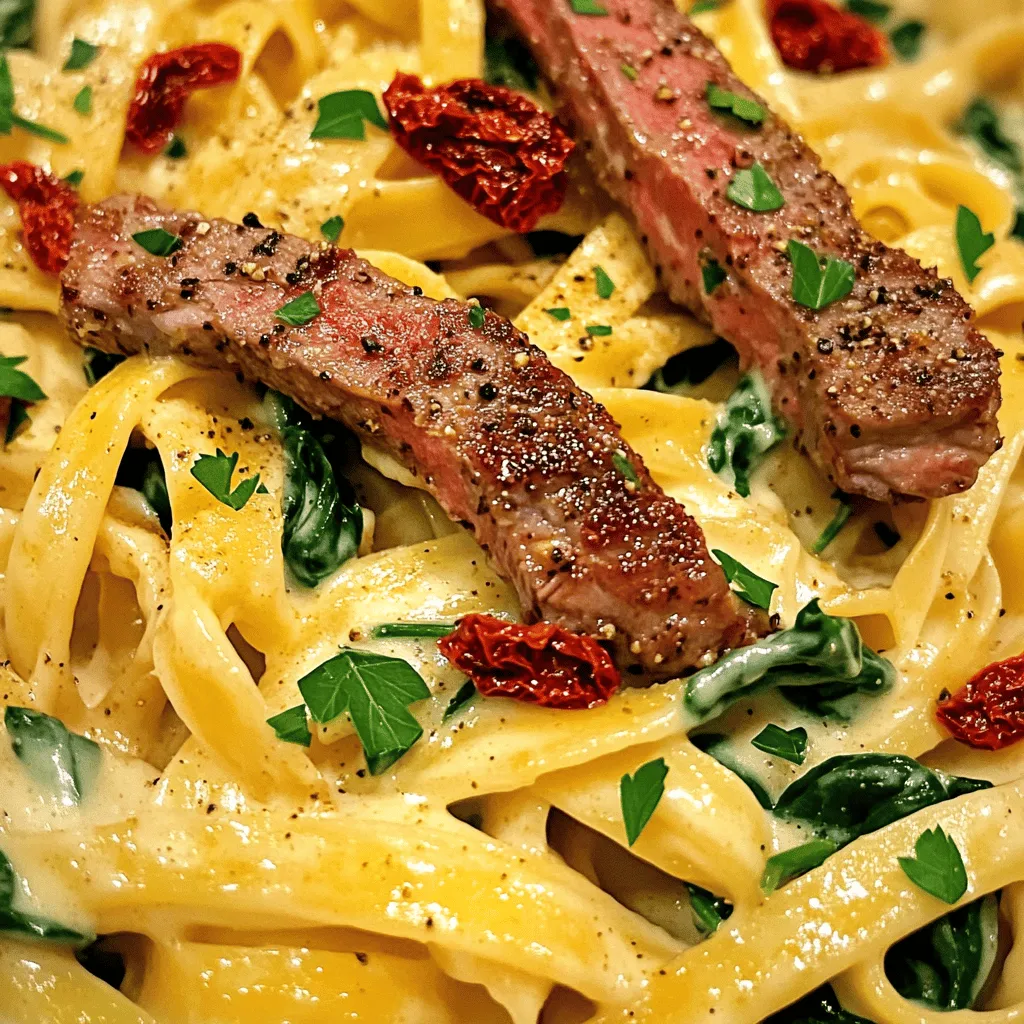
Get ready to delight your taste buds with Creamy Cajun Steak Alfredo! This dish blends bold flavors and rich creaminess
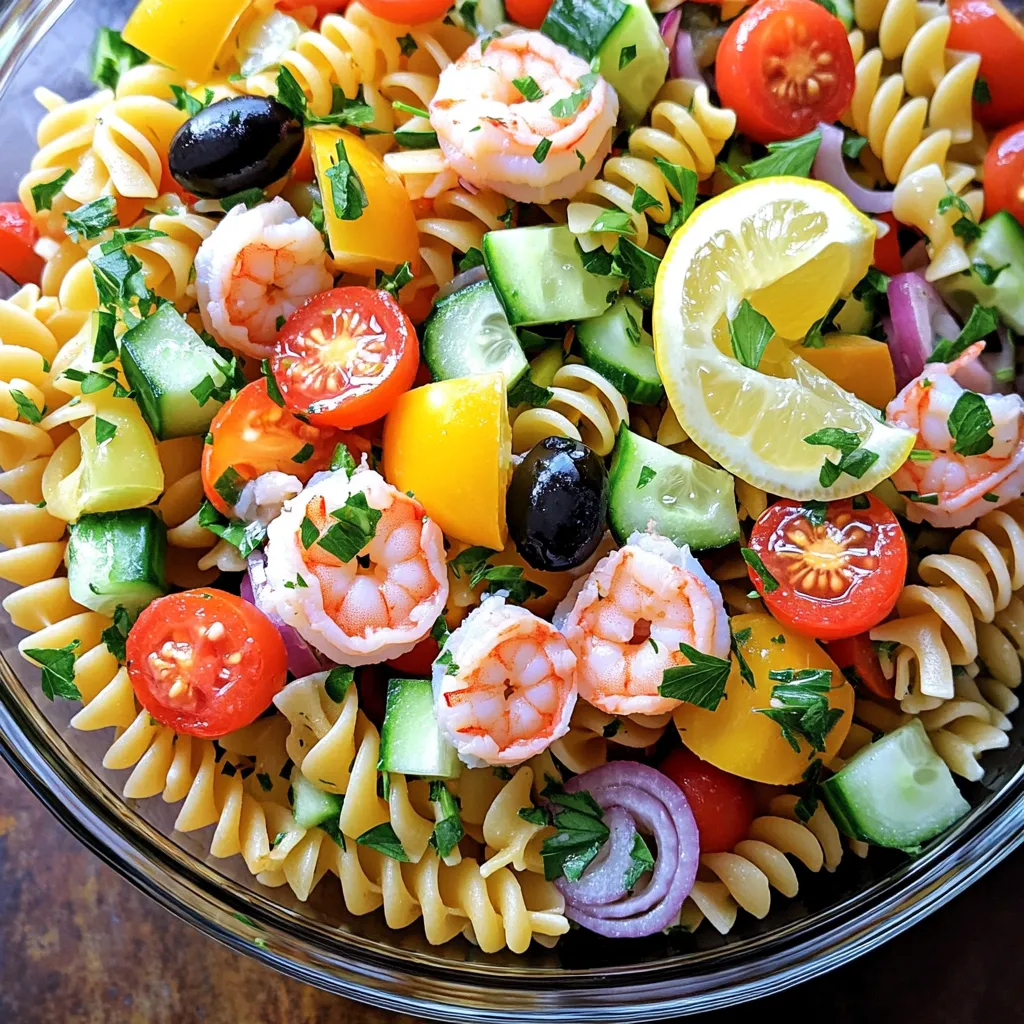
Dive into a bowl of Seafood Pasta Salad, where freshness meets flavor in every bite! This dish is perfect for
![- 1 lb ground beef - 4 large potatoes, thinly sliced - 1 onion, finely chopped - 2 cloves garlic, minced - 1 cup beef broth - 1 cup sour cream - 1 cup shredded cheese (cheddar or a blend) - 2 tablespoons olive oil - 1 teaspoon dried thyme - 1 teaspoon smoked paprika - Salt and pepper to taste - Fresh parsley, chopped (for garnish) When I cook this casserole, I feel like I’m wrapping everyone in a warm hug. The main ingredients are simple but pack a lot of flavors. Ground beef is hearty. It mixes well with the creamy sour cream and cheesy goodness. Potatoes are the star of this dish. When they bake, they become soft. Their flavor balances with the beef. I love adding spices like thyme and smoked paprika to boost taste. You can also make it your own. - Vegetables (carrots, peas) - Different cheese options (mozzarella, gouda) - Spices for extra flavor Want to add more? Toss in some veggies like peas or carrots. They give color and nutrition. You can also change the cheese. Mozzarella or gouda can give it a fun twist. If you love heat, try adding spices like chili powder. Each choice makes the dish unique. For the full recipe, check out the detailed cooking instructions! - Preheat oven to 375°F (190°C). - Prepare ingredients: chop the onion, mince the garlic, and slice the potatoes. - In a large skillet, heat olive oil over medium heat. - Add the chopped onion and minced garlic. Sauté until the onion looks clear. - Add the ground beef to the skillet. Brown it while breaking it apart. - Drain any extra fat if needed. - Stir in beef broth, thyme, smoked paprika, salt, and pepper. - Let the mixture simmer for about 5 minutes. This helps the flavors mix well. - Grease a casserole dish before adding layers. - Layer half of the sliced potatoes evenly at the bottom. - Spread half of the beef mixture over the potatoes. - Add half of the sour cream next. Top with half of the shredded cheese. - Repeat the layers with the remaining potatoes, beef, sour cream, and cheese. - Make sure to spread each layer evenly for best cooking. - Cover the casserole with aluminum foil. Bake for 30 minutes. - After 30 minutes, take off the foil. Bake for another 15 minutes. - Check for doneness by poking a potato with a fork. It should be soft. - The cheese should also look bubbly and golden. This simple process leads you to a tasty dish that warms the heart. For detailed steps, refer to the Full Recipe. - Using fresh herbs for enhanced flavor: Fresh herbs like parsley or thyme can boost the taste. Chopping fresh parsley adds a bright note. Thyme enhances the savory flavor of the beef. - Tips for perfectly cooked potatoes: Slice potatoes evenly for even cooking. Thin slices cook faster and absorb flavors well. Soaking them in water for a few minutes can help reduce starch and improve texture. - Overcooking the beef: Keep a close eye on the beef while cooking. Overcooked beef can become dry and tough. Aim for a nice brown color, then remove from heat. - Soggy potatoes and how to prevent them: To avoid soggy potatoes, layer them properly. Make sure to drain any excess liquid from the beef mixture. You can also bake uncovered for part of the time to let moisture escape. - Recommended sides to complement the dish: A fresh salad pairs well with the casserole. Roasted vegetables can add a nice crunch. Bread or rolls also make a great side. - Ideal wine pairings: A medium-bodied red wine works best. Try a Merlot or a Cabernet Sauvignon. These wines match well with the richness of the beef. For the full recipe, check out [Full Recipe]. {{image_2}} You can easily make a vegetarian version of Beef & Potato Casserole. Instead of ground beef, use plant-based options. Some great choices are lentils, mushrooms, or textured vegetable protein. These substitutes add protein and fiber. They also soak up flavors well, making your dish tasty. You may need to adjust the cooking time slightly, but it will still be delicious. For a gluten-free casserole, choose the right ingredients. Use gluten-free beef broth and sour cream. Check labels to ensure no hidden gluten exists. You can also use cornstarch as a thickener if needed. This way, everyone can enjoy the dish without worry. To spice things up, add ingredients like jalapeños or hot sauce. This gives the casserole a warm kick. You can also explore different cuisines by using herbs and spices. Try Italian herbs like oregano and basil for a Mediterranean twist. Or, go for Mexican spices like cumin and chili powder for a bold flavor. These small changes can make your dish exciting and unique. To store your Beef & Potato Casserole, let it cool first. Place it in an airtight container. This keeps it fresh and safe. You can store it in the fridge for up to 3 days. When you want to eat it, just reheat the portion you want. If you want to freeze the casserole, follow these steps: 1. Allow it to cool completely. 2. Cut it into serving sizes for easy thawing. 3. Wrap each piece tightly in plastic wrap. 4. Place the wrapped portions in a freezer-safe bag or container. This way, the casserole can last up to 3 months in the freezer. When you're ready to enjoy it, thaw it overnight in the fridge. You can reheat it in the oven at 350°F (175°C) for about 25 minutes. If using a microwave, heat it in short intervals, checking often. This will help keep it tasty and warm. For more details, check the Full Recipe. Making Beef & Potato Casserole takes about 55 minutes. The prep time is 15 minutes. You will cook it for 40 minutes. This means you can enjoy a warm, hearty meal quickly. Yes, you can use sweet potatoes. They will change the taste and texture. Sweet potatoes are sweeter and creamier. This will give the dish a new flavor twist. Regular potatoes are starchy and hold their shape better. Both options are delicious, so choose what you prefer! You have many options if you need a sour cream substitute. Greek yogurt works well and adds protein. If you're dairy-free, try coconut cream or cashew cream. Both give a creamy texture. Tofu can also be blended for a similar effect. Absolutely! Doubling the recipe is easy. Just use a larger baking dish. Keep the same cooking time, but check for doneness. You want the potatoes to be soft and the cheese bubbly. This way, you can feed more people without losing quality. For the full recipe, refer to the previous section. This Beef & Potato Casserole is a simple and filling dish. We covered ingredients, step-by-step instructions, and tips for success. Keep the casserole fresh with smart storage and explore variations for your taste. Remember, making this meal can be easy, fun, and tasty. Whether you stick to the recipe or add your spin, you will enjoy a warm, hearty meal that friends and family will love. Happy cooking!](https://flavorsprint.com/wp-content/uploads/2025/06/56ed1a16-3730-401a-af2d-0cb760ca28d1.webp)
If you crave a warm, hearty meal, Beef & Potato Casserole is for you. This dish combines savory ground beef,
![To make the chicken tasty, you need a few key items: - 3 tablespoons fish sauce - 2 tablespoons honey - 1 tablespoon soy sauce - 2 cloves garlic, minced - 1 tablespoon fresh ginger, grated - 1/2 teaspoon black pepper These ingredients blend well. The fish sauce adds saltiness. Honey gives sweetness, and soy sauce brings umami. Garlic and ginger add a fresh kick. The black pepper gives just enough spice. For the rice and veggies, gather these items: - 1 cup jasmine rice - 1 3/4 cups water or low-sodium chicken broth - 1 cucumber, thinly sliced - 1 carrot, julienned Jasmine rice cooks fluffy and fragrant. Using broth enhances the flavor. Cucumber and carrot add a nice crunch and freshness. They balance the dish and make it colorful. The final touch makes a big difference. You will need: - Fresh cilantro leaves - Lime wedges, for serving - Sliced red chili (optional) Cilantro adds a burst of freshness. Lime juice brightens the flavors. For those who like heat, red chili gives a spicy kick. These garnishes turn your meal prep bowls into a feast. Check out the Full Recipe for more details! Start by making the marinade. In a bowl, mix fish sauce, honey, soy sauce, minced garlic, grated ginger, and black pepper. This mix adds a lot of flavor. Place the chicken breasts in the bowl. Make sure every part gets coated well. Cover the bowl and let it chill in the fridge. Thirty minutes is great, but two hours works even better. While the chicken is soaking in flavor, it's time for the rice. Grab a pot and add the jasmine rice and water or chicken broth. Add a pinch of salt for taste. Bring this mixture to a boil. Once it bubbles, cover the pot and lower the heat. Let it simmer for about fifteen minutes. When it's done, take it off the heat and keep it covered for a few minutes. This helps it get fluffy. Now, heat a skillet over medium-high heat. Add a drizzle of oil to the pan. When the oil is hot, place the marinated chicken in the skillet. Cook for six to seven minutes on each side. You want the chicken to be fully cooked and nicely browned. Use a meat thermometer to check the internal temperature. It should reach 165°F (75°C). After cooking, let the chicken rest for a few minutes. Then, slice it into thin strips. To put together your meal prep bowls, take four containers. Divide the fluffy jasmine rice among them. Top each with the sliced chicken, cucumber, and carrot. Garnish with fresh cilantro leaves. Don’t forget to add lime wedges on the side. If you like heat, add some sliced red chili too. Let the bowls cool down before sealing them. You can store these in the fridge for up to four days. For the full recipe, check out the details shared above. To make your chicken burst with flavor, use a good marinade. I mix fish sauce, honey, soy sauce, garlic, ginger, and black pepper. This blend adds sweetness and a savory kick. Marinate your chicken for at least 30 minutes. For deeper taste, let it sit for two hours. This way, every bite of chicken shines with flavor. Cooking chicken can be tricky. I always heat my skillet to medium-high. A hot pan helps the chicken brown well. Cook each side for 6-7 minutes. Use a meat thermometer to check if it’s done. The chicken should reach 165°F (75°C). This ensures juicy, tender meat. After cooking, let the chicken rest a few minutes before slicing. This keeps it moist. When assembling your meal prep bowls, start with rice as the base. I use jasmine rice for its fluffy texture. Evenly divide the rice among your containers. Next, add sliced chicken on top. Follow with cucumbers and carrots for crunch. Garnish with fresh cilantro and lime wedges for brightness. If you like spice, add sliced red chili. This makes each bowl colorful and tasty. For the full recipe, check the earlier section. {{image_2}} You can change up the protein in this dish. If you want a meatless option, use tofu. Firm tofu absorbs flavors well. Just press it to remove moisture and cut it into cubes. Marinate it like you would chicken. For a different taste, try pork. Use pork tenderloin for a lean choice. Cook it until it reaches 145°F (63°C) for a juicy bite. Fresh veggies add color and crunch. Instead of cucumber and carrot, use bell peppers or snap peas. You can also try shredded cabbage for a crunchy twist. If you want more greens, add spinach or kale. These options keep your meal prep bowls exciting and fresh. Jasmine rice is classic, but you can swap it out. Brown rice adds a nutty flavor and more fiber. Quinoa is a great gluten-free option, packed with protein. For a unique twist, try coconut rice. Just replace some water with coconut milk for a creamy texture. Each rice choice brings its own flair to the bowls. For the complete recipe, check the [Full Recipe]. To keep your Vietnamese Chicken Meal Prep Bowls fresh, follow these steps: - Use airtight containers: Choose containers that seal tightly. This keeps air out. - Cool before sealing: Let the bowls cool to room temperature. This prevents condensation. - Label and date: Write the date on each container. This helps you track freshness. - Portion wisely: Divide the meal into single servings. This makes it easy to grab and go. When stored properly, your meal prep bowls can last for up to 4 days in the fridge. The chicken remains juicy, and the veggies stay crisp. If you notice any changes in smell or color, it’s best to toss them out. Always trust your senses! To enjoy your bowls at their best, follow these reheating tips: - Microwave: Heat in short bursts. Stir every 30 seconds to heat evenly. - Stovetop: Add a splash of water or broth to a skillet. Cover and heat on low. - Oven: Preheat to 350°F (175°C). Place in an oven-safe dish and cover with foil. Bake for about 10-15 minutes. These methods help retain flavors and keep the chicken moist. Yes, you can freeze these bowls. The chicken, rice, and veggies freeze well. Just let the bowls cool completely. Use airtight containers or freezer bags. Label them with the date. They stay good for up to three months. When you’re ready to eat, thaw in the fridge overnight. Reheat gently in the microwave or on the stove. Leftover chicken marinade is a treasure! You can turn it into a sauce. Just simmer it in a pan until it thickens. It adds great flavor to vegetables or rice. You can also toss it with stir-fried greens. Always cook the marinade before eating. This will kill any bacteria from the raw chicken. Customizing is fun and easy! First, change the protein. Use tofu, shrimp, or pork for variety. Next, swap the veggies. Try bell peppers, snap peas, or radishes. You can also change the rice. Quinoa or brown rice adds new textures. Lastly, play with sauces. Add sriracha for heat or peanut sauce for creaminess. The options are endless! You learned how to make tasty Vietnamese chicken meal prep bowls. We covered what to include, from the marinade to garnishes. I shared step-by-step cooking tips. You also got ideas for variations and storage. With these skills, you can enjoy great meals all week long. Remember, you can mix and match flavors to fit your taste. Start cooking today and make meal prep fun!](https://flavorsprint.com/wp-content/uploads/2025/06/450469d4-7878-479c-828a-ae6f4f51905d.webp)
Looking for a simple way to enjoy delicious Vietnamese flavors all week? Try my Vietnamese Chicken Meal Prep Bowls! These
