Skip to content
DisclaimerTerms Of UseGDPR PolicyCookie Policy

flavorsprint

  • Home
  • Drinks
  • Appetizers
  • Dinner
  • Dessert
  • About
  • Contact
  • Privacy Policy
DisclaimerTerms Of UseGDPR PolicyCookie Policy

Lillian

To make this cake, you will need some key ingredients. Here’s a list for you: - 200g kunafa (shredded phyllo dough) - 100g unsalted butter, melted - 150g dark chocolate, chopped - 300ml heavy cream - 100g powdered sugar - 1 teaspoon vanilla extract - 150g unsalted pistachios, finely chopped - 200g ricotta cheese - A pinch of salt - 50g additional pistachio crumbs for topping These ingredients come together to create a rich and creamy dessert. The kunafa gives a nice crunch, while the chocolate and cream add a smooth texture. You can add a few optional ingredients to take your cake to the next level: - Orange or lemon zest for a citrus kick - A splash of almond extract for a nutty flavor - Honey or maple syrup for added sweetness These extras can provide unique notes to the cake. They turn a classic dessert into something special. If you have dietary needs, don't worry! Here are some substitutions: - Use gluten-free phyllo dough instead of kunafa for a gluten-free option. - Try coconut cream in place of heavy cream for a dairy-free choice. - Swap ricotta cheese with tofu or a vegan cream cheese mix for a plant-based version. These swaps can help you enjoy this cake while sticking to your dietary needs. It's all about making it work for you! If you want to see the complete recipe, check out the Full Recipe. To start, gather your ingredients. You will need kunafa, melted butter, and a springform pan. First, preheat your oven to 180°C (350°F). Next, take your kunafa and pour the melted butter over it. Mix well to coat every strand. This step is key for a crispy base. Spread half of the buttered kunafa in a greased 9-inch springform pan. Press it down firmly to form a solid base. This will hold the delicious filling later. Now, let’s make the rich chocolate filling. In a saucepan, heat heavy cream over medium heat until it simmers. Remove it from heat and add the chopped dark chocolate. Stir until the chocolate melts and the mixture is smooth. Add powdered sugar, vanilla extract, ricotta cheese, and a pinch of salt to this chocolate mix. Blend everything until it's fully combined. This filling is creamy and oh-so-chocolatey! Pour the chocolate filling over the kunafa base in the springform pan. Sprinkle finely chopped pistachios on top of the filling. This adds a nice crunch and flavor. Cover the filling with the remaining kunafa. Press it down gently to create a top layer. Bake the cake in the oven for about 30-35 minutes. You want the top to be golden brown and crispy. Once baked, let the cake cool in the pan for 15 minutes. Carefully release the springform and transfer the cake to a serving plate. For a lovely finish, dust the top with pistachio crumbs before slicing. You can find the full recipe for details on measurements and times. Enjoy your creation! To get the best texture in your kunafa, you need to start with dry strands. If the kunafa is too moist, it won't crisp up right. I recommend breaking it up with your hands. Make sure to coat every strand with melted butter. This step helps each piece get golden and crunchy. Press down firmly when you layer it in the pan. This ensures it holds together when baked and served. Chocolate can seize up if it gets too hot or touches water. To avoid this, heat the heavy cream slowly. Stir constantly as it warms up. When you add the chocolate, make sure the cream is hot but not boiling. This helps the chocolate melt smoothly. If you see any lumps, just keep stirring until it looks shiny and silky. If the mixture does seize, adding a little hot cream can sometimes rescue it. To make your cake look amazing, you can dust the top with pistachio crumbs. This adds a nice color and texture. For a touch of freshness, add some mint leaves on top. Serve with a dollop of whipped cream for extra creaminess. You can also place extra chopped pistachios around the plate for decoration. These small touches can make your cake shine at any gathering. Check out the Full Recipe for more details on how to make this delicious treat! {{image_2}} You can make a nut-free version of this cake easily. Simply skip the pistachios. Use sunflower seeds or pumpkin seeds instead. These seeds add a nice crunch without the nuts. They also bring a unique flavor. You can finely chop them and sprinkle them on top. This change makes the cake safe for those with nut allergies. For the chocolate layer, you have options! You can use milk chocolate for a sweeter taste. Dark chocolate gives a rich and deep flavor. If you want a twist, try white chocolate. This adds a creamy touch to the cake. You can mix chocolates, too! Just keep the same amount as the recipe states. Each choice changes the cake’s flavor, so feel free to experiment. Want to change up the flavors? Add some citrus zest! Lemon or orange zest brightens the cake. Just a teaspoon can make a big difference. It balances the rich chocolate and brings freshness. You can also try spices like cinnamon or cardamom. These spices pair well with chocolate. They add warmth and depth to the flavor. Adjust the amount to your taste as you explore new flavors. For the full recipe, check the earlier section. Store leftover Chocolate Pistachio Kunafa Cake in an airtight container. Keep it in the fridge to keep it fresh. Make sure to place parchment paper between layers to avoid sticking. This way, you can enjoy it later without losing flavor or texture. You can freeze this cake for later use. First, let it cool completely. Wrap it tightly in plastic wrap and then place it in a freezer bag. It will stay fresh for up to three months. To reheat, thaw it overnight in the fridge. Then, warm it in the oven at 160°C (320°F) for about 10-15 minutes. When stored properly, this cake lasts about five days in the fridge. If you notice any changes in texture or smell, it’s best to discard it. For the best taste, enjoy it within the first few days. This ensures you experience its full rich flavor. Yes, you can make this cake a day ahead. Just follow the full recipe and let it cool. Once cooled, cover it tightly with plastic wrap or foil. This keeps it fresh. Store it in the fridge. When ready to serve, let it sit at room temperature for about 30 minutes. This makes it easier to slice. You can also reheat it in the oven for a few minutes if you prefer it warm. If you don’t have ricotta cheese, try mascarpone or cream cheese. Both create a rich texture and add flavor. You can also blend cottage cheese until smooth for a lighter option. These substitutes work well in the recipe. Just remember to adjust the sweetness slightly if needed. The kunafa is done when it turns a beautiful golden brown color. Check the edges for a crispy look. The center should feel firm to the touch. If you see bubbling around the edges, that’s a good sign too! Use a toothpick to test the filling; it should come out clean. Enjoy the amazing aroma while it bakes! This blog post shared all you need to make a tasty Chocolate Pistachio Kunafa Cake. We covered key ingredients, step-by-step instructions, and helpful tips. You learned about variations for dietary needs and storage best practices. Now, you have the tools to impress your friends and family. Enjoy experimenting with flavors and textures. Your baking adventure starts here!

Chocolate Pistachio Kunafa Cake Deliciously Rich Treat

Are you ready to bite into something truly special? This Chocolate Pistachio Kunafa Cake is a treat that combines rich

To make Coastal Seafood Pasta Salad, you need the following ingredients: - 8 oz penne pasta - 1 cup cooked shrimp, peeled and deveined - 1 cup imitation crab meat, shredded - 1 cup cherry tomatoes, halved - 1/2 cup cucumber, diced - 1/4 cup red onion, finely chopped - 1/4 cup fresh parsley, chopped - 1/2 cup mayonnaise - 2 tablespoons Dijon mustard - 1 tablespoon lemon juice - Salt and pepper to taste - Optional: 1 teaspoon Old Bay seasoning When picking seafood, you have choices. Fresh seafood tastes great, but it can spoil fast. Frozen seafood is also a good option. It is picked at its best time and frozen for later use. This keeps the flavor and texture. If you go fresh, look for shrimp that smell like the ocean. For frozen, check that it is firm and not freezer burnt. Choosing quality ingredients makes a big difference. Always look for bright colors and fresh scents. For shrimp, ensure they are plump and shiny. The crab meat should be flaky and white. For veggies, pick ones that are firm and crisp. When buying herbs, choose ones that smell strong. This ensures your salad will burst with flavor. Remember, quality matters in every bite! Start with 8 oz of penne pasta. Bring a pot of salted water to a boil. Add the pasta and cook it until al dente, which usually takes about 8 to 10 minutes. Be careful not to overcook it. Drain the pasta in a colander and let it cool. Cooling is key to keep the salad fresh. In a large mixing bowl, gather your seafood and veggies. Add 1 cup of cooked shrimp and 1 cup of imitation crab meat. Next, toss in 1 cup of halved cherry tomatoes, 1/2 cup of diced cucumber, and 1/4 cup of finely chopped red onion. Finally, stir in 1/4 cup of chopped fresh parsley. Make sure everything is mixed well. Then, add the cooled pasta to the bowl. For the dressing, take a small bowl. Add 1/2 cup of mayonnaise, 2 tablespoons of Dijon mustard, and 1 tablespoon of lemon juice. Season it with salt and pepper. If you want, add 1 teaspoon of Old Bay seasoning for extra flavor. Whisk these together until the mixture is smooth and creamy. Pour the dressing over the salad and gently toss everything together. Make sure all the pasta and seafood are well coated. Taste it and adjust the seasoning as needed. If it's too thick, add a splash of water or another squeeze of lemon juice. Cover the salad with plastic wrap and chill it in the fridge for at least 30 minutes. This helps the flavors blend. For the full recipe, check the earlier section. To make your Coastal Seafood Pasta Salad shine, focus on cooking the pasta right. Cook it only until it is al dente. This keeps it firm and not mushy. Rinse the pasta in cold water after cooking. This step cools it down and stops the cooking process. Next, mix in the seafood and veggies gently. You want to keep the shrimp and crab intact. If you are using old seafood, it can spoil the dish. Always choose fresh or high-quality frozen seafood. Check for signs of freshness like a mild scent and bright colors. For a great presentation, serve the salad in a large bowl. You can also use individual cups for a fun touch. Garnish each serving with fresh parsley and lemon wedges. This adds color and a burst of flavor. Pair the pasta salad with crusty bread or a fresh green salad. This dish is perfect for picnics or barbecues. It keeps well, making it a great option for gatherings. To add more flavor, consider using fresh herbs. Dill, basil, or chives can give your salad a fresh twist. You can also experiment with spices. A sprinkle of Old Bay seasoning adds a nice kick. If you like heat, try adding a pinch of red pepper flakes. Another idea is to mix in a splash of white wine vinegar. This adds a tangy note that brightens the dish. You can also play with the dressing. Add a bit of honey for sweetness or extra lemon juice for zing. For the full recipe, check the details above. {{image_2}} You can make this pasta salad your own by changing the seafood. Fresh scallops, clams, or even lobster work great. Each seafood type brings its unique taste and texture. For a fun twist, try smoked salmon for a rich flavor. You can also use canned tuna if you're in a hurry. Mix and match seafood based on what you like or what you have on hand. If you need a gluten-free option, you’re in luck! Many brands offer gluten-free pasta made from rice or chickpeas. These alternatives taste great and have a nice texture. Just cook them according to the package directions. Keep in mind, they may need less time than regular pasta. Always check the label to ensure it fits your diet. The dressing can change the whole salad. Besides the creamy mayo dressing, you can try a vinaigrette. A lemon and olive oil mix adds a bright, fresh taste. For a spicy kick, add some sriracha or red pepper flakes. You can also use yogurt instead of mayo for a lighter option. Experiment with different herbs, like dill or basil, to find your perfect blend. For more details, you can check the Full Recipe. To keep your Coastal Seafood Pasta Salad fresh, store it in an airtight container. This prevents air and moisture from getting in. I like to use glass containers because they help keep the salad cool. Always place the lid tightly on the container. If you're using plastic wrap, make sure it is snug against the salad. This will help keep the flavors fresh and bright. When stored correctly, this salad can last up to three days in the fridge. You may notice the flavors blend and deepen over time. However, the seafood can start to lose its texture after the second day. To make the most of your salad, try to eat it within two days. If you see any signs of spoilage, like a sour smell, it’s best to throw it out. Reheating seafood pasta salad isn’t usually needed. But if you like it warm, do it gently. Use a microwave-safe bowl and heat it for about 30 seconds. Stir, then check if it’s warm enough. You can also use a skillet on low heat. This helps maintain the salad's flavor. Remember, don’t overheat, or the seafood may become rubbery. If you want it cold, serve it straight from the fridge. This dish tastes great chilled! For detailed steps on making this dish, check the Full Recipe. Yes, you can make this salad ahead of time. I recommend preparing it a few hours before you plan to serve it. This allows the flavors to blend well together. Just keep it in the fridge and cover it tightly with plastic wrap. It will taste even better after chilling! You have many options for seafood in this recipe. If you can't find shrimp or imitation crab, try using cooked scallops or even canned tuna. You can also use fresh or frozen fish, like salmon. Just make sure to cook it properly before adding to the salad. Yes, this salad is great for meal prep! You can make a big batch and store it in containers. It stays fresh in the fridge for a few days. Just remember to keep the dressing separate if you want to keep it crisp. This way, you have a quick and healthy meal ready to go! This blog post covered everything you need for making a great Coastal Seafood Pasta Salad. We explored the best fresh and frozen ingredients, step-by-step cooking, and smart tips to enhance flavors. You learned about different variations and how to store leftovers properly. In closing, preparing this dish is fun and rewarding. Enjoy your time creating this salad, and don't hesitate to try new twists. Your taste buds will thank you!

Coastal Seafood Pasta Salad Fresh and Flavorful Dish

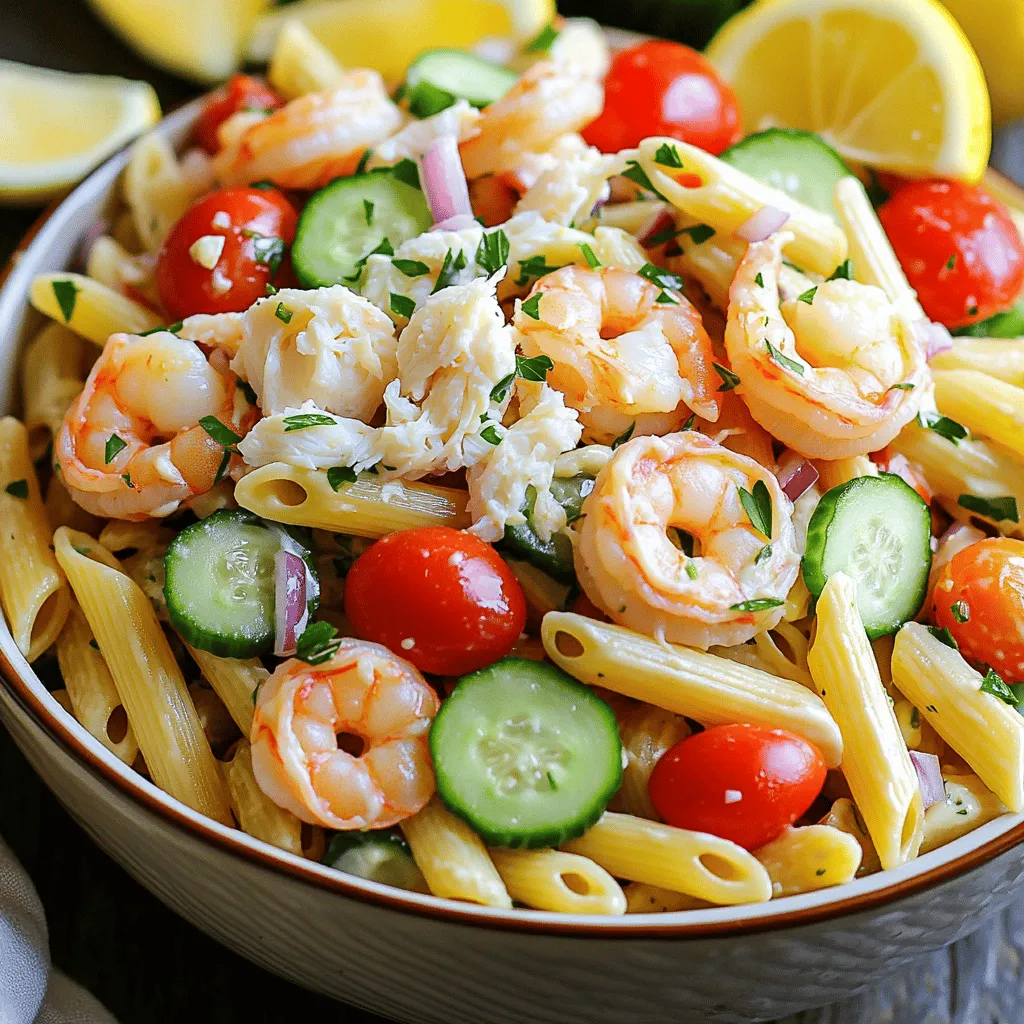
Are you ready to dive into a bright and tasty dish? Coastal Seafood Pasta Salad is a fresh delight, perfect

To make delicious Lightlife Slaw Dogs, gather these key ingredients: - 4 Lightlife Smart Dogs - 2 cups green cabbage, finely shredded - 1 cup carrots, grated - ½ cup red cabbage, finely shredded - ½ cup mayo (or vegan mayo) - 2 tablespoons apple cider vinegar - 1 tablespoon honey or agave syrup (for a vegan option) - 1 teaspoon Dijon mustard - Salt and pepper to taste - ¼ cup pickled jalapeños, chopped (optional for heat) - Hot dog buns, preferably whole wheat or gluten-free These ingredients will help you create a fresh and crunchy meal. The Lightlife Smart Dogs bring a savory taste while the slaw adds a vibrant crunch. The dressing gives it a creamy texture with a hint of tang. If you like some spice, the pickled jalapeños are a great choice. For the full recipe, you can follow the steps to bring this dish to life. Enjoy each bite of these flavorful Slaw Dogs! Start by boiling or grilling the Lightlife Smart Dogs. Follow the package instructions for the best results. Usually, it takes about 5-7 minutes until they heat through. If you prefer grilling, just watch them closely to avoid burning. The key is to make them hot and tasty! While the Smart Dogs cook, let’s make the slaw. Grab a large bowl and add the finely shredded green cabbage, grated carrots, and red cabbage. Mixing these veggies gives the slaw a nice crunch. Make sure to use fresh vegetables for the best flavor and texture. You can even add other veggies if you like! Now, mix up the dressing in a small bowl. Whisk together the mayo, apple cider vinegar, honey or agave, Dijon mustard, salt, and pepper. Make sure it is smooth and creamy. Pour this dressing over your cabbage mixture and toss everything together. If you like a kick, add the chopped pickled jalapeños. This step makes the slaw really pop! Once your Smart Dogs are ready, it’s time to assemble. Place each dog in a bun and top it with a generous amount of slaw. This adds a fresh and crunchy twist to each bite. You can serve them immediately for the best taste. Enjoy the burst of flavors and textures with every mouthful! For a full recipe, check the earlier section. To boost the taste of your Lightlife Slaw Dogs, try adding spices. A dash of smoked paprika gives a nice kick. You can also mix in some cumin for warmth. Fresh herbs can elevate the slaw too. Chopped cilantro or parsley adds a fresh note. For extra zing, squeeze some lime juice over the slaw before serving. You don’t just have to boil or grill the Lightlife Smart Dogs. You can also pan-fry them for a crispy skin. Just heat a little oil in a skillet. Cook the dogs for about five minutes, turning them until golden. Another option is baking. Preheat your oven to 400°F. Bake the dogs for 15 minutes for a nice, even cook. Serve your Lightlife Slaw Dogs with a side of sweet potato fries. They add a nice crunch and sweetness. For a lighter option, try fresh fruit salad. It balances the savory flavors well. You can also add a drizzle of hot sauce on top for those who like heat. Don’t forget to use the Full Recipe for complete guidance! {{image_2}} You can mix and match your slaw. Try adding sliced bell peppers for crunch. Radishes add a nice bite. You can also use kale instead of cabbage for a twist. If you like sweetness, toss in some diced apples. Each of these choices gives a new flavor and texture to your Lightlife Slaw Dogs. Dressing can change the whole dish. Swap mayo for Greek yogurt for a lighter option. A vegan alternative could be a tahini dressing. For a spicy kick, try adding sriracha to your mayo mix. You can also use a vinaigrette with olive oil and lemon juice. Each dressing gives a fresh take on your slaw. Toppings can really make your Slaw Dogs pop! Try crunchy fried onions for a fun texture. You can add diced pickles for tang. Fresh herbs like cilantro or parsley add color and flavor. If you like heat, sprinkle on some chili flakes. These small changes will keep your Lightlife Slaw Dogs exciting every time. For a full recipe, check out the earlier sections. To keep leftover slaw fresh, store it in an airtight container. Place the slaw in the fridge right away. It stays good for about 3 days. Make sure to seal the container well. This helps keep the crispness of the veggies. If the slaw gets too watery, drain some liquid before serving. If you have leftover Lightlife Smart Dogs, reheating is simple. You can microwave them for 30-60 seconds. Alternatively, heat them in a skillet over medium heat for a few minutes. This method helps maintain their texture. Avoid overheating, as they can become tough. Enjoy them again with fresh slaw! Store Lightlife Smart Dogs in their original packaging, tightly wrapped. Keep them in the fridge, where they last for 7-10 days. If you want to keep them longer, freeze them. Make sure to wrap each dog in plastic wrap, then place them in a freezer bag. This keeps them fresh for up to 3 months. Label the bag with the date for easy tracking. Lightlife Slaw Dogs are tasty hot dogs made from plant-based ingredients. They use Lightlife Smart Dogs, which are a great meat alternative. Topping them with crunchy slaw adds flavor and texture. The slaw includes fresh cabbage and carrots, mixed with a creamy dressing. This makes for a fun and healthy meal. You can enjoy them at a picnic or a family dinner. You can find Lightlife Smart Dogs in many grocery stores. Look in the vegan or meat alternative sections. Stores like Whole Foods and Kroger often carry them. You can also buy them online from retailers like Amazon or the Lightlife website. Check your local store's inventory to ensure availability. Yes, Lightlife Slaw Dogs can be gluten-free. Just make sure to use gluten-free buns. The Smart Dogs themselves do not contain gluten. Always check the labels to be sure. If you are gluten-sensitive, this is a great option for you. You can easily customize your Lightlife Slaw Dogs! - Add your favorite spices to the slaw for extra flavor. - Use different veggies like radishes or bell peppers. - Swap the mayo for a yogurt-based dressing for a tangy twist. - Try different toppings like avocado or salsa for a unique taste. - For a spicy kick, add extra jalapeños or hot sauce. Feel free to experiment and make it your own! Check out the Full Recipe for more ideas. In this blog post, we explored how to make tasty Lightlife Slaw Dogs. We talked about the key ingredients, from Lightlife Smart Dogs to fresh veggies. I shared step-by-step cooking instructions and tips to boost flavor. We also looked at fun variations and storage tips for leftovers. Remember, creating your own slaw dog can be easy and fun. You have many ways to customize it. Enjoy making this meal your own!

Lightlife Slaw Dogs Flavorful and Easy Recipe Guide

Are you ready to spice up your meals? Lightlife Slaw Dogs are a fun and tasty way to enjoy plant-based

- 4 boneless, skinless chicken breasts - 1/2 cup honey - 4 cloves garlic, minced - 1 tablespoon soy sauce - 1 tablespoon apple cider vinegar - 1 teaspoon ground ginger - Salt and pepper to taste - 2 tablespoons olive oil - Chopped green onions for garnish - Sesame seeds for garnish When I make sweet honey garlic chicken, I love using fresh ingredients. Fresh garlic and honey truly boost the taste. If you need allergen-friendly options, you can swap soy sauce for coconut aminos. This swap keeps the umami flavor intact while being gluten-free. Using fresh chicken is also key. It gives a better texture and flavor. If you prefer chicken thighs, you can use them instead of breasts. They tend to be juicier and hold more flavor. Remember, the right ingredients make a big difference. They can elevate your meal from good to great. For the full recipe, check out the detailed instructions later in this article. 1. Preparation of marinade and chicken Start by making the marinade. In a bowl, whisk together honey, minced garlic, soy sauce, apple cider vinegar, ground ginger, salt, and pepper. Mix until all the ingredients blend well. Next, place the chicken breasts in a large zip-top bag or a shallow dish. Pour the honey garlic marinade over the chicken. Make sure each piece gets coated. Seal the bag or cover the dish and let it marinate in the fridge for at least 30 minutes. For more flavor, marinate for up to 4 hours. 2. Searing and baking the chicken Preheat your oven to 375°F (190°C). In an oven-safe skillet, heat olive oil over medium-high heat. Take the chicken out of the marinade but keep the marinade for later. Sear the chicken for about 3-4 minutes on each side until golden brown. This step locks in flavor and gives a nice crust. Once both sides are seared, pour the reserved marinade over the chicken. Transfer the skillet to the oven and bake for 20-25 minutes. Check that the chicken reaches an internal temperature of 165°F (75°C). 3. Final steps for serving After baking, take the skillet out of the oven. Let the chicken rest for 5 minutes before slicing. This resting time helps keep the chicken juicy. Serve the chicken with the thickened glaze from the pan. Top it with chopped green onions and sesame seeds for a pop of color and flavor. Enjoy your sweet honey garlic chicken breasts! For more details, check the Full Recipe. - Marinating time recommendations: I suggest marinating the chicken for at least 30 minutes. For a deeper flavor, let it sit for up to 4 hours. This gives the honey and garlic time to soak in. - Optimal cooking temperatures: Always preheat your oven to 375°F (190°C). This ensures even cooking and a nice, golden crust. - Ensuring moist and flavorful meat: To keep the chicken juicy, sear it first in a hot skillet. This step locks in the moisture. After searing, bake it until it reaches 165°F (75°C). This temperature guarantees safety and tenderness. Use these tips for a sweet and tasty dish. For the complete method, check out the Full Recipe. {{image_2}} You can easily switch up the sweet honey garlic chicken breasts to keep things fresh. Here are some fun ideas: - Different marinades and flavor profiles: Try adding fresh herbs like thyme or rosemary to the marinade. You can also swap honey for maple syrup for a different sweetness. Want some heat? Mix in chili flakes or Sriracha. - Alternative cooking methods: Grilling gives the chicken a smoky flavor. Just marinate as usual, then grill for 6-7 minutes per side. You can also use a slow cooker. Cook on low for 4-5 hours. The chicken will be super tender. - Suggested side dishes to enhance the meal: Serve the chicken with rice or quinoa. A side of steamed broccoli or green beans adds color and nutrition. For a fun twist, make a salad with mixed greens, avocado, and a light vinaigrette. Feel free to explore and make this recipe your own. I found that these variations keep me excited about cooking! For the complete recipe, check out the Full Recipe. To keep your sweet honey garlic chicken fresh, store it correctly. First, let the chicken cool to room temperature. Then, place it in an airtight container. This helps prevent any bad smells or flavors from mixing. For maximum freshness, refrigerate the chicken within two hours of cooking. It will last for about three to four days in the fridge. Make sure to label your container with the date. If you want to keep it longer, freezing is a great option. Wrap the chicken tightly in plastic wrap or aluminum foil. Then, place it in a freezer-safe bag. It can stay good in the freezer for up to three months. When you are ready to eat the chicken again, thaw it in the fridge overnight. You can also thaw it in the microwave if you are in a hurry. To reheat, place the chicken in a skillet over low heat. Add a splash of water or broth to keep it moist. Heat it slowly to maintain the flavor and texture. You can also use the oven. Preheat it to 350°F (175°C) and heat the chicken for about 15-20 minutes. Following these steps ensures your sweet honey garlic chicken remains tasty and safe to eat. For the full recipe, check out the [Full Recipe]. Can I make this recipe ahead of time? Yes, you can. Marinate the chicken in the honey garlic mix up to four hours in advance. This helps the flavors soak in. If you want to prepare it even earlier, you can freeze the marinated chicken. Thaw it in the fridge the night before you plan to cook. What can I serve with sweet honey garlic chicken? This dish pairs well with many sides. You can serve it with steamed rice, roasted veggies, or a fresh salad. For a fun twist, try it with quinoa or mashed potatoes. These sides will balance the sweet and savory flavors of the chicken. How do I know when the chicken is fully cooked? The best way to check is by using a meat thermometer. Insert it into the thickest part of the chicken. It should read 165°F (75°C). If you don’t have a thermometer, cut into the chicken. The juices should run clear, and there should be no pink inside. Can I use chicken thighs instead of breasts? Absolutely! Chicken thighs work great in this recipe. They stay moist and have rich flavor. Just adjust the cooking time. Thighs may need a little longer to cook through compared to breasts. Follow the same steps from the Full Recipe for best results. In this blog post, we explored the delicious sweet honey garlic chicken breasts. We discussed key ingredients, cooking steps, and tips for perfect results. Remember to use fresh ingredients for the best flavor. I shared variations and safe storage tips to keep your meal tasty. No matter your skill level, this dish can impress. Enjoy experimenting with marinades and side dishes. With practice, you will master this recipe. Happy cooking!

Sweet Honey Garlic Chicken Breasts Flavorful and Easy

Welcome to a culinary adventure with my Sweet Honey Garlic Chicken Breasts! This dish blends sweet and savory flavors in

To make Philly Cheese Steak Sloppy Joes, gather these items: - 1 pound ground beef - 1 tablespoon olive oil - 1 medium onion, diced - 1 green bell pepper, diced - 2 cloves garlic, minced - 1 tablespoon Worcestershire sauce - 1 teaspoon Dijon mustard - 1 cup beef broth - Salt and pepper to taste - 4 hamburger buns - 1 cup provolone cheese, shredded - Fresh parsley, chopped (for garnish) You will need some basic tools to cook this dish: - Large skillet - Wooden spoon - Knife and cutting board - Measuring spoons - Oven-safe dish for broiling If you want to switch things up, consider these options: - Use ground turkey instead of ground beef for a leaner meal. - Swap Worcestershire sauce for soy sauce if you need a gluten-free option. - Try Swiss cheese instead of provolone for a different taste. - Use any type of bell pepper or even jalapeños for a spicy kick. These swaps keep the flavors rich while allowing you to cater to your taste or dietary needs. For the full recipe, check the details above. Start by gathering your ingredients. You need ground beef, onion, green bell pepper, garlic, and some seasonings. Heat a large skillet over medium heat. Pour in the olive oil and wait for it to warm up. Add the diced onion and bell pepper to the skillet. Sauté them for about five minutes until they soften. Then, add the minced garlic. Cook for one additional minute. This step builds a tasty base for your Sloppy Joes. Next, increase the heat to medium-high. Add the ground beef to the skillet. Break it apart with a wooden spoon as it cooks. This should take about seven to eight minutes. Brown the beef well, and drain any excess fat if needed. After that, stir in the Worcestershire sauce, Dijon mustard, and beef broth. Season this mixture with salt and pepper. Let it simmer on low heat for about ten minutes. This allows the flavors to meld and the mixture to thicken slightly. Now, it's time to assemble your Sloppy Joes. Preheat your oven's broiler. While it heats, toast the hamburger buns under the broiler until they are lightly golden. Once the beef mixture has thickened, spoon it onto the bottom halves of the toasted buns. Make sure to pile it high! Then, sprinkle shredded provolone cheese on top of each filling. Broil them for two to three minutes. Watch closely until the cheese melts and bubbles. Finally, remove them from the oven, place the top bun on, and garnish with fresh parsley. Enjoy your Philly Cheese Steak Sloppy Joes! For more details, check the Full Recipe. To get that real Philly cheesesteak taste, focus on your seasoning. Use Worcestershire sauce for depth. It adds a nice umami kick. Fresh garlic makes a big difference, too. Sauté it well with onions and peppers. This combo creates a base of flavor that shines through. If you want more heat, consider adding a pinch of red pepper flakes. This adds flavor without overpowering the dish. Melted cheese is a must for this dish. I prefer provolone for its creamy texture. To achieve the best melt, broil the sandwiches just before serving. Toast your buns lightly first; this helps keep them from getting soggy. Once you add the beef mixture, top it with cheese. Broil until it bubbles and turns golden. This step makes the meal extra delicious and appealing. Serve these Sloppy Joes with simple sides. A fresh salad or crispy fries pairs well. You can also add pickles for a tangy crunch. If you want to make it fun, set up a topping bar. Offer options like extra cheese, jalapeños, or sautéed mushrooms. Let everyone build their own perfect sandwich. This makes dinner interactive and enjoyable. {{image_2}} You can switch up the meat in Philly Cheese Steak Sloppy Joes. Ground turkey works great if you want a leaner dish. It has a mild flavor that blends well with the spices. Ground chicken is another option. It adds a nice twist and is light. For beef lovers, try using finely chopped steak. This gives more texture and a richer taste. You can also make this dish vegetarian. Substitute the beef with lentils or black beans. Lentils cook fast and soak up all the flavors. Black beans give a hearty bite and a rich taste. Don't forget to add veggies like mushrooms or zucchini. They add great texture and flavor. Use plant-based cheese to keep it dairy-free. Cheese is key for a great Philly Cheese Steak Sloppy Joe. Provolone is classic, but you can explore other cheeses too. Swiss cheese melts well and adds a nutty flavor. Cheddar gives a sharp taste that many love. For a kick, try pepper jack cheese. It adds heat and flavor. Mix and match to find your favorite cheese blend. You can always check the Full Recipe for more ideas! After making your Philly Cheese Steak Sloppy Joes, let them cool down. Place any leftovers in an airtight container. Keep the dish in the fridge for up to three days. When you're ready to eat, just take it out and heat it up. To freeze, follow the same cooling steps. Use freezer-safe bags or containers for best results. Remove as much air as possible. You can freeze the Sloppy Joes for up to three months. When ready to enjoy, thaw in the fridge overnight before reheating. To reheat, you have a few options. You can use the microwave, stovetop, or oven. For the microwave, place a portion in a bowl, cover it, and heat for about 1-2 minutes. Stir halfway through. For the stovetop, use a skillet over medium heat, stirring gently until warmed. If using the oven, preheat to 350°F and bake in a covered dish for about 15 minutes. This way, you keep that yummy flavor intact. For the best taste, always check that it's heated through to 165°F. Enjoy your delicious meal! Yes, you can make this dish ahead of time. Cook the beef mixture and let it cool. Store it in an airtight container in the fridge. It stays fresh for up to three days. When ready to eat, simply reheat it on the stove or in the microwave. You can then assemble the sandwiches right before serving. This makes it a great choice for busy nights. Philly Cheese Steak Sloppy Joes pair well with many sides. Here are some ideas: - French fries: Crispy fries are a classic match. - Coleslaw: The crunch adds great texture. - Potato chips: They bring a salty crunch. - Pickles: They add a tangy flavor. You can also serve it with a simple green salad for a fresh touch. To spice things up, try these tips: - Add hot sauce: Mix in your favorite hot sauce while cooking. - Use spicy cheese: Swap provolone for pepper jack cheese. - Add jalapeños: Stir in sliced jalapeños for a fresh kick. These simple changes will enhance the flavor and heat of your Sloppy Joes. Feel free to adjust the spice level to suit your taste! This blog post covered key elements for making Philly Cheese Steak Sloppy Joes. We listed essential ingredients, tools, and substitutions. I shared step-by-step instructions for preparing, cooking, and assembling your dish. You learned tips to add flavor and melt cheese perfectly. Variations offer meatless options and different cheese choices. Finally, we discussed storage methods and answered common questions. Try these ideas to make your dish special. Enjoy your cooking process and flavor-packed meal. Happy cooking!

Philly Cheese Steak Sloppy Joes Flavorful Family Meal

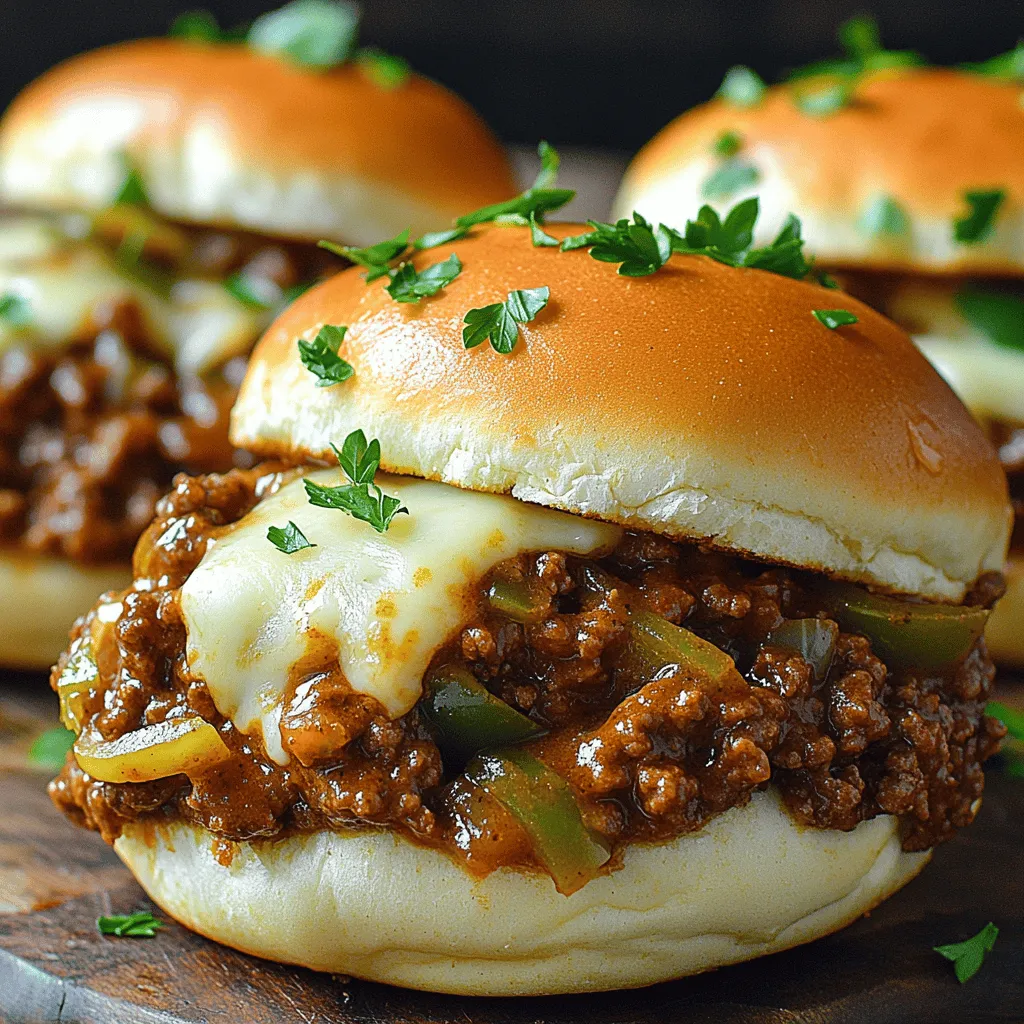
Looking for a family meal that’s hearty and fun? Try Philly Cheese Steak Sloppy Joes! This dish combines the classic

- 8 oz fettuccine pasta - 8 oz shrimp, peeled and deveined - 8 oz scallops - 8 oz crab meat - 1 tablespoon olive oil - 1 small onion, finely chopped - 2 cloves garlic, minced - Salt and pepper to taste - 1 teaspoon lemon zest - 1 cup heavy cream - 1 cup grated Parmesan cheese - Optional: pinch of red pepper flakes for heat - Fresh parsley, chopped for garnish Each ingredient plays a key role in making this dish shine. The fettuccine serves as the perfect base, while the seafood adds rich flavor and texture. Shrimp, scallops, and crab meat all bring their unique tastes to the table. Using fresh aromatics like onion and garlic enhances the sauce's depth. The cream and Parmesan create a smooth, velvety sauce that clings to the pasta. If you like a touch of heat, add red pepper flakes. The lemon zest brightens the dish and balances the richness. I recommend using the freshest seafood you can find. Also, using grated Parmesan will give you a better flavor than pre-packaged cheese. This will truly elevate your Seafood Lovers' Dream Alfredo! You can find the full recipe above to make this delightful dish. - Boil salted water and cook fettuccine according to package instructions. - Drain pasta and reserve 1/2 cup of pasta water. - Heat olive oil and sauté onion until translucent. - Add minced garlic and cook until fragrant. - Increase heat and add shrimp and scallops, sauté until cooked. - Fold in crab meat gently. - Pour in heavy cream and let it simmer. - Stir in grated Parmesan until melted and smooth. - Season with lemon zest, salt, pepper, and optional red pepper flakes. - Combine pasta with the seafood Alfredo sauce and heat together for 1 minute. - Plate and garnish with chopped parsley and extra Parmesan. For the full experience, check out the Full Recipe. Enjoy your creamy delight! To make a great Alfredo sauce, use freshly grated Parmesan. It gives the sauce a much better flavor and texture than pre-grated cheese. If your sauce turns out too thick, don't worry. You can adjust it by adding some of the reserved pasta water. This tip helps you get the perfect creamy consistency. When serving, choose shallow bowls. This adds a nice touch and makes the dish look elegant. For a burst of freshness, add a lemon wedge on the side. It brightens up the flavors and makes your meal pop. Want to take your dish to the next level? Add a dash of white wine while cooking. It gives the sauce more depth. You can also customize your Alfredo by adding seasonal veggies. Spinach or bell peppers work great and add color and nutrition. {{image_2}} To enhance your Seafood Lovers' Dream Alfredo, consider adding lobster or mussels. These additions create a luxurious twist. You can also mix different seafood types. Try clams or squid to bring diverse flavors to your plate. Each seafood type adds its unique taste, making each bite exciting. While fettuccine is fantastic, you can swap it for linguine or penne. These alternatives give a new texture. If you need gluten-free options, there are many gluten-free pasta types available. They work just as well in this dish, ensuring everyone can enjoy a creamy seafood Alfredo. For a vegan twist, replace seafood with sautéed mushrooms or roasted veggies. Both options add depth and flavor. You can also use cashew cream and nutritional yeast to make a rich, creamy sauce. This way, you keep the essence of Alfredo without using dairy or seafood. It’s a great option for plant-based diets. Store leftovers in an airtight container for up to 3 days. This keeps your Seafood Lovers' Dream Alfredo fresh and tasty. Make sure to let it cool down first. Keeping it sealed helps maintain the creamy texture. When reheating, do it slowly on the stove. Add a splash of cream or some reserved pasta water to keep the sauce smooth. Avoid using the microwave. It can cause the sauce to separate, which is not what you want. You can freeze portions of this dish for up to 2 months. Use freezer-safe containers or bags. When you are ready to eat it, thaw in the fridge overnight. This method helps maintain flavor and texture before reheating. Yes, prepare the Alfredo sauce separately and combine with fresh pasta before serving. This way, you keep the pasta and sauce fresh and tasty. You can try clams, squid, or shrimp for diversifying the seafood mix. Each type adds a unique touch to your dish. Yes, it can be made in advance, but best enjoyed fresh for optimal texture. The sauce may thicken when stored, so reheat gently. Use half-and-half instead of heavy cream for a lighter sauce. This change keeps the creaminess while lowering the fat content. Yes, you can use a vegan cheese substitute or omit cheese for a dairy-free version. This option still offers great flavor without dairy. For the full recipe, check the details above! In this blog post, we explored a delicious seafood Alfredo recipe. We covered key ingredients, from fettuccine to a creamy sauce. You learned step-by-step cooking instructions and tips to perfect your dish. Remember, using fresh ingredients enhances flavor. Feel free to customize your seafood and pasta types. This dish keeps well, making it great for meal prep. Enjoy your cooking journey and share your results with others!

Seafood Lovers’ Dream Alfredo Creamy Dinner Delight

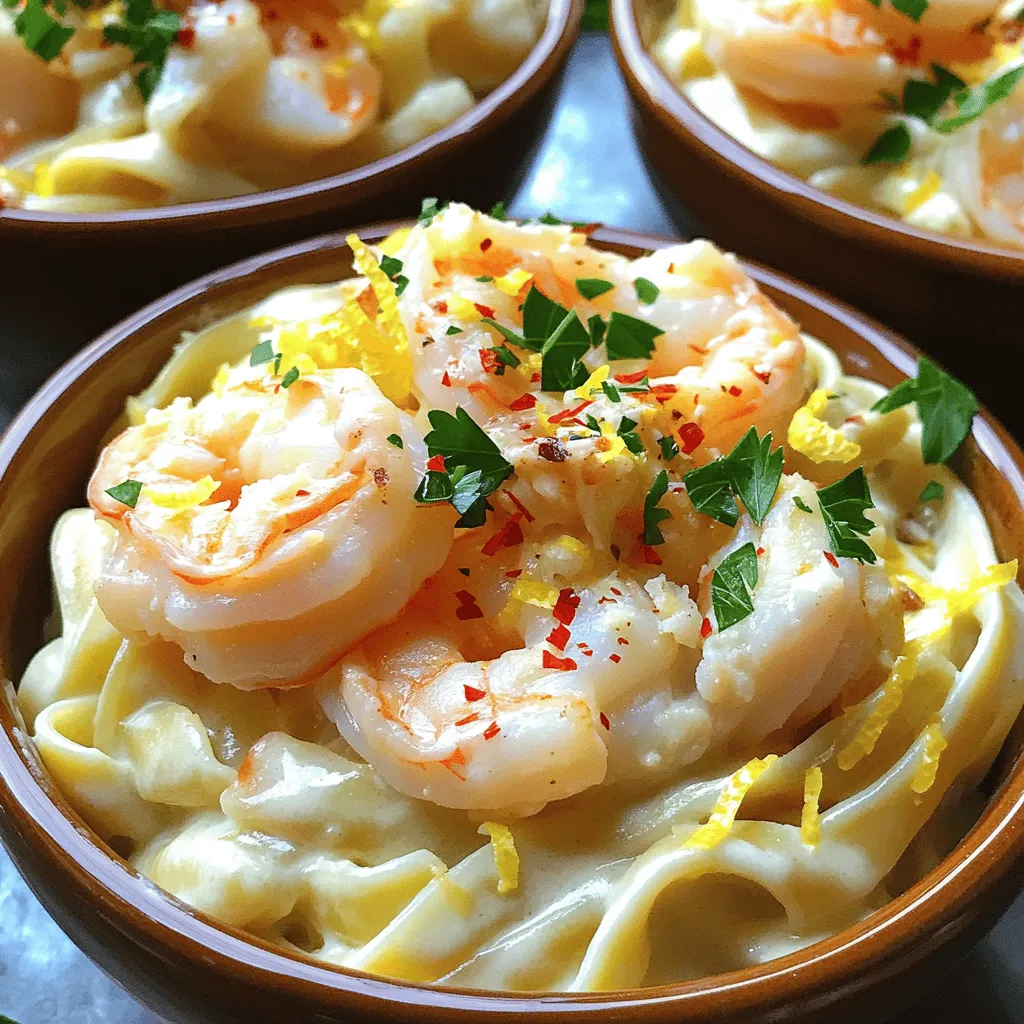
If you’re a seafood lover craving a rich and creamy dish, look no further! My Seafood Lovers’ Dream Alfredo will

To make a warm bowl of sausage tortellini soup, you need fresh, tasty ingredients. Here is what you will need: - 1 pound Italian sausage (choose spicy or sweet) - 1 medium onion, chopped - 3 cloves garlic, minced - 3 medium carrots, diced - 2 celery stalks, diced - 6 cups chicken broth - 1 can (14 oz) diced tomatoes, undrained - 2 cups fresh spinach - 9 oz cheese tortellini - 1 teaspoon Italian seasoning - Salt and pepper to taste - 2 tablespoons olive oil - Fresh basil for garnish (optional) - Grated Parmesan cheese (for serving, optional) Each of these ingredients plays a key role in building flavor. The sausage adds a rich, savory base. The onion and garlic bring a sweet depth. Carrots and celery add a nice crunch. Chicken broth makes the soup warm and hearty, while diced tomatoes give a touch of acidity. For cooking oils, I recommend using olive oil. It enhances the flavors without overpowering them. The Italian seasoning ties everything together, bringing a touch of herbs to your soup. Optional garnishes, like fresh basil and grated Parmesan, add a burst of freshness and creaminess. They can elevate your soup's presentation and taste. If you're ready to dive deeper into making this delicious dish, check out the Full Recipe! To make Sausage Tortellini Soup, follow these easy steps. I will guide you through the process. 1. Start by heating the olive oil in a large pot over medium heat. This step takes about 1 minute. 2. Add the chopped onion, diced carrots, and diced celery. Sauté them for about 5 minutes. You want them to soften but not brown. Stir them often. 3. Next, add the minced garlic. Cook it for 1 minute. The garlic will smell great! 4. Remove the casing from the Italian sausage. Crumble it into the pot. Cook it for about 7-8 minutes. Stir it often until the sausage is brown and no longer pink. This step is key for flavor. 5. Pour in the chicken broth. Add the undrained diced tomatoes and Italian seasoning. Bring this mixture to a boil. It should take around 5 minutes. 6. Once it boils, reduce the heat to medium-low. Now, add the cheese tortellini. This will cook for about 5-7 minutes. Stir it gently to keep it from sticking. 7. Check the tortellini for doneness. It should be tender but still firm. 8. Finally, stir in the fresh spinach until it wilts. Taste the soup. Add salt and pepper as needed. 9. Serve the soup hot in bowls. If you want, garnish with fresh basil and grated Parmesan cheese. This process takes around 30 minutes from start to finish. Enjoy your cozy and flavorful bowl of Sausage Tortellini Soup! For more details, check the Full Recipe. To make your sausage tortellini soup shine, focus on layering flavors. Start by sautéing the onion, carrots, and celery. This step builds a great base. Use a heavy pot like a Dutch oven. It heats evenly and holds heat well. Adding fresh garlic at the right time is key. Cook it just before you add the sausage. This keeps the garlic from burning. For the sausage, crumbling it helps it cook faster and blend into the soup. Avoid overcooking the tortellini. Follow the package instructions for timing. It should be tender but not mushy. If you overcook it, the texture will suffer. This soup takes about 30 minutes total. You will spend about 10 minutes prepping and 20 minutes cooking. It cooks fast, making it a great weeknight meal. Pair this soup with a simple side salad or crusty bread. A crisp green salad adds freshness. A glass of white wine also works well. It complements the soup's flavors nicely. For a cozy touch, serve with grated Parmesan and fresh basil on top. These add a burst of flavor and make your dish look lovely! For the full recipe, check the earlier section. {{image_2}} You can easily change this sausage tortellini soup to fit your needs. If you want a vegetarian option, swap the sausage for mushrooms or lentils. Both give a nice flavor and texture. For a vegan twist, use vegetable broth and skip the cheese tortellini. You can find vegan tortellini made from chickpeas or other plants. If you like different flavors, try using chicken sausage or turkey sausage. These meats add a lighter taste. You can also experiment with spicy sausage for a kick. If you have dietary restrictions, replace the pasta with gluten-free options like quinoa or rice. Each swap will still keep your soup tasty. Seasonal veggies can change your soup's flavor profile. In spring, add peas or asparagus for freshness. In summer, use zucchini or bell peppers for a light touch. Fall brings butternut squash or sweet potatoes, which add warmth. Winter is perfect for hearty vegetables like kale or root veggies. For winter, make a thicker soup by adding more tortellini. In summer, keep it lighter by using less broth and more veggies. Each season tells a story through your soup. The soup will feel different but remain comforting and warm. To store your leftover sausage tortellini soup, place it in an airtight container. This keeps it fresh and safe to eat. You can store it in the fridge for up to three days. Be sure to let it cool down before sealing. This helps prevent moisture build-up inside the container. Want to save some soup for later? Freezing is a great choice. First, cool the soup completely. Then, pour it into freezer-safe bags or containers. Leave some space at the top, as liquids expand when frozen. You can freeze the soup for up to three months. When you’re ready to eat, move the soup to the fridge overnight to thaw. For a quicker option, use the microwave. Heat it in short bursts, stirring often. Once hot, enjoy your cozy bowl of sausage tortellini soup. For the full recipe, check out the earlier sections of this article! How can I make this soup spicier? You can add red pepper flakes or hot sauce. For more heat, use spicy sausage. This adds a nice kick without changing the soup's base flavor. Can I use frozen tortellini? Yes, frozen tortellini works great! Just add it directly to the pot. Cook it a few extra minutes until it is tender. Is this soup suitable for meal prep? Absolutely! This soup stores well in the fridge. Make a big batch and enjoy it later. Just reheat it on the stove or in the microwave. What goes well with sausage tortellini soup? Crusty bread or a fresh salad pairs nicely. You can also serve it with garlic bread for a cozy meal. Can I add other vegetables to the soup? Yes, feel free to add your favorites! Zucchini, bell peppers, or green beans work well. Just chop them small and add them early to cook through. For the complete cooking process, check out the Full Recipe. This blog post covered every step to make delicious sausage tortellini soup. We explored the needed ingredients, preparation steps, and cooking tips. You now know how to customize this dish for your taste and the best ways to store leftovers. Remember, cooking is all about enjoying the process and finding what works for you. With these guidelines, you can create a hearty meal the whole family will love. Enjoy your cooking adventure and feel free to experiment with flavors!

Sausage Tortellini Soup Cozy and Flavorful Meal

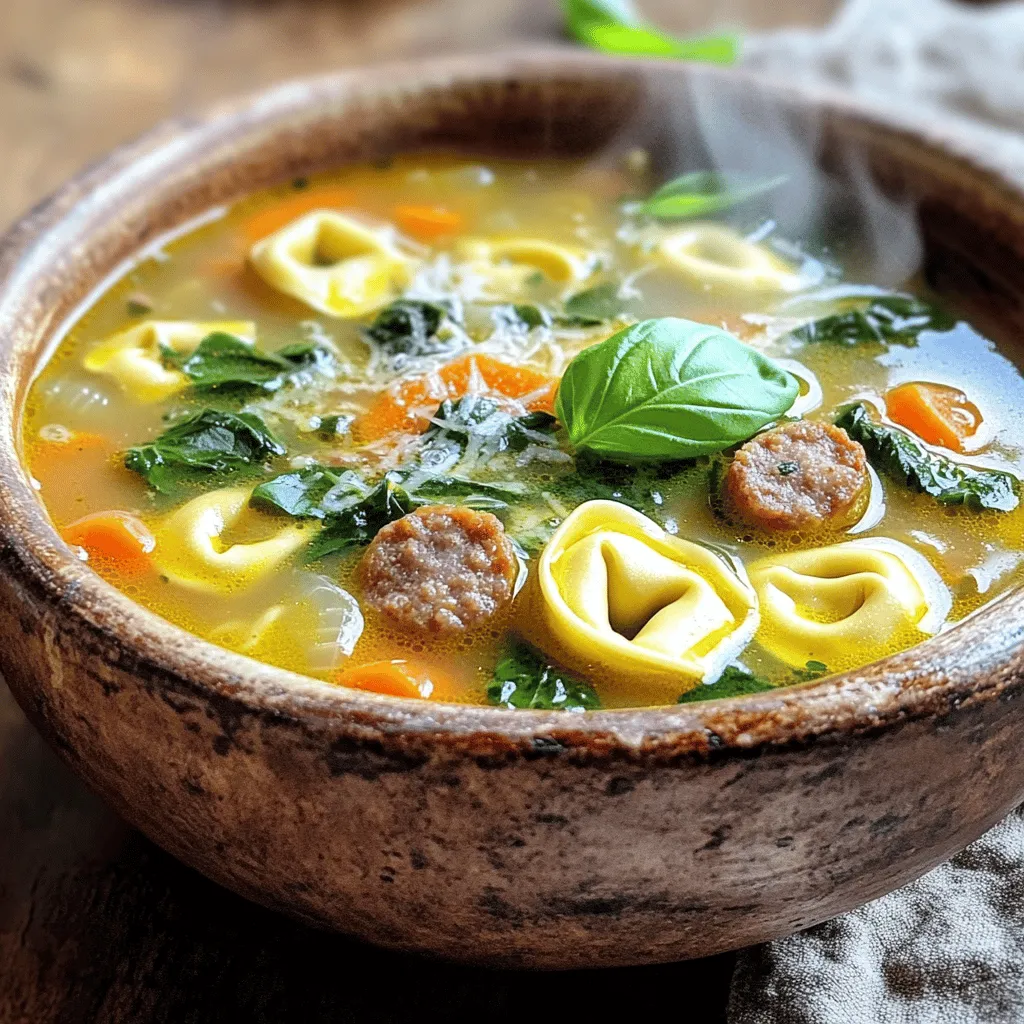
Are you ready for a warm and comforting bowl of Sausage Tortellini Soup? This hearty dish is packed with flavor

- 1 pound large shrimp, peeled and deveined - 4 cloves garlic, minced - 1 teaspoon red pepper flakes (adjust to taste) - 1 teaspoon smoked paprika - 1 tablespoon olive oil - 2 tablespoons fresh lemon juice - Zest of 1 lemon - Salt and pepper to taste - Fresh parsley, chopped (for garnish) - Lemon wedges (for serving) You can swap shrimp for other proteins. Chicken or tofu works well. If you want less heat, use less red pepper flakes. You can also try sweet paprika instead of smoked. If you need an oil substitute, avocado oil is a good choice. These flexible options help fit your taste. Feel free to experiment while cooking. The goal is to enjoy the dish. Remember, cooking is all about finding what you love. For the full recipe, check out the related section. - Marinating the shrimp Start by placing 1 pound of large shrimp in a bowl. Peel and devein them first. Add 4 minced garlic cloves, 1 teaspoon of red pepper flakes, and 1 teaspoon of smoked paprika. Then, pour in 1 tablespoon of olive oil and 2 tablespoons of fresh lemon juice. Add the zest from 1 lemon, and season with salt and pepper. Mix everything well to coat the shrimp. Cover the bowl and let it chill in the fridge for 15 to 20 minutes. This step helps the shrimp soak up all the tasty flavors. - Preparing the skillet While the shrimp marinate, get your skillet ready. Heat a large skillet over medium-high heat. Make sure it gets hot before adding the shrimp. This ensures they cook evenly and get that nice pink color. - Cooking the shrimp Once the skillet is hot, arrange the marinated shrimp in a single layer. Let them cook for about 2 to 3 minutes. You will see them turn pink. After that, flip the shrimp over and cook for another 2 to 3 minutes. They should be fully opaque when done. - Tips on achieving the perfect pink color To get the shrimp just right, watch the color closely. As they cook, they change from gray to pink. Once they are fully pink and opaque, remove them from the heat. This is the sign they are perfectly cooked. - Plating the dish For a great presentation, place the shrimp on a clean plate. Sprinkle some fresh chopped parsley on top for color. Add lemon wedges on the side for a fresh taste. - Recommended side dishes Pair your spicy lemon garlic shrimp with sides like rice, pasta, or a fresh salad. These options complement the flavors well and make your meal balanced. You can find the full recipe for further details. To enhance the flavor of your Spicy Lemon Garlic Shrimp, use fresh ingredients. Fresh garlic and lemon zest add a bright taste. You can also try adding herbs like thyme or basil for more depth. Marinating the shrimp is very important. I suggest letting them sit for at least 15 minutes. This time allows the shrimp to soak up the flavors. If you can, try marinating for up to an hour. The longer they marinate, the more flavor they gain. You can easily adjust the spice level in this dish. If you like it hotter, add more red pepper flakes. For less heat, reduce the amount you use. Remember, it’s easier to add spice than to take it away. Balancing the heat with acid is key. The lemon juice brightens the dish and helps cut through the heat. If it feels too spicy, a little extra lemon juice can help tone it down. Fresh herbs like parsley make a big difference. They add color and freshness to the dish. You can also use cilantro or chives if you prefer something different. For presentation, serve the shrimp on a nice plate. Add lemon wedges for a pop of color. A sprinkle of fresh herbs on top makes it look fancy and appetizing. These simple steps can make your dish stand out. For the full recipe, check out the link provided. {{image_2}} You can change the taste of your spicy lemon garlic shrimp by adding other spices. Try a pinch of cumin for warmth or chili powder for extra heat. These spices can give your dish a new twist. You can also use fresh herbs like basil or cilantro. These herbs add a fresh taste and color. This recipe can fit many diets. If you need gluten-free options, just ensure your spices are gluten-free. Most spices are safe, but check labels to be sure. For keto-friendly modifications, skip the sugar and use more lemon juice. This keeps the dish low-carb while still tasty. Get creative with how you serve your shrimp. You can put the shrimp on skewers for fun finger food. This makes it easy to eat at parties. You can also use the shrimp in tacos or salads. They add a spicy kick and brighten up any meal. Check out the full recipe for more ideas! To store your leftovers, place the shrimp in an airtight container. This keeps them fresh. Ensure the container is sealed tightly. You can store them in the fridge for up to 2 days. After that, the shrimp may lose their taste and texture. If you have extra cooked shrimp, freezing is a great option. First, let the shrimp cool completely. Then, place them in a freezer-safe bag or container. Remove as much air as possible before sealing. You can freeze cooked shrimp for up to 3 months. To thaw frozen shrimp, place them in the fridge overnight. This helps them thaw slowly and keeps their texture. If you're in a hurry, you can run cold water over the shrimp in a sealed bag. Reheat your shrimp gently to avoid overcooking. The best way is to use a skillet on low heat. Add a splash of olive oil for moisture. Heat them for about 2-3 minutes, stirring often. You can also use the microwave, but be careful. Heat in short bursts and check often. This prevents them from becoming rubbery. Shrimp cooks fast. It usually takes 2-3 minutes per side. You want them to turn pink and opaque. Overcooking makes shrimp tough. Keep an eye on them while they cook. Yes, you can use frozen shrimp! Just ensure to thaw them first. Place them in cold water for about 10-15 minutes. Pat them dry before cooking. Fresh shrimp taste great but frozen is convenient. Use them for quick meals. Some great sides are: - Rice (white or brown) - Quinoa - Garlic bread - Steamed vegetables like broccoli or asparagus These sides balance the shrimp's flavors well. Drinks that go nicely are: - White wine, like Sauvignon Blanc - Sparkling water with lemon - Light beers These pairings enhance your meal and make it even more delicious. For the full recipe, check out the Spicy Lemon Garlic Shrimp details! In this post, we covered how to make Spicy Lemon Garlic Shrimp from start to finish. We explored the key ingredients, preparation steps, and cooking tips. I shared great ideas for substitutes and how to adjust spice levels. You learned storage tips and ways to serve this dish. Cooking shrimp can be simple and fun. Don't hesitate to try your own twists. Enjoy making this dish and impress your friends and family!

Spicy Lemon Garlic Shrimp Savory and Simple Recipe

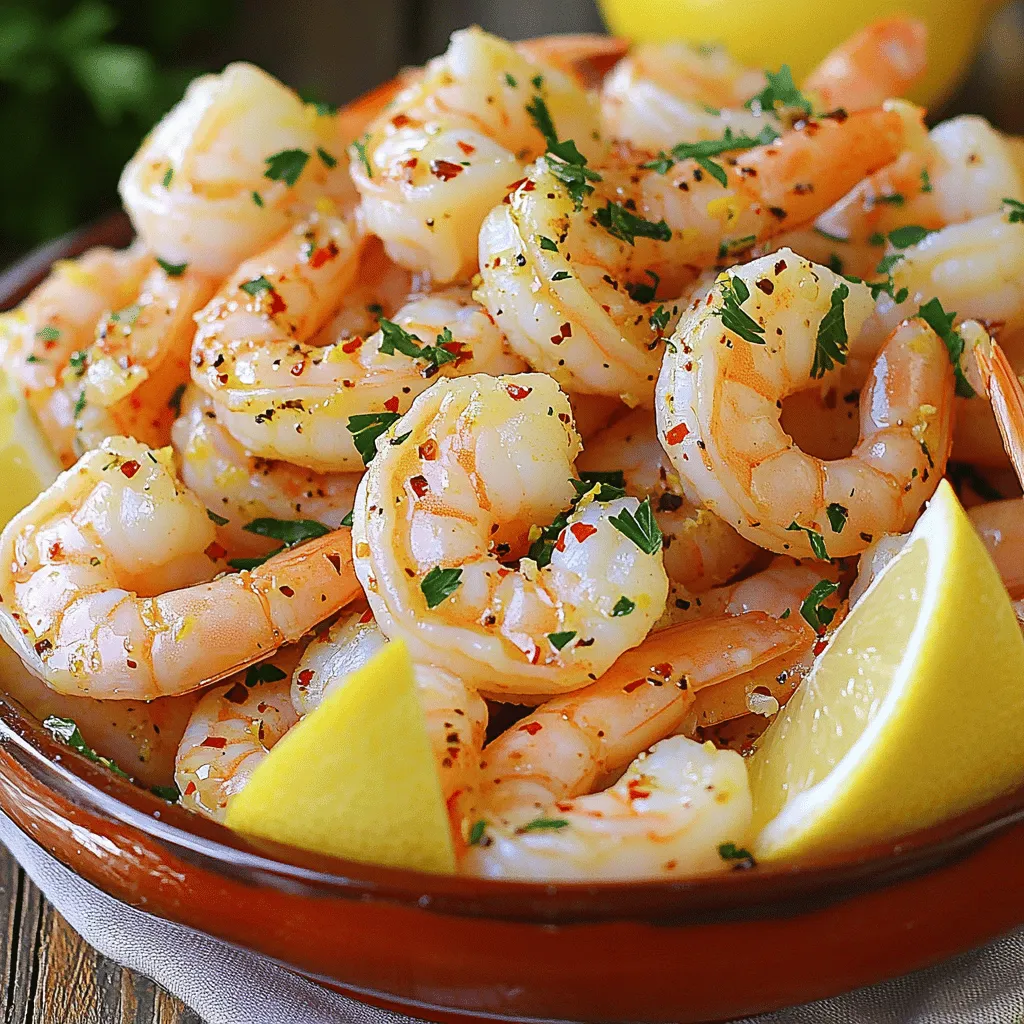
Are you ready to fire up your taste buds? This Spicy Lemon Garlic Shrimp recipe is packed with zesty flavor

- 4 medium green tomatoes, sliced - 1 cup buttermilk - 1 cup cornmeal - 1/2 cup all-purpose flour - 1 teaspoon paprika - 1/2 teaspoon garlic powder - 1/2 teaspoon onion powder - 1/4 teaspoon cayenne pepper - Salt and black pepper to taste - Oil for frying Using fresh ingredients is key. When you work with fresh green tomatoes, they have a firm texture and bright flavor. This makes your dish taste better. Fresh buttermilk adds tanginess and helps the coating stick. Always check your spices too. Old spices can lose flavor, which affects the final dish. If you're out of buttermilk, you can mix 1 cup of milk with 1 tablespoon of vinegar. Let it sit for five minutes. For cornmeal, you can use breadcrumbs for a different crunch. Gluten-free folks can use almond flour instead of all-purpose flour. Each swap changes the taste, so have fun exploring! Remember, you can find the Full Recipe in another section for more details. First, wash your green tomatoes well. This step is key for great flavor. Slice them into 1/4 inch thick rounds. Next, place the slices on a paper towel. Sprinkle salt over them and let them sit for 10-15 minutes. This draws out extra moisture. The result? Crispier fried tomatoes. In a shallow bowl, pour in the buttermilk. This helps the coating stick. In another bowl, mix the cornmeal, flour, paprika, garlic powder, onion powder, cayenne pepper, salt, and black pepper. Dip each tomato slice into the buttermilk first. Let any extra buttermilk drip off. Then, coat it in the cornmeal mix. Press lightly for even coverage. This coating creates a crunchy texture that you want. Heat about 1 inch of oil in a large skillet. Aim for medium heat. You want the oil to reach 350°F (175°C). Carefully place the coated tomato slices in the hot oil. Do this in batches. Overcrowding the pan leads to soggy tomatoes. Fry each side for about 3-4 minutes. Look for a golden brown color. Once done, remove the slices. Place them on a paper towel-lined plate to drain excess oil. Enjoy your crispy fried green tomatoes warm! For more details, see the Full Recipe. To get that crunchy texture, you need to follow a few steps. First, use fresh green tomatoes. They should be firm and bright. Slice them evenly, about 1/4 inch thick. This helps them cook evenly. Next, soak the slices in buttermilk. This helps the coating stick. After soaking, coat each slice well in the cornmeal mix. Press lightly to ensure even coverage. Many people make a few common errors. One mistake is not salting the tomato slices. Salting helps to remove moisture and makes them crispier. Another mistake is overcrowding the pan. Fry in batches to keep the oil temperature steady. If the oil cools down, your tomatoes will become soggy. Lastly, don’t skip the resting step. Placing them on paper towels helps remove extra oil. Dipping sauces can enhance the flavor of your fried green tomatoes. Here are a few great options: - Spicy remoulade - Creamy ranch dressing - Tangy buttermilk dip - Zesty hot sauce Feel free to mix and match to find your favorite! For the full recipe, check the beginning of the article. {{image_2}} For a kick, add heat! Mix the cornmeal with extra cayenne pepper. You can also use hot sauce in the buttermilk for more flavor. Dip each slice into the spicy mixture. Fry as usual for a zesty treat. These spicy fried green tomatoes bring a bold twist to the classic dish. Want extra flavor? Add cheese! Mix grated Parmesan or cheddar cheese into the cornmeal. This makes a deliciously cheesy crust. The cheese melts while frying, creating a tasty bite. Try mixing in herbs like thyme or oregano for a fresh taste. These cheesy cornmeal variations make your fried tomatoes even more special. Need a gluten-free option? No problem! Replace all-purpose flour with a gluten-free flour blend. You can also use almond flour or chickpea flour. Just make sure the cornmeal is gluten-free, too. This way, everyone can enjoy crispy fried green tomatoes without worry. To store leftover fried green tomatoes, let them cool first. Place them in an airtight container. You can keep them in the fridge for up to three days. Make sure to layer them with paper towels to absorb extra moisture. This keeps them tasty and crispy. To reheat, I recommend using the oven. Preheat it to 350°F (175°C). Place your tomatoes on a baking sheet. Heat them for about 10-15 minutes. This method helps to regain some of the crispiness. You can also use an air fryer for about 5-7 minutes at the same temperature. You can freeze fried green tomatoes if you want to save some for later. First, let them cool completely. Place them in a single layer on a baking sheet. Freeze them for about two hours. Once frozen, transfer them to a freezer bag. They can last for up to three months. When ready to eat, just bake them straight from the freezer! For more details, check out the Full Recipe. The best tomatoes for frying are firm green tomatoes. They should be unripe and slightly tart. Varieties like Cherokee Green or Green Zebra work well. Choose tomatoes with no bruises or soft spots. Freshness matters. The flavor and texture improve with quality ingredients. Yes, you can make this recipe vegan. Replace buttermilk with a plant-based milk, like almond milk, mixed with a bit of vinegar. Use a vegan-friendly coating mix instead of regular flour. This keeps the crispy factor while making it plant-based. Enjoy the same great taste without animal products. You can check if the oil is hot enough by using a thermometer. Aim for 350°F (175°C). If you don’t have one, drop a small amount of batter into the oil. It should sizzle and bubble right away. If it sinks, the oil is not hot enough. For the full recipe and detailed instructions, check the Crispy Southern Fried Green Tomatoes recipe. It guides you through every step for perfect results. Fried green tomatoes are fun and tasty. This post shared all you need for success. We covered fresh ingredients, step-by-step frying, and tips for a crispy crust. I shared tasty variations and smart storage methods. Remember, your choice of tomatoes matters. You can swap ingredients to fit your needs. With this guide, you can enjoy crispy fried green tomatoes anytime. Get cooking, and enjoy the crunch!

Crispy Southern Fried Green Tomatoes Easy Frying Guide

Are you ready to enjoy a classic Southern dish? Crispy fried green tomatoes are a tasty treat you can easily

To make baked lemon garlic chicken wings, gather these items: - 2 pounds chicken wings - 1/4 cup olive oil - 1/4 cup lemon juice (freshly squeezed) - 4 cloves garlic, minced - 1 tablespoon lemon zest - 1 teaspoon dried oregano - 1 teaspoon smoked paprika - Salt and pepper to taste - Fresh parsley, chopped (for garnish) You will need a few tools for this recipe: - A large mixing bowl - A baking sheet - Parchment paper or aluminum foil - A sharp knife for chopping - A measuring cup and spoons These tools help you mix and bake the wings easily. I love using fresh ingredients for this recipe. Fresh lemon juice adds brightness. Fresh garlic gives a strong, vibrant flavor. Fresh parsley makes a lovely garnish. Dried herbs, like oregano, are great too. They are convenient and still tasty. Use dried if fresh is not available. Just remember, fresh often shines brighter in flavors. For the best taste, use fresh lemon juice and garlic when you can. It makes a big difference in your baked lemon garlic chicken wings. You can check the Full Recipe for more tips! First, gather all your ingredients. You need chicken wings, olive oil, lemon juice, garlic, lemon zest, oregano, smoked paprika, salt, and pepper. This mix makes a tasty marinade. Start by preheating your oven to 425°F (220°C). Line a big baking sheet with parchment paper. This helps with cleanup later. In a large bowl, mix olive oil, lemon juice, minced garlic, lemon zest, oregano, smoked paprika, salt, and pepper. Stir until well combined. Next, add the chicken wings to the bowl. Toss them until each wing is covered with the marinade. This step is key for flavor. Lay the wings in a single layer on the baking sheet. Make sure they are not crowded. Bake them for 35-40 minutes. Flip them halfway for even cooking. If you want extra crispiness, broil them for 2-3 minutes at the end. Watch closely to prevent burning. When done, let them rest for a few minutes and garnish with parsley. To get crispy wings, use a high oven temperature. Don’t skip the broiling step for crunch. Make sure to spread the wings out on the pan. Overcrowding leads to soggy skin. If you want to add flavor, try marinating overnight. This allows the wings to soak in the taste. Lastly, always check for doneness. The wings should be golden and juicy. For the full recipe, you can refer to the earlier section. To make your wings crispy, start with a dry surface. Pat the chicken wings dry with paper towels. This helps remove extra moisture. Use a high oven temperature of 425°F (220°C) for the best results. Flip the wings halfway through cooking. This ensures even crispiness on both sides. For extra crunch, broil them for a few minutes at the end. Watch them closely to avoid burning! For tasty wings, a good marinade is key. Mix olive oil, lemon juice, and minced garlic well. The acid from the lemon juice helps tenderize the meat. Let the wings marinate for at least 30 minutes. For more flavor, try marinating overnight in the fridge. Just remember to bring them to room temperature before baking for even cooking. Avoid overcrowding your baking sheet. This traps steam and makes the wings soggy. Ensure they have space to crisp up. Do not skip the drying step before marinating. Wet wings will not get crispy. Lastly, do not forget to flip them halfway through cooking. This simple step changes everything! For the full recipe, check out the baking instructions and ingredients list. Enjoy making these juicy, flavorful wings! {{image_2}} If you like heat, try adding hot sauce to your marinade. A tablespoon of your favorite hot sauce will add a nice kick. You could also mix in cayenne pepper. This spice will boost the flavor and heat. Adjust the amount to fit your taste. These spicy wings pack a punch and are great for game day. For a touch of sweetness, mix in honey. Add about two tablespoons of honey to your marinade. This will balance the tangy lemon and the strong garlic. It gives the wings a sticky, caramelized finish. These wings are perfect for those who enjoy sweet and savory flavors. Experiment with fresh herbs for more flavors. Add chopped rosemary or thyme to the marinade. These herbs pair well with lemon and garlic. You can also mix in citrus zest like lime or orange. This will add depth and a bright twist to your wings. Try these herb and citrus additions to elevate your dish. For all these variations, follow the Full Recipe to keep the base flavors intact. Enjoy creating your perfect baked lemon garlic wings! Once you finish your baked lemon garlic chicken wings, let them cool. Place them in an airtight container. You can keep them in the fridge for about 3 to 4 days. If you want to keep them longer, consider freezing them. This helps maintain their juicy flavor. When you are ready to eat your leftovers, reheating is key. Preheat your oven to 350°F (175°C). Place the wings on a baking sheet. Heat them for about 15 to 20 minutes. This keeps the skin crispy. You can also use a microwave, but it may make the wings less crispy. Just heat them in short bursts. To freeze your chicken wings, first, let them cool completely. Then, place them in a freezer-safe bag or container. Squeeze out as much air as you can before sealing. They will last for up to 3 months in the freezer. When you're ready to eat, thaw them in the fridge overnight. Then, reheat them as mentioned above. Enjoy your tasty wings anytime! For the full recipe, check out the complete guide above. Yes, you can use frozen chicken wings. Just remember to thaw them first. Thawing helps the wings cook evenly. You can leave them in the fridge overnight or use cold water. Once thawed, follow the Full Recipe for the best results. Bake chicken wings at 425°F for about 35-40 minutes. This gives them a nice golden color. Flip them halfway through for even cooking. If you like extra crispiness, broil them for 2-3 minutes at the end. Serve baked lemon garlic chicken wings with a fresh salad or veggie sticks. A side of ranch or blue cheese dressing adds a great touch. You can also pair them with rice or fries for a full meal. To make these wings in an air fryer, first, marinate them as per the recipe. Preheat the air fryer to 400°F. Place the wings in a single layer. Cook for 25-30 minutes, flipping halfway. Check for crispiness and adjust the time as needed. Marinating the wings is not strictly necessary, but it adds great flavor. The lemon and garlic seep into the meat, making them juicy and tasty. If you're short on time, you can skip this step, but marinating is worth it! You now have all the key steps to make delicious chicken wings. We explored the important ingredients, equipment, and tips for perfect baking. Remember to try different flavors and avoid common mistakes to get that extra crisp. Proper storage and reheating will keep your wings tasty for later. Whether spicy or sweet, enjoy experimenting with variations that excite your taste buds. Now, get ready to impress your friends and family with your new cooking skills!

Baked Lemon Garlic Chicken Wings Juicy and Flavorful

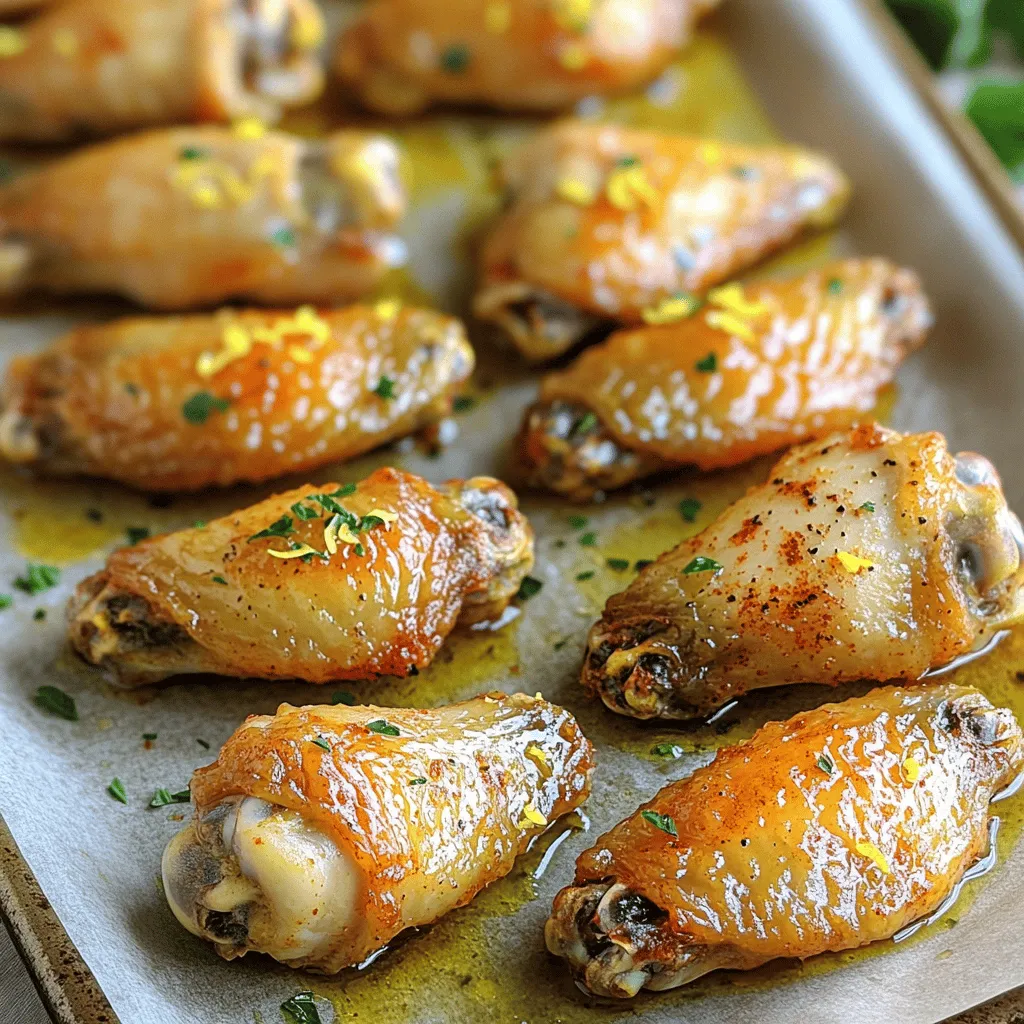
Are you ready to elevate your snack game? Baked Lemon Garlic Chicken Wings are juicy, flavorful, and easy to make

Older posts
Newer posts
← Previous Page1 … Page79 Page80 Page81 … Page93 Next →

dsad

© 2025 flavorsprint • Built with GeneratePress

Our Policies

  • Copyright Policy
  • Cookie Policy
  • GDPR Policy
  • Privacy Policy
  • Disclaimer
  • Terms Of Use

More Information

  • Home
  • About
  • Contact
  • Appetizers
  • Dessert
  • Dinner
  • Drinks
©2025, flavorsprint About Back To Top