Skip to content
DisclaimerTerms Of UseGDPR PolicyCookie Policy

flavorsprint

  • Home
  • Drinks
  • Appetizers
  • Dinner
  • Dessert
  • About
  • Contact
  • Privacy Policy
DisclaimerTerms Of UseGDPR PolicyCookie Policy

Lillian

- 4 boneless, skinless chicken breasts - 1/4 cup honey - 1/4 cup Dijon mustard - 2 tablespoons olive oil - 2 cloves garlic, minced - 1 tablespoon apple cider vinegar - Salt and pepper to taste - Fresh thyme leaves for garnish The main ingredients for honey mustard chicken are simple yet powerful. The chicken is the star, so choose fresh, high-quality breasts. Honey and Dijon mustard create a sweet and tangy sauce that coats the chicken well. Olive oil adds richness, while garlic gives a nice punch. Apple cider vinegar balances the flavors, making it bright and tasty. Don’t forget the salt and pepper; they enhance all the flavors. Fresh thyme leaves add a lovely herbal touch at the end. - Dijon mustard alternatives - Additional spices and herbs - Suggested side dishes If you want to change the flavor, try alternatives for Dijon mustard. Yellow mustard or honey mustard can work too. You can also add spices like paprika or cayenne for heat. Fresh herbs like rosemary or parsley can boost the taste. For side dishes, consider serving it with rice, roasted veggies, or a fresh salad. These options will complement the flavors of the chicken well. For the detailed recipe and cooking steps, check the Full Recipe. - Preheat your oven to 375°F (190°C). This helps cook the chicken evenly. - In a medium bowl, whisk together the honey, Dijon mustard, olive oil, minced garlic, apple cider vinegar, salt, and pepper. Mix until smooth. This marinade adds a sweet and tangy flavor to the chicken. - Place the chicken breasts in a baking dish. Pour the honey mustard mixture over the chicken. Make sure every piece is coated well. This ensures every bite is packed with flavor. - Cover the baking dish with aluminum foil and bake for 25 minutes. This keeps the chicken moist as it cooks. - After 25 minutes, remove the foil. Bake for an additional 15-20 minutes. Look for a golden glaze on the chicken. This means it's almost done! - For extra flavor, switch on the broiler for the last 2-3 minutes. This caramelizes the sauce lightly. Keep a close eye to avoid burning. - Once you take the chicken out of the oven, let it rest for 5 minutes. This helps the juices settle. After resting, slice and serve. Garnish with fresh thyme leaves for a pop of color. You can find the Full Recipe in the earlier section for more details. To ensure your chicken is tender and juicy, start with fresh, high-quality chicken. Use boneless and skinless breasts for quick cooking. Marinate the chicken for at least 30 minutes before baking. This allows the flavors to soak in. To avoid burning the sauce, keep an eye on the oven. During the last few minutes, watch for the sauce to caramelize. If it starts to darken too much, cover the dish with foil. This will help keep the sauce from burning while still getting that lovely glaze. For ideal side dishes, consider light options like steamed broccoli or roasted potatoes. A simple salad can also complement the dish nicely. The fresh greens balance the sweet and tangy flavors of the chicken. When it comes to pairing options for wine, look for a crisp white wine. A Sauvignon Blanc or a light Pinot Grigio works well. If you prefer something non-alcoholic, try sparkling water with a lemon wedge for a refreshing touch. You can prepare the chicken in advance by marinating it the night before. Just place it in the fridge. This makes dinner quick and easy on busy nights. For storage tips, keep any leftover honey mustard chicken in an airtight container. It will last in the fridge for about three days. If you want to store it longer, freeze it. Just make sure to wrap it well to prevent freezer burn. For the full recipe, check out my Honey Mustard Chicken Delight. {{image_2}} You can change the taste of honey mustard chicken easily. One fun option is spicy honey mustard chicken. Just add some cayenne pepper or hot sauce to the honey mustard mix. This will give your dish a nice kick. It’s perfect for those who love heat. Another way to mix things up is by adding fruits. Try diced apples or peaches in the marinade. The sweetness from the fruits blends with the honey. It creates a lovely balance of flavors that brightens up the dish. You can cook honey mustard chicken in several ways. Baking is simple and will give you great results. However, grilling adds a nice smoky flavor. Just brush the chicken with the honey mustard mix before grilling. Cook it until it's golden and juicy. If you want a set-it-and-forget-it option, try a slow cooker. Simply place the chicken and the honey mustard sauce in the slow cooker. Let it cook on low for 4 to 6 hours. The chicken will come out tender and full of flavor. If you're looking for lighter options, use low-calorie substitutes. You can swap honey for a sugar-free sweetener. This keeps the taste while cutting calories. For those with dietary needs, there are gluten-free options. Use gluten-free mustard and check your vinegar. This way, everyone can enjoy the dish. To keep your honey mustard chicken fresh, store it in an airtight container. Let it cool down first. Place it in the fridge for up to four days. For longer storage, you can freeze it. Wrap each piece in plastic wrap, then put it in a freezer bag. This helps prevent freezer burn. Honey mustard chicken can last in the freezer for up to three months. When reheating, the goal is to keep the chicken moist. The oven works best for this. Preheat your oven to 350°F (175°C). Cover the chicken with foil to trap steam. Bake for about 15-20 minutes or until warm. You can use a microwave, but be careful. Heat it in short bursts to avoid drying it out. If you use the microwave, cover the chicken with a damp paper towel to keep it moist. In the fridge, honey mustard chicken stays good for about four days. If you freeze it, it can last for three months. Always check for signs of spoilage. If the chicken smells sour or has a slimy texture, it's best to toss it. Make sure to check these signs before you eat leftovers. What can I use instead of Dijon mustard? You can use yellow mustard or whole grain mustard. Each brings a different flavor. Yellow mustard is milder, while whole grain adds texture. For a twist, try honey mustard or spicy brown mustard. Can I make this recipe without honey? Yes, you can! Use maple syrup or agave nectar for sweetness. Both give a nice flavor. Adjust the amount to your taste. How do I know when the chicken is fully cooked? Check the chicken's internal temperature. It should be at least 165°F (75°C). Use a meat thermometer for accuracy. The juices should run clear, not pink. Can I marinate the chicken overnight? Absolutely! Marinating overnight enhances the flavor. Just cover it and keep it in the fridge. The chicken will be juicy and flavorful. Is this recipe suitable for meal prep? Yes, it is great for meal prep! Cook a batch and store it in containers. You can enjoy it throughout the week. What are some good side dishes to serve with honey mustard chicken? Pair it with roasted vegetables, rice, or salad. Mashed potatoes also work well. These sides balance the sweet and tangy chicken. This blog post covered making honey mustard chicken at home. You learned the key ingredients, steps to prepare, and various tips to make it great. I shared ideas for different flavors and cooking methods too. Remember, you can store and reheat leftovers easily. I hope you feel ready to try this recipe and make it your own. Enjoy your cooking journey!

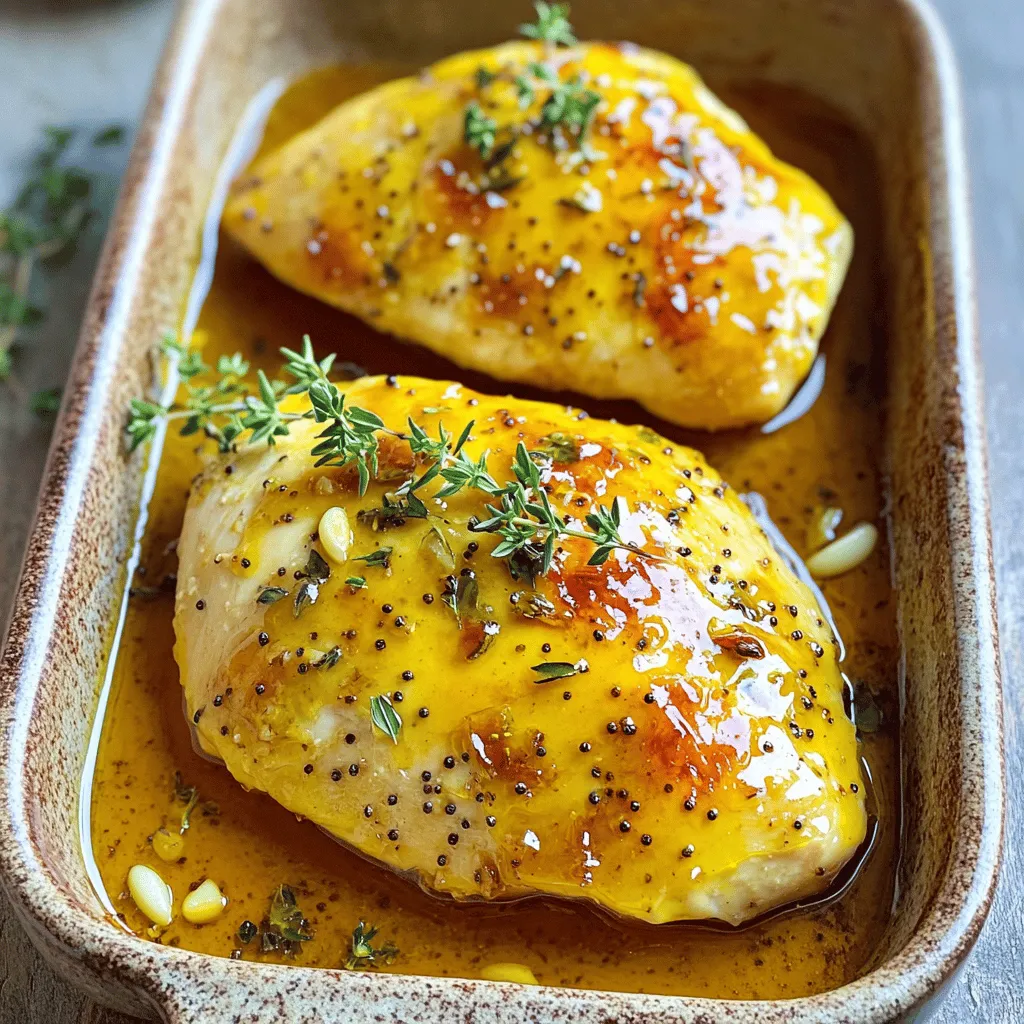
Honey Mustard Chicken Simple and Flavorful Recipe

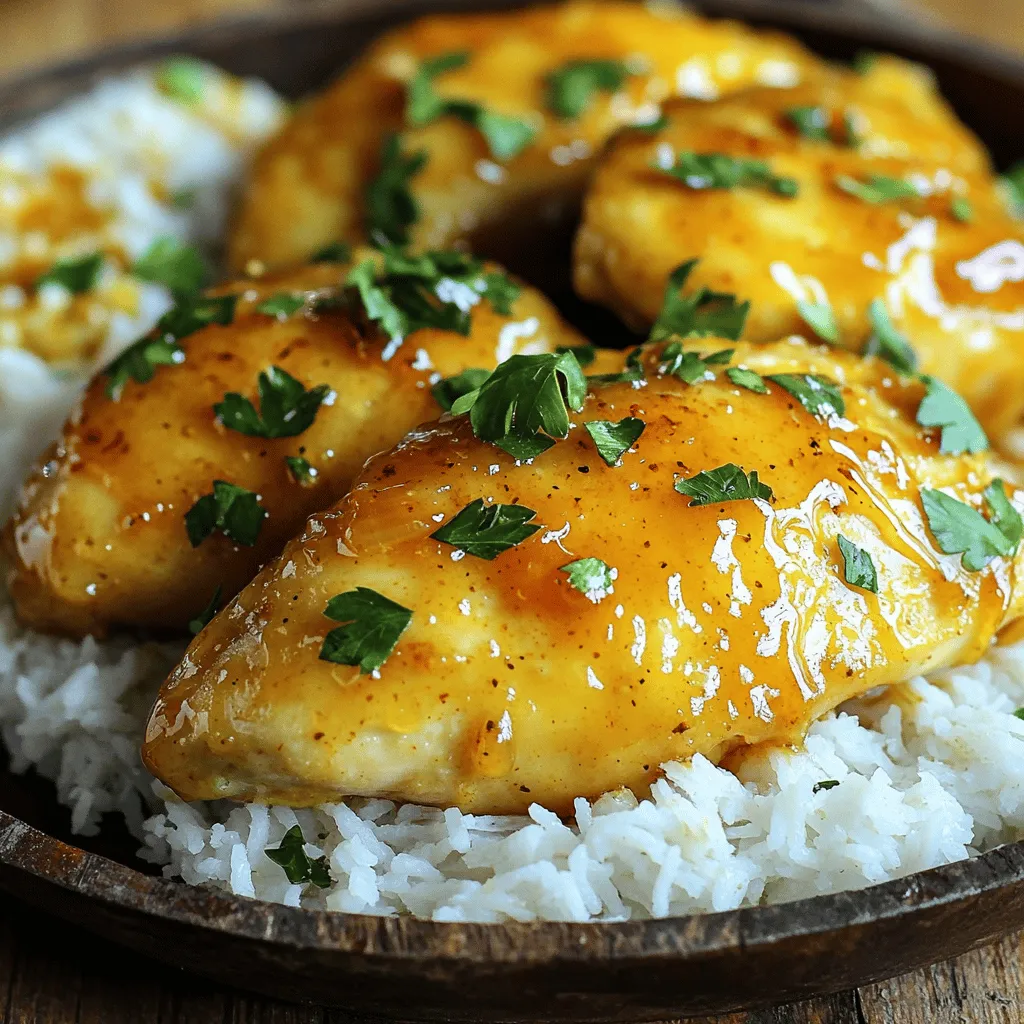
Looking for a quick and tasty dinner idea? This Honey Mustard Chicken recipe is simple and packed with flavor. With

- 1 cup grated Parmesan cheese - 1 cup shredded mozzarella cheese - 1/2 cup breadcrumbs (preferably seasoned) - 1/4 cup all-purpose flour - 2 large eggs - 1 teaspoon Italian seasoning - 1/2 teaspoon garlic powder - 1/2 teaspoon salt - 1/4 teaspoon black pepper - Marinara sauce (for dipping) You may want to swap some ingredients based on your taste or needs. For cheese alternatives, you can use vegan cheese or a mix of cheddar and mozzarella. If you lack breadcrumbs, crushed crackers or panko can work too. For gluten-free options, use almond flour or gluten-free breadcrumbs. To ensure accurate measurements, use a dry measuring cup for flour and breadcrumbs. Press down lightly when measuring cheese for best results. Grating cheese can be tricky. Use a box grater or a food processor for quicker results. This will save you time and keep your bites perfectly cheesy. 1. Preheat your oven to 400°F (200°C). This ensures even cooking. 2. Line a baking sheet with parchment paper. This helps prevent sticking. 3. In a mixing bowl, add 1 cup of grated Parmesan cheese and 1 cup of shredded mozzarella cheese. Mix them well. This blend creates great flavor. 1. Use your hands to form the cheese mixture into small balls, about 1 inch wide. Aim for around 20 bites. 2. For a crispy texture, roll each cheese ball in 1/4 cup of all-purpose flour first. 3. Next, dip the ball into the egg mixture. This uses 2 large eggs combined with seasonings. 4. Finally, coat each ball in 1/2 cup of breadcrumbs. This adds crunch to each bite. 1. Place the coated bites on the prepared baking sheet. Leave space between each ball. 2. Bake in the preheated oven for 12-15 minutes. Watch for a golden brown color. 3. After baking, let them cool for a few minutes. This helps the bites firm up. 4. Serve them warm with marinara sauce for dipping. Enjoy these cheesy delights! You can find the full recipe for Cheesy Parmesan Mozzarella Bites in the earlier section. To make sure your cheesy bites cook evenly, keep these tips in mind: - Space them out: Place the bites on the baking sheet with room between them. This lets hot air flow around each one. - Rotate the tray: Halfway through baking, turn the tray around. This helps them brown nicely. Managing moisture is key for a crispy bite. Here’s how: - Dry cheese: Use well-drained cheese to avoid excess moisture. - Pat dry: If the cheese looks wet, pat it down with a paper towel. The perfect dip for these bites is marinara sauce. Here are some ideas: - Classic combo: Serve with a warm bowl of marinara on the side. - Add spice: Mix in red pepper flakes for extra heat. Garnishing can make your bites look even better: - Fresh herbs: Add basil leaves around the platter for color. - Cheese sprinkle: Grate some extra Parmesan on top for flair. Sometimes bites may not cook just right. If they are undercooked: - Bake longer: Pop them back in the oven for a few more minutes. - Check color: They should be golden brown when done. To avoid sogginess: - Avoid overbaking: Keep an eye on them to prevent drying out. - Cool on a rack: Let bites cool on a wire rack, not on the baking sheet. This keeps the bottom crispy. For the full recipe, refer to the earlier section. {{image_2}} You can make your cheesy bites even better. Adding herbs and spices can bring new tastes. Try mixing in dried oregano or a pinch of chili flakes. These will add some zing to your bites. You can also experiment with fresh herbs. Chopped parsley or basil can enhance the flavor and look. Adding vegetables is another great idea. Finely chopped spinach or roasted red peppers can boost nutrition. Mixing in these veggies gives your bites a colorful twist. They are not only tasty but also healthy. You have options for cooking your bites. An air fryer is quick and gives a nice crunch. Set it to 375°F (190°C) and cook for about 8-10 minutes. Your bites will be crispy and golden. If you prefer to bake, the oven works well. Preheat it to 400°F (200°C) and bake for 12-15 minutes. Both methods deliver tasty bites. Frying is another way to go. It gives a rich flavor and crispiness. Heat oil in a pan and fry until golden brown. Just be careful with hot oil. You can adapt this recipe to fit different diets. For a vegetarian option, skip meat and keep it cheesy. If you want vegan bites, use plant-based cheese. Replace eggs with ground flaxseed mixed with water. This gives a similar binding effect. If you follow a low-carb or keto diet, swap breadcrumbs for almond flour or crushed pork rinds. This keeps your bites low in carbs but full of flavor. No matter your needs, there’s a way to enjoy these cheesy bites. For the full recipe, check out the earlier section. To keep your cheesy parmesan mozzarella bites fresh, place them in an airtight container. Store them in the fridge for up to three days. Make sure they cool down to room temperature before sealing the container. If you want to enjoy them later, freezing is a great option. Place the bites in a freezer-safe bag. They can last up to three months in the freezer. Just remember to label the bag with the date. When you’re ready to eat the leftovers, you can reheat them either in the oven or the microwave. For the oven, preheat it to 350°F (175°C). Bake the bites for about 10 minutes until they are warm and crispy. This method keeps them crunchy. If you’re in a hurry, you can microwave them for about 30 seconds. However, they won’t be as crispy this way. Keep track of how long your mozzarella bites sit in the fridge. They are best eaten within three days. If they smell off or look discolored, it’s time to throw them away. Always trust your senses. If something seems off, don’t eat it. Enjoy your cheesy bites while they are fresh for the best flavor and texture. For the full recipe, check back for details on preparation. You can serve these bites with various dipping sauces. Marinara sauce is a classic choice. Its rich flavor pairs well with the cheesy bites. You might also try ranch dressing or garlic aioli for a fun twist. For sides, fresh veggies like carrot sticks or celery add crunch. A simple salad can also balance the meal. These options keep it light and tasty. Yes, you can prepare these bites in advance. Form the cheese balls and coat them. Then, place them on a baking sheet and cover them. Store them in the fridge for up to 24 hours. This makes cooking quick and easy when you are ready to bake. Just remember to bake them straight from the fridge. This helps keep their shape. You’ll know the bites are done when they turn golden brown. They should feel firm to the touch. If you see a crispy outer layer, that’s a good sign. Let them cool slightly before serving. This helps the cheese inside set a bit. Enjoy your perfectly baked cheesy bites! In this article, we covered all you need for Cheesy Parmesan Mozzarella Bites. We explored key ingredients, useful substitutions, and preparation tips. I provided step-by-step instructions for baking, plus helpful cooking tips and serving ideas. Remember to experiment with flavors and storage methods to fit your needs. These bites are fun and easy to make, so enjoy the process. Your cheesy creation will surely impress anyone who tries them.

Cheesy Parmesan Mozzarella Bites Easy Snack Delight

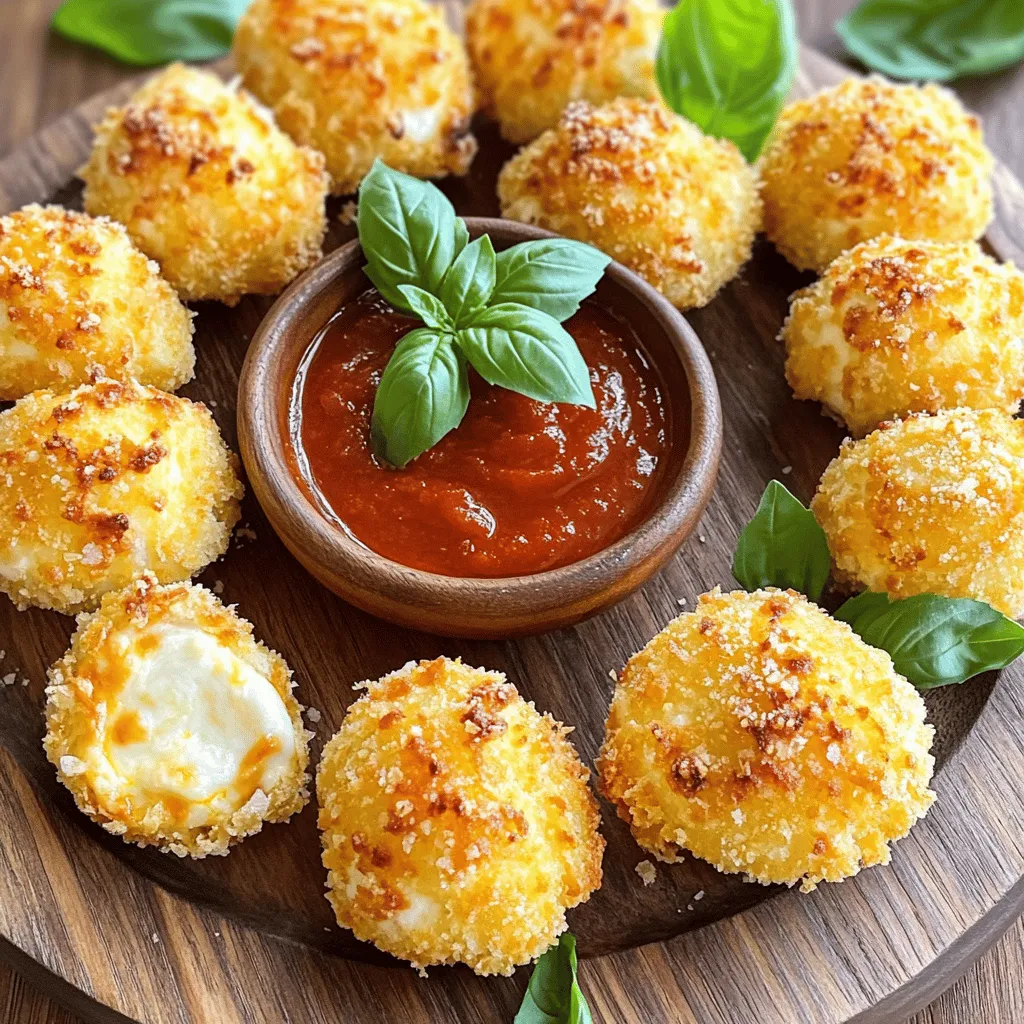
Are you ready to satisfy your cheesy cravings? In this post, I’ll show you how to make Cheesy Parmesan Mozzarella

- 2 cups all-purpose flour - 1 ½ cups granulated sugar - ½ cup unsalted butter, softened - 1 cup crushed pineapple, undrained - 1 large egg - 1 teaspoon baking soda - 1 teaspoon baking powder - ½ teaspoon salt - 1 teaspoon vanilla extract - ½ teaspoon almond extract - 1 cup shredded coconut (optional) - 1 cup chopped walnuts or pecans (optional) To make a great Moist Southern Pineapple Cake, gather these ingredients first. The crushed pineapple adds a lot of flavor. Make sure you keep the juice from the can. It helps keep the cake moist. The butter must be softened before you start. This helps mix it well with the sugar. You can add shredded coconut and nuts if you want extra texture. If you don't like nuts, feel free to leave them out. The same goes for the coconut. You can also mix in spices like cinnamon for a warm flavor. Use fresh ingredients for the best taste. Make sure your baking soda and powder are fresh, too. Old ingredients can ruin your cake. For the complete recipe, check out the Full Recipe. It gives you all the steps to create this delicious cake. 1. Preheat your oven to 350°F (175°C). This ensures even baking. 2. Grease and flour a 9x13 inch baking pan. This helps the cake release easily. 1. In a large bowl, cream the softened butter and granulated sugar. Mix until light and fluffy. 2. Add the egg, crushed pineapple (with juice), vanilla, and almond extracts. Mix until combined. 1. In a separate bowl, whisk together the flour, baking soda, baking powder, and salt. This helps distribute the leavening agents. 2. Gradually mix the dry ingredients into the wet mixture. Stir until just combined. Be gentle; overmixing can make the cake tough. Now you're ready to pour the batter into your prepared pan. Make sure to smooth the top with a spatula. For the full recipe, check out the detailed instructions provided earlier. Enjoy your baking! To get the best moist texture, do not overmix your batter. Overmixing can make the cake tough. Mix just until you combine the wet and dry ingredients. Adding crushed pineapple is also key. The juice in the pineapple keeps the cake moist and adds a fruity flavor. Always use the correct oven temperature. Preheat your oven to 350°F (175°C) for even baking. To check if your cake is done, use the toothpick test. Insert a toothpick into the center. If it comes out clean, your cake is ready. When serving, slice the cake into even pieces. For a special touch, dust the top with powdered sugar. You can also garnish with fresh pineapple slices or toasted coconut flakes. This adds color and flavor. Enjoy your cake with whipped cream or vanilla ice cream for a tasty treat. {{image_2}} To make your Moist Southern Pineapple Cake even better, try adding spices. A sprinkle of cinnamon or nutmeg can add warmth and depth. These spices work well with the pineapple flavor. You can also mix in some shredded coconut. It brings a tropical twist and a nice texture. If you enjoy nuts, walnuts or pecans are great options too. They add crunch and a rich taste. If you need gluten-free options, use a gluten-free flour blend. This makes the cake safe for those with gluten issues. For a dairy-free version, swap out the butter for coconut oil or a plant-based butter. You can also use almond milk instead of regular milk. These swaps keep the cake tasty and moist without dairy. When it comes to serving, you have fun choices. A dollop of whipped cream or a scoop of vanilla ice cream pairs well with the cake. This adds creaminess that complements the sweet pineapple. You can also create a layered dessert. Slice the cake and layer it with whipped cream and fresh fruit. This makes for a beautiful and tasty treat. For the full recipe, make sure to check the earlier section. To keep your cake fresh, you have two main options: room temperature and refrigeration. - Room temperature storage: If you plan to eat the cake within two days, store it at room temperature. Place it in an airtight container. This keeps it moist and tasty. - Refrigeration tips: For longer storage, refrigerate the cake. Wrap it well in plastic wrap or foil. This will help avoid drying out. The cold air can make the cake last up to a week. If you want to save the cake for later, freezing is a great option. - Best practices for freezing: Allow the cake to cool completely. Wrap it tightly in plastic wrap and then in aluminum foil. This helps prevent freezer burn. You can also slice the cake for easier thawing later. - Thawing instructions: When you're ready to enjoy it, take the cake out of the freezer. Place it in the fridge overnight or let it sit at room temperature for a few hours. It will taste just as good as fresh! Knowing how long your cake lasts helps avoid waste. - How long the cake lasts: When stored properly, the cake can last up to a week in the fridge. If frozen, it can last up to three months. - Signs of spoilage: Always check for spoilage before eating. Look for changes in smell, texture, or color. If it smells sour or has mold, toss it out. Enjoy your cake safely! How to make a cake more pineapple-flavored? To boost the pineapple flavor, use more crushed pineapple. You can also add pineapple juice. Mixing in some pineapple extract will enhance the taste too. Can I use fresh pineapple instead of canned? Yes, fresh pineapple works well! Just chop it and crush it lightly. Make sure to measure the same amount as the canned version. Fresh pineapple adds a nice texture and flavor. Why is my cake not rising? If your cake does not rise, check your baking soda and baking powder. They must be fresh. Also, make sure to mix the batter well but don't overmix. This helps the cake rise properly. What if my cake is too dry? If your cake turns out dry, it might be overbaked. Always keep an eye on your cake while it bakes. Adding more crushed pineapple can also help keep it moist. Can I skip the nuts and coconut? Yes, you can skip the nuts and coconut. The cake will still taste great without them. Just keep the other ingredients the same. What are alternatives to almond extract? If you don’t have almond extract, use vanilla extract instead. You can also try coconut or even lemon extract for a different twist. Each option will give your cake a unique flavor. For the full recipe, check the Moist Southern Pineapple Cake section. This blog post covered all the key ingredients, steps, tips, and variations for making a delicious cake. You learned how to mix the batter for moist texture and got storage tips to keep your cake fresh. Remember, you can customize your cake with spices or dietary swaps. Whether serving it warm with ice cream or as a simple slice, enjoy your baking journey. Trust these steps to create a treat that satisfies your taste buds and brings joy to your table. Happy baking!

Moist Southern Pineapple Cake Easy Recipe to Enjoy

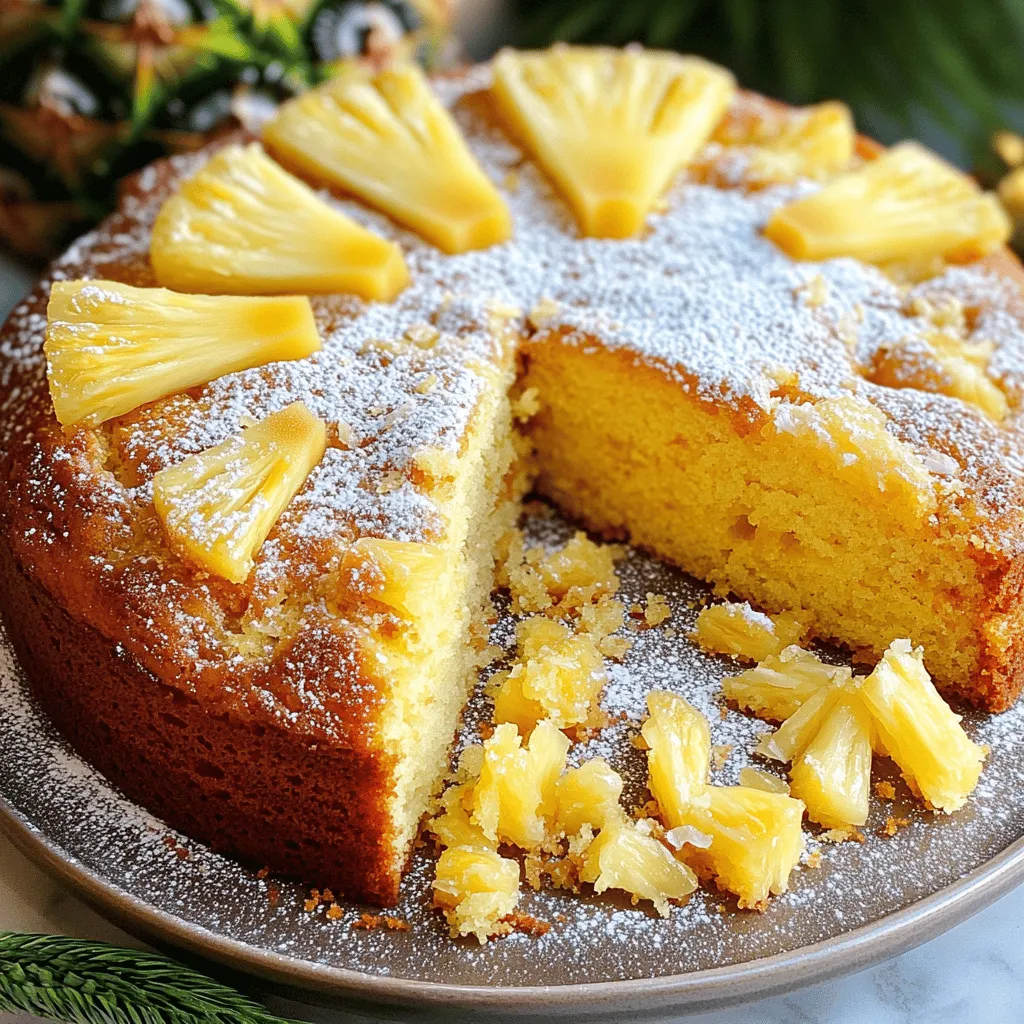
If you crave a sweet and tangy treat, this Moist Southern Pineapple Cake is perfect for you. With easy steps,

- 2 cups all-purpose flour - 1 teaspoon baking powder - 1 teaspoon ground nutmeg - 1 teaspoon ground cinnamon - 1/2 teaspoon salt - 1 cup unsalted butter, softened - 2 cups granulated sugar - 4 large eggs - 1 cup eggnog (store-bought or homemade) - 1 teaspoon vanilla extract - 1 tablespoon lemon zest - 1 cup powdered sugar - 3-4 tablespoons eggnog - A sprinkle of ground nutmeg for garnish These ingredients create a rich and moist cake full of holiday cheer. The blend of spices gives it a warm, festive flavor. The eggnog adds creaminess, making each bite a delight. You can use store-bought eggnog or make your own for a personal touch. It’s simple and fun to prepare. For the glaze, powdered sugar and eggnog combine to create a sweet, creamy topping. Adjust the eggnog amount to get the right thickness. The sprinkle of nutmeg on top adds a beautiful finish. This cake is perfect for gatherings or cozy nights at home. You can find the full recipe at the end of this article for all the details you need. - Preheat your oven to 350°F (175°C) and prepare a 10-inch bundt pan by greasing and flouring it. - In a large bowl, cream together 1 cup of softened unsalted butter and 2 cups of granulated sugar until light and fluffy. This step adds air to the batter, making the cake soft. - Add 4 large eggs, one at a time, mixing well after each addition. This ensures the eggs blend fully into the mixture. - In a separate bowl, mix 2 cups of all-purpose flour, 1 teaspoon of baking powder, 1 teaspoon of ground nutmeg, 1 teaspoon of ground cinnamon, and 1/2 teaspoon of salt. This mix gives the cake its flavor and structure. - Gradually add the dry mix to the butter mixture. Alternate with 1 cup of eggnog. Start and end with the flour mixture. Mix until just combined to avoid overmixing. - Pour the batter into the prepared bundt pan, smoothing the top with a spatula for an even bake. - Bake for 55-65 minutes, or until a toothpick inserted in the center comes out clean. This shows the cake is done. - Allow the cake to cool in the pan for 15 minutes. Then, carefully transfer it to a wire rack to cool completely. This cooling step helps keep the cake moist and prevents it from breaking. For the full recipe, check the detailed instructions above. To cream butter and sugar properly, start with soft butter. Use a mixer and beat until it looks light and fluffy. This step adds air, giving your cake a great rise. Room temperature ingredients are key. Cold eggs or butter can make the batter lumpy. Let your eggs sit out for about 30 minutes before using. This simple tip helps blend everything smoothly. Look for signs that the cake is fully baked. The edges should pull away from the pan. The top will be golden brown and spring back when lightly touched. The toothpick test is a great way to check. Insert a toothpick into the center of the cake. If it comes out clean or with a few crumbs, your cake is ready. If it has wet batter, bake it a bit longer. For a smooth glaze application, drizzle it over the cooled cake slowly. You can use a spoon or a squeeze bottle for more control. Start in the center and let it flow to the edges. Adjusting glaze consistency is important. If it is too thick, add more eggnog a little at a time. If too thin, mix in more powdered sugar. Aim for a drizzle-like texture that coats nicely without running off. For the full recipe, check the detailed steps above to create your Eggnog Pound Cake Delight. {{image_2}} You can make your eggnog pound cake even better. Try adding chocolate chips or nuts for a nice crunch. Chocolate pairs well with the sweet eggnog flavor. Walnuts or pecans add a lovely texture and taste. You can also swap out the spices. Use ginger or allspice for a different kick. Each spice brings a new twist to your cake. If you want a healthier cake, consider using whole wheat flour. This flour adds fiber and nutrients. You can also cut down on sugar. Replace some granulated sugar with a natural sweetener like honey or maple syrup. This change keeps the cake sweet while being a bit better for you. Make your cake festive with fun decorations. Dust the top with powdered sugar or ground nutmeg. You can also drizzle extra eggnog glaze over the cake. Serve slices with whipped cream for a creamy touch. Fresh fruits like berries or citrus slices add color and flavor. These simple ideas make your eggnog pound cake a showstopper! For more details, check out the Full Recipe. To keep your eggnog pound cake fresh, store it at room temperature. Use an airtight container to lock in moisture and flavor. Wrap it tightly in plastic wrap if you don’t have a container. This method helps the cake stay soft and tasty. If you want your cake to last longer, freezing is a great option. First, let the cake cool completely. Then, wrap it in plastic wrap and foil. This way, it will keep its flavor and moisture. When you’re ready to eat it, thaw the cake in the fridge. Allow it to sit overnight for the best results. Once you make the eggnog glaze, it lasts about one week in the fridge. Store it in a sealed container to keep it fresh. If you have leftovers, you can use it for other treats. Just remember to give it a good stir before using again. Yes, you can use many types of eggnog. You might try dairy-free eggnog made from almond or coconut milk. You can also use flavored eggnog, like spiced or vanilla eggnog. Each option gives a unique taste to your cake. Just ensure that the eggnog you pick has a similar texture to traditional eggnog. To check if your cake is done, look for a few signs. The edges should pull away from the pan slightly. The top should be golden brown and firm to touch. An easy test is to insert a toothpick into the center. If it comes out clean, your cake is ready! Eggnog pound cake pairs well with many treats. You can serve it with whipped cream for a light touch. A scoop of vanilla ice cream also works great. For drinks, try pairing it with spiced cider or hot chocolate. These choices make your dessert even more enjoyable. Yes, you can freeze eggnog pound cake! Wrap it tightly in plastic wrap and then in foil. It can stay fresh in the freezer for up to three months. When you're ready to eat, let it thaw in the fridge overnight. This method keeps the cake moist and tasty. You can find the full recipe for Eggnog Pound Cake with Eggnog Glaze in the article. It includes all the steps you need to make this festive treat. Enjoy baking! This blog post covered how to make a delicious Eggnog Pound Cake. You learned about the ingredients, steps to prepare the batter, and tips for getting the right texture. We also explored useful variations and storage tips. Try out this easy recipe for your next gathering. You can impress friends and family with your baking skills. Enjoy the rich flavors and festive spirit this cake brings. Happy baking!

Eggnog Pound Cake with Eggnog Glaze Delight

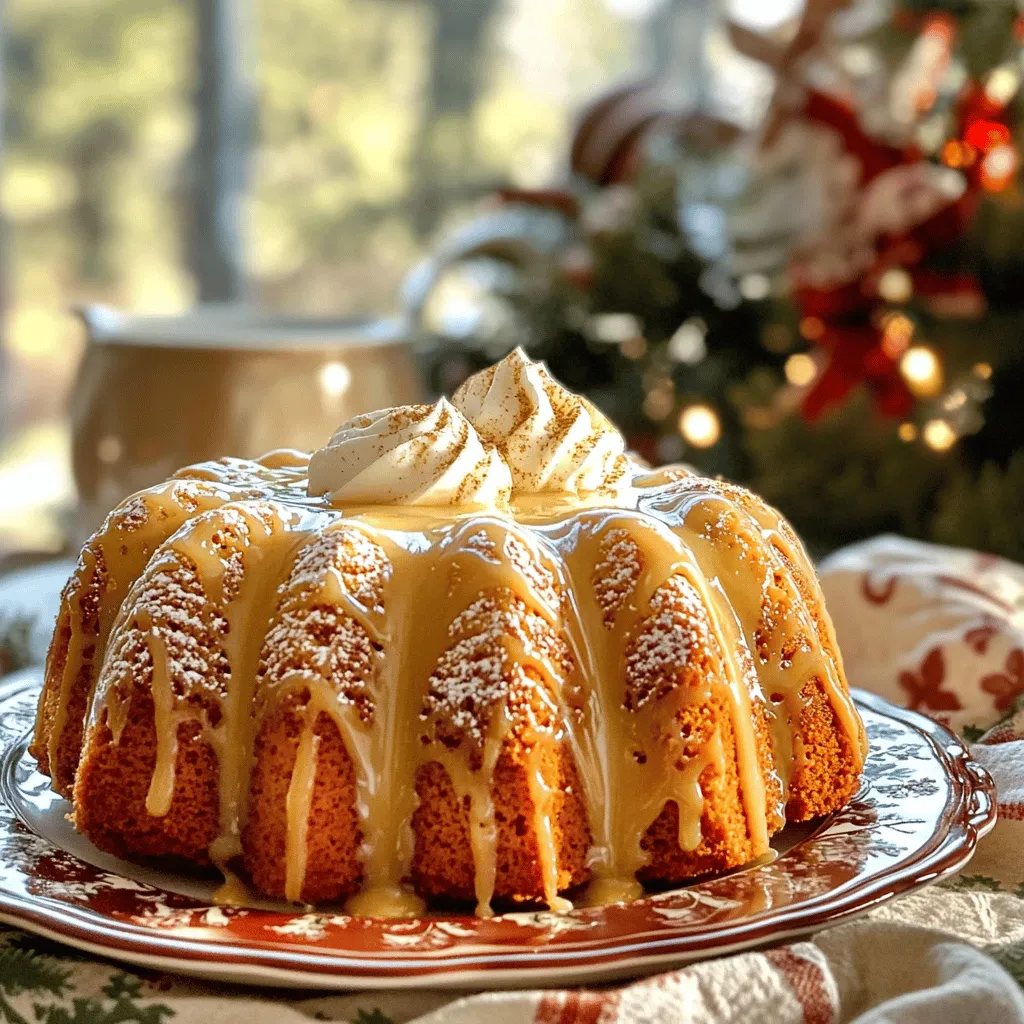
If you love the rich, creamy flavors of eggnog, you’re in for a treat! This Eggnog Pound Cake with Eggnog

- 200g cooked shrimp, peeled and deveined - 200g calamari rings, blanched - 150g mussels, cleaned and pre-cooked Seafood is the star in this dish. I love using shrimp for its sweet flavor. Calamari adds a nice chewy texture. Mussels bring a briny taste that enhances the salad. Always choose fresh seafood for the best results. - 150g cherry tomatoes, halved - 1 cucumber, diced - 1 red bell pepper, finely chopped - 1 small red onion, thinly sliced Next, we need fresh veggies. Cherry tomatoes add a burst of color and sweetness. Cucumbers give a crisp crunch. Red bell peppers bring a hint of sweetness too. The red onion adds a nice bite. All these veggies keep the salad light and refreshing. - Juice of 1 lemon - 3 tablespoons olive oil - 2 tablespoons capers, rinsed - Salt and pepper to taste - Fresh parsley, chopped (for garnish) For seasoning, lemon juice brightens the flavors. Olive oil adds richness and smoothness. Capers provide a tangy kick. I recommend salt and pepper to taste, as they enhance all the flavors. Fresh parsley gives a pop of color and freshness. For the full recipe, check the Mediterranean Mariner's Seafood Salad. First, let’s prepare the seafood. I like to use a mix of shrimp, calamari, and mussels. These seafood types create a great balance in texture and flavor. You want to combine 200g of cooked shrimp, 200g of blanched calamari rings, and 150g of cleaned mussels in a large bowl. Why is freshness important? Fresh seafood tastes better. It also has a better texture. Always choose seafood that smells clean and looks bright. Avoid any seafood that seems dull or has an off odor. Next, we will add fresh veggies. I use cherry tomatoes, cucumber, red bell pepper, and red onion for this salad. Chop the tomatoes in half, dice the cucumber, finely chop the bell pepper, and thinly slice the onion. Mix these chopped veggies with the seafood. This way, you get a wonderful burst of color and flavor in every bite. It’s important to mix gently to keep the seafood intact. Now it's time to dress the salad. I like to sprinkle 2 tablespoons of capers over the seafood and veggies. Then, pour the juice of one lemon and 3 tablespoons of olive oil on top. Season with salt and pepper to taste. After seasoning, mix everything gently with a spatula. This keeps the seafood from breaking. Cover the bowl with plastic wrap and let it chill in the fridge for at least 30 minutes. This chill time allows the flavors to blend together beautifully. You can find the Full Recipe for more details on creating this dish. When choosing seafood, I prefer fresh over frozen. Fresh seafood tastes better and has a firm texture. However, frozen seafood can be a good choice. It is often frozen right after being caught, which retains its flavor. Always check the labels for freshness dates. Seasonal seafood is also key. In summer, you may find shrimp and mussels at their best. In winter, opt for sturdy options like calamari. Local markets often have the freshest seasonal picks. To boost flavor, I love using different dressings. A simple vinaigrette of olive oil and lemon juice works wonders. For a twist, try a yogurt-based dressing with herbs. It adds creaminess and tang. Herbs are also vital. Fresh parsley adds brightness. You can also use basil or dill for a unique taste. Experiment with these to find your favorite flavor combo. When serving, I like to arrange the salad on a large platter. This makes it look festive and inviting. You can also use individual bowls for each guest. Garnishing is fun! I recommend adding lemon wedges or extra parsley on top. This not only looks pretty but also adds fresh flavor. For a pop of color, you can sprinkle some chili flakes or microgreens. Check out the Full Recipe for more details on creating this delightful dish! {{image_2}} You can make your seafood salad even better with fresh greens. Adding arugula or spinach gives it a nice peppery taste. These greens add color and extra nutrients. If you want some crunch, try using diced bell peppers or radishes. They bring a delightful snap to each bite. Feel free to mix up the seafood in your salad. You can substitute shrimp with crab or add scallops for a new twist. Each type of seafood brings its own flavor. In Italy, you might find variations that include octopus or anchovies. These regional twists can really change the dish! When serving your seafood salad, think about good sides. A light, crunchy bread pairs well with it. You could also serve it with a simple green salad. For drinks, a crisp white wine or sparkling water works best. These drinks enhance the fresh flavors of the salad. For a full recipe, check out the Mediterranean Mariner's Seafood Salad! To keep your seafood salad fresh, store it in an airtight container. This prevents air from spoiling the flavors. Make sure to place it in the fridge right after serving. Try to eat it within two days for the best taste. If you want to freeze it, note that seafood can change texture. Freeze in small portions. When ready to eat, thaw in the fridge overnight. In the fridge, seafood salad lasts for about two days. If you notice any off smells or a slimy texture, it's time to toss it. Fresh ingredients are key, so check the salad closely before eating. There are many fun ways to use leftover seafood salad. You can mix it into pasta for a quick meal. Another idea is to stuff it in a wrap with fresh greens. Try adding it on top of a baked potato for a tasty twist. Get creative and enjoy your delicious seafood salad in new ways! For the full recipe, check the Mediterranean Mariner's Seafood Salad. Italian seafood salad is a bright and tasty dish. It features fresh seafood and veggies. Traditional components include shrimp, calamari, and mussels. You can also add cherry tomatoes and cucumbers. The salad often has a light dressing made of lemon juice and olive oil. This mix of flavors creates a refreshing treat perfect for any meal. Yes, you can make seafood salad ahead of time! This dish is great for meal prep. I suggest preparing it a few hours before you serve it. This way, the flavors blend well. Just keep it in the fridge, covered with plastic wrap. Chilling for 30 minutes is key, but the longer, the better! You can use many types of seafood in your salad. Besides shrimp, calamari, and mussels, try scallops or crab meat. If you want a twist, smoked salmon adds a nice flavor. When choosing seafood, always pick fresh or frozen options. This ensures a tasty and safe meal. For more ideas, check the Full Recipe for ideas on seafood combinations. This blog post covered how to make a delicious seafood salad. We explored key ingredients like shrimp, calamari, and fresh veggies. You learned how to combine and season them for the best flavor. I shared tips for choosing fresh seafood and creative ways to store your leftovers. Remember, seafood salad is flexible. You can tweak it to match your taste. Enjoy the process, involve fresh ingredients, and share this dish with friends. Happy cooking, and see you next time!

Italian Seafood Salad Fresh and Flavorful Delight

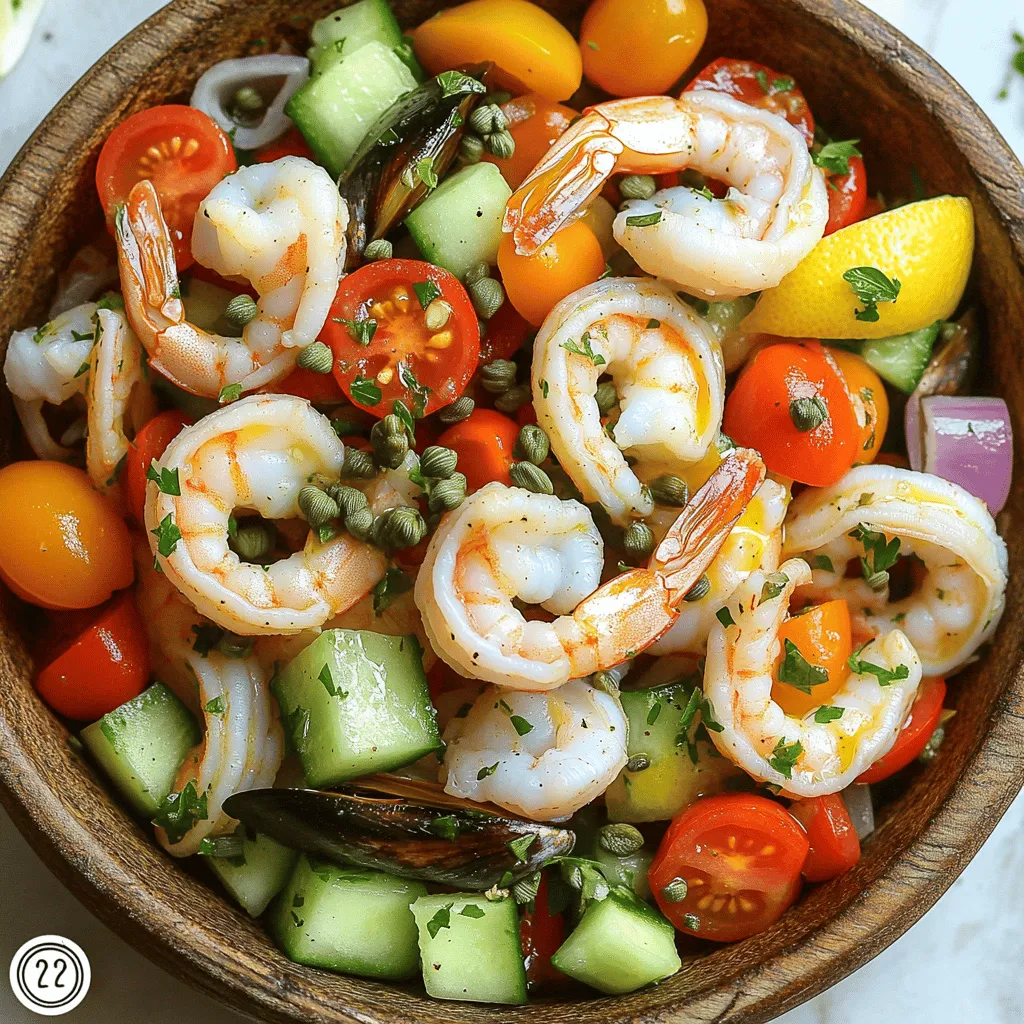
Are you ready to dive into a bowl of fresh Italian seafood salad? This vibrant dish bursts with flavor, thanks

- 1 large loaf of French bread - 1 lb flank steak, thinly sliced - 1 tablespoon olive oil - 1 medium onion, thinly sliced - 1 green bell pepper, thinly sliced - 3 cloves garlic, minced - 1 teaspoon smoked paprika - Salt and pepper, to taste - 1 cup provolone cheese, shredded - 1 cup mozzarella cheese, shredded - Fresh parsley, chopped (for garnish) To make Cheesy Garlic Philly Cheesesteak Bread, gather all these ingredients. The flank steak gives a rich flavor. The onions and bell peppers add sweetness and crunch. Garlic brings a warm aroma, while smoked paprika adds depth. The provolone and mozzarella cheese create a gooey, satisfying topping. - Alternative proteins: You can use chicken or turkey instead of flank steak. For a plant-based option, try mushrooms or tempeh. - Cheese alternatives: If you prefer a dairy-free option, use almond or cashew cheese. Vegan cheese works well too. - Gluten-free options: Look for gluten-free French bread or use a gluten-free roll. This way, everyone can enjoy the dish. This recipe is flexible. Feel free to swap any ingredients to suit dietary needs or preferences. You can find the full recipe in the earlier section. Start by slicing the vegetables and steak. Use a sharp knife for clean cuts. Cut the onion into thin strips. Aim for about the same thickness as the pepper slices. For the green bell pepper, remove the seeds and slice it thinly too. Next, thinly slice the flank steak against the grain. This helps it stay tender. Keep your workspace neat to make cooking smooth. Gather all your ingredients close to you. This saves time and keeps you organized. Heat a large skillet over medium heat and add olive oil. Once hot, toss in the sliced onions and peppers. Sauté them for about 5 to 7 minutes. You want them soft and sweet. Add the minced garlic to the skillet. Cook for one more minute. Smell that? It's the garlic! Now, increase the heat to high. Add the thinly sliced flank steak next. Season it with smoked paprika, salt, and pepper. Cook until the steak is browned, about 3 to 5 minutes. Stir often to mix everything well. Grab your loaf of French bread. Slice it lengthwise. This creates a boat for your filling. If you want, hollow out some inside to fit more goodies. Spread the steak mixture evenly over the cut side of the bread. Make sure to cover every inch. Now, for the cheese! Layer provolone and mozzarella on top. Use a mix to get that gooey, melty goodness. Preheat your oven to 375°F (190°C). Place your filled bread on a baking sheet. Bake for 10 to 15 minutes. You’ll know it’s done when the cheese is melted and bubbly. Keep an eye on it to avoid burning. To make your Cheesy Garlic Philly Cheesesteak Bread truly shine, focus on your seasoning. Use smoked paprika for a unique touch. It adds a deep, warm flavor. Don’t shy away from salt and pepper; they bring out the taste of the steak and veggies. For extra kick, sprinkle some red pepper flakes or chili powder. This way, you can tailor the heat to your taste. You can prep this dish in advance. Slice the veggies and meat the night before. Store them in the fridge in airtight containers. This saves time on the day you plan to bake. You can also assemble the bread and place it in the oven just before serving. To reheat, wrap the bread in foil and place it in a preheated oven at 350°F (175°C) for about 15 minutes. This keeps it warm and the cheese melty. Pair this cheesy delight with easy side dishes. A fresh salad with tomatoes and cucumbers works well. You can also serve it with crispy fries or potato wedges. For extra flavor, try dips like ranch or a zesty garlic sauce. These add a nice touch to every bite. Enjoy the mix of flavors and textures! {{image_2}} For a tasty vegetarian version, swap the steak for mushrooms or tempeh. Mushrooms give a rich, meaty flavor. Tempeh is packed with protein and adds a nice bite. Try using these veggies for added taste: - Bell peppers - Spinach - Zucchini - Onions Each of these choices brings a fresh twist to your Cheesy Garlic Philly Cheesesteak Bread. Cheese is key in this recipe. While provolone and mozzarella work great, you can explore other blends. Gouda adds a smoky taste, while cheddar gives a sharp kick. Here are some fun cheese ideas: - Monterey Jack for creaminess - Blue cheese for a bold flavor - Feta for a tangy surprise Mix and match to find your favorite combo! If you love heat, try adding jalapeños or a splash of hot sauce. These can spice up your bread and make it exciting. Here are some tips to balance the heat: - Start with a small amount and taste as you go. - Pair spicy flavors with cooling ingredients like sour cream or avocado. - Add some sweet peppers to mellow out the heat. This way, your Cheesy Garlic Philly Cheesesteak Bread can be as spicy as you like! To keep your Cheesy Garlic Philly Cheesesteak Bread fresh, follow these tips: - Refrigeration: Wrap the leftovers tightly in foil or plastic wrap. This helps keep them moist. Store in the fridge for up to three days. - Prevent Sogginess: If you notice the bread getting too soft, consider storing the filling and bread separately. This way, the bread stays crisp longer. Freezing is a great option for longer storage. Here’s how to do it right: - Guidelines for Freezing: Wrap the entire loaf tightly in foil, then place it in a freezer bag. This keeps freezer burn at bay. You can freeze it for up to three months. - How to Reheat for Optimal Taste: To enjoy it again, thaw the loaf in the fridge overnight. Preheat your oven to 375°F (190°C) and bake for about 15-20 minutes. This brings back the melty cheese and soft bread. Making Cheesy Garlic Philly Cheesesteak Bread takes about 30 minutes in total. You will spend around 15 minutes prepping the ingredients. The cooking time will take about 15 minutes. This quick method makes it great for a tasty meal when you’re short on time. Yes, you can switch the bread! Here are some great options: - Ciabatta - Hoagie rolls - Italian bread These choices can add a new twist to your dish. Each type brings its own texture and flavor to the mix. Absolutely! This bread is perfect for meal prep. You can make it ahead and enjoy it all week. Just store it in the fridge after it cools. When you're ready to eat, heat it in the oven for a few minutes. This keeps it warm and tasty. Yes, you can prepare this bread in advance. To store it, keep the bread in an airtight container or wrap it well. You can refrigerate it for up to three days. For reheating, place it in the oven at 350°F (175°C) until warm. This will help keep the cheese melted and the bread nice. For the full experience, follow the Full Recipe. This blog post covers everything you need for Cheesy Garlic Philly Cheesesteak Bread. We discussed the required ingredients, offered substitutes, and shared step-by-step cooking instructions. I provided tips for perfect flavor and suggestions for variations. You can even make ahead and store leftovers properly. Enjoy making this dish that fits your taste and dietary needs. Now, gather your ingredients and start cooking! You’ll love the results.

Cheesy Garlic Philly Cheesesteak Bread Delight

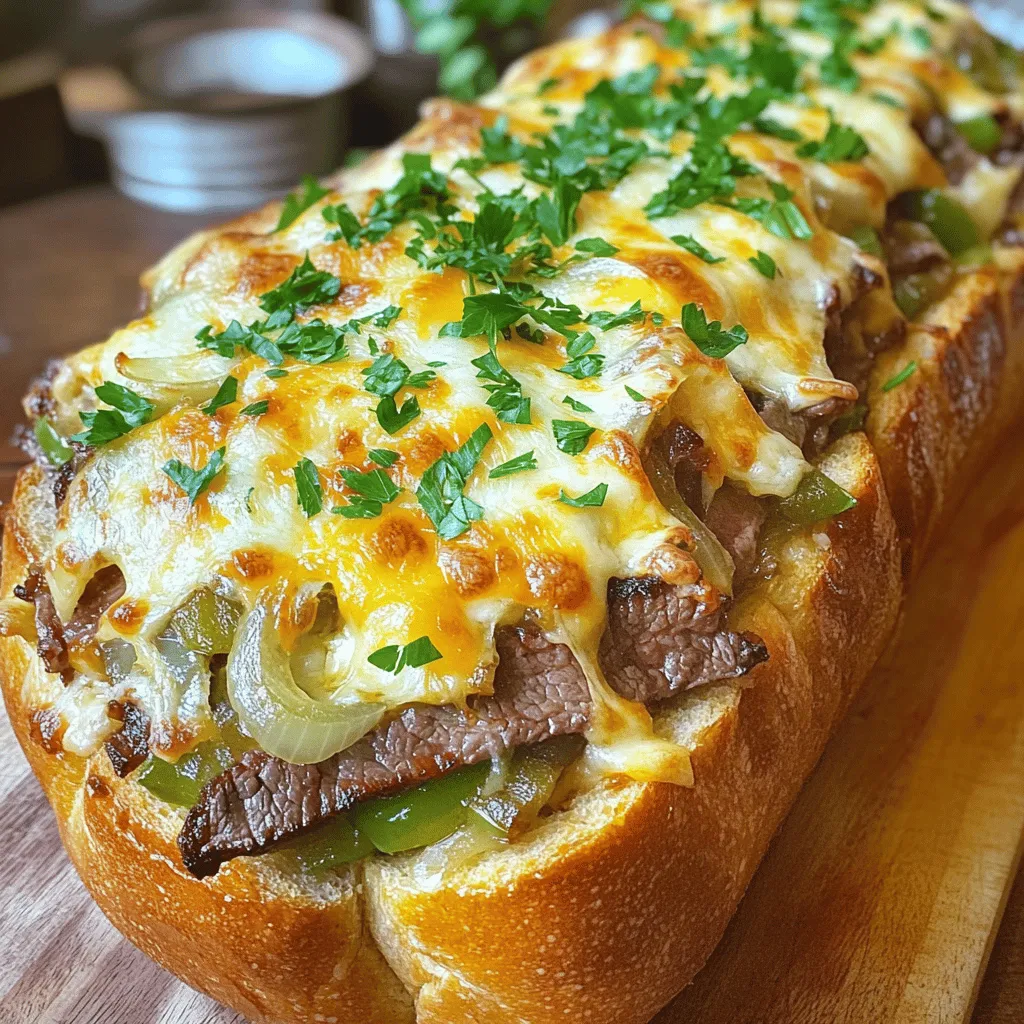
Are you ready to take a classic Philly cheesesteak to a whole new level? In this blog post, I’ll show

To make creamy garlic shrimp pasta, gather these ingredients: - 8 oz fettuccine pasta - 1 lb large shrimp, peeled and deveined - 4 cloves garlic, minced - 1 cup heavy cream - 1/2 cup grated Parmesan cheese - 2 tablespoons unsalted butter - 1 tablespoon olive oil - 1/2 teaspoon red pepper flakes (optional) - Salt and pepper to taste - Fresh parsley, chopped for garnish When picking shrimp, look for these signs of freshness: - Clear, shiny shells - A mild, salty scent - No black spots or discoloration - Firm, springy texture Choose shrimp that are wild-caught if possible. They often taste better than farmed shrimp. If you buy frozen shrimp, check if they are individually quick frozen. This keeps them fresh longer. You can swap some ingredients if needed: - Pasta: Try spaghetti or penne instead of fettuccine. - Cream: Use half-and-half for a lighter sauce. - Shrimp: Scallops or chicken can work well. - Cheese: Grated Pecorino Romano offers a nice twist. - Butter: Use ghee or a plant-based butter for a dairy-free option. Feel free to mix and match based on what you have at home! For the complete recipe, check out the full recipe section. First, fill a large pot with water. Add a good amount of salt to it. Bring the water to a boil. Once boiling, add 8 oz of fettuccine pasta. Cook according to the package instructions until al dente. This usually takes about 8-10 minutes. After cooking, drain the pasta. Remember to save 1/2 cup of the pasta water for later. Set the pasta aside while you cook the shrimp. Now, grab a large skillet and add 1 tablespoon of olive oil and 2 tablespoons of unsalted butter. Heat the skillet over medium-high heat. Once hot, add 4 cloves of minced garlic to the skillet. Stir it for about 30 seconds until it smells amazing. Next, add 1 pound of peeled and deveined shrimp. Season the shrimp with salt, pepper, and 1/2 teaspoon of red pepper flakes if you like heat. Cook the shrimp for 3-4 minutes. They should turn pink and opaque. When done, remove the shrimp from the skillet and set them aside. In the same skillet, lower the heat to medium. Pour in 1 cup of heavy cream. Stir gently as you add 1/2 cup of grated Parmesan cheese. Mix until the cheese melts and forms a creamy sauce. Let it simmer for about 3-5 minutes. This will help the sauce thicken. If it gets too thick, you can add some of that reserved pasta water. Finally, add the cooked shrimp back into the skillet along with the pasta. Toss everything together to coat it well in the creamy sauce. Serve it warm and enjoy this delightful dish. For the complete recipe, refer to the Full Recipe section. To cook pasta just right, start with a big pot of water. Add a good amount of salt. This helps flavor the pasta as it cooks. Bring the water to a boil, then add your fettuccine. Stir often to keep it from sticking. Follow the package time, but check for al dente. That means firm to the bite. When it's done, drain it but keep some pasta water. This water can help your sauce later. To make the cream sauce burst with flavor, use fresh garlic. Mince it finely so it spreads well. Adding grated Parmesan cheese makes the sauce rich and cheesy. For a kick, sprinkle in red pepper flakes. You can also use herbs like thyme or basil. These add freshness and depth. Remember to stir the sauce gently as it simmers. This helps blend the flavors and keep it smooth. Many cooks make a few common mistakes. One is not salting the pasta water. This can lead to bland pasta. Another mistake is overcooking the shrimp. They should be pink and opaque, about 3-4 minutes. Don't skip the step of reserving pasta water. It can save a thick sauce. Lastly, taste your dish before serving. Adjust the salt and pepper to your liking. For more details on how to make this dish, check the Full Recipe. {{image_2}} You can make creamy garlic shrimp pasta even better by adding vegetables. Spinach adds a nice color and taste. Just sauté it with the shrimp for about a minute. Broccoli or asparagus also work well. They bring a crunch and extra nutrients. You can use any veggies you like, such as bell peppers or zucchini. These will make the dish more colorful and healthy. If you love heat, spice up your creamy garlic shrimp pasta. Add red pepper flakes, or use a hot sauce. A pinch of cayenne pepper will also do the trick. For a new twist, mix in diced jalapeños or a splash of sriracha. This will give your dish a fiery kick. Just be careful; too much heat can overpower the flavors. You can swap out fettuccine for other pasta shapes. Penne, linguine, or spaghetti are great choices. Gluten-free pasta is also an option for those with dietary needs. The sauce clings well to any pasta type, so choose what you enjoy. Each shape gives a unique bite, making your meal special. Try different kinds to keep it exciting! For more details, check out the Full Recipe. To store your creamy garlic shrimp pasta, let it cool first. Place it in an airtight container. This will keep it fresh for up to three days in the fridge. Make sure to label the container with the date. Keeping your food safe helps prevent waste. When you reheat the pasta, use a low heat setting. You can use a skillet or microwave. If using a skillet, add a splash of water or cream. This will help revive the creamy texture. Stir gently until heated through, but don't overcook the shrimp. You can freeze this dish for future meals. First, let it cool completely. Then, place it in a freezer-safe bag or container. Remove as much air as you can. It will last for up to two months in the freezer. When ready to eat, thaw it overnight in the fridge before reheating. Check the Full Recipe for more details. You can pair this dish with a fresh salad. A simple green salad adds crunch and flavor. Garlic bread also works well to soak up the creamy sauce. For a light touch, serve with steamed vegetables like broccoli or asparagus. A glass of white wine complements the dish nicely. Yes, frozen shrimp can work great. Just make sure to thaw them before cooking. You can place them in cold water for quick thawing. Pat them dry to avoid excess water in your dish. This way, your creamy garlic shrimp pasta stays rich and flavorful. To lighten the dish, swap heavy cream for half-and-half or a plant-based milk. You can also reduce the amount of cheese. Using less butter and olive oil helps cut down on fat. Adding more vegetables increases nutrition and volume without many calories. For a different twist, try whole wheat pasta for added fiber. Check the Full Recipe for more ideas. This blog post covered all you need to know about creamy garlic shrimp pasta. We discussed the best ingredients, tips for choosing fresh shrimp, and how to store your dish. I shared step-by-step cooking instructions and helpful tips to avoid common mistakes. You learned about delicious variations to try out. Remember, cooking is fun, and you can make this dish your own. Enjoy your pasta and impress your friends!

Creamy Garlic Shrimp Pasta Rich and Flavorful Dish

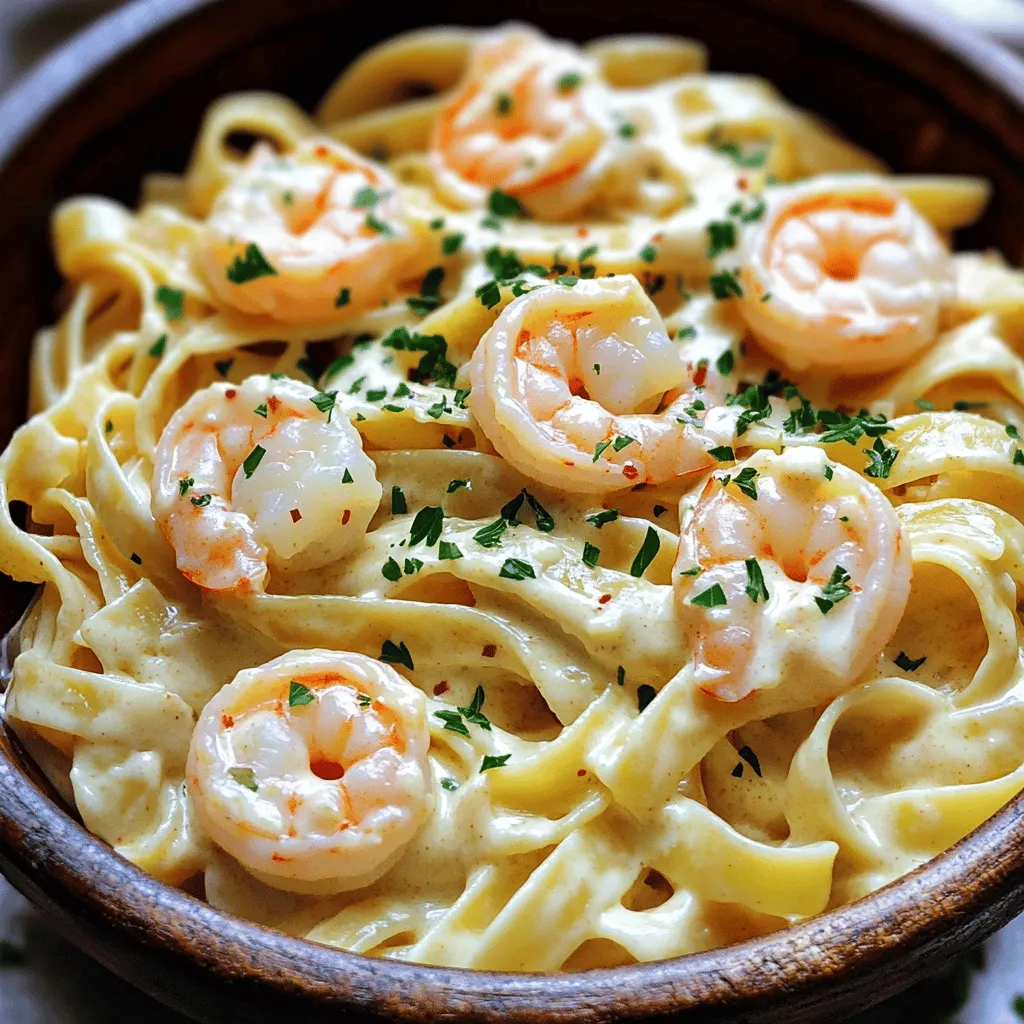
If you crave a dish that’s rich, creamy, and full of flavor, you’ve found it! Creamy Garlic Shrimp Pasta is

To make this dish, you need a few key items. Here’s what you will need: - 8 large sea scallops, patted dry - 8 oz linguine or spaghetti - 4 tablespoons unsalted butter - 4 cloves garlic, minced - 1 teaspoon red pepper flakes (adjust to taste) - ½ cup cherry tomatoes, halved - 2 cups fresh spinach - Salt and pepper to taste - 2 tablespoons fresh parsley, chopped (for garnish) - 1 tablespoon lemon juice - Zest of 1 lemon You can get creative with your dish by adding some extra ingredients. Here are a few ideas: - A splash of white wine for depth - Capers for a briny kick - Fresh basil or thyme for added herbal notes When you choose scallops, freshness is key. Look for these signs: - They should smell like the ocean, not fishy. - The meat should be firm and slightly translucent. - Avoid scallops that are dry or have brown spots. - If possible, buy from a trusted local fishmonger. Using fresh scallops will make your dish shine. For the full recipe, check out the detailed steps to create this delightful meal. Start by boiling a large pot of salted water. This adds flavor to your pasta. Once the water is boiling, add 8 ounces of linguine or spaghetti. Cook it according to the package instructions until it is al dente. Al dente means it is firm to the bite. After cooking, set aside ½ cup of pasta water. Then, drain the pasta and let it rest. For the best seared scallops, you need to dry them well. Use a paper towel to pat 8 large sea scallops until they are dry. This step helps achieve a nice crust. Season both sides with salt and pepper. Heat 2 tablespoons of unsalted butter in a large skillet over medium-high heat. When the butter is hot, add the scallops in a single layer. Do not overcrowd the pan; this keeps the heat high. Sear each side for 2-3 minutes until golden brown. They should look beautiful and cooked through. Remove them from the skillet and set aside. In the same skillet, lower the heat to medium. Add the remaining 2 tablespoons of butter. Once melted, add 4 minced garlic cloves and 1 teaspoon of red pepper flakes. Sauté for about 1 minute until the garlic smells good. Next, add ½ cup of halved cherry tomatoes. Cook them for 2 minutes until they soften. Then, toss in 2 cups of fresh spinach and cook until it wilts. Now, add the cooked pasta along with that reserved pasta water, 1 tablespoon of lemon juice, and the zest of 1 lemon. Mix everything well to combine the flavors. Season with salt and pepper to taste. You can find the full recipe with all the details in the previous section. Enjoy your cooking! To sear scallops well, start with dry scallops. Pat them with paper towels until no moisture remains. This helps them brown nicely. Season both sides with salt and pepper. Heat a skillet over medium-high heat. Add two tablespoons of butter. When it is hot, add the scallops. Give them space; don’t crowd the pan. Sear for about 2-3 minutes. Flip them when they are golden. Cook the other side for another 2-3 minutes. They should be firm yet slightly translucent inside. Garlic pasta shines with fresh ingredients. Begin with good-quality garlic. Mince four cloves to release their flavor. Use unsalted butter to control the saltiness. Red pepper flakes add a nice kick. Adjust the amount to your taste. Cherry tomatoes bring sweetness and color. Cook them until they soften. Fresh spinach wilts quickly, adding a lovely green touch. Always save some pasta water. It helps the sauce cling to the pasta. Presentation makes a dish pop. Use deep bowls for serving. Place a mound of garlic pasta first. Arrange the scallops on top, showing off their golden crust. For a fresh touch, sprinkle parsley over the dish. Add a lemon wedge on the side. This adds color and lets guests brighten their meal if they wish. For the full recipe, you can check the details provided earlier. {{image_2}} If you want to change up the greens in your dish, you have many options. Kale works great if you want a heartier taste. Just chop it finely and add it to the skillet with the garlic. Arugula adds a nice peppery kick. Toss it in at the very end to keep its fresh flavor. Swiss chard is another good choice. Cook it until it's wilted for a delicious twist. Each green brings its own taste and texture to the dish. If you want to add more protein, shrimp or chicken are perfect choices. For shrimp, use large ones and sauté them just like the scallops. They only need a few minutes to cook through. If you prefer chicken, try using thin chicken breasts. Cook them in the skillet first, and then set them aside. You can add them back in with the pasta sauce for a hearty meal. Both options pair well with the garlic sauce. If you need a gluten-free option, there are many pasta types to choose from. Look for gluten-free linguine or spaghetti made from rice or corn. They cook similarly to regular pasta. Zucchini noodles are another fun option. Just spiralize fresh zucchini and sauté it for a few minutes. It’s a low-carb choice and adds a fresh taste. Whichever substitute you pick, you can still enjoy this delicious dish without gluten. For the full recipe, check out the detailed instructions above! To store leftover scallops over garlic pasta, place it in an airtight container. Make sure to cool the dish to room temperature first. Seal the container tightly to keep out air. You can store it in the fridge for up to three days. If you wait longer, the scallops may lose their flavor and texture. When reheating, use the stovetop for best results. Place the pasta in a pan over low heat. Add a splash of water or a bit of butter to keep it moist. Stir gently until heated through, about five minutes. Avoid the microwave, as it can make the scallops rubbery. If you want to save the dish for later, freezing is an option. However, I recommend freezing only the pasta and sauce. Scallops do not freeze well. To freeze, place the cooled pasta in a freezer-safe bag. Remove as much air as possible. It can last up to three months in the freezer. When ready to eat, thaw it overnight in the fridge before reheating. For the best flavor, use the Full Recipe for fresh scallops when you serve it again. You can tell when scallops are done by checking their color. They should be a nice golden brown on the outside. The inside should be opaque and firm to the touch. If the scallops feel soft or mushy, they need more time. Cook them for about 2-3 minutes on each side. Watch closely to avoid overcooking. Overcooked scallops become tough and chewy. Yes, you can make parts of this dish in advance. Cook the pasta and prepare the garlic sauce ahead of time. Store them separately in the fridge. When you're ready to serve, just reheat the sauce and pasta together. Sear the scallops fresh for the best taste. This way, you keep their lovely texture. Seared scallops over garlic pasta pair well with many sides. A fresh green salad with a light vinaigrette complements the dish nicely. You can also serve some crusty bread to soak up any sauce. For a fun twist, a side of roasted asparagus or sautéed zucchini adds color and flavor. These options enhance your meal and make it more complete. In this post, we covered how to make seared scallops over garlic pasta. We discussed essential and optional ingredients, tips for selecting fresh scallops, and detailed cooking steps. I shared tricks to perfect scallops and enhance flavor in your dish. Also, we explored variations and storage tips. Remember, with practice, you can master this dish. Enjoy the delicious meal and impress your guests!

Seared Scallops Over Garlic Pasta Simple and Tasty Dish

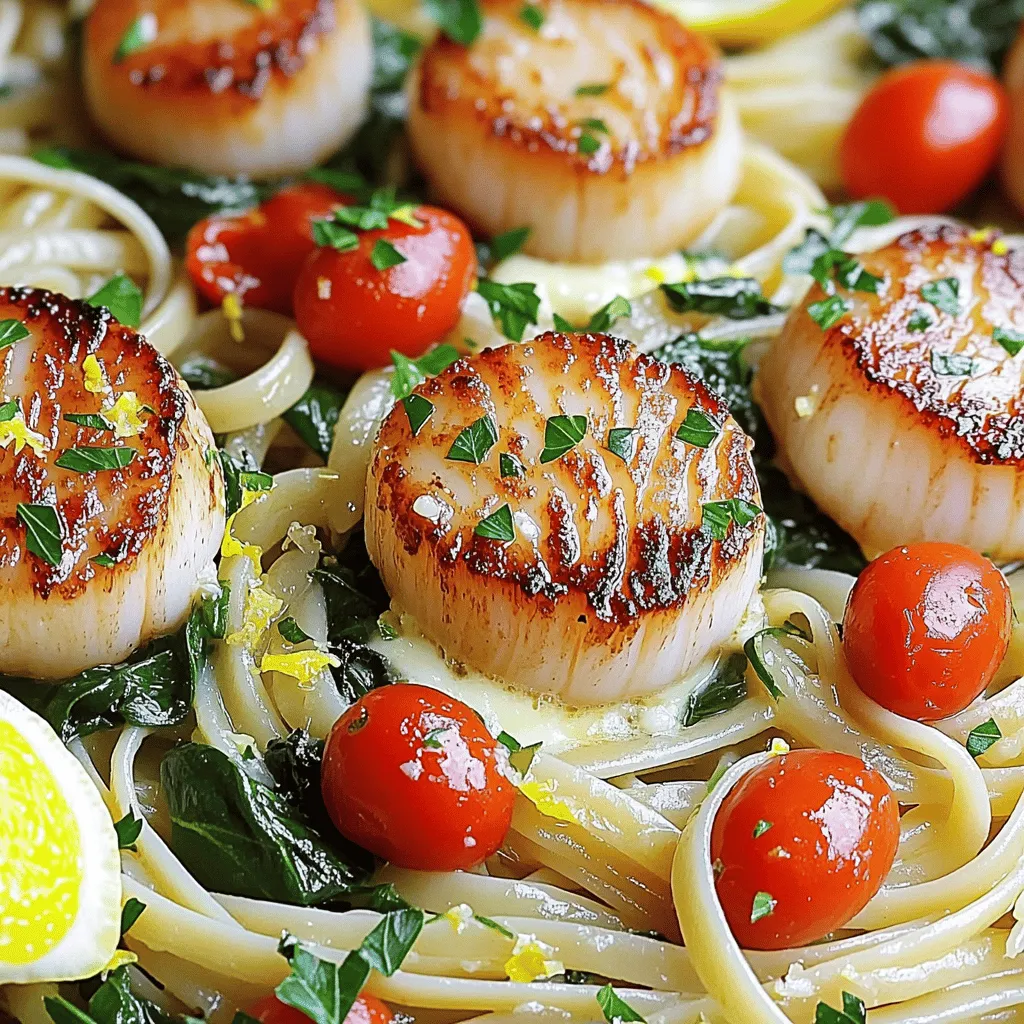
If you’re craving a meal that’s both quick and delicious, seared scallops over garlic pasta is the answer. This simple

For this savory dish, you need: - 4 boneless, skinless chicken breasts - 1/4 cup honey - 1/4 cup unsalted butter - 4 cloves garlic, minced - 1 teaspoon soy sauce - 1/2 teaspoon crushed red pepper flakes (optional for a kick) - Salt and pepper to taste - Fresh parsley, chopped for garnish I choose boneless, skinless chicken breasts for their lean meat and quick cooking. Honey gives a sweet touch, while unsalted butter adds richness. Fresh garlic brings a bold flavor. You can adjust the red pepper flakes for spice lovers! If you need swaps, here are some ideas: - For honey, use agave syrup or maple syrup. - Instead of regular butter, try olive oil or coconut oil. - Fresh garlic can be replaced with garlic powder. Use 1/8 teaspoon per clove. These alternatives won't change the dish much but can fit your needs. To boost flavor, consider these: - Fresh herbs like thyme or rosemary. - Spices such as paprika or cumin for a twist. For garnishing, fresh parsley brightens the dish. You can also use green onions or sesame seeds for a fun look. Each adds a nice touch to your honey butter garlic chicken! 1. First, season the chicken breasts. Use salt and pepper on both sides. This adds basic flavor. 2. Next, grab a large skillet. Place it on the stove and set the heat to medium. 1. Start by melting the butter in the skillet. Watch for it to fully melt but not brown. 2. Now, add the minced garlic. Sauté it for 1-2 minutes until it smells great. 3. In a bowl, mix the honey, soy sauce, and red pepper flakes if you like heat. Stir until combined. 4. Increase the heat to medium-high. Carefully add the seasoned chicken breasts to the skillet. 5. Cook the chicken for about 5-6 minutes on each side. Look for a golden brown color. The chicken should reach 165°F (75°C) inside. 1. Once the chicken is done, reduce the heat to low. Spoon the honey garlic sauce over the chicken. 2. Let it simmer for 2-3 minutes. This helps the chicken soak up the sauce flavors. 3. Remove the skillet from the heat. Let the chicken rest for a few minutes. This keeps it juicy. 4. Finally, garnish the chicken with fresh chopped parsley before serving. Enjoy your delicious honey butter garlic chicken! For more detailed instructions, check out the Full Recipe. To ensure juicy chicken, start with good quality meat. Choose boneless, skinless chicken breasts for the best results. Season them well with salt and pepper. This adds flavor and helps keep the chicken moist. Perfect browning methods involve heating your skillet before adding the chicken. Use medium-high heat for a nice golden color. Don't overcrowd the pan; cook in batches if needed. This allows the chicken to sear properly and develop a rich flavor. To add depth to the sauce, balance the sweetness of honey with soy sauce. This gives a savory touch to your chicken. You can also add a splash of lemon juice for freshness. For a more complex taste, consider using fresh herbs like thyme or rosemary. Incorporating spice adds an exciting kick. Crushed red pepper flakes work well if you want heat. Start small; you can always add more. Experiment with other spices like smoked paprika or cayenne for different flavor profiles. Ideal pairings for the dish include fluffy rice or creamy mashed potatoes. The honey garlic sauce pairs well with both. Roasted vegetables like broccoli or carrots add color and nutrition. They also soak up the sauce, making every bite delicious. For plating tips, slice the chicken for a beautiful presentation. Drizzle the sauce over the top and sprinkle with fresh parsley. This adds a pop of color and freshness. Serve on a warm plate to keep everything inviting. For more details, check the Full Recipe. {{image_2}} To make spicy honey butter garlic chicken, you can add heat with extra spices. A great choice is crushed red pepper flakes. Just toss in half a teaspoon when you mix the sauce. If you want more heat, add fresh chili peppers. Jalapeños or serranos work well. Each type brings its unique flavor and spice level. You can also include sautéed veggies in your dish. Bell peppers, zucchini, or broccoli add color and taste. Start by cooking the veggies in the skillet before the chicken. This way, they soak up the honey garlic sauce. Roasted vegetable combinations are also great. Try mixing carrots, sweet potatoes, and Brussels sprouts. Roasting brings out their natural sweetness and pairs well with the honey garlic sauce. If you want to switch things up, consider alternative proteins. You can substitute chicken with pork or turkey. Just adjust the cooking time as needed. For a vegetarian option, use tofu or tempeh. Marinate the tofu in the honey garlic sauce for flavor. Cook it until it’s crispy and golden. This way, you keep the dish tasty and satisfying. For the full recipe, check out the Honey Butter Garlic Chicken. To keep your honey butter garlic chicken tasty, follow these steps. Allow the chicken to cool down first. Once cool, place it in an airtight container. This helps keep the chicken fresh and prevents drying out. For best results, store it in the fridge. Enjoy it within three days for the best flavor. When you are ready to eat leftovers, reheating is key. The oven is best for keeping flavor. Preheat it to 350°F (175°C). Place the chicken in a baking dish and cover it with foil. Heat for about 15-20 minutes. If you use a microwave, place the chicken on a microwave-safe plate. Heat for 1-2 minutes, checking every 30 seconds. This helps avoid overcooking. You can freeze honey butter garlic chicken for later. Wrap each piece tightly in plastic wrap. Then, place it in a freezer bag. Remove as much air as possible before sealing. This keeps the chicken fresh for up to three months. To thaw, move it to the fridge overnight. Reheat it using the oven or microwave, as mentioned above. Enjoy your delicious meal anytime! For the full recipe, check out the Honey Butter Garlic Chicken 🧄 recipe above. Honey butter garlic chicken is a tasty dish that blends sweet and savory flavors. It features chicken cooked in a rich honey-garlic sauce. This dish is popular due to its simple ingredients and quick cooking time. Many people love it because it tastes great and is easy to make at home. Cooking honey butter garlic chicken takes about 30 minutes. You need about 10 minutes for prep and 20 minutes for cooking. This makes it a quick meal for busy nights. You can have a delicious dinner on the table in no time. Yes, you can make honey butter garlic chicken in advance! This dish holds up well in the fridge. You can prepare it the night before and store it in an airtight container. When you’re ready, just reheat it on the stove or in the microwave. Enjoy it with rice or veggies for a quick meal! For the detailed steps, check the Full Recipe. This blog post covers how to make honey butter garlic chicken. You learned about the key ingredients, preparation steps, and cooking techniques. We explored tips for flavoring, garnishing, and serving the dish. I shared variations with spice and vegetables, plus storage options for leftovers. You now have the tools to create a delicious meal. Enjoy your cooking journey with this tasty recipe. Your kitchen will shine with flavors and warmth.

Savory Honey Butter Garlic Chicken Easy Recipe

Do you crave a dish that’s both sweet and savory? Look no further! This Savory Honey Butter Garlic Chicken recipe

- Pasta: I recommend using penne or rotini. These shapes hold the dressing well. - Proteins: You can use cooked chicken and crispy bacon. Turkey bacon works great too! - Fresh Vegetables: Use cherry tomatoes, diced cucumber, and finely chopped red onion. These add color and crunch. - Cheese: Shredded cheddar cheese gives a rich flavor. Use about half a cup for best taste. - Dressing Components: The dressing needs mayonnaise, Dijon mustard, ranch dressing, and lemon juice. These create a creamy, tangy mix. This combination of ingredients makes the club sandwich pasta salad easy and flavorful. You can find the full recipe above to guide you through every step. Enjoy your cooking! To make your pasta just right, start by boiling water in a large pot. Add a pinch of salt to the water. This helps the pasta have flavor. Once the water boils, add 8 oz of penne or rotini pasta. Cook it according to the package instructions. Usually, this takes about 8 to 10 minutes. You want the pasta to be al dente, which means it should be firm but not hard. When the pasta is cooked, drain it in a colander. Rinse it under cold water. This stops the cooking process and cools it down quickly. Make sure to shake off any extra water. Now, let’s mix everything together. In a large mixing bowl, add the cooled pasta. Then, add 1 cup of diced cooked chicken and 1 cup of chopped cooked bacon. You can use turkey bacon if you prefer. Next, toss in 1/2 cup of halved cherry tomatoes, 1/2 cup of diced cucumber, and 1/4 cup of finely chopped red onion. Finally, sprinkle in 1/2 cup of shredded cheddar cheese. For even mixing, add the ingredients in this order: pasta first, then proteins, followed by the veggies and cheese. This helps distribute everything well. For the dressing, grab a small bowl. Mix together 1/2 cup of mayonnaise, 1 tablespoon of Dijon mustard, 2 tablespoons of ranch dressing, and 1 tablespoon of lemon juice. Add salt and pepper to taste. Whisk everything together until it is smooth and creamy. You can adjust the dressing ratio based on your taste. If you like it tangier, add more lemon juice or mustard. Pour the dressing over the pasta mixture and toss gently. Make sure every piece is coated well. For the full recipe, check the details above. To make your Club Sandwich Pasta Salad taste great, focus on seasoning. Use salt and pepper to enhance the flavors. You can also add garlic powder or smoked paprika for extra depth. Always taste your salad before serving. This helps you adjust the flavors to your liking. Letting the salad chill is key. It allows the flavors to mix and develop. Aim for at least 30 minutes in the fridge. If you have time, chill it longer for an even better taste. For gatherings, get creative with your serving. Use a large, clear bowl to show off the colorful salad. You can also serve individual portions in small cups for a fun touch. Adding fresh parsley on top gives a nice pop of color. Try adding some crackers or breadsticks on the side. They pair well with the creamy texture of the salad. This adds a crunch that everyone will enjoy. Feel free to customize your salad for dietary needs. If you want a vegetarian option, swap out chicken and bacon for chickpeas or more veggies. You can also use a dairy-free cheese if needed. For extra variety, think about toppings. Add sliced olives, bell peppers, or even avocado. These mix-ins can change the flavor and make each bite unique. {{image_2}} You can switch up the protein in your Club Sandwich Pasta Salad to match your taste. For a vegetarian option, try using chickpeas or black beans. These add a nice texture and protein boost. You can also use grilled vegetables, like zucchini or bell peppers, for a fresh twist. If you prefer meat, turkey is a great choice. It has a milder flavor than chicken but still offers that savory kick. Ham is another option, bringing a different taste to the salad. You can even mix and match proteins. Combining chicken, turkey, and bacon can create a hearty delight. The type of pasta you choose can change the whole dish. I love using penne or rotini because they hold the dressing well. But you can also try fusilli or farfalle for a fun look. For a healthier option, whole grain pasta adds more fiber. If you're gluten-free, use rice or quinoa pasta. These work well and keep the dish light. Just make sure to cook them according to package instructions for the best texture. While the dressing in the Full Recipe is creamy and tasty, you can switch it up anytime. A light vinaigrette can add a fresh zing. Mix olive oil, vinegar, and a bit of mustard for a simple dressing. To enhance flavors, add fresh herbs like basil or dill. Spices like paprika or garlic powder can also give the salad a nice kick. Don't be afraid to experiment until you find your perfect mix! To keep your Club Sandwich Pasta Salad fresh, use airtight containers. Glass containers work great. They help keep the salad cold and prevent spills. You can also use plastic containers if they seal well. Store the salad in the fridge right after serving. This helps keep it safe to eat. Your pasta salad will stay fresh for about 3 to 5 days in the fridge. After this time, it may not taste as good. Signs your salad has gone bad include a sour smell or a change in color. If you see mold or the salad looks slimy, it is best to throw it away. If you want to enjoy the salad warm, heat it gently. Use a microwave on low power to avoid drying it out. Add a splash of dressing to keep it moist. If you prefer it cold, chill it in the fridge before serving. This keeps the flavors bright and fresh. Yes, you can make this salad ahead of time. It tastes even better after sitting for a few hours. I usually prepare it the day before a picnic or party. Just store it in the fridge in an airtight container. You can keep this pasta salad in the fridge for about 3 to 5 days. Make sure it's in a sealed container. If it starts to smell off or looks funny, it’s best to toss it. Absolutely! You can try other dressings like Italian or a simple vinaigrette. Each dressing will give the salad a different taste. I love using a lemon vinaigrette for a fresh twist. This salad pairs well with fresh fruit, garlic bread, or a light soup. You can also serve it with veggie sticks and dip for a crunchy side. Choose sides that complement the flavors in the salad. Yes, this salad is great for meal prep. You can portion it out into containers for easy lunches. Just remember to store the dressing separately if you want it extra fresh. Check the full recipe for guidance on making this delicious dish! The blog post covered how to create a tasty Club Sandwich Pasta Salad. You learned about the right ingredients, like types of pasta, proteins, and veggies. We explored steps for cooking the pasta and mixing in the flavors. I shared tips to enhance taste and make the dish visually appealing. Remember, there are many ways to customize your salad to fit your needs. Enjoy making this dish for yourself or a group. Happy cooking!

Club Sandwich Pasta Salad Easy and Flavorful Recipe

Looking for a fun twist on a classic? My Club Sandwich Pasta Salad is the perfect blend of flavors and

Older posts
Newer posts
← Previous Page1 … Page74 Page75 Page76 … Page93 Next →

dsad

© 2025 flavorsprint • Built with GeneratePress

Our Policies

  • Copyright Policy
  • Cookie Policy
  • GDPR Policy
  • Privacy Policy
  • Disclaimer
  • Terms Of Use

More Information

  • Home
  • About
  • Contact
  • Appetizers
  • Dessert
  • Dinner
  • Drinks
©2025, flavorsprint About Back To Top