Skip to content
DisclaimerTerms Of UseGDPR PolicyCookie Policy

flavorsprint

  • Home
  • Drinks
  • Appetizers
  • Dinner
  • Dessert
  • About
  • Contact
  • Privacy Policy
DisclaimerTerms Of UseGDPR PolicyCookie Policy

Lillian

To make a tasty sautéed zucchini dish, you'll need: - 3 medium zucchinis, sliced into half-moons - 1 red bell pepper, diced - 1 yellow bell pepper, diced - 1 small red onion, finely chopped - 3 cloves garlic, minced - 2 tablespoons olive oil - 1 teaspoon dried oregano - 1 teaspoon smoked paprika - Salt and pepper to taste - Fresh basil leaves, for garnish - 1 tablespoon balsamic glaze (optional) These simple, fresh ingredients bring life to your meal. Zucchini is both light and full of flavor. The bell peppers add sweetness and crunch. Garlic and onion give it a nice depth. The olive oil helps everything cook evenly and adds richness. With the spices, you’ll have a flavor-packed dish. For the full recipe and step-by-step instructions, check out Sizzling Zucchini Medley. Slicing zucchini and bell peppers is easy. Use a sharp knife for clean cuts. Cut zucchinis into half-moons for even cooking. Dice bell peppers into small pieces to blend with the zucchini. Preparation matters because it sets you up for success. Having all your ingredients ready makes cooking smooth. You won’t scramble to find things while cooking. First, heat the olive oil in a large skillet over medium heat. Add the chopped red onion and sauté for 2 to 3 minutes. When it turns soft and clear, add minced garlic. Cook for about 30 seconds until you smell that lovely aroma. Next, toss in the sliced zucchinis and diced bell peppers. Sprinkle in dried oregano and smoked paprika. Stir everything well to mix the flavors. Cook for 5 to 7 minutes, stirring often. You want them tender but still crisp. Timing is key here; don’t overcook them. Once the veggies are done, remove the skillet from heat. If you want a sweet kick, drizzle balsamic glaze over the top. This adds a nice contrast to the savory flavors. For a fresh finish, garnish your dish with basil leaves. They not only look good but also add a bright flavor. Serve your sautéed zucchini warm and enjoy! For the full recipe, check the detailed instructions above. To get the best sautéed zucchini, start with the right skillet. A wide, flat pan works best. It helps the heat spread evenly. This way, all the zucchini cooks at the same time. Use medium heat for a good sauté. If the heat is too low, the zucchini can become mushy. If it’s too high, it may burn. Seasoning is key to great flavor. I love adding fresh herbs like thyme or parsley. They brighten the dish. You can also try spices like cumin or coriander for warmth. Want some heat? Add red pepper flakes. Just a pinch can make a big difference! Presentation can make your meal pop. Try layering the zucchini on a plate. Add the bell peppers on top for color. You can drizzle balsamic glaze over the veggies for shine and flavor. Fresh basil leaves are perfect for garnish. They add a lovely touch and a hint of freshness. {{image_2}} If you can’t find zucchini, try these fun swaps: - Yellow squash: Similar texture, slightly sweeter taste. - Eggplant: Adds a creamy texture, but you should salt it first. For bell peppers, different colors bring unique flavors: - Red bell pepper: Sweet and juicy. - Green bell pepper: Slightly bitter and crisp. - Yellow bell pepper: Sweet like red, but milder. To make this dish vegan, skip the balsamic glaze or use a vegan version. You can also replace olive oil with avocado oil for a different taste. If you want it gluten-free, this recipe is already safe! Need low-carb options? Try using zucchini noodles instead of traditional pasta. To boost protein, add cooked chicken or shrimp to the sauté. Just toss them in during the last few minutes of cooking. For a Mediterranean twist, mix in olives and sprinkle with feta cheese before serving. This adds a salty kick that pairs well with the fresh veggies. You can find the full recipe to try out these ideas for yourself! To store sautéed zucchini properly, let it cool first. This helps keep it fresh. Place the zucchini in an airtight container. It will last for 3 to 4 days in the fridge. Glass containers work best, as they do not stain. If you use plastic, make sure it is BPA-free. When reheating, use a skillet over medium heat. This method keeps the zucchini tender and crisp. Add a splash of olive oil to enhance the flavor. You can also reheat it in the microwave, but it may lose some texture. Pair reheated zucchini with grilled chicken or fish. It also goes well with pasta dishes and salads. Yes, sautéed zucchini can be frozen! To freeze, let it cool completely. Then, place it in freezer-safe bags or containers. Remove as much air as possible to prevent freezer burn. It can last up to 3 months in the freezer. To defrost, move it to the fridge overnight. You can also reheat it from frozen on low heat in a skillet. The taste stays great, but the texture may change slightly. When buying zucchini, look for firm, bright green skin. Avoid any that feel soft or have dark spots. Smaller zucchinis are often sweeter and more tender. Check for a smooth surface, as this shows freshness. If you can, buy organic. They taste better and are safer for you. Yes, you can prepare sautéed zucchini ahead of time. It will stay fresh in the fridge for about 3 days. Just store it in an airtight container. If you want to save time, you can slice the zucchini and peppers a day before. Cook them when you're ready to eat. Sautéed zucchini pairs well with many dishes. You can serve it as a side with grilled chicken or fish. It also works great with pasta or rice. Try it on a bed of quinoa for a healthy meal. Add some fresh herbs, and you have a colorful plate. For the full recipe, check out the Sizzling Zucchini Medley. This blog post showed you how to make a tasty sautéed zucchini dish. We covered the right ingredients, step-by-step cooking tips, and ways to make it your own. I shared advice on how to store and reheat your dish too. Remember, cooking is all about fun and creativity. Use these tips to impress your family or friends. Enjoy your cooking journey, and don't be afraid to explore new flavors!

Sautéed Zucchini Flavorful Dish for Easy Meals

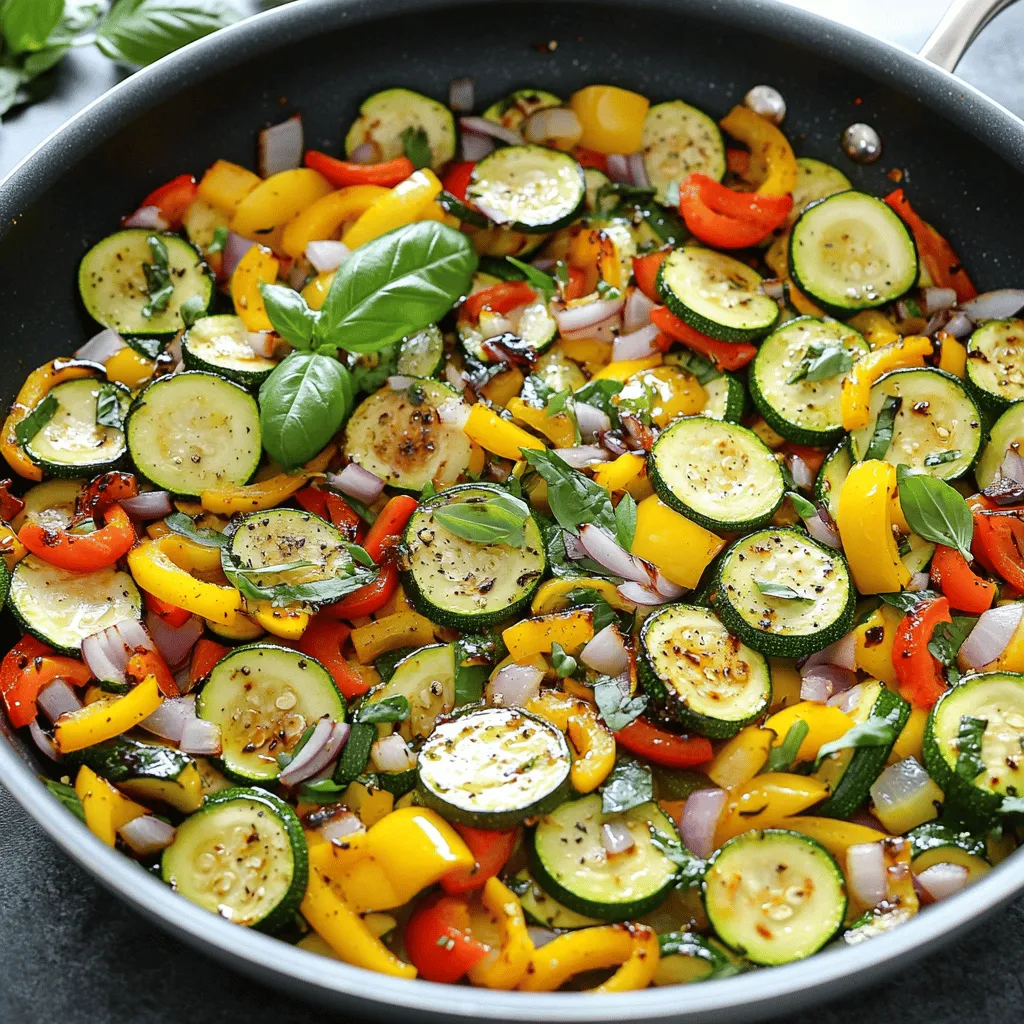
Looking for a quick and tasty dish that elevates your meals? Sautéed zucchini is your answer! Packed with vibrant veggies

To make the best peach pie, you need fresh, juicy peaches. Here are the main ingredients you will need: - 6 cups fresh peaches, peeled and sliced - 1 cup granulated sugar - 1/4 cup brown sugar - 1/4 cup all-purpose flour - 1 tablespoon lemon juice - 1 teaspoon cinnamon - 1/4 teaspoon nutmeg - 1 teaspoon vanilla extract - 1 tablespoon butter, cut into small pieces - 1 package refrigerated pie crusts (or homemade if preferred) - 1 egg, beaten (for egg wash) - Pinch of salt These ingredients come together to create a sweet and flavorful filling that shines. For the best flavor, I recommend using freestone peaches. They pull away from the pit easily. Yellow peaches are great for their sweet and slightly tart taste. White peaches are sweeter and add a nice touch. You can mix these types to create a more complex flavor in your pie. You can enhance your peach pie with some optional ingredients. Consider adding: - A splash of almond extract for a nutty flavor - A handful of fresh berries for added color and taste - Some crushed ginger for a spicy kick These additions can make your pie even more special. Remember, the key is to balance the flavors without overwhelming the peaches. For the full recipe, check out the Best Peach Pie Ever 🥧. Start with fresh peaches. Use six cups. Peel and slice them. Place them in a bowl. Add one cup of granulated sugar and a quarter cup of brown sugar. Mix in a quarter cup of flour as well. This helps thicken the filling. Squeeze in one tablespoon of lemon juice. Add one teaspoon of cinnamon and a pinch of nutmeg. Stir in one teaspoon of vanilla extract too. Mix everything gently. Let it sit for about 15 minutes. This helps the flavors blend well. Roll out your first pie crust. Fit it into a 9-inch pie pan. Make sure it covers the bottom and sides. Pour the peach mixture into the crust. Spread the peaches evenly. Cut one tablespoon of butter into small pieces. Dot these on top of the fruit. Roll out the second pie crust. Place it over the peach filling. Trim any extra crust hanging over the edges. Crimp the edges to seal the pie. Cut several slits in the top crust. This lets steam escape. Brush the top with a beaten egg. This gives it a nice golden color. Preheat your oven to 425°F (220°C). Place the pie in the oven. Bake for 45 to 50 minutes. The crust should turn golden brown. The filling should bubble up. If the edges brown too quickly, cover them with foil. Once done, take the pie out. Let it cool for at least two hours. This helps the filling set. Enjoy this beautiful pie with ice cream or whipped cream. For extra fun, add fresh mint leaves on top. For the full recipe, check out the earlier section. To make the best peach pie, start with great peaches. Look for peaches that feel firm but slightly soft when you press them. They should have a sweet smell and a vibrant color, often yellow or orange. Look for peaches that are free from blemishes. Freestone peaches are best since the pit comes out easily. If you can, pick peaches that are in season for the best flavor. A flaky crust is key to a great peach pie. Use cold butter when making your crust. This keeps it flaky. If you use store-bought crusts, check for ones made with simple ingredients. Roll your crust evenly and don’t stretch it too much. This helps it hold its shape during baking. Remember to chill the crust for a bit before you bake. This will prevent shrinking. Many people make simple mistakes that affect their pie. First, don’t skip the resting time for the peach filling. This lets the sugars and juices mix well. Second, avoid overfilling the crust. If you add too many peaches, it can spill out. Lastly, brush the crust with egg wash. This gives your pie a nice golden color. Follow these tips, and you’ll make a pie that wows! For the full recipe, check out the Best Peach Pie Ever. {{image_2}} You can make peach pie with sugar or without. If you want a classic taste, use granulated sugar. This sweetens the filling and helps it hold together. For a sugar-free version, try using a sugar substitute like stevia or erythritol. These options work well, but the taste may change slightly. The key is to balance sweetness and flavor. Always taste your filling before baking to make sure it is to your liking. Spices can enhance your peach pie. Cinnamon is a popular choice, adding warmth and depth. Nutmeg works well too, giving a cozy fall vibe. You can also use vanilla extract for a sweet note. For a twist, consider almond extract; it adds a nice nutty flavor. Experiment with different spices! Each addition makes your pie unique and special. Just remember, a little goes a long way. The crust can change your pie's taste. A homemade crust is fresh and flaky, but it takes time to make. Use flour, butter, and cold water for a classic crust. If you are short on time, store-bought crusts work great too. They save you effort and still taste good. Just remember to check for quality. No matter which crust you choose, make sure to roll it out evenly. This ensures a nice, golden finish. For the full recipe, check out the Best Peach Pie Ever! To keep your peach pie fresh, store it at room temperature. Cover it with plastic wrap or aluminum foil. If you have a lot of pie left, place it in the fridge. This helps keep the crust crisp. Enjoy your pie within three days for the best taste. When you want to enjoy leftover peach pie, preheat your oven to 350°F (175°C). Place the pie on a baking sheet to catch any drips. Heat it for about 15-20 minutes. This makes the crust warm and flaky again. You could also use the microwave. Heat it in short bursts of 20 seconds. This method is quicker but may not keep the crust as crispy. Freezing peach pie is easy and a great way to save leftovers. First, let the pie cool completely. Wrap it in plastic wrap and then in aluminum foil. This protects it from freezer burn. You can freeze it for up to three months. When ready to eat, let it thaw in the fridge overnight. Reheat it in the oven for the best texture. For more details, you can check the Full Recipe. To peel fresh peaches, start by boiling water in a pot. Next, prepare an ice bath in a bowl. Once the water boils, drop in the peaches for about 30 seconds. This process loosens the skin. Afterward, move the peaches to the ice bath. When they cool, the skin should peel off easily. This method saves time and keeps the peaches intact. Yes, you can use frozen peaches. However, they must be thawed first. Frozen peaches often have added sugar or juice. Adjust your sugar in the recipe to balance the sweetness. Frozen peaches may also release more juice during baking. This can make the pie a bit runny. To fix this, add a bit more flour to your filling. Check the pie at around 45 minutes. The crust should turn a golden brown. You will see bubbles coming from the filling through the slits. If the edges brown too fast, cover them with foil. Let the pie cool for at least 2 hours. This cooling time helps the filling set. Absolutely! Adding other fruits can enhance the flavor. Consider using berries like blueberries or raspberries. You can also mix in apples for a unique twist. Just remember to adjust sugar based on the sweetness of the added fruits. Experimenting with flavors keeps the pie exciting and delightful. For further guidance, check out the Full Recipe for detailed steps. Making the best peach pie is easier than you think. We covered key ingredients, like the right peaches and optional flavors. I shared step-by-step instructions, from filling to baking. You now have tips to pick great peaches and a flawless crust. We explored different variations, storage methods, and answered common questions. Use this guide to bake your perfect pie today! Enjoy your delicious creation with family or friends.

Best Peach Pie Ever Delightful and Simple Recipe

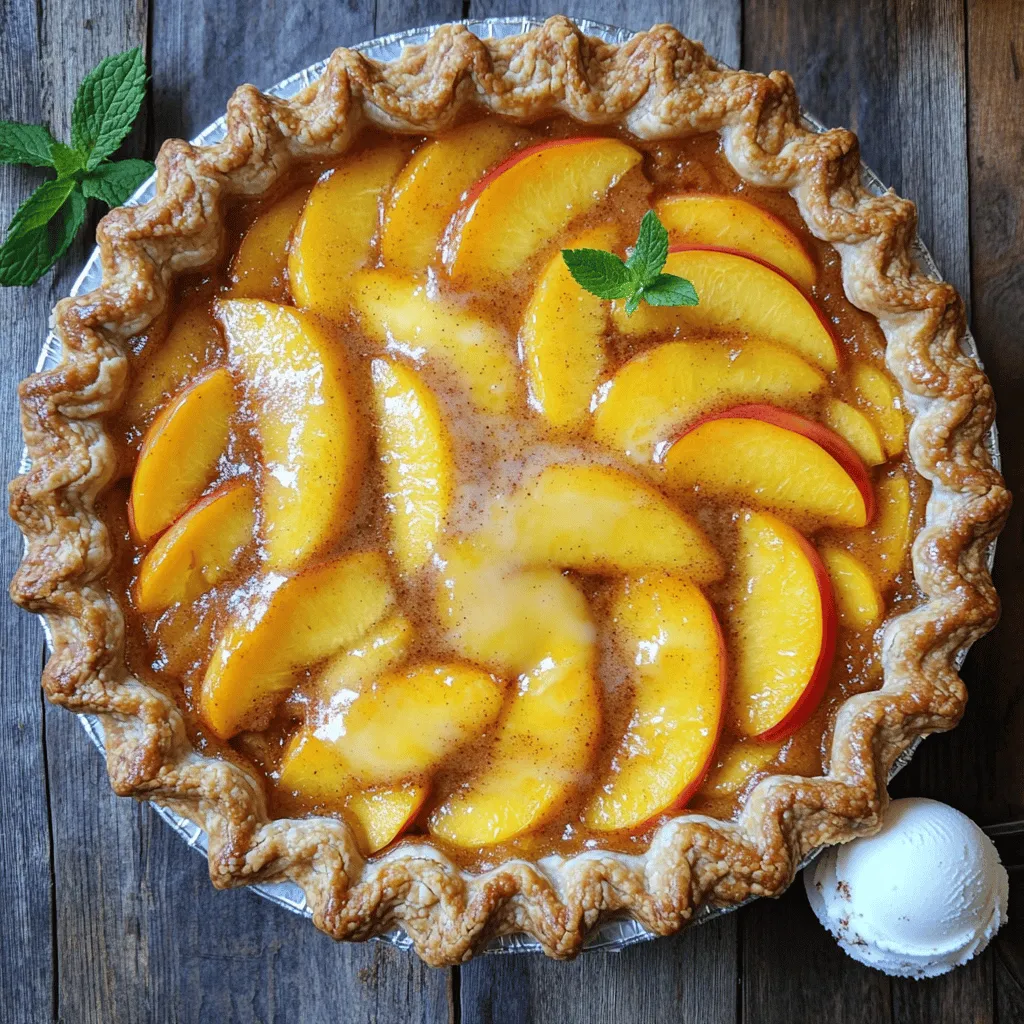
Are you ready to bake the best peach pie ever? This delightful and simple recipe will make your kitchen shine

The star of these Peaches and Cream Crumble Bars is the peach. You need ripe, juicy peaches for the best flavor. When you bite into the bars, you want sweet, soft fruit. Use about 2 cups of fresh peaches, peeled and diced. The lemon juice adds a nice touch, brightening the peaches. Just one tablespoon will do. This keeps the fruit fresh and tangy. For the base and crumble, gather these dry items: - 1 cup rolled oats - 1 cup all-purpose flour - 1/2 cup brown sugar - 1/2 teaspoon cinnamon - 1/4 teaspoon nutmeg - 1/4 teaspoon salt These dry ingredients mix to create a tasty crumble. The oats add a nice texture, while the sugar gives a sweet flavor. Choosing the right peaches is key. Look for peaches that are firm but slightly soft. They should have a sweet scent. Avoid peaches with bruises or dark spots. When you press gently on the skin, it should yield a bit. This means they are ripe and ready to eat. If they are too hard, let them sit for a day or two to ripen. Fresh peaches make your crumble bars shine. Start by gathering all your ingredients. You need fresh peaches, lemon juice, rolled oats, flour, brown sugar, unsalted butter, cinnamon, nutmeg, salt, cream cheese, powdered sugar, and vanilla extract. Preheat your oven to 350°F (175°C). Line an 8x8 inch baking pan with parchment paper. Leave some paper hanging over the sides. This helps you lift out the bars later. Next, take a mixing bowl and toss the diced peaches with lemon juice. This adds flavor and keeps the peaches fresh. Set them aside for now. In another large bowl, mix rolled oats, flour, brown sugar, melted butter, cinnamon, nutmeg, and salt. Use your hands or a fork to mix until it looks crumbly. Save 1 cup of this mixture for the topping. Now, press the rest of the mixture evenly into the bottom of your baking pan. Bake the crust for 15 minutes until it turns lightly golden. While the crust is baking, prepare the cream cheese layer. In a separate bowl, beat softened cream cheese, powdered sugar, and vanilla extract until smooth. This mixture adds a rich creaminess to the bars. Once the crust is out of the oven, spread the cream cheese mixture evenly over it. Then, spoon the diced peaches over the cream cheese layer. Finally, sprinkle the reserved crumble mixture on top. This creates a nice, crunchy layer. Return the pan to the oven and bake for another 25-30 minutes. Look for a golden topping and bubbly peaches. After baking, let the bars cool in the pan for at least 30 minutes. This step is important. Cooling them helps the layers set and makes cutting easier. Use the parchment paper to lift the bars out of the pan. Cut them into squares. For a lovely presentation, dust some powdered sugar on top. You can also add fresh peach slices for extra flair. Enjoy your delicious Peaches and Cream Crumble Bars! For the full recipe, check the details above. When making Peaches and Cream Crumble Bars, avoid using overripe peaches. They can turn mushy and watery. Instead, choose firm, fresh peaches for the best flavor and texture. Another mistake is not measuring ingredients correctly. Use measuring cups and spoons for accuracy. This helps ensure your bars bake evenly and taste great. Lastly, don’t skip chilling the cream cheese mixture. This step keeps it smooth and spreadable over the hot crust. To get that perfect crumble texture, mix the dry ingredients well. Use a fork or pastry cutter to blend the oats, flour, and butter. You want small, pea-sized crumbs. If the mixture is too wet, add a bit more flour. If it’s too dry, a splash of water can help. Remember, saving one cup of the crumble mix for the topping is key. This layer adds crunch and a delicious contrast to the creamy filling. Once your bars are baked and cooled, cut them into squares. For a fun twist, serve them warm with a scoop of vanilla ice cream. The cold ice cream and warm bars create a lovely mix of temperatures. You can also drizzle some honey or caramel sauce on top. For a fresh touch, add mint leaves. Pair your bars with a cup of tea or coffee for a delightful afternoon treat. Enjoy your homemade Peaches and Cream Crumble Bars with friends or family for the best experience! {{image_2}} You can swap peaches with other fruits. Try fresh strawberries, blueberries, or raspberries. Each fruit brings its own flavor and texture. For a tropical twist, use mango or pineapple. Just be sure to adjust the sugar based on the fruit's sweetness. This keeps the balance right. Want to make these bars gluten-free? It's simple! Replace all-purpose flour with a gluten-free blend. Look for one that works well in baking. You can also use almond flour or oat flour. Just make sure your oats are certified gluten-free. This way, everyone can enjoy these tasty bars. If you need a non-dairy option, you can use plant-based cream cheese. Brands like Tofutti or Daiya work well. They blend nicely and keep the creamy texture. For the butter, use coconut oil or a vegan butter substitute. This makes the recipe fit for those avoiding dairy. For the full recipe, check the Peaches and Cream Crumble Bars section. To keep your Peaches and Cream Crumble Bars fresh, store them in an airtight container. Place parchment paper between layers to avoid sticking. They will stay good in the fridge for about five days. If you want to enjoy them later, consider freezing. To freeze your crumble bars, first let them cool completely. Cut them into squares and wrap each piece in plastic wrap. Then, place them in a freezer-safe bag. They can last for up to three months in the freezer. Remember to label the bag with the date for easy reference. When you're ready to enjoy your frozen bars, remove them from the freezer and let them thaw in the fridge overnight. To reheat, place them in a 350°F oven for about 10 minutes. This warms them up and keeps the crumble nice and crisp. You can also use a microwave for a quick fix, but keep the time short to avoid sogginess. Enjoy your delicious treat warm! You can tell the crumble bars are done when the top is golden brown and the peaches bubble. The edges should look firm, too. I usually check around the 25-minute mark to see how the topping is browning. If it needs more time, I give it a few more minutes, but keep a close eye. Yes, you can make these bars ahead of time. I often make them a day before I want to serve them. Just store them in the fridge after they cool. They taste great chilled, but I love them warm, too! If you need a substitute for cream cheese, consider using Greek yogurt or mascarpone. Both give a creamy texture. You can also use silken tofu for a dairy-free option. Just blend it until smooth for the best results. In this blog post, we explored the key ingredients for making delicious crumble bars. We covered how to pick fresh peaches and the best dry ingredients to use. I shared step-by-step instructions for preparing, baking, and serving your bars. We discussed common mistakes, tips for perfect texture, and fun variations, including gluten-free and non-dairy options. Storing leftovers properly and reheating them was also important. Enjoy your baking and create wonderful memories with each bite! Your crumble bars will surely impress everyone.

Peaches and Cream Crumble Bars Delightful Dessert Recipe

Are you ready to indulge in a sweet and fruity treat? My Peaches and Cream Crumble Bars will delight your

- 1 pre-made pie crust (9-inch) - 4 ripe peaches, thinly sliced - 1/4 cup granulated sugar - 1 tablespoon cornstarch - 1 teaspoon vanilla extract - 1/2 teaspoon almond extract - 1/2 teaspoon cinnamon - 1 tablespoon lemon juice - 1 egg (for egg wash) - 2 tablespoons sliced almonds (for topping) - Powdered sugar (for dusting) The key to a great peach tart lies in choosing ripe peaches. You want them soft but not mushy. The sweetness of fresh peaches shines through in this recipe. The pie crust is also important. A pre-made crust saves time and still tastes great. You can use a homemade crust if you prefer, but it’s not necessary. I love using cornstarch for the filling. It thickens the juices and keeps everything from getting too runny. The vanilla and almond extracts give the tart a nice depth of flavor. A touch of cinnamon adds warmth. Don't forget the lemon juice! It brightens the peaches and balances the sweetness. For the egg wash, whisk the egg well. This will give your crust a lovely golden color when baked. Finally, the sliced almonds on top add a nice crunch. They look pretty, too! For a finishing touch, dust the tart with powdered sugar before serving. This makes it feel fancy without much effort. If you want to make this tart, you can find the full recipe mentioned earlier. It is a perfect blend of flavor and ease, making it a must-try for any home cook. - Preheat the oven to 375°F (190°C). - Roll out the pre-made pie crust into a 9-inch tart pan. - Prick the crust with a fork to prevent bubbling. - In a large bowl, combine peach slices, sugar, cornstarch, vanilla extract, almond extract, cinnamon, and lemon juice. - Toss the mixture until the peaches are well coated. - Pour the peach filling into the tart shell, spreading it evenly. - Fold the edges of the dough over the peaches for a rustic look. - Brush the exposed crust with a whisked egg for a golden finish. - Sprinkle sliced almonds over the peach filling. - Bake for 30-35 minutes until the crust is golden and bubbly. This simple process creates a delightful peach tart that is sure to impress. For the complete recipe, check the Full Recipe. - Choosing the right peaches for sweetness and texture: Look for ripe peaches that give slightly when pressed. They should smell sweet. Avoid hard or bruised peaches. Freestone peaches are easier to slice and work best. - How to achieve a flaky crust: Keep your pie crust cold. If it warms up, it can get tough. When rolling it out, use a light touch. Don’t stretch it, as this can lead to shrinkage during baking. - Egg wash application for golden color: Beat one egg and brush it on the edges of the crust. This gives a nice golden brown finish. Make sure to apply it evenly for the best look. - Pairing the tart with ice cream or whipped cream: A scoop of vanilla ice cream or a dollop of whipped cream adds creaminess. The cold treats balance the warm tart perfectly. - Best serving temperature for taste: Serve your peach tart warm or at room temperature. This enhances the flavor of the peaches and crust. - Overfilling the tart shell: Keep the filling to a moderate amount. Too much filling can cause it to overflow and make a mess in the oven. - Not pre-baking the crust: If you skip pre-baking, the crust can become soggy. Pre-baking helps it stay crisp and hold up to the juicy filling. Remember to explore the [Full Recipe] for a complete guide to making this delicious peach tart! {{image_2}} You can change the taste of your peach tart. Adding berries like blueberries or raspberries makes it fruity. You can also mix in other fruits, such as sliced strawberries or plums. These fruits add color and a new taste. Another idea is to use spices. Nutmeg or cardamom can give your tart a warm flavor. Just a pinch can change everything. They work well with peaches and give a cozy feel. If you need a gluten-free tart, use gluten-free pie crust. Many brands offer tasty options. You can also make your own with almond flour or rice flour. This way, everyone can enjoy the tart. For a vegan option, skip the egg wash. Instead, brush the crust with almond milk or coconut milk. This will give a nice shine without using eggs. You can make mini tarts instead of one big one. This is fun for parties. Just use smaller pie crusts and fill them like the big tart. Kids love these little treats! Serving your tart with a fruit compote adds a special touch. Just cook some berries with sugar until they break down. This warm sauce next to the tart will impress your guests. For the full recipe, check out the detailed instructions. To keep your peach tart fresh, you have two options. If you plan to eat it within a day, store it at room temperature. Just place it on a plate and cover it with a clean kitchen towel. This helps keep the crust crisp. If you want to save it for a few more days, pop it in the fridge. First, let it cool completely. Then, cover it with plastic wrap or aluminum foil. This keeps it fresh and prevents it from drying out. When you're ready to enjoy leftovers, reheating is key. The best method is to use an oven. Preheat it to 350°F (175°C). Place the tart on a baking sheet and heat for about 10-15 minutes. This warms it up without making the crust soggy. If you only want a slice, place it on a microwave-safe plate. Heat it in the microwave for about 30 seconds. This method is quick but may soften the crust. You can freeze the peach tart, but timing matters. If you freeze before baking, wrap it tightly in plastic wrap. Then, place it in a freezer bag. You can bake it straight from the freezer, just add a few extra minutes to the baking time. If you freeze after baking, let it cool completely. Then, wrap it well and store it in the freezer. To thaw, place it in the fridge overnight. Reheat it in the oven for the best taste and texture. For the complete recipe, check out the Full Recipe section. Enjoy your delicious peach tart! An easy peach tart lasts about 3 to 4 days in the fridge. To keep it fresh, store it in an airtight container. Look for signs of spoilage like a soggy crust or mold. If you see or smell anything odd, it’s best to toss it. Yes, you can use canned peaches. They save time and are easy to find. However, the flavor and texture will be different. Canned peaches may be softer and sweeter. Make sure to drain them well to avoid excess liquid in your tart. If you need an alternative to almond extract, try vanilla extract. It gives a nice flavor but will change the taste slightly. You can also use a few drops of orange or lemon extract for a bright twist. These options will still make your tart delicious and unique. In this blog post, we explored how to make a delicious peach tart. We covered the ingredients you need and the steps for preparing and baking the tart. I shared pro tips for a perfect crust and ways to customize your filling. Remember to avoid common mistakes like overfilling your tart shell. With these tips and tricks, you can create a sweet treat that impresses. Enjoy your baking journey and savor every bite of your perfect peach tart!

Easy Peach Tart Delightful and Simple Recipe Guide

Are you ready to create a show-stopping dessert with minimal fuss? This Easy Peach Tart is your ticket to a

To make the peach upside-down cupcakes, you need fresh ingredients that blend well. Here’s what you will need: - 1 cup all-purpose flour - 1/2 teaspoon baking powder - 1/4 teaspoon baking soda - 1/4 teaspoon salt - 1/2 cup unsalted butter, softened - 3/4 cup brown sugar, packed - 1/2 teaspoon vanilla extract - 2 large eggs - 1/2 cup buttermilk - 2 ripe peaches, peeled, pitted, and sliced - 1 tablespoon granulated sugar (for peaches) - 1/2 teaspoon cinnamon (for peaches) These ingredients create a perfect blend of flavors. The peaches add sweetness and moisture. Brown sugar gives the cupcakes a rich flavor. The buttermilk keeps them soft and fluffy. I love using ripe peaches for their juicy sweetness. For a tasty twist, feel free to explore the full recipe. You can easily swap some ingredients. For instance, try gluten-free flour if needed. Each choice can change the flavor a bit, making it your own! Start by preheating your oven to 350°F (175°C). This step is important. It gets the oven ready for baking. Line a muffin tin with cupcake liners. This will help you easily remove the cupcakes later. Next, you will make the peach topping. Take two ripe peaches and peel, pit, and slice them. Place the slices in a small bowl. Add 1 tablespoon of granulated sugar and 1/2 teaspoon of cinnamon. Toss the peaches until they are well coated. Set them aside for later. In a medium bowl, whisk together 1 cup of all-purpose flour, 1/2 teaspoon of baking powder, 1/4 teaspoon of baking soda, and 1/4 teaspoon of salt. In a large bowl, cream 1/2 cup of softened unsalted butter and 3/4 cup of brown sugar. Mix this for about 3-4 minutes until fluffy. Beat in 2 large eggs, one at a time. Then add 1/2 teaspoon of vanilla extract. Finally, alternate adding the dry mix and 1/2 cup of buttermilk. Mix until just combined. Now it's time to fill your cupcake liners. Place a few peach slices at the bottom of each liner. Pack them tightly together. Gently spoon the batter over the peaches, filling each liner about 3/4 full. Bake in the preheated oven for 20-22 minutes. Check doneness with a toothpick. It should come out clean. After baking, allow the cupcakes to cool in the tin for 5 minutes. Carefully flip them onto a serving platter. You will see the peaches on top. These cupcakes are best served warm. You can dust them with powdered sugar or add a scoop of vanilla ice cream from the Full Recipe for a sweeter treat. To make perfect peach upside-down cupcakes, start with ripe peaches. They should be soft but not mushy. When mixing the batter, avoid over-mixing. This keeps the cupcakes light. Use room-temperature butter and eggs for a smooth mix. Make sure to alternate adding dry ingredients and buttermilk. This helps blend the batter evenly. Don’t skip the cooling step; it makes flipping easier. One common mistake is not measuring ingredients properly. Use a scale or measuring cups for accuracy. Another mistake is opening the oven door too soon. This can cause the cupcakes to sink. Also, check your oven's temperature. An oven thermometer can help ensure it’s correct. Lastly, avoid letting the cupcakes sit too long in the tin after baking. This can make them soggy. Serve your peach upside-down cupcakes warm for the best flavor. You can dust them with powdered sugar for a nice touch. A scoop of vanilla ice cream pairs well with these cupcakes. For a fun twist, try adding a drizzle of caramel sauce on top. You can also serve them with whipped cream for added creaminess. For the full recipe, check the previous sections. Enjoy! {{image_2}} You can easily swap peaches for other fruits. Try using ripe nectarines or plump cherries. Both fruits add a sweet and juicy burst. Pineapple works well too, bringing a tropical twist. Simply replace the peaches in the recipe with your chosen fruit. Adjust the sugar based on the fruit's sweetness for the best flavor. For a gluten-free version, use a blend of gluten-free flour. Brands like Bob's Red Mill offer great options. Make sure to check labels for safe ingredients. You will still use the same amounts as the all-purpose flour. The texture may vary slightly, but you will still enjoy delicious cupcakes. To make these cupcakes vegan, substitute the eggs with applesauce. Use a flaxseed mixture instead of eggs. Mix one tablespoon of ground flaxseed with three tablespoons of water. Let it sit until it thickens. For buttermilk, use almond milk with a splash of vinegar. This will keep your cupcakes moist and flavorful. For the full recipe, check the detailed instructions above. After making peach upside-down cupcakes, you may have some left. To store them, place them in an airtight container. Keep the container at room temperature for up to two days. If you need more time, refrigerate them. They will last about a week in the fridge. You can freeze these cupcakes for later. First, let them cool completely. Wrap each cupcake tightly in plastic wrap. Then, place them in a freezer bag or container. They can stay frozen for up to three months. When you're ready to enjoy them, simply thaw them in the fridge overnight. To reheat, preheat your oven to 350°F (175°C). Remove the cupcakes from any wrapping. Place them on a baking sheet and heat for about 5-10 minutes. You want them warm but not hot. If you prefer a microwave, heat each cupcake for 15-20 seconds. Enjoy them warm for the best taste! For the full recipe, check out the details above. Yes, you can use canned peaches. Make sure to drain them well. Canned peaches often have added sugar, so adjust your recipe if needed. Fresh peaches are best but canned can work in a pinch. Check your cupcakes after 20 minutes. Insert a toothpick in the middle. If it comes out clean, they are done. If not, bake for another 2-3 minutes. Keep an eye on them to avoid overbaking. These cupcakes pair well with whipped cream or vanilla ice cream. You can also serve them with fresh mint leaves for a pop of color. A drizzle of caramel sauce adds a sweet touch too. Start with fresh, ripe peaches for the best flavor. Cream the butter and sugar until light and fluffy. This step adds air to your batter. Be gentle when mixing in the dry ingredients. This keeps your cupcakes light and fluffy. Yes, you can adjust the sugar to your taste. If you prefer a less sweet cupcake, reduce the brown sugar. You can also use a sugar substitute if needed. Just keep in mind that it may change the texture slightly. For the peaches, you can use less granulated sugar too. For the full recipe, check out the Peachy Paradise Cupcakes section! You can make peach upside-down cupcakes with simple ingredients and steps. We discussed how to prepare the cupcakes, tips for baking, and fun variations. Remember, using fresh fruit adds great flavor. Baking can be tricky, but avoiding common mistakes helps ensure success. Whether you choose to customize or stick to the classic recipe, these cupcakes delight. Enjoy exploring your baking skills and sharing these treats with others. Happy baking!

Peach Upside Down Cupcakes Delightful and Simple Treat

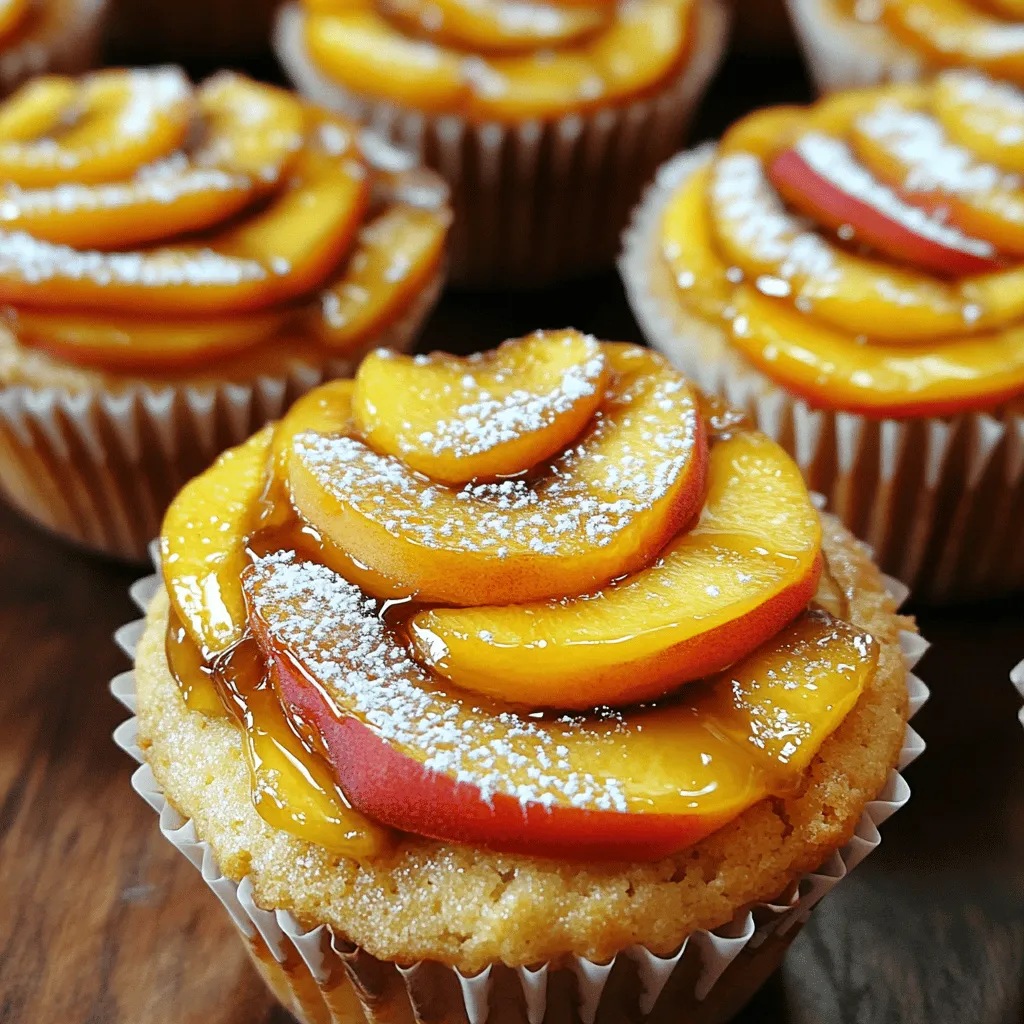
Get ready to impress your friends with Peach Upside Down Cupcakes! This delightfully simple treat combines juicy peaches and fluffy

To make a tasty Zucchini Cornbread Casserole, you need: - 2 medium zucchinis, grated - 1 cup corn kernels (fresh or frozen) - 1 cup cornmeal - 1 cup all-purpose flour - 1 tablespoon baking powder - 1/2 teaspoon baking soda - 1 teaspoon salt - 1/2 teaspoon black pepper - 1 cup buttermilk - 2 large eggs - 1/4 cup melted butter - 1 cup shredded cheddar cheese - 1/4 cup chopped fresh chives (for garnish) Zucchini adds moisture and a mild flavor. Grate it finely for best results. Corn gives a sweet crunch and bright color. Use fresh corn if you can; frozen works too. Cornmeal and flour help create a hearty base. Baking powder and baking soda are key for rising. The buttermilk adds tang and richness. Eggs bind everything together. Cheese adds creaminess and flavor. You can swap the buttermilk for regular milk or plant-based milk. If you lack cornmeal, use all-purpose flour instead, but the texture will change. For a gluten-free option, use gluten-free flour blends. You can replace cheddar with any cheese you like, such as Monterey Jack or feta. If you prefer a dairy-free option, skip the cheese or use a dairy-free substitute. Start by preheating your oven to 375°F (190°C). This step is key. It ensures even baking. While the oven heats, you can prepare the rest of the dish. Next, take two medium zucchinis and grate them. In a large bowl, mix the grated zucchini with one cup of corn kernels. If the zucchini is very wet, squeeze out the extra moisture. This helps keep the casserole from being soggy. In another bowl, whisk together one cup of cornmeal, one cup of all-purpose flour, one tablespoon of baking powder, and half a teaspoon each of baking soda and salt. Add half a teaspoon of black pepper too. This blend gives the casserole a nice flavor and helps it rise. In a separate bowl, mix one cup of buttermilk, two large eggs, and a quarter cup of melted butter. Stir until it looks smooth. This mixture binds everything together. Now, pour the wet mixture into the dry ingredients. Stir until just combined. Don't overmix! Gently fold in the zucchini and corn mixture, along with half of the shredded cheddar cheese. This adds a lovely cheesy flavor. Pour the combined mixture into a greased 9x13-inch baking dish. Smooth the top with a spatula. Sprinkle the remaining cheddar cheese on top. Bake for 25-30 minutes. The top should be golden brown. To check if it’s done, insert a toothpick in the center. It should come out clean. Let the casserole rest for 10 minutes before slicing. Enjoy this dish warm! For the full details, refer to the Full Recipe. To get the best texture in your zucchini cornbread casserole, focus on the zucchini. Grate it finely and squeeze out extra moisture. This step helps your casserole stay fluffy. You want a nice balance of wet and dry in your mix. The cornmeal adds a nice crunch, so don't skip it! Remember to mix just until combined. Over-mixing can make it dense. Serve your casserole warm for the best taste. I love adding a sprinkle of fresh chives on top. They add color and flavor. You can also plate it with a dollop of sour cream. This adds creaminess and pairs well with the dish. For a fun twist, serve it with a side salad or some grilled chicken. One mistake is not squeezing the zucchini enough. Too much moisture can make your casserole soggy. Another common issue is overbaking. Keep an eye on it! When the top is golden brown, it’s time to take it out. Finally, don’t skip the resting time after baking. Letting it sit for ten minutes helps the flavors meld. For the complete recipe, check the Full Recipe section! {{image_2}} You can easily make this dish gluten-free. Instead of all-purpose flour, use a gluten-free blend. Look for one that works well in baking. This swap keeps the texture light and fluffy. Just be sure to check the labels for gluten-free assurance. Want to make this casserole heartier? Add cooked chicken or turkey. Chop the meat into small pieces and mix it in with the veggies. This addition gives the dish extra flavor and protein. It's a great way to use up leftovers, too! Get creative with herbs and spices. Fresh herbs like basil or thyme can brighten the dish. You can also add spices like paprika for a smoky taste. A pinch of cayenne pepper can add heat if you like it spicy. Experiment with flavors to find your perfect mix. To store leftovers of your zucchini cornbread casserole, let it cool completely. Place the casserole in an airtight container. You can keep it in the fridge for up to three days. If you know you won't eat it quickly, think about freezing it instead. To freeze your casserole, start by cutting it into portions. Wrap each piece tightly in plastic wrap. Then place the wrapped portions in a freezer bag or container. This way, they will stay fresh for up to three months. When you're ready to eat, you can thaw it in the fridge overnight. To reheat the casserole, you have a couple of options. You can use the oven or the microwave. If using the oven, preheat it to 350°F (175°C). Place the casserole in an oven-safe dish, cover it with foil, and heat for about 15-20 minutes. If you prefer the microwave, heat individual portions for 1-2 minutes, checking to see if it's hot throughout. Enjoy your delicious zucchini cornbread casserole again! For the full recipe, check the earlier section. Yes, you can make this casserole ahead of time. Prepare it and then cover it well. Store it in the fridge for up to 24 hours. Just remember to bake it before serving. This saves you time on busy days. Zucchini Cornbread Casserole pairs well with many dishes. You can serve it with: - Grilled chicken or fish - A fresh garden salad - Chili or soup - Sour cream or yogurt on the side These sides enhance the flavors and create a balanced meal. Yes, this recipe is perfect for vegetarians. It contains no meat or animal products, aside from the cheese and eggs. You can also use vegan cheese and flax eggs for a vegan option. This makes it friendly for many diets. To check if your casserole is done, look for a golden brown top. Insert a toothpick into the center. If it comes out clean, it’s ready. The baking time is usually 25 to 30 minutes. Let it rest for 10 minutes before slicing. Enjoy this tasty dish! For the full recipe, visit the provided link. This blog post covered everything about making a delicious Zucchini Cornbread Casserole. We discussed the key ingredients, substitutions, and step-by-step instructions to help you bake it perfectly. I shared tips to perfect the texture and common mistakes to avoid. You can even explore variations like gluten-free options or adding protein. Lastly, we touched on storage and reheating. With this guide, you can create a satisfying and tasty dish. Enjoy your cooking adventure!

Zucchini Cornbread Casserole Tasty and Simple Recipe

Looking for a tasty way to use up fresh zucchini? This Zucchini Cornbread Casserole is your answer! It’s easy to

- 8 oz spaghetti or your choice of pasta - 2 medium zucchinis, spiralized or sliced - 8 oz mushrooms, sliced - 3 cloves garlic, minced - 1 small onion, finely chopped - 1/4 cup vegetable broth - 1 teaspoon dried Italian herbs - 1 tablespoon olive oil - Salt and pepper to taste - 1/4 cup grated Parmesan cheese - Fresh basil for garnish When I create Zucchini Mushroom Pasta, I start with the main ingredients. The pasta acts as the base for the dish. I love using spaghetti, but any pasta works. Zucchini adds a fresh, light taste. I spiralize or slice it thin for a nice texture. Mushrooms bring a savory flavor that pairs perfectly with zucchinis. I also add garlic for warmth and depth. Next, I focus on seasonings and extras. A small onion adds sweetness and balance. Vegetable broth gives the dish moisture and enhances flavor. Dried Italian herbs like oregano and basil bring a wonderful aroma. I use olive oil for sautéing, adding richness to the dish. Sometimes, I enhance the dish with optional ingredients. Salt and pepper bring out the flavors. If I want a creamy touch, I sprinkle grated Parmesan cheese on top. Fresh basil not only looks great but also adds a burst of freshness. For the complete recipe, check out the Full Recipe. It lays out the steps to bring all these ingredients together in a delightful meal. - Boil salted water and cook pasta until al dente. - Reserve 1/2 cup of the pasta cooking water, then drain the pasta. Cooking the pasta is simple. Bring a large pot of water to a boil. Add a pinch of salt for flavor. Once the water boils, toss in your chosen pasta. Follow the cooking time on the package until it's al dente, meaning it should still have a slight bite. This texture makes the dish perfect. After cooking, save some pasta water. This water adds flavor and helps bind the sauce. Drain the pasta and set it aside. - Heat olive oil in a skillet, add onion, and sauté. - Stir in garlic and mushrooms, cooking until tender. Next, we move to the vegetables. Heat olive oil in a large skillet over medium heat. Add the finely chopped onion. Sauté for about 2-3 minutes, until it becomes soft and transparent. Then, add minced garlic and sliced mushrooms. Cook for 5-7 minutes. The mushrooms should turn golden brown and tender. This step brings out their rich flavor. - Add zucchini, cook until just tender. - Incorporate vegetable broth and seasonings, mix well. - Combine cooked pasta and sauce, adjusting consistency. Now, it's time to combine everything. Add the spiralized zucchini to the skillet. Cook for another 3-4 minutes until it becomes tender but still has a slight crunch. Pour in the vegetable broth. Sprinkle in the dried herbs, salt, and pepper. Stir well, allowing everything to blend for about 2 minutes. Finally, add the cooked pasta to the skillet. Mix everything thoroughly. If it seems dry, add some reserved pasta cooking water until it reaches your desired creaminess. This pasta dish is now ready to enjoy. For the full recipe, check the details above! - Use high-quality pasta for the best texture. - Don't overcook the zucchini; it should stay crisp. Getting the pasta right is key. I suggest using a brand you trust. Fresh pasta can elevate the dish, but dried pasta works too. Always cook until al dente. This gives your dish the perfect bite. Remember, you can always add more sauce, but you can't fix mushy pasta. - Experiment with fresh herbs for added aroma. - Customize with additional spices or chili flakes. Fresh herbs like basil or parsley take this dish to new heights. They add color and a fresh taste. You can also try adding chili flakes for heat. This gives a nice kick without overpowering the other flavors. - Prep vegetables ahead of time for quick cooking. - Use a large skillet for better heat distribution. Chopping your veggies before you start cooking saves time. It allows you to focus on cooking rather than rushing. A large skillet helps everything cook evenly. This way, your zucchini and mushrooms won't steam; they will sauté nicely. These simple tips make a big difference in your final dish. For the full recipe, check out Zucchini Mushroom Pasta Delight. {{image_2}} You can change the sauce for a different taste. Try creamy Alfredo sauce for a rich twist. It adds a velvety texture that pairs beautifully with the veggies. Alternatively, use marinara sauce for a classic tomato-based option. This gives a fresh, tangy flavor that complements the zucchini and mushrooms. Want to make your dish heartier? Incorporate grilled chicken or shrimp for extra protein. They add great texture and flavor. If you prefer a plant-based option, chickpeas or tofu work well too. They soak up the sauce and add a nice bite. Feel free to mix in other veggies. Asparagus, bell peppers, or spinach can add color and taste. Each vegetable brings its unique character to the dish. Adding a mix of vegetables can also make your meal more exciting and nutritious. Enjoy experimenting! For more on making this dish, check the Full Recipe. To keep your zucchini mushroom pasta fresh, refrigerate it in an airtight container. You can store it for up to 3 days. Before sealing, let it cool for the best results. This helps maintain flavor and texture. When you're ready to enjoy your leftovers, reheat them in the microwave or on the stovetop. To keep it moist, add a splash of water or broth. This step prevents the pasta from drying out. Stir occasionally to heat evenly. If you want to save some for later, freeze the sauce separately from the pasta. This method preserves the taste and texture better. Consume frozen pasta within 2 months for optimal flavor. Remember to label your containers with dates for easy tracking. - Yes, gluten-free alternatives work well with this dish. They provide the same great texture. - Nutritional yeast or vegan cheese are great alternatives. They add a nice flavor without dairy. - Omit Parmesan cheese and ensure your broth is plant-based. This keeps it fully vegan-friendly. - Yes, but it's best to store ingredients separately to maintain freshness. This helps keep the pasta and veggies from getting soggy. - Absolutely, add red pepper flakes to taste during cooking. Adjust the heat level to your liking. For the full recipe, check out the earlier section! This pasta dish uses fresh ingredients like zucchini and mushrooms for a healthy twist. By sautéing vegetables and mixing them with your favorite pasta, you create a delicious and easy meal. Remember to try different flavors, like creamy sauces or grilled proteins, to keep it exciting. Store any leftovers properly for future meals. Enjoy cooking and making this dish your own. You’ll love how simple it is to prepare a tasty and healthy meal.

Zucchini Mushroom Pasta Delightful and Simple Meal

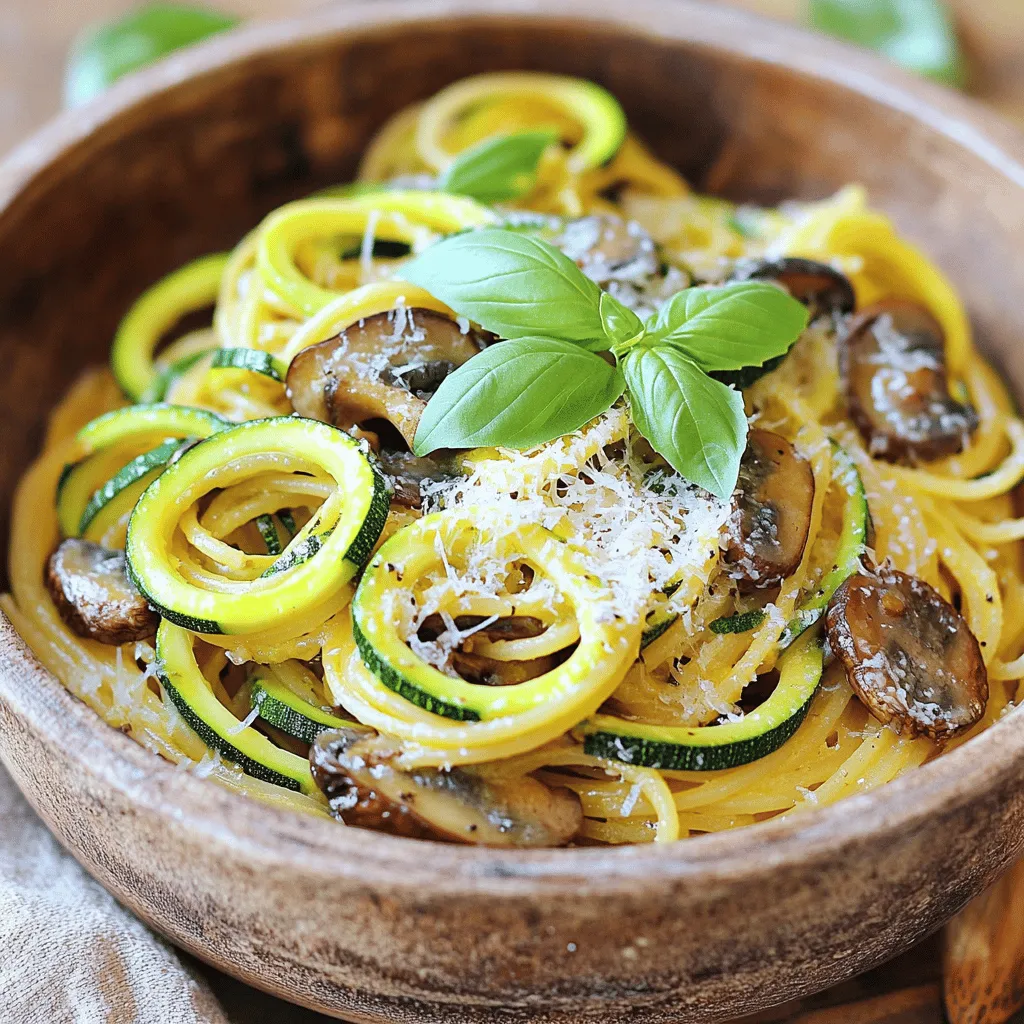
Looking for a quick, tasty meal? Zucchini Mushroom Pasta is perfect for you! Packed with fresh veggies and bold flavors,

- 4 ripe peaches, pitted and chopped - 1 cup fresh lemon juice (about 4-6 lemons) - 1 cup granulated sugar (adjust to taste) - 4 cups cold water - 1 teaspoon vanilla extract - Optional: Fresh mint leaves To create a refreshing peach lemonade, start with ripe peaches. These fruits add natural sweetness and a lovely color to your drink. When choosing peaches, look for ones that yield slightly to pressure. They should smell fragrant and feel soft. Next, you will need fresh lemons. They provide the tangy flavor that balances the sweetness from the peaches. A good rule is to pick lemons that feel heavy for their size. Granulated sugar comes next. You can adjust the amount based on your taste. This recipe calls for one cup, but feel free to add more or less. Cold water is essential to dilute the mixture and create a refreshing drink. Lastly, a teaspoon of vanilla extract adds depth to the flavor. For a touch of brightness, consider adding fresh mint leaves as a garnish. - Blender - Fine mesh sieve - Large pitcher - Ice cube tray Using the right tools helps make the process easier. A blender is your best friend for pureeing the peaches. It turns them into a smooth mixture. Next, a fine mesh sieve ensures you get a silky texture by removing any pulp. This step is key for a refreshing drink. You will also need a large pitcher to mix everything together. It gives you enough space to add all the ingredients. An ice cube tray is useful for chilling your lemonade. You can make ice cubes from the peach lemonade to keep it cold without watering it down. These ingredients and tools set the stage for a delightful summer drink. For the full recipe, check out the detailed steps in the next section. To start, take your ripe peaches and chop them into small pieces. Place the chopped peaches in a blender with half of the cold water. Blend until the mixture is smooth. Next, strain the peach puree through a fine mesh sieve. This step removes any pulp and gives you a smooth texture. Press down on the puree with a spoon to get every drop of juice. Now it’s time to mix your lemonade. In a large pitcher, combine the strained peach juice with fresh lemon juice and granulated sugar. Stir well until the sugar dissolves completely. Then, pour in the remaining cold water and add the vanilla extract. Mix gently to combine all the flavors. If you like it sweeter, you can adjust the sugar to your taste. After mixing, chill your peach lemonade in the refrigerator. Let it sit for at least 30 minutes. This allows the flavors to meld and become even more delicious. When you’re ready to serve, fill tall glasses with ice cubes. Pour the chilled peach lemonade over the ice and garnish with fresh mint leaves. Enjoy this refreshing drink on a hot summer day! For the full recipe, check out the details provided. How to choose ripe peaches Look for peaches that feel slightly soft when you gently press them. Their skin should have a warm color, often yellow or orange. Avoid peaches that are green or too hard, as they won’t be sweet. Picking the right lemons for juicing Choose lemons that are heavy for their size and firm. Bright yellow skin often means they are juicy. If you find a lemon with some slight blemishes, don’t worry; they can still be great for juicing! Adjusting sugar levels Start with the amount of sugar in the recipe. Taste your peach lemonade and decide if it needs more. Just add a little at a time, so it does not get too sweet. Natural sweetener alternatives If you want a healthier option, try using honey or agave syrup. Both dissolve well and add a nice flavor. You can also use stevia or erythritol if you want to cut down on calories. Optional ingredients to enhance taste Add a splash of sparkling water for a fun twist. You can also mix in other fruits like strawberries or raspberries for added flavor. A bit of ginger can give it a zing, too. Tips for adding herbs or spices Fresh mint leaves are perfect for a refreshing touch. You can muddle them in the pitcher before adding lemonade. For a unique flavor, try some basil or even a pinch of cinnamon. {{image_2}} You can make your peach lemonade a bit more fun by adding vodka or rum. A good rule is to add 1-2 ounces of alcohol per glass. This gives a nice kick without overpowering the peach flavor. For parties, serve it in a big pitcher. Add slices of fresh peaches and lemons for a pretty look. Guests will love this refreshing drink! Want some fizz? Making your peach lemonade sparkling is easy! Just mix in some soda water or lemon-lime soda. The bubbles add a fun twist. For the best flavor, try using a citrus soda. You can also add a splash of ginger ale for a spicy hint. Serve it over ice for a bubbly summer treat! Combining strawberries with peaches makes a beautiful blend. To do this, use about 2 cups of fresh strawberries. Blend them with the peaches for a fruity mix. The sweet and tart flavors pair well. Adjust the blending ratio to your taste. More strawberries will make it sweeter, while more peaches keep it classic. This combo will surely impress! For full details on making this delightful drink, check the Full Recipe. Store leftover peach lemonade in a pitcher. Make sure to cover it tightly. This keeps it fresh and prevents smells from mixing in your fridge. For the best taste, drink it within three days. After that, it may lose some flavor. You can freeze peach lemonade for later use. Pour the lemonade into an ice cube tray. This makes perfect peach lemonade cubes. Once frozen, pop them out and store them in a bag. When you want a refreshing drink, just thaw the cubes in a glass of water. You can also blend them for a slushy treat! Homemade peach lemonade can last up to one week in the fridge. To keep it fresh, store it in a sealed pitcher or jar. This helps prevent it from absorbing other smells. If it starts to taste off, it's best to toss it out. Always check for changes in color or smell before serving. Yes, you can use frozen peaches! They work well in this recipe. Just thaw them before blending. Frozen fruit often has great flavor and can save prep time. However, it may make your lemonade a bit more watery. You might need to adjust the sugar to balance the flavors. If you want to cut down on sugar, try using honey or agave syrup. Both of these options will add sweetness without the granules. You can also use stevia or monk fruit sweetener for a low-calorie choice. Keep in mind that each sweetener has a different level of sweetness. Start with a small amount and adjust to taste. Absolutely! This recipe is great for kids. To make it more kid-friendly, you can cut back on the sugar. You might even try swapping out some of the lemonade with sparkling water for a fun twist. Just ensure the lemonade is not too tart. Kids love the fruity flavor and the bright color! This blog post covers how to make refreshing peach lemonade. You learned about fresh ingredients like ripe peaches and lemons, and tools like a blender and pitcher. We went through key steps for preparing the peach puree and mixing the lemonade. You also discovered tips to choose fruits and customize sweetness. Variations like alcoholic and sparkling lemonade add fun twists. For storage, know how to keep it fresh and freeze leftovers. This drink is great for hot days, parties, or family fun. Enjoy your homemade peach lemonade!

Refreshing Peach Lemonade Simple Summer Delight

When summer heat hits, nothing cools you down like a glass of Refreshing Peach Lemonade. This simple recipe bursts with

To make this delightful Southern Peach Bread, you will need a few simple ingredients. Here’s the list: - 2 cups all-purpose flour - 1 teaspoon baking powder - 1/2 teaspoon baking soda - 1/2 teaspoon salt - 1 teaspoon ground cinnamon - 1/2 cup unsalted butter, softened - 1 cup granulated sugar - 2 large eggs - 1 teaspoon vanilla extract - 1 cup buttermilk - 2 cups fresh peaches, peeled and diced - 1/2 cup chopped pecans (optional) - 1/4 cup brown sugar (for topping) - 1 teaspoon cinnamon (for topping) Each of these items brings flavor and texture to the bread. Fresh peaches add sweetness and moisture, making the bread soft. The butter and sugar create a rich base, while the buttermilk keeps it fluffy. If you like nuts, adding pecans gives a nice crunch. This recipe is easy, yet it creates a warm, inviting aroma as it bakes. You can find the full recipe with all the steps and instructions to make this tasty treat. Enjoy making this Southern Peach Bread with great ingredients that come together perfectly! 1. Preheat your oven to 350°F (175°C). 2. Grease and flour a 9x5 inch loaf pan. 3. In a medium bowl, mix the dry ingredients: - 2 cups all-purpose flour - 1 teaspoon baking powder - 1/2 teaspoon baking soda - 1/2 teaspoon salt - 1 teaspoon ground cinnamon 4. Set this bowl aside for later. 1. In a large bowl, cream together: - 1/2 cup unsalted butter, softened - 1 cup granulated sugar Use an electric mixer, blend until light and fluffy. This takes about 3-4 minutes. 2. Add 2 large eggs to the butter mix, one at a time. 3. Mix in 1 teaspoon vanilla extract next. 4. Gradually pour in 1 cup buttermilk. Stir until well combined. 1. Slowly add the dry ingredient mixture to the wet mix. Stir just until combined. Be careful not to overmix! 2. Gently fold in: - 2 cups fresh peaches, peeled and diced - 1/2 cup chopped pecans (optional) 1. Pour the batter into the prepared loaf pan. Smooth the top with a spatula. 2. In a small bowl, mix: - 1/4 cup brown sugar - 1 teaspoon cinnamon Sprinkle this topping over the batter. 3. Bake for 55-60 minutes. Check if done by inserting a toothpick in the center. If it comes out clean, it’s ready. 4. Allow the bread to cool in the pan for about 10 minutes. 5. Then, transfer to a wire rack to cool completely. For the full recipe, refer back to the ingredients listed above. Enjoy each slice of this delightful Southern Peach Bread! To make the best Southern Peach Bread, you must avoid overmixing. This keeps the bread light and fluffy. Mix just until you see no dry flour. It is also important to check for doneness. Insert a toothpick into the center. If it comes out clean, your bread is ready! Serve the bread warm with a pat of butter. Fresh peach slices on top add a nice touch. This makes it look great and taste even better. If you want to store it, keep it in an airtight container. This way, it stays soft and tasty. You can add a little cinnamon or nutmeg for extra flavor. Vanilla extract also boosts the taste. When using peaches, ripe ones work best for this recipe. Canned peaches can also work if fresh ones are not available. Just drain them well before adding to the batter. For the full recipe, check out the original source. {{image_2}} You can change the flavor of Southern Peach Bread by using other fruits. Cherries, blueberries, or apples work well. Each fruit brings its own taste and texture. For cherries, pit and chop them before use. If you choose blueberries, toss them in flour to prevent sinking. Apples should be peeled and diced for easy mixing. When using different fruits, you may need to adjust the sugar. Some fruits are sweeter, so you can cut back on sugar. Always taste the fruit first to decide how much sugar to add. If you need gluten-free options, substitute all-purpose flour with a gluten-free blend. Make sure the blend is suitable for baking. This swap will keep the bread light and tasty. For those avoiding dairy, try using almond milk or oat milk instead of buttermilk. You can use dairy-free butter to replace the regular butter. These changes maintain flavor while fitting your diet. Southern Peach Bread pairs well with breakfast or brunch items. Serve it warm with butter or cream cheese. It also goes great with coffee or tea. This bread is perfect for holidays or gatherings. Slice it and arrange it on a platter. Add fresh peach slices for a colorful touch. Guests will enjoy this sweet treat at any event. For more ideas, check out the Full Recipe for serving tips! To keep your Southern Peach Bread fresh, follow these simple steps. First, let the bread cool completely before storing. This prevents moisture build-up, which can make the bread soggy. Wrap the bread tightly in plastic wrap. You can also use aluminum foil for extra protection. - Store at room temperature for up to 3 days. - For longer storage, place it in the fridge. This will keep it fresh for up to a week. Refrigeration can change the texture, making it a bit denser. If you prefer that fluffy bite, keep it at room temperature. Freezing Southern Peach Bread is easy and keeps it tasty. Once cooled, slice the bread if you want individual pieces. Wrap each slice in plastic wrap. Then, place the slices in a freezer bag or airtight container. - For whole loaves, wrap it tightly in plastic then foil. - Label with the date for easy tracking. To thaw, take out a slice or loaf from the freezer. Leave it at room temperature for an hour or so. You can also heat it in the microwave for about 15 seconds. This way, you enjoy warm, delicious bread anytime! For the complete recipe, check out the Full Recipe section. How long does Southern Peach Bread last? Southern Peach Bread lasts about 3 to 5 days at room temperature. Store it in an airtight container to keep it fresh. If you want it to last longer, you can freeze it. Can I use frozen peaches for this recipe? Yes, you can use frozen peaches. Just make sure to thaw and drain them first. This step helps reduce excess moisture in the bread. What is the best way to slice the bread? To slice the bread, use a serrated knife. This knife helps you get clean cuts without squishing the bread. Slice it when it cools, but warm slices are extra tasty. What to do if the bread is too dense? If your bread turns out dense, it could be due to overmixing. Mix just until combined. Also, ensure your baking powder and baking soda are fresh. Old leavening agents can lead to dense bread. Issues with overbaking or underbaking If you overbake, the bread can dry out. Keep an eye on it and test with a toothpick. For underbaking, the center may stay gooey. Bake a bit longer, but check often to avoid overbaking. Alternatives for all-purpose flour You can use whole wheat flour or a gluten-free blend. If using whole wheat, the bread may be denser. Adjust liquid ingredients to keep the right texture. Substituting sweeteners and toppings Instead of granulated sugar, try honey or maple syrup. For a topping, you can use oats or crushed nuts instead of brown sugar. This will give a nice crunch to the bread. For the full recipe, be sure to check the specific ingredient list and instructions. In this article, I shared how to make delicious Southern Peach Bread. We covered the ingredients you need, step-by-step instructions, and tips for perfecting your loaf. You learned about variations, storage tips, and answers to common questions. Baking can be fun and rewarding. Use fresh peaches for the best flavor. Enjoy sharing this treat with family and friends. Your kitchen will smell wonderful, and you'll have a tasty treat to enjoy. Happy baking!

Southern Peach Bread Irresistible Homemade Delight

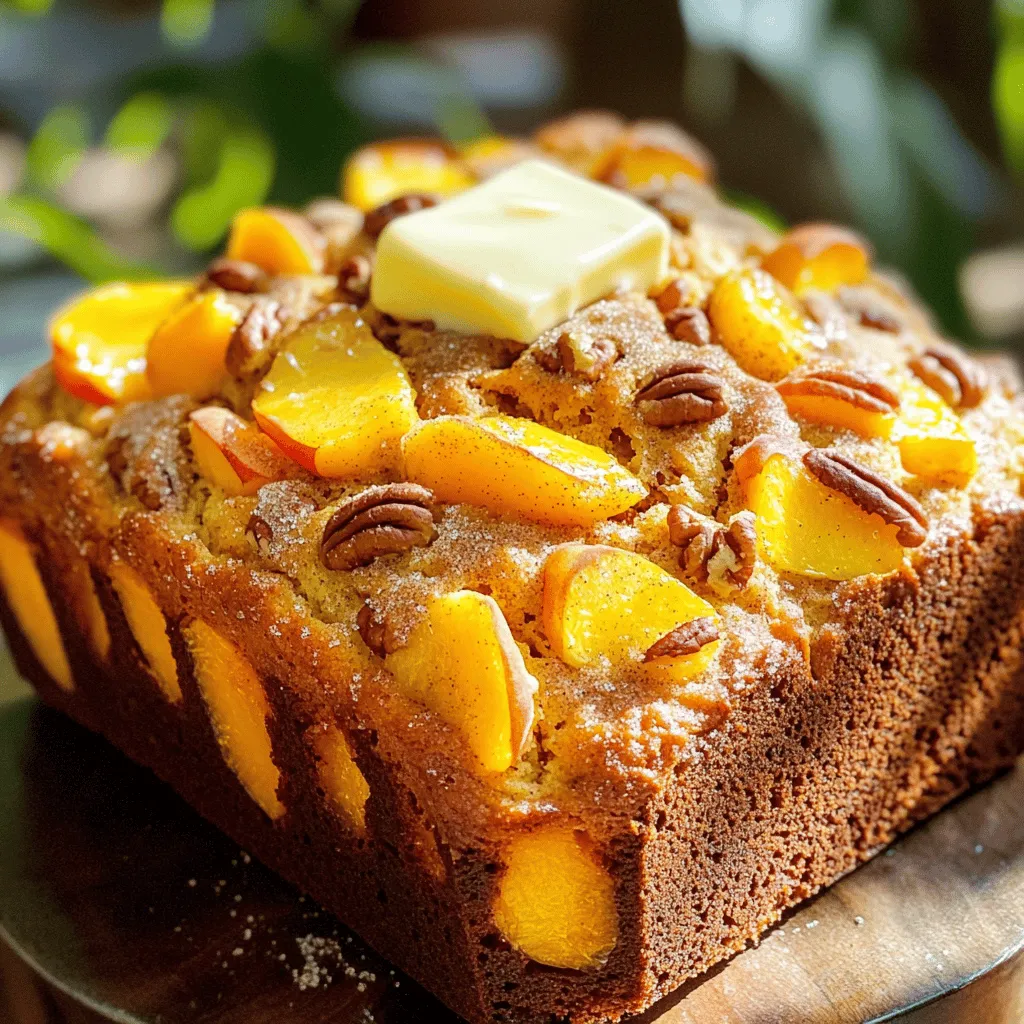
Welcome to a delightful journey of flavor with my Southern Peach Bread! This homemade treat is perfect for summer gatherings

- 1 pound fresh okra, sliced into ½ inch rounds - 1 cup buttermilk - 1 cup cornmeal - ½ cup all-purpose flour - 1 teaspoon garlic powder - 1 teaspoon onion powder - ½ teaspoon cayenne pepper - 1 teaspoon salt - ½ teaspoon black pepper - Oil for frying (canola or vegetable oil) I love using fresh ingredients for this crispy fried okra. The okra should be firm and green. You will slice it into ½ inch rounds. This size cooks well and gives a nice crunch. Soaking the sliced okra in buttermilk is key. It adds flavor and helps the coating stick. For the dry mix, cornmeal is perfect for that crunchy texture. The all-purpose flour adds a lightness to the coating. Garlic and onion powder bring out the flavors. Cayenne pepper adds just a hint of heat, but feel free to adjust it to your taste. Salt and black pepper are must-haves for seasoning. You will need oil for frying. Canola or vegetable oil works best. It should be hot enough to fry the okra until golden brown. Make sure you have enough oil in your pan to cover the okra while frying. This combination of fresh and dry ingredients creates a delicious dish. You can find the full recipe in the previous sections for all the steps. Happy cooking! - Soaking the okra in buttermilk: Start by slicing your fresh okra into ½-inch rounds. Place these slices in a large bowl and cover them with buttermilk. Let them soak for about 30 minutes. This soaking adds flavor and helps the coating stick well to the okra. - Mixing dry ingredients: In another bowl, combine the cornmeal, all-purpose flour, garlic powder, onion powder, cayenne pepper, salt, and black pepper. Mix these together well. This blend gives the okra its great crunch and flavor. - Heating oil to the right temperature: Pour about 2 inches of oil into a deep skillet or frying pan. Heat the oil over medium-high heat until it reaches 350°F (175°C). Use a thermometer to check the temperature. This step is key to getting crispy okra. - Coating the okra: After soaking, take the okra out of the buttermilk. Let the excess buttermilk drip off. Now, take each piece and dredge it in the cornmeal mixture. Be sure each piece is fully coated. Shake off any extra coating. - Frying in batches until golden brown: Carefully place the coated okra into the hot oil. Fry in batches to avoid crowding the pan. Cook for about 3-4 minutes or until the okra is golden brown and crispy. Turn the pieces occasionally for even cooking. - Draining excess oil: Once cooked, remove the fried okra and place it on a paper towel-lined plate. This helps drain off any extra oil. - Presentation tips for serving: Serve the crispy fried okra in a rustic basket lined with parchment paper. Pair it with your favorite dipping sauce, like ranch or a spicy remoulade. For a touch of color, garnish with fresh parsley. Enjoy this delightful dish! For the full recipe, refer to the earlier section. To make crispy fried okra, start by soaking the slices in buttermilk. This step helps the cornmeal coating stick and adds flavor. The buttermilk also tenderizes the okra, making every bite juicy. Soak the okra for at least 30 minutes. Next, get the oil temperature right. Heat oil in a deep pan to 350°F (175°C). Use a thermometer for accuracy. If the oil is too cool, the okra will absorb it and become soggy. If it's too hot, the coating will burn before the okra cooks. You can play with seasonings to make your okra unique. Try adding smoked paprika for a smoky taste or some lemon zest for brightness. You can even mix in Parmesan cheese for a cheesy twist. Dipping sauces also enhance the flavor. Classic ranch works well, but you can try spicy remoulade or even a homemade yogurt dip. These sauces add a creamy contrast to the crunchy okra. For the full recipe, check out the Crunchy Southern Fried Okra . {{image_2}} Southern-style crispy fried okra is a classic favorite. It shines with its crunchy texture and rich flavor. This dish often uses fresh okra, cornmeal, and spices. The method makes it popular in the southern United States. Many other cuisines add their twist to fried okra. In India, for example, they might use chickpea flour and spices. This gives it a different flavor and texture. You can try mixing spices from various regions to create your version of crispy fried okra. If you want to cook okra without frying, try air frying. An air fryer uses hot air to make food crispy without much oil. To air fry okra, just coat it with seasoning and place it in the fryer. Cook at 400°F for about 15 minutes. Shake the basket halfway through for even cooking. Baking is another healthier option. Preheat your oven to 425°F. Spread the coated okra on a baking sheet in a single layer. Bake for about 20-25 minutes, flipping halfway. This gives you crisp okra with less oil. Try these methods for a fun twist on your crispy fried okra. For the full recipe, check out the Crunchy Southern Fried Okra section. After you enjoy your crispy fried okra, store any leftovers in an airtight container. This keeps them fresh for up to three days. Place a paper towel in the container to absorb moisture. This way, they stay crispy longer. When you want to reheat the fried okra, avoid the microwave. Microwaves can make them soggy. Instead, heat them in a skillet over medium heat. This method helps regain their crunch. You can also use an air fryer. Set it to 350°F (175°C) and heat for about 5 minutes. If you want to save fried okra for later, freezing is a great option. First, let the okra cool completely. Then, spread them in a single layer on a baking sheet. Freeze them until solid, about 1-2 hours. Once frozen, transfer the okra to a freezer bag. Be sure to remove as much air as possible before sealing. Fried okra can last up to three months in the freezer. For the best taste and texture, try to use them within this time. When you're ready to eat, fry them directly from frozen. This keeps them crispy and tasty. For more details, check out the Full Recipe. How can I make crispy fried okra without buttermilk? You can use plain yogurt or milk instead. Both will help the coating stick. Just soak the okra for about 30 minutes to get a good flavor. What is the best way to avoid soggy okra? Ensure your oil is hot enough before frying. If it's not hot, the okra will absorb too much oil. Also, do not overcrowd the pan. Fry in small batches to keep them crispy. How long do I fry the okra for perfect crispiness? Fry the okra for about 3 to 4 minutes. Look for a golden brown color. Turn them occasionally to cook evenly and achieve that perfect crunch. Can I use frozen okra for this recipe? Yes, you can use frozen okra. Just thaw it first and pat dry. This helps to remove excess moisture, which can make the coating soggy. Is fried okra healthy? Fried okra can be part of a balanced diet when enjoyed in moderation. It is a good source of fiber and vitamins. Just be mindful of the oil used for frying. What are some nutritious sides to pair with crispy fried okra? Consider serving okra with a fresh salad, coleslaw, or grilled vegetables. These sides add nutrition and balance out the meal. You can also enjoy it with rice or cornbread for a hearty touch. For the full recipe, check out the Crunchy Southern Fried Okra. In this post, you learned how to make crispy fried okra. Fresh okra, buttermilk, and a mix of spices create great flavor. Proper soaking and frying techniques ensure a golden finish. You can try different cooking styles too, like air frying or baking. Remember to store leftovers correctly for the best taste. Fried okra can be both a treat and a side dish. Now, you have all the tools to enjoy this delicious dish. Enjoy your cooking!

Crispy Fried Okra Perfect for Your Next Meal

Are you ready to elevate your meals with a crunchy, flavorful treat? Crispy fried okra is a classic dish that

Older posts
Newer posts
← Previous Page1 … Page70 Page71 Page72 … Page94 Next →

dsad

© 2025 flavorsprint • Built with GeneratePress

Our Policies

  • Copyright Policy
  • Cookie Policy
  • GDPR Policy
  • Privacy Policy
  • Disclaimer
  • Terms Of Use

More Information

  • Home
  • About
  • Contact
  • Appetizers
  • Dessert
  • Dinner
  • Drinks
©2025, flavorsprint About Back To Top