Skip to content
DisclaimerTerms Of UseGDPR PolicyCookie Policy

flavorsprint

  • Home
  • Drinks
  • Appetizers
  • Dinner
  • Dessert
  • About
  • Contact
  • Privacy Policy
DisclaimerTerms Of UseGDPR PolicyCookie Policy

Lillian

To make yellow squash bread, you will need these simple ingredients: - 2 cups grated yellow squash (about 1 medium squash) - 1 cup all-purpose flour - 1 cup whole wheat flour - 1 teaspoon baking powder - 1/2 teaspoon baking soda - 1/2 teaspoon salt - 1 teaspoon ground cinnamon - 1/2 teaspoon ground nutmeg - 1/2 cup granulated sugar - 1/2 cup brown sugar, packed - 2 large eggs - 1/3 cup vegetable oil (or melted coconut oil) - 1 teaspoon vanilla extract - 1/2 cup chopped walnuts or pecans (optional) - 1/2 cup raisins or dried cranberries (optional) You can easily swap some ingredients for other options. Here are a few ideas: - Use almond flour instead of all-purpose flour for a nutty taste. - Replace whole wheat flour with oat flour for a gluten-free choice. - Swap granulated sugar with honey or maple syrup for a natural sweetener. - If you don’t have eggs, try using applesauce or a flaxseed mix. - Use any nut or seed you like in place of walnuts or pecans. Yellow squash is not just tasty; it's also good for you! Here are some benefits: - Low in calories: Great for weight control. - High in vitamins: Packed with vitamins A and C for healthy skin. - Rich in fiber: Helps with digestion and keeps you full. - Hydrating: Contains a lot of water, keeping you refreshed. - Antioxidants: Helps protect your body from damage. With these ingredients and their benefits, you can create a dish that is both delicious and nutritious. For the full recipe, check out the detailed instructions provided earlier. To start, gather your ingredients. You will need: - 2 cups grated yellow squash (about 1 medium squash) - 1 cup all-purpose flour - 1 cup whole wheat flour - 1 teaspoon baking powder - 1/2 teaspoon baking soda - 1/2 teaspoon salt - 1 teaspoon ground cinnamon - 1/2 teaspoon ground nutmeg - 1/2 cup granulated sugar - 1/2 cup brown sugar, packed - 2 large eggs - 1/3 cup vegetable oil (or melted coconut oil) - 1 teaspoon vanilla extract - 1/2 cup chopped walnuts or pecans (optional) - 1/2 cup raisins or dried cranberries (optional) Begin by preheating your oven to 350°F (175°C). Grease a 9x5-inch loaf pan. If you prefer, line the bottom with parchment paper. Next, in a large bowl, mix the grated squash, granulated sugar, brown sugar, eggs, vegetable oil, and vanilla. Stir until everything is well combined. In another bowl, mix the all-purpose flour, whole wheat flour, baking powder, baking soda, salt, cinnamon, and nutmeg. Combine these dry ingredients evenly. Slowly add the dry mix to the wet squash mix. Stir gently until just combined. Be careful not to over-mix. If you like, fold in nuts or dried fruit at this point. Once your batter is ready, pour it into the prepared loaf pan. Smooth out the top with a spatula. Place the pan in your preheated oven. Bake for 50 to 60 minutes. To check if it's done, insert a toothpick into the center. If it comes out clean, the bread is ready. After baking, let the bread cool in the pan for about 10 minutes. Then, transfer it to a wire rack to cool completely. One common mistake is over-mixing the batter. This can make the bread tough. Mix just until you see no dry flour. Another mistake is not checking the oven temperature. An oven that’s too hot can burn the bread. Always use an oven thermometer for accuracy. Also, watch the baking time. If you take it out too soon, the center may be raw. Lastly, avoid skipping the cooling time. This helps the bread set and makes slicing easier. Follow these steps, and your yellow squash bread will be a hit! For the full recipe and more tips, refer to the complete guide. To make your yellow squash bread moist, use fresh squash. Grate it fine, then squeeze out some water. This step helps keep the bread light. Adding eggs also boosts moisture. They bind and enrich the batter. If you want extra moisture, use applesauce or yogurt. These ingredients add flavor, too. Keep an eye on baking time. Overbaking can dry out your loaf. Check with a toothpick around 50 minutes. If it comes out clean, your bread is done. Spices can make a big difference. I love to use ground cinnamon and nutmeg. These spices bring warmth and depth. You can also try adding ginger or allspice for a twist. If you like it sweet, sprinkle a little more sugar in the batter. For a savory touch, consider herbs like thyme or rosemary. They blend well with the squash. Don’t forget to taste your batter before baking. Adjust the spices to fit your preference. Having the right tools makes baking easier. A good box grater is key for shredding squash quickly. Use mixing bowls that are easy to hold and clean. A spatula helps fold in nuts or fruits smoothly. For measuring, use dry and liquid measuring cups. This ensures accuracy in your recipe. A whisk is great for blending dry ingredients without lumps. Finally, a reliable loaf pan helps create that perfect shape. If you have parchment paper, line your pan for easy removal. Check out the Full Recipe for more tips! {{image_2}} You can make yellow squash bread even better by adding nuts or seeds. Try walnuts or pecans for a nice crunch. You can also use sunflower seeds or pumpkin seeds. These add texture and nutrition. Just fold in half a cup of your choice before baking. This small change makes a big difference in taste. Adding fruits can brighten up your squash bread. You can mix in raisins or dried cranberries. They add sweetness and chewiness. For a fresh twist, try diced apples or mashed bananas. These fruits bring moisture and flavor. Just use about half a cup, and mix them into the batter. The result will be a fruity delight! If you need a gluten-free option, you can adapt the recipe easily. Substitute all-purpose flour with a gluten-free blend. Make sure it has xanthan gum for the right texture. You can also use almond flour or coconut flour. Each gives a unique flavor. Just adjust the liquid slightly, as these flours absorb moisture differently. This way, everyone can enjoy delicious yellow squash bread! For the complete recipe, check out the Full Recipe section. To keep your yellow squash bread fresh, wrap it tightly in plastic wrap. You can also use aluminum foil. Store it in a cool, dry place. If you want it to last longer, place it in the fridge. This will keep it moist and tasty for up to a week. If you want to save some bread for later, freezing works great. First, let the bread cool completely. Next, slice it into pieces. Wrap each slice in plastic wrap, then place them in a freezer bag. This way, you can take out just what you need. It can stay in the freezer for up to three months. When you're ready to enjoy your yellow squash bread, reheating is simple. For the best results, use the oven. Preheat it to 350°F (175°C). Unwrap the bread and place it on a baking sheet. Heat for about 10 to 15 minutes. You can also microwave a slice for 20 to 30 seconds. Enjoy your warm and delicious bread! Yellow squash bread can last about 3 to 5 days at room temperature. Store it in an airtight container to keep it fresh. If you want it to last longer, place it in the fridge. In the fridge, it can stay good for up to a week. Yes, you can use frozen yellow squash for this recipe. Just thaw it first and drain any excess water. This helps keep the bread from getting too wet. Frozen squash is a great option when fresh squash is not available. Yellow squash bread tastes great on its own. You can enjoy it plain or with toppings. Try spreading some butter or cream cheese on a warm slice. Adding a sprinkle of chopped nuts or a drizzle of honey can enhance the flavor. For a fun twist, pair it with a fruit jam or a scoop of ice cream. Check out the Full Recipe for more ideas! Yellow squash bread is a tasty treat that uses simple ingredients and steps. We discussed how to prepare, bake, and store this delightful bread. Remember to keep your loaf moist and flavorful by using the right tools and spices. You can also try different nuts or fruits to change things up. With these tips, you can enjoy this dish for days. Keep experimenting and sharing your results. Happy baking!

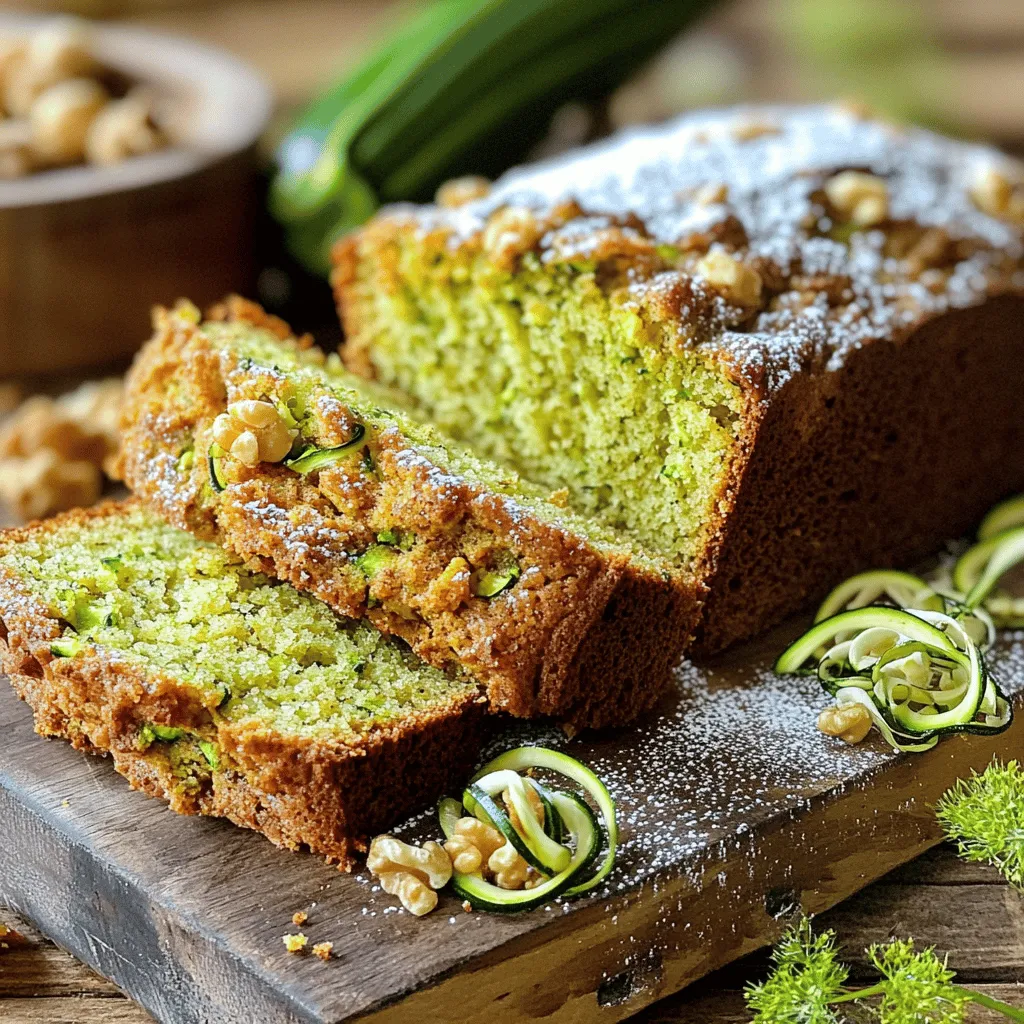
Yellow Squash Bread Simple and Delicious Recipe

If you’re looking for a tasty way to use yellow squash, this simple and delicious recipe for Yellow Squash Bread

To make a tasty grilled peach salad, start with these simple ingredients: - 4 ripe peaches, halved and pitted - 4 cups mixed greens (arugula, spinach, and baby kale) - 1/2 cup crumbled feta cheese - 1/4 cup walnuts, toasted - 1/4 red onion, thinly sliced - 2 tablespoons balsamic glaze - 2 tablespoons olive oil - Salt and pepper to taste - Fresh basil leaves for garnish These ingredients work together to create a fresh and flavorful dish. The peaches bring a sweet taste, while the greens add crunch. Feta cheese adds creaminess, and walnuts give a nice bite. The balsamic glaze ties all the flavors together. You can find the full recipe to guide you in creating this delightful salad. Enjoy the process of gathering these fresh items! To grill peaches for maximum flavor, start with ripe ones. Look for peaches that yield slightly when gently pressed. These will have the best taste. Cut the peaches in half and remove the pit. Brush the cut sides with olive oil. This helps prevent sticking and adds flavor. When grilling, place the peaches cut-side down on a preheated grill. Grill over medium heat for 4-5 minutes. You want nice grill marks and a soft texture. Flip and grill for another 2-3 minutes. For slicing, let the peaches cool for a couple of minutes. Then, cut them into wedges. This makes it easy to add to your salad. Combine the ingredients seamlessly for a beautiful dish. Start with a large bowl. Add the mixed greens, sliced red onion, and toasted walnuts. Toss the greens gently to mix them. This keeps the salad light and airy. Next, add the grilled peach wedges to the bowl. Sprinkle crumbled feta cheese over the top. Drizzle balsamic glaze and a little olive oil. Season with salt and pepper to taste. For tossing, use a light hand. You want to coat everything without breaking the peaches. For presentation, transfer the salad to a large serving platter. Garnish with fresh basil leaves for color and flavor. Pair this salad with grilled chicken or fish for a complete meal. The sweet peaches and salty feta make a great combo with protein. Enjoy your fresh and flavorful grilled peach salad! To get the best grilled peaches, aim for medium heat. This helps the peaches cook evenly. If the grill is too hot, they may burn. You want nice grill marks and soft fruit. To prevent sticking, brush the cut sides of the peaches with olive oil. This simple step makes a big difference. You can also oil the grill grates before adding the peaches. For added protein, consider grilled chicken or shrimp. Both options blend well with the salad. You can also use chickpeas for a vegetarian choice. Dressings matter too! A lemon vinaigrette or honey mustard dressing works great. They enhance the sweetness of the peaches. Fresh herbs boost flavor in this dish. Try basil or mint for a bright touch. A sprinkle of black pepper adds a nice kick too. Balancing sweetness and acidity is key. Use lemon juice to cut through the sweetness of the peaches. This creates a lovely harmony of flavors. For the full recipe, check out the cooking guide. {{image_2}} You can get creative with the fruit in your salad. Try using nectarines or pears instead of peaches. Both fruits offer a sweet flavor and a juicy texture. They work well on the grill and add a fun twist. You can also swap nuts for different textures. Try pecans or almonds for a new crunch. For a vegan version, just skip the cheese. The salad stays tasty and fresh without it. If you need a gluten-free option, ensure your nuts and dressings are safe for your diet. Many balsamic glazes are gluten-free, but always check the label for peace of mind. Want to add more zing? Consider adding citrus! Squeeze fresh lemon or lime juice over the salad for a bright taste. You can also mix in extra veggies, like bell peppers or cucumbers. They add crunch and color, making your dish even more appealing. For the full recipe, check out the complete guide to making this delightful salad! To keep your grilled peach salad fresh, follow these storage tips: - Store mixed greens and grilled peaches separately. This helps prevent sogginess. - Use an airtight container for the greens. This keeps them crisp. - Place the grilled peaches in a separate container. Make sure it's sealed well. - If you can, eat the salad within two days for the best taste. Can you freeze the salad? No, I don’t recommend freezing the whole salad. The greens will get mushy. However, you can freeze the peaches. Here’s how: - Slice the grilled peaches and place them in a single layer on a tray. - Freeze them for about two hours until they are solid. - Once frozen, transfer the peaches to a freezer bag. Remove excess air before sealing. - Label the bag with the date and use within three months for the best flavor. Understanding how long your ingredients last is key: - Grilled peaches can last about three to five days in the fridge. - Mixed greens should stay fresh for up to a week if stored properly. - Watch for signs of spoilage: wilted greens, off smells, or mold. These signs mean it’s time to toss the salad. Enjoy your grilled peach salad fresh for the best taste! To find ripe peaches, look for a few signs. First, check the color. Ripe peaches should have a rich yellow or golden hue. Next, feel the peach. It should yield slightly to gentle pressure. Finally, smell the peach. A sweet, fragrant scent indicates ripeness. If the peaches are hard, let them sit at room temperature for a few days. Yes, you can use canned or frozen peaches, but fresh peaches taste best. If you use canned peaches, choose those packed in juice, not syrup. Drain them well before grilling. For frozen peaches, thaw them first. Keep in mind, grilled texture may be softer than fresh peaches. Feta cheese works great in this salad. It adds a nice salty flavor that balances the sweetness of the peaches. Goat cheese is another good option, offering a creamy texture. Both cheeses complement the other salad ingredients very well. Grilled peaches last for about three days in the fridge. Store them in an airtight container to keep them fresh. If they start to brown or become mushy, it’s best to toss them. Enjoy them while they taste their best! You can use a grill pan or a broiler if you don’t have a grill. For a grill pan, preheat it on medium heat and add a little oil. Place the peach halves cut-side down and cook until grill marks appear. For a broiler, place peaches on a baking sheet and broil for a few minutes, watching closely to avoid burning. For a full recipe on grilled peach salad, check out the detailed instructions above! This article covered how to make a delicious grilled peach salad. You learned about the key ingredients, from ripe peaches to mixed greens and feta. We also shared step-by-step instructions, tips for grilling, and ways to personalize your salad. Remember, you can adjust flavors and ingredients to match your taste. Enjoy this fresh, healthy dish any time of year. A well-made salad not only nourishes but also brings joy. Try it out and share your own twists!

Grilled Peach Salad Fresh and Flavorful Delight

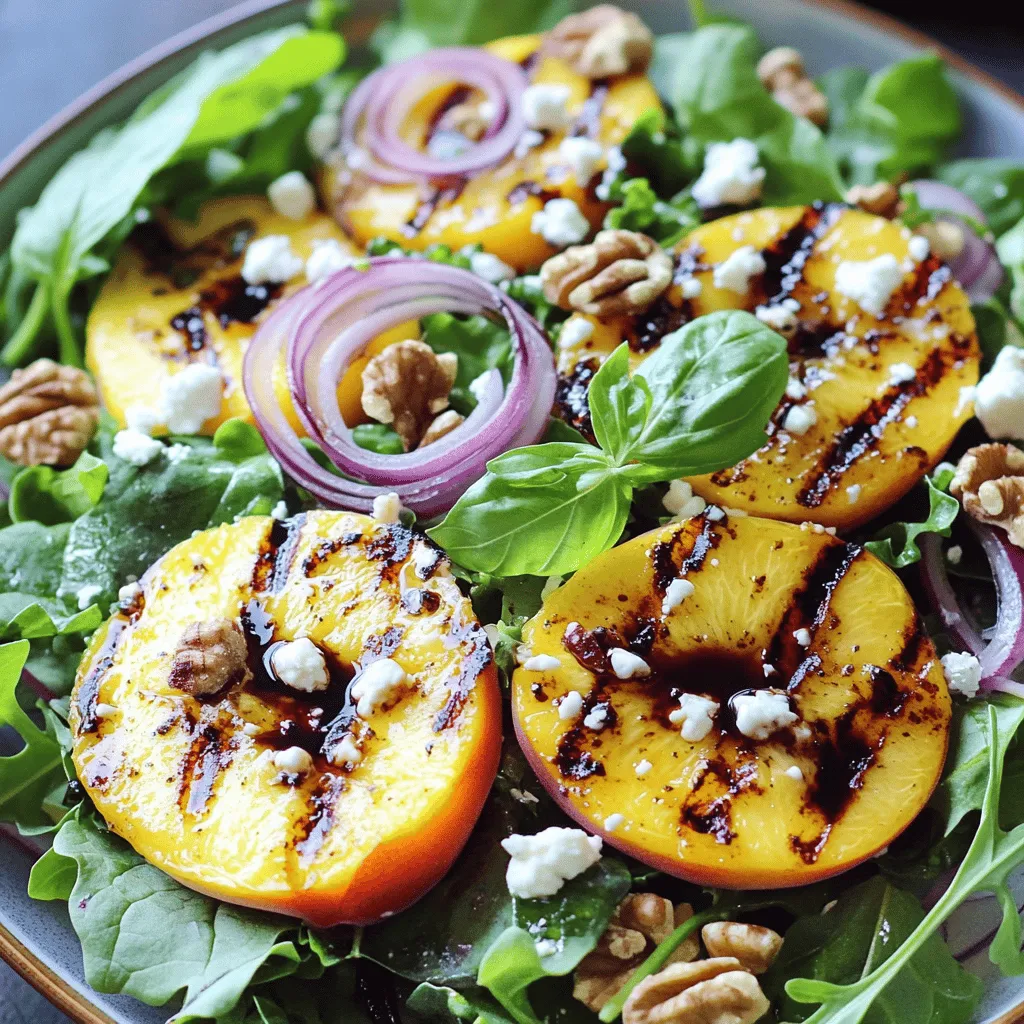
Grilled Peach Salad is a fresh and tasty dish that everyone will love. It brings together juicy peaches, mixed greens,

- 2 medium zucchinis, sliced into half-moons - 2 medium yellow squashes, sliced into half-moons - 3 tablespoons olive oil - 3 cloves garlic, minced - 1 teaspoon smoked paprika - 1 teaspoon dried oregano - Salt and freshly ground black pepper to taste - 1 lemon, zested and juiced - 1/4 cup grated Parmesan cheese - Fresh parsley, chopped (for garnish) Roasted zucchini and summer squash shine with simple yet bold flavors. The fresh produce brings a light crunch and a touch of sweetness. The olive oil helps the veggies caramelize, making them golden and tender. Garlic adds a savory kick that elevates the dish. Smoked paprika brings depth to the mix. It has a rich, smoky taste that transforms the vegetables. Dried oregano gives a hint of earthiness. Salt and freshly ground black pepper enhance each bite. If you want to brighten the dish, lemon zest and juice add a tart twist. For a creamy finish, sprinkle Parmesan cheese on top. Fresh parsley not only adds color but also a fresh taste. This recipe is versatile and fun! You can mix in your favorite herbs or spices. Explore different flavors and find your perfect blend. If you want the full recipe, check out the Zesty Roasted Zucchini and Summer Squash. Enjoy your cooking! - Set temperature to 425°F (220°C). - Combine zucchinis and yellow squashes in a large mixing bowl. - Add olive oil, minced garlic, smoked paprika, dried oregano, salt, and pepper. - Mix well, coating each piece of vegetable. This step adds tons of flavor! - Spread the vegetable mixture onto a baking sheet lined with parchment paper. - Make sure the pieces are in a single layer. This helps them roast evenly. - Cook for about 20-25 minutes, tossing halfway through. - Check for a nice golden color. They should be tender and sweet. - Drizzle with lemon juice, sprinkle lemon zest, and add Parmesan cheese if desired. - These fresh notes elevate the dish, making it taste bright and fresh. For the full recipe, check out the Zesty Roasted Zucchini and Summer Squash! To get the best roast, set your oven to 425°F (220°C). This heat helps the zucchini and squash brown nicely. Place your baking sheet in the center of the oven. This spot ensures even heat around your veggies. Don’t overcrowd the pan; space helps them roast, not steam. Toss them halfway through cooking for even browning. Want to kick up the flavor? Try adding cumin or coriander for warmth. A pinch of cayenne adds heat if you like spice. Fresh herbs like thyme or rosemary can give a fragrant twist. For a tangy kick, mix in some balsamic vinegar before roasting. These spices and herbs will make your roasted veggies pop! Garnish your dish for a stunning look. A sprinkle of fresh parsley adds color and freshness. For a touch of elegance, use lemon zest on top. Serve your roasted zucchini and squash on a bright plate. This makes the colors stand out. You can also drizzle a bit of olive oil for shine. A beautiful dish makes every meal feel special. Check out the Full Recipe for more tips! {{image_2}} You can roast many other vegetables with zucchini and squash. Here are some great options: - Bell peppers - Eggplant - Carrots - Red onions - Mushrooms These vegetables add more color and flavor to your dish. Each one brings a unique taste that complements zucchini and squash. To make this recipe vegan, simply leave out the Parmesan cheese. You can replace it with nutritional yeast. This will give a cheesy flavor without dairy. You can also try adding tahini or a sprinkle of cashew cheese. These options keep the dish rich and tasty. Seasonal herbs can bring fresh flavors to your roasted veggies. Try adding: - Fresh basil - Thyme - Rosemary - Dill These herbs enhance the taste of the dish. You can toss them in before roasting or sprinkle them on top after. For a citrus kick, add some lemon zest or orange zest just before serving. These small changes can elevate your meal. Check the Full Recipe for more tips! After you enjoy your roasted zucchini and summer squash, store any leftovers in the fridge. Use an airtight container to keep them fresh. This helps prevent them from drying out. You can store them for about 3 to 4 days. When you’re ready to eat, just take them out and reheat. To freeze your roasted zucchini and summer squash, let them cool first. Then, place them in a single layer on a baking sheet. Freeze for about 1 to 2 hours. Once frozen, transfer them to a freezer-safe bag. Make sure to remove as much air as you can. They can stay good in the freezer for up to 3 months. When you want to enjoy your leftovers, try these reheating methods: - Oven: Preheat your oven to 350°F (175°C) and bake for 10-15 minutes. This helps keep them crisp. - Microwave: Place them on a microwave-safe plate and heat for 1-2 minutes. Check every 30 seconds to avoid overcooking. - Skillet: Heat a bit of olive oil in a skillet over medium heat. Add the squash and cook for about 5 minutes, stirring often. This method helps retain their flavor and texture. For the full recipe, check the earlier sections. Roast zucchini and summer squash for 20-25 minutes. This time gives you soft, tender veggies. Check them halfway through and give them a toss. This helps them cook evenly and get a nice caramelization. Yes, you can! Try adding basil, thyme, or rosemary for a fresh twist. For heat, add red pepper flakes or chili powder. You can also mix in some lemon pepper for a zesty kick. Get creative and find what flavors you love! Roasted zucchini and squash go well with grilled chicken or fish. They also complement quinoa or brown rice nicely. For a hearty meal, serve them alongside a rich pasta dish. The flavors blend well and make a great plate. Yes, this recipe is gluten-free! All the ingredients used are safe for those avoiding gluten. Just check any optional toppings, like Parmesan cheese, to ensure they meet your needs. Enjoy this dish without worry! Roasting zucchinis and squash offers a tasty way to enjoy fresh produce. You learned how to prepare and season these vegetables for a delicious dish. Remember, you can tweak flavors, use other vegetables, and even make it vegan. Store leftovers properly to enjoy later. Explore different seasoning and pairing options to keep meals exciting. By following this guide, you'll create a colorful and flavorful addition to any table. Happy cooking!

Roasted Zucchini and Summer Squash Flavor Boost

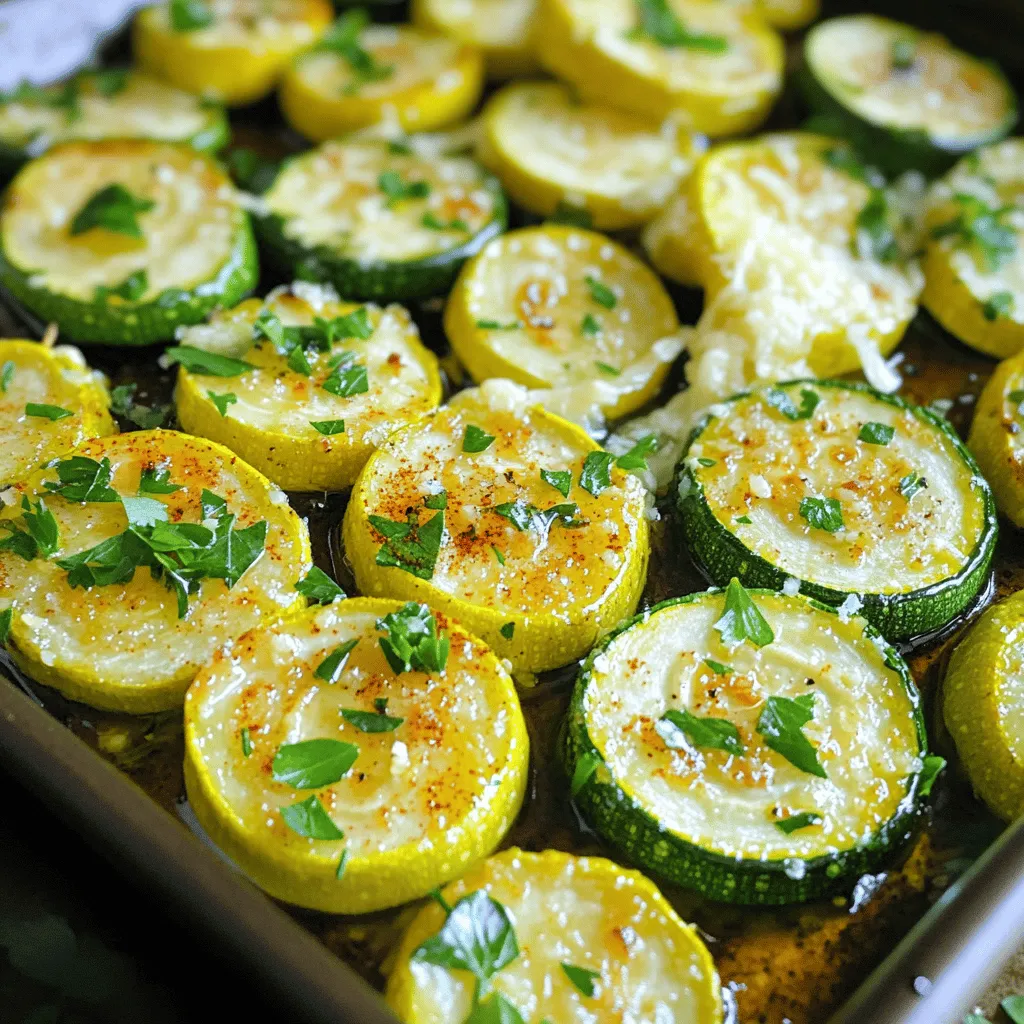
Looking to elevate your summer veggies? Roasted zucchini and summer squash are just what you need! In this post, I’ll

When making Zesty Garlic Dill Refrigerator Pickles, you need fresh ingredients. Here’s what you’ll need to gather: - 4 medium cucumbers - 4 cloves garlic - 1 tablespoon dill seeds or 1/4 cup fresh dill - 1 cup water - 1 cup white vinegar - 1 tablespoon sugar - 1 tablespoon sea salt - 1/2 teaspoon red pepper flakes (optional) - 1/2 teaspoon mustard seeds (optional) Each ingredient plays a key role in flavor and texture. The cucumbers offer crunch. Garlic adds a punchy taste. Dill brings that classic pickle flavor. The vinegar creates the tang, while sugar and salt balance everything. Optional spices can kick up the heat or add depth. Using the freshest cucumbers leads to the best pickles. Look for firm, bright ones at your store or farmer’s market. Fresh dill also shines in this recipe. If you can, opt for it over dried. It makes a big difference! For the brine, a mix of vinegar, water, sugar, and salt creates that tangy flavor. The balance of these ingredients is key. You can adjust the sugar or salt to fit your taste. Just remember, the brine should taste good before pouring it over the cucumbers. For the full recipe, check the details for step-by-step guidance. - Wash cucumbers and soak in ice water. - Smash garlic cloves. Start by washing the cucumbers. This step ensures they are clean. If you want crisp pickles, soak the cucumbers in ice water. Let them sit for about one hour. This soaking helps to keep them crunchy. After soaking, drain the cucumbers and slice them into spears or rounds. Next, take your garlic cloves. Use the flat side of a knife to smash them. This releases their flavor, making your pickles tasty and zesty. - Combine water, vinegar, sugar, and salt. - Bring to a boil and dissolve ingredients. Now, let’s make the brine. In a saucepan, mix one cup of water, one cup of white vinegar, one tablespoon of sugar, and one tablespoon of sea salt. Stir these ingredients together. Heat the mixture over medium heat until it boils. Keep stirring until the salt and sugar dissolve. When it boils, remove the pan from heat. Let the brine cool slightly before using it. - Layer garlic and dill in the jar. - Pack sliced cucumbers. - Pour cooled brine over cucumbers. Grab a clean, quart-sized glass jar. Start by adding the smashed garlic cloves and dill seeds or fresh dill. Then, pack the sliced cucumbers tightly into the jar. Layer them over the garlic and dill for the best flavor. After packing the cucumbers, carefully pour the cooled brine over them. Make sure the cucumbers are fully submerged. Leave about half an inch of space at the top of the jar. Seal the jar tightly with a lid. Let it sit at room temperature for about 30 minutes. This allows the pickles to cool down. After that, place the jar in the refrigerator. For the best taste, allow the pickles to chill for at least 24 hours. The flavors will get even better after a few days. For the complete process, check the Full Recipe. To make pickles that crunch with every bite, I suggest a few tricks. First, soak your cucumbers in ice water for about an hour. This helps them stay crisp. After soaking, drain and slice them. Next, pick the right cucumbers. Look for firm, fresh cucumbers. Pickling cucumbers often work best. They have fewer seeds and a thicker skin, which improves crispness. Want to boost the flavor? Try adding spices like mustard seeds. They offer a nice zing and pair well with dill. You can also use fresh herbs. Thyme or tarragon can add a unique twist to your pickles. Another option is to add red pepper flakes for heat. Adjust the amount to your taste. Just a pinch can make a big difference. When serving your zesty pickles, presentation matters. Use a colorful bowl to show them off. You can also add a sprig of fresh dill on top. This adds a nice touch. These pickles pair well with sandwiches or burgers. They bring a bright flavor that cuts through rich foods. For a fun twist, serve them with a cheese platter. They will stand out and delight your guests. Try these tips for a batch of Zesty Garlic Dill Refrigerator Pickles that are tasty and eye-catching. For the full recipe, check the earlier sections. {{image_2}} You can change the taste of your Zesty Garlic Dill Refrigerator Pickles. For a spicy kick, add more red pepper flakes. This will give your pickles a nice heat. If you prefer sweet and tangy pickles, simply add more sugar to your brine. This balance can create a delightful contrast to the tart vinegar. Both options let you customize your pickles to your taste. You can also switch up the ingredients for your pickles. Try using apple cider vinegar instead of white vinegar. This will add a fruity note to your brine. If you want to experiment with cucumbers, consider different types like Kirby or Persian cucumbers. Each type brings its own crunch and flavor to the pickles. For the full recipe, check out the details above. Enjoy exploring these variations! For the best storage, I recommend using clean glass jars. Quart-sized jars work well for this recipe. Glass helps keep the pickles fresh and crisp. Make sure the lids fit tightly. This will keep air out and maintain the taste. To maintain freshness in the refrigerator, always store your pickles in the coldest part. Avoid opening the jar too often. Each time you open it, air enters and may spoil the pickles faster. Zesty Garlic Dill Refrigerator Pickles last for about 2 to 4 weeks in the fridge. The taste will become stronger over time. You might find them even more delicious after a few days. Watch out for signs of spoilage. If you see any mold or if the pickles become soft, it's time to toss them. A bad smell is also a sign that they are no longer good to eat. Keeping an eye on your pickles will help you enjoy them at their best. For the full recipe, check the earlier section. I recommend chilling your pickles for at least 24 hours. This time allows the flavors to blend. If you can wait, the taste improves after a few days. The longer they chill, the zestier they become. Yes, you can! While I like using medium cucumbers, other varieties work too. For example, Kirby cucumbers are crisp and ideal for pickling. English cucumbers are also great if you prefer fewer seeds. Each type adds its own touch to the pickles. These pickles shine as a snack or side. Serve them with sandwiches for a crunchy contrast. They also pair well with burgers or salads. Try adding a sprig of fresh dill on top for a nice touch. You can even chop them and mix them into potato salad for a tangy twist. Absolutely! To make more, just double or triple the ingredients. Keep the same ratios for brine and spices. Use larger jars to hold the extra pickles. Just remember, the longer you let them chill, the more flavor they develop. Check out the Full Recipe for all the details. In this blog post, we explored making Zesty Garlic Dill Refrigerator Pickles. You learned about the key ingredients, step-by-step instructions, and helpful tips. The right cucumbers and soaking techniques can enhance crispness. We also covered fun variations for flavor and how to store your pickles for freshness. Remember, making pickles is both easy and fun. Enjoy your pickling journey and share your creations!

Zesty Garlic Dill Refrigerator Pickles Tangy and Crisp

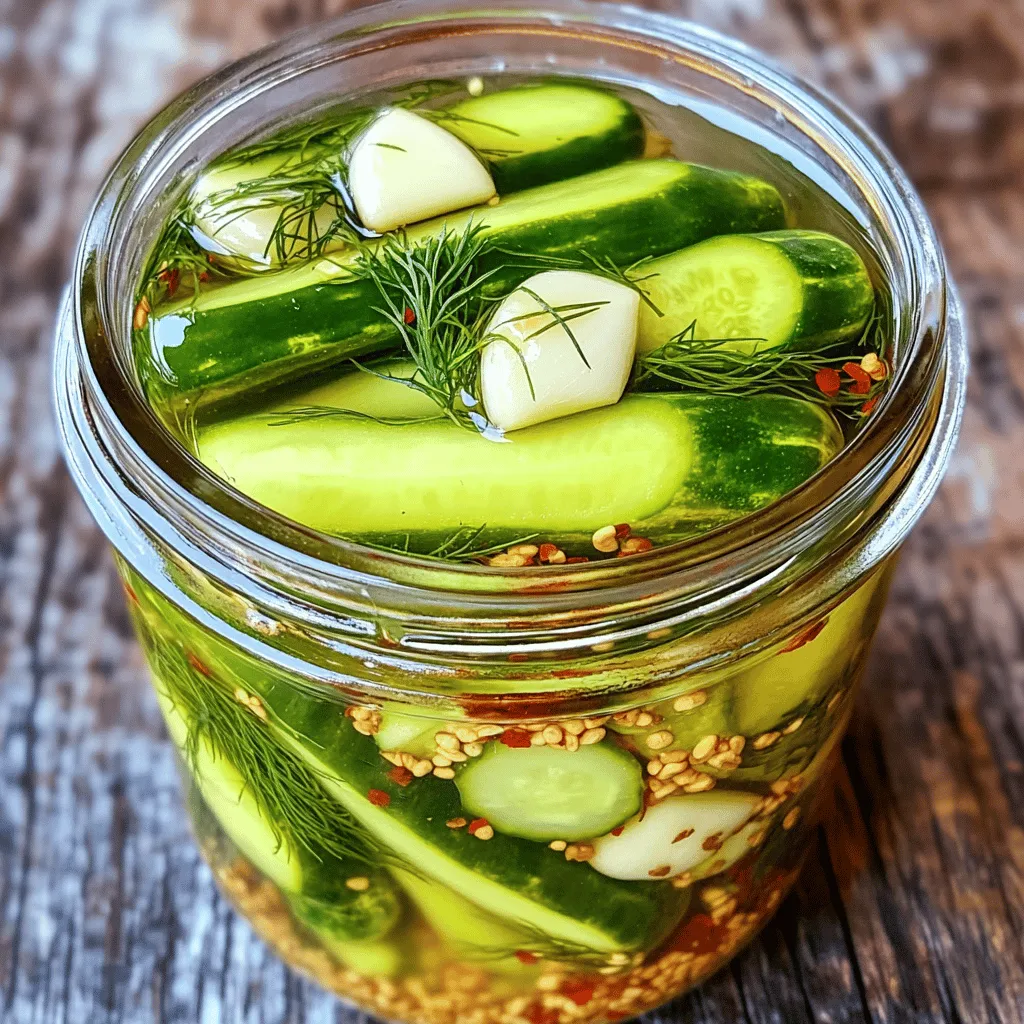
Are you ready to make the best Zesty Garlic Dill Refrigerator Pickles? This recipe is quick, easy, and packed with

To make crispy fried okra, you need a few simple ingredients. Each one plays a key role in flavor and texture. Here’s the complete list of ingredients: - Fresh Okra: 1 pound, sliced into ½-inch rounds - Buttermilk: 1 cup - Cornmeal: 1 cup - All-Purpose Flour: ½ cup - Seasoning Ingredients: - 1 teaspoon garlic powder - 1 teaspoon onion powder - 1 teaspoon smoked paprika - ½ teaspoon cayenne pepper (optional) - Salt and freshly ground black pepper to taste - Vegetable Oil for Frying: Enough to cover the pan about ½ inch deep Each ingredient ensures your okra is crispy and well-seasoned. The fresh okra gives a nice crunch, while buttermilk adds flavor and moisture. Cornmeal and flour create the perfect coating for frying. The seasoning blends give it that extra kick, making each bite delicious. For the full recipe, check the details above. Start with one pound of fresh okra. Rinse it well under cool water. Slice the okra into ½-inch rounds. Pat the pieces dry with paper towels. This step helps remove moisture for crispiness. Next, place the sliced okra in a medium bowl. Pour one cup of buttermilk over the okra. Mix gently until every piece is coated. Let it soak for about 15 minutes. This will add flavor and tenderize the okra. While the okra soaks, prepare the coating. In a shallow dish, combine one cup of cornmeal and half a cup of all-purpose flour. Add one teaspoon each of garlic powder, onion powder, and smoked paprika. If you like heat, include half a teaspoon of cayenne pepper. Season with salt and freshly ground black pepper to taste. Mix all the ingredients well to ensure even flavor in the coating. Now it's time to fry! In a large skillet, heat enough vegetable oil to cover the bottom, about ½ inch deep. Heat the oil over medium-high heat until it shimmers. While waiting, take a handful of okra from the buttermilk. Let the excess buttermilk drip off. Dredge each piece in the cornmeal mixture. Make sure they are evenly coated. Place the coated okra on a plate. Carefully add the okra to the hot oil in batches. Avoid overcrowding to keep the heat steady. Fry for about 3-4 minutes per side. Look for a golden brown color and a crispy texture. Use a slotted spoon to transfer the fried okra to a paper towel-lined plate. This will help drain excess oil. Season with extra salt if needed. Enjoy your crispy fried okra hot and fresh! For the full recipe, check the section above. To get the best crispiness, start with dry okra. Pat it well with paper towels before soaking. The buttermilk adds flavor and helps the coating stick. Make sure to soak the okra for at least 15 minutes. This step is key to a nice crunch. When you coat the okra, press down a bit to pack on the mixture. Do not overcrowd the pan while frying. This keeps the oil hot and helps each piece cook evenly. For frying, vegetable oil works great. It has a high smoke point and does not add strong flavor. Canola oil is also a good choice. You could even use peanut oil for a nutty touch. Whatever oil you choose, make sure to heat it well. The oil should shimmer but not smoke. This ensures that the okra fries evenly and gets golden brown. One common mistake is not drying the okra enough. Excess moisture can make it soggy. Another mistake is skipping the soaking step. This step helps the flavor soak in. Also, avoid adding too many pieces to the pan at once. This can lower the oil temperature and make them greasy. Lastly, don’t forget to season right after frying. It makes a big difference in taste. For the full recipe, check out the [Full Recipe]. {{image_2}} You can easily boost the flavor of crispy fried okra. Try adding a splash of hot sauce to the buttermilk. It gives a nice kick to the dish. You can also mix in some herbs, like dill or thyme, to the cornmeal. This adds an earthy taste that pairs well with the okra. If you need a gluten-free option, swap the all-purpose flour with a gluten-free flour blend. Rice flour works great too. For the cornmeal, make sure it’s labeled gluten-free. This way, you can enjoy tasty crispy fried okra without worry. Experiment with your favorite spices! For a smoky flavor, use smoked paprika or chipotle powder. If you like it spicy, add more cayenne pepper. You can also go for a sweeter taste with a touch of sugar. Mixing cumin and coriander gives a nice depth of flavor too. Just remember, adjust the seasoning to fit your taste! Check out the full recipe for more tips on making your crispy fried okra delicious every time. To keep your fried okra fresh, place it in an airtight container. Let it cool down first. This helps keep the texture. Store it in the fridge for up to three days. Avoid stacking the pieces too high, as this can make them soggy. When you want to enjoy your leftovers, reheating is key. Preheat your oven to 400°F (200°C). Spread the okra on a baking sheet. Bake for about 10 minutes. This helps restore the crispiness. You can also use an air fryer. Cook at 375°F (190°C) for about 5 minutes for a quick, crispy fix. Want to save some for later? You can freeze fried okra! First, let it cool completely. Spread the pieces on a baking sheet in a single layer. Freeze them for about an hour. Once frozen, transfer them to a freezer bag. This keeps them from sticking together. They can last in the freezer for up to three months. When ready to eat, just reheat straight from the freezer. Enjoy your crispy fried okra anytime! For the full recipe, check out the detailed steps. Fresh okra works best for frying. Look for pods that are firm and smooth. They should have a bright green color. Avoid okra that feels too soft or has brown spots. Fresh okra gives the best texture and flavor. To reduce greasiness, follow these steps: - Dry the okra: Pat the sliced okra with paper towels. This removes extra moisture. - Use the right oil: Choose oils with high smoke points, like canola or peanut oil. - Don’t overcrowd: Fry in small batches to keep the temperature up. This helps the okra stay crispy. - Drain properly: After frying, place the okra on paper towels to absorb oil. Yes, you can use frozen okra, but it may not be as crispy. Thaw and dry the okra well before frying. Frozen okra can be mushy, so try to use fresh for the best results. If using frozen, cut the cooking time slightly. Yes! To make a healthier version, try these tips: - Baking: Instead of frying, coat the okra and bake it at 425°F for about 20 minutes. - Use less oil: Spray the okra lightly with cooking oil instead of deep frying. - Whole grain flour: Substitute all-purpose flour with whole wheat flour for added fiber. I love serving crispy fried okra with ranch dressing. The coolness of ranch pairs well with the heat of the fried okra. You can also try spicy remoulade or a zesty yogurt dip. These sauces add flavor and enhance the dish. For the full recipe, check out the complete guide! Fried okra is a delicious dish made with simple ingredients and easy steps. You learned how to prepare the okra, coat it, and fry it to perfection. Plus, I shared tips for crispiness and common mistakes to avoid. Don’t forget about different flavor options and storage tips for leftovers. Enjoy exploring new ways to make fried okra delicious. With these methods, you can impress family and friends every time you serve it. Happy cooking!

Crispy Fried Okra Perfectly Flavored Every Time

If you crave crispy fried okra that’s full of flavor, you’re in the right place! I’ll guide you through making

To make a tasty Green Chile Squash Casserole, gather these ingredients: - 2 medium zucchinis, sliced - 2 medium yellow squashes, sliced - 1 can (4 oz) diced green chiles, drained - 1 cup corn kernels (fresh or frozen) - 1 small onion, finely chopped - 2 cloves garlic, minced - 1 cup shredded Monterey Jack cheese - 1 cup breadcrumbs (preferably whole wheat) - 1/2 cup milk - 2 large eggs - 1 teaspoon cumin - 1 teaspoon smoked paprika - 1/2 teaspoon salt - 1/4 teaspoon black pepper - Olive oil for greasing This mix gives you a rich flavor and great texture. Each ingredient plays a role in making the dish shine. You can swap some ingredients if you need to. Here are a few ideas: - Zucchini and yellow squash: Use any summer squash you like. - Green chiles: Try jalapeños for extra heat. - Corn: Substitute with black beans for a different taste. - Monterey Jack cheese: Cheddar works well if you want a sharper flavor. - Milk: Use almond or oat milk for a dairy-free version. These options keep your casserole fresh and fun! Choosing between fresh and frozen ingredients can impact your dish. Fresh veggies offer a bright taste and crunch. They also add color to your casserole. Frozen vegetables are a good choice too. They are picked at peak ripeness. This means they still hold nutrients. Just make sure to thaw and drain them before use. Using fresh or frozen depends on your time and what you have. Both can make a great Green Chile Squash Casserole. First, gather all your ingredients. You will need: - 2 medium zucchinis, sliced - 2 medium yellow squashes, sliced - 1 can (4 oz) diced green chiles, drained - 1 cup corn kernels (fresh or frozen) - 1 small onion, finely chopped - 2 cloves garlic, minced - 1 cup shredded Monterey Jack cheese - 1 cup breadcrumbs (preferably whole wheat) - 1/2 cup milk - 2 large eggs - 1 teaspoon cumin - 1 teaspoon smoked paprika - 1/2 teaspoon salt - 1/4 teaspoon black pepper - Olive oil for greasing Preheat your oven to 375°F (190°C). Grease a 9x13 inch casserole dish with olive oil. This will prevent sticking and make clean-up easy. In a large skillet, heat a splash of olive oil over medium heat. Add your chopped onion. Sauté it for about 3-4 minutes until it turns clear. Next, add the minced garlic and cook for one more minute. You want to smell that garlic! Now, stir in the sliced zucchinis and yellow squashes. Cook them for about 5-7 minutes. They should soften a bit but not turn mushy. Remove the skillet from the heat. Mix in the green chiles, corn, cumin, smoked paprika, salt, and pepper. Ensure everything is well combined. In a separate bowl, whisk the milk and eggs together until smooth. In a large mixing bowl, combine the sautéed vegetables with the milk and egg mixture. Add half of the shredded cheese and mix it in gently. Transfer this mixture to your greased casserole dish. Spread it out evenly. Top with the remaining cheese and sprinkle on the breadcrumbs. Now, bake your casserole for 25-30 minutes. Keep an eye on it! The top should be golden brown and bubbly. To get a great bake, make sure your oven is fully preheated. This helps the casserole cook evenly. You can check for doneness by inserting a knife in the center. It should come out clean. Let the casserole cool for 5-10 minutes after baking. This allows it to set up nicely. For a special touch, serve it warm with fresh cilantro or green onions on top. You can also add a dollop of sour cream or avocado for extra flavor. For the full recipe, refer to the details above. Enjoy your cooking! Cooking can feel tricky, but I promise it gets easier. Here are some tips to help you. - Read the recipe first: This helps you know what to expect. - Prep all ingredients: Chop, measure, and get everything ready before you cook. - Use a sharp knife: A sharp knife makes cutting veggies safer and faster. - Taste as you go: This lets you adjust flavors to your liking. Making this dish your own is simple! You can swap ingredients to match your taste. Here are some ideas: - Add protein: Cooked chicken or black beans can add more flavor and nutrients. - Change the cheese: Try cheddar or pepper jack for a different flavor. - Mix in veggies: Bell peppers or spinach can add color and nutrients. Knowing when your casserole is done is key. Here’s how to check: - Look for browning: The top should be golden and crispy. - Check the center: Use a knife; it should come out clean when it's done. Common mistakes to avoid include: - Overcooking: This can make the squash mushy. - Skipping the rest time: Letting it cool helps flavors meld and makes serving easier. For the full recipe, check the [Full Recipe] section above. Enjoy your cooking journey! {{image_2}} You can switch up the veggies in your casserole. Try adding bell peppers for a sweet crunch. Mushrooms also add a nice earthy taste. For some heat, you can use jalapeños instead of green chiles. If you love cheese, feel free to mix in cheddar or pepper jack. You can even use quinoa or rice instead of breadcrumbs for a hearty twist. To make this dish vegan, use plant-based milk and replace eggs with flax eggs. For flax eggs, mix 1 tablespoon of ground flaxseed with 3 tablespoons of water. Allow it to sit for five minutes until it thickens. To keep it gluten-free, use gluten-free breadcrumbs. Always check labels to ensure all ingredients fit your diet. Add fresh herbs like cilantro or parsley for a burst of flavor. Squeeze some lime juice on top for a zesty kick. You can also sprinkle in some chili powder for extra warmth. Mixing in black beans can increase protein and fiber. For a creamy touch, add a layer of sour cream or Greek yogurt before baking. Check out the Full Recipe for more ideas and details! When you have leftover Green Chile Squash Casserole, store it in an airtight container. This keeps the casserole fresh. Let it cool to room temperature before sealing. If you want to keep it longer, you can refrigerate it for up to four days. I suggest labeling the container with the date. This helps you track how long it’s been stored. To reheat the casserole, preheat your oven to 350°F (175°C). Place the casserole in an oven-safe dish. Cover it with foil to keep moisture in. Heat for about 20 to 25 minutes, or until it's warm throughout. You can also reheat individual servings in the microwave. Just heat for 1 to 2 minutes, checking to avoid overheating. If you want to freeze the casserole, make sure it’s cool first. Cut it into portions for easy access later. Wrap each portion in plastic wrap and then place it in a freezer-safe bag. This helps prevent freezer burn. You can freeze it for up to three months. When you’re ready to eat, thaw it overnight in the fridge before reheating. This keeps the taste and texture just right. You can serve this casserole with many tasty sides. Here are some ideas: - Rice or quinoa: They add a nice texture. - Salad: A fresh green salad works well. - Tortillas: Soft or crispy tortillas are great for scooping. - Sour cream or guacamole: They add creaminess and flavor. These sides make the meal more filling and fun. Mix and match based on your taste! Yes, you can prep this dish ahead of time. Simply follow these steps: 1. Make the casserole: Complete all steps up to baking. 2. Cover and chill: Wrap the dish tightly in foil and place it in the fridge. 3. Bake later: When ready, bake it straight from the fridge. Just add a few extra minutes to the bake time. This makes it easy for busy days. You can enjoy a warm meal without the hassle! Storing leftovers is simple. Here’s how: - Cool down: Let the casserole cool to room temperature. - Store: Place it in an airtight container. - Refrigerate: Keep it in the fridge for up to three days. To reheat, simply warm it in the oven or microwave. You can also freeze it for up to three months. Just thaw it overnight in the fridge before reheating. Enjoy your leftovers just as much as the first night! This blog post covered all you need for a great Green Chile Squash Casserole. We explored ingredient lists, cooking steps, and tips for beginners. Customization and storage techniques help make this dish better for you. With variations for different diets, you can enjoy this recipe however you want. Now, you have the tools to create a delicious casserole that suits your taste. Enjoy cooking and sharing this meal with family and friends!

Green Chile Squash Casserole Tasty and Simple Dish

Looking for a simple yet tasty dish? You’ve come to the right place! My Green Chile Squash Casserole is not

- 6 large eggs - 1/4 cup milk - 1 cup cherry tomatoes, halved - 1 cup fresh spinach - 1/2 cup diced bell peppers (red or yellow) - 1/2 cup diced zucchini - 1/2 cup finely chopped onion - 1/2 cup crumbled feta cheese - 1/4 cup chopped fresh basil - 1 teaspoon garlic powder - Salt and pepper to taste - 2 tablespoons olive oil - Additional cheese types (Parmesan, mozzarella) - Other vegetables (mushrooms, asparagus) - Meat options (bacon, sausage) To make a great frittata, you need a mix of fresh ingredients. The eggs form the base, while the milk adds a nice creaminess. I love using cherry tomatoes, as their sweetness brightens the dish. Fresh spinach offers color and nutrients. Bell peppers and zucchini add crunch and flavor. Feta cheese gives a salty kick. I often toss in fresh basil for an herbaceous note. Garlic powder enhances the overall taste. Use salt and pepper to balance flavors. Olive oil helps cook the veggies and prevents sticking. You can customize your frittata with more cheese or different veggies. Adding mushrooms or asparagus offers new tastes. If you want some meat, bacon or sausage works well too. All these options make each frittata unique and fun to create. Check out the Full Recipe for more details on how to prepare this delicious dish! Start by cracking 6 large eggs into a bowl. Next, pour in 1/4 cup of milk. This makes the frittata fluffy. Add a teaspoon of garlic powder, and sprinkle in salt and pepper to taste. Whisk all these ingredients together until smooth and well combined. In a large oven-safe skillet, heat 2 tablespoons of olive oil over medium heat. Once hot, add 1/2 cup of finely chopped onion and 1/2 cup of diced bell peppers. Sauté these for about 5 minutes. You want them softened and fragrant. Now, stir in 1/2 cup of diced zucchini and 1 cup of halved cherry tomatoes. Cook these for another 3-4 minutes until the tomatoes begin to soften. Then, add 1 cup of fresh spinach. Cook until it wilts, which takes about 1-2 minutes. Finally, pour the egg mixture evenly over the sautéed veggies. Gently stir to mix them all together. Let the frittata cook on the stovetop for 2-3 minutes. Watch closely as the edges begin to set. After that, transfer the skillet to a preheated oven at 375°F (190°C). Bake for 15-20 minutes. You’ll know it’s done when the frittata is fully set in the center and lightly golden on top. Enjoy your delicious creation! To make a great frittata, use fresh ingredients. Fresh spinach and ripe tomatoes shine in flavor. They bring your dish to life. The next step is cooking time. On the stovetop, gently cook the veggies until soft. This usually takes about 5-8 minutes. Then, bake it in the oven at 375°F (190°C) for 15-20 minutes. This ensures a fluffy texture. One common mistake is overcooking the frittata. This can make it dry. Watch it closely as it bakes. You want it set but still moist. Another mistake is slicing too soon. Let it cool for a few minutes after baking. This helps the frittata hold its shape. For sides, a fresh salad pairs well. You can also serve it with crusty bread. A light beverage, like sparkling water or white wine, complements it nicely. These sides enhance your meal and make it more satisfying. Explore different options to find your favorite! For the full recipe, check here. {{image_2}} You can boost your frittata flavor by adding herbs and spices. Fresh herbs like thyme or oregano bring a nice touch. They add depth and freshness to your dish. Using spices like paprika or cayenne can also spice things up. These ingredients create layers of flavor that make each bite exciting. Frittatas are great for mixing and matching fillings. You can choose meat or go vegetarian. Try adding cooked bacon or sausage for a hearty meal. For a lighter option, use seasonal veggies like asparagus or broccoli. These swaps add color and nutrition. Feel free to get creative with your favorite ingredients. Be careful with high-water content vegetables. Ingredients like cucumbers or mushrooms can make your frittata soggy. You should also avoid overly salty additions like certain cheeses or cured meats. Balancing the salt helps keep your frittata tasty without overpowering it. For a full recipe, check out the Italian Garden Frittata! To keep your frittata fresh, let it cool first. After cooling, slice it into pieces. Place the slices in an airtight container. This helps keep moisture in and air out. Use glass or plastic containers that seal well. Label the container with the date. This way, you know how long it has been stored. You can reheat your frittata in two ways: the microwave or the oven. For the microwave, place a slice on a microwave-safe plate. Heat it for about 30 seconds. Check if it’s warm. If not, heat for another 10 seconds. For the oven, preheat it to 350°F (175°C). Place the frittata slice on a baking sheet. Heat for about 10-15 minutes. This method helps keep the texture nice. Avoid overheating to keep it from drying out. Enjoy your delicious frittata again! A frittata is a thick Italian egg dish. It is similar to an omelet but has a few key differences. Unlike an omelet, a frittata cooks slowly and blends ingredients throughout. Frittatas often include vegetables, cheese, and meats mixed into the eggs. Differences between frittata and quiche: - Crust: Quiche has a pastry crust, while a frittata does not. - Texture: Quiches are creamy and custard-like, while frittatas are denser and fluffier. - Cooking method: Frittatas cook on the stovetop and finish in the oven. Quiches bake entirely in the oven. Yes, you can make frittata ahead of time. This dish holds well in the fridge. To prepare in advance, cook the frittata as normal and let it cool. Once cooled, slice it and wrap it tightly in plastic wrap. Store it in the fridge for up to three days. Tips on preparing frittata in advance: - Use fresh ingredients for the best flavor. - Cool completely before wrapping to avoid sogginess. - Reheat slices in the oven or microwave for a quick meal. To check if the frittata is done, look for a few signs. The edges will pull away from the skillet. The top should look set and slightly golden. A toothpick inserted in the center should come out clean. Signs of doneness for an Italian frittata: - Firm and set edges. - No liquid egg visible in the center. - Lightly browned top. Yes, you can freeze frittata. It freezes well and makes for a quick meal later. Best practices for freezing and thawing: - Wrap individual slices tightly in plastic wrap or foil. - Place wrapped slices in a freezer-safe bag or container. - Thaw overnight in the fridge before reheating. - Reheat in the oven or microwave until hot. For more details, check the Full Recipe for Italian Garden Frittata. In this article, we covered how to make a tasty frittata. You learned about the necessary ingredients, step-by-step instructions, and helpful tips. I shared common mistakes to avoid and ways to customize your dish. Frittatas are versatile, allowing for different flavors and ingredients. Remember, using fresh produce and not overcooking makes a big difference. Enjoy your frittata as a meal or snack. Happy cooking!

Italian Frittata Recipe for a Satisfying Meal

Looking for a meal that’s both easy and tasty? An Italian frittata is the perfect choice for you! It’s a

- 4 cups cucumbers, thinly sliced - 1 cup red onion, thinly sliced - 1 cup apple cider vinegar - 1 cup granulated sugar - 1 tablespoon salt - 1 teaspoon mustard seeds - 1 teaspoon celery seeds - ½ teaspoon turmeric - ½ teaspoon red pepper flakes (optional, for spice) - Alternatives for cucumbers: You can use zucchini or yellow squash if you want. These will still give a nice crunch. - Options for vinegar: White vinegar or rice vinegar work well too. They will change the flavor a bit but still taste great. - Sugar substitutes: If you want less sugar, try honey or agave syrup. They will add sweetness without the granulated sugar. The ingredients are simple and easy to find. They create a balance of sweet and tangy. Each ingredient plays a role in making these pickles crunchy and flavorful. It is fun to mix different flavors and find what you like best. To start, you need fresh cucumbers and red onions. Slice the cucumbers thinly. Aim for about 1/8-inch thick. This thickness gives the best crunch. For the onions, cut them in thin slices too. You can use a sharp knife or a mandoline for even slices. Once sliced, place the cucumbers and onions in a large bowl. Toss them gently together. This helps mix the flavors before adding the brine. Next, you’ll make the brine. In a medium saucepan, combine the apple cider vinegar, granulated sugar, and salt. Heat this mixture over medium heat. Stir it often until the sugar and salt dissolve completely. This step is key; you want no grains left. After the sugar and salt dissolve, add the mustard seeds, celery seeds, turmeric, and red pepper flakes if you like spice. Bring this to a gentle simmer for about 2 minutes. Stir occasionally to mix the flavors well. Once done, take the saucepan off the heat and let it cool for 10 minutes. Now it’s time to combine everything. Pour the cooled brine over the cucumbers and onions in the bowl. Make sure all the veggies are fully submerged in the brine. This ensures they soak up all the great flavors. For jar preparation, use clean, sterilized jars. This step keeps your pickles safe and fresh. Transfer the pickles and brine into the jars, sealing them tightly. Refrigeration is very important. It keeps the pickles crunchy and safe. Store the jars in the fridge right after sealing. Allow them to chill overnight. This waiting time helps the flavors meld together. For the best taste, wait at least 24 hours. These pickles can last up to a month in the fridge. Enjoy them with your meals! To make crunchy pickles, start with the right cucumber. I recommend using Kirby or Persian cucumbers. They stay crisp and have fewer seeds. When slicing, keep your cuts even and thin. A mandoline slicer works well for this. Thin slices allow the brine to soak in better. Add herbs and spices to boost flavor. Dill is a classic choice; it gives a fresh taste. You can also try adding fresh garlic for depth. For extra zing, consider including a bit of ginger or horseradish. A splash of lemon juice can add brightness too. Always sterilize your jars before use. This step helps prevent spoilage. You can do this by boiling the jars in water for ten minutes. Store your pickles in the fridge right after making them. They taste best after sitting for at least 24 hours. Keep them sealed tightly to maintain freshness. Enjoy your pickles within a month for optimal crunch and flavor! {{image_2}} To add heat, simply include red pepper flakes or fresh jalapeños. Adjust the spice level to your taste. For a bold kick, try cayenne pepper or crushed red pepper. You can also mix different spices to find your favorite flavor blend. Consider adding garlic powder or black pepper for more depth. Adjusting sugar levels can change the flavor profile. For sweeter pickles, add more sugar. If you prefer a savory taste, cut back on the sugar. You can also add garlic, dill, or other veggies like bell peppers. These additions can create a unique twist on the classic recipe. Quick-pickling is a fast method that uses vinegar and salt for flavor. Simply combine the ingredients and let them sit for a few hours. Fermentation is another option. This method uses salt and time to create tangy pickles. Both methods can give you great results, so try them out! Amish refrigerator pickles can last up to a month in the fridge. Store them tightly sealed to keep them fresh. Signs of spoilage include a sour smell or mold on the surface. If you see these signs, discard the pickles. Use glass jars with tight-fitting lids for the best results. Wide-mouth jars are great, as they make it easy to access the pickles. Keep the jars in the coldest part of your fridge. This helps maintain their crunch and flavor. You can reuse leftover pickle brine! It works well for quick-pickling other veggies. Try it with carrots or radishes. Just pour the brine over the vegetables and let them sit for a day. You can also use brine in salad dressings for extra zing. Check out the Full Recipe for more ideas. Amish Refrigerator Pickles are a type of quick pickle. They use fresh cucumbers and onions. This recipe is simple and requires no cooking for long hours. These pickles are crunchy, sweet, and tangy. They come from the Amish tradition of preserving food. They reflect a simple, wholesome lifestyle. Many people enjoy them as a side dish or snack. You cannot can these pickles for shelf storage. They are meant for refrigeration only. Canning involves heating jars to kill bacteria. This process makes pickles safe for long-term storage. Refrigerator pickles do not go through this process. They stay fresh in the fridge for about a month. To adjust sweetness, change the sugar amount in the brine. If you want sweeter pickles, add more sugar. If you prefer less sweetness, cut back on sugar. Keep in mind, this will change the taste. More sugar makes the pickles sweeter and less tangy. Less sugar will give a sharper flavor. Yes, there are some safe substitutions. If you have allergies to cucumbers, use zucchini instead. For vinegar, you can use white vinegar or rice vinegar. You can also swap granulated sugar with honey or maple syrup. These changes will alter the flavor slightly but can be delicious. Always taste as you go to find what you like best. In this blog post, I covered how to make delicious Amish refrigerator pickles. We explored each ingredient and offered substitutions. I provided step-by-step instructions for preparation and safety tips for storage. You learned about variations and how to enhance flavors. By following these guidelines, you can enjoy fresh, tasty pickles at home. Experiment with different spices and vegetables to find your favorite blend. Your pickling journey can lead to tasty results and fun new flavors. Enjoy your crunchy creations!

Amish Refrigerator Pickles Crunchy and Flavorful Recipe

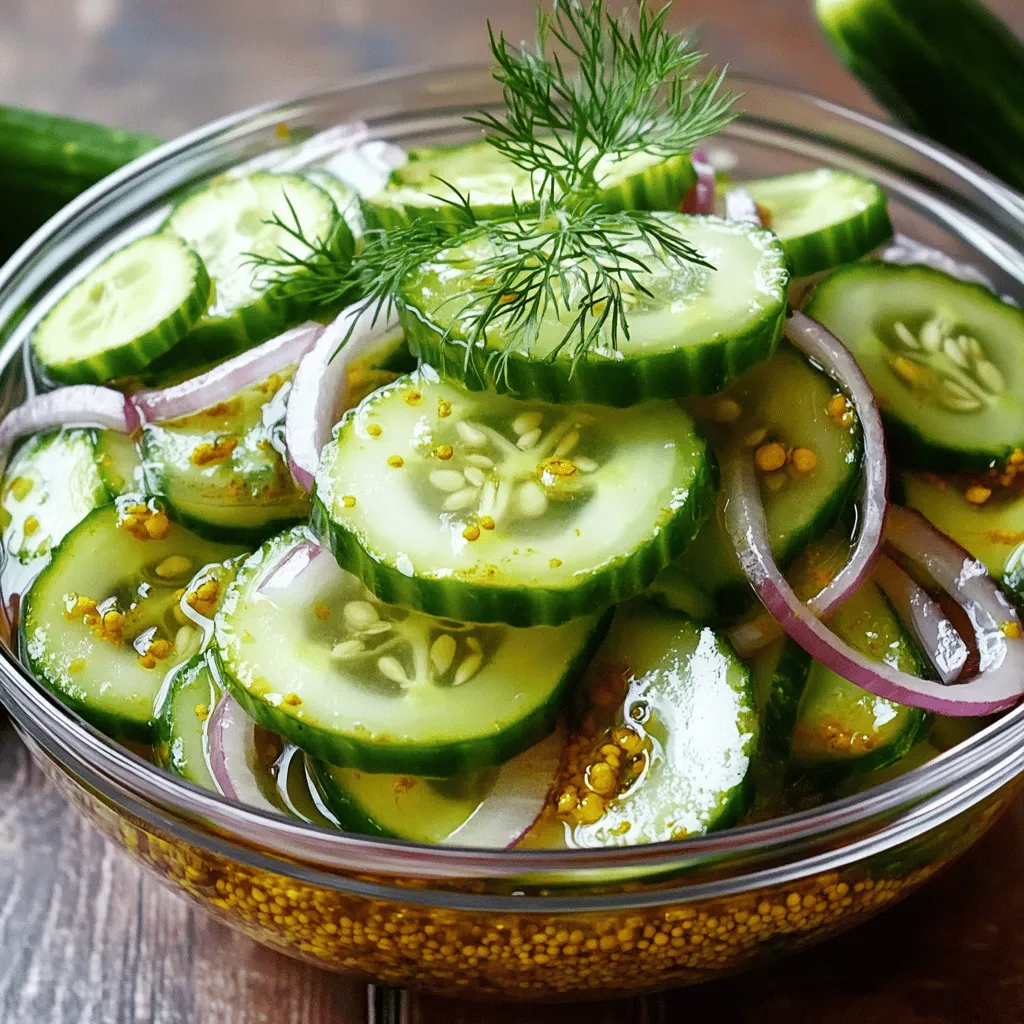
Looking to spice up your meals with a crunchy, flavorful treat? Amish Refrigerator Pickles are the perfect answer. This simple

To make the best zucchini bread, you need some key ingredients. Here’s what you will need: - 2 cups grated zucchini (about 2 medium zucchini) - 1 cup all-purpose flour - 1 cup whole wheat flour - 1 teaspoon baking soda - 1/2 teaspoon baking powder - 1 teaspoon ground cinnamon - 1/2 teaspoon ground nutmeg - 1/2 teaspoon salt - 1/2 cup granulated sugar - 1/2 cup brown sugar, packed - 1/2 cup vegetable oil (or unsweetened applesauce for a lighter version) - 3 large eggs - 1 teaspoon vanilla extract These ingredients come together to create a soft and moist bread that is sure to please everyone. You can also add some fun twists to your zucchini bread. Here are some optional ingredients to consider: - 1/2 cup chopped walnuts or pecans - 1/2 cup chocolate chips These extras can add texture and sweetness, making your zucchini bread even more special. Whether you like nuts or chocolate, these options let you customize the bread to your taste. For the full recipe, check out the Ultimate Zucchini Bread. First, you need to grate the zucchini. Start with two medium zucchini, which gives you about two cups when grated. Use the large holes of a box grater for the best texture. After grating, measure the zucchini. Place it in a clean kitchen towel and squeeze out the excess water. This step helps keep the bread from getting soggy. In a large bowl, combine the grated zucchini with the sugars and vegetable oil or applesauce. Stir this mixture well until all the ingredients blend. Next, grab another bowl to whisk together the flours, baking soda, baking powder, cinnamon, nutmeg, and salt. This step ensures even distribution of the dry ingredients. Now, it’s time to combine the wet and dry ingredients. Gradually add the dry mix to the zucchini mixture. Stir gently until just combined; avoid overmixing to keep your bread light and fluffy. In a small bowl, beat the eggs and vanilla extract. Then, fold this into the batter. If you want, you can add nuts or chocolate chips for extra flavor. Pour the batter into a greased 9x5-inch loaf pan. Smooth the top with a spatula. Preheat your oven to 350°F (175°C) and bake for 50-60 minutes. To check for doneness, insert a toothpick in the center. If it comes out clean, your bread is ready. Let it cool in the pan for about 10 minutes before moving it to a wire rack. For the full recipe, check the details above. Enjoy your delicious zucchini bread! To avoid a soggy loaf, make sure to squeeze excess moisture from the grated zucchini. Place the zucchini in a clean kitchen towel and twist it tightly. This helps keep your bread light and fluffy. Another key tip is to avoid overmixing. When you combine the wet and dry ingredients, mix just until you see no dry flour. Overmixing can lead to a dense loaf. You can store zucchini in your fridge for up to a week. Keep it in a plastic bag with air holes. For baking, wash and grate the zucchini just before using. This way, it stays fresh. You can also freeze zucchini for later use. Simply grate and pack it into a freezer bag. It can last for up to three months in the freezer. For serving, slice the zucchini bread into thick pieces. You can serve it warm or let it cool. Dust the top with powdered sugar for a sweet touch. If you want to get fancy, drizzle a simple glaze made from powdered sugar and milk over the top. Add a few walnuts or ribbons of zucchini for decoration. These small touches make your bread look as good as it tastes! For the full recipe, check out the Ultimate Zucchini Bread. {{image_2}} You can make zucchini bread healthier with a few simple swaps. One great option is to use Greek yogurt instead of oil. This adds moisture and protein, making your bread lighter. If you need gluten-free options, you can try almond flour or a gluten-free blend. Both will change the texture a bit, but they will still taste great. Want to add some fun flavors? You can sprinkle in spices like nutmeg or stir in a splash of almond extract. These small tweaks will give your bread a nice twist. You can also mix in other fruits or veggies. Grated carrots or mashed bananas work well. They add extra moisture and flavor to your bread. Using seasonal ingredients can change your zucchini bread each time you make it. In summer, add fresh herbs like basil or mint for a unique taste. In fall, consider mixing in pumpkin or apple for a cozy flavor profile. Each season brings new ideas, so feel free to experiment! For the full recipe, check out the Ultimate Zucchini Bread. To keep your zucchini bread fresh, store it at room temperature. Wrap it tightly in plastic wrap or foil. This keeps it moist and prevents it from drying out. Place it in a bread box or a cool, dry spot. It should stay good for about 2 to 3 days. If you want to keep it longer, refrigerate it. Wrap the bread well to avoid drying. Zucchini bread can last 1 week in the fridge. For even longer storage, freeze it. Slice the bread before freezing for easy serving. Wrap each slice in plastic wrap, then place in a freezer bag. This way, you can take out what you need. When you're ready to enjoy your zucchini bread, reheating is simple. The best method is to use an oven. Preheat the oven to 350°F (175°C). Place the slices on a baking sheet and warm for about 10 minutes. This keeps the bread soft and tasty. You can also use a microwave for quick reheating. Place a slice on a microwave-safe plate. Heat for 15-20 seconds. Be careful not to overheat, as this can make the bread dry. Enjoy your warm zucchini bread with a spread of butter or cream cheese for a delightful treat! This recipe stands out for its balance of flavors and moist texture. The combination of granulated sugar and brown sugar adds depth. The whole wheat flour gives a nutty taste and boosts nutrition. Spices like cinnamon and nutmeg bring warmth. Grating zucchini keeps the bread moist, while the eggs help it rise. You can even add nuts or chocolate chips for extra crunch or sweetness. These features make every bite delicious. Yes, you can replace eggs easily. For each egg, use one of these options: - 1/4 cup unsweetened applesauce - 1/4 cup yogurt - 1/2 banana, mashed These choices keep the bread moist and tasty. They make this recipe vegan-friendly. Just remember, the flavor may change slightly, but it will still be good. Zucchini bread lasts about 3 to 5 days at room temperature. Keep it in an airtight container. You can also refrigerate it for up to a week. For longer storage, freeze it. Wrap the bread tightly in plastic wrap, then in foil. It can last for about 2 to 3 months in the freezer. Yes, you can use frozen zucchini. Thaw it first and drain excess water. This helps keep the bread from being soggy. Fresh zucchini offers a better texture, but frozen works in a pinch. Just remember to measure the zucchini after draining. Zucchini bread is great on its own, but you can serve it with: - Cream cheese for a rich spread - Butter for a classic touch - Jam or fruit preserves for sweetness It also pairs well with coffee or tea for breakfast or snacks. Enjoying it warm adds to the experience. For the full recipe, check out the Ultimate Zucchini Bread. Zucchini bread is a delightful treat you can easily make at home. Use fresh zucchini and the right mix of ingredients for great flavor and texture. Follow the steps provided, from grating zucchini to baking, and you'll achieve the perfect loaf. Remember to experiment with variations, like adding nuts or spices, to make it your own. With proper storage, you can enjoy it longer. Make this simple recipe, and delight in its rich taste today. Your kitchen will smell amazing!

The Best Zucchini Bread Simple and Tasty Recipe

Are you ready to bake the best zucchini bread ever? With its perfect blend of sweet and savory flavors, this

- 4 ripe peaches, pitted and sliced - 4 cups water - 4 tea bags (black or green tea) - 1/4 cup honey (adjust to taste) - 1 teaspoon vanilla extract - Ice cubes - Fresh mint leaves (for garnish) - Use agave syrup instead of honey - Experiment with other sweeteners - Medium saucepan - Blender - Tall glasses for serving When making this Easy Peach Tea, fresh peaches are key for great taste. You can swap honey with agave syrup for a different flavor. A blender helps blend the peaches smoothly. You’ll also need a medium saucepan to boil the water. Tall glasses will make serving easy and fun. Using ripe peaches enhances the drink's sweetness. If you want to experiment, try other sweeteners to find your favorite. Enjoy the process of making this delightful tea! For the complete steps, check the Full Recipe. 1. First, boil 4 cups of water in a medium saucepan. 2. Once the water is boiling, take it off the heat. 3. Add 4 tea bags, either black or green. Steep the tea for about 5 minutes. 4. While the tea steeps, take 2 of the sliced peaches and put them in a blender. 5. Add 1/4 cup of honey and 1 teaspoon of vanilla extract to the blender. 6. Blend until the mixture is smooth and creamy. 1. After steeping, remove the tea bags from the saucepan. 2. Pour the pureed peach mixture into the brewed tea and stir well. 3. Next, add the remaining sliced peaches to the tea. This gives a nice texture and flavor. 1. Let the tea cool to room temperature. 2. Once cool, place the tea in the refrigerator for at least 1 hour to chill. 3. Serve the tea over ice cubes in tall glasses. 4. Garnish with fresh mint leaves for a pop of color and flavor. For the full recipe, check out the Peachy Summer Bliss Tea recipe above. Enjoy this refreshing drink! To make your peach tea burst with flavor, steep the tea bags longer. I recommend steeping them for about 5 to 10 minutes. The longer steeping time draws out more flavor from the tea leaves. This makes your drink richer and more intense. For sweetness, start with 1/4 cup of honey. You can adjust this based on your taste. If you prefer it sweeter, add a bit more honey. For less sweetness, use less honey. You can also try agave syrup or other sweeteners if you want a different taste. Serving peach tea can be fun! Use tall glasses to show off the beautiful colors. You can layer the tea with ice cubes for a stunning look. Add fresh mint leaves on top for a pop of color and flavor. Another idea is to add a slice of peach on the rim of your glass. This makes it feel special. You can also serve it with a fun straw or a colorful paper umbrella for a festive touch. Peaches are not just tasty; they are good for you too! They contain antioxidants that help protect your body. These antioxidants fight free radicals. They can help keep you healthy and may reduce the risk of some diseases. Drinking peach tea also helps with hydration. Staying hydrated is key for your body to work well. A refreshing glass of peach tea is a great way to stay cool and hydrated. Plus, it’s a tasty alternative to sugary drinks! {{image_2}} You can make your peach tea even better by adding more fruits. Try mixing in berries like strawberries or blueberries. Citrus fruits also work well. Think about adding lemon or orange slices for a zesty twist. You can also infuse your tea with fresh herbs. Basil adds a sweet touch, while rosemary gives a bold flavor. Just a few leaves can change the entire taste. When making peach tea, you can choose your tea base. Black tea has a strong taste and works well with peaches. Green tea offers a lighter flavor that pairs nicely with fruit. If you want a caffeine-free option, herbal teas are fantastic. They come in many flavors and let the peach shine through. Sweetness can change how your peach tea tastes. You can use different types of sugar. Brown sugar adds a rich flavor, while white sugar is classic. If you want a unique twist, add spices like cinnamon. A pinch can warm up your drink and make it special. For even more fun, check out the Full Recipe and explore all the ways to make this drink your own! To keep your peach tea fresh, store it in the fridge. Make sure to use a clean, airtight container. Glass jars or plastic bottles work well. This keeps the tea cool and tasty. Homemade peach tea lasts about 5 to 7 days in the fridge. If it smells sour or looks cloudy, it's best to throw it away. Always taste it first to be sure! If you want to enjoy your peach tea warm, heat it gently on the stove. Avoid boiling it again, as that can change the flavor. For iced tea, simply pour it over ice and enjoy it cold. You can add more peach slices or mint for a refreshing twist. For the full recipe, check out the earlier section! You can make peach tea sweeter by adding more honey. Start with 1/4 cup and taste it. If you want it sweeter, add more, a tablespoon at a time. You can also try agave syrup or sugar. Both work well too. Remember to mix well, so it blends nicely. Yes, you can use canned peaches. However, they may change the flavor a bit. Canned peaches are often sweeter and softer. This can make your tea taste different. Fresh peaches give a nice bite and a true peach flavor. If you like it sweeter, canned peaches are a good choice. Peach tea can have caffeine. It depends on the tea you choose. If you use black tea, it has caffeine. Green tea also has some caffeine, but less than black tea. If you want a caffeine-free option, try herbal tea. Herbal teas are made from fruits and herbs and have no caffeine. Yes, you can make a larger batch of peach tea. Just double or triple the recipe. Use 8 or 12 peaches instead of 4. Adjust the water and tea bags too. For every 4 cups of water, use 4 tea bags. This way, you keep the flavor nice and strong. You can use black or green tea bags for this recipe. Black tea gives a bold flavor. It pairs well with peaches. Green tea has a lighter taste. It can make a refreshing drink too. Try both to see what you like best. Each offers a unique twist to your peach tea delight. This peach tea recipe is simple and fun to make. You need ripe peaches, tea, and a few other ingredients. Remember, you can adjust sweetness and try different fruits or teas. Follow the tips for the best flavor and presentation. Store it well to keep it fresh. Enjoy this refreshing drink at any time! I hope you find joy in making and sharing your peach tea.

Easy Peach Tea Delightful and Refreshing Recipe

Are you craving a drink that is both tasty and refreshing? Look no further! In this post, I’ll show you

Older posts
Newer posts
← Previous Page1 … Page69 Page70 Page71 … Page94 Next →

dsad

© 2025 flavorsprint • Built with GeneratePress

Our Policies

  • Copyright Policy
  • Cookie Policy
  • GDPR Policy
  • Privacy Policy
  • Disclaimer
  • Terms Of Use

More Information

  • Home
  • About
  • Contact
  • Appetizers
  • Dessert
  • Dinner
  • Drinks
©2025, flavorsprint About Back To Top