Skip to content
DisclaimerTerms Of UseGDPR PolicyCookie Policy

flavorsprint

  • Home
  • Drinks
  • Appetizers
  • Dinner
  • Dessert
  • About
  • Contact
  • Privacy Policy
DisclaimerTerms Of UseGDPR PolicyCookie Policy

Lillian

To create Cheesy Garlic Bread Sloppy Joes, gather these simple ingredients: - 1 lb ground beef or turkey - 1 small onion, finely chopped - 2 cloves garlic, minced - 1 cup shredded cheddar cheese - 1 cup marinara sauce - 1 tablespoon Worcestershire sauce - 1 teaspoon dried oregano - Salt and pepper to taste - 4 large garlic bread rolls (preferably with a sturdy texture) - 2 tablespoons butter, softened - Fresh parsley, chopped (for garnish) Each ingredient plays a key role in the flavor and texture of this dish. The ground beef or turkey adds protein, while the onion and garlic provide depth. Marinara sauce brings a sweet and tangy note. Worcestershire sauce adds umami, and oregano gives a hint of earthiness. The garlic bread rolls serve as a delicious base, holding all the goodness together. Softened butter on the rolls enhances the garlic flavor and helps achieve that perfect golden toast. Lastly, fresh parsley not only adds color but also a fresh taste that brightens the dish. For the full recipe, click [Full Recipe]. To start, take a large skillet and set it over medium heat. Add 1 pound of ground beef or turkey. Cook it until it’s browned, which usually takes about 5-7 minutes. Use a spatula to break the meat apart as it cooks. This helps it brown evenly. Next, add 1 small onion, finely chopped, and 2 cloves of minced garlic to the skillet. Sauté this mixture for about 3-4 minutes. You want the onion to turn translucent and smell good. This step adds great flavor to your sloppy joes. Now it’s time to add the marinara sauce. Pour in 1 cup of marinara sauce along with 1 tablespoon of Worcestershire sauce. Sprinkle in 1 teaspoon of dried oregano, and season with salt and pepper to taste. Mix everything well. Let the mixture simmer for about 10 minutes. This helps it thicken. While the meat mixture simmers, preheat your oven to 375°F (190°C). Take 4 large garlic bread rolls and cut them in half horizontally. Spread a thin layer of 2 tablespoons of softened butter on each half. This will give them a nice, rich flavor when toasted. Place the rolls on a baking sheet. Toast them in the preheated oven for about 5-7 minutes. You want the edges to turn golden brown. Once the rolls are toasted, remove them from the oven. Take a generous scoop of the meat mixture and place it on the bottom halves of the garlic bread. Now, sprinkle 1 cup of shredded cheddar cheese over the meat mixture. This cheese will melt beautifully. Return the loaded rolls to the oven for an additional 5 minutes. Wait until the cheese is melted and bubbly. Remove them from the oven, and sprinkle fresh chopped parsley on top. Serve immediately with the top halves of the garlic bread on the side. For the full recipe, check out the link above. To make the best Cheesy Garlic Bread Sloppy Joes, start with quality meat. Ground beef or turkey works well. I prefer using a leaner meat to cut down on grease. Brown it over medium heat until it’s nice and crispy. This adds flavor. Next, balance the sauce. Use marinara sauce for sweetness. The Worcestershire sauce adds depth. Salt and pepper enhance the taste. Don’t forget the oregano! It brings a lovely aroma. Let the sauce simmer to thicken. This makes the filling hearty and rich. When serving, think about drinks or sides. A cold soda or iced tea pairs well. You can also try a light salad on the side. It adds freshness to the meal. For plating, make it fun! Use a large plate. Place the cheesy sloppy joe on one side and a handful of chips on the other. You can sprinkle fresh parsley on top for color. This makes the dish pop and looks inviting. For full details on how to whip up these tasty bites, check out the Full Recipe. {{image_2}} You can switch up the meat by using ground chicken or plant-based meat. Ground chicken gives a lighter flavor. Plant-based meat offers a tasty, meat-free option. Both choices work well in this recipe. For cheese, you can try mozzarella, pepper jack, or even a blend. Each cheese adds a different taste. Mozzarella is creamy, while pepper jack brings heat. Experimenting with cheeses can make your sloppy joes even better. You can turn these sloppy joes into sliders. Use smaller rolls and serve them at parties. They are easy to hold and fun to eat. Another fun option is to transform them into a casserole. Layer the meat mixture and cheese in a baking dish. Top it with garlic bread pieces and bake until golden. This gives you a new way to enjoy the flavors. For the full recipe, check out the detailed instructions. To keep your Cheesy Garlic Bread Sloppy Joes fresh, follow these steps: - Cooling and packing properly: Allow the sloppy joe mixture to cool to room temperature. This step helps avoid condensation in your storage container. Once cooled, scoop the meat mixture into a clean, airtight container. Store the garlic bread rolls separately to keep them crispy. - Recommended storage containers: Use glass or BPA-free plastic containers. These types help keep your food safe. For best results, use containers that fit the amount you have left to minimize air exposure. Reheating your Cheesy Garlic Bread Sloppy Joes can be easy and fun: - Best methods to reheat without losing texture: The oven is your best friend here. Preheat it to 350°F (175°C). Place the stuffed bread on a baking sheet. Cover with foil to keep moisture in and heat for about 10 minutes. This way, the bread stays crisp, and the filling warms up nicely. - Tips for refreshing the toppings: If the cheese has hardened, add a sprinkle of fresh cheese before reheating. You can also add a little more chopped parsley for a fresh taste. Enjoy your meal just like it was fresh out of the oven! For more details, check the Full Recipe. Yes, you can make Cheesy Garlic Bread Sloppy Joes ahead. First, prepare the meat mixture. Store it in an airtight container in the fridge. It stays fresh for up to three days. When you're ready to eat, just reheat it in a skillet over medium heat. Add a splash of water if it looks dry. For the garlic bread, I recommend toasting it fresh. This keeps it crispy and tasty. You can serve many tasty sides with Cheesy Garlic Bread Sloppy Joes. Here are some great ideas: - Crispy potato fries - Fresh garden salad - Coleslaw with a tangy dressing - Sweet corn on the cob - Pickles for a crunchy bite These sides will complement the rich flavors of the sloppy joes. To make Cheesy Garlic Bread Sloppy Joes vegetarian or vegan, swap the meat. Use lentils, mushrooms, or plant-based meat. For the cheese, choose a vegan cheese or skip it altogether. You can also add more veggies, like bell peppers or zucchini, to enhance the flavor. These simple changes keep the dish tasty while meeting dietary needs. For full details on the Cheesy Garlic Bread Sloppy Joes recipe, check the Full Recipe link. Cheesy Garlic Bread Sloppy Joes blend bold flavors with fun, easy steps. I shared the key ingredients, simple instructions, and served-up tips to nail this dish. You can switch up ingredients and find ways to store leftovers, too. This meal is a crowd-pleaser that can fit any gathering. Don't hesitate to get creative with your choices and enjoy every bite. With this guide, you're ready to impress anyone at your table!

Cheesy Garlic Bread Sloppy Joes Tasty and Easy Meal

Are you ready to take your dinner game to a new level? Cheesy Garlic Bread Sloppy Joes are a fun

To make shrimp and grits, you need simple and tasty items. Here’s what you’ll need: - 1 cup grits (stone-ground preferred) - 4 cups water or low-sodium chicken broth - 1 lb large shrimp, peeled and deveined - 1 cup shredded sharp cheddar cheese - 4 slices of turkey bacon, chopped - 1 small onion, finely chopped - 2 cloves garlic, minced - 1 teaspoon smoked paprika - ½ teaspoon cayenne pepper (adjust to taste) - 2 tablespoons butter - Salt and pepper to taste - Chopped green onions for garnish These ingredients blend well and create rich flavors. Each one plays a big role in this dish. When it comes to grits, choose stone-ground varieties for the best taste. Stone-ground grits have a coarser texture, which adds a nice bite. They also cook up creamier. Instant grits can save time, but they may lack flavor and texture. I recommend taking the time to use stone-ground grits for a truly comforting dish. You can make shrimp and grits even better with some fun extras. Try adding: - Sautéed bell peppers for sweetness - Spinach for a healthy touch - Hot sauce for a kick - Lemon juice for brightness These add-ins can change the flavor and make your dish unique. Feel free to mix and match based on your taste. For the full recipe, check out the complete instructions. Start by boiling water or chicken broth in a medium pot. This adds flavor. Once it bubbles, slowly whisk in the grits. Stir them gently. Lower the heat and cover the pot. Let the grits cook for 20-25 minutes. Stir them often. This helps keep them creamy. When they are done, mix in the shredded cheddar cheese. This will make them rich and cheesy. Taste and add salt and pepper as needed. Keep them warm while you cook the shrimp. For juicy shrimp, use large shrimp. Peel and devein them first. Heat a large skillet over medium heat. Cook chopped turkey bacon until crispy. Remove it and leave the drippings. In the same skillet, add chopped onion. Cook it for about 4-5 minutes until it is clear. Next, add minced garlic, smoked paprika, and cayenne pepper. Cook for one more minute to blend the flavors. Now, add the shrimp. Cook for 3-4 minutes. They will turn pink when they are ready. Season with salt and pepper. Stir in butter last. This makes everything rich and tasty. Now it's time to bring it all together. On each plate, scoop a generous amount of cheesy grits. Top them with the shrimp mixture. Don’t forget the crispy turkey bacon on top. Finish with chopped green onions for color and fresh taste. This dish is a comfort food classic. Each bite is a mix of creamy, savory, and just a bit spicy. For the full recipe, check the section above. Enjoy your meal! To make creamy grits, use stone-ground grits. They have a rich taste and texture. Start with four cups of water or low-sodium chicken broth. This makes the grits flavorful. Always bring the liquid to a boil before adding the grits. Then, whisk the grits in slowly. Reduce the heat and cover the pot. Stir occasionally for 20-25 minutes. This helps the grits become smooth and creamy. Don't forget to stir in the sharp cheddar cheese for extra creaminess. It melts beautifully and adds a great taste. Seasoning can make or break your dish. Use smoked paprika for a deep, warm flavor. A little cayenne pepper adds spice but adjust it based on your taste. Salt and pepper are essential as well. Add them to both the grits and shrimp. This ensures every bite is full of flavor. If you want a hint of freshness, add chopped green onions on top. They add a nice crunch and bright taste. Stovetop cooking is the traditional method for shrimp and grits. It allows for better control of the heat. You can easily adjust if things cook too fast. However, you can also use a slow cooker or an Instant Pot. These methods are great for busy cooks. In a slow cooker, let the grits cook on low for a few hours. The flavors meld together beautifully. If you use an Instant Pot, it cooks grits in just a few minutes. Just make sure to follow the proper water-to-grits ratio for best results. Using the right method helps you achieve that perfect blend of flavors and textures. For the complete guide, check out the Full Recipe for Savory Shrimp and Grits Delight. {{image_2}} Southern-style shrimp and grits is a dish filled with warmth and comfort. It often features creamy grits topped with shrimp cooked in a rich sauce. This style shines with its simple yet bold flavors. You can enjoy it with just butter, garlic, and spices. On the other hand, gourmet versions add flair. They might use herbs, fancy cheeses, or unique sauces. A touch of lemon or fresh herbs can elevate the dish. The choice is yours! Explore both styles and see which one you love more. While shrimp is the star, you can swap it out for other proteins. Scallops are a great choice. They bring a sweet, delicate taste. Or try chicken for a heartier option. Cooked sausage can add a spicy kick. Each protein brings its own flavor and texture. Adjust your spices to match the protein you choose. This way, you keep the dish exciting and fresh every time you make it. You can make shrimp and grits vegetarian or vegan too! For a vegetarian version, use mushrooms instead of shrimp. They add a nice umami flavor. For a vegan twist, use plant-based butter and a dairy-free cheese. You can even add sautéed greens for extra nutrients. A touch of smoked paprika keeps that rich flavor. With these changes, you can enjoy this comfort dish in many ways. Don't be afraid to experiment! Each variation can be just as satisfying. Store leftover shrimp and grits in an airtight container. Make sure to cool them first. This helps keep the flavors fresh. You can store them in the fridge for up to three days. If you plan to eat them later, it's best to separate the shrimp from the grits. Reheat shrimp and grits on the stove for the best taste. Add a splash of broth or water to keep the grits creamy. Stir often to avoid burning. You can also microwave them, but be careful. Heat in short bursts to keep them from drying out. You can freeze shrimp and grits for later use. Place them in a freezer-safe container. The shrimp can stay fresh for about three months. When ready to eat, thaw in the fridge overnight. Reheat gently to enjoy a tasty meal. Shrimp and grits comes from the Southern United States, especially the Lowcountry of South Carolina. It started as a simple breakfast dish for fishermen. They often used local shrimp and ground corn. Over time, it became a popular dinner meal. Now, it is enjoyed by many, with different versions across the country. To add spice, use more cayenne pepper in the recipe. You can also add hot sauce or diced jalapeños. A pinch of crushed red pepper flakes works well too. Experiment with spices until you find your perfect heat. Each addition gives a different flavor twist. You can serve a fresh salad for a light side. A collard greens dish adds more Southern charm. Cornbread is excellent for soaking up the sauce too. If you want something lighter, try a citrus salad for a bright contrast. To keep grits creamy, use enough water or broth. Stir them often while cooking. Avoid cooking them too fast; low heat is best. Rinse grits before cooking to remove excess starch. This helps them stay fluffy and not gluey. Using stone-ground grits also makes a big difference. For a detailed guide on making this dish, check the Full Recipe. Shrimp and grits is a tasty dish with rich flavors. You learned about the must-have ingredients, cooking steps, and tips for creamy grits. I shared ways to switch up the dish with different proteins and dietary needs. Storing leftovers and reheating well keeps the dish enjoyable. Remember, you can always make it your own with fun flavors and spices. Enjoy making this classic meal your way!

Savory Shrimp and Grits Flavorful Comfort Dish

Welcome to the world of Shrimp and Grits—your next favorite comfort dish! This classic Southern recipe blends the rich flavors

The main ingredients for Reuben Stromboli are simple yet flavorful. Here’s what you need: - 1 lb pizza dough - 1 cup corned beef, sliced - 1 cup sauerkraut, drained - 1 cup Swiss cheese, shredded - ½ cup Russian or Thousand Island dressing - 1 tablespoon Dijon mustard - 1 teaspoon caraway seeds (optional) - 1 egg, beaten (for egg wash) - 2 tablespoons sesame seeds (for garnish) These ingredients create a tasty blend that captures the essence of a classic Reuben sandwich. The pizza dough acts as a delicious wrap, while the corned beef and cheese provide rich flavors. The dressing adds a creamy touch, and the sauerkraut gives a nice crunch. You can customize your Reuben Stromboli with some fun options. If you want extra veggies, try adding bell peppers or onions. For a spicy kick, jalapeños are a great choice. If you prefer a different cheese, go for provolone or mozzarella. For a lighter option, turkey can replace corned beef. To make your Reuben Stromboli even better, sprinkle in some seasonings. Caraway seeds add a classic flavor, but you can also try garlic powder or paprika. Fresh herbs like parsley or dill can brighten the dish. Feel free to experiment with spices to make it your own. For the full recipe, check out the detailed instructions that follow. Start by preheating your oven to 400°F (200°C). Line a baking sheet with parchment paper. This step helps keep the Stromboli from sticking. Next, take 1 pound of pizza dough and place it on a floured surface. Roll the dough into a large rectangle, about 12x16 inches. Make sure the dough is even so it cooks well. Now it's time to make the filling. In a small bowl, mix ½ cup of Russian or Thousand Island dressing with 1 tablespoon of Dijon mustard. Stir until it's smooth. Spread this mixture evenly over the dough, but leave a 1-inch border all around. Next, layer 1 cup of sliced corned beef on the dressing. Then add 1 cup of drained sauerkraut and top it off with 1 cup of shredded Swiss cheese. If you want, sprinkle in 1 teaspoon of caraway seeds for extra flavor. To shape your Stromboli, start from one of the longer edges of the dough. Carefully roll it up tightly into a log. Pinch the seams and ends to seal it well. Place the Stromboli seam-side down on the baking sheet. Brush the top with 1 beaten egg for a golden finish. Sprinkle 2 tablespoons of sesame seeds on top for a nice crunch. Bake in your preheated oven for 25-30 minutes or until it's golden brown. Once baked, let it cool for about 5 minutes. Then slice and enjoy! For the full recipe, check the details provided. To get a crust that shines and feels crisp, follow these steps: - Brush the top with beaten egg. This gives it a nice golden color. - Sprinkle sesame seeds on top for a crunchy finish. - Bake at 400°F (200°C) until golden brown, about 25-30 minutes. This will help you get that perfect look and taste. Sometimes, your Stromboli might not turn out as expected. Here are tips to fix issues: - Not rising? Ensure your dough is fresh and warm. - Filling leaking? Seal the edges tightly when rolling. - Overcooked? Keep an eye on the oven; every oven is different. These tips should help you avoid common mistakes. Serving your Reuben Stromboli can be fun! Here are a few ideas: - Slice it up and serve with extra dressing for dipping. - Pair it with a simple salad for a fresh side. - You can also add potato chips for some crunch. These options make your meal more enjoyable and tasty. For the complete recipe, check out the Full Recipe section. {{image_2}} You can make a tasty vegetarian version of Reuben Stromboli. Just swap corned beef for roasted veggies. Try using mushrooms, bell peppers, and zucchini. Use the same sauerkraut and Swiss cheese for flavor. You can add avocado for creaminess. This mix keeps it hearty and satisfying. If you need gluten-free options, look for gluten-free pizza dough. Many stores sell ready-made gluten-free dough. You can also make your own. Combine gluten-free flour, yeast, and water for a simple mix. This way, everyone can enjoy the Stromboli. Add more flavor with spices and herbs. Try mixing in garlic powder or smoked paprika. Fresh herbs like dill or parsley also work well. For a spicy kick, use jalapeños or hot sauce in the dressing. You can even switch the cheese! Gouda or pepper jack can give your Stromboli a new twist. For the full recipe, visit the recipe section above. To keep your Reuben Stromboli fresh, store it in an airtight container. Let it cool first to avoid steam buildup. If you don’t have an airtight container, wrap it tightly in plastic wrap or aluminum foil. This helps keep the flavors and moisture locked in. Store it in the fridge for up to three days. When you want to enjoy leftovers, preheat your oven to 350°F (175°C). Place the Stromboli on a baking sheet. Bake for about 10-15 minutes, or until it’s warm throughout. You can also use a microwave, but it may make the crust soft. If you prefer a crispier texture, stick with the oven. To freeze your Stromboli, wrap it tightly in plastic wrap and then foil. This helps prevent freezer burn. You can freeze it for up to three months. To thaw, place it in the fridge overnight. Once thawed, reheat it in the oven for the best results. This keeps the crust nice and crisp. For those looking for the full recipe, you can find it in the earlier sections. Reuben Stromboli blends two classic foods. The Reuben sandwich hails from America. It has roots in Jewish deli culture. Stromboli, on the other hand, is Italian-American. It is a rolled pizza filled with meats and cheese. The combination makes a tasty twist! Chefs like to experiment with flavors and styles. This dish is a fun way to enjoy both meals, perfect for gatherings. Yes, you can prepare Reuben Stromboli ahead of time. Make the Stromboli and wrap it tightly in plastic. You can store it in the fridge for up to a day. This way, you save time on busy days. Just remember to bake it before serving! If you want to freeze it, wrap it well. You can freeze it for up to three months. Thaw in the fridge overnight before baking. Reuben Stromboli pairs well with many sides. Here are some great options: - A simple green salad with vinaigrette - Crispy potato wedges or fries - Pickles for a tangy crunch - Coleslaw for a creamy contrast - Tomato soup for a warm dip These sides balance the rich flavors of the Stromboli. You can find the full recipe for Reuben Stromboli [here](#). It gives detailed steps and tips for making this delicious dish at home. Enjoy cooking! We explored the ingredients needed for a tasty Reuben Stromboli, from key components to optional substitutes and seasonings. I shared step-by-step instructions for making the dough, assembling the filling, and baking to perfection. Tips helped ensure a golden crust, while variations showed options for vegetarians and gluten-free eaters. Proper storage and reheating methods keep leftovers fresh. Finally, I answered common questions about this dish's history and serving ideas. Now, you can enjoy a delicious Reuben Stromboli that fits your taste and needs!

Reuben Stromboli Tasty Twist on a Classic Dish

Are you ready to savor a delicious twist on a classic favorite? The Reuben Stromboli combines all the flavors you

- Firm tofu: 1 block (14 oz), pressed and sliced - Baguette or rolls: 1 French baguette or hoagie rolls - Vegetables: cucumber, carrot, radishes, jalapeño, cilantro - Soy sauce: 1/4 cup - Sesame oil: 2 tablespoons - Maple syrup: 1 tablespoon - Rice vinegar: 1 tablespoon - Mayonnaise: to taste - Salt and pepper: to taste Tofu Banh Mi uses fresh, simple ingredients. Firm tofu gives the sandwich a nice texture. I like to press the tofu to remove excess water. This helps it soak up the flavors better. The baguette should be crispy on the outside and soft inside. For the veggies, I enjoy using a mix of cucumber, carrot, and radishes. They add crunch and brightness. Jalapeño gives a nice kick, and cilantro adds freshness. For the marinade, soy sauce is key for depth. Sesame oil adds a nutty flavor. Maple syrup brings a touch of sweetness, while rice vinegar balances everything out. You can adjust the amount of mayonnaise to your liking. Adding salt and pepper enhances the taste too. Don't forget to check the [Full Recipe] for detailed instructions! Marinating the tofu: Start by mixing the soy sauce, sesame oil, maple syrup, and rice vinegar in a shallow dish. Place your sliced tofu in the marinade, coating it well. Let it sit for at least 30 minutes. This step builds flavor and ensures your tofu is tasty. Cooking the tofu: Heat a non-stick skillet over medium heat. Add the marinated tofu slices. Cook each side for about 4 to 5 minutes. You want the tofu to turn golden and crispy. This texture makes each bite delightful. Cutting and seasoning veggies: In a bowl, combine the sliced cucumber, julienned carrot, radishes, and jalapeño. Sprinkle a pinch of salt over the mixture. This helps draw out the moisture and enhances the flavors. Combining flavors: Let the vegetables sit for about 5 minutes. This short wait allows the flavors to meld together, making your sandwich even tastier. Toasting the baguette: Slice the baguette in half lengthwise. Lightly toast the bread in the oven or on a skillet. This will give your Banh Mi a nice, crispy texture. Layering ingredients: Spread a generous layer of mayonnaise on the inside of each baguette half. Place the cooked tofu on one side and top it with the pickled vegetables and fresh cilantro. Close the sandwich gently and press down. For easier handling, cut it in half. Now, you have an amazing Tofu Banh Mi ready to enjoy! For the full recipe, check the details above. Tofu pressing: Pressing tofu is key. It removes extra water. This helps the tofu soak up the marinade. To press, wrap the block in a clean towel. Place a heavy object on top for about 15 minutes. This step ensures your tofu is firm and flavorful. Marination time: For the best taste, marinate the tofu for at least 30 minutes. If you have time, let it sit longer. Two hours works great! The longer it marinates, the more flavor it gains. This makes every bite delicious. Ideal serving temperature: Serve your Tofu Banh Mi fresh and warm. Warm bread enhances the taste. If you let it sit too long, the bread can get soggy. To keep it fresh, assemble just before serving. Presentation techniques: Make your Banh Mi look great! Use a wooden board for serving. Add extra pickled veggies on the side. A few cilantro sprigs can brighten the plate. These simple touches make your dish inviting and fun to eat. Check out the Full Recipe for more ideas! {{image_2}} You can easily make Tofu Banh Mi vegan-friendly. Instead of regular mayonnaise, use a vegan alternative. There are many great brands available. You can also make your own using tofu, lemon juice, and a bit of mustard. This option is creamy and tasty. You can also swap in local ingredients. If you can’t find traditional veggies, use what you have. Try bell peppers or zucchini instead of cucumber. This way, you can still enjoy a great meal, no matter where you are. Want to spice up your Banh Mi? Add avocado slices for creaminess. Fresh jalapeños give a nice kick. You can also toss in extra herbs, like mint or basil, for more flavor. For sauces, consider sriracha or hoisin sauce. These add a different flavor profile to your sandwich. Just drizzle some on top of the tofu or mix it into your veggies. Your Tofu Banh Mi will be even more delightful! For the full recipe, check out the details above. To store your Tofu Banh Mi, use airtight containers. This keeps the tofu and veggies fresh. Place the tofu in one container and the veggies in another. This way, they stay crisp. In the fridge, your leftovers can last for about three days. After that, the quality might drop. When reheating tofu, use a skillet over medium heat. This helps keep it crispy. You can also use an air fryer for a quick reheat. For the baguette, warm it in the oven or a toaster. A few minutes at 350°F will refresh it nicely. Enjoy your Banh Mi as if it was just made! What type of tofu is best for Banh Mi? I recommend using firm tofu for Banh Mi. Firm tofu holds its shape well and gets crispy when cooked. This texture adds a nice bite to your sandwich. Soft or silken tofu may fall apart too easily and won't give you that great crunch. Can I make the Tofu Banh Mi ahead of time? Yes, you can prepare parts of the sandwich in advance. Marinate the tofu the night before for the best flavor. You can also slice the veggies ahead of time. Just keep them in the fridge until you’re ready to assemble. However, I suggest you toast the baguette just before serving to keep it crispy. Where can I find authentic Banh Mi? You can find authentic Banh Mi at Vietnamese restaurants or food trucks. Many cities have spots known for their sandwiches. If you want to try making it at home, I’ve got a Full Recipe for you to follow. It captures the essence of this classic dish. What are some popular side dishes to serve with Tofu Banh Mi? Some tasty side dishes include a fresh salad, chips, or pickled vegetables. You might also enjoy a bowl of pho or a light soup. These sides complement the flavors of the Banh Mi and can make your meal complete. Tofu Banh Mi blends great flavors and simple ingredients. We covered how to prepare and flavor the tofu, choose fresh veggies, and layer it all in a toasted baguette. Remember to press your tofu well for the best texture and let those pickled veggies sit to enhance their taste. Enjoy experimenting with variations and serving tips to make it your own. With practice, you'll create a delicious meal that shines at any table. This tasty dish is sure to impress!

Tofu Banh Mi Flavorful and Simple Recipe Guide

If you love fresh flavors and easy recipes, you’re in for a treat! My guide to Tofu Banh Mi reveals

To make a tasty macaroni salad, you need some key items. Here’s what you’ll need: - 2 cups elbow macaroni - 1 cup mayonnaise - 2 tablespoons apple cider vinegar - 1 tablespoon Dijon mustard - 1 teaspoon sugar - 1 cup celery, finely diced - 1 cup red bell pepper, diced - 1/2 cup red onion, finely chopped - 1 cup frozen peas, thawed - Salt and pepper to taste - Fresh parsley for garnish These ingredients come together to create a creamy and colorful dish. The elbow macaroni serves as a base, while the veggies add crunch and color. The right seasonings make all the difference in flavor. In this salad, you use: - Salt - Pepper These simple seasonings enhance the taste without overpowering it. The balance is key to a perfect macaroni salad. Feel free to get creative! You can add extra flavors with these optional ingredients: - Chopped hard-boiled eggs - Cooked bacon bits - Diced pickles - Shredded cheese These add-ins can make your salad more hearty and fun. Just mix and match based on what you like! For the full recipe, check out the instructions above. Start by boiling water in a large pot. Add a pinch of salt to the water. When the water bubbles, add 2 cups of elbow macaroni. Cook it until it's al dente, which means it should be firm but not hard. This usually takes about 8 to 10 minutes. Drain the macaroni and rinse it under cold water. This cools it down and stops the cooking. Set the macaroni aside in a bowl. Now let's make the dressing. In a big mixing bowl, add 1 cup of mayonnaise. Then pour in 2 tablespoons of apple cider vinegar. Next, add 1 tablespoon of Dijon mustard and 1 teaspoon of sugar. Whisk these ingredients together until the mixture is smooth and creamy. This dressing gives the salad its rich flavor. It's time to combine everything. Add the cooled macaroni to the bowl with the dressing. Next, fold in 1 cup of finely diced celery, 1 cup of diced red bell pepper, 1/2 cup of finely chopped red onion, and 1 cup of thawed frozen peas. Mix gently until all ingredients are well coated in the dressing. Season your salad with salt and pepper to taste. Now, cover the bowl and refrigerate for at least 1 hour. This chilling time helps all the flavors blend together. For a great finish, garnish with fresh parsley before serving. Enjoy this classic dish! To enhance the taste of your macaroni salad, use fresh ingredients. Fresh herbs, like parsley, add a nice touch. I also suggest adding a squeeze of lemon juice for brightness. For texture, consider adding crunchy veggies, like diced cucumbers or radishes. These will give you that satisfying crunch. Mixing the salad a few times during chilling helps the flavors grow deeper. Macaroni salad is perfect for outdoor events. Serve it in a large bowl with a spoon for easy serving. You can also divide it into small cups for guests to grab. If you want to keep it cool, use a bowl on ice. Pair your salad with grilled meats or veggie skewers. A cold drink like lemonade goes well with it too. One mistake is overcooking the macaroni. You want it al dente, so it stays firm. Another mistake is not chilling the salad long enough. Letting it sit for at least one hour helps the flavors blend well. Avoid skipping the seasoning step; salt and pepper are key for taste. Lastly, don't forget to taste your salad before serving. Adjusting flavors can make a big difference. For the full recipe, check out the Classic Macaroni Salad section above! {{image_2}} Classic macaroni salad is creamy and packed with flavor. It often includes mayo, celery, and peppers. Modern takes add new flavors and textures. You might see ingredients like avocado or a spicy dressing. These twists give the dish a fresh feel. You can also swap out elbow macaroni for spiral or shell pasta. Each shape brings a different bite and look to your salad. If you want a lighter version, try Greek yogurt instead of mayo. It cuts down on fat but keeps creaminess. Adding more veggies can boost nutrition too. Think about adding carrots, cucumbers, or even broccoli. You can also use whole-grain pasta for extra fiber. This keeps the dish filling and satisfying. If you need gluten-free options, choose gluten-free pasta. Many brands make great alternatives that taste just as good. For a dairy-free version, use vegan mayo. This keeps your salad creamy without using eggs. If you want to reduce sugar, skip the sugar in the dressing. You can also add a splash of lemon juice for a fresh taste. These swaps make it easy to adapt the recipe to fit your needs. For the full recipe, check out Classic Macaroni Salad 🥗! After making your classic macaroni salad, let it cool. Cover the bowl tightly with plastic wrap or a lid. This keeps the salad fresh and prevents smells from other foods. Store it in the fridge. The cool air helps maintain its taste and texture. I don’t recommend freezing macaroni salad. The pasta can become mushy when thawed. If you still want to freeze it, pack it in an airtight container. Leave some space at the top for expansion. Thaw it in the fridge when you’re ready to eat it. When stored in the fridge, your macaroni salad lasts about 3 to 5 days. Check for any off smells or changes in texture before eating. If you see any signs of spoilage, it's best to toss it. Enjoy your salad while it’s fresh for the best taste! Yes, you can use other pasta shapes. Fusilli, penne, or shells work well too. Just ensure they cook well and hold the dressing. Each type adds a unique twist to the salad. Try different shapes to find your favorite. You can make macaroni salad a day in advance. Just follow the recipe and store it in the fridge. This gives the flavors time to blend. When you're ready to serve, stir it lightly. If it seems dry, add a bit more mayo. To keep your salad creamy, use enough mayonnaise. Mix mayonnaise with apple cider vinegar and mustard for extra flavor. Whisk them until smooth before adding to the pasta. If needed, add a bit of pasta water for a smoother texture. Macaroni salad is easy to make with the right ingredients and steps. We covered classic components, seasonings, and tasty optional add-ins. I shared tips for flavor and common mistakes to avoid. We explored fun variations and best storage practices. Macaroni salad can fit any meal. With this knowledge, you can enjoy it at home or share with friends.

Classic Macaroni Salad Tasty and Simple Recipe

Are you ready to whip up a dish that’s perfect for any gathering? Classic macaroni salad combines creamy dressing with

Cheesy pizza bombs are fun to make and eat. You can whip them up in about 30 minutes. These tasty bites are great for parties or family movie nights. To make cheesy pizza bombs, gather these key ingredients: - 1 can (16 oz) refrigerated pizza dough - 1 cup shredded mozzarella cheese - ½ cup pepperoni slices - 1 teaspoon Italian seasoning - ½ teaspoon garlic powder - 1 egg, beaten (for egg wash) - Marinara sauce for dipping These ingredients create the perfect blend of flavors and textures. Feel free to get creative with your pizza bombs! Here are some ideas: - Swap pepperoni for cooked sausage or veggies. - Use cheddar or provolone cheese instead of mozzarella. - Add some chopped bell peppers or olives for extra flavor. - Try different seasonings like oregano or red pepper flakes. These options let you personalize your cheesy pizza bombs to suit your taste! Start by preheating your oven to 400°F (200°C). This helps the pizza bombs cook evenly. Next, take your can of refrigerated pizza dough. Roll it out on a clean surface. Aim for a large rectangle. Cut the dough into 12 equal squares. Each square should be about 4 inches wide. This size works great for holding all the yummy filling. Now, let’s make the cheese filling. In a small bowl, mix together 1 cup of shredded mozzarella cheese, ½ cup of pepperoni slices, 1 teaspoon of Italian seasoning, and ½ teaspoon of garlic powder. This blend gives the filling a tasty kick. Stir everything until well combined. Each bite will be cheesy and flavorful. It’s time to assemble! Take one square of dough and place a tablespoon of the cheese mixture in the center. Then, fold the corners of the dough square toward the center. Pinch them together tightly to seal the filling inside. This creates a little ball. Place the seam side down on a baking sheet lined with parchment paper. Repeat this for all squares. After you finish, brush the tops with beaten egg. This step gives a nice golden color. Bake the pizza bombs in the oven for 12-15 minutes. They should puff up and turn golden brown. Once baked, let them cool for a few minutes. Enjoy with marinara sauce for dipping. These cheesy pizza bombs are a perfect snack! For detailed instructions, don’t forget to check the Full Recipe. To get the perfect golden and puffy texture, start with the right oven heat. Preheat your oven to 400°F (200°C). This high temperature helps the pizza bombs rise well. Before baking, brush the tops with beaten egg. This gives them that nice, shiny color. Make sure not to overcrowd them on the baking sheet. Give them room to puff up and become airy. Marinara sauce is a great dip for cheesy pizza bombs. Its rich flavor complements the cheesy filling. You can also try ranch dressing for a creamy twist. For those who like spice, a jalapeño sauce adds a kick. Experimenting with different sauces makes each bite fun and tasty! One common mistake is cutting the dough squares too large. If they are big, they can be hard to seal. Be sure to pinch the edges well to avoid leaks. Another mistake is not letting them cool slightly before serving. They can be very hot right out of the oven. Let them cool for a few minutes to enjoy them safely. Always remember, practice makes perfect! {{image_2}} When making cheesy pizza bombs, you can change the cheese to make it your own. Mozzarella is classic, but feel free to mix it up. Try using cheddar for a sharper taste. You can also use provolone for a creamy bite. If you want something more gourmet, consider goat cheese or feta. Each cheese brings its own flavor and texture, making your snack unique. Want to make your pizza bombs a bit healthier? You can add veggies to the filling. Spinach and mushrooms work great together. Chopped bell peppers add a sweet crunch. You can even throw in some black olives for a salty touch. Just make sure to sauté them first. This helps remove extra water and keeps your pizza bombs from getting soggy. Seasoning can elevate the taste of your pizza bombs. The Italian blend is a great start, but you can get creative. Add a pinch of red pepper flakes for heat. Try smoked paprika for a smoky flavor. If you like a fresh taste, mix in some chopped basil or oregano. Experimenting with spices lets you find your perfect combo. For more ideas, check out the Full Recipe for inspiration! To keep your cheesy pizza bombs fresh, let them cool first. Place them in an airtight container. You can store them in the fridge for up to three days. If you want to keep them longer, freezing is a great option. When you're ready to enjoy leftovers, preheat your oven to 350°F (175°C). Place the pizza bombs on a baking sheet. Heat them for about 10-15 minutes. This method keeps them crispy and delicious. You can also use a microwave, but they may get soft. If you choose the microwave, heat for 30 seconds at a time. Freezing pizza bombs is easy! After you make them, let them cool completely. Wrap each bomb tightly in plastic wrap, then place them in a freezer bag. Be sure to remove as much air as possible. They can stay in the freezer for up to three months. When you're ready to eat, bake them straight from the freezer. Just add a few extra minutes to the bake time. Yes, you can use homemade pizza dough. It gives a fresh taste. Just roll it out into squares, like the store-bought dough. Make sure it’s easy to handle. You want it to be soft and stretchy. This will help keep your cheese and toppings inside. You can use many things instead of pepperoni. Try cooked sausage, diced ham, or even veggies. Bell peppers, mushrooms, or olives work great. If you want a healthier option, use turkey pepperoni or even tofu. Get creative with what you like! Pizza bombs last about 3 to 4 days in the fridge. Store them in an airtight container. This keeps them fresh and tasty. When you’re ready to eat, just reheat them in the oven. They taste great warm and gooey! You now know how to make cheesy pizza bombs from scratch. We covered the key ingredients, step-by-step instructions, and helpful tips to avoid mistakes. You learned about great variations to try, storage tips for leftovers, and answered common questions. Pizza bombs are fun to make and enjoy. Experiment with flavors and share these treats with friends. You'll impress everyone with your cooking skills! Happy baking!

Cheesy Pizza Bombs Flavorful Snack for Everyone

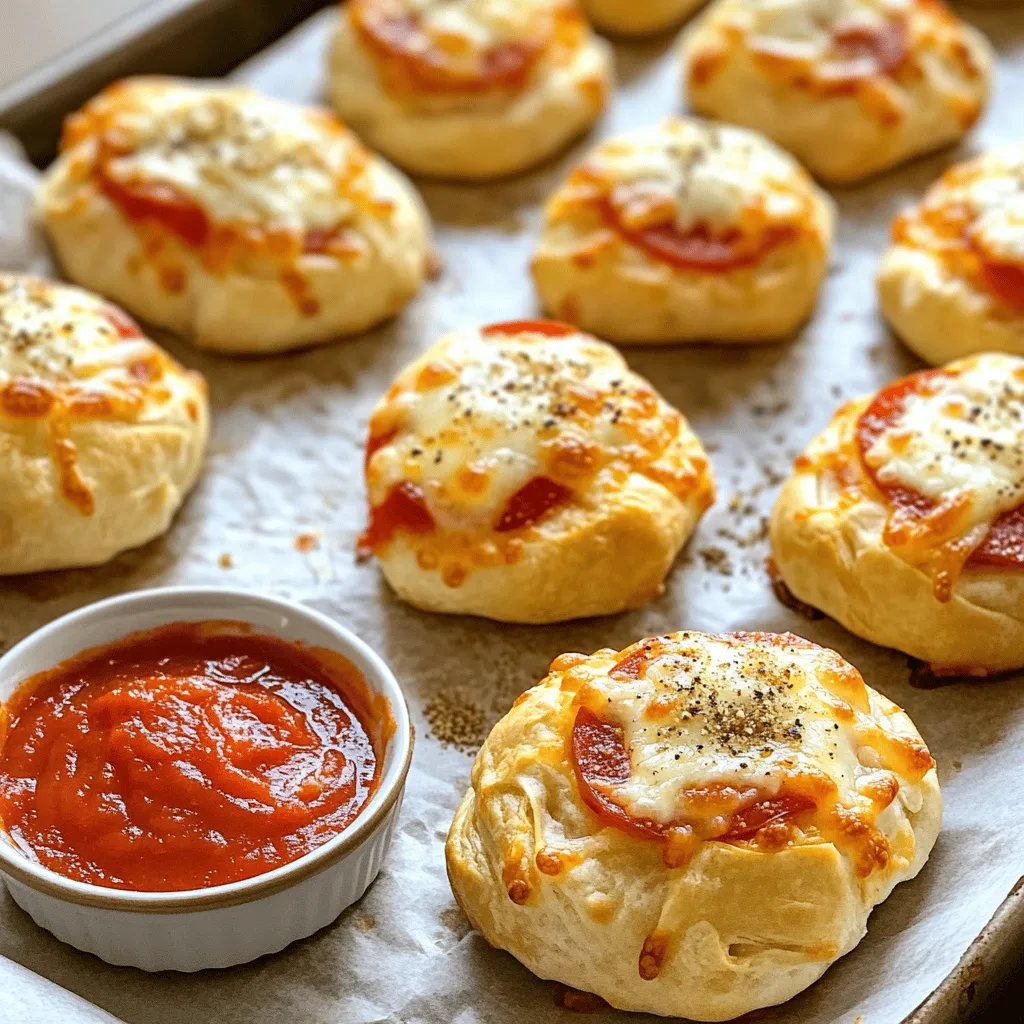
Are you ready to make a snack that everyone will love? These Cheesy Pizza Bombs are simple to whip up

- 1 lb boneless, skinless chicken thighs (or pork) - 1 cup BBQ sauce (your favorite brand) - 2 cups cooked quinoa - 1 cup corn (fresh or frozen) - 1 cup black beans, rinsed and drained For these BBQ pork meal prep bowls, I like to start with boneless, skinless chicken thighs. They stay juicy and tender when cooked. You can also use pork if you prefer. Choose a BBQ sauce that you love. This sauce brings all the flavor to the dish. Next, I add cooked quinoa, which acts as a great base. Corn and black beans add color and protein. Together, these ingredients make a balanced meal. - 1 red bell pepper, diced - 1 avocado, diced - 1/4 cup chopped fresh cilantro Feel free to customize your bowls with more veggies. Diced red bell pepper adds crunch and sweetness. You can also add more greens, like spinach or kale, for extra nutrients. If you want to switch up the protein, consider using turkey or tofu. Toppings like diced avocado and chopped cilantro enhance the flavors. They make your meal look bright and fresh. - Approximately 450 calories per serving - 30g protein, 15g fat, 50g carbs - Gluten-free and dairy-free options available Each serving of these BBQ pork bowls has about 450 calories. You get around 30 grams of protein from the chicken or pork. The meal is also gluten-free and dairy-free, making it suitable for many diets. This balance of nutrients helps you stay full and energized throughout the day. To see the full recipe, check out the [Full Recipe]. To get the best flavor, marinate your chicken or pork with BBQ sauce. Use a large bowl for mixing. Make sure the meat is fully coated. You can use any brand of BBQ sauce you love. I suggest marinating for at least 30 minutes. For even better taste, marinate overnight in the fridge. This time helps the meat soak up all the flavors. When it’s time to cook, heat your grill or grill pan to medium-high. Remove the meat from the marinade, letting extra sauce drip off. Grill the chicken or pork for 5-7 minutes on each side. Use a meat thermometer to check the temperature. It should reach 165°F (75°C) to be safe. Once cooked, let the meat rest for a few minutes before slicing. This helps keep it juicy. Now, let’s cook the quinoa. Follow the package instructions for the best results. Once it’s done, fluff it with a fork and set it aside to cool. Next, grab a skillet and add olive oil over medium heat. Add corn and diced red bell pepper to the skillet. Sauté for about 5 minutes. You want them to be slightly charred but still crisp. Don’t forget to season with salt and pepper. This adds a nice touch to your bowls. To make meal prep easy, gather your ingredients ahead of time. Chop veggies and measure out grains like quinoa. This saves time during your cooking. I recommend cooking in batches, too. Make large amounts of protein and grains, then divide them into portions. This way, you can mix and match throughout the week. For a meal prep bowl that looks great, use colorful ingredients. Arrange items in sections. Place quinoa on one side, veggies on another, and protein in the center. This layered look makes your bowls inviting. Add a sprig of cilantro on top for a fresh touch. Vibrant containers also enhance the appeal. To reheat your BBQ pork meal prep bowls, use the microwave or oven. For the microwave, heat in short bursts. Stir the bowl after each burst for even warmth. If using an oven, cover the bowl with foil. This keeps moisture in and prevents drying out. Always check the temperature to keep flavors fresh and tasty. {{image_2}} You can easily swap out pork for other proteins. Turkey is a great choice. It has a mild flavor that pairs well with BBQ sauce. Tofu is another option. It soaks up flavors well and is plant-based. You can also try tempeh, which has a nutty taste. For BBQ sauce, you can change the flavor by adding honey or mustard. A spicy BBQ sauce can give your bowls a kick. If you want to change the grains, use rice, couscous, or farro. Brown rice adds a nutty taste. Couscous cooks quickly and is light. Farro has a chewy texture that’s nice. For a vegan meal, switch chicken for jackfruit or chickpeas. These options are high in fiber and protein. They also add a different texture to your meal prep bowls. Adding spices can boost the flavor of your dish. Try smoked paprika for a smoky taste. Cumin can add warmth and depth. For extra zest, squeeze fresh lime juice over your bowls. You can also mix in different sauces. Try ranch or a yogurt sauce to change the flavor profile. Top your bowls with crunchy toppings like nuts or seeds for added texture. To keep your BBQ pork meal prep bowls fresh, use airtight containers. Glass or BPA-free plastic works best. These containers help lock in flavor and moisture. If you plan to freeze, use freezer-safe containers. Avoid using regular plastic wrap, as it can tear easily. When storing in the fridge, place bowls on a middle shelf. This helps keep a steady temperature. Label containers with a date. This way, you know when to eat them. You can store BBQ pork meal prep bowls in the fridge for up to four days. In the freezer, they last about three months. Always check for spoilage before eating. Look for changes in color or smell. If you see any mold, toss it out. For frozen bowls, thaw them in the fridge overnight. This method keeps food safe. If you're in a hurry, use the microwave. Set it to defrost for quick results. When reheating, use the microwave or a skillet. If using a microwave, heat for two to three minutes. Stir halfway through to ensure even heat. If using a skillet, add a splash of water to keep things moist. Enjoy your meal! Yes, you can use various meats. Chicken thighs work great, but you can also try: - Beef brisket - Turkey breast - Tofu for a plant-based option - Pulled pork for a classic BBQ flavor Using different meats adds fun and variety to your meal prep. Each meat has its unique flavor and texture. Just remember to adjust cooking times to ensure everything cooks well. To keep quinoa fluffy, follow these tips: - Rinse the quinoa before cooking to remove the bitter coating. - Use a 1:2 ratio of quinoa to water for cooking. - Bring to a boil, then reduce to a simmer. - Cook uncovered until water is absorbed, about 15 minutes. - Let it sit covered for 5 minutes, then fluff with a fork. These steps help you achieve perfect, non-mushy quinoa. Leftover BBQ sauce is handy! Here are some creative uses: - Use it as a marinade for chicken or veggies. - Mix it into baked beans for added flavor. - Brush it onto grilled vegetables or meats. - Stir it into soups for a smoky taste. These ideas help you make the most of your BBQ sauce, reducing waste and boosting flavor. Customizing your meal prep bowls is easy! Here are some suggestions: - For gluten-free, ensure your BBQ sauce is gluten-free. - Swap quinoa for cauliflower rice for a low-carb option. - Add more veggies like spinach or zucchini for extra nutrients. - Choose different proteins like chickpeas for a plant-based meal. These options let you enjoy BBQ bowls that fit your dietary needs. For the full recipe, check out the detailed instructions above. In this post, we covered how to make BBQ pork meal prep bowls. We discussed the main ingredients like chicken or pork paired with quinoa, corn, and beans. I shared tips for marinating and cooking your protein, along with ways to customize your meal prep with add-ins. For storage, I offered best practices to keep your bowls fresh. Preparing these bowls can be both fun and satisfying. You gain tasty meals while saving time. Enjoy your cooking adventure!

BBQ Pork Meal Prep Bowls for Easy Weekly Meals

Looking for a simple way to spice up your weekly meals? BBQ Pork Meal Prep Bowls are your answer! Packed

- 8 oz (225g) linguine or spaghetti - 1 lb (450g) shrimp, peeled and deveined - 1 lb (450g) scallops, patted dry - 3 tablespoons olive oil - 3 cloves garlic, minced - 1 cup cherry tomatoes, halved - 1 teaspoon red pepper flakes - 1 lemon (zested and juiced) - 1 cup fresh spinach - Salt and pepper to taste - Fresh parsley, chopped The main ingredients bring the dish to life. I love using linguine or spaghetti for this recipe. The pasta holds the sauce well and pairs nicely with the seafood. The shrimp and scallops add a sweet, briny flavor that makes each bite special. For the additional ingredients, olive oil helps to sauté the seafood without burning. Garlic gives the dish a rich aroma. Cherry tomatoes add a fresh, juicy burst, while red pepper flakes offer a hint of heat. When it comes to seasonings, lemon brightens the dish. The zest adds a fragrant touch, while the juice balances flavors. Fresh spinach adds color and nutrients. Season with salt and pepper to enhance all the tastes. Lastly, parsley makes for a beautiful garnish and adds a fresh finish. You can find the full recipe for this delightful dish to guide you through each step of making it perfect at home! Start by boiling a large pot of salted water. Once it bubbles, add your linguine or spaghetti. Cook it until it's al dente, which means it should still have a little bite. This usually takes about 8 to 10 minutes, depending on the brand. Remember to reserve one cup of pasta water before draining. This starchy water helps the sauce stick to the pasta later. Use a large skillet for the seafood. Heat two tablespoons of olive oil over medium heat. Once it's hot, add the shrimp. Cook them for about 2 to 3 minutes on each side. They should turn pink and opaque. Remove the shrimp from the skillet and set them aside. For the scallops, add the remaining olive oil to the same skillet. Place the scallops in a single layer and avoid moving them for about 2 to 3 minutes. This helps them get a nice golden crust. Flip them and cook for another 2 minutes. In the same skillet, add minced garlic and red pepper flakes. Sauté for about 30 seconds. This will bring out their flavors. Next, add the halved cherry tomatoes. Cook them until they soften, around 3 to 4 minutes. This step makes the sauce richer and fuller. Lower the heat and add lemon juice and zest along with your cooked pasta. Toss everything together gently. If the sauce looks dry, add a bit of the reserved pasta water. This creates a light and tasty sauce. Next, stir in fresh spinach. Cook it just until it wilts, which takes only a minute. Now, gently fold in the sautéed shrimp and scallops. Season the dish with salt and pepper to your liking. If you want more heat, add more red pepper flakes. For serving, plate the pasta in shallow bowls. Garnish with chopped parsley and a lemon slice for color. Optional: drizzle a bit of extra olive oil for added flavor. Enjoy your seaside delight! - Preventing overcooked shrimp and scallops: Cook shrimp for 2-3 minutes until pink. Sear scallops for 2-3 minutes per side until golden. Remove them right away. If they look rubbery, they are overcooked. - Perfect sauce consistency: Start with garlic and red pepper flakes. Add cherry tomatoes next. Stir often. If the sauce is too thick, use some reserved pasta water. This adds flavor and helps blend everything. - Garnishing and plating: Serve in shallow bowls for a nice look. Add a sprinkle of parsley on top. A slice of lemon on the side brightens the colors and taste. Drizzle with olive oil for extra flavor. - Pairing recommendations: A light salad works well on the side. A chilled white wine, like Pinot Grigio, complements the seafood. Try sparkling water with lemon for a non-alcoholic option. - Overcooking the pasta or seafood: Cook pasta until just al dente. Check it a minute before the time on the package. For seafood, remember to remove it from heat right when it’s done. - Skipping reserved pasta water: Always keep some pasta water. It helps adjust the sauce. If your sauce looks dry, add a splash. This little step makes a big difference in flavor and texture. For the full recipe, check out the Seaside Delight Shrimp and Scallop Pasta ! {{image_2}} If you want to change things up, you can swap shrimp and scallops for other proteins. Chicken works great and is easy to find. For a plant-based option, try mushrooms or tofu. Both add texture without losing flavor. You can also try different pasta types. Penne or fettuccine are excellent choices. They hold sauce well and give a new twist to the dish. To spice things up, add more red pepper flakes. You can also try cayenne pepper for extra heat. If you prefer mild flavors, use less spice. Incorporating fresh herbs can enhance the taste. Basil or parsley brightens the dish. You can also add vegetables like bell peppers or zucchini for extra nutrition and color. For those needing gluten-free options, use gluten-free pasta. Many brands offer tasty choices that work well with this recipe. If you're avoiding dairy, skip any cheese in the dish. The lemon juice adds brightness and flavor without dairy. You can still enjoy every bite! After enjoying your shrimp and scallop pasta, store any leftovers in the fridge. Use airtight containers to keep the dish fresh. Glass or plastic containers work well for this. Allow the pasta to cool before sealing it. This helps prevent moisture build-up. To reheat, you can use a stovetop or microwave. I recommend the stovetop for the best texture. Just add a splash of water or olive oil to help it heat evenly. Stir gently to avoid burning. If using a microwave, cover the dish with a lid or a damp paper towel. This keeps the pasta from drying out. Heat in short bursts, stirring in between. If you want to save some for later, you can freeze the dish. Place it in a freezer-safe container. Make sure to leave some space for expansion. Freeze it for up to three months. When you're ready to eat, thaw it overnight in the fridge. Reheat gently on the stovetop or in the microwave until hot. Enjoy your delicious shrimp and scallop pasta again! For the complete recipe, check the Full Recipe section. You can easily scale the recipe. Just double or triple the ingredients. Keep the same cooking times for the pasta. For the seafood, cook in batches. This way, they will cook evenly. Yes, frozen shrimp and scallops work well here. Thaw them in the fridge overnight. You can also run cold water over them for a quick thaw. Pat them dry before cooking to avoid extra water in the pan. I suggest a fresh salad or garlic bread. A light, creamy soup pairs nicely too. For drinks, try a crisp white wine or sparkling water. These will balance the dish and enhance the meal. Perfectly cooked shrimp turn pink and opaque. They should curl into a C shape. Scallops should be golden brown on the outside. They should feel firm but not tough. This means they are ready to enjoy! For more details, check out the Full Recipe. In this blog post, we covered how to make a delicious shrimp and scallop pasta. We discussed ingredients, cooking steps, and tips to avoid common mistakes. You'll impress your friends with a perfect meal, using simple methods and fresh flavors. Remember to store leftovers properly and follow reheating tips to keep the taste. Enjoy experimenting with variations to suit your taste. Master this dish, and you'll have a go-to recipe for any occasion. Happy cooking!

Savory Shrimp and Scallop Pasta Delight Recipe

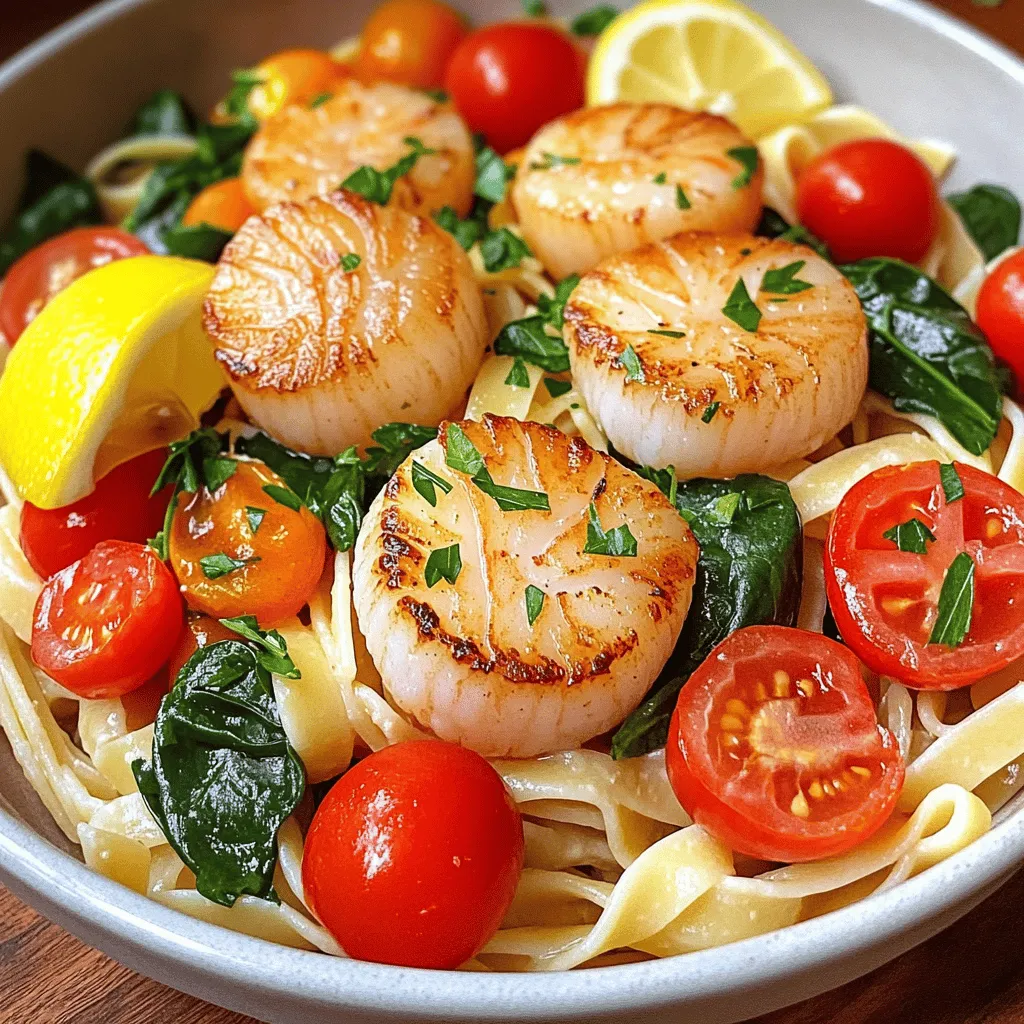
If you love pasta and seafood, this Savory Shrimp and Scallop Pasta Delight Recipe is for you! With tender shrimp

- 4 chicken thighs (bone-in, skin-on for flavor) - 1/4 cup soy sauce (low sodium) - 1/4 cup honey - 2 tablespoons sesame oil - 2 cloves garlic, minced - 1 tablespoon fresh ginger, grated - 1 tablespoon rice vinegar - 1/2 teaspoon black pepper - 1/2 teaspoon red pepper flakes (optional, for heat) - 2 green onions, finely chopped (for garnish) - Sesame seeds (for garnish) When making honey soy sauce chicken, each ingredient plays a key role. For the chicken, I recommend using four thighs. They have flavor and moisture. The soy sauce and honey form the base of the marinade, each at 1/4 cup. The sesame oil gives a nice nutty taste, so use two tablespoons. Garlic and ginger add freshness, with two cloves of garlic and one tablespoon of ginger. Rice vinegar helps balance the sweetness with one tablespoon. Use black pepper and red pepper flakes for a hint of spice. If you don’t have an ingredient, you can swap it. For soy sauce, low-sodium is best, but regular works too. If you need a sweeter option, you can use maple syrup instead of honey. For sesame oil, olive oil will also do. Fresh ginger can be replaced with ground ginger if that is what you have. If you prefer less heat, skip the red pepper flakes. You can also use chives instead of green onions for a different taste. To make a great honey soy sauce chicken marinade, start with a medium bowl. Add 1/4 cup of low sodium soy sauce. Then, mix in 1/4 cup of honey. Next, include 2 tablespoons of sesame oil. I love the flavor this oil adds to the mix. After that, add 2 minced garlic cloves and 1 tablespoon of grated fresh ginger. These ingredients give it a nice kick! Don’t forget to add 1 tablespoon of rice vinegar and 1/2 teaspoon of black pepper. If you want some heat, add 1/2 teaspoon of red pepper flakes. Finally, whisk everything together until it’s well combined. Now it’s time to marinate the chicken. Grab 4 chicken thighs, bone-in and skin-on for extra flavor. Place them in a Ziploc bag or a shallow dish. Pour the delicious marinade over the chicken. Make sure each piece gets coated. Seal the bag tightly or cover the dish with plastic wrap. I recommend marinating it in the fridge for at least 2 hours. For even better flavor, let it sit overnight. When you’re ready to cook, preheat your oven to 375°F (190°C). Take the chicken out of the marinade. Keep the marinade for basting later. Arrange the chicken thighs, skin-side up, on a lined baking sheet. Bake them for 35 to 40 minutes. Every 15 minutes, baste the chicken with the reserved marinade. This step keeps the chicken moist and tasty. When the chicken reaches 165°F (74°C) inside, it’s done. Let it rest for 5 minutes before slicing. For a nice touch, garnish with chopped green onions and sesame seeds. Enjoy your honey soy sauce chicken! You can find the Full Recipe for more details. To get the best flavor, always start with fresh ingredients. Use bone-in, skin-on chicken thighs. This adds extra taste and moisture. Make sure to whisk the marinade well. Each ingredient needs to blend together. Pour the marinade over the chicken in a plastic bag or dish. Seal it tight. Let it soak in the fridge for at least two hours. For even better taste, marinate overnight. This gives the chicken time to absorb all those great flavors. Basting is key! Every 15 minutes, brush the chicken with the leftover marinade while it cooks. This keeps the chicken juicy and full of flavor. If you like a little heat, add red pepper flakes. They give a nice kick without overpowering the dish. Also, don't skip the garnishes! Green onions and sesame seeds add a lovely touch. They look great on the plate and add a nice crunch. One big mistake is not marinating long enough. Short marinating times lead to bland chicken. Another common error is skipping the basting step. This can dry out the chicken. Make sure to check the chicken's temperature before serving. It should reach 165°F (74°C). Lastly, always let the chicken rest for a few minutes before slicing. This keeps the juices in and makes each bite more tender. For the full recipe, check the details provided earlier in the article. {{image_2}} If you want to mix things up, try different ingredients. You can swap regular soy sauce for tamari to make it gluten-free. For a sweeter note, use maple syrup instead of honey. If you're looking for a tangy twist, add orange juice or zest. You can also use chicken breast instead of thighs for a leaner option. To boost flavor, add more spices. Try a dash of five-spice powder for warmth. You can also blend in some hoisin sauce for an extra layer of depth. If you enjoy a bit of heat, increase the red pepper flakes. Fresh herbs like cilantro or basil can also brighten the dish. You can cook this chicken in two main ways: grilling or baking. Grilling gives a smoky flavor and crispy skin. Just marinate the chicken, then place it on a preheated grill. Cook it for about 6-8 minutes per side. Baking is perfect for a hands-off approach. After marinating, bake the chicken in the oven for 35-40 minutes. Both methods yield juicy, tasty results. For the full recipe, check out Honey Soy Glaze Chicken Delight. If you have leftover marinade, you can store it easily. Pour it into a clean jar. Seal it tightly with a lid. Keep it in the fridge. Use it within one week for the best flavor. Always check for any signs of spoilage before use. To store cooked chicken, let it cool to room temperature first. Place the chicken in an airtight container. You can also wrap it tightly in plastic wrap. Store it in the fridge for up to four days. If you want to keep it longer, consider freezing it. Freezing cooked chicken is simple. Cut the chicken into portions for easy use later. Wrap each piece in plastic wrap, then place it in a freezer bag. Squeeze out the air to prevent freezer burn. Label the bag with the date. You can freeze it for up to three months. When ready to eat, thaw it in the fridge overnight. Reheat it gently to enjoy its great taste again. You can marinate chicken for at least 2 hours. For the best flavor, let it sit overnight. The longer you marinate, the more the chicken absorbs those tasty flavors. This honey soy sauce gives a sweet and salty kick that really brings the chicken to life. Yes, you can use this marinade on other proteins. It works well with pork, tofu, and shrimp. Just remember to adjust the marinating time. Fish needs less time, about 30 minutes, while pork can use 2 to 4 hours. This versatility makes the marinade great for different meals! I love serving honey soy sauce chicken with rice or quinoa. Steamed veggies like broccoli or snap peas also pair nicely. You might also add a fresh salad on the side. The bright flavors of the sides balance the savory chicken. For more options, check the Full Recipe! This blog post covered all you need to know about making honey soy sauce chicken. We discussed the key ingredients and suggested substitutes to fit your taste. You learned the step-by-step guide for marinating and cooking the chicken perfectly. I shared tips to enhance flavor and avoid common mistakes. Remember, storage is crucial for leftovers, so use the tips provided. You can mix it up with variations, cooking methods, and side dishes. With this knowledge, you can create a delicious meal that impresses. Enjoy your cooking!

Honey Soy Sauce Chicken Marinade Flavorful Delight

Looking to elevate your chicken game? You’ve come to the right place! In this post, I’ll share my easy and

To make delicious carrot cake whoopie pies, gather these key ingredients: - 2 cups all-purpose flour - 1 teaspoon baking powder - 1 teaspoon baking soda - 1 teaspoon ground cinnamon - 1/2 teaspoon ground ginger - 1/2 teaspoon salt - 1 cup granulated sugar - 1 cup brown sugar, packed - 1 cup vegetable oil - 4 large eggs - 2 cups grated carrots (about 4 medium carrots) - 1/2 cup crushed pineapple, drained - 1 teaspoon vanilla extract For the cream cheese filling, you will need: - 8 oz cream cheese, softened - 1/4 cup unsalted butter, softened - 2 cups powdered sugar - 1 teaspoon vanilla extract - A pinch of salt When measuring ingredients, use dry measuring cups for flour and sugar. Level off the tops with a knife for accuracy. For liquids, use a liquid measuring cup and check the measurement at eye level. If you have allergens or dietary needs, here are some great swaps: - For gluten-free, use a gluten-free flour blend. - For a vegan option, replace eggs with flax eggs and use plant-based cream cheese. - Substitute vegetable oil with applesauce for a lighter version. These alternatives will keep your whoopie pies tasty and enjoyable for everyone! To make the batter for carrot cake whoopie pies, start by gathering all your ingredients. This helps keep things organized. 1. Preheat your oven to 350°F (175°C). Line your baking sheets with parchment paper. This prevents sticking. 2. In a medium bowl, whisk together the dry ingredients: flour, baking powder, baking soda, cinnamon, ginger, and salt. Set this bowl aside. 3. In a large mixing bowl, mix the granulated sugar, brown sugar, and vegetable oil. Beat in the eggs one at a time. This step adds moisture and richness. 4. Gradually add the dry ingredients to the wet ingredients. Mix until just combined. Be careful not to overmix. This keeps the pies soft. 5. Fold in the grated carrots, crushed pineapple, and vanilla extract. Ensure everything is mixed well. Following this order is key. It helps the batter rise and remain fluffy. Now it's time to bake the whoopie pies. 1. Use a cookie scoop or tablespoon to drop rounded scoops of batter onto the baking sheets. Leave about 2 inches between each scoop. 2. Bake in the preheated oven for 12-15 minutes. The edges should set, and the tops should spring back when touched gently. This shows they are done. 3. Remove the baking sheets from the oven and let the pies cool for 5 minutes. Then, transfer them to wire racks to cool completely. Checking for doneness is vital. If the tops spring back, your whoopie pies are ready. Enjoy the process, and soon you'll have delicious treats! To keep your whoopie pies moist, use fresh grated carrots and crushed pineapple. These ingredients add natural moisture. Mix them in gently to avoid overworking the batter. Overmixing can make them tough. Enhancing flavor profiles is easy! You can add a pinch of nutmeg or allspice for warmth. A splash of orange juice or zest can brighten the taste. Experiment with spices to find your favorite blend. Creative ideas for serving whoopie pies include stacking them on a tiered stand. This adds height and makes a great display. You can also serve them on a colorful platter for a festive vibe. For garnishing, dust the whoopie pies with powdered sugar for a sweet touch. A sprinkle of chopped walnuts or pecans adds crunch. You can also drizzle melted chocolate over the top for an extra treat. Enjoy making these delightful treats! For the complete recipe, check out the Full Recipe section. {{image_2}} You can add spices to your carrot cake whoopie pies for extra warmth. Try adding: - 1/4 teaspoon nutmeg - 1/4 teaspoon allspice - 1/2 teaspoon vanilla extract These spices bring a rich flavor that many love. You can also switch up the filling. Instead of cream cheese, consider: - Chocolate ganache - Lemon curd - Fruit preserves Each choice gives a new twist to the classic whoopie pie. To make carrot cake whoopie pies healthier, you can make a few simple swaps. Use: - Whole wheat flour instead of all-purpose flour - Applesauce in place of some oil These changes add fiber and lower fat. If you want vegan whoopie pies, substitute: - Flax eggs (1 tablespoon flaxseed meal + 2.5 tablespoons water per egg) - Coconut cream for the cream cheese These options keep the flavor while fitting different diets. For the full recipe, check the details above. To keep your whoopie pies fresh, store them in an airtight container. Place a piece of parchment paper between layers to avoid sticking. This helps maintain their soft texture. Keep them at room temperature for up to three days. If you want them to last longer, try refrigerating them. They can stay fresh in the fridge for about a week. Freezing whoopie pies is simple. Let them cool completely after baking. Wrap each pie in plastic wrap or foil. This prevents freezer burn. Place wrapped pies in a freezer bag or container. They will stay good for up to three months in the freezer. To thaw, take them out and leave them at room temperature for about 30 minutes. You can also use the microwave for a quick thaw. Just heat them for 10-15 seconds. After thawing, enjoy them as is or add a touch of frosting if you like. For serving after freezing, consider dusting them with powdered sugar. This adds a nice touch and makes them look great! Can I make these ahead of time? Yes, you can make whoopie pies ahead of time. Bake the cookies and let them cool. Store them in an airtight container for up to three days. You can also freeze the cookies for later use. Just remember to fill them with cream cheese filling right before serving. What can I substitute for cream cheese filling? If you want a different filling, try mascarpone cheese. It's creamy and has a mild taste. You can also use whipped cream or a dairy-free cream cheese for a lighter option. This keeps the flavor fun and fresh. What should I do if my whoopie pies are too dry? If your whoopie pies are dry, check your oven temperature. It may be too hot. Also, ensure you measure your ingredients correctly. Adding a bit more oil or mashed banana can help keep them moist too. Why did my pies spread too much while baking? Whoopie pies may spread too much if the batter is too warm. Make sure you chill the dough for about 30 minutes before baking. Also, be careful not to overmix the batter. This will help keep their shape. What beverages pair well with carrot cake whoopie pies? Carrot cake whoopie pies taste great with coffee or tea. A tall glass of milk is a classic choice too. For a twist, try pairing them with a spicy chai latte. Occasions to enjoy whoopie pies? These whoopie pies are perfect for birthdays, picnics, and holiday gatherings. They also make great treats for bake sales or just a cozy night in. Enjoy them anytime you crave something sweet! In this post, I covered everything about whoopie pies, from key ingredients to variations. We explored how to measure, mix, and bake for the best results. With tips on texture, flavor, and storage, you now have all you need to create these treats. Don't forget to try different flavors or adaptations! Enjoy making and sharing whoopie pies, and remember that practice makes perfect. Happy baking!

Carrot Cake Whoopie Pies Delicious and Easy Recipe

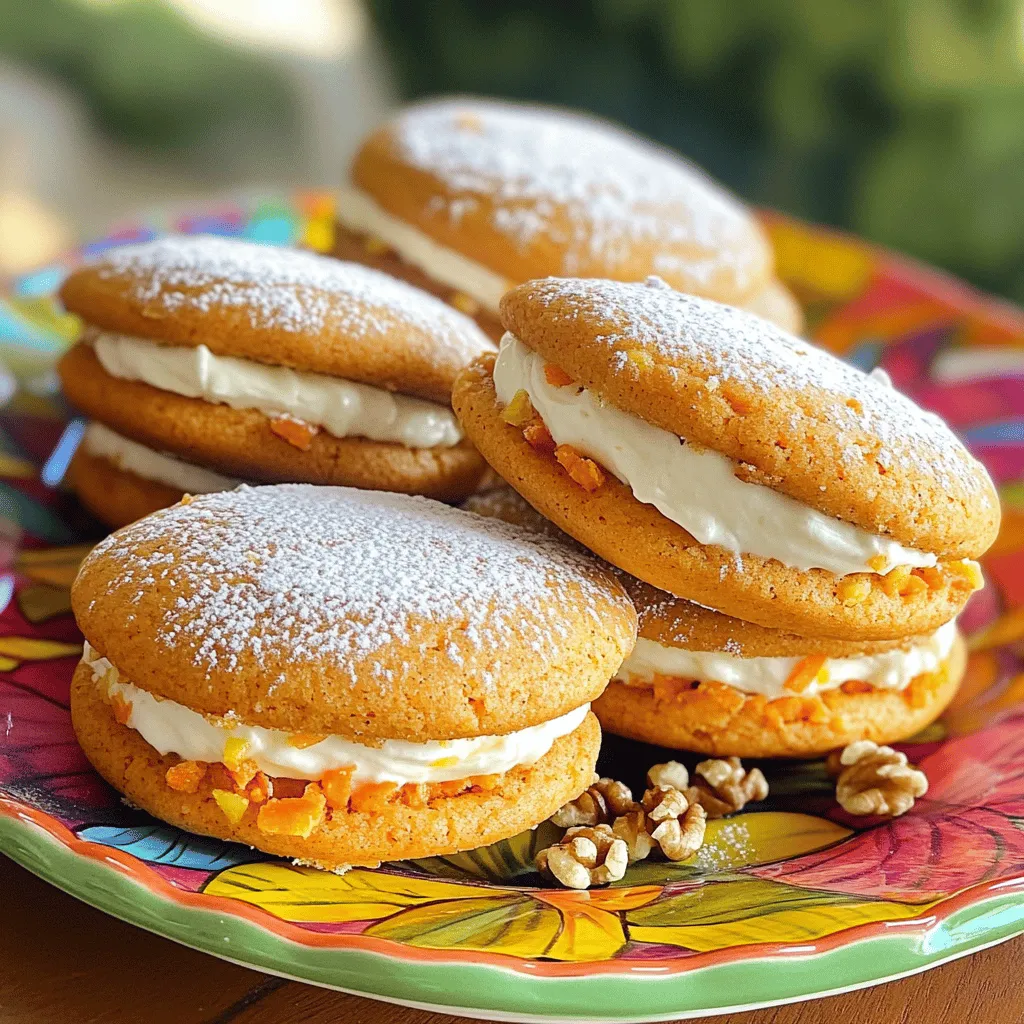
Craving something sweet and unique? Carrot Cake Whoopie Pies blend the classic flavors of carrot cake into fun, chewy treats.

Older posts
Newer posts
← Previous Page1 … Page50 Page51 Page52 … Page60 Next →

dsad

© 2025 flavorsprint • Built with GeneratePress

Our Policies

  • Copyright Policy
  • Cookie Policy
  • GDPR Policy
  • Privacy Policy
  • Disclaimer
  • Terms Of Use

More Information

  • Home
  • About
  • Contact
  • Appetizers
  • Dessert
  • Dinner
  • Drinks
©2025, flavorsprint About Back To Top