Skip to content
DisclaimerTerms Of UseGDPR PolicyCookie Policy

flavorsprint

  • Home
  • Drinks
  • Appetizers
  • Dinner
  • Dessert
  • About
  • Contact
  • Privacy Policy
DisclaimerTerms Of UseGDPR PolicyCookie Policy

Lillian

- 2 cups cooked rice (white or brown) - 2 cups shredded cooked chicken (rotisserie chicken works great) - 1 large onion, thinly sliced - 2 tablespoons butter - 3 cloves garlic, minced - 2 cups beef broth (low sodium) - 1 teaspoon dried thyme - 1 teaspoon dried rosemary - 1 cup shredded Gruyère cheese (or Swiss cheese) - 1 cup heavy cream - Salt and pepper to taste - Fresh parsley, chopped (for garnish) For this French Onion Chicken Rice Bake, I love using cooked rice as my base. You can use white or brown rice, whatever you have on hand. Next, shredded chicken makes it easy. I often grab a rotisserie chicken for this. It's quick and adds great flavor. The onions are key. When you thinly slice one large onion and cook it, it becomes sweet and savory. The magic happens when you caramelize them in butter. Add minced garlic to the mix for even more flavor. Now, let’s talk about beef broth. I use low-sodium broth to control the salt level. This keeps our bake tasty but not too salty. We can't forget the seasonings! Dried thyme and rosemary add depth. Gruyère cheese melts beautifully and gives a rich taste. I also use heavy cream for creaminess. Remember to season with salt and pepper to your liking. Finally, a sprinkle of fresh parsley makes it pretty! You can find the full recipe for this dish at the end of the article. - Preheat the oven to 375°F (190°C). - In a large skillet, melt 2 tablespoons of butter over medium heat. - Add 1 large, thinly sliced onion to the skillet. Cook the onion, stirring often. - Keep cooking until the onions turn caramelized and golden brown. This takes about 15-20 minutes. - In the last minute, stir in 3 cloves of minced garlic. Season with salt and pepper. - In a large mixing bowl, combine 2 cups of cooked rice, 2 cups of shredded chicken, and the caramelized onions. - Pour in 2 cups of beef broth and 1 cup of heavy cream. - Add 1 teaspoon of dried thyme and 1 teaspoon of dried rosemary. - Mix well and stir in half of the 1 cup of shredded cheese. - Transfer the mixture into a greased 9x13-inch baking dish. Spread it out evenly. - Sprinkle the remaining cheese on top. - Cover the dish with aluminum foil. Bake in the preheated oven for 25 minutes. - After 25 minutes, remove the foil. Bake for an additional 15-20 minutes, until the cheese is bubbly and golden. - Let it sit for 5 minutes before serving. Garnish with fresh parsley. This dish is not just tasty; it fills the kitchen with warm, inviting smells. For the full recipe, check out the previous section! How to properly caramelize onions To get sweet, golden onions, slice them thin. Use a large skillet and melt butter over medium heat. Add onions and stir often. Cook for 15-20 minutes. When they turn a deep brown, add minced garlic. This brings out the flavor. Season with salt and pepper. Choosing the right type of chicken I love using rotisserie chicken for this dish. It saves time and adds great taste. You can also cook your chicken at home. Just bake or boil it until done. Shred it and add to the rice bake. Suggested herbs and spices to use Dried thyme and rosemary work great in this dish. They add warmth and depth. You can also try sage or oregano for a new twist. Fresh herbs like parsley make it bright. Add them just before serving for the best flavor. Best cheese alternatives Gruyère cheese gives a nice melt and flavor. If you can’t find it, Swiss cheese is a good choice. Cheddar adds sharpness, while mozzarella keeps it mild. Use what you have and experiment! Garnishing suggestions Fresh parsley adds color and a fresh taste. Chop it finely and sprinkle it on top. You can also add crispy onion bits for crunch. A drizzle of olive oil makes it shine. Serving ideas Serve this bake with a simple side salad. A green salad with vinaigrette is perfect. You can also pair it with some crusty bread. This makes for a cozy family meal. For the full recipe, visit [Full Recipe]. {{image_2}} You can change the rice type in this bake. Both white and brown rice work well. If you want to try something fun, use wild rice or quinoa. These options add great texture and flavor. For the broth, beef broth is classic, but you can swap it out. Use vegetable broth for a lighter taste. This keeps the dish tasty while making it vegetarian-friendly. Add extra veggies for a boost of taste. Mushrooms work great in this recipe. You can also toss in bell peppers, spinach, or carrots. These add color and nutrients. Cheese blends can change the whole vibe. Gruyère is delicious, but try mozzarella or cheddar too. Mixing two or more types can create a rich, creamy layer of flavor. If you prefer slow cooking, this dish adapts easily. Just combine all the ingredients in your slow cooker. Let it cook on low for about 6 hours. It will be lovely and warm when done. You can also make this in an Instant Pot. Cook on high pressure for 10 minutes. Let it release naturally for 5 minutes before serving. This method saves time and keeps everything moist. For more details, you can check the Full Recipe. To store leftovers, let the dish cool down first. Place it in an airtight container. This keeps the flavors fresh. You can refrigerate it for up to three days. Make sure to check for any signs of spoilage before eating. Freezing is a great way to save extra portions. Start by letting the dish cool completely. Portion it into freezer-safe containers or bags. Be sure to label them with the date. You can freeze the dish for up to three months. To thaw, move it to the fridge overnight. When you’re ready to enjoy it again, the best way to reheat is in the oven. Preheat it to 350°F (175°C). Cover the dish with foil to keep it moist. Heat for about 20-25 minutes. You can also use a microwave for quick reheating. Just be sure to add a splash of broth or cream to keep it flavorful. Enjoy each bite like the first time! If you want a lighter option, try using half-and-half. It gives a nice creaminess but with less fat. You can also mix one cup of milk with two tablespoons of butter for a similar effect. This mix keeps the flavor rich without being too heavy. Yes, you can use uncooked chicken. Just make sure to cut it into small pieces. You will need to increase the cooking time. Bake it covered for about 40 minutes, then check if it's fully cooked. Chicken should reach an internal temp of 165°F (75°C). The dish is ready when the cheese is bubbly and golden brown on top. You can also check the rice. It should be soft and hot throughout. If you see steam rising when you cut into it, that’s a good sign too. Yes, you can prepare this dish in advance. Just follow the recipe, but do not bake it right away. Cover it tightly and keep it in the fridge for up to 24 hours. When you’re ready, bake it as directed. This makes it easy for busy days. For the full recipe, refer to the earlier section. This dish combines cooked rice, chicken, and caramelized onions for a cozy meal. You prepare it in simple steps and can customize it with different flavors and ingredients. Tips help you elevate the taste and ensure a great presentation. You can also store leftovers easily for future meals. Enjoy experimenting with this recipe, and make it your own. You’ll love how comforting and delicious it is!

French Onion Chicken Rice Bake Comforting Family Dish

Looking for a cozy family meal that warms your heart and fills your belly? This French Onion Chicken Rice Bake

To make your salmon and shrimp dish shine, you need key ingredients. Here’s what you’ll need: - 2 salmon fillets - 8 oz shrimp, peeled and deveined - 4 cloves garlic, minced - 1 tablespoon olive oil - 1 tablespoon butter - 1 lemon, juiced (about 2 tablespoons) - 1 teaspoon paprika - Salt and pepper to taste - Fresh parsley, chopped (for garnish) These ingredients work together to create a rich and flavorful sauce. The garlic adds a bold taste, while the lemon brightens the dish. You can also add a few optional ingredients to take your dish to the next level: - Red pepper flakes for heat - Fresh herbs like thyme or dill for added aroma - A splash of white wine for depth - Grated Parmesan cheese for creaminess These extras allow you to customize your dish based on your taste. Feel free to experiment! If you don’t have all the ingredients, don’t worry! Here are some easy swaps: - Use tilapia or cod instead of salmon. - Any cooked shrimp can replace the raw ones. - Substitute garlic with garlic powder (1/4 teaspoon per clove). - Lemon juice can be swapped with lime juice. These substitutes ensure you can still create a tasty meal even with limited ingredients. For the full recipe, check out the Salmon & Shrimp Delight with Garlic Sauce. First, take your salmon fillets and pat them dry with paper towels. This step helps the skin get crispy. After that, sprinkle salt, pepper, and paprika on both sides of the fillets. Use just enough to add flavor without overpowering the fish. Next, heat a large skillet over medium heat. Add olive oil and butter to the pan. Wait for the butter to melt before adding the salmon fillets, skin-side down. Cook for about 4 to 5 minutes. This will make the skin crispy. After that, carefully flip the salmon fillets. Add the minced garlic to the skillet. Let it cook for another 3 to 4 minutes. The salmon should be cooked through and flaky. Once the salmon is done, take it out and keep it warm on a plate. In the same skillet, add the shrimp. Cook the shrimp for 2 to 3 minutes. They should turn pink and be fully cooked. Squeeze fresh lemon juice over the shrimp. Stir well to mix the flavors. Cook for another minute, then you are ready to serve. To serve, place the salmon on a plate. Top it with the garlic shrimp and drizzle the sauce from the skillet over the top. Finish with fresh parsley to add color and freshness. Enjoy this dish hot for the best taste. You can find the full recipe for Salmon & Shrimp Delight with Garlic Sauce in the article. To get crispy salmon skin, start with dry fillets. Pat them with paper towels. This step removes moisture for better crisping. Season the skin with salt and paprika. Heat your skillet before adding the fish. When the oil and butter are hot, place the salmon skin-side down. Cook it without moving for 4-5 minutes. This allows the skin to crisp up nicely. Flip it gently to avoid tearing. The skin should be golden and crispy. Sautéing shrimp is quick and easy. Use medium heat to cook them evenly. Start by adding the shrimp to the hot skillet. Cook for 2-3 minutes until they turn pink. Don't overcrowd the pan; this helps them cook well. Stir occasionally to ensure even cooking. Once they are done, squeeze lemon juice over them. This adds brightness to the flavor. Remove them from the pan promptly to avoid overcooking. Pair your salmon and shrimp with fresh herbs. Chopped parsley adds a nice touch. Other herbs like dill or cilantro work well too. For a spicy kick, sprinkle red pepper flakes. Serve with lemon wedges for extra zest. A simple side of rice or a salad complements the dish nicely. You can also try garlic bread for a cozy meal. For the full recipe, check out the detailed instructions provided above. {{image_2}} You can add heat to this dish. Mix in red pepper flakes or hot sauce. Use one teaspoon of red pepper flakes for a mild kick. For more heat, double that amount. This change wakes up the flavors and excites your taste buds. You’ll enjoy a bold flavor that complements the garlic. If you love creamy sauces, this option is for you. Add heavy cream to the garlic sauce. Start with 1/4 cup and stir it in after you cook the shrimp. This makes the sauce rich and smooth. It pairs perfectly with the salmon and shrimp. You can also use Greek yogurt for a lighter option. Want to add more nutrition? Toss in some veggies. Good choices are spinach, bell peppers, or zucchini. Add them when you cook the shrimp. This keeps the veggies crisp and bright. They add color and important nutrients to your meal. You can modify the recipe while keeping it delicious. For the complete instructions, refer to the Full Recipe. To store your leftover salmon and shrimp, let them cool first. Place the food in an airtight container. You can keep it in the fridge for up to three days. Make sure to separate the salmon and shrimp from the sauce if you can. This helps keep the texture nice. When reheating, the goal is to keep the fish moist. Place the salmon and shrimp in a skillet. Add a splash of water or broth to help with moisture. Heat on low for about 5 minutes. Stir gently until warmed through. Avoid the microwave, as it can dry out the fish. If you want to freeze the dish, do it right after cooking. Wrap the salmon and shrimp tightly in plastic wrap. Then, place them in a freezer bag. Make sure to squeeze out as much air as possible. This can last up to three months. When you’re ready to eat, thaw it in the fridge overnight before reheating. Cooking salmon and shrimp takes about 15 to 20 minutes. First, season the salmon and cook it for 4 to 5 minutes on one side. Then, flip it for another 3 to 4 minutes. For shrimp, just 2 to 3 minutes is enough. They turn pink when done. Yes, you can use frozen shrimp. Just thaw them first. Place the shrimp in cold water for about 10 minutes. Once thawed, pat them dry before cooking. This helps them cook evenly and taste better. This dish pairs well with several sides. Try serving it with: - Steamed rice - Quinoa - Garlic bread - Fresh salad - Roasted vegetables These sides balance the rich flavors of salmon and shrimp. You can find the full recipe for Salmon & Shrimp Delight with Garlic Sauce in the earlier sections of this article. It includes all the steps to make this tasty dish. This article covered how to cook a tasty salmon and shrimp dish. I shared key ingredients and steps, plus tips for perfecting textures and flavors. You learned about spicy and creamy variations to mix it up. We discussed how to store leftovers and best reheating methods. Cooking this dish can be simple but satisfying. Enjoy your time in the kitchen!

Savory Salmon Shrimp Garlic Sauce Simple Recipe

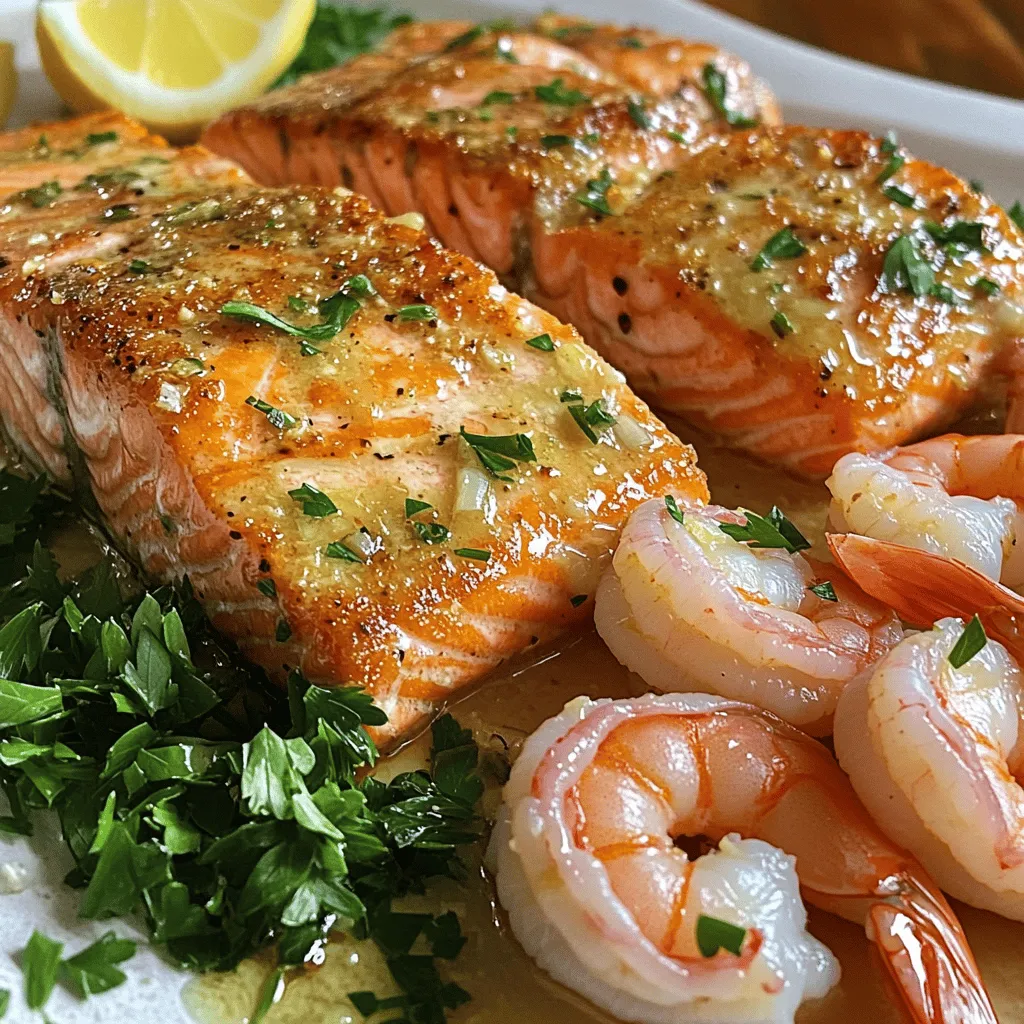
Ready to elevate your dinner game? This simple recipe for Salmon Shrimp Garlic Sauce packs a punch of flavor that’s

Chinese Five Spice Powder has five key spices. Each spice brings a unique flavor. Here is what you need: - 1 tablespoon star anise, whole - 1 tablespoon cloves, whole - 1 tablespoon Sichuan peppercorns - 1 tablespoon fennel seeds - 1 tablespoon cinnamon, ground Star anise gives a sweet and licorice flavor. Cloves add warmth and depth. Sichuan peppercorns create a tingling sensation. Fennel seeds offer a hint of sweetness. Cinnamon rounds it out with warmth. The usual ratio is one tablespoon of each spice. This mix creates a balanced flavor. You can adjust this based on your taste. Want more sweetness? Add more star anise or fennel seeds. Prefer warmth? Increase the cloves or cinnamon. Feel free to personalize your blend. You might add ginger for a spicy kick. Some people enjoy a touch of nutmeg for warmth. If you like heat, consider adding dried chili flakes. Experiment to find your perfect mix! For the full recipe, check out the Homemade Chinese Five Spice Powder section. To make Chinese Five Spice Powder, start with the right spices. You need: - 1 tablespoon star anise, whole - 1 tablespoon cloves, whole - 1 tablespoon Sichuan peppercorns - 1 tablespoon fennel seeds - 1 tablespoon cinnamon, ground In a dry skillet, add the whole star anise, cloves, Sichuan peppercorns, and fennel seeds. Use medium heat for this step. Toast the spices for about 3-5 minutes. Stir them often. You want them to become aromatic but not burnt. This step is crucial. Toasting brings out the flavors. Once done, remove the skillet from heat. Let the spices cool for a few minutes. After your spices cool, it’s time to grind them. Add the toasted spices and the ground cinnamon into a spice grinder or use a mortar and pestle. Grind until you have a fine powder. Once you achieve the right texture, store it. Transfer the ground spice mix into an airtight container. Keep it in a cool, dark place. It can last for several months. For the full recipe, check out the details above. Using Chinese Five Spice Powder can elevate your dishes. Start by adding it early during cooking. This lets the flavors mix well with other ingredients. You can use it in marinades, stir-fries, and soups. A little goes a long way, so start small. I suggest using half a teaspoon for most recipes. You can always add more if needed. One common mistake is adding too much spice. It can overpower your dish. Always taste as you cook. If you use Five Spice Powder in sweet dishes, balance it with sugar or honey. Another mistake is not toasting the spices. Toasting brings out the flavor and aroma. Follow the steps in the Full Recipe for the best results. To enhance flavors, mix Five Spice Powder with other spices. Pair it with garlic and ginger for a classic taste. Consider using it with soy sauce for a savory kick. You can also add it to roasted vegetables or meats. Don't forget to experiment and find your favorite combinations. {{image_2}} If you can't find one spice, don't worry. You can swap it out with something else. For star anise, use anise seeds or a bit of nutmeg. Instead of cloves, try allspice or cinnamon. If you need Sichuan peppercorns, regular black pepper works in a pinch. Fennel seeds can be replaced with dill seeds. Each swap will change the flavor, but it can still taste great. Some people love bold flavors, while others prefer mild ones. To make five spice powder milder, use less Sichuan peppercorn. You can also balance it by adding more ground cinnamon. For a spicier blend, increase the amount of Sichuan peppercorns. You can always mix small amounts until you find your perfect blend. Taste as you go to get the right flavor. Different regions have their own takes on five spice powder. In southern China, you might find more fennel and less star anise. Northern blends often use black pepper instead of Sichuan peppercorns. Some blends even add ginger or cardamom for a twist. Each version tells a story of local tastes and traditions. You can explore these variations in your cooking, making each dish unique. For a classic mix, try the recipe for homemade Chinese five spice powder. To keep your Chinese five spice powder fresh, store it in an airtight container. This helps prevent moisture and air from ruining its flavor. Choose a dark, cool place, like a pantry or cupboard. Avoid direct sunlight and heat, which can fade the spices quickly. A good rule is to use the powder within six months to a year for the best taste. You can tell if your five spice powder is old by its smell and taste. If it lacks a strong aroma, it may be time to toss it. A weak flavor means it's no longer fresh. You should also check for any clumping, which can happen if moisture gets in. If it clumps or smells off, it's best to replace it. Use glass jars or metal tins with tight seals for storage. These containers protect the spices from air and humidity. Label your containers with the date you made the spice mix. This helps you keep track of freshness. Remember, the right environment keeps the flavors alive. Store away from stoves or ovens where heat can sneak in. For a homemade version, check out the Full Recipe for a delightful blend! Chinese Five Spice Powder is a blend of five key spices. It usually includes: - Star anise - Cloves - Sichuan peppercorns - Fennel seeds - Ground cinnamon These spices create a warm, sweet, and spicy flavor. Each spice adds its unique taste, making the blend rich and complex. You can use Chinese Five Spice in many dishes. It works well in: - Marinades for meats - Stir-fries with vegetables - Soups for added depth - Rice dishes for flavor Start with a small amount. You can always add more if needed. It pairs nicely with soy sauce and ginger. Yes, you can easily make this blend at home. I recommend using the recipe for Homemade Chinese Five Spice Powder. You will need to toast the spices first, then grind them to a fine powder. This process brings out their flavors. Chinese Five Spice Powder has several health benefits. It can help with: - Digestion, thanks to fennel - Reducing inflammation with cloves - Boosting circulation from Sichuan peppercorns These spices offer a mix of flavor and health. Adding them to your meals can enhance both taste and wellness. In this article, we covered what Chinese five spice powder is, its key ingredients, and how to make it. I shared step-by-step instructions for preparation and storage. You learned tips to avoid common mistakes and enhance your dishes. We also discussed variations and substitutes to fit your taste. Always remember that this spice can transform your meals. Enjoy exploring the unique flavors of five spice powder in your cooking!

Chinese Five Spice Powder Flavorful Culinary Boost

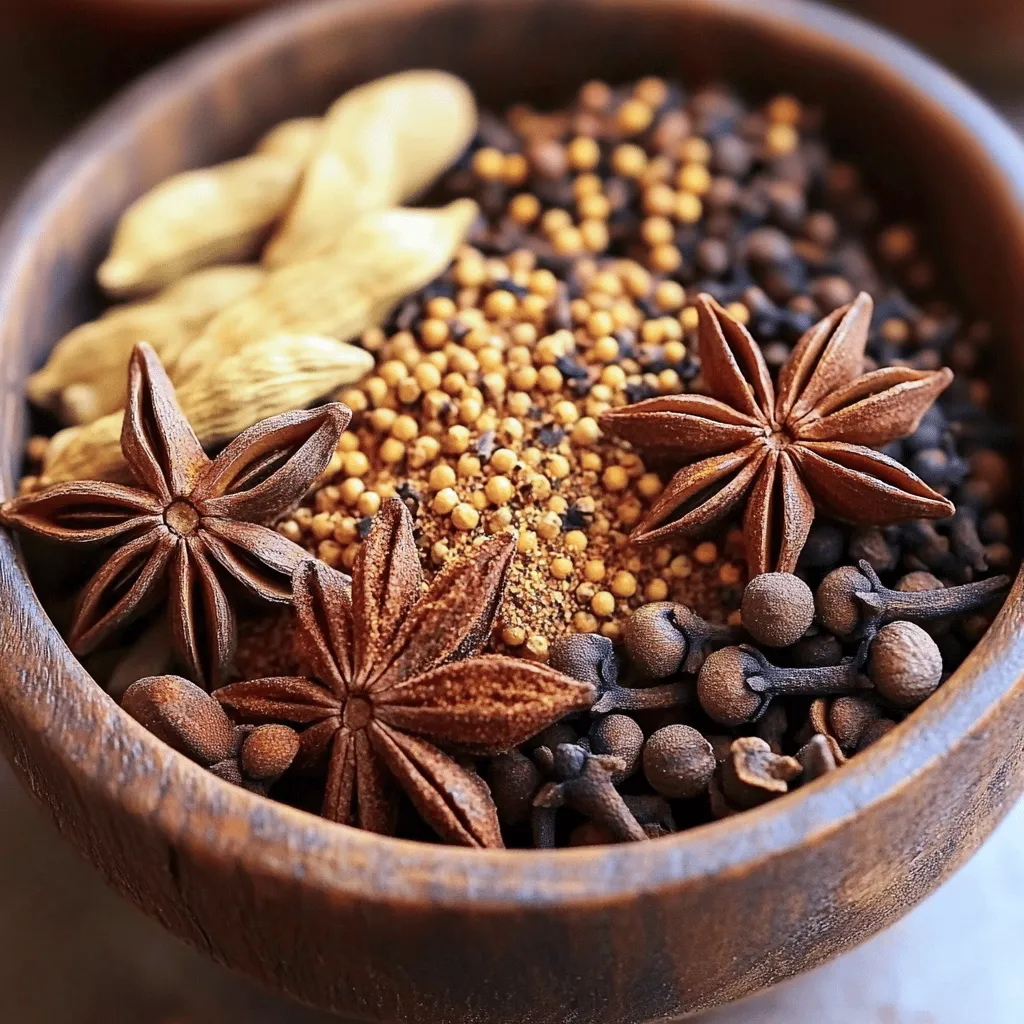
Are you ready to elevate your cooking game? Chinese Five Spice Powder is a blend of flavors that can make

- 4 boneless, skinless chicken breasts - 1 cup grated Parmesan cheese - 1 cup panko breadcrumbs - 2 cloves garlic, minced - 2 tablespoons fresh parsley, chopped - 1 teaspoon Italian seasoning - 1/2 teaspoon black pepper - 1/2 teaspoon salt - 1/4 cup all-purpose flour - 2 large eggs, beaten - Olive oil or cooking spray for baking When I prepare Parmesan crusted chicken, I focus on fresh ingredients. The chicken breasts should be boneless and skinless for easy cooking. I love using grated Parmesan cheese for its rich flavor. Panko breadcrumbs add a great crunch to the dish. Garlic gives it a nice kick, while parsley adds freshness. Italian seasoning, black pepper, and salt enhance the overall taste. Flour helps the coating stick, and eggs bind everything together. For a healthier touch, you can use olive oil or cooking spray to bake the chicken. This dish is not just simple; it’s packed with flavor. Enjoy the process of gathering these ingredients for a delicious meal! - Calories per serving: Approximately 400 - Protein: 34 grams - Fat: 20 grams - Carbohydrates: 20 grams - Dietary notes: You can use gluten-free breadcrumbs for a gluten-free option. This meal is filling and nutritious. Each serving delivers high protein, making it great for muscle repair. The fat content mainly comes from the cheese and oil. If you're watching carbs, this dish fits well into a balanced diet. To begin, you need to prepare the chicken breasts. Take four boneless, skinless chicken breasts. Rinse them under cold water. Then, place them on a clean cutting board. Use a paper towel to pat them dry. This is important because moisture can make the crust soggy. Dry chicken helps the coating stick better. Now, let’s set up the dredging station. You need three shallow dishes. In the first dish, put 1/4 cup of all-purpose flour. In the second dish, add two large beaten eggs. In the third dish, mix together 1 cup of grated Parmesan cheese, 1 cup of panko breadcrumbs, minced garlic, chopped parsley, Italian seasoning, black pepper, and salt. Coat each chicken breast in flour first. Shake off any extra flour. This keeps the coating light. Next, dip the floured chicken in the eggs. Make sure it is fully coated. Finally, press the chicken into the Parmesan breadcrumb mixture. Coat both sides well for a crunchy crust. Preheat your oven to 400°F (200°C). Lightly grease a baking sheet with olive oil or cooking spray. Place the coated chicken breasts on the baking sheet. Space them evenly to ensure even cooking. Drizzle a little olive oil over each piece for extra crispiness. Bake the chicken for 25 to 30 minutes. Check for doneness by cutting into the thickest part. The chicken should be cooked through and the crust should be golden brown. This is how you achieve a delicious, crunchy Parmesan crust. For more details, see the Full Recipe. To get a nice, crispy crust on your Parmesan crusted chicken, use panko breadcrumbs. They are lighter and crunchier than regular breadcrumbs. - Technique for Crispiness: Press the chicken firmly into the panko mix. This step makes sure the crust sticks well. - Panko vs. Regular Breadcrumbs: Panko has larger flakes, which add more texture. Regular breadcrumbs can make the crust dense and less crispy. Thaw your chicken properly for the best results. - Best Practices for Thawing Chicken: Always thaw in the fridge overnight. This keeps the chicken safe and maintains its flavor. - Recommended Marinating Methods: For added flavor, marinate the chicken in olive oil and herbs for at least 30 minutes. Pair your chicken with tasty side dishes to make a complete meal. - Ideas for Side Dishes: Roasted vegetables, mashed potatoes, or a fresh salad work great. - Garnishing Techniques for Presentation: Add fresh parsley or lemon slices on the side. This adds color and invites people to dig in. For the full recipe, you can refer to the complete instructions. {{image_2}} You can change the taste of Parmesan crusted chicken by adding herbs and spices. Try mixing in some dried oregano or thyme for a fresh twist. You can also use smoked paprika for a warm flavor. If you want a spicy kick, add a dash of cayenne pepper or crushed red pepper flakes. When it comes to cheese, Parmesan isn't the only option. You can use Pecorino Romano for a sharper taste. For a milder flavor, try using mozzarella or even cheddar. Each cheese brings a unique flavor profile. Feel free to experiment with blends to find your favorite. You can cook Parmesan crusted chicken in different ways. An air fryer gives you a quick option. Preheat your air fryer to 375°F (190°C). Place the coated chicken in the basket, leaving space between pieces. Cook for about 15-20 minutes. Check for a golden crust and doneness. If you prefer stovetop cooking, heat some olive oil in a skillet over medium heat. Cook the chicken for about 5-7 minutes on each side. This method gives you a nice, crispy crust. It’s a great option if you want to keep things quick and delicious. If you need gluten-free options, substitute panko with gluten-free breadcrumbs. These work just as well for that crispy coating. You can also use crushed nuts, like almonds or walnuts, for a different texture and flavor. For a healthier version, try baking instead of frying. You can use less oil and still achieve a crispy crust. Another option is to use skinless chicken thighs for more flavor and tenderness while still keeping it healthy. These small changes make a big difference in nutrition. For the full recipe, check out the [Full Recipe]. To keep your Parmesan crusted chicken fresh, store leftovers promptly. Place the chicken in an airtight container. This helps keep moisture in and prevents drying. Use glass or plastic containers with tight lids for best results. Make sure the chicken cools before sealing. You can keep it in the fridge for up to three days. When it's time to enjoy leftovers, reheating is key. The oven is the best method for keeping that crispy crust. Preheat your oven to 350°F (175°C). Place the chicken on a baking sheet and heat for about 10-15 minutes. If you must use a microwave, do so with caution. Microwaves can make the crust soggy. Try covering the chicken with a paper towel to help retain some moisture. If you want to save some for later, freezing is a great option. For unbaked chicken, wrap each piece tightly in plastic wrap. Then, place them in a freezer bag. You can freeze it for up to three months. For baked chicken, let it cool completely before freezing. Wrap it the same way as unbaked. When ready to cook, thaw it overnight in the fridge before reheating. This helps ensure even cooking and keeps it juicy. How long to bake Parmesan crusted chicken? You should bake Parmesan crusted chicken for 25 to 30 minutes. The chicken is done when it reaches 165°F (75°C) inside. A golden crust shows it's ready and crispy. Can I make this recipe ahead of time? Yes, you can prep the chicken ahead. Coat it, then cover and refrigerate for a few hours. Bake it when you’re ready to eat. This saves time for busy days. What should I serve with Parmesan crusted chicken? This chicken pairs well with many sides. Try roasted vegetables or a fresh salad. Mashed potatoes or rice also make good options. Keep it colorful and tasty! Can I use chicken thighs instead of breasts? Absolutely! Chicken thighs work well for this dish. They stay juicy and tender during cooking. Just adjust the baking time slightly if they are thicker. What’s the best way to season the chicken? I suggest using salt and pepper as a base. You can add any herbs you like. Italian seasoning complements the cheese well. A simple garlic rub also adds great flavor. Is Parmesan crusted chicken healthy? Parmesan crusted chicken can be a healthy choice. Chicken is high in protein and low in carbs. Just watch the cheese and breadcrumbs if you’re counting calories. Can this recipe be made keto-friendly? Yes, you can easily make it keto-friendly. Use almond flour instead of regular flour. Choose low-carb breadcrumbs for the crust. This keeps the taste while lowering carbs. Check the [Full Recipe] for all the details! This post covered how to make Parmesan crusted chicken. You learned about key ingredients, step-by-step instructions, and smart tips for success. We also discussed variations and storage, plus answered common questions. In my view, this dish is a winner. It’s easy to prepare and full of flavor. Try it out, and enjoy the delicious results with your loved ones!

Parmesan Crusted Chicken Flavorful and Simple Recipe

If you’re searching for a dish that’s both flavorful and easy to make, look no further! My Parmesan Crusted Chicken

- 1.5 lbs bone-in, skin-on chicken thighs - 1/2 cup honey - 1/4 cup soy sauce (low sodium) - 4 cloves garlic, minced - 1 tablespoon fresh ginger, grated - 1 tablespoon apple cider vinegar - 1 teaspoon sesame oil - 1/2 teaspoon black pepper - 1/4 teaspoon red pepper flakes (optional) - 2 green onions, chopped (for garnish) - Sesame seeds (for garnish) To make Sticky Honey Garlic Chicken, gather these simple ingredients. First, choose 1.5 lbs of bone-in, skin-on chicken thighs. Their rich flavor pairs well with our sweet and savory sauce. Next, add 1/2 cup of honey and 1/4 cup of low-sodium soy sauce. This mix creates the base of our marinade. For flavor, include 4 cloves of minced garlic and 1 tablespoon of grated ginger. These two ingredients add warmth and zest. Don’t forget 1 tablespoon of apple cider vinegar for a slight tang. Now, let’s talk seasonings and garnishes. Use 1 teaspoon of sesame oil for a hint of nuttiness. Add 1/2 teaspoon of black pepper for depth. If you like heat, toss in 1/4 teaspoon of red pepper flakes. Finally, for presentation, chop 2 green onions and sprinkle sesame seeds on top. This adds color and crunch. With these ingredients ready, you’ll create a dish that is both tasty and beautiful. For the full recipe, check the recipe section above. Start by making the marinade. In a bowl, whisk together the honey, soy sauce, minced garlic, grated ginger, apple cider vinegar, sesame oil, black pepper, and red pepper flakes. This mix will add great flavor to the chicken. Next, grab your chicken thighs. Place them in a large ziplock bag or a dish. Pour the marinade over the chicken, making sure it covers all the pieces. Seal the bag or cover the dish. Refrigerate for 1 to 4 hours. The longer you marinate, the more flavor the chicken will soak up. Now, preheat your oven to 375°F (190°C). Remove the chicken from the marinade and place it skin-side up on a baking sheet lined with foil or parchment paper. Save the leftover marinade in a saucepan. Bake the chicken for 30 to 35 minutes. While it bakes, pour the reserved marinade into the saucepan. Bring it to a boil over medium heat. Let it simmer for about 5 to 7 minutes until it thickens to a syrupy texture. After baking, take the chicken out of the oven. Brush the thickened marinade over the chicken. Return it to the oven for another 5 minutes. This step gives the chicken a beautiful glaze. Once done, remove it from the oven and let it rest. Before serving, garnish with chopped green onions and sesame seeds. Enjoy your sticky honey garlic chicken! - For the best flavor, marinate the chicken for up to 4 hours. - Lightly score the chicken skin with a knife. This helps the marinade soak in better. - Always check the chicken's doneness with a meat thermometer. It should reach 165°F (75°C). - Line your baking sheet with foil. This makes cleaning up much easier. - Pair your sticky honey garlic chicken with steamed rice or sautéed veggies. This gives you a well-rounded meal. - Present the dish on a large platter. This makes it look even more appealing and inviting. Feel free to explore tips for more delicious ideas or visit the Full Recipe for detailed steps! {{image_2}} You can make this dish more exciting. Add crushed red pepper flakes to the marinade for heat. If you like sriracha, mix it in for a spicy kick. Just a small amount can change the flavor. Start with a little, then taste and adjust as you go. This will give your chicken a bold twist. If you want to switch things up, try using chicken breasts or drumsticks. These cuts cook well and absorb flavors nicely. They will give you a different texture but still keep the dish delicious. You can follow the same cooking times as the thighs. Just ensure they reach the right temperature for safe eating. For a vegan twist, swap chicken for tofu or tempeh. Both options soak up the marinade well. Cut them into thick slices or cubes. Adjust the cooking times. Tofu may need less time, while tempeh can take a bit longer. You’ll still get that sticky, sweet flavor that makes this dish special. For the complete cooking method and ingredients, check the Full Recipe section. After enjoying your sticky honey garlic chicken, store any leftovers in an airtight container. This keeps the chicken fresh and tasty. You can keep it in the refrigerator for up to 3 days. Make sure it cools down before sealing it up. This helps keep the texture and flavor. Want to save some for later? You can freeze the marinated chicken before cooking. It stays good for up to 2 months. Just place it in a freezer bag or container and seal it tight. When you're ready to cook, thaw it in the refrigerator overnight. This step keeps all the flavors intact. Reheating your chicken can be simple and quick. For the best results, use the oven. This method helps keep the skin crispy. Preheat your oven to 350°F (175°C) and warm the chicken for about 10-15 minutes. If you need a quicker option, you can use the microwave. Just heat it in short bursts to avoid drying it out. Enjoy your meal again! To spice up your chicken, add more red pepper flakes. You can also use a splash of chili sauce in the marinade. This will give your dish a nice kick without overpowering the sweet flavor. Yes, you can use chicken breasts or drumsticks. Both options work well in this recipe. The cooking time may change slightly, so check for doneness. I love serving this chicken with rice or noodles. A fresh salad also pairs well and adds a nice crunch. These sides help create a complete meal. The total cooking time is about 35-40 minutes. This does not include the marinating time. Marinate your chicken for at least one hour for the best flavor. For the complete recipe with detailed instructions, see the "Full Recipe" section above. You learned how to make Sticky Honey Garlic Chicken with simple steps and tasty ingredients. Marinating and cooking bring out bold flavors, and the recipe allows for easy tweaks. Remember to store leftovers well and reheat them carefully. This dish is versatile; you can adapt it to different proteins or spice levels. Enjoy making and sharing this delicious meal!

Sticky Honey Garlic Chicken Delightful and Easy Recipe

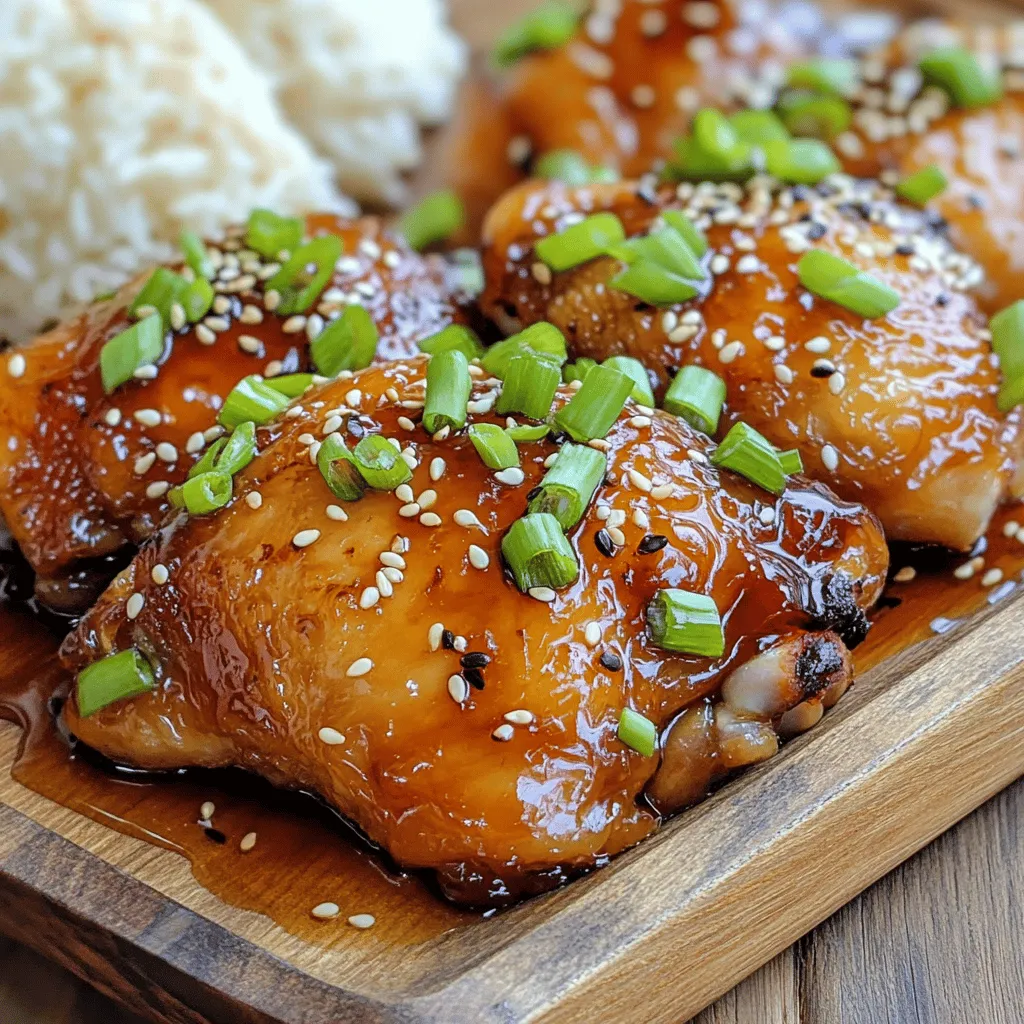
Are you craving a dish that’s sweet, savory, and incredibly easy to make? Look no further! My Sticky Honey Garlic

To make crispy baked sweet potato fries, you need: - 2 large sweet potatoes, peeled and cut into thin strips - 2 tablespoons olive oil - 1 tablespoon cornstarch - 1 teaspoon paprika - 1 teaspoon garlic powder - 1 teaspoon onion powder - 1/2 teaspoon salt - 1/4 teaspoon black pepper - Optional: Fresh herbs (like parsley) for garnish When measuring, use dry measuring cups for solid ingredients. For liquids, use a liquid measuring cup. A kitchen scale can help if you want exact weights. For the sweet potatoes, cut them evenly. This helps them cook at the same rate. Thin fries get crispier than thick ones. Using fresh sweet potatoes makes a big difference. Look for firm, smooth ones with no bruises. Good olive oil enhances flavor and helps with crispiness. Fresh spices like paprika and garlic powder can bring out the best taste. Quality ingredients lead to better results. They make your fries more enjoyable! For the full recipe, follow the steps above. To make crispy baked sweet potato fries, start by gathering your ingredients. You need two large sweet potatoes, olive oil, cornstarch, and some spices. First, peel the sweet potatoes and cut them into thin strips. Thin strips help them cook faster and get crispy. In a large bowl, toss the fries with two tablespoons of olive oil. Make sure each fry gets a nice coat of oil. Now, add one tablespoon of cornstarch and the spices: one teaspoon each of paprika, garlic powder, and onion powder. Also, add half a teaspoon of salt and a quarter teaspoon of black pepper. Mix well to coat all the fries evenly. Preheat your oven to 425°F (220°C). This high heat will help the fries turn crispy. Line a baking sheet with parchment paper to prevent sticking. Spread the fries on the sheet in a single layer. Avoid crowding them together, as this can make them soggy. Bake them for 25-30 minutes. Flip the fries halfway through to ensure even cooking. You want them golden brown and crispy all over. After baking, let them cool for a few minutes. This helps them firm up even more. These sweet potato fries are tasty on their own, but you can spice them up! Serve them with your favorite dipping sauce, like ketchup or ranch. You can also add fresh herbs like parsley for a pop of color and flavor. Feel free to try out different dips to find your favorite. For a fun twist, serve them as a side with burgers or sandwiches. For the complete recipe, check out the [Full Recipe]. To get crispy baked sweet potato fries, follow these steps: - Cut the sweet potatoes into thin strips. Thin fries cook better. - Toss the fries in olive oil. This helps them crisp up nicely. - Use cornstarch in your mix. It helps absorb moisture and adds crunch. - Spread the fries out on the baking sheet. This keeps them from steaming. - Flip them halfway through baking. This ensures even cooking and browning. Many people make mistakes when baking sweet potato fries. Here are some to watch for: - Don't overcrowd the baking sheet. This traps steam and makes them soggy. - Avoid cutting fries too thick. Thick fries take longer to cook and won't crisp. - Skipping the cornstarch is a big no. It is key for that crunch. - Not preheating the oven can lead to soft fries. Always preheat! Dipping sauces can make your fries even better. Here are some great options: - Classic ketchup is always a hit. - Try a creamy ranch for a cool flavor. - Sweet chili sauce adds a fun kick. - Homemade garlic aioli is rich and tasty. - Enjoy them with a spicy sriracha mayo for heat. Explore the full recipe to enjoy crispy baked sweet potato fries in your kitchen! {{image_2}} You can change the flavor of your sweet potato fries easily. Use different spices to create fun tastes. For a spicy kick, try cayenne pepper. If you love herbs, mix in dried oregano or thyme. For a sweet twist, cinnamon adds a nice touch. You can also use taco seasoning for a zesty flavor. Each option gives your fries a unique taste. Sweet potatoes can be cut into various shapes. Classic fries are great, but have you tried wedges? They are thicker and hold more flavor. You can also make curly fries using a spiral cutter. This fun shape adds crunch and makes them special. Each style brings its own texture and taste to your dish. Mixing in other veggies makes your fries even better. Carrots and zucchini work well with sweet potatoes. Cut them into similar sizes for even cooking. You can even add bell peppers for a colorful plate. This mix not only adds flavor but also boosts nutrition. Your snack becomes more exciting and healthy with each added veggie. For the full recipe, check out the steps above. To store leftover fries, let them cool completely. Then, place them in an airtight container. Use parchment paper to separate layers if needed. This helps keep them crispy. Store the container in the fridge for best results. For the best taste, reheat fries in the oven. Preheat your oven to 400°F (200°C). Spread the fries on a baking sheet. Bake for about 10-15 minutes or until hot and crispy. You can also use an air fryer for quick reheating. Set it to 350°F (175°C) and cook for about 5-7 minutes. These crispy baked sweet potato fries can last in the fridge for up to 3 days. If you want to keep them longer, consider freezing them. Frozen fries can last for about 2 months. Just make sure to store them in a freezer-safe bag. Yes, you can use regular potatoes. However, sweet potatoes have a sweeter taste. They also have more nutrients, like vitamin A. If you choose regular potatoes, try Yukon Gold or Russets. They will give you a nice flavor, but the texture may differ. The key is to cut them into similar sizes to ensure they cook evenly. You can tell the fries are done by their color and texture. Look for a golden brown color. They should also feel crispy to the touch. If you flip them halfway through baking, this helps them cook evenly. A good way to test is to poke one with a fork. If it’s soft inside and crisp outside, they are ready to eat! You can prep the sweet potato fries ahead. Cut them and store them in the fridge for up to 24 hours. Just remember to toss them with olive oil and spices right before baking. This keeps them fresh and tasty. You can also bake them in advance, let them cool, and then store in an airtight container. Just reheat them in the oven to regain that crispy texture. For the full recipe, check out the earlier section! This article covered the key steps to make perfect sweet potato fries. We explored vital ingredients and measurement tips. I shared tricks for getting crispy fries and common mistakes to avoid. You learned how to serve them with tasty dips. In the end, quality ingredients and proper techniques can make a big difference. Enjoy your fries with flavor and variety!

Crispy Baked Sweet Potato Fries Easy and Tasty Snack

Looking for a quick snack that’s easy and delicious? You’ve found it! Crispy baked sweet potato fries are not just

- 500g chicken breast, diced - 1 cup plain yogurt - 2 tablespoons ginger-garlic paste - 2 tablespoons tikka masala spice mix - 1 can (400g) crushed tomatoes The main ingredients give this dish its rich flavor. The chicken breast is tender and soaks up the spices well. Yogurt helps tenderize the chicken and adds creaminess. Ginger-garlic paste brings a warm kick, and the tikka masala spice mix adds depth. Crushed tomatoes provide a nice base for the sauce. - 1 cup coconut milk - Fresh cilantro for garnish - Cooked basmati rice or naan Coconut milk gives the dish a creamy texture. You can add it for a richer taste. Fresh cilantro adds a burst of color and freshness on top. Serve your chicken tikka masala with basmati rice or naan for a complete meal. - 2 tablespoons vegetable oil - 1 teaspoon salt (to taste) Oil is key for frying and helps the spices bloom. Salt enhances all the flavors in the dish. Adjust the salt to fit your taste. For the full recipe, check out the details above. To start, I take a bowl and combine the plain yogurt, ginger-garlic paste, and tikka masala spice mix. This blend creates a tasty marinade that makes the chicken tender and flavorful. Next, I add the diced chicken to the bowl. I mix everything well to coat the chicken evenly. It’s best to let it marinate for at least 30 minutes. You can even leave it overnight in the fridge for more flavor. Once marinated, I heat vegetable oil in a large skillet over medium heat. I add the finely chopped onion and sauté it until it turns golden brown. This step adds a sweet flavor to the dish. It usually takes about 5 to 7 minutes. After that, I add the marinated chicken to the skillet, along with all the marinade. I cook it until the chicken is browned on all sides, which takes about 5 to 8 minutes. After the chicken is browned, I stir in a can of crushed tomatoes. I bring the mixture to a simmer, allowing it to cook for about 10 minutes. This helps the flavors combine nicely. Then, I pour in the coconut milk, mixing everything well. I let it simmer for another 10 to 15 minutes until the chicken is fully cooked and the sauce thickens. Finally, I season with salt to taste and garnish with fresh cilantro. This dish pairs perfectly with basmati rice or naan. For the complete recipe, check out the Full Recipe section. For the best flavor, marinate the chicken for at least 30 minutes. If you have more time, marinating overnight works wonders. This allows the spices to soak into the chicken. You can also try adding a squeeze of lemon juice for a zesty kick. Mixing in some fresh herbs like mint or cilantro can elevate the taste even more. Heat your skillet over medium heat before adding oil. This helps the chicken sear nicely, giving it a golden color. Cook the chicken until it’s browned on all sides. Make sure the internal temperature reaches 165°F (75°C) for safety. Cut a piece to check if it looks white and juicy inside. Serve your chicken tikka masala with basmati rice or warm naan. Both soak up the sauce perfectly. For a fresh touch, garnish with chopped cilantro on top. It adds color and a burst of flavor. You can also serve it with a side of cucumber salad or roasted vegetables for a balanced meal. {{image_2}} You can make a tasty vegetarian version of chicken tikka masala. Simply swap the chicken for tofu or your favorite vegetables. Tofu absorbs flavors well, making it a great choice. Cut the tofu into cubes and marinate it just like the chicken. You can also use vegetables like bell peppers, zucchini, or cauliflower. Cook them until tender. This option is healthy and still full of flavor! To add more flavor, consider using extra spices. You can try garam masala, cumin, or coriander for a deeper taste. If you like heat, add chili powder or cayenne pepper. Start with a small amount and adjust to your liking. This way, you can control the spice level. Remember, not everyone enjoys the same heat, so make it your own! You can play around with the sauces too. A creamy coconut sauce gives a sweet twist. On the other hand, a tomato-based sauce offers a tangier taste. If you're feeling adventurous, experiment with your own homemade tikka masala. Mix different ingredients to find the flavor you love most. The beauty of this dish is its flexibility. You can create your ideal version! For the full recipe, check the section above. Store your Easy Chicken Tikka Masala in an airtight container. This keeps it fresh. It lasts up to four days in the fridge. The flavors deepen after a day or two. Reheat it on low heat to bring it back to life. Stir well to avoid hot spots. To freeze leftovers, let the dish cool completely. Pour it into freezer-safe bags or containers. Remove as much air as possible before sealing. It keeps well for three months. Thaw in the fridge overnight. Reheat it on the stove or in the microwave. Add a splash of coconut milk if the sauce thickens too much. You can make this chicken tikka masala ahead of time. Cook a big batch on the weekend. Divide it into portions for the week. This makes busy nights easier. Pair with rice or naan for a quick meal. You’ll enjoy a tasty dinner without much effort. Making Easy Chicken Tikka Masala takes about 1 hour. The prep time is around 30 minutes. During this time, you can marinate the chicken. The cooking time is about 30 minutes. You will sauté the onions and cook the chicken and sauce. Yes, you can use different cuts of chicken. Chicken thighs work well and stay juicy. You can even use bone-in chicken for more flavor. Just adjust the cooking time. Make sure the chicken cooks completely for safety. You can serve Chicken Tikka Masala with basmati rice or naan. These sides soak up the sauce nicely. You might also add a fresh salad or roasted vegetables. They balance the rich flavors and add crunch. For a complete meal, try yogurt sauce as a dip. In summary, you’ve learned how to make Easy Chicken Tikka Masala. We covered the key ingredients, marinating steps, and cooking methods. You now know how to perfect your dish with useful tips and variations. Consider trying different proteins or sauces for personalized flavor. With proper storage and meal prep, you can enjoy this dish throughout the week. Dive into this tasty recipe and impress your family or friends!

Easy Chicken Tikka Masala Flavorful and Simple Recipe

Are you craving a delicious, flavorful dish that’s easy to make? Look no further! My Easy Chicken Tikka Masala recipe

For a tasty Vegan Buddha Bowl, gather these fresh ingredients: - 1 cup quinoa, rinsed - 2 cups vegetable broth - 1 cup chickpeas, drained and rinsed - 1 medium sweet potato, peeled and cubed - 1 cup broccoli florets - 1 cup cherry tomatoes, halved - 1 avocado, sliced - 2 tablespoons tahini - 2 tablespoons lemon juice - 1 tablespoon olive oil - 1 teaspoon garlic powder - Salt and pepper to taste - Fresh parsley, chopped (for garnish) This bowl is packed with nutrients. Quinoa offers protein and fiber. Sweet potatoes add vitamins and minerals. Chickpeas give you more plant-based protein and fiber. Broccoli provides vitamins C and K. Cherry tomatoes add antioxidants. Avocado brings healthy fats. Tahini offers calcium and iron. This meal keeps you full and nourished. You can mix it up based on what you have. Use brown rice or farro instead of quinoa. If you dislike sweet potatoes, try butternut squash or carrots. For a protein boost, add lentils or tofu. Don’t have tahini? Use peanut butter or yogurt instead. Customize it to fit your taste! To make a vegan Buddha bowl, start by gathering your ingredients. You need quinoa, chickpeas, sweet potato, broccoli, cherry tomatoes, and avocado. These ingredients create a colorful and tasty meal. You can also prepare the tahini dressing while you cook. This dressing adds flavor and creaminess to the bowl. Cooking quinoa is simple. Rinse one cup of quinoa under cold water. This removes any bitter taste. In a medium saucepan, combine the rinsed quinoa with two cups of vegetable broth. Bring the mixture to a boil over medium heat. Once boiling, reduce the heat to low. Cover the pan and let it simmer for 15 minutes. After 15 minutes, check if the liquid is absorbed. If it is, remove it from the heat and fluff it with a fork. This fluffy quinoa will be the base of your bowl. Roasting the vegetables adds great flavor. Preheat your oven to 400°F (200°C). On a baking sheet, toss the cubed sweet potato with olive oil, garlic powder, salt, and pepper. Spread them out in a single layer. Roast these for 20-25 minutes until they are tender and slightly caramelized. While the sweet potato roasts, prepare the broccoli. In the last 10 minutes, add the broccoli florets to the baking sheet. Roast them alongside the sweet potato until they are tender. This method keeps the veggies bright and tasty. Now, you can move on to assembling your vibrant vegan Buddha bowl. For the full recipe, check out the instructions above. To make your Vegan Buddha Bowl exciting, blend flavors and textures. Use creamy avocado with crunchy vegetables. Pair sweet roasted sweet potatoes with savory chickpeas. You can also add a tangy dressing to brighten each bite. Think about taste balance as sweet, salty, sour, and bitter. This way, each spoonful brings joy. A colorful bowl makes your meal inviting. Start with a base of quinoa. Then, arrange each component in neat sections. Use bright cherry tomatoes, green broccoli, and golden sweet potatoes. This adds a feast for the eyes. You can drizzle extra tahini on top and sprinkle with sesame seeds for flair. Remember, we eat with our eyes first! Dressings can change the whole meal. For a nutty taste, use tahini mixed with lemon juice. You can try adding maple syrup for sweetness. For a spicy kick, add chili flakes or sriracha. A simple olive oil and vinegar mix works great too. Feel free to experiment until you find your favorite! For the full recipe, check [Full Recipe]. {{image_2}} You can swap chickpeas for other proteins. Try black beans, lentils, or edamame. Each option adds a unique flavor and texture. If you want more protein, use tofu or tempeh. Both can be marinated and grilled for extra taste. You can also use seitan, which has a meat-like texture. These choices keep your meal tasty and satisfying. Using seasonal ingredients makes your bowl fresh and vibrant. In spring, add asparagus or peas for a crisp bite. Summer calls for zucchini and corn, which bring sweetness. Fall is perfect for roasted root veggies like carrots and beets. In winter, try adding kale or Brussels sprouts, which are hearty and filling. This way, your Buddha bowl stays exciting all year round. Boost your bowl's flavor with simple toppings. Sprinkle seeds like pumpkin or sunflower seeds for crunch. Use fresh herbs like basil or cilantro for a burst of freshness. A squeeze of lime or lemon juice brightens the dish. For a kick, add red pepper flakes or a spicy sauce. These tweaks make your meal more delicious and fun. Store your Vegan Buddha Bowl leftovers in a tight container. Use glass or plastic containers with lids. Keep them in the fridge. They stay fresh for about three days. Make sure to keep the dressing separate. This helps the veggies stay crisp. To reheat, use the microwave for quick warming. Heat for one to two minutes. Stir halfway through for even warmth. You can also reheat on the stove. Add a splash of water to the pan. This helps steam the veggies and keeps them tender. You can freeze your Buddha Bowl for longer storage. Pack the quinoa, chickpeas, and roasted veggies in freezer-safe bags. Remove as much air as you can. They keep well for up to three months. When ready to eat, thaw overnight in the fridge. Then reheat as needed. Avoid freezing fresh veggies like avocado or tomatoes, as they can get mushy. A vegan Buddha bowl is a colorful, healthy meal. It typically includes grains, veggies, and protein. You can mix and match ingredients to suit your taste. This dish is fun because it is both tasty and pretty. You can use quinoa, rice, or barley as a base. Add fresh greens, roasted vegetables, and legumes for protein. To make your Buddha bowl more filling, add extra protein and healthy fats. Use chickpeas, beans, or lentils for protein. Nuts and seeds also work great. You can include avocado for healthy fats too. Adding more grains, like brown rice or farro, fills up the bowl. Don't forget to use a tasty dressing to enhance flavors. Yes, you can prep a Buddha bowl in advance. Cook grains and roast your veggies ahead of time. Store them in the fridge for easy access. Keep the dressing separate until you're ready to eat. This way, your bowl stays fresh and tasty. You can enjoy your meal in just a few minutes. For the full recipe, check out the Vibrant Vegan Buddha Bowl. In this article, we explored how to create a delicious Buddha bowl. We covered key ingredients, their nutrition, and helpful substitutions. You learned step-by-step instructions for cooking quinoa and roasting veggies. Our tips improved flavors and made your bowl stand out. Variations offered protein options and seasonal ideas. We also shared storage tips to keep leftovers fresh. Now, you can enjoy making this healthy meal anytime. Go ahead and experiment with different flavors and ingredients to make it your own!

Vegan Buddha Bowl Tasty and Nutritious Meal Options

If you crave a colorful, tasty meal that fuels your body, a Vegan Buddha Bowl is perfect for you. Packed

- 12 oz fettuccine pasta - 4 cups vegetable broth - 1 tablespoon olive oil - 4 cloves garlic, minced - 1 teaspoon Italian seasoning The base of this dish is simple and full of flavor. I love using fettuccine because it soaks up the sauce well. The vegetable broth brings a rich taste that adds depth. Garlic gives a wonderful aroma and flavor. Italian seasoning adds a nice herb mix that completes the profile. - 1 cup heavy cream - 1 cup grated Parmesan cheese - Salt and pepper to taste The heavy cream is what makes this pasta creamy and dreamy. It balances perfectly with the salty Parmesan cheese. Together, they create a smooth, rich sauce that coats every strand of pasta. Remember to adjust salt and pepper to match your taste. - 2 tablespoons chopped fresh parsley (for garnish) Fresh parsley adds a pop of color and a hint of freshness. It makes the dish look pretty and bright. You can skip it if you want, but I think it makes a lovely touch. You can find the Full Recipe to get started on making this delicious dish! First, grab a large pot or Dutch oven. Heat one tablespoon of olive oil over medium heat. Once the oil is hot, add four cloves of minced garlic. Sauté for about one minute. You want it fragrant but not browned. The garlic is the heart of this dish. It adds a great flavor that pairs well with the creamy sauce. Next, pour in four cups of vegetable broth. Bring it to a gentle boil. Add 12 ounces of fettuccine pasta and one teaspoon of Italian seasoning. Stir to make sure the pasta is fully submerged. Reduce the heat to medium-low and cover the pot. Cook for about 10 to 12 minutes. Stir occasionally. You want the pasta to be al dente, with most of the liquid absorbed. Now it's time for the creamy goodness. Stir in one cup of heavy cream and one cup of grated Parmesan cheese. Mix well until everything is creamy and smooth. Season with salt and pepper to taste. Adjust the creaminess and flavor to your liking. Let the pot sit off the heat for a couple of minutes. This helps it thicken slightly. Serve hot and enjoy your delicious pasta! You can find the Full Recipe for more details. To make your pasta creamy, you can adjust the cream-to-cheese ratio. If you want it richer, add more cream. For a lighter dish, use less cream. Be careful with the cheese. To avoid clumping, add the cheese slowly while stirring. This helps it melt evenly. If you notice clumps, whisk it gently to smooth it out. Cooking time can change based on your pasta type. Fettuccine takes about 10-12 minutes. If you use thin pasta, check it earlier. For thicker pasta, allow a few extra minutes. Always taste it to see if it’s al dente. Adjust the heat if needed to cook it just right. You can boost flavors with herbs and spices. Fresh basil or thyme add a nice touch. A pinch of red pepper flakes gives heat. For more depth, try adding a squeeze of lemon juice. Nutritional yeast can also enhance the taste and add a cheesy flavor. Feel free to experiment! {{image_2}} You can easily boost nutrition by adding veggies. Spinach works great. Toss in a few handfuls during the last few minutes of cooking. It wilts nicely and adds color. Mushrooms are another good choice. Slice them and add when you sauté the garlic. This gives them time to soften. Cherry tomatoes can add a fresh touch. Halve them and stir in right before serving. Their sweetness balances the savory flavors. Adding protein makes this dish heartier. Grilled chicken is a popular option. Dice it up and mix it in after cooking. Shrimp also pairs well. Just add them when you stir in the cream. Cook until they turn pink and opaque. For plant-based options, try chickpeas or tofu. They soak up flavors well and keep the dish filling. To make this dish vegan, swap out the cream and cheese. Use coconut milk or cashew cream instead of heavy cream. Nutritional yeast can replace Parmesan. It adds a cheesy flavor without dairy. Make sure your vegetable broth is vegan-friendly, too. With these swaps, you’ll enjoy a creamy pasta that fits your diet. To keep your One-Pot Garlic Parmesan Pasta fresh, store leftovers in an airtight container. This helps maintain flavor and texture. Refrigerate the pasta for up to three days. If you plan to keep it longer, freezing is a great option. Use freezer-safe containers or bags, and try to remove as much air as you can. This way, the pasta can last for up to three months in the freezer. When it’s time to enjoy your leftovers, reheating them properly is key. Start by adding a splash of water or broth to a skillet. Heat it on low, and then add the pasta. Stir gently until it warms through. This method helps avoid dry or clumpy pasta. You can also use the microwave. Just cover the bowl with a damp paper towel to keep moisture in. Heat in short bursts, stirring in between. If you want to prep this dish in advance, cook the pasta and sauce as usual. Then, let it cool before storing it in the fridge. You can also prepare the sauce without the pasta. This way, you can quickly cook fresh pasta when you’re ready to eat. It saves time and keeps the meal fresh. Just remember to add the cream and cheese right before serving for the best taste. This dish is quick to prepare. You need about 10 minutes to prep. The total time is 25 minutes. You can serve it fast! Yes, you can! Use gluten-free pasta instead of regular fettuccine. Many brands make gluten-free options. Look for ones made from rice, quinoa, or chickpeas. They taste great and cook well. If you need a substitute for heavy cream, several options exist. You can use full-fat coconut milk for a dairy-free choice. If you prefer lighter options, try whole milk or Greek yogurt. Both can give you creaminess without heavy calories. This blog post covered how to make One-Pot Garlic Parmesan Pasta. You learned about key ingredients, step-by-step cooking, and smart tips. I shared ideas for variations, like adding veggies or protein. Storing and reheating tips help you enjoy leftovers. Now, you can create a simple, tasty dish that suits your taste. With these methods, your pasta will be creamy and flavorful. Enjoy your cooking adventure!

One-Pot Garlic Parmesan Pasta Creamy and Quick Dish

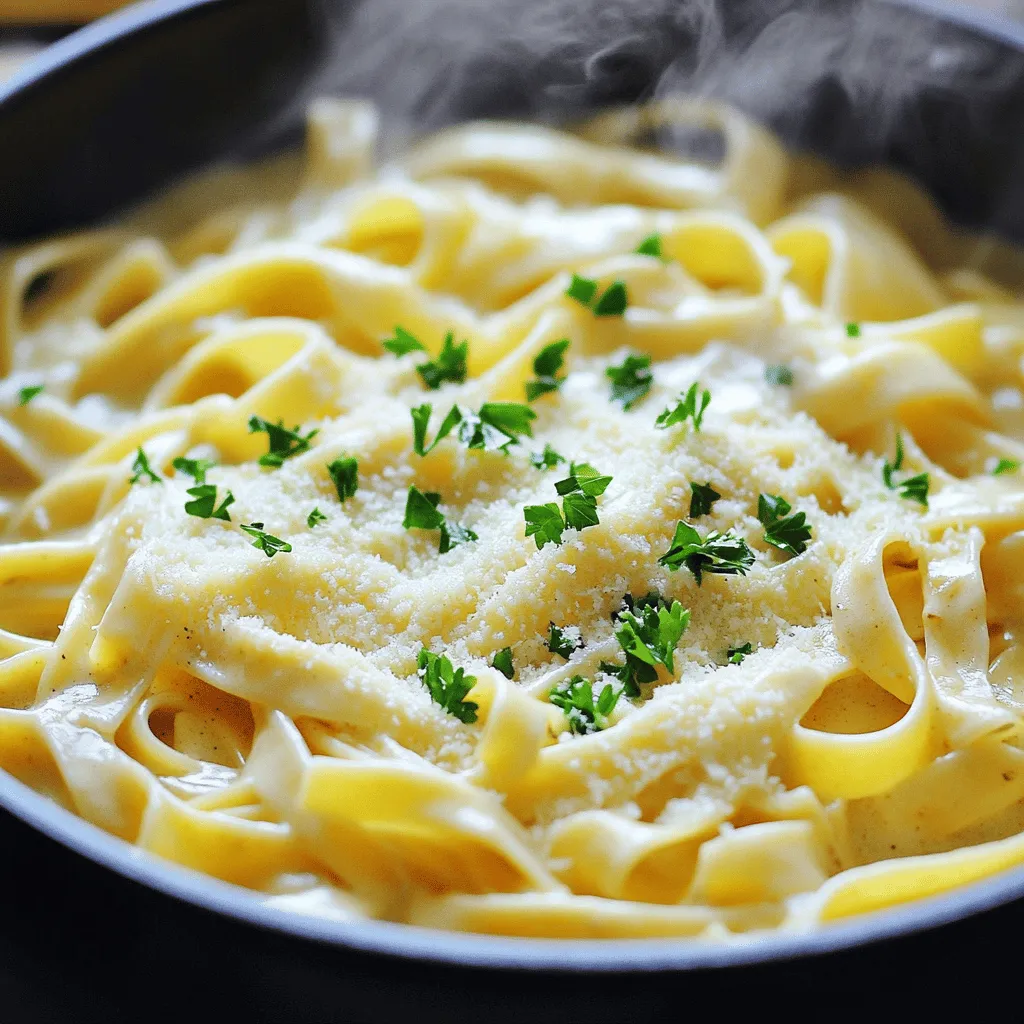
If you’re looking for a fast, tasty dinner, you’ve found it! This One-Pot Garlic Parmesan Pasta requires just 25 minutes

To make your espresso brownies, gather these key ingredients: - 1 cup (226g) unsalted butter, melted - 1 cup (200g) granulated sugar - 1 cup (220g) brown sugar, packed - 4 large eggs - 1 tablespoon vanilla extract - 1 cup (130g) all-purpose flour - 1 cup (100g) unsweetened cocoa powder - 1 teaspoon espresso powder - 1/2 teaspoon salt - 1 cup (170g) semi-sweet chocolate chips These ingredients create a rich and fudgy base. The butter adds moisture, while both sugars give sweetness. Eggs bind everything together, and the cocoa powder ensures a deep chocolate flavor. You can take your brownies to the next level with these optional add-ins: - 1/2 cup (50g) chopped walnuts or pecans Adding nuts gives a nice crunch that contrasts with the smooth brownie texture. You can also consider adding white chocolate chips or a swirl of caramel for extra sweetness. Using high-quality ingredients makes a big difference. Select fresh eggs and pure vanilla extract. Choose unsweetened cocoa powder that is rich in flavor. For the best chocolate chips, go for semi-sweet or dark chocolate. These choices enhance the taste and texture of your brownies. Remember, quality matters when you want the best espresso brownies. Check out the Full Recipe for detailed steps! Start by gathering your ingredients. This keeps you organized and focused. Preheat your oven to 350°F (175°C). Grease a 9x13 inch baking pan. You can also line it with parchment paper. This makes it easy to lift the brownies out later. In a large bowl, mix the melted butter, granulated sugar, and brown sugar. Whisk until smooth and well combined. Then, add the eggs one at a time. Mix after each egg to keep it creamy. Stir in the vanilla extract for added flavor. In a separate bowl, sift together the flour, cocoa powder, espresso powder, and salt. This step helps mix the dry ingredients well. Gradually add this mixture to the wet ingredients. Stir until no flour streaks remain. Be careful not to overmix, as this can make the brownies tough. Fold in the chocolate chips and nuts if you choose to use them. This adds great texture and flavor. Pour the brownie batter into your prepared pan. Spread it evenly so it bakes nicely. Bake in the preheated oven for 25 to 30 minutes. Check doneness by inserting a toothpick into the center. If it comes out with a few moist crumbs, your brownies are ready. Once baked, remove the brownies from the oven. Let them cool in the pan on a wire rack for about 20 minutes. This helps set the texture. After cooling, cut them into squares. For a special touch, serve warm brownies with a scoop of vanilla ice cream. Drizzle chocolate syrup on top for extra indulgence. A dusting of powdered sugar can make them look even fancier. Enjoy your espresso-infused fudgy delight! For the full recipe, check out the complete instructions above. To get that perfect fudgy texture, use less flour than you might think. This keeps your brownies dense and moist. Also, don't overmix your batter. Mix just until combined. If you want deeper flavor, add a bit more espresso powder. It boosts the coffee taste without being too strong. One common mistake is overbaking. Brownies should be soft in the middle. Check them a few minutes early. Another mistake is not letting them cool. Warm brownies fall apart easily. Always let them cool for at least 20 minutes before cutting. Lastly, make sure to measure your ingredients right. Too much flour can lead to dry brownies. Serve these espresso brownies warm for a gooey treat. A scoop of vanilla ice cream on top makes it special. You can also drizzle chocolate syrup for extra sweetness. For a fun twist, sprinkle sea salt on top. It enhances the chocolate flavor. If you want a crunchy bite, add chopped nuts on top before serving. You can find the Full Recipe for more details on making these delicious treats! {{image_2}} If you want nut-free brownies, just leave out the nuts. You can still enjoy rich flavors. The brownies will stay moist and fudgy without them. You might want to add extra chocolate chips for a sweet boost. This will keep the texture just right. Kids and adults alike will enjoy these treats. You can change the flavor to suit your taste. Try adding peppermint extract for a minty twist. A touch of orange zest gives a bright, fresh flavor. Want something rich? Add a swirl of caramel or peanut butter. Each of these will make your brownies unique. Don’t be afraid to mix and match flavors. Your taste buds will thank you! If you need gluten-free brownies, swap the all-purpose flour. Use a gluten-free flour blend instead. Make sure it has xanthan gum to help with texture. The brownies will still taste delicious and fudgy. You can also use almond flour for a nutty flavor. Just adjust the amount, as almond flour can be denser. Now everyone can enjoy these espresso brownies! Check out the Full Recipe for more tips. To keep your espresso brownies fresh, store them in an airtight container. This method locks in moisture and flavor. Place parchment paper between layers to avoid sticking. These brownies are best enjoyed within a week. If you want warm brownies, preheat your oven to 350°F (175°C). Place the brownies on a baking sheet and cover them with foil. Heat them for about 10 minutes. This warms them without drying them out. You can also microwave them for 10-15 seconds, but be careful not to overheat. You can freeze your espresso brownies for up to three months. First, cut them into squares. Wrap each square in plastic wrap. Then, place them in a freezer-safe bag or container. When you want to enjoy them, let them thaw in the fridge overnight. You can warm them up again if you like. For a tasty treat, serve them with ice cream after thawing. To boost the coffee taste, use fresh espresso. Brew a strong shot and mix it in. You can also add more espresso powder to the batter. Remember, a little goes a long way. A pinch of sea salt can also bring out the coffee flavor. It makes all the difference in each bite. Yes, you can! Use applesauce instead of butter for a lower-fat option. Swap granulated sugar for coconut sugar or honey for a natural sweetener. You can also use whole wheat flour for added fiber. For a dairy-free version, try coconut oil or a plant-based butter. These swaps keep your brownies delicious and guilt-free. Check your brownies at the 25-minute mark. Insert a toothpick into the center. If it comes out with a few moist crumbs, they are done. If it comes out with wet batter, bake for a few more minutes. Don’t overbake; you want that fudgy texture. Let them cool for 20 minutes before cutting. In this blog post, I shared how to make delicious espresso brownies. We covered key ingredients, step-by-step baking, and tips for that perfect fudgy texture. You learned about variations like nut-free and gluten-free options, plus the best ways to store your treats. Baking espresso brownies is fun and rewarding. With the right ingredients and techniques, you can impress anyone with your skills. Enjoy your baking adventures, and remember, perfect brownies are within your reach!

Espresso Brownies Decadent Fudge Delight Recipe

Craving something rich and chocolatey? Let’s dive into my Espresso Brownies recipe! This fudgy delight combines deep coffee flavor with

Older posts
Newer posts
← Previous Page1 … Page46 Page47 Page48 … Page61 Next →

dsad

© 2025 flavorsprint • Built with GeneratePress

Our Policies

  • Copyright Policy
  • Cookie Policy
  • GDPR Policy
  • Privacy Policy
  • Disclaimer
  • Terms Of Use

More Information

  • Home
  • About
  • Contact
  • Appetizers
  • Dessert
  • Dinner
  • Drinks
©2025, flavorsprint About Back To Top