
Italian Zucchini Tart Savory and Flavorful Delight
Are you looking for a tasty and easy dish to impress your family? This Italian Zucchini Tart brings together fresh
Are you looking for a tasty and easy dish to impress your family? This Italian Zucchini Tart brings together fresh
![- 3 medium yellow squash, sliced - 2 cups zucchini, sliced - 1 medium onion, chopped - 2 cloves garlic, minced - 1 cup shredded cheddar cheese - 1 cup cream cheese, softened - 1/2 cup sour cream - 1 cup breadcrumbs - 2 tablespoons olive oil - 1 teaspoon dried thyme - Salt and pepper to taste - Oven - Skillet - Casserole dish - Mixing bowl The main ingredients for Cheesy Squash Casserole are simple and fresh. You need three medium yellow squash and two cups of zucchini. These veggies give a nice texture. You will also need one medium onion and two cloves of garlic for flavor. The cheese is the star here. Use one cup of shredded cheddar cheese and one cup of cream cheese, both softened. Finally, half a cup of sour cream adds creaminess. For additional ingredients, you'll want one cup of breadcrumbs to create a crunchy topping. Two tablespoons of olive oil enhance the sautéing process. One teaspoon of dried thyme brings in some earthy notes. Don’t forget to season with salt and pepper to taste. Make sure you have the right equipment. You will need an oven to bake the casserole. A skillet helps in cooking the veggies. A casserole dish is essential to hold everything together while baking. Lastly, a mixing bowl is needed to combine all your creamy ingredients nicely. This list of ingredients ensures your casserole is rich in flavor and texture. You can find the full recipe for detailed steps on how to make this delicious dish. - Preheat the oven to 350°F (175°C). - Prepare the casserole dish by greasing it. - Heat olive oil in a skillet over medium heat. - Sauté onion and garlic until translucent. - Add yellow squash and zucchini, seasoning with salt, pepper, and thyme. - Mix cream cheese and sour cream in a bowl. - Stir in cooked squash mixture and half of the cheddar cheese. - Transfer to casserole dish, top with remaining cheese and breadcrumbs, and bake for 25-30 minutes. This method creates a creamy and cheesy dish. You’ll love how the flavors blend. I recommend checking the squash for tenderness while sautéing. You want it cooked but still firm. Don't rush this step! The beauty of the casserole shines through after baking. The cheese melts and bubbles, creating a delicious crust. For a touch of crunch, sprinkle the breadcrumbs evenly on top. They give a delightful contrast to the creamy filling. When serving, let the casserole cool for a few minutes. This wait helps the cheese set slightly, making it easier to scoop. For the full details on making this dish, check the Full Recipe. Enjoy your cooking adventure! To get the best texture, ensure your squash is tender but not mushy. Cook it just right. After baking, let the casserole sit for 5 minutes. This helps with serving. Boost the flavor with fresh herbs like basil or parsley. These add a nice touch. You can also switch up the cheese. Try mozzarella or parmesan for a new taste. This casserole pairs well with grilled meats or a fresh salad. It makes a complete meal. Add a garnish of fresh parsley or chives for color. It makes the dish more inviting. For the full recipe, check the section above. {{image_2}} You can easily make this dish more colorful and nutritious. - Add different vegetables like bell peppers or spinach for added nutrition. - Use quinoa or brown rice as a base for a heartier dish. One of my favorite combinations is adding spinach. It adds a lovely green color and pairs well with the cheese. Quinoa gives a nice texture and makes it filling. If you want a meatier casserole, there are fun options. - Incorporate cooked bacon or sausage for a meatier casserole. - Substitute cream cheese with Greek yogurt for a lighter option. Bacon brings a smoky flavor that complements the squash. Sausage adds a nice kick. For a lighter twist, Greek yogurt keeps it creamy without the extra fat. Making this dish gluten-free is simple and tasty. - Use gluten-free breadcrumbs for a gluten-friendly dish. - Substitute cream cheese with dairy-free alternatives if needed. Gluten-free breadcrumbs work just as well to create that crunchy top. For those avoiding dairy, there are many great cream cheese alternatives that still taste great. For the full recipe, check out the [Full Recipe]. Store leftovers in an airtight container in the refrigerator for up to 3-4 days. This keeps the casserole fresh and tasty. When you want some, just take it out and enjoy! You can freeze this casserole for up to 2 months. Wrap it tightly in foil or plastic wrap before freezing. This helps prevent freezer burn and keeps the flavor intact. When you're ready to eat it, just thaw it in the fridge overnight. To reheat, place the casserole in the oven at 350°F (175°C). Bake until it is warmed through. This method keeps the cheese melty and the casserole nice and creamy. Enjoy your meal! For the full recipe, check out the Cheesy Squash Casserole details. Look for bubbly cheese and a golden-brown top as indicators of doneness. This means the cheese has melted nicely and the casserole is ready to enjoy. You can also insert a knife in the center; it should come out hot. Yes, prepare it ahead of time and store it in the fridge before baking. This is great for busy days. Just cover it well to keep it fresh. When you are ready, pop it in the oven and bake as directed. Yellow squash and zucchini work best, but other squash varieties can be substituted. Try using butternut squash or even acorn squash for a twist. Each type adds its own flavor and texture, making this dish fun to customize. Yes, it’s a kid-friendly dish and a great way to incorporate vegetables into their diet. The cheese makes it tasty, and kids often love the creamy texture. They won’t even notice they are eating vegetables! This casserole combines fresh veggies with rich flavors to create a tasty dish. I explained the key ingredients and how to prepare everything step by step. You can also make it your own with different cheeses and add-ins. Plus, I shared tips for perfecting the texture and serving suggestions. Leftovers are easy to store, too! Enjoy making this cheesy squash casserole and share it with friends or family. It’s a simple way to enjoy healthy veggies!](https://flavorsprint.com/wp-content/uploads/2025/06/fb7b5603-a089-4276-868d-b274305f4d5b.webp)
Dive into comfort food with my Cheesy Squash Casserole! This dish is simple yet bursting with flavor. Perfect for a
![To make my Easy Yellow Squash Recipes, you will need a few simple items. Here’s what you’ll need for the Squash & Spaghetti Delight: - 2 medium yellow squash, spiralized - 1 cup cherry tomatoes, halved - 2 cloves garlic, minced - 1 tablespoon olive oil - 1 teaspoon dried oregano - 1 teaspoon chili flakes (optional) - Salt and pepper to taste - Fresh basil leaves for garnish - Grated Parmesan cheese (optional) These ingredients combine to create a bright, tasty dish. You can add or change some items to fit your taste. For example, you might want to add more herbs or use a different cheese. Yellow squash is low in calories but high in nutrients. It gives you vitamins A and C, which help your skin and eyes. The tomatoes add antioxidants that support heart health. Olive oil is a good fat and can help lower cholesterol. If you want to customize your dish, consider adding protein like grilled chicken or shrimp. This will boost the nutritional value and make your meal more filling. For the full recipe, check out the detailed instructions that follow! 1. Start by spiralizing the yellow squash to make noodles. This gives a fun shape. Set the noodles aside when done. 2. Heat a large skillet over medium heat. Add the olive oil. 3. When the oil is hot, add the minced garlic. Sauté for about 1 minute. You want the garlic to smell good but not brown. 4. Next, add the halved cherry tomatoes. Cook them for about 3-4 minutes. They should soften and release some juice. 5. Toss in the spiralized squash along with dried oregano, chili flakes, salt, and pepper. Stir it all together. 6. Continue to sauté for another 4-5 minutes. You want the squash to be tender but still have a bit of bite. 7. Remove the skillet from heat. If you like, sprinkle grated Parmesan cheese over the top. This adds a rich taste. 8. Finally, garnish with fresh basil leaves before serving. This makes your dish look great. - Use a sharp spiralizer. It helps create even noodles. - Choose firm squash. This makes the noodles hold their shape better. - Do not overcook the squash. Keep it slightly crunchy for best texture. - Cook garlic on medium heat to avoid burning. - Keep the skillet hot but not smoking. This helps with even cooking. - The total cooking time should be around 10 minutes after adding the squash. This ensures all flavors meld well. For the full recipe, check out the Squash & Spaghetti Delight. Enjoy your cooking! When I cook yellow squash, I love using three main methods: roasting, grilling, and sautéing. Each way brings out the squash’s unique taste. - Roasting: This method gives the squash a sweet and caramelized flavor. Cut the squash into chunks, toss with olive oil, salt, and your favorite herbs. Roast at 400°F for about 20–25 minutes. - Grilling: Grilling adds a nice smoky flavor. Slice the squash into thick rounds. Brush with olive oil and grill each side for about 3–4 minutes. - Sautéing: This technique is quick and easy. Slice the squash into thin rounds. Heat some olive oil in a skillet and add the squash. Cook for 5–7 minutes until tender but still firm. To keep your squash tender yet firm, avoid overcooking. Use a fork to check for doneness. It should be soft but not mushy. To enhance flavor, add herbs and spices. Fresh basil, oregano, and thyme work well. A pinch of chili flakes can add a nice kick. Spiralizing squash can be fun and easy. Use a spiralizer for even noodles. If you don't have one, a vegetable peeler can also work. Just peel long strips to mimic noodles. For meal prep, wash and cut your squash ahead of time. Store the pieces in an airtight container in the fridge. They stay fresh for up to three days. When reheating, use a skillet on medium heat. This helps keep the squash’s texture. Microwaving can make it soggy, so avoid that if you can. {{image_2}} You can mix other vegetables with yellow squash. Zucchini, bell peppers, or spinach work well. They add color and nutrients. For protein, consider chicken, shrimp, or beans. Chicken adds heartiness, while shrimp brings a light touch. If you want a vegan dish, use chickpeas or lentils instead. Both options boost protein and flavor. For gluten-free meals, ensure all sauces and seasonings are gluten-free. This way, everyone can enjoy the dish. Squash dishes are so versatile. You can serve them as a main or side. Try pairing the squash with grilled chicken or fish. This adds protein and makes a balanced meal. You can also toss squash into a fresh salad for crunch. A light vinaigrette goes well with the flavors. For sides, consider a simple rice dish or crusty bread. These pair nicely with the squash. For drinks, a crisp white wine or sparkling water enhances your meal. For a full recipe, check out Squash & Spaghetti Delight . To keep your yellow squash dishes fresh, store them properly. After cooking, let the dish cool to room temperature. Then, place it in an airtight container. This helps keep out moisture and air, which can spoil your food. Use glass or plastic containers with tight lids. Glass containers are great for reheating in the oven or microwave. If you are using plastic, make sure it is safe for heat. For refrigerated squash dishes, they last about 3 to 5 days. If you want to store them longer, freezing is a good option. Frozen squash dishes can last for about 2 to 3 months. Just make sure to label your containers with the date. If you’re storing raw yellow squash, keep it in a cool, dry place. It can last up to a week in your kitchen. In the fridge, it stays fresh for about 1 to 2 weeks. Avoid washing the squash until you are ready to use it. Moisture can lead to spoilage. For the full recipe, check out Squash & Spaghetti Delight. This dish can be easily stored and enjoyed later! What is the best way to cut yellow squash? To cut yellow squash, use a sharp knife. Start by trimming both ends. Slice it into rounds or half-moons, depending on your dish. For spiralized noodles, use a spiralizer for long, thin strands. This makes the squash cook quickly and look fun on the plate. Can I substitute yellow squash with zucchini? Yes, you can use zucchini instead of yellow squash. Both have a similar taste and texture. They cook at the same rate, making them easy swaps in recipes. You can even mix them for a colorful dish! How long should I cook yellow squash? Cook yellow squash for about 4 to 5 minutes if sautéing. You want it tender but still slightly firm. If roasting, cook for 15 to 20 minutes at 400°F until golden. The goal is to keep its bright color and fresh taste. What are some health benefits of yellow squash? Yellow squash is low in calories and high in vitamins. It's rich in vitamin C and A, which support your immune system. It also has fiber, which helps digestion. Eating yellow squash can add nutrients to your meals without extra calories. Are there any tips for enhancing the nutritional value of my dish? To boost nutrition, add more veggies like bell peppers or spinach. Use whole grains like quinoa for a healthy base. You can also add lean proteins, such as chicken or beans. These changes make your meals filling and tasty. For a delightful recipe, check out the [Full Recipe] for Squash & Spaghetti Delight! We explored easy yellow squash recipes with clear steps, tips, and variations. You learned about key ingredients, how to cook squash perfectly, and smart storage. Each detail helps you enjoy tasty and healthy meals. Remember, yellow squash is versatile and easy to customize. Use these tips to make dinner fun and exciting. Enjoy your cooking and share your creations with others!](https://flavorsprint.com/wp-content/uploads/2025/06/4ba9eb8d-202b-464c-83f1-da14ccc87686.webp)
Are you ready to turn that vibrant yellow squash into delicious meals? In this post, I’ll share simple and flavorful
![When making Baked Parmesan Yellow Squash, the right ingredients matter. Here’s what you'll need: - 4 medium yellow squash, sliced into 1/4 inch rounds - 1 cup grated Parmesan cheese - 1/2 cup breadcrumbs (preferably panko for extra crunch) - 2 tablespoons olive oil - 2 cloves garlic, minced - 1 teaspoon dried thyme - 1 teaspoon dried oregano - Salt and pepper to taste - Fresh parsley, chopped for garnish Each ingredient plays a key role in creating a savory, crunchy dish. The yellow squash gives a sweet flavor and soft texture. Parmesan adds a rich taste, while the breadcrumbs give that satisfying crunch. Olive oil helps everything cook well and adds flavor. Garlic, thyme, and oregano boost the taste with herbs and spices. Finally, fresh parsley gives a nice color and freshness to the dish. For the full recipe, make sure to check out the [Full Recipe]. - Preheat your oven to 400°F (200°C). - In a large bowl, combine the sliced yellow squash, olive oil, minced garlic, thyme, oregano, salt, and pepper. Toss well. You want each slice to be coated nicely. This mix adds rich flavor to the squash. - In another bowl, mix together the grated Parmesan cheese and breadcrumbs. This topping brings a crunchy texture. Using panko breadcrumbs gives you extra crispiness. - Take a baking sheet lined with parchment paper. Arrange the seasoned squash slices in a single layer. If needed, let them slightly overlap. - Generously sprinkle the Parmesan and breadcrumb mix over the squash. Make sure each slice is covered for that perfect crunch. - Bake for about 20-25 minutes. Look for a golden brown color and tender squash. This gives you a savory dish that is both tasty and fun to eat. When you pick yellow squash, look for firm, smooth skin. The color should be bright yellow. Avoid squash with soft spots or wrinkles. Fresh squash has a sweet smell. If you can, choose squash that feels heavy for its size. This means it is juicy and fresh. For a crunchy topping, use panko breadcrumbs. They are light and airy, making your dish crispy. You can mix in some Italian seasoning for added flavor. When it comes to olive oil, drizzle it evenly over the squash. This helps the breadcrumbs stick and crisp up nicely. Too much oil can make the squash soggy, so use just enough to coat. For a great presentation, serve the Baked Parmesan Yellow Squash on a nice plate. You can drizzle a bit of extra olive oil around it. This adds a lovely touch and flavor. Garnish with fresh parsley for color. Adding lemon wedges on the side gives a bright contrast and a zesty kick. This makes your dish not only tasty but also beautiful to look at. You can find the Full Recipe to get all the details you need. {{image_2}} You can change the flavor with different herbs. Instead of thyme and oregano, try using basil or rosemary. These herbs add a fresh taste. You can also sprinkle some red pepper flakes for heat. A dash of smoked paprika gives a nice twist too. Experimenting with these seasonings lets you customize your dish. If you want to switch up the cheese, go for mozzarella or feta. Mozzarella melts well, giving a gooey texture. Feta adds a tangy flavor that pairs nicely with squash. You can even try a blend of cheeses for more depth. Just remember to adjust the amount, as some cheeses are saltier than Parmesan. Adding more veggies can enhance your dish. Try mixing in sliced bell peppers, zucchini, or cherry tomatoes. These veggies add color and nutrition. They also bring out the natural sweetness of the squash. You can roast them together for a tasty medley. This way, you create a vibrant dish that is both healthy and satisfying. Store any extra Baked Parmesan Yellow Squash in an airtight container. Place it in your fridge right away. This keeps the squash fresh for about three days. Always let the dish cool before you seal it. This helps avoid condensation. You want to keep the crispy texture of the topping. To reheat your squash, use the oven for the best results. Heat your oven to 350°F (175°C). Place the squash on a baking sheet. Cover it with foil to keep moisture in. Bake for about 10-15 minutes. This method helps restore the crunchiness of the topping. You can also use a toaster oven for faster reheating. You can freeze Baked Parmesan Yellow Squash, but it may lose some texture. To freeze, let the dish cool completely. Then, cut it into portions. Wrap each piece tightly in plastic wrap, then place in a freezer bag. Make sure to remove as much air as possible. When ready to eat, thaw in the fridge overnight. Reheat in the oven as mentioned above for the best taste. You can tell when the squash is done by looking for a few signs. First, the squash should be tender. You can test this by poking it with a fork. If it goes in easily, it is cooked. Second, check the topping. It should be golden brown and crispy. This gives the dish that nice crunch. Lastly, the aroma will be inviting and warm. You will smell the garlic and cheese. Yes, you can make this dish vegan with some simple swaps. Instead of Parmesan cheese, use a vegan cheese option. Nutritional yeast also works well for a cheesy flavor. For the breadcrumbs, ensure they are vegan-friendly. You can skip the cheese topping or use a vegan butter for a crispier texture. This keeps the dish flavorful while being plant-based. Baked Parmesan Yellow Squash pairs well with many dishes. You might enjoy it with grilled chicken or fish for a nice protein boost. It also goes well with a fresh salad for a light meal. If you want something heartier, serve it alongside quinoa or couscous. The squash adds great flavor and crunch to any plate. For the complete recipe for Baked Parmesan Yellow Squash, check out the [Full Recipe]. You learned how to make Baked Parmesan Yellow Squash step-by-step. We covered the ingredients and detailed prepping, baking, and serving tips. Always choose fresh squash and use high-quality breadcrumbs for the best taste. Feel free to get creative with seasonings and cheese. After baking, store your leftovers properly to enjoy later. This dish is easy and delicious, perfect for any meal. Try it, and make it your own!](https://flavorsprint.com/wp-content/uploads/2025/06/52785b61-edc2-426e-8480-213d48660b5f.webp)
Looking for a quick and tasty side dish? Baked Parmesan Yellow Squash is your answer! This savory, crunchy delight is
![For the Ultimate Tomato Pie, you'll need fresh and simple ingredients. Here’s what you need: - 2 cups all-purpose flour - 1 teaspoon salt - 1/2 teaspoon baking powder - 1/2 cup unsalted butter, chilled and cubed - 6 tablespoons cold water - 4 large ripe tomatoes, sliced - 1 cup ricotta cheese - 1 cup shredded mozzarella cheese - 1/2 cup grated Parmesan cheese - 1/4 cup fresh basil leaves, chopped - 2 cloves garlic, minced - Salt and pepper to taste - 1 tablespoon olive oil - 1 teaspoon balsamic vinegar Using fresh tomatoes is key for flavor. Ripe tomatoes bring sweetness and juiciness to your pie. They should feel firm and smell fragrant. Always choose in-season tomatoes for the best taste. If you can, visit a local farmer’s market for the freshest picks. The quality of your tomatoes makes a big difference in the final dish. Cheese adds richness to the pie. I love using three types: ricotta, mozzarella, and Parmesan. Ricotta gives a creamy texture. Mozzarella melts beautifully and adds stretch. Parmesan adds a sharp, salty bite. You can mix them for the best flavor. Don't forget to sprinkle some salt and pepper to enhance the cheese’s taste. Each cheese plays a role in making your pie delicious and memorable. For a complete guide, check out the Full Recipe. To start, gather your ingredients. You need flour, salt, baking powder, butter, and cold water. Mix the flour, salt, and baking powder in a bowl. Next, add the cold butter. Use your fingers or a pastry cutter to blend until it looks like crumbs. Then, add cold water, one tablespoon at a time. Mix until the dough holds together. Shape it into a ball. Wrap it in plastic and refrigerate for 30 minutes. This chilling time makes the crust flaky. While the dough chills, focus on the filling. Heat olive oil in a skillet over medium heat. Add minced garlic and sauté for about a minute. You want it fragrant but not brown. Slice your tomatoes and lay them on paper towels. Sprinkle a little salt on top. This helps remove extra moisture. After 10 minutes, pat them dry. In a bowl, mix ricotta, mozzarella, Parmesan, garlic, basil, salt, and pepper. This cheesy mixture will be the star of your pie. Once the dough is ready, roll it out on a floured surface. Make sure it fits your 9-inch pie pan. Carefully transfer it to the pan and trim the edges. Spread the cheese mixture evenly across the crust. Then, layer the dried tomato slices on top. Drizzle balsamic vinegar over the tomatoes. This adds a nice zing. Bake the pie in your preheated oven for 30 to 35 minutes. You want the tomatoes to bubble and the crust to turn golden. After baking, let it cool for 10 minutes. Now, you’re ready to slice and serve your ultimate tomato pie! For the full recipe, check out the details above. To make a great pie crust, start with cold ingredients. Use chilled butter and ice-cold water. This keeps the dough flaky. Mix the flour, salt, and baking powder in a bowl. Then add the cubed butter. Use your fingers or a pastry cutter. Mix until it looks like crumbs. Gradually add cold water. Do this slowly, a tablespoon at a time. Stop when the dough holds together. Wrap it in plastic and chill for thirty minutes. This step is key for a tender crust. Seasoning makes your tomato pie shine. Use fresh herbs like basil and thyme for great taste. Mince garlic for added depth. Always taste as you mix. A pinch of salt and pepper can boost flavors. Don’t forget to sprinkle salt on the tomato slices. This helps remove excess moisture and enhances their flavor. A drizzle of balsamic vinegar before baking adds a nice tang. Each layer of flavor counts! Let your pie cool for about ten minutes before slicing. This helps it set nicely. Serve warm or at room temperature. For a beautiful presentation, place slices on a wooden platter. Garnish with fresh basil leaves and a drizzle of olive oil. This makes your dish look and taste gourmet. You can also pair it with a fresh salad or a glass of crisp white wine. Enjoy the burst of flavors! For the full recipe, check out [Full Recipe]. {{image_2}} You can add many herbs and spices to enhance your tomato pie. Fresh herbs like thyme or oregano work well. You can mix in dried herbs if fresh ones are not available. For a kick, try adding red pepper flakes. They add warmth and depth. You can also sprinkle some smoked paprika for a unique flavor twist. Mixing these into the cheese filling can make a big difference. While ricotta and mozzarella are classic choices, feel free to experiment. Goat cheese adds a tangy taste that pairs nicely with tomatoes. Feta cheese brings a salty bite, which contrasts well with the sweetness of the tomatoes. If you like a stronger flavor, try blue cheese. Mixing different cheeses can create a rich and exciting taste. Just remember to balance flavors so one doesn’t overpower the others. You can boost your tomato pie with extra vegetables. Sautéed spinach or kale adds great color and nutrition. Zucchini or bell peppers can add crunch and sweetness. Mushrooms provide a nice umami flavor. You can even toss in roasted garlic for a deeper taste. Just make sure to pat the veggies dry before adding them to keep the crust from getting soggy. This way, you keep the pie delicious and fresh. For the full recipe, check out the [Full Recipe]. To store leftover tomato pie, let it cool completely. Cover it tightly with plastic wrap or aluminum foil. You can also place it in an airtight container. This will keep it fresh for up to three days in the fridge. Keeping it sealed helps prevent it from drying out. When you want to enjoy your leftover tomato pie, preheat your oven to 350°F (175°C). Place the slices on a baking sheet. Cover them with aluminum foil to keep them moist. Heat for about 15 to 20 minutes. This will keep the crust crispy and the cheese warm. Avoid using the microwave, as it can make the pie soggy. If you want to save your tomato pie for later, freezing is a great option. Cut the pie into slices. Wrap each slice in plastic wrap, then place them in a freezer bag. Try to remove as much air as possible. You can freeze the slices for up to three months. When you're ready to eat, thaw in the fridge overnight. Then reheat in the oven for a delicious meal. Remember, freezing keeps the flavors intact for your future enjoyment! The best way to slice tomatoes for pie is to use a sharp knife. Start by cutting off the stem end. Then, slice the tomatoes into even pieces, about 1/4 inch thick. This thickness helps the tomatoes cook well and keeps the pie from getting too soggy. After slicing, place the tomato slices on a paper towel and sprinkle them with salt. Let them sit for about 10 minutes. This helps remove excess moisture, which is key for a crisp crust. Yes, you can make the dough ahead of time. I often prepare it the night before. After mixing the dough, shape it into a ball and wrap it in plastic wrap. Place it in the fridge until you are ready to use it. This not only saves time but also lets the dough chill, which makes it easier to roll out later. Just remember to take it out of the fridge about 10 minutes before rolling. The Ultimate Tomato Pie lasts about 3 to 5 days in the fridge. To store it, cover the pie with plastic wrap or foil. This keeps it fresh and helps prevent it from drying out. When you're ready to eat it, you can enjoy it cold or reheat it in the oven. Just heat it at 350°F (175°C) for about 10-15 minutes until warm. This will help refresh the flavors and crust. For the full recipe, check out the earlier section! You’ve learned how to make the Ultimate Tomato Pie. Fresh tomatoes and great cheese are key. A well-made crust makes all the difference. Remember to season well for added flavor. You can also mix in herbs, spices, or veggies for a twist. Store leftovers properly and reheat them to enjoy later. With these tips and instructions, you're set for success. Enjoy your pie and the smiles it brings!](https://flavorsprint.com/wp-content/uploads/2025/06/b4d143e7-b805-4083-8158-022ba83527ca.webp)
If you love tomatoes, this Ultimate Tomato Pie recipe is your new go-to! I’ll share how to make a crust

Are you ready to dive into the world of comfort food with a twist? This Tomato Onion Pie is not

Looking for a delicious and easy dish to impress your family? This Yellow Squash Casserole is the perfect solution! It’s
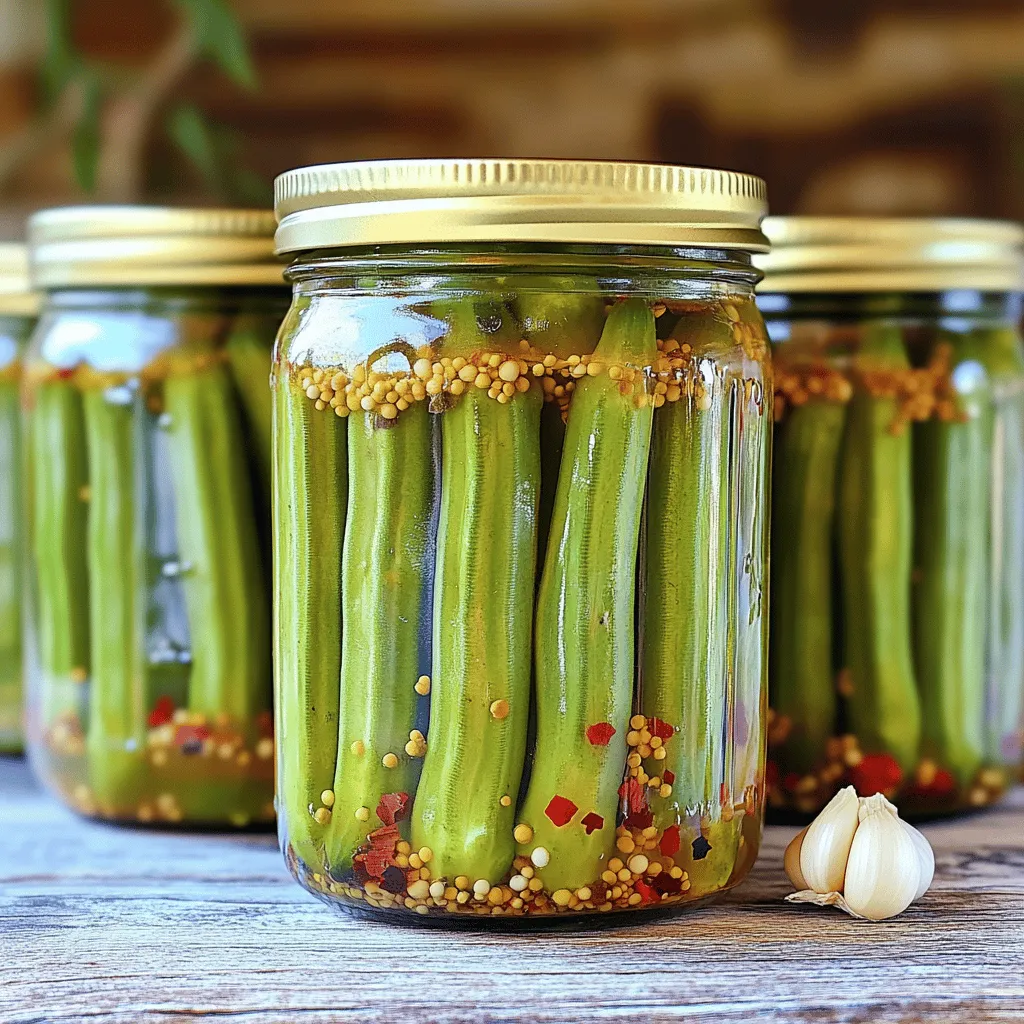
![To make hot pickled okra, start with fresh okra. Look for bright green pods. They should feel firm and smooth. Choose okra that is small to medium in size. These pods taste better and stay crisp when pickled. You need key ingredients for the brine. Here is what you will need: - 1 pound fresh okra, stems trimmed - 2 cups distilled white vinegar - 1 cup water - 2 tablespoons kosher salt - 2 tablespoons sugar - 4 cloves garlic, smashed - 1 tablespoon black mustard seeds - 1 tablespoon coriander seeds - 1 teaspoon red pepper flakes (adjust to taste) - 1 teaspoon dill seeds - 1 bay leaf These ingredients create a tangy and flavorful brine. The vinegar provides sharpness, while the spices add depth. You can add fun flavors to your pickling. Try these options for extra zing: - Fresh herbs like dill or thyme - Additional spices such as cumin or turmeric - A touch of honey for sweetness Feel free to mix and match. The goal is to create a flavor that you love. For the full recipe, be sure to check the detailed instructions. Start by sterilizing your jars. This step is key to keep the okra fresh. Take two pint-sized canning jars and their lids. Boil them in water for 10 minutes. After that, let them cool on a clean towel. This helps prevent any unwanted germs. Next, we will blanch the okra. Bring a pot of water to a boil. Add your trimmed okra and let it cook for 2-3 minutes. You want the okra to turn bright green. Once done, drain the okra and place it in ice water. This stops the cooking process. After 5 minutes, drain the okra again. This will keep them crisp and bright. Now, it’s time to make the brine. In a saucepan, mix the distilled white vinegar, water, kosher salt, and sugar. Heat it over medium heat until the salt and sugar dissolve. This is when the magic begins! Add smashed garlic, mustard seeds, coriander seeds, red pepper flakes, dill seeds, and a bay leaf. Bring this mixture to a boil, then take it off the heat. Let it cool slightly before using. Once the brine is ready, it’s time to pack the jars. Stand the blanched okra upright in your sterilized jars. This looks nice and helps them absorb the brine. Carefully pour the warm pickling brine over the okra. Make sure they are completely submerged but leave about a half-inch of headspace at the top. Wipe the rims of the jars with a clean cloth. Then, place the lids on and screw on the bands until just fingertip-tight. Finally, let the jars cool to room temperature. Once cooled, place them in the refrigerator. After 24 hours, the okra will be ready to enjoy, but waiting 3-5 days will give them the best flavor. Enjoy your hot pickled okra! For more detailed steps, check the Full Recipe. To make safe pickled okra, start with clean jars. Boil your jars and lids for 10 minutes. This kills germs and keeps your pickles safe. After boiling, let them cool on a clean towel. Do not touch the insides with your hands. This keeps them germ-free. Want more heat? Add more red pepper flakes to the brine. If you prefer mild, use less. You can also swap in jalapeño slices for a different flavor. Taste the brine before pouring it over the okra. Adjust the spices to your liking. Everyone's taste is unique! To keep the okra crisp, blanch it for just 2-3 minutes. This brightens the color and helps maintain crunch. After blanching, quickly cool the okra in ice water. This stops the cooking. Pack the okra tightly in jars but don't squish them. This helps keep them crunchy. For a full recipe with detailed steps, check out the [Full Recipe]. Enjoy your pickled okra! {{image_2}} You can make sweet and spicy hot pickled okra by adjusting the sugar and spice levels. Start with the basic recipe, but add an extra tablespoon of sugar. This gives a nice sweet taste to balance the heat. You can also increase the red pepper flakes for more kick. The sweet and spicy combo adds a fun twist. Try it with sandwiches or as a snack. Garlic and herbs can elevate the flavor of your hot pickled okra. After you prepare the brine, add fresh herbs like thyme or oregano. Use more smashed garlic cloves for a stronger taste. This method creates a savory depth that pairs well with meats or salads. Enjoy the fresh aroma that fills your kitchen! You can pickle many other vegetables using the same brine. Carrots, green beans, and cauliflower work great. Just cut them into bite-sized pieces and blanch as you did with the okra. Each vegetable adds its own twist to the mix. Experiment with your favorites to find new flavor combinations. This way, you can create a colorful mix for parties or meals. For the full recipe, refer to the section on ingredients and instructions! Hot pickled okra lasts about 1 month in the fridge. If stored properly, it can stay tasty for up to 4 weeks. The flavors will deepen over time, making it even more delicious. However, it's best to eat it fresh for the best crunch and tang. To keep your pickled okra fresh, store it in the coldest part of your fridge. Always use a clean spoon when serving to prevent germs. Ensure the jars are tightly sealed to keep the brine from spoiling. Check for any changes in smell, color, or texture. If you see mold or the brine becomes cloudy, it's time to toss it. A sour smell that is different from the pickling spices also indicates spoilage. Always trust your senses; if it seems off, do not eat it. For the full recipe and tips on making this delightful snack, check out the Full Recipe above! You can enjoy hot pickled okra straight from the jar. It makes a great snack. Serve it in a small bowl with toothpicks. You can also use it as a garnish for cocktails. The bright color adds flair to any plate. Try adding it to salads for a tangy kick. Yes, you can can hot pickled okra. Follow proper canning steps to ensure safety. Make sure your jars are sterilized before use. If done right, pickled okra can last for a year. Store it in a cool, dark place. Always check for signs of spoilage before eating. You can find hot pickled okra in many grocery stores. Look in the pickle or condiment aisle. Local farmers' markets may also sell homemade versions. Some specialty food stores offer unique flavors. If you want a specific taste, consider making your own. Check out the Full Recipe for guidance. Okra is low in calories and high in fiber. It can help with digestion and weight control. It also contains vitamins A, C, and K. These vitamins support immune health and skin. Plus, okra has antioxidants that fight free radicals. This can help keep your body healthy. Yes, you can use frozen okra for pickling. Just make sure to thaw it first. Blanching the okra is still a must. This helps maintain its color and texture. Keep in mind, frozen okra may be softer than fresh. It still makes a tasty pickled treat! You now know how to make hot pickled okra. Use fresh okra and essential pickling ingredients to get the best taste. Remember to blanch properly and pack jars tightly for crispness. You can try different flavors and even add other veggies. Store them right to keep them tasty and safe. Hot pickled okra is a fun treat or snack. Enjoy experimenting with your new skills!](https://flavorsprint.com/wp-content/uploads/2025/06/13128536-ee0d-4156-8561-ba61ea4130bd.webp)
Are you ready to spice up your meals? Hot pickled okra offers a tangy kick that will make your taste
Are you ready to dive into the world of pickled okra? This delightful treat adds a burst of flavor to
![- 3 ripe peaches, peeled, pitted, and chopped - 1 tablespoon lemon juice - 1/4 cup sugar, adjust based on sweetness of peaches - 1 cup heavy cream - 1 teaspoon vanilla extract - 2 tablespoons gelatin powder - 1/4 cup cold water - 1/4 cup Greek yogurt, optional for extra creaminess - Fresh mint leaves for garnish Peach mousse requires fresh, ripe peaches. They give the best flavor and sweetness. You can find good peaches at your local market. Look for ones that are soft but not too mushy. The lemon juice helps keep the color bright. It adds a nice zing to the sweetness. Sugar is important, but you can adjust it. Taste the peach puree first. If the peaches are very sweet, you may need less sugar. Heavy cream creates a rich texture. Whipping it to soft peaks makes the mousse light and airy. Vanilla extract gives a warm flavor. You can use real vanilla beans for a more intense taste. Gelatin is key for setting the mousse. It makes the texture smooth. Dissolve it in cold water before adding it to the mix. This step is very important. Greek yogurt adds creaminess and a slight tang. It’s optional, but I love it for added depth. Finally, fresh mint leaves make a beautiful garnish. They add color and a fresh scent. - Variations with other fruits: You can mix in berries or mango for different flavors. - Sweetener alternatives for dietary needs: Try honey or agave syrup. They can replace sugar for a healthier option. This flexibility allows you to create a mousse that fits your taste. Play with textures and flavors to find your perfect mix! For the complete recipe, check out the Full Recipe section. To make the peach puree, start by blending the peaches with lemon juice. The lemon juice brightens the flavor and keeps the peaches fresh. Peel and pit three ripe peaches, then chop them. Place the chopped peaches and one tablespoon of lemon juice into a blender. Blend until the mixture is smooth. If the puree is too thick, you can add a little water to help it along. For a perfect puree, use ripe peaches. They should feel slightly soft when you press them. This ensures a sweet and juicy flavor. Blooming gelatin correctly is key to a smooth mousse. In a small bowl, sprinkle two tablespoons of gelatin powder over a quarter cup of cold water. Let it sit for about five minutes. This helps the gelatin absorb water and expand. After blooming, gently heat it in the microwave for ten seconds. Stir until it fully dissolves, but do not boil. Boiling can ruin the texture. Common mistakes include adding gelatin directly to hot liquids or not letting it bloom. Avoid these for the best results. Whipping cream is vital for a light texture. Use one cup of heavy cream for this recipe. Start by chilling your mixing bowl and beaters. Cold equipment helps achieve better volume. Whip the cream until you see soft peaks form. This means the cream holds some shape but still looks smooth. Next, add a quarter cup of sugar and one teaspoon of vanilla extract. Continue whipping until stiff peaks form. Stiff peaks hold their shape well and add airiness to the mousse. When combining ingredients, use a gentle folding technique. Start by adding the peach puree to the whipped cream. Use a spatula to fold them together gently. This keeps the mixture light and airy. If you want extra creaminess, fold in a quarter cup of Greek yogurt at this stage. This step is optional but adds a rich flavor. Be careful not to overmix. You want to maintain the whipped cream's volume for a fluffy mousse. Chilling the mousse is the final step. Pour the mixture into individual serving dishes or a large bowl. Chill it in the refrigerator for at least two hours. This allows the mousse to set properly. To check if it’s ready, gently shake the dish. If it wobbles slightly and holds its shape, it's set. The mousse should be smooth and creamy. For the best taste, serve it chilled with a slice of fresh peach and mint leaves on top. For the full recipe, refer to the earlier section. - Over-whipping the cream: When you whip cream, stop at stiff peaks. If you whip too long, it turns to butter. This ruins the smooth texture. - Not allowing gelatin to bloom properly: Blooming helps the gelatin dissolve evenly. If you skip this step, your mousse may not set well. Always let it sit in cold water for five minutes. - Presentation ideas for peach mousse: To impress guests, serve the mousse in clear cups. Garnish with a slice of fresh peach and a mint sprig. This adds color and freshness. - Pairing with other desserts or drinks: Peach mousse pairs well with light cakes or sorbets. For drinks, try it with a sparkling wine or iced tea. These choices enhance the fruity flavor. - Adjusting sweetness based on peach ripeness: Taste your peaches first. If they’re sweet, use less sugar. If they’re tart, add a bit more. This keeps your mousse balanced and delicious. - Adding spices or extracts for enhanced flavor: To elevate your mousse, think about adding cinnamon or nutmeg. A splash of almond extract can also bring depth. Just a little goes a long way! {{image_2}} To make a vegan peach mousse, you can use agar-agar instead of gelatin. Agar-agar is a seaweed-based thickener. It sets just like gelatin, but it is plant-based. You will need to dissolve it in boiling water. This creates a similar texture without any animal products. For the cream, use dairy-free alternatives. Coconut cream works well and adds a nice flavor. You can also try cashew cream for a lighter taste. Blending soaked cashews with water creates a smooth consistency. This combination gives you a creamy and delicious vegan mousse! If you want a lower-sugar option, consider natural sweeteners. Honey or maple syrup can replace refined sugar. These options add sweetness without too many calories. Adjust the amount based on your taste. You can also use stevia or erythritol for a diabetic-friendly choice. These sweeteners have little to no calories and won't spike blood sugar. Get creative with flavor variations! You can add other fruits like mango or raspberry. Mixing these fruits with peaches gives a fun twist. Try adding herbs or spices like mint or cinnamon. These can enhance the peach flavor and make your mousse unique. Experimenting with different flavors keeps the dessert fresh and exciting! For the complete recipe, check out the [Full Recipe]. To keep your peach mousse fresh, store it in the fridge. Use airtight containers to prevent odors and moisture from affecting the mousse. It stays good for 2 to 3 days in the fridge. Make sure to label your containers with the date. This helps you keep track of how long it's been stored. You can freeze peach mousse if you want to save it for later. Use a freezer-safe container to avoid freezer burn. Before freezing, leave some space at the top of the container. This allows the mousse to expand. It can last in the freezer for up to one month. For the best texture, avoid freezing if it has been garnished. To thaw, move it to the fridge for several hours or overnight. This helps it regain its creamy texture. You can also thaw it at room temperature for about 30 minutes. Avoid using a microwave, as it can change the texture. After you take the mousse out from the fridge or freezer, it may need some refreshing. Gently stir it to bring back the smoothness. If it's frozen, let it sit for a bit before stirring. For a beautiful presentation, use fresh peach slices and mint leaves. This adds color and freshness to your mousse. Serve it in clear cups or bowls to show off its lovely color. You can find the full recipe for this delightful dessert in the earlier sections. Peach mousse needs at least two hours in the fridge to set. If you serve it in smaller cups, it might set faster. Check after one hour for smaller servings. For best results, let it chill overnight. This helps all the flavors blend well. Yes, you can use frozen peaches! Just remember to thaw them first. Drain any excess water after thawing. This keeps your mousse from becoming too watery. Frozen peaches work well if fresh ones are not available. They still bring that sweet peach flavor. To reduce sweetness, you can cut back on sugar. Start with two tablespoons instead of a quarter cup. Taste the mixture as you mix. If it needs more sweetness, add a little sugar at a time. This way, you can control the sweetness to your liking. If you need a lighter option, try coconut cream or almond milk. These are good dairy-free choices. You can also use Greek yogurt for a creamier texture. Just remember, these may change the taste a bit. Experiment to find what you like best in your mousse. Peach mousse is simple and fun to make. You need ripe peaches, cream, and gelatin. You can add new fruits or adjust sugar for your taste. Follow the steps carefully to get the best texture. Chill it well and serve with mint for a lovely touch. Remember, practice makes perfect. Enjoy your peach mousse and get creative with flavors. It’s a treat you can easily share!](https://flavorsprint.com/wp-content/uploads/2025/06/0d8b1073-47c6-4fbc-a7c4-ad8b3d0aab1e.webp)
Craving something light and fruity? Peach Mousse Delight is your answer! This simple dessert bursts with fresh peach flavor and
