Skip to content
DisclaimerTerms Of UseGDPR PolicyCookie Policy

flavorsprint

  • Home
  • Drinks
  • Appetizers
  • Dinner
  • Dessert
  • About
  • Contact
  • Privacy Policy
DisclaimerTerms Of UseGDPR PolicyCookie Policy

Lillian

- 2 pounds chicken wings - 1/4 cup honey - 1/4 cup soy sauce - 2 tablespoons sriracha sauce - 1 tablespoon apple cider vinegar - 1 tablespoon garlic powder - 1 teaspoon ginger powder - 1 teaspoon ground black pepper - 1/2 teaspoon chili flakes (adjust to taste) - 2 tablespoons sesame oil - 2 green onions, chopped - Sesame seeds To make sweet spicy chicken wings, start with the right ingredients. You need fresh chicken wings for the best flavor. Use honey for sweetness. Soy sauce adds depth. Sriracha gives the wings their kick. Apple cider vinegar balances everything out. For seasoning, garlic powder brings richness. Ginger powder adds warmth. Ground black pepper gives a nice bite. Chili flakes let you control the heat level. Finally, sesame oil adds a nutty aroma that ties it all together. Garnishes like chopped green onions and sesame seeds not only add color but also enhance the taste. You can find the full recipe with step-by-step guidance to bring these flavors together. Enjoy the process and let your taste buds dance! - Preheat the oven to 400°F (200°C). - Line a baking sheet with aluminum foil or parchment paper for easy cleanup. Start by preparing your kitchen for a fun cooking session. Preheating the oven is key. It helps the wings cook evenly and get crispy. Lining your baking sheet makes cleanup a breeze. No one likes a messy kitchen after a delicious meal! - Whisk together marinade ingredients until well combined. - Coat the wings in the marinade and refrigerate. Now, let’s make the marinade. In a bowl, combine honey, soy sauce, sriracha, apple cider vinegar, garlic powder, ginger powder, black pepper, and chili flakes. Whisk it all together until smooth. This marinade packs a sweet and spicy punch. Pour it over the chicken wings in a large bowl or a zip-top bag. Make sure every wing gets coated. Seal it, then refrigerate for at least an hour. If you have time, let them marinate overnight for even more flavor. - Arrange wings on the baking sheet and bake for 40-45 minutes. - Flip wings halfway through for even cooking. After marinating, it's time to bake! Place the wings in a single layer on the baking sheet. Bake them for 40-45 minutes. Halfway through, flip the wings to ensure they cook evenly. This step helps them get that perfect golden brown color and crispy texture. - Heat remaining marinade to create a glaze. - Brush glaze on wings and bake for an additional 5-10 minutes. While the wings bake, prepare the glaze. Take the remaining marinade that you set aside before marinating the wings. Heat it in a small saucepan over medium heat. Bring it to a simmer and let it cook for about 5-7 minutes until it thickens a bit. This glaze adds a sticky, flavorful finish. Once the wings are done baking, brush them with the glaze. Pop them back in the oven for another 5-10 minutes. This final touch gives the wings a shiny, caramelized finish that you won’t be able to resist. For the full recipe, refer to the instructions above. Enjoy making these sweet spicy chicken wings! To get the right mix of sweet and spicy, adjust the sriracha and honey. If you want more heat, add extra sriracha. For more sweetness, increase the honey. You can also try adding a splash of apple cider vinegar to enhance the flavors during marination. This little trick helps bring out the best in both the sweet and spicy notes. Getting crispy skin is all about technique. Start by baking the wings at a high temperature of 400°F (200°C). Arrange the wings in a single layer on your baking sheet. Flip them halfway through cooking. This step ensures that both sides crisp up nicely. If you want extra crunch, broil them for the last few minutes. Sweet spicy chicken wings pair well with a variety of sides. Try serving them with celery sticks and carrot sticks for a fresh crunch. A cooling ranch or blue cheese dressing makes a great dip. For presentation, serve the wings on a large platter. Drizzle any leftover glaze on top and garnish with chopped green onions and sesame seeds. This makes your dish look even more inviting! {{image_2}} You can change the flavor of your sweet spicy chicken wings by adding different sauces or spices. For example, chipotle sauce gives a smoky taste. You might also try garlic aioli for a creamy touch. Each sauce adds its own twist to the dish. Using different types of vinegar can also change the flavor. Apple cider vinegar is great, but you could use rice vinegar for a milder taste. Each choice brings new depth to the wings. Experimenting is part of the fun! You can cook sweet spicy chicken wings in various ways. Grilling gives them that nice char and smoky flavor. Baking is easier and keeps them juicy. Both methods work well, but you should choose based on your time and tools. Air frying is another option. It cooks wings quickly and makes them crispy with less oil. If you want a healthier option, this is a great choice. The wings still taste amazing! When serving your wings, think about pairing them with different dipping sauces. Ranch and blue cheese are classic choices, but you could try a spicy mustard or a yogurt-based dip too. These add extra flavor and keep things exciting. Consider sides that complement your wings as well. Fresh veggies or a light salad work great. You could also serve them with fries or coleslaw for a hearty meal. Enjoy exploring different combinations to find your perfect match! To keep your sweet spicy chicken wings fresh, store them in an airtight container. This helps lock in their flavor and moisture. You can also wrap them tightly in aluminum foil. Make sure to refrigerate them within two hours of cooking. Ideally, consume the wings within three days for the best taste. For reheating, the oven works best. Preheat it to 350°F (175°C). Place the wings on a baking sheet and cover with foil. Heat for around 15-20 minutes. This method keeps them crispy and juicy. Avoid using the microwave, as it can make them rubbery. Always check that they reach an internal temperature of 165°F (74°C) to ensure they are safe to eat. You can freeze the wings for longer storage. First, let them cool completely. Then, place them in a freezer-safe bag. Squeeze out as much air as possible. They will last for up to three months in the freezer. To defrost, move them to the fridge overnight. Reheat them in the oven as mentioned above. This keeps them tasty and tender. For the full recipe, check out the Sweet Spicy Chicken Wings section. Yes, you can make sweet spicy chicken wings ahead of time. To prep in advance, marinate the wings the night before. This lets the flavors soak in deeply. Store the marinated wings in the fridge. When you’re ready to cook, just bake them as per the recipe. You save time and still enjoy great taste. If you need a honey substitute, try maple syrup or agave nectar. Both add sweetness but change the flavor a bit. You can also use brown sugar dissolved in water for a similar effect. Each option gives a unique twist to the wings. To change the heat level, modify the amount of sriracha or chili flakes. For milder wings, use less sriracha and omit chili flakes. If you like it hot, add more sriracha and chili flakes. Always taste as you go to find the right balance for your palate. Yes, this recipe works well for meal prep. The wings stay tasty even after a few days in the fridge. Cook a big batch and store them in meal prep containers. You can enjoy them for lunch or dinner throughout the week. Just reheat and savor the sweet and spicy goodness. For the full recipe, check out the details above! This post covered all you need for sweet spicy chicken wings. You learned about the key ingredients, easy steps for marinating and baking, and tips for perfecting flavor and texture. I shared ways to store leftovers and reheat them without losing taste. In the end, this recipe is simple, fun, and can impress anyone. You can adjust flavors and try new methods. Get cooking and enjoy delicious wings!

Sweet Spicy Chicken Wings Irresistible Flavor Boost

Are you ready to take your wing game to the next level? My Sweet Spicy Chicken Wings offer a delicious

- Pineapple: 1 cup, diced - Strawberries: 1 cup, hulled and sliced - Kiwi: 1 cup, peeled and sliced - Blueberries: 1 cup - Mango: 1 cup, diced - Fresh mint leaves: 1 tablespoon, chopped - Honey: 3 tablespoons - Lime juice: 2 tablespoons - Lime zest: Zest of 1 lime Fruits are packed with vitamins and minerals. They help you stay healthy and energized. Each fruit brings its own benefits. Pineapple has bromelain, which aids digestion. Strawberries are high in vitamin C, great for your skin. Kiwi is rich in vitamin K, good for bone health. Blueberries are known for antioxidants, supporting brain health. Mango adds vitamin A, which helps your eyesight. Mint is refreshing and can aid digestion too. Honey adds natural sweetness. It has antioxidants and may soothe your throat. Lime juice is refreshing and high in vitamin C. It helps absorb iron from fruits. The combination of honey and lime gives flavor and health benefits. This salad not only tastes great but also boosts your health. To enjoy this delightful mix, check out the Full Recipe. To start, gather your fresh fruits. I love using pineapple, strawberries, kiwi, blueberries, and mango. 1. Pineapple: Cut the top and bottom off. Stand it upright and slice off the skin. Cut the flesh into small, bite-sized cubes. 2. Strawberries: Remove the green tops. Slice the strawberries into thick pieces. 3. Kiwi: Cut off both ends. Use a spoon to scoop out the green flesh. Slice it into rounds. 4. Blueberries: These are easy! Just rinse them well under cold water and set them aside. 5. Mango: Stand the mango upright. Cut along the pit to get two large pieces. Peel the skin and dice the flesh. Mix all the diced fruits in a large bowl. This colorful mix makes your salad look great! Now, let’s make the dressing. This part is simple and quick. 1. In a small bowl, take three tablespoons of honey. I prefer clover or wildflower honey for their light flavor. 2. Squeeze in two tablespoons of fresh lime juice. Roll the lime on the counter first to get more juice. 3. Add the zest from one lime to the bowl. This gives a nice aroma and flavor. Whisk everything together until it’s smooth. Set it aside for a moment. Next, it’s time to bring everything together. 1. Pour the honey lime dressing over the fruit mix. 2. Gently toss the fruit with the dressing. Be careful not to mash the fruit. 3. Add one tablespoon of chopped fresh mint leaves. This gives your salad a fresh taste. Let the salad sit for about 10 minutes. This will help the flavors blend well. Enjoy your fresh fruit salad with honey lime dressing! For the complete recipe, check out the Full Recipe. To boost flavor in your fruit salad, add fresh herbs. Mint is a great choice. It pairs well with sweet fruits. You can also use basil for a unique twist. If you want more fruit, try adding peaches or raspberries. They add sweetness and color. Serving your salad in a fun way is easy. Use a large bowl to show off the colors. You can also use clear cups for individual servings. This makes it look fancy. Don’t forget to garnish with extra mint leaves. A lime wedge on the side adds a nice touch. For the best taste, chill the salad for at least 10 minutes. This allows the flavors to mix well. You can prepare it ahead of time, but don’t chill it for too long. Serve it fresh for the best experience. Enjoy it on a hot day or as a light dessert. Check the [Full Recipe] for more details. {{image_2}} You can create a tropical fruit medley by adding other fruits. Try including papaya or passion fruit for new flavors. These fruits blend well with the honey lime dressing. You can also use coconut flakes for a fun texture. Just chop them finely and mix them in. This twist makes your salad taste like a beach getaway! For a berry blast version, swap in different berries. Blackberries, raspberries, and even strawberries work great. Mix them in with the blueberries for added color and taste. Berries are sweet and add a burst of juice. You can even mash some berries for a thicker dressing. This version is perfect for berry lovers! Citrus fruits can brighten your salad. Add slices of orange or grapefruit to give it a zesty kick. Both fruits pair well with honey and lime. Their juice adds a refreshing twist. Cut them into small pieces so they mix well with the other fruits. This will enhance the flavor and make your salad pop! For the full recipe, visit the [Full Recipe]. To keep your fruit salad fresh, store it in an airtight container. Place it in the fridge right after serving. This helps maintain its crispness and flavor. The salad will stay fresh for about 2 days. After that, the fruits may start to lose their texture. If you see any browning, scoop out those pieces before serving. Can you freeze fruit salad? Yes, but it may change the texture. Some fruits, like strawberries and kiwi, can get mushy after freezing. If you want to freeze it, only freeze the fruits that hold up well, like pineapple and blueberries. Cut them into small pieces and place them in a freezer-safe bag. Use them within a month for the best taste. When you're ready to serve the salad after storage, take it out of the fridge. If it's been frozen, let it thaw in the fridge overnight. Once thawed, gently mix it to combine the flavors again. You may want to add a splash of fresh lime juice to brighten it up. Serve it cold for a refreshing treat. Enjoy your colorful and tasty fruit salad! For the complete recipe, check out the Full Recipe section above. You can make the honey lime dressing ahead of time. Just mix the honey, lime juice, and lime zest in a jar. Seal it tightly and store it in the fridge. It will stay fresh for about a week. Before using, give it a good shake. This helps mix any ingredients that may have settled. While you can use frozen fruit, I prefer fresh. Fresh fruit tastes better and has a nice crunch. Frozen fruit can be mushy after thawing. If you choose frozen, let it thaw completely. Drain any extra juice to keep your salad from getting soggy. Fresh fruit brings bright flavors and a great texture to this salad. Yes, this recipe is great for meal prep. You can chop the fruit a day in advance. Store it in an airtight container in the fridge. The salad lasts up to three days, but some fruits may brown. To keep it fresh, add the honey lime dressing just before serving. This way, your salad stays colorful and tasty. To make your fruit salad last longer, choose ripe fruit that is firm. Avoid overripe fruit, as it spoils quickly. To prevent browning, use an acid like lime juice on fruits like apples and bananas. Mixing the fruits gently helps keep them intact. Store the salad in a sealed container in the fridge for freshness. Enjoy this refreshing dish from the Full Recipe. This blog post covered how to create a fresh fruit salad with honey lime dressing. You learned about the ingredients, step-by-step preparation, and tips for enhancing flavor. Nutritional benefits show how these fruits boost health. Remember, you can add your favorite fruits or herbs for a personal touch. Store leftovers properly to keep them fresh for longer. With these ideas, you can enjoy a delicious and healthy salad anytime. Keep experimenting, and make this salad a family favorite!

Fresh Fruit Salad with Honey Lime Dressing Delight

Get ready to brighten your day with a Fresh Fruit Salad with Honey Lime Dressing! This vibrant dish bursts with

- 2 large chicken breasts - 2 tablespoons honey - 2 tablespoons chipotle sauce (or adobo sauce from chipotle peppers) - 1 tablespoon olive oil - 1 teaspoon garlic powder - 1 teaspoon cumin - Salt and pepper to taste - 1 cup cooked brown rice or quinoa - 1 cup black beans, rinsed and drained - 1 cup corn (fresh or canned) - 1 cup cherry tomatoes, halved - 1 avocado, sliced - Fresh cilantro, chopped (for garnish) - Lime wedges (for serving) When I create Honey Chipotle Chicken Bowls, I love to start with fresh ingredients. The chicken breasts are the star of this dish. They soak up the sweet and spicy marinade well. Honey brings a natural sweetness, while chipotle adds a smoky kick. Next, I prepare the base. You can choose either brown rice or quinoa. Both options work great! Each adds a nice texture and complements the chicken. For toppings, I like to use black beans, corn, and cherry tomatoes. These add color and flavor to the bowl. Sliced avocado gives it a creamy touch. Finally, I sprinkle fresh cilantro on top for a burst of freshness. A squeeze of lime adds zest, making each bite lively. This recipe is not just tasty; it is easy to make. You can have everything ready in about 50 minutes. For the full recipe, check out the detailed instructions. To start, you need to prepare the marinade. In a medium bowl, mix together: - 2 tablespoons honey - 2 tablespoons chipotle sauce - 1 tablespoon olive oil - 1 teaspoon garlic powder - 1 teaspoon cumin - Salt and pepper to taste This mix gives your chicken a sweet and spicy flavor. Once you have your marinade ready, it’s time to coat the chicken. Place the two large chicken breasts in the bowl. Make sure they are fully covered in the marinade. Let the chicken marinate for at least 30 minutes. If you have more time, marinate it for up to 2 hours in the fridge. This extra time will help the flavors soak in. Next, you’ll cook the chicken. Preheat your grill or grill pan over medium-high heat. Once it’s hot, take the chicken out of the marinade. Grill each breast for about 6-7 minutes on one side. Flip the chicken and grill for another 6-7 minutes. You want the chicken to be fully cooked. Check the internal temperature; it should reach 165°F (75°C). When done, take it off the grill and let it rest for a few minutes. This keeps it juicy. Now, it’s time to build your bowls. Start with a base of brown rice or quinoa. Place a cup of your chosen base in each bowl. Next, slice the grilled chicken into strips. Arrange the chicken on top of the rice or quinoa. Add black beans, corn, cherry tomatoes, and avocado slices. For a beautiful finish, garnish with fresh cilantro. Serve lime wedges on the side. A squeeze of lime adds a fresh, zesty touch. Enjoy your Honey Chipotle Chicken Bowls! For the complete recipe, check the [Full Recipe]. To ensure juicy chicken, marinate the meat well. Use the marinade for at least 30 minutes. The longer it sits, the more flavor it gains. You can marinate it for up to 2 hours in the fridge. This time lets the honey and chipotle sauce soak in. If you want to change the marinade, try different sauces. Teriyaki or barbecue sauce works great. You can also use yogurt or buttermilk for a tenderizing effect. Just remember to keep the honey for sweetness. For sides, I recommend fresh salad or roasted veggies. Corn on the cob pairs well too. You can also serve this dish with a refreshing drink like iced tea or lemonade. If you have leftovers, consider making a wrap. Use tortillas and add your favorite veggies. You could also mix the chicken with scrambled eggs for breakfast. The sweet and spicy flavors work well in many dishes. For the full recipe, check out the details above. {{image_2}} You can change up the protein in your honey chipotle chicken bowls. Try using tofu for a vegetarian option. Tofu absorbs flavors well and gives a nice texture. Shrimp is another great choice. It cooks quickly and adds a sweet taste. For the base, consider different options. Lettuce works well for a lighter meal. Just chop it up and use it as the bowl's foundation. Cauliflower rice is another fun swap. It adds a healthy twist and keeps carbs low. You can add more spices or sauces to boost flavor. Try a pinch of paprika for some smokiness. A dash of lime juice can add freshness. You could also mix in some salsa for extra zest. Seasonal vegetables can change your bowls too. In the summer, grilled zucchini or bell peppers taste great. In the fall, roasted sweet potatoes add sweetness and warmth. You can really make these bowls your own! For the full recipe, check out the Honey Chipotle Chicken Bowls section. To keep your Honey Chipotle Chicken Bowls fresh, store leftovers in the fridge. Use airtight containers to prevent air from spoiling the food. The chicken can last up to four days in the fridge. If you want to save it longer, freeze the chicken and other ingredients separately. This way, you can enjoy a quick meal later. Wrap them well in freezer-safe bags or containers. They can last for up to three months in the freezer. Reheating your bowls properly keeps the flavors intact. The microwave is quick but may dry out the chicken. To avoid this, cover the bowl with a damp paper towel. This keeps moisture in. Heat in short bursts of 30 seconds, stirring in between. Using the stovetop is a great option too. Just add a splash of water or broth to a pan. Heat over low heat, stirring often. This method keeps the chicken juicy and the rice tender. Enjoy your delicious, reheated Honey Chipotle Chicken Bowls just like fresh! You can grill or bake honey chipotle chicken. For grilling, preheat your grill to medium-high heat. Cook the chicken for about 6-7 minutes on each side until it reaches 165°F. For baking, set your oven to 375°F. Place the chicken in a baking dish and cook for 25-30 minutes. Both methods produce juicy chicken full of flavor. Yes, you can prepare honey chipotle chicken ahead of time. Marinate the chicken and store it in the fridge. You can also cook the chicken in advance and store it in an airtight container. It lasts up to three days in the fridge. This saves time for busy days. You can change the honey chipotle chicken bowls to suit your taste. Try adding different vegetables like bell peppers or zucchini. You can also switch the base to lettuce or cauliflower rice. For extra heat, add more chipotle sauce. Mix in your favorite toppings, like cheese or salsa. Honey chipotle chicken bowls are balanced meals. Each serving has about 400-500 calories, depending on toppings. The bowls provide protein from chicken and fiber from beans. The rice or quinoa adds healthy carbs. This meal is nutritious and filling. You can find the full recipe [here](#). In this blog post, we explored how to make delicious honey chipotle chicken bowls. We covered the main and additional ingredients, detailed steps for marinating and cooking the chicken, and tips for assembling the bowls. I also shared some variations, storage tips, and answered common questions. Overall, these bowls are easy to prepare and packed with flavor. Customize them to fit your taste. Enjoy the process and taste the rewards!

Honey Chipotle Chicken Bowls Tasty and Easy Recipe

Looking for a tasty dish that’s simple to make? Honey Chipotle Chicken Bowls could be your new favorite! With sweet

To make a great Balsamic Strawberry Caprese Salad, you need fresh ingredients. Here’s what you’ll need: - 2 cups fresh strawberries, hulled and sliced - 1 cup fresh mozzarella balls (bocconcini), halved - 1 handful fresh basil leaves - 3 tablespoons balsamic glaze - 1 tablespoon extra virgin olive oil - Salt and pepper to taste - Zest of 1 lemon (optional for added freshness) These ingredients come together for a bright, tasty salad. The strawberries add sweetness, while the mozzarella gives creaminess. Fresh basil provides a fragrant touch. The balsamic glaze ties everything together with its rich flavor. You can make this salad even better with a few simple add-ons. Consider these options: - A sprinkle of crushed red pepper flakes for heat - Sliced avocado for creaminess - Toasted nuts like walnuts or almonds for crunch - A drizzle of honey for extra sweetness These enhancements can elevate your salad and impress your guests. You don’t need fancy tools to make this salad. Here’s what you’ll need: - A large mixing bowl - A sharp knife for slicing - A cutting board - Measuring spoons for the balsamic glaze and olive oil Having these tools handy will make the process smooth and easy. With just a few basic items, you can whip up this fresh and flavorful dish. For the full recipe, check out the details above. To start, gather your ingredients. You need fresh strawberries, mozzarella, and basil. Slice the strawberries and halve the mozzarella balls. Place them in a large mixing bowl. Add the basil leaves gently. This keeps them whole and fresh. Drizzle balsamic glaze and olive oil over the top. Sprinkle salt and pepper to taste. If you like a zesty touch, add lemon zest. Now, gently toss everything together. Make sure the dressing coats all the ingredients. This salad is all about balance and flavor. When mixing, use a light hand. You want to keep the mozzarella and strawberries intact. If you stir too hard, they can break apart. Serve the salad on a large white platter. This makes the colors pop. Right before serving, add a bit more balsamic glaze on top. It gives a nice shine and extra flavor. Garnish with whole basil leaves for a fresh look. After mixing, let the salad sit for 5 minutes. This allows the flavors to blend well. The strawberries will release some juice, adding to the dressing. If you serve it right away, the flavors may not be as strong. Enjoy your fresh and flavorful Balsamic Strawberry Caprese Salad! For the complete recipe, visit the section above. Serving your Balsamic Strawberry Caprese Salad right is key. I love using a large white platter. The colors pop against the white. Drizzle extra balsamic glaze on top just before serving. This adds a nice touch. Garnish with whole basil leaves for a fresh look. You can also serve it in individual bowls for a more personal touch. This salad can shine with a few simple pairings. Try serving it with grilled chicken or fish. The flavors mix well and create a balanced meal. A side of crusty bread will complement the salad nicely. If you want to drink something, a light white wine works great. It enhances the flavors without overpowering them. Avoid using strawberries that are overripe. They can make the salad too mushy. Fresh mozzarella should be soft but not dripping. Don't skip the salt and pepper. They elevate the taste of each ingredient. Toss the salad gently. You don't want to tear the basil leaves. Lastly, let it sit for a few minutes. This waiting time helps the flavors blend beautifully. For the full recipe, refer to the earlier section. {{image_2}} You can change up this salad based on what is fresh. In spring, try ripe peaches instead of strawberries. In fall, use apples or pears for a crunchy twist. Each fruit brings new flavors. You might also add tomatoes for extra color and taste. Mix and match to find what you love best. This salad is easy to adapt. For a vegan version, swap mozzarella with vegan cheese or avocado. For gluten-free needs, this recipe is already safe. Just ensure all ingredients are gluten-free. You can enjoy this salad without any worry. Try adding nuts like almonds or walnuts for crunch. A drizzle of honey can make it sweeter. You could also include a pinch of chili flakes for some heat. If you love herbs, mix in mint or oregano for a fresh kick. Each twist makes this salad unique and fun. For the full recipe, check the main article. To store your Balsamic Strawberry Caprese Salad, place it in an airtight container. Make sure to cover it well to keep out air. This helps keep the salad fresh. Refrigerate it right away. Enjoy it within two days for the best taste. When prepping this salad in advance, keep the dressing separate. This helps the salad stay crisp. You can slice the strawberries and mozzarella ahead of time. Just wait to add the basil until right before serving. This keeps the basil fresh and vibrant. The salad stays fresh for up to two days. After that, the strawberries may become mushy. The cheese can get rubbery and lose its charm. The basil can also turn brown and wilt. For the best flavor and texture, enjoy your salad soon after making it. If you want to try this delicious dish, check out the Full Recipe. If you can't find fresh basil, try using fresh parsley or mint. Both herbs add a fresh taste. You can also use arugula for a peppery kick. Each option gives a unique twist to your salad. Yes, you can prepare the salad ahead of time. Just be careful with the basil. It wilts quickly when mixed with moisture. I suggest adding the basil right before serving. This keeps the leaves fresh and vibrant. Making balsamic glaze is easy! Simply heat 1 cup of balsamic vinegar in a pot. Bring it to a simmer and cook until it reduces by half. This usually takes about 10-15 minutes. The glaze thickens as it cools. Absolutely! This salad is colorful and tasty, making it perfect for a potluck. It’s easy to transport and doesn’t need cooking. Just mix it in a bowl and serve. The bright flavors will impress your friends. For the full recipe, check out the earlier section. This blog post covered all you need to know for a great Balsamic Strawberry Caprese Salad. We discussed fresh ingredients and optional enhancements for bold flavors. I shared tips for perfect mixing and serving, along with common mistakes to avoid. You can also explore seasonal swaps and dietary options to cater to different tastes. Remember to store your leftovers properly for the best taste later. Enjoy this delicious salad and get creative with your own variations!

Balsamic Strawberry Caprese Salad Fresh and Flavorful

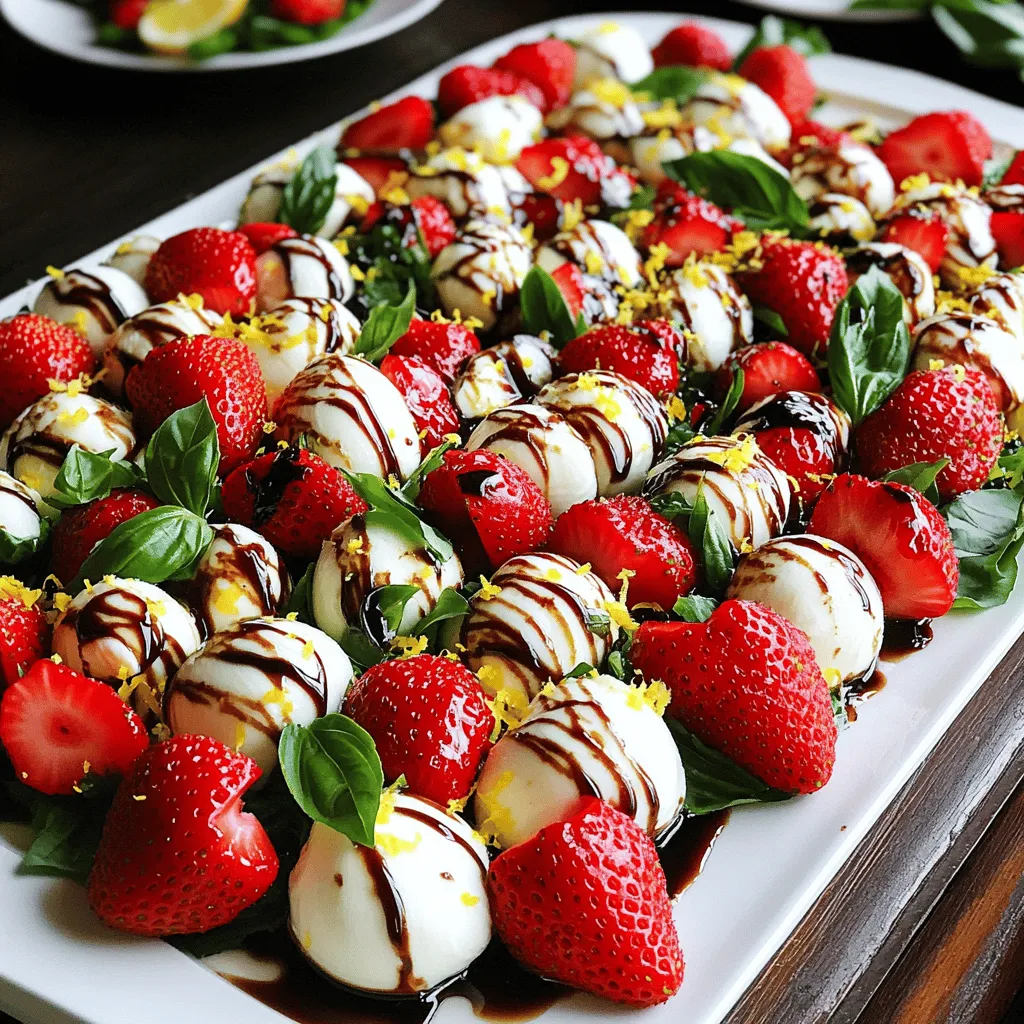
Get ready to elevate your salad game with my Balsamic Strawberry Caprese Salad! This sweet and savory dish combines fresh

For a delightful Blueberry Peach Feta Salad, we need a mix of fresh and vibrant ingredients. Each component adds its own flavor and texture. Here’s what you will need: - 2 cups fresh spinach - 1 cup blueberries - 1 medium ripe peach - 1/2 cup feta cheese - 1/4 cup toasted pecans - Dressings: Honey, balsamic vinegar, olive oil - Seasoning: Salt and pepper Fresh spinach offers a crisp base for this salad. Blueberries bring a sweet burst, while ripe peaches add juicy softness. The feta cheese gives a tangy kick, and toasted pecans provide a crunchy texture. For the dressing, honey, balsamic vinegar, and olive oil create a perfect balance of sweet and tangy flavors. Don’t forget to season with salt and pepper to enhance all the tastes. This combination makes for a fresh and flavorful delight. You can find the detailed preparation steps in the Full Recipe section. Enjoy the bright colors and tastes of this salad! To make the Blueberry Peach Feta Salad, follow these easy steps. 1. Combine 2 cups fresh spinach and 1 cup blueberries in a large bowl. 2. Add 1 medium ripe peach, sliced, on top of the spinach and blueberries. Arrange them attractively. 3. Sprinkle 1/2 cup feta cheese, crumbled, and 1/4 cup toasted pecans, roughly chopped, over the salad. 1. In a small bowl, whisk together 2 tablespoons honey, 1 tablespoon balsamic vinegar, and 2 tablespoons olive oil until smooth. 2. Season with salt and pepper to taste. 1. Drizzle the dressing over the salad, then toss gently to mix all the flavors. 2. Taste the salad and adjust seasoning with more salt, pepper, or honey as needed. For the Full Recipe and more details, feel free to explore further. Enjoy the fresh and vibrant flavors of this salad! You can serve Blueberry Peach Feta Salad in a large bowl or on individual plates. A large bowl makes it easy for guests to serve themselves. If you choose individual plates, it adds a nice touch to your table. For a pretty look, garnish with extra blueberries and a sprinkle of feta on top. It creates a fresh and colorful appeal. This salad goes well with grilled chicken or fish for a light meal. It also pairs nicely with a crisp white wine, like Sauvignon Blanc. You can serve it at picnics, barbecues, or as a refreshing starter at dinner parties. Its bright flavors fit perfectly into summer gatherings. To add more flavor, try mixing in fresh herbs like mint or basil. They can give a lovely twist to your salad. You can also use different nuts like walnuts or almonds for a unique crunch. If you want to switch up the cheese, goat cheese is a great choice and adds a different taste. For the full recipe, check out the detailed instructions above. Enjoy experimenting with these tips! {{image_2}} You can swap peaches or blueberries for other fruits. Try strawberries or raspberries for a sweet twist. For a tropical vibe, use mango or pineapple. Seasonal fruits like pears work well in fall. In winter, consider using citrus fruits like oranges or grapefruit. Each fruit adds a unique taste and texture, keeping your salad fresh. To make this salad vegan, replace feta with a plant-based cheese. You can also use avocado for creaminess. For a gluten-free option, ensure your dressing is gluten-free. You can make a low-sugar dressing by using agave syrup instead of honey. This keeps the salad tasty without added sugar. You can find inspiration from global cuisines. Add spicy jalapeños for a Mexican kick. For an Italian flair, include basil or use a pesto dressing. You can also explore local flavors by adding nuts or cheeses from your area. This personal touch makes the salad unique and fun. To keep your Blueberry Peach Feta Salad fresh, store it in an airtight container. This helps prevent air from spoiling the ingredients. You can use glass or plastic containers with tight lids. Make sure to remove excess air before sealing. It’s best to store the salad without the dressing. This way, the greens stay crisp and the fruits remain juicy. The salad lasts about three days in the fridge. After that, the quality drops. If you see any brown spots on the spinach or mushy fruit, it’s time to toss it out. Mold is another sign to watch for. Always check for off smells, as they indicate spoilage. This salad is best enjoyed cold. However, if you want to reuse the feta or nuts, you can warm them slightly. Just avoid reheating the spinach or fruits, as they can lose their texture. Freezing this salad is not recommended. The fruits and greens will become mushy when thawed. For the freshest taste, always prepare just what you need! For the full recipe, refer to the Blueberry Peach Feta Salad section. This salad is a healthy choice. It has about 220 calories per serving. Here’s a quick breakdown: - Fats: 12 grams - Carbohydrates: 25 grams - Protein: 6 grams - Fiber: 4 grams - Vitamins: Rich in vitamins A and C from spinach and fruit. Yes, you can prepare it in advance. Make it up to 2 hours ahead. Keep the dressing separate to avoid soggy greens. Just toss it together before serving. If you want a dairy-free option, try using tofu or cashew cheese. Both add creaminess. They won’t taste exactly the same, but they work well. You can also use goat cheese for a tangy flavor. This salad works well for meal prep. Store it in airtight containers. Keep the dressing separate. This helps keep it fresh for up to three days. When ready to eat, just combine and enjoy! For the full recipe, check out the [Full Recipe]. This blog post covered a delicious Blueberry Peach Feta Salad. You learned about fresh ingredients, dressing options, and easy prep steps. We discussed tips for serving, ideal pairings, and flavor boosts. You also explored fun variations and important storage info. In closing, this salad is not just tasty; it’s simple to make. Enjoy fresh flavors and create your unique version! You can impress guests or treat yourself. Eat well and enjoy every bite!

Blueberry Peach Feta Salad Fresh and Flavorful Delight

Are you ready to elevate your salad game? This Blueberry Peach Feta Salad is a fresh and flavorful delight that

To make your Garlic Parmesan Chicken Skillet, gather these items: - 4 boneless, skinless chicken breasts - 1 tablespoon olive oil - 4 cloves garlic, minced - 1 cup chicken broth - 1 cup heavy cream - 1 cup grated Parmesan cheese - 1 teaspoon Italian seasoning - ½ teaspoon red pepper flakes (optional for heat) - Salt and pepper to taste - Fresh parsley, chopped for garnish You can swap some ingredients based on what you have. If you don't have chicken broth, use vegetable broth. For a lighter dish, use half-and-half instead of heavy cream. If you dislike Parmesan, try another cheese like mozzarella or cheddar. You can leave out the red pepper flakes if you prefer no heat. Fresh parsley can be replaced with basil for a different flavor. Start by measuring your ingredients carefully. Use a dry measuring cup for the cheese and liquid measuring cup for the broth and cream. Mince the garlic finely to release all its flavor. For the chicken, make sure to pat it dry with paper towels before seasoning. This helps the chicken sear better in the pan. Prepare all ingredients before cooking, as this makes the process smooth and quick. You can find the full recipe to guide you step by step. First, let’s prepare the chicken. Season the chicken breasts on both sides with salt and pepper. This adds great flavor. Next, heat one tablespoon of olive oil in a large skillet over medium-high heat. Add the chicken breasts and sear them for about 5-7 minutes on each side. Look for a nice golden brown color. When cooked through, remove the chicken from the skillet and set it aside. Now, it’s time to sauté the garlic. In the same skillet, lower the heat to medium. Add the minced garlic and cook it for about one minute until it smells amazing. Be careful not to burn it. After that, pour in one cup of chicken broth. Bring this to a simmer and scrape the bottom of the skillet. This helps pick up all those tasty bits left behind. Let the broth reduce for about 3-4 minutes. Next, we’ll make the sauce. Stir in one cup of heavy cream, one cup of grated Parmesan cheese, one teaspoon of Italian seasoning, and optional red pepper flakes if you like some heat. Mix everything well and let the sauce simmer for another 5 minutes. You want it to thicken up nicely. Finally, return the cooked chicken breasts to the skillet. Coat them in that creamy sauce and let them heat through for a couple of minutes. For a fresh touch, sprinkle with chopped parsley right before serving. - Prepare the Chicken: 5 minutes - Sear the Chicken: 10-14 minutes - Sauté Garlic: 1 minute - Create the Sauce: 8-10 minutes - Combine Chicken and Sauce: 2-3 minutes Overall, you can make this dish in about 30 minutes. To make sure your chicken is cooked right, use a meat thermometer. The internal temperature should reach 165°F. If you don’t have a thermometer, cut into the thickest part. The juices should run clear, not pink. Also, letting the chicken rest for a few minutes after cooking keeps it juicy. Enjoy this Garlic Parmesan Chicken Skillet with confidence! For the full recipe, check out the details above. When making Garlic Parmesan Chicken Skillet, avoid overcooking the chicken. It can dry out quickly. Use a meat thermometer to check for doneness. Aim for 165°F (75°C). Also, don't burn the garlic. Sauté it gently until fragrant. If it turns brown, it gets bitter. Lastly, don’t skip the seasoning. Salt and pepper enhance the dish's flavor. You can boost the flavor in this dish easily. Try adding fresh herbs like thyme or rosemary. They add a nice touch. For more heat, increase the red pepper flakes. A splash of lemon juice can brighten the sauce too. Experiment with different cheeses. Asiago or mozzarella can change the taste while keeping it creamy. A large skillet is key for this recipe. I recommend a non-stick one for easy cleanup. A meat thermometer helps ensure chicken cooks well. Use a wooden spoon for stirring sauce and scraping the pan. This keeps the flavors mixed and prevents sticking. Lastly, have a sharp knife handy for cutting the chicken after cooking. For the full cooking steps, check the Full Recipe. {{image_2}} You can swap chicken for other proteins. Turkey cutlets work well. Pork chops are another great option. For a lighter choice, try shrimp or tofu. Each protein adds a new taste to the dish. Just adjust the cooking time. Cook shrimp until pink. For pork, ensure it reaches a safe internal temperature. Adding vegetables boosts the meal's nutrition. Spinach, kale, or broccoli are excellent choices. Simply toss them into the skillet during the last few minutes of cooking. This way, they stay bright and crisp. You can also add bell peppers or zucchini for color and flavor. They cook quickly and add sweetness to the dish. To make this dish gluten-free, use gluten-free chicken broth. For a dairy-free version, coconut milk can replace heavy cream. Nutritional yeast gives a cheesy flavor without dairy. You can also use vegan cheese for a similar taste. These swaps let everyone enjoy this tasty meal without worry. After making Garlic Parmesan Chicken Skillet, let it cool down. Place the chicken in an airtight container. Store it in the fridge for up to three days. Keep the sauce separate to maintain its creamy texture. To reheat, use a skillet over medium heat. Add a splash of chicken broth or cream to keep it moist. Heat until warm, stirring gently. You can also use a microwave. Place it in a microwave-safe dish and cover with a lid. Heat for 1-2 minutes, stirring halfway through. You can freeze Garlic Parmesan Chicken Skillet for up to three months. Place the chicken and sauce in a freezer-safe container. When ready to eat, thaw it overnight in the fridge. Reheat using the instructions above for the best results. Enjoy your meal even days later! The best way to season chicken is with salt and pepper. This simple mix brings out the natural flavor. You can also add garlic powder or paprika for more taste. If you want it even better, try using fresh herbs like thyme or rosemary. These add a nice touch and a fresh aroma. Just remember to season both sides of the chicken well. Yes, you can use frozen chicken for this recipe. However, you need to thaw it first. The best way is to place it in the fridge overnight. If you're in a hurry, you can use the microwave to thaw it. Just be careful not to start cooking it. Once thawed, follow the recipe as usual for great results. To make the sauce thicker, you can add a bit of cornstarch. Mix one tablespoon of cornstarch with two tablespoons of cold water. Stir this mixture into the sauce while it simmers. Another way is to let the sauce cook longer. This will reduce the liquid and make it thicker. You can also add more Parmesan cheese to help thicken the sauce while boosting the flavor. For the full recipe, check out the complete instructions! We covered essential ingredients and how to measure them well. You learned step-by-step cooking instructions and tips to check if your chicken is done. Avoid common mistakes and enhance flavors with the right tools. Remember, you can try protein swaps or add veggies for a healthy twist. Finally, store your food safely with the right methods. Use this guide to create delicious meals with confidence. Happy cooking!

Garlic Parmesan Chicken Skillet Flavorful and Easy Meal

Are you ready for a quick, tasty dinner? This Garlic Parmesan Chicken Skillet recipe is your answer! Packed with rich

- 1 lb fresh shrimp, peeled and deveined - 4 corn tostadas - 2 tablespoons olive oil - 1 teaspoon chili powder - 1/2 teaspoon garlic powder - Salt and pepper to taste - 1 ripe avocado - 1 tablespoon lime juice - 1/4 cup red onion, finely chopped - 1 small tomato, diced - 1/4 cup cilantro, chopped - Optional: sliced jalapeños for topping Gathering fresh ingredients is key to great flavor. Start with 1 pound of fresh shrimp. Make sure they are peeled and deveined for easy cooking. You will need four crispy corn tostadas to hold all the toppings. Olive oil helps the shrimp cook nicely and adds flavor. Chili powder gives a nice kick, while garlic powder enhances the taste. Salt and pepper round out the seasoning. For the guacamole, use one ripe avocado. The lime juice keeps it fresh and adds zesty flavor. Finely chopped red onion and diced tomato bring in crunch and color. Lastly, fresh cilantro adds brightness. If you like heat, consider adding sliced jalapeños as a topping. You can find the Full Recipe [here](#). To start, combine the shrimp with olive oil, chili powder, garlic powder, salt, and pepper. Use a bowl to mix everything well. Make sure the shrimp gets coated evenly. Next, let it marinate for about 15 minutes. This step enhances the flavor and prepares the shrimp for cooking. While the shrimp marinates, let’s make the guacamole. Cut the ripe avocado in half, remove the pit, and scoop the flesh into a mixing bowl. Use a fork to mash the avocado until smooth. Then mix in lime juice, finely chopped red onion, diced tomato, and cilantro. Don’t forget to season with salt to taste. Once mixed, set the guacamole aside. Now it's time to cook the shrimp. Heat a skillet over medium-high heat until hot. Add the marinated shrimp to the pan. Cook the shrimp for about 2-3 minutes on each side. You want them to turn pink and be cooked through. This quick cooking method keeps the shrimp tender and juicy. Now comes the fun part: assembling the tostadas! Take each corn tostada and spread a generous amount of guacamole on top. Then, add a portion of the cooked shrimp. If you like some heat, you can add sliced jalapeños as well. Arrange the assembled tostadas on a platter for a beautiful presentation. If you want, garnish with more cilantro for a fresh touch. These shrimp tostadas are ready to impress! Enjoy them with friends or family as a tasty snack or meal. For the complete recipe, check out the Full Recipe. To make the best guacamole, start with a ripe avocado. It should feel soft but not mushy. Mash it with a fork until it's smooth but leave some small chunks for texture. Mix in lime juice to add flavor and prevent browning. Lime juice slows oxidation and keeps your guacamole bright green. To keep your guacamole fresh longer, store it in an airtight container. Press plastic wrap directly onto the surface. This reduces air exposure and helps it stay green. If you see browning, just mix it lightly before serving. Cooking shrimp can be tricky. Make sure to cook them just right. Shrimp should be pink and firm when done. Overcooking makes them tough. Cook for only 2-3 minutes on each side in a hot pan. To enhance flavor, marinate shrimp with spices like chili powder and garlic powder. This adds depth and makes them more tasty. You can also add a pinch of salt while cooking for extra flavor. Storing assembled tostadas requires care. Tostadas can get soggy if stored too long. I recommend storing the guacamole and shrimp separately. If you have leftovers, store the guacamole in a sealed container. Keep the tostadas in a cool, dry place. Reheat tostadas in the oven for a few minutes to restore their crispness. This way, you can enjoy them later without losing that great crunch! {{image_2}} You can change up the toppings on your shrimp tostadas. If you want a fish option, try grilled mahi-mahi or tilapia. These fish have a mild flavor and cook quickly. For a chicken twist, use diced grilled chicken breast. Just season it well, and it will complement the guacamole perfectly. You can even mix shrimp and chicken for a surf and turf treat. To make a plant-based version of shrimp tostadas, swap shrimp for jackfruit or mushrooms. Jackfruit has a meaty texture that works well. You can shred it and sauté it with spices. Mushrooms, like portobello or shiitake, add a rich flavor when cooked. For the guacamole, use fresh avocado, lime juice, and your favorite veggies. This way, you keep the creamy goodness without any animal products. You can adjust the spice level of your tostadas easily. For a mild dish, use less chili powder and add sweet paprika. If you love heat, add diced jalapeños or a dash of cayenne pepper. You might also try adding cumin for a smoky flavor. A squeeze of lime can brighten the dish, making every bite refreshing. Experiment to find your perfect balance! To store leftover shrimp, place it in an airtight container. This keeps moisture in and air out. You can keep shrimp in the fridge for up to three days. Make sure it cools completely before sealing. If you want to keep it longer, freeze the shrimp. For freezing, wrap it tightly in plastic wrap, then place it in a freezer bag. Frozen shrimp can stay fresh for up to three months. Guacamole can brown quickly. To keep it fresh, use a few tricks. First, press plastic wrap directly onto the guacamole's surface. This limits air exposure. You can also add a thin layer of lime juice on top. This helps slow down browning. Store it in the fridge for up to two days. If you see some browning, just scrape off the top layer before serving. Tostadas are best when crispy. To store them, keep them in a cool, dry place. Use an airtight container to protect them from moisture. If you need to reheat tostadas, preheat your oven to 350°F (175°C). Place them on a baking sheet and heat for about five minutes. This restores their crispness. Avoid using the microwave, as it makes them soggy. To make shrimp tostadas gluten-free, I recommend using corn tostadas. They are naturally gluten-free and perfect for this dish. You can also find gluten-free tortillas or make your own using masa harina. Just be sure to check labels to avoid hidden gluten in processed foods. Yes, you can use frozen shrimp! Just make sure to thaw them first. Place the shrimp in cold water for about 15-20 minutes. Once thawed, pat them dry before marinating. This helps the shrimp absorb the flavors better and cook evenly. Shrimp tostadas pair well with many side dishes. Here are some great options: - A fresh salad with lime dressing - Mexican rice or quinoa - Black beans for added protein - A chilled beverage like horchata or a light beer For the complete cooking instructions and ingredient list, check the Full Recipe. In this blog post, I covered making shrimp tostadas with guacamole. We began with fresh shrimp and rich spices, then moved to easy guacamole and assembly. I also shared tips for great flavor and perfect texture. You can try variations with different proteins or flavors. Whether serving for a dinner or a gathering, these tostadas shine. Enjoy making this dish, and remember, fresh ingredients make the best meals.

Savory Shrimp Tostadas with Guacamole Recipe

Are you ready to brighten up your dinner table with a burst of flavor? This Savory Shrimp Tostadas with Guacamole

To make a delightful Raspberry Lime Rickey, gather these key ingredients: - 1 cup fresh raspberries - 2 limes, juiced - 1 cup sparkling water or club soda - 2 tablespoons honey or agave syrup (adjust for sweetness) - Ice cubes - Fresh mint leaves for garnish - Lime slices for garnish These ingredients blend to create a refreshing drink that sings with flavor. Fresh raspberries give a sweet and tart taste, while lime juice adds a zesty kick. Sparkling water provides the fizz that makes this drink fun. You can customize your Raspberry Lime Rickey by adding: - A splash of orange juice for extra citrus - Fresh berries like blueberries or strawberries for added color - A dash of flavored syrup like lavender or elderflower These extras can make the drink more exciting. Feel free to get creative and try new flavors. If you don’t have some ingredients, here are easy swaps: - Use frozen raspberries if fresh ones aren't available. - Substitute lime juice with lemon juice for a different taste. - Swap honey or agave for maple syrup if you prefer. These substitutions keep the drink flavorful and fun. You can enjoy a Raspberry Lime Rickey even if you don’t have every ingredient. For the full recipe, check out the details in the guide. First, gather your ingredients. You need fresh raspberries and lime juice. I like to use ripe, juicy raspberries for the best flavor. In a blender, add one cup of fresh raspberries and the juice of two limes. Blend them together until smooth. This step is simple and fun. The bright colors make it look great. Next, you will strain the mixture. Pour the blended raspberries through a fine mesh sieve into a mixing bowl. This step removes the seeds, giving you a smooth drink. Use a spatula to press down on the mixture. Make sure to get all the juice out. Now, it's time to sweeten! In a pitcher, mix the raspberry juice with two tablespoons of honey or agave syrup. Stir it well until the sweetener dissolves completely. Now, let’s put it all together! Fill each glass with ice cubes. Pour the raspberry-lime mixture into the glasses, filling them halfway. Next, top each glass with sparkling water or club soda. This adds fizz and fun! Gently stir to mix everything together. Finally, garnish with fresh mint leaves and a slice of lime. Your Raspberry Lime Rickey is ready to enjoy! For the full recipe, refer to the earlier section. To make your Raspberry Lime Rickey just right, taste is key. Start with two tablespoons of honey or agave. This gives a nice sweetness without being too much. After mixing, taste it. If you want it sweeter, add a bit more. Remember, the tart lime juice will balance the sweetness. Adjust until it feels just right. Adding fresh herbs can really boost your drink. Mint is a great choice. It adds a cool note that pairs well with raspberries and lime. Simply slap the mint leaves to release their oils before adding them as a garnish. You can also try basil for a unique twist. Crush the leaves gently to release their flavor. Serve your Raspberry Lime Rickey very cold. Chill your glasses in the fridge for a bit before pouring. Use tall glasses to show off the drink’s color and garnishes. The ice cubes keep it cold, while the sparkling water adds a refreshing fizz. Enjoy it on a hot day for the best experience. {{image_2}} You can switch up the fruit in your Raspberry Lime Rickey. Try using strawberries or blueberries instead of raspberries. They add a fun twist and a different flavor. For strawberries, blend one cup of fresh berries with lime juice. For blueberries, use the same method. The sweet and tart flavors blend nicely. You’ll still enjoy that refreshing taste. Want to make it a cocktail? Add a splash of gin or vodka. This makes a great adult drink. Use one to two ounces of your favorite spirit. Mix it in with the raspberry-lime mixture before adding the sparkling water. You’ll enjoy a fizzy and fun drink perfect for parties or relaxing evenings. Change the drink with the seasons. In summer, add fresh peaches or watermelon for a juicy twist. In fall, try some apple juice or cinnamon. Just mix these fruits into your base recipe. You can keep the original flavors while adding new ones. This way, you can enjoy a Raspberry Lime Rickey all year long! For the complete recipe, check out the Full Recipe for detailed steps! Store leftover raspberry-lime mixture in a clean glass jar. Seal it tightly. Keep it in the fridge. This helps preserve its freshness. Use the mixture within a few days for the best taste. You can keep the mixture in the fridge for up to three days. After that, the flavor may fade. Always smell and taste before using. If it smells off or tastes strange, throw it away. You can freeze the mixture for later use. Pour it into ice cube trays. Once frozen, transfer the cubes to a zip-top bag. This way, you can use small amounts as needed. Use frozen cubes within three months for the best flavor. A Raspberry Lime Rickey is a fun, refreshing drink. It blends tart lime juice with sweet raspberries. This drink is bubbly and vibrant. You make it with sparkling water or club soda. It’s perfect for a hot day or a party. You can serve it over ice for extra chill. If you want to impress guests, garnish it with mint or lime slices. This drink is a crowd-pleaser! Yes, you can make a sugar-free Raspberry Lime Rickey! Instead of honey or agave syrup, use a sugar substitute. Options include stevia or erythritol. These sweeteners give the drink a nice flavor without the sugar. Adjust the amount to your taste. This way, you can enjoy the drink without added sugar. You can serve Raspberry Lime Rickey in tall glasses or mason jars. It looks great with ice cubes and garnishes. Try adding fresh mint leaves and lime slices for a pop of color. For a fun twist, serve it with colorful straws. This drink pairs well with light snacks like fruit or chips. You can even serve it at brunch with pastries. To make a party punch, simply double or triple the recipe. Use a large bowl or pitcher for serving. Mix the raspberry-lime base and add extra sparkling water. For a twist, add sliced fruits like strawberries or oranges. You can also include a splash of vodka or rum for an adult version. This bubbly punch will keep everyone refreshed and happy! In this article, we explored the essential ingredients for making a Raspberry Lime Rickey. You learned how to prepare the mixture, strain and sweeten it, and assemble your drink. We discussed tips to balance flavors and enhance your drink with fresh herbs. You can also try fun variations, including fruity twists or cocktails. Don’t forget about storage tips to keep your mixture fresh. With these steps, you can enjoy a delicious Raspberry Lime Rickey any time. Now it’s your turn to mix, sip, and share!

Raspberry Lime Rickey Refreshing Drink Recipe Guide

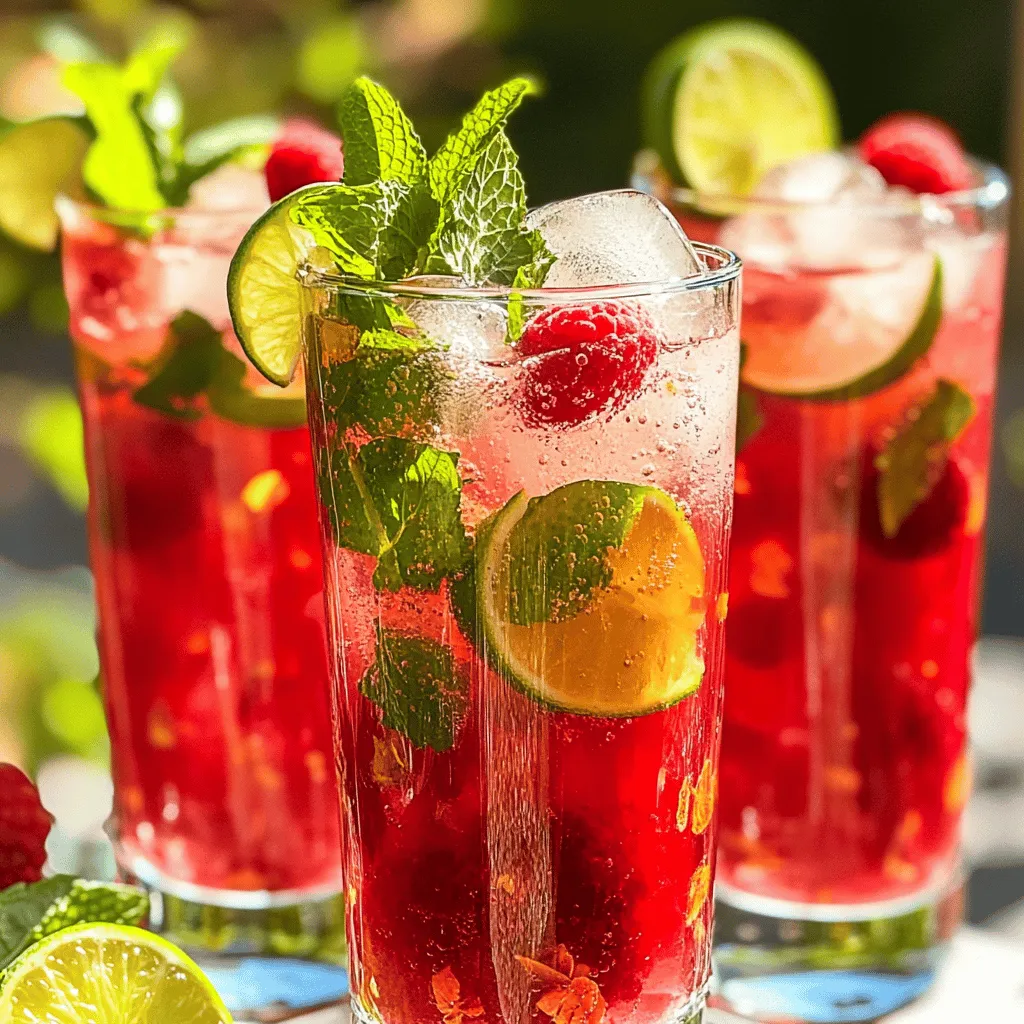
Looking for a thirst-quenching treat? This Raspberry Lime Rickey recipe is your answer! I’ll guide you through the simple steps

To make this drink, you need: - 2 cups fresh strawberries, hulled and sliced - 1 cup freshly squeezed lemon juice (about 4-6 lemons) - 1 cup granulated sugar (adjust to taste) - 4 cups cold water - 2 cups ice cubes - 1 lemon, sliced (for garnish) - Fresh mint leaves (for garnish) The key ingredients create a bright, refreshing drink. Fresh strawberries offer sweetness and vibrant color. Lemon juice adds a zesty tartness. Sugar balances the flavors. Cold water keeps it light and refreshing. Ice cubes make it frosty and fun. Garnishes add flair to your drink. A lemon slice gives a pop of color. Fresh mint leaves add a lovely aroma. For a special touch, you can place whole strawberries on the rim. These garnishes make the drink look and taste even better. To make the best Strawberry Frosted Lemonade, start by preparing your strawberries. Wash and hull two cups of fresh strawberries. Slice them to help with blending. Next, add the sliced strawberries to a blender. Pour in half of the cold water, about two cups. Blend until you have a smooth puree. If you want, strain the mixture through a fine-mesh sieve for extra smoothness. Set the strawberry puree aside. In a large pitcher, squeeze the juice from about four to six lemons until you have one cup. Add one cup of granulated sugar to the lemon juice. Stir the mixture well until the sugar dissolves completely. Now, pour in the strawberry puree and the remaining two cups of cold water. Mix everything together until it looks uniform. To achieve that frosted texture, you must crush the ice properly. Place two cups of ice cubes into the blender. Pulse the ice until it is finely crushed. This creates a great texture. You can also adjust the amount of ice based on how frosted you want your drink. Now it's time to serve your Strawberry Frosted Lemonade. Start by filling serving glasses with a layer of crushed ice. Pour the strawberry lemonade mixture over the ice until the glass is about three-quarters full. For an eye-catching finish, garnish each glass with a slice of lemon and a sprig of fresh mint. You can even add whole strawberries on the rim for an extra special touch. Serve with colorful straws and enjoy your refreshing summer drink! To get the right sweetness, taste as you go. Start with one cup of sugar. If it's too sweet, add more lemon juice. If it’s not sweet enough, add a bit more sugar. Remember, the strawberries also add sweetness. Always adjust to your taste. For a great frosted texture, use crushed ice. You can crush ice in a blender or use a mallet. If you want it finer, blend it longer. Make sure to layer the crushed ice in your glass for that nice frosted look. It keeps your drink cold and fun. You can make this drink even better by adding more flavors. Try adding a splash of lime juice for a zesty kick. Fresh mint mixed in adds a cool taste. You could even add some coconut milk for creaminess. Be creative; mix and match to find your favorite flavor! {{image_2}} You can mix strawberry with other fruits for fun flavors. Mango adds a tropical twist. Its sweetness complements the tartness of lemon well. Raspberry also works great. It gives a bright color and a delicious taste. Try mixing two or three fruits. This way, you can create your own unique drink! If you want a healthier drink, think about sugar substitutes. Honey or agave syrup can replace granulated sugar. They add sweetness without refined sugars. You can also use stevia or monk fruit sweetener. These options reduce calories and keep the flavor. Adjust the amount to suit your taste. Both frozen and fresh ingredients work well for this drink. Fresh strawberries bring a bright flavor. If fresh ones are not available, frozen strawberries are a good choice. They also chill the drink quickly. Use frozen lemon juice for a convenient option too. Both types will yield a tasty Strawberry Frosted Lemonade. After enjoying your Strawberry Frosted Lemonade, store leftovers in a pitcher. Cover it with plastic wrap or a lid. Keep it in the fridge. This drink tastes best within two days. If you notice any separation, just shake it gently before serving again. If you want to freeze your Strawberry Frosted Lemonade, pour it into ice cube trays. This makes it easy to use later. Once frozen, transfer the cubes to a zip-top bag. Remove as much air as you can. This helps avoid freezer burn and keeps the flavor fresh. Prepared Strawberry Frosted Lemonade lasts about two days in the fridge. After that, the taste and texture may change. If frozen, enjoy it within three months for the best flavor. Always check for any off-smells or changes in color before consuming. Yes, you can make Strawberry Frosted Lemonade ahead of time. I suggest mixing the strawberry and lemon mixture first. Store it in the fridge. When it's time to serve, blend the ice and pour it over the mixture. This keeps the drink fresh and frosty. If you prepare it too early, the ice may melt and dilute the flavor. The nutritional facts may vary, but here’s a general idea: - Calories: About 150 per serving - Carbohydrates: Around 38 grams - Sugar: Roughly 30 grams - Fiber: 2 grams - Vitamin C: A good source from lemons and strawberries This drink is refreshing and provides some vitamins. Adjust the sugar to make it healthier. Yes, Strawberry Frosted Lemonade is naturally non-alcoholic. It is perfect for kids and anyone who prefers a fresh drink. Use the full recipe to enjoy this tasty treat without any alcohol. You can sip it on a hot day or serve it at parties. You now have a clear path to make Strawberry Frosted Lemonade. Start with the right ingredients and follow the steps to create a refreshing drink. Remember the tips for sweetness and ice texture. Feel free to try different fruits or sweeteners. Store any leftovers properly to keep them fresh. Enjoy this yummy drink with friends and family, or make it for yourself. Each glass can be a tasty treat. I hope this recipe inspires you to get creative in the kitchen!

Strawberry Frosted Lemonade Refreshing Summer Drink

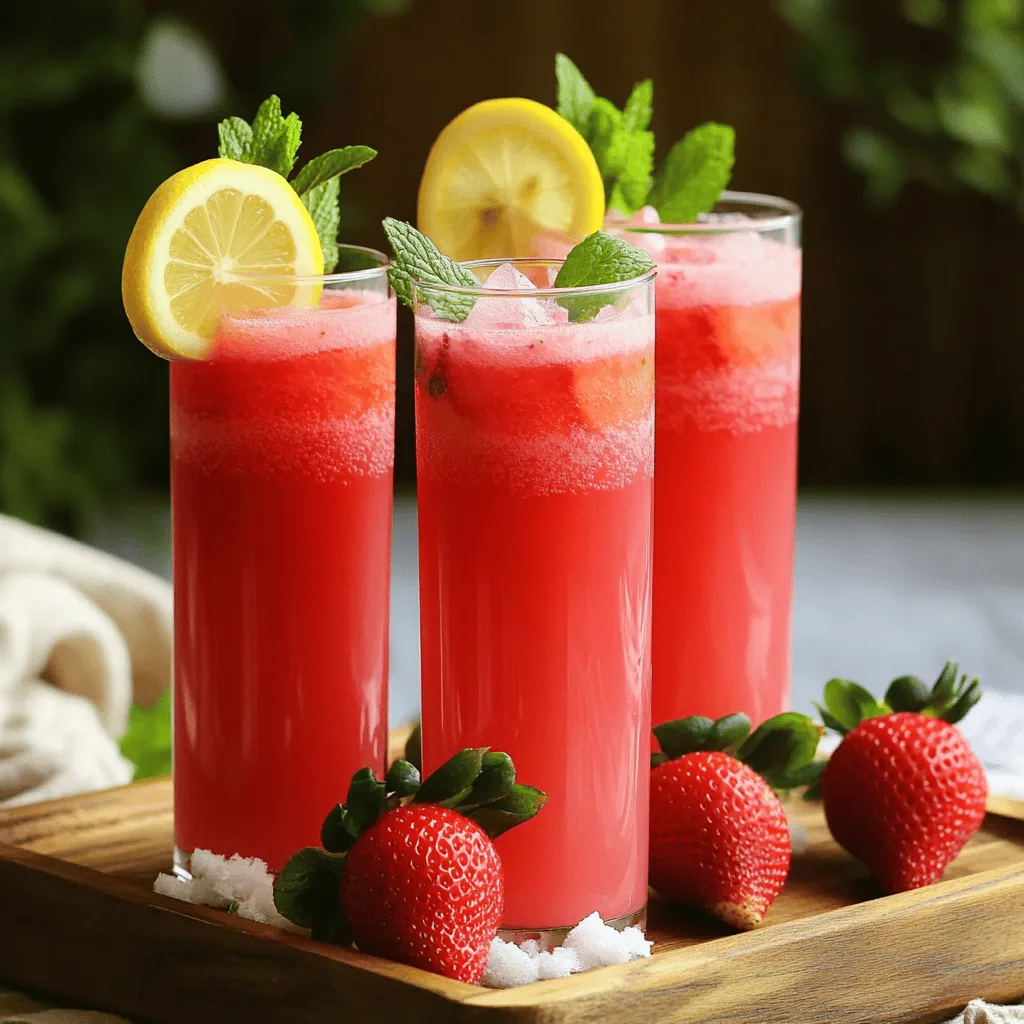
Beat the heat this summer with my delicious Strawberry Frosted Lemonade! This drink combines the sweet taste of strawberries with

- Ground beef - Fresh Thai basil leaves - Garlic and ginger The main ingredients in Thai Basil Beef Rolls create a vibrant flavor. Ground beef gives a hearty base. Fresh Thai basil leaves add a fragrant kick. Garlic and ginger bring warmth and depth to the dish. - Soy sauce - Fish sauce (optional) - Sugar and sesame oil Seasonings are key to great flavor. Soy sauce gives a savory taste. Fish sauce adds umami, but it's optional. A touch of sugar balances saltiness. Sesame oil enhances the dish with nutty notes. - Rice paper wraps - Lettuce leaves - Fresh mint leaves Wrapping ingredients make the rolls fun and fresh. Rice paper wraps are soft and easy to use. Lettuce leaves add a crisp texture. Fresh mint leaves serve as a bright garnish. You can find the full recipe to make these delightful rolls. To start, gather all your ingredients. This includes: - 1 lb ground beef - 1 cup fresh Thai basil leaves, chopped - 2 cloves garlic, minced - 1 tablespoon ginger, grated - 2 tablespoons soy sauce - 1 tablespoon fish sauce (optional) - 1 teaspoon sugar - 1 tablespoon sesame oil - 8 rice paper wraps - Lettuce leaves (for wrapping) - Fresh mint leaves (for garnish) Next, soak the rice paper wraps. Fill a shallow dish with warm water. Dip each wrap for about 10-15 seconds. You want them soft, not too soggy. Place them on a clean surface to prepare for rolling. Now it’s time to cook the filling. Heat the sesame oil in a skillet over medium heat. Add the minced garlic and grated ginger. Sauté them until you smell their aroma, which takes about 1 minute. Then, add the ground beef to the skillet. Cook it until it’s brown and fully cooked, which should take about 6-8 minutes. Break the meat up with a spatula as it cooks. After the beef is cooked, stir in the soy sauce, fish sauce (if using), and sugar. Mix everything well and let it simmer for 2-3 minutes. Finally, remove the skillet from heat and fold in the chopped Thai basil. The heat will wilt the basil perfectly. Now, let’s assemble the rolls. Start with a softened rice paper wrap. Lay a lettuce leaf on top. Spoon a good amount of the beef mixture onto the lettuce. Carefully fold the sides of the rice paper over the filling. Then, roll it tightly from the bottom up, like a burrito. Repeat this process with the remaining rice paper and filling. Serve the rolls on a platter. Add fresh mint leaves on top for a lovely garnish. For the full recipe, check the previous section. Enjoy your Thai Basil Beef Rolls! To cook ground beef well, use medium heat. This keeps the beef juicy. Break it into small pieces as it cooks. This ensures even browning. Aim for a nice brown color without burning. For the rice paper, soak it in warm water. Do this for about 10-15 seconds. It should feel soft and pliable. If it gets too soft, it may tear. So, check it closely. Work with one sheet at a time to avoid sticking. You can add more herbs or spices to boost flavor. Try adding cilantro or chili flakes for heat. A splash of lime juice can brighten the taste too. Experiment until you find your favorite mix. For dipping sauces, peanut sauce or sweet chili sauce pair well. They add a nice contrast to the savory beef. Feel free to try other sauces you love. Pair these rolls with fresh veggies or a light salad. This adds crunch and freshness to the meal. You can also serve them with rice for a fuller dish. To present for guests, arrange the rolls on a nice platter. Garnish with mint leaves for a pop of color. You can even add small bowls of dipping sauce for fun. This makes your dish look inviting and tasty. For the full recipe, check out the recipe section above. Enjoy your cooking adventure! {{image_2}} You can switch the ground beef in this recipe. Ground chicken or turkey works well. They have a lighter taste but still absorb the flavors nicely. If you want a vegetarian option, use mashed tofu or lentils. Both give a great texture and soak up the sauces. Adding vegetables can boost nutrition and flavor. Think about bell peppers, carrots, or cucumbers. These add a nice crunch. You can also mix in other herbs like cilantro or mint. Each herb brings a new taste to your rolls. You can easily change the spice level. If you like heat, add red pepper flakes or sliced chili. For a milder version, skip the spicy extras. You can serve these rolls as a meal with a salad or as an appetizer at a party. They fit any setting! To keep your Thai Basil Beef Rolls fresh, use airtight containers. Glass or plastic containers work well. Store them in the fridge. They stay good for 2-3 days. After that, the rice paper can get too soft. The beef may lose its flavor. If you want to freeze the rolls, first wrap them tightly in plastic wrap. Then, place them in a freezer bag. Make sure to squeeze out any air. These rolls can stay frozen for up to 2 months. To reheat, let them thaw in the fridge overnight. Next, place them in a warm skillet for a few minutes. This keeps the rice paper soft and tasty. You can make these rolls ahead of time for a quick meal. Prepare the filling and soak the rice paper wraps. Store everything separately in the fridge. When you’re ready to eat, assemble the rolls quickly. This saves time and keeps them fresh. You’ll enjoy a flavorful meal in no time. For the full recipe, check above. To make these rolls gluten-free, swap regular soy sauce with tamari. Tamari gives a similar taste without gluten. You can also check if your fish sauce is gluten-free. It's best to use fresh rice paper wraps as they are usually gluten-free too. Yes, you can make these rolls ahead. Prepare the beef filling and store it in the fridge. For best taste, wrap the rice paper just before serving. If you make the rolls early, keep them in an airtight container. Use parchment paper between layers to avoid sticking. These rolls pair well with many sides. Try a light salad with lime dressing or a bowl of steamed rice. For dips, a sweet chili sauce or peanut sauce works great. You can also serve cucumber slices for a fresh crunch. To avoid tearing, handle rice paper gently. Soak it in warm water until soft but not too long. Lay it flat on a clean surface. Don’t overfill the wraps; a little goes a long way. Roll them loosely at first, then tighten as you go. Thai Basil Beef Rolls are fun and easy to make. You learned how to prepare the filling, assemble the rolls, and enhance their flavors. Remember to try different proteins and customize your dish to fit your taste. Store leftovers properly to keep them fresh. With these tips, you can impress your guests or enjoy a tasty snack at home. Keep experimenting and enjoy every bite of your delicious Thai Basil Beef Rolls.

Thai Basil Beef Rolls Flavorful and Easy Delight

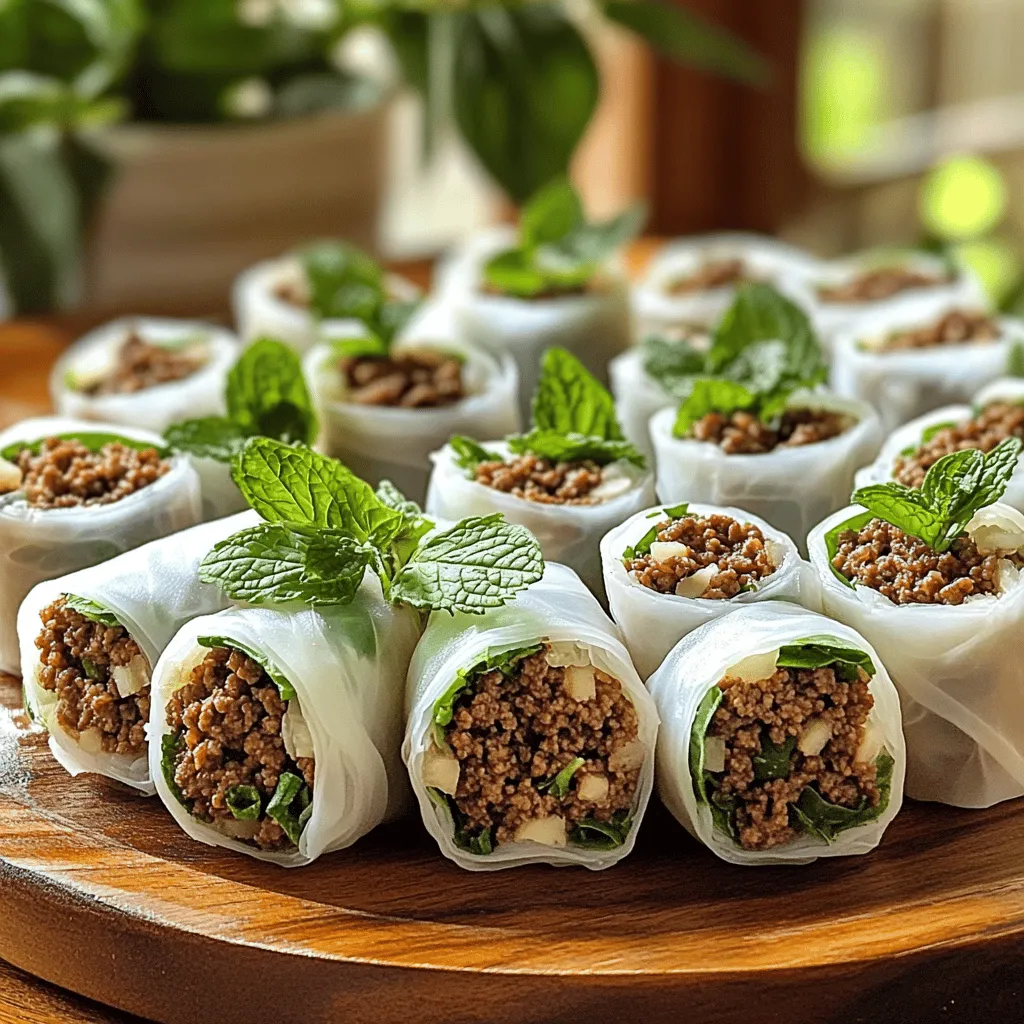
Are you ready to try something new in the kitchen? Thai Basil Beef Rolls are a tasty and fun dish

Older posts
Newer posts
← Previous Page1 … Page29 Page30 Page31 … Page63 Next →

dsad

© 2025 flavorsprint • Built with GeneratePress

Our Policies

  • Copyright Policy
  • Cookie Policy
  • GDPR Policy
  • Privacy Policy
  • Disclaimer
  • Terms Of Use

More Information

  • Home
  • About
  • Contact
  • Appetizers
  • Dessert
  • Dinner
  • Drinks
©2025, flavorsprint About Back To Top