Skip to content
DisclaimerTerms Of UseGDPR PolicyCookie Policy

flavorsprint

  • Home
  • Drinks
  • Appetizers
  • Dinner
  • Dessert
  • About
  • Contact
  • Privacy Policy
DisclaimerTerms Of UseGDPR PolicyCookie Policy

Lillian

- 3 cans of refrigerated biscuit dough (16.3 oz each) - 1 cup pecans, chopped - 1 cup brown sugar - 1/2 cup unsalted butter, melted - 1/2 cup pure maple syrup - 2 teaspoons cinnamon - 1/2 teaspoon vanilla extract - Pinch of salt Choosing the right maple syrup is key. Look for pure maple syrup, not imitation. It adds real flavor. The best syrup is from the first run, so check labels. If you cannot find pecans, walnuts or almonds work well too. For those needing sugar substitutes, coconut sugar or brown rice syrup can be good choices. - Bundt pan - Mixing bowls - Cooking spray or butter for greasing Gather these tools before you start. A good bundt pan is essential for shape. You want the bread to rise and hold together well. Mixing bowls help keep your ingredients organized as you prep. Greasing the pan ensures the monkey bread releases easily after baking. First, preheat your oven to 350°F (175°C). This step is key for even baking. Next, grease your bundt pan with cooking spray or butter. A well-greased pan helps the monkey bread come out easily. In a medium bowl, mix together the chopped pecans, brown sugar, and cinnamon. Stir until everything is well combined. Set this mix aside; it will add great flavor to your monkey bread. Open your canned biscuit dough and separate the biscuits. You will need to cut each biscuit into quarters. This makes it easy to coat them later. In another bowl, mix the melted butter, maple syrup, vanilla extract, and a pinch of salt. Make sure everything is combined well. Dip each quartered biscuit piece into this butter-maple mix. Coat them fully, then roll them in the pecan-brown sugar mixture. This will give your monkey bread a tasty crunch. Start layering the coated biscuit pieces in your prepared bundt pan. Sprinkle some additional pecan and brown sugar mix between the layers. Keep adding until you use all the pieces. Once layered, pour any remaining butter-maple mixture over the top. This adds even more flavor and stickiness, which is what we want! Bake your monkey bread in the preheated oven for about 30-35 minutes. The top should be golden brown and the bread should pull away from the pan sides. To check for doneness, insert a toothpick into the center. If it comes out clean, your monkey bread is ready. Let it cool in the pan for 10 minutes, then invert it onto a platter. Allow it to cool for another 5-10 minutes before serving. This time helps the sticky topping set. For the full recipe, check the main section. To make the best sticky maple pecan monkey bread, focus on two key things: crust and sogginess. To avoid sogginess, make sure not to over-soak the biscuit pieces. A quick dip in the butter-maple mixture is all they need. This gives you a nice golden crust while keeping the inside soft. Let your monkey bread rest after baking. This helps the flavors blend well and improves the texture. A 10-minute cool time in the pan works wonders. It allows the sticky topping to set before you invert it. This monkey bread shines on its own, but you can make it even better. A drizzle of extra maple syrup adds sweetness. You can also serve it with cream cheese frosting for a rich touch. The tangy frosting balances the sweetness perfectly. For a fun twist, think about adding fresh berries on the side. They add a pop of color and flavor. Many home cooks face common issues when making monkey bread. One mistake is not greasing the bundt pan well. This can cause sticking, making it hard to flip. Always use cooking spray or butter generously. If your monkey bread is too dense, you may have overpacked the dough. Ensure you layer the biscuit pieces loosely. For different ovens, keep an eye on the baking time. If it bakes too fast, turn down the heat slightly. Following these tips will help you create a delicious sticky maple pecan monkey bread. For a complete guide, check out the Full Recipe! {{image_2}} You can change the taste of your sticky maple pecan monkey bread easily. Start by adding spices like nutmeg or ginger. These spices bring warmth and depth to each bite. You can also integrate chocolate chips or dried fruit. Chocolate adds a sweet twist, while dried fruit gives a chewy texture. Both options make your monkey bread unique and fun. If you want a healthier version, use whole wheat biscuit dough. This swap keeps the flavor but adds more fiber. You can also reduce the sugar or butter in the recipe. Lowering these ingredients still lets you enjoy the sweetness of the maple syrup. Taste tests can help you find the right balance while keeping it tasty. Monkey bread can change with the seasons. For the fall, try pumpkin spice monkey bread. This version adds warming spices and a hint of pumpkin flavor. In the summer, adding citrus zest gives a fresh twist. Lemon or orange zest brightens the dish and makes it feel light. Each season offers a chance to enjoy this treat in a new way. For the full recipe, refer to the recipe section above. To keep your sticky maple pecan monkey bread fresh, store it in an airtight container. Wrap it tightly with plastic wrap before placing it in the container. This helps keep moisture in and air out. If you have a lot left, consider dividing it into smaller portions. That way, you can enjoy a piece without exposing the whole thing to air. When it comes time to enjoy leftovers, the best way to reheat is in the oven. Preheat it to 350°F (175°C). Place the monkey bread on a baking sheet and cover it with foil. Heat for about 10-15 minutes or until warm. You can also microwave individual pieces for about 20-30 seconds. If you want to freeze your monkey bread, wrap it well in plastic wrap. Thaw it in the fridge overnight before reheating. Stored monkey bread will last about 3 days in the fridge. Check it for any signs of spoilage before eating. Look for a change in color, an off smell, or a dry texture. If you notice any of these signs, it’s best to discard it. Enjoy your delicious monkey bread while it’s fresh! To keep your monkey bread from being soggy, balance the butter and syrup. Use just enough syrup to coat the biscuit pieces. If you notice the dough is too wet, reduce the maple syrup a bit. Another key is to bake it well. A golden color means it is cooked right. Letting it cool slightly helps, too. This allows the sticky topping to set up, giving it a nice texture. Yes, you can prepare monkey bread ahead of time. You can assemble it the night before and let it chill in the fridge. Cover it tightly with plastic wrap. When you’re ready to bake, let it sit at room temperature for about 30 minutes. This way, it warms up for even cooking. If you have leftovers, store them in an airtight container. They will stay fresh for up to three days. Serve your monkey bread warm on a nice platter. Drizzle extra maple syrup on top for a sweet touch. Garnish with whole pecans for a pretty look. You can also add a side of cream cheese frosting for dipping. It adds a smooth and rich flavor that many enjoy. This makes your dish even more special for guests or family. You can certainly use homemade biscuit dough! It will taste fresher and more personal. If you go this route, watch the baking time. Homemade dough might need a bit longer to cook through. Check for doneness by inserting a toothpick. If it comes out clean, you’re good to go! Adjust the flavor by adding spices like nutmeg or vanilla for a twist. This recipe for sticky maple pecan monkey bread highlights key ingredients, tips, and variations. You learned how to prepare, bake, and serve this delightful dish. Remember, quality ingredients make a big difference. Use good maple syrup and experiment with flavors. With the right techniques, you can avoid common mistakes and achieve that perfect golden crust. Keep these steps and tips in mind, and your monkey bread will impress everyone. Enjoy the sweet and sticky goodness that brings joy to any meal!

Sticky Maple Pecan Monkey Bread Irresistible Recipe

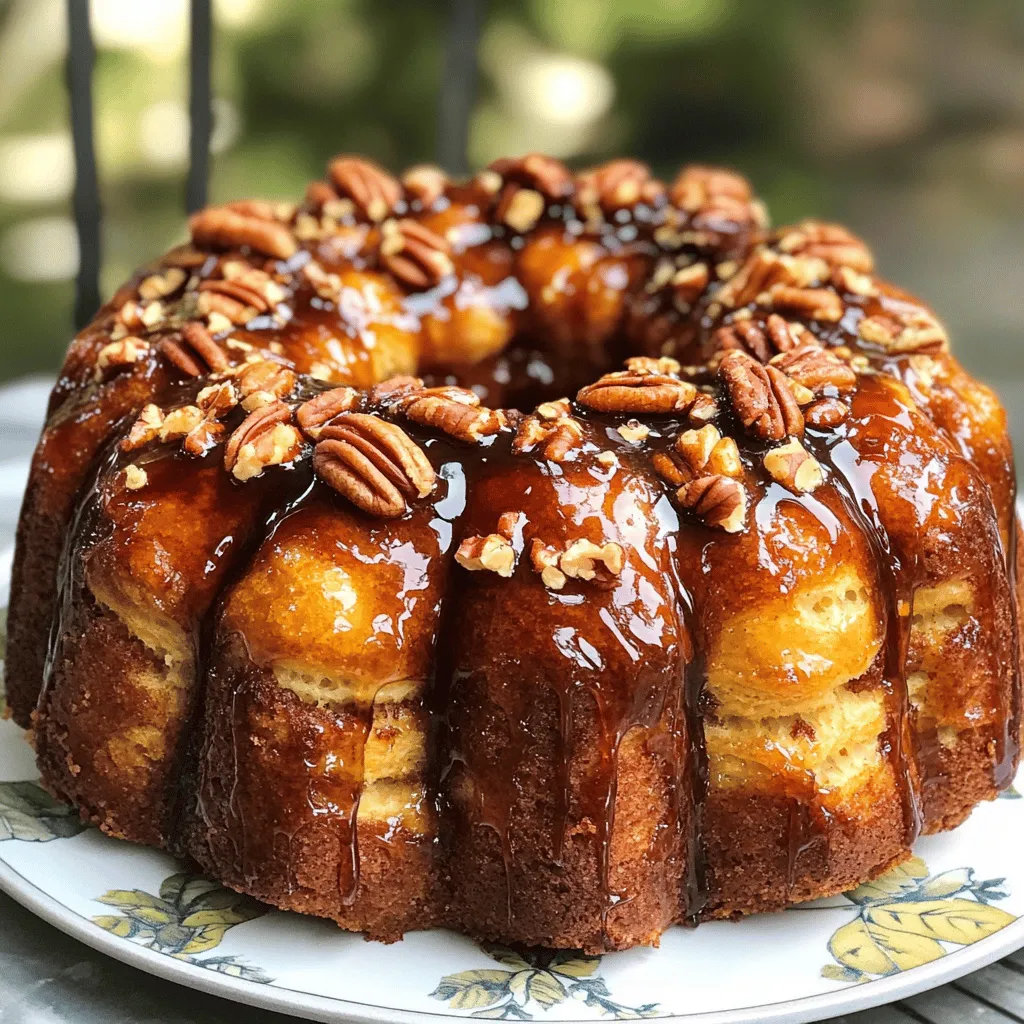
If you’re searching for a fun and tasty treat, look no further! My Sticky Maple Pecan Monkey Bread is the

To make a tasty butternut lattice quiche, you need just a few key items. Here’s what you will gather: - 1 medium butternut squash, peeled and diced - 1 onion, finely chopped - 2 cloves garlic, minced - 4 large eggs - 1 cup heavy cream - 1 cup shredded Gruyère cheese - Salt and pepper to taste - Fresh thyme leaves, for garnish - 1 pie crust (store-bought or homemade) These ingredients create a rich, creamy filling and a lovely flavor. Using fresh and seasonal ingredients makes your quiche shine. Look for a butternut squash that feels heavy for its size. Choose an onion that is firm with no soft spots. Fresh garlic adds a punch of flavor, so avoid pre-minced options. For the best results, select high-quality Gruyère cheese. This cheese melts well and adds depth to your dish. Fresh thyme leaves give a burst of color and aroma, making your quiche more inviting. You can adapt this recipe based on what you have on hand. If you can’t find Gruyère, try Swiss cheese or cheddar. For a lighter option, replace heavy cream with whole milk or half-and-half. If you want a vegetarian quiche, skip the cheese and add more veggies like spinach or bell peppers. If you prefer a gluten-free dish, use a gluten-free pie crust. These swaps will still give you a delicious butternut lattice quiche. For the full recipe, check out the detailed instructions above. To start, gather all your ingredients. You will need a medium butternut squash, an onion, garlic, eggs, heavy cream, Gruyère cheese, salt, and pepper. Don't forget your pie crust! Next, peel and dice the butternut squash into small cubes. Chop the onion finely and mince the garlic. This makes everything cook evenly. 1. Preheat your oven to 375°F (190°C). This step is key for a nice, crisp crust. 2. Heat a splash of olive oil in a skillet over medium heat. Add the chopped onion and minced garlic. Cook for about 3-4 minutes until soft. 3. Now add the diced butternut squash. Stir and cook for another 10-12 minutes. The squash should be tender when done. Season with salt and pepper. Set it aside to cool a bit. 4. In a large mixing bowl, whisk together the eggs and heavy cream until smooth. Add the shredded Gruyère cheese. Mix it all together well. 5. Fold in the cooled butternut squash mixture. Make sure it is evenly spread in the egg mixture. 6. Roll out your pie crust and place it into a quiche dish. Make sure it fits snugly against the edges. Trim off any extra crust. 7. Pour the filling into the prepared crust. Spread it out evenly. 8. To make the lattice top, you can either cut strips from another pie crust or use fun shapes. Place this on top of the filling. 9. Bake in the oven for 35-40 minutes. Your quiche is ready when the filling is set and the crust is golden brown. 10. After baking, let it cool for a few minutes. Before serving, add fresh thyme leaves on top for a nice touch. Creating a lattice top is all about practice. Start with even strips of dough, about 1 inch wide. Lay half of the strips across the quiche in one direction. Then, weave the other half over and under the first half. This gives a beautiful, homemade look. If you make it a little messy, don’t worry! It will still taste amazing. To enhance the flavor of your filling, start with fresh herbs. Thyme and rosemary work wonders. You can also add a pinch of nutmeg for warmth. If you like heat, sprinkle in some red pepper flakes. Mixing in sautéed mushrooms or spinach adds depth and texture. Always taste your filling before baking. Adjust the salt and pepper as needed. A crisp crust is key to a great quiche. Start by pre-baking the crust. This helps set it and keeps it from getting soggy. Use pie weights or dried beans to weigh it down while baking. Bake it for about 10 minutes before adding the filling. Make sure your oven is hot enough; 375°F works best. Also, avoid overfilling the crust, as this can lead to a soggy base. One mistake is not letting the filling cool before pouring it into the crust. Hot filling can make the crust soggy. Another mistake is using cold eggs and cream. Let them sit at room temperature for about 30 minutes. This helps the filling mix well. Lastly, don’t skip the garnish. Fresh thyme adds a pop of color and flavor. For the full recipe, check the previous sections. {{image_2}} You can change the cheese in your quiche to mix flavors. Try sharp cheddar for a bold taste. Feta adds a salty kick, while goat cheese gives a creamy texture. Use mozzarella for a milder flavor and great melt. Each cheese brings its own flair, so feel free to experiment! Add more veggies for extra color and taste. Spinach or kale can boost nutrition and flavor. Bell peppers add sweetness, while mushrooms bring an earthy note. You can also toss in fresh herbs like basil or parsley for a fresh twist. These choices make your quiche unique and yummy! If you want to switch up the crust, consider using a vegetable crust. A cauliflower crust is low-carb and gluten-free. You could also try a whole wheat crust for a healthy option. Even a puff pastry gives a flaky texture. Each crust style offers a new bite to enjoy. For more details on making the perfect Butternut Lattice Quiche, check out the Full Recipe. After you enjoy your Butternut Lattice Quiche, store leftovers in the fridge. Place slices in an airtight container. This keeps the quiche fresh for up to three days. If you want to keep it longer, consider freezing it. To reheat your quiche, preheat your oven to 350°F (175°C). Place the quiche slices on a baking sheet. Heat for about 15-20 minutes. This method warms it evenly and keeps the crust crispy. You can also use a microwave, but the crust may get soggy. If you want to freeze the quiche, let it cool completely first. Wrap it tightly in plastic wrap and then in aluminum foil. This prevents freezer burn. It can stay frozen for up to three months. When you're ready to eat, let it thaw in the fridge overnight before reheating. For the full recipe, check the section above! Yes, you can make Butternut Lattice Quiche ahead of time. Prepare the quiche fully, but do not bake it. Cover it with plastic wrap and store it in the fridge. You can bake it the next day. This way, the flavors have time to blend. It makes for a quick meal on a busy day. You can serve many things with Butternut Lattice Quiche. A fresh green salad pairs well. Use leafy greens, tomatoes, and a light vinaigrette. You can also add fruit, like sliced apples or pears. A simple yogurt or sour cream can bring extra creaminess. These sides balance the flavors of the quiche. Check your quiche after baking for 35-40 minutes. The filling should be set and not jiggly. A knife inserted into the center should come out clean. The crust should be a golden brown. If it looks good, let it cool for a few minutes. Trust your eyes and that knife test! You now know how to make a Butternut Lattice Quiche. We covered the best ingredients, detailed steps, and handy tips. You learned about flavor boosts and storage methods. Each part helps you craft a tasty dish with ease. Remember, cooking is about fun and trying new things. Enjoy creating your quiche and impressing others with your skills!

Butternut Lattice Quiche Flavorful and Simple Recipe

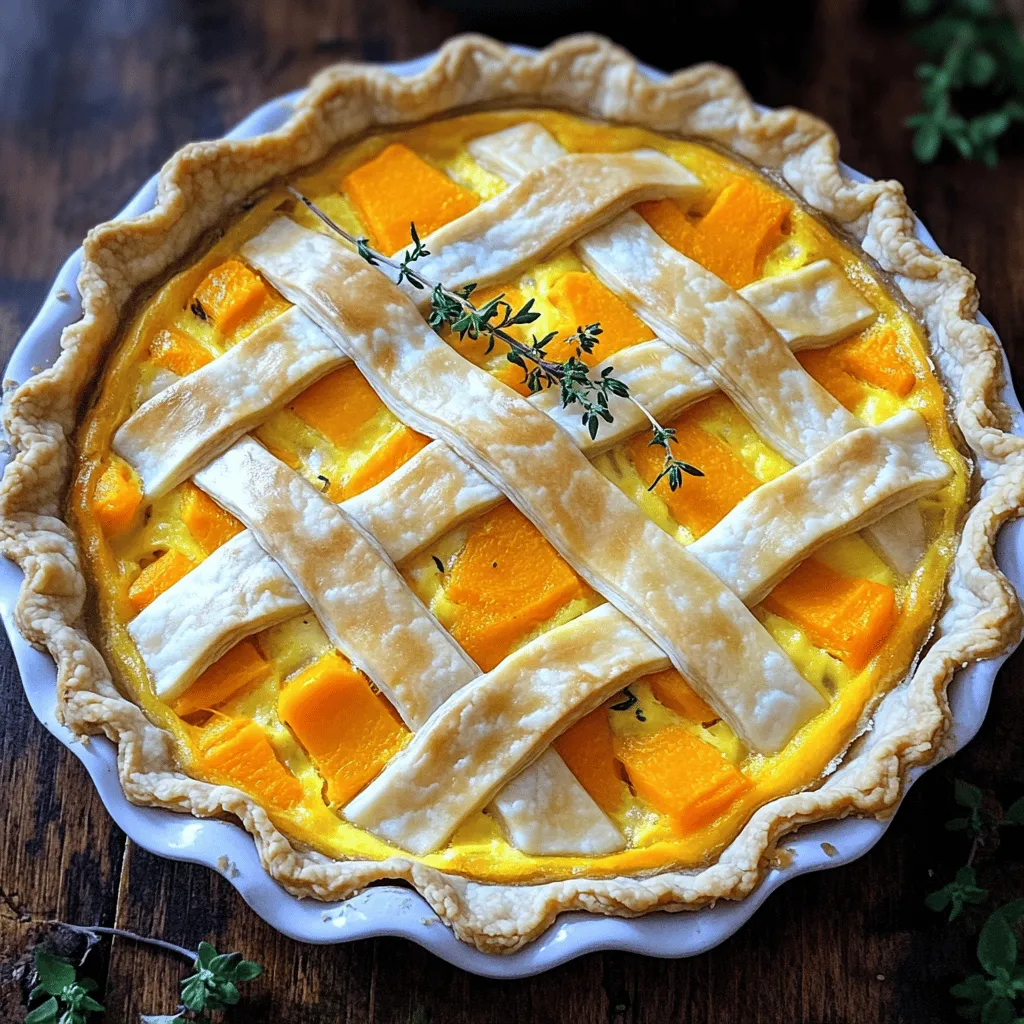
Looking for a tasty and simple dish that wows? Let’s dive into the Butternut Lattice Quiche! This recipe combines sweet

- 4 cups apple cider - 2 teaspoons chai spice blend (cinnamon, cardamom, ginger, cloves) - 1 cup vanilla ice cream - 1/4 cup whipped cream - 1/4 cup chopped nuts (walnuts or pecans) - Slices of fresh apple and star anise for garnish To make chai spiced apple cider floats, start with fresh apple cider. The cider gives a sweet and rich base. Next, the chai spice blend adds warmth and depth. This blend includes cinnamon, cardamom, ginger, and cloves. Each spice contributes unique flavors. Vanilla ice cream is a must. It melts slightly into the hot cider, creating a creamy texture. Whipped cream adds a light and fluffy touch on top. Chopped nuts provide a satisfying crunch. They contrast nicely with the smooth ice cream. Slices of fresh apple and star anise are for garnish. They make your float look beautiful and festive. - Suggested toppings and enhancements - Alternative spice blends - Dairy-free ice cream options For added fun, try different toppings. You might sprinkle some caramel sauce or chocolate shavings. These enhance the flavor and add sweetness. You can also swap the chai spice blend. Try pumpkin spice or even a chocolate flavor for a twist. If you want a dairy-free option, use coconut or almond milk ice cream. This keeps the dessert creamy without dairy. You can still enjoy all the flavors while catering to different diets. First, we need to heat the apple cider. Pour 4 cups of apple cider into a medium saucepan. Set the stove to medium heat. Warm the cider until it feels nice, but do not let it boil. Boiling can ruin the flavor. Next, it’s time to infuse the cider with chai spices. Add 2 teaspoons of the chai spice blend, which includes cinnamon, cardamom, ginger, and cloves. Stir it well to mix everything. Let it steep for about 5 minutes. This step allows the spices to release their full flavor. After 5 minutes, take the saucepan off the heat. Now, let’s assemble our floats! Take a tall glass and add a scoop of vanilla ice cream. You want the ice cream to sit nicely at the bottom. Then, pour the warm, spiced cider over the ice cream. Fill the glass about three-quarters full. This mix of hot and cold creates a fun treat. To achieve the perfect ice cream-to-cider ratio, make sure the cider does not overflow. You want a good balance so every sip has flavor. Time for the fun part! Add a generous dollop of whipped cream on top of the cider and ice cream. This adds a creamy texture that pairs perfectly with the spices. Sprinkle some chopped nuts on top for an extra crunch. You can use walnuts or pecans. For a beautiful finish, garnish with a slice of fresh apple and a star anise. These touches make your floats look as good as they taste. Serve immediately and enjoy the delightful fusion of flavors! For the full recipe, check out the earlier section. To make your Chai Spiced Apple Cider Floats just right, adjust the spice levels based on your taste. If you love bold flavors, add more chai spice. If you prefer a milder taste, reduce the amount. Remember, the key is to find what makes you smile with every sip. Serve the cider warm but not boiling. Heat it gently on the stove until it's cozy. You want it warm enough to melt the ice cream, but too hot will make the ice cream melt too fast. You can prepare the spiced apple cider ahead of time. Just heat it, infuse the spices, and let it cool. Store it in the fridge until you’re ready to serve. It stays fresh for about three days. If you have leftovers, just reheat it gently before serving. For extra crunch, top your floats with chopped nuts like walnuts or pecans. They add a nice bite that contrasts well with the smooth ice cream. You can also try adding granola for a fun twist! Pair the floats with snacks like cinnamon sugar cookies or soft pretzels. These snacks enhance the flavors and make your treat even more delightful. For the full recipe of Chai Spiced Apple Cider Floats, check out the section above! {{image_2}} You can change the flavor of your Chai Spiced Apple Cider Floats by using different spice blends. Try adding nutmeg for warmth or allspice for a rich, deep taste. Mix in a bit of vanilla for sweetness. You can also explore region-inspired blends. For instance, use a Moroccan spice mix with cumin and coriander for a twist. Each blend offers a new flavor adventure. If you want to make Chai Spiced Apple Cider Floats vegan, it’s easy! Choose non-dairy ice cream made from coconut, almond, or cashew milk. These options have great creaminess and flavor. Look for brands that use natural sweeteners and avoid dairy. This way, you can enjoy the treat without any animal products. Seasonal fruits can add a fresh twist to your floats. In autumn, try adding pear slices or pomegranate seeds. In winter, top with candied ginger or cranberries for a festive touch. Consider adding holiday spices like nutmeg or orange zest for cheer. This makes your floats feel special for any season! To keep your apple cider fresh, store it in the fridge. Use a glass or plastic container with a tight lid. This helps prevent any odors from other foods. The cider lasts about 7 days in the fridge. Use it in other recipes or enjoy it chilled. You can freeze spiced apple cider for later. Pour it into ice cube trays for easy use. Once frozen, pop the cubes into a freezer bag. They last up to 6 months. For ice cream, freeze it in an airtight container. Leave some space at the top for expansion. Enjoy your creamy treat for up to 3 months. This blog shared a simple way to make Chai Spiced Apple Cider Floats. We discussed the essential ingredients and optional variations you can try. You learned how to prepare the cider and assemble the floats step by step. I shared tips for flavor and storing leftovers to help you enjoy this treat longer. Whether you stick to the classic recipe or explore new options, I hope you enjoy creating this fun drink! It's a cozy treat perfect for any season.

Chai Spiced Apple Cider Floats Delightful Dessert Combo

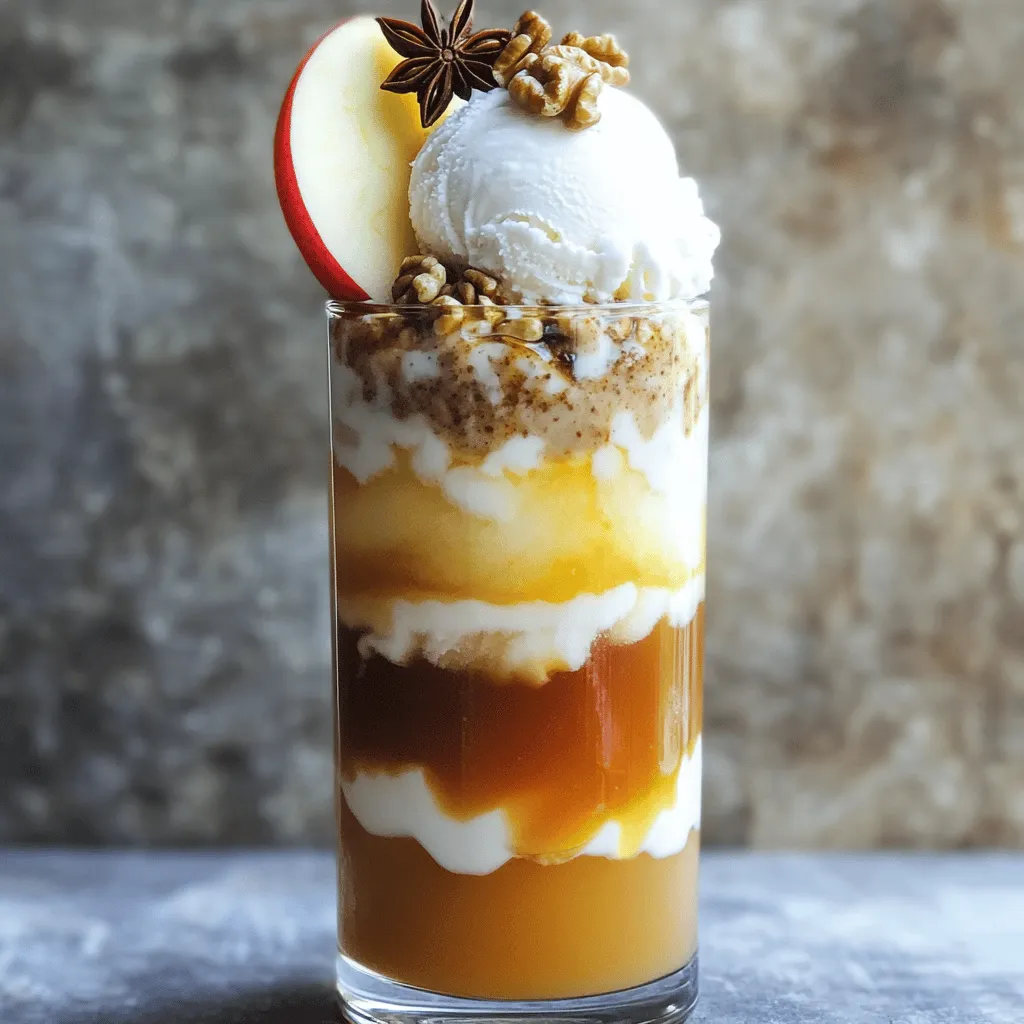
Get ready to treat your taste buds with my Chai Spiced Apple Cider Floats! This delightful dessert combines warm apple

- 1 large bunch of kale, stems removed and leaves torn into bite-sized pieces - 1 can of chickpeas, drained and rinsed - 1 tablespoon olive oil - ¼ cup grated Parmesan cheese (or nutritional yeast for a vegan option) - ½ teaspoon smoked paprika - Salt and pepper to taste - 2 tablespoons Dijon mustard - 2 cloves of garlic, minced - 1 cup croutons (store-bought or homemade) - ½ cup tahini - 2 tablespoons lemon juice - 2 tablespoons water (more as needed) Each of these ingredients plays a key role in creating a delightful dish. The kale provides a strong base, while chickpeas add protein and crunch. Olive oil makes everything richer, and cheese gives it a savory kick. The spices and garlic bring depth to the flavor. For the dressing, tahini blends with lemon juice and Dijon mustard, making a creamy texture. Adding water adjusts the thickness, so you get just the right pour. Croutons add extra crunch that turns this salad into a feast. Using the full recipe, you can see how these ingredients come together to create a tasty Harvest Kale Caesar with Crispy Chickpeas. Enjoy the process of gathering these fresh and pantry ingredients as you prepare to make a delicious meal! 1. Preheat the oven: Start by setting your oven to 400°F (200°C). This high heat helps make the chickpeas crispy. 2. Seasoning the chickpeas: In a bowl, toss the drained chickpeas with olive oil, smoked paprika, salt, and pepper. This mix adds great flavor. 3. Roasting process: Spread the chickpeas on a baking sheet in a single layer. Roast them for 25-30 minutes. Shake the pan halfway through for even cooking. You want them crispy and golden brown. 1. Combining dressing ingredients: In a mixing bowl, add tahini, lemon juice, Dijon mustard, minced garlic, and water. These ingredients create a smooth and creamy dressing. 2. Achieving the desired consistency: Whisk the mixture until it’s smooth. If it’s too thick, add more water slowly until you reach the right consistency. 3. Adjusting seasoning: Taste the dressing and add salt if needed. This step ensures the flavors shine without overpowering the dish. 1. Massaging the kale: In a large bowl, add the torn kale leaves. Drizzle some dressing over the kale and use your hands to massage the leaves for 2-3 minutes. This softens the kale and brings out its flavor. 2. Mixing in the chickpeas and croutons: Gently add the roasted chickpeas, croutons, and grated Parmesan (or nutritional yeast). Toss everything together to blend well. 3. Plating the dish: Spoon the salad into bowls. Drizzle with any remaining dressing and sprinkle with more Parmesan if you like. Enjoy your delicious Harvest Kale Caesar with crispy chickpeas! For the complete recipe, check out the Full Recipe section. To boost the taste of your crispy chickpeas, try these spices: - Cumin: Adds a warm flavor. - Garlic powder: Gives a savory touch. - Cayenne pepper: Adds a kick of heat. You can swap the dressing too. Here are some alternatives: - Yogurt dressing: Creamy and tangy. - Vinaigrette: Bright and zesty. - Avocado dressing: Smooth and rich. Massaging the kale is key for a great texture. It helps break down tough fibers. Just drizzle some dressing over the leaves and rub gently for 2-3 minutes. This makes the kale tender and flavorful. You can pair your Harvest Kale Caesar with proteins. Try grilled chicken, shrimp, or tofu for added heartiness. This salad works well as a side or a main dish. For garnishing, consider these options: - Extra Parmesan: For more cheesy flavor. - Fresh herbs: Like parsley or basil for freshness. - Lemon wedges: A splash of zest right before serving. These tips will take your Harvest Kale Caesar with Crispy Chickpeas to the next level! For the full list of ingredients and instructions, check the Full Recipe. {{image_2}} You can make this Harvest Kale Caesar vegan easily. Instead of using Parmesan cheese, try nutritional yeast. Nutritional yeast adds a cheesy flavor without any dairy. You can also explore other creamy dressings. For instance, a blend of cashews and lemon juice works well. Blend soaked cashews with water for a smooth, rich dressing. Feel free to get creative with add-ins. Try adding fruits like apples or pomegranate seeds for a sweet touch. Nuts, such as walnuts or almonds, add a nice crunch. If you want to switch greens, use spinach or arugula instead of kale. Each green brings a different taste and texture. Don’t forget about croutons! You can use different types to mix things up. Try garlic croutons for extra flavor or even spicy ones for a kick. Store-bought ones work great, but homemade croutons can be special. They are simple to make and full of flavor. For the full recipe, check out the detailed instructions above. Enjoy making your Harvest Kale Caesar with these fun variations! To keep your Harvest Kale Caesar fresh, store it properly. If you dress the salad, it can wilt quickly. I suggest keeping the dressing separate until you are ready to eat. This way, the kale stays crisp and vibrant. For the crispy chickpeas, store them in an airtight container. They can lose their crunch if exposed to air. Place them in the fridge for up to three days, but they are best enjoyed fresh. Can you freeze the salad? I do not recommend freezing the dressed salad. Freezing can change the texture of the kale and chickpeas. However, you can freeze the chickpeas before they are roasted. If you want to freeze individual components, here are some tips. Place raw chickpeas in a freezer bag. You can also freeze portions of the dressing. Just remember to thaw everything in the fridge before use. Enjoy your Harvest Kale Caesar fresh for the best taste! To make crispy chickpeas, start by draining and rinsing them. Pat them dry with a towel. Toss the chickpeas with olive oil, smoked paprika, salt, and pepper. Spread them on a baking sheet in a single layer. Roast at 400°F (200°C) for 25-30 minutes. Shake the pan halfway through. This helps them cook evenly and become crunchy. The Harvest Kale Caesar can last in the fridge for up to three days. If you store it, keep the dressing separate. Mixing the dressing in advance can make the kale wilt faster. To keep it fresh, add chickpeas and croutons right before serving. Yes, you can prepare the Harvest Kale Caesar in advance. Wash and tear the kale a few hours before serving. Store it in a container with a lid. Make the dressing ahead of time and keep it in the fridge. For the crispy chickpeas, roast them just before serving. This keeps everything fresh and crunchy. You can find the Full Recipe to guide you through the process! In this blog post, we explored how to make a Harvest Kale Caesar Salad. We covered fresh and pantry ingredients, easy step-by-step instructions, and tips to boost flavor. You learned about variations, storage options, and answers to common questions. This salad is not only tasty but also flexible for your needs. Try different herbs, fruits, or nuts to make it your own. Enjoy this healthy meal that is both fun to make and delicious to eat!

Harvest Kale Caesar with Crispy Chickpeas Delight

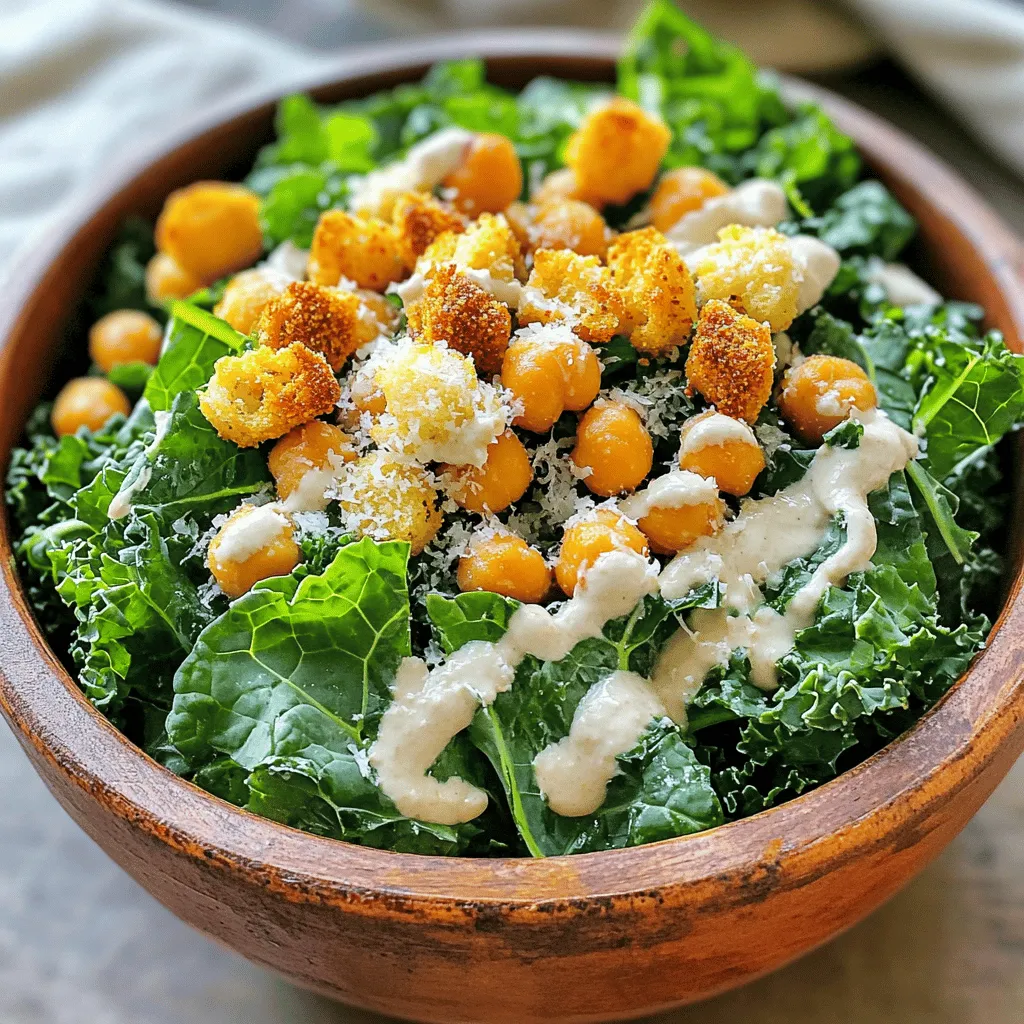
Looking to jazz up your salad game? This Harvest Kale Caesar with Crispy Chickpeas is a game changer! Packed with

- 2 cups pretzel sticks - 1 cup semi-sweet chocolate chips - 1 cup caramel candies, unwrapped - 2 tablespoons heavy cream - Sea salt for sprinkling The magic of salted caramel pretzel bark comes from its simple yet tasty ingredients. First, you need pretzel sticks. They add a nice crunch and salty flavor. I like to use two cups because it gives the bark a solid base. Next, you need chocolate chips. Semi-sweet chocolate works best. One cup melts smoothly and balances the sweet caramel. Speaking of caramel, you’ll need one cup of unwrapped caramel candies. These candies bring rich sweetness to the bark. Combine them with two tablespoons of heavy cream. This mix helps the caramel melt perfectly. Finally, don't forget the sea salt. A light sprinkle at the end enhances all the flavors. These ingredients come together beautifully, creating a treat that’s sweet, salty, and oh-so-satisfying. For the full recipe, check the [Full Recipe]. - Preheat the oven to 350°F (175°C). - Line a baking sheet with parchment paper. To start, I recommend preheating your oven. This step ensures even cooking. While the oven heats, grab your baking sheet and line it with parchment paper. This will keep your treat from sticking. - Spread pretzel sticks evenly on the baking sheet. - Melt caramel and heavy cream combination. Next, take your pretzel sticks. Spread them out evenly on the lined baking sheet. Make sure they cover the sheet well. Now, let’s melt the caramel. In a microwave-safe bowl, combine caramel candies and heavy cream. Microwave this mix in 30-second bursts. Stir between each burst. Keep going until the caramel is smooth. - Drizzle melted caramel over pretzels. - Melt chocolate chips and spread over caramel. - Sprinkle sea salt for flavor enhancement. Once your caramel is ready, drizzle it over the pretzels. Use a spatula to spread it out. Make sure to cover as many pretzels as you can. Next, melt your chocolate chips. Just like before, use a microwave-safe bowl. Heat in 30-second intervals, stirring each time. When smooth, pour the chocolate over the caramel. Spread it evenly too. Finally, sprinkle sea salt on top. This adds a nice flavor boost. Now you can chill the baking sheet in the fridge. After about an hour, your salted caramel pretzel bark will be set. You can then break it into pieces and enjoy! For the full recipe, check out the details above. When melting chocolate or caramel, you want to avoid burning. To do this: - Use a microwave-safe bowl. - Heat in short bursts of 30 seconds. - Stir well after each interval. This method helps keep heat even. If chocolate looks thick, it may need more time. Keep stirring, and it will become smooth. Choosing the right pretzels makes a big difference. I like using thin pretzel sticks. They add a nice crunch. You can also try flavored pretzels, like cheese or honey. They will change the taste and make it fun. For chocolate, consider flavored options. Dark chocolate adds depth. White chocolate gives a sweet contrast. Explore your favorite flavors to create your perfect bark. Serving your salted caramel pretzel bark can be fun and creative. Here are some ideas: - Cut the bark into fun shapes using cookie cutters. - Serve on a colorful plate for a pop of color. You can also add toppings like crushed nuts or sprinkles. This adds texture and makes it look beautiful. Get creative and let your bark shine! For the full recipe, check the section above. {{image_2}} You can switch up the chocolate for a new taste. Using white chocolate or milk chocolate gives a creamy twist. Both options melt well and add a sweet flavor. Try adding nuts like pecans or almonds. They add crunch and flavor. Dried fruits like cranberries or raisins also work. These ingredients mix well with the salty pretzels. Get creative with spices or extracts. A pinch of cinnamon or nutmeg adds warmth. You can also use vanilla or almond extract for a different flavor. For the holidays, think about using peppermint or pumpkin spice. These seasonal touches can make your treat special and festive. If you need gluten-free options, choose gluten-free pretzels. Many brands offer tasty choices that work well. For a vegan version, use dairy-free chocolate and caramel. There are great plant-based options that taste amazing. These swaps let everyone enjoy this delightful treat, no matter their diet. You can find the full recipe for salted caramel pretzel bark to try these variations. To keep your salted caramel pretzel bark fresh, store it in an airtight container. This helps prevent moisture and keeps it crisp. You can also layer pieces with parchment paper to avoid sticking. A glass or plastic container works well. Avoid metal containers, as they may affect the taste. Salted caramel pretzel bark lasts about two weeks at room temperature. If you want it to last longer, freeze it. To freeze, wrap the bark tightly in plastic wrap, then place it in a freezer bag. It can last up to three months in the freezer. You usually don’t need to reheat pretzel bark. Enjoy it straight from the fridge. If you want it warm, use the microwave for a few seconds. Be careful not to melt it too much. Fresh bark tastes best, but it stays tasty after storage. Yes, you can make salted caramel pretzel bark ahead of time. It stays fresh for up to two weeks when stored properly. I suggest placing it in an airtight container. Keep it away from heat and sunlight. If you make it a few days before a party, it will still taste great! To cut the bark evenly, use a sharp knife. Let the bark chill until it is firm. Then, score it lightly with the knife before cutting all the way through. This method helps to keep the pieces neat. You can also use a pizza cutter for quick and even slices. If your chocolate or caramel turns grainy, try adding a little cream. For chocolate, a small amount of vegetable oil can help too. Heat it gently and stir until smooth. If the caramel is grainy, stir in a bit of water and reheat gently. This should restore its silky texture. In this guide, we explored making salted caramel pretzel bark with just a few simple steps. We covered key ingredients, like pretzel sticks and chocolate chips, and shared tips for melting without burning. You learned about fun variations to customize your bark, plus storage and reheating advice. Enjoying this sweet treat is simple and fun. I encourage you to experiment with flavors and share the joy of this tasty snack!

Ingredient Salted Caramel Pretzel Bark Delightful Treat

Are you ready to experience a sweet and salty treat that’s hard to resist? Salted Caramel Pretzel Bark combines crunchy

To create this creamy pumpkin risotto, you need a few key ingredients: - 1 cup Arborio rice - 1 cup pumpkin puree (canned or fresh) - 4 cups vegetable broth - 1 small onion, finely chopped - 2 cloves garlic, minced - 1 teaspoon dried thyme - 1 teaspoon ground nutmeg - 1/2 cup grated Parmesan cheese - 2 tablespoons unsalted butter - Salt and pepper to taste - Fresh parsley, chopped (for garnish) These ingredients work together to create a rich and warm dish that is perfect for fall. You can make your risotto even better with some fun garnishes: - A drizzle of olive oil adds flavor. - Toasted pumpkin seeds provide crunch. - A sprinkle of red pepper flakes adds heat. - A dollop of cream can make it richer. Feel free to mix and match these garnishes to make the dish yours. Choosing the right ingredients is key to great risotto. Here are some tips: - Rice: Use Arborio rice. It has the right starch for creaminess. - Pumpkin: Fresh pumpkin is great, but canned works well too. Look for pure pumpkin, not pie filling. - Broth: Choose quality vegetable broth for the best flavor. Homemade is even better. - Cheese: Use good Parmesan cheese. Grate it fresh for the best taste. With these tips, you’ll ensure your pumpkin risotto shines. For the full recipe, check out the details above! To start, turn on your Instant Pot and choose the Sauté function. Add 2 tablespoons of unsalted butter to melt. Once the butter melts, toss in 1 small chopped onion. Cook it for about 3 minutes until it turns soft and translucent. Next, add 2 minced garlic cloves. Stir this mixture for 30 seconds until it smells amazing. This step builds a strong flavor base for your risotto. Now it’s time to add the rice. Pour in 1 cup of Arborio rice and stir it for about 2 minutes. This toasts the rice and helps it soak in the flavors. After that, mix in 1 cup of pumpkin puree, 1 teaspoon of dried thyme, 1 teaspoon of ground nutmeg, and salt and pepper to taste. Then, pour in 4 cups of vegetable broth. Stir everything well to combine all the ingredients. Close the Instant Pot lid, making sure the valve is set to Sealing. Select the Manual or Pressure Cook setting and set the timer for 6 minutes. When the timer goes off, let the pressure release naturally for 5 minutes. After that, carefully switch the valve to Venting to release any remaining pressure. Once you open the lid, the risotto should look creamy and slightly firm. Stir it gently to mix it all up. Then, fold in 1/2 cup of grated Parmesan cheese. This adds richness to the dish. If your risotto is too thick, you can add a splash of vegetable broth to make it perfect. Spoon the creamy risotto into bowls. Garnish with chopped parsley and extra Parmesan, if you like. Enjoy your delicious meal! For the full recipe, check the earlier section. To get that dreamy, creamy texture, use Arborio rice. This rice has high starch, which helps create a rich and velvety risotto. When you sauté the rice, it absorbs flavors well. After pressure cooking, stir in grated Parmesan cheese. This cheese adds creaminess and depth. If the risotto feels thick, just add a splash of broth. Stir until you reach your desired consistency. One mistake is not to toast the rice long enough. Toasting adds flavor and helps with creaminess. Another error is rushing the pressure release. Always allow for a natural release for at least five minutes. This helps the risotto finish cooking and keeps it creamy. Finally, avoid overcooking the risotto. It should be al dente, not mushy. Always ensure your Instant Pot seals well. A good seal helps maintain pressure for cooking. Use the sauté function to add flavor before pressure cooking. This step is key in developing taste. Clean your Instant Pot thoroughly after use. This keeps it in great shape and ready for your next dish. For precise cooking, refer to the Full Recipe for step-by-step guidance. {{image_2}} You can easily make this dish vegan. Simply skip the Parmesan cheese and butter. Use coconut cream or a vegan butter alternative. This change keeps the creaminess while making it plant-based. The pumpkin adds natural sweetness, so you won’t miss the dairy. Adding herbs and spices can elevate your risotto. Fresh sage pairs well with pumpkin. Just chop it finely and add it during cooking. You can also try rosemary for a strong flavor. A pinch of cayenne pepper adds heat, while a sprinkle of cinnamon can give warmth. Feel free to customize your risotto with other ingredients. Add cooked mushrooms for a savory touch. Spinach or kale can boost nutrients and color. You might even try chickpeas for protein. Just remember to adjust the broth as needed if you add more ingredients. For the complete preparation details, check out the Full Recipe. To keep your leftover risotto fresh, you should store it in an airtight container. Let the risotto cool to room temperature before sealing it. This helps prevent moisture build-up and keeps it creamy. It can stay in the fridge for up to three days. If you want to eat it later, freezing is a great option. When you reheat risotto, you want to keep it creamy. Place it in a pot over low heat. Add a bit of vegetable broth or water to loosen it up. Stir it often. You can also use the microwave. Just add a splash of liquid and cover it. Heat in short bursts, stirring in between until warmed through. If you choose to freeze your risotto, pour it into a freezer-safe container. Leave some space at the top, as it will expand. Risotto can be frozen for up to three months. To thaw, move it to the fridge overnight before reheating. This way, you can enjoy your creamy pumpkin risotto at a later time! For the full recipe, check out the complete guide. Yes, you can use different rice. Arborio rice works best for creamy risotto. Other options are Carnaroli or Vialone Nano. These choices have high starch. This starch gives risotto its creamy texture. Using long-grain rice will not give the same results. To make risotto without an Instant Pot, start with a skillet. Use a medium heat on your stove. Sauté the onions and garlic in butter. Add the Arborio rice and toast it for two minutes. Gradually add warm broth, one cup at a time. Stir often until the rice absorbs the liquid. This will take about 20 minutes. Finish with pumpkin puree and cheese for creaminess. Creamy pumpkin risotto goes well with many dishes. Try serving it with roasted chicken or sautéed greens. A fresh salad with nuts adds crunch. Grilled vegetables also pair nicely. You can even add a poached egg on top for extra protein. You can easily boost the nutrition of your risotto. Add diced spinach or kale for extra vitamins. Incorporating cooked lentils or chickpeas adds fiber and protein. You can use whole grain Arborio rice for more nutrients. Additionally, replace some broth with a vegetable-rich puree. This will add flavor and health benefits. For the full recipe, check out the [Full Recipe]. In this article, we explored how to make creamy pumpkin risotto in an Instant Pot. I shared key ingredients and optional garnishes to enhance flavor. You learned step-by-step cooking instructions and tips for a perfect texture. We also discussed variations, storage info, and answered common questions. Making risotto is easy when you follow these steps. Enjoy your delicious meal, and don’t hesitate to get creative with flavors! Cooking should be fun, so keep experimenting and savoring every bite.

Delicious Instant Pot Creamy Pumpkin Risotto Recipe

Get ready to delight your taste buds with my Instant Pot Creamy Pumpkin Risotto recipe! This cozy dish combines creamy

To make Cheesy Pizza Pot Pie Dip, gather these simple ingredients: - 1 cup pizza sauce - 2 cups shredded mozzarella cheese - 1 cup ricotta cheese - 1 cup cooked Italian sausage, crumbled (or use a meat substitute) - 1/2 cup sliced black olives - 1/2 cup diced bell pepper - 1/4 cup grated Parmesan cheese - 1 teaspoon Italian seasoning - Salt and pepper to taste - 1 package refrigerated pie crusts (or use crescent roll dough) - Fresh basil or parsley for garnish Each ingredient plays a key role in building flavor and texture. The pizza sauce adds a rich base, while the mozzarella and ricotta bring creaminess. The sausage or meat substitute gives it heartiness. Black olives and bell peppers add color and crunch. Seasoning ties everything together, making it irresistible. Using refrigerated pie crusts or crescent roll dough gives a flaky, golden topping. Fresh herbs like basil or parsley make for a beautiful garnish. These ingredients create a dish that everyone will love. For the complete recipe, check out the Full Recipe for detailed steps! - Preheating the oven: Start by setting your oven to 375°F (190°C). This ensures it is hot and ready for baking. - Mixing the dip ingredients: In a large bowl, combine the pizza sauce, shredded mozzarella, ricotta, cooked sausage, black olives, diced bell pepper, and Parmesan. Add Italian seasoning, salt, and pepper. Mix everything well until it's smooth and creamy. - Preparing the baking dish: Take a medium-sized, oven-safe baking dish and spread the dip mixture evenly into it. Make sure to cover the bottom completely for even cooking. - Designing the pie crust topping: Roll out the refrigerated pie crusts on a clean surface. Cut the crust into strips. Lay the strips in a lattice pattern over the dip, allowing the edges to hang over. Fold the edges under for a neat finish. - Timing and temperature settings: Place your baking dish in the preheated oven. Bake for about 25-30 minutes. - Indicators for doneness: Look for a golden brown and crispy crust. The cheese should be bubbling, signaling that it is ready. - Cooling and garnishing tips: After baking, remove the dish from the oven. Let it cool for a few minutes. Garnish with fresh basil or parsley for a pop of color and flavor. Enjoy this cheesy delight with crispy tortilla chips or toasted baguette slices! - How to achieve a crispy crust For a crispy crust, use a hot oven. Preheat to 375°F (190°C). Bake until golden brown. Make sure to cut your pie crust into thin strips. This helps it cook evenly and crisp up nicely. - Best practices for mixing ingredients Mix your cheeses and sauces in a bowl. Stir gently to avoid breaking the ricotta. Add your seasonings last for balanced flavor. Ensure all ingredients are evenly distributed for the best taste. - Flavor enhancement suggestions Try adding garlic powder or crushed red pepper for extra kick. Fresh herbs like basil can brighten the dish. A splash of Worcestershire sauce adds depth. Experiment with flavors to find your perfect mix. - Pairing options for dipping Serve your dip with crunchy tortilla chips. Toasted baguette slices are great too. Fresh veggie sticks like carrots and cucumbers add a healthy touch. - Creative serving displays Use a cast-iron skillet for a rustic look. A shallow bowl makes it easy for guests to dip. Arrange your sides in a circle around the dip for a fun presentation. - Garnishing for visual appeal Finish with fresh basil or parsley on top. A sprinkle of extra Parmesan adds flair. Consider adding a drizzle of olive oil for shine and flavor. For the full recipe, check the details above. {{image_2}} You can easily switch some items in your dip. This way, you can match your taste or diet. - Vegetarian or vegan options: Swap out the Italian sausage for a meat substitute. You can use mushrooms or eggplant to add texture and flavor. For a vegan dip, use plant-based cheese and skip the ricotta. - Alternative cheese combinations: Try mixing different cheeses. Cheddar adds a sharp taste, while gouda gives a smoky flavor. You can blend mozzarella with feta for a tangy twist. - Different proteins or toppings: Instead of sausage, use pepperoni or diced chicken. You can also add toppings like spinach or artichokes for extra flavor and nutrition. You can make your Cheesy Pizza Pot Pie Dip even more fun with different tastes. - Spicy versions with added heat: Add red pepper flakes or jalapeños for a kick. You can also use spicy sausage instead of mild for more heat. - Sweet variations using different ingredients: Try adding a touch of honey or caramelized onions. These add a sweet note that balances the cheese. - Exploring international flavors: Use pesto instead of pizza sauce for an Italian twist. You can also try adding taco seasoning for a fun Tex-Mex flavor. Each option gives your dip a new and exciting taste. For the full recipe, visit the provided link. To keep your Cheesy Pizza Pot Pie Dip fresh, store leftovers quickly. Place the dip in an airtight container. Make sure it cools down first. This helps keep it safe and tasty. Use a glass or plastic container that seals well. It keeps moisture out and flavor in. When reheating, use the oven for best results. Preheat your oven to 350°F (175°C). Place the dip in an oven-safe dish. Cover it with foil to avoid drying out. Heat for about 15-20 minutes until hot. You can also use a microwave. Just heat in short bursts. Stir between each burst to ensure even heating. Avoid overheating, as this can make it rubbery. Enjoy your dip warm and gooey, just like fresh from the oven! For the full recipe, don't forget to check the previous sections! How do I make this dip ahead of time? You can prepare the dip mix a day before. Just mix all the dip ingredients and store it in the fridge. When you are ready to serve, spread it in the baking dish and top with the pie crust. Bake it as directed for fresh, hot dip. Can I freeze Cheesy Pizza Pot Pie Dip? Yes, you can freeze it! After mixing the dip, place it in a freezer-safe container. When you're ready to eat it, thaw it overnight in the fridge. Then, bake as usual. This helps keep the flavors fresh. What are the best sides to serve with this dip? I love serving this dip with crispy tortilla chips, toasted baguette slices, or fresh veggie sticks. These sides add great crunch and make dipping fun! Is it okay to use low-fat cheese? You can use low-fat cheese if you want a lighter option. Just keep in mind that it may not melt as smoothly. Full-fat cheese gives the best texture and taste. Can I use homemade pizza sauce? Absolutely! Homemade pizza sauce adds a personal touch. Make sure it has great flavor to enhance your dip. Fresh herbs or spices in your sauce can make it even better. What's the best way to serve this dip warm? Serve it right from the oven in the baking dish for warmth. You can also use a warming tray to keep it hot. Just make sure to provide plenty of dippers nearby! For the full recipe, check out the details above. You now have all the details to create a tasty Cheesy Pizza Pot Pie Dip. Start with fresh ingredients and use the right techniques for the best results. Remember, you can customize this dip to fit your taste by changing ingredients or flavors. Enjoy experimenting and sharing it at your next gathering. With these tips, you'll impress family and friends with your cooking skills. Keep the leftovers stored well, so every bite tastes great later. Enjoy every cheesy moment of this fun dish!

Cheesy Pizza Pot Pie Dip Irresistible Comfort Food

Craving comfort food? Look no further than my Cheesy Pizza Pot Pie Dip! This warm, gooey dip blends all the

To make these tasty sandwiches, you need key ingredients. Here’s what you need: - 4 boneless, skinless chicken thighs - 1 cup buttermilk - 1 cup all-purpose flour - 1 teaspoon garlic powder - 1 teaspoon onion powder - 1 teaspoon paprika - 1/2 teaspoon cayenne pepper - Salt and pepper to taste - Oil for frying (vegetable or canola) - 4 hamburger buns - 1 cup shredded lettuce - 1 cup dill pickle slices - 1/2 cup ranch dressing - Fresh dill for garnish (optional) These ingredients come together to create a crispy and flavorful sandwich. You can add fun flavors to your sandwich. Try some of these options: - Sliced jalapeños for a spicy kick - Smoked paprika for a deeper taste - A sprinkle of lemon zest for freshness These add-ins can really change the game in your sandwich. Garnishes make your sandwich look and taste better. Here are some great choices: - Extra dill pickle slices for crunch - Shredded carrots for color and sweetness - A slice of tomato for juiciness - A drizzle of hot sauce for heat These toppings can elevate your Pickle Ranch Fried Chicken Sandwiches. Marinating is key for juicy chicken. Start by taking your boneless, skinless chicken thighs. Place them in a bowl and pour in 1 cup of buttermilk. Make sure all the chicken is covered. This helps keep the chicken moist and adds flavor. Let it chill in the fridge for at least one hour. For even better flavor, marinate overnight. Next, you’ll want to prepare the seasoned coating. In a clean bowl, mix together 1 cup of all-purpose flour, 1 teaspoon of garlic powder, 1 teaspoon of onion powder, 1 teaspoon of paprika, 1/2 teaspoon of cayenne pepper, and salt and pepper to taste. This blend gives the chicken a tasty crunch. Make sure it’s well combined for even flavor. Now comes the fun part: frying! First, heat oil in a large skillet to about 350°F. You need enough oil for a depth of 1 inch. Test the oil by dropping a bit of the flour mixture in. If it sizzles, you’re ready! Take the marinated chicken out of the buttermilk. Let the extra buttermilk drip off and then dredge each piece in the seasoned flour. Shake off any excess flour. Carefully place the chicken in the hot oil. Fry each side for 6 to 8 minutes until they turn golden brown. To ensure they are cooked through, check that the internal temperature reaches 165°F. Once done, transfer the chicken to a plate lined with paper towels. This will help drain any extra oil. Now your chicken is crispy and ready for the best Pickle Ranch Fried Chicken Sandwiches! For the full recipe, check out the recipe section. To get that perfect crunch, follow these steps: - Marinate well: Soaking the chicken in buttermilk makes it tender. - Coat thoroughly: Use the seasoned flour mix to cover the chicken well. - Maintain oil temp: Heat the oil to 350°F. This keeps the chicken crispy. - Fry in batches: Don’t crowd the pan. Give the chicken room to fry evenly. Here are some things to watch out for: - Skipping the marinade: This step helps flavor the chicken. - Not shaking off excess flour: Too much flour can lead to a gummy texture. - Overcrowding the pan: This lowers the oil temperature and results in soggy chicken. - Not checking doneness: Always use a meat thermometer. Chicken should reach 165°F. Put together your sandwich like a pro: - Start with ranch dressing: Spread it on the bottom bun for flavor. - Layer smartly: Place fried chicken first, then lettuce and pickles. - Keep it neat: Press the top bun down gently to hold everything together. - Garnish if you like: Fresh dill adds a nice touch. These tips will help you create the best Pickle Ranch Fried Chicken Sandwiches every time. For the detailed steps, check the Full Recipe. {{image_2}} To make your Pickle Ranch Fried Chicken Sandwiches spicy, add more cayenne pepper. You can increase the amount to 1 teaspoon, or even more if you love heat. You can also mix hot sauce into the buttermilk. This step adds a fiery kick that pairs well with the cool ranch dressing. If you want a lighter option, try grilled chicken instead of fried. Marinate the chicken as usual and grill it until cooked through. For a vegan twist, use tofu. Press the tofu to remove excess moisture, then marinate it in buttermilk or a plant-based alternative. Fry or grill it until golden. You can add other toppings to boost flavor. Consider adding sliced jalapeños or pickled red onions for zing. Swap out ranch dressing for a spicy aioli or garlic mayo for a different taste. For crunch, add coleslaw or crispy onions. Each swap lets you customize your sandwich to your liking. To store leftover sandwiches, wrap them tightly in plastic wrap or foil. You can also place them in an airtight container. Keep the sandwiches in the fridge for up to three days. This keeps them fresh and helps maintain flavor. For the best taste, reheat your sandwiches in the oven. Preheat your oven to 350°F (175°C). Place the sandwich on a baking sheet and cover it with foil. Heat for about 10-15 minutes. This method keeps the chicken crispy and the bun warm. You can also use a skillet over medium heat for a quicker option. Just flip the sandwich until both sides are warm. If you want to freeze the fried chicken, let it cool first. Place the pieces in a freezer-safe container or bag. They can be frozen for up to three months. When ready to eat, thaw in the fridge overnight. Reheat using the oven for the best texture. Enjoy your crispy chicken even after freezing! To reheat fried chicken, use an oven. Preheat it to 375°F (190°C). Place the chicken on a baking sheet. Bake for about 15 to 20 minutes. This keeps the chicken crispy and warm. Avoid using a microwave. It makes the chicken soggy. Yes, you can make these sandwiches ahead of time. Fry the chicken and let it cool. Store the chicken in the fridge. Assemble the sandwiches just before serving. This keeps them fresh and tasty. Many local restaurants and fast-food places serve fried chicken sandwiches. Some may offer variations with pickle ranch flavor. Check menus online or call ahead to ask. You might discover a new favorite spot nearby. You can find the full recipe for Zesty Pickle Ranch Fried Chicken Sandwiches above. This includes all the steps and ingredients needed to create this delicious dish. Enjoy making your own at home! You learned about making Pickle Ranch Fried Chicken Sandwiches. Key ingredients include the chicken, coatings, and tasty toppings. I shared steps for marinating and frying the chicken perfectly. We also explored ways to get crispy results and what common mistakes to avoid. As you enjoy your sandwiches, remember to experiment with flavors or proteins. You can also store leftovers for tasty meals later. Now, you have everything needed to make these sandwiches a hit!

Pickle Ranch Fried Chicken Sandwiches Crispy and Flavorful

Are you ready for a taste explosion? Pickle Ranch Fried Chicken Sandwiches deliver crispy, juicy goodness in every bite. You’ll

To make Cherry Almond Overnight Oats, gather these ingredients: - 1 cup rolled oats - 2 cups unsweetened almond milk - 1 cup fresh cherries, pitted and halved - 1/4 cup sliced almonds - 2 tablespoons chia seeds - 2 tablespoons maple syrup (or honey) - 1 teaspoon vanilla extract - 1/2 teaspoon almond extract - A pinch of salt These ingredients work together to create a tasty and healthy meal. The oats provide fiber, while the almonds add healthy fats. Cherries bring natural sweetness and a burst of flavor. You can customize your oats with fun toppings. Here are some ideas: - Sliced bananas - Fresh berries - Coconut flakes - Greek yogurt - A drizzle of nut butter These options add different textures and flavors. Mix and match to find your favorite combo! Cherry Almond Overnight Oats are not just delicious; they are nutritious too. Here’s a quick look at what you get per serving: - Calories: Around 300 - Protein: 8 grams - Fat: 12 grams - Carbohydrates: 45 grams - Fiber: 10 grams This meal keeps you full and satisfied. It’s perfect for busy mornings. For the full recipe, check out the detailed instructions. To start, gather your ingredients. You will need rolled oats, chia seeds, and a pinch of salt. In a large mixing bowl, add the rolled oats and chia seeds. Sprinkle in that pinch of salt. Stir the dry mix gently until it is even. This step sets the base for your overnight oats. Next, take a separate bowl. Here, you will whisk together the almond milk, maple syrup, vanilla extract, and almond extract. Make sure the liquids blend well. Pour this mixture over your dry ingredients. Stir it all together until every oat is coated. Now, gently fold in the halved cherries and sliced almonds. Save a few cherries and almonds for later. Divide the oat mixture into mason jars or airtight containers. Seal them tight and place them in the fridge overnight. When you are ready to eat, stir the oats well. If you want it creamier, add a splash of almond milk. Top each jar with the reserved cherries and almonds for a nice touch. Enjoy your Cherry Almond Overnight Oats! For the full recipe, check out the details above. To get the creamiest overnight oats, use rolled oats. They soak up liquid well. Always mix your oats with the liquid first. Let them rest for a minute before adding fruit. This helps them soften even more. You can also try adding a bit more almond milk if you want a looser texture. One common mistake is not measuring ingredients. Too much liquid can make them runny. Too little can make them dry. Another mistake is skipping the chia seeds. They help thicken the oats and add fiber. Always remember to stir well to mix all flavors evenly. To save time, prepare your oats in jars. This makes it easy to grab and go. You can also batch-make them for the week. Just keep them in the fridge. If you are short on time, consider using frozen cherries. They are quick to add and still taste great in the oats. For a fun twist, mix in your favorite nuts and seeds for extra crunch. Check the Full Recipe for more ideas! {{image_2}} If you don’t have almond milk, don’t worry! You can use any milk you like. Here are some great options: - Cow's milk: This is a classic choice. It adds creaminess. - Soy milk: This milk is rich in protein. It works well in oats. - Oat milk: This has a mild flavor and is very creamy. - Coconut milk: This gives a tropical twist. It adds a nice sweetness. Feel free to choose what suits your taste best! You can mix up the fruits and nuts in your oats. Here are some fun ideas: - Berries: Strawberries, blueberries, or raspberries can add a fresh flavor. - Bananas: Sliced bananas can make it sweeter and creamier. - Peaches: Fresh or canned peaches add a juicy texture. - Walnuts: They add a nice crunch and healthy fats. - Pecans: These nuts give a rich, buttery taste. Experiment with different combinations to find your favorite! If you want to change up the sweetness, try these options: - Honey: This natural sweetener adds a lovely flavor. - Agave syrup: This is a great vegan option. It’s sweeter than sugar. - Stevia: This calorie-free sweetener is perfect for low-sugar diets. - Brown sugar: This adds a hint of caramel flavor to your oats. Choose what you enjoy most to make your Cherry Almond Overnight Oats just right for you! For the full recipe, check out the detailed steps and ingredients. You can store Cherry Almond Overnight Oats in mason jars or airtight containers. Make sure to seal them tightly. This keeps the oats fresh and prevents them from drying out. Always refrigerate them right after making. This helps maintain their flavor and texture. These overnight oats last about five days in the fridge. To keep them fresh, check for any signs of spoilage before eating. If they look or smell off, it’s best to throw them away. Use fresh ingredients for the best taste. The better the ingredients, the more flavorful your oats will be. You can eat these oats cold or warm them up. To heat, microwave them in short bursts, stirring in between. Add a splash of almond milk if they seem dry. For serving, top with extra cherries and almonds. You can also add a drizzle of maple syrup for extra sweetness. Enjoy your delicious breakfast! Yes, you can make Cherry Almond Overnight Oats ahead of time. I often prepare them the night before. This lets the oats soak up all the flavors. You can store them in the fridge for easy breakfasts all week. Just grab a jar, and you’re good to go! Overnight oats can last for about 4 to 5 days in the fridge. To keep them fresh, use airtight containers. Each day, the oats might get softer. If you like a firmer texture, eat them within the first few days. Yes, frozen cherries work well too. Just thaw them before adding to the oats. They add a nice sweetness. The texture may change a bit, but the flavor stays great. You can also use them straight from the freezer if you're in a hurry. You can try many nuts in this recipe. Walnuts or pecans add a great crunch. Hazelnuts can give a nice flavor twist. Feel free to mix and match to find your favorite combo. Almonds are tasty, but the choice is yours! For more ideas, check out the Full Recipe. Cherry almond overnight oats are easy to make and super tasty. You learned how to combine simple ingredients, add fun toppings, and store your oats for freshness. I shared tips to make them creamy and avoid common mistakes. You can even mix it up with fruit and nut options or find different milk substitutes. In short, cherry almond overnight oats are a quick, healthy choice for breakfast and can fit your taste. Enjoy your tasty oats and feel great knowing you made a smart meal!

Cherry Almond Overnight Oats Healthy Breakfast Recipe

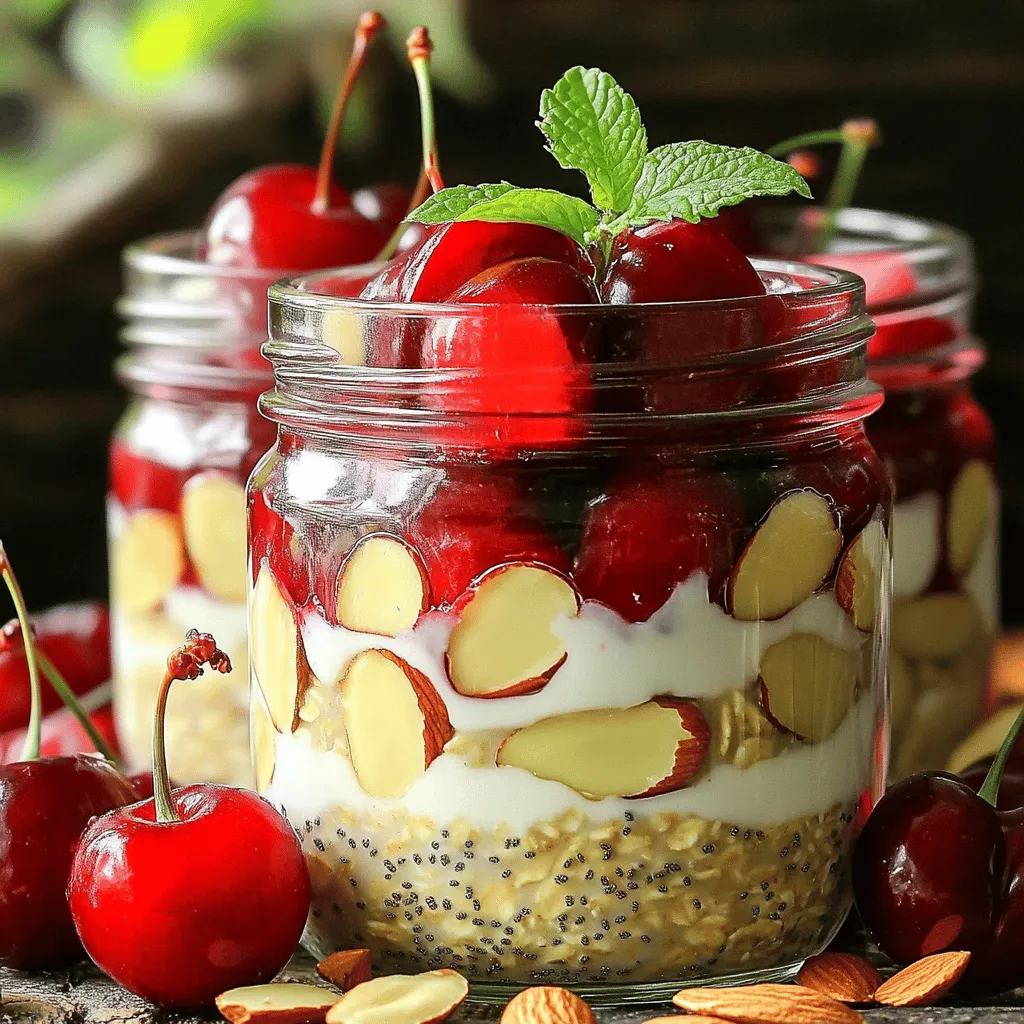
Looking for a quick, healthy breakfast that’s full of flavor? I’ve got you covered with my Cherry Almond Overnight Oats

To make these tasty no bake cheesecake cups, you need: - 1 cup graham cracker crumbs - 3 tablespoons sugar - 4 tablespoons unsalted butter, melted These three ingredients form the base of your cheesecake cups. The graham cracker crumbs give a crunchy texture. The sugar adds sweetness, and the melted butter helps bind everything together into a crust. The filling is the star of the show. Here are the key ingredients: - 8 oz cream cheese, softened - 1/2 cup powdered sugar - 1 teaspoon vanilla extract Cream cheese is rich and creamy. Softening it makes mixing easier. The powdered sugar sweetens the filling. Vanilla extract adds a lovely flavor. Together, they create a smooth and delicious filling. Top your cheesecake cups with these fun additions: - 1 cup heavy whipping cream - Fresh fruit (like strawberries or blueberries) - Mint leaves for garnish (optional) Whipping cream makes the filling light and fluffy. Fresh fruit adds color and natural sweetness. Mint leaves can give a fresh touch. These toppings make your dessert not just tasty but also pretty! Start by mixing the graham cracker crumbs, sugar, and melted butter. In a medium bowl, combine these three ingredients well. You want the crumbs to soak up the butter and sugar. This will give you a tasty base. Once mixed, divide the crust into your serving cups. Press it gently at the bottom to form a solid layer. This crust will add a nice crunch to your cheesecake cups. Now, let’s make the creamy filling. In a large mixing bowl, beat the softened cream cheese. Add the powdered sugar and vanilla extract. Mix until it is smooth and creamy. This step is key for flavor. In another bowl, whip the heavy cream until stiff peaks form. This means it holds its shape. Gently fold the whipped cream into the cream cheese mixture. Be careful not to deflate it. This keeps the filling light and airy. It’s time to layer your cups. Spoon or pipe the cheesecake filling over the crust layer. Fill the cups almost to the top. This looks great and tastes even better! Once filled, cover the cups and chill them in the fridge for at least 2 hours. This helps the cheesecake set. When you’re ready to serve, add fresh fruit on top. A mint leaf can add a nice touch too. Enjoy your delicious no bake cheesecake cups! For a complete guide, check the Full Recipe. To get the best cream cheese texture, use room temperature cream cheese. Cold cream cheese can make your filling lumpy. Let it sit out for about 30 minutes before you start. Another key step is whipping the cream. Start with cold heavy cream. Use a clean bowl and beaters. Whip the cream until stiff peaks form. This adds lightness to your cheesecake. Gently fold the whipped cream into the cream cheese mixture. Presentation is key for these cheesecake cups. Serve them on a stylish platter. Arrange fresh fruit around the cups for a colorful look. You can also use clear cups to show off those creamy layers. Top each cup with fruit and mint leaves. This makes them look fancy and appetizing. You can easily adjust the sweetness of your cheesecake cups. If you like it sweeter, add more powdered sugar. For a less sweet version, cut back on the sugar. Taste as you go. This way, you can find the perfect balance for your palate. For the full recipe, check [Full Recipe]. {{image_2}} You can change the flavor of your no bake cheesecake cups easily. Try adding lemon zest for a fresh, zesty taste. Just a teaspoon or two will brighten the flavor. If you love chocolate, mix in cocoa powder. One to two tablespoons will give a rich, chocolatey twist. These small changes can make a big difference in taste and keep things exciting! For those who need a gluten-free option, swap regular graham crackers for gluten-free ones. Many brands offer tasty gluten-free graham crackers. You can still enjoy the crunchy crust without worry. This simple switch ensures everyone can savor these cheesecake cups. The fun doesn't stop at the filling! You can top your cheesecake cups with a variety of ingredients. Use crushed cookies for a delightful crunch. Oreos or chocolate wafer cookies work well. You can also add different fruits. Try peaches, raspberries, or kiwi for a colorful and tasty garnish. Each topping adds a new layer of flavor and texture to your dessert. To keep your no bake cheesecake cups fresh, store them in the fridge. Use an airtight container to prevent any strong odors from seeping in. If you have leftovers, cover each cup with plastic wrap. This will help maintain their creamy texture and flavor. I recommend consuming them within three days for the best taste. Yes, you can freeze no bake cheesecake cups! They freeze well and make a great treat later. Just cover each cup with plastic wrap and then foil. This extra layer helps prevent freezer burn. When you are ready to eat, move them to the fridge to thaw overnight. Enjoy a cool treat on a hot day! Understanding how long your cheesecake cups last is key. They stay good in the fridge for about 3 to 5 days. After that, the texture may change, and they might not taste as fresh. Always check for any signs of spoilage, like off smells or changes in color. Keeping track of their shelf life ensures you enjoy them at their best! Yes, you can use low-fat cream cheese. However, it may change the texture and taste. Low-fat cream cheese contains less fat, which can make the cheesecake less creamy. For the best results, I recommend using full-fat cream cheese. This will give your cheesecake cups that rich, smooth texture we all love. Chill your cheesecake cups for at least 2 hours. This time allows the filling to set properly. If you can wait longer, chilling them overnight makes them even better. The longer they chill, the firmer they become. You can use coconut cream as a dairy-free option. It has a similar texture. Silken tofu blended until smooth is another great choice. This will give you a creamy filling without dairy. Make sure to adjust the sweetness if you use these substitutes. Garnishing can make your cheesecake cups look stunning. Use fresh fruit like strawberries or blueberries on top. You can also add a sprig of mint for color. For a fun twist, drizzle chocolate sauce or a fruit puree over the cups. These simple touches elevate your dessert and impress your guests. For the complete recipe, check out the [Full Recipe]. No bake cheesecake cups are simple and fun to make. We covered key ingredients like cream cheese and graham crackers. Then I shared easy steps to prepare and layer your cups. Remember the tips for the best taste and texture, too. You can create many variations with different flavors and toppings. Enjoy these treats fresh or store them for later. With these ideas, you can impress anyone. Dive in and have fun making your own no bake cheesecake cups!

No Bake Cheesecake Cups Simple and Delicious Treat

Craving a sweet treat that’s easy to make and satisfying? Let me introduce you to No Bake Cheesecake Cups! This

Older posts
Newer posts
← Previous Page1 … Page20 Page21 Page22 … Page65 Next →

dsad

© 2025 flavorsprint • Built with GeneratePress

Our Policies

  • Copyright Policy
  • Cookie Policy
  • GDPR Policy
  • Privacy Policy
  • Disclaimer
  • Terms Of Use

More Information

  • Home
  • About
  • Contact
  • Appetizers
  • Dessert
  • Dinner
  • Drinks
©2025, flavorsprint About Back To Top