Skip to content
DisclaimerTerms Of UseGDPR PolicyCookie Policy

flavorsprint

  • Home
  • Drinks
  • Appetizers
  • Dinner
  • Dessert
  • About
  • Contact
  • Privacy Policy
DisclaimerTerms Of UseGDPR PolicyCookie Policy

Lillian

- Puff Pastry Required You need one sheet of puff pastry. Make sure it is thawed before use. This pastry gives the bites their flaky and light texture. - Onions and Flavor Components Use two large onions, thinly sliced. These are the stars of the dish. You will also need two tablespoons of butter and one tablespoon of olive oil to cook the onions. These fats help caramelize the onions and bring out their sweet flavor. Lastly, add two tablespoons of fresh thyme leaves, or one tablespoon of dried thyme. Salt and pepper are also important to enhance the taste. - Gruyère Cheese and Seasoning One cup of grated Gruyère cheese is essential. Its rich and nutty flavor pairs perfectly with the sweet onions. For the finishing touch, you will need one beaten egg. This egg wash will make your puff bites golden and shiny after baking. These ingredients come together to create a snack that is both simple and delicious. The mix of sweet and savory makes these bites hard to resist! To start, heat 2 tablespoons of butter and 1 tablespoon of olive oil in a large skillet over medium heat. Add 2 large, thinly sliced onions. Season with salt to bring out their natural sweetness. Stir often for about 20-25 minutes. You want them golden brown and soft. Near the end, add 2 tablespoons of fresh thyme. Mix well for added flavor. This step is key. Properly caramelized onions give your puff bites a rich taste. Next, preheat your oven to 400°F (200°C). On a lightly floured surface, roll out 1 sheet of thawed puff pastry. This helps smooth out any creases. Cut the pastry into 2.5-inch squares. Place the squares on a baking sheet lined with parchment paper. Make sure they have space to puff up when baking. Now, it’s time to fill the pastry. Spoon a small amount of your caramelized onion mixture onto the center of each square. Top each with a generous sprinkle of grated Gruyère cheese. This cheese melts beautifully and adds a creamy texture. To seal your puff bites, fold each square into a triangle or bring the corners together to form a pocket. Pinch the edges firmly to keep the filling inside. Before baking, brush the tops of your puff bites with a beaten egg. This gives them a nice golden color. Bake for 15-18 minutes. They should turn golden and flaky. To know if they are done, look for a deep golden brown color. Once they are ready, let them cool for a few minutes. Serve warm for the best taste. These bites are perfect for any gathering! - Use low heat to cook the onions slowly. - Stir often to avoid burning. - Add salt early; it helps to draw out moisture. - When the onions turn golden, they are ready. - Add thyme at the end for fresh flavor. Caramelizing onions takes time, but it’s worth it. The slow cooking makes them sweet and rich. If you rush, they can burn and taste bitter. Make sure to keep an eye on them. - An egg wash gives a shiny, golden finish. - Brush it on gently with a pastry brush. - Make sure to cover all edges for an even color. Applying an egg wash is key for great puff bites. The wash also helps seal the edges. This makes sure your filling stays inside while baking. - Serve on a wooden platter for a rustic look. - Garnish with fresh thyme for color. - Pair with a tangy dip like sour cream or yogurt. - Try serving with a light white wine or sparkling water. Presentation makes your puff bites even more appealing. A beautiful platter catches the eye. They taste best warm, so serve them fresh out of the oven! {{image_2}} Different Cheeses to Use If you want to switch things up, try using different cheeses. Cheddar, fontina, or even goat cheese can work well. Each cheese adds its own flavor twist. For a sharper taste, use aged cheddar. If you prefer something creamier, choose fontina. Goat cheese adds a tangy note that many enjoy. Alternative Herbs and Spices You can also change the herbs for new flavors. Rosemary and sage pair nicely with the sweet onions. If you like spice, add a pinch of red pepper flakes. Garlic powder can also enhance the taste. Just remember, keep it simple to not overpower the onions. Making it Vegetarian This recipe is already vegetarian, but you can make it even more so. Just ensure you use vegetable broth if caramelizing your onions in broth. This adds extra flavor while keeping it meat-free. Gluten-Free Adjustments To make these bites gluten-free, swap the puff pastry for gluten-free dough. Many brands offer great options that puff up nicely. Just check that your cheese and seasonings are also gluten-free for a safe meal. Turning Puff Bites into Main Dishes You can easily turn these bites into a main dish! Just make larger squares of puff pastry. Fill them with more caramelized onions and cheese. Serve with a fresh salad for a delicious dinner option. Creative Appetizer Ideas These bites are a hit at parties! Serve them on a platter with dips. Try a homemade sour cream dip or a zesty salsa. You can even make a cheese board with different cheeses and crackers alongside your puff bites. They will surely impress your guests! To keep your puff bites fresh, use an airtight container. Place a paper towel inside to absorb moisture. This method helps prevent sogginess. Stored this way, they last for about 2-3 days in the fridge. For the best results, reheat your puff bites in the oven. Set the oven to 350°F (175°C). Place them on a baking sheet for about 10-15 minutes. This method keeps them crispy. Avoid using the microwave, as it can make them soggy. Yes, you can freeze puff bites! Allow them to cool completely first. Place them in a single layer on a baking sheet. Once frozen, transfer them to a freezer bag. They can stay good for up to 2 months. To reheat, thaw in the fridge overnight and follow the reheating instructions above. You can use Swiss cheese, cheddar, or fontina. Each cheese gives a unique taste. Swiss cheese melts well and offers a mild flavor. Cheddar adds a sharp bite. Fontina provides a creamy texture. Feel free to mix different cheeses for added depth in flavor. Caramelized onions should be golden brown and soft. This takes about 20-25 minutes over medium heat. Stir them often to prevent burning. You want a sweet flavor, not a bitter one. If they stick, add a bit of water to help. Yes, you can prepare the filling in advance. Just store it in the fridge for up to three days. You can also assemble the puff bites ahead. Keep them in the fridge before baking. Just add a few extra minutes to the baking time. These bites taste great with sour cream or a yogurt dip. A sweet chili sauce also adds a nice kick. You can try a balsamic reduction for a tangy contrast. For a classic touch, serve with ranch dressing or herbed olive oil. In this blog post, we explored how to make delicious caramelized onion Gruyère puff bites. We covered the key ingredients, step-by-step instructions, helpful tips, and storage methods. Remember, the perfect puff bite comes from well-caramelized onions and a golden crust. You can customize the recipe to fit your taste and dietary needs. Enjoy these bites as a snack or a fancy appetizer. With practice, you’ll master this tasty treat! Now, it's time to get cooking and impress your friends and family.

Caramelized Onion Gruyère Puff Bites Irresistible Snack

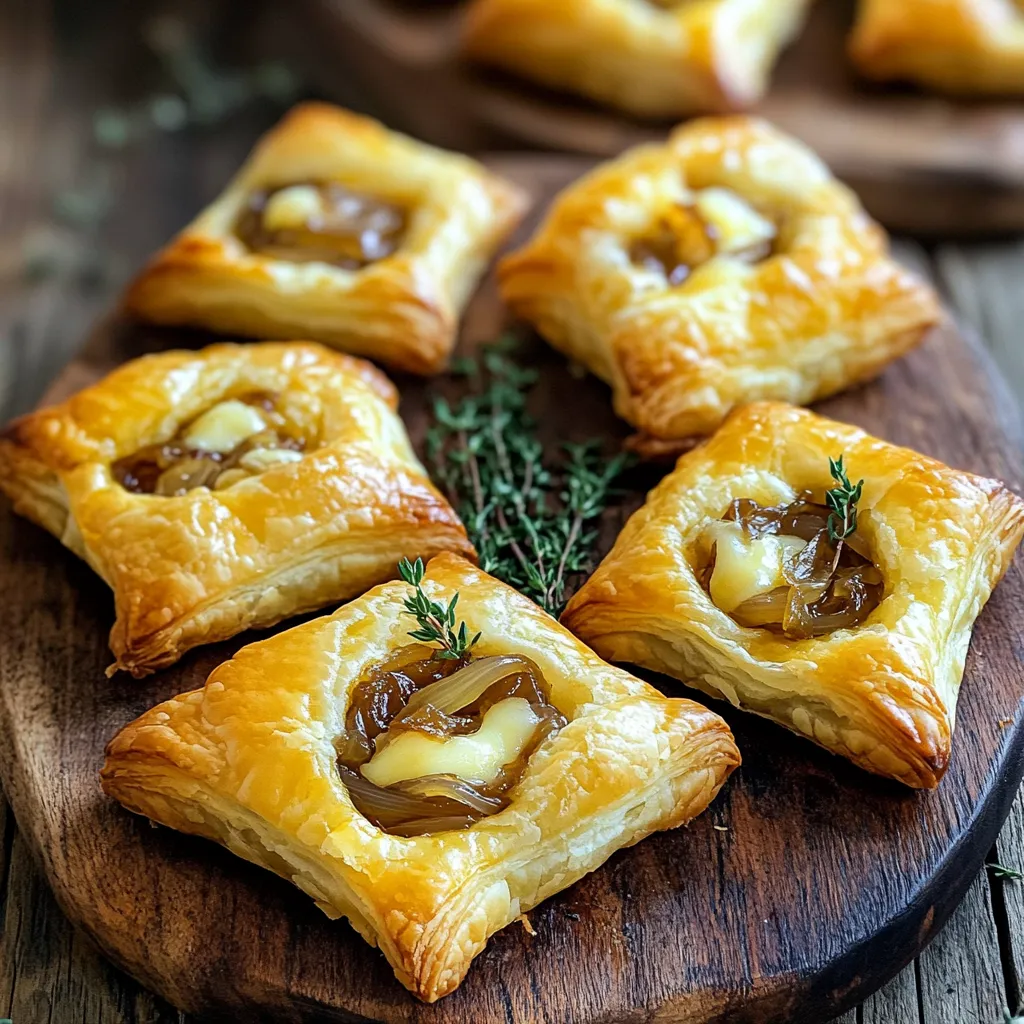
Looking for the perfect snack? You’ve found it! Caramelized Onion Gruyère Puff Bites are an irresistible treat that combines sweet,

- 1 pound boneless, skinless chicken thighs, thinly sliced - 1 cup fresh Thai basil leaves, packed - 3 cloves garlic, minced - 1-2 Thai bird chilies, sliced The chicken thighs give this dish a juicy bite. They stay tender while cooking. Fresh Thai basil adds a sweet and spicy flavor. Garlic brings a rich aroma, and chilies give a nice kick. Adjust the chilies based on your spice level. - 2 tablespoons soy sauce - 1 tablespoon fish sauce - 1 tablespoon oyster sauce (optional) These sauces add depth to the stir fry. Soy sauce gives saltiness. Fish sauce adds a unique umami taste. You can skip the oyster sauce if you want a lighter dish. - 1 bell pepper (red or green), sliced - 1 onion, sliced Bell peppers add crunch and color. They pair well with onion, which becomes sweet when cooked. These veggies make the dish vibrant and healthy. Together, they make the stir fry colorful and full of flavor. - Slicing the Chicken and Vegetables Start by slicing 1 pound of boneless, skinless chicken thighs into thin pieces. Use a sharp knife for clean cuts. Next, slice 1 bell pepper and 1 onion. Keep the slices even for even cooking. - Gathering and Measuring Ingredients Gather all your ingredients before you start cooking. This includes 3 cloves of minced garlic, sliced Thai bird chilies, and 1 cup of fresh Thai basil leaves. Measure out 2 tablespoons of soy sauce, 1 tablespoon of oyster sauce (if using), and 1 teaspoon of fish sauce. Having everything ready makes cooking smooth. - Heating the Oil Heat 1 tablespoon of vegetable oil in a large skillet or wok. Use medium-high heat. Make sure the oil is hot before adding chicken. This helps the chicken sear nicely. - Step-by-step Stir-frying Techniques Add the sliced chicken to the hot oil. Stir-fry for about 5-7 minutes. Look for the chicken to turn brown and be cooked through. Next, add the minced garlic and sliced chilies. Stir-fry for 1 minute until you smell the garlic's aroma. Now, add the sliced onion and bell pepper. Stir-fry for 2-3 minutes. The veggies should be slightly soft but still crispy. Pour in the soy sauce, fish sauce, and oyster sauce. Stir well to coat all the ingredients. - Incorporating Thai Basil Remove the skillet from heat. Fold in the fresh Thai basil leaves. The heat will wilt the basil and release its lovely scent. This step adds a fresh burst of flavor to your dish. - Serving Suggestions with Jasmine Rice Serve the hot stir-fry over cooked jasmine rice. The rice soaks up the tasty sauce. For a nice touch, you can add more fresh basil on top. This dish looks great and tastes amazing! - Using Fresh Ingredients Fresh ingredients make a big difference. Use fresh chicken and herbs for the best taste. Fresh Thai basil adds a sweet, aromatic flavor. Look for vibrant, green leaves. The fresher the garlic and chilies, the better your dish will taste. - Adjusting Spice Levels with Chilies If you like heat, use more chilies. Thai bird chilies pack a punch. Start with one or two and taste as you go. You can always add more if you want it spicier. If you prefer mild, remove the seeds before adding them. - Time-saving Preparation Tips Prepare all your ingredients first. Slice the chicken, bell pepper, and onion. Mince the garlic and chilies. This will save you time when cooking. You can even do this ahead of time and store them in the fridge. - Efficient Stir-frying Methods Use a large skillet or wok for even cooking. Heat the oil until it shimmers. This helps to sear the chicken quickly. Stir-fry in small batches if necessary. This keeps the heat high and cooks everything evenly. - Serving Suggestions for Visual Appeal Serve your stir fry over a bed of fluffy jasmine rice. A white plate makes the colors pop. Place the chicken and veggies on top for a beautiful look. This adds a nice contrast to the dish. - Garnishing Ideas Add a sprinkle of fresh basil on top for color. Sliced chilies or lime wedges can add a fresh touch. A drizzle of soy sauce can also enhance the look. These small details make your meal more inviting. {{image_2}} You can make this dish your own by changing the protein. If you want a vegetarian option, use tofu instead of chicken. Just press the tofu to remove the water, then cut it into cubes. Stir-fry it until golden brown. For beef lovers, thinly sliced beef works well too. Use flank steak or sirloin for great flavor. Cook it just like the chicken until it’s browned. If you love seafood, shrimp is a fun option. Use peeled and deveined shrimp and cook them for about 3-5 minutes. They will turn pink when done. Adding more veggies can boost nutrition and color. Broccoli is a great choice. Cut it into small florets and add it when you add the bell pepper. It cooks quickly and stays crisp. Carrots are also a tasty option. Slice them thinly so they cook fast. You can even use a mix of colors for your bell peppers. Red, yellow, and green peppers add fun and flavor. You can customize the sauce to suit your taste. Want more heat? Add more chilies or some chili flakes. If you need a vegan option, skip the oyster sauce and use more soy sauce instead. You can also find vegan fish sauce made from mushrooms. For gluten-free diets, check your soy sauce. Use a gluten-free version to keep the flavor while avoiding gluten. To cool and store your Quick Thai Basil Chicken Stir Fry, let it sit at room temperature for no more than two hours. This helps prevent bacteria growth. Once cooled, place the stir fry in a container with a lid. I recommend using glass or BPA-free plastic containers. They keep food fresh and make reheating easy. To properly freeze stir fry, first, cool it completely. Then, divide it into portion-sized servings. Use freezer-safe bags or containers. Squeeze out as much air as you can to avoid freezer burn. When it's time to eat, thaw the stir fry in the fridge overnight. For reheating, you can use a microwave or a skillet over low heat. Your Thai Basil Chicken Stir Fry lasts about three to four days in the fridge. Always check for any off smells or changes in color. If it looks slimy or has an unusual odor, toss it out. Keeping track of these signs helps you enjoy your meals safely. If you cannot find Thai basil, there are some good choices. You can use regular basil. It has a sweet taste, but it lacks that distinct anise flavor. Another option is to use mint. Mint adds a fresh taste that works well in stir-fries. Cilantro is also a great choice. It gives a bright flavor that can lift your dish. Yes, you can prep this dish in advance. You can slice the chicken and veggies a day before. Store them in the fridge. When you are ready to cook, just heat the oil and stir-fry. If you want to cook the stir-fry ahead, store it in an airtight container. It will stay fresh for about three days. The heat level depends on the chilies you use. Thai bird chilies are quite spicy. If you like mild heat, use one chili instead of two. You can also remove the seeds for less heat. Taste the dish as you cook. Adjust the chilies to fit your liking. In this post, we explored making Thai Basil Chicken Stir Fry. We discussed key ingredients like chicken, fresh basil, and chilies. I shared step-by-step instructions for preparation and cooking. We also revealed tips to boost flavor and presentation. Finally, I provided variations and storage tips. Remember, fresh ingredients make a big difference. Don't hesitate to try your own variations. This dish brings a burst of flavor to your table. Happy cooking!

Quick Thai Basil Chicken Stir Fry Tasty and Simple Meal

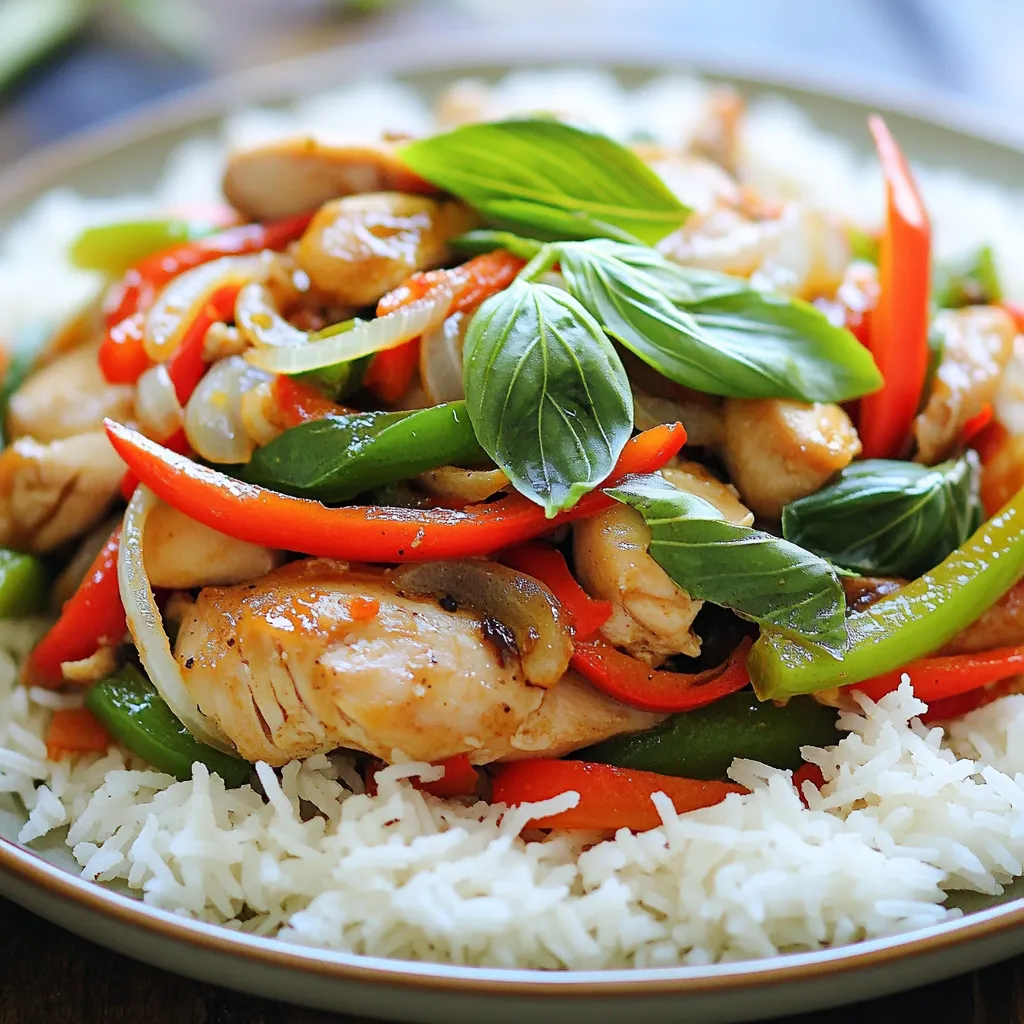
Looking for a quick and tasty meal? You’re in the right place! My Quick Thai Basil Chicken Stir Fry is

To make a tasty butternut squash mac and cheese bake, gather these key items: - 2 cups elbow macaroni - 2 cups butternut squash, peeled and diced - 2 tablespoons olive oil - 1 teaspoon garlic powder - 1 teaspoon onion powder - 1 teaspoon smoked paprika - 1/2 teaspoon salt - 1/4 teaspoon black pepper - 2 cups sharp cheddar cheese, shredded - 1 cup mozzarella cheese, shredded - 1 cup milk - 1/4 cup cream cheese - 1/2 cup breadcrumbs - Fresh parsley for garnish (optional) These ingredients create a creamy, cozy dish that blends classic mac and cheese with the sweet taste of butternut squash. The elbow macaroni provides a classic base, while the butternut squash adds a unique twist. With a mix of garlic, onion, and smoked paprika, the flavors deepen. The sharp cheddar and mozzarella cheeses melt together, making the dish rich and creamy. The breadcrumbs on top give a crunchy finish, creating a delightful contrast. You can add fresh parsley on top for a fresh look and taste. Each element plays an important role in making this dish a flavorful delight. First, you need to preheat your oven to 375°F (190°C). This sets the stage for a perfect bake. While the oven warms up, grab a medium pot. Fill it with water, add some salt, and bring it to a boil. Cook 2 cups of elbow macaroni according to the package directions. Once done, drain the macaroni and set it aside for later. Get a large saucepan and heat 2 tablespoons of olive oil over medium heat. Add 2 cups of peeled and diced butternut squash. Sauté this for about 5 to 7 minutes until the squash is fork-tender. Next, add 1 teaspoon of garlic powder, 1 teaspoon of onion powder, 1 teaspoon of smoked paprika, 1/2 teaspoon of salt, and 1/4 teaspoon of black pepper. Stir well to coat the squash with these spices. The aroma will be amazing! Now it's time to mix everything. Add the cooked macaroni to the squash mixture. Pour in 1 cup of milk and add 1/4 cup of cream cheese. Stir until the cream cheese melts and blends smoothly. Next, remove the saucepan from heat. Stir in 2 cups of shredded sharp cheddar and 1 cup of shredded mozzarella cheese until it all becomes creamy and delicious. Transfer the mac and cheese mixture into a greased 9x13 inch baking dish. This is where the magic happens! Sprinkle 1/2 cup of breadcrumbs evenly over the top. This will create a crispy layer when baked. Place the dish in your preheated oven. Bake for 20 to 25 minutes. Keep an eye on it. You want the top to turn golden brown and bubbly. After baking, let it cool for a few minutes before serving. Enjoy your flavorful butternut squash mac and cheese bake! To boost the taste of your butternut squash mac and cheese, try adding some herbs and spices. Here are a few great options: - Thyme: Adds a lovely earthy note. - Sage: Complements the squash very well. - Nutmeg: Just a pinch can bring warmth. - Cayenne: For a little heat, sprinkle a dash. These simple additions can elevate the dish and make it even more delicious. For a creamier texture, keep these tips in mind: - Use full-fat milk and cream cheese. This adds richness. - Stir the cheeses well until they completely melt. - Consider adding a bit more cream if you want it even creamier. The creaminess makes each bite feel indulgent and satisfying. To make this dish appealing to kids, try these ideas: - Use mild cheese instead of sharp cheddar. It’s less tangy. - Cut the butternut squash into tiny pieces. Kids may not notice it! - Add fun shapes of pasta. Kids love the look of star or shell shapes. These small changes can help get kids excited about eating their veggies! {{image_2}} You can switch up the cheese for fun flavors. Try gouda for a smoky taste. Fontina adds creaminess and richness. For a sharp bite, use pepper jack. You can even mix different cheeses for a unique blend. Just keep the total amount similar to the recipe. Want to make it heartier? Add cooked chicken, crispy bacon, or grilled tofu. Chicken works well with the creamy sauce. Bacon adds a nice crunch and salty flavor. For a plant-based choice, use tofu. Just cube it and sauté until golden before adding. You can easily make this dish vegetarian or vegan. For a vegetarian version, just skip the meat. Use all plant-based cheeses and milk for a vegan option. Nutritional yeast can add a cheesy flavor. Try coconut cream for a rich, creamy texture. To keep your butternut squash mac and cheese bake fresh, store it in an airtight container. Make sure to let it cool down first. This keeps moisture out and helps it last longer. Place the container in the fridge. It will stay good for about three to four days. If you want to save some for later, freezing is a great option. First, let the dish cool completely. Then, cut it into individual portions for easy reheating. Wrap each portion tightly in plastic wrap, then place them in a freezer-safe bag. When you are ready to eat, thaw it in the fridge overnight. Reheat it in the oven at 350°F (175°C) until warm. When kept in the fridge, your leftovers are good for about four days. If frozen properly, they can last up to three months. Always check for signs of spoilage, like a strange smell or color changes. This way, you ensure your meal stays tasty and safe to eat. Yes, you can! While elbow macaroni is a classic choice, you can use many other types of pasta. Here are a few great alternatives: - Shells: They hold onto the cheese sauce well. - Penne: This pasta has a nice bite and works great. - Fusilli: Its spiral shape adds fun texture. Feel free to choose what you like best. Just remember to cook it until al dente, so it stays firm when baked. Making this dish gluten-free is easy. Here are some tips: - Use gluten-free pasta: Many brands offer rice, corn, or quinoa options. - Check the cheese: Most cheeses are gluten-free, but always check labels. - Use gluten-free breadcrumbs: You can find these at many stores or make your own. These changes will keep the flavor while making it safe for those with gluten allergies. Absolutely! You can prepare this dish ahead of time. Here’s how: 1. Cook the macaroni and squash as per the recipe. 2. Mix all the ingredients together in a baking dish. 3. Cover it with foil and store it in the fridge for up to 24 hours. 4. When ready to bake, preheat your oven and remove the foil. 5. Bake as instructed, adding a few extra minutes if it’s cold. This makes it perfect for busy nights or when you have guests coming over. Enjoy the taste of comfort food without the last-minute rush! This blog post covers a delicious butternut squash mac and cheese bake. You learned about key ingredients like elbow macaroni, cheeses, and seasonings. The step-by-step guide ensures perfect preparation and baking. I shared tips to enhance flavor, achieve creaminess, and offer kid-friendly options. You can explore variations, including vegetarian options and protein additions. Lastly, I provided storage tips to keep leftovers fresh. Enjoy experimenting with this recipe, and make it your own! Your meal will delight everyone around the table.

Butternut Squash Mac and Cheese Bake Flavorful Delight

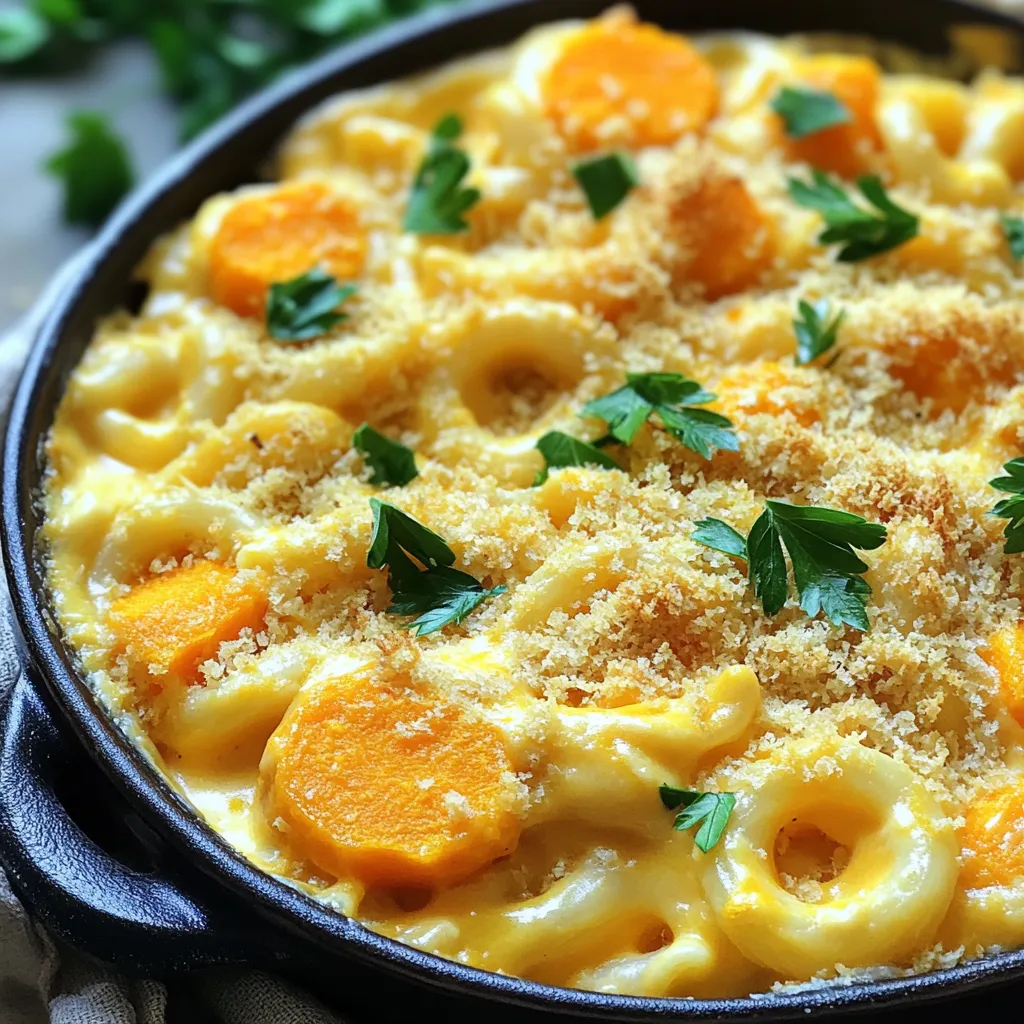
Are you ready to enjoy a cozy dish that warms both your heart and belly? My Butternut Squash Mac and

- 2 cups rolled oats - 1 cup chopped pecans - 1/2 cup sliced almonds - 1/2 cup unsweetened shredded coconut - 1/2 cup maple syrup - 1/4 cup melted coconut oil - 1/2 teaspoon vanilla extract - 1/2 teaspoon cinnamon - 1/4 teaspoon salt - 1/2 cup dried cranberries or raisins (optional) To make Crunchy Maple Pecan Granola Clusters, gather these key ingredients. Rolled oats form the base. They give a hearty texture. Chopped pecans add a nutty crunch. They are rich in healthy fats. Sliced almonds offer another layer of flavor. Their mild taste balances the mix. Unsweetened shredded coconut brings a touch of sweetness. It also enhances the chewiness. Maple syrup serves as the main sweetener. Its natural flavor shines through. Melted coconut oil binds the dry ingredients. It adds a subtle coconut taste. Vanilla extract lifts the overall flavor. It makes each bite delightful. Cinnamon adds warmth and depth. It’s a perfect match for the maple. Salt balances sweetness. Just a pinch makes all the difference. Dried cranberries or raisins are optional. They offer bursts of fruity flavor. Using these fresh ingredients will make your granola clusters shine. They provide the perfect balance of taste and texture. 1. Preheat your oven to 325°F (163°C). Line a large baking sheet with parchment paper. 2. In a large mixing bowl, mix together: - 2 cups rolled oats - 1 cup chopped pecans - 1/2 cup sliced almonds - 1/2 cup unsweetened shredded coconut - 1/2 teaspoon cinnamon - 1/4 teaspoon salt 3. In a separate bowl, combine: - 1/2 cup maple syrup - 1/4 cup melted coconut oil - 1/2 teaspoon vanilla extract Whisk until well mixed. 4. Pour the liquid mix over the dry mix. Stir until all ingredients are coated. 5. Transfer the mixture to your baking sheet. Spread it out evenly. Press down firmly to form clusters. 6. Bake for 25-30 minutes. Stir halfway through the baking time. Watch closely during the last few minutes to prevent burning. 7. Once baked, remove the granola from the oven. Let it cool fully on the baking sheet. It will harden as it cools. 8. After cooling, break the granola into clusters. If you like, mix in 1/2 cup of dried cranberries or raisins for extra sweetness. To get those crispy clusters, press the mixture down firmly on the baking sheet. This helps them stick together while baking. Don't skip stirring halfway through the baking time. It keeps the granola golden and prevents burning. For even baking, spread the mixture in a single layer. Avoid overcrowding the pan, as this can lead to uneven cooking. If you have allergies, you can swap pecans with walnuts or seeds. Almonds can be replaced with sunflower seeds. Use maple syrup or honey for sweetness. This granola shines when paired with yogurt or almond milk. You can layer it in a bowl with fresh fruit for a tasty breakfast. For snacks, enjoy it plain or mix it with dried fruit. It is also a great topping for smoothies or ice cream. You can even sprinkle it over oatmeal for added crunch. {{image_2}} You can easily change this recipe to fit your taste. Here are some fun ideas: - Different nuts and seeds: Try walnuts, hazelnuts, or sunflower seeds. Each nut gives a new taste and texture. - Sweetener alternatives: Use honey or agave syrup instead of maple syrup. This change can alter the flavor a bit. - Adding spices for flavor: Sprinkle in nutmeg, ginger, or cardamom for a spicy kick. These spices can make your granola unique. Seasonal changes can inspire new flavors. Think about these options: - Using seasonal fruits: Add dried apples in fall or fresh berries in summer. Fruit adds sweetness and nutrition. - Adapting for holidays and special occasions: For holidays, mix in pumpkin spice or peppermint extract. This can make your granola feel festive and special. To keep your crunchy maple pecan granola fresh, use an airtight container. Glass jars work well, but plastic containers are fine too. Make sure the lid seals tight. This keeps out air and moisture. You can also use resealable bags. Just press out the air before sealing. Store your granola in a cool, dark place like a pantry or cupboard. Avoid heat and sunlight, as they can make the granola taste stale. At room temperature, your granola can last about two weeks. If stored properly, it stays crunchy and tasty. Look for signs of spoilage, like a change in smell or taste. If it smells off or feels soft, it’s best to throw it away. For even longer storage, you can freeze it. Just make sure it's in a freezer-safe container. This way, you can enjoy your granola for up to three months! How can I make this granola gluten-free? To make this granola gluten-free, choose certified gluten-free rolled oats. Regular oats may contain gluten from cross-contamination during processing. Can I use honey instead of maple syrup? Yes, you can use honey instead of maple syrup. Honey will add a different flavor, but it will still be sweet and delicious. Is it possible to make granola clusters without added sugar? Yes, you can make granola clusters without added sugar. Use ripe bananas or unsweetened applesauce as a natural sweetener. Adjust the recipe to maintain moisture. How can I store granola for longer periods? Store your granola in an airtight container. Keep it in a cool, dry place to maintain freshness and crunch. Can I freeze Crunchy Maple Pecan Granola Clusters? Yes, you can freeze these granola clusters. Place them in a freezer-safe bag or container. They can last for up to three months in the freezer. This blog post shared how to make crunchy maple pecan granola clusters. We covered the main ingredients like oats, nuts, and coconut. I detailed step-by-step instructions for mixing and baking, ensuring great results. Tips on storage and customizing the recipe added extra value. You can make this granola your own with seasonal fruits or different nuts. Enjoy it with your favorite yogurt or in snacks. Try this easy recipe for a delicious treat that stays fresh and tasty!

Crunchy Maple Pecan Granola Clusters Delightful Treat

Are you craving a crunchy snack that’s both delicious and healthy? Look no further! My Crunchy Maple Pecan Granola Clusters

Let's gather the ingredients for your Garlic Butter Salmon & Veggies Sheet Pan. You will need: - 4 salmon fillets - 4 tablespoons unsalted butter, melted - 4 garlic cloves, minced - 1 lemon, zested and juiced - 1 teaspoon dried thyme - Salt and pepper to taste - 1 cup cherry tomatoes, halved - 1 cup asparagus, trimmed - 1 cup baby potatoes, halved - Fresh parsley for garnish Each item plays a key role in making this dish shine. The salmon provides a rich protein base, while the garlic and butter bring depth and flavor. The lemon adds a bright touch, and thyme gives it a nice herbaceous note. The veggies not only add color but also a variety of textures. Use fresh ingredients for the best taste. Fresh salmon will have a vibrant color and a clean smell. Look for firm cherry tomatoes and bright green asparagus. This will ensure that your meal is both tasty and healthy. Gather these ingredients, and let’s get ready to cook! To start, preheat your oven to 400°F (200°C). This step is key for even cooking. A hot oven helps the salmon and veggies cook properly. If the oven is not hot enough, the food can turn out soggy instead of crispy. In a small bowl, mix together the melted butter, minced garlic, lemon zest, lemon juice, dried thyme, salt, and pepper. Stir well until combined. This mixture should be smooth and fragrant. If it is too thick, add a little more melted butter. This flavorful blend will coat your salmon and veggies perfectly. On a large sheet pan, spread the halved baby potatoes in a single layer. Drizzle half of the garlic butter mixture over them. Toss the potatoes to coat them well, then spread them out on one side of the pan. Next, add the asparagus and cherry tomatoes. Pour the remaining garlic butter over these veggies and toss gently to coat. Finally, place the salmon fillets in between the veggies. Season the salmon with salt and pepper, and drizzle any leftover garlic butter on top. Roast the potatoes in the preheated oven for about 15 minutes. This will give them a head start in softening. After 15 minutes, add the asparagus and cherry tomatoes to the pan. Return the sheet pan to the oven and bake for another 12-15 minutes. The salmon is done when it flakes easily with a fork and the veggies are tender. Once your dish is cooked, remove it from the oven and let it cool for a few minutes. To make it pretty, garnish with freshly chopped parsley. This adds color and freshness to your meal. Serve it straight from the pan for a fun, family-style dinner. Enjoy every bite of your garlic butter salmon and veggies! To make the garlic butter shine, try a few twists. You can add fresh herbs like basil or dill. They boost flavor and freshness. If you use dried herbs, thyme is a great choice. It pairs well with garlic and lemon. Mix it into the butter for a tasty blend. You want to know when the salmon is ready. Look for a light pink color and a flaky texture. If it flakes easily with a fork, it’s done. Use a food thermometer for best results. Aim for 145°F (63°C) for safe eating. A non-stick pan helps keep the salmon from sticking, making it easy to serve. To save time on cleanup, line your sheet pan with parchment paper. This step helps prevent sticking and makes it easy to clean. You can also use a non-stick spray before adding the veggies and salmon. This way, food slides off easily. Keep your prep area tidy by using bowls for your ingredients. It makes cooking smooth and fun! {{image_2}} If you want a change from salmon, try chicken or tofu. Chicken thighs or breasts work great for this dish. Just make sure to cut them into similar sizes as the salmon fillets. For tofu, use firm or extra-firm types. This will hold up well during cooking. When you switch proteins, you need to adjust cooking times. Chicken usually takes longer. Bake it for about 20-25 minutes. Tofu cooks faster, so 10-12 minutes should be enough. Always check that your protein is cooked through before serving. You can mix and match veggies to your liking. Bell peppers, zucchini, or broccoli are all great choices. If you want a seasonal touch, use squash in the fall or green beans in the summer. Just make sure to cut them to the same size for even cooking. Different veggies may cook at varying times. Tomatoes and asparagus cook quickly, while potatoes need a bit more time. Keep an eye on them to ensure they are tender but not mushy. If you need a gluten-free option, this dish is already safe. All the ingredients are naturally gluten-free. Just check labels to ensure no hidden gluten. For a dairy-free version, swap out the butter for olive oil or a dairy-free butter. This keeps the rich flavor while making it suitable for those avoiding dairy. Your dish will still taste great and be a hit with everyone at the table. To store leftovers, let the dish cool down first. Place the salmon and veggies in an airtight container. Refrigerate them right away. Leftovers last up to three days in the fridge. Make sure to seal the container well to keep the flavors fresh. When you reheat, avoid drying out the salmon. The best method is using the oven. Preheat it to 350°F (175°C). Place the salmon and veggies on a baking sheet. Cover them with foil to keep moisture in. Heat for about 10 to 12 minutes. Check the internal temperature; it should reach 145°F (63°C). If you want to freeze the dish, cool it completely first. Place portions in freezer-safe bags. Remove as much air as you can before sealing. You can freeze it for up to three months. When you're ready to eat, thaw it in the fridge overnight. Reheat it in the oven using the previous method. This way, you'll enjoy a tasty meal again! Yes, you can use frozen salmon. Just remember to thaw it first. Place the salmon in the fridge overnight or submerge it in cold water for about an hour. This helps it cook evenly. If you cook it from frozen, increase the baking time by 5 to 10 minutes. Always check for doneness to ensure it’s fully cooked. Many sides pair well with this dish. Here are some ideas: - Quinoa or rice for a hearty base. - A fresh green salad for crunch. - Steamed or roasted broccoli for added veggies. - Garlic bread for a tasty touch. These sides will round out your meal nicely. To check if the salmon is done, look for a few signs: - It should be opaque and flake easily with a fork. - The internal temperature should reach 145°F (63°C). - If you see white albumin on the surface, it means it’s done but not overcooked. These checks help ensure perfect salmon every time. Yes, you can prep ingredients ahead of time. Chop the veggies and store them in the fridge. You can also mix the garlic butter and marinate the salmon earlier. Just keep everything in airtight containers. When you’re ready to cook, assemble the dish and bake. It saves time on busy days. For this recipe, you can use several types of pans: - A large sheet pan is best for even cooking. - A glass baking dish works well too. - If you have a cast iron skillet, it also performs great. Just make sure whatever pan you choose can handle high heat. This blog post covered a tasty garlic butter salmon dish with easy steps and tips. You learned about the right ingredients and how to prepare them. I also shared ways to switch proteins and veggies for variety. Remember, cooking is about enjoying the process. Try this recipe to impress your family and friends. You can store and reheat leftovers easily. Don’t be afraid to make this dish your own. Happy cooking!

Garlic Butter Salmon & Veggies Sheet Pan Delight

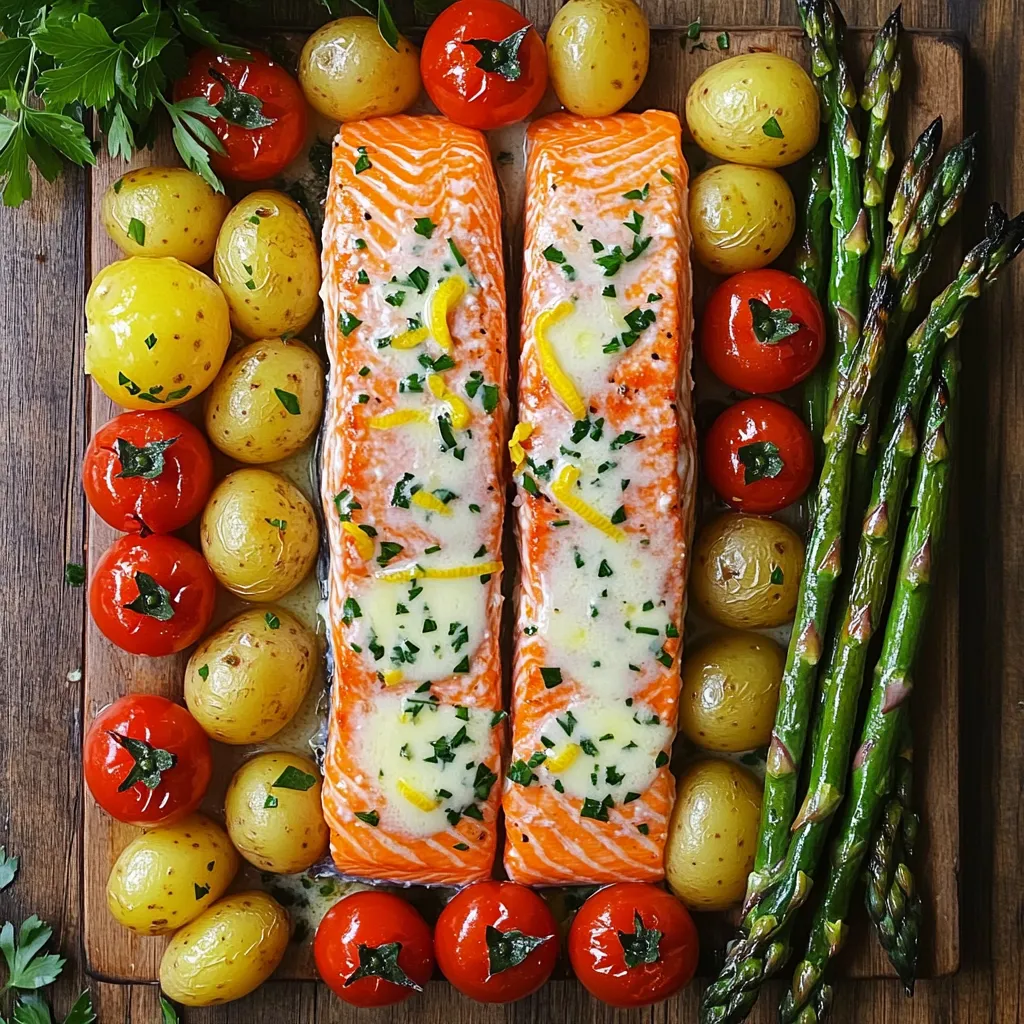
Are you ready for a meal that’s quick, tasty, and full of flavor? This Garlic Butter Salmon & Veggies Sheet

To make Pumpkin Spice Energy Oat Balls, gather these simple ingredients: - 1 cup rolled oats - 1/2 cup pumpkin puree - 1/4 cup almond butter (or any nut butter) - 1/4 cup honey or maple syrup - 1 teaspoon pumpkin pie spice - 1/2 teaspoon vanilla extract - 1/4 cup chopped walnuts or pecans (optional) - 1/4 cup dark chocolate chips (or raisins) - A pinch of salt You can swap out some ingredients if needed: - Use sunflower seed butter instead of almond butter for nut-free. - Maple syrup can replace honey for a vegan option. - If you can’t find pumpkin pie spice, mix cinnamon, nutmeg, and ginger. - For a crunch, add pumpkin seeds in place of walnuts or pecans. Each serving has about: - Calories: 120 - Protein: 3g - Carbohydrates: 15g - Fat: 6g - Fiber: 2g - Sugar: 4g These energy oat balls offer a healthy snack rich in fiber and good fats. They are perfect for a quick boost of energy! To start, gather all your ingredients. You will need rolled oats, pumpkin puree, almond butter, and honey or maple syrup. In a large bowl, mix the rolled oats, pumpkin puree, almond butter, and honey. Make sure everything blends well. Next, add the pumpkin pie spice, vanilla extract, and a pinch of salt. Stir until the mixture is nice and smooth. If you like, fold in the chopped walnuts or pecans and chocolate chips. These add great flavor and texture. When it’s time to form the oat balls, use your hands. Roll the mixture into small balls, about one inch wide. If your hands get too sticky, wet them a little with water. This helps keep your hands clean. Try to make each ball uniform in size. This way, they look nice and will cook evenly. Once you roll all the oat balls, place them on a baking sheet lined with parchment paper. This keeps them from sticking. Next, put the tray in the fridge for at least 30 minutes. This step helps the oat balls firm up. After chilling, transfer them to an airtight container. You can keep them in the fridge for up to one week. Enjoy them as a snack or a quick breakfast! To make these energy oat balls taste great, use fresh pumpkin puree. It adds a rich flavor. You can adjust the pumpkin pie spice to your liking. If you love sweet treats, add more honey or maple syrup. For a nice crunch, include chopped walnuts or pecans. They give a fun texture. Dark chocolate chips add sweetness and flavor. You can swap them for raisins if you prefer. To keep your oat balls fresh, store them in an airtight container. This helps keep them moist and tasty. You can keep them in the fridge for up to one week. For longer storage, freeze them. Just make sure to wrap each ball in plastic wrap before freezing. This way, they won’t stick together. These energy oat balls make a perfect snack anytime. Serve them on a pretty plate and sprinkle some extra pumpkin pie spice on top. Pair them with a warm cup of herbal chai or pumpkin spice tea for a cozy treat. You can also pack them in lunch boxes for a healthy option. They are great for a quick breakfast or a post-workout snack, too! {{image_2}} You can mix it up with these ideas! Try adding peanut butter instead of almond butter. This gives a rich, nutty taste. Swap the pumpkin puree for mashed bananas for a different flavor. You can also use different spices like cinnamon or ginger for a new twist. Want something sweet? Add dried cranberries or coconut flakes! Each change makes these oat balls unique. If you need to adjust for diet, it's easy. Use sunflower seed butter if you're nut-free. Maple syrup can replace honey for a vegan option. For gluten-free needs, ensure your oats are certified gluten-free. You can also leave out the chocolate chips if you want fewer sugars. These swaps keep the energy balls tasty and healthy. Seasons bring new spice options! In winter, add nutmeg and cloves for a warm flavor. Summer could use cardamom for a fresh taste. In the fall, try adding apple pie spice for a twist on tradition. Each season gives you a chance to play with flavors. Don't be afraid to experiment! To keep your Pumpkin Spice Energy Oat Balls fresh, place them in an airtight container. Store them in the fridge. This helps retain their texture and flavor. Avoid leaving them at room temperature for long periods. If you want to keep them for a week, this method works great. For long-term storage, you can freeze these oat balls. First, roll the mixture into balls. Then, place them on a baking sheet. Freeze them for about two hours until firm. After that, transfer the frozen balls to a freezer-safe bag. This way, they can last for up to three months. These energy balls last about one week in the fridge. If you notice any off smells, strange colors, or mold, it’s best to discard them. Always check for freshness before enjoying your snack. Keeping an eye on these signs ensures you have a tasty treat! Yes, you can make these oat balls vegan. Swap almond butter for a nut-free option. Use maple syrup instead of honey. Both changes keep the flavor and texture great. These energy balls stay fresh in the fridge for up to one week. Store them in an airtight container. This keeps them tasty and prevents them from drying out. If you need a nut-free option, use sunflower seed butter. You can also try tahini or pumpkin seed butter. All these options keep the recipe creamy and delicious. You can skip the sweetener, but I suggest using ripe bananas or unsweetened applesauce. These add natural sweetness without sugar. You can still enjoy a tasty treat this way! We explored how to make delicious pumpkin spice energy oat balls. You learned the right ingredients and measurements, with great substitutes if needed. The step-by-step instructions made preparation easy. Tips for flavor and storage keep your oat balls fresh and tasty. You can even try variations for different tastes and seasons. Remember, these energy balls are a quick snack, perfect for any time. Enjoy making and sharing them with friends and family!

Pumpkin Spice Energy Oat Balls Tasty and Nutritious

Looking for a snack that’s both tasty and good for you? Pumpkin Spice Energy Oat Balls are the perfect choice!

- 1 medium head of cauliflower, cut into florets - 1 cup all-purpose flour (or gluten-free flour) - 1 cup breadcrumbs (panko for extra crunch) - 1 teaspoon garlic powder - 1 teaspoon onion powder - 1 teaspoon smoked paprika - 1 teaspoon cayenne pepper (adjust for spice preference) - 1 cup buttermilk (or plant-based milk + 1 tablespoon lemon juice) - 2 tablespoons olive oil - 1/2 cup buffalo sauce (store-bought or homemade) When I make Air Fryer Crispy Buffalo Cauliflower Wings, I gather fresh ingredients first. I love using a medium head of cauliflower. Cut the cauliflower into bite-sized florets. This size helps them cook evenly. Next, I grab my flour. All-purpose flour works great, but you can use gluten-free flour too. I also prepare breadcrumbs. I prefer panko breadcrumbs for that extra crunch. Now, let's spice things up. Garlic powder and onion powder add fantastic flavor. Smoked paprika gives a nice depth, and cayenne pepper adds heat. You can adjust the cayenne to suit your taste. For the liquid, I use buttermilk, but plant-based milk is a solid choice too. Just add a tablespoon of lemon juice to mimic buttermilk. I also use olive oil for coating and buffalo sauce for that spicy kick. These ingredients create a tasty and crunchy dish. Enjoy crafting this delicious recipe! Start by washing the cauliflower under cool water. This helps remove dirt. Cut it into bite-sized florets. Make sure the pieces are even in size. This ensures they cook at the same rate. In a large bowl, mix the dry ingredients. Combine 1 cup of flour, 1 teaspoon of garlic powder, 1 teaspoon of onion powder, 1 teaspoon of smoked paprika, 1 teaspoon of cayenne pepper, salt, and pepper. Whisk these well. Slowly add 1 cup of buttermilk. Stir until you get a smooth batter. The batter should stick to the cauliflower but not be too thick. Dip each cauliflower floret into the batter. Make sure they are fully coated. Let the excess batter drip off. Next, roll each piece in breadcrumbs. Use panko for extra crunch. Preheat your air fryer to 400°F (200°C) for about 5 minutes. Lightly spray the air fryer basket with olive oil. Place the breaded cauliflower in a single layer. Leave space between them for air to move. Spray the tops with olive oil too. Air fry the cauliflower for 10 minutes. Then flip them over. Cook for another 5 to 6 minutes. They should turn golden brown and crispy. Once done, transfer the wings to a bowl. Drizzle 1/2 cup of buffalo sauce over them. Toss gently so they are evenly coated. Enjoy your crispy buffalo cauliflower wings! To get the best crunch from your cauliflower wings, choose panko breadcrumbs. They create a lighter, crispier texture. If you can't find panko, regular breadcrumbs work too. Air circulation is key. Make sure to leave space between each floret in the fryer. This helps hot air flow and cook all sides evenly. A crowded basket leads to soggy wings, which we want to avoid. Want to change the heat level? You can adjust the cayenne pepper. Start with a little, then add more if you like it spicier. You can also try adding other spices like smoked paprika or chili powder for extra flavor. For a flavor boost, mix in some garlic powder or onion powder. Nutritional yeast adds a cheesy taste without the cheese. Feel free to experiment with spices that you love! Pair your cauliflower wings with ranch or blue cheese dressing for dipping. The coolness of the dressing balances the spice. For sides, fresh celery sticks add crunch and freshness. You can also serve these wings with a light salad or some crispy potato wedges for a full meal experience. Enjoy! {{image_2}} You can switch up the sauce for your buffalo cauliflower wings. Barbecue sauce adds a sweet and smoky twist. Teriyaki brings a nice glaze and flavor. You can also try different coatings. Use crushed nuts like almonds or seeds like sesame for a crunchy layer. This adds flavor and texture, making your wings unique. If you need gluten-free options, swap all-purpose flour for gluten-free flour. This keeps the dish safe for those with gluten issues. For a vegan-friendly version, replace buttermilk with plant-based milk mixed with lemon juice. This change works well and keeps the batter tasty and smooth. Baking is one option if you don’t have an air fryer. Spread the coated cauliflower on a lined baking sheet. Bake at 425°F (220°C) for about 25-30 minutes. Flip halfway through for even crispiness. Stovetop frying is another option. Heat oil in a pan and fry the wings until golden brown. This method gives a nice crunch but uses more oil. To keep your crispy buffalo cauliflower wings fresh, store leftovers properly. First, let the wings cool to room temperature. This helps prevent moisture buildup. Next, place them in an airtight container. I recommend using glass containers for best results. These help keep the wings from getting soggy. You can also use plastic containers, but ensure they seal well. Reheating your wings can be tricky. You want them crispy, not soggy. For the best results, use the air fryer. Set it to 350°F (175°C) and heat the wings for about 5 to 7 minutes. This method keeps them crunchy. You can also use an oven. Preheat it to 350°F (175°C) and bake for 10 minutes. If you use a microwave, the wings may get soft. To avoid sogginess, skip the microwave if possible. Your buffalo cauliflower wings can last in the fridge for about 3 to 5 days. Always check for signs of spoilage. If they smell off or look slimy, it’s time to toss them. Fresh wings should still be crisp and smell great. Storing them right keeps them delicious for longer. Yes, you can make these wings ahead of time. To prep in advance, follow these steps: - Prepare the cauliflower: Cut the florets and wash them. - Make the batter: Mix all dry ingredients, then add the buttermilk. - Coat the cauliflower: Dip the florets in the batter and breadcrumbs. After coating, store the cauliflower in the fridge for up to 24 hours. When ready, just air fry them. This saves time and makes for a quick meal. Absolutely! Freezing is a great way to keep leftovers. Here are the best practices: - Cool the wings: Let them cool completely first. - Use airtight containers: Place the wings in a container or freezer bag. - Label and date: Write the date on the bag or container. To thaw, put them in the fridge overnight. Reheat in the air fryer for a crispy finish. This keeps the flavor fresh and tasty. To kick up the heat, try these suggestions: - Add more cayenne pepper: Increase the amount in the batter. - Mix in hot sauce: Blend extra hot sauce into the buffalo sauce. - Use spicy seasonings: Consider adding chipotle powder or crushed red pepper flakes. These tips help you customize the spice level to your liking. Enjoy the fiery flavors! In this blog post, we covered how to make delicious air fryer cauliflower wings. You learned about the main ingredients, spices, and liquid components needed. We shared step-by-step instructions to prepare, batter, and fry the cauliflower. Tips for achieving maximum crispiness and serving suggestions added more flavor options. Lastly, we explored variations, storage techniques, and answered common questions. Enjoy making your crispy, tasty wings and feel free to experiment with flavors for a truly unique snack!

Air Fryer Crispy Buffalo Cauliflower Wings Recipe

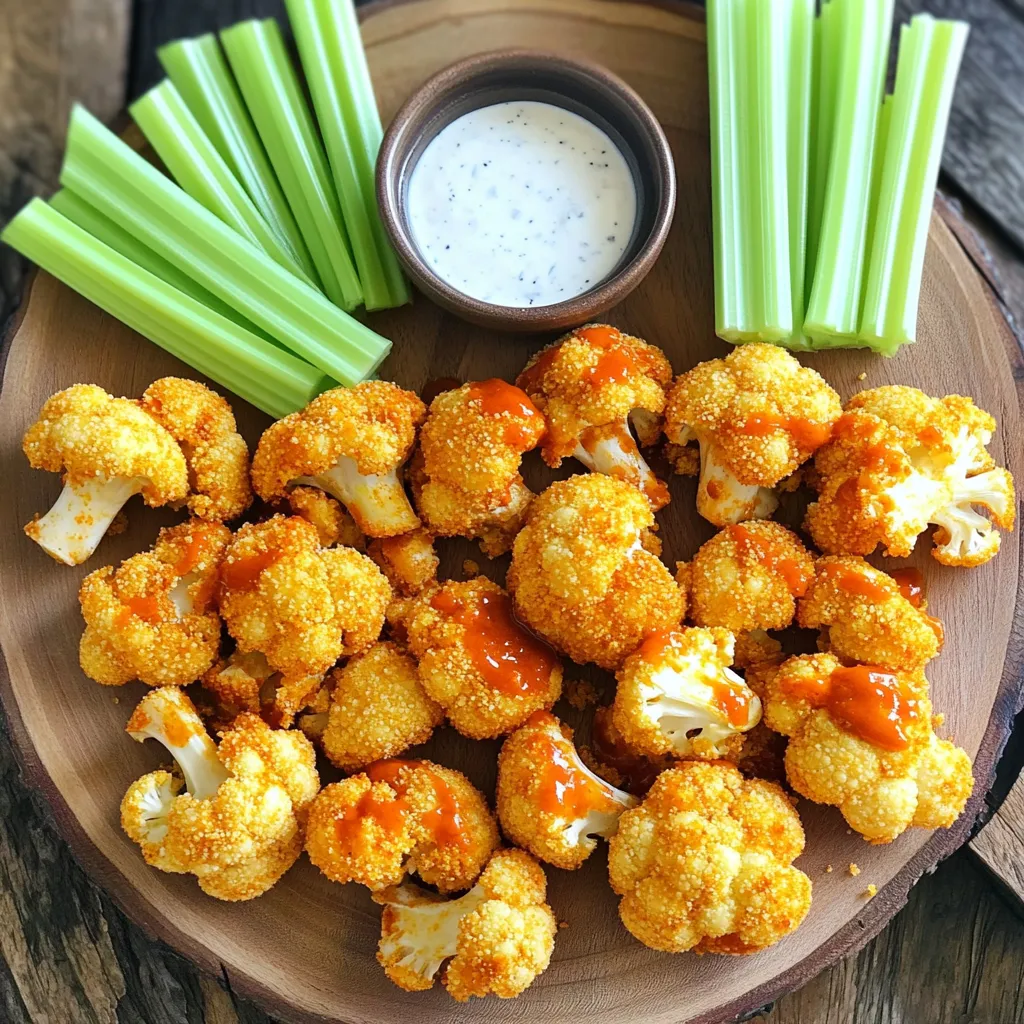
Are you ready to spice up your snack game? Air Fryer Crispy Buffalo Cauliflower Wings are the perfect blend of

To make Pumpkin Spice Latte Overnight Oats, you will need: - 1 cup rolled oats - 1 cup almond milk (or any milk of choice) - 1/2 cup canned pumpkin puree - 1 tablespoon chia seeds - 2 tablespoons maple syrup (adjust for sweetness) - 1 teaspoon vanilla extract - 1 teaspoon pumpkin pie spice (plus extra for garnish) - 1/2 cup Greek yogurt (optional for creaminess) - 1/4 cup brewed coffee (cooled) - A pinch of salt These ingredients create a warm and cozy flavor that pairs well with coffee. The oats soak up the milk and pumpkin, making them creamy. You can change some ingredients if needed. Use any milk you like, such as oat or coconut milk. If you want a dairy-free option, skip the Greek yogurt. You can also swap the maple syrup for honey or agave nectar. For a nut-free version, stick to oat milk. Feel free to add extra flavors. Some great choices are: - A handful of nuts like walnuts or pecans for crunch. - Dried fruits like cranberries or raisins for sweetness. - A scoop of protein powder for a boost. - A tablespoon of cocoa powder for a mocha twist. These add-ins can enhance the texture and taste of your overnight oats. Enjoy experimenting to find your favorite mix! First, gather your dry ingredients. Take 1 cup of rolled oats, 1 tablespoon of chia seeds, and 1 teaspoon of pumpkin pie spice. Mix these in a medium-sized bowl. Stir well so the spices coat the oats evenly. This step adds great flavor to your oats. Next, let’s prepare the wet ingredients. In a separate bowl, whisk together 1 cup of almond milk, 1/2 cup of canned pumpkin puree, and 2 tablespoons of maple syrup. Add 1 teaspoon of vanilla extract, 1/4 cup of brewed coffee, and a pinch of salt. Make sure to mix everything until it's smooth. This mixture gives your oats that creamy texture and rich taste. Now, it's time to combine the mixtures. Pour the wet mixture into the dry ingredients. Stir until everything is fully combined. If you want it creamier, fold in 1/2 cup of Greek yogurt at this point. Now, divide the mixture into jars or containers. Seal them tightly and place them in the fridge. Let them chill overnight or for at least 4 hours. This step lets the oats soak up all the flavors. In the morning, stir the oats and enjoy! To make perfect overnight oats, use rolled oats. They soak up liquid well and stay chewy. Mix dry and wet ingredients separately first. This helps to combine flavors better. If you want creaminess, add Greek yogurt. It makes the texture smooth and rich. You can change the sweetness by using more or less maple syrup. Start with two tablespoons and taste it. If you want it sweeter, add more syrup. You can also use honey or agave syrup. To boost flavor, try adding more pumpkin pie spice. Just a pinch can make a big difference! Serve your oats in clear jars or bowls. This way, you can see the lovely layers. Top with a sprinkle of pumpkin spice and a drizzle of maple syrup. For a crunchy texture, add pumpkin seeds or chopped nuts. This makes your breakfast not just tasty, but also pretty! {{image_2}} You can change up the flavors of pumpkin spice latte overnight oats for different seasons. In fall, try adding chopped apples or pears for a fresh twist. You can also sprinkle in some chopped pecans or walnuts for crunch. In winter, replace pumpkin with mashed bananas for a cozy banana bread flavor. To make a healthier version, reduce the maple syrup. You can also use mashed ripe banana for sweetness. If you want more fiber, add extra chia seeds. This will keep your oats tasty without added sugar. For a dairy-free option, use almond milk or oat milk. Skip the Greek yogurt to keep it vegan. You can still have a creamy texture by adding more pumpkin puree. This makes your oats rich without any dairy. To keep your Pumpkin Spice Latte Overnight Oats fresh, store them in airtight containers. Glass jars work well since they help you see the layers. Always seal the jars tightly to keep out air. Place them in the fridge right after making them. Your oats can last up to 5 days in the fridge. Make sure to check for any changes in smell or texture before eating. If they look or smell off, it’s best to toss them. Freshness is key for great taste. If you want to heat your oats, use the microwave. Start with a 30-second interval, then stir. Add a splash of almond milk if they seem too thick. This keeps them creamy and tasty. Enjoy your warm oats! Yes, you can make Pumpkin Spice Latte Overnight Oats in advance. This recipe is perfect for meal prep. Just prepare the oats the night before and let them chill in the fridge. You can store them in jars or containers. They will taste great for breakfast the next morning. The longer they sit, the more flavors they soak up. If you want to switch things up, you can use quick oats or steel-cut oats. Quick oats will absorb liquid faster and become soft. Steel-cut oats will take longer to soften, so you might need to soak them longer. You can also try using quinoa or buckwheat for a different texture. Each option will give you a unique taste. Yes, there are many health benefits in this recipe. Rolled oats provide fiber, which helps digestion. Pumpkin is rich in vitamins and antioxidants. Chia seeds add healthy omega-3 fatty acids, and Greek yogurt boosts protein. Maple syrup gives natural sweetness without refined sugar. Together, these ingredients make a nutritious breakfast, keeping you full and energized all morning. This blog post covered everything you need for perfect overnight oats. We explored key ingredients, substitutions, and optional add-ins to boost flavor. The step-by-step guide made preparation easy. I shared tips for the best results and how to make variations for every season. You also learned about storage and answered common questions. Now you can enjoy tasty, healthy oats every day. Get creative, and let your taste buds lead the way!

Pumpkin Spice Latte Overnight Oats Easy Morning Recipe

Start your mornings with a burst of fall flavor! My Pumpkin Spice Latte Overnight Oats recipe combines all the joy

For this tasty snack, you need simple, wholesome ingredients. Here’s what you will use: - 2 cups rolled oats - 1 cup pecans, roughly chopped - 1/2 cup sunflower seeds - 1/2 cup honey or maple syrup - 1/4 cup coconut oil, melted - 1 teaspoon vanilla extract - 1/2 teaspoon cinnamon - 1/4 teaspoon salt - 1/2 cup dried cranberries or raisins (optional) These ingredients work together to create a crunchy, sweet snack. The oats give you fiber. The pecans add healthy fats. Sunflower seeds provide protein and crunch. The honey or maple syrup binds everything and adds natural sweetness. Coconut oil keeps the clusters crispy and rich. You can customize your granola clusters with fun add-ins. Consider these options: - Chopped dark chocolate or chocolate chips - Shredded coconut - Chia seeds or flaxseeds for extra nutrition - Other dried fruits like apricots or figs Adding these can enhance the flavor and texture. Mix and match to find your favorite combinations. Each serving of these clusters is packed with good nutrients. Here’s a rough breakdown of what you get: - Calories: About 150 - Protein: 3 grams - Fat: 8 grams - Carbohydrates: 18 grams - Fiber: 2 grams - Sugar: 6 grams This granola is a healthy option for snacks or breakfast. You’ll enjoy a balance of energy and nutrition without added junk. Feel free to adjust the recipe to fit your dietary needs. First, set your oven to 350°F (175°C). This heat will help the granola bake evenly. Next, grab a baking sheet and line it with parchment paper. This step keeps your granola from sticking. In a large bowl, combine 2 cups of rolled oats, 1 cup of chopped pecans, and 1/2 cup of sunflower seeds. Make sure everything mixes well. The oats are the base. The pecans add crunch. Sunflower seeds give it a nice twist. In another bowl, mix 1/2 cup of honey or maple syrup, 1/4 cup of melted coconut oil, 1 teaspoon of vanilla extract, 1/2 teaspoon of cinnamon, and 1/4 teaspoon of salt. Stir until everything blends together. This mix brings sweetness and flavor. Pour the wet mix over the dry ingredients. Stir until all the oats and nuts are coated. If you want, fold in 1/2 cup of dried cranberries or raisins. Next, spread the mixture onto the baking sheet. Press it down with a spatula to make it even. Bake for 20-25 minutes. Look for a golden brown color around the edges. Once baked, let the granola cool on the sheet. This cooling helps the clusters form. After it cools completely, break it into your desired sizes. Store the clusters in an airtight container. This keeps them fresh and tasty. To get those perfect clusters, you need to press the mixture down firmly. After mixing your oats and nuts with the wet ingredients, spread it onto the baking sheet. Use a spatula to flatten it into an even layer. This helps the clusters stick together while baking. Bake until golden brown, but don’t stir it while it cooks. Let it cool completely before breaking it into clusters. If you have allergies or dietary needs, you can still enjoy this granola. Swap pecans for almonds or walnuts if you prefer. Use agave syrup instead of honey or maple syrup for a vegan option. For a nut-free version, replace the nuts with more seeds. You can use pumpkin seeds or sesame seeds. Serve your granola clusters as a snack on their own. Toss them into yogurt for breakfast or a healthy dessert. Add them to smoothies for extra crunch and flavor. They also pair well with fresh fruits like bananas or berries. Try sprinkling some on your favorite oatmeal or ice cream for a tasty twist. {{image_2}} To make chocolate maple pecan granola clusters, add cocoa powder. Use 1/4 cup of unsweetened cocoa powder in the wet mix. This gives a rich chocolate flavor. You can also add dark chocolate chips after baking. This adds a sweet touch and a melty texture. For a spiced version, add more spices. Use 1/2 teaspoon of nutmeg or ginger. You can also mix in a pinch of cayenne for heat! This will give your granola a warm, cozy taste. Adjust the cinnamon to your liking. Spice up your breakfast or snack with this fun twist. If you want a nut-free granola, swap pecans for more sunflower seeds. Use 1 1/2 cups of sunflower seeds instead. You can also add pumpkin seeds for crunch. This keeps your granola tasty without nuts. Enjoy this version if you have nut allergies or sensitivities. To keep your maple pecan granola fresh, store it in an airtight container. A glass jar or a plastic container with a tight lid works well. Make sure to place it in a cool, dry spot away from sunlight. This helps prevent moisture and keeps your granola crunchy. When stored properly, your granola can last up to two weeks. If you notice any changes in smell or texture, it’s best to throw it out. Always check for freshness before enjoying. You can freeze your maple pecan granola clusters to enjoy later. Just place them in a freezer-safe bag or container. Remove as much air as possible before sealing. Frozen granola can last up to three months. When you want some, take it out and let it thaw for a few minutes. This way, you always have a tasty snack ready! Yes, you can use other nuts. Almonds, walnuts, or cashews work well. Each nut adds a different taste and crunch. Just make sure to chop them roughly. You can also mix different nuts for more flavor. To make this granola gluten-free, use certified gluten-free oats. Check the label on your oats to ensure they meet the standards. The other ingredients, like nuts and seeds, are naturally gluten-free. This way, everyone can enjoy your tasty snack. Maple syrup offers a unique flavor that is rich and sweet. It has antioxidants that help fight cell damage. Some people prefer maple syrup for its lower glycemic index. This means it won’t spike your blood sugar as quickly as honey. To get crunchier clusters, press the mixture firmly before baking. Also, let it cool completely on the baking sheet. This helps the clusters stick together. If you want extra crunch, bake it a few minutes longer, but watch it closely to prevent burning. Maple pecan granola clusters are easy to make and great for snacks. We covered the key ingredients, options for add-ins, and how to bake them perfectly. Remember, you can also modify recipes to fit your needs. Experiment with flavors or try a nut-free version. Store your granola well to keep it fresh. Making your own granola lets you control healthy choices and flavors. Enjoy your tasty clusters, and share them with friends!

Maple Pecan Granola Clusters Easy and Healthy Snack

Looking for a tasty and healthy snack? You’ve come to the right place! These Maple Pecan Granola Clusters are easy

- 2 cans (15 oz each) white beans (cannellini or great northern), drained and rinsed - 1 tablespoon olive oil - 1 medium onion, diced - 3 cloves garlic, minced - 4 cups vegetable broth I love using white beans for this soup. Their creamy texture adds a nice base. Cannellini or great northern beans work best. They blend well and taste great! I start with olive oil for cooking. It adds depth to the onion and garlic. - 2 cups kale, chopped (stems removed) - 1 cup coconut milk (or heavy cream if preferred) - 1 teaspoon dried thyme - 1 teaspoon smoked paprika - Juice of 1 lemon Kale is my go-to green for this soup. It adds color and nutrients. I often use coconut milk for creaminess, but heavy cream is a nice alternative. Thyme and smoked paprika give this soup warmth and flavor. A splash of lemon juice brightens each bite. - Salt and pepper to taste - Fresh parsley for garnish Seasoning is key! Salt and pepper enhance all the flavors. I like to finish with fresh parsley for a pop of color. It makes the soup look and taste fresh. 1. In a large pot, heat the olive oil over medium heat. 2. Add the diced onion and cook until it turns clear, about 5-7 minutes. 3. Stir in the minced garlic and cook for another minute until you smell it. 1. Pour in the drained and rinsed white beans. 2. Add the vegetable broth to the pot. 3. Bring this mix to a simmer and cook for about 5 minutes. 1. Use an immersion blender to mix the soup until it is mostly smooth. 2. Leave some bean chunks for a nice texture. 3. Stir in the chopped kale and coconut milk next. 1. Add dried thyme, smoked paprika, salt, and pepper to taste. 2. Simmer for another 10-15 minutes until the kale is soft. 3. Just before serving, squeeze in fresh lemon juice for brightness. 4. Taste and adjust the seasoning if needed. Now your creamy white bean and kale soup is ready to enjoy! To get the best texture, let your soup simmer for 10 to 15 minutes. This time helps the flavors blend well. Make sure to blend your soup properly. Using an immersion blender is easy and keeps some bean bits for a nice texture. If you use a countertop blender, only blend half at a time. This way, you keep some chunks for that heartiness. You can add extra spices to boost flavor. Consider adding a pinch of cayenne for some heat or a dash of oregano for a fresh taste. To make your soup creamier, try using full-fat coconut milk. You can also add a bit more than the recipe calls for if you love that rich flavor. Serve your soup hot in deep bowls. Drizzle some coconut milk on top for a nice finish. Garnish with fresh parsley for a pop of color. Pair your soup with a slice of crusty bread. This gives you a complete meal that is both filling and delicious. {{image_2}} You can easily make this soup plant-based. For a vegan twist, use coconut milk instead of heavy cream. This keeps the soup creamy and rich without any dairy. You can also swap the vegetable broth for homemade vegetable stock. This adds even more flavor while keeping it vegan. Feel free to mix things up with the beans. Besides cannellini, you can use great northern or even chickpeas. Each type brings a unique taste and texture. For greens, spinach works well too, giving you a fresh, tender bite. For a creamier soup, try adding cashew cream or silken tofu instead of coconut milk. Both options add richness without dairy. This soup adapts well to the seasons. In winter, add root vegetables like carrots or sweet potatoes. They will not only add flavor but also make the soup heartier. During summer, use fresh tomatoes and zucchini to lighten the dish. You can also add fresh herbs like basil or dill for a burst of flavor. This keeps the soup feeling fresh and vibrant all year round. To store leftovers, let the soup cool down. Once it cools, pour it into airtight containers. Seal them tightly to keep out air. You can keep the soup in the fridge for up to 5 days. This way, you can enjoy a warm bowl later in the week. Freezing soup is easy! First, make sure the soup is fully cooled. Pour portions into freezer-safe bags or containers. Leave some space at the top for expanding liquid. You can freeze the soup for up to 3 months. To thaw, place it in the fridge overnight. For quick thawing, you can use the microwave. When ready to serve, heat in a pot on low until warm. Leftover soup is versatile! You can use it in many ways. Try adding it to pasta for a creamy sauce. Mix it with cooked rice for a hearty dish. You can also top it with grilled cheese for a fun meal. The ideas are endless! Get creative and enjoy your leftovers in new ways. Yes, you can make this soup ahead of time. To prepare it in advance, follow these steps: - Cook the soup as directed. - Allow it to cool completely before storing. - Place it in an airtight container. - Keep it in the fridge for up to three days. - Reheat on the stove over low heat, stirring often. This soup tastes even better the next day, as flavors meld together. You can easily adjust the spice level in this soup. Here are some tips: - For mild heat, stick to the recipe. - Add a pinch of red pepper flakes for a little kick. - For more spice, mix in chopped jalapeños or cayenne pepper. - Taste as you go. It’s easy to add, but hard to remove! Experiment with spices to find your perfect balance. Yes, you can use other greens. Here are some tasty alternatives: - Spinach adds a mild flavor and cooks quickly. - Swiss chard has a slightly earthy taste and holds up well. - Collard greens give a robust flavor and nice texture. Feel free to mix and match based on what you have. Each green will bring its own twist! Pair this soup with simple sides for a complete meal. Here are some great options: - A slice of crusty bread for dipping. - A fresh salad with lemon vinaigrette. - Grilled cheese for a comforting combo. - Roasted vegetables for added nutrition. These pairings enhance your meal and add variety to your table. Enjoy! This blog post covered how to make a delicious creamy white bean and kale soup. We reviewed the key ingredients, like white beans, kale, and coconut milk. I shared step-by-step instructions for preparation and cooking, plus tips for texture and flavor. We discussed variations to suit your taste and storage methods for leftovers. In conclusion, this soup is not just tasty; it’s versatile and easy. Try it with different greens or beans to make it your own! Enjoy your cooking adventure.

Creamy White Bean and Kale Soup Yummy Delight

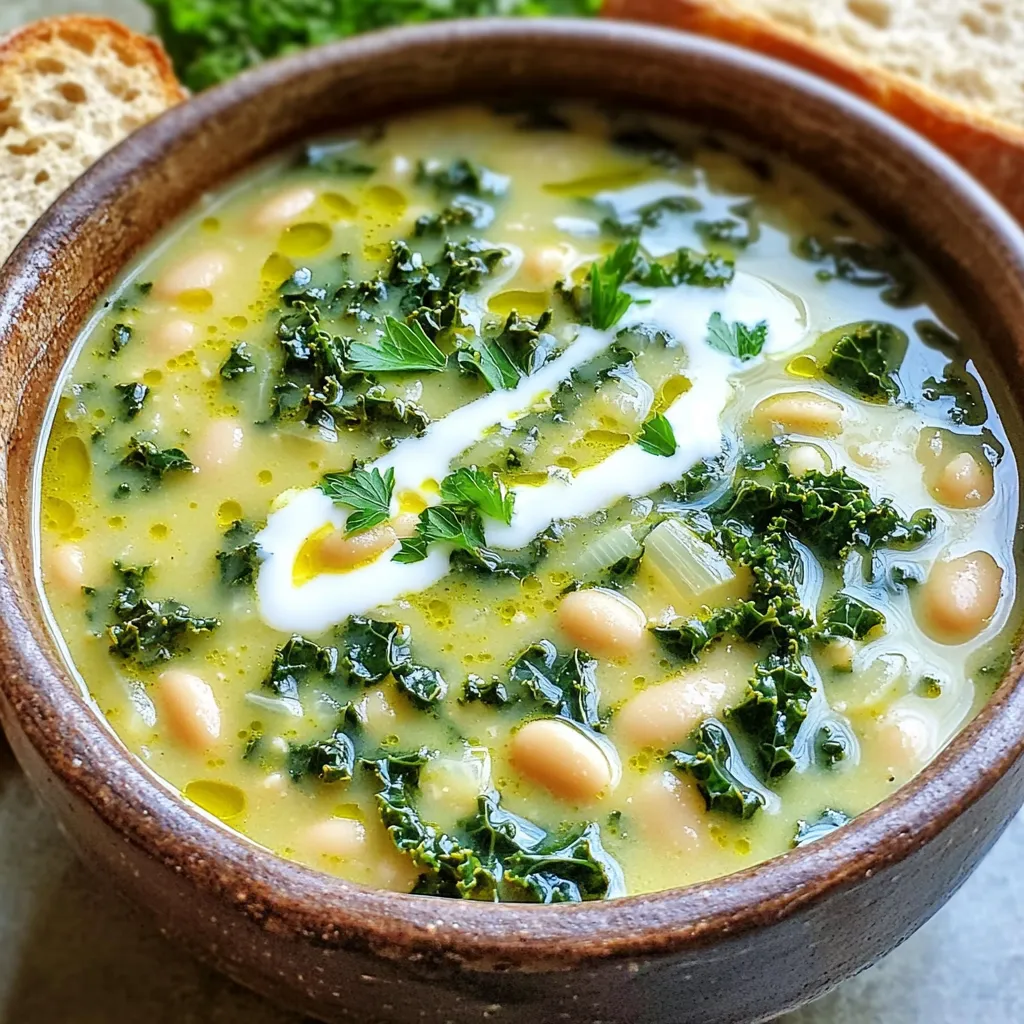
If you’re looking for a warm and hearty meal, this Creamy White Bean and Kale Soup is a true winner.

Older posts
Newer posts
← Previous Page1 … Page12 Page13 Page14 … Page93 Next →

dsad

© 2025 flavorsprint • Built with GeneratePress

Our Policies

  • Copyright Policy
  • Cookie Policy
  • GDPR Policy
  • Privacy Policy
  • Disclaimer
  • Terms Of Use

More Information

  • Home
  • About
  • Contact
  • Appetizers
  • Dessert
  • Dinner
  • Drinks
©2025, flavorsprint About Back To Top