Skip to content
DisclaimerTerms Of UseGDPR PolicyCookie Policy

flavorsprint

  • Home
  • Drinks
  • Appetizers
  • Dinner
  • Dessert
  • About
  • Contact
  • Privacy Policy
DisclaimerTerms Of UseGDPR PolicyCookie Policy

Lillian

- 2 boneless, skinless chicken breasts, diced - 8 oz whole wheat pasta (your choice of shape) - 2 cups fresh spinach - 1 can (14 oz) diced tomatoes (drained) - 2 cloves garlic, minced - 1 small onion, finely chopped - 1 teaspoon dried oregano - 1 teaspoon dried basil - 2 tablespoons olive oil - Salt and pepper to taste - 1/4 cup grated Parmesan cheese (for serving) - Fresh basil leaves (for garnish, optional) When choosing chicken, go for fresh, high-quality breasts. Look for clear skin and no dark spots. For pasta, whole wheat is best. It adds fiber and a nice nutty taste. Use fresh spinach for its vibrant color and taste. Canned tomatoes should be ripe and juicy. Check the label for no added sugar. Fresh herbs give more flavor than dried ones. Always choose good-quality olive oil for cooking. You can swap chicken for tofu or chickpeas for a vegetarian dish. Use gluten-free pasta if you need to avoid gluten. Spinach can be replaced with kale or Swiss chard. If you dislike tomatoes, use bell peppers or zucchini. Nutritional yeast can replace Parmesan for a dairy-free option. Adjust seasonings to fit your taste, too. {{ingredient_image_1}} Start by boiling a large pot of salted water. Once it boils, add 8 ounces of whole wheat pasta. Cook it according to the package directions until it is al dente. This usually takes about 8 to 10 minutes. Drain the pasta and set it aside. This step is quick and easy but very important for great texture. In a large skillet, heat 1 tablespoon of olive oil over medium heat. Once hot, add 2 diced boneless, skinless chicken breasts. Season the chicken with salt, pepper, 1 teaspoon of dried oregano, and 1 teaspoon of dried basil. Cook the chicken for about 6 to 8 minutes. You want it browned and fully cooked. Once done, remove the chicken from the skillet and set it aside. Don’t skip this step; well-cooked chicken adds a lot of flavor. In the same skillet, add another tablespoon of olive oil. This helps build flavor. Sauté 1 finely chopped onion and 2 minced cloves of garlic until they are fragrant and golden. This should take about 3 to 4 minutes. The aroma will fill your kitchen with warmth. Now, add 1 can (14 oz) of drained diced tomatoes and 2 cups of fresh spinach to the skillet. Stir them in and cook until the spinach wilts, which takes about 2 to 3 minutes. Then, return the cooked chicken to the skillet. Add the drained pasta and toss everything together. Make sure the pasta is well-coated with the sauce. Cook for an additional 2 minutes. This allows all the flavors to blend nicely. To serve, plate the pasta in a large bowl or individual plates. Sprinkle 1/4 cup of grated Parmesan cheese on top. If you like, add fresh basil leaves for a nice garnish. This dish looks great and tastes even better. Enjoy your meal with extra Parmesan on the side for those who want more cheesy goodness! To cook pasta well, you need a big pot of water. Use plenty of salt in the water. This helps give the pasta flavor. Cook the pasta until it is al dente, which means firm to the bite. This usually takes about 8 to 10 minutes. Remember to stir it so it doesn’t stick together. After cooking, drain it right away. Rinse it with cold water to stop cooking. This keeps your pasta just right for the dish. To keep chicken juicy, cook it on medium heat. First, heat the oil in your skillet, then add the chicken. Season it well with salt, pepper, oregano, and basil. Cook it for 6 to 8 minutes. You want the outside to be golden brown and the inside to be fully cooked. Use a meat thermometer if you have one. The chicken should be 165°F. If you cut it and the juices run clear, it's perfect! Fresh herbs can really boost the taste of your meal. Basil is a great choice for this pasta dish. Add fresh basil leaves right before serving. This adds a bright and fresh touch. You can also use parsley or thyme for different flavors. Just chop them finely and sprinkle them on top. If you want more flavor, feel free to add herbs while cooking. This will make your dish pop with taste and color! Pro Tips Use Fresh Ingredients: Fresh spinach and ripe tomatoes will enhance the flavor of your pasta dish significantly. Always opt for the freshest produce you can find. Customize Your Pasta: Feel free to switch up the type of whole wheat pasta you use. Penne, fusilli, or spaghetti all work well with this sauce. Extra Flavor Boost: For a deeper flavor, consider adding a splash of white wine to the sauce after sautéing the garlic and onion. Let it simmer for a minute before adding the tomatoes and spinach. Meal Prep Friendly: This dish can be made in advance and stored in the refrigerator for up to three days. Reheat gently on the stovetop, adding a splash of water if needed to loosen the pasta. {{image_2}} You can easily make this dish vegetarian. Just skip the chicken. Replace it with extra vegetables. Try mushrooms, zucchini, or bell peppers. These add great flavor and texture. Use the same spices for taste. You can keep the rest of the recipe the same. It will still be delicious and satisfying. To make this recipe gluten-free, choose gluten-free pasta. Many options are available, such as rice or quinoa pasta. Follow the same cooking instructions. The sauce and chicken will pair well with these pasta types. This way, you still enjoy all those great flavors without gluten. You can boost the nutrition by adding more vegetables. Consider adding broccoli, peas, or carrots. These can add color and crunch. Sauté them with the onion and garlic for best results. This not only enhances the dish but also makes it healthier. Feel free to experiment and make it your own! After enjoying your Tomato Spinach Chicken Pasta, let it cool down. Place it in an airtight container. This helps keep the flavors fresh. Store it in the fridge for up to three days. If you want, you can separate the pasta from the sauce. This keeps everything better. When you're ready to eat, you can heat it in several ways. The best way is on the stove. Use a skillet over low heat. Add a splash of water or olive oil to keep it moist. Stir often until hot. You can also use the microwave. Place the pasta in a bowl and cover it. Heat in 30-second bursts, stirring in between. If you want to save some for later, freezing works great. First, divide it into individual portions. Use freezer-safe containers or bags. Squeeze out as much air as you can. This prevents freezer burn. You can freeze it for up to three months. When you want to eat it, thaw it in the fridge overnight. Then reheat as mentioned above. Enjoy your meal later with ease! Yes, you can use frozen spinach. Just make sure to thaw and drain it first. Frozen spinach will work well in this dish. It might be softer than fresh, but it still adds great flavor. To add some heat, try adding red pepper flakes. Start with a pinch and taste as you go. You can also use spicy sausage instead of chicken for a different flavor. Hot sauce is another easy way to spice things up. You can use shrimp, turkey, or tofu. Each protein will change the taste slightly. Shrimp cooks quickly and adds a nice touch. Turkey is lean and works well, while tofu gives a vegetarian option. Yes, you can prepare this dish ahead of time. Cook the pasta and chicken, then store them separately. Combine them just before serving for the best taste. This makes it easy to heat and serve on busy nights. This article covered key components of a delicious dish, from ingredients to storage. We looked at quality ingredients, cooking steps, and helpful tips. We also explored variations like vegetarian and gluten-free options. In the end, remember that this dish is flexible. You can adapt it to fit your tastes and needs. Cooking should be fun and easy, so enjoy the process and your meal. Make it your own!

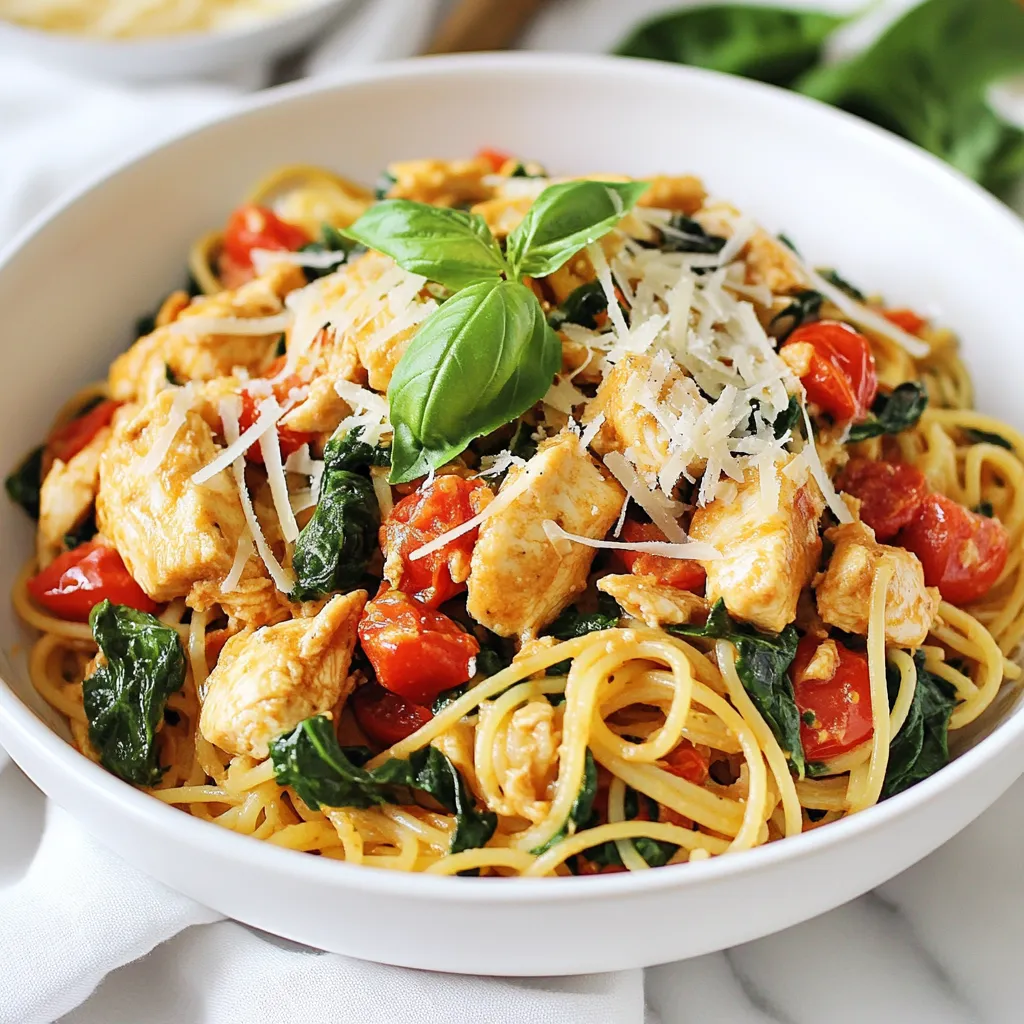
Tomato Spinach Chicken Pasta Easy Weeknight Meal

Looking for an easy weeknight meal that is both tasty and quick? You’ll love my Tomato Spinach Chicken Pasta! Packed

To make Marry Me Herb Garlic Salmon, you need the following ingredients: - 4 salmon fillets (6 oz each) - 4 cloves garlic, minced - 1/4 cup olive oil - 1 tablespoon fresh lemon juice - 1 teaspoon lemon zest - 2 tablespoons fresh parsley, chopped - 1 tablespoon fresh dill, chopped - 1 teaspoon dried oregano - Salt and pepper to taste - Lemon wedges for serving These ingredients bring together fresh flavors to create a dish that is both delicious and simple. The salmon fillets are the star of the show. They provide a rich, buttery taste that pairs well with the garlic and herbs. Garlic adds a warm, savory note. It complements the fresh herbs like parsley and dill. Lemon juice and zest bring brightness, making the dish feel lively and fresh. Olive oil is key for cooking the salmon. It helps the fish stay moist while adding a smooth texture. Dried oregano adds depth, and salt and pepper enhance all the flavors. I love serving this dish with lemon wedges. They add a lovely pop of color and extra zest. This combination of ingredients makes Marry Me Herb Garlic Salmon a fantastic dinner option. It’s easy to prepare and sure to impress. {{ingredient_image_1}} Prepping the Oven and Baking Sheet First, preheat your oven to 400°F (200°C). This ensures the oven is hot enough when you bake the salmon. Next, line a baking sheet with parchment paper or foil. This makes cleanup easy later. Whisking the Herb Garlic Mixture In a small bowl, combine the olive oil, minced garlic, lemon juice, lemon zest, chopped parsley, chopped dill, dried oregano, salt, and pepper. Use a whisk to blend all the ingredients well. This mixture is packed with flavor and will coat the salmon beautifully. Arranging the Fillets for Baking Take the salmon fillets and place them skin-side down on the prepared baking sheet. Make sure to space them out so they cook evenly. Now, use a brush to apply the herb garlic mixture generously over each fillet. Ensure all parts are well coated for maximum flavor. Baking Time and Techniques Slide the baking sheet into the preheated oven. Bake the salmon for about 12 to 15 minutes. The fish is done when it flakes easily with a fork. Keep an eye on it to avoid overcooking. Resting Time for Flavors Once you remove the salmon from the oven, let it sit for a minute. This resting time allows the flavors to settle and intensify. Presenting with Lemon Wedges When ready to serve, plate the salmon fillets. Add lemon wedges on the side for a bright touch. The lemon adds a fresh zing that complements the herb garlic flavors perfectly. Enjoy your flavorful dinner delight! - Ensuring Perfectly Cooked Salmon: To cook salmon perfectly, aim for a temperature of 145°F (63°C). Use a meat thermometer for accuracy. Check the thickest part of the fillet. The salmon should flake easily with a fork when done. - Optimal Baking Times: Bake your salmon for 12-15 minutes at 400°F (200°C). Thicker fillets may need more time. Keep an eye on them to avoid overcooking. - Variations for Herb Cheese Mixture: You can mix in cream cheese or goat cheese for extra creaminess. Add in fresh basil or tarragon for a different flavor profile. Feel free to experiment with herbs you enjoy! - Adding Heat with Spices if Desired: For a spicy kick, add red pepper flakes or cayenne pepper. Start with a small amount and adjust to your taste. This adds warmth without overpowering the dish. - Arranging on a Platter: Place the baked salmon fillets on a large platter. Keep some space between each fillet for a neat look. This allows guests to serve themselves easily. - Using Additional Herbs for Garnish: Sprinkle fresh herbs, like parsley or dill, on top for color. This enhances the dish’s visual appeal. You can also drizzle some extra herb garlic mixture around the plate. It makes the dish pop! Pro Tips Fresh Herbs Matter: For the best flavor, use fresh herbs whenever possible. They add a vibrant taste and aroma that dried herbs can't match. Salmon Thickness: The cooking time may vary depending on the thickness of your salmon fillets. Thicker fillets might require a few extra minutes in the oven. Resting Time: Letting the salmon rest for a minute after baking allows the juices to redistribute, resulting in a more flavorful and moist dish. Lemon Zest Boost: Don’t skip the lemon zest; it enhances the overall flavor profile and gives the salmon a bright, refreshing taste. {{image_2}} Substituting Salmon for Other Fish If you want to switch up the protein, try using other fish. Cod or halibut works well. Both have a mild flavor and flaky texture. You can follow the same cooking steps. Just adjust the cooking time. Thinner fillets may need less time in the oven. Vegetarian Options Using Tofu For a plant-based option, use firm tofu instead of salmon. Press the tofu to remove extra water. Cut it into thick slices. Marinate it in the same herb garlic mixture. Bake it just like the salmon. This gives you a tasty, meat-free meal. Different Fresh Herbs to Try Feel free to mix up the herbs. Basil, cilantro, or thyme can add new flavors. Each herb brings its own twist. Experiment to find your favorite combo. Just remember to chop them fresh for the best taste. Using Dried Herbs for Convenience If fresh herbs are not available, dried herbs are a great choice. Use half the amount of dried herbs. They can pack a punch, so go easy. They still give that lovely flavor without the fuss of chopping. Other Flavor Profiles to Consider Want to change the taste? Try adding different flavors to your marinade. Soy sauce, honey, or mustard can create a new dish. Mix them with olive oil and garlic for a twist. Be creative and you might discover a new favorite. Adjusting Citrus Elements You can alter the citrus in the recipe too. Instead of lemon, use lime or orange juice. Both bring a bright taste that pairs well with fish. Adjust the zest to match the juice you choose for balance. - For best results, store leftover salmon in an airtight container. - Place the container in the fridge right away. - Consume the salmon within 2 to 3 days for best taste. - To freeze, wrap salmon in plastic wrap, then foil. - Use a freezer-safe bag for extra protection. - Label the bag with the date for easy tracking. - To keep salmon moist, reheat in the oven at 275°F. - Place the salmon on a baking sheet. - Cover it with foil to prevent drying out. - Heat for about 15 minutes or until warm. - You can also reheat in a skillet with a splash of water. - For leftover salmon, try using it in salads or pasta. - Flake it into a fresh salad for added protein. - Mix it into a creamy pasta dish for a quick meal. How Long to Bake Salmon? Bake salmon for 12-15 minutes at 400°F (200°C). This time will help it cook well. The salmon should flake easily with a fork when it's done. What to Serve with Herb Garlic Salmon? Herb garlic salmon pairs well with rice, quinoa, or a fresh salad. You can also add steamed veggies for a colorful plate. Can I Use Frozen Salmon Fillets? Yes, you can use frozen salmon fillets. Just thaw them in the fridge overnight before cooking. This way, they will cook evenly. Is Marry Me Herb Garlic Salmon Healthy? Yes, this dish is healthy! Salmon is rich in omega-3 fatty acids. The fresh herbs and lemon juice add vitamins and flavor. Can I Make This Recipe Ahead of Time? You can prep the herb garlic mixture in advance. Marinate the salmon fillets for an hour before baking for more flavor. How to Know When Salmon is Cooked? Check if the salmon flakes easily with a fork. It should also have a light pink color in the center. Use a food thermometer for best results; it should reach 145°F (63°C). What if I Don't Have Fresh Herbs? If you lack fresh herbs, dried herbs work too. Use one-third of the amount of dried herbs as a substitute. They still give great flavor to your dish. This article shared key steps to make herb garlic salmon. We covered ingredients, cooking methods, and serving tips. You now know how to perfect your salmon dish and impress your guests. Remember, feel free to swap proteins or herbs for your taste. Storing leftovers can help you create new meals. Enjoy the process and your delicious results! Simple, healthy cooking is achievable. Dive in and have fun experimenting with flavors.

Marry Me Herb Garlic Salmon Flavorful Dinner Delight

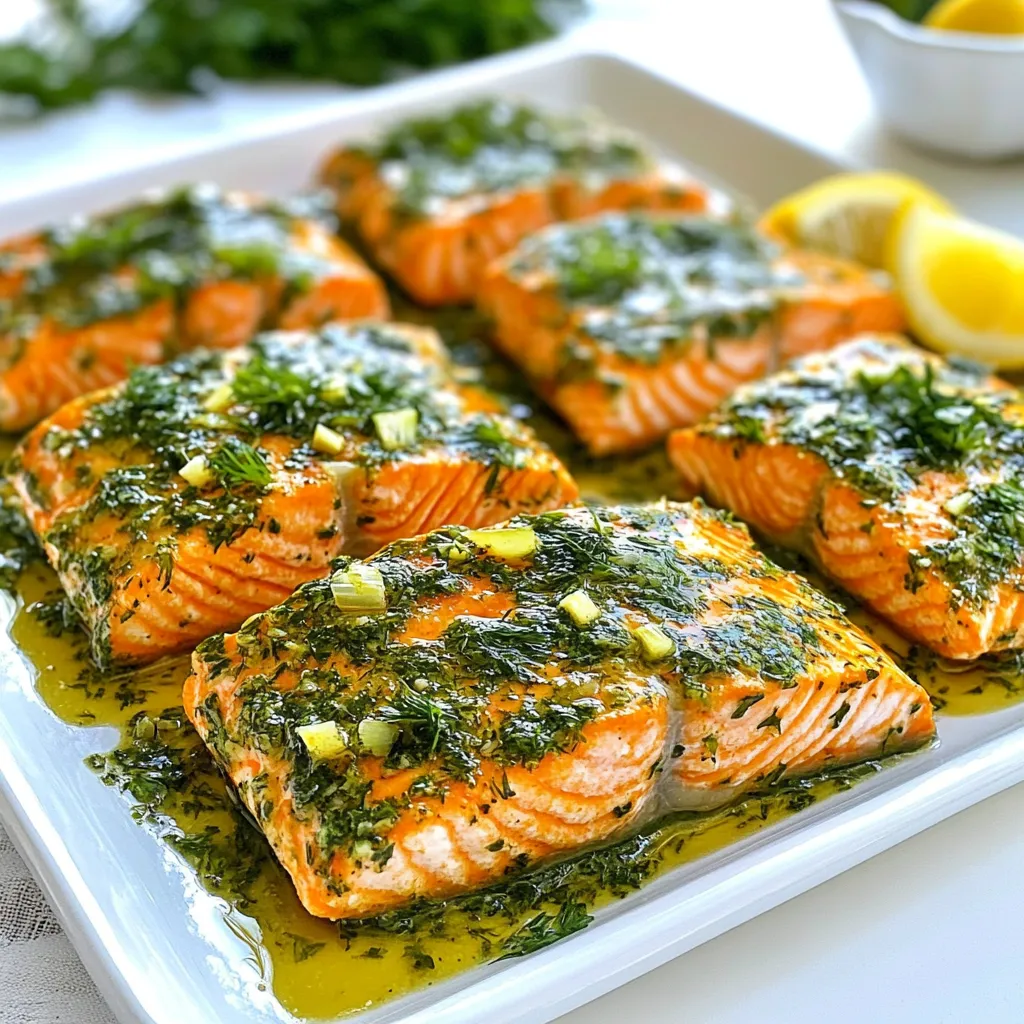
Looking to impress at dinner? My Marry Me Herb Garlic Salmon is your answer. With its rich flavors and easy

To make One Pot Creamy Vegetable Soup, gather these key ingredients: - 2 tablespoons olive oil - 1 medium onion, diced - 2 garlic cloves, minced - 2 medium carrots, diced - 2 celery stalks, diced - 1 medium potato, diced - 1 zucchini, diced - 1 cup green beans, chopped - 1 cup frozen corn - 4 cups vegetable broth - 1 cup coconut milk or heavy cream - 1 teaspoon dried thyme - 1 teaspoon Italian seasoning - Salt and pepper to taste - Fresh parsley, chopped for garnish You can easily swap some ingredients based on your taste or what you have: - Use canola oil instead of olive oil. - Any onion type works; red or yellow will do. - For garlic, try garlic powder if you’re in a pinch. - Sweet potatoes can replace regular potatoes. - Frozen mixed veggies can stand in for fresh ones. - Almond milk or cashew cream can replace coconut milk. For the best taste, follow these tips: - Use fresh herbs if possible for a vibrant flavor. - Sauté onions until soft to build a sweet base. - Don’t skip the thyme; it adds depth to the soup. - Taste and adjust salt and pepper at the end. - Let the soup sit for a bit to enhance the flavors. These simple tips and ingredient swaps make your creamy vegetable soup a delight. Enjoy the process, and feel free to get creative! {{ingredient_image_1}} To make this soup, start by gathering your ingredients. Heat 2 tablespoons of olive oil in a large pot over medium heat. Add 1 diced onion and sauté for 3 to 4 minutes until it turns clear. Next, stir in 2 minced garlic cloves and cook for 1 more minute. This step builds flavor. Now, add 2 diced carrots, 2 diced celery stalks, and 1 diced potato. Stir and cook for about 5 minutes. This helps to soften the veggies. After that, add 1 diced zucchini, 1 cup of chopped green beans, and 1 cup of frozen corn. Pour in 4 cups of vegetable broth and stir well. Bring the soup to a boil. Once boiling, lower the heat. Add 1 teaspoon of dried thyme and 1 teaspoon of Italian seasoning. Cover the pot and let it simmer for about 20 minutes. This will make the vegetables nice and tender. Remove the pot from heat. Use an immersion blender to blend the soup until creamy but still a bit chunky. If you don’t have one, you can carefully transfer the soup to a regular blender in batches. Stir in 1 cup of coconut milk or heavy cream. Add salt and pepper to taste. Heat the soup again, but do not let it boil. Serve it hot and garnish with fresh chopped parsley. Using a large pot is key. It allows room for all the veggies and broth. Sautéing the onion and garlic first builds a strong flavor base. Simmering the soup softens the vegetables and blends the herbs. Blending the soup creates a creamy texture. You can adjust how smooth or chunky you want it. Adding coconut milk or cream gives it richness. This step makes the soup hearty and satisfying. Using an immersion blender is easy and fun. First, make sure the soup is not too hot. Hold the blender at the bottom of the pot. Turn it on and move it slowly up and down. This way, it blends evenly. If you do not have an immersion blender, do not worry. You can use a regular blender, but let the soup cool slightly. Fill the blender halfway to avoid spills. Blend in batches and then return it to the pot. This method keeps your soup warm and creamy, making it a great meal for any day! To make your soup creamy, choose coconut milk or heavy cream. I love using coconut milk for a light, sweet taste. If you want a richer flavor, use heavy cream. When blending, aim for a texture that is smooth yet has some chunks. This adds depth and interest to the soup. You can easily change the flavor of your soup. Try adding spices like cumin or paprika for warmth. Fresh herbs like basil or dill can give a fresh taste. You can also switch up the veggies. Use seasonal vegetables like spinach in spring or squash in fall. This keeps the soup exciting and new. If you have leftovers, store them in an airtight container. It stays fresh in the fridge for 3-4 days. When reheating, add a splash of broth or coconut milk. This keeps the soup creamy and prevents it from getting too thick. Heat it gently on the stove or in the microwave. Enjoy your delicious soup again! Pro Tips Use Fresh Vegetables: Fresh vegetables enhance the flavor and nutritional value of your soup. Try to use seasonal produce for the best taste. Adjust Creaminess: If you prefer a thicker soup, add more coconut milk or heavy cream. You can also blend longer for a smoother consistency. Season Gradually: Taste the soup as it cooks and adjust seasoning gradually. This ensures you achieve the perfect balance of flavors. Garnish for Color: Fresh parsley not only adds flavor but also a pop of color. Consider adding other herbs like basil or cilantro for an extra flavor dimension. {{image_2}} You can switch up the veggies in this soup. Use what's fresh and in season. In the spring, try adding asparagus or peas. In the summer, bell peppers and tomatoes work great. Fall brings squash, like butternut or acorn. In winter, add root veggies like parsnips or turnips. This keeps your soup tasty and exciting. Each season brings new flavors! To make this soup vegan, use coconut milk instead of heavy cream. It adds creaminess and a hint of sweetness. You can also use vegetable broth for a richer base. For a nutty twist, try cashew cream. Just blend soaked cashews with water until smooth. This way, everyone can enjoy this soup, no matter their diet. If you love heat, add chili powder or cayenne pepper. Start with a small amount, then taste. You can always add more if you want extra kick. Another option is to toss in fresh jalapeños or crushed red pepper flakes. This adds a fun, spicy layer to your creamy soup. Enjoy the warmth with every spoonful! To keep your soup fresh, store it in an airtight container. Let the soup cool to room temperature before sealing. This step helps prevent condensation, which can make the soup watery. If you have leftovers, divide them into smaller portions. This way, you can grab just what you need when you want it. Freezing soup is a great way to save time. Use freezer-safe containers or bags. Leave some space at the top of the container, as soup expands when frozen. Label each container with the date and type of soup. This makes it easy to find what you want later. When you are ready to eat, thaw the soup in the fridge overnight. In the fridge, this soup can last about 3 to 4 days. Make sure to check it for any off smells before eating. If frozen, the soup stays good for up to 3 months. For the best taste, eat it within 1 to 2 months. Always reheat the soup until it is hot all the way through. You can use many vegetables in this soup. I like using carrots, celery, and potatoes. Zucchini and green beans add great texture. You can also add spinach or peas for color. Feel free to mix and match your favorite veggies. This recipe is flexible and lets you use what you have on hand. Yes, you can make this soup ahead of time. It tastes even better the next day. Just prepare it and let it cool. Store it in an airtight container in the fridge. When you are ready to eat, just heat it up on the stove. If you freeze it, let it thaw in the fridge before reheating. To make the soup thicker, blend it longer with an immersion blender. You can also add more potatoes or a bit of cornstarch mixed with water. Another option is to stir in some cream or a thickening agent like flour. Experiment to find your favorite thickness! This blog post covered key ingredients for a delicious soup, along with substitutes. I shared step-by-step cooking instructions and tips for using an immersion blender. You learned how to perfect creaminess and customize flavors. We discussed variations for seasonal veggies and vegan options. I also included storage tips to keep your leftovers fresh. Overall, making a creamy vegetable soup is simple and fun. Try different ingredients and find what you love. Enjoy your cooking journey!

One Pot Creamy Vegetable Soup Easy and Delicious Recipe

If you’re craving a simple and tasty meal, try my One Pot Creamy Vegetable Soup. This recipe combines fresh veggies

- 1 pound ground turkey or beef - 1 can (15 oz) black beans, drained and rinsed - 1 can (15 oz) corn, drained - 1 can (10 oz) diced tomatoes with green chilies - 1 packet taco seasoning The main ingredients are the base of your taco casserole. Ground turkey or beef gives it a hearty taste. Black beans and corn add texture and nutrition. Diced tomatoes with green chilies bring a nice kick. The taco seasoning ties all these flavors together. - 1 1/2 cups cooked rice (brown or white) - 1 1/2 cups shredded cheddar cheese - 1 cup salsa - 1 cup bell peppers, diced (red and green for color) - 1 cup onion, diced - Salt and pepper to taste Now let's add some extra goodness. Cooked rice makes it filling. Shredded cheddar cheese melts into a creamy layer. Salsa gives it that zesty punch. Bell peppers and onions add crunch and color. Don’t forget to season with salt and pepper. - Sour cream - Avocado slices - Fresh cilantro These toppings make your casserole shine. Sour cream adds a cool creaminess. Avocado slices bring a rich flavor. Fresh cilantro gives a fresh touch. Feel free to mix and match these toppings to suit your taste! {{ingredient_image_1}} First, heat a skillet over medium heat. Add one pound of ground turkey or beef. Cook it until it is no longer pink. This should take about 5 to 7 minutes. While cooking, season the meat with salt and pepper to taste. Once done, drain any excess fat. This step keeps the casserole from becoming greasy. Next, transfer the browned meat to the slow cooker. Now, add all the other ingredients. You will need: - 1 can (15 oz) black beans, drained and rinsed - 1 can (15 oz) corn, drained - 1 can (10 oz) diced tomatoes with green chilies - 1 packet taco seasoning - 1 1/2 cups cooked rice (brown or white) - 1 cup salsa - 1 cup bell peppers, diced (red and green for color) - 1 cup onion, diced Stir everything together well. This mixes all the flavors and makes each bite tasty. Cover the slow cooker and set it to cook. You have two options here. For a slow and steady cook, set it on low for 4 to 6 hours. If you are in a hurry, you can cook it on high for 2 to 3 hours. About 20 minutes before you serve, sprinkle 1 1/2 cups of shredded cheddar cheese on top. Cover it again until the cheese melts. When ready, give the casserole a gentle stir. It’s now ready to enjoy! Seasoning is key in any dish. For this taco casserole, use salt and pepper wisely. You want to bring out the flavors of your ingredients. Taco seasoning adds a hit of spice. I recommend trying a mix of spices if you want more depth. Fresh ingredients make a big difference. Use ripe tomatoes and crisp bell peppers. They add great taste and color. If you can, go for organic veggies. They often have better flavor. Garnishing elevates your dish. Top your casserole with a dollop of sour cream. Add sliced avocado for creaminess. Fresh cilantro gives it a nice pop of color. Pair the casserole with a simple salad. A crisp green salad adds freshness. You can also serve it with warm bread for a hearty meal. Prep your ingredients in advance. Chop the bell peppers and onions the night before. This saves time on busy days. You can also brown the meat ahead of time. Store it in the fridge until you’re ready to cook. If you have leftovers, freezing is a great option. Portion them into containers. This way, you can enjoy your casserole later. Just remember to label them with the date for easy tracking. Pro Tips Use Lean Meat: Opt for ground turkey or lean beef to keep the casserole healthy without sacrificing flavor. Customize Your Beans: Feel free to swap black beans for pinto or kidney beans depending on your taste preference. Layering Flavors: Add a pinch of smoked paprika or cumin for an extra depth of flavor that enhances the taco seasoning. Make-Ahead Option: Prepare the casserole the night before and refrigerate it, then simply set it in the slow cooker in the morning for an easy meal. {{image_2}} You can easily swap the meat in this dish. Using chicken instead of turkey or beef works great. Chicken brings a lighter taste. It also absorbs the taco flavors well. You can also choose different beans or grains. Instead of black beans, try pinto or kidney beans. You could use quinoa or farro instead of rice. These swaps add unique flavors and textures. To boost the flavor, add more spices or sauces. Try extra chili powder or cumin for heat. A splash of hot sauce can make it exciting. You can also mix in your favorite salsa for added zest. Incorporate more veggies for a colorful dish. Zucchini or spinach are excellent choices. They cook down nicely and add nutrients. Plus, they blend well with the other ingredients. For plant-based options, substitute meat with lentils or black beans. These add protein and fiber. They also soak up the delicious taco spices. If you want to go vegan, use dairy-free cheese. Brands like Daiya or Violife melt nicely. They provide that cheesy flavor without animal products. This way, everyone can enjoy the casserole! To store your taco casserole, use an air-tight container. This keeps the flavors fresh. Let the casserole cool before sealing it. It lasts up to four days in the fridge. When you're ready to eat, just take it out and reheat. If you want to freeze portions, divide the casserole into small containers. Label them with the date. It can stay frozen for up to three months. To thaw, move a portion to the fridge for several hours or overnight. For quick thawing, you can use the microwave. You can safely reheat in the microwave or the oven. For the microwave, heat in 30-second intervals, stirring in between. This ensures even heating. If you use the oven, preheat to 350°F. Place the casserole in a dish, cover it with foil, and heat for about 20 minutes. This way, it warms up nicely. Yes, you can! To make a vegetarian version, swap the ground turkey or beef for plant-based meat, such as lentils or crumbled tofu. Use black beans as your main protein. You can also add more vegetables like zucchini, mushrooms, or spinach. These will give texture and flavor. Make sure to choose a taco seasoning that is vegetarian-friendly. This way, you get all the taste without the meat. There are many ways to add spice! You can add extra chili powder or cayenne pepper for heat. If you like a smoky flavor, try adding smoked paprika. You can also mix in diced jalapeños or serrano peppers. If you prefer fresh herbs, cilantro or fresh lime juice can brighten the dish. Just be careful; add a little at a time. You can always taste and adjust as you go. This dish pairs well with many sides. A fresh salad with lettuce, tomatoes, and avocado is a great choice. You can also serve it with tortilla chips for crunch. A side of Mexican rice or guacamole complements the flavors nicely. If you like something warm, consider cornbread. These sides will make your meal even more enjoyable. This blog post covered everything you need for a tasty taco casserole. I shared key ingredients like ground turkey, black beans, and fresh veggies. You learned how to prepare the meat and mix flavors in a slow cooker. We discussed tips for the best taste and how to store leftovers properly. Enjoy experimenting with variations, like meat swaps or cooking methods. This dish is easy and fun to make. Now, gather your ingredients and create something delicious today.

Slow Cooker Taco Casserole Flavor-Packed Comfort Dish

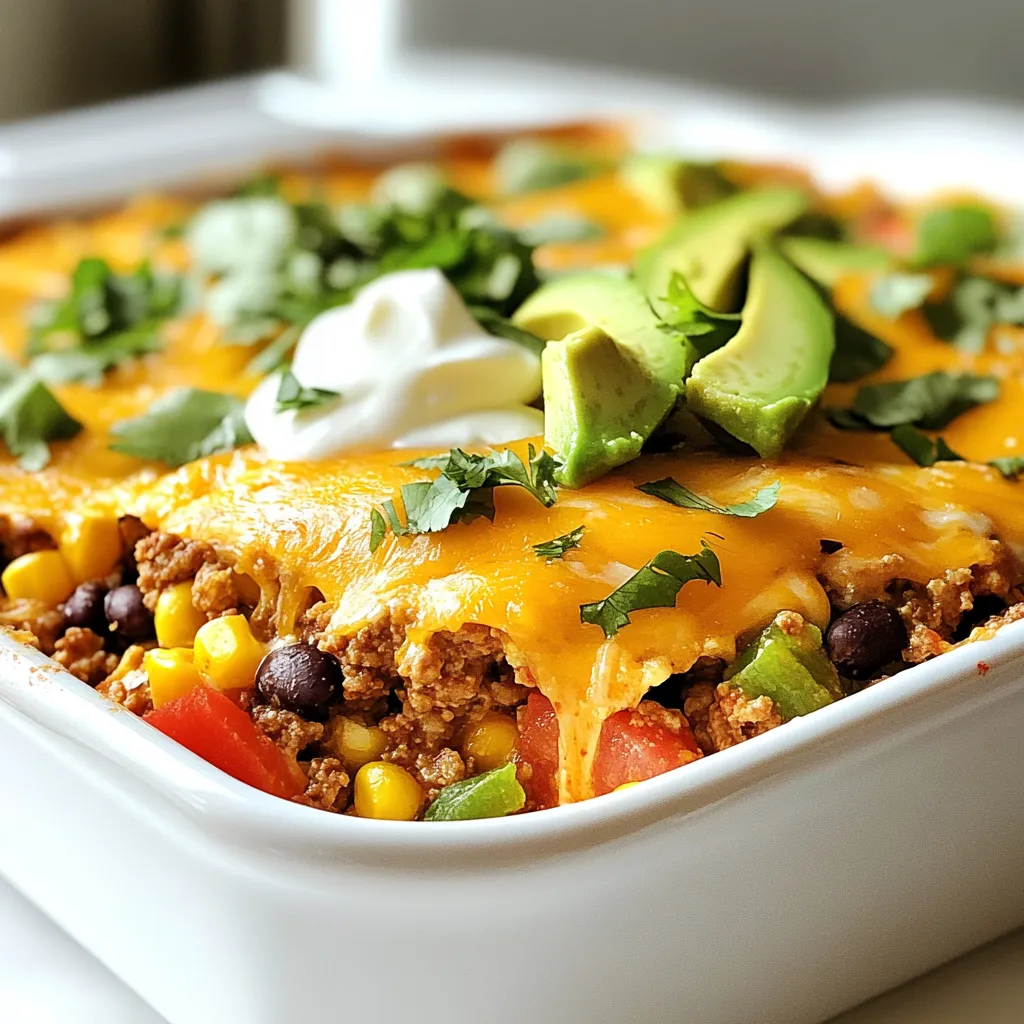
Craving a hearty meal that’s easy to prepare? My Slow Cooker Taco Casserole is the answer! Packed with bold flavors

To make Three-Mushroom Alfredo Rigatoni, gather these key ingredients. Each one plays a big role in the dish. - 12 oz rigatoni pasta - 1 tablespoon olive oil - 1 small yellow onion, finely chopped - 2 cloves garlic, minced - 4 oz cremini mushrooms, sliced - 4 oz shiitake mushrooms, sliced - 4 oz portobello mushrooms, diced - 1 cup heavy cream - 1 cup grated Parmesan cheese - 1 teaspoon dried thyme - Salt and black pepper to taste - Fresh parsley, chopped (for garnish) Each ingredient adds flavor and texture. Rigatoni gives a nice base with its ridges. Olive oil helps in cooking and adds richness. The onion and garlic create a fragrant start. The three types of mushrooms bring earthy notes and umami. Heavy cream makes the sauce thick and rich. Parmesan cheese adds a salty, nutty taste. Dried thyme enhances the flavor with a hint of herbiness. Remember to season with salt and black pepper. The fresh parsley at the end adds a bright pop of color and freshness. Enjoy the journey of flavors as you gather these items! {{ingredient_image_1}} - Start by boiling a large pot of water. - Add a generous amount of salt to the water. - Cook the rigatoni for 10-12 minutes until it is al dente. - Drain the pasta and set it aside. - Remember to save 1 cup of the pasta water for later. - In a large skillet, heat 1 tablespoon of olive oil over medium heat. - Add 1 small chopped yellow onion. Cook for 3-4 minutes until it turns translucent. - Next, mix in 2 cloves of minced garlic. Cook for another minute until you smell the aroma. - Use 4 oz each of cremini and shiitake mushrooms, sliced, and 4 oz portobello mushrooms, diced. - Stir in the mushrooms and cook for 8-10 minutes. - Keep stirring and watch for the mushrooms to soften and release their juices. - Pour in 1 cup of heavy cream and bring it to a gentle simmer. - Turn down the heat and stir in 1 cup of grated Parmesan cheese. - If the sauce is thick, slowly add reserved pasta water until it reaches the right texture. - Add the cooked rigatoni to the Alfredo sauce. - Toss gently to coat the pasta well with the creamy sauce. - Cook for an extra 2 minutes over low heat to blend the flavors. - Serve the pasta hot, garnished with chopped fresh parsley. Enjoy! To make your sauce creamy, use heavy cream. It gives a rich taste. Add Parmesan cheese slowly. This helps it melt well. If it feels too thick, add some reserved pasta water. This will help adjust the thickness. For flavor, season with salt and black pepper. Try using fresh herbs for a bright touch. Fresh parsley brings a nice pop. Dried thyme works well but has a different taste. Cooking mushrooms right is key. They should be tender and juicy. Sauté them for about 8-10 minutes. Stir them often to avoid burning. For pasta, cook it al dente. This means it should be firm when you bite. Use a large pot for boiling. This helps keep pasta from sticking. A wide skillet helps cook the sauce evenly. Pair your rigatoni with a fresh salad. A simple green salad balances the meal. For garnish, sprinkle more Parmesan cheese on top. Fresh parsley adds color and flavor. If you like wine, try a light white wine. A Chardonnay or Pinot Grigio pairs nicely with this dish. Enjoy your meal with a side of crusty bread for dipping! Pro Tips Use Fresh Mushrooms: For the best flavor and texture, opt for fresh mushrooms rather than canned. Fresh varieties enhance the dish with a rich umami taste. Reserve Pasta Water: Always reserve a cup of pasta water before draining. This starchy water is perfect for adjusting the sauce's consistency without losing flavor. Low and Slow Cream Sauce: When adding cream to the skillet, keep the heat low to prevent it from curdling. This ensures a smooth and creamy Alfredo sauce. Garnish for Flavor: Don't skip the fresh parsley garnish! It adds a pop of color and a fresh flavor contrast that brightens the rich Alfredo sauce. {{image_2}} You can boost flavor and nutrition by adding vegetables. Spinach or kale adds color and nutrients to your dish. Simply toss them in during the last few minutes of cooking. Seasonal vegetables like zucchini or bell peppers can also enhance your meal. Roasting vegetables like asparagus or cherry tomatoes brings out their natural sweetness. Just add them to the skillet before the mushrooms. For extra protein, consider adding grilled chicken or shrimp. These options pair well with the creamy sauce. If you prefer plant-based options, tofu works great. You can sauté it until golden, then mix it in. Different cheese options can also change the flavor. Try using goat cheese or a dairy-free alternative for a twist. Want to kick it up a notch? Add red pepper flakes for heat. A pinch goes a long way! Infusing garlic or shallots into the sauce adds depth. Simply sauté them with the onions for a richer taste. Consider adding white wine to the sauce. It helps balance the creaminess and adds a nice tang. Store leftovers in an airtight container. This keeps the flavors fresh. The dish stays good in the fridge for about 3 days. Make sure to let it cool first before sealing. You can freeze portions of the pasta and sauce. Use a freezer-safe container. This helps keep the meal tasty. It can last up to 3 months. When you’re ready to eat, thaw it overnight in the fridge. Reheat the rigatoni in a skillet over low heat. Add a splash of cream or water to keep it moist. Stir often to avoid burning. You can also use a microwave, but cover it to trap steam. This helps keep the texture creamy and smooth. Yes, you can use other pasta shapes. Penne, fusilli, or farfalle work well too. Each pasta shape has a unique feel and texture that can change your dish. If you choose a smaller pasta, reduce the cooking time. For larger shapes, keep an eye on the cooking time to ensure it's perfect. This dish is not vegan as is. You can swap heavy cream for coconut cream or cashew cream. Use nutritional yeast instead of Parmesan for a cheesy flavor. Look for vegan pasta, which is often egg-free. These swaps keep the taste rich while making it vegan-friendly. To make this dish gluten-free, choose gluten-free rigatoni. Many brands offer great options made from rice or lentils. For the sauce, ensure the heavy cream and other ingredients are free from gluten. Check labels to avoid any hidden gluten sources. This blog post took you through making a delicious rigatoni Alfredo. We covered key ingredients, cooking steps, tips, and variations to make it your own. Remember, you can add veggies, proteins, or spices for extra flavor. Storing leftovers is easy, whether in the fridge or freezer. The recipe caters to dietary needs too, with options for gluten-free or vegan choices. Enjoy your creamy pasta dish today! You’ll have a tasty meal ready in no time.

Three-Mushroom Alfredo Rigatoni Creamy Comfort Dish

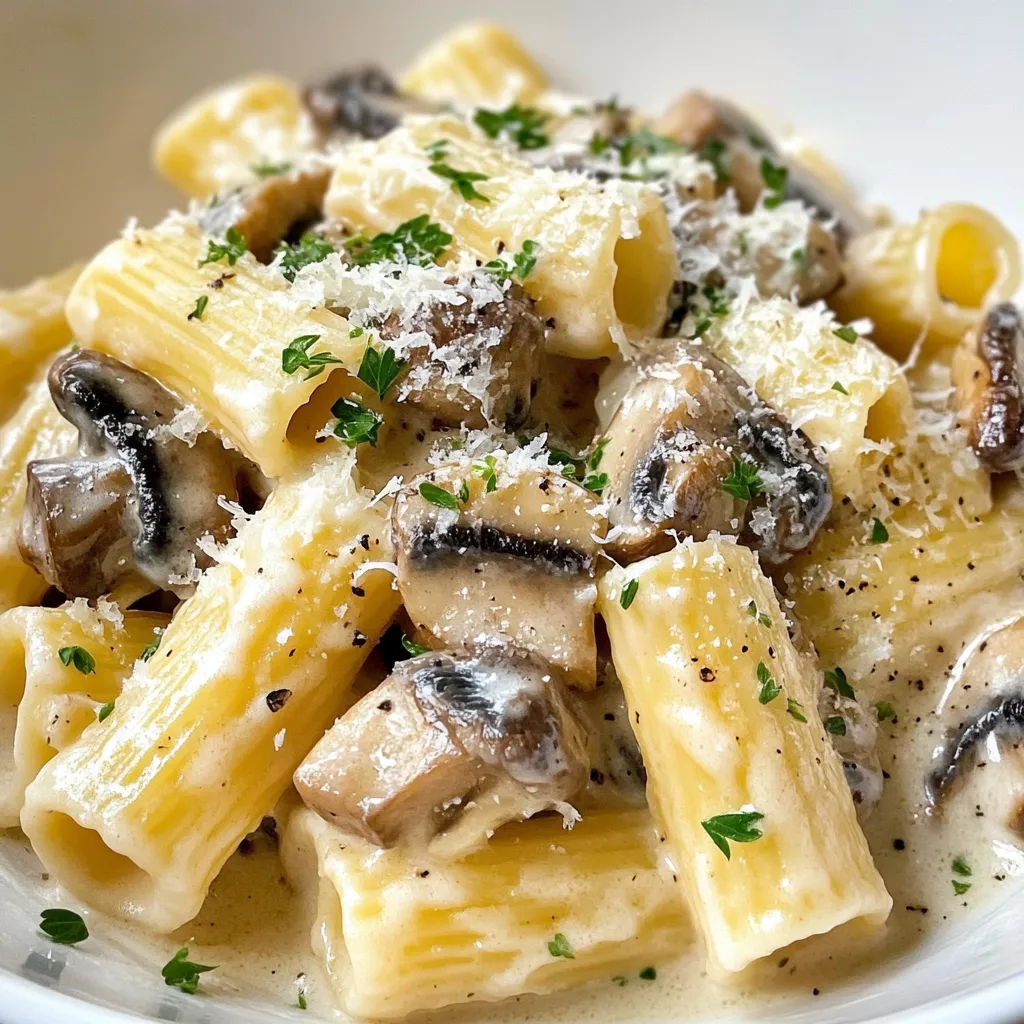
Welcome to your new favorite comfort food! This Three-Mushroom Alfredo Rigatoni combines creamy sauce with three delicious types of mushrooms.

Newer posts
← Previous Page1 … Page114 Page115

dsad

© 2025 flavorsprint • Built with GeneratePress

Our Policies

  • Copyright Policy
  • Cookie Policy
  • GDPR Policy
  • Privacy Policy
  • Disclaimer
  • Terms Of Use

More Information

  • Home
  • About
  • Contact
  • Appetizers
  • Dessert
  • Dinner
  • Drinks
©2025, flavorsprint About Back To Top