Skip to content
DisclaimerTerms Of UseGDPR PolicyCookie Policy

flavorsprint

  • Home
  • Drinks
  • Appetizers
  • Dinner
  • Dessert
  • About
  • Contact
  • Privacy Policy
DisclaimerTerms Of UseGDPR PolicyCookie Policy

Lillian

- 2 pounds beef stew meat - 4 medium potatoes - 1 large onion - 3 cloves garlic - 1 tablespoon fresh ginger In this dish, beef stew meat is the star. It becomes tender and juicy as it cooks. The potatoes add a hearty touch, soaking up all those delicious flavors. The onion, garlic, and fresh ginger bring a warm aroma that fills your kitchen with comfort. - 1 tablespoon curry powder - 1 teaspoon ground cumin - 1 teaspoon turmeric - 1 teaspoon paprika - Salt and pepper to taste Spices are key in this curry. Curry powder gives it a rich flavor. Cumin adds warmth, while turmeric brings a bright color. Paprika adds a hint of sweetness. Don't forget to add salt and pepper for balance. These spices work together to create a taste that is both bold and comforting. - 2 tablespoons vegetable oil - Fresh cilantro for garnish - Cooked rice or naan for serving The oil helps sear the beef, sealing in flavor. Fresh cilantro adds a pop of color and freshness at the end. Serving this curry with rice or naan makes it a full meal. You can scoop up the rich sauce, making each bite a delight. {{ingredient_image_1}} - Searing the beef in vegetable oil: Heat 2 tablespoons of vegetable oil in a large skillet over medium-high heat. Once hot, add 2 pounds of beef stew meat, cut into 1-inch pieces. Sear the beef for about 5-7 minutes until it is brown on all sides. This step adds flavor and makes the meat tender. - Removing the beef from heat: After the beef is browned, take it off the heat. Set it aside and let it rest. This will keep the juices in the meat, ensuring it stays moist during cooking. - Adding onions, garlic, and ginger: In the slow cooker, start by adding 1 large onion, finely chopped. Then, add 3 cloves of minced garlic and 1 tablespoon of grated fresh ginger. These ingredients give the curry its wonderful flavor. - Layering potatoes and carrots: Next, peel and dice 4 medium potatoes. Slice 2 carrots. Layer these vegetables on top of the onion mixture. The potatoes and carrots will soak up all the tasty juices as they cook. - Adding beef and sauce mixture: Place the seared beef on top of the vegetables in the slow cooker. In a separate bowl, mix 1 can of diced tomatoes, 1 cup of beef broth, 1 tablespoon of curry powder, 1 teaspoon of ground cumin, 1 teaspoon of turmeric, 1 teaspoon of paprika, and salt and pepper to taste. Pour this sauce over the beef and vegetables. - Setting the slow cooker time: Set the slow cooker to low and cook for 6-8 hours. You can also set it to high for 3-4 hours if you’re short on time. The beef should be tender, and the potatoes should be cooked through. - Adjusting the seasoning before serving: Once the cooking time is up, stir the curry well to combine all the flavors. Taste the curry and adjust the seasoning if needed. Add more salt or pepper if you like. Now, it’s ready to serve! To make your beef potato curry even better, try adding a few extra spices. *Cinnamon* and *cardamom* can add warmth. A pinch of *red pepper flakes* can bring heat. You can also add a dash of *coconut milk* for creaminess. For more tender beef, sear it well before adding it to the slow cooker. This step locks in flavor and moisture. You can also let the beef marinate for a few hours in yogurt or an acid like vinegar. This helps to break down tough fibers in the meat. This curry pairs well with warm *naan* or steamed *rice*. Both options soak up the rich sauce. You can also serve it with a light salad to balance the meal. For a nice touch, garnish your curry with fresh *cilantro*. You can also add a sprinkle of *chopped green onions* or a squeeze of *lime* for brightness. When cooking, it’s best to set your slow cooker to low for 6-8 hours. This ensures the beef becomes tender and the flavors meld well. If you’re short on time, you can cook it on high for 3-4 hours. Every slow cooker is different. If yours runs hot, check the curry earlier. If it runs cool, it might need a bit more time. Always check that the beef is tender and the potatoes are soft before serving. Pro Tips Choose the Right Cut: Opt for chuck roast or brisket for a tender, flavorful curry. These cuts break down beautifully during slow cooking. Layering is Key: Always layer your ingredients in the slow cooker, starting with onions and garlic, to build a base of flavor. Thicken the Sauce: If you prefer a thicker curry, remove the lid during the last hour of cooking to allow some moisture to evaporate. Garnish for Flavor: Fresh cilantro adds a burst of freshness. Consider adding a squeeze of lime for an extra layer of brightness before serving. {{image_2}} You can switch the beef for chicken, pork, or even vegetables. Chicken thighs work well. They stay moist and tender. Pork shoulder is another good choice. For a vegetarian option, try chickpeas or tofu. If you want more nutrition, add different veggies. Sweet potatoes add sweetness. Cauliflower is a great low-carb choice. Spinach or kale can boost the greens. You can also toss in peas for a pop of color and flavor. For a spicy twist, add chopped chilies or cayenne pepper. You can also use a spicy curry powder. If you want warmth without heat, use more ginger. To make it sweet and savory, add coconut milk. This gives it a rich creaminess. You can also add a tablespoon of honey for a hint of sweetness. Dried fruits like raisins or apricots can add a fruity note to your curry. If you need a gluten-free dish, all the spices and ingredients are safe. Just check your broth for gluten. For low-carb variations, replace potatoes with cauliflower. This keeps the texture but cuts carbs. You can also skip the rice or naan to stay low-carb. Enjoy it as is or with a salad on the side. To store leftovers safely, let the curry cool first. Then, place it in an airtight container. Make sure the lid seals well to keep air out. I recommend using glass or plastic containers with tight-fitting lids. They help prevent spills and keep the curry fresh. For freezing beef potato curry, use freezer-safe bags or containers. Leave some space at the top, as the curry expands when it freezes. Label the bags with the date. To thaw, place the curry in the fridge overnight. When ready to eat, reheat it in a pot over low heat or in the microwave. Stir often to ensure even heating. You can store the curry in the fridge for up to four days. If you freeze it, it can last for about three months. Signs that the curry has gone bad include an off smell, mold, or a change in color. If you notice any of these, it’s best to throw it away. It takes about 6-8 hours on low or 3-4 hours on high. The beef needs time to become tender. The longer you cook it, the better the flavors mix. I love using the low setting for a rich taste. This slow cooking makes the meat and potatoes soft and full of flavor. Yes, you can use frozen beef. Just add an extra hour to the cooking time. The beef will cook well and stay juicy. Make sure to cut the meat into small pieces before freezing. This helps it cook evenly. I recommend searing the beef first when using fresh meat. This adds a nice brown crust. Beef potato curry pairs well with rice or naan. Rice soaks up the tasty sauce. Naan is great for dipping. You can also serve it with a simple salad or yogurt. A squeeze of lime adds a fresh kick. Fresh cilantro on top makes it look great and adds flavor. This guide covered everything you need for Beef Potato Curry. You learned about the main ingredients, cooking tips, and variations. The slow cooker makes meal prep easy and delicious. Remember to store leftovers properly and feel free to try new spices. I encourage you to adapt the recipe to fit your taste and explore different sides. With these tips, you can enjoy a flavorful meal every time. Happy cooking!

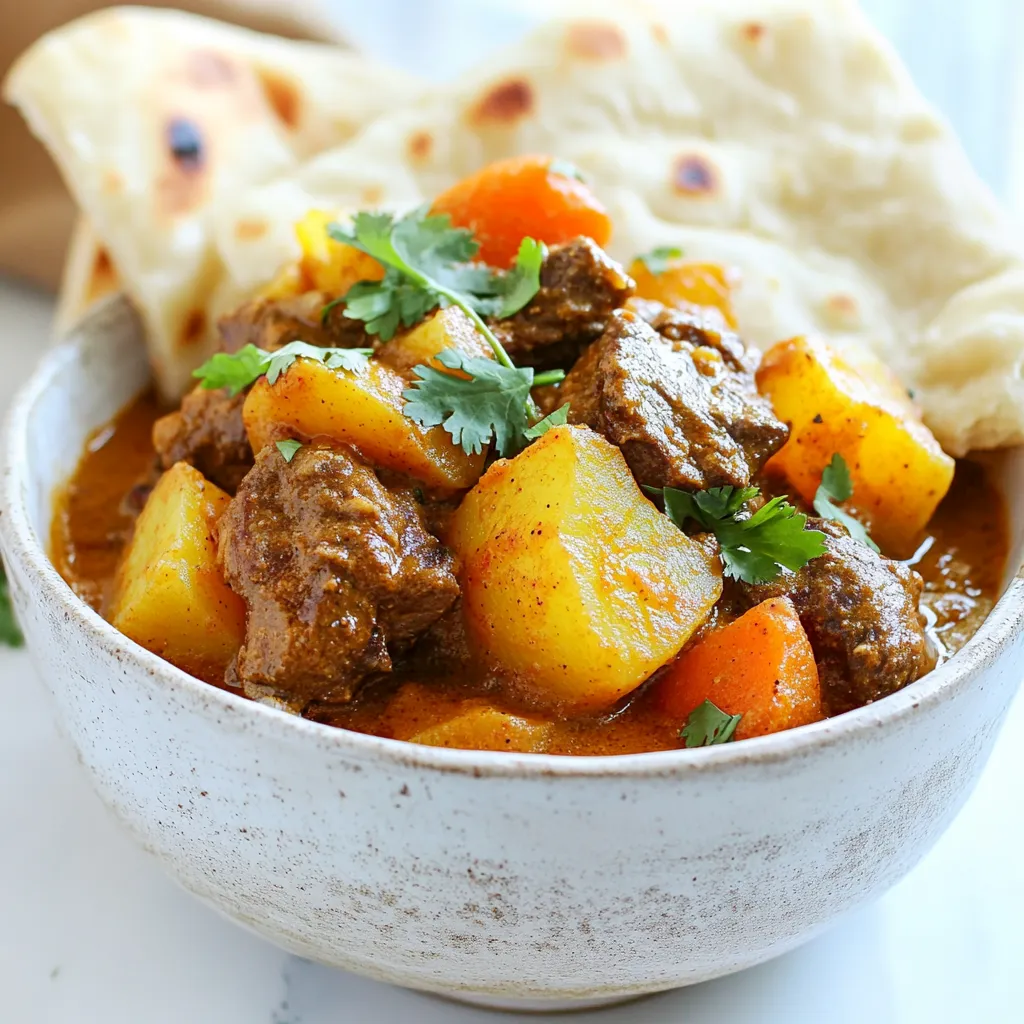
Slow Cooker Beef Potato Curry Flavorful Comfort Dish

Craving a warm, comforting meal that fills your kitchen with mouthwatering aromas? Look no further! This Slow Cooker Beef Potato

To make a delicious Moist Pumpkin Bundt Cake, you need a few key ingredients: - 1 ½ cups all-purpose flour - 1 tsp baking powder - 1 tsp baking soda - 1 tsp ground cinnamon - ½ tsp ground nutmeg - ½ tsp ground ginger - ¼ tsp ground cloves - ½ tsp salt - 1 cup granulated sugar - ½ cup brown sugar, packed - ½ cup vegetable oil - 1 cup pure pumpkin puree (canned or fresh) - 3 large eggs - 1 tsp vanilla extract - ½ cup buttermilk These ingredients create a soft, moist cake full of pumpkin flavor. The spices add warmth and depth, making it perfect for fall. You can easily swap out some ingredients if needed. Here are a few ideas: - Instead of all-purpose flour, you can use cake flour for a lighter texture. - If you don’t have buttermilk, mix ½ cup milk with 1 tsp lemon juice or vinegar. Let it sit for 5 minutes to thicken. - For a healthier oil option, use applesauce instead of vegetable oil. These substitutions keep the flavor while making the cake fit your needs. Want to add a twist to your cake? Consider these optional add-ins: - 1 cup chopped pecans or walnuts for a crunchy bite. - ½ cup raisins or chocolate chips for sweetness. These add-ins not only enhance the taste but also make your cake unique. Feel free to experiment and find your favorite combo! {{ingredient_image_1}} First, set your oven to 350°F (175°C). Take a 10-cup Bundt pan and grease it well. Use butter or cooking spray to coat the pan. Then, add a bit of flour to the pan. Shake it around to cover all surfaces. This step helps the cake come out smoothly after baking. Grab a medium bowl. Add 1 ½ cups of all-purpose flour, 1 teaspoon of baking powder, and 1 teaspoon of baking soda. Then, sprinkle in 1 teaspoon of ground cinnamon, ½ teaspoon of ground nutmeg, ½ teaspoon of ground ginger, and ¼ teaspoon of ground cloves. Don’t forget to include ½ teaspoon of salt. Whisk these dry ingredients well. This mix gives your cake its warm fall flavor. In a large mixing bowl, combine 1 cup of granulated sugar and ½ cup of packed brown sugar. Pour in ½ cup of vegetable oil and beat the mix on medium speed until smooth. Next, add in 1 cup of pumpkin puree, 3 large eggs, and 1 teaspoon of vanilla extract. Mix until everything is well combined. Now, it’s time to combine the dry and wet ingredients. Gradually add the dry mix to the wet mix. Alternate this with ½ cup of buttermilk. Blend just until combined—don’t overmix! If you want, fold in 1 cup of chopped pecans or walnuts and ½ cup of raisins or chocolate chips. Pour the finished batter into the prepared Bundt pan. Smooth the top with a spatula and bake it in the preheated oven for 45 to 50 minutes. To check if it's done, insert a toothpick in the center. If it comes out clean, your cake is ready! Let the cake cool in the pan for about 10 minutes. Then, invert it onto a wire rack to cool completely. You can dust it with powdered sugar or drizzle a glaze made from powdered sugar and milk for extra sweetness. To keep your pumpkin Bundt cake moist, use fresh pumpkin puree. Canned puree works too, but ensure it’s not too watery. Mixing in buttermilk adds richness. The oil in the recipe also helps maintain moisture. Avoid overbaking; check for doneness early. A toothpick should come out clean, but not dry. When mixing your cake batter, start with the sugars and oil. Mix them well to create a smooth base. Add the pumpkin, eggs, and vanilla next. Mix until just blended; overmixing can make your cake tough. Alternate adding the dry mix and buttermilk. This technique keeps the batter light and fluffy. After baking, let the cake cool in the pan for about 10 minutes. This step helps it firm up. Use a knife to gently loosen the edges. Then, flip the pan upside down on a wire rack. Give it a gentle tap to release the cake. Allow the cake to cool completely before serving. This helps it set and enhances the flavors. Pro Tips Use Fresh Pumpkin: For the best flavor, consider using fresh pumpkin puree made from roasted pumpkin instead of canned. It adds a richer taste. Don't Overmix: Mix the batter just until combined to ensure a tender cake. Overmixing can lead to a dense texture. Check for Doneness: Ovens can vary, so start checking for doneness a few minutes before the recommended baking time to prevent overbaking. Storage Tips: Store leftover cake in an airtight container at room temperature for up to three days, or refrigerate for longer freshness. {{image_2}} You can make this pumpkin bundt cake even better by adding new flavors. Try adding a pinch of allspice or cardamom for a warm twist. You can also use a splash of almond or orange extract. These flavors blend well with pumpkin and spice. You will create a unique cake that is perfect for fall. If you want to cut down on sugar, there are great options. You can use honey or maple syrup instead. These natural sweeteners add a nice flavor. Just remember to reduce the liquid in your recipe slightly if you use these. Another option is coconut sugar, which has a lower glycemic index. This makes the cake a bit more health-friendly while still being sweet. You can easily make this cake gluten-free. Use a gluten-free flour blend instead of all-purpose flour. Many blends work well in baking. Just make sure it has xanthan gum for better texture. This will help the cake rise and stay moist. You won’t miss the regular flour at all! After you enjoy your Moist Pumpkin Bundt Cake, you may have some left. To store it, place the cake in an airtight container. You can keep it at room temperature for up to three days. If you want to store it longer, refrigerate it. This will help keep the cake fresh and moist. Just be sure to wrap it tightly in plastic wrap before placing it in the fridge. If you want to save your cake for later, freezing is a great option. First, let the cake cool completely. Then, slice it into pieces. Wrap each slice in plastic wrap, then place them in a freezer bag. You can freeze it for up to three months. When you're ready to enjoy a slice, just take it out and let it thaw at room temperature. You can also warm it in the microwave for a few seconds if you prefer. To keep your Bundt cake fresh, avoid cutting into it until you're ready to serve. Once cut, store the cake in an airtight container. If you notice any dryness, you can brush the slices with a bit of simple syrup. This will add moisture back into the cake. Always check for any signs of spoilage before consuming. Enjoy your delicious treat with confidence! Yes, you can use fresh pumpkin. First, cook a small pumpkin. Cut it in half and remove the seeds. Roast the halves in the oven until soft. Then, scoop out the flesh and mash it until smooth. You need one cup of pumpkin puree for this cake. Fresh pumpkin adds a nice flavor, but canned is easier. Check the cake with a toothpick. Insert it into the center of the cake. If it comes out clean, the cake is done. You should also look for a golden-brown color on the top. The cake will spring back when you touch it lightly. These signs help ensure your cake is perfectly baked. Pumpkin bundt cake pairs well with many treats. Serve it with whipped cream for a classic touch. You can also add a scoop of vanilla ice cream for extra sweetness. A drizzle of caramel sauce adds a lovely flavor too. Consider garnishing with toasted nuts for crunch. Enjoy with a cup of coffee or tea! You now have all the info needed to bake a perfect pumpkin bundt cake. We covered key ingredients, helpful tips, and creative variations to suit your needs. Remember, keep your cake moist with the right techniques and store leftovers so they stay fresh. You can adapt the recipe to fit your taste and dietary needs. Now, it’s time to enjoy your delicious creation with friends or family. Happy baking!

Moist Pumpkin Bundt Cake Irresistible Fall Treat

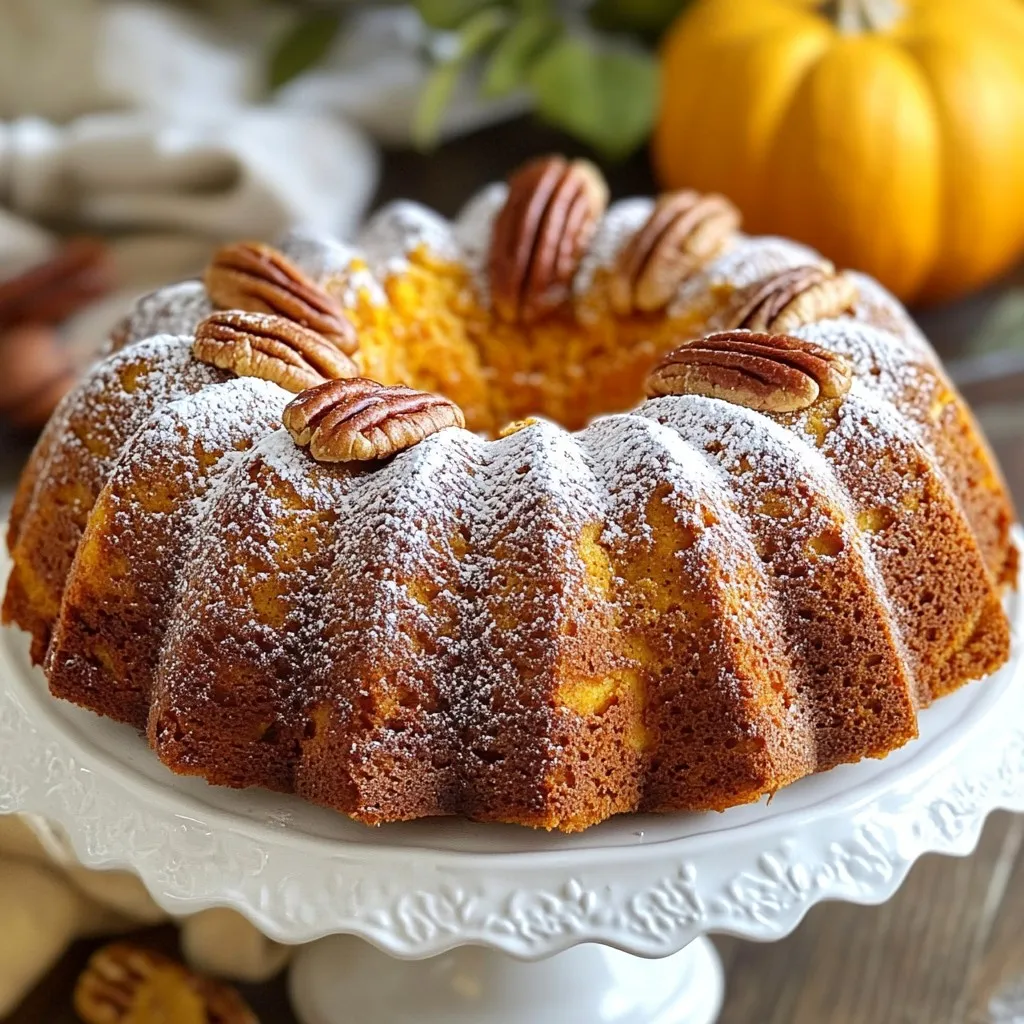
Fall is the perfect time for a delicious treat, and nothing says autumn quite like a Moist Pumpkin Bundt Cake.

- 2 cups jasmine rice - 1 ½ cups coconut milk - 500g boneless, skinless chicken thighs - 1 tablespoon curry powder - 1 tablespoon garlic powder - 1 teaspoon ginger powder - 1 red bell pepper, sliced - 1 cup snap peas - Fresh cilantro, chopped (for garnish) When making a Coconut Chicken Rice Bowl, start with the main ingredients. Jasmine rice gives a nice texture. Coconut milk adds a rich flavor. Chicken thighs are juicy and tender. Next, you need seasonings to boost the taste. Curry powder adds warmth. Garlic powder brings depth, while ginger powder adds a zing. Together, they create a balanced flavor profile. Finally, fresh ingredients brighten the dish. The red bell pepper adds crunch and color. Snap peas bring a sweet snap. Fresh cilantro makes it fresh and vibrant. Each ingredient contributes to a delicious and simple meal. {{ingredient_image_1}} - Rinse the jasmine rice. Rinsing helps remove extra starch. You want the rice to be fluffy, not sticky. - Combine ingredients in a saucepan. In a medium pot, mix the rinsed rice, coconut milk, and water. Stir gently. - Season the chicken pieces. Sprinkle the chicken with curry powder, garlic powder, ginger powder, salt, and pepper. Mix well. - Sauté the chicken in a skillet. Heat olive oil in a large skillet over medium-high heat. Add the seasoned chicken. Cook for about 6-8 minutes. The chicken should be golden brown and cooked through. - Add vegetables to the skillet. Toss in the sliced red bell pepper and snap peas. Cook for 3-4 more minutes. The veggies should be tender but still crisp. - Serve with coconut rice and garnish. Scoop the coconut rice into bowls. Top with the chicken and veggies. Garnish with fresh cilantro. Add lime wedges on the side for a zesty kick. To make the best coconut rice, start with rinsing the jasmine rice. Rinse it under cold water until the water runs clear. This step gets rid of extra starch. Less starch means fluffier rice. After cooking, let the rice rest for five minutes. This helps it finish cooking and makes it even fluffier. For juicy chicken, marinate it with the spices. Use curry powder, garlic powder, ginger powder, salt, and pepper. Let it sit for even just 15 minutes for better taste. Cook the chicken for about six to eight minutes. This time ensures it cooks through and stays tender. Garnish your dish with fresh cilantro for a pop of color. You can also add a few lime wedges on the side. The lime juice adds brightness to the bowl. Serve the chicken and veggies over the coconut rice for a beautiful meal. Pro Tips Rinse the Rice: Always rinse your jasmine rice under cold water until the water runs clear. This step is crucial for removing excess starch, resulting in fluffy, non-gummy rice. Cook Chicken Thoroughly: Ensure that the chicken is cooked until golden brown and reaches an internal temperature of 165°F (75°C) for safety and best flavor. Vegetable Crunch: Add vegetables like red bell pepper and snap peas towards the end of cooking to maintain their vibrant color and crisp texture. Lime Zest: Serving lime wedges on the side adds a refreshing zing that elevates the flavors of the dish—don’t skip this step! {{image_2}} You can change a few things to make this dish your own. For protein, try using tofu or shrimp. Both options taste great in this bowl. If you want to switch up the veggies, broccoli and carrots work well too. These choices add color and crunch to your meal. Want to add more flavor? Sprinkle in some coconut flakes. They give a nice texture. You can also adjust the spices. If you like heat, add more curry powder or even a pinch of chili flakes. These changes can make the dish pop with flavor. Think about how you want to serve this dish. You can use a bowl for a cozy feel or a plate for a more elegant look. Both work well! Pair your meal with a side of steamed greens or a light salad. These sides add freshness and balance to your meal. Store your Coconut Chicken Rice Bowl in airtight containers. This keeps the flavors fresh. Make sure the dish cools down before sealing. In the fridge, it lasts for up to three days. If you want to enjoy it later, remember to label the container. This way, you won't forget when you made it. You can freeze your Coconut Chicken Rice Bowl too. First, let it cool completely. Then, place it in a freezer-safe container. Remove as much air as possible to avoid freezer burn. It will stay good for about three months. When you want to eat it, thaw in the fridge overnight. Reheat in the microwave until piping hot. Stir it halfway through to heat evenly. To keep your vegetables fresh, store them in the fridge. Use a plastic bag or container with holes for airflow. This helps reduce moisture and spoilage. If you cook rice ahead of time, let it cool fully. Store it in an airtight container in the fridge. Use it within five days for the best taste. A Coconut Chicken Rice Bowl is a hearty dish featuring tender chicken, rice, and veggies in a creamy coconut sauce. The dish brings a taste of Southeast Asian flavors into your kitchen. This meal is not just tasty; it also holds cultural significance. It reflects the use of coconut in many tropical cuisines, symbolizing warmth and comfort. To make this dish vegetarian, replace chicken with firm tofu or chickpeas. Use vegetable broth instead of water for cooking the rice. You can also add more veggies like carrots or mushrooms. These swaps help keep the dish full of flavor and texture. Yes, you can make this dish ahead. Cook the rice and chicken mixture separately. Store them in airtight containers in the fridge. This way, the rice stays fluffy, and the chicken remains juicy. Reheat them together when you're ready to eat. This blog post guides you through making a delicious Coconut Chicken Rice Bowl. You learned about key ingredients like jasmine rice, chicken thighs, and spices that add flavor. We covered simple steps for cooking the dish and tips for perfect rice and chicken. You can even customize with different veggies or proteins. In closing, enjoy experimenting with flavors and textures in your home kitchen. Keep these tips handy for a delightful meal every time. Happy cooking!

Coconut Chicken Rice Bowl Flavorful and Simple Meal

Are you ready for a delicious twist on dinner? The Coconut Chicken Rice Bowl is simple yet packed with flavor.

- 4 large bell peppers (any color) - 1 pound ground turkey or beef - 1 small onion, diced - 2 cloves garlic, minced - 1 can (15 oz) black beans, rinsed and drained - 1 cup corn (fresh or frozen) - 1 cup diced tomatoes (canned or fresh) - 1 tablespoon taco seasoning - 1 teaspoon cumin - 1 cup shredded cheddar cheese - 1/4 cup fresh cilantro, chopped - Salt and pepper to taste - 1 tablespoon olive oil Taco stuffed bell peppers pack a lot of flavor. Each color of bell pepper brings its own twist. Green peppers are sharp, while red ones are sweet. I love using a mix for a vibrant look. Ground turkey or beef serves as the base. Both add protein and richness. I often choose turkey for a lighter meal. Diced onions and minced garlic give a nice aroma. They build a solid flavor foundation. Canned black beans are a favorite. They are easy to use and add fiber. Fresh or frozen corn adds sweetness and crunch. Diced tomatoes bring moisture and a bit of tang. Taco seasoning and cumin give the dish its signature taste. I always use shredded cheddar cheese. It melts perfectly and adds creaminess. Chopped cilantro brightens the dish. Salt and pepper round out the flavors. A dash of olive oil helps with cooking and adds richness. Gather these ingredients, and you’re ready to create a delicious and colorful meal. {{ingredient_image_1}} 1. Preheat your oven to 375°F (190°C). 2. Slice the tops off the bell peppers and remove the seeds and membranes. This makes room for the tasty filling. Lightly drizzle the outside of the peppers with olive oil. Place them upright in a baking dish. 1. In a large skillet, heat the olive oil over medium heat. 2. Add the diced onions and minced garlic. Sauté until they soften, about 3 to 4 minutes. You want them fragrant and tender. 3. Add 1 pound of ground turkey or beef to the skillet. Cook until browned, breaking the meat apart with a spatula. This takes about 5 to 7 minutes. 4. Stir in one can of rinsed black beans, 1 cup of corn, and 1 cup of diced tomatoes. Mix well. 5. Add 1 tablespoon of taco seasoning and 1 teaspoon of cumin. Cook for another 5 minutes until heated through. Season with salt and pepper to taste. 1. Remove the skillet from the heat. Stir in half of the shredded cheddar cheese and chopped cilantro. This adds great flavor. 2. Spoon the taco mixture evenly into each bell pepper, packing it slightly. 3. Sprinkle the remaining shredded cheese over each stuffed pepper. 4. Cover the baking dish with aluminum foil and bake in the preheated oven for 25 minutes. 5. After 25 minutes, remove the foil and bake for an additional 10 to 15 minutes. The peppers should be tender, and the cheese should be bubbly and golden. 6. Once done, let them cool slightly before serving. You can garnish with more cilantro if you like. When picking bell peppers, color matters. Green, red, yellow, or orange all work well. Red peppers taste sweeter, while green ones are more bitter. Choose large peppers for easy stuffing. They should feel firm and heavy. Organic peppers often have better taste. They lack harmful chemicals. However, conventional peppers are often more affordable. Choose what fits your budget and needs. Homemade taco seasoning makes a big difference. Mix cumin, chili powder, and garlic powder for a tasty blend. This can boost the flavor of your filling. Garnish your stuffed peppers for a fresh touch. Add chopped cilantro or a squeeze of lime. A dollop of sour cream can make them creamy. You can also sprinkle more cheese on top for extra richness. Different bell peppers cook at different rates. Thinner-skinned peppers like yellow and red tend to cook faster. Green peppers may need a bit more time. If using smaller peppers, check them earlier. They will bake faster than large ones. Always check for softness and a bubbly topping to know they are done. Pro Tips Choose Colorful Peppers: Using a mix of bell pepper colors not only makes the dish visually appealing but also adds subtle flavor variations. Meal Prep Friendly: These stuffed peppers can be prepared in advance and stored in the fridge for up to 3 days, making them a great meal prep option. Customize Fillings: Feel free to add other ingredients like quinoa, rice, or different beans to customize the filling to your taste preferences. Garnish Creatively: Top your stuffed peppers with avocado slices, sour cream, or hot sauce for an extra layer of flavor before serving. {{image_2}} You can make a tasty vegetarian version easily. Substitute the meat with beans. Use black beans or pinto beans for a great texture. You can also add quinoa or rice for extra protein and fiber. This adds heartiness and makes the meal more filling. If you like heat, try the spicy version. Add diced jalapeños or a splash of your favorite hot sauce to the filling. This will give your peppers a kick. You can also use pepper jack cheese instead of cheddar. It melts beautifully and adds a zesty flavor. For a low-carb meal, you can swap out bell peppers for zucchini. Zucchini boats work just as well. Use keto-friendly ingredients like cauliflower rice instead of regular rice. This keeps your meal light while still being delicious and satisfying. To store leftovers, let the taco stuffed bell peppers cool completely. Place them in an airtight container. This keeps them fresh and tasty. In the fridge, they last for about 3 to 4 days. Just make sure you reheat them well before eating. You can freeze stuffed peppers for later. Wrap each pepper tightly in plastic wrap. Then, place them in a freezer-safe bag. They can stay good for up to 3 months. When you want to eat them, thaw them overnight in the fridge. Reheat in the oven at 350°F (175°C) for about 20-25 minutes. This warms them up nicely. Prepping in advance is a great way to save time. You can make the filling a day ahead. Just store it in the fridge. On a busy night, stuff the peppers and bake them. You can also stuff and freeze the peppers before baking. This way, you have a quick meal ready anytime. Yes, you can make Taco Stuffed Bell Peppers ahead. Here are some tips: - Prepare the filling: Cook the meat, beans, corn, and spices. Let it cool. - Stuff the peppers: Fill the peppers and cover them tightly. - Store: Keep in the fridge for up to 24 hours. - Bake: When ready, bake straight from the fridge. Add 5-10 minutes to the bake time. You can use various alternatives for ground turkey or beef: - Ground chicken: A leaner option with a similar taste. - Plant-based meat: Brands like Beyond Meat or Impossible Burger work well. - Beans or lentils: Great for a vegetarian option, adding fiber and protein. - Quinoa: A healthy grain that adds texture and nutrients. Taco Stuffed Bell Peppers can be healthy. Here are some benefits: - High in fiber: The beans and peppers provide good fiber. - Low in carbs: Great for low-carb diets when you skip rice. - Customizable: You can add more veggies or use lean meats to reduce calories. - Vitamins and minerals: Bell peppers are rich in vitamins A and C. Look for these signs to check doneness: - Tenderness: The peppers should feel soft when pierced with a fork. - Cheese: The cheese on top should be melted and slightly golden. - Cooking time: Generally, 35-40 minutes is a good baking time. - Color change: The peppers will have a bright, cooked color. Taco stuffed peppers are simple to make and full of flavor. We covered the needed ingredients, step-by-step cooking, and helpful tips. You can customize this dish to fit your taste. Try adding different spices or using veggies instead of meat. Storing leftovers is easy, too. They taste great reheated or even cold. Cooking can be fun and creative. Enjoy making these tasty meals and share with family and friends! You’ll love how satisfying they are and how many ways you can enjoy them.

Taco Stuffed Bell Peppers Flavorful Weeknight Meal

Looking for a quick and tasty dinner idea? Taco Stuffed Bell Peppers will satisfy your cravings! This recipe combines fresh

To make Italian Penicillin Chicken Soup, you need these key ingredients: - 1 lb (450g) boneless, skinless chicken thighs - 8 cups low-sodium chicken broth - 2 cups water - 1 medium onion, diced - 2 cloves garlic, minced - 2 medium carrots, sliced - 2 stalks celery, diced - 1 medium zucchini, diced - 1 cup spinach, packed - 1 tablespoon fresh thyme leaves - 1 tablespoon fresh parsley, chopped - 1 tablespoon olive oil - Salt and pepper to taste - 1 cup whole grain pasta (like ditalini or orzo) - Juice of 1 lemon These ingredients create a warm, hearty dish. Each one adds flavor and nutrition to the soup. You can swap some ingredients if needed: - Chicken thighs can be replaced with chicken breasts. Breasts are leaner but can dry out. - If you prefer less salt, use unsalted broth. You can always add salt later. - For a veggie twist, use mushrooms instead of chicken. This will still give you a tasty base. - If you don’t have zucchini, try yellow squash or even bell peppers. These swaps keep the soup delicious and flexible for your taste. Herbs can change the flavor of your soup. Fresh herbs offer vibrant taste. They brighten each spoonful. Use these amounts: - For thyme, use 1 tablespoon of fresh or 1 teaspoon of dried. - For parsley, 1 tablespoon fresh equals about 1 teaspoon dried. Dried herbs are strong, so add them early in cooking. Fresh herbs work best near the end. This helps keep their bright flavor and color. Choosing the right herbs can enhance your soup experience. {{ingredient_image_1}} To start, grab a large pot. Pour in one tablespoon of olive oil. Heat it over medium heat. Once hot, add one diced onion. Sauté the onion until it turns clear, about four to five minutes. Next, add two minced garlic cloves, two sliced carrots, and two diced stalks of celery. Cook these for another three to four minutes. You want the veggies to soften but not get too mushy. Now it's time for the chicken. Add one pound of boneless, skinless chicken thighs to the pot. Cook the chicken for about five to six minutes. Make sure it is browned on all sides. Once the chicken looks good, pour in eight cups of low-sodium chicken broth and two cups of water. Bring this mix to a gentle boil. After it boils, add one tablespoon of fresh thyme, salt, and pepper. Lower the heat and cover the pot. Let the soup simmer for twenty minutes. This helps the flavors blend well. After twenty minutes, take the chicken out. Use two forks to shred the chicken into bite-sized pieces. Then, add the shredded chicken back into the pot. Toss in one diced zucchini and one cup of whole grain pasta, like ditalini or orzo. Cook this for another ten to twelve minutes, or until the pasta is just right. To finish, stir in one cup of packed spinach and one tablespoon of chopped parsley. Let them wilt in the hot soup for about two minutes. Finally, squeeze the juice of one lemon into the pot. Taste your soup and adjust the salt and pepper if needed. Now, ladle the soup into warm bowls. For a nice touch, add a sprinkle of fresh parsley and a slice of lemon on the side. Enjoy this comforting Italian Penicillin Chicken Soup! To make your Italian Penicillin Chicken Soup truly shine, focus on fresh ingredients. Use fresh herbs like thyme and parsley. They add great taste and aroma. Sauté the onions until they are soft and sweet. This step builds a strong flavor base. Another tip is to add your lemon juice last. This keeps the soup bright and fresh. Don’t skip the salt and pepper. They enhance all the flavors in the soup. If you want a deeper taste, try adding a splash of white wine. It adds a nice zing! If you have leftovers, store them in an airtight container. The soup will stay fresh in the fridge for about three days. To keep the pasta from getting mushy, add it only to what you will eat. If you plan to freeze the soup, leave out the pasta. You can freeze the soup for up to three months. When ready to eat, thaw it in the fridge overnight. Then reheat on the stove until warm. If needed, add a little water or broth to thin it out. This soup pairs well with crusty bread. A slice of warm, toasted baguette can soak up the broth perfectly. You can also serve it with a simple green salad. A light lemon vinaigrette adds a fresh touch. For a heartier meal, consider a side of roasted vegetables. They add color and more nutrients to your dinner. If you want a drink, a glass of white wine complements the soup nicely. Enjoy your meal! Pro Tips Use Fresh Herbs: Adding fresh thyme and parsley just before serving enhances the soup's flavor and aroma, giving it a vibrant, fresh taste. Perfectly Cooked Pasta: To avoid overcooking, add the pasta to the soup only during the last 10-12 minutes of cooking, ensuring it remains al dente. Customize Your Veggies: Feel free to swap in your favorite vegetables, like green beans or peas, to make the soup your own and utilize what's in season. Make It Ahead: This soup stores well in the fridge for a few days. Reheat gently, adding a splash of broth if needed to loosen it up. {{image_2}} You can easily swap some ingredients in this soup. If you are gluten-free, use gluten-free pasta. Quinoa or rice works too. For a low-sodium option, choose low-sodium broth. This keeps the soup tasty without the extra salt. If you want more fiber, add beans or lentils. They work well with the chicken and veggies. To make this soup vegetarian, skip the chicken and broth. Use vegetable broth instead. Add extra veggies like mushrooms or bell peppers for more flavor. You can also use tofu for protein. If you want a vegan version, replace the chicken with chickpeas. They add great texture and taste. Top with fresh herbs for a tasty finish. For a spicy kick, add red pepper flakes or diced jalapeños. You can also use spicy Italian sausage instead of chicken. This gives the soup a nice heat. Experiment with different spices like cayenne or smoked paprika. These add depth and warmth. Just remember to balance the heat with lemon juice for brightness. Enjoy the heat while still keeping the comfort! After you make Italian Penicillin Chicken Soup, let it cool. Pour it into a container. Seal the container tightly. Store it in the fridge for up to three days. When you want a bowl, heat it on the stove or in the microwave. Stir it well to mix the flavors. If it seems thick, add a splash of water or broth. To freeze the soup, use a freezer-safe container. Leave some space at the top. The soup will expand when frozen. It can last up to three months in the freezer. When you are ready to eat it, move the soup to the fridge overnight. Reheat it on the stove or in the microwave. Make sure it is hot all the way through before serving. I recommend using glass or BPA-free plastic containers. Glass containers do not stain and keep the soup fresh. Choose containers with tight-fitting lids to avoid spills. If you use plastic, make sure it is safe for the freezer. Label your containers with the date. This way, you will know how long the soup has been stored. Italian Penicillin Chicken Soup is a warm and hearty dish. It features tender chicken, fresh veggies, and rich broth. The name comes from its comforting nature. Many people turn to this soup when they feel under the weather. Its simple ingredients create a nourishing meal for the soul. You can also add pasta for a filling touch. This soup is a blend of flavors that warms you inside and out. You can boost the nutrition of this soup easily. Here are some ideas: - Add leafy greens: Mix in kale or Swiss chard for extra vitamins. - Include beans: Chickpeas or white beans add protein and fiber. - Use whole grains: Choose brown rice or quinoa instead of pasta. - Add more veggies: Bell peppers, peas, or broccoli can up the health factor. Try to have a mix of colors for a variety of nutrients. These changes keep the soup delicious and healthy. Yes, you can use other types of chicken. Here are some options: - Bone-in chicken: This adds more flavor. Just remove the bones after cooking. - Chicken breasts: They are leaner but can dry out if overcooked. - Rotisserie chicken: This is a fast way to add cooked chicken. Just shred it and mix it in at the end. Feel free to choose what you like best. The soup will still taste great! In this blog post, we explored the essential ingredients and shared step-by-step cooking instructions for Italian Penicillin Chicken Soup. We covered easy ingredient swaps, the difference between fresh and dried herbs, and all the tips for storage and serving. You can adjust the recipe for dietary needs or add a spicy kick. I hope these insights inspire you in your kitchen. Remember, cooking is fun, and with these guidelines, you can make a tasty soup that warms the soul. Enjoy your cooking journey!

Italian Penicillin Chicken Soup Comforting and Hearty

When you’re feeling under the weather or just need comfort, Italian Penicillin Chicken Soup is your go-to dish. This hearty

- 3 cups cooked chicken, shredded (can use rotisserie chicken) - 2 cups cauliflower florets (fresh or frozen) - 1 cup heavy cream - 1 cup shredded mozzarella cheese - 1/2 cup grated Parmesan cheese - 3 cloves garlic, minced - 1 teaspoon Italian seasoning - Salt and pepper to taste - 1/4 cup chopped fresh parsley (for garnish) These ingredients create a tasty and filling dish. You can easily find them at your local store. Using rotisserie chicken saves time and adds great flavor. This Keto Chicken Alfredo Casserole is packed with protein and healthy fats. Each serving has about: - Calories: 400 - Protein: 30g - Fat: 30g - Carbohydrates: 6g - Fiber: 2g This meal fits well in a low-carb diet. It's a great option for lunch or dinner. You can swap some ingredients if needed. Here are a few ideas: - Use turkey instead of chicken for a lighter dish. - Swap heavy cream with coconut cream for a dairy-free option. - Try different cheeses, like cheddar or gouda, for new flavors. - Add spinach or broccoli for more veggies. These alternatives still keep the dish flavorful and keto-friendly. Feel free to get creative with what you have on hand! {{ingredient_image_1}} First, set your oven to 350°F (175°C). This ensures your casserole cooks evenly. If you use fresh cauliflower, steam the florets for 5-7 minutes. They should be slightly tender. If you have frozen cauliflower, microwave it as per the package. Make sure to drain any extra water after cooking. In a large mixing bowl, combine the following ingredients: - 3 cups cooked chicken, shredded - 2 cups cauliflower florets - 1 cup heavy cream - 1 cup shredded mozzarella cheese - 1/2 cup grated Parmesan cheese - 3 cloves garlic, minced - 1 teaspoon Italian seasoning - Salt and pepper to taste Mix these well until everything is evenly combined. This step is key to a tasty casserole. Next, transfer the mixture to a greased 9x13 inch baking dish. Spread it out evenly so it cooks well. Cover the dish with aluminum foil. Bake it in the oven for 25 minutes. After that, remove the foil and bake for another 10-15 minutes. The top should be bubbly and golden. Once it’s done, let it cool for a few minutes. Finally, garnish with chopped fresh parsley for a pop of color. To cook chicken perfectly, use rotisserie chicken for ease. It saves time and adds flavor. If you prefer raw chicken, bake or boil it until it reaches 165°F. Shred the chicken into bite-sized pieces for the best texture in your casserole. Keep it moist by not overcooking. A juicy chicken makes your casserole stand out. Seasonings can transform your dish. I love using Italian seasoning for a warm, herby taste. Add salt and pepper to enhance the flavors. Fresh garlic is a must; it brings depth to the sauce. You can also mix in some red pepper flakes if you like heat. Toss the seasonings with the chicken and cheese for a tasty blend. For a creamier casserole, use high-fat heavy cream. It creates a rich sauce that coats each bite. Mixing in mozzarella and Parmesan adds gooey texture. If you want it even creamier, try adding cream cheese or sour cream. Make sure all ingredients are well-blended before baking. This ensures every spoonful is rich and delicious. Pro Tips Use Rotisserie Chicken: For a quick and easy shortcut, use store-bought rotisserie chicken to save time on prep while still enjoying a delicious meal. Perfect Cauliflower: If using fresh cauliflower, ensure it’s steamed just until tender to maintain a good texture in the casserole. Cheese Variations: Feel free to mix different cheeses like cheddar or gouda for a unique flavor twist in your casserole. Let it Rest: Allow the casserole to cool for a few minutes before serving. This helps it set and makes it easier to serve. {{image_2}} You can add more low-carb veggies to the casserole. Some great choices include: - Broccoli florets - Spinach - Zucchini - Bell peppers These veggies boost nutrition and flavor. Simply chop and mix them in with the other ingredients. They add color and crunch, making your dish even more appealing. Cheese adds richness to your casserole. You can switch up the cheese types for new flavors. Here are some options: - Cheddar cheese for a sharper taste - Cream cheese for extra creaminess - Gouda cheese for a smoky flavor Feel free to mix different cheeses. This makes the dish unique and personal to your taste. If you like heat, spice it up! Add crushed red pepper flakes or diced jalapeños. This gives your casserole a kick. You can also use spicy Italian sausage instead of chicken for added flavor. Adjust the spice level to fit your preference. Enjoy the bold taste that comes from this twist! To store your Keto Chicken Alfredo Casserole, let it cool first. Then, place it in an airtight container. You can keep it in the fridge for up to four days. If you want to enjoy it longer, consider freezing it. When you're ready to eat the leftovers, preheat your oven to 350°F (175°C). Place the casserole in an oven-safe dish. Cover it with foil to prevent drying out. Heat for about 20 minutes or until it's warm all the way through. You can also reheat individual portions in the microwave for about two to three minutes. To freeze the casserole, first let it cool completely. Cut it into serving sizes and wrap each portion tightly in plastic wrap. Then, place them in a freezer-safe bag or container. It can last for up to three months in the freezer. When you're ready to eat it, thaw it overnight in the fridge before reheating. This way, you can enjoy a tasty meal anytime! Yes, you can prepare this casserole ahead of time. Just follow the recipe until you mix all the ingredients. Then, cover the dish and place it in the fridge. You can bake it the next day. This keeps the flavors fresh and makes dinner easy. If you need a substitute for heavy cream, try using coconut cream or full-fat Greek yogurt. Both options are creamy and add nice flavor. You can also use a mix of milk and butter if you want a lighter choice. Yes, this casserole works great for meal prep. You can store individual portions in airtight containers. It stays good in the fridge for up to four days. Just reheat it in the microwave or oven when you're ready to eat. This blog post covered tasty ingredients, clear steps, useful tips, and fun variations. I shared how to cook chicken well and add flavor to your dish. You can store leftovers and reheat them easily. Don't forget these ideas for meal prep or swaps for heavy cream. By trying new ingredients and techniques, you can make a dish that's just right for you. Enjoy your delicious casserole and keep experimenting in the kitchen!

Keto Chicken Alfredo Casserole Comforting Easy Meal

Are you craving a warm, cheesy dish that fits your keto diet? Look no further! My Keto Chicken Alfredo Casserole

To make a great green chile stew, you need fresh and tasty ingredients. Here’s what you will need: - 1 lb chicken thighs, diced - 4 cups chicken broth - 2 cups tomatillos, husked and chopped - 1 cup green chiles (fresh or canned), chopped - 1 medium onion, diced - 3 garlic cloves, minced - 2 medium potatoes, peeled and diced - 1 tsp cumin - 1 tsp oregano - 1 tbsp olive oil - Salt and pepper to taste - Fresh cilantro for garnish These ingredients create a rich and flavorful stew. The chicken thighs add protein and a nice texture. Tomatillos give a tart flavor that balances the heat from the green chiles. While chicken is my go-to, you can try other meats too. Pork or beef works well if you prefer a different taste. Just remember, each meat brings its own flavor. You might need to adjust cooking times to make sure the meat is tender and juicy. If you can’t find some ingredients, don't worry! Here are some easy swaps: - Chicken broth: Use vegetable broth for a lighter taste or water if you have none. - Tomatillos: You can use canned tomatoes if tomatillos are hard to find. - Chicken thighs: Chicken breast works too, though it may be less juicy. - Fresh chiles: Canned green chiles are a good option if fresh ones aren’t available. These substitutes will keep your stew tasty and satisfying. Just remember to taste as you cook! {{ingredient_image_1}} Start by gathering all your ingredients. This makes cooking easy and fun. You will need: - 1 lb chicken thighs, diced - 4 cups chicken broth - 2 cups tomatillos, husked and chopped - 1 cup green chiles, chopped - 1 medium onion, diced - 3 garlic cloves, minced - 2 medium potatoes, peeled and diced - 1 tsp cumin - 1 tsp oregano - 1 tbsp olive oil - Salt and pepper to taste - Fresh cilantro for garnish First, peel and chop your tomatillos. Then, dice your potatoes and onion. Next, mince the garlic. Dice the chicken thighs into bite-sized pieces. This prep makes your cooking smooth and quick. Now, heat 1 tablespoon of olive oil in a large pot over medium heat. Add the diced onion and sauté for about 5 minutes. You want the onion to be soft and clear. Then, stir in the minced garlic. Cook for 1 more minute until it smells great. Next, add the chicken thighs to the pot. Season with salt, pepper, cumin, and oregano. Cook until the chicken turns brown on all sides. This should take about 5 to 7 minutes. After that, pour in the chicken broth. Add the chopped tomatillos, green chiles, and diced potatoes. Stir everything together. Bring the pot to a boil, then reduce the heat to low. Let it simmer for 30 to 35 minutes. The potatoes should be tender, and the flavors will blend well. Once the stew is done, taste it. You may want to add a pinch of salt or pepper. This is your chance to adjust the flavor. Serve the stew hot in bowls. Garnish each bowl with fresh cilantro. This adds a nice touch and fresh flavor. Enjoy your hearty green chile stew with crusty bread or rice. To adjust the heat, think about the type of green chiles you use. Fresh green chiles can be much hotter than canned ones. If you like spice, use more chiles or a hot variety. You can also add a pinch of cayenne pepper for an extra kick. For a milder stew, use fewer chiles or try sweet bell peppers instead. Always taste as you go. This way, you can find the right balance for your taste buds. Texture is key in making a great stew. Make sure to dice the potatoes into even pieces. This helps them cook at the same rate. You can also use waxy potatoes for a firmer bite. When you sauté the onions and garlic, wait until they are soft and fragrant. This builds a strong base for your stew. Let the stew simmer gently. This helps the chicken become tender and the flavors blend well. Serve your green chile stew hot, topped with fresh cilantro. It pairs well with warm tortillas or crusty bread. You can also add a dollop of sour cream for creaminess. For a complete meal, consider serving it with rice or a simple salad. If you want a drink, try a cold cerveza or a glass of agua fresca. Each bite will feel like a warm hug on a chilly day! Pro Tips Use Fresh Ingredients: Fresh tomatillos and green chiles will provide a vibrant flavor that enhances the stew. If possible, choose locally sourced produce for the best taste. Adjust the Heat: If you prefer a milder stew, opt for canned green chiles which are usually less spicy. Conversely, add more fresh chiles for an extra kick. Make it Ahead: This stew tastes even better the next day as the flavors continue to develop. Prepare it in advance for a more robust taste. Garnish Generously: Fresh cilantro adds a bright note to the stew. Consider adding lime wedges for an extra layer of flavor when serving. {{image_2}} You can easily make green chile stew vegetarian or vegan. Start by removing the chicken. Instead, use hearty vegetables. Good choices include mushrooms, zucchini, and bell peppers. Replace chicken broth with vegetable broth for flavor. You can still enjoy the spices and flavors. This stew will be rich and satisfying. If you want to switch up the protein, consider using turkey or pork. Both meats work well in this stew. For a plant-based option, try lentils or beans. They add protein and texture. Chickpeas are also a great choice. They soak up the flavors of the stew nicely. Green chile stew varies by region. In New Mexico, they often add potatoes and more spices. Some places use pork instead of chicken. In Texas, they may include beans. Each region brings its twist to this dish. You can customize it based on your taste and location. Try adding ingredients you love to make it your own. To store leftover green chile stew, first let it cool. Then, transfer it to an airtight container. Keep it in the fridge for up to three days. This helps maintain the stew's rich flavor. If you want to store it longer, freezing is a great option. Freezing green chile stew is easy. Place the cooled stew in freezer-safe bags. Remove as much air as you can before sealing. Label each bag with the date. You can freeze it for up to three months. When ready to eat, just thaw it in the fridge overnight. Reheating green chile stew is simple. Pour the stew into a pot over medium heat. Stir it often to warm it evenly. You can also use the microwave. Heat it in a microwave-safe bowl for two to three minutes, stirring halfway through. Make sure it's hot all the way through before serving. Enjoy the warm, hearty goodness! Green chiles are young peppers that are harvested before they fully ripen. They are commonly found in Southwestern cooking. Their flavor is bright and can be mild to hot. I love using both fresh and canned green chiles in my recipes. They add a nice kick to dishes like stews, salsas, and casseroles. Yes, you can use canned tomatillos instead of fresh ones. Canned tomatillos save time and still pack a punch of flavor. They also have a nice tangy taste that works well in green chile stew. Just make sure to drain and rinse them before adding to your dish. This helps reduce extra liquid in your stew. You can easily make this stew ahead of time. Just cook the stew as directed and let it cool. Once cool, store it in an airtight container in the fridge. It will stay fresh for up to three days. You can also freeze it for up to three months. When you're ready to eat, just reheat it on the stove or in the microwave. This makes meal prep super easy! Green Chile Stew blends fresh ingredients and flavorful meats into a comforting dish. I shared the steps, tips, and variations to fit your taste. Whether you're cooking for yourself or friends, you can adapt this stew easily. Remember to store leftovers well and reheat them for future meals. With a bit of practice, you'll master making this dish. Enjoy your cooking journey and share this tasty stew with loved ones!

Green Chile Stew Hearty and Flavorful Comfort Dish

If you’re craving a dish that brings warmth and comfort, look no further than green chile stew. This hearty meal

- Ground turkey - Brown rice - Fresh baby spinach - Onion - Garlic - Bell pepper - Low-sodium soy sauce - Sesame oil - Grated ginger - Salt and pepper - Green onion (for garnish) - Sesame seeds (optional) The ingredients in this Low Calorie Turkey Rice Bowl are simple but packed with flavor. You start with ground turkey, which is lean and full of protein. Brown rice serves as a hearty base. It is a smart choice because it has more fiber than white rice. Adding fresh baby spinach boosts the nutrition. Spinach is low in calories and high in vitamins. The onion and garlic give a nice aroma and taste. Bell peppers add a sweet crunch and color to the dish. For flavor, low-sodium soy sauce provides a savory touch without too much salt. Sesame oil adds depth and a hint of nuttiness. Grated ginger gives a warm spice that brightens the entire bowl. Finally, salt and pepper enhance all these wonderful flavors. You can garnish with green onion for a fresh bite and sesame seeds for a bit of crunch. This combination of ingredients creates a balanced meal that is both tasty and healthy. {{ingredient_image_1}} To cook the brown rice, follow the package instructions. Usually, you will need about 30-35 minutes. Here’s how to get it just right: - Use a 1:2 ratio of rice to water. - Bring the water to a boil, then add the rice. - Cover the pot and lower the heat to simmer. - Check it after 30 minutes. If it is tender and absorbs all the water, it's ready. Perfect rice should be fluffy, not sticky. For best results, let it sit covered for a few minutes after cooking. Start by heating 1 tablespoon of sesame oil in a large skillet over medium heat. Once the oil is hot, add: - 1 small chopped onion Sauté the onion for about 3-4 minutes until it turns translucent. Next, add: - 2 cloves of minced garlic - 1 teaspoon of grated ginger Stir these for an additional 1-2 minutes. You want to release their wonderful aromas without burning them. Now, raise the heat to medium-high. Add: - 1 pound of ground turkey Cook it until browned, about 6-8 minutes. Make sure to break it apart with a spatula as it cooks. When the turkey is no longer pink, add: - 1 diced bell pepper Stir and cook for another 2-3 minutes until the pepper softens. Finally, add: - 2 cups of fresh baby spinach This will wilt quickly. Drizzle in: - 2 tablespoons of low-sodium soy sauce Mix everything well and season with salt and pepper to your taste. Once the brown rice is ready, fluff it with a fork. Divide the rice into serving bowls. Top each bowl with the turkey and vegetable mixture. For a nice finish, garnish with: - Sliced green onions - Sesame seeds (if you like) This adds a lovely crunch and flavor! Enjoy your meal, packed with healthy ingredients and delicious taste. To boost flavor in your turkey rice bowl, try adding herbs and spices. Fresh herbs like cilantro or basil can brighten the dish. Dried herbs, such as oregano or thyme, work well too. They add depth without extra calories. You can also explore alternative sauces. Instead of low-sodium soy sauce, try teriyaki or a splash of lime juice. These options enhance the taste and add a unique twist. A drizzle of sriracha brings heat, while a touch of honey can add sweetness. Batch cooking is an easy way to enjoy this dish all week. Make double the amount of turkey and rice. Store the extra in separate containers. This way, you can mix and match for quick meals. For storage, let your turkey rice bowl cool before sealing. Use airtight containers to keep it fresh. This helps prevent sogginess. When ready to eat, simply reheat in the microwave or on the stove. Each ingredient in your turkey rice bowl brings health benefits. Ground turkey is lean protein, helping build muscle. Brown rice offers fiber, which supports digestion. Spinach is rich in vitamins A and C, boosting your immune system. To lower calorie content further, use less sesame oil. You can also reduce soy sauce for less sodium. Swap brown rice for cauliflower rice for a low-carb option. This keeps the meal light while still being filling. Pro Tips Use Fresh Ingredients: Fresh baby spinach and vibrant bell peppers not only enhance the flavor but also add essential nutrients to your meal. Customize the Protein: Feel free to substitute the ground turkey with ground chicken, beef, or even a plant-based protein for a different flavor profile. Perfect Rice Cooking: Rinse the brown rice under cold water before cooking to remove excess starch, which helps achieve a fluffier texture. Enhance with Spices: Experiment with adding spices like chili flakes or a dash of five-spice powder for an extra kick of flavor in your rice bowl. {{image_2}} You can swap ground turkey for plant-based protein. Options like lentils or chickpeas work well. These proteins give your dish a hearty feel without meat. They also add fiber, making your meal filling and healthy. Plus, using plant-based protein can lower calorie content. If you want a low-carb option, replace the rice with cauliflower rice. Cauliflower rice is light and easy to make. Simply pulse cauliflower florets in a food processor until they resemble rice. Sauté it in the same skillet for a quick, tasty base. This swap cuts carbs and calories while keeping flavor. Explore different vegetables and seasonings for diverse flavors. Try adding mushrooms, zucchini, or carrots for more texture. Fresh herbs like basil or cilantro can brighten the dish. You can also change up the sauce; teriyaki or hoisin will add a sweet twist. Each variation brings a new taste to your turkey rice bowl. To store your turkey rice bowl, use airtight containers. Glass or plastic containers work well. Make sure the dish cools down before sealing. Let it sit at room temperature for about 30 minutes. This helps avoid steam build-up, which can make your meal soggy. Reheat your turkey rice bowl on the stove for best results. Heat a skillet over medium heat. Add a splash of water or broth to keep it moist. Stir occasionally until it’s hot. You can also use a microwave. Place in a microwave-safe bowl and cover it loosely. Heat for 1-2 minutes, stirring halfway through. In the fridge, your turkey rice bowl lasts up to four days. For longer storage, freeze it. In the freezer, it can last up to three months. When ready to eat, thaw in the fridge overnight before reheating. Yes, you can use white rice. However, the nutrition changes a bit. White rice has fewer fibers than brown rice. If you use white rice, cook it for about 15-20 minutes instead of 30-35 minutes. This change can make the dish lighter, but you miss out on some health benefits. This recipe is not gluten-free due to the soy sauce. You can swap it for gluten-free soy sauce or coconut aminos. These options taste great and keep the dish gluten-free. Always check the labels when you buy these products to be sure. Yes, you can freeze this dish. To freeze, let it cool completely. Then, put it in a freezer-safe container. It will last about three months in the freezer. When ready to eat, thaw it overnight in the fridge. Reheat it in a skillet or microwave until hot. You can serve many things with this turkey rice bowl. Try a fresh salad with mixed greens and a light vinaigrette. Steamed broccoli or roasted carrots also work well. You can even add some fruit, like sliced apples, for a sweet crunch. This blog post showed how to make a tasty turkey rice bowl. We covered the main ingredients and their health benefits. I shared step-by-step ways to cook rice, sauté veggies, and combine all the parts. You learned tips for flavor, storage, and meal prep. In the end, you have a flexible recipe. You can change it to fit your needs. Enjoy making this dish and sharing it with others! Your kitchen adventures await!

Low Calorie Turkey Rice Bowl Healthy Flavor Boost

Are you looking for a delicious, low-calorie meal that’s easy to make? My Low Calorie Turkey Rice Bowl is packed

- 1 cup orzo pasta - 2 tablespoons olive oil - 1 small onion, finely chopped - 3 cloves garlic, minced - 1 bell pepper (red or yellow), diced - 1 zucchini, diced - 1 cup cherry tomatoes, halved - 4 cups vegetable broth - 1 cup heavy cream (or coconut milk for a lighter version) - 1 teaspoon dried basil - 1 teaspoon dried oregano - Salt and pepper to taste - Fresh basil leaves for garnish - Grated Parmesan cheese (optional) If you don’t have orzo, use another small pasta like ditalini or couscous. For the heavy cream, coconut milk gives a nice twist and is lighter. You can swap the vegetables too! Spinach, peas, or broccoli can work well. If you want a different herb flavor, try thyme or parsley. You need a large pot for this recipe. A wooden spoon helps stir everything well. A sharp knife will make chopping easy and quick. A cutting board is also a must for safe food prep. Lastly, grab a measuring cup and spoons to get your ingredients just right. {{ingredient_image_1}} 1. First, grab a large pot and heat the olive oil over medium heat. 2. Next, add the chopped onion. Sauté it for about 3-5 minutes. The onion should look clear. 3. Now, toss in the minced garlic. Sauté it for one more minute. You want that nice aroma. 4. Then, add the diced bell pepper, zucchini, and cherry tomatoes. Cook these for 4-5 minutes. Stir often until the veggies soften. 5. After that, mix in the orzo pasta, vegetable broth, dried basil, and oregano. Bring everything to a boil. 6. Once it's boiling, reduce the heat to low and cover the pot. Let it simmer for 10-12 minutes. Stir occasionally until the orzo is soft and most of the liquid is gone. 7. Next, stir in the heavy cream or coconut milk. Mix well until the dish looks creamy. Cook on low heat for another 2-3 minutes. 8. Finally, season with salt and pepper to taste. Serve hot with fresh basil and Parmesan cheese if you like. - When sautéing the onion, make sure it doesn’t brown. You want it soft and clear. - If garlic starts to brown, it can taste bitter. Keep an eye on it! - Stir the veggies often to cook them evenly. You want soft, but not mushy. - The broth should fully cover the orzo. This helps it cook well. - If your orzo is too dry, add a splash of water or broth while cooking. - For a creamier dish, add a bit more cream or coconut milk at the end. - If the orzo is too firm, it needs more cooking time. Add broth and simmer longer. - If the dish is too thick, add more cream or broth to loosen it. - For too much salt, add a little more cream or coconut milk to balance the flavor. - If you forget to add seasonings, sprinkle them in at the end and stir well. - If your dish is too bland, add a pinch of salt or fresh herbs for a flavor boost. To boost the creaminess, use full-fat cream. Heavy cream gives a rich taste. You can also use coconut milk for a lighter option. For extra flavor, add cream cheese. Just mix it in after cooking. It melts well and makes the dish even creamier. For more flavor, add fresh herbs. Chopped parsley or thyme brightens the dish. You can also sprinkle in lemon zest for a fresh kick. If you like spice, add red pepper flakes. They add warmth without being too hot. A splash of white wine can also enhance the taste. Just let it cook off before adding broth. To save time, chop your veggies ahead of cooking. You can store them in the fridge. Use pre-cut vegetables from the store if you're in a hurry. Another tip is to cook orzo in the broth, not water. This adds flavor and cuts out an extra pot. You’ll have a tasty meal in just 30 minutes! Pro Tips Use a Good Quality Broth: For a deeper flavor, choose a high-quality vegetable broth. Homemade broth can elevate the taste significantly. Vegetable Variations: Feel free to mix and match vegetables based on what you have on hand. Spinach, peas, or mushrooms can also be delicious additions. Make It Creamier: If you prefer a creamier dish, you can add more heavy cream or a dollop of cream cheese at the end for extra richness. Storage Tips: Leftovers can be stored in an airtight container in the fridge for up to 3 days. Reheat gently on the stove with a splash of broth to loosen the pasta. {{image_2}} You can easily add proteins to your creamy orzo dish. Chicken and shrimp work great. For chicken, use cooked, diced chicken. Stir it in during the last minute of cooking. This adds flavor and makes the meal heartier. For shrimp, add peeled shrimp during the last five minutes of cooking. They cook quickly and add a nice touch. For a vegetarian option, simply skip the meat. You can add more veggies like mushrooms or spinach. If you want a vegan dish, use coconut milk instead of heavy cream. This keeps it creamy while fitting a vegan diet. You can also add nutritional yeast for a cheesy flavor without dairy. Change up your vegetables based on what's in season. In spring, add asparagus or peas for a fresh taste. In fall, try butternut squash or kale. This not only adds color but also boosts nutrition. Mixing seasonal veggies gives you new flavors and makes the dish exciting every time you make it. After you enjoy your creamy one-pot orzo dinner, let it cool. Transfer it to an airtight container. This will keep the dish fresh. Store the container in the fridge. Leftovers will stay good for about 3 to 4 days. If you want to keep it longer, consider freezing it. When you’re ready to eat your leftovers, put them in a pot. Add a splash of broth or water to help with moisture. Heat over low to medium heat. Stir often until the orzo is hot. You can also use the microwave. Just heat it in short bursts, stirring in between. This keeps it from getting too dry. You can freeze this dish for later. First, let it cool completely. Then, scoop portions into freezer-safe bags or containers. Make sure to remove as much air as possible. Label the bags with the date. You can freeze it for up to 2 months. When you want to eat it, thaw overnight in the fridge before reheating. It takes about 10 to 12 minutes to cook orzo pasta. You want it tender but not mushy. Stir it occasionally. This helps it cook evenly and prevents sticking. Once the orzo absorbs most of the liquid, it's ready. Yes, you can use other pasta shapes! Short pasta like ditalini or small shells works well. Just remember to adjust the cooking time. Check the package for the right time to cook. You can use coconut milk for a lighter version. It gives a nice flavor and creaminess. Another option is plain yogurt. This adds creaminess but lowers the fat. You could also try cashew cream for a nutty taste. In this blog post, we explored the ingredients, detailed steps, and helpful tips for making a delicious dish. You learned about ingredient lists, substitutions, and which kitchen tools to use. We also covered troubleshooting, variations, and how to store leftovers. Cooking can be fun and easy with the right knowledge. Now, you can confidently whip up your dish, making it your own. Enjoy your cooking journey, and remember that practice makes perfect!

Creamy One-Pot Orzo Dinner Easy and Delicious Meal

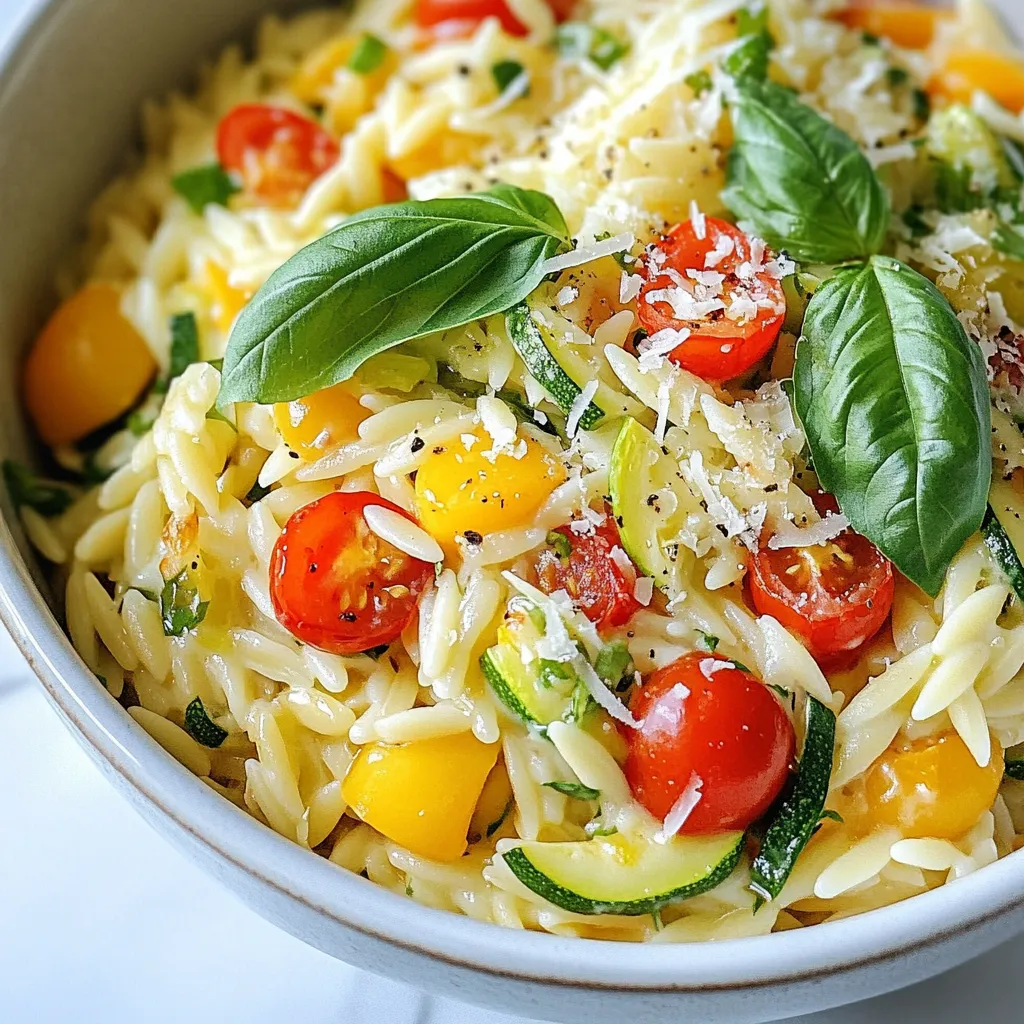
Are you ready for a quick, tasty meal that’s simple to make? My Creamy One-Pot Orzo Dinner is an easy

- 1 lb ground beef or turkey - 1 medium onion, diced - 3 cloves garlic, minced - 1 bell pepper (red or green), diced - 1 can (14 oz) diced tomatoes - 1 can (14 oz) tomato sauce (no added sugar) The main ingredients in Whole30 Paleo Chili create a rich, hearty base. Ground beef or turkey gives protein and flavor. The onion, garlic, and bell pepper add depth. Diced tomatoes and tomato sauce bring moisture and a tangy zest. - 1 can (15 oz) kidney beans or black beans, rinsed and drained (optional for strict Whole30) - 2 tablespoons chili powder - 2 teaspoons ground cumin - 1 teaspoon smoked paprika - 1 teaspoon oregano - ½ teaspoon salt (to taste) - ½ teaspoon black pepper (to taste) - 1 tablespoon olive oil - 1 cup vegetable broth (preferably homemade or low sodium) Optional beans can add texture and heartiness. Spices like chili powder and cumin enhance the flavor. Adjusting salt and pepper lets you cater to your taste. - Chopped green onions - Avocado slices - Fresh cilantro Toppings complete the chili. Chopped green onions add a fresh crunch. Avocado slices give creaminess. Fresh cilantro brings a burst of flavor. These add-ons make the dish even more enjoyable. {{ingredient_image_1}} To start, heat 1 tablespoon of olive oil in a large pot over medium heat. Once the oil is hot, add the diced onion and bell pepper. Sauté them for about 5 minutes. You want the veggies to be soft and translucent. Next, stir in 3 cloves of minced garlic. Cook this mixture for another 1-2 minutes until the garlic has a nice smell. Now it's time to cook the meat. Add 1 pound of ground beef or turkey to the pot. Break it apart with a spatula as it cooks. Brown the meat for about 6-8 minutes. Make sure it is fully cooked before moving on. Once the meat is browned, mix in the spices. Add 2 tablespoons of chili powder, 2 teaspoons of ground cumin, 1 teaspoon of smoked paprika, 1 teaspoon of oregano, ½ teaspoon of salt, and ½ teaspoon of black pepper. Stir everything well to coat the meat evenly with the spices. Next, pour in 1 can of diced tomatoes, 1 can of tomato sauce, and 1 cup of vegetable broth. Stir this mixture and bring it to a simmer. If you want to add beans, now is the time. You can use 1 can of kidney beans or black beans, rinsed and drained. If you stick to strict Whole30, just leave out the beans. Lower the heat and let the chili simmer uncovered for 30-40 minutes. Stir it occasionally, so it cooks evenly. Keep an eye on the chili as it thickens. You want it to reach your desired consistency. After simmering, taste the chili and adjust the seasonings if needed. When it's ready, serve hot. You can top it with chopped green onions, avocado slices, or fresh cilantro for extra flavor. Enjoy your hearty, flavorful Whole30 Paleo Chili! To make your Whole30 Paleo Chili shine, use fresh, quality spices. I recommend using: - 2 tablespoons chili powder - 2 teaspoons ground cumin - 1 teaspoon smoked paprika - 1 teaspoon oregano - ½ teaspoon salt - ½ teaspoon black pepper Feel free to adjust these spices. If you like more heat, add extra chili powder or some diced jalapeños. If you want it milder, cut back on the spices. Fresh herbs also boost the flavor. Always taste as you go. Quality ingredients matter, too. Fresh vegetables and organic meat enhance taste. For best results, use homemade broth. To cook the chili evenly, use a large pot. A Dutch oven works great. Start with medium heat to sauté the veggies. This step brings out their sweetness. Stir often to avoid burning. When cooking the meat, break it apart well. This ensures all pieces cook through. Using a wooden spoon or spatula helps. It’s easy to control the heat. Let the chili simmer uncovered. This lets it thicken nicely. Stir occasionally to prevent sticking. For a cozy feel, serve your chili in rustic bowls or mason jars. This adds charm to your meal. Garnish with colorful toppings like: - Chopped green onions - Avocado slices - Fresh cilantro These toppings not only add flavor but also make the dish look inviting. Pair your chili with Whole30-friendly sides like a simple salad or roasted veggies. The freshness balances the chili's richness and makes for a perfect meal. Pro Tips Fresh Ingredients: Use fresh vegetables and high-quality ground meat to enhance the flavor of your chili. Spice It Up: Adjust the amount of chili powder and smoked paprika to control the heat level of your chili. Meal Prep Friendly: This chili can be made in advance and freezes well. Prepare a double batch for easy meals later. Flavor Development: Allow the chili to simmer longer for deeper flavors. The longer it cooks, the better it tastes! {{image_2}} You can make this chili without meat. Try using lentils or mushrooms instead. These options give a nice texture and flavor. You can also add more beans. Kidneys and black beans work well. Just remember, beans are not allowed on strict Whole30. Feel free to swap in more veggies like zucchini or carrots for extra nutrients. Want more heat? Add jalapeños or serrano peppers to the pot. You can also sprinkle in cayenne pepper for a fiery kick. If you prefer mild chili, use less chili powder. Start with a small amount and taste as you go. This way, you can make it just right for your taste. For other diets, you can still enjoy this chili. If you're gluten-free, check that your spices are certified gluten-free. If you're dairy-free, skip cheese toppings. Meal prepping this chili is easy. Make a big batch, store it in portions, and reheat when needed. It’s a great quick meal for busy days. To store your Whole30 Paleo chili, let it cool first. Then, place it in an airtight container. This keeps out air and moisture. You can store it in the fridge for up to four days. Make sure to label the container with the date. This helps you track freshness. For best flavor, eat it within two days. Reheat only what you plan to eat. This keeps the rest fresh longer. You can freeze the chili for later meals. Use freezer-safe containers or heavy-duty freezer bags. Leave some space at the top to allow for expansion. This prevents spills as it freezes. When ready to eat, thaw it in the fridge overnight. You can also use the microwave for quicker thawing. Heat it on medium until hot throughout, stirring often. In the fridge, Whole30 Paleo chili lasts about four days. If you freeze it, it can last up to three months. Always check for signs of spoilage before eating. If you see mold or smell something off, it’s best to throw it away. Remember, fresh food tastes best! No, you cannot use canned beans on Whole30. Whole30 guidelines say to avoid legumes, which includes beans. This means you should skip beans if you want to stay strict. If you still want a hearty chili, use more vegetables instead. Options like zucchini or carrots work great. You can use several proteins instead of ground beef or turkey. Try ground chicken or pork for a change. You can also use shredded chicken or turkey. For a plant-based option, consider using lentils or mushrooms. Both add great texture and flavor. The chili has a mild spice level but can be adjusted. If you like it hotter, add more chili powder or diced jalapeños. For a milder version, use less chili powder and skip spicy peppers. Always taste as you go to find your perfect balance. In this blog post, I covered how to make Whole30 Paleo Chili. I shared key ingredients, step-by-step instructions, and tips for great flavor. You learned about variations, storage tips, and frequently asked questions too. This chili is flexible and can fit many diets. Enjoying this recipe can help you stick to your goals while savoring delicious meals. Keep experimenting and make it your own. Good luck, and happy cooking!

Whole30 Paleo Chili Flavorful and Hearty Dish

Looking for a hearty meal that fits your Whole30 and Paleo plans? You’re in the right place! My Whole30 Paleo

Older posts
Newer posts
← Previous Page1 … Page113 Page114 Page115 Next →

dsad

© 2025 flavorsprint • Built with GeneratePress

Our Policies

  • Copyright Policy
  • Cookie Policy
  • GDPR Policy
  • Privacy Policy
  • Disclaimer
  • Terms Of Use

More Information

  • Home
  • About
  • Contact
  • Appetizers
  • Dessert
  • Dinner
  • Drinks
©2025, flavorsprint About Back To Top