Skip to content
DisclaimerTerms Of UseGDPR PolicyCookie Policy

flavorsprint

  • Home
  • Drinks
  • Appetizers
  • Dinner
  • Dessert
  • About
  • Contact
  • Privacy Policy
DisclaimerTerms Of UseGDPR PolicyCookie Policy

Lillian

- 2 cups cooked rice (white or brown) - 2 boneless, skinless chicken breasts - 1 cup corn kernels (fresh, frozen, or canned) - 1 red bell pepper, diced - 1/4 cup red onion, finely chopped - 1/2 cup cotija cheese, crumbled (or feta cheese) - 2 tablespoons mayonnaise - 1 tablespoon lime juice - 1 teaspoon chili powder - 1 teaspoon cumin - Salt and pepper to taste To make this Street Corn Chicken Rice Bowl, gather these fresh ingredients. Start with cooked rice as your base. You can use either white or brown rice, depending on your choice. Next, grab two boneless, skinless chicken breasts. These will be marinated to enhance the flavor. Corn adds a sweet crunch to the dish. You can use fresh corn, frozen corn, or canned corn. Choose what you have on hand. For toppings, dice one red bell pepper and finely chop 1/4 cup of red onion. These will add color and texture. Cotija cheese is traditional for this dish, but feta works well too. You will need about 1/2 cup, crumbled. This cheese brings a creamy element that pairs nicely with the other flavors. For the marinade, combine 2 tablespoons of mayonnaise and 1 tablespoon of lime juice. Add 1 teaspoon each of chili powder and cumin. Don’t forget to season with salt and pepper. This mix will give the chicken a zesty kick and keep it juicy. Having all these ingredients ready will make your cooking process smooth and fun. Enjoy the vibrant colors and flavors as you prepare this delicious meal! {{ingredient_image_1}} First, mix the marinade ingredients. Take a bowl and add: - 2 tablespoons mayonnaise - 1 tablespoon lime juice - 1 teaspoon chili powder - 1 teaspoon cumin - Salt and pepper to taste Stir well until it is smooth. Now, take your chicken breasts and coat them in the marinade. Make sure every part of the chicken is covered. Let it sit for at least 20 minutes. This helps the chicken soak up the flavors. While the chicken marinates, prepare the street corn topping. In a medium bowl, combine: - 1 cup corn kernels (fresh, frozen, or canned) - 1 diced red bell pepper - 1/4 cup finely chopped red onion - 1/4 cup cotija cheese Mix these ingredients well. This mixture will add a fresh crunch to your bowl. Next, heat a pan over medium heat. Sauté the corn mixture for about 3-4 minutes. Stir it often until it is heated through. If you want, you can add a bit of olive oil for extra flavor. Now it's time to cook the chicken. Heat a pan over medium heat. Place the marinated chicken in the pan. Cook for 6-7 minutes on each side. Look for a golden brown color. The chicken should be fully cooked. Once done, remove it from the heat. Allow it to rest for a few minutes. After resting, slice the chicken into strips. To build your rice bowl, start with a base of rice. Use 2 cups of cooked rice, either white or brown. Scoop a generous portion into a serving bowl. Next, layer the sliced chicken on top of the rice. Follow this with the sautéed corn mixture. Finish off your bowl by sprinkling the remaining cotija cheese and chopped cilantro over the top. Serve it with lime wedges on the side for that extra zesty kick. Enjoy your Street Corn Chicken Rice Bowl! To keep your chicken juicy, marinate it well. Use a mix of mayonnaise, lime juice, chili powder, cumin, salt, and pepper. Let the chicken sit for at least 20 minutes. This helps lock in moisture. Cook the chicken at medium heat. This allows it to cook evenly. Aim for an internal temperature of 165°F. Use a meat thermometer for accuracy. If you want to try different proteins, chicken isn’t your only option. Use shrimp or tofu for a tasty twist. Each option brings its own flavor. For a dairy-free option, try nutritional yeast or vegan cheese. These alternatives still give you a creamy texture. You can also skip cheese altogether if you prefer. Pair your rice bowl with a light salad. A fresh green salad with lime dressing adds a nice crunch. You could also serve tortilla chips for a fun side. For drinks, I suggest a cold limeade or a light beer. Both options complement the flavors well. You could even try a fruity soda for something different. Pro Tips Marinate for Flavor: Allow the chicken to marinate for at least 30 minutes to enhance the flavor. The longer it marinates, the more intense the taste will be. Use Fresh Ingredients: Whenever possible, opt for fresh corn and vegetables. Fresh ingredients will add vibrant flavors and textures to your dish. Rest the Chicken: After cooking, let the chicken rest for a few minutes before slicing. This helps retain the juices, making the chicken more tender and flavorful. Customize Your Bowl: Feel free to add your favorite toppings like avocado, jalapeños, or a drizzle of hot sauce for an extra kick! {{image_2}} To make this dish spicy, you can add jalapeños. Slice fresh jalapeños and mix them into your corn topping. This addition brings heat and flavor. You can also use spicy mayo. Just mix some sriracha with your mayonnaise. Drizzle it over the bowl for extra kick. This spicy twist elevates the entire meal. If you want a meat-free version, substitute chicken for tofu. Use firm tofu for the best texture. Press it to remove water, then marinate it like you would the chicken. Sauté it until golden. For cheese, try vegan options. Nutritional yeast or plant-based cheese can work well. These swaps keep all the flavors while catering to dietary needs. You can switch up the base grain for variety. Quinoa or cauliflower rice are great choices. Quinoa adds protein and has a nutty taste. Cauliflower rice is lighter and low in carbs. You can also try different types of rice. Jasmine or basmati rice can add unique flavors and aromas. These alternatives let you customize your bowl to match your taste. To store leftovers, place the rice bowl in an airtight container. This keeps the flavors fresh. You can also separate the chicken and corn to maintain texture. The shelf life in the fridge is about three to four days. Make sure the bowl cools down before sealing it. For freezing options, you can freeze the chicken and corn mixture separately. This helps keep each component tasty. Wrap them well in plastic wrap or use freezer bags. For best results, eat the frozen bowls within three months. When you are ready to eat, thaw overnight in the fridge. For reheating, heat them in a pan over low heat. Stir often to avoid burning. You can also microwave it; just add a splash of water to keep it moist. To add heat, you can try a few ideas: - Add jalapeños: Slice fresh jalapeños and mix them in. - Use spicy mayo: Mix mayonnaise with sriracha for a spicy kick. - Sprinkle red pepper flakes: Add these on top before serving. - Incorporate hot sauce: Drizzle your favorite hot sauce over the rice bowl. These simple changes can set your taste buds on fire! Experiment and find the heat level you enjoy most. Yes, you can prep this dish ahead of time! Here are some tips: - Marinate the chicken: You can marinate the chicken the night before. - Cook the rice: Make the rice a day in advance and store it in the fridge. - Store the corn topping: Mix the corn and veggies, then keep them covered. - Reheat before serving: Just warm everything up before you serve. This way, you save time and enjoy a quick meal! For sides, consider these delicious options: - Black beans: Seasoned black beans pair well with the flavors. - Guacamole: Creamy guacamole adds a nice touch. - Chips and salsa: Serve crunchy chips with fresh salsa on the side. - Mexican street corn salad: This complements the rice bowl perfectly. These sides will enhance your meal and make it even more enjoyable! You now know how to make a delicious Street Corn Chicken Rice Bowl. We explored the key ingredients, from juicy chicken to fresh corn. I shared steps for marinating chicken and preparing toppings. You gained insights on cooking tips, ingredient swaps, and storage options. This meal is both fun to make and enjoy. Whether you stick to the original or try variations, it’s sure to please. Happy cooking!

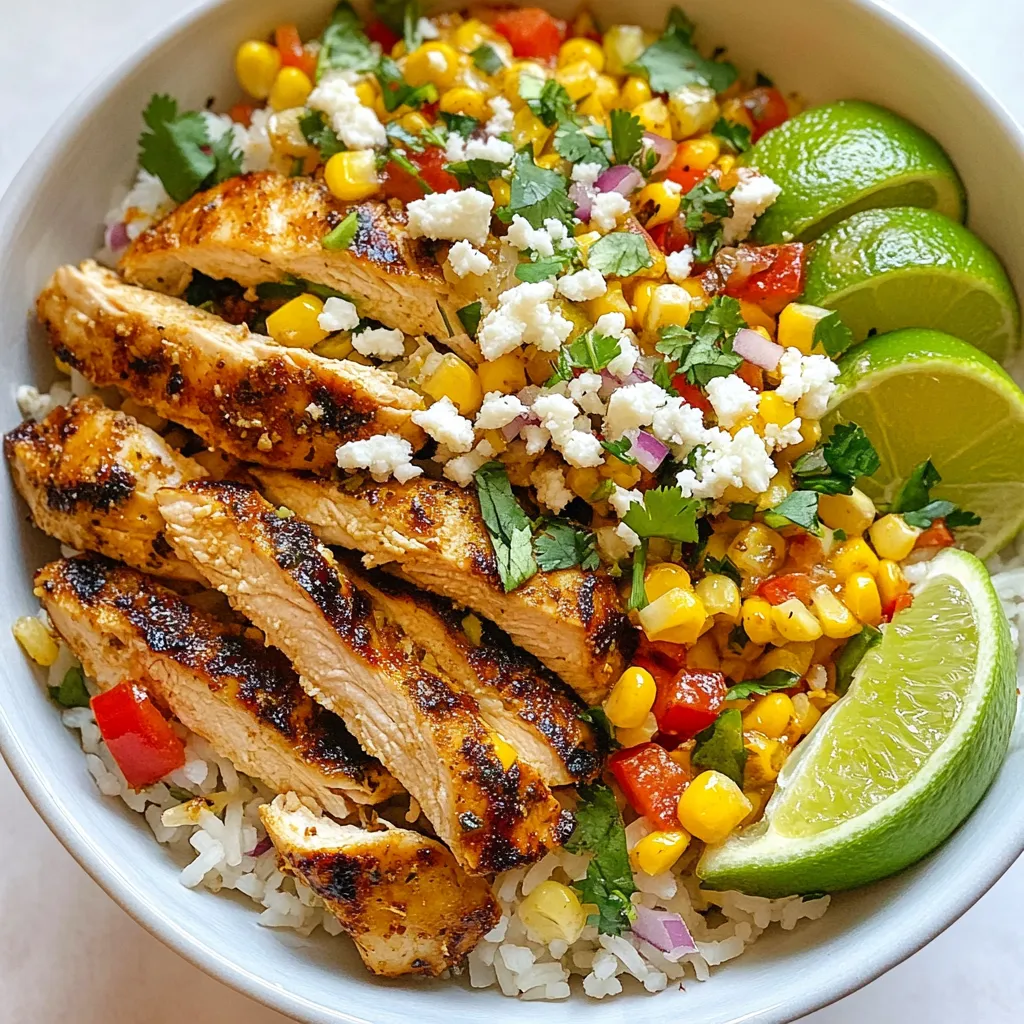
Street Corn Chicken Rice Bowl Flavorful and Easy Meal

Craving a tasty, easy meal? The Street Corn Chicken Rice Bowl packs a punch of flavor in every bite! With

To make a cozy cup of cinnamon citrus tea, you need a few key items. Here’s the list: - 4 cups water - 1 cinnamon stick (or 1 teaspoon ground cinnamon) - 1 orange, sliced - 1 lemon, sliced - 1 tablespoon fresh ginger, grated (or 1 teaspoon ground ginger) - 2 tablespoons honey (or to taste) - Fresh mint leaves for garnish These ingredients work together to create a warm, tasty drink. Each one brings its own special flavor. You can add your own twist to this tea. Here are some ideas: - A dash of nutmeg for warmth - A few cloves for a spiced kick - A splash of vanilla for sweetness - Other fruits like lime or grapefruit Feel free to mix and match! You can turn this tea into your own unique blend. Cinnamon citrus tea is not just tasty; it also has health benefits. - Cinnamon helps with digestion and may lower blood sugar. - Citrus fruits like orange and lemon are high in vitamin C. This boosts your immune system. - Ginger can help with nausea and may reduce inflammation. - Honey is a natural sweetener that can soothe a sore throat. This tea is a delightful way to enjoy health perks while sipping something warm and fragrant. {{ingredient_image_1}} To make Cinnamon Citrus Tea, start with 4 cups of water. Pour the water into a medium saucepan and bring it to a boil. This step gets the water hot enough to release flavors. Once the water boils, add 1 cinnamon stick or 1 teaspoon of ground cinnamon. Next, add 1 tablespoon of fresh ginger, grated, or 1 teaspoon of ground ginger. Let this mix simmer for about 5 minutes. This simmering time lets the spices share their warmth and aroma. After 5 minutes, it’s time for the citrus. Add 1 sliced orange and 1 sliced lemon to the pot. Allow it to simmer for an additional 5 to 7 minutes. This step helps the citrus flavors blend with the spices for a tasty tea. When the time is up, remove the pot from heat. To ensure you get the best flavor, keep an eye on the simmering time. If you simmer too long, the flavors can get too strong. For a milder taste, aim for the lower end of the time range. Also, use fresh ingredients when possible. Fresh ginger and citrus give a brighter flavor. If you have it, try to use organic fruits to avoid chemicals. When the tea is done brewing, it’s time to strain it. Use a fine mesh strainer to separate the tea from the spices and fruit. Discard the cinnamon stick, ginger, and citrus slices. Pour the tea into individual cups. Stir in 2 tablespoons of honey, or adjust to your taste. For a finishing touch, garnish each cup with fresh mint leaves. Serve it hot. Enjoy the warm, comforting blend of spices and citrus! To boost the taste of your tea, try these ideas: - Use fresh ingredients. Fresh oranges and lemons make a big difference. - Experiment with spices. Add a pinch of nutmeg or a few cloves. - Adjust the sweetness. Honey can be swapped for maple syrup or agave. - Garnish with fresh herbs. Mint leaves add a nice touch and aroma. Watch out for these common errors: - Boiling the water too long can burn the tea. Keep it at a gentle boil. - Adding citrus too early can make it bitter. Wait until the spices infuse well. - Skipping the straining step leaves bits in your cup. Always strain before serving. - Forgetting to taste can lead to an unbalanced drink. Adjust sweetness to your liking. Follow these tips for the best brew: - Start with good water. Filtered water gives a cleaner taste. - Let the spices simmer for at least five minutes. This ensures full flavor release. - Serve it hot for the best experience. Warm tea comforts and soothes. - Store any leftover tea in the fridge. It tastes great chilled, too! Pro Tips Use Fresh Ingredients: Fresh citrus and ginger will provide the best flavor and aroma in your tea. Adjust Sweetness: Feel free to modify the amount of honey based on your taste preference or try other sweeteners like agave or maple syrup. Experiment with Spices: Add other spices like cloves or cardamom for a unique twist on this classic tea. Chill for Iced Tea: Make a larger batch and chill it to enjoy as a refreshing iced tea during hot days. {{image_2}} You can switch up the citrus in your tea for fun. Try using grapefruit for a tangy twist. Lime adds a sharp zest, while tangerines give a sweet touch. Each fruit offers a different flavor, so don’t be shy. Experiment until you find your favorite mix! Cinnamon is great, but you can add other spices too. Try cardamom for a warm, sweet taste. Cloves can add a deep, rich flavor. Fresh herbs like basil or thyme can brighten the tea. Each spice or herb brings its own health benefits and tastes. Mix and match until you find your perfect blend. Iced tea is refreshing, especially in warm weather. Start with the original recipe. Once brewed, let the tea cool, then pour it over ice. Add fresh fruit slices for a pretty look and extra flavor. Mint leaves make it fresh and fun. Enjoy your iced version on a sunny day! If you have leftover cinnamon citrus tea, store it in the fridge. Use an airtight container to keep it fresh. Let the tea cool first before sealing it. This keeps the flavors intact for your next cup. To reheat, pour the tea into a small pot. Heat it on low to avoid burning. Stir occasionally to warm it evenly. You can also use a microwave. Heat for about 30 seconds, then check if it's warm enough. Cinnamon sticks last for about 3-5 years when stored in a cool, dark place. Ground cinnamon has a shorter shelf life of about 1-2 years. Fresh ginger should be used within a week for the best flavor. Sliced citrus fruits last about 1-2 days in the fridge. Honey, however, can last indefinitely if kept sealed. Cinnamon citrus tea has many health benefits. It can boost your immune system. The cinnamon can help lower blood sugar levels. Citrus fruits, like orange and lemon, provide vitamin C. This helps fight off colds. Ginger adds anti-inflammatory properties. It can soothe your stomach and ease nausea. Together, these ingredients support digestion and overall wellness. Enjoying this tea can be a simple way to stay healthy. Yes, you can substitute honey with other sweeteners. Maple syrup or agave nectar works well. You can also use stevia or monk fruit for a low-calorie option. Adjust the amount based on your taste. Each sweetener will change the flavor slightly. Try a small amount first, then add more if needed. This makes it easy to find your perfect sweetness. Yes, it is safe to drink cinnamon citrus tea daily. The ingredients are natural and healthy. However, moderation is key. Too much cinnamon can lead to health issues. Aim for one to two cups a day. This keeps the benefits without overdoing it. Always listen to your body. If you notice any discomfort, take a break. Enjoy this tea as part of a balanced diet. Cinnamon citrus tea is easy to make and full of flavor. We explored the key ingredients, brewing steps, and tips for a perfect cup. You learned how to personalize your tea and avoid common mistakes. Also, I shared ways to store and reheat leftovers. Remember, you can enjoy this tea daily for its health perks. Experiment with flavors and variations to make it your own. Enjoy your tea journey!

Cinnamon Citrus Tea Flavorful Blend for Wellness

Are you ready to boost your wellness with a delicious drink? Cinnamon citrus tea is a flavorful blend that offers

- 2 large chicken breasts, cubed - 2 cups fresh spinach, roughly chopped - 1 cup mushrooms, sliced (cremini or button) - 1 cup cream cheese, softened - 1/2 cup shredded mozzarella cheese - 1/2 teaspoon garlic powder - 1/2 teaspoon onion powder - 1/4 teaspoon black pepper - 1/4 teaspoon red pepper flakes (optional, for heat) - 2 tablespoons olive oil - Salt to taste Using fresh ingredients makes a big difference. Fresh spinach has a bright taste. It also adds nutrients. Fresh mushrooms give a nice texture. They soak up flavors well. The chicken should be fresh for the best taste. Fresh ingredients enhance the dish’s overall appeal. They can also make it healthier. This dish is simple, but fresh ingredients bring it to life. Chicken is a great source of protein. It helps build muscles and keeps you full. Spinach is rich in vitamins A and C. It also has iron, which is good for your blood. Mushrooms add fiber and are low in calories. Cream cheese adds creaminess but keep an eye on portions. Mozzarella cheese gives calcium, which is good for bones. The spices add flavor without extra calories. Overall, this dish is tasty and healthy. {{ingredient_image_1}} Start by cubing the chicken breasts into bite-sized pieces. This helps it cook evenly. Next, chop the fresh spinach roughly. You want it to mix well but keep some texture. Slice the mushrooms thinly. Cremini or button mushrooms both work great. Gather all your ingredients. It makes cooking easier. Heat two tablespoons of olive oil in a large skillet over medium heat. Add the cubed chicken to the hot oil. Season it with salt, garlic powder, onion powder, and black pepper. Cook the chicken for 6 to 8 minutes. It should not be pink inside. Then, add the sliced mushrooms to the skillet. Cook for another 4 to 5 minutes. The mushrooms should become tender and release their juices. Once the chicken and mushrooms are ready, stir in the chopped spinach. Cook until the spinach wilts, which takes about 2 minutes. Take the skillet off the heat. In a separate bowl, mix the softened cream cheese and shredded mozzarella cheese together. Make sure they are well combined. Gently fold the cheese mixture into the skillet with the chicken, mushrooms, and spinach. Ensure everything gets coated nicely. Transfer the mixed ingredients into a baking dish. Spread it out evenly. If you like, sprinkle extra mozzarella cheese on top for a cheesy finish. Preheat your oven to 375°F (190°C). Bake the dish for 20 to 25 minutes. It should become bubbly and lightly golden on top. Once done, remove it from the oven and let it cool for a few minutes before serving. Enjoy your low carb chicken spinach mushroom bake! To get that rich, creamy texture, use softened cream cheese. It blends better with the other ingredients. Mix it well with shredded mozzarella before adding it to the skillet. This helps avoid clumps and ensures every bite is smooth. If you want even more creaminess, try adding a splash of heavy cream. This little tip makes a big difference! Seasoning makes or breaks this dish. Start with the recommended amounts, but feel free to adjust. If you like it spicy, add more red pepper flakes. If you prefer it milder, skip them altogether. Taste as you go. This way, you can find the flavor that you love the most. Don’t forget to add salt slowly; you can always add more later. Cooking chicken just right is key. Cut the chicken into even cubes for even cooking. Cook it until no longer pink, but don’t overcook it. This keeps the chicken juicy and tender. The mushrooms will add moisture too. Let the chicken rest for a few minutes after baking. This helps keep it juicy when you serve it. Pro Tips Use Fresh Ingredients: Fresh spinach and mushrooms enhance the flavor and texture of the dish. Opt for organic produce if available for the best taste. Customize the Heat: Adjust the amount of red pepper flakes according to your spice preference. For a milder version, omit the flakes or reduce the amount. Cheese Variations: Experiment with different types of cheese like cream cheese or Gruyere for unique flavor profiles. Just ensure they melt well! Let it Rest: Allow the dish to cool for a few minutes after baking. This helps the flavors meld and makes it easier to serve. {{image_2}} If you want a lighter option, use Greek yogurt instead of cream cheese. It still gives creaminess but adds protein. You can also try cottage cheese for a different taste. For a dairy-free choice, nut-based cream cheese works well. These swaps keep the dish rich and tasty. Feel free to add more veggies to boost nutrition. Zucchini, bell peppers, or broccoli are great choices. You can mix them in while cooking the chicken. Not only will they add color, but they also enhance the dish’s flavor. Just ensure they are cut small to cook evenly. Switching cheeses can change the flavor profile. Try sharp cheddar for a bold taste. Feta cheese adds a tangy kick, while gouda gives a smoky note. You can also mix different cheeses for added depth. Just remember to adjust the amount based on your cheese choice. To store your low carb chicken spinach mushroom bake, let it cool first. Then, place it in an airtight container. You can keep it in the fridge for up to three days. When you store it this way, the flavors stay fresh, and it’s easy to enjoy later. When you are ready to eat the leftovers, reheat in the oven for the best taste. Preheat the oven to 350°F (175°C). Place the dish in the oven for about 15-20 minutes. You can also microwave it for 2-3 minutes. Just make sure it is hot all the way through before you eat. If you want to freeze the dish, it works well! Let it cool completely first. Then, wrap it tightly in plastic wrap and foil. You can freeze it for up to three months. When you want to eat it, thaw in the fridge overnight before reheating. This way, you maintain the taste and texture. Yes, you can prepare this dish in advance. Cook the chicken and veggies, then mix with cheese. Place it in a baking dish and cover it. Store it in the fridge for up to two days. When ready, just bake it. This saves time during busy days. Absolutely! This chicken spinach mushroom bake works well for meal prep. You can divide it into portions. Store them in airtight containers. It keeps well in the fridge for up to four days. Reheat for a quick and tasty meal during the week. This dish pairs nicely with simple sides. Consider serving it with: - Cauliflower rice - Zucchini noodles - A fresh green salad These sides add lightness and balance the richness of the bake. To make it dairy-free, swap cream cheese and mozzarella with dairy-free alternatives. Look for brands that offer cashew or almond-based cream cheese. Nutritional yeast can add a cheesy flavor. Always check labels for hidden dairy ingredients. Yes, you can switch the chicken for other meats. Turkey works well for a lean option. Lean pork or beef can also be used. Just ensure the meat is cooked through. Adjust cooking times as needed for different meats. This blog post covered all the details for making a tasty dish. We explored fresh ingredients, important cooking steps, and helpful tips for the best results. I shared how to store leftovers and answered common questions, like making it dairy-free and using different meats. With these insights, you can enjoy a delicious meal tailored to your taste. Remember, cooking is fun! Try new flavors and have a great time in the kitchen.

Low Carb Chicken Spinach Mushroom Bake Delight

Are you ready for a tasty low-carb dish that packs a punch? The Low Carb Chicken Spinach Mushroom Bake Delight

To make your Street Corn Chicken Rice Bowl, gather these items: - 2 cups cooked jasmine rice - 1 lb boneless, skinless chicken breasts - 1 cup corn kernels (fresh or frozen) - 1 red bell pepper, diced - 1 avocado, diced - 1/2 cup crumbled feta cheese - 1/4 cup mayonnaise - 2 tablespoons lime juice - 1 teaspoon chili powder - 1 teaspoon garlic powder - Salt and pepper to taste - Fresh cilantro for garnish You can swap out some ingredients if needed. Use brown rice instead of jasmine rice for a nutty flavor. If you want a leaner option, use turkey instead of chicken. For a dairy-free bowl, skip the feta cheese or use a vegan option. You can replace mayonnaise with Greek yogurt for a lighter dressing. Fresh corn works best, but canned corn is fine in a pinch. When picking your produce, look for vibrant colors. For corn, choose ears with tightly wrapped husks. The kernels should look plump. For bell peppers, pick ones that feel firm and heavy. Avoid any with soft spots. When choosing avocados, gently squeeze them. They should yield slightly to pressure but not feel mushy. Fresh cilantro should smell strong and look bright green. {{ingredient_image_1}} First, take 1 pound of boneless, skinless chicken breasts. Season them with chili powder, garlic powder, salt, and pepper. Heat a splash of oil in a skillet over medium heat. Cook the chicken for about 6-7 minutes on each side. You want it cooked all the way through. Once done, take it off the heat and let it cool. Finally, slice the chicken into strips. Next, you will cook the corn. Use 1 cup of corn kernels, fresh or frozen. If you use frozen corn, make sure to thaw it first. In the same skillet, add the corn kernels. Sauté them for about 5-6 minutes. You want them to be slightly charred and heated through. Season with salt and pepper to taste. Now, let's make the creamy dressing. In a small bowl, mix 1/4 cup of mayonnaise and 2 tablespoons of lime juice. Stir until it is smooth and creamy. This dressing adds great flavor to the bowl. It’s time to assemble your bowl. Start with 2 cups of cooked jasmine rice as the base. Then, add the sliced chicken on top of the rice. Next, add the sautéed corn, diced red bell pepper, and diced avocado. This adds color and freshness to your dish. To finish, drizzle the creamy lime dressing over each bowl. Sprinkle with 1/2 cup of crumbled feta cheese and some fresh cilantro. Serve immediately while everything is warm. This meal is perfect for lunch or dinner. Enjoy the burst of flavors! To cook chicken just right, start with boneless, skinless breasts. Season them with chili powder, garlic powder, salt, and pepper. Heat oil in a skillet over medium heat. Cook the chicken for 6-7 minutes on each side. Check that it’s cooked through. Let it cool, then slice it into strips. This keeps it juicy and tender. You can boost the flavor in your Street Corn Chicken Rice Bowl. Try adding lime juice to the corn after cooking. This gives a fresh taste. Mixing in feta cheese adds creaminess. Don't forget cilantro for a fresh, bright flavor. Use ripe avocados for a rich, buttery texture. Each bite should burst with flavor. One common mistake is overcooking the chicken. This makes it dry and tough. Always check for doneness. Another mistake is not seasoning enough. Don’t skip salt and pepper; they enhance all flavors. Also, avoid using cold corn. It should be warm and slightly charred. This adds depth to your dish. Pro Tips Use Fresh Ingredients: Fresh corn on the cob will enhance the flavor of the dish significantly. If using frozen corn, ensure it's high quality for the best taste. Perfectly Cooked Chicken: To ensure your chicken stays juicy, avoid overcooking it. Use a meat thermometer to check for an internal temperature of 165°F (75°C). Customize Your Bowl: Feel free to add other toppings such as black beans, jalapeños, or a squeeze of extra lime for additional flavor and texture. Meal Prep Friendly: This dish is great for meal prep. Store components separately and assemble when ready to eat to maintain freshness. {{image_2}} You can make a great vegetarian version of this dish. Instead of chicken, use grilled or roasted vegetables. Zucchini, mushrooms, and bell peppers work well. You can also add black beans for protein. Replace the mayonnaise with a vegan dressing to keep it plant-based. This option is colorful and still full of flavor. If you love heat, spice it up! Add diced jalapeños to the corn while cooking. You can also mix extra chili powder into the chicken seasoning. For more flavor, drizzle hot sauce over the top when you serve. This will make your taste buds dance. Feel free to get creative with toppings. Try fresh tomatoes for a burst of juice. Chopped green onions can add a nice crunch. You might like to sprinkle some crushed tortilla chips for extra texture. Lime wedges on the side can add a zesty kick. Mix and match to find your favorite combo! To keep your Street Corn Chicken Rice Bowl fresh, place leftovers in an airtight container. Ensure you separate the rice, chicken, and toppings to prevent sogginess. Store them in the fridge for up to three days. This method helps keep flavors intact and maintains texture. When ready to enjoy your leftovers, heat them gently. I recommend using a microwave for convenience. Place the rice and chicken in a bowl. Cover with a damp paper towel to retain moisture. Heat in short bursts of 30 seconds until warm. You can also use a skillet over medium heat for even heating. If you want to save your dish for later, freezing is a good option. Divide the components into portions. Wrap the rice and chicken tightly in plastic wrap, then place them in freezer bags. You can freeze the corn and toppings separately too. This way, you can enjoy this meal for up to three months. When ready to eat, thaw in the fridge overnight before reheating. A Street Corn Chicken Rice Bowl is a tasty meal. It combines rice, chicken, corn, and fresh veggies. The dish has a creamy lime dressing, which adds flavor. You get a mix of textures and tastes in each bite. This bowl is inspired by Mexican street corn, known for its bold flavors. Yes, you can make parts of this dish ahead. Cook the chicken and corn a day before. Store them in the fridge. You can also prepare the dressing early. Just mix the mayo and lime juice. It will save you time when you're ready to eat. If you don’t have jasmine rice, use other types of rice. Brown rice or basmati rice work well. Quinoa is another great choice for a healthy option. Just be sure to cook it according to the package directions. Yes, this dish is naturally gluten-free. All the ingredients, like rice and chicken, do not contain gluten. Just check your mayonnaise for any hidden gluten. This way, you can enjoy the meal without worry. You can store leftovers in the fridge for up to three days. Place them in an airtight container. When ready to eat, just reheat them in the microwave. Enjoy your delicious meal again! In this blog post, we explored the tasty street corn chicken rice bowl. We detailed the key ingredients, including substitutions and tips for picking fresh produce. I shared step-by-step instructions for cooking, making the dressing, and serving the dish. Plus, we discussed common mistakes and variations, like a vegetarian option. Now you have all the tools to create this delicious meal. Enjoy your cooking and make it your own!

Street Corn Chicken Rice Bowl Flavorful Meal Idea

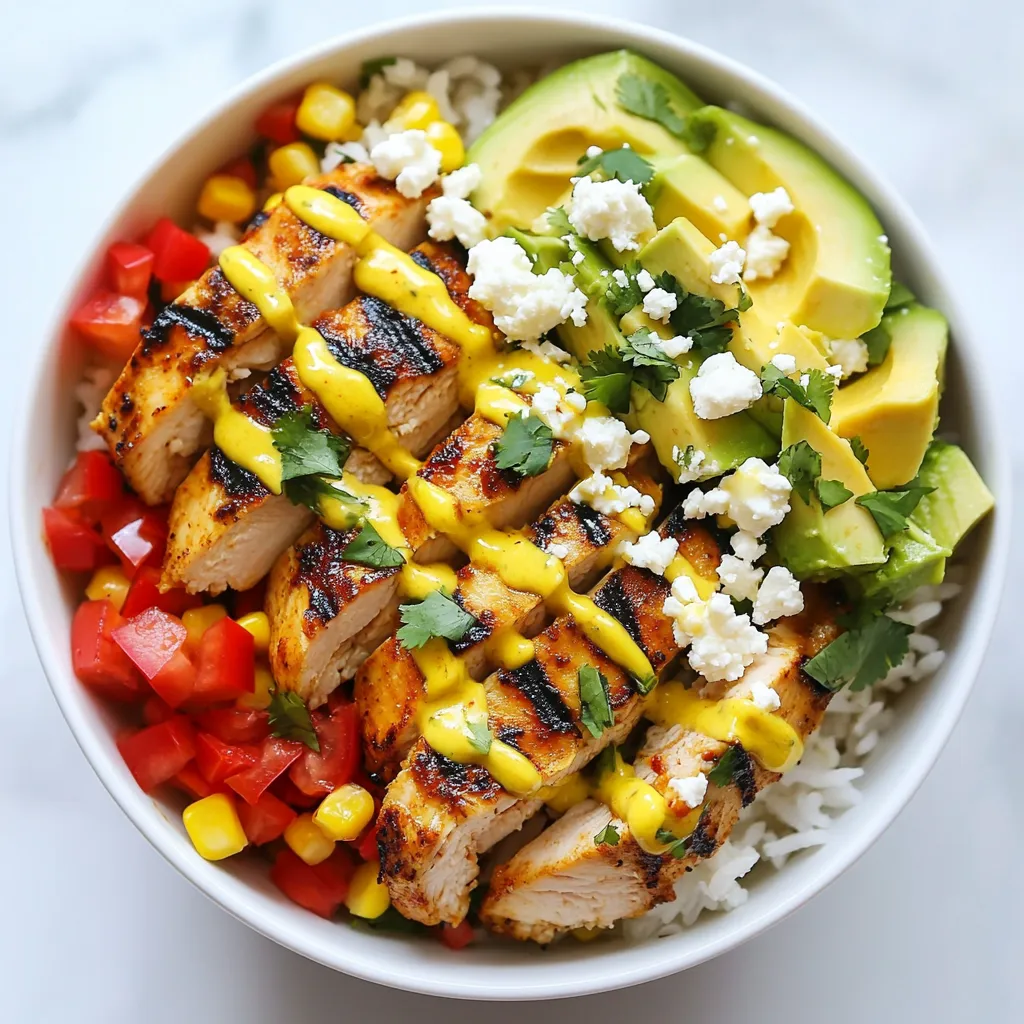
Craving a tasty yet simple meal? The Street Corn Chicken Rice Bowl is your answer! This dish combines juicy chicken,

- 1 pound ground beef - 1 medium onion, chopped - 2 cloves garlic, minced - 2 cups frozen mixed vegetables (carrots, corn, peas) - 1 can (15 oz) diced tomatoes with herbs - 1 cup cooked rice (or any leftover rice) - 1 teaspoon Italian seasoning - 1 teaspoon smoked paprika - Salt and pepper to taste Hobo Ground Beef Casserole shines with its main ingredients. Ground beef gives this dish a hearty base. Chopped onion and minced garlic add depth. Frozen mixed vegetables bring color and nutrition. Diced tomatoes add moisture and flavor. Cooked rice helps bind the mix, giving it body. Italian seasoning and smoked paprika bring warmth and zest. Don't forget to add salt and pepper to enhance all the flavors. - 1 cup shredded cheddar cheese - 1 cup crispy potato chips You can elevate the casserole with optional ingredients. Shredded cheddar cheese creates a creamy, cheesy layer on top. It melts beautifully, making every bite delightful. Crispy potato chips add a fun crunch. You can crush them and sprinkle them on top for a tasty finish. - Large skillet - 9x13 inch baking dish - Aluminum foil To make this dish, gather a few kitchen tools. A large skillet is essential for browning the ground beef and sautéing the vegetables. A 9x13 inch baking dish holds all the tasty layers together. Aluminum foil is handy for covering the dish while it bakes, helping to lock in moisture. Having these tools ready will make your cooking experience smooth and enjoyable. {{ingredient_image_1}} First, preheat your oven to 350°F (175°C). This will help the casserole cook evenly. While the oven heats up, chop your onion and mince your garlic. These fresh items will add a nice flavor to the dish. Next, take a large skillet and add a bit of oil. Heat it over medium heat. Once it's warm, add the chopped onion. Sauté the onion for about 3-5 minutes until it softens. Then, add the minced garlic to the skillet. Stir it for about a minute until it smells great. Now it’s time to brown the ground beef. Add it to the skillet with the onion and garlic. Cook the beef for about 6-8 minutes, breaking it apart with a spatula. You want it to be fully cooked and no longer pink. Once the beef is browned, stir in the frozen mixed vegetables. Next, add the can of diced tomatoes along with the juices. Then, mix in the cooked rice, Italian seasoning, smoked paprika, salt, and pepper. Mix everything well and let it simmer for about 5 minutes. This helps the flavors blend nicely. Now, transfer the beef and vegetable mixture into a greased 9x13 inch baking dish. Spread the mixture evenly. Then, sprinkle the shredded cheddar cheese on top. If you like a crunch, crush the potato chips and sprinkle them over the cheese. Cover the dish with aluminum foil and place it in the preheated oven. Bake for 20 minutes. After that, remove the foil and bake for an additional 10-15 minutes. You want the cheese to melt and bubble nicely. Let it cool for a few minutes before serving. Enjoy your comforting meal! How to properly brown ground beef To brown ground beef well, use medium heat. Start with a hot skillet. Add a bit of oil to prevent sticking. Place the beef in the skillet and break it up with a spatula. Let it sit for a minute before stirring. This helps form a nice brown crust. Keep cooking until it is no longer pink. Choosing the right vegetables Frozen mixed vegetables work great in this dish. They save time and add flavor. Look for mixes that include carrots, corn, and peas. These add color and texture. If you prefer fresh veggies, feel free to use them. Just chop them up into small pieces. Make sure they cook through in the casserole. Presentation tips for the dish When serving, take the casserole right from the oven. A nice touch is to garnish with fresh parsley. This adds color and makes it look appealing. Use a big spoon to serve it warm. Ideal side dishes to accompany A fresh side salad pairs well with this dish. It adds crunch and freshness. You might also consider garlic bread. It soaks up the delicious sauce. Both options keep the meal balanced and tasty. Fixing if casserole is too dry If your casserole turns out too dry, add a splash of broth. Chicken or beef broth works well. You can also mix in a bit of tomato sauce. This will add moisture and flavor back into the dish. Adjusting flavors based on taste preferences Taste your casserole before serving. If it needs more flavor, add salt or pepper. You can also sprinkle in more Italian seasoning or smoked paprika. Remember, cooking is all about your taste. Don't hesitate to adjust the seasonings to suit your liking. Pro Tips Use Lean Ground Beef: Opt for lean ground beef to reduce excess fat in your casserole, making it a healthier option without compromising flavor. Mix and Match Vegetables: Feel free to swap out the frozen mixed vegetables for your favorites, such as bell peppers, broccoli, or spinach for added nutrition and taste. Cheese Variations: Experiment with different types of cheese like mozzarella or pepper jack for a unique flavor profile and added creaminess. Make Ahead: Prepare the casserole ahead of time and refrigerate it. Just bake it straight from the fridge, adding a few extra minutes to the cooking time. {{image_2}} You can change the meat in this dish easily. Ground turkey or chicken works great. These meats provide a lean option, making the casserole lighter. You may need to adjust cooking times slightly since they are leaner than beef. If you want a meat-free version, try using vegetarian protein. Options like lentils or plant-based crumbles are perfect. These substitutes add protein while keeping the dish hearty and satisfying. You can use many types of vegetables in this casserole. Seasonal veggies make it fresh and fun. Think about bell peppers, zucchini, or even spinach. Each season offers its own bounty, so feel free to mix and match! Fresh vegetables add crispness, but frozen ones are easy and quick. They are often frozen at peak freshness. This means you can save time while still enjoying great flavor. Just make sure to thaw them a bit before cooking. Spices and herbs can really change the flavor. Adding garlic powder or chili flakes can give it a kick. Fresh herbs like basil or parsley can add brightness. These small tweaks can make a big difference in taste. You can also incorporate sauces to boost flavor. A splash of Worcestershire sauce or a dollop of sour cream can work wonders. Toppings like crispy fried onions or extra cheese can add crunch and richness. Enjoy experimenting to find your favorite combinations! To store leftovers safely, let the casserole cool first. Once cool, transfer it to an airtight container. I recommend using glass or plastic containers with tight lids. This keeps the food fresh and prevents odors from mixing. Make sure to label the container with the date. For freezing, allow the casserole to cool completely. Cut it into individual portions for easy thawing. Use freezer-safe containers or heavy-duty freezer bags. Remove as much air as possible to prevent freezer burn. When ready to eat, thaw the casserole overnight in the fridge. Reheat it in the oven at 350°F until hot, about 20-30 minutes. In the fridge, Hobo Ground Beef Casserole lasts about 3-4 days. Always check for signs of spoilage. Watch for changes in color, smell, or texture. If it looks or smells off, it’s best to discard it. Enjoy your leftovers safely! You can use quinoa instead of rice. Quinoa adds protein and fiber. Cauliflower rice is a great low-carb choice. It cooks fast and soaks up flavors well. Both options keep the dish tasty and satisfying. Yes, you can make this casserole ahead of time. Prepare it, then cover and store it in the fridge. When you are ready to eat, just reheat it in the oven. This makes meal prep easy and quick on busy days. To make this dish healthier, use lean ground beef or turkey. You can also add more vegetables, like spinach or bell peppers. Swap regular cheese for low-fat cheese. These changes cut calories while keeping the flavor high. This blog outlined a simple casserole recipe using ground beef, veggies, and seasonings. I shared tips on how to cook, bake, and store your dish. You learned how to customize it with optional ingredients and variations. Remember, cooking can be fun and easy. Experiment with flavors and ingredients to suit your taste. With the right tools and steps, you can make a delicious meal that your whole family will love. Enjoy your cooking journey!

Hobo Ground Beef Casserole Simple and Comforting Meal

Looking for a meal that warms the heart and fills the belly? My Hobo Ground Beef Casserole is simple, comforting,

To make this soup, you need a few key items. Here’s the list: - 4 large red bell peppers - 1 medium onion, chopped - 2 cloves garlic, minced - 2 cups vegetable broth - 1 cup heavy cream - 1 cup Gouda cheese, shredded - 2 tablespoons olive oil - 1 teaspoon smoked paprika - Salt and pepper to taste These ingredients create a rich and tasty soup. The red peppers give it a sweet flavor. The Gouda adds creaminess and a nice depth. For a beautiful finish, consider these garnishes: - Fresh basil leaves - A drizzle of olive oil - Extra Gouda cheese Garnishes make the soup look great. They also add more flavor. Here are the tools you will need: - Baking sheet - Pot for cooking - Immersion blender or regular blender - Knife and cutting board Having the right tools helps you cook better. With these tools, you can easily make this delicious soup. {{ingredient_image_1}} First, I preheat the oven to 425°F (220°C). I cut the red bell peppers in half and remove the seeds and stems. Next, I place them skin-side up on a baking sheet. I drizzle olive oil over them and sprinkle with salt. I roast the peppers for about 30 minutes. I look for the skins to be blistered and charred. Once I take them out, I put the peppers in a bowl. I cover the bowl with plastic wrap. This step helps them steam for 10 minutes. Steaming makes it easier to peel off the skins. After steaming, I peel the skins and chop the peppers roughly. In a large pot, I heat 1 tablespoon of olive oil over medium heat. I add the chopped onion and cook until it turns translucent, which takes about 5 minutes. Then, I stir in the minced garlic and smoked paprika. I cook this mix for an extra minute until I can smell the garlic. Next, I add the roasted red peppers and vegetable broth to the pot. I bring the mix to a simmer and let it cook for about 10 minutes. This helps the flavors mix well together. I use an immersion blender to blend the soup until it is smooth. If I don’t have this tool, I carefully transfer the soup to a regular blender in batches. After blending, I return the soup to the pot. Now, I stir in the heavy cream and shredded Gouda cheese. I cook it on low heat while stirring often. I wait until the cheese melts and the soup heats through. Finally, I season it with salt and pepper to taste. Roasting peppers brings out their sweet flavor. Start by choosing large, bright red bell peppers. Cut them in half and remove the seeds and stems. Place them skin-side up on a baking sheet. Drizzle with olive oil and sprinkle with salt. Roast in a preheated oven at 425°F (220°C) for about 30 minutes. The skins should blister and char. This adds depth to your soup. After roasting, cover the peppers in a bowl with plastic wrap for 10 minutes. This helps to steam and loosen the skins for easy peeling. For a smooth, creamy soup, use an immersion blender. Blend the soup until it reaches your desired consistency. If you don't have one, carefully transfer the soup to a regular blender in small batches. Be cautious, as hot soup can splash. Once blended, return the soup to the pot. Stir in heavy cream and Gouda cheese on low heat. This helps the cheese melt evenly, creating that rich, creamy texture you want. Seasoning can elevate your soup. Use smoked paprika for a subtle smoky taste. Salt and pepper are essential for balancing flavors. Taste the soup before serving and adjust as needed. Fresh basil leaves make a great garnish. They add a pop of color and freshness. You can also try adding a dash of cayenne pepper for heat or a sprinkle of lemon juice for brightness. Feel free to experiment to find your favorite flavor balance! Pro Tips Roasting Peppers: Roasting the peppers until the skins are charred enhances their sweetness and adds a smoky flavor to the soup. Steaming for Easier Peeling: Covering the roasted peppers to steam helps loosen the skins, making them much easier to peel off. Using Fresh Ingredients: For the best flavor, use fresh garlic and herbs. Fresh ingredients can elevate the taste of your soup significantly. Blending Tips: If using a regular blender, allow the soup to cool slightly before blending to prevent splattering and burns. {{image_2}} You can make this soup heartier by adding protein. Chicken or beans work well. For chicken, cook it in the pot before adding the onions. Shred the cooked chicken and mix it in with the soup. If you prefer beans, add a can of drained white beans when you add the roasted peppers. Both options add flavor and keep you full. To make this soup vegan, swap the heavy cream with coconut milk or cashew cream. Use a vegan cheese instead of Gouda. You can also replace the vegetable broth with homemade nut broth for a richer taste. These swaps keep the soup creamy while sticking to a plant-based diet. You can elevate the flavor with herbs and spices. Fresh basil adds a nice touch. You can also try adding thyme or oregano for an herbal kick. For a spicy twist, sprinkle in red pepper flakes. Each adds a unique layer to the soup, making it even more delightful. After you enjoy your Roasted Red Pepper Gouda Soup, store the leftovers. Let the soup cool down to room temperature. Then, place it in an airtight container. It will stay fresh in the fridge for about 3 to 4 days. If you want to keep it longer, consider freezing it. To freeze the soup, use a freezer-safe container. Leave some space at the top for expansion. You can also use freezer bags. Make sure you squeeze out the air before sealing. The soup can last up to 3 months in the freezer. When you’re ready to eat it, just thaw it in the fridge overnight. When reheating your soup, do it slowly. Pour the soup into a pot over low heat. Stir it often to avoid sticking. If the soup is too thick, add a splash of vegetable broth or water. You can also use a microwave. Heat it in short bursts, stirring in between. This will help it heat evenly and stay creamy. Yes, you can try other cheeses. Some great options are sharp cheddar, cream cheese, or even feta. Each cheese will give a unique flavor. If you like a stronger taste, use aged cheese. For a milder flavor, try fresh cheese. Make sure to melt it well to keep the soup smooth. Roasted Red Pepper Gouda Soup lasts about 3 to 5 days in the fridge. Store it in an airtight container to keep it fresh. If you notice any changes in smell or color, it’s best to toss it out. Always reheat it until hot before eating. You can serve this soup with many sides. Grilled cheese sandwiches pair perfectly. A fresh salad adds a nice crunch. You can also try crusty bread for dipping. If you want something light, serve with a fruit salad. Each option complements the soup well. In this post, we explored how to make roasted red pepper Gouda soup. We covered the key ingredients, steps to prepare, and useful tips. I shared variations for adding protein and flavor. Storing and reheating options help you enjoy this dish later. This soup is tasty and versatile. With a few ingredients, you can create a meal that warms the soul. I hope you try this recipe soon and enjoy every bite!

Roasted Red Pepper Gouda Soup Creamy and Smooth Delight

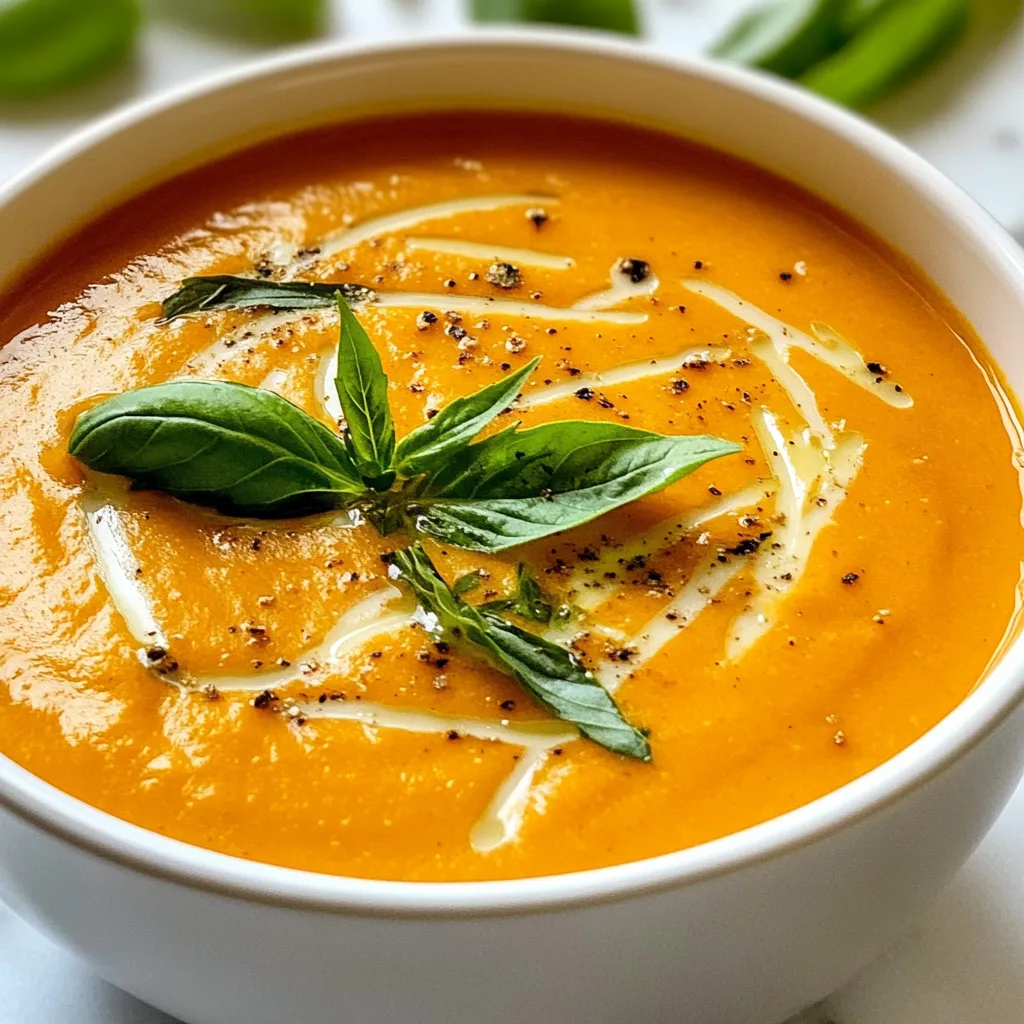
Welcome to a creamy and smooth delight! Roasted Red Pepper Gouda Soup is perfect for those chilly days. This rich

- 1 package of phyllo pastry (about 12 sheets) - 1 cup fresh cranberries - 8 oz Brie cheese, cut into small pieces - 1/2 cup sugar - 1/4 cup water - 1 tablespoon fresh rosemary, chopped - 1 tablespoon olive oil - 1/4 teaspoon black pepper - 1 egg (for wash) The main ingredients set the stage for these tartlets. Phyllo pastry brings a crispy texture. Fresh cranberries give a burst of tartness, which balances the rich Brie cheese. The additional ingredients sweeten the cranberries. Sugar and water help create a lovely sauce. Fresh rosemary adds an herby note that lifts the flavors. An egg wash is crucial, too. It gives your tartlets a beautiful golden color. Olive oil and black pepper add flavor and shine. Using these ingredients, you will create a dish that impresses everyone. Each bite will offer a mix of textures and tastes. The tartlets serve as a perfect festive appetizer. {{ingredient_image_1}} - First, combine 1 cup of fresh cranberries, 1/2 cup of sugar, and 1/4 cup of water in a saucepan. - Cook over medium heat. Stir occasionally until the cranberries burst. This takes about 10-15 minutes. - Once thickened, remove it from heat and let it cool. This sauce adds a sweet and tart flavor. - Next, lay out a sheet of phyllo pastry on a clean surface. Brush it lightly with 1 tablespoon of olive oil. - Repeat this with two more sheets, stacking them on top. This helps create a nice texture. - Cut the layered phyllo into squares, about 4x4 inches. These will form the tartlet cups. - Gently press each square into a muffin tin cup. This forms the shell for your tartlets. - Now, fill each phyllo cup with small pieces of Brie cheese. - Top each one with a spoonful of the cranberry sauce. Add a sprinkle of fresh rosemary and black pepper for extra flavor. - To finish, prepare the egg wash. Beat 1 egg with a splash of water in a small bowl. - Brush the edges of the phyllo cups with the egg wash. This gives them a golden finish. - Place the muffin tin in a preheated oven at 375°F (190°C). Bake for 15-20 minutes until the phyllo is golden and crispy. These steps will guide you to make delicious savory cranberry brie tartlets. Enjoy the fun of creating these festive bites! To make the perfect cranberry sauce, start by adjusting the sweetness. You can add more sugar if you like it sweeter. If you prefer a healthier option, try using honey or maple syrup instead of sugar. These alternatives give a unique flavor while keeping the sauce tasty. Handling phyllo pastry can be tricky. To avoid tearing, keep the sheets covered with a damp cloth while you work. This keeps them moist and easier to handle. If you have leftover phyllo, store it in an airtight container in the fridge. Use it within a few days to keep it fresh. For a beautiful presentation, garnish the tartlets with extra rosemary. A light drizzle of olive oil adds shine. Pair these tartlets with sparkling wine or a light beer. The flavors blend nicely and elevate your dish. Enjoy sharing them at your next gathering! Pro Tips Use Fresh Cranberries: Fresh cranberries provide the best flavor and texture for this recipe. Avoid canned cranberry sauce for a more vibrant tartlet. Layering Phyllo Pastry: Ensure you brush each layer of phyllo with olive oil to achieve a flaky and crispy texture. Don’t skip this step! Customize Fillings: Feel free to experiment with different cheeses or herbs, such as goat cheese or thyme, to create your unique flavor combination. Serving Suggestions: These tartlets are best served warm. Consider pairing them with a light salad or a glass of sparkling wine for an elegant appetizer. {{image_2}} You can switch out Brie for other cheeses. Try goat cheese for a tangy flavor. Cream cheese is smooth and mild, while blue cheese gives a bold taste. Each cheese adds its own unique flavor profile. Goat cheese offers a creamy, tart bite. Cream cheese provides a rich, soft texture. Blue cheese brings a sharp, funky taste that pairs well with cranberries. Get creative with fillings in your tartlets. Add chopped nuts like walnuts or pecans for crunch. Diced apples or pears can add sweetness and texture. You can also try spicy elements, like jalapeños or red pepper flakes, for a kick. Mixing in sautéed onions or garlic can create savory depth. These twists keep your tartlets exciting and flavorful. If you want a plant-based version, use vegan cheese. Brands like Violife or Daiya offer great options. For the egg wash, substitute with a mixture of plant-based milk and a little oil. This gives a shiny finish without using eggs. You can also skip the wash altogether for a rustic look. These changes make the tartlets suitable for everyone. To keep your leftover tartlets fresh, store them in an airtight container. Place a paper towel at the bottom to absorb any moisture. This helps keep the phyllo crispy. You can refrigerate them for up to three days. After that, the texture may change, and they could become soggy. You can freeze these tartlets both before and after baking. If you freeze them before baking, assemble the tartlets and place them on a baking sheet. Freeze until solid, then transfer them to a zip-top bag. They will last for up to three months. To bake from frozen, just add a few extra minutes to the baking time. If you freeze them after baking, let them cool completely. Wrap each tartlet in plastic wrap and place them in an airtight container. Reheat in the oven at 350°F (175°C) for about 10-15 minutes. This keeps the texture and flavor intact. To reheat leftover tartlets, use an oven. Set it to 350°F (175°C). Place the tartlets on a baking sheet. Heat for about 10 minutes. This keeps the phyllo crispy. Microwaving can make them soggy. If you must use a microwave, heat them for only a few seconds. This method works but may lose some crunch. Yes, you can make the cranberry sauce ahead of time. Prepare it up to three days before serving. Store it in an airtight container in the fridge. This helps the flavors blend. Just give it a stir before using. If it thickens too much, add a splash of water to loosen it. You can make these tartlets gluten-free. Use gluten-free phyllo pastry. Many brands offer this option. Check the package to ensure it is certified gluten-free. You can also use gluten-free pie crusts as an alternative. This way, everyone can enjoy this tasty appetizer. You now know how to make tasty cranberry Brie tartlets. We covered the key ingredients, like phyllo pastry and fresh cranberries. You learned step-by-step how to prepare the tartlets and tips for perfecting your dish. I shared storage options to keep them fresh. In the end, these tartlets are great for many occasions. Try different cheeses or flavors to make them your own. Enjoy your cooking and impress your friends and family!

Savory Cranberry Brie Tartlets Easy Festive Appetizer

Looking for an easy and tasty appetizer to impress your guests? Try my Savory Cranberry Brie Tartlets! This festive treat

- 4 fresh jalapeños, stems removed and diced - 1 medium onion, chopped - 3 cloves garlic, minced - 4 cups chicken or vegetable broth - 1 cup cream cheese, softened - 1 cup shredded cheddar cheese - 1 cup corn kernels, fresh or canned - 1 teaspoon smoked paprika - 1 teaspoon cumin - 2 tablespoons olive oil - Salt and pepper to taste - 1/4 cup fresh cilantro, chopped for garnish - Tortilla chips for serving This soup has a rich and creamy base. The fresh jalapeños give it that nice kick. You can adjust the heat by changing the amount of jalapeños you use. I love adding the onions and garlic first. This builds a great flavor. Sauté them in olive oil until they are soft. The broth is the next key part. Use chicken broth for a savory touch or vegetable broth for a lighter flavor. The cream cheese adds that creamy texture we want in our soup. It melts into the broth and makes everything smooth. Next, you’ll blend in the cheddar cheese and corn. The corn adds sweetness and texture. Smoked paprika and cumin bring warmth and depth to the soup. Don’t forget to season with salt and pepper. This dish gets even better with fresh cilantro on top. And of course, tortilla chips make the perfect crunchy side. {{ingredient_image_1}} 1. Heat two tablespoons of olive oil in a large pot over medium heat. 2. Chop one medium onion and add it to the pot. Sauté for 3-4 minutes until it turns soft and clear. 3. Mince three cloves of garlic and add them to the pot. Cook for another 2 minutes. 4. Dice four fresh jalapeños, keeping the heat level in mind. Add them to the pot and stir well. 5. Pour in four cups of chicken or vegetable broth. Bring the mix to a gentle simmer. 1. Take one cup of softened cream cheese and add it to the pot. Stir until it melts smoothly into the broth. 2. Next, add one cup of shredded cheddar cheese. Mix well until the cheese is fully melted. 1. Season the soup with salt and pepper to taste. If you want more heat, add extra diced jalapeños. 2. Let the soup simmer for 10-15 minutes. This helps the flavors mix well. 3. Serve the soup hot, garnished with 1/4 cup of fresh chopped cilantro. 4. Pair it with tortilla chips for a crunchy touch. Enjoy every savory bite! You can change the heat by modifying the jalapeño quantity. If you want a milder soup, use fewer jalapeños. Start with two instead of four. You can also remove the seeds to lower the heat. If you like it spicy, add more diced jalapeños. You can even sprinkle in some cayenne or crushed red pepper for extra kick. To make the soup creamier, focus on the cream cheese. Soften it well before adding it to the pot. This helps it melt smoothly. You can also use half-and-half or sour cream for a different creamy texture. For a dairy-free option, try coconut cream. It adds richness without the milk. Serve the soup in rustic bowls for a cozy feel. Add a sprinkle of extra shredded cheese on top for color and flavor. Fresh cilantro not only looks great but also adds a bright taste. Don't forget the tortilla chips! They add crunch and fun to each bite. Pro Tips Adjust the Heat: If you prefer a milder soup, remove the seeds from the jalapeños before dicing them. This will reduce the heat while still providing flavor. Cheese Variations: For a richer flavor, consider mixing different types of cheese like Monterey Jack or pepper jack with the cheddar. Make it Creamy: Blend the soup with an immersion blender after simmering for a smoother texture, if you prefer a creamier soup. Garnish Ideas: Enhance the presentation by adding a dollop of sour cream or a sprinkle of crispy bacon bits on top before serving. {{image_2}} To make this soup vegetarian, swap the chicken broth for vegetable broth. Use cream cheese made from plants, like cashew or almond. For cheese, try a flavor-packed cheddar alternative made from nuts or soy. These swaps keep the soup rich and tasty while being meat-free. For a vegan twist, start with non-dairy cream cheese. Brands like Tofutti or Kite Hill work well. For cheese, look for veggie-based options like vegan cheddar or mozzarella. This way, you enjoy the creamy texture without dairy. The flavors still shine through, making it a delightful dish. You can add proteins like cooked chicken or crispy bacon. Both add a savory punch and complement the jalapeños well. If you want more veggies, consider corn, bell peppers, or even spinach. Each option brings its own taste and texture, letting you customize your soup to fit your mood. To keep your jalapeño popper soup fresh, you can refrigerate or freeze it. - For refrigeration, let the soup cool down first. - Pour it into airtight containers. - It will stay good for a few days in the fridge. For freezing, use freezer-safe containers. - Make sure to leave space for expansion. - You can also use freezer bags for easy storage. - Just remember to label them with the date. When you want to enjoy the soup again, reheating is simple. - The best way is to use a pot on the stove. - Heat it over medium-low heat, stirring often. - If you prefer, you can use a microwave. To avoid separation, stir in a bit of cream cheese while reheating. - This keeps the soup creamy and smooth. - If it seems too thick, add a splash of broth or water. In the fridge, your soup lasts about 3 to 4 days. - After that, it may start to spoil. Watch for signs of spoilage. - If you see any mold, toss it out. - A sour smell or off taste also means it’s time to let go. - Always trust your senses when checking food! Yes, you can use frozen jalapeños. They work well in this soup. Just thaw them first and chop. Frozen jalapeños may lose some crunch but keep their flavor. To spice up your soup, add more jalapeños. You can also add hot sauce or diced serrano peppers. Adjust the spice to match your taste. Start small and taste as you go. Yes, you can make this soup ahead of time. Store it in the fridge for up to three days. Just reheat it on the stove when you're ready to serve. The flavors may even improve overnight! Great sides include crispy tortilla chips or a fresh salad. You can also serve cornbread or grilled cheese sandwiches for a comforting meal. These sides pair nicely with the creamy soup. To lower the calories, use low-fat cream cheese and reduced-fat cheese. You can also add more veggies like zucchini or bell peppers. Skipping the tortilla chips or using baked chips helps too. This blog post covered a tasty jalapeño popper soup recipe. We explored the ingredients, from fresh jalapeños to creamy cheese. I shared step-by-step instructions to simplify cooking for you. We discussed tips to adjust spice levels and make it creamier. Variations offer options for vegetarians and vegans. Lastly, I explained storage methods and reheating to enjoy later. Embrace your culinary skills and enjoy every spoonful of this creamy, spicy delight!

Savory Jalapeño Popper Soup Creamy and Flavorful Dish

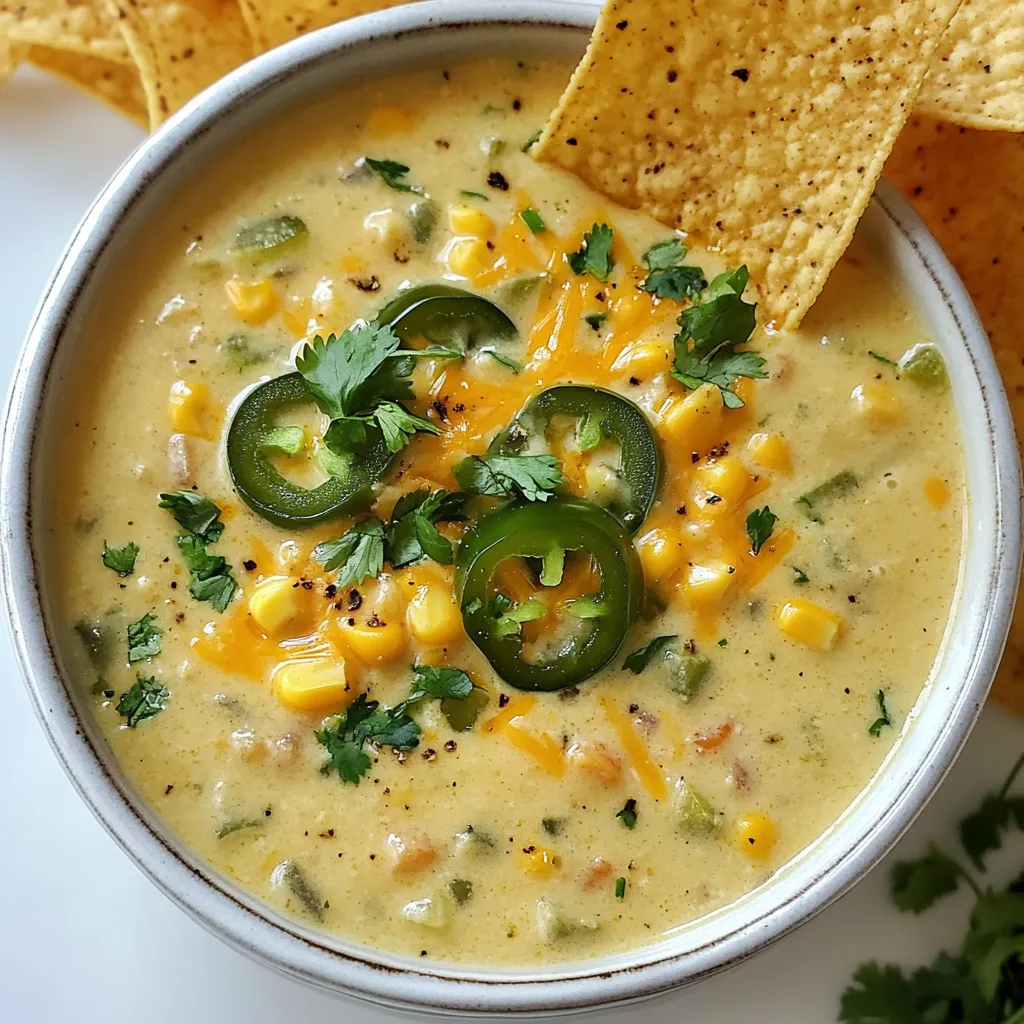
If you love the spicy kick of jalapeños and creamy soups, you’re in for a treat! My Savory Jalapeño Popper

To make a delicious Ground Turkey and Peppers Skillet, you need a few simple items. Here’s what you will gather: - 1 pound ground turkey - 2 bell peppers (one red, one yellow), sliced - 1 medium onion, chopped - 3 cloves garlic, minced - 1 teaspoon ground cumin - 1 teaspoon smoked paprika - 1 teaspoon chili powder - 1/2 teaspoon salt - 1/4 teaspoon black pepper - 1 can (15 oz) black beans, rinsed and drained - 1 cup corn kernels (fresh or frozen) - 2 tablespoons olive oil - Fresh cilantro, chopped (for garnish) - Lime wedges (for serving) These ingredients create a colorful and tasty dish. Ground turkey gives you lean protein. Bell peppers add crunch and sweetness. Onions and garlic give flavor that makes your meal pop. Spices like cumin and smoked paprika bring warmth. Black beans and corn add texture and nutrition. Olive oil helps cook everything nicely and adds richness. Finally, cilantro and lime brighten up the dish when you serve it. When you combine these ingredients, you make a warm meal that feels good and tastes great. {{ingredient_image_1}} 1. Heat the olive oil in a large skillet over medium heat. 2. Add the chopped onion to the skillet. Sauté for about 3 minutes. The onion should look translucent. 3. Next, add the minced garlic and sliced bell peppers. Cook for 5 to 7 minutes. Stir occasionally until the peppers soften. 4. Push the veggies to one side of the skillet. Add the ground turkey to the other side. Break it apart with a spatula. Cook for 6 to 8 minutes until browned and cooked through. 5. Once the turkey is cooked, mix it with the vegetables. Sprinkle cumin, smoked paprika, chili powder, salt, and black pepper over the mix. Stir well to combine all the flavors. 6. Stir in the rinsed black beans and corn. Cook for another 4 to 5 minutes until everything is hot. 7. Taste the skillet mixture. Adjust the seasoning if needed. Remove from heat. 8. Serve the skillet warm. Garnish with fresh cilantro and lime wedges on the side. How to avoid dry turkey To keep ground turkey moist, cook it on medium heat. This method helps it brown well without drying out. Breaking it apart with a spatula while it cooks also helps. You can add a splash of chicken broth if you feel it may dry out. Tips for sautéing vegetables perfectly Start with the onion. Sauté it for about three minutes until it is soft. Then, add garlic and peppers. Stir often to keep them from burning. Cooking them until they are soft makes the dish taste great. Importance of seasoning adjustments Taste your dish before serving. You can add more salt or spices if needed. Everyone’s taste is different, so feel free to adjust. Don’t forget to add lime juice before serving for a fresh kick! Pro Tips Use Fresh Ingredients: Fresh bell peppers and onions will provide the best flavor and texture. Choose vibrant, firm vegetables for optimal results. Customize the Spice Level: Adjust the amount of chili powder to your taste. For a milder dish, reduce the quantity, or add some diced jalapeños for extra heat. One-Pan Meal: This recipe is versatile; feel free to add other vegetables like zucchini or spinach to make it even heartier without adding additional pans to clean. Perfect for Meal Prep: This skillet dish stores well in the refrigerator for up to 4 days. Reheat in the microwave for a quick and nutritious meal. {{image_2}} You can easily mix up this recipe with some smart swaps. - Leaner ground meat options: Try ground chicken or lean beef for a different taste. Turkey is great, but these options can add new flavors. - Alternative vegetables to use: Use zucchini, mushrooms, or even spinach if you want. They add texture and color to the dish. You can get creative with what you have on hand. - Different seasoning blends: Instead of cumin and chili powder, try Italian herbs or taco seasoning. They will change the dish's flavor profile while keeping it tasty. Each swap gives you a new meal experience. Enjoy experimenting with what you like! Refrigeration instructions: After cooking, let the ground turkey and peppers cool. Place leftovers in an airtight container. Store in the fridge for up to three days. Always label the container with the date. Freezing tips and duration: You can freeze this dish for later use. Allow it to cool completely before freezing. Use a freezer-safe container or bag. It can last up to three months in the freezer. When ready to eat, thaw it in the fridge overnight before reheating. Reheating suggestions: To reheat, warm it on the stove over medium heat. Stir occasionally until heated through. You can also use a microwave. Heat in short bursts, stirring in between. Add a splash of water if it seems dry. Enjoy it warm with fresh lime juice on top! Can I use frozen vegetables? Yes, you can use frozen vegetables. They save time and are easy to use. Just add them to the skillet in place of fresh ones. They may need a minute or two more to cook through. How can I make it spicier? To make it spicier, add more chili powder or some red pepper flakes. You can also include fresh jalapeños or hot sauce to your taste. Start small and add more as you go. Can I make this ahead of time? You can make this dish ahead of time. Cook it, let it cool, and store it in the fridge. It stays good for up to three days. Just reheat it on the stove when you’re ready to eat. What to serve with ground turkey and peppers skillet? This skillet pairs well with rice or quinoa. You can also serve it with tortillas for a fun twist. Add a side salad for some crunch and freshness. This blog post covered all the key steps to make a tasty ground turkey and peppers skillet. You learned about the main ingredients and how to prepare them. I shared tips on cooking and variations to suit your taste. Finally, we discussed storage and answered common questions. With these insights, you can create a delicious meal that fits your style. Enjoy cooking and feel proud of your tasty dish!

Ground Turkey and Peppers Skillet Easy Weeknight Meal

Looking for a quick and tasty weeknight meal? I’ve got you covered with this delicious Ground Turkey and Peppers Skillet.

- 2 cups cooked rice (jasmine or basmati) - 1 pound boneless, skinless chicken thighs, diced - 1 cup corn kernels (fresh or frozen) - 1 red bell pepper, diced - 1 avocado, sliced - 1/2 cup crumbled feta cheese - 1/4 cup fresh cilantro, chopped - 2 tablespoons olive oil - 2 tablespoons lime juice - 1 teaspoon smoked paprika - 1 teaspoon garlic powder - 1/2 teaspoon cumin - Salt and pepper to taste - Lime wedges, for garnish To make the perfect Street Corn Chicken Rice Bowls, start with the main ingredients. You can choose jasmine or basmati rice for a fluffy base. The chicken thighs add rich flavor and stay moist. I prefer boneless, skinless thighs for easy cooking. Fresh corn gives a sweet crunch. Red bell pepper adds color and a slight sweetness. Avocado brings creaminess, while feta cheese adds a salty kick. Fresh cilantro brightens up the dish. Don't forget lime juice for zest and a touch of olive oil for cooking. - Additional spices and seasonings - Alternative toppings For extra flavor, consider adding spices like chili powder or cayenne for heat. You can also try a pinch of oregano for depth. If you want more toppings, think about adding jalapeños for spice or black beans for heartiness. You might even swap feta for queso fresco or use a dollop of sour cream for creaminess. The options are endless, so feel free to explore what you love most! {{ingredient_image_1}} To start, gather your chicken and seasoning. You need: - 1 pound boneless, skinless chicken thighs, diced - 2 tablespoons olive oil - 2 tablespoons lime juice - 1 teaspoon smoked paprika - 1 teaspoon garlic powder - 1/2 teaspoon cumin - Salt and pepper to taste Mix the chicken with olive oil and lime juice in a bowl. Add the spices and salt. Stir until the chicken is well coated. Let it marinate for at least 15 minutes. This step adds great flavor to your dish. While the chicken marinates, heat a skillet over medium heat. Add 1 cup of corn kernels. Sauté the corn for about 5-7 minutes until it gets a nice char. Remove the corn from the skillet and set it aside. In the same skillet, add the marinated chicken. Cook it for 8-10 minutes, stirring often. Look for the chicken to turn golden brown and be fully cooked. Next, add 1 diced red bell pepper to the skillet. Cook for another 2-3 minutes until the bell pepper is just tender. This adds sweetness and color to your bowl. Now it’s time to build your bowls! Start by placing 2 cups of cooked rice at the bottom. Jasmine or basmati rice works great. Top the rice with the chicken and corn mixture. Next, add sliced avocado and sprinkle 1/2 cup of crumbled feta cheese on top. Finish with 1/4 cup of fresh cilantro for a burst of flavor. For a nice touch, serve each bowl with lime wedges on the side. This way, you can squeeze fresh lime juice for extra zing. Use colorful bowls to make your meal look vibrant and appealing! To get the best chicken thighs, start with good quality meat. I like boneless, skinless thighs. They stay juicy and tender. Marinate the chicken for at least 15 minutes. Use olive oil, lime juice, smoked paprika, garlic powder, cumin, salt, and pepper. This mix not only adds flavor but also helps keep the chicken moist. Cook over medium heat for about 8-10 minutes. Stir occasionally until they turn golden brown. This method ensures even cooking and a nice texture. I recommend using a blend of spices. The right ratios make a big difference! For this recipe, I use: - 1 teaspoon smoked paprika - 1 teaspoon garlic powder - 1/2 teaspoon cumin - Salt and pepper to taste These spices give depth and warmth. You can also add a pinch of chili powder for heat. Adjust the amounts based on your taste. Feel free to experiment with other spices like cayenne or oregano. Balance is key for that perfect kick! Meal prep can save you time! Cook a big batch of rice ahead of time. Store it in the fridge and use it throughout the week. You can also marinate the chicken the night before. This way, the flavors soak in deeply. If you’re short on time, use frozen corn. It cooks quickly and still tastes great. Pre-chop your veggies too. This makes assembly fast and easy. With these tips, you can whip up your bowls in no time! Pro Tips Marinate for More Flavor: Allow the chicken to marinate for at least 30 minutes, or up to overnight, to enhance the flavor and tenderness. Char the Corn: For an extra smoky flavor, grill the corn instead of sautéing it. This will give your dish a delicious charred taste. Use Fresh Ingredients: Whenever possible, opt for fresh corn and ripe avocados to elevate the dish's overall taste and texture. Customize Your Bowls: Feel free to add other toppings like black beans, diced tomatoes, or jalapeños to personalize your rice bowls. {{image_2}} You can switch chicken for other proteins. Try shrimp or beef for a new taste. For vegan options, use tofu or tempeh. These can soak up flavors well. Just marinate them as you would the chicken. For a quick change, use canned beans. Black beans or chickpeas add protein and fiber. Spices can change the flavor of your dish. Add chili powder for heat or oregano for earthiness. Try lime zest for a fresh kick. You can also mix in some chipotle sauce for smokiness. Different sauces, like sriracha or barbecue, can give a twist too. Experiment with what you like! You can adapt this dish for any season. In spring, use fresh peas or asparagus. Summer corn is sweet and perfect in this bowl. For fall, add roasted pumpkin or squash. Winter calls for hearty greens like kale or spinach. Seasonal swaps keep your meal fresh and exciting. To keep your Street Corn Chicken Rice Bowls fresh, use airtight containers. Divide the rice, chicken, and toppings. Store them separately to prevent sogginess. Place the bowls in the fridge. They should last for about three days. Always cool the food to room temperature before storing. This helps avoid condensation, which can make your food wet. For reheating, use the microwave or a skillet. If using the microwave, cover your bowl loosely. Heat in short bursts, stirring between each burst. This keeps the food moist and flavors intact. If you prefer the skillet, add a splash of water to the pan. Heat over medium until warmed through. Stir often to keep everything juicy. To freeze components, cool them first. Place the chicken and corn in separate freezer bags. Remove as much air as possible before sealing. You can freeze the rice too, but it’s best to eat it fresh. When ready to use, thaw overnight in the fridge. Reheat thoroughly before serving. Enjoy your flavorful meal later! A Street Corn Chicken Rice Bowl is a tasty meal. It combines rice, chicken, and street corn. You get soft rice as the base and juicy chicken on top. The bowl often has fresh corn and colorful veggies. You can add creamy avocado and crumbly feta cheese for extra flavor. Each bite brings a mix of textures and tastes. It's a fun way to enjoy street food at home. Yes, you can make this recipe ahead of time! Meal prep helps save time during busy days. You can cook the chicken and corn in advance. Store them in separate containers. Cook your rice, too, and keep it in the fridge. When you're ready to eat, just heat the chicken and corn. Then, assemble your bowl with fresh toppings. This way, you enjoy a quick, yummy meal any day. You can easily adjust this recipe for dietary needs. For a gluten-free option, use rice and check labels on spices. To make it dairy-free, skip the feta cheese or use a plant-based alternative. If you want it vegan, swap the chicken for tofu or beans. You can also use vegetable broth instead of water for cooking rice. This recipe is flexible, so you can enjoy it no matter your diet! This article gave you all the steps to create a tasty Street Corn Chicken Rice Bowl. You learned about the main and optional ingredients, the cooking process, and tips for perfecting texture and flavor. I shared ideas for protein swaps and seasonal swaps too. Don’t forget how to store your leftovers. With these easy recipes, you can enjoy this dish anytime. Now, go ahead and make your own bowls for a fun meal!

Savory Street Corn Chicken Rice Bowls Recipe Guide

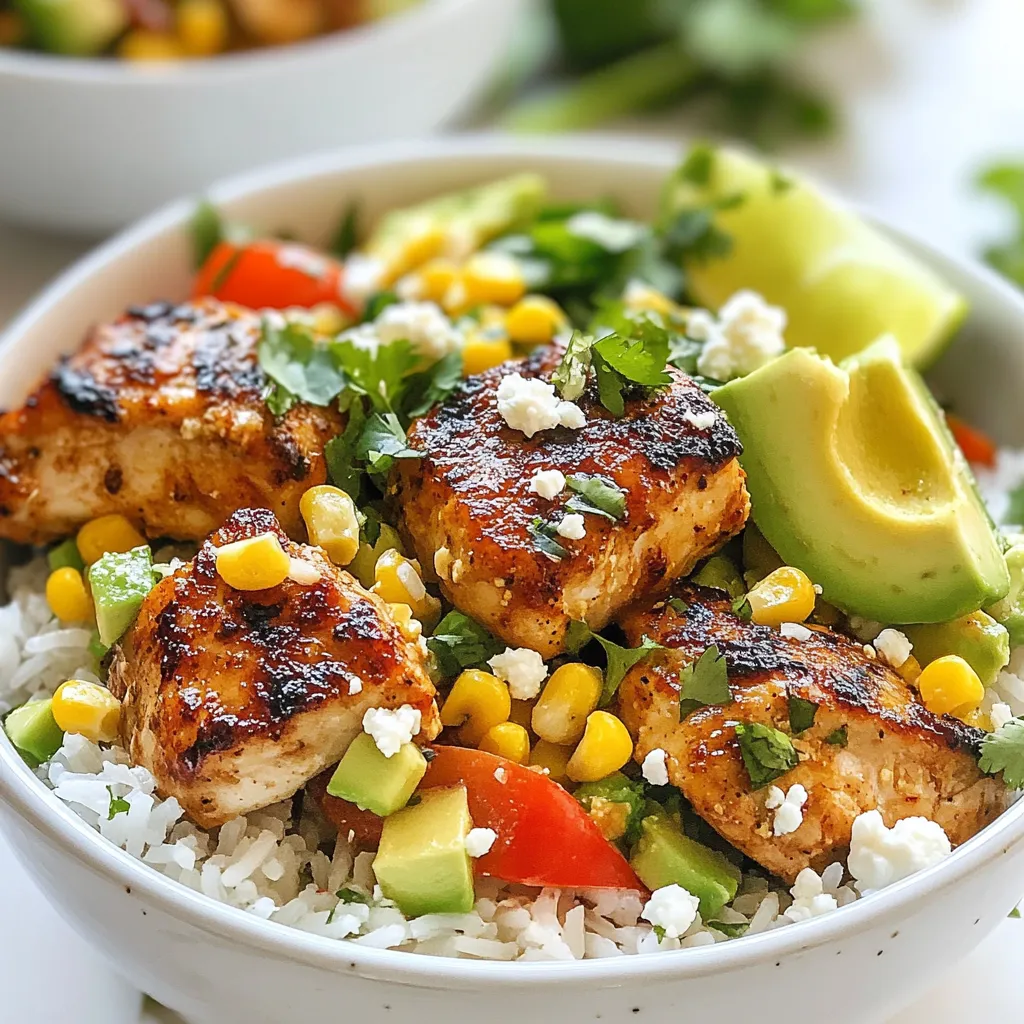
Get ready to elevate your dinner game with my Savory Street Corn Chicken Rice Bowls! This dish combines tender chicken,

Older posts
Newer posts
← Previous Page1 … Page112 Page113 Page114 Page115 Next →

dsad

© 2025 flavorsprint • Built with GeneratePress

Our Policies

  • Copyright Policy
  • Cookie Policy
  • GDPR Policy
  • Privacy Policy
  • Disclaimer
  • Terms Of Use

More Information

  • Home
  • About
  • Contact
  • Appetizers
  • Dessert
  • Dinner
  • Drinks
©2025, flavorsprint About Back To Top