Skip to content
DisclaimerTerms Of UseGDPR PolicyCookie Policy

flavorsprint

  • Home
  • Drinks
  • Appetizers
  • Dinner
  • Dessert
  • About
  • Contact
  • Privacy Policy
DisclaimerTerms Of UseGDPR PolicyCookie Policy

Lillian

- 1 pound ground beef - 1/2 cup yellow onion, finely chopped - 1 cup cheddar cheese, shredded - 1/2 cup dill pickles, finely chopped - 1 tablespoon ketchup - 1 tablespoon mustard - 1 teaspoon garlic powder - 12 egg roll wrappers - Salt and pepper, to taste - Oil for frying The main ingredients make up the heart of the cheeseburger egg rolls. You start with ground beef. This gives a rich, meaty flavor. Next, add yellow onion for sweetness and texture. Cheddar cheese melts inside, adding creaminess. Dill pickles bring a tangy crunch. For extra flavor, you need ketchup and mustard. They add depth and classic cheeseburger taste. Garlic powder enhances the mix, making it more savory. Egg roll wrappers hold everything together. They crisp up nicely when fried. You will also need salt and pepper to season the mix just right. Lastly, oil is necessary for frying. It creates that golden, crunchy exterior we all crave. These ingredients come together for a tasty and fun snack. Get ready to enjoy a twist on a classic dish! {{ingredient_image_1}} Browning the Ground Beef Start by heating a large skillet over medium heat. Add the ground beef and cook until it turns brown. This usually takes about 5-7 minutes. If there’s extra grease, drain it off. This step gives your filling a rich flavor. Sautéing the Onions Next, add the finely chopped onions to the skillet. Cook them with the beef until they become soft and clear. This should take around 3-4 minutes. The onions add a sweet flavor that makes it taste even better. Mixing in Cheese and Seasonings Once the onions are ready, stir in the shredded cheddar cheese, dill pickles, ketchup, mustard, garlic powder, salt, and pepper. Mix everything until the cheese melts and all the flavors blend. Remove the skillet from heat and let the filling cool a bit. Laying Out the Egg Roll Wrapper Now it’s time to assemble! Place an egg roll wrapper on a clean surface with one corner pointing toward you. This makes it easier to roll. Filling and Rolling Techniques Spoon 2-3 tablespoons of the cheeseburger mixture onto the center of the wrapper. Fold the bottom corner over the filling. Then fold the sides in tightly. Roll toward the top corner and seal the edge with a little water. This keeps the filling inside while frying. Sealing the Edges Make sure to press the edges well. You want a good seal to prevent any filling from leaking out. Repeat this process with the rest of the wrappers and filling. Heating the Oil In a large pot or deep skillet, heat oil over medium-high heat until it reaches about 350°F. This is the perfect temperature for frying. Frying Instructions Carefully add the egg rolls in batches to the hot oil. Fry them for about 3-4 minutes on each side. Look for a golden brown color and a crispy texture. This gives them a nice crunch. Draining Excess Oil Once they’re done frying, use a slotted spoon to lift the egg rolls out of the oil. Place them on a plate lined with paper towels. This helps drain any extra oil, keeping them light and tasty. - Temperature Check for Oil: Heat your oil to about 350°F. This ensures a crispy outside. Use a thermometer for accuracy. If you don't have one, drop a small piece of bread in the oil. It should sizzle and brown in about 60 seconds. - Avoiding Grease Sputters: To keep your kitchen clean, add egg rolls slowly. This prevents excess splatter. You can also cover the pot with a splatter guard for extra protection. - Ideal Dipping Sauces: I love serving these egg rolls with ketchup or mustard. You can also try spicy mayo for a kick. BBQ sauce adds a nice sweetness, too! - How to Present: Arrange egg rolls on a large plate. You can stack them or lay them side by side. Add small bowls of dipping sauces for a fun touch. - Best Practices for Leftovers: Store leftovers in an airtight container. This keeps them fresh. They can last for up to three days in the fridge. - Reheating Instructions: For the best texture, reheat in the oven. Set it to 350°F and bake for about 10 minutes. This keeps them crispy and tasty! Pro Tips Keep It Cool: Allow the cheeseburger mixture to cool slightly before filling the egg roll wrappers to prevent them from getting soggy. Fry in Batches: Don’t overcrowd the pot while frying. Frying in batches ensures that the oil temperature stays consistent for crispy egg rolls. Seal Well: Make sure to seal each egg roll tightly with water to prevent any filling from leaking out during frying. Serve Fresh: Enjoy these egg rolls immediately after frying for the best texture. They can lose their crispness if left out too long. {{image_2}} You can change the meat in your egg rolls. Try ground turkey or chicken instead of beef. These options make the dish lighter but still tasty. You can also go for a vegetarian version. Use black beans, corn, and cheese for a delicious twist. This way, everyone can enjoy the fun! Dipping sauces can really spice up your cheeseburger egg rolls. Spicy mayo is easy to make. Just mix mayonnaise with hot sauce for a kick. BBQ sauce is another great choice. It adds a sweet and smoky flavor to your bites. Don't be afraid to try other sauces, too! Want to amp up the flavor? Adding jalapeños gives a nice heat to your filling. Just chop them finely and mix them in. You can also swap out cheddar for different cheeses. Try pepper jack for a spicy twist or mozzarella for a milder taste. These simple changes make your egg rolls even more exciting! Cheeseburger egg rolls mix two great foods: cheeseburgers and egg rolls. This fusion started in the United States. People wanted fun and tasty snacks. They took the classic egg roll and filled it with cheeseburger flavors. This unique idea quickly gained fans. Many American restaurants adopted cheeseburger egg rolls. They became a favorite appetizer. Diners enjoy their crunchy outside and savory inside. These bites are perfect for sharing. You can find them at sports bars, restaurants, and food festivals. Egg rolls have roots in Asian cuisine. They are made with thin dough and filled with various ingredients. The Asian influence is clear in the way we make cheeseburger egg rolls. In many cultures, cooks adapt recipes to fit local tastes. For example, some people use spicy sauces or add veggies. Others might include different meats like chicken or turkey. This shows how food evolves over time. Cheeseburger egg rolls are now part of a global snack scene. Cheeseburger egg rolls have become trendy. They are popular in casual dining and food trucks. Chefs love to create fun, shareable dishes. These egg rolls fit right in. They bring a playful twist to classic flavors. Food trucks often feature them on their menus. Customers crave quick and tasty bites. The combination of crispy egg rolls and juicy cheeseburger filling makes them a hit. As more people try them, their popularity keeps growing. Yes, you can bake cheeseburger egg rolls. Preheat your oven to 400°F. Place the egg rolls on a baking sheet lined with parchment paper. Brush them lightly with oil for a crispy texture. Bake for about 15-20 minutes or until golden brown. Baking is a healthier option, but frying gives a crunchier bite. You can use spring roll wrappers or wonton wrappers instead. If you want a gluten-free option, try rice paper. Just soak them in water for a few seconds to soften. Each wrapper type has its own taste and texture, so choose what you like best. Cheeseburger egg rolls can last about 3 to 5 days in the fridge. Store them in an airtight container to keep them fresh. Make sure they cool down before putting them in the fridge. This helps prevent sogginess. Absolutely! You can freeze cheeseburger egg rolls before or after frying. If freezing before frying, lay them on a baking sheet and freeze until firm. Then, transfer to a freezer bag. They can last up to 3 months. When ready, fry them from frozen or bake after thawing. Avoid overfilling the egg rolls. This can cause them to burst while cooking. Also, make sure to seal the edges well with water. If the oil is not hot enough, the egg rolls will absorb too much grease. Keep an eye on the frying time to get that perfect golden color. You learned how to make tasty cheeseburger egg rolls. We covered the key ingredients, steps, and tips for perfecting your recipe. You can explore fun variations and creative dips to change things up. Remember, these egg rolls mix classic flavors in a new way. They are perfect for parties or as a snack. So, roll up your sleeves and try making these fun treats. You’ll impress your family and friends with this easy twist on a beloved favorite. Enjoy your cooking adventure!

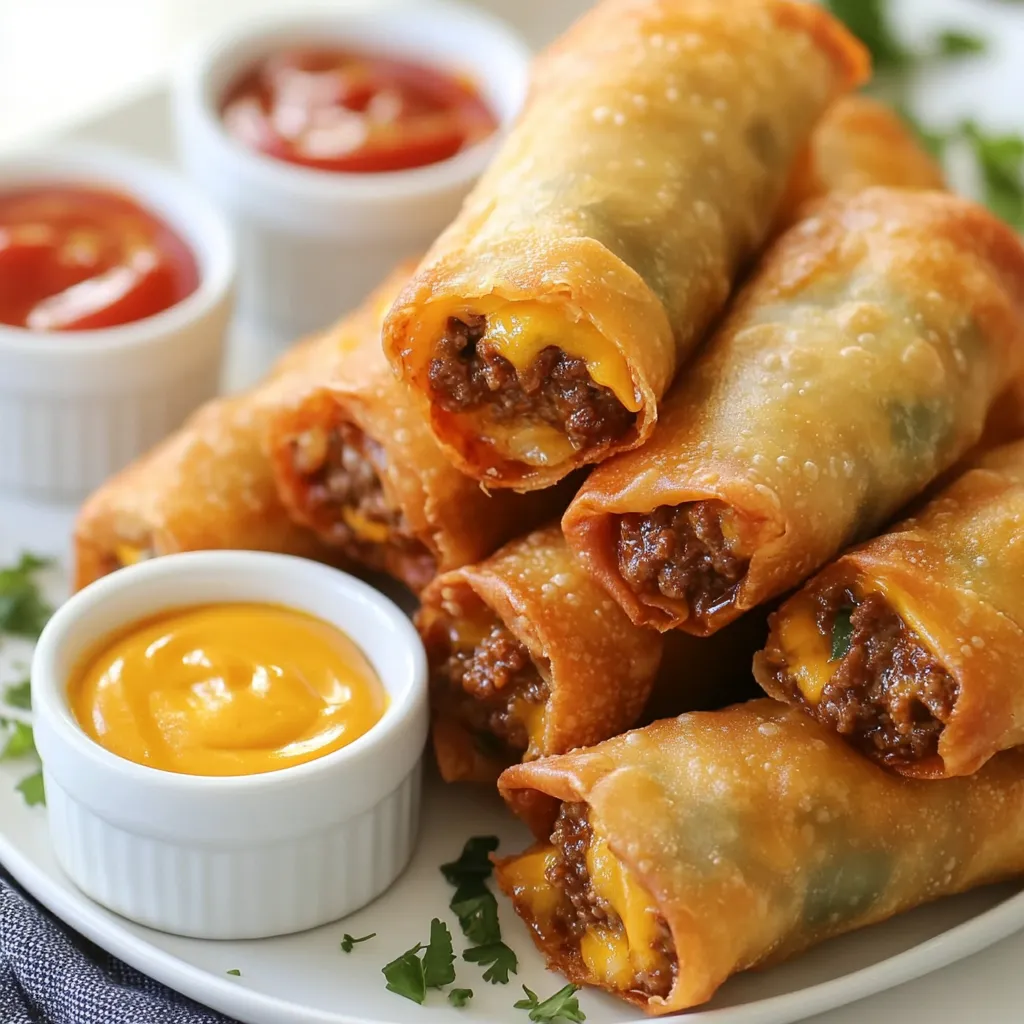
Cheeseburger Egg Rolls Tasty and Fun Snack Idea

Looking for a fun snack that packs all the flavor of a cheeseburger? You’re in the right place! These cheeseburger

- 4 medium sweet potatoes, peeled and cut into 1-inch cubes - 1/4 cup pure maple syrup - 2 tablespoons olive oil - 1 teaspoon cinnamon - 1/2 teaspoon nutmeg - Salt and pepper to taste - 1/4 cup pecans, roughly chopped - Fresh parsley, chopped for garnish You can swap maple syrup for honey or agave syrup if needed. For nuts, try walnuts or almonds instead of pecans. If you want to use oil, avocado oil works well. Each serving has about 200 calories. It offers 3 grams of protein, 8 grams of fat, and 36 grams of carbs. Sweet potatoes are high in fiber and packed with vitamins A and C. They also help support eye health and boost your immune system. {{ingredient_image_1}} 1. Prepping sweet potatoes Start by peeling the sweet potatoes. Then cut them into 1-inch cubes. This size helps them cook evenly. Make sure to use a sharp knife for safety. 2. Coating mixture preparation In a large bowl, combine the sweet potato cubes with olive oil and pure maple syrup. Add cinnamon, nutmeg, salt, and pepper. Mix well until every piece is coated. This mixture gives the sweet potatoes a sweet and warm flavor. 1. Key roasting tips Preheat your oven to 400°F (200°C). Line a baking sheet with parchment paper to prevent sticking. Spread the sweet potatoes in a single layer. This ensures they roast well without steaming. 2. Importance of stirring halfway Roast the sweet potatoes for 25-30 minutes. Make sure to stir them halfway through cooking. This helps them caramelize on all sides and adds to their flavor. Keep an eye on them to avoid burning. 1. Best ways to present the dish Once cooked, let the sweet potatoes cool for a few minutes. Garnish with chopped fresh parsley for a pop of color. Serve them warm on a nice platter to impress your guests. 2. Complementary sides and mains Maple roasted sweet potatoes pair well with grilled chicken or fish. You can also serve them alongside a fresh salad. They make a great side for any meal, adding warmth and color to your plate. To get the best caramelization, use pure maple syrup. Its high sugar content helps the sweet potatoes brown nicely. A higher oven temperature also aids this process. Set your oven to 400°F (200°C). This temperature ensures the sweet potatoes cook well and get that golden edge. Want to add more flavor? Try adding minced garlic or fresh herbs like thyme or rosemary. They bring a fresh taste that complements sweet potatoes. You can also mix in spices like cumin or paprika for a kick. These additions make the dish unique and fun! If your sweet potatoes are larger or smaller, adjust the cooking time. Larger pieces may need a few extra minutes. Smaller cubes will cook faster, so check them after 20 minutes. Remember that every oven can cook a bit differently, so watch closely. Pro Tips Choose the Right Sweet Potatoes: Look for firm sweet potatoes with smooth skin and no blemishes for the best flavor and texture. Maple Syrup Quality Matters: Use pure maple syrup for a richer taste; avoid imitation syrups for better flavor in your dish. Adjust Sweetness: Feel free to adjust the amount of maple syrup based on your sweetness preference or the natural sweetness of the sweet potatoes. Experiment with Spices: Try adding a pinch of ginger or allspice for an extra layer of flavor that complements the sweetness of the potatoes. {{image_2}} You can make this recipe vegan and gluten-free easily. Use pure maple syrup as your sweetener. Sweet potatoes are naturally gluten-free, so they fit right in. For a plant-based twist, skip the pecans or use sunflower seeds instead. This option keeps the dish crunchy and nut-free, perfect for those with allergies. Want to add some savory flavor? Try adding crispy bacon or prosciutto. The saltiness from the meat pairs well with the sweet potatoes. You can also mix in different herbs like rosemary or thyme. These herbs bring a new depth to the dish. Spice lovers can add paprika or cayenne for extra heat. You can mix in seasonal vegetables for a fresh twist. Carrots or Brussels sprouts work great with sweet potatoes. Want a fun holiday touch? Add mini marshmallows on top before roasting. They create a sweet, gooey layer that kids love. This variation brings a festive vibe to your meal. To keep your maple roasted sweet potatoes fresh, use airtight containers. Glass or plastic containers work well. Make sure to let the sweet potatoes cool before sealing them. Store them in the fridge. They stay fresh for about three to five days. When reheating, aim to keep the texture nice. The oven is best for this. Preheat it to 350°F (175°C). Spread the sweet potatoes on a baking sheet. Heat for about 10-15 minutes. If you use a microwave, cover them with a damp paper towel. This keeps moisture in but may not keep them as crispy. If you want to freeze your sweet potatoes, let them cool completely first. Place them in freezer-safe bags. Remove as much air as possible. They will freeze well for up to three months. To thaw, move them to the fridge overnight. Reheat in the oven or microwave, following the tips above to keep the texture. You can tell sweet potatoes are ready by looking for a golden-brown color. They should be tender and caramelized on the edges. To test for tenderness, use a fork or knife. If it easily pierces the sweet potato, it’s done. If not, let them roast a bit longer. Yes, you can prep the sweet potatoes in advance. Cut and coat them with olive oil and spices. Store them in the fridge for up to 24 hours. When you are ready to cook, just spread them on a baking sheet and roast. To reheat, cook in the oven at 350°F (175°C) for about 10 minutes. If you don’t have maple syrup, you can use honey or agave syrup. Brown sugar also works well, but use less since it is sweeter. Adjust the olive oil to keep the balance right. These options still give a nice sweetness and flavor to your dish. In this post, we covered key ingredients for a delicious sweet potato dish, including substitutions and health benefits. I shared step-by-step instructions for preparation, roasting, and serving. You learned tips for perfect caramelization and flavor enhancements along with variations for dietary needs. Finally, I offered storage and reheating tips. Use these insights to create a tasty and healthy meal. Enjoy the journey of cooking and make the most of your sweet potatoes!

Maple Roasted Sweet Potatoes Flavorful Side Dish Recipe

Looking for a tasty side dish? Maple roasted sweet potatoes are perfect! This easy recipe blends natural sweetness with a

To make this tasty chili, gather the following key ingredients: - 2 cups shredded cooked chicken - 1 can (15 oz) white beans, drained and rinsed - 1 can (15 oz) corn kernels, drained - 1 small red onion, diced - 2 cloves garlic, minced - 4 cups chicken broth - 1 cup heavy cream - 1 teaspoon ground cumin - 1 teaspoon chili powder - ½ teaspoon smoked paprika - 1 teaspoon salt - ½ teaspoon black pepper - 1 cup cojita cheese, crumbled - 2 tablespoons fresh cilantro, chopped - 1 lime, juiced - Tortilla strips for garnish These ingredients create a rich and creamy base. The shredded chicken adds protein. White beans and corn give texture and flavor. The spices bring warmth and depth. You can add a few optional items to enhance your chili: - Fresh jalapeños for heat - Avocado for creaminess - Extra lime for brightness - Sour cream for tanginess These options let you customize the dish. You can adjust heat and creaminess to your taste. This chili is not just delicious; it's also healthy. Here’s a quick look at its key nutrients: - High in protein from chicken and beans - Good source of fiber from beans and corn - Contains healthy fats from heavy cream and cheese Each serving is filling and nutritious. This makes it a great choice for a family meal. {{ingredient_image_1}} Start by gathering all your ingredients. You need: - 2 cups shredded cooked chicken - 1 can (15 oz) white beans, drained and rinsed - 1 can (15 oz) corn kernels, drained - 1 small red onion, diced - 2 cloves garlic, minced - 4 cups chicken broth - 1 cup heavy cream - 1 teaspoon ground cumin - 1 teaspoon chili powder - ½ teaspoon smoked paprika - 1 teaspoon salt - ½ teaspoon black pepper - 1 cup cojita cheese, crumbled - 2 tablespoons fresh cilantro, chopped - 1 lime, juiced - Tortilla strips for garnish Now, heat a tablespoon of olive oil in a large pot over medium heat. Add the diced red onion. Sauté it for 3-4 minutes until it becomes soft and translucent. Then, add the minced garlic and cook for another minute. This step builds a strong flavor base. Next, stir in the shredded chicken, corn, white beans, chicken broth, cumin, chili powder, smoked paprika, salt, and black pepper. Bring the pot to a boil, which helps combine all the flavors. Once boiling, reduce the heat to low. Let it simmer for about 15 minutes. This allows all the flavors to meld together. After 15 minutes, add the heavy cream and lime juice. Stir well and let it simmer again for another 5 minutes. This will make your chili creamy and rich. Serve the chili hot in deep bowls. Top each bowl with crumbled cojita cheese, chopped cilantro, and crispy tortilla strips. For a pop of color, add extra lime wedges on the side. This dish not only tastes great but looks amazing too! When making Mexican street corn white chicken chili, avoid these common mistakes: - Overcooking the Chicken: Use shredded cooked chicken. Do not cook it again in the pot. - Skipping the Spices: The spices add great flavor. Don’t skip cumin and chili powder. - Too Much Cream: Heavy cream adds richness, but too much can make it heavy. Stick to one cup. - Not Simmering Long Enough: Let it simmer for at least 15 minutes. This helps flavors blend well. Here are my expert tips to ensure your chili shines: - Use Fresh Ingredients: Fresh garlic and onion boost flavor. Try not to use dried versions. - Adjust Spice Levels: Feel free to add more chili powder if you like heat. Taste as you go. - Top with Fresh Herbs: Fresh cilantro and lime juice brighten the dish. Add them just before serving. - Choose Quality Chicken Broth: A good broth makes a big difference. Look for low-sodium options for better control. To take your chili to the next level, consider these enhancements: - Add Lime Zest: A bit of lime zest brightens the flavor. Add it with the lime juice. - Try Different Cheeses: While cojita cheese is great, try crumbled feta or queso fresco for a twist. - Incorporate Vegetables: Add bell peppers or zucchini for more texture and nutrients. Sauté them with the onion. - Finish with Hot Sauce: A dash of your favorite hot sauce can add a kick at the end. Pro Tips Use Rotisserie Chicken: For quicker prep, consider using store-bought rotisserie chicken. It adds flavor and saves time on cooking. Adjust Spice Levels: If you prefer a spicier chili, add diced jalapeños or extra chili powder to taste. Customize Your Toppings: Feel free to get creative with toppings! Avocado, sour cream, or hot sauce can enhance the flavor. Make It Ahead: This chili can be made ahead of time and tastes even better the next day as the flavors develop. {{image_2}} You can easily make this chili vegetarian. Replace the shredded chicken with 2 cups of cooked quinoa or brown rice. Use vegetable broth instead of chicken broth. This keeps the dish hearty and filling. Add more veggies like bell peppers or zucchini for extra flavor. You can also add more white beans to enhance protein. For heat lovers, add fresh jalapeños. Dice 1-2 jalapeños and add them when sautéing the onions. This gives the chili a nice kick. You can also use pickled jalapeños for a tangy twist. Adjust the amount based on your spice level. This variation keeps the dish exciting and full of flavor. Want to make your chili even heartier? Consider adding 1 cup of diced potatoes or sweet corn. You can also mix in some chopped spinach or kale for added nutrition. If you enjoy extra creaminess, try stirring in more heavy cream or a dollop of sour cream before serving. These additions make your chili rich and satisfying. First, let your chili cool down. This helps keep it fresh. Transfer the chili to an airtight container. You can use glass or plastic, whichever you prefer. Store it in the fridge for up to four days. If you want to keep it longer, consider freezing it. When you are ready to enjoy your chili again, take it out of the fridge. Pour the chili into a pot over medium heat. Stir it often to help heat it evenly. You can also use a microwave if you want it fast. Just put it in a microwave-safe bowl and heat it for 1-2 minutes. Stir it halfway through. Freezing is a great way to save your chili. Use a freezer-safe container or a heavy-duty freezer bag. Leave some space at the top for the chili to expand. Label the container with the date. You can freeze it for up to three months. Thaw it in the fridge overnight when you're ready to eat. Then, reheat as mentioned above. Mexican street corn, or elote, is a popular snack. It features grilled corn on the cob. The corn is smothered in creamy sauce, often made with mayonnaise, lime juice, and chili powder. Then, it gets topped with cheese, usually cotija. This dish brings bold flavors and a crunchy texture. It’s often sold by street vendors in Mexico, making it a beloved treat. Yes, you can use fresh or frozen corn! Fresh corn gives a crisp bite. You can cut it off the cob after grilling or boiling. Frozen corn offers convenience and is just as tasty. If using frozen corn, just thaw it before adding it to the pot. Both options work well in this chili recipe. To make this chili dairy-free, swap out the heavy cream. Use coconut milk or almond milk instead. Both options add creaminess without dairy. For cheese, try a dairy-free cheese option or skip it altogether. You can still enjoy great flavor without dairy in this delicious chili. Mexican Street Corn White Chicken Chili is a fun and tasty dish. We covered the key ingredients, cooking steps, and tips for best results. You learned how to modify the recipe, whether you prefer vegetarian options or a spicy kick. Storing and reheating the chili is easy too. Try making this dish at home. Enjoy the rich flavors and warmth it brings. Happy cooking!

Mexican Street Corn White Chicken Chili Recipe Delight

Get ready for a flavor explosion with my Mexican Street Corn White Chicken Chili! This dish combines the sweet, smoky

To make Cowboy Butter Chicken Pasta, you need these main ingredients: - 2 chicken breasts, diced - 8 oz (225g) penne pasta - 4 tablespoons unsalted butter - 4 cloves garlic, minced - 1 teaspoon smoked paprika - 1 teaspoon onion powder - ½ teaspoon red pepper flakes - 1 cup heavy cream - 1 cup grated Parmesan cheese - 1 cup cherry tomatoes, halved - 1 tablespoon fresh parsley, chopped - Salt and pepper to taste You can add a few ingredients for even more flavor: - Fresh basil for a herbal note - Lemon zest for a bright touch - Crushed nuts for a crunchy texture These extras can help boost your dish's taste and texture. Experimenting is part of the fun. If you don't have some ingredients, here are easy swaps: - Use rotisserie chicken instead of fresh chicken for speed. - Swap penne for any pasta shape you like. - Substitute half-and-half for heavy cream if you want a lighter sauce. - Try nutritional yeast instead of Parmesan for a dairy-free option. These swaps can make this dish fit what you have on hand. Enjoy creating your Cowboy Butter Chicken Pasta! {{ingredient_image_1}} Start by boiling a large pot of salted water. This helps flavor the pasta. Once the water boils, add 8 oz of penne pasta. Cook it according to the package instructions until it is al dente. This should take about 8-10 minutes. When done, drain the pasta and set it aside. Next, heat a large skillet over medium heat. Add 4 tablespoons of unsalted butter. Let it melt, then add 4 minced garlic cloves. Sauté the garlic for about 1-2 minutes. Be careful not to burn the garlic; it can turn bitter. Now, add 2 diced chicken breasts to the skillet. Sprinkle in 1 teaspoon of smoked paprika, 1 teaspoon of onion powder, and ½ teaspoon of red pepper flakes. Season with salt and pepper to taste. Cook the chicken for 6-8 minutes, stirring often, until it is browned and cooked through. Once the chicken is cooked, stir in 1 cup of heavy cream. Bring this mixture to a gentle simmer. Then, add 1 cup of grated Parmesan cheese and 1 cup of halved cherry tomatoes. Stir everything together until the cheese melts and the sauce thickens, about 3-4 minutes. Finally, add the cooked penne pasta to the skillet. Toss it all together to combine evenly. If the sauce is too thick, add a splash of pasta water. This helps reach the right consistency. Remove from heat and garnish with 1 tablespoon of chopped fresh parsley before serving. To make juicy chicken, start with even-sized pieces. Cut your chicken breasts into small, uniform cubes. This helps them cook evenly. Use a hot pan for better searing. Heat the skillet before adding the butter. This locks in flavor. Cook the chicken until it’s golden brown. Use a meat thermometer to check for doneness. Chicken should reach 165°F (75°C). For a rich sauce, use heavy cream. It blends well with cheese for a silky finish. Add the cream slowly to avoid curdling. Stir constantly as you mix in the Parmesan. If the sauce is too thick, splash in some pasta water. This will loosen it up without losing flavor. Finish with fresh parsley for color and taste. Store leftovers in an airtight container. They can last up to three days in the fridge. When reheating, use low heat to avoid drying out the chicken. You can add a bit of cream or water to keep it creamy. Stir often to heat evenly. Enjoy your meal again without losing its charm. Pro Tips Use Fresh Ingredients: Fresh garlic and herbs can significantly enhance the flavor of your Cowboy Butter Chicken Pasta, making it more vibrant and aromatic. Adjust Spice Level: If you prefer a milder dish, reduce the amount of red pepper flakes, or omit them altogether. You can always add more spice later! Perfect Pasta: To prevent overcooking, make sure to cook the penne pasta until al dente, as it will continue to cook slightly when combined with the sauce. Leftovers Storage: Store any leftovers in an airtight container in the refrigerator for up to 3 days. Reheat gently on the stovetop with a splash of cream or pasta water. {{image_2}} You can make a tasty vegetarian version of Cowboy Butter Chicken Pasta. Swap the chicken for diced mushrooms or firm tofu. Both options soak up flavors well. Use the same spices for that cowboy taste. Add more vegetables like bell peppers or zucchini for extra color. This keeps the dish hearty and filling. If you love heat, make a spicy variant. Increase the red pepper flakes to one teaspoon or more. You can also add diced jalapeños for extra spice. When cooking the chicken, toss in some cayenne pepper for a kick. This fiery version will surely satisfy spicy food lovers. To make this dish gluten-free, choose gluten-free penne pasta. Many brands offer great options that taste just like regular pasta. Check the labels to ensure they meet your needs. The rest of the recipe stays the same, so you get all the creamy goodness without the gluten. To store leftovers, let the Cowboy Butter Chicken Pasta cool down first. Place it in an airtight container. Make sure to seal it well. You can keep it in the fridge for up to three days. When you’re ready to eat, just reheat it on the stove or in the microwave. If you want to freeze this dish, use a freezer-safe container. Make sure to leave some space at the top. This helps the pasta expand when frozen. You can freeze it for up to three months. To use it, thaw it overnight in the fridge. Reheat it gently on the stove. Adding a splash of cream can help it stay creamy. When stored properly, Cowboy Butter Chicken Pasta lasts about three days in the fridge. In the freezer, it can last up to three months. Always check for any changes in smell or color before eating. If it looks or smells off, it’s best to throw it away. You can serve this dish with a simple green salad. A fresh Caesar salad works well too. Garlic bread is a great side for soaking up the sauce. You could also add some roasted vegetables for extra flavor. If you want a drink, try a light white wine or sparkling water. Yes, you can make this dish ahead of time. Cook the pasta and chicken, then mix them with the sauce. Store it in the fridge for up to two days. When you’re ready to eat, just reheat it on the stove. You might need to add a splash of cream or pasta water to keep it creamy. To reduce the spice, skip the red pepper flakes. You can also use less smoked paprika. If you want, add more cream to tone down the heat. Another option is to serve it with a dollop of sour cream. This will cool it down and add a nice creaminess. This blog post shared how to make Cowboy Butter Chicken Pasta. We covered all the ingredients, including options for better taste. I gave you step-by-step instructions so you can cook with ease. You learned tips for great chicken and a creamy sauce, plus how to store leftovers. In closing, I encourage you to try making this dish. Adjust it to fit your tastes. Enjoy this fantastic meal that's perfect for any occasion. Happy cooking!

Cowboy Butter Chicken Pasta Flavorful Weeknight Meal

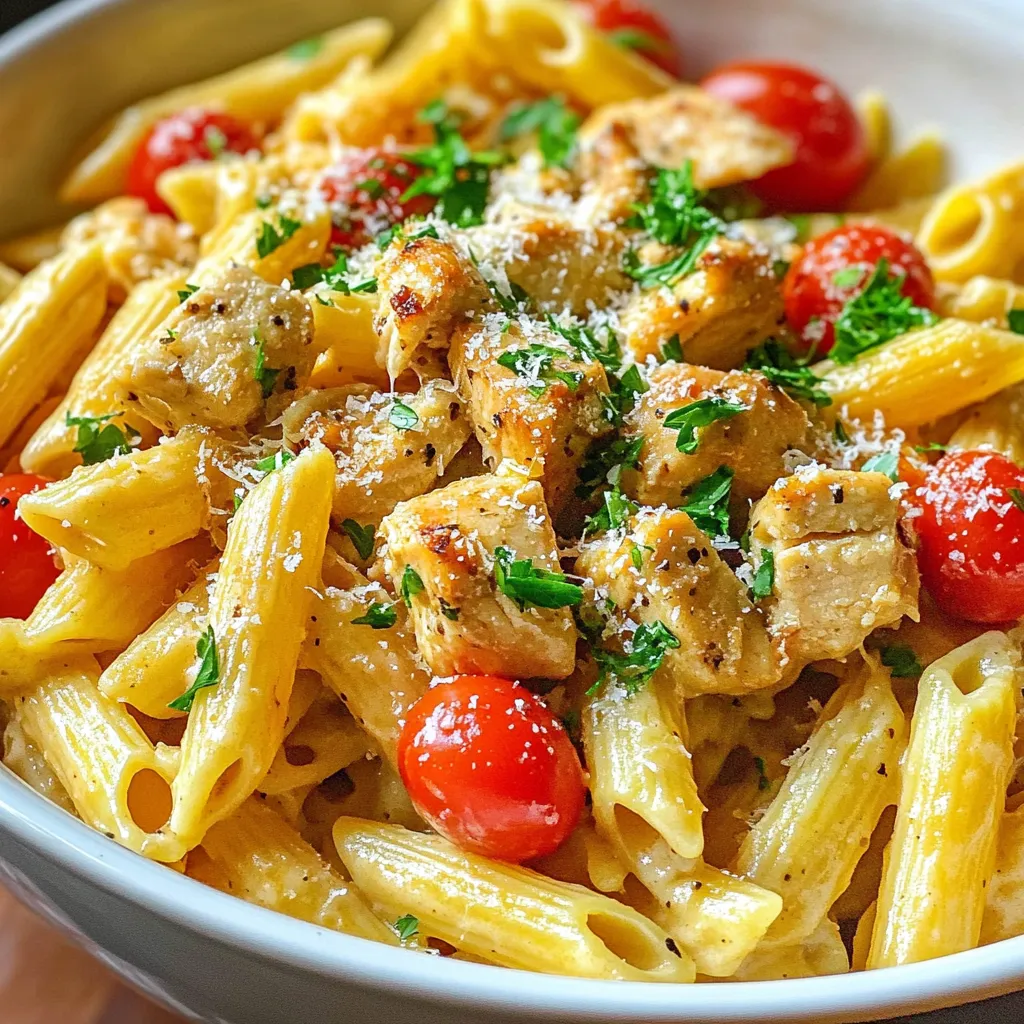
Looking for a quick and tasty dinner idea? Cowboy Butter Chicken Pasta is your answer! This dish brings together juicy

- 1 cup orzo pasta - 2 tablespoons olive oil - 2 chicken sausages, sliced (preferably Italian or garlic flavored) - 2 cups broccoli florets - 1 small onion, diced - 2 cloves garlic, minced - 1 teaspoon red pepper flakes (optional for heat) - 2 cups chicken broth - 1 lemon (zested and juiced) - Salt and pepper to taste - 1/4 cup grated Parmesan cheese - Fresh parsley, chopped for garnish This recipe needs just a few key ingredients. First, orzo pasta is the base of the dish. It cooks quickly and absorbs flavors well. You can use any type of chicken sausage you enjoy, but I prefer Italian or garlic for a tasty kick. Next, fresh broccoli adds color and nutrients. The onion and garlic give the dish depth and aroma. Olive oil is essential for cooking and adds healthy fats. You may want to add red pepper flakes for some heat. The chicken broth makes the orzo creamy and flavorful. Don't forget the lemon zest and juice; they brighten the entire dish. Finally, salt, pepper, and Parmesan cheese round everything out. These ingredients come together to create a delightful meal. Each one plays a role in building flavor and texture. You can easily find these items at your local grocery store. {{ingredient_image_1}} 1. Sautéing chicken sausage Start by heating 2 tablespoons of olive oil in a large saucepan over medium heat. Once hot, add 2 sliced chicken sausages. Cook them for about 5 to 7 minutes. Stir often until they are browned. Use a spatula to break them apart as they cook. This step builds a great base flavor. 2. Adding onions and garlic Next, add 1 diced small onion and 2 minced garlic cloves to the pan. Stir this mixture for 2 to 3 minutes. You want the onion to turn translucent. This will create a nice aroma that fills your kitchen. 3. Incorporating broccoli and orzo After the onions and garlic are ready, toss in 2 cups of broccoli florets. Cook for another 2 minutes. The broccoli should look bright green but still be crisp. Now, add 1 cup of orzo pasta to the pan. Mix it well with the sausage and vegetables. This brings all the flavors together. 4. Simmering the mixture Slowly pour in 2 cups of chicken broth while stirring everything. Bring the mixture to a gentle boil. Then, reduce the heat to low and cover the pan. Let it simmer for about 10 to 12 minutes. The orzo will cook al dente and soak up most of the liquid. Keep an eye on it to avoid burning. 5. Final seasoning and serving suggestions Once the orzo is cooked, stir in the zest and juice of 1 lemon. If you like heat, add 1 teaspoon of red pepper flakes. Season with salt and pepper to taste. Mix well to combine all the flavors. Finally, remove the pan from heat and stir in 1/4 cup of grated Parmesan cheese. Serve hot, garnished with freshly chopped parsley for a bright touch. Enjoy your meal! - Choosing the right chicken sausage: Look for chicken sausage that is flavorful. Italian or garlic sausage works best. They add a nice depth to the dish. Avoid sausages with too many fillers; you want quality meat. - Cooking orzo al dente: To cook orzo just right, follow the package instructions. Usually, it takes about 8-10 minutes. Taste it a minute before the time is up. It should be firm but not hard. This will keep it from getting mushy when mixed with other ingredients. - Enhancing flavors with lemon: Lemon adds brightness to your meal. Use both the zest and juice for the best flavor. The zest gives a pop while the juice adds a tangy finish. It balances the richness of the sausage and cheese well. - Alternatives for seasoning: If you want to change things up, try different spices. Fresh herbs like basil or thyme can add a nice touch. For a kick, use smoked paprika or cayenne pepper instead of red pepper flakes. Each will change the flavor in a fun way! Pro Tips Choose Quality Sausages: Opt for high-quality chicken sausages for better flavor. Italian or garlic-flavored sausages will enhance the dish significantly. Don’t Overcook the Broccoli: Cook the broccoli just until it’s bright green and slightly tender to maintain its nutrients and vibrant color. Adjust the Lemon to Taste: The amount of lemon juice can be adjusted based on your preference for acidity. Start with less and add more if desired. Parmesan Cheese Tip: For a creamier texture, use freshly grated Parmesan cheese instead of pre-packaged, as it melts better and enhances the overall flavor. {{image_2}} You can make Chicken Sausage Broccoli Orzo your own. Start by swapping chicken sausage for other proteins. Try turkey sausage or even shrimp for a new twist. If you're vegan or vegetarian, you can replace sausage with plant-based options. Use lentils or chickpeas for protein. They add great texture and flavor. Adding different vegetables can also change the dish. Bell peppers, zucchini, or spinach work well. Feel free to mix and match them based on what's in your fridge. For flavor variations, herbs can elevate your meal. Fresh basil or thyme can add a nice touch. You could also use dried herbs, like oregano or rosemary, for a warm taste. To keep your Chicken Sausage Broccoli Orzo fresh, start by letting it cool. Once cooled, place it in an airtight container. Store it in the fridge. It stays good for up to three days. When you want to reheat, use a microwave-safe dish. Add a splash of chicken broth or water. This helps keep it moist. Cover it with a lid or plastic wrap. Heat on medium for 2-3 minutes, stirring halfway through. If you need to freeze it, use freezer-safe containers. You can freeze leftovers for up to three months. To thaw, move it to the fridge overnight. Reheat it on the stove or in the microwave. By following these tips, you can enjoy this tasty dish later! Can I use a different type of pasta? Yes, you can use other pasta types. Try penne, farfalle, or even whole wheat pasta. Just adjust cooking time as needed. Keep an eye on it while cooking. Is this dish suitable for meal prep? Absolutely! Chicken sausage broccoli orzo makes a great meal prep dish. It stores well in the fridge and reheats nicely. Pack it in individual containers for easy lunches. How long can leftovers be stored? Leftovers can last up to four days in the fridge. Make sure to store them in an airtight container. If you want to keep it longer, consider freezing it. Can I make this recipe gluten-free? Yes, you can make this dish gluten-free. Just swap the orzo for gluten-free pasta. Many good options are available, like rice or quinoa pasta. Adjust cooking time as needed. This blog post shared a simple recipe for chicken sausage and broccoli orzo. We covered the ingredients needed, from orzo pasta to spices. I guided you through the cooking steps and shared tips for perfecting the dish. We also explored variations to make it your own and discussed storage methods for leftovers. Enjoy making this dish! With its ease and flavor, you can impress anyone at your table. Happy cooking!

Chicken Sausage Broccoli Orzo Flavorful Weeknight Meal

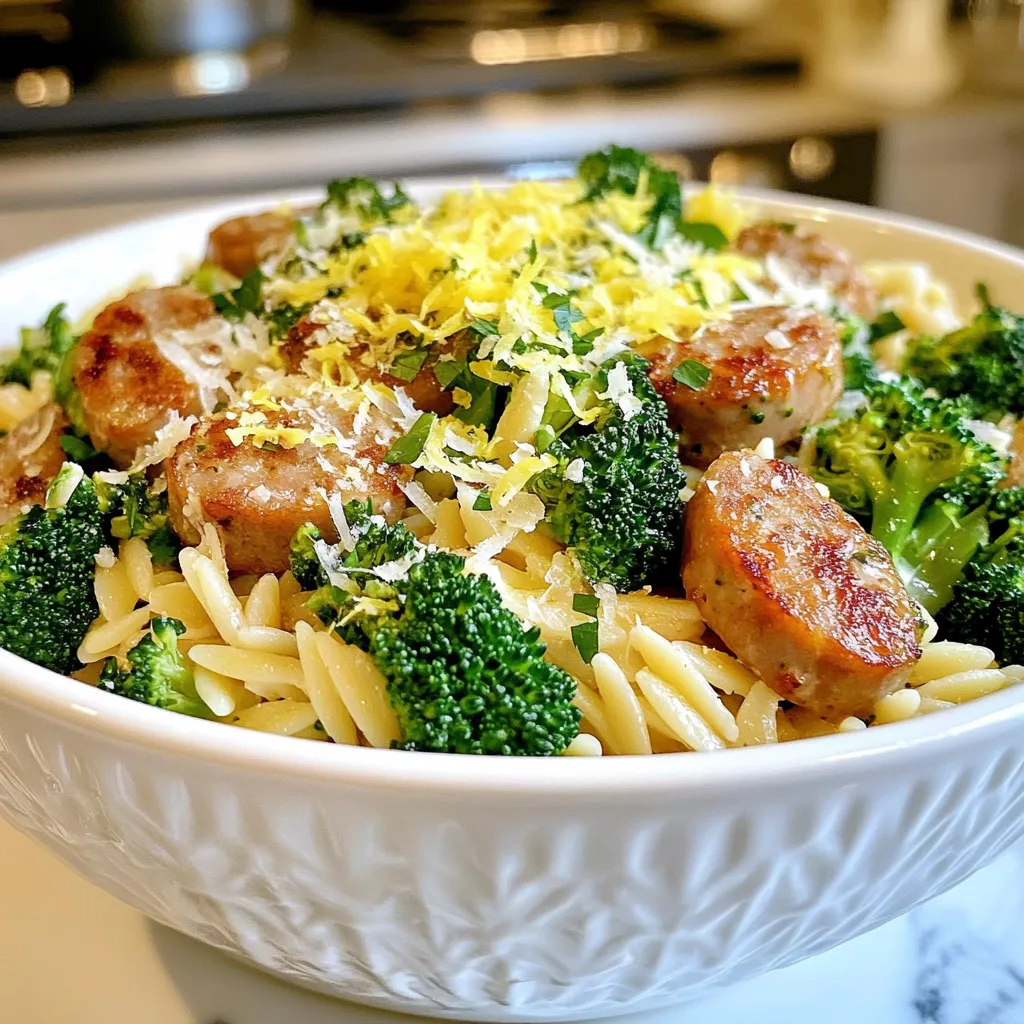
Looking for a quick and tasty weeknight meal? Chicken Sausage Broccoli Orzo is your answer! This dish packs flavor, nutrition,

- 1 lb boneless skinless chicken thighs, cut into bite-sized pieces - ½ cup cornstarch - 1 cup orange juice To make Minute Crispy Orange Chicken, start with the right main ingredients. I recommend using boneless skinless chicken thighs. They stay juicy and tender. Cornstarch is key for that crispy texture. It coats the chicken well and helps it fry up perfectly. Fresh orange juice adds a bright and sweet flavor. Make sure it’s real juice, not from a bottle. - 2 tablespoons soy sauce - 1 tablespoon honey - 1 tablespoon sesame oil - 1 teaspoon grated ginger - 2 garlic cloves, minced - 1 tablespoon rice vinegar The sauce is where the magic happens. Soy sauce gives a rich umami taste. Honey adds sweetness and helps the sauce stick to the chicken. Sesame oil brings a nutty flavor that rounds out the dish. Grated ginger and minced garlic add warmth and depth. Rice vinegar balances the sweetness with a bit of tang. - 1 tablespoon green onions, finely chopped - Sesame seeds Garnishes make your dish look stunning. Chopped green onions add color and a mild onion taste. Sesame seeds are great for crunch and visual appeal. They also bring a hint of nutty flavor. You can skip these if you want, but they really enhance the dish. {{ingredient_image_1}} To start, take your boneless, skinless chicken thighs and cut them into bite-sized pieces. In a bowl, add ½ cup of cornstarch. Coat the chicken pieces well with the cornstarch. Ensure every piece is covered evenly. This step is key for a crispy texture. Next, grab a separate bowl for the sauce. Whisk together 1 cup of orange juice, 2 tablespoons of soy sauce, 1 tablespoon of honey, 1 tablespoon of sesame oil, 1 teaspoon of grated ginger, 2 minced garlic cloves, and 1 tablespoon of rice vinegar. Mix until all ingredients blend well. Set this aside for later. Now, heat about 1 inch of vegetable oil in a large skillet. Aim for medium-high heat. Once the oil is hot, carefully add the coated chicken, but do this in batches. Don't overcrowd the pan. Fry the chicken for about 3-4 minutes. Look for that golden brown color. Remove the chicken and let it drain on paper towels. After frying, it’s time for the sauce. In the same pan, drain excess oil, leaving just 1 tablespoon. Pour in the orange sauce and let it heat for about a minute. Add the fried chicken pieces and toss to coat well. Keep mixing for about 2 minutes so every piece gets that delicious sauce. When the chicken is well-glazed, remove it from heat. Now, it’s time to plate. Garnish your crispy orange chicken with chopped green onions and a sprinkle of sesame seeds. This adds a nice touch and makes it look great for serving. Enjoy your meal! To get that perfect crunch, cornstarch is a must. It coats the chicken and gives it a light, crispy shell. Without it, your chicken might end up soggy. Frying temperature is key too. Heat your oil to around 350°F. If it’s too cool, the chicken will absorb oil and become greasy. Too hot, and it will burn. Find that sweet spot for the best results. Using fresh ingredients makes all the difference. Fresh ginger and garlic add bright flavors that dried spices can’t match. You can even add more garlic or ginger if you love those tastes. Just a little extra can give your dish a huge flavor boost. Pair this crispy orange chicken with steamed rice or stir-fried veggies. These sides balance the dish and add nutrients. For a beautiful presentation, serve it in a large bowl. Top it with green onions and sesame seeds. This makes your meal pop and looks great on the table. Pro Tips Coating Technique: Make sure to evenly coat each piece of chicken with cornstarch for maximum crispiness. Oil Temperature: Ensure the oil is hot enough before frying; a temperature of 350°F (175°C) is ideal for achieving that golden brown color. Batch Frying: Fry the chicken in small batches to prevent overcrowding, which can lead to sogginess. Garnish Wisely: Use fresh green onions and sesame seeds as toppings to add flavor and visual appeal to your dish. {{image_2}} You can swap chicken thighs for chicken breasts if you prefer. Chicken thighs give a juicy bite. Chicken breasts are leaner and still taste great. If you want a meat-free meal, use tofu instead. Tofu absorbs the orange sauce well and adds protein. Just press the tofu to remove excess water. Cut it into bite-sized cubes, then coat with cornstarch. To add spice, mix in some chili paste or crushed red pepper. This will give your dish a nice kick. You can also try different fruit juices. Pineapple juice or lemon juice can add a fun twist to the flavor. Just replace part of the orange juice with your choice. For a healthier option, try baking the chicken in the oven. Coat the chicken with cornstarch and place it on a baking sheet. Bake at 400°F for about 20 minutes. This keeps the chicken crispy without frying. If you want quick and easy, use an air fryer. It cooks the chicken fast and gives it a nice crunch. Just follow the same steps as frying, but use the air fryer instead. After enjoying your Minute Crispy Orange Chicken, store leftovers properly. Let the chicken cool down to room temperature. Place it in an airtight container. This helps keep it fresh. Glass or plastic containers with tight lids work well. Make sure to eat it within three days for the best taste. You can freeze your crispy orange chicken for longer storage. To do this, let it cool completely. Then, place it in a freezer-safe bag or container. Remove as much air as possible. This helps prevent freezer burn. When you're ready to eat it, thaw it in the fridge overnight. For reheating, use your oven or an air fryer. This keeps the chicken crispy. In the fridge, Minute Crispy Orange Chicken lasts about three days. If you freeze it, it can stay good for about three months. Check for signs of spoilage. Look for off smells or color changes. If it smells bad or looks strange, throw it away. Always prioritize your health and safety when it comes to food. It takes about 20 minutes to cook Minute Crispy Orange Chicken. Here's how it breaks down: - Prep Time: 10 minutes - Cook Time: 10 minutes This quick recipe lets you enjoy a tasty meal in no time! Yes, you can prepare some parts of this dish ahead of time. Here are some tips: - Chicken Prep: Coat the chicken with cornstarch and store it in the fridge. - Sauce Prep: Mix the orange sauce and keep it in a sealed container. - Frying: Fry the chicken fresh for the best crispiness. This way, you can cut down on cooking time later! Minute Crispy Orange Chicken pairs well with many sides. Here are some suggestions: - Rice: Serve it over white or brown rice. - Vegetables: Steamed broccoli or stir-fried veggies work great. - Salad: A fresh salad adds a nice crunch. These sides balance the flavors and make a complete meal! You can make this dish healthier with a few simple swaps: - Chicken: Use skinless chicken breast instead of thighs. - Cornstarch: Substitute with whole wheat flour for a fiber boost. - Sauce: Reduce honey to cut down on sugar. These changes keep the taste while making it more nutritious. This recipe for Minute Crispy Orange Chicken offers simple ingredients and steps. You learn to make a tasty sauce and fry chicken to perfection. Tips on keeping it crispy and serving ideas enhance the dish. Now you can try different meats and cooking methods. Don’t forget about storage tips to enjoy leftovers. Explore options to add flavor and make it fit your taste. With this guide, you can impress anyone with your cooking skills. Enjoy making this dish!

Minute Crispy Orange Chicken Flavorful Quick Recipe

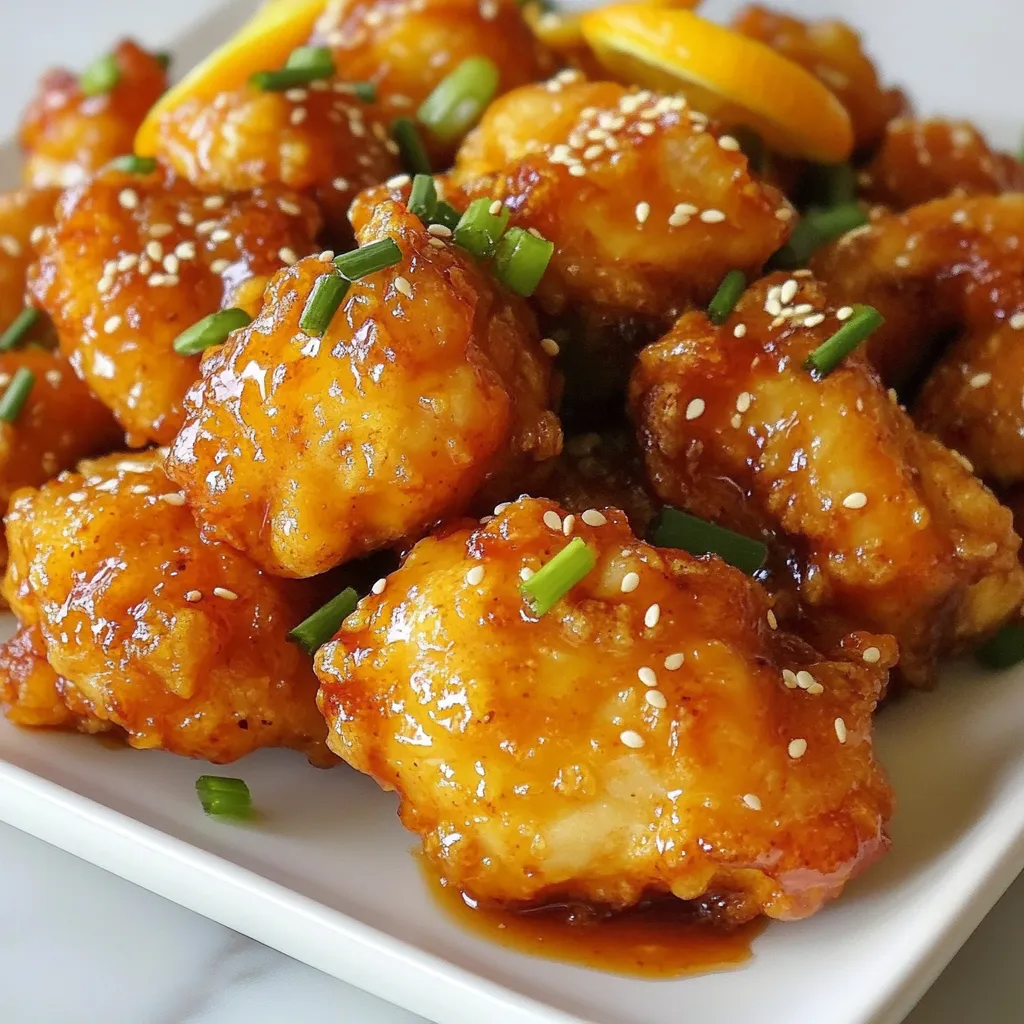
Are you ready to whip up a quick and tasty meal? This Minute Crispy Orange Chicken recipe is your answer!

To make low carb chicken tortilla soup, you need some key ingredients. Each one adds flavor and texture to the dish. Here’s what you will need: - 2 tablespoons olive oil - 1 medium onion, diced - 3 cloves garlic, minced - 1 red bell pepper, diced - 1 green bell pepper, diced - 1 teaspoon ground cumin - 1 teaspoon chili powder - 6 cups chicken broth (low sodium) - 2 cups cooked chicken, shredded - 1 can (14.5 oz) diced tomatoes, no added sugar - 1 cup corn (fresh or frozen, optional for low-carb) - 1 avocado, diced - 1 lime, juiced - 1/4 cup fresh cilantro, chopped - Salt and pepper to taste - 1/2 cup shredded cheese (cheddar or Mexican blend) - Tortilla chips (low-carb or homemade, optional for garnish) These ingredients work together to create a soup that is both hearty and healthy. The diced tomatoes bring sweetness, while the spices add warmth. You can adjust the corn based on your carb goals. Fresh lime juice gives it a zesty kick. This soup is great for any meal! {{ingredient_image_1}} 1. Heating the oil and sautéing onions Start by heating 2 tablespoons of olive oil in a large pot over medium heat. Once hot, add 1 medium diced onion. Sauté for about 5 minutes until the onion is soft and clear. 2. Adding garlic and bell peppers Next, stir in 3 cloves of minced garlic along with 1 diced red and 1 diced green bell pepper. Cook this mixture for 3 to 4 minutes until the peppers soften and the garlic is fragrant. 3. Incorporating spices Now, add 1 teaspoon of ground cumin and 1 teaspoon of chili powder to the pot. Stir everything together and cook for another minute. This step enhances the soup's flavor. 4. Adding broth and main ingredients Pour in 6 cups of low-sodium chicken broth. Bring the soup to a gentle simmer. Then, mix in 2 cups of shredded cooked chicken, 1 can of diced tomatoes (14.5 oz, no added sugar), and 1 cup of corn if you choose to include it. Stir well. 5. Simmering the soup Lower the heat and let the soup simmer for 15 to 20 minutes. This allows all the flavors to blend. Be sure to taste and season with salt and pepper as needed. 6. Finishing touches with lime and cilantro Just before serving, stir in the juice from 1 lime and 1/4 cup of chopped fresh cilantro. This adds a bright, fresh taste to the soup. 7. Serving Finally, ladle the soup into bowls. Top each bowl with diced avocado, shredded cheese, and tortilla chips if desired. This adds texture and flavor. This soup is easy to make and packed with flavor. Enjoy every comforting spoonful! Adjusting spice levels Start with mild spices. You can always add more. If you love heat, try more chili powder. For a smoky flavor, add smoked paprika. Taste as you go to find your perfect balance. Utilizing fresh ingredients Fresh ingredients make a big difference. Use fresh garlic and herbs for bright flavors. Fresh bell peppers add crunch and sweetness. Avocado must be ripe for the best taste in your soup. Choosing the right cheese Cheddar or a Mexican blend works best. They melt well and add flavor. For a different twist, try crumbled queso fresco. This cheese gives a creamy and tangy touch. Serving suggestions with garnishes Serve your soup with a lime wedge on the side. This adds a fresh kick. Top with diced avocado, shredded cheese, and chopped cilantro. For a crunch, add low-carb tortilla chips. Bowl presentation ideas Use colorful bowls to make your soup pop. A bright bowl draws the eye. Arrange the garnishes neatly on top. This makes your meal look restaurant-worthy and inviting. Pro Tips Use Fresh Ingredients: For the best flavor, opt for fresh vegetables and herbs whenever possible. They will enhance the overall taste of your soup. Control the Spice Level: Adjust the amount of chili powder according to your taste preference. You can also add fresh jalapeño for an extra kick. Make it Ahead: This soup tastes even better the next day as the flavors continue to meld. Prepare it in advance and reheat when ready to serve. Experiment with Toppings: Try different toppings such as sour cream, sliced radishes, or pickled onions to add variety and texture to your soup. {{image_2}} Low-carb adjustments To keep this soup low-carb, skip the corn. You can also cut back on the potatoes or beans if you want. Using more low-carb veggies like zucchini and spinach can add bulk without the carbs. Vegetarian options To make a vegetarian version, swap the chicken for beans or lentils. Use vegetable broth in place of chicken broth. You can add more veggies like carrots or mushrooms to keep it hearty. Adding different proteins You can use turkey or even shrimp instead of chicken. Just make sure to adjust the cooking time. If you use shrimp, add it in the last few minutes of cooking. Alternative vegetables Feel free to mix in some diced carrots or celery for added crunch. You might also want to try adding kale or spinach for extra nutrients. Cheese options For cheese, you can use pepper jack for a spicy kick. If you prefer a milder flavor, mozzarella works well too. Just pick what you enjoy most! To keep your low carb chicken tortilla soup fresh, follow these tips: - Refrigerator storage: Place the soup in an airtight container. It stays good for 3-4 days in the fridge. - Freezing guidelines: If you want to freeze it, pour the soup into freezer-safe bags or containers. Leave some space at the top, as it will expand. It keeps well for up to 3 months in the freezer. When you're ready to enjoy leftovers, use these methods: - Stovetop: Pour the soup into a pot. Heat over medium heat until hot. Stir occasionally to warm evenly. - Microwave: Place the soup in a microwave-safe bowl. Heat for 1-2 minutes, stirring halfway through. Make sure it is hot all the way through before serving. These tips will help you savor your delicious soup anytime! Low carb tortilla soup is a flavorful dish. It has all the best parts of classic tortilla soup. You get chicken, spices, and fresh veggies. Instead of high-carb tortillas, this soup keeps it low-carb, making it great for diets. You can enjoy all the taste without the extra carbs. To spice up your soup, add more chili powder. You can also toss in some diced jalapeños or hot sauce. Taste as you go to reach your perfect spice level. Remember, a little can go a long way! Yes, rotisserie chicken is a great choice! It saves time and adds rich flavor. Just shred the chicken and mix it into the soup. This makes meal prep faster without losing taste. You can serve this soup with a side of salad or low-carb tortilla chips. A dollop of sour cream or some shredded cheese adds creaminess. You can also enjoy it with sliced avocado on top for extra flavor. To cut down on sodium, choose low-sodium broth. You can also skip added salt while cooking. Instead, focus on herbs and spices for flavor. This keeps the soup tasty without too much salt. This blog post covered how to make a tasty chicken tortilla soup. We discussed all the key ingredients, straightforward steps, and useful tips to enhance flavor. You learned about variations and how to store and reheat leftovers. In the end, this soup is simple, flexible, and fun to make. It’s a dish you can enjoy with family and friends. Enjoy cooking, and have fun making this soup your own!

Low Carb Chicken Tortilla Soup Quick and Easy Recipe

Looking for a tasty meal without the carbs? This Low Carb Chicken Tortilla Soup is your answer! Packed with vegetables

- 1 lb ground chicken - 1 cup breadcrumbs - 1/2 cup grated Parmesan cheese The main ingredients are the heart of this dish. Ground chicken offers a light taste. It is lean and healthy. Breadcrumbs help bind the meatloaf together. Parmesan cheese adds a rich, creamy flavor. Each ingredient works in harmony to create a tasty meal. - 1/2 cup chopped fresh parsley - 4 cloves garlic, minced - 1 small onion, finely chopped Flavor enhancers make this meatloaf special. Fresh parsley adds color and a fresh taste. Garlic gives it a bold kick. Onion brings sweetness that balances the flavors. Together, they create a delicious aroma that fills your kitchen. - 1 large egg - 1/4 cup milk - 1/2 cup marinara sauce (for topping) Binders keep the meatloaf moist and hold it together. The egg acts as a glue for the mix. Milk adds creaminess and helps keep the meatloaf tender. Topping it with marinara sauce adds extra flavor. It also makes the meatloaf look inviting and delicious. {{ingredient_image_1}} - Preheating the oven: Start by setting your oven to 350°F (175°C). This will ensure it is hot enough to cook the meatloaf evenly. - Greasing the loaf pan: Lightly grease a loaf pan with cooking spray or oil. This helps the meatloaf come out easily after baking. - Combining ground chicken with dry ingredients: In a large bowl, add 1 pound of ground chicken. Then, mix in 1 cup of breadcrumbs, 1/2 cup of grated Parmesan cheese, 1/2 cup of chopped parsley, 4 minced garlic cloves, and 1 small finely chopped onion. Stir until well combined. - Mixing wet ingredients: In a separate bowl, whisk together 1 large egg, 1/4 cup of milk, 1 teaspoon of dried thyme, and 1/2 teaspoon of black pepper. Add a pinch of salt. This mixture will help bind everything together. - Transferring the mixture to the loaf pan: Pour the egg mixture into the meat mixture. Stir until everything is mixed well. Next, transfer this mix to the greased loaf pan. Shape it into a loaf. - Applying marinara sauce and baking: Spread 1/2 cup of marinara sauce evenly over the top of the meatloaf. Bake in the preheated oven for 50 to 60 minutes. Check that the internal temperature reaches 165°F (74°C). After baking, let it rest for 10 minutes before slicing. To get the best texture in your meatloaf, start with room temperature ingredients. If your chicken or egg is cold, it can affect how well the meatloaf binds. Mix everything in a large bowl, but don't overdo it. Overmixing can make the meatloaf dense. You want a nice, tender loaf that holds together. You can add more spices and herbs to boost flavor. Think about adding dried oregano or basil for a twist. Fresh herbs like rosemary or chives can also brighten the taste. For sides, consider serving it with mashed potatoes or a fresh salad. These pair well and complete the meal nicely. If your meatloaf is undercooked, return it to the oven. Cook it longer until it reaches 165°F (74°C). If the flavor seems off, taste it before serving. You can adjust seasoning by adding more salt or pepper as needed. Always trust your taste buds! Pro Tips Use Fresh Ingredients: Fresh garlic and parsley will enhance the flavor of your meatloaf significantly compared to dried alternatives. Let it Rest: Allowing the meatloaf to rest for 10 minutes after baking helps the juices redistribute, resulting in a juicier slice. Experiment with Toppings: Try different sauces or cheese toppings for variety; BBQ sauce or mozzarella cheese can add a unique twist! Check for Doneness: Always use a meat thermometer to ensure your meatloaf reaches an internal temperature of 165°F (74°C) for safety. {{image_2}} You can switch meats for this recipe. Use ground beef or turkey instead of chicken. Both will yield tasty results. If you want a meatless option, try a lentil or chickpea base. These options are rich in protein and flavor. For those needing gluten-free meals, use gluten-free breadcrumbs. They work well and will still give you a great texture. If you cannot use dairy, almond or oat milk can replace regular milk. These alternatives blend nicely with the other ingredients. Get creative with your meatloaf by adding veggies. Spinach or bell peppers add color and nutrients. You can also try different cheeses, like mozzarella or cheddar, for a creamy twist. Each addition can change the taste and make it unique. How long will it last in the fridge? Your Garlic Parmesan Chicken Meatloaf will stay fresh in the fridge for about 3 to 4 days. Best practices for storing leftovers To store leftovers, slice the meatloaf and place it in an airtight container. This keeps it moist and tasty. Steps to freeze the meatloaf To freeze, let the meatloaf cool completely. Wrap it tightly in plastic wrap, then place it in a freezer bag. Label it with the date. Thawing and reheating tips When ready to eat, thaw the meatloaf in the fridge overnight. Reheat it in the oven at 350°F until warm. Best ways to reheat for optimal flavor Reheat slices in the oven for the best flavor. Place the slices on a baking sheet and cover with foil. This helps keep them moist. Ideas for repurposing leftovers You can use leftover meatloaf in a sandwich or crumble it over a salad. It adds great taste and texture! To cook Garlic Parmesan Chicken Meatloaf, you should bake it for 50-60 minutes. The meatloaf is done when the internal temperature reaches 165°F (74°C). Use a meat thermometer for the best results. Let it rest for 10 minutes before slicing. This resting time helps keep the juices inside. Yes, you can make this meatloaf ahead of time. Mix the ingredients and shape it into a loaf. Cover it and store it in the fridge for up to 24 hours. This saves time for busy days. You can also freeze it before baking. Wrap it well and store it for up to three months. When ready, bake it directly from frozen, but add extra cooking time. Garlic Parmesan Chicken Meatloaf pairs well with several side dishes. Here are some tasty options: - Mashed potatoes - Steamed vegetables - Garlic bread - Salad with vinaigrette - Roasted sweet potatoes These sides complement the meatloaf's flavors and make a complete meal. Enjoy your cooking! This blog covered a simple, tasty Garlic Parmesan Chicken Meatloaf. We discussed key ingredients, like ground chicken, garlic, and fresh herbs. I shared step-by-step instructions to make mixing and baking easy. Tips helped ensure your meatloaf is tasty and has the right texture. In the end, this dish is flexible and can suit many tastes. You can adjust flavors, substitute ingredients, or store leftovers easily. Enjoy making this meatloaf and explore all the ways to serve it!

Garlic Parmesan Chicken Meatloaf Easy and Tasty Recipe

Looking for a meatloaf recipe that’s easy and full of flavor? You’re in the right spot! My Garlic Parmesan Chicken

To make a Firecracker Ground Chicken Bowl, you will need the following ingredients: - 1 lb ground chicken - 1 cup bell peppers (mixed colors), diced - 1 cup snap peas, trimmed - 1 small onion, finely chopped - 3 cloves garlic, minced - 2 tablespoons soy sauce - 1 tablespoon sriracha - 1 tablespoon sesame oil - 2 teaspoons ginger, minced - 1 tablespoon honey - 2 cups cooked brown rice - 2 green onions, sliced (for garnish) - Sesame seeds (for garnish) - Salt and pepper to taste Each ingredient plays a key role in the dish. The ground chicken is the main protein and gives a nice texture. The bell peppers add color and sweetness, while snap peas bring a fresh crunch. The onion, garlic, and ginger create a base of flavor that makes the dish savory and aromatic. Using soy sauce and sriracha gives the bowl a rich umami taste with a kick of heat. Honey balances this with a touch of sweetness. Brown rice serves as a hearty base, making the meal filling. Finally, green onions and sesame seeds add a lovely finish, both in taste and appearance. {{ingredient_image_1}} - Heat sesame oil in a skillet. - Sauté onions until translucent. - Add garlic and ginger for flavor. - Brown the ground chicken. First, I heat sesame oil in a large skillet over medium heat. This oil adds a nutty taste. Next, I add finely chopped onions and sauté them until they turn translucent. This step usually takes about 2-3 minutes. Then, I add minced garlic and ginger to the skillet. I cook them for one more minute, stirring to avoid burning. This mix adds depth to the dish. Now, I increase the heat to medium-high and add 1 pound of ground chicken to the skillet. I break it apart with my spatula. I cook it until it turns brown and is fully cooked, which takes about 5-7 minutes. I season it with salt and pepper. - Incorporate bell peppers and snap peas. - Prepare and add the firecracker sauce. - Allow flavors to meld. Next, I stir in 1 cup of diced bell peppers and 1 cup of trimmed snap peas. I cook them for 3-4 minutes. I want them tender but still crisp. In a small bowl, I whisk together 2 tablespoons of soy sauce, 1 tablespoon of sriracha, and 1 tablespoon of honey. This sauce gives the dish its firecracker kick. I pour the sauce over the chicken and veggies, stirring to coat everything. I let it cook for another 2 minutes. This step allows all the flavors to meld perfectly. - Scoop cooked brown rice into bowls. - Top with ground chicken mixture. - Garnish with green onions and sesame seeds. To serve, I scoop 2 cups of cooked brown rice into bowls. Then, I top the rice with the firecracker ground chicken mixture. Finally, I garnish with sliced green onions and a sprinkle of sesame seeds. This adds color and texture. You can serve extra sriracha on the side for those who like it spicier! - How to adjust spice levels: To change the heat, add less sriracha. You can also use more honey to balance the spice. If you want more heat, add extra sriracha or a pinch of chili flakes. - Substitutions for ground chicken: You can swap ground chicken for turkey or beef. Each option gives a slightly different flavor. If you want a lighter meal, try ground turkey. - Alternatives for vegetables: If you don’t have snap peas or bell peppers, use broccoli or carrots. Zucchini also works well. Choose what you have on hand. - Best practices for browning chicken: Start with a hot skillet. This helps the chicken brown well. Don’t crowd the pan. Cook in batches if needed to keep the heat up. - Tips for keeping veggies crisp: Add vegetables later in the cooking process. This keeps them bright and crunchy. Stir-fry them quickly over high heat for the best texture. - Serving suggestions and garnishing tips: Serve the chicken over brown rice. Top it with green onions and sesame seeds. For extra flair, drizzle some sriracha on top. - Pairing with sides or sauces: This meal pairs well with a simple side salad. You could also serve it with extra sriracha for those who like more spice. Try adding a refreshing cucumber salad for a nice contrast. Pro Tips Adjust the Spice Level: Increase or decrease the amount of sriracha based on your personal heat preference. You can also add more chili flakes for extra kick! Veggie Variations: Feel free to swap in your favorite vegetables, such as broccoli, carrots, or zucchini. Just ensure they are cut into similar sizes for even cooking. Marinate for More Flavor: For a deeper flavor, consider marinating the ground chicken in the soy sauce, ginger, and garlic for 30 minutes before cooking. Meal Prep Friendly: This dish is great for meal prep! Make a larger batch, and store in the fridge for up to 4 days or freeze for later use. {{image_2}} You can switch the ground chicken for turkey or beef. Ground turkey works well and keeps the dish light. It has a similar texture and absorbs flavors nicely. Ground beef gives a richer taste. Cook it until browned like chicken. Adjust the seasoning if needed. Both options will still taste great in your firecracker bowl. To make a vegetarian version, use mushrooms or tofu. Mushrooms add a meaty texture and earthy flavor. Chop them up and sauté until golden. Tofu is another excellent choice. Press it to remove water, then cube and cook until crispy. Both options blend well with the sauce and veggies. You won't miss the meat! You can change the serving style for fun. Try lettuce wraps instead of bowls. Just spoon the chicken mix into lettuce leaves and roll them up. It’s a fresh and crunchy option. For a stir-fry style, serve the mix over cooked noodles. Both styles give you a new way to enjoy this dish. To store leftovers, let the Firecracker Ground Chicken Bowl cool first. Place it in an airtight container. This keeps the meal fresh and safe to eat. You can keep it in the fridge for up to three days. When you want to enjoy it again, just check for any odd smells or colors. If it seems good, it’s ready to reheat! If you want to make this meal ahead of time, freezing works great. To freeze, let the dish cool completely. Then, pack it in freezer-safe bags or containers. Make sure to remove as much air as possible to avoid freezer burn. You can freeze it for up to three months. When you're ready, just take it out and thaw it in the fridge overnight. To reheat the Firecracker Ground Chicken Bowl, use a skillet on low heat. This method helps keep the flavors vibrant and the texture nice. Stir occasionally to heat evenly. You can also use a microwave. Just cover it loosely and heat in short bursts, stirring in between. This keeps everything from getting too dry or overcooked. Enjoy your meal just like you made it fresh! If you want a different heat, try these options: - Chili garlic sauce: This has a bold flavor with some heat. - Hot sauce: Use any hot sauce you enjoy. Adjust the amount to fit your taste. - Red pepper flakes: These add spice and work well in the sauce. - Harissa: A North African paste that gives a warm flavor. These choices let you customize your dish. You can find them in most stores. To tone down the heat, follow these tips: - Reduce sriracha: Start with half a tablespoon instead. - Add more honey: This sweetens the dish and balances the spice. - Use a milder sauce: Try a sweet chili sauce for a tasty twist. - Add more veggies: Extra bell peppers or snap peas can help dilute the spice. These steps let everyone enjoy the meal, no matter their spice level. Yes, you can make this meal ahead of time! Here’s how: - Cook the chicken mix: Prepare it and let it cool. - Store in the fridge: Place it in an airtight container for up to three days. - Reheat: Warm it in a skillet or microwave before serving. You can also prep the rice ahead. This makes meal time quick and easy. You can create a delicious meal with these simple ingredients and steps. Start with ground chicken, fresh veggies, and a tasty sauce. Customize the spice level and even switch proteins easily. Don't forget to try the veggie variations for a healthy twist! With proper storage, you can enjoy this dish throughout the week. Keeping leftovers fresh is key to great flavor. I hope this guide helps you enjoy cooking and eating well!

Firecracker Ground Chicken Bowl Flavorful and Easy Meal

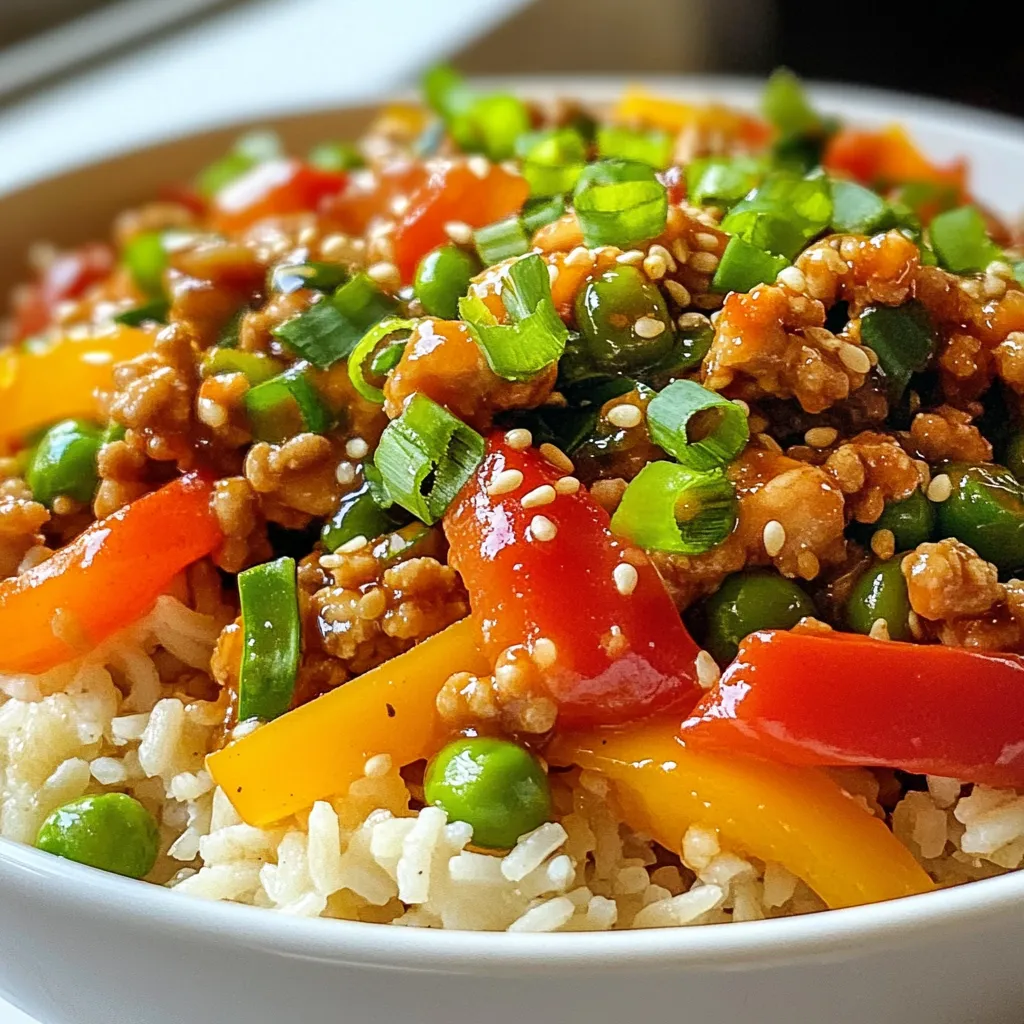
Are you ready to spice up your dinner routine? The Firecracker Ground Chicken Bowl is a quick and tasty meal

- 2 boneless, skinless chicken breasts - 1/4 cup honey - 3 tablespoons soy sauce - 3 cloves garlic, minced - 4 tablespoons unsalted butter - 8 oz elbow macaroni - 1 cup shredded sharp cheddar cheese - 1/2 cup milk - Salt and pepper - 1/4 teaspoon paprika - Fresh parsley, chopped First, season the chicken breasts. Sprinkle salt and pepper on both sides. This step adds flavor. Next, heat a skillet over medium-high heat. Melt 2 tablespoons of butter in the skillet. Once hot, place the chicken in the skillet. Cook for about 6-7 minutes per side. The chicken should turn golden brown. Check that it's fully cooked through. Remove the chicken from the skillet and set it aside. In the same skillet, add the remaining butter and minced garlic. Sauté for about 1 minute. The garlic should smell great. Then, add honey and soy sauce to the skillet. Stir to mix well. Let this sauce simmer for about 2-3 minutes. This makes the sauce thicken slightly. After that, return the chicken to the skillet. Coat each piece well with the honey garlic sauce. Simmer for an extra 2 minutes to soak in the flavor. While the chicken simmers, boil a pot of salted water. Add elbow macaroni and cook according to the package. It should be al dente. Drain the macaroni when done and set aside. In the same pot, pour in the milk. Add the drained macaroni back in. Stir in the cheddar cheese and paprika. Mix until the cheese melts and turns creamy. If it’s too thick, add a splash of milk to reach the right creaminess. Slice the honey garlic butter chicken. Serve it next to the cheesy macaroni. Drizzle with extra honey garlic sauce. Don’t forget to sprinkle chopped parsley on top. It adds a nice touch! {{ingredient_image_1}} To ensure juicy chicken, start by seasoning it well. Use salt and pepper to enhance flavor. Cook the chicken over medium-high heat for the right texture. Aim for about 6-7 minutes on each side. Check for doneness with a meat thermometer. The internal temperature should reach 165°F. If you don’t have a thermometer, cut into the chicken. The meat should be white with no pink inside. Let the chicken rest for a few minutes after cooking. This helps keep it moist. For creamy mac and cheese, you can adjust the milk amount. Start with 1/2 cup and add more if needed. Use shredded cheese for easy melting. Sharp cheddar works best for flavor. When cooking the cheese, keep the heat low. Stir often to prevent burning. If the cheese does not melt completely, add a splash of milk. This will help create that perfect creamy texture. To store leftover Honey Garlic Butter Chicken with Mac, follow these tips: - Let the dish cool down first. - Use an airtight container to keep it fresh. - Store it in the fridge for up to three days. This keeps the chicken moist and the macaroni creamy. Freezing this dish is easy if you do it right: - Cut the chicken into smaller pieces. This helps it freeze well. - Place the chicken and macaroni in a freezer-safe bag or container. - Be sure to remove as much air as possible before sealing. To reheat, follow these steps for the best texture: - Thaw in the fridge overnight. - Warm it in a pan over medium-low heat. - Add a splash of milk to keep it creamy. This way, you can enjoy your delicious meal later! Pro Tips Use Fresh Garlic: Freshly minced garlic enhances the flavor of the sauce, making it more aromatic and delicious. Adjust Sweetness: Feel free to adjust the amount of honey based on your sweetness preference. You can also use maple syrup for a different flavor. Cheese Variations: Experiment with different types of cheese like mozzarella or gouda for unique flavors in your mac and cheese. Rest the Chicken: Let the chicken rest for a few minutes after cooking for juicier meat before slicing. {{image_2}} Can I use chicken thighs instead of breasts? Yes, you can use chicken thighs. They add more flavor and stay juicy. Just cook them until they reach 165°F. This usually takes about 7-9 minutes per side. How long should I cook the chicken for? Cook the chicken breasts for about 6-7 minutes on each side. Look for a golden brown color. The chicken needs to be fully cooked to 165°F for safety. Is the recipe gluten-free? No, this recipe is not gluten-free. The soy sauce contains gluten. You can use gluten-free soy sauce as a substitute. This change makes the dish safe for those with gluten allergies. Can I make this dish dairy-free? Yes, you can make it dairy-free. Use dairy-free butter and a plant-based milk. This swap keeps the dish tasty while meeting dietary needs. What side dishes pair well with Honey Garlic Butter Chicken? This dish pairs well with simple sides like steamed broccoli or a fresh salad. You can also serve it with crusty bread to soak up the sauce. How to serve for a dinner party? For a dinner party, slice the chicken and arrange it on a platter. Serve the macaroni and cheese in a separate bowl. This makes it easy for guests to serve themselves. Garnish with parsley for a nice touch. This blog post covered a tasty recipe for Honey Garlic Butter Chicken with macaroni and cheese. You learned about key ingredients, seasoning tips, and step-by-step instructions for cooking. We also explored variations to suit your taste and smart storage practices to keep leftovers fresh. My final thought: this dish is easy, fun, and perfect for family meals. Enjoy the cooking process and make this your go-to recipe!

Honey Garlic Butter Chicken with Mac Delightful Dish

Get ready to impress your family and friends with my Honey Garlic Butter Chicken with Mac! This dish combines tender

Older posts
Newer posts
← Previous Page1 … Page110 Page111 Page112 … Page115 Next →

dsad

© 2025 flavorsprint • Built with GeneratePress

Our Policies

  • Copyright Policy
  • Cookie Policy
  • GDPR Policy
  • Privacy Policy
  • Disclaimer
  • Terms Of Use

More Information

  • Home
  • About
  • Contact
  • Appetizers
  • Dessert
  • Dinner
  • Drinks
©2025, flavorsprint About Back To Top