Skip to content
DisclaimerTerms Of UseGDPR PolicyCookie Policy

flavorsprint

  • Home
  • Drinks
  • Appetizers
  • Dinner
  • Dessert
  • About
  • Contact
  • Privacy Policy
DisclaimerTerms Of UseGDPR PolicyCookie Policy

Lillian

When making cranberry sauce with vanilla bean, you need the following ingredients: - 12 oz fresh cranberries - 1 cup granulated sugar - 1 cup water - 1 vanilla bean, split and scraped (or 1 tsp vanilla extract) - 1 orange, zested and juiced - 1/2 tsp ground cinnamon - 1/4 tsp ground ginger - A pinch of salt Each ingredient plays a key role. Fresh cranberries provide the tartness. Sugar adds sweetness, balancing the flavors. Water helps cook the cranberries down to a sauce. The vanilla bean gives a rich, warm aroma and flavor. Orange zest and juice add brightness and a hint of citrus. Cinnamon and ginger lend warmth and depth. Lastly, a pinch of salt enhances all the flavors. Choosing fresh cranberries is vital. Look for firm, bright berries. Avoid any that are soft or bruised. This choice ensures a tasty sauce. If you don't have a vanilla bean, vanilla extract works well. Just remember, one teaspoon of extract equals one vanilla bean. These ingredients come together to create a rich and flavorful cranberry sauce. You will enjoy this blend at your next meal. {{ingredient_image_1}} First, I rinse the fresh cranberries under cold water. I check each one and toss out any that are bruised or soft. This step is key to ensuring a great sauce. Clean cranberries give the best flavor and texture. Next, I grab a medium saucepan. I add one cup of water and one cup of granulated sugar. I put it on medium heat, stirring until the sugar dissolves. This sweet mix will balance the tartness of the cranberries. Once the sugar dissolves, I add the rinsed cranberries to the pan. I turn up the heat and bring it all to a boil. After that, I reduce the heat to low. I stir in the split and scraped vanilla bean, orange zest, orange juice, cinnamon, ginger, and a pinch of salt. I let it simmer for about 10 to 15 minutes. The cranberries will burst, and the sauce will thicken. After cooking, I take the sauce off the heat and let it cool slightly. The sauce will thicken more as it cools. Once it's cooler, I taste it. If I want it sweeter, I add a bit more sugar. Finally, I transfer the sauce to a serving dish or an airtight container. I refrigerate it for at least an hour. This helps all the flavors mix well before serving. When you pick cranberries, look for bright, firm berries. Avoid soft or bruised ones. Fresh cranberries should have a shiny skin. You can also check for color; dark red is best. If they bounce when dropped, they are fresh. These small tips will help you get the best flavor. If you can't find a vanilla bean, vanilla extract works well. Use one teaspoon of extract instead of the bean. The flavor may not be as strong, but it will still taste great. Measure it carefully and add it when cooking. This way, you still get that warm, sweet note. You want your sauce to be thick but not too thick. During cooking, stir it often. Cranberries will burst and release juice. If the sauce is too thin, let it simmer longer. It will thicken as it cools. If it's too thick, add a little water or orange juice. Adjust it to fit your taste! Pro Tips Freshness Matters: Always choose fresh cranberries that are bright in color and firm to touch for the best flavor and texture. Adjusting Sweetness: If you find the sauce too tart, gradually add more sugar to reach your desired sweetness level while it's still warm. Flavor Infusion: For an extra layer of flavor, let the sauce sit overnight in the refrigerator before serving to allow the ingredients to meld. Serving Suggestions: This versatile sauce pairs wonderfully with roasted meats, desserts, or as a spread on holiday pastries. {{image_2}} You can boost flavor by adding fruits like apples or pears. These fruits add sweetness and texture. Chop them into small pieces and add them to the pot with the cranberries. Choose tart apples for a nice balance. This change makes the sauce more fruity and fun. To change the taste, try adding spices. Nutmeg and cloves work well in this sauce. Just a pinch adds warmth and depth. You can mix and match spices to find your perfect blend. A little goes a long way, so start small and taste as you go. If you want a different sweetness, consider honey or maple syrup. These sweeteners add unique flavors. You can use them instead of granulated sugar. Adjust the amount based on your taste. Remember, some sweeteners are sweeter than sugar, so a little can go far. After you enjoy your cranberry sauce, store any leftovers in the fridge. Use an airtight container to keep it fresh. This sauce lasts about one week when stored properly. If you notice any change in smell or color, it’s best to toss it. For longer storage, freezing is a great option. First, let the sauce cool completely. Then, transfer it to a freezer-safe container or a zip-top bag. Remove as much air as possible before sealing. This sauce can freeze well for up to three months. When you’re ready to use it, just thaw it in the fridge overnight. When you're ready to enjoy your cranberry sauce again, reheat it gently. Pour it into a saucepan over low heat. Stir occasionally until it warms through. If it seems too thick, add a splash of water or orange juice to loosen it up. You can also microwave it in short bursts, stirring in between. Homemade cranberry sauce lasts about one to two weeks in the fridge. Store it in an airtight container. If you notice any changes in color or smell, it’s best to toss it out. Yes, you can use frozen cranberries. Just rinse them under cold water to break up any clumps. They may take a bit longer to cook, so watch for doneness. Cranberry sauce is great with turkey, ham, or roasted chicken. It also works well on sandwiches or with cheese. Try it on pancakes or yogurt for a sweet twist. Absolutely! You can make this sauce up to a week in advance. Just store it in the fridge. It will taste even better as the flavors meld together. This blog post covered how to make a simple, tasty cranberry sauce. We explored the ingredients, giving a full list you need. I shared step-by-step instructions to guide you through the process. Tips and variations help you personalize your sauce. Plus, I included storage info and answered common questions. In the end, making your own cranberry sauce is easy and rewarding. Enjoy it with your meals or as a treat!

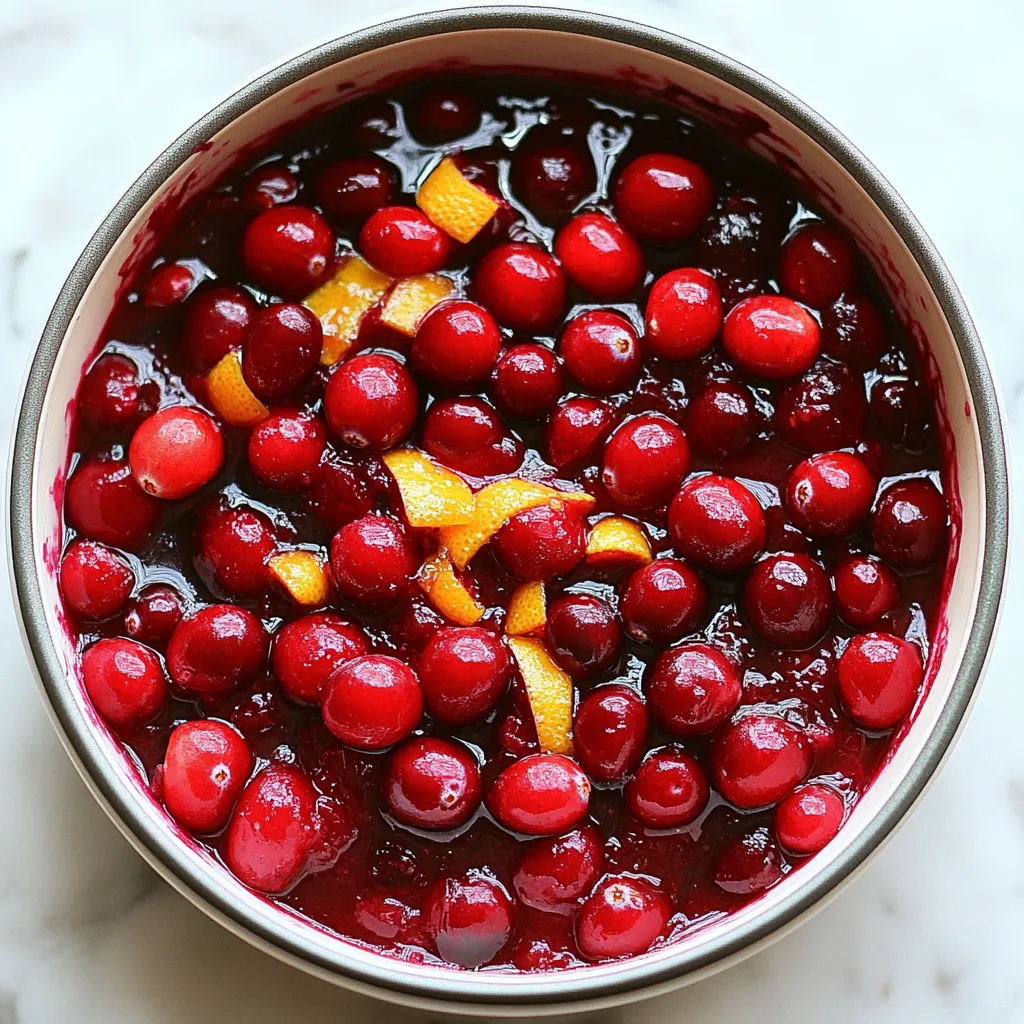
Cranberry Sauce with Vanilla Bean Rich and Flavorful

Cranberry sauce is a must for holiday feasts, but let’s make it special. Adding vanilla bean gives your sauce a

- 1 pound ground beef (or turkey) - 1/2 cup breadcrumbs - 1/4 cup chopped green onions - 1/4 cup fresh cilantro, chopped - 2 cloves garlic, minced - 1 teaspoon ginger, grated - 1 cup teriyaki sauce (store-bought or homemade) - 1 cup pineapple chunks (fresh or canned, drained) - 2 tablespoons soy sauce - 1 tablespoon sesame oil - Salt and pepper to taste - Optional: sesame seeds for garnish The ingredients for Crockpot Pineapple Teriyaki Meatballs are simple yet full of flavor. Start with ground beef or turkey. Both work well, but beef gives a richer taste. The breadcrumbs help bind the meatballs. Fresh green onions and cilantro add a nice crunch and freshness. Garlic and ginger bring warmth and depth. Use fresh garlic and ginger for the best taste. The teriyaki sauce is the star of the dish. It's sweet and savory, coating the meatballs perfectly. You can use store-bought for convenience or make your own for a personal touch. Next, the pineapple chunks add a sweet burst. They balance the savory meatballs. Soy sauce and sesame oil deepen the flavor. Adjust salt and pepper to fit your taste. Finally, sprinkle sesame seeds on top for a nice touch. This mix of ingredients creates a dish that is both tasty and fun. You will love how they come together in the crockpot! {{ingredient_image_1}} To start, gather all your ingredients in a large mixing bowl. You will need: - 1 pound ground beef (or turkey) - 1/2 cup breadcrumbs - 1/4 cup chopped green onions - 1/4 cup fresh cilantro, chopped - 1 egg - 2 cloves garlic, minced - 1 teaspoon ginger, grated - Salt and pepper to taste Mix the ground beef or turkey, breadcrumbs, green onions, cilantro, egg, garlic, ginger, salt, and pepper. Use your hands to combine everything well. Next, form the mixture into small meatballs. Aim for about 1 inch in diameter. You should have around 20 to 25 meatballs. Now, it’s time to cook! First, layer the sauce and meatballs in the crockpot. Pour in 1 cup of teriyaki sauce, 1 cup of pineapple chunks, 2 tablespoons of soy sauce, and 1 tablespoon of sesame oil. Stir gently to mix the sauce. Then, add the meatballs on top. Make sure they are submerged in the sauce. Cover the crockpot. Cook on low for 4 to 6 hours or on high for 2 to 3 hours. The meatballs should be cooked through and tender when done. Once cooked, stir the meatballs in the sauce to coat them evenly. For serving, I recommend putting the meatballs over rice or noodles. This adds a nice base and makes the meal filling. You can also garnish the dish with sesame seeds, more green onions, or cilantro for extra flavor and color. Enjoy your flavorful meal! To make your meatballs burst with flavor, focus on seasoning. I recommend using fresh herbs like cilantro and green onions. If you want a bit more heat, add a pinch of red pepper flakes. You can swap ground beef for turkey to make them leaner. For a gluten-free option, use gluten-free breadcrumbs and soy sauce. These tweaks keep the dish tasty and inclusive. How do you know when meatballs are done? They should be firm and cooked through, reaching an internal temperature of 160°F. If you use a meat thermometer, it helps ensure safety. To keep them from falling apart in the sauce, make sure to mix the meatball ingredients well. Form them tightly and avoid overcooking in the crockpot. Choose a large, wide serving dish for a great look. A white bowl makes the colors pop. For garnishing, sprinkle sesame seeds on top. Add extra green onions or cilantro for a fresh touch. You can even serve them with rice or noodles for a complete meal. These small details make your dish more appealing and fun! Pro Tips Use Fresh Ingredients: For the best flavor, opt for fresh garlic and ginger instead of dried. Fresh herbs like cilantro and green onions also enhance the taste significantly. Customize the Sauce: Feel free to adjust the sweetness of the teriyaki sauce by adding honey or brown sugar if you prefer a sweeter dish or increase the soy sauce for a saltier flavor. Perfect Meatball Size: Keeping your meatballs uniform in size ensures even cooking. Aim for about 1 inch in diameter for consistent results. Garnish Wisely: Enhance the presentation by garnishing with toasted sesame seeds, sliced green onions, or a sprinkle of additional cilantro right before serving. {{image_2}} You can easily swap out the meat in this recipe. If you want a vegetarian or vegan option, use plant-based ground meat. This will give you a similar texture. For a lighter dish, try ground chicken or pork. Both will absorb the flavors well. If you want to make your own teriyaki sauce, it's simple. Mix 1/4 cup soy sauce, 1/4 cup honey, 1 tablespoon rice vinegar, and 1 teaspoon cornstarch. Heat until thickened. For a twist on flavor, add sweet chili sauce or a splash of sriracha. These will add a nice kick! These meatballs taste great over rice or noodles. You can also serve them with steamed broccoli or a fresh salad. For drinks, sweet iced tea or ginger ale works well. A light beer or sake also pairs nicely with these flavors. Enjoy your meal! To store leftovers, let the meatballs cool down. Place them in an airtight container. Keep them in the fridge for up to three days. This helps keep them fresh and tasty. For reheating, use a microwave-safe plate. Add a splash of teriyaki sauce for extra moisture. To freeze the meatballs, place them in a single layer on a baking sheet. Freeze them for about two hours. Once frozen, transfer them to a freezer bag. Seal it tightly and label it. For thawing, place the meatballs in the fridge overnight. Reheat them in the microwave or on the stove. In the fridge, these meatballs stay fresh for about three days. If you freeze them, they can last up to three months. Always check for signs of spoilage before eating. Enjoy your delicious meatballs at any time! How to make meatballs stay moist? To keep meatballs moist, use a mix of ground meat and breadcrumbs. Add an egg to help bind the mixture. This keeps the meatballs tender. Don’t overcook them. Cook until just done. Can I cook this recipe without a crockpot? Yes, you can! Use a large pot on the stove. Brown the meatballs in the pot first. Then add the sauce and pineapple. Simmer on low heat for about 30 minutes. What can I use instead of breadcrumbs? You can use crushed crackers or oats. Ground almonds also work well. These options add flavor and keep the meatballs firm. Can I use a different fruit? Yes! Try using mango or peach chunks instead. They add a sweet twist. You can even use dried fruits, like apricots, for a unique taste. Is this recipe gluten-free? To make it gluten-free, swap breadcrumbs for gluten-free options. Use gluten-free soy sauce too. This way, you can enjoy the dish without worry. Can I make it low-carb? Absolutely! Use ground turkey or chicken for lower fat. Replace breadcrumbs with almond flour. You can also skip the rice and serve the meatballs with veggies instead. This blog post covered a simple and tasty meatball recipe. We explored the key ingredients, cooking steps, and variations to suit your taste. Remember that using fresh herbs and spices enhances flavor. You can adapt this dish to meet dietary needs by switching proteins or sauces. Store leftovers properly to keep them fresh. With these tips, you can enjoy delicious meatballs any time. Experiment and make this recipe your own for a fun meal experience.

Crockpot Pineapple Teriyaki Meatballs Flavorful Dish

Get ready to elevate your dinner game with my Crockpot Pineapple Teriyaki Meatballs! This flavorful dish mixes juicy meatballs with

- 1 box Jiffy Cornbread Mix - 1 lb ground beef or turkey - 1 cup shredded cheddar cheese - 1 packet taco seasoning - 1 can black beans, drained and rinsed - 1 cup frozen corn - 1 cup salsa - 1/4 cup chopped green onions - 1/2 cup sour cream (for topping) - Fresh cilantro for garnish In this dish, I love how the Jiffy Cornbread Mix brings a sweet touch. The ground beef or turkey offers a hearty base. Cheddar cheese melts beautifully, adding creaminess. Taco seasoning gives it all a warm and spicy kick. Black beans and corn add texture and nutrition. Salsa adds a nice tang, blending all flavors. Green onions add a fresh crunch, while sour cream cools the dish. Finally, fresh cilantro brightens every bite. Each ingredient plays a role, making this meal satisfying and fun. {{ingredient_image_1}} - Preheat the oven to 400°F (200°C). - In a large skillet, cook 1 pound of ground beef or turkey over medium heat until it is browned. Make sure to drain any excess fat. - Stir in 1 packet of taco seasoning with 1/4 cup of water. Let it simmer for 5 minutes. - Next, add 1 can of black beans, drained and rinsed, along with 1 cup of frozen corn. Mix everything well to combine. - In a separate bowl, prepare the Jiffy Cornbread Mix according to the package instructions. Fold in half of the shredded cheddar cheese. - Grease a 9x13-inch baking dish. Spread the meat mixture evenly at the bottom. Pour 1 cup of salsa over the meat layer. Carefully spread the cornbread batter over the salsa. - Finally, sprinkle the remaining cheddar cheese on top of the cornbread layer. Now you have a delicious Jiffy Cornbread Taco Bake ready to go into the oven! To brown meat well, heat your skillet on medium. Add the ground beef or turkey and break it up with a spatula. Cook until it turns brown. Drain the fat for a leaner dish. This step adds great flavor. For mixing cornbread batter, follow the Jiffy instructions closely. Use a bowl that’s large enough. Mix gently until just combined. Overmixing can make the cornbread tough. Fold in half of your cheese to add flavor. Pair this dish with a fresh salad. A side of guacamole complements the flavors nicely. You could also serve tortilla chips for some crunch. As for drinks, a cold soda works well. A light beer or a margarita pairs great too. Choose what you enjoy most! To boost flavor, consider adding spices like cumin or chili powder. You can also add chopped bell peppers or jalapeños for an extra kick. These ingredients add depth to your dish. For toppings, think about avocado slices or diced tomatoes. You can also use jalapeño slices for heat. Fresh ingredients make the dish more appealing. Pro Tips Use Fresh Ingredients: Opt for fresh vegetables and herbs to enhance the flavor of your cornbread taco bake. Fresh cilantro and green onions make a big difference! Customize the Heat: If you like it spicy, consider adding jalapeños or a dash of hot sauce to the meat mixture for an extra kick. Make it Vegetarian: Substitute the ground meat with a mix of sautéed mushrooms, bell peppers, and additional beans for a delicious vegetarian option. Serve with Sides: Pair your cornbread taco bake with a simple side salad or some tortilla chips and guacamole for a complete meal. {{image_2}} You can easily change the protein in this dish. Ground beef or turkey works great. If you want a lighter option, use chicken or tofu. Both swap outs will still give you tasty results. For a vegetarian version, replace the meat with extra black beans or lentils. This keeps the meal hearty without losing flavor. You can also try quinoa for a fun twist. To make your Jiffy Cornbread Taco Bake healthier, opt for low-fat cheese or sour cream. This small change cuts calories while keeping it creamy. Adding more vegetables makes it even better. Try bell peppers, zucchini, or spinach. These veggies add color and nutrients. You can mix them right in with the meat or layer them on top. Want a kick? Add jalapeños for some heat. Toss in diced jalapeños with the meat mixture. This gives a spicy twist that many love. You can also go for Southwest-style toppings. Think avocado, pico de gallo, or a sprinkle of taco seasoning on top. These additions can elevate your dish to a whole new level. To store leftovers, let the Jiffy Cornbread Taco Bake cool first. Then, cover it with plastic wrap or foil. You can also use an airtight container. This dish lasts about 3 to 4 days in the fridge. Make sure to check for any off smells before eating. To freeze the Jiffy Cornbread Taco Bake, first let it cool completely. Cut it into portions for easier thawing. Wrap each piece tightly in plastic wrap and then in aluminum foil. You can freeze it for up to 3 months. When you’re ready to eat, thaw it in the fridge overnight. Reheat in the oven at 350°F (175°C) for about 20 minutes. This keeps it warm and tasty. Can I use homemade cornbread mix instead of Jiffy? Yes, you can use homemade cornbread mix. Just make sure it has similar ingredients and ratios. Jiffy is quick and easy, but a homemade mix can be tasty too. You might need to adjust the baking time based on your mix. Is it possible to make this dish vegetarian? Absolutely! You can swap the meat for beans or lentils. Use a mix of black beans and pinto beans for added protein. This keeps the dish hearty and filling while making it meat-free. How do I ensure the cornbread is cooked through? To make sure the cornbread is cooked, bake it until golden brown. Use a toothpick to check the center. If it comes out clean, the cornbread is ready. Keep an eye on it during the last few minutes to avoid overcooking. What can I do if the meat is too greasy? If the meat is too greasy, drain excess fat after cooking. You can also use leaner meats like ground turkey. If you have already mixed it in, try adding a bit more corn or beans to soak up the grease. Can I use a different type of cheese? Yes, you can use other cheeses like Monterrey Jack or Pepper Jack. Each cheese brings a different flavor. Choose one that melts well for the best texture. What if I don't have taco seasoning? If you lack taco seasoning, make your own with cumin, chili powder, garlic powder, and paprika. These spices will give you a similar flavor. Adjust the amounts to fit your taste and heat preference. The Jiffy Cornbread Taco Bake is simple and tasty. We explored main and additional ingredients, guiding you through cooking and assembling the dish. I shared tips to enhance the flavors and provided variations for different tastes. Proper storage methods ensure leftovers stay fresh. You can easily adapt this recipe to fit your needs. Enjoy making your own twist on this convenient meal. It’s great for gatherings or a cozy night in, and I hope you love it as much as I do!

Jiffy Cornbread Taco Bake Savory and Hearty Meal

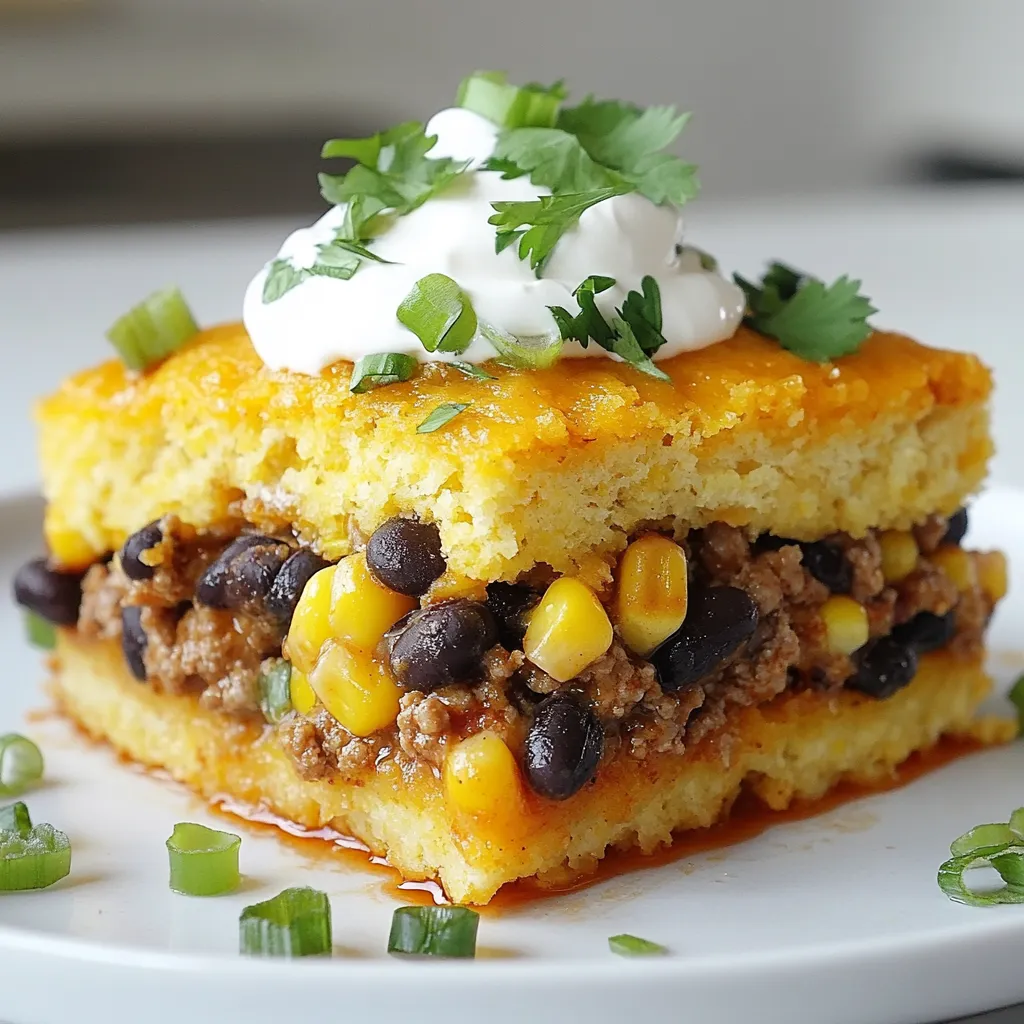
If you’re in the mood for a quick, hearty meal, Jiffy Cornbread Taco Bake is the answer. This dish combines

- 1 lb Italian sausage, casings removed - 1 medium onion, diced - 3 cloves garlic, minced - 4 cups kale, chopped - 4 medium potatoes, diced - 6 cups chicken broth - 1 cup heavy cream - 1 teaspoon red pepper flakes (adjust to taste) - Salt and pepper to taste - 2 tablespoons olive oil - Fresh parsley, chopped (for garnish) When you make Zuppa Toscana, use these fresh ingredients. The Italian sausage gives the soup its rich flavor. I like to use a good quality sausage for the best taste. Next, diced onion and minced garlic add depth and aroma. You’ll want some kale for a pop of green. The kale wilts perfectly into the broth. Diced potatoes add heartiness and texture. I prefer using Yukon Gold potatoes for their creaminess. Chicken broth is key for a savory base. Heavy cream gives the soup a nice, creamy finish. You can adjust the amount of red pepper flakes for your spice level. Finally, season with salt and pepper to taste. Don’t forget fresh parsley for a lovely garnish. This mix of ingredients makes Zuppa Toscana a warm and hearty meal. {{ingredient_image_1}} Start your Zuppa Toscana by heating 2 tablespoons of olive oil in a large pot over medium heat. Once the oil is hot, add 1 medium diced onion. Sauté it until it turns soft and clear, about 3 to 4 minutes. Next, add 3 minced garlic cloves to the pot. Stir it all together for a minute. Now, it is time to add the 1 pound of Italian sausage. Cook the sausage until it is well-browned. Break it up into small pieces as it cooks to ensure even flavor. Once the sausage is browned, toss in 4 diced medium potatoes and 6 cups of chicken broth. Stir the mixture well and bring it to a boil. After it boils, lower the heat and let it simmer. Cook until the potatoes are soft, which takes about 15 to 20 minutes. This step fills your kitchen with a warm, hearty aroma. Now, it’s time to make your soup shine! Add 4 cups of chopped kale and 1 teaspoon of red pepper flakes. Stir the mix and let it cook for 5 more minutes. This will wilt the kale and add a nice kick. Finally, pour in 1 cup of heavy cream. Stir everything together and let it heat for another 5 minutes. Don’t forget to taste and add salt and pepper as needed. Serve your Zuppa Toscana hot, garnished with fresh chopped parsley for a pop of color. Enjoy the delicious warmth of this Italian comfort soup! Choosing the right Italian sausage is key. I prefer using spicy sausage for a kick. Sweet sausage works if you want milder soup. Mix both for a balanced taste. The flavor of the sausage shapes the whole dish. Adjusting spice levels with red pepper flakes is easy. Start with one teaspoon, then taste. Add more if you like heat. Remember, you can always add more spice, but you can't take it out. Ensuring the right texture for potatoes and kale is crucial. Cut potatoes into small pieces so they cook evenly. Aim for fork-tender potatoes, not mushy. For the kale, add it near the end. This keeps it bright and vibrant. Tips for reheating for best results include using the stovetop. Heat slowly to prevent burning. Add a splash of cream or broth if it thickens too much. This keeps the soup creamy and smooth. Pro Tips Use Fresh Ingredients: Fresh kale and high-quality Italian sausage will elevate the flavor of your Zuppa Toscana significantly. Adjust the Spice: Feel free to modify the amount of red pepper flakes according to your heat preference for a customized kick. Thicken the Soup: For a thicker consistency, mash some of the potatoes against the side of the pot before adding the cream. Garnish with Care: A sprinkle of fresh parsley not only adds color but also enhances the freshness of the dish. {{image_2}} You can change up the greens in Zuppa Toscana. Instead of kale, try spinach or Swiss chard. These greens add their own unique taste. You can also mix in some broccoli or green beans for extra crunch. For sausage, use turkey or chicken sausage if you want a lighter dish. You can even try spicy sausage for a kick. If you want a meatless option, use mushrooms for a hearty texture. To make Zuppa Toscana gluten-free, choose a gluten-free broth. Most broths are naturally gluten-free, but always check the label. You can also use gluten-free pasta instead of potatoes for a twist. For a dairy-free version, swap heavy cream with coconut cream or cashew cream. Both options offer a creamy base without dairy. If you want a vegan variant, skip the sausage and cream. Use vegetable broth and add more veggies for flavor. Try lentils or beans for protein. To keep your Zuppa Toscana fresh, store it in a sealed container. Let it cool down first. Place it in the fridge for up to three days. If you want to keep it longer, freeze it. Pour the soup into freezer-safe bags or containers. Lay the bags flat for easy stacking. Zuppa Toscana can last up to three months in the freezer. Just remember to label your containers with the date. When you're ready to enjoy leftovers, you can reheat it on the stovetop or in the microwave. For the stovetop, pour the soup into a pot. Heat it over medium heat, stirring often. This keeps the soup from sticking and helps it heat evenly. It should take about 10 minutes to warm through. If you prefer the microwave, use a microwave-safe bowl. Cover it with a microwave-safe lid or wrap. Heat it in intervals of one minute, stirring in between. This helps it warm evenly. Make sure it's hot all the way through before eating. Aim for a temperature of at least 165°F to ensure food safety. Enjoy your comforting soup again! Zuppa Toscana is a hearty Italian soup. It comes from the Tuscany region. This dish combines Italian sausage, potatoes, kale, and cream. The mix of flavors warms you up on cold days. It has a rich taste, thanks to the sausage and cream. You can find this soup in many Italian restaurants. To lower calories in Zuppa Toscana, consider these tips: - Use ground turkey instead of Italian sausage. - Replace heavy cream with a lighter option, like half-and-half or almond milk. - Add more vegetables, such as carrots or zucchini, to boost fiber. - Reduce the amount of olive oil when sautéing. - Use low-sodium chicken broth to cut down on salt. These changes keep the flavor while making it lighter. Yes, you can meal prep Zuppa Toscana with ease. Here are some tips: - Cook the soup and let it cool completely. - Store it in airtight containers in the fridge for up to three days. - For longer storage, freeze the soup for up to three months. - When ready to eat, reheat on the stovetop or microwave. - If freezing, leave out the cream until you heat it up. This keeps the texture nice. Meal prepping makes this comforting soup easy to enjoy anytime. Zuppa Toscana is a hearty and flavorful soup that combines simple ingredients like Italian sausage, kale, and potatoes. You learned how to prepare the base, cook the soup, and add finishing touches to make it rich and satisfying. I also shared tips for flavor, texture, and storage. Remember, you can customize this dish to fit your taste or dietary needs. Whether you enjoy a traditional version or a twist, Zuppa Toscana is easy to love and share. Enjoy making it your own!

Zuppa Toscana Flavorful Italian Comfort Soup

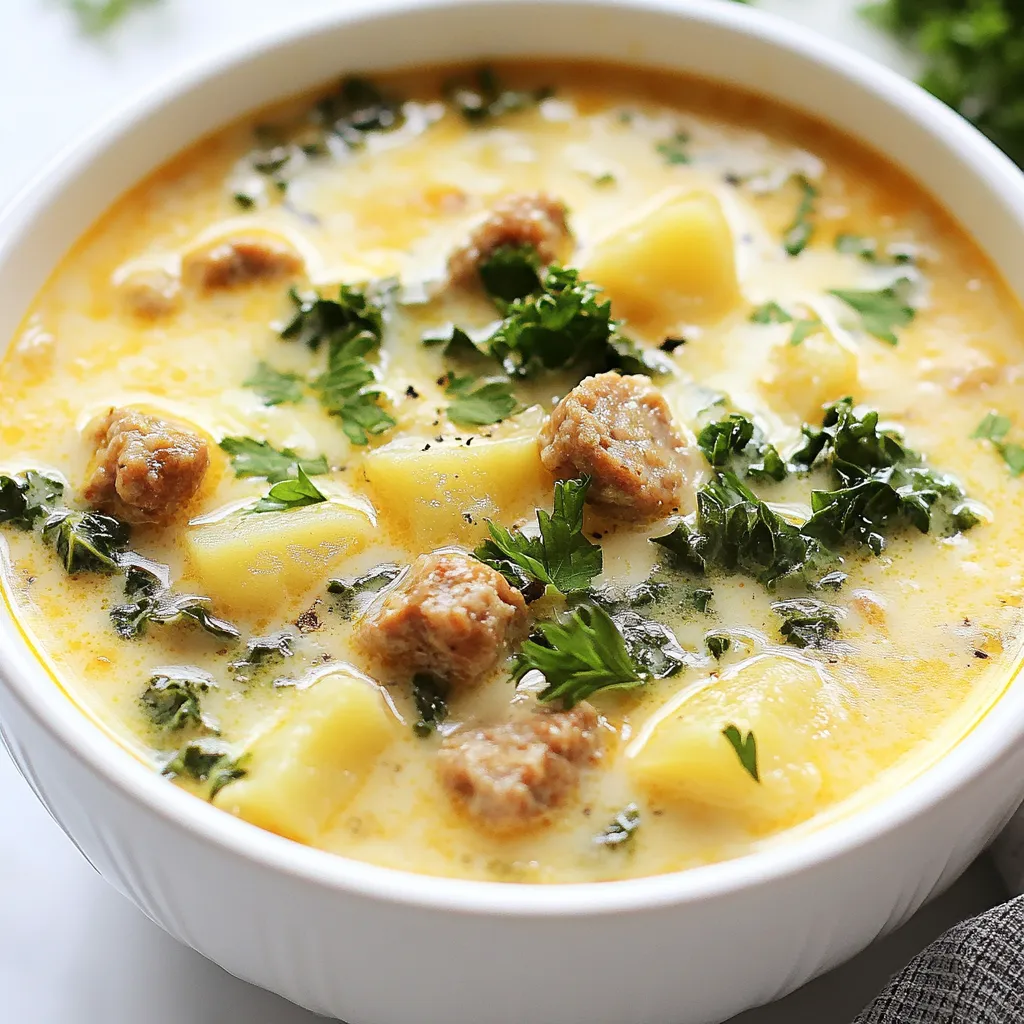
Are you ready to dive into a bowl of warm comfort? Zuppa Toscana is an iconic Italian soup that fills

To make a hearty French Country Beef Stew, you will need the following ingredients: - 2 lbs chuck beef, cut into 1-inch cubes - 4 tablespoons olive oil - 1 large onion, diced - 4 cloves garlic, minced - 3 large carrots, sliced - 2 parsnips, sliced - 2 medium potatoes, diced - 3 cups beef broth - 2 cups diced tomatoes, canned or fresh - 1 tablespoon tomato paste - 2 teaspoons dried thyme - 1 teaspoon rosemary - Salt and pepper to taste - 2 bay leaves - Fresh parsley, chopped, for garnish Each ingredient plays a key role in this dish. The chuck beef gives the stew its rich flavor. Olive oil helps brown the meat and sauté the veggies. Onions and garlic add depth. Carrots, parsnips, and potatoes provide sweetness and texture. Beef broth forms the base, while tomatoes and herbs bring brightness. Finally, parsley adds freshness when you serve. {{ingredient_image_1}} - Cut the beef into 1-inch cubes. - Season the cubes with salt and pepper. - Dice the onion and mince the garlic. - Slice the carrots and parsnips. - Dice the potatoes into small pieces. - Heat 2 tablespoons of olive oil in a Dutch oven. - Brown the beef cubes in batches until golden. - Remove the beef from the pot and set it aside. - Add the remaining olive oil to the pot. - Sauté the onion for 4-5 minutes until soft. - Stir in the minced garlic and cook for 1 minute. - Add the sliced carrots, parsnips, and diced potatoes. - Cook the vegetables for about 5 minutes until they soften. - Return the browned beef to the pot. - Pour in the beef broth, diced tomatoes, and tomato paste. - Add thyme, rosemary, and bay leaves, then stir well. - Bring the stew to a simmer over medium heat. - Reduce heat to low, cover, and cook for 1.5 to 2 hours. - Stir occasionally and check if more broth is needed. - Ensure the beef is tender before serving. - Taste the stew and adjust seasoning with salt and pepper. - Remove bay leaves before serving. - Use fresh herbs like thyme and rosemary. They boost flavor and aroma. - Always season your meat with salt and pepper before cooking. This step adds depth. - Browning meat is key. It creates a rich crust and adds complex flavors. When you brown the beef, it locks in juices and enhances the stew's taste. - A Dutch oven is the best pot for this stew. Its heavy base distributes heat well. - Use a wooden spoon for stirring. It prevents scratching and helps mix flavors. - A sharp knife makes cutting vegetables quick and easy. This saves you time in the kitchen. - Overcooking makes the beef dry and tough. Cook just until tender. - Under-cooking leaves meat chewy. Aim for 1.5 to 2 hours of simmering. - Skipping the browning step is a big mistake. This step adds a lot of flavor. Always brown your meat! Pro Tips Browning the Beef: Ensure that the beef is patted dry before seasoning and browning. This helps achieve a rich, caramelized crust and enhances the overall flavor of the stew. <strong.Layering Flavors: Add the vegetables in stages. Start with the onions and garlic, then add the root vegetables. This method helps develop a deeper flavor profile in the stew. Using Fresh Herbs: If possible, use fresh thyme and rosemary instead of dried. Fresh herbs can elevate the dish with their vibrant flavors and aromas. Resting the Stew: For even better flavor, let the stew rest for a few hours or overnight in the fridge. Reheat it gently before serving to allow the flavors to meld beautifully. {{image_2}} You can change up the veggies in this stew. Seasonal vegetables add fresh flavor. Try using root vegetables like sweet potatoes or turnips. You can also add green beans or peas for color. If you don't have parsnips, use more carrots or even celery. This keeps the stew tasty and fun! If you want to switch the meat, you can use chicken or pork. Both options work well. Chicken makes the dish lighter, while pork adds sweetness. For a vegetarian twist, use hearty mushrooms like portobello or shiitake. They give a full flavor that makes the stew rich and delicious. To enhance the taste, add a splash of red wine or brandy. Both add depth and warmth. For some heat, toss in red pepper flakes. This will wake up your taste buds. Remember, a little goes a long way! These tweaks can elevate your stew to the next level. After you finish your stew, let it cool. Transfer it to an airtight container. Store the stew in the fridge for up to three days. If you want it to last longer, freeze it. Use freezer-safe bags or containers. The stew can stay good in the freezer for up to three months. To reheat your stew, use the stove or microwave. If using the stove, heat it in a pot over low heat. Stir often to keep it from sticking. If you use a microwave, place it in a bowl and cover it. Heat it in short bursts, stirring in between. This helps keep the texture nice. In the fridge, your stew lasts about three days. Look for changes in color or smell to check for spoilage. If it smells off or has mold, throw it away. Always trust your senses. French Country Beef Stew, also known as beef bourguignon, comes from France. This dish has roots in rustic cooking. It began as a way for farmers to cook tough cuts of meat. Slow cooking with wine and vegetables makes the meat tender and rich in flavor. Over time, this stew became a beloved staple in French homes. It reflects the heartiness of country cooking and the use of fresh, local ingredients. Yes, you can adapt this recipe for a slow cooker. First, brown the beef in a pan, as the recipe states. Then, transfer the beef and vegetables to the slow cooker. Add the beef broth, tomatoes, and herbs. Set your slow cooker on low for 6 to 8 hours. This method keeps the beef juicy and allows flavors to blend well. Beef stew pairs well with many side dishes. Here are some suggestions: - Crusty bread for dipping - Creamy mashed potatoes - Buttered egg noodles - A fresh green salad - Roasted vegetables Each of these sides balances the stew's rich flavors and makes a complete meal. Absolutely! Making this stew ahead of time is easy and convenient. Cook the stew as directed and let it cool. Then, store it in the fridge for up to three days. The flavors deepen over time. You can also freeze it for up to three months. Just thaw in the fridge before reheating and enjoy! In this post, we explored the ingredients and steps for making a delicious French Country Beef Stew. We covered how to prepare the beef and vegetables, build flavors, and avoid common mistakes. As you cook, remember to enjoy the process and get creative. This stew is versatile, so feel free to try different vegetables or proteins. Each variation can bring a new taste to your table. Happy cooking!

French Country Beef Stew Hearty and Flavorful Meal

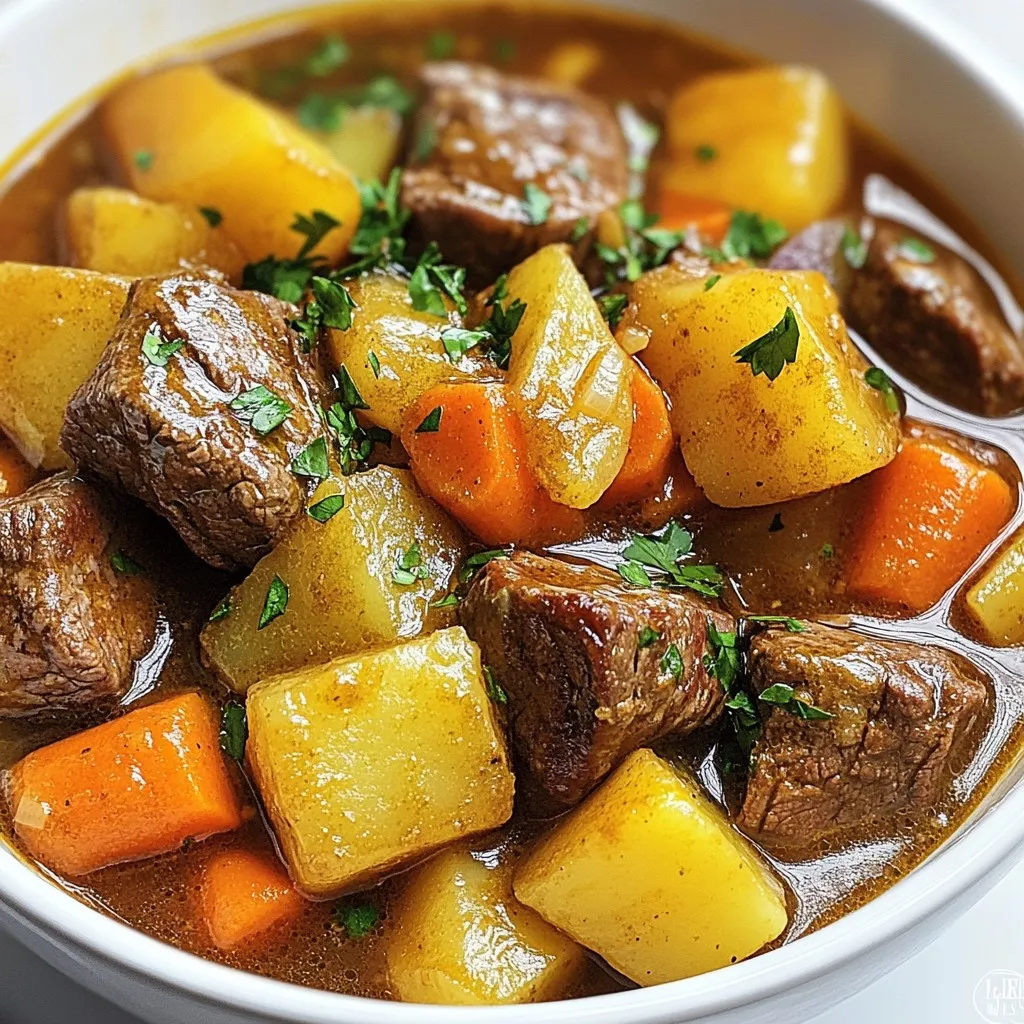
When the chill of winter hits, there’s nothing quite like a hearty bowl of French Country Beef Stew to warm

- 2 cups cooked chicken, shredded or diced - 1 cup jasmine rice, uncooked - 2 cups broccoli florets - 1 cup bell peppers, sliced (red and yellow) - 1 cup carrots, shredded - 1 cup teriyaki sauce - 2 cups chicken broth - 1 teaspoon garlic powder - 1 teaspoon ginger powder - 1 tablespoon sesame oil - 1/2 cup green onions, sliced (for garnish) - Sesame seeds (for garnish) When I make teriyaki chicken casserole, I love how simple the ingredients are. You can use leftover chicken, which saves time. Jasmine rice gives a nice texture and flavor. Broccoli adds a bright color and crunch. The bell peppers make it pretty and sweet. I always choose fresh carrots, but you can use pre-shredded ones to save time. The teriyaki sauce is key. You can make it or buy a good one. Chicken broth adds depth to the dish. The garlic and ginger powders give subtle warmth. Sesame oil brings a nice nutty taste. For the finish, I love adding green onions and sesame seeds on top. They make it look great and taste fresh! Gather all these ingredients, and you are ready to create a warm, delicious meal that everyone will love. {{ingredient_image_1}} 1. First, preheat your oven to 350°F (175°C). This step helps the dish cook evenly. 2. Next, take a large bowl. Combine 2 cups of cooked chicken, 1 cup of uncooked jasmine rice, 2 cups of broccoli florets, 1 cup of sliced bell peppers, and 1 cup of shredded carrots. Make sure all the ingredients mix well. 1. In another bowl, mix together 1 cup of teriyaki sauce, 2 cups of chicken broth, 1 teaspoon of garlic powder, 1 teaspoon of ginger powder, and 1 tablespoon of sesame oil. Stir until everything is well blended. 1. Now, pour the sauce over the chicken and vegetable mixture. Stir until every piece is coated. 2. Transfer this mixture to a greased 9x13 inch baking dish. Spread it out evenly. 3. Cover the dish with aluminum foil. Bake in the preheated oven for 30 minutes. 4. After 30 minutes, remove the foil. Bake for an additional 15 minutes. This helps the rice become tender and absorb the liquid. 5. When it’s done, take it out of the oven. Let it cool for a few minutes before serving. Choosing the right rice is key. Jasmine rice gives a nice aroma and texture. It cooks well with the other ingredients in this dish. To avoid overcooking, follow the cooking time carefully. Keep an eye on it as it bakes. You can add a twist to the dish with extra seasonings. Try a dash of chili flakes for a little heat. A splash of soy sauce can deepen the flavor, too. You can also add fresh ginger or garlic for a more vibrant taste. Garnishing makes the dish pop. Use fresh green onions for color and crunch. Sprinkle sesame seeds for a nutty flavor. These small touches can make your casserole look and taste gourmet. Pro Tips Use Leftover Chicken: This recipe is perfect for using up leftover rotisserie chicken or any cooked chicken you have on hand. Customize Your Vegetables: Feel free to swap in your favorite vegetables such as snap peas, zucchini, or even mushrooms for a different flavor profile. Make It Ahead: You can prep this casserole the night before and store it in the fridge. Just bake it when you're ready to serve! Garnish for Extra Flavor: Don’t skip the green onions and sesame seeds on top; they add a lovely crunch and boost the overall flavor. {{image_2}} You can change up the chicken in this casserole. Try turkey or even cooked shrimp. If you want to skip meat, use tofu or chickpeas instead. Tofu soaks up the flavor well. Chickpeas add great texture and protein. For a gluten-free meal, swap soy sauce with tamari. Tamari gives you that same savory taste without gluten. If you're watching carbs, use cauliflower rice instead of jasmine rice. It’s light and still fills you up. Want to take it slow? Use a slow cooker. Combine all ingredients, cover, and let it cook for 6 to 8 hours on low. If you're in a hurry, use an Instant Pot. Cook on high for about 10 minutes, and you’ll have dinner ready fast. To store your Teriyaki Chicken Casserole, let it cool first. Place leftovers in an airtight container. This keeps the dish fresh and tasty. It can stay in the fridge for up to four days. If you want it to last longer, consider freezing it. To freeze portions, cut the casserole into servings. Wrap each piece tightly in plastic wrap. Then, place them in a freezer-safe bag. Don't forget to label the bags with the date. This way, you know when you made them. When ready to eat, thaw in the fridge overnight. Reheat in the oven at 350°F (175°C) until hot. You can also use the microwave if you’re in a hurry. Preparing ingredients ahead saves time. You can chop the vegetables and store them in the fridge. Cook the chicken and rice in advance too. This makes assembly quick and easy. Batch cooking is another great idea. Make multiple casseroles and freeze them. This way, you have ready meals for busy days. Yes, you can use frozen vegetables in this dish. They save time and are easy to find. Frozen veggies are picked at their peak ripeness, which helps keep their flavor and nutrients. Just add them straight to your mix. You do not need to thaw them first. The cooking time may need slight adjustments. If you cannot find jasmine rice, try long-grain white rice or basmati rice. Both options will work well. Long-grain rice takes about 15 to 20 minutes to cook. Basmati may take 10 to 15 minutes. Just follow package instructions for the best results. Look for a few signs to know your casserole is ready. The rice should be tender, and the liquid should be mostly absorbed. You can also check that the chicken is heated through. If you see bubbles around the edges, it’s a good sign. Let it cool a bit before serving. You can prepare this casserole ahead of time. Mix all your ingredients and place them in your baking dish. Cover it tightly and store it in the fridge for up to 24 hours. When ready to bake, just remove it from the fridge. Bake as usual, adding a few extra minutes if it’s cold. This blog shared a tasty Teriyaki Chicken Casserole recipe. We discussed ingredients, easy steps, and tips for perfect results. You also learned about variations, storage options, and common questions. Now, you have all the tools to make this dish work for you. Enjoy adapting it to your taste. Happy cooking!

Teriyaki Chicken Casserole Tasty and Simple Recipe

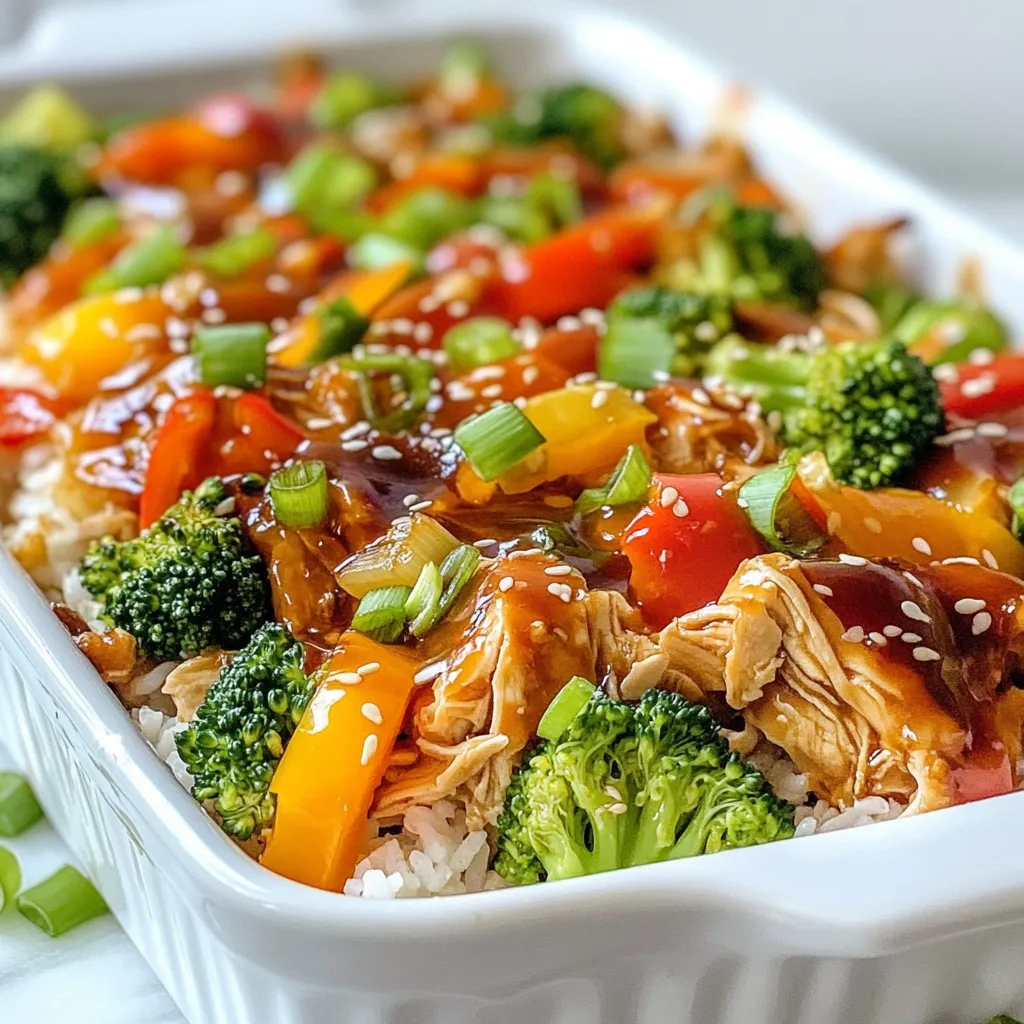
Are you ready to dive into a simple and tasty recipe that your family will love? This Teriyaki Chicken Casserole

- 4 boneless, skinless chicken breasts - 1/2 cup grated Parmesan cheese - 1/2 cup breadcrumbs (preferably panko for extra crunch) - 4 cloves garlic, minced - 1/4 cup fresh parsley, chopped - 1/4 cup olive oil - 1 teaspoon Italian seasoning - 1/2 teaspoon salt - 1/2 teaspoon black pepper - Zest of 1 lemon - Lemon wedges, for serving You can use any cheese you like. For a twist, try mozzarella or cheddar. If you want a gluten-free option, use gluten-free breadcrumbs. Fresh herbs like basil or thyme can add great flavor. If you lack fresh parsley, use dried parsley, but cut the amount in half. For those who prefer metric, here are some quick conversions: - 1/2 cup = 120 ml - 1 teaspoon = 5 ml - 1/4 cup = 60 ml Using these ingredients, you will create a tasty dish. Each item plays a key role. The chicken is the star, while garlic and cheese add depth. Panko breadcrumbs give a great crunch. Using fresh parsley brightens the flavor. Have fun with these choices! {{ingredient_image_1}} First, preheat your oven to 400°F (200°C). This step is key to getting the chicken crispy. Next, line a baking sheet with parchment paper. This keeps the chicken from sticking. It also makes cleanup easier. 1. In a mixing bowl, combine these ingredients: - 1/2 cup grated Parmesan cheese - 1/2 cup breadcrumbs (use panko for extra crunch) - 4 cloves garlic, minced - 1/4 cup fresh parsley, chopped - 1 teaspoon Italian seasoning - 1/2 teaspoon salt - 1/2 teaspoon black pepper - Zest of 1 lemon Mix these well. This will be your breading mixture. 2. In another shallow dish, pour 1/4 cup olive oil. Dip each chicken breast into the oil. Make sure each piece is fully coated. 3. Next, take the chicken out of the oil. Dredge each breast in the breading mixture. Press gently to make sure it sticks. 4. Place the breaded chicken breasts on the prepared baking sheet. 5. Bake for 25-30 minutes. The chicken is done when the coating is golden brown and crispy. To check if the chicken is fully cooked, use a meat thermometer. The internal temperature should reach at least 165°F (74°C). If you don’t have a thermometer, cut into the thickest part. The meat should be white with no pink inside. Let the chicken rest for a few minutes after baking. This helps keep it juicy. Serve warm with lemon wedges for a burst of flavor. Breading chicken can seem tough, but it’s easy with these tips. First, always use dry chicken. Pat the chicken breasts with a paper towel. This helps the breading stick better. Next, set up your stations. Have one dish with oil and another with your breading mix. Dip the chicken in the oil first, then coat it in the mix. Press down lightly to make sure it sticks well. This way, you get a nice, even coat. To get that perfect crispy texture, bake your chicken on a wire rack. This allows hot air to circulate around the chicken. If you don’t have a rack, use parchment paper. Ensure your oven is preheated to 400°F (200°C). This helps the coating crisp up quickly. Also, avoid overcrowding the baking sheet. Leave space between each chicken piece. This keeps moisture from building up and makes your chicken crispy. One common mistake is not seasoning your chicken. Always season the chicken with salt and pepper before breading. Another mistake is using wet chicken. Wet chicken can make the breading soggy. Don’t skip the oil step either. It helps the breading brown and adds flavor. Lastly, don’t rush cooking. If you pull the chicken out too soon, it won’t be fully cooked. Always check the internal temperature to ensure it reaches 165°F (74°C). Pro Tips Use Fresh Ingredients: Always opt for fresh garlic and parsley to enhance the flavor profile of the dish. Let the Chicken Rest: Allow the chicken to rest for a few minutes after baking to retain its juices and flavor. Experiment with Seasonings: Feel free to add your favorite spices or herbs to the breadcrumb mixture for a customized taste. Serve with Sides: Pair the chicken with a fresh salad or roasted vegetables for a balanced meal. {{image_2}} To make your Garlic Parmesan Chicken spicy, add red pepper flakes. Just a pinch brings warmth. You can also mix in hot sauce with the olive oil. This adds a great kick without changing the main flavors. Adjust the heat to your liking. This way, you get a tasty twist without losing the garlic and cheese goodness. You can swap out parsley for other herbs. Fresh basil or oregano work well too. Try thyme for a different taste. Each herb gives a unique flavor to the dish. Experiment to find your favorite mix. Fresh herbs brighten the chicken and make it even more tasty. Don't hesitate to try dried herbs if fresh isn't available. You can also fry or grill the chicken for different textures. For frying, heat oil in a pan. Cook the chicken until golden brown on both sides. This gives a crispy crust. Grilling adds a smoky flavor. Preheat your grill and cook the chicken for about 6-7 minutes per side. Check the internal temperature to ensure it's safe to eat. Each method brings its own charm to this dish. After enjoying Garlic Parmesan Chicken, store leftovers in an airtight container. Make sure to let the chicken cool down to room temperature first. Place the chicken in the fridge within two hours of cooking. This helps keep it fresh and safe to eat later. Proper storage can keep your chicken tasty for up to three days. When you're ready to eat the leftovers, you can reheat the chicken in several ways. The best way is to use the oven. Preheat it to 350°F (175°C). Place the chicken on a baking sheet and cover it with foil. Bake for about 15-20 minutes until it’s hot. You can also use a microwave, but the oven keeps the chicken crispy. If you want to save the chicken for later, freezing is a great option. Wrap each piece tightly in plastic wrap, then place them in a freezer bag. Make sure to squeeze out as much air as possible. This method can keep your chicken good for up to three months. When you're ready to eat, thaw it in the fridge overnight before reheating. You can serve Garlic Parmesan Chicken with many sides. Try these options: - Roasted vegetables - Creamy mashed potatoes - Fresh garden salad - Garlic bread - Steamed rice Each side adds flavor and balance to your meal. Roasted veggies add color and nutrition. A salad offers freshness. Garlic bread brings more garlic goodness. Choose what you love! Yes, you can use bone-in chicken. Bone-in pieces will take longer to cook. Adjust the cooking time to about 35-45 minutes. Use a meat thermometer to check the temperature. Bone-in chicken should reach 165°F (74°C) to be safe. To check if the chicken is cooked well, use a meat thermometer. Insert it into the thickest part of the chicken. The temperature should reach 165°F (74°C). The juices should run clear, not pink. If you see pink, cook it longer. Always ensure your chicken is safe to eat! This blog post covered everything you need to make great Garlic Parmesan Chicken. We discussed ingredients, cooking steps, and tips for the best texture. We also offered recipe variations and smart storage methods. Remember, whether you add spice or try different herbs, enjoy every bite! With these methods, you'll cook with confidence. Follow these tips for tasty meals, and you'll impress everyone at your table. Happy cooking!

Garlic Parmesan Chicken Flavorful and Crispy Meal

Looking for a delicious and easy meal? Garlic Parmesan Chicken is just what you need! This dish pairs juicy chicken

- 12 lasagna noodles - 2 cups ricotta cheese - 3 cups shredded mozzarella cheese - 1 cup grated Parmesan cheese - 1 large egg - 2 cups marinara sauce (store-bought or homemade) - 1 pound ground beef or turkey (optional for added protein) The main ingredients form the heart of your lasagna. The lasagna noodles serve as the layers that hold everything together. I love using a mix of ricotta, mozzarella, and Parmesan. This cheese blend gives your dish a creamy, rich taste. The marinara sauce adds a tangy flavor that ties it all together. If you want extra protein, you can add ground beef or turkey. - 1 teaspoon dried oregano - 1 teaspoon dried basil - 1/2 teaspoon garlic powder - Salt and pepper to taste Flavor enhancers bring your dish to life. Dried oregano and basil add a classic Italian taste. Garlic powder gives a nice depth of flavor. Salt and pepper help balance everything out. It’s important to taste as you go. Adjust these seasonings based on your preference. - Fresh basil leaves - Additional cheese variations Garnishing makes your lasagna look great and taste even better. Fresh basil leaves on top add a pop of color. You can sprinkle more cheese on top for extra richness. Feel free to get creative with your garnishes. They can make your dish feel special. {{ingredient_image_1}} 1. First, you need to preheat your oven to 375°F (190°C). This step ensures your lasagna cooks evenly and thoroughly. 2. While the oven heats, fill a large pot with water and add a pinch of salt. Bring it to a boil. Once boiling, add the lasagna noodles. Cook them until they are al dente. This usually takes about 8 to 10 minutes. After cooking, drain and rinse the noodles under cold water. Set them aside to cool. 1. In a large mixing bowl, combine 2 cups of ricotta cheese, 1.5 cups of shredded mozzarella, and 1 cup of grated Parmesan. 2. Add 1 large egg, 1 teaspoon of dried oregano, 1 teaspoon of dried basil, and ½ teaspoon of garlic powder. 3. Season with salt and pepper to taste. Mix everything together until it is well blended. This cheese mix adds a rich flavor to your lasagna. 1. Grab a 9x13-inch baking dish. Start by spreading a thin layer of marinara sauce on the bottom. 2. Place 3 lasagna noodles on top of the sauce. 3. Spread half of your cheese mixture over the noodles. If you are using meat, add half of the cooked ground beef or turkey next. 4. Pour more marinara sauce on top of this layer. 5. Repeat the process: add another layer of noodles, the remaining cheese mixture, meat, and sauce. 6. Complete with a final layer of noodles. Spread the remaining marinara sauce on top and sprinkle the last 1.5 cups of mozzarella cheese. 7. Cover the dish with aluminum foil. To prevent sticking, spray the foil with cooking spray first. Bake in the preheated oven for 25 minutes. 8. After 25 minutes, remove the foil and bake for an additional 15 minutes. This allows the cheese to get bubbly and golden brown. 9. Once done, let the lasagna rest for 10 to 15 minutes before slicing. This helps the layers set for easier serving. To create the best lasagna, layering is key. Start with a thin layer of marinara sauce at the bottom. This helps prevent sticking. Place three lasagna noodles on top. Next, spread half of the cheese mixture over the noodles. If using meat, add half of it next. Follow with another layer of sauce. Repeat this process. Finish with a final layer of noodles and sauce. Top it with the remaining mozzarella cheese. This layering gives you rich flavor and great texture. Want to kick up the flavor? Try adding more herbs or spices. You can mix in fresh herbs like parsley or thyme. They add a nice touch. A pinch of red pepper flakes will give it a bit of heat. You can also use Italian seasoning for a more robust taste. These small changes can make your lasagna even more special. Baking your lasagna just right is crucial. Cover the dish with aluminum foil to keep it moist. However, spray the foil with cooking spray first. This prevents the cheese from sticking. Bake it for 25 minutes, then remove the foil. Bake for another 15 minutes until the cheese bubbles and turns golden brown. Let it rest for 10 to 15 minutes before serving. This helps the layers set and makes cutting easier. Pro Tips Tip Title: Use Fresh Herbs: Fresh basil or oregano can elevate the flavor of your lasagna. Add them to the cheese mixture or as a garnish for a burst of freshness. Tip Title: Make Ahead: Lasagna can be assembled and stored in the refrigerator for up to 24 hours before baking. This allows the flavors to meld beautifully. Tip Title: Use a Variety of Cheeses: For a richer flavor, mix different types of cheese such as provolone or fontina with the mozzarella and ricotta. Tip Title: Let It Rest: Allowing the lasagna to rest after baking helps it set up, making it easier to cut and serve without falling apart. {{image_2}} For a vegetarian twist, you can swap meat for plant-based options. Try using mushrooms, lentils, or chickpeas. These add great texture and protein. You can also load up on veggies. Think spinach, zucchini, or bell peppers. These will give your lasagna extra flavor and nutrients. If you need a gluten-free option, there are great alternatives. Use gluten-free lasagna noodles made from rice or corn. You may also try zucchini slices for a low-carb choice. Just remember to adjust cooking times based on the noodles you choose. Want to change things up? You can add different sauces for new flavors. Pesto or Alfredo sauce can give your lasagna a unique taste. If you want more protein, try adding Italian sausage or chicken. These options can really elevate your dish. To keep your Million Dollar Lasagna fresh, store it in the fridge. Use an airtight container or cover it tightly with plastic wrap. This will keep the moisture in and the flavors intact. Make sure to refrigerate within two hours of baking. Leftovers can last up to four days in the refrigerator. When you're ready to eat, just reheat a slice in the microwave or oven. If you want to save extra lasagna, freezing is a great option. First, allow the lasagna to cool completely. Then, cut it into portions. Wrap each piece tightly in plastic wrap and then in aluminum foil. This double wrap helps prevent freezer burn. You can freeze it for up to three months. To reheat, thaw it in the fridge overnight. Bake at 375°F (190°C) for about 30 minutes, or until heated through. Refrigerated Million Dollar Lasagna stays fresh for about four days. If you freeze it, expect it to taste great for up to three months. However, for the best flavor and texture, eat it within two months. Always check for any signs of spoilage before eating. Enjoy your delicious comfort food! Million Dollar Lasagna is a rich and tasty dish. It gets its name from its luxurious flavors and textures. This meal features layers of creamy cheese, savory meat, and delicious sauce. The blend of ricotta, mozzarella, and Parmesan gives it a unique taste. When you serve this dish, it feels special, almost like a million bucks. Yes, you can make Million Dollar Lasagna ahead of time. Just prepare the lasagna up to the baking step. Cover it tightly with foil and store it in the fridge. You can keep it there for about 24 hours. When you are ready to bake it, preheat your oven. It may take a bit longer to bake since it is cold. Just make sure the cheese gets bubbly and golden. Many side dishes go well with Million Dollar Lasagna. Here are some great options: - Garlic bread - Caesar salad - Steamed vegetables - Antipasto platter - Sautéed greens These sides add texture and balance to the meal, making it even more enjoyable. In this article, I covered the key steps to making a delicious lasagna. We explored essential ingredients, like noodles, cheese, and marinara. I provided tips for layering and baking for the best results. If you want to try new flavors, I suggested tasty variations. Remember, lasagna is easy to store and reheat. Enjoy experimenting with this classic dish. You can make it your own through creativity and care. Whether for family or friends, a great lasagna will impress everyone. Happy cooking!

Million Dollar Lasagna Simply Delicious Comfort Food

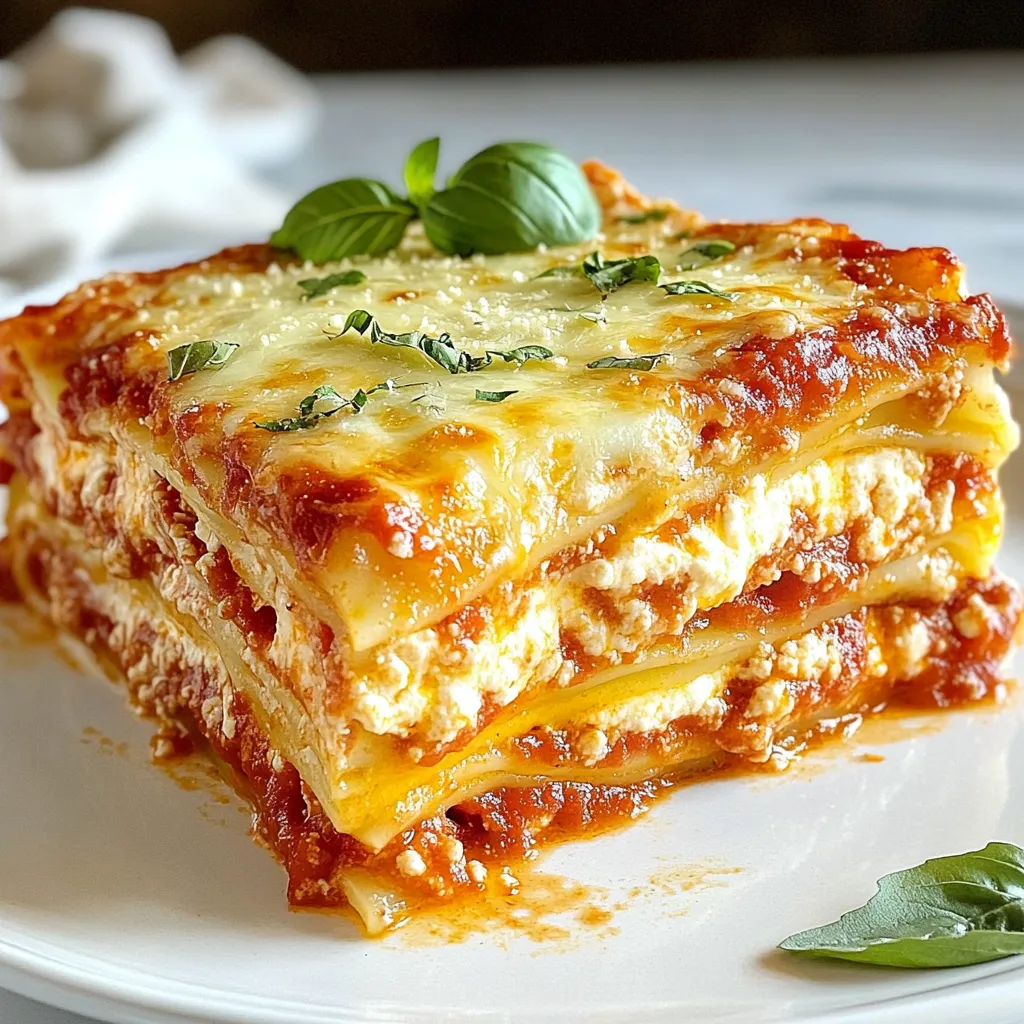
If you crave a warm, hearty meal that delights, try my Million Dollar Lasagna. This dish combines layers of cheesy

To make these thick and delightful cookies, you need: - 2 cups all-purpose flour - 1 teaspoon baking soda - 1/2 teaspoon salt - 1 cup unsalted butter, softened - 3/4 cup brown sugar, packed - 3/4 cup granulated sugar - 2 large eggs - 2 teaspoons vanilla extract - 1 cup semi-sweet chocolate chips - 1 cup milk chocolate chips - 1/2 cup chopped walnuts (optional) - Flaky sea salt for topping These ingredients create a rich base for your cookies. The mix of semi-sweet and milk chocolate chips gives a great flavor contrast. You can enhance your cookies by adding: - 1/2 cup chopped walnuts - Extra chocolate chips for a richer taste - A dash of cinnamon for warmth These optional ingredients add texture and flavor. Feel free to mix and match based on what you love. If you lack some ingredients, here are some swaps: - Use light brown sugar instead of granulated sugar for a deeper flavor. - Swap unsalted butter with coconut oil for a dairy-free version. - Replace eggs with flaxseed or applesauce for a vegan option. These substitutions keep the cookies tasty. Just remember that each change can slightly alter the final texture. {{ingredient_image_1}} To start, gather all your ingredients. You will need: - 2 cups all-purpose flour - 1 teaspoon baking soda - 1/2 teaspoon salt - 1 cup unsalted butter, softened - 3/4 cup brown sugar, packed - 3/4 cup granulated sugar - 2 large eggs - 2 teaspoons vanilla extract - 1 cup semi-sweet chocolate chips - 1 cup milk chocolate chips - 1/2 cup chopped walnuts (optional) - Flaky sea salt for topping First, preheat your oven to 350°F (175°C). Line two baking sheets with parchment paper. This helps prevent sticking and makes cleanup easier. Next, in a medium bowl, whisk together the flour, baking soda, and salt. Set this bowl aside for now. In a large mixing bowl, cream the softened butter with both sugars. Mix until it's light and fluffy, which should take about 2-3 minutes. This step adds air and helps cookies rise. Once mixed, add the eggs one at a time. Be sure to mix well after each egg. Then, stir in the vanilla extract. Gradually mix the dry ingredients into the wet mixture. Stir until just combined. Over-mixing can make cookies tough, so be gentle! Now, fold in the semi-sweet and milk chocolate chips. If you want, add in the chopped walnuts for some crunch. Using a cookie scoop or a tablespoon, drop generous mounds of dough onto your prepared baking sheets. Make sure to leave space between each cookie. They will spread a little as they bake. Sprinkle a light pinch of flaky sea salt on top of each mound of cookie dough. This enhances the flavor and adds a nice finish. Bake the cookies for 12-15 minutes. The edges should turn lightly golden, but the centers should stay soft. After baking, remove the sheets from the oven. Let the cookies cool on the baking sheet for 5 minutes. This helps them set before moving. Carefully transfer the cookies to a wire rack to cool completely. For a fun touch, serve the cookies on a decorative plate. You can even drizzle melted chocolate on top for extra flair. Enjoy them warm with a glass of milk! To get that thick and chewy cookie, use softened butter. Cream it well with the sugars. This step adds air, which helps the cookie rise. Don’t skip the resting time; letting the dough chill for 30 minutes makes a huge difference. Cold dough also helps keep the cookies thick. One big mistake is over-mixing the dough. Mix just until combined; too much mixing can make cookies tough. Also, don’t skip the flaky sea salt on top. It adds a nice contrast to the sweet chocolate. Lastly, avoid pressing the cookies flat before baking. Let them keep their shape! Look at the edges first. They should be golden brown. The center might look soft, and that’s okay. Remember, cookies continue to cook on the baking sheet after you take them out. If they look too baked, they can turn dry. Trust your eyes and take them out a bit early if needed! Pro Tips Chill the Dough: For thicker cookies, chill the dough for at least 30 minutes before baking. This helps the cookies hold their shape and enhances the flavor. Use Quality Chocolate: Opt for high-quality chocolate chips for the best flavor. A mix of semi-sweet and milk chocolate creates a delicious contrast. Don’t Overbake: Keep an eye on your cookies while baking. They should be golden around the edges but still soft in the center to maintain a chewy texture. Experiment with Add-ins: Feel free to add in your favorite nuts, dried fruits, or even a sprinkle of espresso powder for an extra flavor boost. {{image_2}} You can make these cookies gluten-free easily. Substitute all-purpose flour with a gluten-free blend. Look for blends that include xanthan gum, as it helps with texture. Follow the same steps in the recipe. Your cookies will still taste great! Want to mix it up? Try adding fun flavors! You can include: - 1/2 cup of shredded coconut - 1/2 cup of dried fruit like cranberries or cherries - 1 teaspoon of espresso powder for a coffee kick These add-ins will make your cookies unique and tasty. If you love chocolate, switch it up! Use different types of chocolate chips. You can try: - Dark chocolate chips for a richer taste - White chocolate chips for a sweeter treat - Even peanut butter chips for a fun twist Mix and match to create your perfect cookie! To keep your thick two chip chocolate chip cookies fresh, use an airtight container. Place a piece of wax paper between layers to prevent sticking. Store them at room temperature for up to five days. If you want them to last longer, consider freezing them. Freezing cookies is easy and a great way to save some for later. First, let the cookies cool completely. Then, place them in a single layer on a baking sheet. Freeze for about an hour, or until firm. After that, transfer them to a freezer bag. They can stay in the freezer for up to three months. To enjoy your cookies warm again, preheat your oven to 350°F (175°C). Place the cookies on a baking sheet and heat for about 5-10 minutes. This warms them up and brings back that fresh-baked taste. You can also use the microwave for a quick fix. Heat each cookie for about 10-15 seconds. Enjoy! Yes, you can use just one type of chocolate chip. If you prefer, use semi-sweet or milk chocolate. The flavor will change slightly but will still taste great. I love the mix of both chips for added texture and taste. But if you want a richer chocolate flavor, go with dark chocolate chips. To make cookies thick and chewy, use more flour and less baking soda. The right ratio of butter and sugar helps too. Chilling the dough before baking also helps keep them thick. When you scoop the dough, make big mounds. This keeps the cookies from spreading too much in the oven. To stop cookies from spreading too much, chill the dough for at least 30 minutes. Use a cookie scoop to keep the size even. Also, make sure your oven is at the right temperature. If it’s too hot, the cookies will spread fast. Lastly, don’t skip the parchment paper; it helps the cookies hold their shape. In this post, we covered key ingredients and how to bake cookies perfectly. I shared steps for preparation, baking, and cooling. I also listed tips to avoid common mistakes and achieve a great texture. You can even explore fun variations and storage tips. Remember, baking is all about practice. Keep experimenting with flavors and techniques. Enjoy the journey of making the best cookies your way!

Thick Two Chip Chocolate Chip Cookies Delightfully Simple

If you’re craving a cookie that’s thick, chewy, and packed with flavor, you’ve come to the right place! My Thick

For the One-Pan Beefy Tortellini Bake, you will need: - 1 lb ground beef - 1 medium onion, chopped - 2 cloves garlic, minced - 2 cups marinara sauce - 1 cup beef broth - 12 oz cheese tortellini (fresh or frozen) - 1 cup shredded mozzarella cheese - 1 cup ricotta cheese - 1 teaspoon Italian seasoning - Salt and pepper to taste - Fresh basil, for garnish Using fresh tortellini makes the dish light and tender. Fresh pasta cooks quickly and absorbs flavors better. On the other hand, frozen tortellini offers convenience and still tastes great. Both options work well in this recipe. If you choose frozen, just add a minute or two to the cooking time. If you want a change, try using ground turkey or chicken instead of beef. These options are leaner and still very tasty. You can also use plant-based ground meat for a vegetarian twist. Each substitute will give a different flavor but will still work well in this dish. Remember to adjust the cooking time if needed. {{ingredient_image_1}} Start by gathering all your ingredients. You will need: - 1 lb ground beef - 1 medium onion, chopped - 2 cloves garlic, minced - 2 cups marinara sauce - 1 cup beef broth - 12 oz cheese tortellini (fresh or frozen) - 1 cup shredded mozzarella cheese - 1 cup ricotta cheese - 1 teaspoon Italian seasoning - Salt and pepper to taste - Fresh basil for garnish Make sure the onion is finely chopped and the garlic is minced. This helps them cook evenly. If using frozen tortellini, set it out to thaw a bit. This will help with cooking later. Heat a large oven-safe skillet over medium heat. Add the ground beef to the skillet. Cook until it turns brown. Drain any extra fat. This step keeps the dish from being greasy. Next, add the chopped onion and minced garlic. Stir them in and cook for about 3-4 minutes. You want the onion to become soft and clear. This brings out the sweet flavor of the onion and the aroma of garlic. Now, pour in the marinara sauce and beef broth. Mix it all together and bring it to a simmer. This step makes the sauce rich and tasty. Once the sauce is simmering, add the cheese tortellini. Gently stir to coat the tortellini with the sauce. In a separate bowl, mix ricotta cheese with Italian seasoning, salt, and pepper. Drop spoonfuls of this mixture over the tortellini. This adds creaminess to the bake. Lastly, sprinkle the shredded mozzarella cheese evenly over the top. Cover the skillet with a lid or aluminum foil. Bake in the preheated oven at 375°F (190°C) for 20 minutes. After that, remove the cover and bake for another 10-15 minutes. The cheese should be bubbling and golden. Let it sit for a few minutes before you serve it. Garnish with fresh basil for a burst of flavor. Enjoy your delicious One-Pan Beefy Tortellini Bake! To get that gooey, dreamy cheese melt, follow these steps. First, use fresh mozzarella for the best taste. Shred the cheese yourself for a better melt than pre-shredded cheese. When you sprinkle it on top, spread it evenly. Cover the dish while baking helps keep the moisture in. Once the time is up, remove the cover and bake until golden. This creates a crispy top and a soft, melty layer underneath. You can easily prepare this dish ahead of time. Cook the beef and veggies as directed. Then, layer everything in your skillet, but do not bake it yet. Cover the skillet and store it in the fridge for up to 24 hours. When you're ready to eat, just pop it in the oven. You may need to add a few extra minutes to the baking time since it's cold. This dish pairs well with several sides. A simple green salad adds freshness and crunch. Garlic bread is a classic choice that complements the flavors. You can also serve steamed broccoli or green beans to add nutrition. For a fun twist, try a side of roasted vegetables. Each side brings something special to the table, making your meal even better. Pro Tips Use Fresh Tortellini: Fresh tortellini will give your dish a delightful texture and flavor. If using frozen, ensure they are fully cooked before adding to the sauce. Season Generously: Don’t forget to taste and adjust the seasoning as you go. A pinch of red pepper flakes can add a nice kick! Let It Rest: Allow the dish to sit for a few minutes after baking. This helps the flavors meld together and makes it easier to serve. Add Veggies: For extra nutrition, consider adding spinach or bell peppers to the skillet when sautéing the onion and garlic. {{image_2}} You can easily swap the ground beef for turkey or chicken. Both options offer a lighter taste. Ground turkey is lean and great if you want fewer calories. Ground chicken has a mild flavor that pairs well with cheese and sauce. Just brown the turkey or chicken in the skillet first, just as you would with beef. The cooking times remain the same, making it a simple swap. If you want a vegetarian dish, use meat substitutes like lentils or chickpeas. They add protein and texture. Cook them the same way you would prepare the beef. You can also try plant-based ground beef. These options keep the dish filling while being meat-free. Just ensure to adjust the salt, as some meat substitutes are saltier. Adding veggies boosts nutrition and flavor. You can mix in spinach, bell peppers, or zucchini. Chop them small so they cook quickly. Sauté them with the onion and garlic before adding the sauce. This method adds color and health benefits to your One-Pan Beefy Tortellini Bake. You can also top it with fresh basil for a pop of flavor. To store your One-Pan Beefy Tortellini Bake, let it cool first. Once cooled, put it in an airtight container. This helps keep the flavors fresh. You can store it in the fridge for up to three days. Make sure to cover it well, so it does not dry out. When you want to reheat your dish, the oven works best. Preheat your oven to 350°F (175°C). Place the tortellini bake in an oven-safe dish. Cover it with foil to keep it moist. Heat for about 20 minutes, or until hot. You can also use the microwave. Just heat in short bursts, stirring in between. This keeps the cheese from getting tough. You can freeze this dish for later. It’s great for meal prep! To do this, let it cool completely. Then, transfer it to a freezer-safe container. Be sure to label it with the date. You can freeze it for up to three months. When ready to eat, thaw it in the fridge overnight before reheating. This way, it stays tasty and ready to enjoy! Yes, you can! Feel free to mix and match cheeses. Try using provolone or gouda. Both melt well and add great flavor. Just keep in mind that mozzarella gives a classic touch. Ricotta adds creaminess. Using a blend makes it fun and tasty! You have many choices! A fresh salad pairs well with this dish. Consider a simple green salad with tomatoes and cucumbers. Garlic bread is also a great side. It soaks up the sauce nicely. You can even serve it with steamed veggies for extra nutrition. This recipe takes about 50 minutes in total. You need about 15 minutes to prep the ingredients. Cooking the dish in the oven takes around 35 minutes. It’s quick and easy, perfect for busy nights! In this article, we explored how to make a delicious One-Pan Beefy Tortellini Bake. We discussed the fresh ingredients needed and the importance of using frozen tortellini. I shared steps for cooking and tips for achieving a great cheese melt. We looked at variations and storage options, plus answered common questions. This dish is easy, tasty, and perfect for busy nights. Try it out and enjoy a hearty meal that everyone will love. Your kitchen will smell amazing, and you'll impress your family!

One-Pan Beefy Tortellini Bake Flavorful and Easy Dish

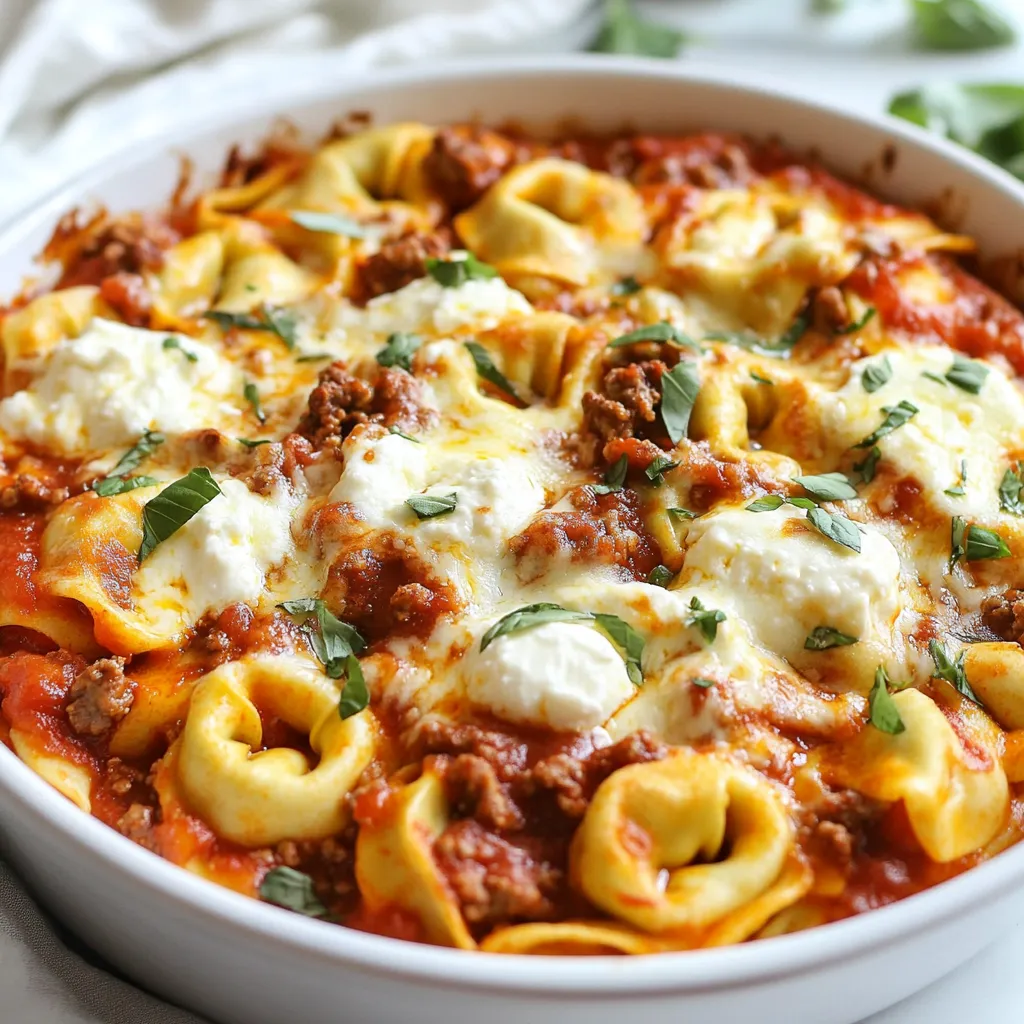
Get ready to savor a delicious One-Pan Beefy Tortellini Bake! This simple dish combines tender beef, cheesy tortellini, and fresh

Older posts
Newer posts
← Previous Page1 … Page109 Page110 Page111 … Page115 Next →

dsad

© 2025 flavorsprint • Built with GeneratePress

Our Policies

  • Copyright Policy
  • Cookie Policy
  • GDPR Policy
  • Privacy Policy
  • Disclaimer
  • Terms Of Use

More Information

  • Home
  • About
  • Contact
  • Appetizers
  • Dessert
  • Dinner
  • Drinks
©2025, flavorsprint About Back To Top