Skip to content
DisclaimerTerms Of UseGDPR PolicyCookie Policy

flavorsprint

  • Home
  • Drinks
  • Appetizers
  • Dinner
  • Dessert
  • About
  • Contact
  • Privacy Policy
DisclaimerTerms Of UseGDPR PolicyCookie Policy

Lillian

- Chicken breasts and seasonings - 4 boneless, skinless chicken breasts - Salt and pepper to taste - 1 tablespoon olive oil - Creamy base components - 2 cloves garlic, minced - 1 cup heavy cream - 1 cup freshly grated Parmesan cheese - Juice and zest of 1 large lemon - Herbs and garnishes - 1 teaspoon dried basil - 1 teaspoon dried oregano - Fresh parsley, chopped for garnish These ingredients form the backbone of the dish. The chicken breasts provide a juicy base, while salt and pepper enhance the flavor. Olive oil helps sear the chicken, locking in moisture. The garlic adds a delightful aroma, and heavy cream gives the sauce its rich texture. Parmesan cheese brings a savory depth, and lemon juice brightens the dish with zest and freshness. Dried basil and oregano add herbal notes. Finally, fresh parsley gives a pop of color and freshness as a garnish. This combination of ingredients makes for a truly delicious meal that you’ll want to share. {{ingredient_image_1}} To start, season your chicken breasts with salt and pepper on both sides. This simple step boosts flavor. Next, heat one tablespoon of olive oil in a large skillet over medium-high heat. When the oil shimmers, add the chicken breasts. Sear each side for 6-7 minutes. Look for a nice golden brown color. This browning gives great flavor. Once cooked through, remove the chicken from the skillet and set it aside. In the same skillet, add the minced garlic. Sauté it for about 30 seconds. You want it fragrant but not burnt. Lower the heat to medium and pour in one cup of heavy cream. Stir constantly to mix well. This will create a rich base for your sauce. Gradually whisk in one cup of freshly grated Parmesan cheese. Keep stirring until the sauce is creamy and smooth. Then add the juice and zest of one large lemon. This adds brightness. Lastly, mix in one teaspoon each of dried basil and oregano. Stir well and let it cook for an additional 2-3 minutes until the sauce thickens. Return the chicken to the skillet with the sauce. Coat each piece thoroughly. Let it simmer on low heat for an additional 2-3 minutes. This allows the flavors to meld nicely. When done, remove from heat and sprinkle with chopped fresh parsley for a pop of color. Enjoy your creamy lemon chicken! To keep your sauce creamy, avoid high heat after adding the cream. High heat can cause it to separate. Instead, keep the heat low and stir gently. If your sauce is too thick, add a bit of chicken broth or water. This helps to reach the perfect consistency without losing flavor. Seasoning is key to great taste. I always start with salt and pepper, but feel free to adjust as you like. Add more flavors with dried basil and oregano. Before serving, taste the sauce. If it needs more, just add a pinch more salt or herbs. Adjusting is part of the fun! Creamy Lemon Chicken pairs well with rice or garlic bread. Both soak up the sauce nicely. For a nice touch, serve it on a bed of fresh spinach. For plating, drizzle extra sauce over the chicken. Garnish with lemon slices and chopped parsley for a bright look. This makes your dish pop and look amazing! Pro Tips Use Fresh Ingredients: Always opt for fresh garlic and freshly grated Parmesan cheese for the best flavor in your creamy lemon sauce. Perfectly Cooked Chicken: To ensure your chicken is juicy and tender, use a meat thermometer; it should read 165°F (75°C) when fully cooked. Customize the Sauce: Add a splash of white wine or a pinch of red pepper flakes to the sauce for an extra layer of flavor. Let it Rest: After cooking, allow the chicken to rest for a few minutes before slicing to keep it moist and flavorful. {{image_2}} You can switch the chicken breasts for thighs. Thighs add more flavor and stay moist. They work well with the creamy sauce too. You can also use turkey. Turkey breast is a lean option, and it cooks quickly. Just remember to adjust the cooking time to ensure it is fully cooked. To make the sauce even better, consider adding vegetables. Spinach or mushrooms blend nicely into the creamy mix. They add color and nutrition. If you want a lighter sauce, use yogurt instead of heavy cream. It gives a tangy flavor while keeping the dish creamy. You can change the taste by using different herbs or spices. Try rosemary or thyme for a new twist. If you want more zing, adjust the citrus levels. Adding extra lemon juice or zest brightens the dish. Don’t be afraid to experiment! After you enjoy Creamy Lemon Chicken, store any leftovers right away. Let the chicken cool a bit. Place it in an airtight container. This helps keep it fresh. You can keep it in the fridge for up to three days. If you want to keep it longer, freeze the chicken. Use a freezer-safe bag or container. It can last up to three months in the freezer. When it is time to eat the leftovers, you want them just as tasty. The best way to reheat is on the stovetop. This keeps the sauce creamy and the chicken juicy. Heat a skillet over low heat. Add a splash of cream or broth to keep moisture. Stir gently until warmed through. You can also use the microwave. Place the chicken on a microwave-safe plate. Cover it with a damp paper towel. Heat in short bursts, checking often. This will help avoid overcooking. Remember, the stovetop method is better for flavor and texture. To lighten the sauce, you can swap heavy cream for half-and-half or whole milk. This change cuts the fat but keeps some creaminess. You might also consider using Greek yogurt. It adds tang and creaminess without being too heavy. For a citrus twist, you can add more lemon juice or zest to brighten the flavor. Yes, you can use pre-grated Parmesan cheese. However, it may not melt as smoothly as fresh cheese. Pre-grated cheese often has anti-caking agents, which can affect the sauce's texture. Freshly grated cheese gives a richer flavor and a creamier sauce, which enhances your dish. This dish pairs well with many sides. Try serving it over rice or pasta to soak up the sauce. Garlic bread is also a great option for a comforting meal. Roasted vegetables, like asparagus or broccoli, add color and nutrition. A fresh salad can balance the richness of the chicken. In this post, we covered the key ingredients for a delicious creamy lemon chicken dish. You learned how to prepare the chicken perfectly and make a flavorful sauce. We included tips for ensuring creaminess and adjusting seasonings. You can also experiment with various chicken alternatives and flavor enhancements. In the end, this dish is simple yet impressive. Try it out and enjoy the fresh tastes and creamy goodness. Each step leads to a meal that delights!

Creamy Lemon Chicken with Parmesan Sauce Recipe

Are you ready to impress your family with a fantastic meal? This Creamy Lemon Chicken with Parmesan Sauce is simple,

- 4 large russet potatoes, peeled and diced - 1/2 cup unsalted butter - 1 cup onion, finely chopped - 3 cloves garlic, minced - 1/2 cup all-purpose flour - 4 cups vegetable broth - 2 cups milk (or plant-based milk) - 2 cups sharp cheddar cheese, grated - 1/2 cup sour cream (or Greek yogurt) - Salt and pepper to taste - 1 teaspoon smoked paprika - 1/2 cup green onions, sliced (for garnish) - 1/2 cup crispy tortilla chips (for garnish) To make loaded baked potato soup, gather these ingredients. Large russet potatoes give the soup its hearty base. I use unsalted butter for flavor, while onion and garlic add depth. All-purpose flour helps thicken the soup. Vegetable broth brings in liquid and flavor. For creaminess, I add milk, but you can use plant-based milk if you prefer. Sharp cheddar cheese melts beautifully, adding a rich taste. Sour cream or Greek yogurt gives it a nice tang. Don't forget your seasonings! Salt and pepper enhance all the flavors. Smoked paprika adds a subtle warmth. Finally, green onions and crispy tortilla chips make excellent toppings. They add crunch and freshness to each bowl. {{ingredient_image_1}} Start by melting the unsalted butter in a large pot over medium heat. Once it melts, add the finely chopped onion and minced garlic. Sauté them for about five minutes. You want the onions to become soft and clear. This adds a great flavor to your soup. Next, stir in the all-purpose flour. Cook this mixture for another two minutes. This step creates a roux, which helps thicken the soup later. Make sure to stir continuously to avoid lumps. Now it's time to add the vegetable broth. Pour it in slowly while whisking. This helps keep the mixture smooth. Bring the broth to a gentle simmer. Once it simmers, add the peeled and diced russet potatoes. Season with salt, pepper, and smoked paprika. Cover the pot and let it simmer for 15 to 20 minutes. You want the potatoes to be tender and easy to mash. After the potatoes are tender, use a potato masher or an immersion blender. Blend the soup a bit, but leave some chunks for texture. Next, stir in the milk. Heat it until warm, and then add the grated sharp cheddar cheese. Stir until the cheese melts and combines into a creamy mix. Finally, remove the pot from heat and add sour cream. Mix well to combine. Taste and adjust the seasonings as needed. Serve the soup in bowls. Top with sliced green onions and crispy tortilla chips for a nice crunch. Enjoy your delicious loaded baked potato soup! To get the right consistency for your loaded baked potato soup, aim for a creamy yet chunky feel. Start by mashing some of the potatoes after they cook. This gives the soup a nice base. If you want it smoother, use an immersion blender. Blend just a little to keep some potato pieces. This adds character to the soup. For extra flavor, try adding more spices like garlic powder or onion powder. These give depth to your soup. Fresh herbs like parsley or chives can brighten the taste. Just chop them up and stir them in before serving. They add a fresh kick that makes the soup even better. Garnishes can really elevate your soup. Top each bowl with green onions for a fresh crunch. Crispy tortilla chips add a fun texture too. You can also try adding crumbled bacon or extra cheese on top. Serve the soup with crusty bread or a simple salad for a complete meal. Enjoy every spoonful! Pro Tips Use Starchy Potatoes: Russet potatoes are ideal for a creamy texture, but you can also mix in Yukon Gold for added flavor. Adjust Thickness: If you prefer a thicker soup, let it simmer longer or mash more potatoes; for a thinner consistency, add more broth or milk. Cheese Variations: Experiment with different cheeses like Monterey Jack or Gouda for a unique twist on the classic flavor. Garnish Creatively: Besides green onions and tortilla chips, try adding crispy bacon bits or a drizzle of hot sauce for extra flavor. {{image_2}} To make this soup vegan, you can substitute dairy ingredients easily. Use plant-based milk like almond or oat milk instead of regular milk. Swap the sour cream with vegan yogurt or silken tofu for creaminess. For cheese, try nutritional yeast or a vegan cheese brand. These swaps keep the rich flavor without using animal products. If you need a gluten-free version, you can thicken the soup differently. Instead of all-purpose flour, use cornstarch or a gluten-free flour blend. Simply mix it with a bit of cold water before adding it to the soup. Ensure your vegetable broth is gluten-free too. For extra flavor, consider adding bacon or other proteins. Cook bacon until crispy, then crumble it on top of the soup. You can also use cooked chicken or turkey for added heartiness. To spice things up, try adding cayenne pepper or red pepper flakes for heat. A dash of hot sauce can also bring a kick! To store your loaded baked potato soup in the fridge, let it cool first. Once cool, transfer it to an airtight container. This keeps the soup fresh and prevents spills. I recommend using glass containers for easy reheating. They do not stain and can go in the microwave. For freezing, use freezer-safe containers. Leave some space at the top for expansion. It is best to freeze the soup in single servings. This makes it easy to thaw only what you need. When you are ready to eat, thaw overnight in the fridge. Reheat in a pot on low heat. Stir often to avoid sticking on the bottom. You can also use the microwave but do it in short bursts. Loaded baked potato soup lasts about 3 to 4 days in the fridge. In the freezer, it can last for up to 3 months. Always check for signs of spoilage. If you see any mold or off smells, it’s best to throw it away. When in doubt, it’s safer to discard it than to risk eating spoiled food. Yes, you can make this soup ahead of time. It tastes even better the next day! To prep, follow these meal prep tips: - Cook the soup completely as per the recipe. - Let it cool to room temperature before storing. - Store in an airtight container in the fridge for up to three days. - When ready to serve, reheat gently on the stove over low heat. Add a splash of milk if needed. If you want to swap sour cream, you have many choices. Here are some great alternatives: - Greek yogurt: It adds creaminess and tang. - Cottage cheese: Blend it smooth for a similar texture. - Cream cheese: It gives a rich flavor, just blend well. - Non-dairy yogurt: Use coconut or almond yogurt for a vegan option. To add some heat to your soup, try these simple ideas: - Cayenne pepper: Start with a small pinch for a kick. - Jalapeños: Chop fresh or pickled jalapeños and stir in. - Hot sauce: A few dashes can spice things up. - Crushed red pepper flakes: Sprinkle in to taste as you cook. These options let you customize the heat level to your liking! This blog post guides you in making a delicious Loaded Baked Potato Soup. We’ve covered the key ingredients, step-by-step instructions, and helpful tips. You learned how to prepare the base, cook the soup, and add finishing touches for optimal flavor. Additionally, we explored variations to suit dietary needs and tips for storage. Remember, cooking is fun and a way to be creative. Enjoy your delicious soup, share it with friends, and make it your own!

Loaded Baked Potato Soup Flavorful and Hearty Recipe

If you’re craving a warm, tasty bowl of comfort, you’re in the right place. This Loaded Baked Potato Soup is

- 12 oz fettuccine or your favorite pasta - 2 tablespoons olive oil - 4 cloves garlic, minced - 1 cup cherry tomatoes, halved - 1 teaspoon red pepper flakes (adjust to taste) - 1 cup heavy cream - 1 cup grated Parmesan cheese - Salt and freshly ground black pepper to taste - 1/4 cup fresh basil, chopped (plus extra for garnish) The main ingredients make this dish shine. The fettuccine serves as a perfect base. Olive oil gives a rich flavor. Garlic adds depth and warmth. Cherry tomatoes bring a sweet burst. Red pepper flakes add just the right kick. Heavy cream creates a smooth sauce. Parmesan cheese adds a rich, salty finish. Fresh basil brightens every bite. - 1/4 cup sun-dried tomatoes, chopped (optional for a flavor boost) Sun-dried tomatoes can step up the flavor. They add a chewy texture and extra taste. You can also consider adding sautéed mushrooms or spinach for more color and nutrients. These options make the dish even more special. - Gluten-free pasta for a gluten-free option - Plant-based cream and cheese for a vegan version If you need gluten-free, swap the pasta for a gluten-free type. For vegans, use plant-based cream and cheese. These swaps keep the spirit of the dish while meeting your needs. Enjoy experimenting with these options! {{ingredient_image_1}} Start by boiling a large pot of salted water. Once it boils, add your pasta. I recommend fettuccine for a great texture. Cook it until it is al dente, following the package directions. This usually takes about 8 to 10 minutes. After cooking, drain the pasta but keep about 1 cup of the pasta water. Set the pasta aside and let it rest. In a large skillet, heat 2 tablespoons of olive oil over medium heat. Once the oil is hot, add 4 minced garlic cloves. Stir it for about 1 minute until it becomes fragrant. Next, add 1 cup of halved cherry tomatoes and 1 teaspoon of red pepper flakes. Cook this mixture for about 3 to 4 minutes. You want the tomatoes to soften but not turn mushy. Pour 1 cup of heavy cream into the skillet with the garlic and tomatoes. Stir it well and let it simmer gently for 2 to 3 minutes. Then, add 1 cup of grated Parmesan cheese. Stir continuously until the cheese melts and the sauce thickens. If the sauce is too thick, add a splash of the reserved pasta water until it reaches your desired consistency. Now, add the cooked fettuccine to the skillet. Toss it well to coat the pasta in the creamy sauce. Season with salt and freshly ground black pepper to taste. For a fresh touch, stir in 1/4 cup of chopped basil and optional sun-dried tomatoes. Make sure everything is well combined. Your pasta is now ready to serve! To make your sauce extra creamy, use heavy cream. This adds richness. If you want more creaminess, add more cheese. Grated Parmesan melts well and blends nicely. You can also use a bit of the reserved pasta water. This helps adjust the sauce's thickness without losing creaminess. Fettuccine works great for this dish, but you can try other types too. Penne, rigatoni, or even spaghetti can give you a fun twist. Just make sure the pasta can hold the sauce well. Longer shapes like fettuccine coat better, but short shapes trap sauce inside. Seasoning is key to a great Marry Me Pasta. Start with salt in the boiling water. This adds flavor to the pasta. Taste your sauce as you cook. Adjust with salt and black pepper. Red pepper flakes give a nice kick, so add them slowly. Don't forget to add fresh basil at the end for a fresh taste. Pro Tips Perfect Pasta Texture: Always cook your pasta until al dente for the best texture. This ensures it holds up well when mixed with the sauce and avoids becoming mushy. Garlic Timing: Sauté the garlic until fragrant but avoid browning it. Burnt garlic can impart a bitter flavor to your sauce. Cheese Melting: Gradually add Parmesan cheese to the sauce and stir continuously. This helps achieve a smooth and creamy sauce without clumps. Fresh Herbs Finish: Add fresh basil right before serving to maintain its vibrant color and flavor. Overcooking fresh herbs can diminish their aromatic qualities. {{image_2}} You can easily make Marry Me Pasta vegetarian. Simply swap the heavy cream with a plant-based option. Coconut cream works great. For cheese, try vegan Parmesan or nutritional yeast. Add more veggies like spinach or zucchini for extra color and taste. These changes keep the dish rich and satisfying without meat. To make the dish heartier, add protein. Grilled chicken or shrimp pairs well with the flavors. Cook these separately and toss them in before serving. For a different twist, use Italian sausage or pancetta. Both add depth to the sauce. You can also add beans for a vegetarian protein boost. Seasonal ingredients can enhance your Marry Me Pasta. In spring, add fresh asparagus or peas for a pop of green. In summer, use sun-ripened tomatoes for an extra burst of flavor. Fall calls for roasted pumpkin or squash, which adds creaminess. Winter is perfect for kale or broccoli. These swaps keep the dish fresh and exciting all year round. To keep your Marry Me Pasta fresh, store it in an airtight container. Use a glass or plastic container that seals well. This keeps moisture out and prevents odors from other foods. Place it in the fridge within two hours of cooking. The pasta will stay good for about 3 to 5 days. Before eating, check for any signs of spoilage, like off smells or changes in texture. When reheating, add a splash of pasta water or cream to keep it creamy. This helps restore moisture. You can heat it in a skillet over low heat. Stir often until warm. If you prefer the microwave, use a microwave-safe dish. Cover it with a damp paper towel to trap steam. Heat in short bursts to prevent it from drying out. To freeze Marry Me Pasta, let it cool completely first. Then, divide it into portions. Use freezer-safe bags or containers. Remove as much air as possible to prevent freezer burn. It will last up to 3 months in the freezer. When ready to enjoy, thaw it in the fridge overnight. Reheat as mentioned above for the best taste. Marry Me Pasta is a dish that became popular on social media. It is said to have originated from a food blog. The name hints at its rich, tasty flavors, which may win hearts. The dish combines creamy sauce with fresh ingredients, making it special. It’s a great choice for romantic dinners or special occasions. Yes, you can make Marry Me Pasta ahead of time. Cook the pasta and sauce separately. Store them in airtight containers in the fridge. When you’re ready to eat, warm the sauce and mix it with the pasta. This helps keep the pasta from getting soggy. You can serve Marry Me Pasta with various side dishes. Here are some great options: - Garlic bread for a crunchy bite - A fresh salad for a light side - Roasted vegetables for added flavor - Grilled chicken for extra protein These sides balance the creamy pasta and add texture. To make Marry Me Pasta spicier, add more red pepper flakes. You can also use chopped fresh chili peppers. Another option is to drizzle some hot sauce over the top before serving. Adjust the heat to fit your taste without overpowering the dish. Yes, Marry Me Pasta is great for meal prep. You can easily divide it into portions. Store the pasta and sauce separately to keep them fresh. This way, you can enjoy delicious meals throughout the week. Just heat and combine when you’re ready to eat. Marry Me Pasta is a delightful dish with simple ingredients that pack a punch. We discussed key components, step-by-step preparation, and clever tips to enhance your meal. You can adapt it to fit diets and swap ingredients based on the season. In my experience, this dish will impress anyone at your table. Keep experimenting to find your favorite versions. With just a few adjustments, you’ll make Marry Me Pasta a staple in your home. Enjoy every bite!

Marry Me Pasta Irresistible Flavor for Dinner Nights

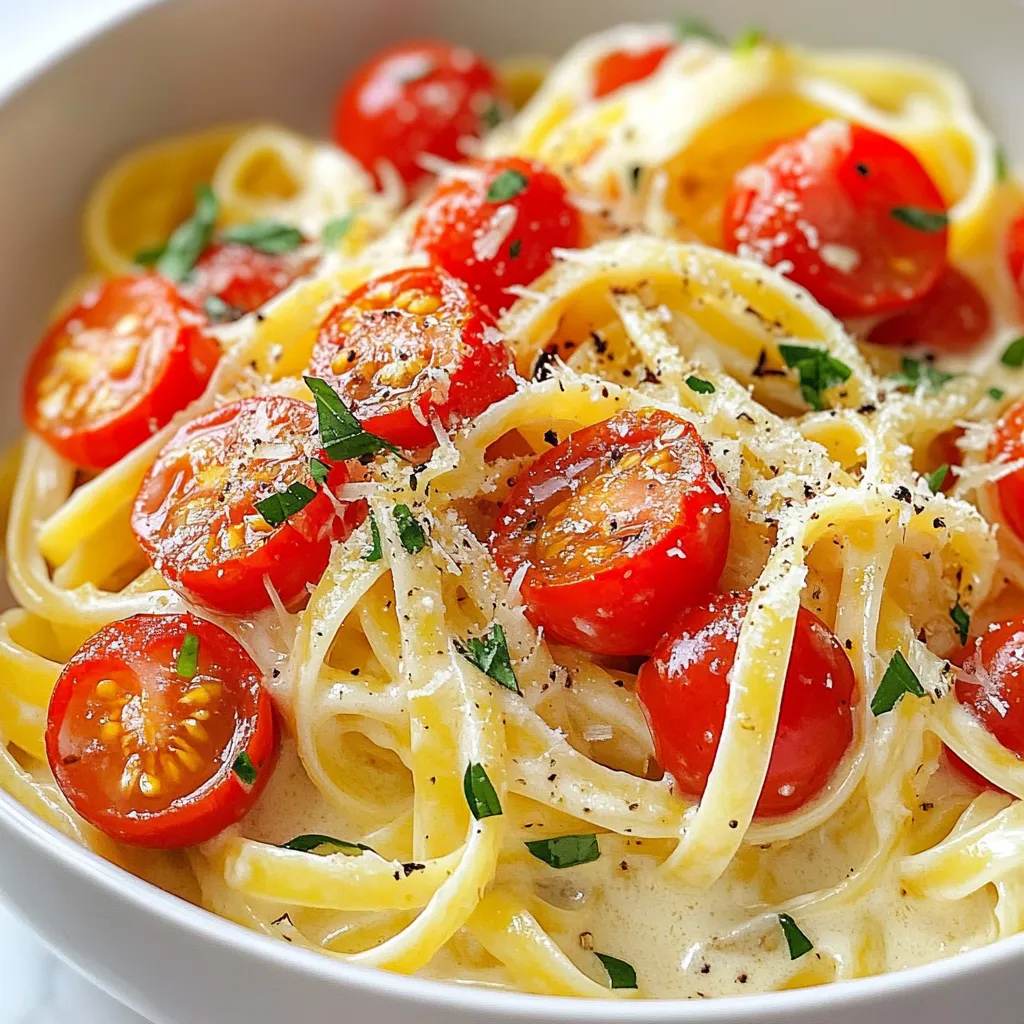
Looking for a dish that will impress your dinner guests? Look no further than Marry Me Pasta! This creamy, flavorful

- Refrigerated pizza dough - Shredded cheddar cheese - Cooked ground beef (or turkey) - Taco seasoning - Black beans - Corn - Diced tomatoes - Fresh cilantro - Egg (for egg wash) These ingredients create a delicious mix. The pizza dough acts as a tasty wrap. The ground beef or turkey adds protein. Taco seasoning gives it that classic zest. Black beans and corn add texture and color. Diced tomatoes bring freshness, while cilantro adds a burst of flavor. The egg wash helps the sticks turn golden brown. Each bite is cheesy, savory, and satisfying. This recipe is flexible! You can swap ingredients or add your favorites. Enjoy exploring different flavors. {{ingredient_image_1}} First, preheat your oven to 400°F (200°C). This step is key for a crisp finish. Next, line a baking sheet with parchment paper. This helps prevent sticking. In a large skillet, combine 1 cup of cooked ground beef with 1/2 cup of taco seasoning. Add 1 cup of black beans, 1/2 cup of corn, and 1/2 cup of diced tomatoes. Stir well and cook for 3-5 minutes. This heats the filling through. Finally, stir in 1/4 cup of chopped fresh cilantro for a burst of flavor. Now it’s time to prepare the dough. Roll out your package of refrigerated pizza dough on a lightly floured surface. Aim for a large rectangle about 1/4 inch thick. This thickness ensures a nice texture. Next, cut the dough into strips that are about 2 inches wide. This size is perfect for holding the filling. For the fun part, take one dough strip and spoon a generous amount of the taco mixture down the center. Leave space on the edges for sealing. Sprinkle a tablespoon of shredded cheddar cheese on top of the filling. This adds that cheesy goodness. Now fold the sides of the dough over the filling, enclosing it completely. Pinch the edges tightly to seal. This helps keep the filling inside. Place the sealed taco sticks on the baking sheet and brush the tops with a beaten egg for a shiny finish. Bake your taco sticks in the preheated oven for about 15-20 minutes. They should turn golden brown and smell amazing. Once they are done, let them cool for a couple of minutes. This makes them easier to handle. Serve warm with salsa on the side for dipping. Enjoy the cheesy, tasty goodness! To make the best cheesy taco sticks, roll the dough evenly. This helps them cook well. The thickness of the dough should be about 1/4 inch. If it's too thick, the inside may not cook through. Bake your taco sticks for about 15 to 20 minutes. Keep an eye on them until they turn golden brown. This ensures they will be crispy and tasty. You can adjust spices to fit your taste. If you like it spicy, add some chili powder or cayenne pepper to the taco mix. For a milder flavor, leave out the heat. You can also switch proteins. Ground turkey or chicken works great too. If you want a vegetarian option, use black beans or lentils instead of meat. The flavors will still shine through. Prepping these cheesy taco sticks in advance saves time. You can make the filling the day before. Store it in the fridge until you are ready to assemble. Roll out the dough and cut it into strips. When you are ready to bake, just fill and seal them. This method makes cooking quick and easy, perfect for busy days. Pro Tips Use Fresh Ingredients: Fresh vegetables and herbs will enhance the flavor of your taco sticks and make them more vibrant. Customize the Filling: Feel free to add your favorite ingredients like jalapeños, bell peppers, or different cheeses for a unique twist. Perfectly Seal the Edges: Make sure to pinch the dough edges tightly to prevent any filling from leaking out during baking. Experiment with Dips: In addition to salsa, try serving with guacamole, sour cream, or a spicy ranch dressing for added flavor. {{image_2}} To make vegetarian cheesy taco sticks, swap the ground beef for veggies or meat alternatives. You can use mushrooms, zucchini, or bell peppers. These ingredients add flavor and texture. You can also use lentils or chickpeas for a protein boost. Mix these veggies with taco seasoning, black beans, corn, and tomatoes. The result is a tasty, plant-based snack that everyone will enjoy. For those who love heat, adding jalapeños or spicy cheese turns up the flavor. Chop fresh jalapeños or use pickled ones for a zesty kick. Alternatively, you can choose pepper jack cheese instead of cheddar. This adds a creamy texture and a spicy bite. Feel free to adjust the amount of spice to match your taste. These spicy taco sticks will make your taste buds dance. Serving cheesy taco sticks with dips elevates the snack experience. Salsa is a classic choice, but you can get creative. Guacamole adds a smooth and rich flavor. Sour cream mixed with lime juice also makes a great dip. You can even try a cheese sauce for extra gooeyness. Encourage your friends to mix and match dips for a fun tasting party. To keep your cheesy taco sticks fresh, store them in the fridge. Place them in an airtight container. They will stay good for about 3 to 4 days. If you want to keep them longer, you can freeze them. Wrap each taco stick in plastic wrap and place them in a freezer bag. This way, they can last up to 3 months. When you're ready to eat them, just take out what you need. To reheat your cheesy taco sticks, use the oven for the best results. Preheat the oven to 350°F (175°C). Place the sticks on a baking sheet. Heat them for about 10 to 15 minutes. This will help keep the dough crispy and the cheese melty. Avoid using the microwave, as it can make the dough soggy. If you need a quicker option, you can use an air fryer. Just set it to 350°F (175°C) and heat for about 5 to 7 minutes. Enjoy your tasty snack! You can use several other options if you lack pizza dough. Here are some great alternatives: - Puff pastry: This gives a flaky texture. - Tortillas: They are easy to roll and fill. - Phyllo dough: For a lighter, crispier bite. - Bread dough: Any homemade or store-bought variety works well. These options can also add unique flavors to your taco sticks. Yes, you can prep these taco sticks ahead of time. Here’s how: - Prepare the filling: Cook the meat and mix in the beans, corn, and spices. - Roll the dough: Cut your pizza dough strips in advance. - Assemble: Fill and seal the sticks, then cover them with plastic wrap. - Refrigerate: Store them in the fridge for up to 24 hours before baking. This makes for a quick snack when you’re ready to eat! Dipping sauces can elevate your taco sticks. Here are my top picks: - Salsa: A classic choice that adds zest. - Guacamole: Creamy and flavorful, it complements the cheese. - Sour cream: A cooling dip that balances spice. - Queso dip: For extra cheesy goodness. Feel free to mix and match these dips! Storing leftovers is easy. Follow these steps for best results: - Cool completely: Let the taco sticks cool down first. - Refrigerate: Place them in an airtight container. They last about 3-4 days. - Freeze: For longer storage, wrap each stick in foil and freeze. They can last up to 2 months. When ready to enjoy again, reheat them in the oven for best texture! In this post, we explored how to make tasty Cheesy Taco Sticks. We covered the key ingredients, from dough to toppings. You learned the step-by-step process from prep to baking. Tips for perfecting flavors, customizing, and storing leftovers were also shared. Enjoy making these fun snacks for any occasion. They're easy, delicious, and sure to please everyone. Get creative with your fillings and enjoy crafting your own version.

Cheesy Taco Sticks Quick and Tasty Snack Recipe

Craving a snack that’s both cheesy and bursting with flavor? Let me introduce you to Cheesy Taco Sticks! This easy

- 2 boneless, skinless chicken breasts, cut into bite-sized pieces - 1 cup orzo pasta - 1 bell pepper (red or green), diced - 1 small onion, finely chopped - 2 cloves garlic, minced - 1 cup fresh spinach, chopped The chicken is the main protein in this dish. I use boneless, skinless chicken breasts for a tender bite. Cut them into small pieces for even cooking. The orzo pasta adds a fun twist. It cooks quickly and absorbs flavors well. I love to add a diced bell pepper and onion for sweetness and crunch. The garlic brings a rich aroma and taste to the mix. Fresh spinach adds color and nutrients, wilting perfectly into the warm meal. - 2 cups low-sodium chicken broth - 1 teaspoon smoked paprika - ½ teaspoon cumin - Salt and pepper to taste - 2 tablespoons olive oil For seasoning, I use smoked paprika and cumin to create warmth. These spices give depth without overpowering the dish. Low-sodium chicken broth helps to keep the meal flavorful but not too salty. It also keeps the orzo tender. I always add a pinch of salt and pepper to enhance all the flavors. Olive oil is my choice for sautéing. It adds richness and helps cook the veggies and chicken evenly. - 1 cup Monterey Jack cheese, shredded - Fresh cilantro or parsley for garnish I sprinkle Monterey Jack cheese on top before serving. It melts beautifully and adds creaminess. Fresh herbs, like cilantro or parsley, give a nice pop of color and flavor. They also brighten the dish and make it look more inviting. These garnishing elements turn a simple meal into something special. {{ingredient_image_1}} - Sautéing Onions and Peppers Heat 2 tablespoons of olive oil in a large skillet over medium heat. Add 1 small, finely chopped onion and 1 diced bell pepper to the pan. Cook them for about 3-4 minutes until they turn soft and translucent. - Adding Garlic Next, add 2 minced cloves of garlic to the skillet. Sauté for another minute until the garlic smells fragrant. This step builds a strong flavor base for the dish. - Seasoning Techniques Take 2 boneless, skinless chicken breasts and cut them into bite-sized pieces. Season the chicken with 1 teaspoon smoked paprika, ½ teaspoon cumin, salt, and pepper. This will add depth to the chicken’s flavor. - Browning Process Raise the heat to medium-high and add the seasoned chicken to the skillet. Cook for about 5-6 minutes until the chicken browns on all sides. This step locks in moisture and flavor. - Adding Broth and Orzo Pour in 2 cups of low-sodium chicken broth and bring it to a simmer. Once simmering, stir in 1 cup of orzo pasta. This pasta will absorb the broth, adding flavor and texture. - Simmering Techniques Reduce the heat to medium-low and cover the skillet. Cook for about 10-12 minutes. Stir occasionally to prevent the orzo from sticking to the bottom. Check if the orzo is tender and has absorbed most of the liquid. - Incorporating Spinach Once the orzo is cooked, fold in 1 cup of chopped fresh spinach. Let it wilt in the warm skillet, adding color and nutrients to your dish. - Melting the Cheese Top the dish with 1 cup of shredded Monterey Jack cheese. Cover the skillet for about a minute until the cheese melts and becomes bubbly. This gives a rich, creamy finish to the meal. Avoiding Overcooked Orzo To keep your orzo from overcooking, stir it often. After you add the orzo to the broth, set a timer for 10 minutes. Check it every few minutes. You want it tender but not mushy. Ensuring Evenly Cooked Chicken Cut the chicken into small, bite-sized pieces. This helps it cook evenly. When you add it to the skillet, make sure it gets nice and brown on all sides. This will lock in the flavor and keep it juicy. Additional Seasonings to Consider You can add more flavor with herbs like thyme or basil. A squeeze of lemon can brighten the dish. If you like spice, try adding a pinch of red pepper flakes. These little changes can make a big difference. Storing Leftover Broth If you have leftover broth, store it in a jar. Keep it in the fridge for up to a week. You can use it for soups or sauces later. Just make sure to label the jar with the date. Stylish Garnishing Ideas Garnish your dish with fresh cilantro or parsley. This adds color and a fresh taste. You can also sprinkle some extra cheese on top for a nice touch. Serving Suggestions Serve the skillet in the pan for a family-style meal. Pair it with a simple salad or bread. This makes the meal feel special and inviting. Pro Tips Cook Chicken Thoroughly: Ensure that the chicken is fully cooked by checking that it reaches an internal temperature of 165°F (75°C) for food safety. Stir Occasionally: Stirring the orzo occasionally while it cooks helps prevent it from sticking to the bottom of the skillet and ensures even cooking. Customize Your Veggies: Feel free to add other vegetables such as zucchini, mushrooms, or cherry tomatoes for added flavor and nutrition. Let It Rest: Allow the skillet to sit for a few minutes after cooking to enhance the flavors and make serving easier. {{image_2}} You can swap chicken for other proteins. Try turkey, shrimp, or tofu. Each choice gives a new taste. Chicken cooks fast, but shrimp takes less time. Tofu needs longer to soak in flavors. Adjust your cooking times as needed. Feel free to change the veggies in this dish. Instead of bell peppers, use zucchini, carrots, or broccoli. You can even add mushrooms for a meatier bite. Mix and match based on what you have at home. For a gluten-free version, choose gluten-free orzo. Many brands offer tasty alternatives. Just make sure to check the package for cooking times. You can also use rice or quinoa for a great base. To make this dish vegan, skip the chicken and cheese. Replace chicken with chickpeas or lentils. Use nutritional yeast for a cheesy flavor without dairy. Substitute vegetable broth for chicken broth to keep it plant-based. Want some heat? Add red pepper flakes or diced jalapeños. You can also use a spicy cheese blend. This twist brings a kick to every bite. Adjust the amount to suit your spice level. If you love cheese, mix it up! Try cheddar, feta, or pepper jack. Each cheese adds a unique taste. Just remember, melting points may vary, so keep an eye on the skillet. - How Long to Keep Leftovers You can keep leftover Monterey Chicken Orzo Skillet in the fridge for up to three days. Store it in a cool place to keep it fresh. - Storage Containers to Use Use airtight containers to store your leftovers. Glass containers are great because they won’t stain or hold odors. If you use plastic, ensure it is BPA-free. - Best Practices for Freezing For freezing, let the dish cool first. Then, portion it into airtight freezer bags. Make sure to squeeze out excess air to prevent freezer burn. - Thawing and Reheating Instructions To thaw, place the frozen bag in the fridge overnight. You can also use the microwave to thaw it quickly. - Best Methods for Reheating The best way to reheat Monterey Chicken Orzo Skillet is on the stove. Use low heat and stir often. You can also use a microwave, but cover it to keep moisture in. - Ensuring Quality When Reheated Add a splash of chicken broth or water while reheating. This helps keep the dish moist and tasty. Stir well to combine all flavors again. It takes just 30 minutes to cook this dish. Here's the breakdown: - Prep Time: 10 minutes - Cook Time: 20 minutes This quick time makes it perfect for busy weeknights. You can enjoy a tasty meal without spending hours in the kitchen. Yes, you can prepare the Monterey Chicken Orzo Skillet ahead of time. Here are some tips: - Prep Ahead: Cut the chicken and veggies the night before. Store them in the fridge. - Cook and Store: You can cook the dish and store it in an airtight container. It stays fresh for up to 3 days. - Reheat: When ready to eat, just reheat in a pan over medium heat. Add a splash of broth if it looks dry. This dish pairs well with several side options: - Green Salad: A simple green salad adds freshness. - Garlic Bread: Crunchy garlic bread makes a great match. - Steamed Veggies: Steamed broccoli or green beans add color and nutrition. These sides enhance the meal and make it even more satisfying. Enjoy your cooking! This blog post covered the key parts of making a Monterey Chicken Orzo Skillet. We explored the main ingredients like chicken, orzo, and fresh veggies. You learned how to season and cook everything perfectly. I shared tips for avoiding overcooked orzo and keeping chicken juicy. Plus, you discovered fun ways to customize the dish. Feel free to get creative with flavors or modify for your diet. Remember, cooking is about enjoying the process. Happy cooking!

Monterey Chicken Orzo Skillet Simple and Tasty Meal

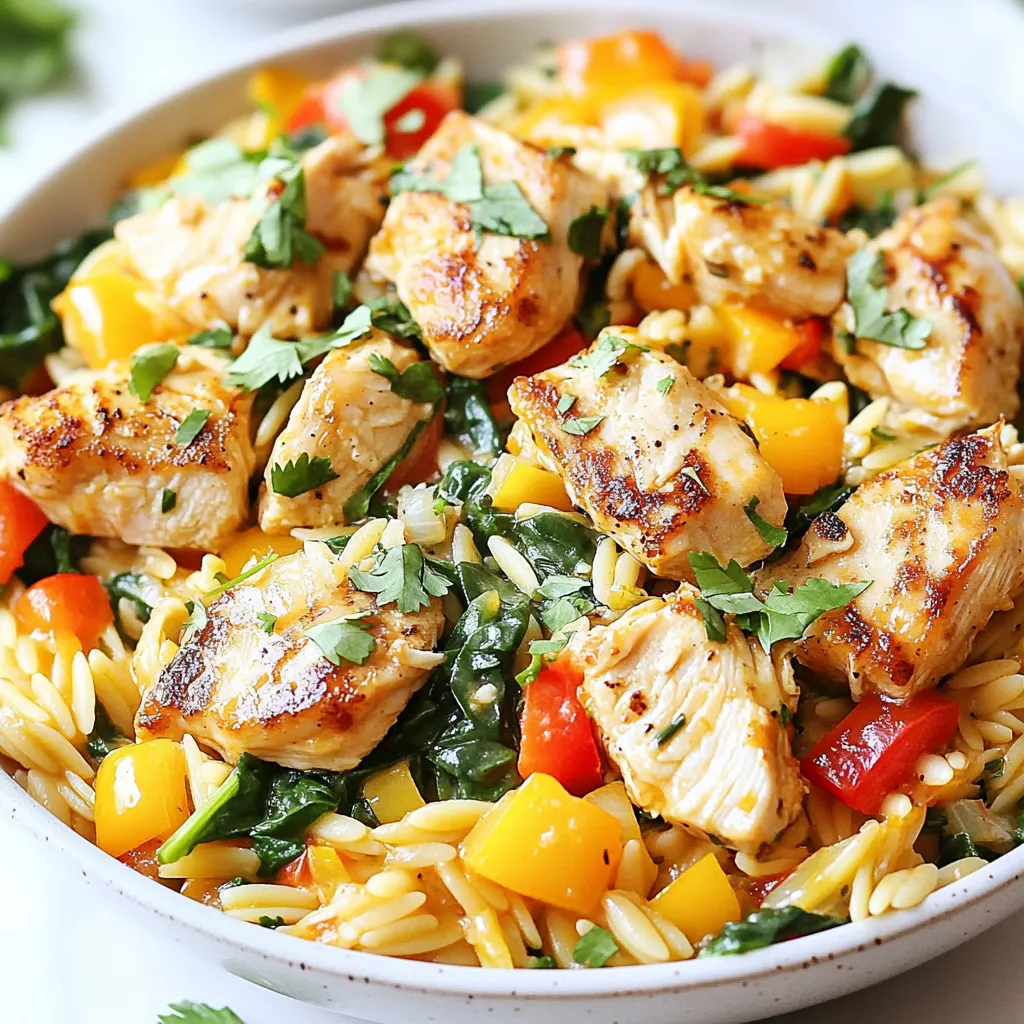
Looking for a meal that’s both simple and tasty? You’ve found it! My Monterey Chicken Orzo Skillet is not just

- 3-4 lb chuck roast - 1 tablespoon olive oil - 1 large onion, chopped - 4 garlic cloves, minced - 4 carrots, peeled and cut into chunks - 4 medium potatoes, quartered The chuck roast is the star of this dish. It becomes tender and juicy when cooked slowly. Olive oil helps sear the meat, adding flavor. The vegetables give taste and texture. Onions and garlic bring sweetness and depth. Carrots and potatoes round out the meal, making it hearty. - 2 cups beef broth - 2 tablespoons Worcestershire sauce - 1 tablespoon fresh rosemary, chopped - 1 tablespoon fresh thyme, chopped - 1 teaspoon salt - 1 teaspoon black pepper - 2 bay leaves The beef broth adds richness and moisture. Worcestershire sauce gives a savory kick. Fresh rosemary and thyme add bright, herbal notes. Salt and black pepper enhance all the flavors. Bay leaves infuse a subtle earthiness during cooking. - Fresh parsley for garnish - Additional seasoning options You can add fresh parsley for a pop of color. It also adds a fresh taste. Feel free to use other spices to customize the flavor. Try garlic powder, onion powder, or paprika for a twist. {{ingredient_image_1}} 1. Preheat your oven to 300°F (150°C). This low heat helps keep the roast tender. 2. Sear the roast: In a large Dutch oven, heat 1 tablespoon of olive oil over medium-high heat. Season the 3-4 lb chuck roast with 1 teaspoon of salt and 1 teaspoon of black pepper. Once the oil is hot, add the roast. Cook each side for about 4-5 minutes until it's browned. This step adds great flavor. Remove the roast and set it aside. 3. Sauté onions and garlic: In the same pot, add 1 large chopped onion and 4 minced garlic cloves. Sauté them for about 3-4 minutes or until they become soft and fragrant. This step builds a strong flavor base. 4. Add vegetables and liquids: Now, toss in 4 chopped carrots and 4 quartered medium potatoes. Mix them with the onion and garlic for about 2-3 minutes. This adds sweetness and texture to the dish. 5. Pour in the liquids: Add 2 cups of beef broth and 2 tablespoons of Worcestershire sauce. Scrape up the brown bits from the bottom of the pot. These bits add a rich flavor to the broth. 6. Return the roast to the pot: Place the seared roast back into the pot. Add 1 tablespoon of chopped fresh rosemary, 1 tablespoon of chopped fresh thyme, and 2 bay leaves. Make sure the herbs are spread around the meat evenly. 7. Cooking time in the oven: Cover the Dutch oven with a lid and transfer it to your preheated oven. Cook for about 3-4 hours. The roast will be done when it's tender and shreds easily with a fork. 8. Resting and slicing the pot roast: Once cooked, take the pot out of the oven. Remove the roast and let it rest for a few minutes. This helps the juices to settle. After resting, slice the roast against the grain. 9. Serve: Discard the bay leaves and serve the roast with the vegetables. Spoon some of the flavorful cooking liquid over the top. Enjoy your hearty meal! To get a good sear on your chuck roast, start with high heat. This helps create a nice brown crust. The brown color adds flavor to your dish. Avoid adding moisture when searing. If the pan is too wet, the meat will steam instead of sear. Make sure the oil is hot before adding the roast. Herbs and spices play a big role in boosting flavor. Fresh rosemary and thyme add a wonderful taste to the pot roast. Don’t skip these! Using quality beef broth also makes a difference. A rich broth adds depth and richness to your dish. It helps keep the meat moist and flavorful as it cooks. For the best side dishes, think about crusty bread or a fresh salad. Both work well with pot roast. They help soak up the delicious broth. When serving, use a large platter for a beautiful display. Garnish with fresh parsley for a pop of color. This makes the meal look even better. Pro Tips Use a Meat Thermometer: For perfect doneness, check the internal temperature of the roast; it should reach at least 195°F (90°C) for optimal tenderness. Let it Rest: Allow the pot roast to rest for at least 10-15 minutes after cooking to retain its juices and enhance flavor. Customize Vegetables: Feel free to add other vegetables like parsnips or turnips according to your taste preferences for a different flavor profile. Make it Ahead: This pot roast tastes even better the next day; prepare it ahead of time and reheat gently for a delicious meal. {{image_2}} You can switch up the meat in your pot roast. A brisket or round roast works well. Brisket has rich flavor and stays juicy. Round roast is leaner and can still be tender. Both cuts give you great options for taste and texture. Just adjust the cook time if needed. You can add more veggies to your pot roast. Try turnips, parsnips, or sweet potatoes. They add unique flavors and colors. Greens like kale or spinach can also boost nutrition. Make sure to cut them into similar sizes for even cooking. This way, all the veggies cook perfectly together. Experiment with herbs and spices to change the flavor. You can use thyme and rosemary for a classic taste. If you want bold flavors, try cumin or smoked paprika. Fresh herbs like parsley or oregano can add brightness. Don't be afraid to mix and match. Your pot roast can be a new dish each time! To keep your pot roast fresh, cool it first. Place it in airtight containers. Store in the fridge for up to three days. Label the containers with the date for easy tracking. This helps avoid waste and keeps your meal safe. If you want to save some for later, freezing works great. Cut the roast into smaller pieces. Wrap each piece tightly in plastic wrap. Then, place them in a freezer-safe bag. Squeeze out as much air as you can. This helps prevent freezer burn. You can freeze it for up to three months. To thaw, move it to the fridge overnight before using. Reheating your pot roast can bring back its tasty goodness. The best way is to use a slow cooker. Add a splash of beef broth to keep it moist. Heat on low for 2-3 hours. If you're in a hurry, use the microwave. Place the roast in a microwave-safe dish, cover it, and heat in short bursts. Stir in between to check the heat. Enjoy your flavorful comfort dish! It takes about 3-4 hours to cook a pot roast in a Dutch oven. The low and slow method is key. This helps the meat become tender. Yes, you can use a different pot. A heavy pot with a lid works well. A slow cooker is another option. Just adjust the cooking time for the new pot. Here are some great side dishes to serve with pot roast: - Mashed potatoes - Roasted vegetables - Crusty bread - A fresh green salad These add balance to the meal. You can tell the pot roast is done when it’s very tender. Use a fork to test it. If it shreds easily, it's ready. The internal temperature should be at least 195°F. In this post, we explored how to make the perfect pot roast. We covered main ingredients like chuck roast and vegetables and discussed seasoning options. The step-by-step guide detailed preparation, cooking, and finishing touches. Tips helped you achieve a great sear and enhance flavors. You can also try variations with different cuts of meat and vegetables. With proper storage and reheating methods, you can enjoy your pot roast later. Now, you have the tools to create a flavorful and comforting meal for family and friends. Enjoy every bite!

Dutch Oven Pot Roast Flavorful Comfort Classic Recipe

If you’re craving a meal that wraps you in warmth and flavor, look no further than my Dutch Oven Pot

To make a Texas Chocolate Pecan Pie, you need simple yet rich ingredients. Here’s what you will need: - 1 pre-made pie crust (9 inches) - 1 cup pecans, toasted and chopped - 1 cup semi-sweet chocolate chips - 3/4 cup granulated sugar - 1/4 cup brown sugar, packed - 1/2 cup light corn syrup - 3 large eggs - 1/4 cup unsalted butter, melted - 1 teaspoon vanilla extract - 1/4 teaspoon salt - Additional chocolate chips and pecans for topping Each ingredient plays a key role. The pre-made pie crust saves time and provides a flaky base. The pecans add crunch and nutty flavor. Semi-sweet chocolate chips give a sweet depth. The sugars balance the flavors while the corn syrup adds a lovely texture. Eggs help bind everything together. Unsalted butter adds richness, and vanilla enhances the overall taste. A pinch of salt brings out the sweetness, making it all come together beautifully. Feel free to customize by adding different nuts or chocolate types if you like! {{ingredient_image_1}} - Preheat the oven to 350°F (175°C). - Prepare the pre-made pie crust in a 9-inch pie pan. Use a fork to poke a few holes in the bottom. This helps avoid bubbles during baking. - In a large mixing bowl, combine the granulated sugar, brown sugar, light corn syrup, melted butter, and vanilla extract. Whisk these ingredients well until they blend smoothly. - Next, add the eggs one at a time. Make sure to whisk after each egg until the mixture is smooth. Stir in the salt at this stage. - Gently fold in the chopped pecans and semi-sweet chocolate chips. Mix until everything is evenly combined. - Pour the filling into the prepared pie crust. Sprinkle some extra chocolate chips and pecans on top for a nice touch. - Bake the pie in the preheated oven for 50-55 minutes. Look for the filling to be set in the center with lightly browned edges. - Once done, remove the pie from the oven. Allow it to cool on a wire rack for at least 1 hour. This cooling time helps the filling set nicely. To make a great Texas Chocolate Pecan Pie, start with the crust. I poke holes in the bottom of the pie crust. This helps it avoid bubbling up. Preheat your oven to 350°F (175°C). Bake for 50-55 minutes. The pie should be set in the center. The edges should look lightly brown. Presentation matters! I love to serve this pie with a dollop of whipped cream. A scoop of vanilla ice cream goes well too. This adds a great contrast to the rich filling. You can also sprinkle extra pecans or chocolate chips on top. This makes it look fancy! Keep leftovers in the fridge. Cover the pie with plastic wrap. This keeps it fresh for up to four days. To reheat, slice a piece and warm it in the microwave. Heat it for about 20-30 seconds. Enjoy it warm for the best taste! Pro Tips Use Fresh Pecans: Opt for fresh, high-quality pecans for the best flavor and texture. Toast Your Nuts: Toasting the pecans enhances their flavor, adding a delightful crunch to your pie. Check for Doneness: Ensure the pie is set in the center by gently shaking it; it should not wobble excessively. Cool Before Serving: Allow the pie to cool completely to help the filling firm up, making it easier to slice. {{image_2}} You can change the taste of your Texas Chocolate Pecan Pie by using different types of chocolate. Dark chocolate adds a rich taste, while milk chocolate gives a sweet touch. Try mixing both for a fun balance. You can also add other nuts, like almonds, for extra crunch. This mix creates a unique flavor twist. If you need a gluten-free option, use a gluten-free pie crust. Many stores sell these ready-made. You can also make your own by using almond flour or gluten-free flour blends. For those following a vegan diet, swap eggs with flaxseed or chia seeds. Use plant-based butter and a vegan pie crust. These changes keep the pie delicious and friendly for everyone. You can serve Texas Chocolate Pecan Pie warm or chilled. Warm pie brings out the chocolate flavor, while chilled pie offers a refreshing bite. Both ways taste great! This pie is perfect for special occasions like holidays or birthdays. You can also enjoy it as a sweet treat any day. It’s a versatile dessert that fits any mood or event. - Sweet Treats Bakery: Known for its rich chocolate pecan pie, this bakery uses fresh, local ingredients. Their pies are both sweet and nutty, making each bite a delight. - The Pie Hole: This charming spot serves Texas chocolate pecan pies that are always a hit. Their flaky crust and gooey filling leave customers coming back for more. - Pecan Pie Palace: A local favorite, offering pies made with high-quality pecans. Their chocolate pecan pie has a unique twist with a hint of espresso. - Texas BBQ and Pie Co.: Famous for its smoked meats and desserts, their chocolate pecan pie is a must-try. Patrons rave about the balance of chocolate and pecans. - Southern Comfort Café: This café serves traditional Texas dishes, including a delicious chocolate pecan pie. Guests love the homemade feel and rich flavors. - Lone Star Pies: Known for their classic Texas desserts, this restaurant offers a chocolate pecan pie that stands out. Their generous portions leave you satisfied and happy. - Goldbelly: You can order Texas chocolate pecan pie from various bakeries online. They ship pies nationwide, ensuring they arrive fresh. - Texas Pecan Pie Co.: This site specializes in shipping authentic Texas pies. They have rave reviews for taste and quality. Expect a rich, flavorful pie right at your door. - Etsy: Some local bakers sell their pies on Etsy. You can find unique flavors and homemade touches. Shipping times vary, but the taste is worth the wait. How do I know when the pie is done baking? The pie is done when the center is set and edges are lightly browned. You can gently shake the pie. If it wobbles slightly but is mostly firm, it's ready. Can I make Texas Chocolate Pecan Pie in advance? Yes, you can make this pie a day ahead. Just store it in the fridge. Let it cool completely before covering it. The flavors will meld nicely overnight. What can I use instead of corn syrup? You can use maple syrup or honey as a substitute. Both add sweetness and flavor. Keep in mind that the taste may change slightly with these options. Can I use different nuts? Absolutely! You can use walnuts or almonds if you prefer. Each nut will bring a unique flavor and crunch. Just make sure they are chopped to similar sizes. What if I don’t have a pre-made pie crust? If you don’t have a pre-made crust, you can make your own. Use flour, butter, and water to create a simple dough. Roll it out and fit it into your pie pan. Do I need to blind-bake the crust before filling? No, you do not need to blind-bake the crust. The filling will cook the crust perfectly during baking. Just poke holes in the bottom to prevent bubbles. How can I prevent the filling from boiling over? To prevent boiling over, pour the filling slowly. Do not overfill the crust. Leave a little space at the top for the filling to expand while baking. In this article, we covered how to make Texas Chocolate Pecan Pie. You learned about the key ingredients, step-by-step instructions, and helpful tips for baking and serving. We also explored variations and local bakeries where you can enjoy this dessert. Remember, a homemade pie often tastes better than store-bought. With practice, you can impress yourself and your guests with this classic treat. Enjoy making this pie and savoring every bite!

Texas Chocolate Pecan Pie Delightful and Rich Recipe

Are you ready to indulge in a slice of Texas Chocolate Pecan Pie? This delightful dessert combines rich chocolate with

- 8 chicken drumsticks - 1 cup breadcrumbs (preferably panko) - 1/2 cup grated Parmesan cheese - 4 cloves garlic, minced - 1 tablespoon dried Italian herbs - 1/2 teaspoon paprika - 1/4 teaspoon cayenne pepper (optional) - Salt and pepper to taste - 1/2 cup all-purpose flour - 2 large eggs, beaten - 1/4 cup olive oil - Additional spices or herbs for customization - Alternative coatings (e.g., crushed cornflakes) - Garlic aioli - Spicy ranch dressing The ingredients for crunchy garlic Parmesan chicken drumsticks are simple yet full of flavor. You need fresh chicken drumsticks as your base. The panko breadcrumbs give a great crunch. Parmesan cheese adds a rich, salty taste. The minced garlic brings a robust flavor that makes the dish shine. Using dried Italian herbs like oregano, basil, and thyme adds depth to the taste. You can spice it up with paprika and cayenne pepper if you enjoy heat. Be sure to season with salt and pepper to enhance all the flavors. To create the coating, mix the breadcrumbs, cheese, garlic, and herbs in a bowl. The flour helps the egg stick to the chicken. Beating the eggs ensures they coat the drumsticks evenly. The olive oil will help crisp everything up in the oven. Feel free to add your favorite spices or even try crushed cornflakes instead of breadcrumbs for a new twist. Dipping sauces can elevate your meal. I love garlic aioli or spicy ranch for extra flavor. {{ingredient_image_1}} - Preheat oven to 425°F (220°C). - Line a baking sheet with parchment paper. First, you need a hot oven. This helps the chicken cook well. The parchment paper keeps the drumsticks from sticking. It also makes clean-up easy. - Combine breadcrumbs, Parmesan, garlic, herbs, and spices in a mixing bowl. In a large bowl, mix these items well: - 1 cup breadcrumbs - 1/2 cup grated Parmesan cheese - 4 cloves garlic, minced - 1 tablespoon dried Italian herbs - 1/2 teaspoon paprika - 1/4 teaspoon cayenne pepper (optional for heat) - Salt and pepper to taste This mixture gives the chicken great flavor. The cheese and herbs make it rich. Garlic adds a nice kick. - Flour, egg, and breadcrumb coating process. You will coat the chicken in three steps: 1. First, take each drumstick and coat it in 1/2 cup all-purpose flour. Shake off the extra flour. 2. Next, dip it into 2 beaten eggs. Let the extra egg drip off. 3. Finally, roll it in the breadcrumb mixture. Press down lightly so it sticks. Repeat this for all 8 drumsticks. Each piece should be well coated. This helps create a crispy crust. - Instructions for placing drumsticks and drizzling with oil. - Baking time and temperature details. Place the coated drumsticks on the lined baking sheet. Make sure they have space. Drizzle 1/4 cup olive oil over them to help with crispiness. Bake in the preheated oven for 35-40 minutes. You want them golden brown. The chicken should reach 165°F (75°C) inside. Flip the drumsticks halfway through baking. This ensures they cook evenly and stay crunchy. To get that perfect crunch, use panko breadcrumbs. They are light and airy, which gives the best texture. Regular breadcrumbs can be softer and less crispy. Make sure to coat the drumsticks well. This helps the crumbs stick better. Also, use olive oil wisely. Drizzle just enough to coat the drumsticks lightly. This will help them brown and crisp up nicely. Flipping the drumsticks is key. Turn them halfway through baking. This ensures all sides cook evenly. You want them golden brown all around. It helps to set a timer for flipping. This way, you won’t forget! For more flavor, marinate the drumsticks before coating. Use garlic, herbs, or your favorite spices. Letting them sit for at least 30 minutes makes a big difference. You can also add spices to the breadcrumb mix. A pinch of extra paprika or cayenne can boost the taste. Try different herbs to find your best mix! Pro Tips Use Panko Breadcrumbs: For an extra crispy texture, always opt for panko breadcrumbs instead of regular ones. They create a delightful crunch! Marinate for Flavor: Consider marinating the chicken drumsticks in olive oil, garlic, and herbs for a few hours or overnight before coating. This enhances the flavor immensely. Rest After Baking: Allow the drumsticks to rest for a few minutes after baking. This helps the juices redistribute, resulting in moist and tender meat. Experiment with Spices: Feel free to customize the spice blend by adding your favorite seasonings, such as lemon zest or smoked paprika, for a unique twist. {{image_2}} You can make these drumsticks spicy by adding more cayenne pepper. If you want more heat, try some hot sauce in the batter. This will give your chicken a nice kick. You can add one tablespoon of hot sauce to the egg mixture. It will make each bite exciting and flavorful. Feel free to switch up the herbs in this recipe. Instead of just dried Italian herbs, you can use fresh herbs like rosemary or thyme. These herbs will give your chicken a fresh and fragrant taste. Simply chop the herbs finely and mix them into the breadcrumb mixture. This small change can bring a whole new flavor to your dish. If you need a gluten-free option, it's easy to adapt this recipe. Use gluten-free breadcrumbs instead of regular ones. You can also replace all-purpose flour with almond flour or a gluten-free flour blend. This way, everyone can enjoy the crunchy garlic Parmesan goodness without worry. Just make sure to check your labels to ensure all ingredients are gluten-free. To keep your drumsticks fresh, place them in an airtight container. Make sure they cool first. Store them in the fridge for up to three days. This helps keep the flavor and texture intact. If you want to keep them longer, freezing is a great option. To reheat your drumsticks, the oven works best. Preheat the oven to 375°F (190°C). Place the drumsticks on a baking sheet. Heat for about 15 to 20 minutes. This keeps them crispy. If you use a microwave, they can get soggy. If you must use a microwave, cover them with a paper towel. Heat them in short bursts to avoid overcooking. To freeze cooked drumsticks, first let them cool completely. Wrap each drumstick in plastic wrap. Place them in a freezer bag or container. Make sure to squeeze out any air. They can stay frozen for up to three months. To thaw, move them to the fridge overnight. You can also use the microwave for quick thawing. Just make sure to reheat them properly after thawing for the best taste. Cook chicken drumsticks for 35-40 minutes at 425°F (220°C). This ensures they become golden brown and safe to eat. Always check that the internal temperature reaches 165°F (75°C). This guarantees they are fully cooked and safe for you and your guests. If you want extra crispiness, flip the drumsticks halfway through baking. Yes, you can use skinless drumsticks. However, this may change the texture. The skin helps lock in moisture and adds a crispy bite. Without skin, your drumsticks may be less juicy and not as crunchy. You could try adding more breadcrumbs or adjusting the cooking time to keep them tender. These drumsticks pair well with many side dishes. Here are some tasty ideas: - Garlic mashed potatoes - Fresh garden salad - Steamed broccoli or green beans - Roasted sweet potatoes - Coleslaw for a crunchy contrast You can also serve dipping sauces like garlic aioli or ranch dressing for added flavor. Enjoy! In this post, I shared a simple and tasty way to make crunchy garlic Parmesan chicken drumsticks. You learned about the essential ingredients, easy steps to prepare them, and tips for achieving the perfect crispiness. Remember, you can customize the flavors to your liking and even explore gluten-free options. Cooking can be fun and rewarding, so get started on this delicious recipe! Your kitchen adventures await, and I can’t wait for you to enjoy your tasty creation.

Crunchy Garlic Parmesan Chicken Drumsticks Delight

If you crave a dish that’s both crunchy and packed with flavor, you’ve come to the right place! My Crunchy

- 8 oz lo mein noodles - 1 cup broccoli florets - 1 cup bell pepper, julienned (any color) - 1 medium carrot, julienned - 1 cup sugar snap peas - 3 cloves garlic, minced - 1 inch ginger, grated - 2 tablespoons sesame oil Lo mein noodles are the heart of this dish. They are soft and chewy. Fresh vegetables bring color and crunch. Broccoli adds a nice green touch. Bell peppers add sweetness. Carrots give a bit of crunch. Sugar snap peas are crisp and sweet. For flavor, garlic and ginger are key. They add warmth and depth. - 3 tablespoons soy sauce (or tamari for gluten-free) - 1 tablespoon hoisin sauce - 1 teaspoon chili paste (adjust to taste) Sauces make the dish shine. Soy sauce or tamari gives a salty base. Hoisin sauce adds sweetness. Chili paste brings heat. Adjust the chili to fit your taste. This balance adds layers of flavor. - Sesame seeds - Chopped green onions Garnishes add a final touch. Sesame seeds give a nutty flavor. Chopped green onions add freshness and color. These small details make your dish look and taste great. {{ingredient_image_1}} First, bring a large pot of salted water to a boil. This helps the noodles cook evenly. Next, add 8 oz of lo mein noodles. Cook them according to the package instructions until they are al dente. Al dente means the noodles are firm to the bite. After cooking, drain the noodles and rinse them with cold water. This stops the cooking process and keeps them from sticking. Set the noodles aside for later use. While the noodles cook, grab a small bowl. In this bowl, mix together 3 tablespoons of soy sauce, 1 tablespoon of hoisin sauce, and 1 teaspoon of chili paste. Stir well until everything combines smoothly. Set this sauce aside, as it will add flavor to your stir-fry. Now, it's time to heat things up. In a large skillet or wok, pour in 2 tablespoons of sesame oil. Heat it over medium-high heat. Once hot, add 3 cloves of minced garlic and 1 inch of grated ginger. Sauté these for about 30 seconds. You want to release their wonderful aroma. Next, toss in 1 cup of broccoli florets, 1 cup of julienned bell pepper, 1 medium julienned carrot, and 1 cup of sugar snap peas. Stir-fry these veggies for 5 to 7 minutes. You want them to be tender but still crisp. Once your veggies are ready, it’s time to add the noodles. Toss in the cooked lo mein noodles along with the stir-fry sauce you prepared. Mix everything together for another 2 to 3 minutes. This step ensures the noodles are heated through and coated in sauce. Before serving, stir in 2 chopped green onions. This adds a fresh crunch. For plating, serve the veggie lo mein in a large bowl or individual dishes. Sprinkle sesame seeds on top for a nice finish. You might also consider adding some edible flowers for extra color. Enjoy your simple and satisfying meal! To cook lo mein noodles, start with plenty of water. This helps keep the noodles from sticking. Here are some tips: - Preventing sticking: Use a large pot with salted water. Stir the noodles often while cooking. This keeps them from clumping together. - Rinsing techniques: After cooking, drain the noodles in a colander. Rinse them with cold water. This stops the cooking and helps them stay firm. Flavor and texture are key to a great stir-fry. Here’s how to make your dish pop: - Adjusting spice levels: Start with a small amount of chili paste. You can always add more later. This way, you control the heat. - Timing for crisp vegetables: Add the veggies in the right order. Start with the broccoli and carrots, as they take longer to cook. Add the sugar snap peas last for a nice crunch. You can make your Veggie Lo Mein even better by adding some protein and fresh veggies: - Adding protein options: Tofu or tempeh are great choices. They soak up flavors well and add texture. - Using seasonal vegetables: Choose vegetables that are fresh and in season. This not only boosts flavor but also adds more nutrients to your meal. Think about bell peppers, zucchini, or mushrooms for extra color and taste. Pro Tips Prep Your Ingredients: To make the cooking process smoother, chop all your vegetables and measure out your sauces before starting. This ensures everything is ready to go when you're stir-frying. Don’t Overcook the Veggies: Stir-frying is all about maintaining the crunch! Cook your vegetables until they are just tender to keep their vibrant color and nutrients intact. Use High Heat: For the best stir-fry results, make sure your skillet or wok is hot before adding ingredients. This helps to sear the vegetables quickly, enhancing flavor and texture. Customize Your Sauce: Feel free to adjust the stir-fry sauce to your taste. Adding a splash of rice vinegar or a hint of sesame oil can elevate the flavors even more. {{image_2}} You can mix up your Veggie Lo Mein with different veggies. Use what you love or what’s in season. Try zucchini, mushrooms, or spinach. They add flavor and color. Seasonal choices make the dish fresh and fun. Don’t be afraid to get creative! If you need a gluten-free meal, swap lo mein noodles for rice noodles. They work great and taste amazing. Also, use gluten-free soy sauce or tamari. This keeps the flavor while meeting your needs. You won’t miss the gluten at all! Want to add some protein? Chicken, shrimp, or tofu are all great choices. Cook your protein first, then set it aside. Add it back in with the noodles and sauce. This makes your meal heartier. It’s a simple way to make it more filling! Store leftover veggie lo mein in airtight containers. Use glass or plastic containers. They keep food fresh and safe. Fill the container with lo mein and seal it tight. Keep it in the fridge. Eat leftovers within three days for the best taste. To reheat, use a skillet or a microwave. For the skillet, add a splash of water. Heat it over low to medium heat. Stir often to keep the noodles from sticking. In the microwave, cover the bowl with a damp paper towel. Heat for 1-2 minutes, stirring halfway through. This keeps the veggies crisp and the noodles soft. You can freeze veggie lo mein, but it's best to do this before adding green onions. Cool the dish completely. Place it in freezer-safe bags. Squeeze out the air and seal tightly. Label the bag with the date. When ready to eat, thaw it overnight in the fridge. Reheat it in a skillet for the best texture. Yes, you can use other noodles. Try using rice noodles or even spaghetti. Both options work well. If you want a lower-carb meal, try zucchini noodles. This dish is quite healthy. It includes fresh veggies like broccoli and bell peppers. These vegetables provide vitamins and fiber. Lo mein noodles offer carbs for energy. The sauce adds flavor without too many calories. The spice level depends on your taste. The recipe includes chili paste, which adds heat. To make it less spicy, use less chili paste. If you want it spicier, add more. Adjust to what you like! In this blog post, we explored how to make a delicious Veggie Lo Mein Stir-Fry. We discussed key ingredients like lo mein noodles, fresh veggies, and tasty sauces. The step-by-step guide helped you prepare the dish smoothly. Tips on cooking noodles and enhancing flavors made it easier. We also covered storage and answered common questions. Remember, cooking is fun and can be tailored to your taste. Enjoy your stir-fry!

Veggie Lo Mein Stir-Fry Simple and Satisfying Meal

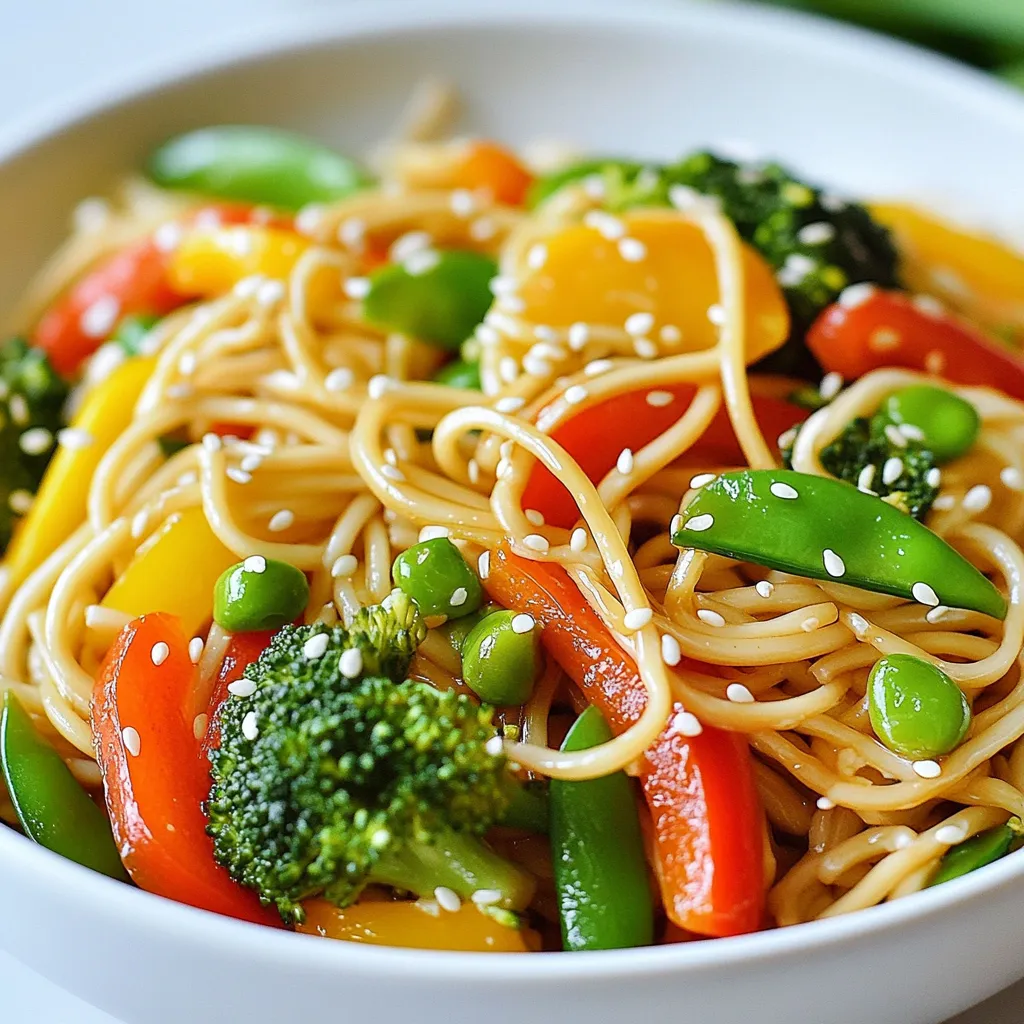
Are you craving a quick, satisfying meal that’s packed with flavor? This Veggie Lo Mein Stir-Fry is your answer. With

- 2 medium zucchinis, spiralized into noodles - 1 pound boneless, skinless chicken breast, cubed - 1 tablespoon olive oil - Salt and pepper, to taste - 1 cup heavy cream - 1 cup grated parmesan cheese - 2 cloves garlic, minced - 1 teaspoon garlic powder - 1/2 teaspoon nutmeg - Fresh parsley, chopped (for garnish) You can swap out heavy cream for coconut milk if you want a lighter dish. For dairy-free options, use nutritional yeast instead of parmesan cheese. If you don’t have zucchinis, you can use spaghetti squash or even carrots for a different twist. Chicken can also be replaced with shrimp or tofu for a fun change. This dish serves about four people. Each serving has around 400 calories. You get 25 grams of protein from the chicken and cheese, which helps keep you full. The zucchinis add fiber, which is great for digestion. This meal is rich in vitamins A and C, thanks to the zucchini and parsley. It’s a balanced dish that gives you energy and keeps meals exciting. {{ingredient_image_1}} First, take two medium zucchinis. Use a spiralizer to turn them into noodles. This tool makes nice, thin strands that look just like pasta. Once you spiralize the zucchinis, set them aside on a plate. They will wait for their turn in the pan. Zucchini noodles cook fast, so you want to prepare them first. Next, grab a large skillet and pour in one tablespoon of olive oil. Heat it on medium heat. When the oil is hot, add one pound of cubed, boneless chicken breast. Season the chicken with salt and pepper. Cook it for about 6 to 8 minutes. Stir often until the chicken looks golden brown and is no longer pink inside. Once done, take the chicken out of the pan and place it on a plate. In the same skillet, add two cloves of minced garlic. Sauté the garlic for about one minute. You want it to smell good but not burn. Then, pour in one cup of heavy cream. Stir it well and let it simmer for 2 to 3 minutes. This helps the flavors mix. Slowly whisk in one cup of grated parmesan cheese, one teaspoon of garlic powder, and half a teaspoon of nutmeg. Keep stirring until the cheese melts and the sauce thickens a bit. Now, add the zucchini noodles to the sauce. Toss them around for 2 to 3 minutes. You want them coated in that creamy goodness. They should be tender but still crunchy. Finally, return the cooked chicken to the skillet. Mix everything together until it is hot and well combined. Taste the dish and add more salt or pepper if needed. Enjoy your creamy Zucchini Noodle Chicken Alfredo! To get the best texture for zucchini noodles, start with fresh zucchinis. Look for ones that are firm and smooth. After spiralizing, you can lightly salt the noodles. This helps draw out extra water, making them less soggy. Let them sit for about 10 minutes, then pat them dry with a paper towel. When cooking, keep the heat at medium. This way, the noodles stay tender but still have a nice crunch. Remember, overcooking can turn them mushy, so aim for just 2-3 minutes in the skillet. Seasoning can elevate your dish. For this Zucchini Noodle Chicken Alfredo, salt and pepper are key. They bring out the flavors of the chicken and sauce. I also love adding nutmeg; it gives a warm touch to the cream. If you want a kick, try adding red pepper flakes. Fresh herbs like parsley can add brightness. You can mix in basil or oregano for a different flavor profile. Always taste your dish as you go. Adjust the seasoning until it’s just right for you. A few simple mistakes can affect your dish. First, don’t skip the salting step for the zucchini noodles. It’s important! Next, be careful not to add the zucchini too early. They should join the sauce toward the end of cooking. Another mistake is using too much heat. High heat can make the cream sauce split. Lastly, don’t forget to taste your sauce before serving. It’s easy to overlook, but it makes a big difference. Avoiding these common pitfalls will lead to a delicious meal. Pro Tips Spiralizing Technique: To achieve the best texture, slightly press the zucchini while spiralizing to create uniform noodles. Chicken Cooking Tips: Ensure the chicken is cooked to an internal temperature of 165°F for safety and optimal tenderness. Thickening the Sauce: If your sauce is too thin, let it simmer a bit longer before adding the zucchini noodles to help it thicken. Storage Suggestions: Store any leftovers in an airtight container in the fridge, and consume them within 2-3 days for best flavor. {{image_2}} You can make Zucchini Noodle Chicken Alfredo even better by adding more veggies. Try adding spinach or bell peppers. They add color and nutrients to your meal. Simply chop them and add them to the pan after the chicken cooks. Cook them for a few minutes until they're soft. You can also add broccoli or peas for a nice crunch. Mixing in vegetables helps you get your daily vitamins while keeping the dish tasty. If you want to change the protein, there are great options. You can use shrimp instead of chicken. Just sauté the shrimp until they're pink and cooked through. Tofu is another great choice. Use firm tofu, and make sure to press it to remove extra water. Cut it into cubes and cook it like the chicken. This way, everyone can enjoy a protein they like. To make a dairy-free version, swap the heavy cream and cheese. Use coconut milk for a creamy base. Almond milk is another good choice but may be thinner. Nutritional yeast can replace the parmesan cheese for a cheesy flavor. Add a squeeze of lemon to brighten the dish. These changes make it vegan-friendly without losing the rich taste of Alfredo. Enjoy every bite while sticking to your dietary needs! Store any leftover Zucchini Noodle Chicken Alfredo in an airtight container. This helps keep the dish fresh. Place the container in the fridge. It will last for 3 to 4 days. Make sure to let it cool down before sealing it. This helps avoid extra moisture inside the container. When it’s time to eat your leftovers, reheat gently. Use a skillet over medium heat. Add a splash of cream or broth to help keep the dish moist. Stir it often to heat evenly. You can also use a microwave. Heat it in short bursts, around 30 seconds each time. Stir after each burst to avoid hot spots. You can freeze Zucchini Noodle Chicken Alfredo, but it may change texture. To freeze, let the dish cool completely. Then, place it in a freezer-safe container. It can last for up to 2 months. When ready to eat, thaw it in the fridge overnight. Reheat gently as described above for the best taste. Yes, you can use regular pasta. Cook it according to the package instructions. However, zucchini noodles are a great low-carb option. They add freshness and nutrition to the dish. Plus, they soak up the creamy sauce well. If you want a lighter meal, stick with zucchini noodles. To lower calories, you can use less cream. Swap heavy cream for a lighter option, like half-and-half. You can also reduce the amount of cheese. Using less cheese still gives you good flavor. Another tip is to add more veggies. Spinach or bell peppers can add volume and nutrients without many calories. The best way to spiralize zucchini is with a spiralizer. A handheld spiralizer is easy to use. Just cut off the ends of the zucchini and twist it into the spiralizer. If you don’t have one, you can use a vegetable peeler to make thin strips. Aim for thin noodles for a better texture in the dish. In this blog post, we explored all the key ingredients for a delicious dish. I detailed how to prepare zucchini noodles, cook chicken, and create a creamy Alfredo sauce. We also discussed tips to perfect the texture, season your meal, and avoid common mistakes. You learned about variations, storage, and answered frequent questions. By following these steps, you can enjoy a savory, healthy meal. Keep it fresh, try new flavors, and enjoy your cooking journey!

Zucchini Noodle Chicken Alfredo Creamy and Simple Dish

Looking for a tasty twist on a classic dish? Zucchini Noodle Chicken Alfredo is your answer. This creamy and simple

Older posts
Newer posts
← Previous Page1 … Page108 Page109 Page110 … Page115 Next →

dsad

© 2025 flavorsprint • Built with GeneratePress

Our Policies

  • Copyright Policy
  • Cookie Policy
  • GDPR Policy
  • Privacy Policy
  • Disclaimer
  • Terms Of Use

More Information

  • Home
  • About
  • Contact
  • Appetizers
  • Dessert
  • Dinner
  • Drinks
©2025, flavorsprint About Back To Top