Skip to content
DisclaimerTerms Of UseGDPR PolicyCookie Policy

flavorsprint

  • Home
  • Drinks
  • Appetizers
  • Dinner
  • Dessert
  • About
  • Contact
  • Privacy Policy
DisclaimerTerms Of UseGDPR PolicyCookie Policy

Lillian

- 1 lb flank steak - 2 tablespoons olive oil - Spices and Seasonings: smoked paprika, garlic powder, ground cumin, salt, and pepper - Fresh Ingredients: cherry tomatoes, cucumber, red onion, Kalamata olives, feta cheese, fresh parsley, lemon In my Mediterranean Steak Power Bowls, I focus on fresh, vibrant flavors. Each ingredient plays a role in creating a balanced meal. The flank steak shines with its rich taste. I start with 1 lb flank steak. This cut is tender and full of flavor. Marinating it makes all the difference. Next, I use 2 tablespoons olive oil to help the spices stick and add healthy fat. For the spices, I mix smoked paprika, garlic powder, ground cumin, salt, and pepper. These spices bring warmth and depth. They make the steak flavorful and aromatic. Fresh ingredients are key to this bowl. Cherry tomatoes add sweetness. Cucumber brings crunch. Red onion adds a sharp bite. Kalamata olives give a briny touch, while feta cheese adds creaminess. I sprinkle on fresh parsley for a pop of color and freshness. Finally, I squeeze in the juice of 1 lemon for brightness. The zest of the lemon enhances the dish’s aroma. Each component contributes to a colorful, tasty power bowl that is both healthy and satisfying. {{ingredient_image_1}} To start, we need to prepare the marinade. In a small bowl, mix 2 tablespoons of olive oil, 2 teaspoons of smoked paprika, 1 teaspoon of garlic powder, 1 teaspoon of ground cumin, salt, and pepper. This blend gives the steak a great flavor kick. Next, rub this marinade all over 1 pound of flank steak. Make sure every bit of the steak gets coated. Let it marinate for at least 30 minutes at room temperature. If you have more time, marinate it for 1-2 hours in the fridge. This step makes the steak even tastier. Now, let’s cook the steak. Preheat your grill or skillet over high heat. Once it's hot, take the steak out of the marinade and throw away the leftover marinade. Grill or sear the steak for about 4-6 minutes on each side to reach medium-rare. If you like it more well-done, cook it a bit longer. After cooking, it’s important to let the steak rest for 5-10 minutes. This helps keep it juicy. When ready, slice the steak against the grain into thin strips. This keeps it tender and easy to chew. Now comes the fun part—assembling your power bowl! Start by layering 2 cups of cooked quinoa as the base in a serving bowl. This grain adds a nice texture and protein. Next, add your fresh ingredients. Top the quinoa with 1 cup of halved cherry tomatoes, 1 diced cucumber, and 1 thinly sliced red onion. Don’t forget to include 1 cup of pitted Kalamata olives and 1 cup of crumbled feta cheese. Arrange these ingredients nicely to make your bowl look colorful and inviting. Finally, place the sliced steak on top of the fresh ingredients in each bowl. Make sure to distribute it evenly for a balanced bite. To finish, drizzle 4 tablespoons of tahini sauce over the bowl. Squeeze fresh lemon juice on top and sprinkle lemon zest for that extra zing. Garnish with chopped fresh parsley to add a pop of color. Enjoy your delicious Mediterranean steak power bowl! To make your steak shine, marinate it well. Mix olive oil, smoked paprika, garlic powder, ground cumin, salt, and pepper. Rub this mix over the flank steak. Let it sit for 30 minutes at room temperature or up to 2 hours in the fridge. This gives it great flavor. When cooking, heat your grill or skillet until it's very hot. Remove the steak from the marinade and throw that away. Cook the steak for about 4-6 minutes on each side for medium-rare. Rest the steak for 5-10 minutes after cooking. This keeps it juicy and tender. Slice it against the grain to enhance tenderness. For a stunning bowl, layer your ingredients in a large, shallow dish. Start with a base of cooked quinoa. Then, add halved cherry tomatoes, diced cucumber, sliced red onion, Kalamata olives, and crumbled feta cheese. Arrange them in a way that shows off each color. This makes the dish more appealing. To boost flavor, drizzle tahini sauce over the top. Squeeze fresh lemon juice on each bowl for a zesty touch. A sprinkle of lemon zest adds a fresh kick. Top everything with chopped parsley for color and freshness. For a gluten-free option, use quinoa as your base. It’s naturally gluten-free and full of protein. If you want a lower-carb meal, swap quinoa for cauliflower rice. This keeps the dish light but still filling. Always check labels on ingredients like feta cheese and tahini. Some brands may add gluten or carbs. Adjust your toppings to fit your dietary needs. Enjoy your Mediterranean Steak Power Bowl while keeping it healthy! Pro Tips Marinate for Maximum Flavor: Allow the steak to marinate for at least 1-2 hours to enhance its flavor profile. If time allows, marinating overnight is even better. Perfectly Cooked Steak: Use a meat thermometer to check for doneness. Aim for 130°F for medium-rare, adjusting the cooking time accordingly to ensure optimal tenderness. Layer Ingredients for Visual Appeal: Arrange each ingredient in separate sections over the quinoa base. This not only looks beautiful but allows for customizable bites with every spoonful. Fresh Herbs for Brightness: Add a variety of fresh herbs, like mint or dill, in addition to parsley for an extra layer of freshness and flavor complexity. {{image_2}} You can switch the flank steak for chicken or tofu. Chicken gives a lighter taste, while tofu is great for a plant-based option. For toppings, try avocado for creaminess or nuts for crunch. Dressings like yogurt sauce or balsamic vinaigrette add a new twist. Add toppings like avocado or nuts to boost flavor and texture. Nuts like almonds or walnuts add crunch. You can also explore Mediterranean sauces. Try tzatziki for a cool and refreshing taste. Harissa sauce adds a spicy kick for those who love heat. You can change the grain base from quinoa to farro, couscous, or rice. Farro is chewy and nutty, while couscous cooks quickly for busy days. Rice, whether white or brown, offers a classic base. Each choice gives a different texture and taste to your power bowl. To keep your Mediterranean steak power bowls fresh, store leftovers in airtight containers. Refrigerate them right away to avoid spoilage. The cooked steak stays good for about 3 to 4 days. Quinoa can last up to a week when stored properly. Fresh veggies, like tomatoes and cucumbers, are best used within 2 days. When reheating, aim to keep the steak juicy and the veggies crisp. Use a skillet over medium heat to warm the steak. Add a splash of water to help steam it. For quinoa, toss it in the microwave for a quick heat-up. This method keeps the texture and flavor intact. For easy meal prep, marinate the steak the night before. Cook a large batch of quinoa to use throughout the week. Chop veggies and store them in separate containers to keep them fresh. Layer everything in bowls right before serving for the best look and taste. To check if the flank steak is done, use a meat thermometer. For medium-rare, aim for 130-135°F. If you don’t have a thermometer, press the meat with your finger. If it feels firm but springs back, it’s likely cooked. Let the steak rest for 5-10 minutes after cooking. This keeps the juices in and makes it juicy. Yes, you can prepare parts of this recipe ahead of time. Marinate the steak a day before cooking. You can also cook the quinoa and chop the veggies ahead. Store them in the fridge. Just assemble the bowls when you are ready to eat. This saves time and makes meal prep easy. If you want a substitute for tahini, try almond butter or sunflower seed butter. You can also make a quick yogurt sauce with plain yogurt, lemon juice, and garlic. These options keep the dish creamy and tasty without tahini. Yes, this recipe is great for meal prep. You can divide the ingredients into individual containers. Keep the steak and veggies separate to keep them fresh. This way, you can grab a bowl for lunch or dinner throughout the week. This blog post covered how to create a delicious power bowl with flank steak. We explored the key ingredients, marinating tips, and cooking techniques. I also shared ideas for presentation and variations to suit your taste. Remember, you can customize this dish for dietary needs or meal prep. Whether you use quinoa or another grain, the goal is to enjoy your meal. Have fun experimenting, and enjoy your tasty creation!

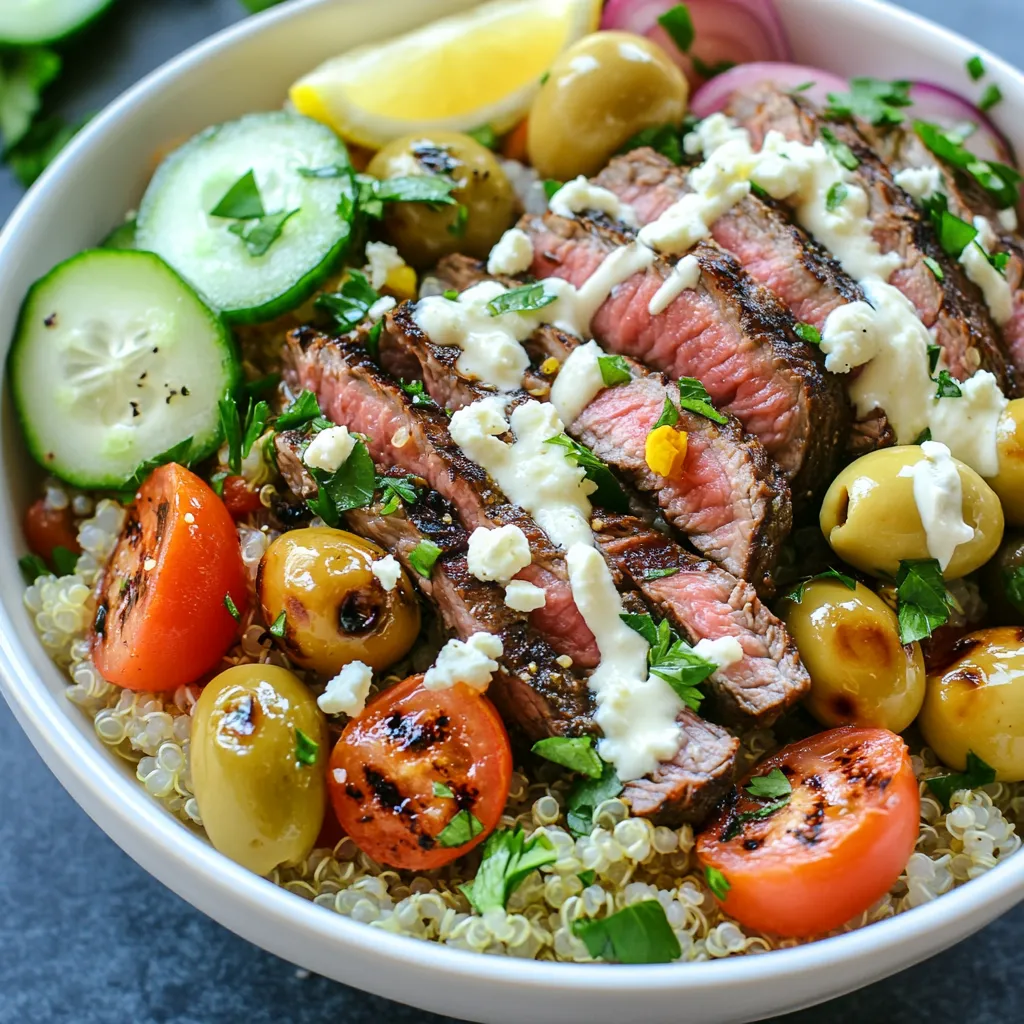
Mediterranean Steak Power Bowls Healthy Flavor Boost

Looking for a tasty way to eat healthy? Mediterranean Steak Power Bowls are your answer! Packed with protein, fresh veggies,

- 12 oz penne pasta - 1 lb smoked sausage (like Andouille) - 1 medium onion - 3 cloves garlic - 1 red bell pepper - 1 green bell pepper - 2 cups chicken broth - 1 cup heavy cream - 1 tablespoon Cajun seasoning - 1 teaspoon smoked paprika - 1 cup cherry tomatoes - 1 cup shredded cheddar cheese - 2 tablespoons olive oil - Salt and pepper to taste - Chopped parsley for garnish When I create this dish, I focus on fresh flavors and quality ingredients. Each item plays a key role in making this creamy Cajun sausage pasta a hit. The penne pasta holds the sauce well, giving you bites of creamy goodness. Smoked sausage adds a rich, savory taste that is hard to resist. Onions and garlic bring depth to the dish. The bell peppers add color and crunch. Chicken broth provides the base for a tasty sauce. Heavy cream makes it rich and smooth, while Cajun seasoning gives it that signature kick. Smoked paprika deepens the flavor, making it even more special. Cherry tomatoes add a pop of sweetness. Shredded cheddar cheese melts beautifully, adding creaminess. Finally, olive oil helps everything cook evenly. Don't forget salt and pepper to enhance all these flavors. Garnish with chopped parsley for a fresh look and taste. - Additional vegetables (like spinach or zucchini) - Different types of cheese (Parmesan or mozzarella) - Hot sauce for added spice If you want to mix it up, try adding extra vegetables like spinach or zucchini. This can make the dish even healthier. You can also switch up the cheese. Parmesan or mozzarella would work well. If you love spice, a dash of hot sauce can take it to the next level. {{ingredient_image_1}} - Heat olive oil in a pot. - Cook smoked sausage until browned. To start, grab a large pot. Turn your stove to medium-high heat. Add the olive oil and let it warm up. Then, toss in the sliced smoked sausage. Cook it for about five minutes. You want it to get nice and brown. This adds flavor to your dish. - Sauté onions, garlic, and bell peppers. - Add spices and chicken broth. Next, add the diced onion, minced garlic, and the red and green bell peppers. Stir them well for about three to four minutes. You want the veggies to soften a bit. After that, sprinkle in the Cajun seasoning and smoked paprika. Mix everything together. Then, pour in the chicken broth and bring it to a boil. - Add penne pasta and cherry tomatoes to broth. - Simmer and stir until pasta is al dente. When the broth is boiling, add the penne pasta and halved cherry tomatoes. Give everything a good stir so it combines well. Cover the pot and lower the heat. Let it simmer for about ten to twelve minutes. Stir occasionally until the pasta is al dente, which means it should be firm but not hard. - Stir in heavy cream and cheddar cheese. - Season to taste with salt, pepper, and Cajun seasoning. Once the pasta is cooked, lower the heat again. Pour in the heavy cream and add the shredded cheddar cheese. Stir until the cheese melts and the sauce becomes creamy. Taste it and add salt, pepper, and more Cajun seasoning if you like. Let it sit for a minute before serving. To get the best texture for pasta, cook it al dente. This means it should be firm but not hard. Start by boiling water in a big pot. Add salt to the water for flavor. Once the water boils, add the penne pasta. Stir it to prevent sticking. Cook it as per the package directions, usually around 10-12 minutes. Always taste a piece to check. For heat settings, start on medium-high when cooking sausage. This helps it brown nicely. After adding veggies, lower the heat to medium. When adding broth, turn it up to bring it to a boil. Then, reduce it to medium-low when you add the pasta. This keeps the pasta from overcooking. Pair this dish with garlic bread or a fresh salad. Garlic bread adds crunch and flavor. A salad brings freshness and balance. For serving, use wide bowls. This makes it look nice and gives space for the sauce. Top with chopped parsley and a sprinkle of cheese. This adds color and makes it more appealing. If you need a gluten-free option, use gluten-free penne pasta. It works just as well. You can also swap the smoked sausage for other proteins. Chicken, shrimp, or tofu are great choices. Just ensure you cook them well before adding to the dish. This keeps your meal tasty and fun! Pro Tips Choose the Right Sausage: Using Andouille or another smoked sausage adds depth to the flavor, but feel free to experiment with other types for a different twist. Don’t Overcook the Pasta: Since the pasta continues to cook in the sauce, aim for it to be al dente before adding the cream and cheese to avoid mushiness. Adjust the Spice Level: If you prefer a milder dish, reduce the Cajun seasoning and smoked paprika, or add a dollop of sour cream before serving for creaminess. Garnish for Freshness: Chopped parsley not only adds color but also a fresh taste that balances the richness of the creamy sauce, enhancing the overall dish. {{image_2}} To make a Cajun vegetable pasta, swap the smoked sausage for hearty vegetables. Here’s how: - Use 1 cup of diced zucchini, 1 cup of mushrooms, and 1 cup of spinach. - Sauté the vegetables with the onions and garlic for a rich flavor. - Keep the Cajun seasoning to add that kick. - Use vegetable broth instead of chicken broth for depth. This version offers a fresh taste while keeping the creamy texture. Want more heat? You can spice it up with more Cajun seasoning or hot peppers. - Add an extra tablespoon of Cajun seasoning while cooking. - Chop fresh jalapeños or serrano peppers and mix them in. - Use a spicy sausage like chorizo for a flavor boost. Feel free to adjust the spice level to match your taste. If you want lighter options for the cream, here are two ideas: - Use half-and-half instead of heavy cream for a lighter sauce. - For a dairy-free version, try coconut milk or cashew cream. These alternatives keep the dish creamy but reduce calories and dairy. To store leftovers, let the pasta cool to room temperature. Place it in an airtight container. This helps keep it fresh. You can store it in the fridge for up to three days. When you’re ready to eat, just reheat it on the stove or in the microwave. If you want to freeze it, use a freezer-safe container. Make sure to leave some space at the top for expansion. It can last in the freezer for up to three months. To reheat, thaw it overnight in the fridge. Heat it gently on the stove with a splash of chicken broth to keep it creamy. One Pot Creamy Cajun Sausage Pasta stays good for about three days in the fridge. Check for signs of spoilage, like a sour smell or mold. If it smells off or looks strange, it’s best to toss it. Always trust your senses! It takes about 30 minutes in total. You spend 10 minutes prepping, like chopping veggies and slicing sausage. Cooking takes about 20 minutes. This quick time makes it perfect for busy nights. Yes, you can! Andouille sausage adds great flavor, but you can try others too. Kielbasa, chorizo, or turkey sausage work well. Each type will give the dish a unique taste. The spice level can vary. Cajun seasoning adds heat, but you control it. If you want less spice, use less seasoning. You can also add sour cream to cool it down. For more spice, add hot sauce or extra Cajun seasoning. This pasta pairs well with garlic bread or a fresh salad. You might enjoy a glass of white wine, like a Sauvignon Blanc. Together, these sides create a fun and tasty meal experience. This recipe for One Pot Creamy Cajun Sausage Pasta combines great flavors and easy steps. You learned about the key ingredients like sausage, pasta, and cream. I shared tips for cooking and storing so your dish stays fresh. You can tweak flavors with optional ingredients or variations to suit your taste. This meal is perfect for busy nights or special occasions. Enjoy making it your own while bringing a taste of Cajun cuisine to your table. Cooking can be fun and rewarding!

One Pot Creamy Cajun Sausage Pasta Delight

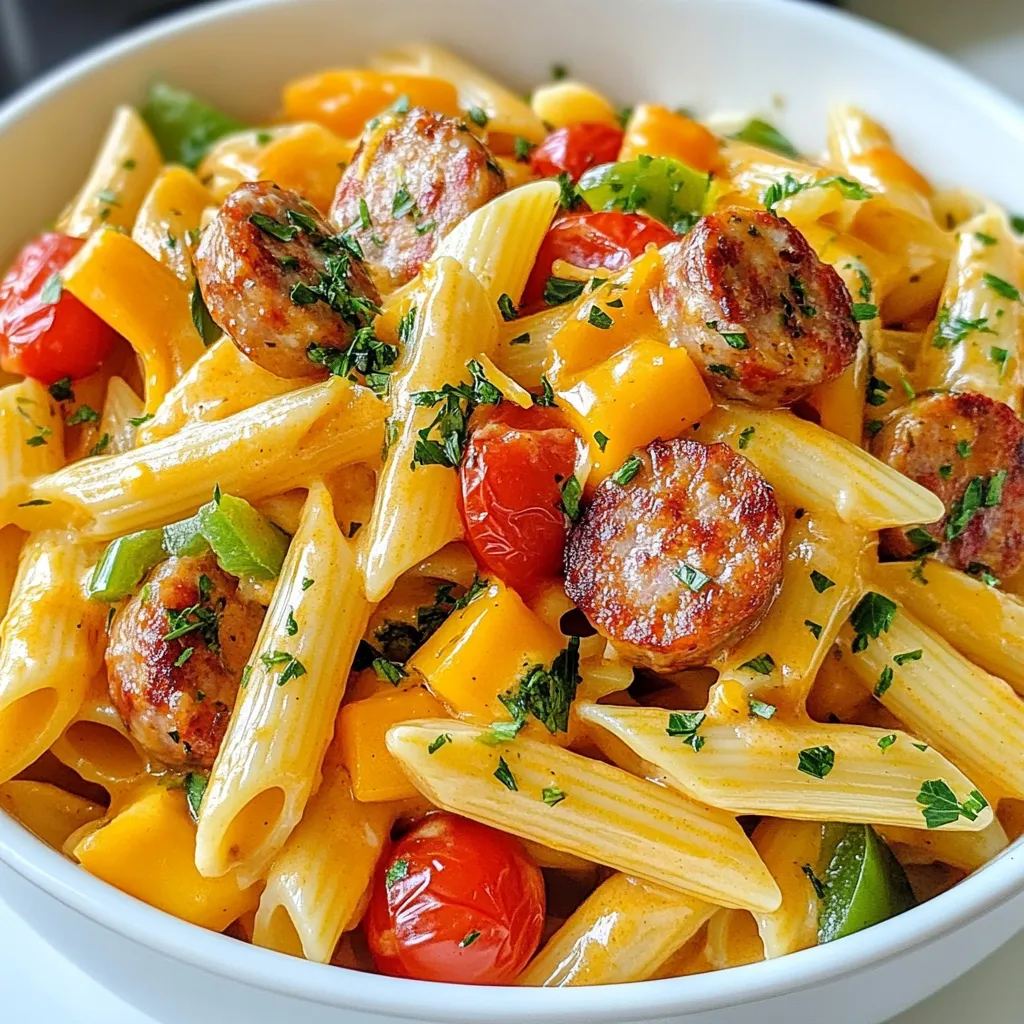
Looking for a quick, tasty meal? My One Pot Creamy Cajun Sausage Pasta Delight is your solution! In just one

Gathering the right ingredients makes this Chicken Fajita Casserole shine. Here’s what you need: - 2 cups cooked chicken, shredded - 1 red bell pepper, sliced - 1 green bell pepper, sliced - 1 large onion, sliced - 1 can (15 oz) black beans, drained and rinsed - 1 cup corn kernels (fresh, frozen, or canned) - 1 teaspoon chili powder - 1 teaspoon cumin - 1 teaspoon paprika - 1/2 teaspoon garlic powder - 1/2 teaspoon onion powder - 1/4 teaspoon black pepper - 1 cup salsa (mild or hot, to preference) - 2 cups shredded cheese (cheddar or Mexican blend) - 6 small tortillas, cut into wedges - Fresh cilantro for garnish (optional) Each ingredient brings its own flavor. The cooked chicken gives a hearty base. Bell peppers add crunch and sweetness. The black beans bring protein and texture. Corn adds a touch of sweetness, and the spices give it that fajita kick. Salsa ties everything together with its tangy goodness, while cheese adds creaminess. Tortilla wedges create layers and soak up all the tasty juices. Don't forget the cilantro for a fresh finish! {{ingredient_image_1}} Start by preheating your oven to 375°F (190°C). This step is key. A hot oven helps the casserole cook evenly. In a large bowl, mix the following: - 2 cups cooked chicken, shredded - 1 sliced red bell pepper - 1 sliced green bell pepper - 1 sliced large onion - 1 can (15 oz) black beans, drained and rinsed - 1 cup corn kernels - 1 teaspoon chili powder - 1 teaspoon cumin - 1 teaspoon paprika - 1/2 teaspoon garlic powder - 1/2 teaspoon onion powder - 1/4 teaspoon black pepper Stir until everything is well combined. The spices will add great flavor. Grab a 9x13-inch baking dish. Spread half of the tortilla wedges on the bottom. This gives a tasty base. Then add half of the chicken and vegetable mix over the tortillas. Pour half of the salsa on top, then sprinkle a third of the cheese. Repeat this layering: the rest of the tortilla wedges, chicken mixture, salsa, and top with the remaining cheese. Cover the baking dish with aluminum foil. Bake it in the preheated oven for 25 minutes. After 25 minutes, take off the foil and bake for another 15 minutes. Watch for the cheese to bubble and turn golden. This step makes the dish extra appealing. Let the casserole cool slightly before serving. You can garnish it with fresh cilantro if you like. This adds a fresh touch. Serve it with a side salad or some guacamole for a complete meal. Enjoy the blend of flavors! Shredding chicken can be easy if you have the right tools. Use two forks. Place the chicken on a cutting board. Hold one fork in each hand. Pull the chicken apart with the forks. This method gives you nice, even pieces. You can also use your hands if the chicken is cool enough. For best results, shred the chicken while it is warm. This makes it easier to handle. You can personalize your seasoning to match your taste. If you like spice, add more chili powder or fresh jalapeños. If you prefer a milder flavor, use less spice. You can experiment with herbs like oregano or thyme. A squeeze of lime juice can add a fresh twist. Taste as you go to find what you love best. Cheese can change the taste and texture of your casserole. Cheddar brings a sharp flavor, while a Mexican blend adds a creamy touch. Try pepper jack for a spicy kick. If you want a lighter option, use reduced-fat cheese. Each choice will give your dish a different vibe. Don’t shy away from mixing cheeses for depth in flavor. Layering is key to a great casserole. Start with tortilla wedges at the bottom. This creates a strong base. Spread half of the chicken mix on top. Follow with salsa and cheese. Repeat these layers carefully. Make sure to cover everything well. This helps all the flavors blend while baking. Aim for three layers for a hearty dish. Pro Tips Use Leftover Chicken: This casserole is a perfect way to use up leftover rotisserie chicken or any cooked chicken you have on hand. Customize Your Vegetables: Feel free to swap or add any vegetables you like, such as zucchini or mushrooms, to make it even more colorful and nutritious. Spice It Up: Adjust the level of heat by choosing a spicier salsa or adding fresh jalapeños for an extra kick. Make Ahead: Prepare the casserole in advance and store it in the refrigerator. Just bake it when you're ready to serve! {{image_2}} You can easily make a vegetarian version of the chicken fajita casserole. Start by swapping the chicken for 2 cups of cooked quinoa or lentils. These options add protein and texture. Use the same mix of veggies, like bell peppers and onions. You can also add extra beans and corn for more flavor. This dish stays just as tasty without meat. If you love heat, make a spicy version! Use hot salsa instead of mild. Add a diced jalapeño or two for a kick. You can also sprinkle in some cayenne pepper or crushed red pepper flakes. These changes will make each bite exciting and full of flavor. Feel free to swap ingredients to fit your taste. Instead of black beans, try pinto beans or kidney beans. If you don't like corn, you can skip it or add diced zucchini. Use your favorite cheese, like pepper jack for a creamy heat. Adjust the spices too; add more chili powder or cumin if you enjoy bolder flavors. The beauty of this dish is its flexibility! To store your Chicken Fajita Casserole, let it cool first. Transfer it to an airtight container. This helps keep it fresh. You can also cover the baking dish with plastic wrap or foil. Stored this way, it stays good for about 3 to 4 days in the fridge. If you want to save it for later, freezing is a great option. Cut the casserole into portions. Wrap each piece tightly with plastic wrap, then foil. This prevents freezer burn. You can freeze it for up to 3 months. When you're ready to eat, just thaw it in the fridge overnight. To reheat, preheat your oven to 350°F (175°C). Place the casserole in an oven-safe dish. Cover it with foil to keep it moist. Heat for about 20-25 minutes, or until it's hot all the way through. You can also microwave it in short bursts, stirring in between. Enjoy it warm for a tasty meal! Yes, you can use rotisserie chicken. It saves time and adds great flavor. Just shred the chicken and mix it into your casserole. This option makes meal prep super easy. If you want to skip tortillas, you can use rice or even zucchini slices. Both options work well. They give a different texture but still taste great. The casserole can last about 3 to 4 days in the fridge. Make sure to store it in an airtight container. This helps keep it fresh and tasty for your next meal. Yes, you can make this dish ahead of time. Prepare everything, then cover and store it in the fridge. Bake it just before serving. This makes it a perfect meal for busy nights. You can serve this casserole with a simple salad or some tortilla chips. A dollop of sour cream or guacamole adds extra flavor, too. Enjoy your meal with fresh toppings for the best experience. This blog post covered how to make a Chicken Fajita Casserole. We explored the ingredients, step-by-step instructions, and many helpful tips. You learned about variations and how to store leftovers. This dish is easy to make and fun to eat. Feel free to get creative with the recipe and make it your own. Enjoy each bite and share it with family and friends. Use these tips to impress everyone with your cooking skills!

Chicken Fajita Casserole Flavorful Kitchen Delight

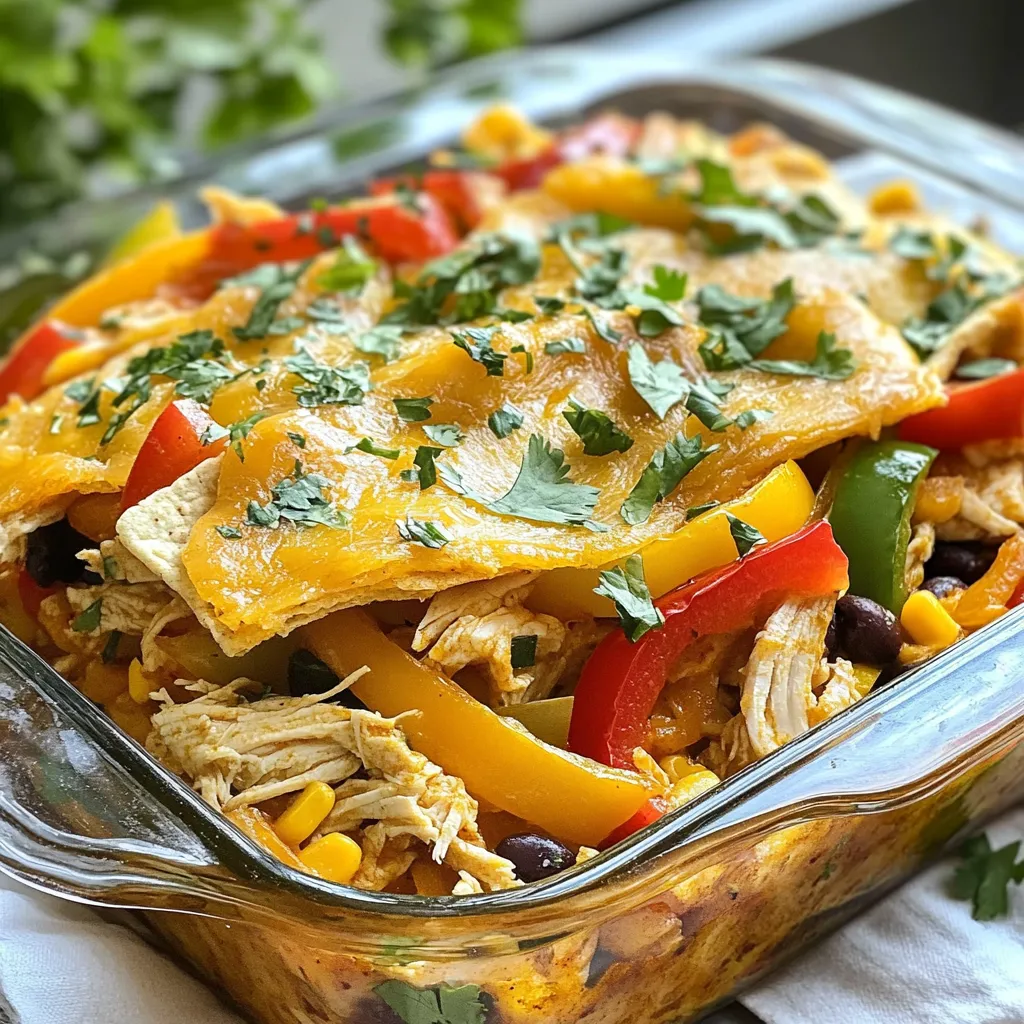
If you love bold flavors and easy meals, you’re in for a treat! My Chicken Fajita Casserole mixes tender chicken,

To make your Vanilla Chai Old Fashioned, gather these simple items: - Cooled brewed chai tea - Vanilla extract - Maple syrup - Aromatic bitters - Fresh lemon juice - Sparkling water - Ice cubes - Garnish options (cinnamon sticks and star anise) Each ingredient plays a key role. The cooled brewed chai tea adds warmth and spice. Vanilla extract gives a sweet touch. Maple syrup brings a rich flavor. Aromatic bitters add depth. Fresh lemon juice balances the sweetness. Sparkling water lightens the drink. Ice cubes chill your cocktail. Garnishes like cinnamon sticks and star anise make it pretty and fragrant. You can find these ingredients at any grocery store. Make sure to get good-quality chai tea for the best flavor. {{ingredient_image_1}} Start by brewing a strong cup of chai tea. Use your favorite blend for the best flavor. Allow the tea to cool completely. This step is important, as warm tea can dilute the drink. Aim for one cup of brewed tea. In a shaker, add the cooled chai tea. Pour in one tablespoon of vanilla extract. Next, add one tablespoon of maple syrup for sweetness. Then, include two dashes of aromatic bitters. Finally, squeeze in one tablespoon of fresh lemon juice. Each ingredient adds depth to the flavor. Fill the shaker with ice cubes. Shake gently until everything is well mixed and chilled. Strain the mixture into a glass filled with fresh ice cubes. Top off your drink with half a cup of sparkling water. Stir gently to combine all the flavors. For a lovely touch, garnish with a cinnamon stick and a star anise. Enjoy your Vanilla Chai Old Fashioned! To make great chai, start with quality tea leaves. Choose loose-leaf tea or tea bags with strong flavors. Use one cup of water for each cup of tea. Bring water to a boil. Add your tea and let it steep for five to seven minutes. This helps extract all the rich spices. After steeping, strain the tea and let it cool. Cooling is key for mixing. When picking whiskey, consider its flavor. A smooth bourbon or rye works best. Bourbon adds sweetness, while rye gives a spicy kick. Taste different brands to find your favorite. You want a whiskey that complements the chai and vanilla. Avoid strong, harsh whiskeys that overpower the drink. If you don't have maple syrup, try honey or agave nectar. Both add sweetness but have different flavors. Honey adds floral notes, while agave is lighter. You can also use brown sugar for a rich taste. Just dissolve it in warm water first. This makes it easier to mix into your cocktail. Experiment with these options to find what you like best. Pro Tips Use Quality Chai Tea: The flavor of your drink will depend significantly on the quality of chai tea you use. Opt for loose-leaf tea or high-quality tea bags for the best taste. Adjust Sweetness: Feel free to modify the amount of maple syrup based on your personal preference. You can also substitute with honey or agave syrup if desired. Experiment with Bitters: Different types of aromatic bitters can enhance the complexity of your drink. Try orange or chocolate bitters for a unique twist! Garnish Creatively: Beyond cinnamon sticks and star anise, consider adding a slice of lemon or a sprig of mint to elevate the presentation and aroma. {{image_2}} You can enjoy a refreshing iced version of this cocktail. Start with brewed chai tea, cooled down. Mix it as usual, but add more ice to the glass. Top with sparkling water for extra fizz. This drink is perfect for hot days. For a warm twist, try adding rum. Use the same chai tea base. Replace the whiskey with a dark rum. The rum adds depth and warmth. You will also enjoy the spice of the chai. Garnish with a cinnamon stick for extra flavor. If you prefer no alcohol, this drink is easy to adapt. Simply leave out the whiskey. The tea, vanilla, and maple syrup still taste great. Use extra sparkling water for a fun fizz. It’s a delicious treat for everyone. If you have extra Vanilla Chai Old Fashioned, store it in the fridge. Use a sealed container. This drink is best enjoyed fresh, but you can keep it for up to two days. To keep your drink fresh, avoid adding sparkling water until you're ready to serve. This helps keep the fizz when you pour. Always store the garnish separately. Cinnamon sticks and star anise can stay dry in a cool place. You can reuse ingredients in other drinks too. The chai tea makes a great base for many cocktails. Use leftover maple syrup in pancakes or oatmeal. Lemon juice can brighten other drinks or dressings. Keep your cocktail game strong by using what you have! A Vanilla Chai Old Fashioned is a twist on the classic drink. It blends warm chai tea with vanilla and maple syrup. This makes a sweet and spiced cocktail. You add aromatic bitters to deepen the flavor. Finally, you top it off with sparkling water for a fizzy touch. It’s perfect for cozy nights. Yes, you can make parts of this cocktail ahead of time. Brew the chai tea and cool it first. Mix the other ingredients, except for the sparkling water. Store them in the fridge until you’re ready to serve. Just add the sparkling water and ice when you are ready to enjoy. If you don’t have aromatic bitters, try orange bitters instead. They add a nice citrus flavor. You can also use a dash of vanilla extract for a sweeter taste. If you want a unique twist, try using a spiced syrup. Just keep in mind it may change the final flavor. You can find great vanilla chai tea in many places. Look at local tea shops for fresh blends. Online stores also offer a wide range of options. Check the ingredients for real vanilla and spices. This ensures a rich flavor in your cocktail. Choose a blend that excites your taste buds. This blog post covered crafting a Vanilla Chai Old Fashioned. We explored key ingredients, brewing techniques, and fun variations. I shared tips for the best chai, whiskey choices, and sweetener swaps. Remember to store leftovers properly to keep flavors fresh. Whether you’re mixing for a special occasion or just treating yourself, enjoy experimenting with this unique drink. Have fun making your own version of this delightful cocktail!

Vanilla Chai Old Fashioned Cocktail Delight Recipe

Looking to spice up your cocktail game? The Vanilla Chai Old Fashioned is a warm twist on a classic drink,

- 2 boneless, skinless chicken breasts - 3 cups chicken broth - 1 jar (15 oz) Alfredo sauce - 1 cup heavy cream - 1 package (9 oz) refrigerated cheese tortellini The main ingredients are simple and easy to find. The chicken breasts create a tender base. Chicken broth adds flavor and moisture. Alfredo sauce makes it creamy and rich. Heavy cream enhances the sauce's smoothness. The cheese tortellini brings a fun twist and texture. - 1 teaspoon garlic powder - 1 teaspoon Italian seasoning - Salt and pepper to taste - 1 cup frozen peas The seasonings bring the dish to life. Garlic powder adds depth, and Italian seasoning gives a classic flavor. Salt and pepper are key to balance. Frozen peas add a pop of color and sweetness. - Fresh parsley, chopped - Grated Parmesan cheese Fresh parsley adds brightness and a hint of freshness. Grated Parmesan cheese gives a salty finish. These garnishes make your dish look and taste gourmet. You can easily impress your family or guests with these simple touches. {{ingredient_image_1}} - Seasoning the Chicken Start with two boneless, skinless chicken breasts. Place them in your crockpot. Sprinkle garlic powder, Italian seasoning, salt, and pepper over the chicken. Make sure to coat it well. This will add great flavor to your dish. - Cooking the Chicken in the Crockpot Pour three cups of chicken broth over the chicken. This keeps it moist while cooking. Cover the crockpot and set it to low for five to six hours. If you’re in a hurry, cook on high for three to four hours. The chicken will be done when it is no longer pink inside. - Shredding the Chicken After cooking, take the chicken out of the crockpot. Use two forks to shred the chicken into bite-sized pieces. This makes it easy to mix with the other ingredients. Once shredded, put the chicken back in the pot. - Adding Alfredo Sauce and Heavy Cream Now, stir in one jar of Alfredo sauce and one cup of heavy cream. Mix until all the chicken is coated. This creamy sauce will make your dish rich and delicious. - Incorporating Tortellini and Peas Add one package of refrigerated cheese tortellini and one cup of frozen peas to the pot. Gently mix everything together. This adds color and texture to your meal. - Cooking Until Tender Cover the crockpot again. Cook on low for 30 to 40 more minutes. Check that the tortellini is tender and heated through. Taste it and adjust the seasoning if needed. Your meal is almost ready! - Adjusting Cooking Times for Different Settings: If you cook on low, aim for 5-6 hours. For high, 3-4 hours works well. Check the chicken for doneness. - Ensuring Chicken is Cooked Thoroughly: Use a meat thermometer. The chicken should reach 165°F. This keeps your meal safe and tasty. - Presentation Tips for Serving: Serve in deep bowls. Drizzle with extra Alfredo sauce and sprinkle parsley on top. This adds color and charm. - Complementary Sides or Salads: Pair with a simple green salad or garlic bread. These sides balance the creamy dish nicely. - Adding Extra Seasonings: Try adding crushed red pepper for heat. A touch of lemon zest brightens the flavors. - Using Different Types of Cheese: Experiment with mozzarella or a sharp cheddar. Each cheese adds its unique twist to the dish. Pro Tips Use Fresh Ingredients: Fresh ingredients can elevate the flavor of your dish. Opt for freshly grated Parmesan cheese and consider using fresh herbs for garnish. Adjust the Creaminess: If you prefer a richer sauce, feel free to add more heavy cream or Alfredo sauce. You can also mix in a little cream cheese for added richness. Cook Tortellini Separately: For the best texture, you can cook the tortellini separately and add it just before serving. This prevents it from becoming overly soft in the crockpot. Customize with Vegetables: Feel free to add other vegetables like spinach, bell peppers, or mushrooms. Just make sure to adjust the cooking time accordingly to ensure everything is cooked perfectly. {{image_2}} You can switch the chicken for turkey if you want a lighter taste. Turkey works well in this dish. If you're feeling adventurous, try pork or beef. They add great flavor too. For vegetarian options, mushrooms are a fantastic choice. They give a nice, meaty texture. Tofu is another great swap. It soaks up the sauce and adds protein. You can also mix in beans for added nutrition. Alfredo sauce is creamy and rich, but other sauces can shine too. Try marinara for a zesty twist. Pesto adds a fresh, herby flavor that is delightful. You can even use a cheese sauce for extra creaminess. If you want a dairy-free option, look for cashew-based sauces. These can mimic the creaminess of Alfredo. Another option is to use coconut milk with some nutritional yeast for a cheesy taste. You can use different flavors of tortellini to mix things up. Spinach and ricotta tortellini adds a nice color and flavor. Try meat-filled tortellini for a heartier dish. If you don’t have tortellini, any pasta will do. Penne or fusilli work well in this recipe. Just adjust the cooking time to ensure the pasta is tender. To keep your leftovers fresh, store them in an airtight container. Make sure to cool the dish to room temperature before sealing. Properly stored, Crockpot Chicken Alfredo Tortellini lasts about 3 to 4 days in the fridge. Always check for any off smells or changes in texture before eating. To freeze this dish, let it cool completely. Then, pour it into a freezer-safe container. Leave some space at the top for expansion. The dish can stay frozen for up to 3 months. When you’re ready to eat, thaw it overnight in the fridge. Reheat it on the stove over low heat, stirring often until warm. You can also use the microwave, but stir it halfway for even heat. Making this meal ahead of time is smart for busy days. You can prepare it in the morning and let it cook while you're at work. To reheat, warm it slowly on the stove. You may need to add a splash of cream or broth for moisture. This way, your meal stays creamy and delicious. Yes, you can use frozen chicken. Just remember that it will take longer to cook. If you choose frozen chicken, add an extra hour on low or 30 minutes on high. This ensures the chicken cooks thoroughly and stays safe to eat. Yes, you can. If you don’t have a crockpot, you can use a stove. Start by boiling the chicken in a pot with chicken broth. Cook it until it's tender, about 20-30 minutes. Then, shred the chicken and mix in the Alfredo sauce, cream, tortellini, and peas. Let it simmer until everything is hot and the tortellini is soft. This dish pairs well with many sides. Here are a few ideas: - Garlic bread for a crunchy texture. - A fresh green salad for some crunch. - Steamed vegetables like broccoli or green beans for color and nutrition. To add some heat, try these tips: - Add red pepper flakes for a mild kick. - Stir in diced jalapeños for a stronger flavor. - Use spicy Italian sausage instead of chicken for a bold twist. In summary, this blog post covers a delicious Crockpot Chicken Alfredo Tortellini recipe. We discussed main ingredients, like chicken and tortellini, along with seasonings and fresh garnishes. I shared step-by-step instructions for cooking and great tips for serving and storage. Try out different proteins and sauces to make it your own. Cooking should be fun and easy. Enjoy your meal and impress your family!

Crockpot Chicken Alfredo Tortellini Simple and Tasty

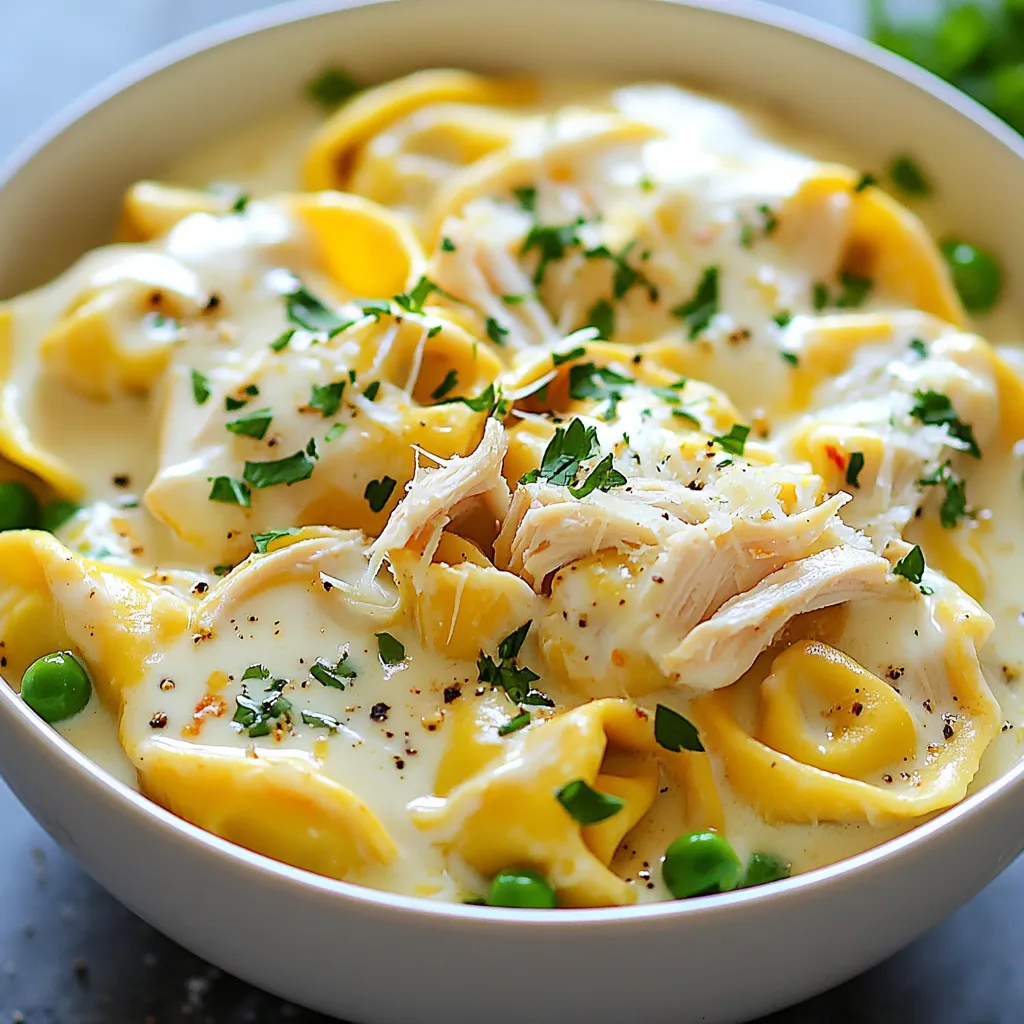
Are you ready to impress your family with a simple and tasty meal? This Crockpot Chicken Alfredo Tortellini is perfect

- 1 lb ground beef - 1 cup orzo pasta - 1 medium onion, finely chopped - 2 cloves garlic, minced - 1 bell pepper, diced - 2 cups beef broth - 1 can diced tomatoes (14 oz) - Dried oregano and paprika - Fresh parsley and grated Parmesan cheese To make One-Pot Beef Orzo, you need a few key ingredients. First, ground beef gives it a rich flavor. The orzo pasta adds a nice texture. A finely chopped onion brings sweetness and depth. Don't forget the supporting ingredients! Minced garlic adds a punch of flavor. Diced bell pepper, any color, adds color and crunch. Use beef broth for a savory base that ties it all together. For seasonings, diced tomatoes brighten the dish. Dried oregano and paprika give warmth and earthiness. Fresh parsley adds a pop of color and freshness. If you like cheese, grated Parmesan makes it even better! Gather these ingredients, and you are ready to create this tasty one-pot meal! {{ingredient_image_1}} Start by heating 2 tablespoons of olive oil in a large pot over medium heat. Once hot, add 1 medium onion, finely chopped, and 1 diced bell pepper. Sauté them for about 5 minutes. You want them soft and a bit sweet. Next, add 2 cloves of minced garlic to the pot. Cook this for 1 minute until you smell the garlic's lovely aroma. Increase the heat to medium-high and add 1 pound of ground beef. Use a wooden spoon to break the meat apart. Cook until the beef is browned, about 5 to 7 minutes. Drain any excess fat if needed. This step gives your dish a rich flavor. Now, it’s time to combine the orzo. Add 1 cup of orzo pasta, 2 cups of beef broth, and a 14-ounce can of diced tomatoes with their juice. Sprinkle in 1 teaspoon of dried oregano and 1 teaspoon of paprika. Season with salt and pepper. Bring everything to a boil, then reduce the heat. Cover the pot and let it simmer for about 10 to 12 minutes. Stir occasionally to prevent sticking. The orzo should be cooked just right and soak up most of the liquid. After cooking, let it sit covered for another 2 to 3 minutes. This helps the orzo absorb any last moisture. Finally, fluff the orzo with a fork and stir in some chopped fresh parsley for a burst of color and flavor. Serve it warm, and add grated Parmesan cheese if you like. Enjoy your tasty one-pot beef orzo! To get the best orzo, stir it often while it cooks. This helps keep it from sticking. Check for doneness by tasting a few grains. The orzo should be soft but still firm, known as al dente. Cooking time may vary, so don’t rush it! Add more depth to your dish by using extra spices. Try a pinch of red pepper flakes for heat or some ground cumin for warmth. You can also mix in some vegetables. Spinach, zucchini, or peas work great. They add color and nutrition. Make your dish look fancy by garnishing with fresh parsley. It adds a pop of green. For a rich finish, sprinkle some grated Parmesan cheese on top. Serve this dish in bowls for family meals. It makes sharing easy and fun! Pro Tips Use Lean Ground Beef: Opt for lean ground beef (90% lean or higher) to reduce excess fat and keep the dish healthier without sacrificing flavor. Flavor Boost: Enhance the flavor by adding a splash of Worcestershire sauce or soy sauce when cooking the beef for a savory depth. Vegetable Variations: Feel free to add other vegetables like zucchini or spinach for added nutrition and color; just adjust cooking times accordingly. Leftover Perfection: This dish makes excellent leftovers! Store in an airtight container in the fridge for up to 3 days and reheat gently on the stove. {{image_2}} You can switch the ground beef for ground turkey or chicken. Both work well and keep it light. If you want a vegan or vegetarian dish, try using lentils or chickpeas. These options add texture and protein without meat. To give your dish an Italian twist, add fresh basil. This herb adds a nice aroma and flavor. For a Southwestern style, mix in black beans and corn. These ingredients bring a fun, fresh taste to the one-pot meal. Incorporate seasonal vegetables like zucchini in summer or carrots in winter. This makes your dish fresh and colorful. You can adapt the recipe according to what’s in season. Using fresh produce not only boosts flavor but also adds health benefits. To keep your One-Pot Beef Orzo fresh, refrigeration is key. Use airtight containers to store leftovers. These containers help keep moisture in and air out. It’s best to let the dish cool before sealing it. This helps prevent steam buildup, which can make the orzo mushy. Try to eat leftovers within three days for the best taste. When it’s time to enjoy your leftovers, there are a few good ways to reheat. You can use the microwave or a stovetop. If you use the microwave, heat in short bursts, stirring often. This helps the orzo heat evenly. On the stovetop, add a splash of water or broth to keep it moist. Stir gently to avoid breaking the orzo. Always check that it's heated through before serving. If you want to save your One-Pot Beef Orzo for later, freezing works well. First, let the dish cool completely. Then, portion it into freezer-safe containers or bags. Be sure to remove excess air to prevent freezer burn. Label the containers with the date, so you know how long they’ve been frozen. When you’re ready to eat, thaw it overnight in the fridge. Reheat on the stovetop, adding a little broth for moisture. Enjoy your hearty meal anytime! You can tell when the orzo is done by checking its texture. It should be al dente, which means it’s tender but still has a slight bite. Look for a soft surface with a firm center. You can taste a piece to make sure it’s just right. The cooking time is usually about 10 to 12 minutes. Stir the orzo occasionally to help it cook evenly. Remember, it will continue to soften a bit after you take it off the heat. Yes, you can make One-Pot Beef Orzo ahead of time! This dish is perfect for meal prep. Cook it as directed, then let it cool before storing. Use an airtight container to keep it fresh in the fridge. It will last for about 3 to 4 days. When you’re ready to eat, simply reheat it on the stove or in the microwave. Add a splash of broth if it seems dry. One-Pot Beef Orzo pairs well with many side dishes. A simple green salad adds freshness. You can also serve it with crusty bread for dipping. Garlic bread is another great option. If you like veggies, roasted or steamed vegetables complement the dish nicely. For a fun twist, try serving it with a side of pickled veggies. Each option brings something special to your meal! You now have a complete guide to making delicious One-Pot Beef Orzo. We covered the main and supporting ingredients, how to prepare everything, and tips for perfect results. This dish is simple yet versatile; you can change the proteins and flavors to suit your taste. Proper storage and reheating tips help keep leftovers tasty. With this knowledge, you can impress your family with a hearty meal. Enjoy cooking and exploring different variations to make this recipe your own!

One-Pot Beef Orzo Flavorful and Easy Dinner Delight

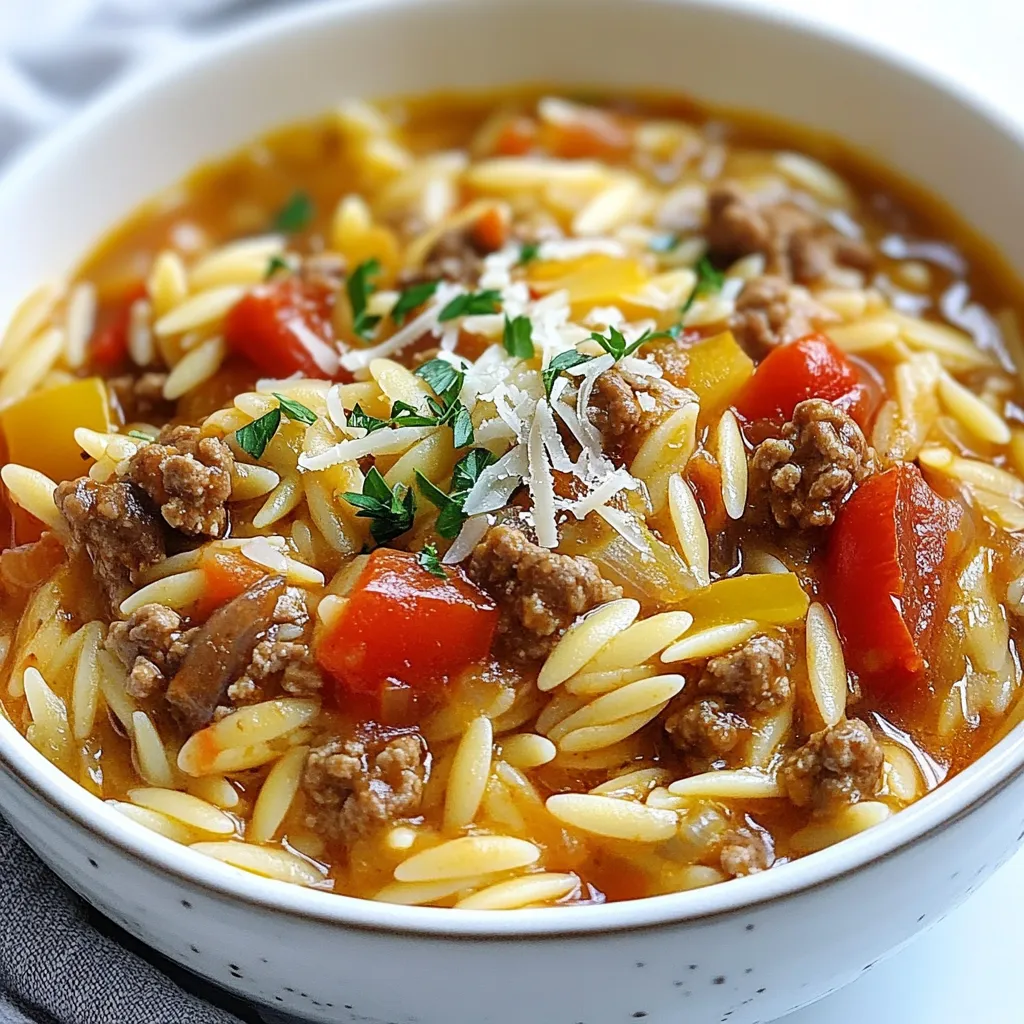
Looking for a quick and tasty dinner? Try my One-Pot Beef Orzo recipe! With just a few simple ingredients like

- 300g medium shrimp, peeled and deveined - 200g rice noodles - 2 tablespoons sesame oil - 1 red bell pepper, sliced - 1 cup snap peas - 1 carrot, julienned - 3 green onions, chopped - 2 cloves garlic, minced - 1 tablespoon fresh ginger, minced - 3 tablespoons low-sodium soy sauce - 1 teaspoon chili paste - Salt and pepper to taste - Lemon or lime wedges for garnish - 1 tablespoon oyster sauce (for added depth) - More chili paste (for extra heat) Each serving contains: - Calories: 350 - Protein: 25g - Carbohydrates: 45g - Fat: 10g - Fiber: 4g This dish packs a punch with flavors and nutrition! The shrimp offers great protein, while the colorful veggies add vitamins. The noodles give you energy for the day. If you want a little more flavor, add the oyster sauce. Adjust the chili paste to fit your taste. Enjoy! {{ingredient_image_1}} Start by boiling water in a large pot. Once it boils, add the rice noodles. Cook them as the package says until they are just right, or al dente. This usually takes about 4-5 minutes. When done, drain the noodles and set them aside. In a large pan or wok, heat 1 tablespoon of sesame oil over medium-high heat. Add the peeled and deveined shrimp to the pan. Sprinkle some salt and pepper on them. Cook the shrimp for about 2-3 minutes until they turn pink. Once they are cooked, take them out of the pan and keep them aside. Using the same pan, add the other tablespoon of sesame oil. Toss in minced garlic and ginger, stirring until they smell nice, about 30 seconds. Then, add the sliced bell pepper, snap peas, and julienned carrot. Stir fry these veggies for about 3-4 minutes. You want them tender but still crisp. Now it's time to bring everything together. Add the cooked shrimp back into the pan with the vegetables. Then, add the drained noodles. Pour in the low-sodium soy sauce, oyster sauce if you like it, and the chili paste for some heat. Toss everything gently until all the noodles, shrimp, and vegetables are well-coated with the sauces. Finish by mixing in the chopped green onions. Taste and add more salt or pepper if needed. Remove the stir fry from heat. Squeeze some lemon or lime juice over the top for a fresh touch. Serve the stir fry in bowls, adding more green onions and lemon or lime wedges on the side for garnish. To get the best shrimp texture, start with fresh or thawed shrimp. Cook them quickly over high heat. When they turn pink, they are done. Avoid overcooking, as this makes shrimp tough. Let the shrimp rest after cooking. This keeps them juicy and tender. For crisp vegetables, cut them into uniform pieces. This ensures even cooking. Stir-fry them quickly, so they stay bright and crunchy. Don’t overcrowd the pan; cook in batches if needed. Add garlic and ginger early for flavor, but don’t burn them. This keeps the dish fresh and vibrant. Low-sodium soy sauce adds umami without too much salt. Oyster sauce gives depth, but it’s optional. Adjust chili paste based on your heat level. Squeeze fresh lemon or lime before serving. It brightens the flavors and adds a zesty touch. Don’t forget to taste as you cook. This helps you find the perfect balance. Pro Tips Perfectly Cooked Shrimp: Avoid overcooking the shrimp by removing them from the pan as soon as they turn pink. They will continue to cook slightly even after being removed from the heat. Cooking Noodles: Rinse the cooked rice noodles under cold water after draining to stop the cooking process and prevent them from sticking together. Vegetable Crunch: For crunchier vegetables, add them to the stir fry in the order of their cooking time, starting with the denser ones like carrots, and finishing with the softer ones like snap peas. Flavor Boost: Enhance the dish's flavor by adding a splash of rice vinegar or a sprinkle of sesame seeds just before serving for an additional dimension. {{image_2}} You can swap shrimp for tofu. Use firm tofu for the best texture. Cut the tofu into bite-sized cubes. Press it to remove water. This helps it crisp up better. Cook the tofu in sesame oil until golden brown. Then follow the rest of the recipe as usual. You'll still enjoy a tasty dish with a different protein. Rice noodles are great, but you have other choices. Try egg noodles for a richer flavor. Whole wheat noodles add more fiber. For a low-carb option, use zucchini noodles or shirataki noodles. Each type gives a distinct taste and texture. Feel free to experiment based on what you like best. Adjusting the spice can change the dish's vibe. For mild heat, use less chili paste. If you want more heat, add extra chili paste. You can also mix in crushed red pepper or sriracha. For sweetness, add a spoonful of sugar or honey. These changes let you customize the dish to your taste. To keep your shrimp stir fry fresh, let it cool down first. Place the leftovers in an airtight container. This helps lock in flavors and moisture. Store them in the fridge for up to three days. Label the container with the date, so you know when you made it. When it's time to reheat, I recommend using a pan. Heat it on medium-low heat. Add a splash of water or a bit of oil to keep it moist. Stir it gently until heated through. This method helps maintain the shrimp's tenderness. You can also use a microwave, but be careful not to overcook the shrimp. If you want to freeze your stir fry, use a freezer-safe container. It will last up to three months in the freezer. When you're ready to enjoy it again, move it to the fridge overnight to thaw. Reheat as mentioned above, and enjoy your meal without losing taste! Yes, you can use frozen shrimp. Just thaw them first. Place the shrimp in cold water for about 15-20 minutes. This method works well. You can also leave them in the fridge overnight. Rice noodles are great for stir fry. They cook quickly and soak up flavors. You can also use egg noodles or whole wheat noodles if you prefer. To make this dish gluten-free, use gluten-free soy sauce. You can find this in most stores. Ensure that your noodles are also gluten-free. You can add many veggies! Broccoli, bell peppers, and carrots work well. Snow peas and zucchini are also good choices. Feel free to use what you like. Oyster sauce adds depth and flavor to the dish. However, it is optional. If you want a hint of sweetness, try using hoisin sauce instead. This blog post covered how to make a tasty shrimp stir fry. We looked at key ingredients, steps, tips, variations, and storage. Remember to use fresh shrimp and crisp veggies for the best result. You can switch shrimp for tofu for a vegetarian twist. Store any leftovers properly to enjoy later. With these tips, you can create a quick meal every time. Now it's your turn to try this easy dish and impress your friends and family. Happy cooking!

Savory Shrimp Stir Fry with Noodles Quick Recipe

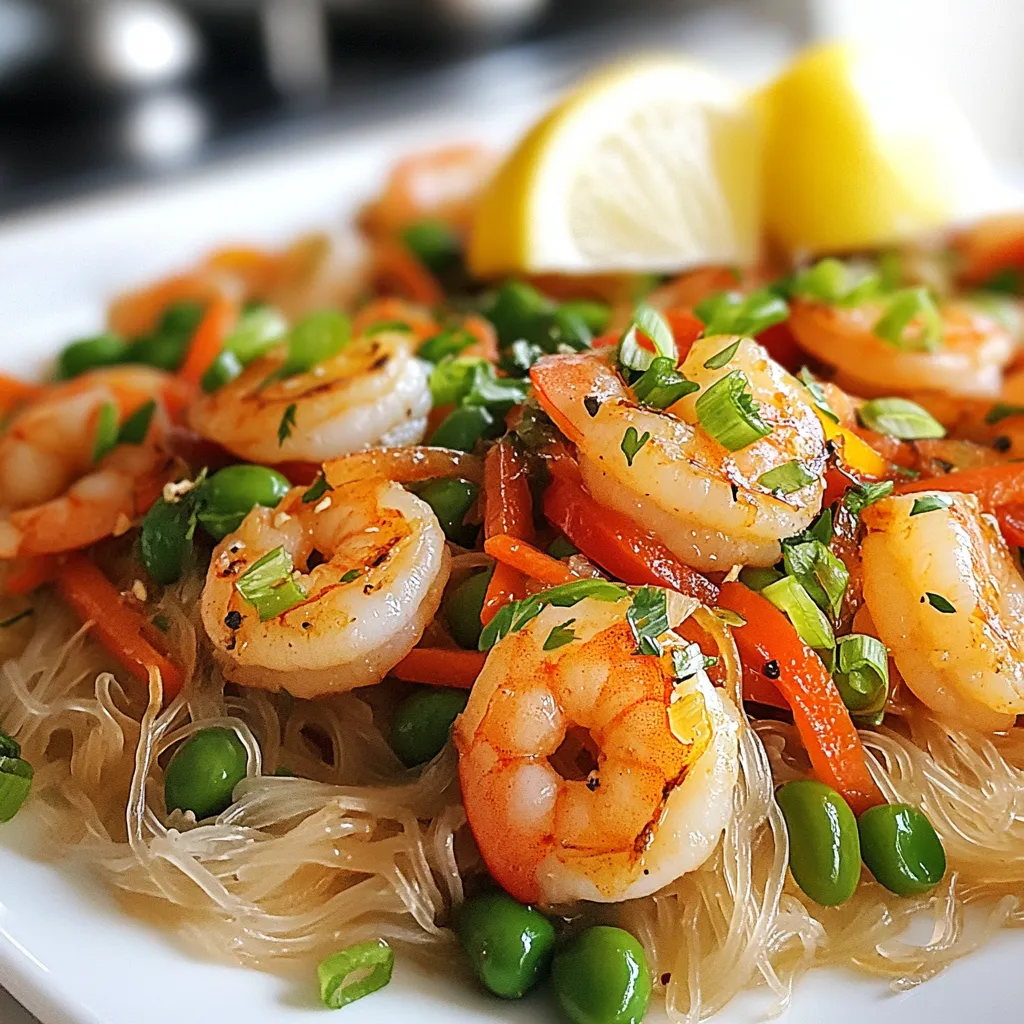
Are you ready to whip up a delicious meal in minutes? This Savory Shrimp Stir Fry with Noodles is quick,

For a tasty Ground Turkey Tomato Orzo, gather these simple ingredients: - 1 pound ground turkey - 1 cup orzo pasta - 1 can (14.5 oz) diced tomatoes, with juices - 1 small onion, diced - 2 cloves garlic, minced - 1 cup vegetable broth - 1 teaspoon dried oregano - 1 teaspoon dried basil - 1/2 teaspoon red pepper flakes (optional for spice) - Salt and pepper to taste - 2 tablespoons olive oil - Fresh parsley, chopped for garnish These ingredients create a savory one-pot meal perfect for any night. Ground turkey offers lean protein, while orzo adds a delightful texture. Diced tomatoes bring a rich flavor, and herbs like oregano and basil enhance the dish beautifully. Don't forget the garlic and onion, which add depth to every bite. Feel free to adjust the spice level by adding or removing red pepper flakes. Fresh parsley at the end adds a burst of color and taste. Enjoy cooking this easy and satisfying dish! {{ingredient_image_1}} - Heat the olive oil in a large pot over medium heat. - Add the diced onion and sauté for about 3-4 minutes until it turns soft and clear. - Next, stir in the minced garlic. Cook for another 1-2 minutes. Be careful not to brown it. - Now, add the ground turkey to the pot. Break it apart with a wooden spoon. Cook until it is no longer pink, which takes about 5-6 minutes. - Incorporate the can of diced tomatoes, including their juices. Pour in the vegetable broth and sprinkle in the dried oregano and basil. If you like spice, add red pepper flakes too. Stir everything to mix well. - Bring the mixture to a gentle simmer. Then, add the orzo pasta. Stir well to make sure the pasta is under the liquid. - Cover the pot and reduce the heat to low. Let it cook for about 10-12 minutes. This allows the orzo to become tender and soak up most of the liquid. Stir occasionally to prevent sticking. - After cooking, season with salt and pepper to taste. Remove the pot from heat and let it sit for a couple of minutes to thicken slightly. - Serve warm and garnish with fresh parsley on top for a nice touch. To ensure even cooking for ground turkey, break it apart well with a spoon. This helps it cook evenly. I like to cook it until it's no longer pink, about 5-6 minutes. Stir often to check for any uncooked bits. To avoid clumping with orzo, stir the pasta into the pot as soon as you add it. Make sure the orzo gets submerged in the broth. Stir every few minutes while it cooks. This keeps the orzo from sticking together and helps it cook evenly. For pairing options, I recommend a fresh salad or warm crusty bread. A light green salad adds a nice crunch and freshness. Bread is perfect for soaking up the tasty sauce. For ideal garnishes, sprinkle fresh parsley on top before serving. It adds a pop of color and a fresh taste. You can also add grated cheese, like Parmesan, for extra flavor. Pro Tips Use Fresh Herbs: Fresh herbs like basil and parsley can elevate the flavor of your dish. Add them at the end of cooking to maintain their vibrant taste and color. Cook Orzo Al Dente: To ensure your orzo maintains a nice texture, cook it al dente. It will continue to soften as it sits in the sauce. Customize with Vegetables: Feel free to add chopped vegetables such as bell peppers or spinach for added nutrition and flavor. Just sauté them with the onions. Make it Ahead: This dish can be made ahead of time and reheated. Store leftovers in an airtight container in the fridge for up to 3 days. {{image_2}} You can easily swap the ground turkey for other meats. Chicken or beef work well here. Each option brings its own flavor. Just keep an eye on cooking times, as they can vary. If you need a gluten-free meal, look for gluten-free orzo. Many brands now offer this option. It acts just like regular orzo in this dish. You can enjoy the same taste without the gluten. To boost the flavor, adding spices can work wonders. Try using paprika for a smoky taste. Cumin adds a warm, earthy flavor that complements the tomatoes. Just a teaspoon of each can make a big difference. Adding vegetables can also enhance the meal. Spinach wilts nicely into the dish. Bell peppers add sweetness and crunch. Feel free to toss in your favorite veggies. This way, you can customize the meal to your taste. To store leftovers properly, let the dish cool first. Then, transfer it to an airtight container. This helps keep it fresh and tasty. You can store it in the fridge for about 3 to 4 days. Always check for any changes in smell or color before eating. For freezing, place the cooled meal in a freezer-safe container. Leave some space at the top because the food will expand. This dish can stay good in the freezer for up to 3 months. When you're ready to enjoy it again, thaw in the fridge overnight. To reheat, warm it on the stove over low heat. Add a splash of broth or water if it seems dry. Stir often to ensure even heating. Enjoy your savory ground turkey tomato orzo just like it was made fresh! Yes, you can! You can swap orzo for small pasta shapes like macaroni or ditalini. Just adjust the cooking time based on the pasta you choose. Keep an eye on it as it cooks. To boost the flavor, add fresh herbs like basil or thyme. You can also toss in some lemon juice for brightness. For a richer taste, use chicken broth instead of vegetable broth. If you like heat, add more red pepper flakes or even some diced jalapeño. Absolutely! This dish stores well. You can make a big batch and divide it into meal prep containers. It keeps in the fridge for about three days. Just reheat it in the microwave or on the stove when you're ready to eat. This blog post covered how to make a tasty dish with ground turkey and orzo. You learned the simple steps to prepare, cook, and serve it. I shared helpful tips to ensure the meat cooks evenly and avoid clumping. Variations let you explore different proteins and spices. Proper storage and reheating keep leftovers fresh. Remember, cooking is all about experimenting. Enjoy making this recipe your own, and don’t hesitate to try new ingredients. Happy cooking!

Ground Turkey Tomato Orzo Savory One-Pot Meal

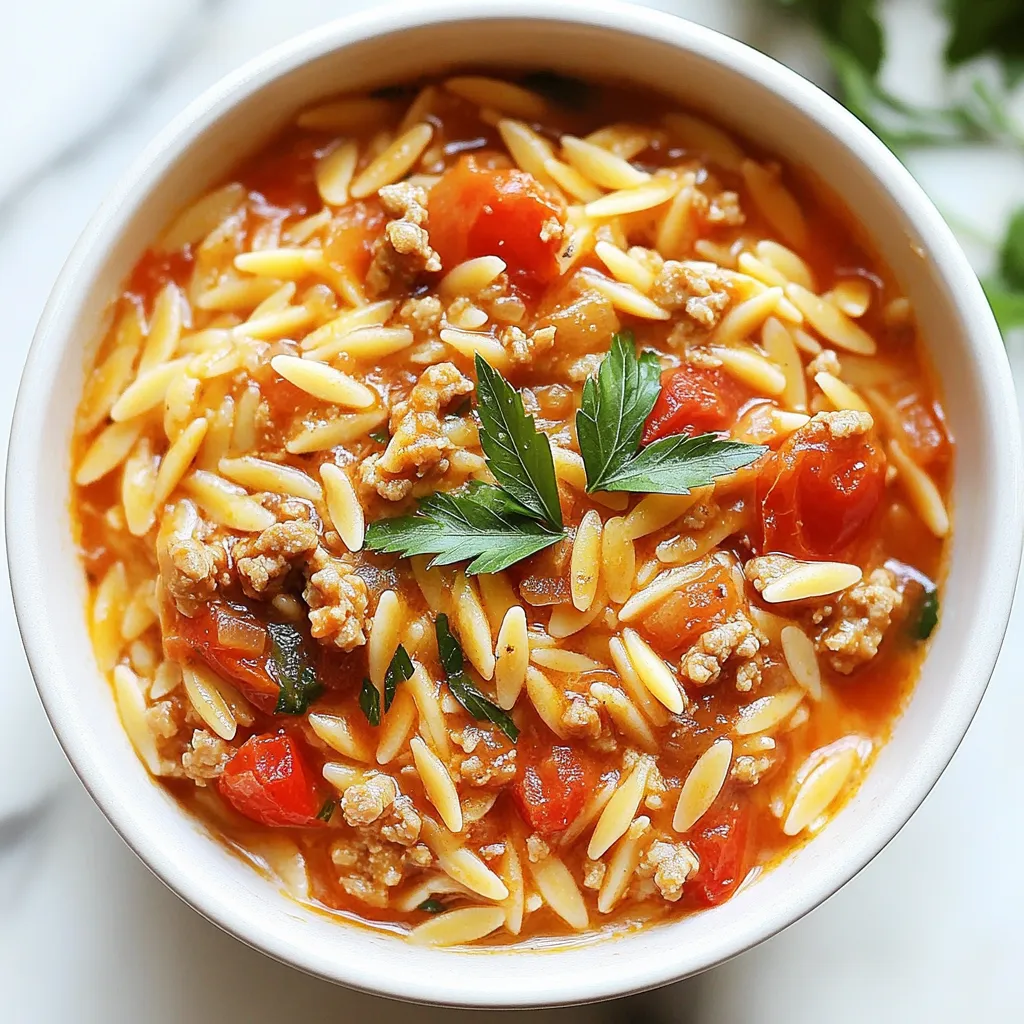
Craving a hearty meal that’s quick and easy? Look no further! This Ground Turkey Tomato Orzo is a savory, one-pot

For this recipe, I recommend using high-protein pasta. Here are some great options: - 8 oz chickpea pasta - 8 oz lentil pasta - 8 oz quinoa pasta These options boost protein while keeping the dish delicious and filling. High-protein pasta has more fiber and nutrients than regular pasta. It helps you feel satisfied longer. Choosing the right beef is key. I suggest using lean ground beef for a healthier meal. Look for ground beef with 90% lean or higher. This option has less fat and cooks up tender. You can also try ground turkey or chicken if you prefer a lighter taste. The sauce is what makes this dish special. Here’s what you’ll need: - 1 cup Greek yogurt - 1/2 cup low-fat cream cheese - 1 cup chopped spinach - 1 cup halved cherry tomatoes - 3 cloves minced garlic - 1 finely chopped onion - 1 teaspoon Italian seasoning - Salt and pepper to taste - 2 tablespoons olive oil These ingredients blend together to create a rich and creamy sauce. The Greek yogurt adds protein and tanginess while the cream cheese makes it smooth. The veggies add color and nutrients to the dish. {{ingredient_image_1}} Start by boiling water in a large pot. Add a pinch of salt to the water. Once it’s boiling, add 8 oz of high-protein pasta. I like chickpea or lentil pasta for extra protein. Cook the pasta according to the package instructions, usually about 8-10 minutes. Stir it occasionally to avoid sticking. Once done, drain the pasta and set it aside. In a large skillet, pour in 2 tablespoons of olive oil. Heat it over medium heat. Add 1 finely chopped onion and sauté for 3-4 minutes until it turns translucent. Next, add 3 minced garlic cloves and cook for another minute. This makes the kitchen smell amazing! Increase the heat to medium-high and add 1 lb of lean ground beef. Break it apart with a spoon while it cooks. Cook the beef for 6-8 minutes until it turns brown. Mix in 1 teaspoon of Italian seasoning, along with salt and pepper to taste. Stir well. Lower the heat and toss in 1 cup of chopped spinach and 1 cup of halved cherry tomatoes. Let them cook for 2-3 minutes until they soften. In a separate bowl, mix 1 cup of Greek yogurt with 1/2 cup of low-fat cream cheese. Stir until it’s smooth. Add this creamy mixture to the skillet and stir it well. This is where the magic happens! Now, fold in the cooked high-protein pasta. Make sure every piece of pasta is coated in that creamy sauce. Taste and adjust the seasoning if needed. Let the dish warm for a couple more minutes. Then, it’s ready to serve! To boost protein in your dish, consider adding beans or lentils. These ingredients blend well and add texture. You can also mix in some cooked chicken breast or turkey for extra protein. If you want to keep it simple, use more Greek yogurt. It is a great source of protein and makes the sauce creamy. For the best creamy texture, blend the Greek yogurt and cream cheese well. This helps avoid lumps in your sauce. You can add a splash of pasta water to thin the sauce if it gets too thick. Stir continuously while adding pasta to ensure every piece is coated in the creamy goodness. Serve your High-Protein Creamy Beef Pasta in deep bowls. Top it with grated Parmesan cheese for added flavor. A sprinkle of fresh spinach leaves makes it look nice. Pair it with a light salad or garlic bread for a complete meal. Don’t forget to enjoy it warm for the best taste! Pro Tips Use Fresh Ingredients: Whenever possible, opt for fresh spinach and ripe cherry tomatoes to enhance the flavor and nutrition of your dish. Adjust the Creaminess: Feel free to adjust the amount of Greek yogurt and cream cheese based on your desired level of creaminess in the sauce. Spice it Up: If you like a bit of heat, consider adding red pepper flakes or a dash of hot sauce to the beef while cooking for an extra kick. Meal Prep Friendly: This recipe is great for meal prep! Make a larger batch and store it in the fridge for quick lunches or dinners throughout the week. {{image_2}} You can easily swap the beef for plant-based options. Try using lentils or chickpeas for protein. You can also use mushrooms for a meaty texture. Tofu is another great choice. It soaks up flavors well and adds protein too. If you want a creamy sauce, use silken tofu mixed with Greek yogurt for richness. While high-protein pasta is great, you can choose other types as well. Whole wheat pasta adds more fiber and nutrients. Zucchini noodles are a fun and low-carb option. You can even try spiralized veggies for a fresh twist. Just remember to adjust cooking time based on the pasta type you pick. Want to boost the flavor? Add herbs like basil or parsley for freshness. A splash of lemon juice brightens up the dish. You can also mix in crushed red pepper for some heat. For a smoky taste, try adding smoked paprika. Don’t be afraid to play with spices to find your perfect blend! After you make the High-Protein Creamy Beef Pasta, cool it down. Store the leftovers in an airtight container. This helps keep the flavors fresh. You can keep it in the fridge for up to three days. When reheating, make sure it warms evenly. Stir it well to keep the creamy sauce smooth. If you want to save some for later, freezing is a great option. Let the pasta cool completely first. Then, place it in a freezer-safe container. You can also use freezer bags; just remove as much air as you can. This dish can freeze well for up to two months. Label your container with the date for easy tracking. To reheat your pasta, take it out of the fridge or freezer. If frozen, let it thaw overnight in the fridge. Heat it gently in a skillet over low heat. Add a splash of water or broth if it seems dry. Stir often to make sure it warms through. For best results, avoid using the microwave, as it can make the pasta mushy. Yes, you can use regular pasta. However, it will change the protein content. High-protein pasta, like chickpea or lentil, adds more nutrition. If you choose regular pasta, consider adding extra protein sources, like chicken or beans, to keep it balanced. To make this dish dairy-free, swap Greek yogurt and cream cheese with dairy-free alternatives. Use coconut yogurt or cashew cream for the creamy texture. These options provide richness without dairy. Always check labels to ensure there are no hidden dairy ingredients. Great sides include a fresh salad or steamed vegetables. A simple green salad with lemon vinaigrette adds brightness. Roasted broccoli or green beans can also complement the dish’s creamy texture. These sides boost the meal’s nutrition and make it more colorful. This post covered tasty high-protein creamy beef pasta. We explored the best ingredients, like lean beef and creamy sauces. You learned step-by-step cooking, from pasta to sauce. Tips showed how to boost protein and perfect texture. We shared veggie options and storage tips. Remember, cooking can be fun and healthy. Try new flavors and ingredients. Make this dish your own! Enjoy your meals and happy cooking!

High-Protein Creamy Beef Pasta Simple and Delicious

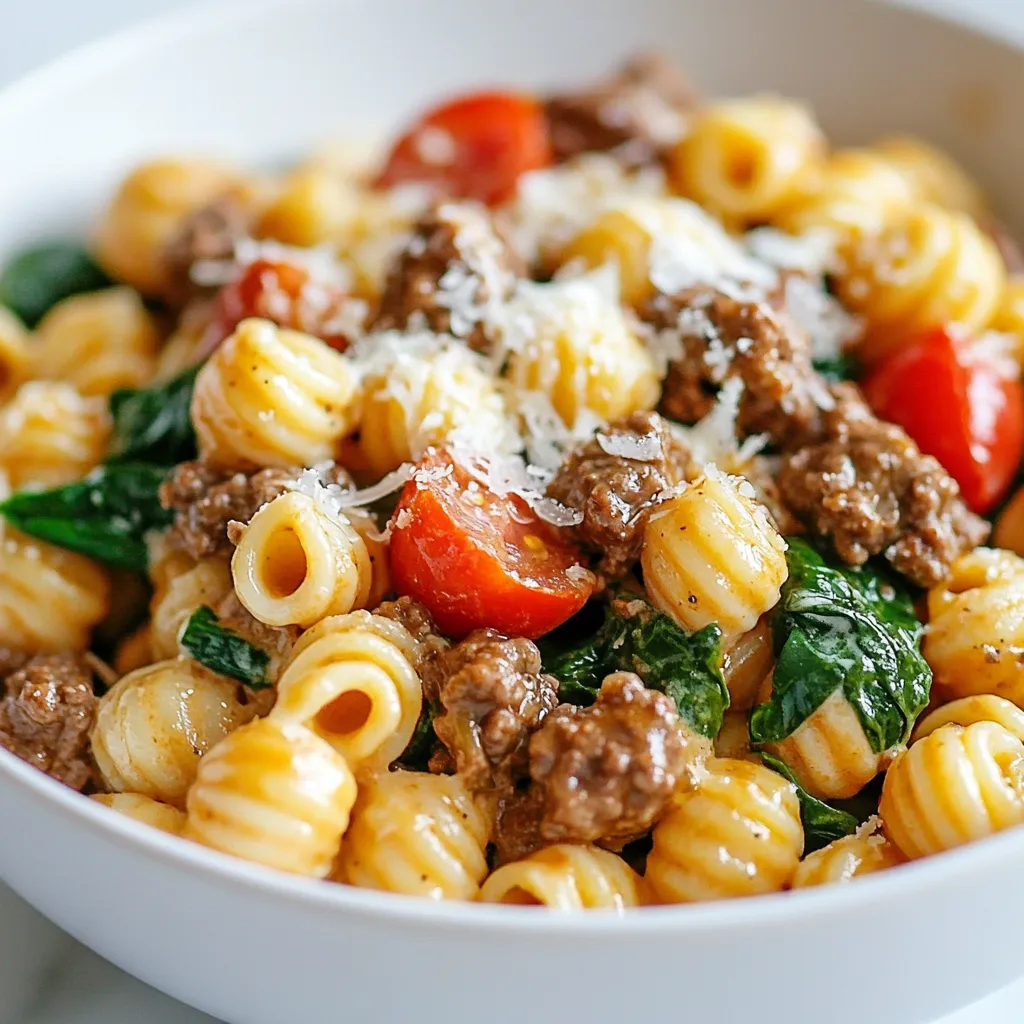
If you’re craving a hearty meal packed with protein, you’ve come to the right place! My High-Protein Creamy Beef Pasta

To make Creamy Cajun Chicken Soup, gather these ingredients: - 1 lb boneless, skinless chicken thighs, diced - 1 tablespoon Cajun seasoning - 2 tablespoons olive oil - 1 medium onion, chopped - 2 cloves garlic, minced - 1 red bell pepper, diced - 1 green bell pepper, diced - 2 medium carrots, diced - 4 cups chicken broth - 1 cup heavy cream - 1 cup corn (fresh or frozen) - 1 cup chopped kale - Salt and pepper to taste - Fresh parsley, chopped (for garnish) You can swap some ingredients if needed. Here are a few ideas: - Use chicken breast instead of thighs for a leaner option. - If you don’t have Cajun seasoning, mix paprika, garlic powder, and cayenne pepper. - Substitute olive oil with butter for a richer flavor. - You can replace kale with spinach for a different taste. - Use vegetable broth instead of chicken broth for a plant-based option. Fresh ingredients make a big difference in flavor. They enhance the taste and texture of your soup. Fresh vegetables add crunch and color. For example, fresh bell peppers brighten the dish. Fresh herbs, like parsley, boost the aroma and add a pop of flavor. When possible, use seasonal produce. It is often tastier and more nutritious. Fresh ingredients help you serve a comforting bowl of soup that everyone will love. {{ingredient_image_1}} First, gather your ingredients. You need 1 pound of boneless, skinless chicken thighs. Dice the chicken into bite-sized pieces. Heat 2 tablespoons of olive oil in a large pot over medium heat. Once the oil is hot, add the diced chicken. Sprinkle 1 tablespoon of Cajun seasoning over the chicken. Cook it until browned, which takes about 5 to 7 minutes. After that, remove the chicken and set it aside on a plate. Next, in the same pot, add a chopped medium onion and 2 minced garlic cloves. Sauté these for about 2 to 3 minutes. You want the onion to turn fragrant and soft. Now, add 1 diced red bell pepper, 1 diced green bell pepper, and 2 diced carrots. Cook these veggies for about 5 minutes. Stir them occasionally. They should become tender and colorful. Now it’s time to bring everything together. Pour in 4 cups of chicken broth and bring the mix to a boil. Once it boils, reduce the heat to low. Add 1 cup of heavy cream, 1 cup of corn, and 1 cup of chopped kale. Stir well to blend all the ingredients. Return the chicken to the pot and let it simmer for 15 to 20 minutes. This helps the flavors mix together. Finally, season with salt and pepper to taste. Your creamy Cajun chicken soup is almost ready! To make your soup burst with taste, use fresh ingredients. Fresh chicken thighs and bright bell peppers add great flavor. Cajun seasoning is key. I recommend using a mix with paprika, garlic, and cayenne. Adjust the amount based on your spice level. When you sauté the onions and garlic, let them get fragrant. This step builds a strong base for your soup. After adding the broth, let it boil. Then, reduce the heat and stir in the cream, corn, and kale. These ingredients balance the heat and add creaminess. One common mistake is overcooking the chicken. Cook it just until browned. Overcooked chicken can become dry and tough. Another mistake is not seasoning enough. Always taste your soup before serving. Add salt and pepper to enhance the flavors. Also, avoid adding the cream too early. If you add it too soon, it can curdle. Lastly, don’t skip the garnish. A sprinkle of parsley adds a fresh touch. Serve your creamy Cajun chicken soup in deep bowls. Garnish with chopped parsley for color and flavor. A sprinkle of extra Cajun seasoning on top can also add a nice kick. Pair it with crusty bread or cornbread for a filling meal. You can also offer a side salad for a light contrast. Enjoying this soup with loved ones makes it even better. Pro Tips Use Fresh Ingredients: Fresh vegetables and herbs enhance the flavor of the soup, making it more vibrant and delicious. Adjust Spice Level: If you prefer a milder soup, reduce the amount of Cajun seasoning or add it gradually to taste. Thicken the Soup: For a thicker consistency, blend a portion of the soup and stir it back in before serving. Make Ahead: This soup can be made in advance and stored in the fridge for up to 3 days, allowing the flavors to deepen. {{image_2}} If you want a meat-free version, swap the chicken for hearty veggies. Use diced mushrooms, zucchini, or eggplant. You can also add chickpeas or lentils for protein. Keep the Cajun seasoning for that bold flavor. Cream can be replaced with coconut milk for a nice twist. This gives a creamy texture and a hint of sweetness. To kick up the heat, try adding cayenne pepper or hot sauce. A little goes a long way, so start small. You can also mix in some smoked paprika for a deeper flavor. If you love spices, consider tossing in a pinch of crushed red pepper flakes. Adjust the heat to match your taste. If chicken isn’t your favorite, consider shrimp or sausage. Shrimp cooks fast and adds a nice seafood touch. Sausage brings a robust flavor that pairs well with Cajun spices. You can also use turkey or tofu for a healthier choice. Each protein option adds its unique twist to this comforting soup. Store your creamy Cajun chicken soup in an airtight container. Make sure it cools first. Place it in the fridge for up to three days. This keeps it fresh and safe to eat. To reheat, pour the soup into a pot. Heat it over medium heat on the stove. Stir it often to warm evenly. You can also use the microwave. Place the soup in a microwave-safe bowl. Heat in 30-second bursts, stirring in between. You can freeze this soup for later meals. Let it cool completely before freezing. Use a freezer-safe container or bag. It can last for about three months in the freezer. When ready to eat, thaw it overnight in the fridge. Reheat as described above. Cajun seasoning is a mix of spices from Louisiana. It often includes paprika, cayenne, garlic powder, and oregano. This blend adds bold flavor and a bit of heat to dishes. You can buy it or make your own at home. Just mix equal parts of paprika, cayenne, garlic powder, and a bit of black pepper. Yes, you can make this soup ahead of time. It tastes even better the next day! Just cook it and let it cool. Store it in an airtight container in the fridge. When you are ready to eat, reheat it on the stove over low heat. Stir often to make sure it heats evenly. To make this soup spicier, you can add more Cajun seasoning. Start with one extra teaspoon and taste. If you want more heat, add diced jalapeños or hot sauce. You can also use spicy sausage instead of chicken. This will give you a nice kick in every bite! You learned how to make a delicious Cajun soup. We covered the key ingredients and the importance of fresh ones. I shared step-by-step instructions to prepare your soup perfectly. I also included helpful tips, variations for different diets, and storage advice. In the end, cooking should be fun and tasty. With these tips, you can whip up a bowl of joy that suits any taste. Enjoy your cooking!

Creamy Cajun Chicken Soup Flavorful Comfort Dish

If you’re craving a warm, hearty dish that easily satisfies, this Creamy Cajun Chicken Soup is for you. Packed with

Older posts
Newer posts
← Previous Page1 … Page106 Page107 Page108 … Page115 Next →

dsad

© 2025 flavorsprint • Built with GeneratePress

Our Policies

  • Copyright Policy
  • Cookie Policy
  • GDPR Policy
  • Privacy Policy
  • Disclaimer
  • Terms Of Use

More Information

  • Home
  • About
  • Contact
  • Appetizers
  • Dessert
  • Dinner
  • Drinks
©2025, flavorsprint About Back To Top