Skip to content
DisclaimerTerms Of UseGDPR PolicyCookie Policy

flavorsprint

  • Home
  • Drinks
  • Appetizers
  • Dinner
  • Dessert
  • About
  • Contact
  • Privacy Policy
DisclaimerTerms Of UseGDPR PolicyCookie Policy

Lillian

To make One-Pot Lasagna Soup, you need: - 1 tablespoon olive oil - 1 medium onion, diced - 4 cloves garlic, minced - 1 pound ground beef (or ground turkey) - 1 can (28 oz) crushed tomatoes - 4 cups chicken or vegetable broth - 1 tablespoon Italian seasoning - 8 lasagna noodles, broken into pieces - 1 cup ricotta cheese - 1 cup shredded mozzarella cheese - 1/2 cup grated Parmesan cheese - Fresh basil leaves, for garnish - Salt and pepper to taste These ingredients create a rich and hearty soup. The mix of flavors brings comfort to any meal. You can add or change some ingredients based on your taste: - 1 teaspoon red pepper flakes for a spicy kick - Fresh herbs like oregano or thyme for extra flavor These optional ingredients can make your soup unique. Feel free to experiment! You can swap ingredients easily: - Use ground turkey for a leaner option. - Try vegetable broth for a vegetarian version. - Replace ricotta with cottage cheese if needed. These substitutions keep the dish tasty while meeting different diets. Adjust based on what you have! {{ingredient_image_1}} Start by heating the olive oil in a large pot over medium heat. Add the diced onion and cook for 3-4 minutes until it softens. Then, stir in the minced garlic and cook for one more minute. This step fills your kitchen with lovely scents. Next, add the ground beef or turkey to the pot. Cook it for 5-6 minutes, breaking it up with a spatula. Season with salt and pepper to enhance the flavor. Make sure the meat is fully browned before moving on. Now, stir in the crushed tomatoes and your choice of broth. Add the Italian seasoning and red pepper flakes if you want a kick. Bring this mixture to a boil. The colors and smells will make you excited for the next steps. Once it reaches a boil, lower the heat to a simmer. Add the broken lasagna noodles and cook for about 10-12 minutes. Stir occasionally, so the noodles don’t stick together. They should become tender and soak up all the delicious flavors. After the noodles are cooked, take the pot off the heat. Stir in the ricotta cheese until it's mixed well. This adds a creamy texture that makes the soup rich and hearty. Next, sprinkle the shredded mozzarella and grated Parmesan cheese on top of the soup. Gently stir to combine. Allow the heat to melt the cheese for a few minutes, creating a gooey layer of goodness. Finally, taste the soup and add more salt and pepper if needed. Garnish with fresh basil leaves right before serving. This adds a pop of color and flavor, making your dish even more inviting. Enjoy your warm, comforting bowl of One-Pot Lasagna Soup! To boost the flavor of your One-Pot Lasagna Soup, start with good quality ingredients. Fresh garlic and onion add a rich taste. Use ripe crushed tomatoes for a sweet base. Italian seasoning is key, but don’t shy away from tweaking it. If you like spice, add more red pepper flakes. Fresh basil at the end brightens every bite. Taste as you go; this helps you adjust the seasoning just right. For a great texture, break the lasagna noodles into smaller pieces. This helps them cook evenly. Avoid overcooking the noodles; they should be tender but not mushy. Stir in the ricotta cheese off the heat. This keeps it creamy without clumping. Let the mozzarella melt a little before serving. This gives a lovely stretch and creaminess to the soup. Cleaning up after cooking can be a hassle. To make it easier, soak the pot right after serving. This helps loosen any stuck bits. Use a non-stick pot if you can; it reduces sticking. For any stubborn stains, a mix of baking soda and water works wonders. Just let it sit for a while, then scrub gently. Keeping your kitchen tools clean ensures they last longer and work better. Pro Tips Use Fresh Herbs: Fresh basil adds a vibrant flavor to your lasagna soup. Add it just before serving to maintain its freshness. Mix Cheeses: For a more complex flavor, consider mixing in different types of cheese like provolone or fontina along with the mozzarella and Parmesan. Texture Variation: For added texture, toss in some chopped spinach or kale during the last few minutes of cooking for a nutritious boost. Make It Ahead: This soup can be made ahead of time. Just reheat and add a splash of broth to loosen it up before serving. {{image_2}} You can make a tasty vegetarian version. Swap out the ground beef for lentils or mushrooms. Use vegetable broth instead of chicken broth. This keeps it hearty and delicious. Add chopped spinach for extra greens. You can also toss in zucchini or bell peppers. These veggies add great flavor and color. If you like heat, try the spicy version. Add more red pepper flakes to the mix. You can also include diced jalapeños for a kick. Another great idea is to use spicy sausage instead of ground beef. This adds a nice depth of flavor. Finish with a sprinkle of crushed red pepper on top before serving. For a gluten-free meal, choose gluten-free lasagna noodles. These noodles cook up just as well in the soup. Make sure to check the broth labels to ensure they are gluten-free. You can also add quinoa for a fun twist. It’s packed with protein and will fill you up! After you enjoy your One-Pot Lasagna Soup, let it cool first. Use an airtight container to keep it fresh. Store it in the fridge for up to three days. Make sure to label the container with the date. This helps you keep track of how long it has been stored. When you're ready to enjoy the soup again, pour it into a pot. Heat it over medium heat. Stir it often to warm it evenly. You can also use a microwave. Place the soup in a microwave-safe bowl. Heat it in short bursts, stirring in between, until it's hot. If you want to save some for later, freezing is a great option. Pour the cooled soup into freezer-safe bags or containers. Leave some space at the top, as soup expands when it freezes. It can last for up to three months in the freezer. When you're ready to eat it, thaw it in the fridge overnight. Reheat it on the stove or in the microwave, and enjoy! Yes, you can use different meats. Ground turkey or chicken works well. You can also use sausage for added flavor. If you prefer a meat-free option, try using lentils or mushrooms instead. To make it dairy-free, skip the ricotta and cheeses. Use a dairy-free cream cheese for the creamy texture. You can also add nutritional yeast for a cheesy flavor without dairy. This soup pairs well with crusty bread or garlic bread. A simple salad adds freshness. You can also serve it with a sprinkle of fresh herbs for more flavor. This soup takes about 30 minutes from start to finish. Prep time is around 10 minutes, and cooking time is about 20 minutes. It’s a quick meal for busy nights. Yes, you can use fresh lasagna noodles. Just break them into pieces and add them to the pot. They may cook faster, so keep an eye on them to avoid mushiness. In this post, we explored the key ingredients for One-Pot Lasagna Soup, from essential to optional. We walked through step-by-step instructions for making it, focused on flavor, texture, and easy cleanup. You learned about tasty variations, along with how to store and reheat leftovers. This dish offers fun ways to change up your meal. With a few simple swaps, you can adapt it to fit your needs. I hope you give it a try and enjoy every bite.

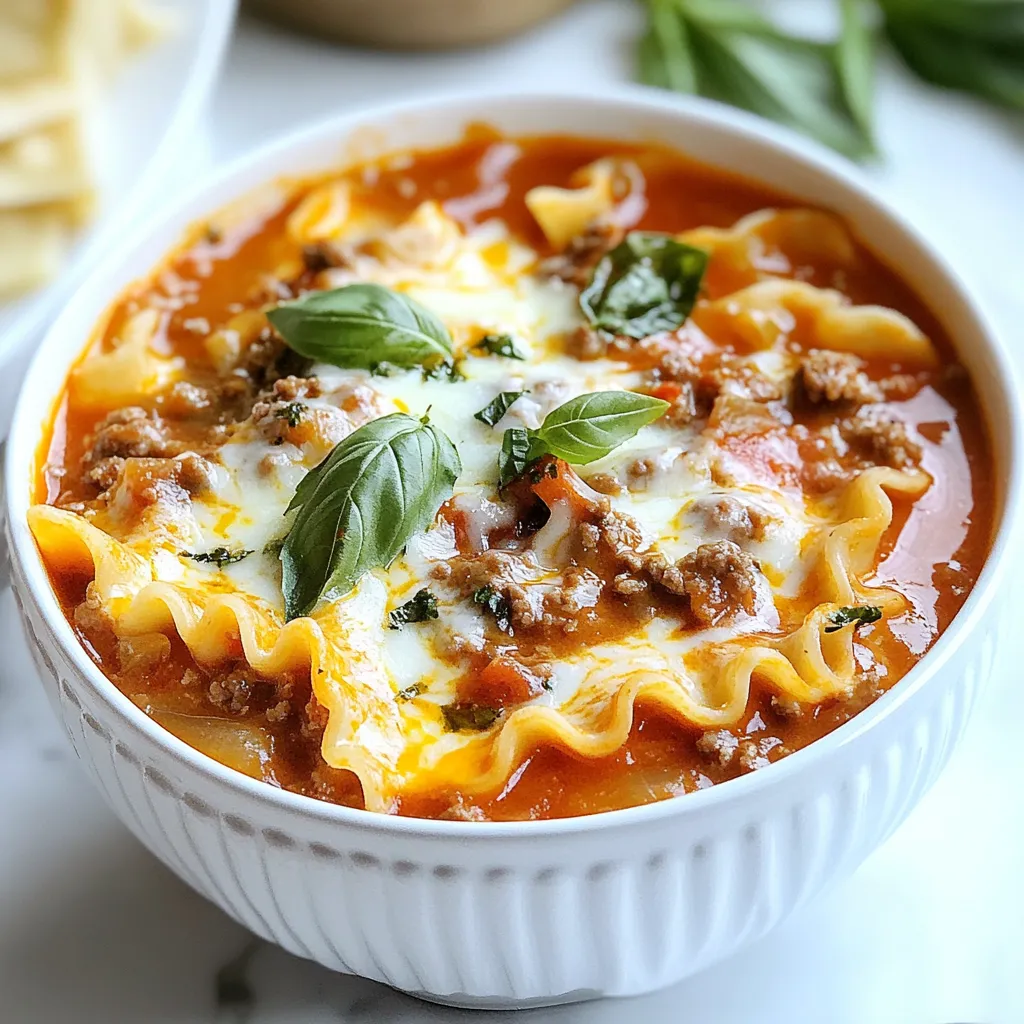
One-Pot Lasagna Soup Quick and Easy Comfort Meal

Craving comfort food that’s quick and easy? Look no further than my One-Pot Lasagna Soup! This dish combines all the

To make a tasty spicy shrimp ramen, gather these main ingredients: - 200g ramen noodles - 300g large shrimp, peeled and deveined - 4 cups chicken or vegetable broth - 2 tablespoons soy sauce - 2 tablespoons chili paste (adjust for desired spiciness) - 1 tablespoon sesame oil - 2 cloves garlic, minced - 1 inch ginger, grated - 2 green onions, sliced (white and green parts separated) - 1 cup bok choy, chopped - 1 carrot, julienned These ingredients create a flavorful base for your ramen. The shrimp adds protein, while the spices bring heat. The vegetables add crunch and color. To elevate your ramen, consider these tasty toppings: - 1 soft-boiled egg (optional, for topping) - Sesame seeds for garnish The soft-boiled egg adds creaminess. The sesame seeds give a nice crunch and look great on top. You can also add more green onions or chili flakes for extra flavor. For a rich broth, use either chicken or vegetable broth. Chicken broth gives a hearty taste. Vegetable broth offers a lighter option. If you want more depth, try adding miso or dashi to the mix. You can also adjust the soy sauce and chili paste to match your taste. {{ingredient_image_1}} To make the broth, start with a large pot. Heat 1 tablespoon of sesame oil over medium heat. Add 2 cloves of minced garlic and 1 inch of grated ginger. Sauté for about 1 minute until fragrant. Next, pour in 4 cups of chicken or vegetable broth. Stir in 2 tablespoons of soy sauce and 2 tablespoons of chili paste. Bring this mixture to a gentle boil. This base sets the tone for your spicy ramen. Once your broth simmers, it is time to add the veggies. Stir in 1 cup of chopped bok choy and 1 julienned carrot. Cook for about 3-4 minutes until tender. Then, add 300 grams of large shrimp, peeled and deveined. Simmer for another 3-5 minutes. Watch for the shrimp to turn pink and opaque. This step keeps the shrimp juicy and flavorful. While the broth simmers, prepare the ramen noodles. In a separate pot, bring water to a boil. Cook 200 grams of ramen noodles according to the package instructions, usually about 3-4 minutes. Once cooked, drain the noodles and set them aside. This ensures the noodles stay firm and do not get mushy in the broth. Now, you are ready to assemble your spicy shrimp ramen! To get the best flavor, use fresh ingredients. Fresh garlic and ginger add depth. I love using homemade broth, but store-bought works too. Heat sesame oil first to bring out its nutty taste. Sauté garlic and ginger until they smell good. This step builds a strong flavor base. Add soy sauce and chili paste next. This combo gives a rich umami taste. Let the broth simmer for a few minutes. Taste it and adjust as needed. To adjust spice levels, start with a small amount of chili paste. You can always add more later. If you want it milder, use less paste or skip it. For extra heat, add more chili paste or a dash of hot sauce. Remember, everyone's spice tolerance is different. Test the broth before serving. You can always serve extra chili paste on the side for those who love heat. Timing is key for soft-boiled eggs. Boil water in a separate pot. Once boiling, add the eggs gently. Cook them for exactly six to seven minutes. Six minutes gives a runnier yolk; seven makes it firmer. After cooking, place the eggs in cold water. This stops the cooking process. Peel them carefully, and slice in half before topping the ramen. A soft-boiled egg adds creaminess to your dish. Pro Tips Adjust the Spice Level: Start with less chili paste and taste the broth before adding more to achieve your preferred heat level. Perfectly Cooked Shrimp: Cook the shrimp until they are just pink and opaque; overcooking will make them tough. Use Fresh Ingredients: Fresh garlic, ginger, and vegetables enhance the flavor of the broth, making your ramen more vibrant and delicious. Soft-Boiled Egg Technique: For the perfect soft-boiled egg, cook it for about 6-7 minutes, then plunge it into ice water to stop the cooking process. {{image_2}} You can easily make spicy shrimp ramen vegetarian or vegan. Swap the shrimp for tofu. Use vegetable broth instead of chicken broth. Replace the soft-boiled egg with avocado slices or more veggies. You can add mushrooms, bell peppers, or snap peas for extra flavor and texture. If you are not in the mood for shrimp, use chicken or beef. Thinly slice the meat and add it to the broth as it simmers. You can also use tempeh or seitan for a plant-based protein. These options still keep your dish tasty and filling. Make your ramen even better by adding miso paste. Stir a spoonful into the broth for a rich taste. A squeeze of lime juice brightens the dish. Fresh herbs like cilantro or basil can add an extra layer of flavor. Try adding chili flakes or sesame oil for a kick! Store any leftover Spicy Shrimp Ramen in an airtight container. Make sure to let it cool first. Place it in the fridge for up to three days. If you have extra broth, keep it separate for best results. This helps the noodles stay firm and not soggy. To reheat your ramen, use a pot on the stove. Add a splash of water or broth to keep it moist. Heat over medium until warm. If you use a microwave, cover the bowl with a lid. Heat in short bursts, stirring in between. This ensures even warming without overcooking the shrimp. Freezing is a great option if you want to save some for later. Use freezer-safe containers to store portions. Leave some space at the top for expansion. You can freeze for up to a month. When ready to eat, thaw it in the fridge overnight. Reheat using the tips above, adding fresh vegetables if you like. Yes, you can use other noodles. Udon or rice noodles work well. Choose what you like best. Just remember to adjust cooking times based on the noodle type. If you don't want shrimp, try chicken or tofu. Both options absorb flavors nicely. You can also use firm vegetables for a plant-based dish. To make this dish gluten-free, use gluten-free ramen. Swap soy sauce for tamari. Check all labels to be sure. Many Asian restaurants serve Spicy Shrimp Ramen. Look for ramen shops or sushi places. Check online reviews for the best options in your area. Spicy shrimp ramen combines fresh ingredients and bold flavors. We explored the main ingredients, like shrimp and broth options. I shared easy steps to cook the broth, shrimp, and noodles perfectly. Flavor tips will help you adjust spice levels and cooking times. You can also try variations, from vegetarian choices to different proteins. Don’t forget to store leftovers right and reheat them well. With this guide, you can make a tasty bowl of ramen at home. Enjoy your cooking adventure!

Spicy Shrimp Ramen Savory and Fast Weeknight Meal

Craving a quick and tasty dinner? Look no further than Spicy Shrimp Ramen! This dish packs a punch with vibrant

To make Healing Chicken Soup, gather these main ingredients: - 1 lb chicken breast or thighs, boneless and skinless - 8 cups low-sodium chicken broth - 2 carrots, diced - 2 celery stalks, diced - 1 onion, finely chopped - 3 cloves garlic, minced - 1 teaspoon fresh ginger, grated - 1 cup frozen peas - 1 cup sweet corn These ingredients form the base of the soup. The chicken gives protein and texture, while the broth adds warmth. Carrots, celery, and onion provide a classic mirepoix, which adds depth. Garlic and ginger boost flavor and health benefits. To elevate your soup, include these spices and herbs: - 1 teaspoon turmeric powder - 1 teaspoon thyme (fresh or dried) - Salt and pepper to taste Turmeric adds a bright color and anti-inflammatory properties. Thyme offers a fragrant note that pairs well with chicken. Adjust salt and pepper to taste, enhancing the soup's appeal. For a finishing touch, consider these optional garnishes: - Fresh parsley or cilantro Adding fresh herbs gives a pop of color and flavor. They brighten the dish and enhance its presentation, making it even more inviting. {{ingredient_image_1}} Start by washing and chopping your veggies. You will need 2 diced carrots, 2 diced celery stalks, and 1 finely chopped onion. These will add flavor and texture to your soup. Heat 2 tablespoons of olive oil in a large pot over medium heat. Add the chopped onion, carrots, and celery. Sauté these for 5 to 7 minutes. You want them to soften and get a bit sweet. Next, add 3 minced garlic cloves and 1 teaspoon of grated fresh ginger. Cook for 1 more minute. The smell will be amazing! Now, it’s time for the main event: the chicken! Add 1 pound of boneless, skinless chicken breast or thighs to the pot. Then pour in 8 cups of low-sodium chicken broth. This broth is key for depth of flavor. Add 1 teaspoon of turmeric powder and 1 teaspoon of thyme, along with salt and pepper to your taste. Bring everything to a boil. Once boiling, lower the heat. Cover the pot and let it simmer for about 20 minutes. This will cook the chicken fully. After 20 minutes, remove the chicken from the pot. Use two forks to shred it. Return the shredded chicken back to the pot. Now, let’s add some color and sweetness. Toss in 1 cup of frozen peas and 1 cup of sweet corn. Stir well and let it simmer for another 5 to 10 minutes. This will heat everything through. For a bright finish, stir in 1 tablespoon of lemon juice. Taste your soup and adjust the seasoning if needed. Serve hot, and if you like, garnish with fresh parsley or cilantro. Enjoy your nourishing bowl of healing chicken soup! To make a great soup, start with sautéing. Heat olive oil in a large pot. Add diced onion, carrots, and celery. Cook them for 5-7 minutes until soft. This step builds flavor. Next, stir in minced garlic and grated ginger. Cook for one more minute. This adds a nice aroma. Taste as you go. After adding broth and spices, check the flavor. If it needs more depth, add more salt or pepper. You can also add a splash of lemon juice. This brightens the soup and makes it fresh. If you want a thicker texture, mash some of the cooked vegetables. Use a sharp knife for chopping. It helps with speed and safety. A large pot is key for cooking. A ladle makes serving easy. Use measuring spoons for spices to keep flavors balanced. A cutting board helps keep your space neat. These tools make the process smooth and enjoyable. Pro Tips Use Bone-in Chicken: For deeper flavor, consider using bone-in chicken. It will enrich the broth and add more nutrients. Customize Your Veggies: Feel free to add other vegetables like spinach, kale, or bell peppers for extra nutrients and flavor. Make it Ahead: This soup stores well. Make a big batch and freeze portions for quick meals later. Adjust the Seasoning: Taste before serving! Adjust salt, pepper, or lemon juice to suit your preference for a balanced flavor. {{image_2}} You can make this soup healthier by choosing low-sodium broth. This option will help you manage your salt intake. If you need a gluten-free version, use gluten-free broth and make sure your seasoning is gluten-free too. This way, everyone can enjoy its healing benefits. If you have dietary needs, you can swap ingredients. For a dairy-free version, skip any dairy-based garnishes. You can also replace chicken with tofu or chickpeas for a plant-based soup. Use zucchini or spinach if you want more veggies. These swaps keep the soup tasty and nutritious. Adding extra nutrients is easy! Toss in some leafy greens like kale or spinach near the end of cooking. They will soften quickly and add vitamins. You can also add beans for protein and fiber. Try adding flaxseeds or chia seeds for a boost of omega-3s. These small changes make your soup even more nourishing. To store your healing chicken soup, let it cool first. Then, place it in an airtight container. You can keep it in the fridge for up to three days. If you want to store it longer, freezing is a great option. When you're ready to enjoy your soup again, reheating is simple. Pour the soup into a pot. Heat it on the stove over medium heat. Stir it often until it's hot. You can also use a microwave. Heat it in a microwave-safe bowl, stirring every minute, until warm. If you choose to freeze the soup, use freezer-safe containers. Leave some space at the top for expansion. Label your containers with the date. The soup can last in the freezer for up to three months. To thaw, move it to the fridge overnight before reheating. Healing Chicken Soup is good for you. It has many healthy ingredients. Chicken provides protein, which helps your body heal. The broth keeps you hydrated and warms you up. Carrots and celery add vitamins and minerals. Garlic and ginger boost your immune system. Turmeric has anti-inflammatory properties. This soup is great when you feel sick or need comfort. It can help soothe a sore throat and ease congestion. Yes, you can make Healing Chicken Soup in a slow cooker. Just follow these steps: 1. Sauté the onion, carrots, and celery in a pan. 2. Add them to the slow cooker. 3. Place the chicken, broth, and spices in the cooker. 4. Set it on low for 6-8 hours or high for 3-4 hours. 5. Shred the chicken and add peas and corn before serving. This method makes it easy and hands-free. You can come home to a warm, ready meal. You can store homemade chicken soup in the fridge for about 3-4 days. Make sure to keep it in an airtight container. If you want to keep it longer, freeze it. In the freezer, it can last up to 3 months. Just remember to let it cool before you freeze it. When you are ready to eat, thaw it in the fridge overnight, then heat it on the stove or microwave. In this post, we explored how to make healing chicken soup. We covered key ingredients, cooking steps, and handy tips. You learned about flavor boosts with spices and herbs. We also shared variations for different diets and easy storage methods. Enjoy making this soup for health and comfort. With each bowl, you bring warmth and care. Trust the process, and have fun in the kitchen. Your healing chicken soup is now ready to nourish you and your loved ones.

Healing Chicken Soup Nourishing Comfort Food Recipe

Welcome to your new favorite recipe: Healing Chicken Soup! This dish is more than just comfort food; it’s packed with

To make cheesy beef potato soup, you need: - 1 lb ground beef - 1 medium onion, diced - 2 cloves garlic, minced - 4 medium potatoes, peeled and cubed - 4 cups beef broth - 1 cup shredded cheddar cheese - 1 cup heavy cream - 1 teaspoon paprika - 1 teaspoon dried thyme - Salt and pepper to taste - 2 tablespoons olive oil These ingredients create a rich and hearty soup. The ground beef adds protein. Potatoes give it body. Cheese and cream make it creamy and comforting. For extra flavor and a pop of color, consider these garnishes: - Chopped green onions - Fresh parsley These additions brighten the soup. They also add a fresh taste that balances the richness. If you lack any main ingredients, here are some swaps: - Use turkey instead of ground beef for a lighter choice. - Swap heavy cream with half-and-half or milk for a lower-fat option. - If you don’t have paprika, use chili powder for a kick. These substitutions will still yield a tasty soup. Experiment with what you have on hand. {{ingredient_image_1}} First, gather all your ingredients. You will need: - 1 lb ground beef - 1 medium onion, diced - 2 cloves garlic, minced - 4 medium potatoes, peeled and cubed - 4 cups beef broth - 1 cup shredded cheddar cheese - 1 cup heavy cream - 1 teaspoon paprika - 1 teaspoon dried thyme - Salt and pepper to taste - 2 tablespoons olive oil - Optional: Chopped green onions or parsley for garnish Next, prepare your workspace. Ensure you have a large pot ready to go. This pot will hold all the tasty goodness. Heat the olive oil in your pot over medium heat. Add the diced onion and minced garlic. Sauté them until they turn translucent, about 3-4 minutes. This step adds nice flavor to the base. Now, add the ground beef to the pot. Cook it until browned, breaking it apart with a spatula. This should take around 5-7 minutes. If there’s any excess fat, drain it off. Once the beef is browned, stir in the cubed potatoes along with the beef broth, paprika, and thyme. Raise the heat until it boils. When it boils, lower the heat and let it simmer. Cook for about 15-20 minutes or until the potatoes feel tender when poked with a fork. After the potatoes are tender, it’s time to add the creamy elements. Stir in the heavy cream and shredded cheddar cheese. Keep stirring until the cheese melts and the soup looks creamy. Taste your soup and add salt and pepper as needed. If it seems too thick, add a bit more beef broth or water until you reach your desired consistency. Serve your soup hot. If you like, garnish it with chopped green onions or parsley for a fresh touch. Enjoy your comforting bowl of cheesy beef potato soup! To cook ground beef well, start with a hot pan. I use a large pot and heat olive oil over medium heat. Add diced onion and minced garlic first. Sauté until soft, about 3-4 minutes. This adds great flavor. Then, add the ground beef. Break it apart with a spatula as it cooks. This helps it brown evenly. Cook until no pink is left, about 5-7 minutes. If there’s excess fat, drain it before adding potatoes and broth. To make your soup creamy, use heavy cream and cheese. Once your potatoes are tender, stir in the heavy cream slowly. Then, add shredded cheddar cheese. Mix well until the cheese melts. If it’s too thick, add extra beef broth or water. This helps you get the right texture. You want it smooth and rich, not too runny. Store any leftover soup in an airtight container. It lasts in the fridge for about 3-4 days. To reheat, pour it into a pot over medium heat. Stir often until hot. If it thickens too much, add a splash of broth. You can also microwave it in a bowl. Cover it loosely and heat in short bursts. This way, it warms evenly without splattering. Pro Tips Use Fresh Ingredients: Fresh potatoes and herbs will enhance the flavor of your soup, making it more delicious. Mix Cheeses: For a more complex flavor, consider mixing different types of cheese, such as gouda or mozzarella, with cheddar. Adjust Thickness: If your soup turns out too thick, gradually add more beef broth or water until you reach your desired consistency. Garnish for Presentation: Adding chopped green onions or parsley not only enhances the look of your soup but also adds a fresh flavor. {{image_2}} To make a vegetarian version, leave out the beef. Use vegetable broth instead of beef broth. Add more veggies like carrots and celery for extra flavor. You can also add beans for protein. Use the same cheese and cream for that rich taste. This soup will still be creamy and satisfying. If you love heat, add some spice! Mix in diced jalapeños or red pepper flakes when cooking the beef. You can also use pepper jack cheese instead of cheddar. This adds a nice kick to the soup. Adjust the spice to your taste, and enjoy the fiery flavor. For a dairy-free version, swap heavy cream with coconut milk or a nut milk. Use a dairy-free cheese that melts well. Make sure to check the labels for hidden dairy. This version will still be creamy and delicious, just without dairy. Enjoy a warm bowl that fits your diet! To make your meal even better, I suggest serving warm breadsticks or a fresh green salad. A simple garden salad with crisp lettuce and juicy tomatoes pairs well. You could also try roasted vegetables for a healthy side. These options complement the creamy soup and add freshness. Bread is a great companion for cheesy beef potato soup. I love using crusty sourdough or fluffy dinner rolls. You can dip the bread into the soup for extra flavor. If you want something more fun, try garlic bread. The garlic and cheese mix perfectly with the soup. Toppings can transform your soup into something special. Chopped green onions add a nice crunch and fresh taste. You could also sprinkle crispy bacon bits for a savory touch. For a spicy kick, add jalapeños or hot sauce. Lastly, a dollop of sour cream can make it extra creamy! You can use whole milk or half-and-half. These options will make the soup lighter. If you want a thicker texture, add some cream cheese. Blend it in until smooth. Coconut milk is another choice for a dairy-free version. It adds a nice flavor too. You can keep the soup in the fridge for about three days. Make sure to store it in an airtight container. Before serving, reheat it gently on the stove. Stir well to mix the flavors back together. If it looks too thick, add some broth or water. Yes, you can freeze Cheesy Beef Potato Soup! Let it cool completely first. Then, pour it into a freezer-safe container. It will last for up to three months in the freezer. When ready to eat, thaw it overnight in the fridge. Reheat it on the stove and enjoy! This blog post covered all you need to make Cheesy Beef Potato Soup. We looked at key ingredients, cooking steps, and tips for great results. You can also try tasty variations and serve it with sides to enhance flavor. With easy substitutions, anyone can enjoy this dish. Remember, cooking should be fun and satisfying. I hope you feel inspired to try making this soup your own!

Cheesy Beef Potato Soup Comforting and Filling Bowl

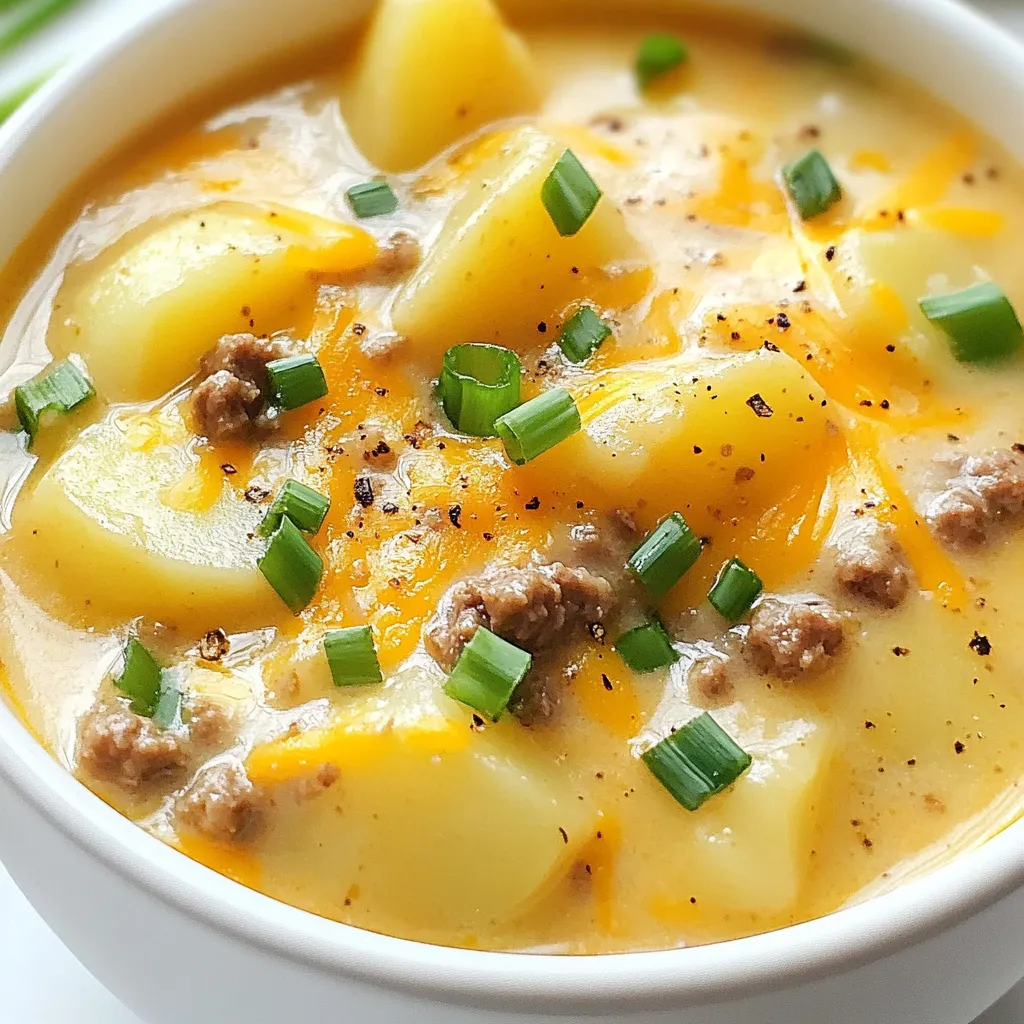
Are you ready to warm up with a comforting bowl of Cheesy Beef Potato Soup? This rich soup is not

To make these tasty burgers, you need: - 1 lb ground turkey - 1/2 cup black beans, drained and rinsed - 1/4 cup corn kernels (fresh or frozen) - 1/4 cup diced red bell pepper - 1 small jalapeño, seeded and finely chopped - 1 teaspoon cumin - 1 teaspoon chili powder - 1/2 teaspoon smoked paprika - 1/2 teaspoon garlic powder - 1/4 teaspoon cayenne pepper (adjust to taste) - Salt and pepper to taste These main ingredients come together to create a flavorful base. The ground turkey provides protein, while the black beans and corn add texture and taste. Sometimes, the mixture may be a bit loose. If that happens, add: - 1/4 cup breadcrumbs The breadcrumbs help hold everything together. They ensure the patties stay firm while cooking. To make your burger extra special, consider these toppings: - Avocado slices - Lettuce - Salsa - Whole wheat burger buns These toppings add freshness and flavor. They also make your burger look amazing on the plate. Enjoy experimenting with different combinations! {{ingredient_image_1}} In a large bowl, combine the ground turkey, black beans, and corn. Add the diced red bell pepper and jalapeño for a spicy kick. Sprinkle in the cumin, chili powder, smoked paprika, garlic powder, cayenne pepper, salt, and pepper. Mix it all well. If the mixture feels loose, add some breadcrumbs. This helps hold the burgers together. Next, divide your mixture into four equal parts. Roll each part into a ball, then flatten it into a patty. Make sure the patties are compact. This step is key to keeping them from falling apart on the grill. Now it's time to grill! Preheat your grill or grill pan to medium-high heat. Lightly brush the grill with olive oil to stop sticking. Place your patties on the grill and cook them for about 5-6 minutes on each side. They should reach an internal temperature of 165°F (74°C) and have nice grill marks. In the last few minutes, toast your whole wheat buns on the grill. Once everything is cooked, assemble your burgers with avocado, lettuce, and salsa. Enjoy your delicious meal! To keep your turkey burgers juicy, use a mix of ingredients. Adding black beans and corn helps. They create moisture and flavor. If your mixture feels loose, add breadcrumbs. This keeps everything together and adds texture. Make sure you do not overmix. This can make the burgers tough. Preheat your grill well before cooking. This helps the burgers get nice grill marks. Brush the grill with olive oil to prevent sticking. Cook the burgers for 5-6 minutes on each side. Use a meat thermometer to check for 165°F. This ensures your burgers are safe to eat. Avoid pressing down on the burgers. This releases juices and dries them out. For a great meal, serve your burgers with fresh sides. Here are some ideas: - Sweet potato fries - Grilled vegetables - Corn on the cob - A light salad with lime dressing These options balance the spice and add freshness to your plate. Pro Tips Let the Mixture Chill: Allow the turkey mixture to rest in the refrigerator for about 30 minutes before forming patties. This helps the flavors meld and makes the patties easier to handle. Experiment with Spices: Feel free to adjust the spices according to your heat preference. Adding more cayenne or even some chipotle powder can enhance the spiciness! Don’t Overcook: To maintain the juiciness of your turkey burgers, be careful not to overcook them. Use a meat thermometer to ensure they reach an internal temperature of 165°F (74°C). Perfect Toppings: Try adding different toppings like pepper jack cheese, pickled onions, or a dollop of Greek yogurt for a creamy contrast to the spicy flavors. {{image_2}} You can change the taste of your spicy Southwest turkey burgers by adding different spices. Try adding smoked paprika for a deeper flavor. A dash of oregano can bring a nice touch too. If you want more heat, increase the cayenne pepper. You can also play with flavors by using taco seasoning instead of individual spices. This can make your burger taste even more exciting! If you want a meatless option, make black bean patties. Use the same ingredients, but swap the ground turkey for mashed black beans. You can add corn and diced peppers for extra taste. Season with cumin and chili powder just like in the original recipe. Shape this mixture into patties and grill them. They will be tasty and filling! Toppings can change everything about your burger. Instead of avocado, try slices of fresh tomato or pickled red onions. You can also add cheese, like pepper jack for a spicy kick. If you love crunch, consider adding coleslaw. It adds texture and flavor. Don’t forget your favorite sauces! Chipotle mayo or creamy ranch can make your burger extra special. After you enjoy your spicy turkey burgers, store leftovers in an airtight container. Place them in the fridge. They stay fresh for up to three days. Ensure the burgers cool down before sealing. This helps keep them moist. To freeze your turkey burgers, wrap each one in plastic wrap. Then, place them in a freezer bag or container. They can stay frozen for up to three months. To enjoy later, just take them out and let them thaw in the fridge overnight. When you’re ready to eat the leftovers, heat them up right. You can use a skillet or an oven. If using the oven, preheat it to 350°F (175°C). Heat the burgers for about 10 minutes or until hot. This method keeps them juicy. If using a skillet, warm them over medium heat for about 5 minutes on each side. Enjoy your tasty meal again! Yes, you can use ground chicken. It works well with this recipe. Both meats have a similar texture. The taste may be slightly different, but it will still be delicious. Just ensure you cook it fully. If you don't have jalapeños, try using green bell peppers. They add crunch without the heat. You can also use a pinch of red pepper flakes for spice. Adjust to your taste for a milder flavor. To make these burgers gluten-free, skip the breadcrumbs. You can also use gluten-free breadcrumbs if you prefer. Just check the label for safe ingredients. Always make sure the buns are gluten-free too. The ideal internal cooking temperature for turkey burgers is 165°F (74°C). Use a meat thermometer to check. This ensures the burgers are safe to eat and juicy. Cooking them at this temperature keeps them tender and flavorful. In this post, we explored how to make spicy Southwest turkey burgers. We covered ingredients, steps to prepare, and tips to keep them moist. Variations like black bean patties and alternative toppings offer great options. Remember to store leftovers properly and follow reheating tips to enjoy them later. With these ideas, you’ll create tasty burgers that everyone loves. Get ready to impress at your next meal!

Spicy Southwest Turkey Burgers Flavorful and Easy Recipe

Looking for a quick dinner that’s full of flavor? My Spicy Southwest Turkey Burgers are just what you need! This

- 1/2 cup unsalted butter, melted - 1 cup brown sugar - 1/4 cup granulated sugar - 2 large eggs - 1 teaspoon vanilla extract - 1/3 cup unsweetened cocoa powder - 1 cup all-purpose flour - 1/4 teaspoon salt - 1/4 teaspoon baking powder - 1/2 cup unsalted butter, softened - 1/2 cup brown sugar - 1/2 cup granulated sugar - 1 large egg - 1 teaspoon vanilla extract - 1 1/4 cups all-purpose flour - 1/2 teaspoon baking soda - 1/4 teaspoon salt - 1 cup chocolate chips (semi-sweet or dark) When I gather my ingredients for fudgy chewy brookies, I focus on quality. I use unsalted butter for a rich flavor, and I always choose brown sugar for that lovely caramel taste. The two types of sugar make the texture just right. Using eggs that are at room temperature helps the batter mix better. For the brownie layer, cocoa powder is key. It brings a deep chocolate flavor. I sift it with flour, salt, and baking powder. This step makes the brownies rise nicely without clumps. Moving on to the cookie layer, I opt for softened butter. It blends well with the sugars. When you cream them together, you create a light and fluffy base. The chocolate chips are a must. They add gooeyness and extra sweetness. Having all these ingredients ready makes the process fun and smooth. You'll enjoy making these brookies as much as you love eating them! {{ingredient_image_1}} 1. In a big bowl, mix melted butter with brown and granulated sugar. Stir until smooth. 2. Add in the eggs and vanilla extract. Mix until everything is well combined. 3. Sift in cocoa powder, flour, salt, and baking powder. Stir until no flour clumps remain. 1. In another bowl, cream the softened butter with brown and granulated sugar. Mix until fluffy. 2. Beat in the egg and vanilla extract. Ensure everything is well mixed. 3. In a separate bowl, combine flour, baking soda, and salt. Gradually add to the butter mix. Fold in chocolate chips last. 1. Pour the brownie batter into the bottom of a greased baking pan. Spread it evenly. 2. Take spoonfuls of cookie dough and dollop it over the brownie layer. 3. Use a spatula or knife to gently swirl the brownie and cookie layers together. 1. Preheat your oven to 350°F (175°C). Prepare a 9x13-inch pan. 2. Bake for 25-30 minutes. Use a toothpick to check for doneness. 3. Look for a few moist crumbs on the toothpick, not wet batter. 1. Let the brookies cool in the pan for about 10 minutes. 2. Carefully transfer them to a wire rack. Let them cool completely. 3. Cut the cooled brookies into squares. Enjoy them warm or at room temperature. To get that perfect chewy texture, use room temperature ingredients. When butter and eggs are at room temperature, they mix better. This helps create a smooth batter. Avoid overmixing your batters. Mix just until combined. If you mix too much, your brookies may turn out tough. You can add nuts for a crunchy twist. Try walnuts or pecans for extra flavor. Different chocolate types also work well. Use dark chocolate chips or even white chocolate for a new flair. Experiment with extracts or spices. A hint of almond extract can enhance the flavor. A pinch of cinnamon adds warmth and depth. Serve the brookies warm. Add a scoop of ice cream or whipped cream on top. This makes for a delicious combo. Drizzle with chocolate sauce for added indulgence. A beautiful drizzle elevates the look and taste. These simple touches make your dessert extra special. Pro Tips Tip Title 1: For extra fudginess, consider adding a tablespoon of coffee or espresso powder to the brownie layer; it enhances the chocolate flavor. Tip Title 2: Chill the cookie dough for about 30 minutes before dolloping it onto the brownie layer for a thicker, chewier texture. Tip Title 3: Use a toothpick to create a marbled effect when swirling the brownie and cookie layers together; this adds a beautiful visual element. Tip Title 4: Store leftover brookies in an airtight container at room temperature for up to 3 days, or freeze for longer-lasting enjoyment. {{image_2}} To make gluten-free brookies, substitute all-purpose flour with a gluten-free flour blend. Look for blends that contain xanthan gum. This helps mimic the texture of regular flour. Use a one-to-one ratio. Measure carefully to avoid too much flour. The result will still be fudgy and chewy. For a vegan brookie, replace eggs with flax eggs. Mix one tablespoon of ground flaxseed with three tablespoons of water. Let it sit for 5 minutes to thicken. For butter, use a dairy-free alternative. Choose a plant-based butter or coconut oil. It keeps the rich taste without any animal products. You can switch up the chocolate chips to change the flavor. Use white chocolate chips or milk chocolate chips for a sweeter treat. For a fun twist, add mint extract or orange zest. These flavors brighten the brookies and make them unique. Experiment with your favorites to find new combinations! Store your brookies in an airtight container at room temperature. This keeps them soft and chewy. If you want them to last longer, refrigerate them. Just remember to wrap them well to avoid drying out. You can freeze brookies before or after baking. If freezing before baking, scoop the dough into balls and place them on a tray. Once frozen, transfer them to a bag. For baked brookies, let them cool fully, then wrap tightly. To thaw, leave them in the fridge overnight or at room temperature for a few hours. Brookies stay fresh at room temperature for about five days. Look for signs of spoilage, like a dry texture or off smell. If they become hard or crumbly, it’s time to toss them. Enjoy each bite while they are fresh! Yes, you can! Using different sugars changes the taste and texture. Brown sugar gives a rich flavor and moisture. It also makes brookies more chewy. White sugar adds a lighter taste and helps them rise. If you mix both, you get the best of both worlds. Just remember, too much white sugar can make them cake-like. These brookies bake for 25 to 30 minutes at 350°F (175°C). Check them after 25 minutes. Insert a toothpick in the center. If it comes out with a few moist crumbs, they are ready. Be careful not to overbake, or they will lose their fudgy texture. If your brookies are not fudgy, you might have made some common mistakes. Overmixing the batter can cause them to rise too much, making them cake-like. Also, using too much flour or baking them too long can dry them out. To fix this, mix just until combined and watch the baking time closely. You learned how to make delicious brookies with a brownie layer and cookie layer. We covered ingredients, step-by-step prep, and baking instructions. You also discovered tips for chewy texture and fun flavor variations. Try adding your favorite chocolate or nuts for a twist. Store them wisely and enjoy them for days. With these easy steps, you can impress friends and family with your baking skills. Enjoy your tasty reward!

Fudgy Chewy Brookies Irresistible Dessert Recipe

If you crave a dessert that’s both fudgy and chewy, you’ve hit the jackpot! My Fudgy Chewy Brookies combine the

To make hot honey chicken biscuits, you need some key ingredients. Here’s what you’ll need: - 2 cups all-purpose flour - 1 tablespoon baking powder - 1/2 teaspoon baking soda - 1 teaspoon salt - 1/4 cup cold butter, cubed - 3/4 cup buttermilk - 1 pound boneless chicken thighs, cut into bite-sized pieces - 1/2 cup hot honey (store-bought or homemade) - 1/2 teaspoon smoked paprika - 1/2 teaspoon garlic powder These ingredients come together to create a tasty meal. The chicken thighs keep it juicy, while the hot honey adds a sweet kick. You can enhance your biscuits with a few optional ingredients. Here’s what works well: - Fresh thyme leaves for garnish These add a fresh touch and make your dish look beautiful. The thyme also gives a nice flavor boost. You can use either store-bought or homemade hot honey. Store-bought is quick and easy. Just drizzle it on your chicken after cooking. Homemade hot honey lets you control the heat level. To make homemade hot honey, mix honey with your choice of hot sauce. Here’s a simple recipe: 1. Combine 1/2 cup honey with 1-2 tablespoons of your favorite hot sauce. 2. Stir well until mixed. You can adjust the heat to your liking. This way, you get the perfect balance of sweet and spicy. {{ingredient_image_1}} First, set your oven to 425°F (220°C). This high heat helps make the biscuits nice and fluffy. While the oven heats, grab a baking sheet and line it with parchment paper. This keeps the biscuits from sticking and makes cleanup easy. In a big bowl, combine 2 cups of all-purpose flour, 1 tablespoon of baking powder, 1/2 teaspoon of baking soda, and 1 teaspoon of salt. Stir them together well. Next, add 1/4 cup of cold butter, cut into small cubes. Use your fingers or a pastry cutter to mix until the mixture looks like coarse crumbs. Now, pour in 3/4 cup of buttermilk slowly. Mix gently until just combined. Don't overmix; we want fluffy biscuits! Turn the dough out onto a floured surface. Pat it down into a rectangle that is about 1 inch thick. Use a biscuit cutter to cut out rounds from the dough. You should get about 10-12 biscuits. Place them on the lined baking sheet. Bake the biscuits for 12-15 minutes. They should turn golden brown and smell amazing. While the biscuits bake, heat a skillet over medium-high heat. Add 1 pound of boneless chicken thighs, cut into bite-sized pieces. Season the chicken with 1/2 teaspoon of smoked paprika, 1/2 teaspoon of garlic powder, and a pinch of salt. Cook for about 6-8 minutes until the chicken is golden and fully cooked. Once done, drizzle 1/2 cup of hot honey over the chicken. Toss it well to coat all the pieces. To make fluffy biscuits, always use cold butter. Cold butter helps create layers. When you mix it into the flour, you want chunks of butter. These chunks will melt when baking, making the biscuits rise. Don't overwork the dough; mix until just combined. This keeps the biscuits light and airy. For the best chicken, cut it into small, even pieces. This helps it cook evenly. Use medium-high heat for a nice sear. Season the chicken well with smoked paprika and garlic powder. Cook until golden brown, around 6-8 minutes. Make sure it's cooked through, then coat with hot honey. This adds flavor and keeps the chicken juicy. These biscuits are great on their own, but you can add more! Try serving them with a side salad for crunch. You can also pair them with crispy fries for a fun meal. If you want a kick, serve with extra hot honey on the side. Fresh thyme leaves add a nice touch, too. Pro Tips Chill the Butter: For flakier biscuits, ensure your butter is very cold. You can even freeze it for 10-15 minutes before cutting it into the flour. Don’t Overmix: When adding buttermilk to the dough, mix until just combined. Overmixing can lead to tough biscuits. Use Fresh Herbs: For added flavor, consider incorporating fresh herbs like rosemary or chives into the biscuit dough. Customize the Heat: Adjust the amount of hot honey based on your heat preference. You can mix in some regular honey for a milder sweetness. {{image_2}} You can make hot honey chicken biscuits even spicier! Try using different hot sauces. Each sauce brings unique heat and flavor. Here are some ideas: - Sriracha: This sauce adds a tangy kick. - Chili Garlic Sauce: It gives a bold, garlicky flavor. - Buffalo Sauce: This will add a tangy and buttery taste. Mix these into the hot honey or drizzle directly on the chicken. Adjust the amount based on your spice level preference. You can make this recipe healthier while keeping it tasty. Here are some swaps: - Whole Wheat Flour: Use this instead of all-purpose flour for more fiber. - Greek Yogurt: Swap buttermilk with plain Greek yogurt. It adds protein and creaminess. - Air-Fried Chicken: Instead of frying, try air-frying the chicken. It uses less oil and still tastes great. These changes keep the dish delicious but lower in calories. Pairing your hot honey chicken biscuits with sides can elevate the meal. Here are some options: - Coleslaw: A crunchy, tangy slaw adds freshness. - Sweet Potato Fries: These are sweet and pair well with the heat. - Green Salad: A light salad balances the richness of the biscuits. Experiment with these sides to find your favorite combination! To keep your leftover biscuits fresh, store them in an airtight container. This will help them stay soft. Place a paper towel in the container to absorb extra moisture. You can keep them at room temperature for up to two days. If you want to store them longer, refrigerate them for up to a week. When you want to enjoy your leftover biscuits, reheating is key. The best way is to use the oven. Preheat your oven to 350°F (175°C). Wrap the biscuits in foil to keep them moist. Heat for about 10 minutes or until warm. You can also use a microwave. Place biscuits on a plate and cover with a damp paper towel. Microwave for 15-20 seconds, but watch closely to avoid making them tough. If you have extra hot honey chicken, freezing is a great option. Let the chicken cool first. Then, place it in a freezer-safe bag. Ensure you remove as much air as possible. Label the bag with the date. You can freeze the chicken for up to three months. When you're ready to eat, thaw it in the fridge overnight before reheating. Yes, you can use regular honey. However, you will lose the spicy kick. Hot honey brings a sweet and spicy flavor that makes this dish special. If you like heat, try adding a little hot sauce to regular honey. This can mimic the taste of hot honey well. You can serve these biscuits with several sides. Here are some great options: - Fresh fruit salad for a sweet touch. - Coleslaw adds a nice crunch. - Crispy fries for a classic combo. - A green salad for a light option. These sides balance the flavor and texture of the biscuits. To check if the chicken is done, cut a piece in the thickest part. The meat should be white, not pink. You can also use a meat thermometer. The internal temperature should reach 165°F (75°C). This ensures your chicken is safe to eat and juicy. This blog post covered how to make delicious hot honey chicken biscuits. You learned about the main ingredients, the step-by-step cooking process, and helpful tips to make it perfect. I also shared tasty variations and storage info for leftovers. Hot honey chicken biscuits are not just tasty; they are fun to make. I hope you feel inspired to try this recipe at home and share it with friends and family. Enjoy your cooking!

Hot Honey Chicken Biscuits Tasty and Easy Recipe

Are you craving a dish that’s both sweet and spicy? You’re in for a treat with these Hot Honey Chicken

- 2 cups cooked chicken, shredded - 1 cup frozen mixed vegetables (peas, carrots, corn) - 1/2 cup diced potatoes, boiled until tender - 1/2 cup onion, chopped - 1/2 cup celery, chopped - 1/4 cup butter - 1/4 cup all-purpose flour - 1 cup chicken broth - 1 cup milk - 1 teaspoon garlic powder - 1 teaspoon thyme - Salt and pepper to taste - 2 pre-made pie crusts (store-bought or homemade) - 1 egg, beaten (for egg wash) Each item plays a key role in making the pot pie warm and tasty. The cooked chicken brings protein. The mixed vegetables add color and nutrients. Diced potatoes give it heartiness. Onions and celery create a great flavor base. Butter and flour make a smooth sauce. Chicken broth and milk help bind it all together. Seasonings like garlic powder and thyme boost the taste. The pie crust wraps everything in a flaky hug. Lastly, the egg wash gives a shiny look. {{ingredient_image_1}} 1. Start by melting the butter in a large skillet over medium heat. 2. Add the chopped onion and celery. Sauté them for about 5 to 7 minutes. They should be soft and clear. 3. Next, stir in the flour and cook for one minute. This forms a roux. 4. Slowly whisk in the chicken broth and milk. Make sure there are no lumps. 5. Add garlic powder, thyme, salt, and pepper to taste. 6. Bring this mix to a gentle simmer. Let it thicken for about 5 minutes. 7. Once thick, stir in the cooked chicken, mixed vegetables, and boiled potatoes. Remove from heat and set aside. 1. Roll out one pie crust on a clean surface. Fit it into a 9-inch pie dish. 2. Pour the chicken filling into the bottom crust. 3. Roll out the second pie crust. Place it over the filling. 4. Crimp the edges to seal the pie. Make slits in the top for steam to escape. 1. Brush the top crust with the beaten egg for a nice golden finish. 2. Bake in the preheated oven at 425°F (220°C) for 30 to 35 minutes. 3. Look for a golden brown crust and bubbly filling to know it's ready. 4. Once done, let the pie cool for 10 minutes before slicing. - How to achieve a flaky crust To get a flaky crust, keep your ingredients cold. Use chilled butter and cold water. When mixing, work quickly. Don’t over-knead the dough. Use a light touch to keep air pockets. - Adjusting seasonings to taste Taste your filling before baking. Add more salt, pepper, or herbs if needed. Garlic powder and thyme bring great flavor. Adjust these based on your preference. A little extra spice can make a big difference. - Ensuring even cooking Preheat your oven to 425°F (220°C). This helps the crust bake evenly. Make sure to cut slits in the top crust. This allows steam to escape and stops sogginess. - Using store-bought ingredients To save time, use pre-made pie crusts. You can also buy rotisserie chicken. This cuts down on cooking and prep time. Frozen mixed veggies make it quick and easy. - Preparing filling ahead of time You can make the filling a day ahead. Store it in the fridge. When you're ready to bake, just pour it into the crust. This makes your meal prep much easier. Pro Tips Use Rotisserie Chicken: For a quicker prep time, consider using store-bought rotisserie chicken. It adds great flavor and saves you the step of cooking the chicken yourself. Thicken the Filling: If you prefer a thicker filling, allow it to simmer a bit longer before pouring it into the crust. Just be careful not to let it get too thick to pour. Egg Wash for Shine: Brushing the top crust with beaten egg not only gives it a beautiful golden color but also adds a slight sheen that makes your pie look professional. Let it Rest: Allow the pie to cool for at least 10 minutes after baking. This resting period helps the filling set, making it easier to slice and serve. {{image_2}} You can easily change up the veggies in your pot pie. Try using fresh spinach, green beans, or even mushrooms. Each vegetable brings a new taste. Adding herbs and spices can make your pie even better. Try rosemary or basil for a fresh kick. A pinch of paprika can also add warmth. If you need a gluten-free option, look for gluten-free pie crusts. Many stores sell them now. You can also make your own crust with almond flour or rice flour. For a dairy-free filling, use almond milk or coconut milk instead of regular milk. You can also swap butter for olive oil or vegan butter. These changes keep the pie tasty for everyone. After you enjoy your double crust chicken pot pie, store any leftovers properly. Keep the pie in the fridge if you plan to eat it soon. Use an airtight container or cover it tightly with plastic wrap. This helps the pie stay fresh and tasty. Consume the leftovers within three days for the best flavor. If you want to keep it longer, freezing is a great option. First, let the pie cool completely. Then wrap it tightly in plastic wrap. After that, place it in a freezer-safe bag or container. This will keep it safe for up to three months. When you're ready to eat, you can thaw it in the fridge overnight. When it’s time to enjoy your leftover chicken pot pie, reheating is key. The best method is to use the oven. Preheat your oven to 350°F (175°C). Place the pie on a baking sheet to catch any drips. Heat it for about 20-30 minutes. This will warm the filling and crisp the crust. If you're short on time, a microwave works too. Just be sure to cover the pie with a damp paper towel. This keeps the moisture in and prevents the crust from getting too hard. Microwaving might not make the crust crisp, but it will be quick and easy. No matter how you reheat it, check that the filling is hot. This ensures the pie stays delicious and safe to eat. It takes about one hour to make this pot pie. You will spend 20 minutes prepping and 30 to 35 minutes baking. This quick time makes it a great meal for busy days. Yes, you can use leftover chicken! It is a great way to use what you have. Just shred the chicken into small pieces. This will save you time and add extra flavor to your pot pie. Some great side dishes are: - Simple green salad - Steamed vegetables - Garlic bread - Mashed potatoes These sides balance the meal and add freshness. Your pot pie is done when the crust is golden brown. The filling should bubble around the edges. You can check by inserting a knife into the filling. If it is hot, it is ready to eat! In this article, we covered all you need for a great chicken pot pie. We discussed essential ingredients, from cooked chicken to pie crusts. The step-by-step instructions guide you through making the filling, assembling, and baking. We also shared helpful tips, variations, and storage info to keep your pie fresh. Making this dish is fun and rewarding. With your new skills, your pot pie will impress everyone. Enjoy sharing this classic meal and the joy it brings!

Double Crust Chicken Pot Pie Flavorful and Simple Meal

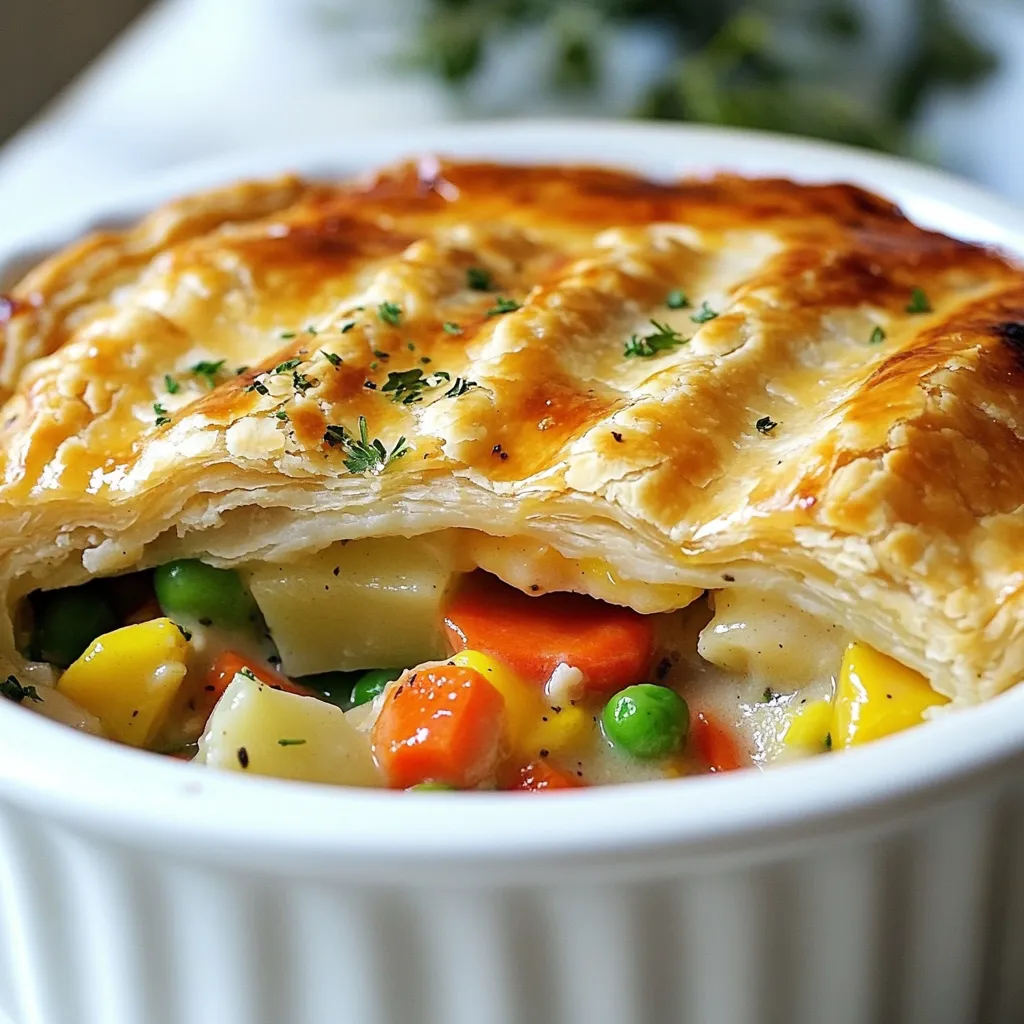
If you’re looking for a warm, homey meal, this Double Crust Chicken Pot Pie is perfect. It combines tender chicken,

To make this tasty dish, you need: - 1 cup orzo pasta - 2 cups mixed seasonal vegetables (like zucchini, bell peppers, cherry tomatoes, and carrots) - 3 tablespoons olive oil - 1 teaspoon dried oregano - 1 teaspoon garlic powder - Salt and pepper to taste - Juice of 1 lemon These simple ingredients create a fresh and colorful meal. The orzo pasta gives the dish a nice texture. The roasted vegetables add great flavor. You can make this dish even better by adding: - ½ cup feta cheese, crumbled (optional) - Fresh basil leaves for garnish Feta cheese adds a creamy touch. Basil gives a fresh pop of flavor. Feel free to mix in your favorite veggies or herbs. This recipe is vegetarian, which makes it great for many diets. If you need it to be gluten-free, use gluten-free orzo pasta. This way, you can still enjoy the flavors without the gluten. Always check labels to ensure all ingredients meet your dietary needs. {{ingredient_image_1}} Start by washing your mixed seasonal vegetables. I like to use zucchini, bell peppers, cherry tomatoes, and carrots. Chop these veggies into small, bite-sized pieces. This helps them cook evenly. In a large bowl, toss the vegetables with 2 tablespoons of olive oil, 1 teaspoon of dried oregano, 1 teaspoon of garlic powder, salt, and pepper. Make sure all the pieces are coated well. This step adds great flavor to the dish. While your oven heats up, bring a pot of salted water to a boil. Add 1 cup of orzo pasta to the boiling water. Cook it according to the package instructions, usually about 8-10 minutes. You want the pasta to be al dente, which means it should still be slightly firm. Once cooked, drain the orzo and set it aside. Now it’s time to bring everything together. Once your vegetables are roasted for about 20-25 minutes, take them out of the oven. They should be tender and caramelized. In a large mixing bowl, combine the roasted vegetables and the cooked orzo. Drizzle the last tablespoon of olive oil and squeeze the juice of 1 lemon over the top. Toss everything gently to mix. If you like, sprinkle crumbled feta cheese on top for an extra touch. Serve this dish in shallow bowls, garnished with fresh basil leaves and a lemon wedge for color. Roasting vegetables brings out their natural sweetness. To roast them perfectly, start by cutting them into equal sizes. This helps them cook evenly. Toss the veggies in olive oil and seasonings. I like to use oregano and garlic powder for extra flavor. Spread them on a baking sheet in a single layer. Avoid overcrowding; this keeps them from steaming. Roast at 425°F for 20-25 minutes. Stir halfway to ensure they brown nicely. Orzo cooks quickly, making it a great pasta choice. Bring a pot of salted water to a boil. Add the orzo and cook for 8-10 minutes. Check for al dente, which means firm to the bite. Drain the orzo but save a bit of pasta water. This water can help mix your dish later, adding moisture. When serving roasted vegetable orzo, presentation matters! Use shallow bowls for a nice look. Garnish each bowl with fresh basil leaves. A wedge of lemon adds a splash of color and flavor. If you like cheese, sprinkle feta on top just before serving. This dish is great warm or at room temperature. Enjoy it as a main or a side dish! Pro Tips Seasonal Vegetables: Use a variety of seasonal vegetables for the best flavor and color. Try incorporating vegetables that are in season for a fresh taste. Al Dente Orzo: Cook the orzo until al dente for the best texture. This will help it hold its shape and not become mushy when mixed with the roasted vegetables. Lemon Zest: For an extra burst of flavor, consider adding lemon zest along with the juice. This enhances the citrus note and brightens the dish. Feta Variations: If you're not a fan of feta, try substituting it with goat cheese or a vegan cheese alternative for a different flavor profile without sacrificing creaminess. {{image_2}} You can switch up the vegetables based on what’s fresh. In spring, try asparagus and peas. Summer brings sweet corn and eggplant. Fall is great for butternut squash and Brussels sprouts. Winter offers root vegetables like sweet potatoes and parsnips. Each season adds its own twist to the dish. This keeps your roasted vegetable orzo exciting and full of flavor. Adding protein makes this dish heartier. For meat lovers, grilled chicken or shrimp works well. Cook them separately and then mix them in with the orzo. If you prefer plant-based protein, chickpeas are a fantastic choice. They add texture and keep the meal filling. Tofu or tempeh can also join the mix for a satisfying vegan option. To make this dish vegan, simply skip the feta cheese. You can add a sprinkle of nutritional yeast for a cheesy taste without dairy. Use more vegetables or add nuts for extra crunch. A tahini sauce can also bring creaminess to your dish. These changes keep your roasted vegetable orzo both tasty and vegan-friendly. To keep your roasted vegetable orzo fresh, store it in an airtight container. Place it in the fridge within two hours of cooking. It should stay good for 3 to 4 days. If you notice any signs of spoilage, like an off smell or mold, throw it away. When you want to enjoy your leftovers, reheat them on the stove or in the microwave. For the stove, place the orzo in a pan over medium heat. Add a splash of water or broth to keep it moist. Stir until heated through. In the microwave, use a microwave-safe bowl. Heat in short bursts of 1 to 2 minutes, stirring in between. You can freeze roasted vegetable orzo for longer storage. Let it cool completely before freezing. Use a freezer-safe container or bag. It can last up to 3 months in the freezer. When it's time to eat, thaw it overnight in the fridge. Reheat it as mentioned earlier. This way, you keep all the great flavors! Yes, you can! Other small pasta shapes work well. Try using couscous, ditalini, or even small shells. Just keep an eye on the cooking time. Each type might need a bit more or less time in boiling water. I love using seasonal vegetables! Zucchini, bell peppers, cherry tomatoes, and carrots are great choices. You can also add broccoli, asparagus, or eggplant. Just make sure to cut them into even pieces. This helps them cook evenly and taste great. Roasted Vegetable Orzo lasts about 3 to 5 days in the fridge. Store it in an airtight container. When you're ready to eat it, just reheat it on the stove or in the microwave. Add a splash of olive oil or lemon juice for extra flavor. Roasted Vegetable Orzo is a tasty dish that you can make with ease. We covered the key ingredients needed, like vegetables and orzo pasta, and explored some optional customizations. I shared steps for preparing everything and tips for perfect results. You can make it suit your diet or add proteins too. In the end, this dish is not just flexible; it’s also a fun way to enjoy healthy food. You can store leftovers or freeze them for later. I hope you try it and love it!

Roasted Vegetable Orzo Flavorful and Simple Dish

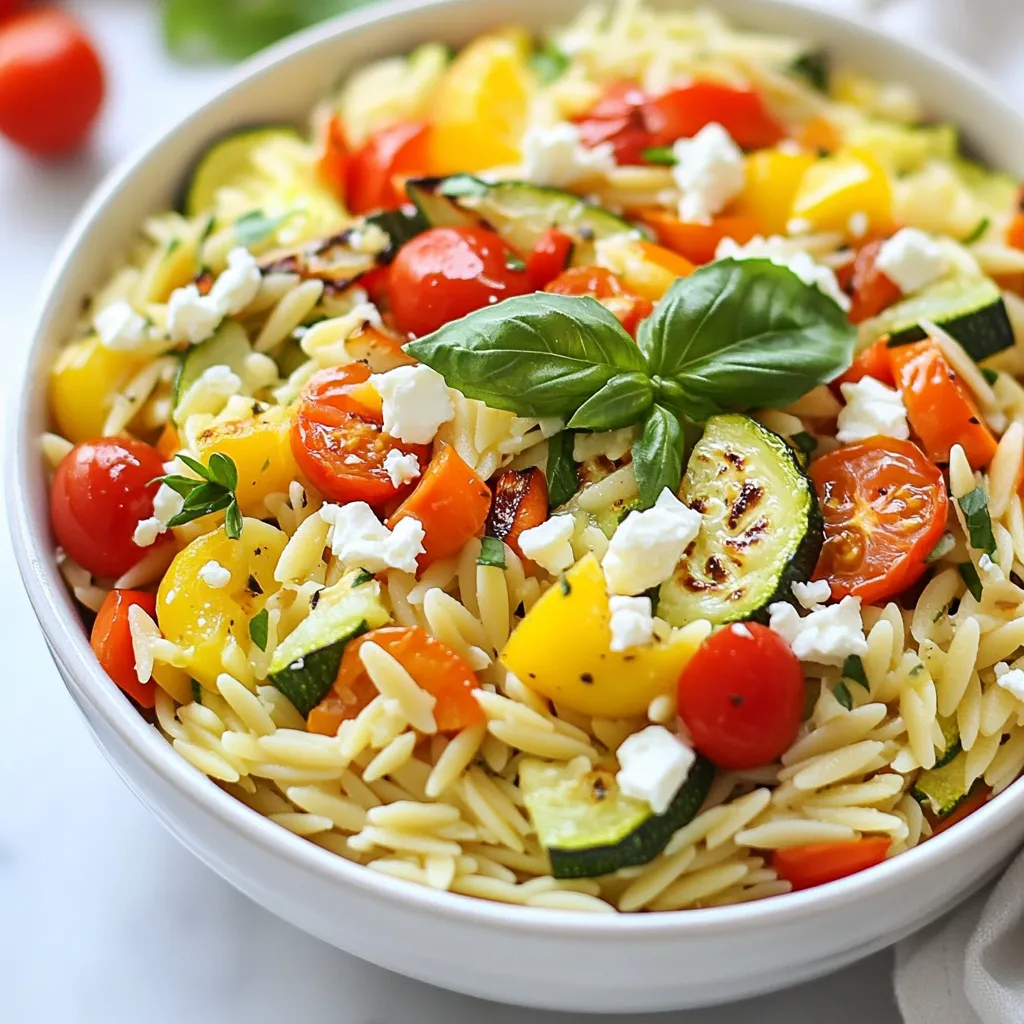
Looking for a quick and tasty meal? Let me introduce you to Roasted Vegetable Orzo. This dish combines savory roasted

To make crispy salted caramel cookies, gather these ingredients: - 1 cup unsalted butter, softened - 1 cup brown sugar, packed - ½ cup granulated sugar - 2 large eggs - 1 teaspoon vanilla extract - 2 ½ cups all-purpose flour - 1 teaspoon baking soda - ½ teaspoon salt - 1 cup caramel chips - ½ cup sea salt flakes (for topping) You can swap some ingredients if needed: - Use coconut oil instead of unsalted butter for a vegan option. - Replace brown sugar with coconut sugar for a different flavor. - Substitute granulated sugar with honey or maple syrup for a natural sweetener. - Use egg replacers like flax eggs if you want to make it egg-free. - For gluten-free cookies, replace all-purpose flour with a gluten-free blend. Select the best ingredients for great flavor: - Choose high-quality unsalted butter for a rich taste. - Look for pure vanilla extract, not imitation, for better flavor. - Use fresh eggs for the best texture and taste. - Select caramel chips that melt well and have a rich caramel flavor. - Opt for coarse sea salt flakes; they add a nice crunch and balance the sweetness. {{ingredient_image_1}} Start by getting your kitchen ready. First, preheat your oven to 350°F (175°C). This makes sure your cookies bake evenly. Next, line two baking sheets with parchment paper. This helps your cookies not stick. You can also gather your ingredients so everything is easy to find. This includes butter, sugars, eggs, and caramel chips. Now, let's mix the dough. In a large bowl, cream together the softened butter, brown sugar, and granulated sugar. Do this for about 2-3 minutes until it is light and fluffy. Next, add the eggs one at a time. Mix well after each egg, then stir in the vanilla extract. In a separate bowl, whisk the flour, baking soda, and salt together. Gradually add this dry mix to the wet ingredients. Mix just until the dough comes together. Finally, gently fold in the caramel chips. Make sure they are evenly spread throughout the dough. It's time to bake! Using a cookie scoop or tablespoon, drop spoonfuls of dough onto the prepared baking sheets. Space them about 2 inches apart for even baking. Before you put them in the oven, sprinkle a pinch of sea salt flakes on the dough balls. Bake for 10-12 minutes, or until the edges are golden brown. The centers should still be soft. After baking, let the cookies cool on the sheets for 5 minutes. Then, transfer them to a wire rack to cool completely. Enjoy the aroma as they cool! To get the best texture for your crispy salted caramel cookies, follow these tips: - Use softened butter. This helps create a light and fluffy dough. - Cream the butter and sugars until they look pale. This takes about 2-3 minutes. - Don’t overmix the dough after adding flour. Mix just until combined to keep them soft. - Let the cookies cool slightly on the baking sheet. This helps them firm up without getting too hard. To keep your cookies fresh, follow these storage tips: - Place cooled cookies in an airtight container. This helps them stay soft and delicious. - Use parchment paper between layers of cookies. This prevents them from sticking together. - Store the container in a cool, dry place. Avoid heat and moisture to keep them fresh longer. These cookies taste great on their own, but here are some fun ideas: - Serve them warm with a scoop of vanilla ice cream. The warm cookie pairs well with cold ice cream. - Drizzle extra caramel on top for a sweet touch. This adds flavor and makes them look fancy. - Enjoy with a cup of coffee or milk. The flavors blend perfectly together, making a nice treat. Pro Tips Chill the Dough: For even thicker cookies, chill the dough for at least 30 minutes before baking. This helps prevent spreading and gives a chewier texture. Use High-Quality Caramel Chips: Opt for premium caramel chips for richer flavor. They melt beautifully and ensure that every bite is deliciously sweet. Check for Doneness: Keep a close eye on the cookies while baking. Remove them when the edges are golden brown, and the center still looks slightly underbaked for the best texture. Storage Tips: Store cookies in an airtight container at room temperature for up to a week, or freeze them for longer freshness. Just let them cool completely before sealing. {{image_2}} You can make these cookies even more fun by adding different mix-ins. Try adding nuts, like chopped pecans or walnuts, for a nice crunch. You can also use chocolate chips for a sweet twist. If you love fruit, consider adding dried cranberries or cherries. These additions add flavor and texture, making each bite exciting. To make these cookies gluten-free, just swap the all-purpose flour for a gluten-free blend. Look for blends that contain xanthan gum, as it helps with texture. You can also use almond flour or coconut flour, but adjust the amount. Each flour type has different properties, so you may need to experiment to find the right texture. For a unique taste, try using flavored caramels. Sea salt caramel adds a nice touch. You can also find caramel with hints of vanilla or chocolate. These flavors can change the whole cookie experience. Just make sure the caramel you choose melts well. This way, you keep that gooey, delicious inside. To keep your crispy salted caramel cookies fresh, store them in an airtight container. This will prevent them from getting stale. Place a piece of parchment paper between layers of cookies. This helps avoid sticking. Try to eat them within a week for the best taste. You can freeze these cookies for future enjoyment. Allow them to cool completely before freezing. Place them in a freezer-safe bag or container. Make sure to remove as much air as possible. Cookies can last up to three months in the freezer. When you want one, just thaw it at room temperature. The best containers for cookie storage are glass or plastic with tight seals. Glass jars look great on your counter too! If you choose plastic, make sure it is BPA-free. These containers keep your cookies fresh and tasty. Yes, you can use salted butter. However, it may change the cookie's taste. The sea salt flakes might make the cookies too salty. If you choose salted butter, skip the added salt in the recipe. This way, you keep the balance of flavors right. These cookies stay fresh for about a week. Store them in an airtight container. They can also keep longer in the fridge, up to two weeks. For extra freshness, layer the cookies with parchment paper. This prevents them from sticking together. Some great brands for caramel chips include Guittard and Nestle. Both brands offer quality and taste. You can also look for local brands at specialty stores. If you prefer a unique flavor, try dark chocolate caramel chips. They add a nice twist to your cookies. This blog post covered the key ingredients, easy steps, and helpful tips for making crispy salted caramel cookies. Quality ingredients are vital for flavor. I shared tricks for storing cookies to keep them fresh. You can also customize the recipe with different mix-ins and storage options. Remember, baking can be fun and creative. Enjoy your cookie journey and feel free to experiment with flavors!

Crispy Salted Caramel Cookies Irresistible Treat Recipe

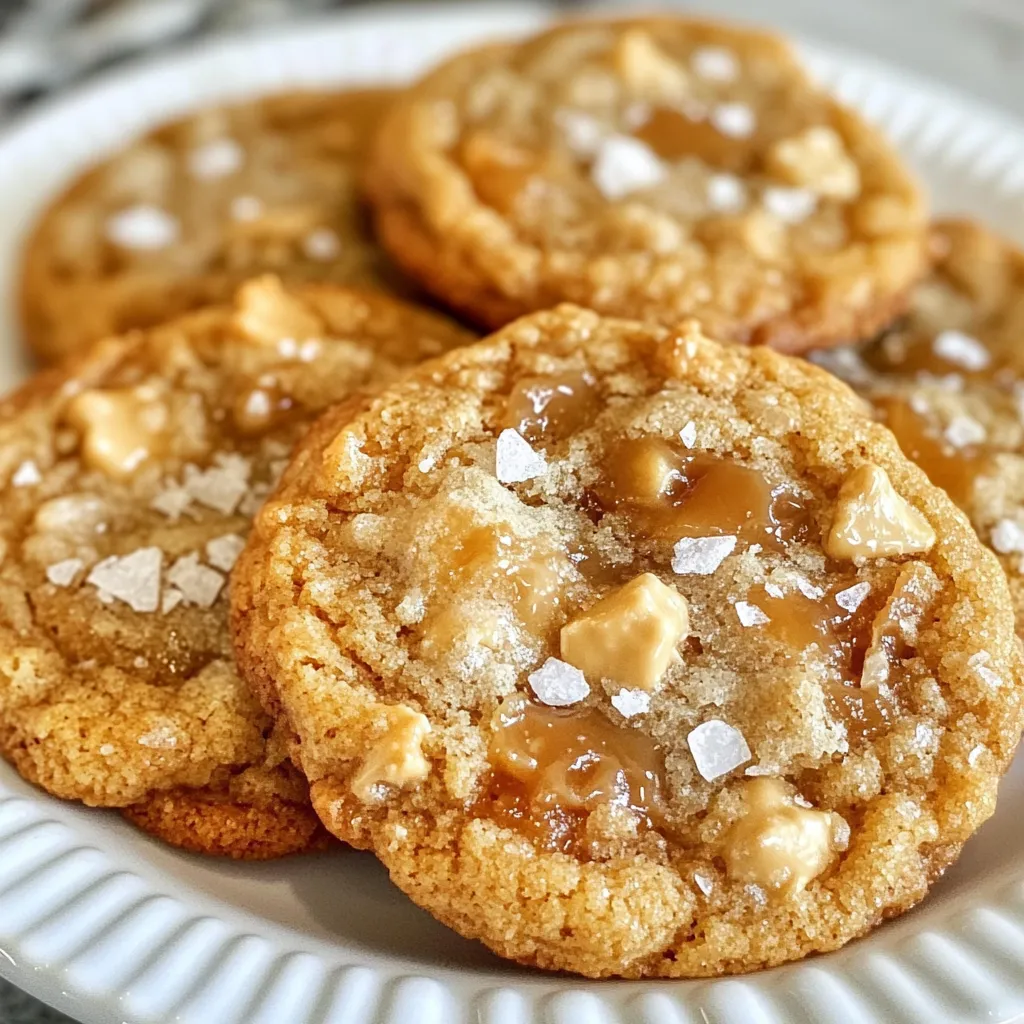
Do you crave a sweet treat that perfectly balances crunch and gooeyness? Look no further! My Crispy Salted Caramel Cookies

Older posts
Newer posts
← Previous Page1 … Page105 Page106 Page107 … Page115 Next →

dsad

© 2025 flavorsprint • Built with GeneratePress

Our Policies

  • Copyright Policy
  • Cookie Policy
  • GDPR Policy
  • Privacy Policy
  • Disclaimer
  • Terms Of Use

More Information

  • Home
  • About
  • Contact
  • Appetizers
  • Dessert
  • Dinner
  • Drinks
©2025, flavorsprint About Back To Top