Skip to content
DisclaimerTerms Of UseGDPR PolicyCookie Policy

flavorsprint

  • Home
  • Drinks
  • Appetizers
  • Dinner
  • Dessert
  • About
  • Contact
  • Privacy Policy
DisclaimerTerms Of UseGDPR PolicyCookie Policy

Lillian

Gathering the right ingredients is key to making your buffalo chicken wrap tasty. Here’s what you need: - 2 cups cooked chicken, shredded - 1/2 cup buffalo sauce - 1/2 cup cream cheese, softened - 1 cup lettuce, shredded - 1/2 cup cherry tomatoes, halved - 1/4 cup blue cheese crumbles (optional) - 4 large tortillas or wraps - 1 tablespoon olive oil - Salt and pepper to taste - Fresh cilantro or parsley for garnish (optional) Each ingredient adds to the overall taste. The shredded chicken gives protein. The buffalo sauce adds heat and flavor. Cream cheese makes the filling creamy and rich. Fresh lettuce and tomatoes add crunch and freshness. Blue cheese crumbles give a tangy twist. I always keep these ingredients on hand. They allow me to whip up this wrap in no time. If you like spice, adjust the buffalo sauce to your taste. You can also swap the blue cheese for your favorite cheese if you prefer. Now that you have the ingredients, you’re ready to create a meal that’s quick, flavorful, and sure to please. {{ingredient_image_1}} To make the chicken mixture, start by combining the shredded chicken with the buffalo sauce. Mix well until the chicken is coated evenly. Next, take the softened cream cheese and add it to the chicken. Stir until the mixture looks creamy and smooth. This step adds richness and balances the heat from the buffalo sauce. If you want it spicier, feel free to add more buffalo sauce. Now it’s time to prepare the tortillas. Lay them out flat on a clean surface. Brush each tortilla lightly with olive oil. This oil adds flavor and helps the wrap stay flexible. Once the tortillas are ready, evenly distribute the buffalo chicken mixture on each one. Leave about an inch of space at the edges. Then, add toppings like shredded lettuce, halved cherry tomatoes, and blue cheese crumbles if you like. For extra flavor, you can toast the wraps. Heat a skillet over medium heat. Cook each wrap for about 2-3 minutes on each side until they turn golden and crispy. This makes the wrap even tastier. When serving, slice them in half diagonally for a nice presentation. You can garnish with fresh cilantro or parsley to make them look vibrant and fresh. If you want a milder wrap, use less buffalo sauce. Start with a quarter cup. You can also add more cream cheese to tone it down. For a spicier wrap, add more buffalo sauce. Just a tablespoon can make a big difference. Taste as you mix to get it just right. You can also use a hot sauce that you like. To save time, you can prep the chicken mix ahead. Store it in the fridge for up to two days. Make sure to cover it well. When ready to eat, just assemble the wraps. If you want to store whole wraps, wrap them in foil. They last well in the fridge for about three days. These wraps go great with fresh sides. Try a simple green salad or veggie sticks. You can also serve them with ranch or blue cheese dressing. A side of chips adds a nice crunch. For drinks, try iced tea or lemonade. They will make your meal even better! Pro Tips Adjust the Heat: Feel free to modify the amount of buffalo sauce to suit your spice preference; adding more can really amp up the flavor! Wrap It Right: For a tighter wrap, make sure to tuck in the sides as you roll, which also helps to keep the filling from spilling out. Extra Creaminess: If you like it extra creamy, consider adding some ranch dressing or even a dollop of sour cream to the chicken mixture. Make Ahead: These wraps can be prepared a few hours in advance; just keep them wrapped in plastic wrap in the fridge until you're ready to serve. {{image_2}} You can switch the chicken for turkey or tofu. Turkey gives a nice taste and is lean. Tofu is great for a meat-free option. Just make sure to season it well. You can cube the tofu and sauté it in a pan. This adds flavor and texture. Try using ranch or BBQ sauce instead of buffalo sauce. Ranch gives a cool, creamy taste. BBQ adds a sweet and smoky flavor. Both options work well with the chicken mix. Feel free to adjust the sauce amount to match your taste. You can even mix sauces for a unique twist. If you want a lighter wrap, look for low-carb tortillas. You can also use lettuce leaves as wraps. This cuts down on carbs and adds crunch. For lighter ingredients, swap cream cheese with Greek yogurt. Use fresh veggies like cucumber or bell peppers for extra nutrients. To keep your buffalo chicken wraps fresh, store them in airtight containers. This helps lock in the flavor and moisture. You can also wrap each one in plastic wrap before placing it in a container. They stay good in the fridge for up to three days. If you plan to eat them later, consider not adding fresh veggies until you're ready. Freezing buffalo chicken wraps is simple. First, wrap each one tightly in plastic wrap. Then, place them in a freezer bag. Remove as much air as you can. They can stay in the freezer for up to three months. When you’re ready to enjoy, take a wrap out and let it thaw in the fridge overnight. To reheat, unwrap it and heat in the microwave for about one to two minutes. You can also toast it in a skillet for a crispy finish. Enjoy your meal! Buffalo chicken wraps last about 3 to 4 days in the fridge. Store them in an airtight container to keep them fresh. If they contain fresh veggies, use them sooner for the best taste. Yes, you can make these wraps vegetarian. Replace the chicken with shredded jackfruit or tofu. Use buffalo sauce made from plant-based ingredients. This gives you the same spicy kick without meat. The best way to reheat buffalo chicken wraps is in a skillet. Heat the skillet over medium heat. Place the wrap in the skillet and cook for about 3 minutes on each side. This keeps the wrap crispy. Absolutely! You can customize the ingredients in many ways. Try adding different veggies like bell peppers or cucumbers. Swap the blue cheese for feta or omit it entirely. Adjust the buffalo sauce for your heat level. These buffalo chicken wraps are fun to make and tasty to eat. You learned the key ingredients, steps to prepare, and how to store leftovers. Plus, you can adjust spice levels and try different proteins or sauces. Remember, you can customize your wrap to fit your taste. Enjoy these wraps as a quick meal or snack. You’ll impress friends and family with your cooking skills!

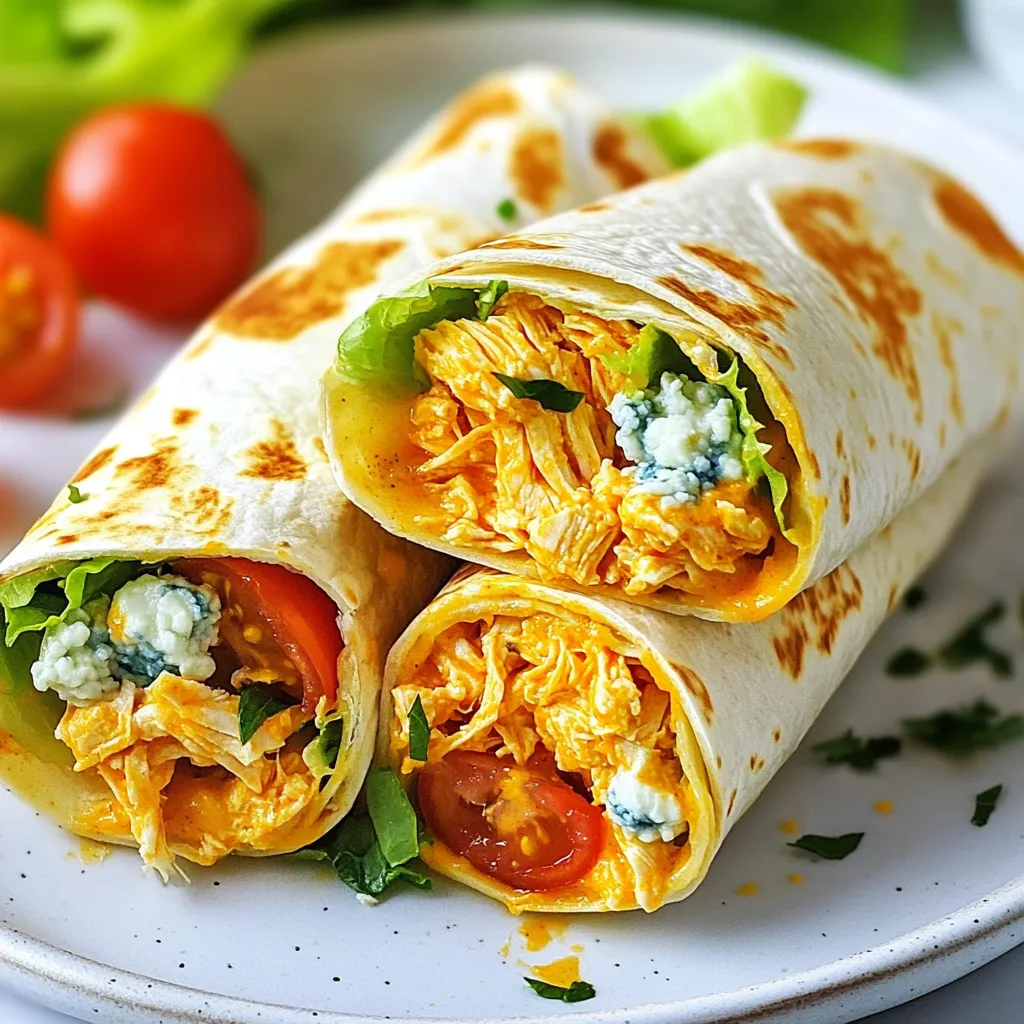
Easy Buffalo Chicken Wrap Flavorful and Fast Meal

Looking for a quick and tasty meal? You’ve found it! My Easy Buffalo Chicken Wrap brings amazing flavors to your

- 1 lb of ground beef or thinly sliced steak - 8 oz mozzarella cheese, shredded - 1 package of pizza dough (store-bought or homemade) - 1 onion, sliced - 1 green bell pepper, sliced - 2 cloves garlic, minced - 1 tablespoon Worcestershire sauce - 1 teaspoon Italian seasoning - Salt and pepper to taste - 1 tablespoon olive oil - 1 egg, beaten (for egg wash) - Fresh parsley, chopped (for garnish) When making Mozzarella Cheesesteak Stromboli, the choice of ingredients is key. You start with your main ingredients: ground beef or thinly sliced steak. Both options bring juicy flavor to the dish. The mozzarella cheese melts beautifully, adding creaminess. The pizza dough acts as a sturdy yet soft wrap, holding all the goodness inside. Next come the vegetables. Onion, green bell pepper, and garlic add crunch and depth. They mix well with the savory meat. Worcestershire sauce and Italian seasoning enhance the flavors. Salt and pepper tie it all together, making each bite savory and satisfying. Lastly, the extra ingredients boost the final result. Olive oil helps cook the meat and veggies. The egg wash gives the Stromboli a shiny golden finish. Fresh parsley adds a pop of color when you serve it. Each ingredient plays a role in creating a delicious meal that everyone loves. {{ingredient_image_1}} - Preheat the oven to 400°F (200°C). - In a skillet, heat 1 tablespoon of olive oil over medium heat. - Add 1 pound of ground beef or thinly sliced steak. Cook until browned. - Next, drain any extra fat from the skillet. - Add 1 sliced onion, 1 sliced green bell pepper, and 2 minced garlic cloves. - Sauté these for about 5-7 minutes until soft. - Stir in 1 tablespoon of Worcestershire sauce, 1 teaspoon of Italian seasoning, salt, and pepper. - Remove the mixture from heat and let it cool slightly. - On a floured surface, roll out the pizza dough into a rectangle, about 14x10 inches. - Spread the beef and vegetable mixture evenly over the dough. - Leave about an inch of border all around the edges. - Generously sprinkle 8 ounces of shredded mozzarella cheese over the top. - Starting from one end, roll the dough tightly over the filling. - Pinch the edges to seal the Stromboli and tuck the ends under. - Place the rolled Stromboli seam-side down on a lined baking sheet. - Brush the top with 1 beaten egg for a nice golden color. - Use a sharp knife to make 3-4 diagonal slits on top for steam. - Bake in the preheated oven for 20-25 minutes until golden brown. - Once baked, remove it from the oven and let it cool for a few minutes. - Slice into thick pieces and serve warm. - To brown meat well, use high heat. This speeds up the process. - Avoid crowding the pan. This keeps the meat from steaming. - For the best flavor, cook ground beef until it’s deep brown. - When sautéing vegetables, cut them evenly for even cooking. - Stir the veggies often to prevent burning. - To prevent tearing, let the dough rest. This makes it more pliable. - Roll the dough on a floured surface to keep it from sticking. - Keep your rolling pin floured too. This helps the dough slide. - For a golden crust, brush the dough with the egg wash. - Bake until the crust is a rich golden brown. - Serve your Stromboli with marinara sauce for dipping. - A fresh salad is a great side dish to balance the meal. - For garnish, sprinkle chopped parsley on top for a pop of color. - You can also add grated parmesan for extra flavor. - Slice the Stromboli thick for a hearty bite. Pro Tips Use Quality Meat: Opt for high-quality ground beef or steak for a richer flavor and better texture in your Stromboli. Don’t Overfill: Be mindful not to overfill the dough to prevent it from bursting during baking. A generous layer is perfect! Let It Rest: After baking, allow the Stromboli to rest for a few minutes before slicing. This helps the cheese set and makes for cleaner cuts. Experiment with Fillings: Feel free to customize the filling with other ingredients like mushrooms, spinach, or different cheeses for a unique twist! {{image_2}} You can mix different cheeses to change the flavor. Provolone and cheddar both add unique tastes. For a rich blend, use mozzarella with a sharp cheddar. This gives your Stromboli a creamy and tangy bite. You can also add a sprinkle of Parmesan for a salty finish. If you want a vegetarian version, try using mushrooms or eggplant. These can mimic the meaty texture. You can also use tofu for a protein boost. If you prefer different proteins, chicken or turkey work well too. Each option changes the flavor profile, making it fun to experiment. Adding spices can elevate your Stromboli. Try a pinch of red pepper flakes for heat. A dash of smoked paprika gives a nice depth. You can also drizzle some hot sauce on top for a kick. For toppings, consider sautéed spinach or roasted peppers. These add color and flavor. To store leftovers, place the Stromboli in an airtight container. You can also wrap it tightly in plastic wrap. This keeps it fresh for up to three days. If you leave it uncovered, it may dry out. Always aim for covered storage to maintain moisture. You can freeze Stromboli for future meals. Wrap it well in aluminum foil or plastic wrap. Use a freezer bag for extra protection. This method keeps it safe for up to three months. To reheat, let it thaw in the fridge overnight. This helps it heat evenly. When reheating, use the oven for best results. Preheat it to 350°F (175°C). Place the Stromboli on a baking sheet for about 15-20 minutes. This keeps the crust crispy. If using a microwave, heat it on medium power for about 2-3 minutes. This may make the crust soft, so the oven is better for texture. How do I know when my Stromboli is fully cooked? Your Stromboli is fully cooked when the dough turns golden brown. The filling should be hot and melty. A good way to check is to use a food thermometer. The center should reach 165°F. Can I use homemade pizza dough instead of store-bought? Yes, you can use homemade pizza dough. Just make sure it is rolled out thin enough. This helps the Stromboli cook evenly. Homemade dough adds a personal touch to your dish. What can I use instead of Worcestershire sauce? If you need a substitute for Worcestershire sauce, try soy sauce. Add a bit of vinegar for tanginess. You can also mix soy sauce with some mustard for a similar flavor. Can I make this dish dairy-free? Yes, you can make this dish dairy-free. Use a dairy-free cheese option instead of mozzarella. There are many great plant-based cheeses available now. Just check that they melt well. How many people does one Stromboli typically serve? One Stromboli typically serves 4 to 6 people. It depends on how hungry everyone is. You can always serve some sides to make it a fuller meal. What are good portion sizes for this recipe? A good portion size is about 1 to 2 slices per person. This gives everyone enough to enjoy. If you have sides, you can serve smaller pieces. Stromboli is a delicious and fun meal to make. You start with key ingredients like beef, cheese, and vegetables. Then, you follow easy steps to roll and bake it to perfection. Remember to try different cheeses or meats for variety. Store leftovers smartly and reheat them well to enjoy again. With these tips and tricks, your Stromboli will impress everyone. So gather your ingredients and get started on this tasty dish today!

Mozzarella Cheesesteak Stromboli Flavorful Game Changer

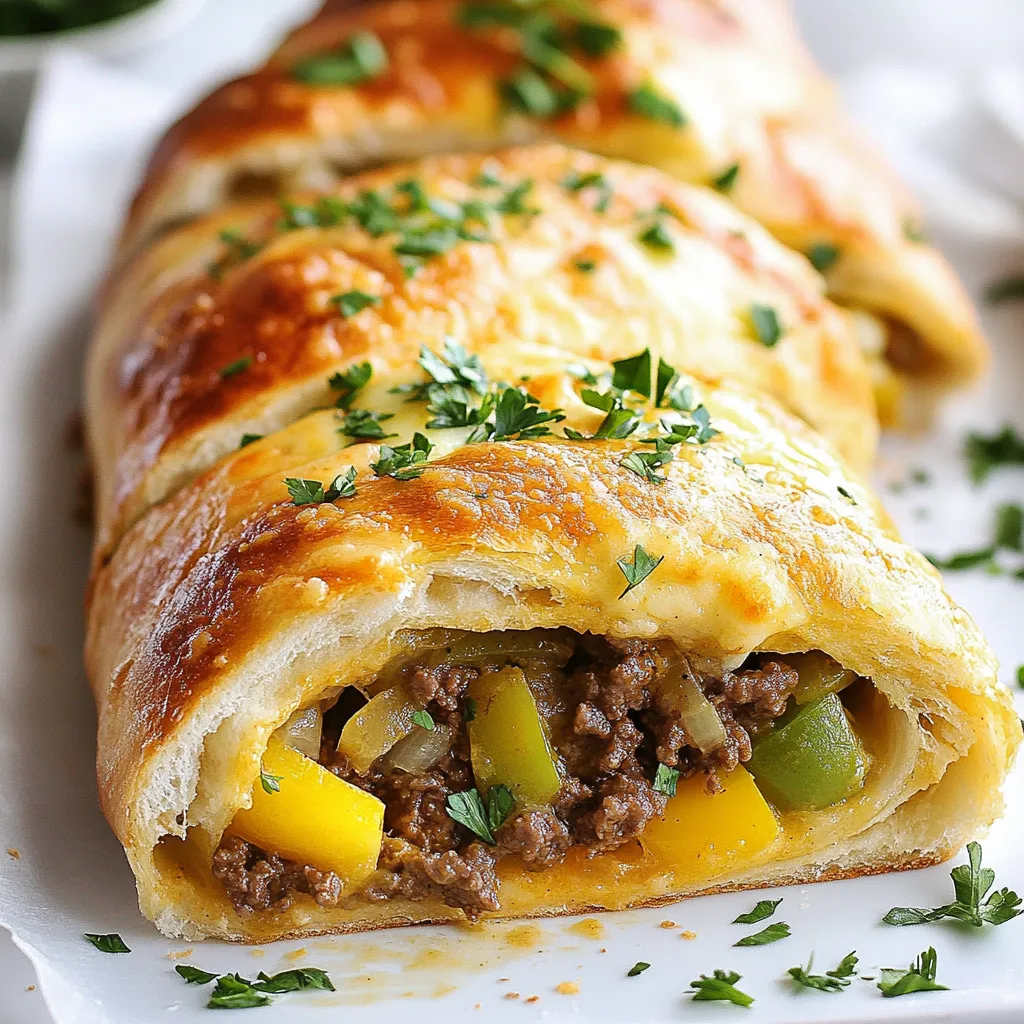
If you love bold flavors and easy-to-make meals, this Mozzarella Cheesesteak Stromboli is a game changer. Picture a warm, flaky

- 4 boneless, skinless chicken breasts - 1 cup roasted red peppers, chopped - 1 cup fresh mozzarella, diced - 1 teaspoon garlic powder - 1 teaspoon onion powder - Salt and pepper to taste - 1/2 cup breadcrumbs for a crispy topping - 2 tablespoons olive oil - 1/2 cup fresh basil leaves, chopped The key to making Roasted Red Pepper Mozzarella Stuffed Chicken is selecting the right ingredients. First, you need the chicken. I prefer boneless, skinless chicken breasts. They cook evenly and stay juicy. Next, roasted red peppers are a must. They add a sweet, smoky flavor, making each bite special. Fresh mozzarella is another star ingredient. It melts beautifully and gives a creamy texture. For seasonings, garlic powder and onion powder add depth. They enhance the flavor of the chicken without overpowering it. Salt and pepper are essential too. They help bring all the tastes together. If you like a crunchy texture, breadcrumbs are a great option. They add a satisfying crunch on top. Olive oil helps the chicken brown nicely in the pan. Lastly, fresh basil gives a bright, herbal taste. It also makes the dish pretty. With these ingredients, you're ready to create a delicious meal that will impress everyone at your table. {{ingredient_image_1}} - Preheat your oven to 375°F (190°C). - Combine roasted red peppers, mozzarella, and basil in a bowl. To start, you want to get your oven nice and hot. Set it to 375°F (190°C). This temperature cooks the chicken evenly. Next, grab a mixing bowl. Add one cup of chopped roasted red peppers. Then, add one cup of diced fresh mozzarella. Finally, toss in half a cup of chopped basil. Stir gently to mix the flavors well. This filling is the star of the dish! - Create a pocket in each chicken breast. - Season chicken with garlic powder, onion powder, salt, and pepper. Now, let’s work on the chicken. Take each boneless, skinless chicken breast and carefully make a pocket. Cut through the thickest part, but don’t cut all the way through. You want to hold the filling inside. Season both sides of the chicken with garlic powder, onion powder, salt, and pepper. This adds flavor and enhances the dish. - Stuff chicken breasts with the mixture. - Sear in olive oil and transfer to the oven for baking. Next, take the roasted red pepper and mozzarella mix. Stuff each chicken breast pocket generously. Press the filling inside so it stays put. If needed, use toothpicks to hold the pockets closed. Heat two tablespoons of olive oil in a large oven-safe skillet over medium-high heat. Once hot, add the stuffed chicken breasts. Sear them for about 3-4 minutes on each side until they turn golden brown. This step gives the chicken a nice crust. After searing, carefully transfer the skillet to your preheated oven. Bake for 20-25 minutes. The chicken is ready when it reaches an internal temperature of 165°F (75°C). Enjoy the smell of this tasty meal as it cooks! - Use chicken breasts that are the same size. This helps them cook evenly. - A meat thermometer is key. It tells you when the chicken is done. - Add fresh basil leaves on top for color and taste. - Serve with roasted veggies or a crisp salad for balance. - Keep leftovers in an airtight container in the fridge. - For best flavor, reheat in the oven. This keeps the chicken juicy. Pro Tips Use Fresh Ingredients: Opt for fresh mozzarella and basil for the best flavor and texture in your stuffed chicken. Perfectly Sear the Chicken: Ensure the skillet is hot enough before adding the chicken to achieve a beautiful golden crust. Let it Rest: Allow the chicken to rest for a few minutes after baking. This helps retain the juices and enhances flavor. Experiment with Fillings: Feel free to customize the stuffing by adding ingredients like spinach, sun-dried tomatoes, or different cheeses. {{image_2}} You can switch mozzarella for goat cheese or feta. Both options bring a unique taste. Goat cheese adds creaminess and tang. Feta provides a salty kick that pairs well with peppers. Try both in your next dish. You might find a new favorite! For more flavor, add sun-dried tomatoes or olives. Sun-dried tomatoes add sweetness and a chewy texture. They work great with roasted red peppers. Olives add saltiness and a nice briny flavor. Both will make your dish pop! Mix them into the cheese filling for a tasty surprise. If you want a low-carb option, use chicken thighs or zucchini boats. Chicken thighs keep moisture and flavor while cooking. Zucchini boats are a fun way to serve the filling. Just scoop out the insides and fill them with your mix. Bake until tender for a healthy twist! Store your roasted red pepper mozzarella stuffed chicken in an airtight container. It will stay fresh for up to 3 days. This way, you can enjoy tasty leftovers without losing flavor. Want to save some for later? You can freeze the stuffed chicken individually. It will last up to 3 months in the freezer. Just wrap each piece tightly to avoid freezer burn. To reheat, place the chicken in an oven set to 350°F. Heat until warmed through. This method keeps the chicken juicy and the flavors intact. Enjoy your meal like it's fresh out of the oven! Generally, 20-25 minutes at 375°F for perfect results. This allows the chicken to cook evenly. Use a meat thermometer to check for doneness. The internal temperature should reach 165°F. This ensures your chicken is safe and juicy. Yes, prepare filling and stuff chicken breasts a day before cooking. Just keep them in the fridge. This saves time on busy days. You can also season the chicken in advance for more flavor. Just remember to cook it fresh for the best taste. It pairs well with rice, pasta, or a fresh garden salad. These sides complement the dish nicely. You can add a light dressing to the salad for extra flavor. A simple balsamic glaze can also enhance the meal. This blog post guided you through making delicious roasted red pepper mozzarella stuffed chicken. You learned about key ingredients, preparation steps, and cooking tips. Remember, even cooking and serving with fresh basil enhances the dish. Feel free to explore variations to match your taste. Proper storage will keep leftovers tasty for days. Enjoy this meal with friends or family and make it a new favorite!

Roasted Red Pepper Mozzarella Stuffed Chicken Delight

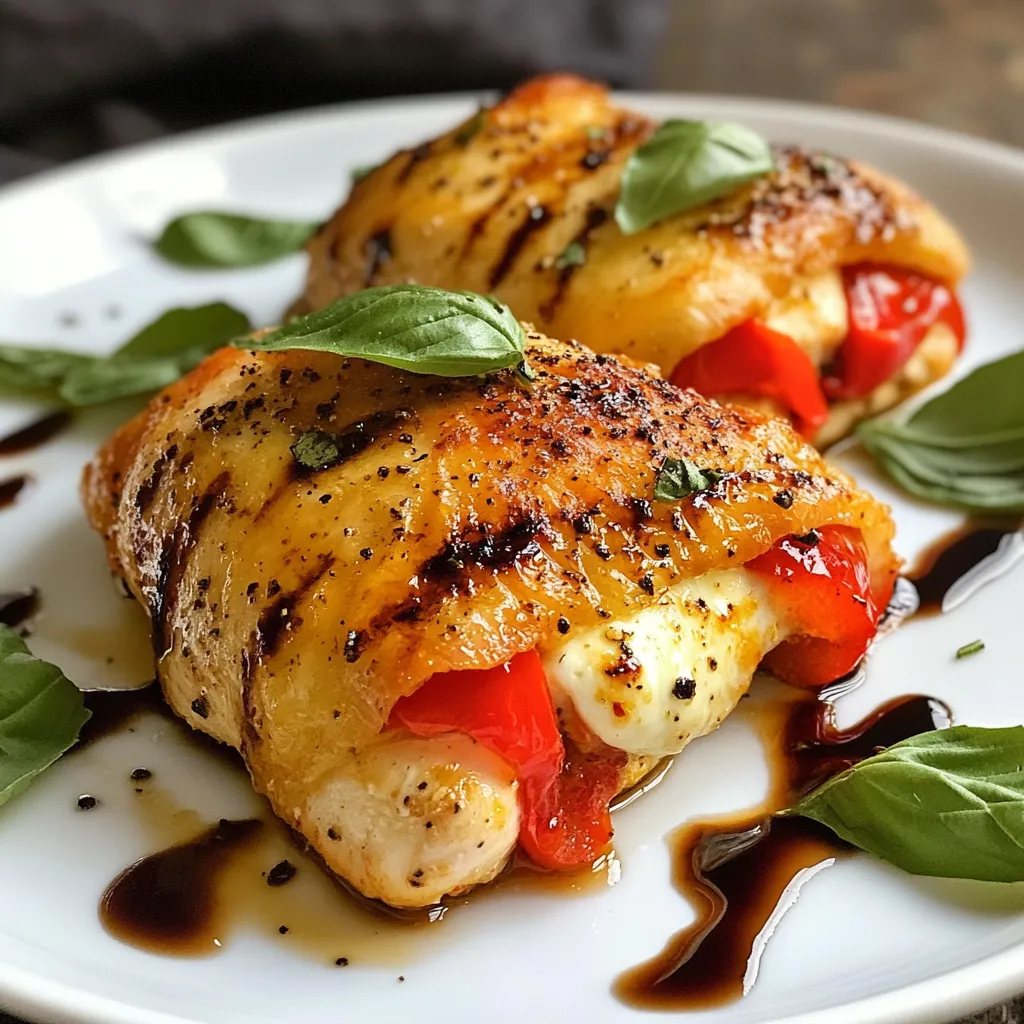
If you’re craving a dish that is as delicious as it is simple to make, look no further! Roasted Red

- 4 boneless, skinless chicken breasts - 2 tablespoons olive oil - Salt and pepper to taste - 4 tablespoons unsalted butter, divided - 4 cloves garlic, minced - 1 cup chicken broth - Zest and juice of 2 large lemons - 1 cup heavy cream - 1 teaspoon dried thyme - 1 teaspoon Italian seasoning - Fresh parsley, chopped (for garnish) You can switch the chicken breasts for chicken thighs. Thighs have more flavor and stay moist. If you want a lighter dish, use turkey instead of chicken. For a vegetarian option, try tofu or tempeh. When choosing chicken, look for bright pink meat with no odor. Fresh herbs should smell strong and vibrant. For lemons, pick ones that feel heavy for their size. This means they are juicy. Always check the cream for freshness by ensuring it is within the expiration date. Fresh ingredients make your creamy lemon butter chicken shine! {{ingredient_image_1}} First, season the chicken breasts with salt and pepper. Make sure to coat both sides well. This step adds flavor. Next, heat olive oil in a large skillet over medium-high heat. Once hot, place the chicken in the skillet. Cook for 6 to 7 minutes on each side. You want the chicken to turn golden brown and be fully cooked. After cooking, take the chicken out and set it aside on a plate. To get that nice golden crust, keep the heat at medium-high. Use a heavy skillet to hold the heat well. Do not overcrowd the pan; if it’s too full, the chicken will steam instead of sear. Let the chicken cook without moving it too much. This helps create a great sear. When it’s time to flip, check if it releases easily from the pan. If it sticks, give it more time. After you take out the chicken, lower the heat to medium. Add two tablespoons of butter to the same skillet. When the butter melts, add minced garlic and sauté for one minute. This brings out the flavor. Next, pour in chicken broth and scrape the bottom of the pan. This gets all the tasty bits. Then, add lemon zest, lemon juice, heavy cream, thyme, and Italian seasoning. Stir well and let it simmer for about five minutes. This helps thicken the sauce. Finally, return the chicken to the skillet and spoon the sauce over it. Add the rest of the butter to make it extra creamy. Cook for 2 to 3 more minutes, then garnish with fresh parsley. Enjoy the rich flavors! To stop your sauce from curdling, use low heat. High heat can make the cream curdle. Always add the cream slowly while stirring. This helps keep the sauce smooth. If you notice the sauce thickening too fast, take it off the heat. Let it cool slightly before adding any cream. Plan your prep time well. Start by seasoning the chicken first. While the chicken cooks, chop the garlic and zest the lemons. This helps save time. Have all your ingredients ready before you begin cooking. This way, you can focus on making the dish without rushing. Want to boost the flavor? Try adding a splash of white wine after sautéing the garlic. This adds depth to the sauce. Fresh herbs like basil or dill can brighten the dish. You can also mix in a bit more lemon juice for extra zing. Always taste as you go to adjust flavors to your liking. Pro Tips Perfectly Cooked Chicken: Use a meat thermometer to ensure the chicken is cooked to an internal temperature of 165°F (75°C) for safety and juiciness. Enhance the Flavor: Marinate the chicken in lemon juice, olive oil, and garlic for at least 30 minutes before cooking to infuse more flavor. Thickening the Sauce: For a thicker sauce, you can whisk in a tablespoon of cornstarch mixed with water before simmering, ensuring a rich consistency. Garnishing for Presentation: Use lemon slices and additional fresh herbs like thyme or basil for a beautiful presentation and added freshness. {{image_2}} You can easily add veggies to your creamy lemon butter chicken. Spinach and broccoli work great. Just add them to the skillet when cooking the sauce. Spinach wilts quickly and adds a nice color. Broccoli adds crunch and flavor. You can also try asparagus or bell peppers for more variety. If you want to switch proteins, shrimp and tofu are great choices. For shrimp, add them to the skillet after the garlic. Cook for a few minutes until they turn pink. For tofu, use firm or extra-firm tofu. Cube it and sauté until golden brown before adding it to the sauce. Both options keep the dish fresh and exciting. Adjusting spice levels is easy. If you like it mild, skip any extra spices. For more heat, add red pepper flakes or cayenne pepper. Start with a small amount, then taste and adjust. This way, you can make the dish perfect for everyone at your table. After enjoying your creamy lemon butter chicken, store leftovers in an airtight container. This keeps the dish fresh and flavorful. Place it in the fridge within two hours of cooking. Remember, the sooner you store it, the better it will taste later. Cream-based dishes like this one can stay fresh in the fridge for about three to four days. After that, the cream may separate, affecting the texture. Always check for any off smells or changes in color before eating. To reheat your creamy lemon butter chicken, use low heat on the stove. Add a splash of chicken broth or cream to help keep it creamy. Stir gently to avoid separating the sauce. You can also microwave it, but do so in short intervals, stirring in between. This helps maintain the dish’s delicious texture. Yes, you can use frozen chicken. Just make sure to thaw it first. You can thaw it in the fridge overnight. If you need it fast, use cold water. Place the chicken in a sealed bag and submerge it in cold water. Change the water every 30 minutes until it’s thawed. Once thawed, follow the recipe as usual. This will ensure your chicken cooks evenly and stays juicy. Creamy lemon butter chicken pairs well with many sides. Here are some tasty options: - Fluffy white rice - Roasted vegetables - Mashed potatoes - Quinoa - Steamed broccoli - A fresh green salad Each side adds a different flavor and texture. Feel free to mix and match based on what you enjoy! You can make some easy swaps to cut calories. Here are some ideas: - Use skinless chicken thighs instead of breasts. - Replace heavy cream with low-fat milk or a dairy-free option. - Cut back on butter by using just 2 tablespoons instead of 4. - Reduce the amount of oil used for cooking. These changes can help you enjoy this dish while keeping it lighter. Always taste as you go to keep the flavors balanced! This blog shared the essential ingredients and easy steps for making creamy lemon butter chicken. You learned how to choose fresh items and substitute ingredients. I also gave tips on cooking techniques and avoiding sauce issues. You can adjust the recipe with veggies or different proteins. Use the storage tips for leftovers, too. This dish is flexible and flavorful, making it a great choice for any meal. Enjoy your cooking adventure!

Creamy Lemon Butter Chicken Flavorful Dinner Delight

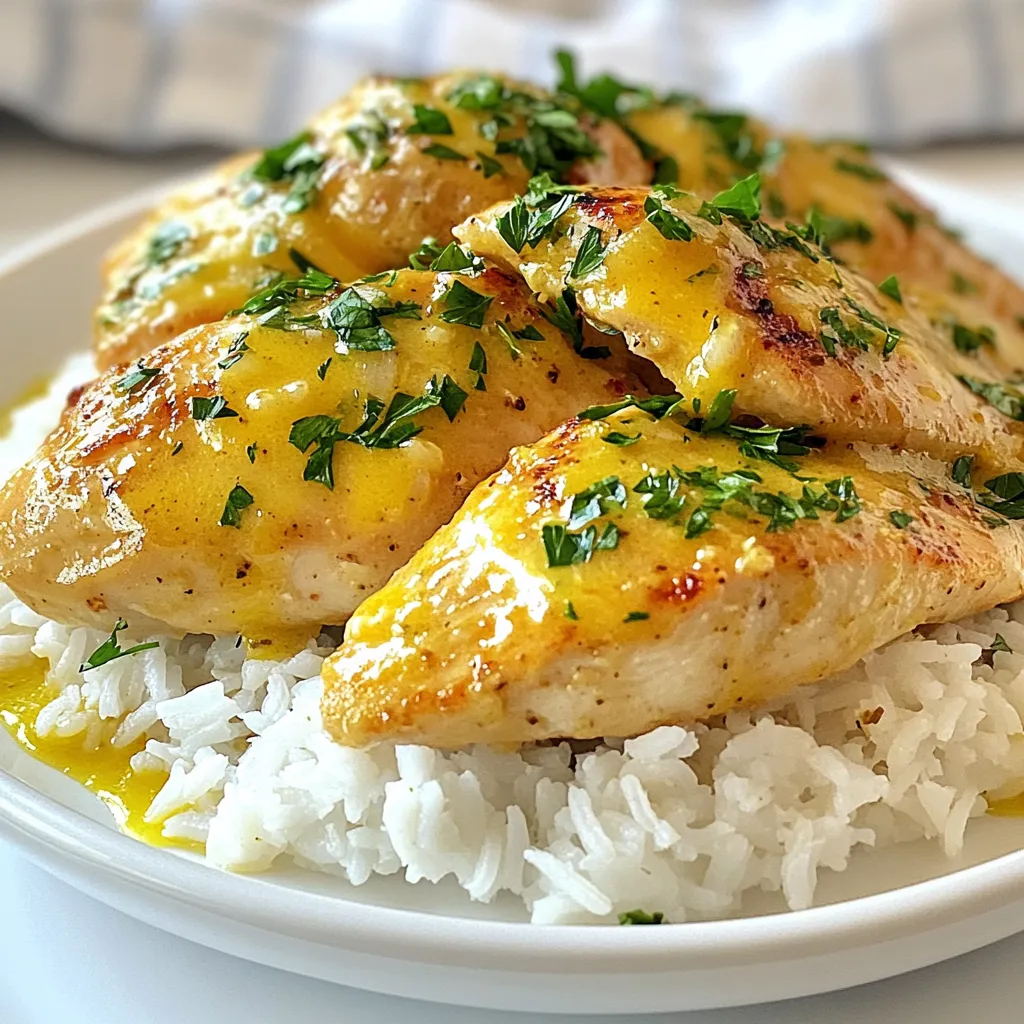
Looking to impress at dinner tonight? This Creamy Lemon Butter Chicken is your answer! With its rich flavor and simple

- 1 cup red lentils, rinsed - 1 tablespoon coconut oil - 1 medium onion, diced - 2 cloves garlic, minced - 1 tablespoon fresh ginger, minced - 1 tablespoon curry powder - 1 teaspoon ground turmeric - Salt and pepper to taste - 1 can (14 oz) coconut milk - 4 cups vegetable broth - 1 medium carrot, diced - 1 cup frozen peas - Fresh cilantro, for garnish - Juice of 1 lime To make this soup, gather your ingredients first. The main stars are red lentils, onion, and coconut milk. The spices bring warmth and flavor. Curry powder and turmeric give a nice kick. Salt and pepper balance everything out. The carrot adds texture, and peas bring sweetness. Finally, fresh cilantro and lime juice brighten the dish. With these ingredients, you can create a delicious, healthy meal in just twenty minutes. {{ingredient_image_1}} - Heat 1 tablespoon of coconut oil in a large pot over medium heat. - Once the oil melts, add 1 medium diced onion and sauté for 2-3 minutes until soft. - Next, stir in 2 minced garlic cloves and 1 tablespoon of minced ginger. Cook for 1 more minute. - Now, add 1 tablespoon of curry powder and 1 teaspoon of ground turmeric. - Stir well to coat the onions and let the spices cook for another minute. This step brings out the deep flavors. - Incorporate 1 cup of rinsed red lentils, 1 diced medium carrot, 1 can of coconut milk, and 4 cups of vegetable broth. - Stir everything together until well mixed. Increase the heat to bring the soup to a gentle boil. - Once boiling, reduce the heat to low, cover the pot, and let it simmer for 15 minutes or until the lentils are tender. - After 15 minutes, add 1 cup of frozen peas and stir to combine. - Season with salt and pepper to taste. Let it cook for another 2-3 minutes. - Remove the pot from heat and add the juice of 1 lime. Stir well to combine all the flavors. Serve hot, garnished with fresh cilantro. - Use fresh ingredients for best flavor. Fresh veggies and herbs make a big difference. - Adjust spice levels according to your taste. If you love heat, add more curry powder or chili. - Garnish with cilantro and lime wedges. This adds color and a fresh taste. - Pair with bread or rice for a complete meal. A slice of crusty bread soaks up the soup perfectly. - A heavy-bottomed pot works best for even cooking. This helps prevent burning and sticking. - Use a sharp knife for prep. It makes chopping quick and easy. A ladle is great for serving the soup. Pro Tips Store lentils properly: Keep your red lentils in an airtight container in a cool, dark place to preserve their freshness. Customize your spices: Feel free to adjust the curry powder and turmeric to match your spice preference; adding a pinch of cayenne can give it an extra kick. Enhance the flavor: For more depth, consider adding a splash of soy sauce or tamari to the soup just before serving. Make it a meal: Serve the soup over cooked rice or quinoa for a heartier dish that’s filling and nutritious. {{image_2}} You can swap the red lentils for other legumes. Try chickpeas or black beans for a twist. If you want grains, use quinoa or brown rice instead. They cook well with the flavors of the soup. For coconut milk, you can use almond milk or soy milk. These alternatives work great for different diets. Just remember, they may change the soup's taste a bit. Add fresh herbs like cilantro or basil for extra freshness. These herbs boost the flavor and make it look nice too. You can also sprinkle in more spices. Consider cumin or paprika for a different kick. Want to add more veggies? Try bell peppers, spinach, or sweet potatoes. They will add color and nutrition to your soup. To make this soup creamier, blend a portion of it. Use an immersion blender for a smooth texture. You can also add more coconut milk for richness. If you prefer a thicker soup, add mashed potatoes or a spoonful of flour. This will give it a hearty feel. Adjust the broth to get your desired consistency. If the soup is too thick, add more broth little by little. If it's too thin, simmer it longer to let it reduce. To store leftovers, let the soup cool. Use an airtight container. I recommend glass containers for easy reheating. Always label your container with the date. This way, you’ll know when to eat it. For freezing, pour the cooled soup into freezer-safe bags. Remove as much air as possible before sealing. This helps prevent freezer burn. You can freeze the soup for up to three months. To defrost, place it in the fridge overnight or use the microwave. When reheating, I suggest using a pot on the stove. Heat it on medium-low to avoid burning. Stir often to keep it from sticking. If the soup seems thick, add a splash of vegetable broth. This will help maintain the flavor and texture. You can also use the microwave. Heat in short bursts, stirring in between. Yes, you can make this soup ahead of time. It stores well in the fridge. To store, let it cool first. Then, put it in an airtight container. You can keep it for up to five days. When you are ready to eat, just reheat it on the stove or in the microwave. Stir well and check the temperature. If it is too thick, add a splash of water or broth. Absolutely! This soup is gluten-free. It uses lentils and vegetables, which are all gluten-free. Always check labels on broth or any added ingredients. Some brands may add gluten. Most vegetable broths are gluten-free, but it is best to confirm. This soup lasts about five days in the fridge. Make sure to store it in an airtight container. Check for signs of spoilage. If it smells off or has a strange color, it’s best to toss it. Before eating, always reheat it until it is hot. Yes, you can add protein to this soup. Tofu is a great choice. You can use firm or extra-firm tofu. Cut it into cubes and add it when you add the peas. Chickpeas also work well. Drain and rinse them before adding. If you want more options, try adding cooked quinoa or lentils. They blend perfectly with the flavors. This blog post covered a delightful lentil soup recipe using simple, wholesome ingredients. We explored each step, from preparing the base to adding flavors and final touches. You can adjust spices and serve it with bread or rice. Remember, fresh ingredients enhance taste. You can also experiment with substitutions and variations. Whether storing leftovers or making changes, this recipe fits your needs. Enjoy cooking this healthy meal that is both tasty and filling!

Twenty Minute Vegan Curry Lentil Soup Recipe

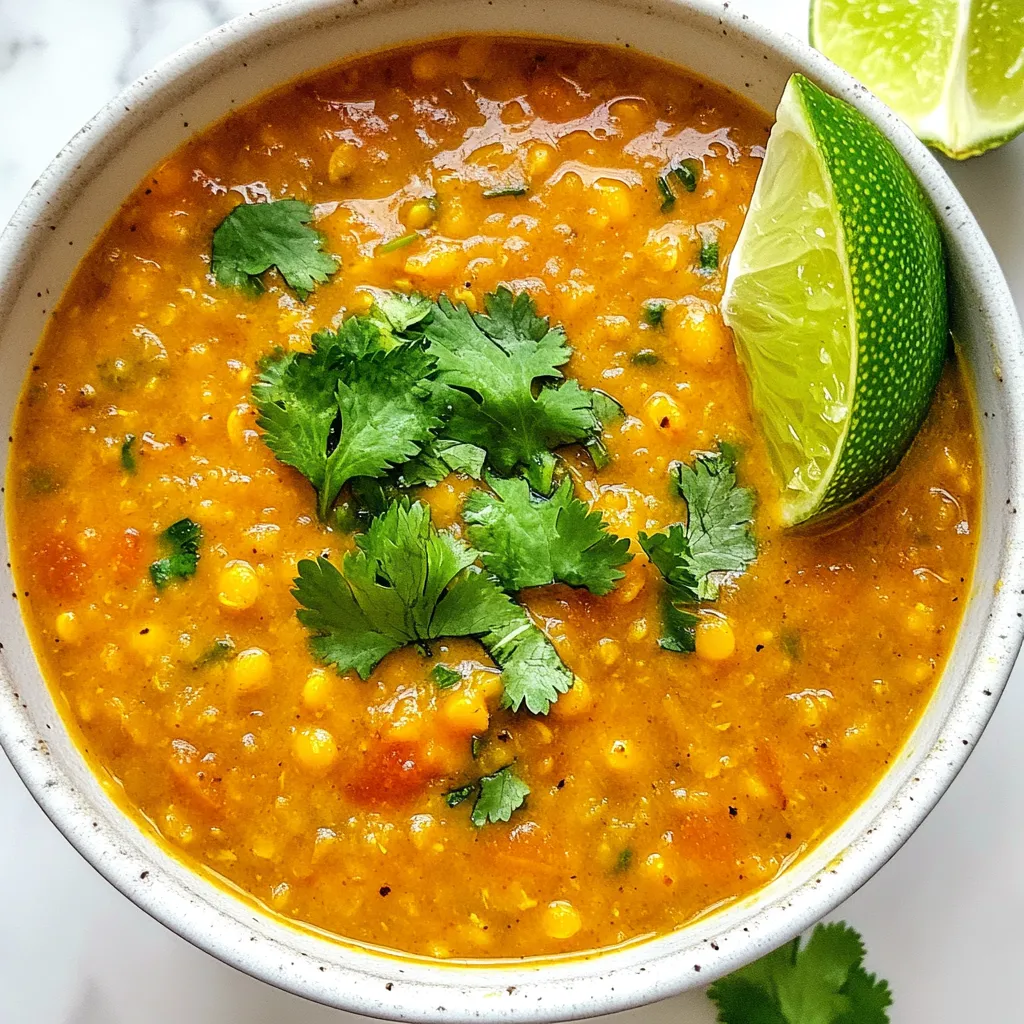
If you’re looking for a quick and tasty meal, this Twenty Minute Vegan Curry Lentil Soup is for you! Packed

- 1 pound Andouille sausage, sliced - 1 cup long-grain white rice - 1 bell pepper (red or green), diced - 1 medium onion, diced - 3 cloves garlic, minced - 1 can (14.5 oz) diced tomatoes, undrained - 2 cups chicken broth - 1 tablespoon Cajun seasoning - 1 teaspoon dried thyme - 1 bay leaf - 1 cup frozen peas - 2 tablespoons olive oil - Salt and pepper to taste - Fresh parsley, chopped (for garnish) Gathering the right ingredients is key to this dish. Andouille sausage brings a rich, smoky flavor that defines Cajun cooking. The rice serves as a base, soaking up all the tasty juices. The bell pepper and onion add crunch and sweetness, while garlic gives a nice kick. Diced tomatoes and chicken broth create a savory sauce. Cajun seasoning gives this dish its unique flair, while thyme and bay leaf add depth. Frozen peas bring color and a fresh taste. Don't forget olive oil for cooking and seasoning with salt and pepper to enhance the flavors. Fresh parsley makes a lovely garnish, adding brightness to your plate. - Large skillet or frying pan - Cooking spoon - Measuring cups and spoons - Knife and cutting board Having the right tools makes cooking easier. A large skillet allows for even cooking. A cooking spoon helps mix ingredients well. Measuring cups and spoons ensure you add just the right amounts. A knife and cutting board are essential for chopping your veggies. - Lid for the skillet - Fork for fluffing rice Using a lid helps trap steam, cooking the rice perfectly. A fork is useful for fluffing the rice once it’s done. This will make your dish light and fluffy, ready to serve. {{ingredient_image_1}} - Heat 2 tablespoons of olive oil in the skillet over medium heat. - Add 1 pound of sliced Andouille sausage. Brown it for about 5-7 minutes. - Next, add 1 diced onion and 1 diced bell pepper to the skillet. Sauté them for about 4-5 minutes. They should become tender. - Add 3 cloves of minced garlic. Sauté for another minute until it smells great. - Stir in 1 cup of long-grain white rice. Toast it slightly for about 2 minutes. - Pour in 1 can of diced tomatoes, 2 cups of chicken broth, 1 tablespoon of Cajun seasoning, 1 teaspoon of dried thyme, and 1 bay leaf. Mix everything well. - Bring the mixture to a gentle boil. Then, lower the heat and return the sausage to the pan. Cover it and let it simmer for 18-20 minutes. The rice should be tender and absorb most of the liquid. - Once the rice is cooked, stir in 1 cup of frozen peas. Let it sit covered for another 5 minutes. This helps the peas heat up. - Remove the bay leaf and season with salt and pepper to taste. Fluff the rice with a fork before serving. - For a bright touch, garnish with freshly chopped parsley. Choosing the right Cajun seasoning is key. Look for a blend that has a mix of spices like paprika, cayenne, and garlic. You want a balance of heat and flavor. If you prefer more heat, add a pinch of cayenne or extra seasoning. For less spice, use half the amount at first and taste before adding more. To achieve perfectly cooked rice, rinse it before cooking. This removes excess starch and helps prevent stickiness. Toast the rice in the pan for two minutes. This adds a nice nutty flavor. When you combine the ingredients, make sure the rice is fully submerged in the liquid. This helps it cook evenly. Overcooking the sausage can lead to a tough texture. Cook it just until browned and crispy. Remove it from the pan to prevent it from cooking further. Not allowing the rice to rest after cooking can make it gummy. Let it sit covered for five minutes. This helps the grains firm up and absorb any remaining liquid. Pro Tips Use Quality Sausage: The flavor of your dish heavily relies on the quality of the Andouille sausage. Look for a brand that uses natural spices and has a good balance of smokiness and heat. Toast the Rice: Toasting the rice for a couple of minutes before adding liquids enhances its nutty flavor and helps prevent it from becoming mushy. Adjust the Spice Level: If you prefer a milder dish, reduce the amount of Cajun seasoning. Conversely, for more heat, feel free to add extra seasoning or a pinch of cayenne pepper. Let it Rest: Allowing the dish to sit covered after cooking lets the flavors meld and gives the rice time to absorb any remaining liquid, resulting in a better texture. {{image_2}} You can easily switch up the sausage in this dish. Kielbasa sausage works well and adds a nice flavor. If you prefer, you can use chicken or shrimp instead. Both will cook quickly and soak up the Cajun spices. Feel free to mix in more veggies. Adding corn brings sweetness and color. Zucchini can add a nice crunch. You can use frozen or fresh vegetables based on what you have. Just remember to adjust cooking times if you add fresh options. If you're looking for a healthy twist, try brown rice or quinoa. They add more fiber and nutrients. You can also use flavored rice, like garlic or herb rice, to give your dish a new taste. Just make sure to adjust the liquids based on what you use. To keep your One Pan Cajun Sausage and Rice fresh, place it in a container. Make sure it is airtight. You can refrigerate the dish for up to four days. This keeps the flavors intact and safe to eat. For best results, use glass or BPA-free plastic containers. They seal well and won’t retain odors. If you have more than one serving, consider using smaller containers. This makes it easy to grab a portion later. When it's time to eat again, you can reheat this dish in two ways. The microwave is quick. Just place the food in a microwave-safe bowl. Heat in short bursts, checking often. Stir the rice to help it heat evenly. The stovetop is another option. Place the dish in a skillet over low heat. Add a splash of chicken broth or water. This helps keep the rice moist. Stir frequently until everything is hot. If you want to save some for later, freezing is great. Portion out the leftovers into freezer-safe bags or containers. Make sure to remove air before sealing. This prevents freezer burn. To thaw, move the container to the fridge overnight. If you're in a hurry, you can use the microwave. Just use the defrost setting. After thawing, reheat as mentioned above. Enjoy your flavorful meal anytime! It takes about 40 minutes to cook One Pan Cajun Sausage and Rice. This includes 10 minutes of prep and 30 minutes of cooking. The cooking time allows the rice to soak up all the tasty flavors. Yes, you can use other sausages. Kielbasa is a great choice. Chicken sausage also works well for a lighter dish. Feel free to use what you like. Just keep the cooking time similar. Yes, this recipe is gluten-free. The main ingredients do not contain gluten. Just make sure your chicken broth is gluten-free. Always check labels if you are unsure. One Pan Cajun Sausage and Rice is a tasty and easy meal. We covered the key ingredients and steps for cooking this dish. You learned about tips and tricks to enhance flavor and avoid common mistakes. We also discussed variations and storage info for leftovers. This meal works well for a busy weeknight. It offers flexibility for ingredients, making it enjoyable for all. Try it out and make it your own!

One Pan Cajun Sausage and Rice Flavorful Comfort Dish

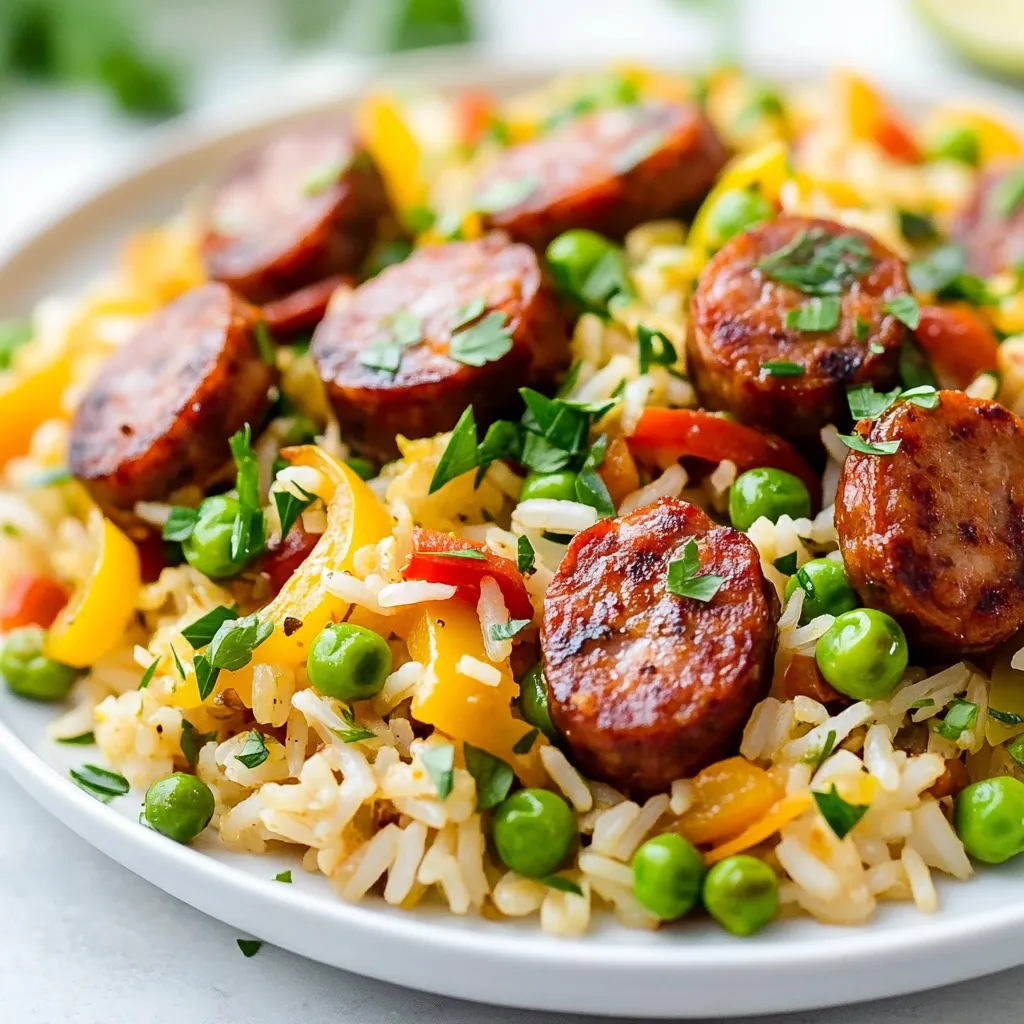
Looking for a warm, hearty meal that’s both simple and bursting with flavor? Our One Pan Cajun Sausage and Rice

To make lemon pepper chicken, gather these items: - 4 boneless, skinless chicken breasts - 1/4 cup olive oil - Zest of 2 large lemons - 1/4 cup fresh lemon juice - 2 teaspoons freshly ground black pepper - 1 teaspoon garlic powder - 1 teaspoon onion powder - 1 teaspoon salt - 1/2 teaspoon red pepper flakes (optional for heat) - Fresh parsley, chopped for garnish You can swap some ingredients to suit your taste or needs. Use canola oil instead of olive oil. Lemon zest can be replaced with lime zest for a twist. If you lack fresh lemons, bottled lemon juice works, but fresh is best. You can use powdered garlic instead of garlic powder. If you prefer a milder flavor, reduce the black pepper. For a spicy kick, add more red pepper flakes. Fresh ingredients often bring more flavor than dried ones. Fresh lemon juice offers a bright taste that dried cannot match. The same goes for lemon zest; fresh zest has a strong, zesty aroma. Use fresh black pepper for a better flavor punch. However, if you only have dried spices, they will work fine. Just remember to adjust the amounts since dried spices are more potent. {{ingredient_image_1}} To make the marinade, grab a mixing bowl. In this bowl, add 1/4 cup of olive oil. Next, zest two large lemons to get that fresh flavor. Then, squeeze the lemons to collect 1/4 cup of lemon juice. Add 2 teaspoons of freshly ground black pepper, 1 teaspoon of garlic powder, 1 teaspoon of onion powder, and 1 teaspoon of salt. If you like some heat, toss in 1/2 teaspoon of red pepper flakes. Whisk all these ingredients together until they blend well. Next, take four boneless, skinless chicken breasts. Place them in a resealable plastic bag or a shallow dish. Pour the marinade over the chicken, making sure each piece gets coated. Seal the bag or cover the dish tightly. Now, let the chicken sit in the fridge for at least 30 minutes. For more flavor, you can marinate it for up to 2 hours. Time to fire up the grill! Preheat your grill or grill pan to medium-high heat. When the grill is ready, take the chicken out of the marinade. Let any excess marinade drip off, but don’t wipe it clean. Place the chicken on the grill. Cook for about 6-7 minutes on each side. You want the internal temperature to reach 165°F (75°C). This ensures the chicken is safe to eat. When done, move the chicken to a plate. Let it rest for about 5 minutes. This resting time helps the juices stay inside the meat. Finally, garnish with chopped fresh parsley for a pop of color. Enjoy your zesty lemon pepper chicken! To boost the flavor of your lemon pepper chicken, follow these tips: - Use fresh lemons: Fresh lemon juice and zest add a bright taste. - Marinate longer: Let the chicken sit in the marinade for at least an hour. This helps the flavors soak in deeper. - Add herbs: Fresh herbs like thyme or rosemary can give extra flavor. - Grill with care: Ensure your grill is hot before placing the chicken on it. This helps get nice grill marks and flavor. Avoid these pitfalls for perfect lemon pepper chicken: - Don't skip the marinating step: Skipping this can lead to dull flavors. - Watch the cooking time: Overcooking can make the chicken dry. Always check the internal temperature. - Skip the salt: Salt is key. It enhances all the flavors in your dish. - Don't wipe off excess marinade: Let some marinade stay on the chicken. It adds to the taste. Resting the chicken is vital. Here’s why and how: - Let it rest: After grilling, let the chicken rest for 5 minutes. This allows juices to settle. - Garnish for beauty: Use fresh parsley to make the dish look appealing. - Serve with sides: Pair with grilled veggies or a fresh salad. The colors will pop and taste great together. - Add lemon wedges: They not only look nice but can be squeezed over the chicken for extra zing! Pro Tips Marinate Longer for Flavor: Allow the chicken to marinate for up to 2 hours to enhance the flavor and tenderness of the meat. Use a Meat Thermometer: Ensure the chicken is cooked perfectly by checking the internal temperature; it should reach 165°F (75°C). Let it Rest: After grilling, let the chicken rest for 5 minutes before slicing to keep the juices inside, resulting in a juicier bite. Experiment with Herbs: Add fresh herbs like thyme or rosemary to the marinade for an extra layer of flavor that complements the lemon. {{image_2}} You can add fresh herbs to your lemon pepper chicken for extra flavor. Use herbs like thyme, rosemary, or basil. Chop them finely and mix them into your marinade. This will add a fresh taste and aroma. You can also sprinkle herbs on top before serving for a lovely look. If you like heat, try adding more red pepper flakes to your marinade. Start with 1 teaspoon and see how it tastes. You can also add hot sauce for extra spice. This variation gives a nice kick to the dish. It pairs well with a cool side, like a creamy coleslaw. Cut the chicken breasts into cubes for skewers. Marinate the cubes just like before. Thread them onto skewers with bell peppers and onions. Grill them for about 10-12 minutes, turning often. This makes a fun and easy meal for parties or picnics. Serve them with a side of rice or salad. After grilling your lemon pepper chicken, let it cool. Store it in an airtight container. It stays fresh in the fridge for up to three days. If you want to keep it longer, consider freezing. To freeze the chicken, wrap each piece tightly in plastic wrap. Then, place it in a freezer-safe bag. This method helps prevent freezer burn. You can freeze lemon pepper chicken for up to three months. When it's time to reheat, use the oven for the best results. Preheat your oven to 350°F (175°C). Place the chicken on a baking sheet. Heat for about 15-20 minutes or until hot. You can also use a microwave, but that may dry it out. To keep it moist, cover it with a damp paper towel. Enjoy your lemon pepper chicken again! Yes, you can marinate the chicken overnight. Marinating for this long helps the flavors soak in. It makes the chicken juicier and more tasty. Just remember to store it in the fridge. This keeps the chicken safe and fresh. Many sides pair nicely with lemon pepper chicken. Here are some great options: - Grilled vegetables like zucchini and bell peppers - A light salad with mixed greens - Steamed rice or quinoa - Mashed potatoes with herbs - Roasted potatoes for a crunchy bite These sides add color and balance to your meal. The best way to check if chicken is cooked is to use a meat thermometer. Insert it into the thickest part of the chicken. It should read 165°F (75°C) for safe eating. If you don’t have a thermometer, you can cut into the chicken. The juices should run clear, and the meat should not be pink. Always make sure to check for doneness to stay safe. In this article, we covered the key ingredients for making tasty lemon pepper chicken. We explored ingredient substitutions and the difference between fresh and dried items. You learned step-by-step instructions on preparing the marinade, marinating the chicken, and grilling tips. We shared useful tips for enhancing flavor and avoiding mistakes. We also discussed fun variations, like lemon pepper chicken skewers. Finally, remember the best ways to store and reheat your chicken. Enjoy your cooking, and don’t hesitate to try new things. Keep experimenting with flavors!

Lemon Pepper Chicken Tasty and Simple Recipe Guide

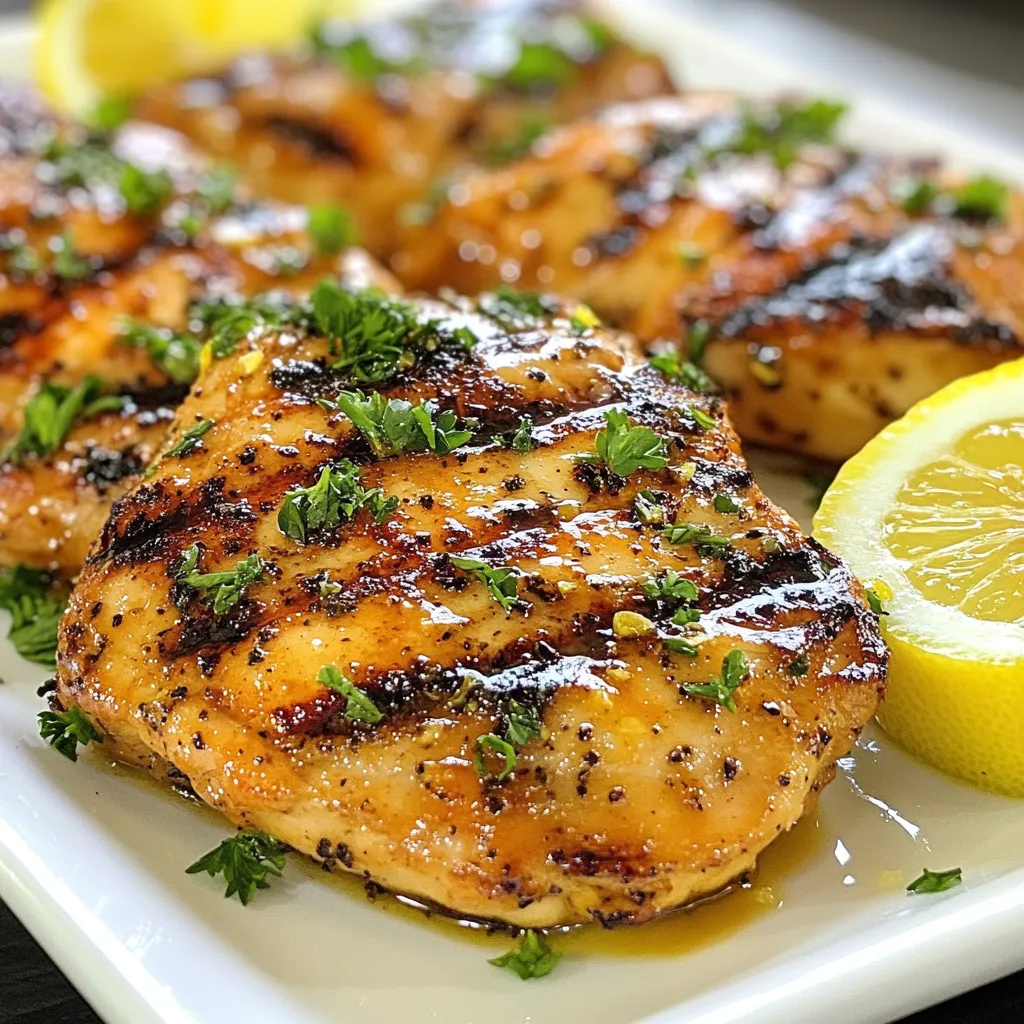
Looking for a quick and tasty meal? This Lemon Pepper Chicken recipe is your answer. With just a few easy

For a tasty Mexican Fiesta Casserole, you need these ingredients: - 1 lb ground beef (or ground turkey) - 1 can (15 oz) black beans, drained and rinsed - 1 can (15 oz) corn, drained - 1 can (10 oz) diced tomatoes with green chilies - 1 medium onion, diced - 2 cloves garlic, minced - 2 cups cooked rice (white or brown) - 1 tablespoon taco seasoning - 1 teaspoon cumin - 2 cups shredded cheddar cheese - 1 cup salsa - Fresh cilantro for garnish - Salt and pepper to taste You can swap some ingredients to fit your taste or needs. Use ground turkey instead of beef for a leaner option. If you want a vegetarian dish, try black beans and mushrooms instead of meat. Riced cauliflower works great if you're cutting carbs. You can also use fresh tomatoes instead of canned ones for a fresher taste. Using fresh ingredients can enhance the flavor of your casserole. Fresh onions and garlic give a nice bite. Fresh cilantro adds brightness when you serve it. However, canned ingredients save time and work well too. Canned beans and corn are easy and still tasty. Just rinse them well to cut down on sodium. This balance lets you enjoy both fresh and canned ingredients while making your cooking a breeze. {{ingredient_image_1}} To start, gather all your ingredients. This makes cooking easy and fun. You will need: - 1 lb ground beef (or ground turkey) - 1 can (15 oz) black beans, drained and rinsed - 1 can (15 oz) corn, drained - 1 can (10 oz) diced tomatoes with green chilies - 1 medium onion, diced - 2 cloves garlic, minced - 2 cups cooked rice (white or brown) - 1 tablespoon taco seasoning - 1 teaspoon cumin - 2 cups shredded cheddar cheese - 1 cup salsa - Fresh cilantro for garnish - Salt and pepper to taste Next, preheat your oven to 350°F (175°C). This ensures your casserole cooks evenly. Now, chop the onion and mince the garlic. This step adds a nice flavor to your dish. Heat a large skillet over medium-high heat. Add the ground beef (or turkey) and cook until it is browned. Break it up with a spatula as it cooks. If there is too much fat, drain it. Add the diced onion and minced garlic to the skillet. Sauté for about 3-4 minutes. You want the onion to look clear. Stir in the taco seasoning, cumin, black beans, corn, and diced tomatoes with their juice. Cook for another 5 minutes. This helps all the flavors mix well. Season with salt and pepper to taste. In a large bowl, combine the cooked rice and salsa. Pour this mixture into the skillet. Stir it all together until combined. Spread half of the mixture into a greased 9x13 inch casserole dish. Sprinkle 1 cup of shredded cheese over the top. Layer the remaining mixture over the cheese. Then, top it with the last cup of shredded cheese. Cover the dish with foil and bake for 25 minutes. Remove the foil and bake for an additional 10-15 minutes. You want the cheese to be bubbly and golden. Once done, take it out and let it sit for 5 minutes. Garnish with fresh cilantro before serving. When layering, think about balance. Start with the rice and salsa mix at the bottom. Then, add half of the meat mixture. This keeps the rice from getting too soggy. Sprinkle cheese between layers for extra flavor. It also helps bind the layers together. Don’t forget to leave some cheese for the top layer. This gives a nice golden color when baked. Layering this way ensures every bite has a mix of flavors. Enjoy your delicious Mexican Fiesta Casserole! To stop your casserole from being soggy, drain all canned ingredients well. This keeps extra liquid out of the dish. Use cooked rice instead of raw rice. Cooked rice absorbs less moisture. Also, avoid overcooking the layers. A quick bake helps keep everything firm. I love using cheddar cheese for that classic flavor. You can also mix in Monterey Jack for extra creaminess. If you want a bit of spice, try pepper jack cheese. For a richer taste, use a blend of cheeses. Mixing cheeses makes every bite more exciting! To boost flavor, add more spices. Try paprika or chili powder for warmth. A sprinkle of oregano adds an earthy touch. Fresh herbs like cilantro or parsley can brighten the dish. Taste as you go, and adjust the spices to your liking. This personal touch makes your casserole unique! Pro Tips Use Leftovers: This casserole is a great way to use up leftover cooked meats or vegetables. Feel free to add in whatever you have on hand! Spice it Up: If you like it hot, add some chopped jalapeños or a sprinkle of cayenne pepper to the meat mixture for an extra kick! Cheese Variations: Try using a blend of cheeses such as Monterey Jack or Pepper Jack for different flavors and textures. Make Ahead: You can prepare this casserole a day in advance. Just cover it tightly and refrigerate before baking. It may require a few extra minutes in the oven. {{image_2}} You can make a tasty vegetarian version of this casserole. Simply swap the ground beef or turkey for mushrooms or lentils. Use the same spices to keep the flavor. Add more veggies like bell peppers, zucchini, or spinach for extra nutrition. This version is just as filling and packed with flavor. If you love heat, add jalapeños or hot sauce to the mix. Chop fresh jalapeños and stir them in with the veggies. For more kick, drizzle hot sauce over the layers before baking. This will give your casserole a fiery twist that spice lovers will enjoy. Adjust the amount based on your heat preference. To make this dish gluten-free, simply check your ingredients. Most canned beans, corn, and tomatoes are gluten-free. Use a gluten-free taco seasoning to ensure safety. Serve with gluten-free rice or corn tortillas for added flavor. This way, everyone can savor this delicious meal without worry. After enjoying your Mexican Fiesta Casserole, let it cool down. Once it cools, place it in an airtight container. Make sure to cover the container tightly. This helps keep the flavors fresh. You can store it in the fridge for up to three days. If you want to eat it later, freezing is also an option. To freeze the casserole, let it cool completely. Cut the casserole into portions for easier thawing. Wrap each portion tightly in plastic wrap. Then, place the wrapped portions in a freezer bag. Label the bag with the date. The casserole can stay in the freezer for up to three months. When you’re ready to eat, thaw it in the fridge overnight. When you're ready to enjoy the leftovers, preheat your oven to 350°F (175°C). Remove the casserole from the fridge or freezer. If frozen, let it thaw for a few hours first. Place the casserole in an oven-safe dish. Cover it with foil to keep it moist. Heat for about 20-25 minutes or until warmed through. You can also microwave individual portions. Heat on high for 1-2 minutes. Check to ensure it is hot in the center. Enjoy your tasty leftovers! Mexican Fiesta Casserole lasts about 3 to 4 days in the fridge. Make sure to store it in an airtight container. This helps keep it fresh. When you want to eat it, check for any off smells or changes in color. If it looks and smells good, it is safe to eat. Yes, you can prepare the casserole ahead of time. You can make the layers and put them in the dish. Cover it tightly with foil and store it in the fridge. When you're ready to bake, just pop it in the oven. If you store it overnight, add a few extra minutes to the baking time. You can serve many fun sides with this casserole. Here are some ideas: - Fresh guacamole - Crunchy tortilla chips - A simple green salad - Sour cream or Greek yogurt - Extra salsa on the side These sides will add more flavor and make your meal special. Enjoy your fiesta! In this post, we explored the Mexican Fiesta Casserole. We covered its ingredients, including substitutes, and the choice between fresh and canned items. The step-by-step guide made cooking easy. I shared tips to avoid a soggy casserole and suggested the best cheese options. You discovered fun variations and learned how to store leftovers safely. This dish is simple and versatile, ready to impress anyone. Enjoy making it!

Mexican Fiesta Casserole Flavorful and Easy Recipe

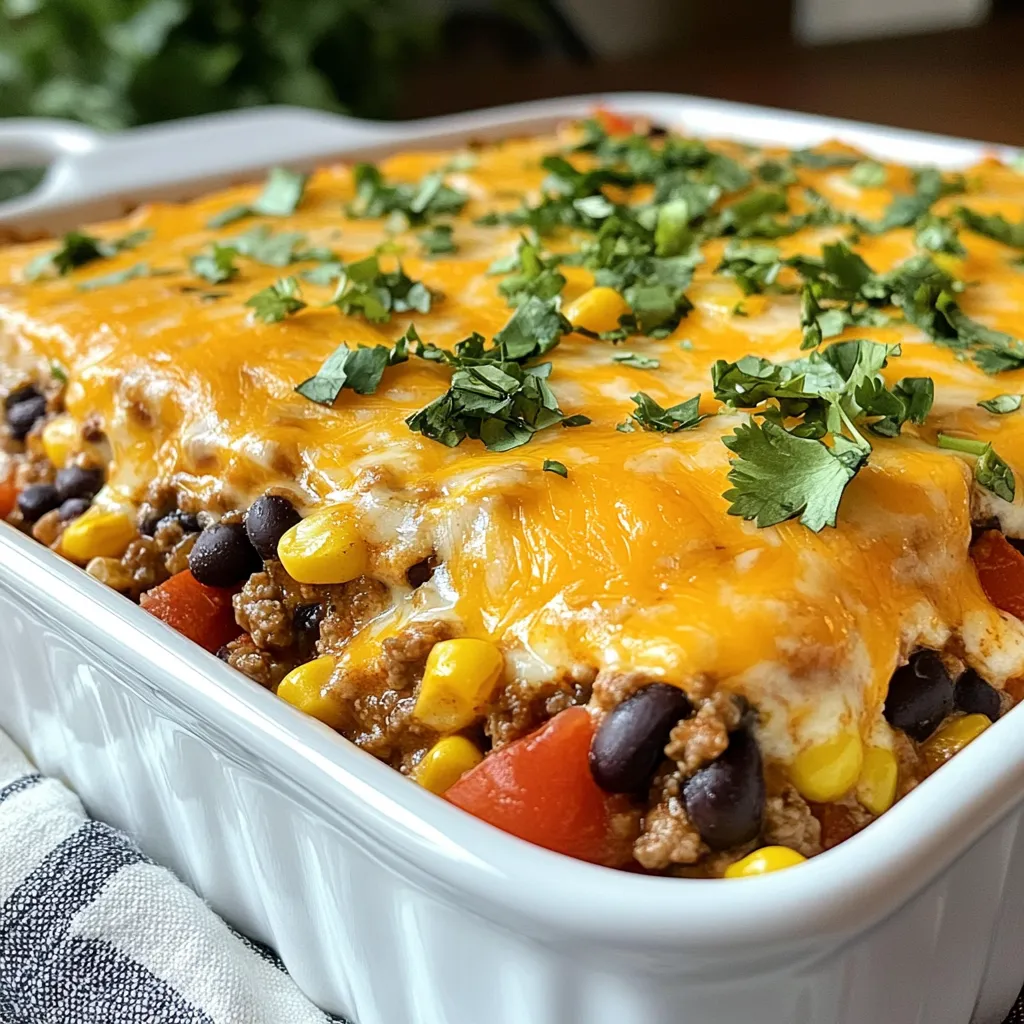
Are you ready to spice up your dinner routine? This Mexican Fiesta Casserole is not just tasty; it’s simple to

To make Gordon Ramsay's Chicken Tikka Masala, gather these ingredients: - 500g chicken breast, cut into bite-sized pieces - 200g plain yogurt - 2 tablespoons garam masala - 1 tablespoon ground cumin - 1 tablespoon ground coriander - 1 teaspoon turmeric powder - 1 teaspoon cayenne pepper (adjust for spice) - 2 tablespoons olive oil - 1 large onion, finely chopped - 3 cloves garlic, minced - 1-inch ginger, grated - 2 tomatoes, pureed - 200ml coconut milk - Fresh cilantro, for garnish - Salt and pepper to taste If you can't find an ingredient, try these substitutes: - Chicken breast: Use boneless chicken thighs for more flavor. - Plain yogurt: Substitute with Greek yogurt for creaminess. - Garam masala: Make your own by mixing equal parts of cumin, coriander, and cardamom. - Coconut milk: Use heavy cream for a richer taste. - Fresh cilantro: Parsley works as a mild alternative for garnish. Spice levels can change based on your taste. Here’s how to adjust: - Mild: Reduce cayenne pepper to ½ teaspoon or omit it. - Medium: Use the recipe as is, with 1 teaspoon of cayenne. - Spicy: Increase cayenne pepper to 2 teaspoons for a kick. - Extra spicy: Add fresh chopped green chilies or increase garam masala. This dish is all about balance, so feel free to experiment! {{ingredient_image_1}} Start by mixing yogurt and spices. In a bowl, add 200g plain yogurt. Next, include 1 tablespoon of garam masala, 1 tablespoon of ground cumin, 1 tablespoon of ground coriander, 1 teaspoon of turmeric powder, and 1 teaspoon of cayenne pepper. Don’t forget to add salt. Now, cut 500g chicken breast into bite-sized pieces. Add the chicken to the bowl and mix until coated. Marinate for at least 1 hour. For extra flavor, marinate overnight in the fridge. Heat 2 tablespoons of olive oil in a skillet over medium heat. Once the oil is hot, add 1 finely chopped onion. Cook the onion until it turns golden brown, which takes about 7-8 minutes. After that, stir in 3 minced cloves of garlic and 1-inch grated ginger. Sauté for another 2 minutes until the kitchen smells amazing. Now, add the marinated chicken to the skillet. Cook the chicken until it is browned on all sides, which takes about 5-6 minutes. Next, pour in 2 pureed tomatoes and the remaining 1 tablespoon of garam masala. Cook for about 5 minutes to let the flavors mix well. Lower the heat and stir in 200ml coconut milk. Let it simmer for 10 minutes. This step makes the sauce rich and creamy. Check the salt and pepper, adjusting to your taste. Serve the Chicken Tikka Masala with fresh cilantro on top for a lovely finish. Enjoy! To get that real taste, marinate the chicken. I suggest using yogurt mixed with spices. Let it sit for at least one hour. Overnight is even better. This step tenderizes the meat and adds depth. Use fresh spices. Ground spices lose flavor over time. Buy whole spices and grind them when needed. This keeps the taste strong and fresh. When cooking, heat the oil first. This helps the onion brown nicely. Stir it often to avoid burning. Cook it until golden, about seven to eight minutes. Add garlic and ginger after the onion. Cooking them briefly brings out their flavor. They should smell great before adding the chicken. When you add the marinated chicken, let it brown well. This step builds flavor. It should take around five to six minutes. For a great look, serve the Chicken Tikka Masala in a bowl. Top it with fresh cilantro for color. Pair it with warm naan bread or fluffy basmati rice. This adds an authentic touch. You can also offer yogurt or chutney on the side. These add freshness and balance to the dish. Pro Tips Marination Time: For the best flavor, marinate the chicken overnight. This allows the spices to penetrate the meat deeply, resulting in a more flavorful dish. Spice Level Adjustment: Feel free to adjust the amount of cayenne pepper to suit your spice tolerance. Start with less and add more if you prefer heat. Garnish for Freshness: Always use fresh cilantro for garnish just before serving. It adds a bright flavor and a pop of color to the dish. Serving Suggestions: Serve your Chicken Tikka Masala with warm naan or fluffy basmati rice to soak up the delicious sauce. {{image_2}} You can easily make a vegan version of Chicken Tikka Masala. Instead of chicken, use firm tofu or chickpeas. For the yogurt, use plant-based yogurt. Coconut milk works well for creaminess. The spices stay the same, so the flavor remains rich and exciting. You don’t have to stick with chicken. You can try lamb, shrimp, or fish. Each protein adds its unique taste. Just remember to adjust the cooking time. Lamb will need a bit more time, while shrimp cooks fast. This way, you can enjoy different flavors every time. Every region has its twist on Chicken Tikka Masala. In India, some add more cream for a richer sauce. In the UK, it might be spicier with extra chilies. You could also find variations with different herbs or spices, like curry leaves or fenugreek. These changes give each dish a special touch. To store your Chicken Tikka Masala, let it cool first. Place it in an airtight container. Make sure the lid seals well to keep the flavors fresh. Leftovers stay good in the fridge for up to three days. If you want to keep it longer, freezing is a great option. When you're ready to eat the leftovers, take them out of the fridge. Heat them on the stove over medium heat. Stir often to make sure it heats evenly. You can also use a microwave. Just cover the bowl to avoid splatters. Heat in short bursts, stirring in between, until warm. For freezing, store the Chicken Tikka Masala in a freezer-safe container. Leave some space at the top for expansion as it freezes. It can last up to three months in the freezer. When you're ready to eat it, thaw it in the fridge overnight. Then, reheat as mentioned above for the best taste. You can serve Chicken Tikka Masala with warm naan bread or fluffy basmati rice. Both options soak up the tasty sauce well. You might also try a fresh salad or some roasted vegetables. These sides add balance to the meal. To make it spicier, add more cayenne pepper or a chopped chili. You can also use a spicier garam masala blend. For a milder taste, reduce the cayenne pepper. You can also skip the spicy peppers and use more coconut milk, which cools the heat. Yes, you can use boneless chicken thighs. They add juiciness and flavor to your dish. Just cut them into bite-sized pieces like the chicken breasts. The cooking time will stay about the same. Thighs also stay tender, making them a great choice. In this blog post, we explored the key ingredients for Chicken Tikka Masala, including substitutes and spice levels. We detailed step-by-step instructions, from marinating the chicken to cooking the sauce. I shared tips for authentic flavor and cooking techniques inspired by Gordon Ramsay. We also looked at variations, storage tips, and common questions. You can now create a delicious dish tailored to your tastes. Enjoy cooking and sharing this meal with loved ones!

Gordon Ramsay Chicken Tikka Masala Flavorful Recipe

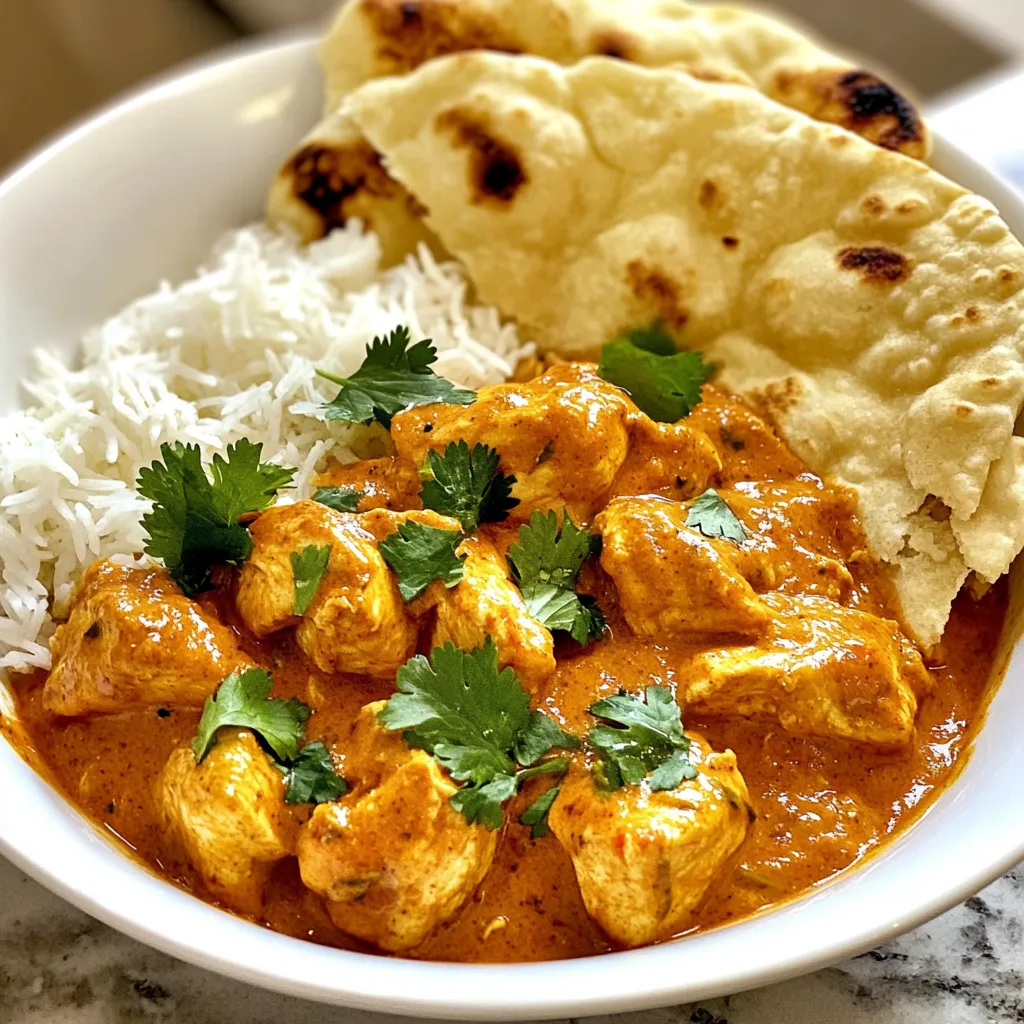
If you’re craving a burst of flavor, this Gordon Ramsay Chicken Tikka Masala recipe is for you. With easy steps

- Cooked rice options: You can use either 2 cups of white rice or brown rice. Both work well in this dish. - Types of chicken: I often suggest using 2 cups of shredded rotisserie chicken. It saves time and adds great flavor. - Enchilada sauce options: For this recipe, you can choose between red or green enchilada sauce, depending on your taste. - Additional ingredients: - 1 can (15 oz) black beans, drained and rinsed - 1 cup corn, either frozen or canned - 1 teaspoon ground cumin - 1 teaspoon chili powder - 1 cup diced bell peppers, mixed colors add a fun look - 1 cup diced onion for sweetness - 2 cups shredded cheese, a blend of cheddar and Monterey Jack works best - Salt and pepper to taste - Fresh cilantro for garnish, optional but freshens the dish! This list gives you all the tasty items you need to make a comforting Chicken Enchilada Rice Casserole. Each ingredient plays a role in building layers of flavor. {{ingredient_image_1}} 1. Preheating the oven and greasing the dish First, preheat your oven to 350°F (175°C). A warm oven helps cook the casserole evenly. Next, grab a 9x13-inch casserole dish. Lightly grease it with cooking spray or a drizzle of olive oil. This step prevents sticking and makes serving easier. 2. Mixing the ingredients in a bowl In a large mixing bowl, combine these ingredients: - 2 cups cooked rice - 2 cups shredded cooked chicken - 1 can (10 oz) enchilada sauce - 1 can (15 oz) black beans, drained and rinsed - 1 cup corn - 1 teaspoon ground cumin - 1 teaspoon chili powder - 1 cup diced bell peppers - 1 cup diced onion - 1 cup shredded cheese (reserve half for later) Mix well until everything is coated nicely in sauce and spices. 3. Seasoning tips for optimal flavor Add salt and pepper to taste. Feel free to add more spices if you like a kick. Taste the mixture to make sure the flavors are just right. 1. Layering the casserole Pour the chicken and rice mixture into your greased casserole dish. Spread it evenly to ensure every bite has flavor. Top this layer with the remaining shredded cheese. This will create a nice cheesy crust. 2. Covering and initial baking time Cover the dish with aluminum foil. Bake in the preheated oven for 25 minutes. This helps the flavors meld together and keeps the dish moist. 3. Final baking for cheese melting After 25 minutes, remove the foil. Bake for an additional 10-15 minutes. This allows the cheese to melt and bubble nicely, creating a golden layer on top. Once it looks perfect, take it out of the oven and let it cool for a few minutes. Choosing the right rice and chicken is key. I often use white rice for its fluffy texture. Brown rice adds a nutty flavor but takes longer to cook. Rotisserie chicken is my top choice for ease. It is flavorful and saves time. Adjust your spice levels to fit your taste. If you like it mild, use less chili powder. For heat, add more cumin or a dash of hot sauce. Taste as you mix to find your perfect balance. Avoid undercooked or overcooked rice. If you use leftover rice, ensure it’s heated through before mixing. If you cook rice fresh, follow package instructions for the best result. To achieve the perfect cheese layer, use a mix of cheeses. Cheddar and Monterey Jack melt beautifully together. For a golden top, bake uncovered for the last 10-15 minutes. Keep an eye on it to prevent burning. Pro Tips Use Rotisserie Chicken: For a quick and easy option, rotisserie chicken adds great flavor and saves time on cooking. Customize the Heat: Adjust the spice level by using spicy enchilada sauce or adding jalapeños for an extra kick. Add More Veggies: Feel free to include more vegetables like zucchini or spinach for added nutrition and flavor. Make Ahead: This casserole can be prepared in advance and stored in the refrigerator. Just bake it right before serving! {{image_2}} You can easily change up the protein in this dish. Ground turkey or beef works great. You can even use tofu for a plant-based option. This makes it easy for everyone to enjoy. For a vegetarian-friendly dish, skip the chicken. Add more black beans or use lentils instead. You can also mix in some extra veggies like zucchini or mushrooms. These choices keep the taste great while adding nutrition. Feel free to get creative with the vegetables. Try adding diced tomatoes, spinach, or zucchini for extra color and flavor. You can also swap bell peppers for jalapeños if you want some heat. Experimenting with spices is fun too. Add a pinch of smoked paprika for a smoky taste or some cayenne pepper for a kick. You can also mix in a dash of lime juice to brighten the flavor. Each of these changes helps make the chicken enchilada rice casserole your own. So, have fun and let your taste buds guide you! To keep your Chicken Enchilada Rice Casserole fresh, follow these tips: - Refrigerate: Place leftovers in an airtight container. They can last in the fridge for up to 3-4 days. - Freeze: For longer storage, use a freezer-safe container. It will stay good for 2-3 months. - Portion Control: Consider dividing into smaller portions. This makes it easy to reheat only what you need. To safely reheat your casserole, use these methods: - Oven: Preheat your oven to 350°F (175°C). Cover the casserole with foil. Heat for about 20-25 minutes or until warm. - Microwave: Place a portion on a microwave-safe plate. Heat on medium for 2-3 minutes, stirring halfway through. - Flavor Tips: Add a splash of water or extra sauce before reheating. This helps keep the dish moist and delicious. No, uncooked rice won't work well here. You need cooked rice for the best texture. If you use uncooked rice, it will not cook fully in the oven. This can lead to a hard and crunchy dish. Always use cooked rice, whether it's white or brown. To make this dish gluten-free, choose a gluten-free enchilada sauce. Many brands offer gluten-free options. Also, make sure the black beans and any other ingredients are gluten-free. This way, you can enjoy the flavor without any gluten. You can serve this casserole with a fresh salad or some tortilla chips. A side of guacamole also adds great flavor. If you want something warm, try serving it with Mexican rice or refried beans. These sides complement the main dish and create a fun meal. The Chicken Enchilada Rice Casserole combines simple ingredients for great taste. You can choose between white or brown rice, and rotisserie chicken works best. We explored different sauces and added flavorful beans and veggies. Remember to preheat your oven and mix well for the best flavor. Avoid common mistakes, like overcooking the rice. Feel free to switch proteins or spices to match your taste. Store leftovers properly to enjoy later. With these tips, you'll create a dish that delights everyone at your table. Happy cooking!

Chicken Enchilada Rice Casserole Easy and Flavorful Dish

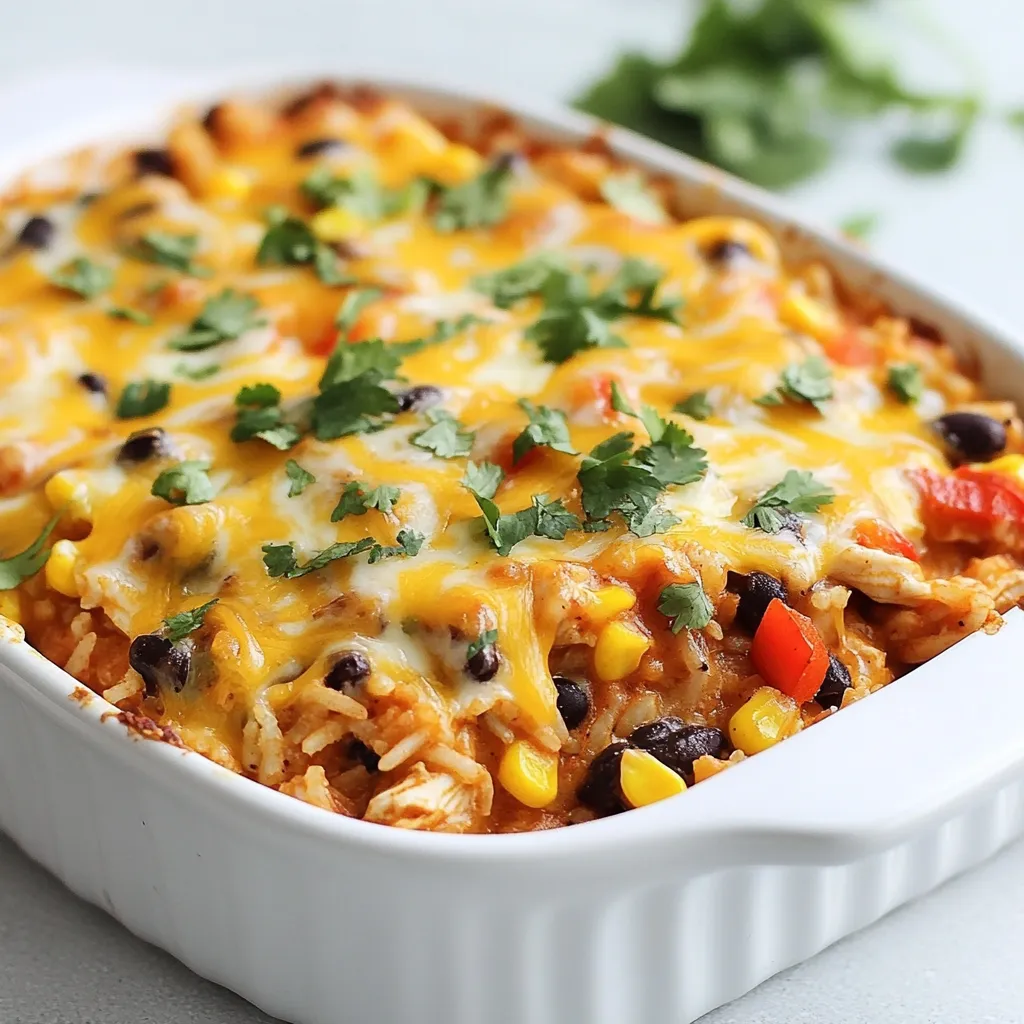
Looking for a tasty and easy meal? Chicken Enchilada Rice Casserole is your answer! This dish brings together savory chicken,

Older posts
Newer posts
← Previous Page1 … Page104 Page105 Page106 … Page115 Next →

dsad

© 2025 flavorsprint • Built with GeneratePress

Our Policies

  • Copyright Policy
  • Cookie Policy
  • GDPR Policy
  • Privacy Policy
  • Disclaimer
  • Terms Of Use

More Information

  • Home
  • About
  • Contact
  • Appetizers
  • Dessert
  • Dinner
  • Drinks
©2025, flavorsprint About Back To Top