Skip to content
DisclaimerTerms Of UseGDPR PolicyCookie Policy

flavorsprint

  • Home
  • Drinks
  • Appetizers
  • Dinner
  • Dessert
  • About
  • Contact
  • Privacy Policy
DisclaimerTerms Of UseGDPR PolicyCookie Policy

Lillian

For a tasty Air Fryer Teriyaki Salmon Bowl, you'll need: - 4 salmon fillets (about 6 oz each) - 1/4 cup teriyaki sauce - 1 tablespoon sesame oil - 2 cups cooked jasmine rice - 1 cup broccoli florets - 1 cup shredded carrots - 1 red bell pepper, thinly sliced - 2 green onions, sliced - 1 tablespoon sesame seeds - Salt and pepper to taste These ingredients combine to create a meal that is both healthy and filling. The salmon brings rich flavor while the veggies add crunch and color. If you want to take your bowl to the next level, consider adding: - Avocado slices for creaminess - Pickled ginger for a tangy kick - Extra teriyaki sauce for more flavor - Chili flakes for some heat Feel free to mix and match these garnishes. They will enhance the taste and make your bowl look stunning. You will need a few key tools to make these bowls: - Air fryer for cooking the salmon - Shallow dish for marinating - Steamer basket or pot for veggies - Serving bowls for assembly - Tongs for easy handling Having these tools ready will help you prepare your meal quickly and easily. Enjoy the process of cooking and the delightful meal that follows! To start, gather your ingredients for the marinade. In a shallow dish, mix the following: - 1/4 cup teriyaki sauce - 1 tablespoon sesame oil - Salt and pepper to taste This mix will add a rich flavor to the salmon. The teriyaki sauce gives it a sweet and savory taste, while the sesame oil adds a nice nutty touch. Next, add your 4 salmon fillets to the dish. Make sure each fillet is coated well with the marinade. I like to let them marinate for at least 15 minutes. This step is key for infusing flavor into the salmon. If you have more time, feel free to let it marinate longer. While the salmon marinates, it’s time to prep the veggies. Take 1 cup of broccoli florets and 1 cup of shredded carrots. Steam them for about 3 to 5 minutes until they are just tender. This quick steam keeps them bright and crunchy. Set them aside when done. Then, slice 1 red bell pepper thinly. This will add color and texture to your bowls. Preheat your air fryer to 400°F (200°C). This takes about 5 minutes. Once hot, place the marinated salmon fillets in the basket. Be sure to lay them in a single layer. Cook them for 8 to 10 minutes. You’ll know they are done when they flake easily with a fork and look glazed. To assemble your bowls, start with 2 cups of cooked jasmine rice. Scoop the rice into each serving bowl. Next, place a salmon fillet on top of the rice. Add the steamed broccoli, shredded carrots, and sliced red bell pepper. For the finishing touch, sprinkle with sliced green onions and sesame seeds. If you like, drizzle any leftover teriyaki sauce over the top for extra flavor. Enjoy your tasty and healthy teriyaki salmon bowls! To get the best flavor, marinate your salmon well. Use a shallow dish for even coverage. Combine 1/4 cup of teriyaki sauce and 1 tablespoon of sesame oil. Add salt and pepper to taste. Make sure each fillet is covered in the marinade. Let it sit for at least 15 minutes. For more flavor, marinate for up to an hour. This helps the salmon soak up all the tasty sauce. Achieving perfectly cooked salmon is easy with an air fryer. Preheat your air fryer to 400°F (200°C) for 5 minutes. Place the salmon fillets in a single layer in the basket. Cook for 8-10 minutes. Check the salmon at 8 minutes. It should flake easily with a fork when ready. If it’s not done, cook for another 1-2 minutes. This method gives you a nice glaze and a tender texture. Steaming veggies in an air fryer is quick and easy. For this recipe, use broccoli and carrots. Place them in the air fryer basket. Steam at 400°F (200°C) for about 3-5 minutes. Check for tenderness, but don’t overcook. You want them bright and crisp. This method keeps the nutrients intact and enhances their natural flavors. Enjoy your vibrant and healthy toppings! {{image_2}} You can swap salmon for other proteins, like chicken or tofu. Chicken thighs work great, too. They absorb flavors well and stay juicy. For a plant-based option, use firm tofu. Just press it to remove moisture before marinating. Feel free to change up the veggies in your bowl. Snap peas, zucchini, or asparagus add nice crunch. You can also add mushrooms for a savory twist. Mix and match to find your favorite combo. Just remember to steam or air fry them for the best texture. While jasmine rice is a classic choice, other types work well, too. Brown rice adds a nutty flavor and more fiber. Quinoa is a great gluten-free option packed with protein. Cauliflower rice is perfect if you want a low-carb meal. Choose what fits your taste and dietary needs! To keep your teriyaki salmon bowls fresh, place leftovers in an airtight container. Make sure to separate the salmon from the rice and veggies. This helps to prevent sogginess. Store them in the fridge. They will stay good for up to three days. When it's time to eat your leftovers, reheat them gently. You can use the microwave or air fryer. If using the microwave, heat in short bursts to keep the salmon moist. For the air fryer, set it to 350°F (175°C) and heat for about 5-7 minutes. This method helps the salmon stay flaky. If you want to save some bowls for later, freezing is a great option. First, cool the food completely. Then, place the salmon and veggies in freezer-safe bags. Squeeze out excess air and seal tightly. The rice can be frozen in a separate bag. You can freeze them for up to one month. When ready to eat, thaw overnight in the fridge before reheating. Yes, you can! Other fish like trout or tilapia work well. Choose fish that cooks quickly. This keeps the meal simple and fast. Just adjust cooking time as needed. Thicker fish may need a bit longer. To make teriyaki sauce, mix these ingredients in a small bowl: - 1/4 cup soy sauce - 2 tablespoons brown sugar - 1 tablespoon honey - 1 tablespoon rice vinegar - 1 teaspoon minced garlic - 1 teaspoon minced ginger Stir until sugar dissolves. This sauce brings fresh flavor to your dish. These sides taste great with teriyaki salmon bowls: - Steamed edamame - Cucumber salad - Pickled ginger - Seaweed salad These add extra texture and flavor to your meal. No, you can bake the salmon in an oven instead. Preheat your oven to 400°F (200°C). Place the salmon on a baking sheet. Bake for 12-15 minutes or until done. However, the air fryer gives a crispier finish. Yes, you can! Prepare the salmon and veggies earlier in the day. Store them in airtight containers. When ready to eat, just reheat and assemble. This saves time on busy nights. We explored how to make tasty air fryer teriyaki salmon bowls. I shared key ingredients, step-by-step cooking methods, and helpful tips. You learned about different protein options and how to store leftovers. With these tips, you can enjoy delicious meals anytime. Use this guide to make your kitchen adventures fun and easy. Enjoy your cooking and share your tasty results!

Air Fryer Teriyaki Salmon Bowls Flavorful and Easy Meal

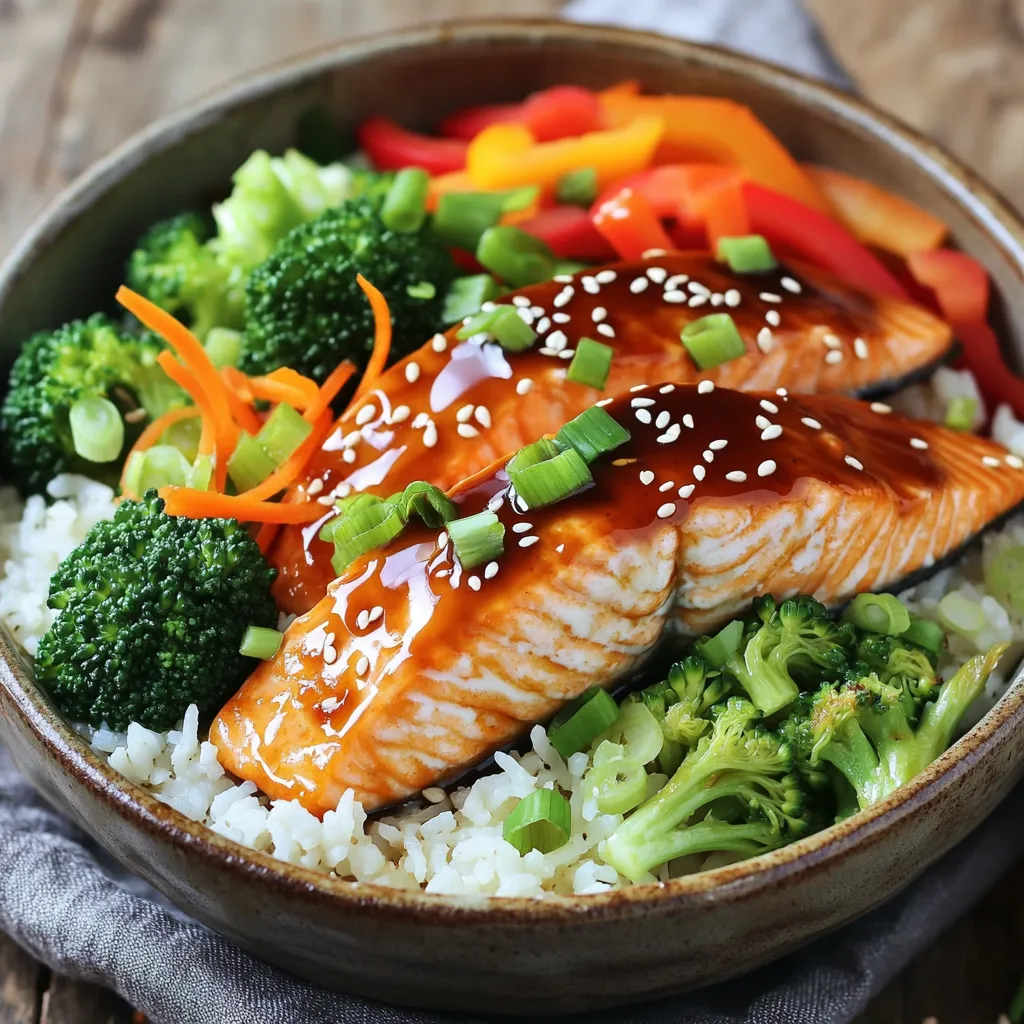
Are you ready for a quick, tasty meal? Air Fryer Teriyaki Salmon Bowls are simple to make and packed with

- 1 medium butternut squash, peeled and chopped - 1 can (400ml) coconut milk - 1 onion, diced - 2 cloves garlic, minced - 1 inch ginger, grated - 1 carrot, diced - 2 cups vegetable broth - 1 teaspoon ground coriander - 1 teaspoon ground cumin - Salt and pepper to taste - Fresh cilantro for garnish (optional) - Lime wedges for serving When you prepare your ingredients, keep these tips in mind: - Butternut Squash: Peel and chop the squash into small cubes. This helps it cook evenly. - Onion and Garlic: Dice the onion and mince the garlic finely. This enhances their flavors in the soup. - Ginger: Grate the ginger to release its oils. This adds a warm spice to the dish. - Carrot: Dice the carrot into small pieces for quicker cooking and even texture. - Coconut Milk: Use full-fat coconut milk for a rich and creamy soup. - Vegetable Broth: Choose low-sodium broth to control the saltiness of your soup. If you cannot find an ingredient, here are some great substitutes: - Butternut Squash: You can use pumpkin or sweet potato if needed. - Coconut Milk: Almond or cashew milk works, but the flavor will change. - Vegetable Broth: Chicken broth is a good option if you prefer a meat base. - Cilantro: If you don’t like cilantro, parsley or green onions can work as a garnish. - Spices: If you lack coriander or cumin, use curry powder for a twist. These tips will help you create a delicious slow cooker butternut squash coconut soup. Enjoy the cooking process and the tasty results! First, take your butternut squash. Peel it and chop it into small cubes. This helps it cook evenly. Next, dice one onion and mince two cloves of garlic. Grate one inch of ginger for a warm flavor. Finally, chop one carrot into small pieces. These fresh veggies create a nice base for the soup. Now, grab your slow cooker. Add the chopped butternut squash, diced onion, minced garlic, grated ginger, and diced carrot into it. Pour in one can of coconut milk and two cups of vegetable broth. Sprinkle in one teaspoon each of ground coriander and ground cumin. Finally, season with salt and pepper to fit your taste. Stir everything well to mix the flavors together. Close the lid on your slow cooker. Set it to low and let it cook for 6 to 7 hours. If you're in a hurry, you can set it on high for 3 to 4 hours. The squash should be tender when it's done. After cooking, blend the soup until it's smooth. You can use an immersion blender or a regular blender in batches. Adjust the seasoning if needed, and let it cool a bit before serving. To get a smooth soup, blend well. I like using an immersion blender. This tool makes it easy to blend right in the pot. If you don’t have one, pour the soup into a regular blender. Do this in small batches. Always let the soup cool a bit first. This keeps it safe and helps prevent spills. Taste is key! After blending, try the soup. If it needs more flavor, add salt or pepper. You can also add extra spices. A pinch of cayenne can add a nice kick. For a sweeter taste, add a touch of maple syrup or honey. Always adjust slowly, tasting as you go. This way, you can find the perfect balance for your palate. If your soup is too thick, stir in more vegetable broth or coconut milk. This will make it lighter and creamier. For a heartier texture, add cooked lentils or chickpeas. They mix well and add protein. If you prefer a chunkier soup, reserve some squash before blending. Add it back after blending for a lovely texture. {{image_2}} You can make this soup heartier by adding protein. Chickpeas are a great choice. They add a nice texture and flavor. You can also use cooked lentils. Add about one cup of either to the slow cooker. This way, you boost the soup's nutrition and make it more filling. If you like heat, try adding red pepper flakes or diced jalapeños. Start with a small amount, like half a teaspoon. You can always add more later. A splash of lime juice can also brighten the flavor and enhance the spice. Consider topping with sliced chili peppers for an extra kick! While a slow cooker is easy, you can make this soup on the stove. Start by sautéing the onion, garlic, and ginger in a pot. Then add the rest of the ingredients. Cook on medium heat until the squash is soft. Use an immersion blender to puree the soup. This method takes less time and can be just as tasty! Once you finish your delicious soup, let it cool down. Pour any leftover soup into an airtight container. Make sure to seal it tightly. Store it in the fridge for up to three days. If you want to keep it longer, freezing is a great option. To reheat your soup, you can use a pot or the microwave. If you use a pot, pour the soup in and heat on low. Stir often until it’s warm. If you use a microwave, place the soup in a microwave-safe bowl. Heat in short bursts, stirring in between, until hot throughout. Always check the temperature before serving. To freeze the soup, use freezer-safe containers or bags. Leave some space at the top for expansion. Label the container with the date. The soup can last up to three months in the freezer. To eat, thaw it in the fridge overnight. Reheat it on the stove or in the microwave as mentioned. Enjoy your tasty soup anytime! Yes, you can use fresh butternut squash. Just peel and chop it into small cubes. Fresh squash adds a great flavor and texture. It takes a bit more time to prep, but the taste is worth it! You can store the soup in the fridge for up to five days. Make sure to keep it in an airtight container. If you want to keep it longer, you can freeze it for up to three months. Just remember to leave space in the container for expansion. Yes, this soup is already dairy-free! The coconut milk gives it a creamy texture without any dairy. If you want to add more flavor, try using unsweetened coconut milk. It will keep your soup rich and delicious! This blog post covers the essentials for making slow cooker butternut squash coconut soup. We explored key ingredients, how to prepare them, and offered useful substitutes. I shared step-by-step instructions for cooking and tips for perfecting flavors and texture. You learned about variations, storage, and answered common questions. Now, you can confidently create your own delicious soup. Try different flavors and enjoy the process. Happy cooking!

Slow Cooker Butternut Squash Coconut Soup Recipe

Looking to warm up your meal routine? This Slow Cooker Butternut Squash Coconut Soup is perfect for you! In this

- 1 cup all-purpose flour - 1 teaspoon baking powder - 1/2 teaspoon baking soda - 1/4 teaspoon salt - 1 teaspoon ground cinnamon - 1/2 teaspoon ground nutmeg - 1/2 cup unsalted butter, melted - 1 cup granulated sugar - 2 large eggs - 1 teaspoon vanilla extract - 1/2 cup pumpkin puree - 8 oz cream cheese, softened - 1/4 cup powdered sugar - 1 egg yolk The key ingredients in these brownies create a rich and cozy flavor. The pumpkin puree gives moisture and a warm taste. The cream cheese adds a creamy layer that contrasts perfectly with the rich brownie. The spices, like cinnamon and nutmeg, bring out the fall flavors. Using these ingredients will ensure a delicious treat. - Gluten-free flour substitutions - Vegan alternatives If you want to make these brownies gluten-free, use a gluten-free flour mix. This will keep the texture nice and fluffy. For a vegan version, you can swap the eggs for flaxseed meal or unsweetened applesauce. You can also use vegan butter and cream cheese. These options let everyone enjoy them. - Using fresh pumpkin vs. canned - Selecting the right cream cheese Fresh pumpkin can enhance the flavor of your brownies. It has a vibrant taste that canned pumpkin may lack. If using canned, choose a good quality brand. When it comes to cream cheese, make sure it's full-fat and soft. This helps create a smooth, rich filling. The quality of your ingredients truly makes a difference in taste and texture. - Preheat the oven to 350°F (175°C). This helps the brownies bake evenly. - Grease a 9x9 inch baking pan with butter or use parchment paper. This prevents sticking. - In a medium bowl, whisk together the flour, baking powder, baking soda, salt, cinnamon, and nutmeg. Set it aside. - In a large bowl, mix the melted butter and sugar. Stir until it's smooth. - Add the eggs one at a time, mixing well after each. Then, add the vanilla extract and pumpkin puree. Mix until smooth. - Gradually fold the dry ingredients into the wet mix. Be careful not to overmix. - In another bowl, beat the softened cream cheese until it’s creamy. - Add the powdered sugar and egg yolk. Mix until well blended and smooth. - Pour half of the brownie batter into the greased pan. Spread it evenly. - Spoon dollops of the cream cheese mixture over the brownie batter. - Add the rest of the brownie batter on top, spreading it gently. - Use a knife or toothpick to swirl the cream cheese into the brownie batter. This creates a lovely marble effect. - Bake in the preheated oven for 30 to 35 minutes. Check for doneness by inserting a toothpick in the center. It should come out with a few moist crumbs. - Let the brownies cool in the pan for at least 20 minutes. This helps them set and makes slicing easier. To get the best pumpkin cream cheese brownies, pay close attention to mixing. Avoiding overmixing is key. When you mix the dry and wet ingredients, do it gently. Stop mixing as soon as you see no dry flour. This keeps your brownies soft and fudgy. Checking for doneness is also very important. Use a toothpick to check the center. If it comes out with a few moist crumbs, your brownies are perfect. If it comes out clean, they may be overbaked. The best way to store brownies is in an airtight container. Keep them at room temperature for up to three days. For longer storage, you can refrigerate them. For serving, I love adding a drizzle of chocolate sauce on top. You can also sprinkle some chopped nuts for a nice crunch. One common mistake is mismeasuring ingredients. Always measure your flour and sugar correctly. Too much flour can make your brownies dry. Another mistake is skipping cooling time. It’s tempting to cut into them right away, but let them cool for at least 20 minutes. This helps the brownies set and makes them easier to slice. {{image_2}} To make gluten-free pumpkin cream cheese brownies, use gluten-free flour. You can find many blends at stores. These blends help keep the taste and texture. Look for one that is made for baking. When using gluten-free flour, your brownies may be denser. To help, add an extra egg. This gives them a light and fluffy texture. The pumpkin still shines through, making them delicious. For vegan pumpkin cream cheese brownies, you can swap out the eggs. Use flaxseed meal or applesauce as a substitute. Mix one tablespoon of flaxseed with three tablespoons of water. Let it sit for a few minutes. This mix acts like an egg in the recipe. Instead of butter, use coconut oil or vegan butter. For the cream cheese, choose a dairy-free cream cheese. There are many good brands available. They keep the flavor creamy and rich without dairy. You can add chocolate chips to the batter for extra richness. Dark or semi-sweet chocolate works best. Just fold them in before baking. This gives a nice contrast to the pumpkin flavor. Try adding spices like ginger or cloves for an extra kick. A pinch of nutmeg can also enhance the warm flavors. Experimenting with these spices can lead to a unique twist on your brownies. You can store your pumpkin cream cheese brownies at room temperature for up to three days. Keep them in an airtight container to stay fresh. If you want them to last longer, put them in the fridge. They can stay good there for about a week. To freeze brownies, let them cool completely first. Then, wrap each brownie in plastic wrap. Place them in a freezer bag or container. They can last for up to three months in the freezer. When you want to enjoy them, just take them out and thaw at room temperature. To refresh your brownies, you can microwave them for about 10-15 seconds. This warms them up and softens the cream cheese layer. If you prefer, you can also reheat them in the oven. Set the oven to 350°F (175°C). Place the brownies on a baking sheet and heat for about 5-10 minutes. Enjoy them warm! Pumpkin Cream Cheese Brownies can last for about 3 to 5 days when stored correctly. Keep them in an airtight container at room temperature. If you want to keep them fresh longer, you can store them in the fridge for up to a week. Just make sure you let them cool completely before wrapping them up. Yes, you can make these brownies ahead of time. You can bake them a day or two in advance. Let them cool, then cover tightly and store at room temperature. This way, they will be ready to enjoy when you need them. You can also prepare the batter the night before and bake it fresh the next day. If you don’t have pumpkin puree, you can use other pureed fruits or vegetables. Options include mashed sweet potatoes, butternut squash, or even applesauce. Each alternative will give a different flavor and texture, so choose what you like best. Yes, you can use a different cheese. Cream cheese gives a nice creamy texture, but you can try mascarpone or ricotta for a different taste. Each cheese will change the flavor a bit, so feel free to experiment with what you have on hand. Absolutely! To make these brownies dairy-free, use a dairy-free butter or oil. For the cream cheese layer, use a dairy-free cream cheese alternative. Check labels to ensure there are no dairy ingredients. These swaps will let you enjoy these brownies without dairy. In this post, I shared how to make Pumpkin Cream Cheese Brownies. We covered key ingredients, including fresh pumpkin and cream cheese. I provided steps for making, layering, and baking the brownies. You learned tips to perfect your treats and avoid common mistakes. Choose quality ingredients for the best results. Enjoy experimenting with variations like gluten-free or vegan options. These brownies are versatile and fun. Now, get baking and treat yourself or share with friends!

Pumpkin Cream Cheese Brownies Delightful and Easy Recipe

Get ready for a sweet treat that combines the flavors of autumn and indulgence! In this article, I’ll guide you

To make Crockpot Beef Birria, you need a few key ingredients. Here is what you'll need: - 3 lbs beef chuck roast, cut into large chunks - 4 dried guajillo chilies - 2 dried ancho chilies - 1 dried pasilla chili - 1 medium onion, quartered - 4 cloves garlic, minced - 2 cups beef broth - 1 teaspoon cumin - 1 teaspoon oregano - 1 tablespoon apple cider vinegar - 2 bay leaves - Salt and pepper to taste - 1 tablespoon vegetable oil The spices give the birria its rich flavor. You will use cumin and oregano. These spices add warmth and depth. The apple cider vinegar balances the richness, adding a nice tang. Don't forget salt and pepper! They help elevate all the other flavors. For a tasty finish, add garnishes. Fresh cilantro brings brightness. Lime wedges add a zesty kick. Serve the birria in bowls with a splash of broth. Don't forget warm corn tortillas for dipping. This makes every bite even more delicious! {{ingredient_image_1}} First, gather your dried chilies. You will need guajillo, ancho, and pasilla chilies. Toast them in a dry skillet over medium heat for 2-3 minutes. This step makes them fragrant. Remove the stems and seeds. Place the toasted chilies in a blender. Add the quartered onion, minced garlic, and beef broth to the blender. Include cumin, oregano, apple cider vinegar, and bay leaves. Season with salt and pepper. Blend everything until smooth to form a spicy adobo sauce. Next, heat a large skillet over medium-high heat. Add vegetable oil to the skillet. Once hot, add the beef chuck roast chunks. Brown the beef on all sides for 4-5 minutes. This step adds rich flavor and color. Once browned, transfer the beef to your crockpot. Now, pour the adobo sauce over the beef in the crockpot. Make sure all the beef is coated. Cover the crockpot with its lid. Cook on low for 8 hours or on high for 4 hours. The beef should become tender and shreddable. After cooking, remove the bay leaves. Shred the beef with two forks. Stir it into the sauce. Adjust the seasoning with salt and pepper if needed. Serve your birria with fresh cilantro and lime wedges. Enjoy this comforting dish with warm corn tortillas! To get the best flavor in your beef birria, use fresh ingredients. Start with high-quality beef chuck roast. The marbled fat gives taste and tenderness. Next, toast the dried chilies before blending. This step brings out their rich aroma. Aim for a balance of guajillo, ancho, and pasilla chilies. Each adds a unique flavor. Don't skip the spices. Cumin and oregano enhance the depth. Finally, let the birria simmer slowly. This allows all flavors to meld perfectly. One common mistake is not toasting the chilies. This can make your dish taste flat. Another mistake is rushing the browning of the beef. Take your time; this step adds flavor. Avoid over-seasoning too early. You can always add more salt later. Lastly, don’t skip the vinegar. It brightens the flavors and adds a nice zing. After cooking, let your beef rest for a few minutes. This keeps it juicy. Use two forks to shred the beef. Pull apart against the grain for the best texture. Mix the shredded beef back into the sauce. This helps it soak up all that yummy flavor. Serve it with fresh cilantro and lime for a burst of freshness. Enjoy your meal with warm tortillas for dipping! Pro Tips Chili Toasting: Toasting the dried chilies enhances their flavor, making your adobo sauce richer and more aromatic. Broth Choice: Using homemade beef broth will elevate the dish's taste, but store-bought works well in a pinch. Shredding Technique: For easier shredding, let the beef rest for a few minutes after cooking to retain moisture. Serving Suggestion: Serve with warm corn tortillas and a side of pickled onions for an authentic touch. {{image_2}} You can use other cuts of meat for birria. Chuck roast works great, but brisket or short ribs also bring rich flavor. These cuts have a lot of fat, which makes the meat tender and juicy. Just remember to adjust cooking times. Thinner cuts may need less time to cook. You can make a tasty vegetarian or vegan birria too. Use jackfruit or mushrooms instead of beef. They soak up all the flavors from the spices well. If you want a plant-based option, try Beyond Meat. Just follow the same steps for cooking but skip the browning. This way, you can enjoy birria without meat. Chilies add depth to birria. You can mix and match different types. For a smoky flavor, add chipotle peppers. For heat, try adding more guajillo or serrano chilies. If you prefer a milder dish, stick with just ancho chilies. Experiment with the chili mix until you find your favorite blend! To keep leftover beef birria fresh, let it cool first. Transfer the birria into an airtight container. Store it in the fridge for up to three days. If you want to save it longer, freezing is a great option. For freezing, use freezer-safe containers or bags. Portion out the birria for easy meals later. Date the containers to know when you stored them. Beef birria can last up to three months in the freezer. When ready to eat, just thaw it in the fridge overnight. To reheat, use a pot over medium heat. Add a splash of beef broth to keep it moist. Stir it often until hot. You can also microwave it in a bowl. Cover it with a paper towel and heat in short bursts. Always check that it is hot throughout before serving. Beef birria is a rich, flavorful Mexican stew. It uses beef, dried chilies, and spices. The meat cooks slowly, making it tender. This dish often has a deep red color from the chilies. You can serve it with broth, tortillas, and fresh toppings. It is perfect for gatherings or cozy dinners. Yes, you can make it spicy! To add heat, use more dried chilies. Try adding extra guajillo or pasilla chilies. You can also add fresh jalapeños or serranos. Just remember, taste the sauce as you go. Adjust the spice level to fit your taste. Serve beef birria in bowls with some broth. Top it with chopped cilantro and lime wedges. Add warm corn tortillas on the side for dipping. You can also include diced onions or sliced radishes as toppings. This makes each bite special and full of flavor. Crockpot beef birria is a rich and tasty dish made simple with my steps. I showed you the key ingredients, spices, and garnishes needed for this meal. You learned how to prepare dried chilies and brown beef. Plus, I shared tips to get authentic flavors and avoid mistakes. Now, you can enjoy your delicious birria any time. Whether you stick to traditional meat or try a veggie version, you can make it work. Dive into this recipe and create great meals to share. Your culinary journey is just beginning!

Crockpot Beef Birria Flavorful Comfort Food Recipe

Are you ready to dive into a bowl of warm, flavorful comfort? My Crockpot Beef Birria recipe delivers rich, savory

To make Air Fryer Buffalo Cauliflower Bites, you need a few key ingredients. Here’s what you’ll need: - 1 medium head of cauliflower, cut into bite-sized florets - 1 cup all-purpose flour (or gluten-free flour) - 1 cup almond milk (or any plant-based milk) - 1 teaspoon garlic powder - 1 teaspoon onion powder - 1 teaspoon smoked paprika - 1/2 teaspoon cayenne pepper (adjust to taste) - Salt and pepper to taste - 1 cup buffalo sauce (store-bought or homemade) - 2 tablespoons olive oil - Fresh parsley, chopped (for garnish) These ingredients work together to create a crispy, spicy treat that’s hard to resist. If you have dietary needs or preferences, you can easily swap some ingredients. Here are a few ideas: - Use gluten-free flour instead of all-purpose flour for a gluten-free option. - Almond milk can be replaced with any plant-based milk, like oat or soy milk. - For a milder flavor, reduce the cayenne pepper or leave it out entirely. - Olive oil can be swapped for avocado oil or melted coconut oil. These substitutions keep the dish tasty while catering to your needs. Choosing fresh cauliflower is key for this recipe. Here’s how to pick the best head: - Look for a head that is firm and heavy for its size. - The florets should be tightly packed and white. Any brown spots are signs of age. - Check the leaves; they should be green and fresh-looking, not wilted. - Avoid cauliflower with an off smell. Fresh cauliflower has a mild, clean scent. Using fresh cauliflower ensures your bites will be crisp and flavorful. Start by cutting one medium head of cauliflower into bite-sized florets. This size helps them cook evenly. Rinse the florets under cold water to remove any dirt. Then, pat them dry with a clean towel. Dry florets will absorb the batter better. In a mixing bowl, combine one cup of all-purpose flour, one teaspoon of garlic powder, one teaspoon of onion powder, one teaspoon of smoked paprika, and half a teaspoon of cayenne pepper. Add salt and pepper to taste. Whisk these dry ingredients together. Slowly pour in one cup of almond milk. Keep whisking until the batter is smooth. It should be thick enough to coat the cauliflower. Preheat your air fryer to 400°F (200°C). Spray the air fryer basket lightly with cooking spray. This helps the cauliflower not stick. Dip each cauliflower floret in the batter, making sure to coat it evenly. Place the battered florets in a single layer in the basket. Avoid overcrowding. This allows hot air to flow around them. Air fry for 10 to 12 minutes, shaking the basket halfway through. This ensures even cooking and crispiness. While the cauliflower cooks, mix one cup of buffalo sauce and two tablespoons of olive oil in a large bowl. Once the cauliflower is golden and crispy, transfer it to the bowl with the buffalo sauce. Toss gently to coat each piece well. Return the coated cauliflower to the air fryer basket and cook for another 5 minutes. This step makes the bites extra flavorful. Finally, garnish with chopped fresh parsley before serving. Enjoy your tasty Air Fryer Buffalo Cauliflower Bites! To get that crispy texture, use a light batter. Make sure to coat each floret evenly. If your batter is too thick, it won't crisp well. I recommend using almond milk for a light and airy feel. Always preheat your air fryer to 400°F (200°C). This helps to achieve that perfect crunch. Avoid overcrowding the air fryer basket. If you pack in too many florets, they won't cook evenly. This can lead to soggy bites instead of crispy ones. Also, don’t forget to shake the basket halfway through cooking. This ensures all sides get nice and golden. Lastly, watch the cooking time closely to prevent burning. Use fresh spices for the best flavor. Garlic powder, onion powder, and smoked paprika add depth. Adjust the cayenne pepper to control the heat. After air frying, toss the cauliflower in buffalo sauce mixed with olive oil. This step boosts flavor and keeps the bites juicy. Garnish with fresh parsley for a bright finish. {{image_2}} You can spice up your buffalo cauliflower bites in many ways. Try using different sauces for a kick. Sriracha, spicy BBQ, or even mango habanero sauce can add unique flavors. Mix these sauces with olive oil to coat the cauliflower more evenly. You can adjust the heat level by adding more or less sauce. If you need a gluten-free option, you can easily swap out regular flour. Use almond flour or a gluten-free flour blend. Both work well and keep the crispy texture. Just make sure to double-check that your buffalo sauce is also gluten-free. This way, everyone can enjoy these bites without worry. Serving matters! Present your buffalo cauliflower bites on a big platter. You can add celery sticks for crunch and freshness. Pair them with dips like ranch or blue cheese for extra flavor. You can also sprinkle fresh parsley on top for color. Other great garnishes include sliced green onions or sesame seeds. These add a fun look and enhance the taste. After you enjoy your Air Fryer Buffalo Cauliflower Bites, store leftovers properly. Place them in an airtight container. Make sure they cool down first. This helps keep them fresh. You can store them in the fridge for about 3 to 4 days. If you want to enjoy them later, proper storage is key. Reheating your cauliflower bites can be tricky. You want them crispy, not soggy. The best way to reheat is in the air fryer. Set it to 350°F (175°C). Heat them for about 5 to 7 minutes. This method revives their crunch and flavor. Avoid the microwave, as it can make them soft and mushy. If you want to save your bites for later, freezing is a great option. First, let them cool completely. Then, place them in a single layer on a baking sheet. Freeze them for about an hour. Once frozen, transfer to a freezer-safe bag. They can last up to 3 months in the freezer. When ready to eat, cook directly from frozen in the air fryer for about 10 to 12 minutes. This makes for a quick and tasty snack! Yes, you can use frozen cauliflower. Just thaw it first and pat it dry. This helps keep the batter from getting too soggy. Frozen cauliflower might need a bit more time in the air fryer to get crispy. To cut down the heat, use less cayenne pepper in the batter. You can also try a milder buffalo sauce. Another option is to mix in extra almond milk to tone down the spice. Buffalo cauliflower bites go great with ranch or blue cheese dressing. You can also try a creamy garlic sauce or even a sweet chili sauce. The coolness of these dips balances the heat nicely. Yes, you can bake these bites! Preheat your oven to 425°F (220°C). Spread the cauliflower on a baking sheet in a single layer. Bake for about 25-30 minutes, flipping halfway through. This will give you a nice crispy texture, too. This post covered everything you need to make Air Fryer Buffalo Cauliflower Bites. You learned about key ingredients, how to prepare them, and tips for a crispy finish. We also shared variations, storage tips, and answers to common questions. Remember, choosing fresh cauliflower is key for flavor. Experiment with sauces to find your favorite. Enjoy your cooking adventure and share these bites with family and friends!

Air Fryer Buffalo Cauliflower Bites Easy and Flavorful

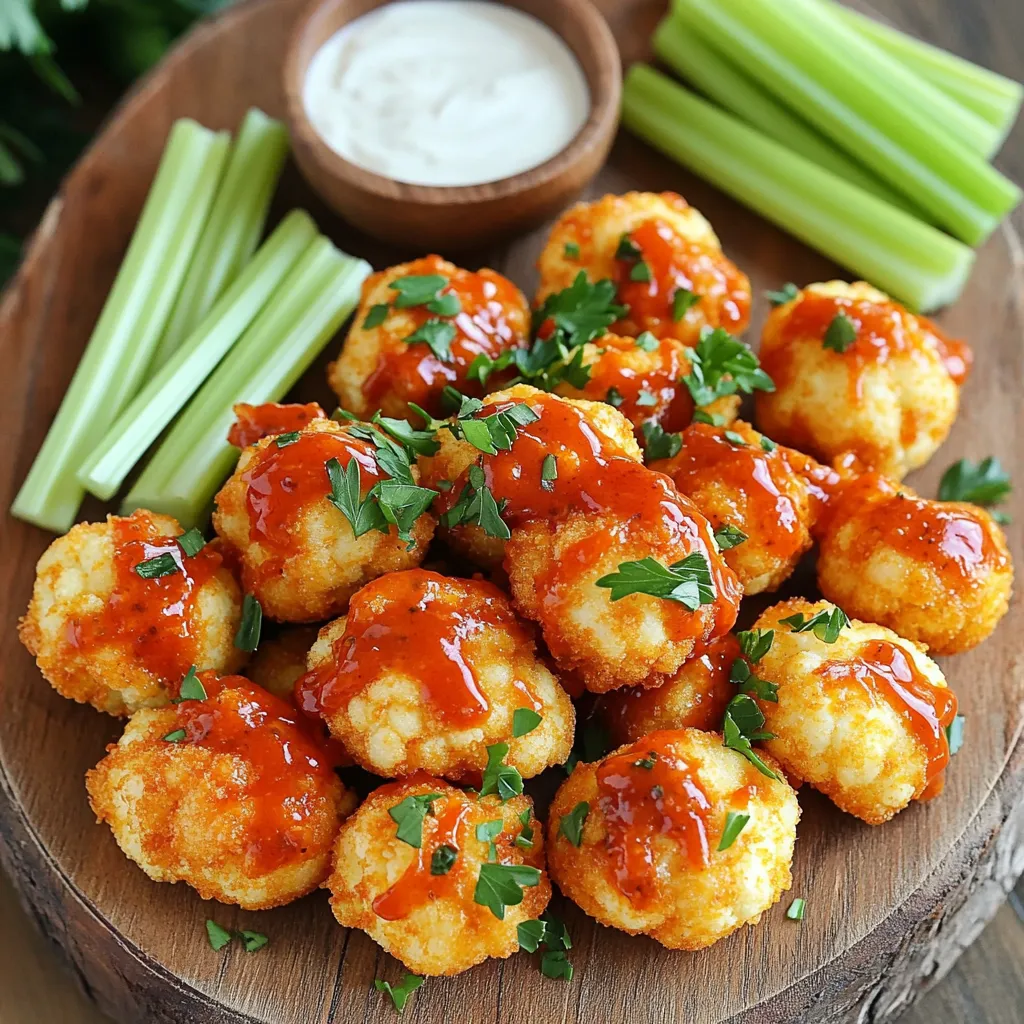
Looking for a quick and tasty snack? Air Fryer Buffalo Cauliflower Bites are your solution! With just a few simple

To make caramelized onion Gruyere tartlets, gather these items: - 1 sheet of puff pastry, thawed - 2 large onions, thinly sliced - 1 tablespoon olive oil - 1 tablespoon butter - 1 teaspoon sugar - 1 teaspoon fresh thyme leaves (or ½ teaspoon dried thyme) - 1 cup Gruyere cheese, grated - 1 egg, beaten (for egg wash) - Salt and pepper to taste You can swap out some ingredients if needed. Try these: - Use any cheese like cheddar or mozzarella instead of Gruyere. - Substitute vegetable oil for olive oil. - Use shallots for a sweeter flavor in place of onions. - You can omit butter and use more oil for a dairy-free option. - For a vegan version, skip the egg wash and use a plant-based cheese. To make this recipe, you will need: - A large skillet for cooking the onions - A sharp knife for slicing and scoring - A rolling pin to flatten the puff pastry - A baking sheet lined with parchment paper - A mixing bowl for the egg wash - A spoon for filling the tartlets These tools make the process easier and more fun. Enjoy your cooking adventure! Start by heating your skillet on medium heat. Add one tablespoon of olive oil and one tablespoon of butter. Once the butter melts, add two large, thinly sliced onions. Cook the onions for about 10 minutes. Stir them often. They should turn soft and clear. Next, sprinkle one teaspoon of sugar over the onions. Keep cooking for about 15 more minutes. Stir frequently until the onions turn a deep brown color. This caramelization adds a sweet and rich flavor. Season with salt, pepper, and one teaspoon of fresh thyme leaves. Remove the skillet from heat and let the mixture cool a bit. While your onions cool, prepare the puff pastry. On a lightly floured surface, roll out one sheet of thawed puff pastry. Smooth out any creases. Cut the pastry into small squares, about 3 to 4 inches each. Place these squares on a lined baking sheet. Next, use a sharp knife to score a smaller square inside each piece. Be careful not to cut all the way through. This will create a nice border for the filling. Spoon a good amount of the cooled caramelized onion mixture into the center of each pastry. Then, sprinkle with one cup of grated Gruyere cheese. Now, it’s time to bake! Preheat your oven to 400°F (200°C). Brush the edges of the puff pastry with one beaten egg. This gives a lovely golden finish. Bake the tartlets in the oven for 20 to 25 minutes. Watch for them to puff up and turn golden brown. Once they are ready, take them out of the oven. Let them cool for a few minutes before serving. Enjoy these warm and savory treats! To get the best caramelized onions, slice them thin. This helps them cook evenly. Use medium heat and stir them often. After about ten minutes, they will become soft and clear. Sprinkle a teaspoon of sugar to boost the sweetness. Cook them for another fifteen minutes until they turn deep brown. This caramelization gives the tartlets a rich taste. Season with salt, pepper, and thyme for added flavor. Flaky pastry starts with cold ingredients. Make sure your puff pastry is well-chilled before rolling. If it warms up, it will lose its flakiness. Roll it out gently on a floured surface. Cut it into squares, and score a smaller square inside. This creates a border that helps the pastry puff up while baking. Brush the edges with an egg wash for a beautiful golden finish. Serve the tartlets warm for the best taste. Arrange them on a nice platter and garnish with thyme leaves. This adds color and freshness. For extra flavor, include a small bowl of balsamic reduction on the side. Drizzle it over the tartlets for a sweet and tangy kick. These tartlets make great appetizers for any gathering or special meal. Enjoy the savory goodness! {{image_2}} If you want to switch up the cheese, there are many options. Try using sharp cheddar for a bolder taste. Feta adds a nice tang. Mozzarella gives a creamy stretch that melts well. You can also mix cheeses for a unique blend. Just keep the flavors balanced. You can add more flavor by including veggies or meats. Spinach works well and adds color. Mushrooms bring a rich, earthy taste. For meat lovers, crispy bacon or diced ham can make it hearty. Just sauté any added ingredients before mixing them in. This helps enhance their flavors. To make these tartlets vegan, use plant-based cheese. Olive oil can replace butter in the onion mix. For a gluten-free option, use gluten-free puff pastry. This way, everyone can enjoy the tartlets. Always check labels to ensure your ingredients fit your diet. To keep your caramelized onion Gruyere tartlets fresh, let them cool first. Place them in an airtight container. You can store them in the fridge for up to three days. If you want to keep them longer, consider freezing them. For the best taste, reheat your tartlets in the oven. Preheat the oven to 350°F (175°C). Place the tartlets on a baking sheet and heat for about 10-15 minutes. This method keeps the pastry crispy. You can also use a microwave, but it may make the pastry soft. You can freeze the tartlets after baking. Let them cool completely, then wrap each one in plastic wrap. Place them in a freezer bag or container. They will last up to three months in the freezer. When ready to eat, thaw in the fridge overnight and reheat in the oven. To make caramelized onions, slice two large onions thinly. Heat one tablespoon of olive oil and one tablespoon of butter in a skillet over medium heat. Add the onions and stir them often. Cook for about ten minutes until they are soft and clear. Then, sprinkle one teaspoon of sugar over the onions. Keep cooking for another fifteen minutes. Stir frequently until the onions turn a deep, rich brown. Add salt, pepper, and thyme for flavor. This process brings out their natural sweetness and adds depth to your tartlets. Yes, you can use other cheeses! While Gruyere adds a nutty flavor, you might try cheddar, goat cheese, or mozzarella. Each cheese gives a unique taste and texture. If you want a sharp flavor, go for aged cheddar. For creaminess, goat cheese works well. If you prefer a milder taste, mozzarella is a great option. Mix and match to find your favorite combination. Baking the tartlets takes about twenty to twenty-five minutes. Preheat your oven to 400°F (200°C) first. Once you place the tartlets on the baking sheet, watch for the puff pastry to rise and turn a golden brown. This is when they are ready. Let them cool for a few minutes before serving. Enjoy the crispy, flaky goodness with the rich onion filling! We covered all you need to make delicious tartlets. First, we discussed the ingredients required and offered simple swaps. Next, I guided you through the step-by-step instructions, from prepping onions to baking. I shared tips for the best flavor and texture. You can also find fun variations to suit different diets. Lastly, I provided storage and reheating tips. With this knowledge, you can enjoy your tartlets any time! Now, get cooking and enjoy your tasty creations.

Caramelized Onion Gruyere Tartlets Savory Delight

Welcome to your new favorite appetizer: Caramelized Onion Gruyere Tartlets! These savory delights are easy to make and burst with

To make your Pumpkin Spice Latte Overnight Oats, you will need: - 1 cup rolled oats - 1 cup milk of choice (dairy or non-dairy) - 1/2 cup canned pumpkin puree - 1 tablespoon maple syrup (adjust for sweetness) - 1/2 teaspoon vanilla extract - 1 teaspoon pumpkin spice blend (or a mix of cinnamon, nutmeg, and ginger) - 1/2 teaspoon chia seeds (optional, for added texture) - Pinch of salt - Whipped cream or coconut whipped cream (for topping, optional) - Additional pumpkin spice for garnish You can easily swap some ingredients. Here are a few ideas: - Use rolled oats for quick oats if you prefer. - Any milk works here. Almond, soy, and oat milk are great options. - Instead of pumpkin puree, use apple sauce for a fruity twist. - Honey or agave can replace maple syrup for sweetness. - If you don't have pumpkin spice, mix equal parts cinnamon and nutmeg. Each ingredient brings unique benefits: - Rolled oats are high in fiber. They help you feel full and support digestion. - Pumpkin puree adds vitamins A and C, which are good for your skin and eyes. - Chia seeds (if you use them) are packed with omega-3 fatty acids. They support heart health. - Maple syrup provides natural sweetness along with minerals like manganese and zinc. These ingredients make your overnight oats tasty and healthy. Enjoy the flavors while feeling good about what you eat! Start by gathering your ingredients. You will need 1 cup of rolled oats, 1 cup of your favorite milk, and 1/2 cup of canned pumpkin puree. Also, have 1 tablespoon of maple syrup ready for sweetness. You will add 1/2 teaspoon of vanilla extract and 1 teaspoon of pumpkin spice blend. If you want, grab 1/2 teaspoon of chia seeds for texture and a pinch of salt. In a medium-sized bowl, mix the oats, milk, pumpkin puree, maple syrup, and vanilla extract. Stir these until they blend well. Next, add the pumpkin spice blend, chia seeds, and pinch of salt. Mix everything until you see no dry oats. Once mixed, it is time to divide the mixture. Use two glass jars or bowls. Pour the mixture evenly into each one. Seal the jars tightly or cover them with plastic wrap. This helps keep your oats fresh. Place the jars in the fridge for at least 4 hours, or better yet, overnight. This allows the oats to soak up the liquid and take on all the great pumpkin spice flavor. If you want to get fancy, you can layer the ingredients. Start by putting the oats at the bottom. Then, add a layer of pumpkin puree. This creates a lovely visual effect. You can repeat this until you fill the jars. Just make sure to leave some room at the top for the whipped cream. After soaking, stir the oats in the morning. If they seem thick, add a splash of milk for a creamier texture. Top with whipped cream and a sprinkle of pumpkin spice for a delightful finish. To get that creamy texture, start with rolled oats. They soak up liquid well. Use a mix of milk and pumpkin puree. These add richness. If you want it creamier, add a splash of milk before serving. Stir it well to blend everything nicely. You can also add chia seeds. They soak up liquid and give a nice texture. For a more robust flavor, consider adding espresso. Just a shot can boost the coffee taste. You can also try flavored syrups. Vanilla or caramel syrups can add sweetness and depth. Mix these in with your other ingredients. This will make your oats taste like a coffee shop treat. Make your overnight oats in batches. You can prepare several jars at once. This saves time in the morning. Use glass jars to store them. They are easy to grab and eat. You can even pack them for work or school. Just remember to keep them in the fridge. This way, they stay fresh and tasty for days. {{image_2}} You can mix things up with fun flavors. Try adding cocoa powder for chocolate oats. Just one tablespoon will give a rich taste. For a nutty twist, stir in peanut butter. A tablespoon will add creaminess and protein. You can even swap pumpkin for mashed banana for a fruity option. You can easily make this recipe vegan. Use almond milk or coconut milk instead of dairy milk. Also, make sure to check your maple syrup for any additives. If you want it gluten-free, just use certified gluten-free oats. These small changes keep the dish tasty and safe for all diets. You can get creative with your toppings. Add chopped nuts like walnuts or pecans for crunch. Dried fruits like cranberries or raisins add sweetness. Try a sprinkle of granola for texture. You can also drizzle some honey or more maple syrup on top. A dollop of whipped cream makes it feel special. Mix it up daily for a fun breakfast! To keep your pumpkin spice latte overnight oats fresh, use airtight containers. Glass jars work well, as they seal tightly and let you see the layers. Always allow the oats to cool down before sealing. This step helps prevent moisture build-up. Store your jars in the back of the fridge, where the temperature stays steady. This placement keeps your oats cool and safe. When stored properly, your overnight oats last about 3 to 5 days in the fridge. The oats absorb moisture over time, making them softer. If you notice the oats becoming too thick, add a splash of milk to loosen them up. Always check for any off smells or colors before enjoying them. Freshness is key for great taste! You can freeze your pumpkin spice latte overnight oats for longer storage. Use freezer-safe containers or jars, leaving space for expansion. Oats can last up to 3 months in the freezer. When ready to eat, thaw them in the fridge overnight. You can also microwave them for 1 to 2 minutes to enjoy them warm. Just stir well and add a splash of milk if needed. Yes, you can use any type of milk. Dairy milk, almond milk, or oat milk all work well. Each type adds a unique taste. Choose what you like best or what you have at home. If your oats are too thick, add more milk. You can mix in a little at a time. Stir well after each addition. This way, you can reach your desired texture without losing flavor. If you want an alternative to maple syrup, try honey or agave nectar. You can also use brown sugar for a richer flavor. Just adjust the amount to fit your taste. This blog post covered everything you need to know about overnight oats. We discussed key ingredients, substitutions, and their benefits. Then, we walked through detailed steps for perfect prep and storage. I shared tips for rich flavors and creamy textures. We explored various fun flavor twists and storage hacks. Finally, I answered common questions to help you get started with confidence. Now, you're ready to create tasty and easy overnight oats that fit your style! Enjoy experimenting with them for breakfast or snacks!

Pumpkin Spice Latte Overnight Oats Delightfully Easy

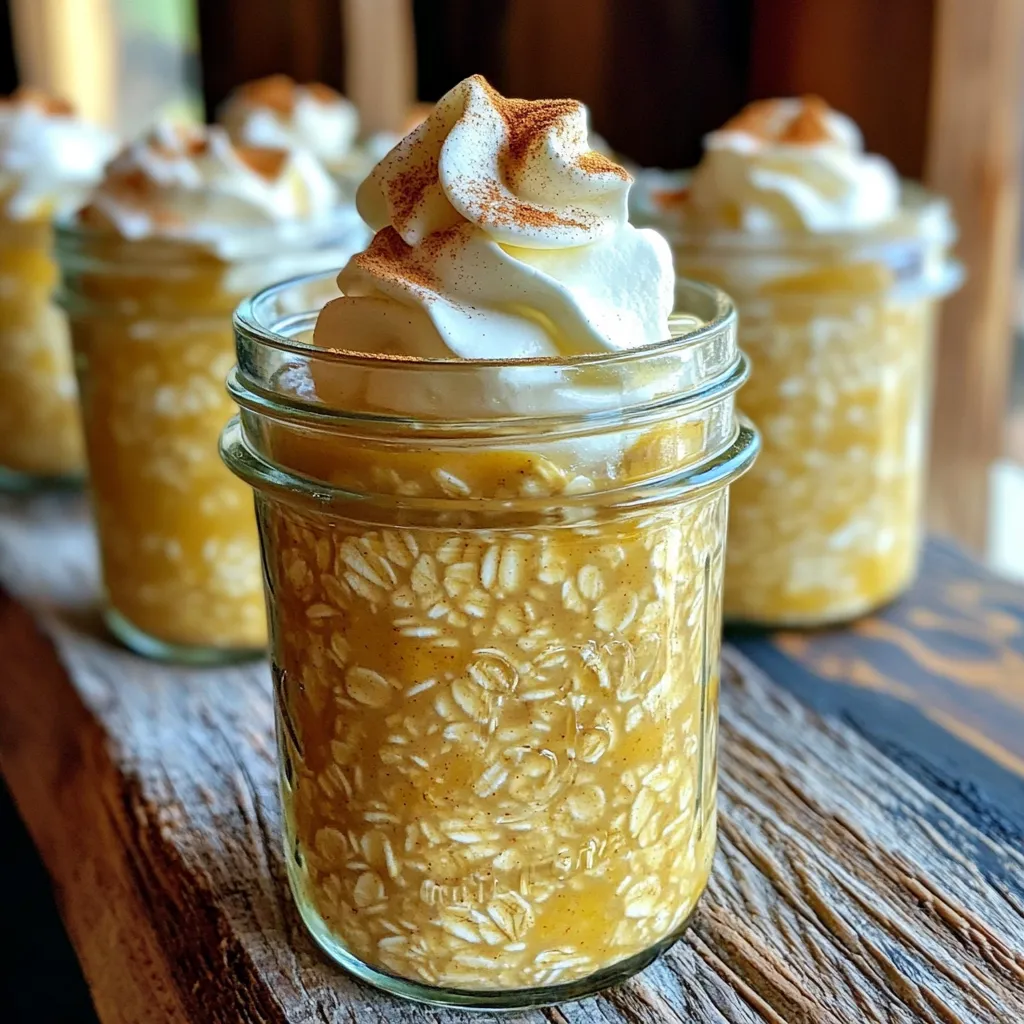
Do you love the cozy flavor of pumpkin spice lattes? You’ll adore my Pumpkin Spice Latte Overnight Oats! They’re quick

- 1 cup orzo pasta - 2 cups vegetable broth - 1 cup fresh mushrooms, sliced - 2 cups fresh spinach - 1 small onion, diced - 2 cloves garlic, minced - 1 teaspoon dried thyme - 1 teaspoon dried oregano - ¼ cup grated Parmesan cheese - Fresh parsley, chopped When I cook One-Pot Mushroom Spinach Orzo, I focus on fresh, simple ingredients. The main star is orzo pasta, which cooks perfectly in one pot. I love using vegetable broth for a rich base. Fresh mushrooms add umami, while spinach brings a nice pop of color and nutrients. Next, I prepare my aromatics. A small onion, diced finely, creates a sweet flavor when sautéed. I always add minced garlic for its bold taste. Dried thyme and oregano add warmth and depth to the dish. If you want to elevate your meal, consider stirring in some grated Parmesan cheese. It adds creaminess and a savory bite. Finally, I like to garnish with fresh parsley. It gives a bright finish to the dish. Gather these ingredients, and you are on your way to making a delicious meal in no time! 1. Start by heating 2 tablespoons of olive oil in a large pot over medium heat. 2. Add 1 small diced onion and sauté it for about 3-4 minutes. The onion should be soft and clear. 3. Next, stir in 2 minced garlic cloves and 1 cup of sliced mushrooms. Cook this mixture for 5-7 minutes. The mushrooms will get soft and release their tasty juices. 1. Once the mushrooms are tender, add 1 cup of orzo pasta to the pot. Stir well to mix it with the onion and mushroom. 2. Pour in 2 cups of vegetable broth. Add 1 teaspoon of dried thyme, 1 teaspoon of dried oregano, and some salt and pepper for flavor. 3. Stir everything together and bring the mixture to a gentle boil. 1. Reduce the heat to low, cover the pot, and let it simmer for about 10-12 minutes. Stir occasionally to stop the orzo from sticking. You want the orzo to be al dente and soak up most of the broth. 2. When the orzo is cooked, fold in 2 cups of fresh spinach. Let it wilt for a minute. 3. If you want a creamy touch, stir in ¼ cup of grated Parmesan cheese. Adjust the seasoning if needed. 4. Serve warm, and don’t forget to sprinkle some chopped fresh parsley on top for a vibrant look. To prevent orzo from sticking, stir it often while it cooks. Adding a little extra broth can help keep it loose. If you find the orzo too thick, just add more broth until you reach the right texture. For a richer taste, try different cheese options like feta or goat cheese. If you want to add protein, consider chicken, shrimp, or tofu. Each choice brings a unique flavor to the dish. Garnishing with fresh parsley adds a nice pop of color. You can also sprinkle extra cheese on top for a fancy touch. Serve this dish with a side salad or crusty bread for a complete meal. {{image_2}} You can easily adapt this dish to fit your diet. For a gluten-free option, try using rice or quinoa instead of orzo. These grains cook well in the same way. You can find gluten-free orzo made from rice or corn too. For a vegan meal, simply skip the Parmesan cheese. The dish will still taste great without it. Want to change up the flavor? Add fresh herbs like basil or parsley. These herbs bring a bright taste that makes the dish pop. You can also mix in different veggies like zucchini or bell peppers. Cook them with the mushrooms for extra color and nutrition. This dish is versatile! You can mix it with other grains, like farro or quinoa. This adds more texture and flavor. If you want more protein, try adding chickpeas or beans. They make the meal heartier and more filling. Just stir them in when the orzo is almost done cooking. To store leftovers properly, let the orzo cool down first. Place it in an airtight container. This will keep it fresh for your next meal. I recommend using glass or BPA-free plastic containers. They seal well and help prevent odors. You can enjoy the leftovers for up to 3 days in the fridge. If you want to save it for a longer time, you can freeze the orzo. Put it in a freezer-safe container or bag. Make sure to remove as much air as possible. This helps avoid freezer burn. It will last up to 2 months in the freezer. When you’re ready to eat, thaw it in the fridge overnight. Then, reheat it on the stove or in the microwave. Add a splash of broth to keep it moist. For best freshness, consume the orzo within 3 days if stored in the fridge. If you freeze it, use it within 2 months. Watch for signs of spoilage, such as an off smell or mold. If it looks or smells bad, it's best to discard it. Keeping it well-sealed helps maintain its quality and taste. To make it gluten-free, you can use gluten-free orzo. Many brands offer options made from rice or corn. Always check the label to ensure it meets your needs. The cooking steps stay the same. Just replace the regular orzo with the gluten-free type. Enjoy your meal without worry! Yes, you can use other pasta shapes. Small shapes like ditalini or fusilli work well. They cook similarly to orzo. Adjust the cooking time based on the pasta you choose. Keep an eye on it so it doesn’t overcook. Each pasta will add its own twist to the dish! You can add many veggies to make it your own! Try diced bell peppers, zucchini, or peas. Broccoli florets or artichoke hearts are great too. Feel free to mix and match based on your taste. Just chop them small so they cook evenly with the orzo. To add spice, consider using crushed red pepper flakes. Start with a pinch and taste as you go. You can also add diced jalapeños or a splash of hot sauce. For a different flavor, mix in smoked paprika. Adjust the heat to match your preference! This blog post covered a tasty one-pot mushroom spinach orzo recipe. You learned about the key ingredients, step-by-step cooking methods, and helpful tips. I shared ideas for variations and how to store leftovers too. Whether you follow the original recipe or get creative, this dish is both easy and flavorful. It’s a great way to enjoy healthy, delicious meals. Cooking should be fun, so make it your own! Enjoy your orzo adventure!

One-Pot Mushroom Spinach Orzo Nourishing Delight

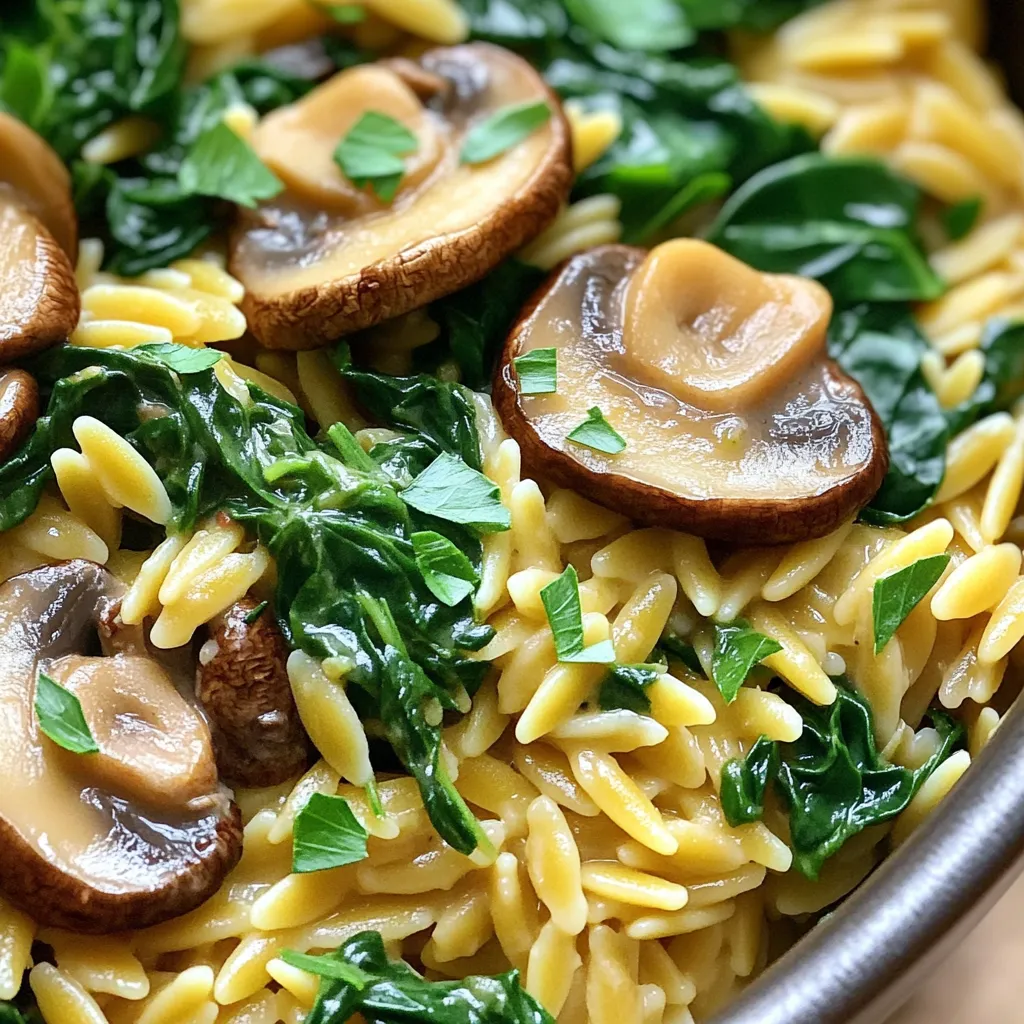
Looking for a warm and comforting meal that’s easy to prepare? My One-Pot Mushroom Spinach Orzo is the perfect dish!

- 4 cups all-purpose flour - 1/4 cup granulated sugar - 1 packet (2 1/4 tsp) instant yeast - 1/2 teaspoon salt - 1/2 cup whole milk, warmed - 1/4 cup unsalted butter, melted These main ingredients create the base for your rolls. The all-purpose flour gives the dough strength. Sugar adds sweetness, while instant yeast makes it rise. Whole milk and butter ensure the rolls remain soft and rich. - Zest of 1 orange - 1 cup fresh cranberries, chopped (or dried cranberries) - 1 teaspoon cinnamon - 1/4 cup orange juice Flavor enhancers bring life to your rolls. The orange zest gives a bright taste. Fresh cranberries add tartness, while cinnamon warms the flavor. Orange juice ties it all together with more citrusy goodness. - 1 cup powdered sugar - 2-3 tablespoons orange juice - Zest of 1 orange The glaze is the finishing touch. It adds sweetness and a beautiful shine. Mixing powdered sugar with orange juice creates a smooth texture. The orange zest on top makes it pop visually and flavor-wise. - In a large bowl, mix 2 cups of flour, sugar, yeast, and salt. Stir well. - In another bowl, combine warmed milk, melted butter, eggs, and orange zest. Mix until smooth. - Pour the wet mix into the dry mix. Stir until combined. Gradually add the rest of the flour, one cup at a time, until the dough is slightly sticky but manageable. - Knead the dough on a floured surface for 5-7 minutes. It should be smooth and elastic. - Place the dough in a greased bowl. Cover it with a kitchen towel. Let it rise in a warm area for 1 hour, or until it doubles in size. - After rising, punch down the dough. Roll it out on a floured surface into a rectangle, about 12x18 inches. - In a small bowl, mix chopped cranberries, cinnamon, and orange juice. Spread this mix over the rolled dough. - Starting from one long side, roll the dough tightly into a log. Pinch the seams to seal it. - Cut the log into 12 equal pieces. Place them in a greased baking dish. Cover with a towel and let them rise again for 30 minutes. - Preheat your oven to 350°F (175°C). - Bake the rolls for 25-30 minutes. They should be golden brown when done. - While the rolls bake, mix powdered sugar, orange juice, and zest in a bowl until smooth. - Once the rolls cool slightly, drizzle the glaze over the top. Kneading the dough is key. It helps develop gluten, which makes rolls fluffy. Knead for 5-7 minutes until smooth. Check for stickiness by touching the dough. If it sticks to your fingers, add a little flour. The dough should feel soft but not clingy. If you can't find fresh cranberries, use dried ones. They work well and add sweetness. You can also mix in other fruits like blueberries or cherries. For added depth, sprinkle in spices like nutmeg or ginger. These give your rolls an extra flavor boost. Serve these rolls in a beautiful basket for a nice touch. You can also arrange them on a large plate, drizzled with glaze. Serve them warm for the best taste. If you have leftovers, warm them gently before serving. {{image_2}} You can change up these rolls in fun ways. - Adding nuts or chocolate: Try adding chopped walnuts or pecans for a nice crunch. You can also mix in chocolate chips for a sweet twist. - Using different fruits: Fresh blueberries or raspberries can replace cranberries. You can even use dried fruits like apricots or cherries for a unique flavor. Making these rolls fit your diet is easy. - Gluten-free options: Use a gluten-free flour blend that measures cup for cup with regular flour. This way, you can enjoy the same fluffy texture. - Vegan adaptations: Replace the eggs with flax eggs and use almond milk instead of whole milk. You can also use coconut oil instead of butter. Adding a special touch for holidays is a great idea. - Holiday-themed ingredients: Spice up your rolls with nutmeg and cloves for a warm, festive flavor. You can also add orange and lemon zest for freshness. - Special occasion decorations: Drizzle the glaze in fun patterns. You can even sprinkle on some edible glitter or colored sugar for extra flair. To keep your cranberry orange sweet rolls fresh, store them in an airtight container. This prevents them from drying out. Place them in the fridge if you plan to eat them in a few days. For longer storage, you can freeze the rolls. Wrap each roll in plastic wrap and place them in a freezer-safe bag. This way, you can enjoy them later. When you're ready to eat the rolls, reheating them is easy. Use the oven for the best results. Preheat your oven to 350°F (175°C). Place the rolls on a baking sheet and cover them with foil. Heat for about 10-15 minutes. This method keeps the rolls fluffy. You can also use a microwave. Heat them for 15-20 seconds, but be careful not to overdo it, or they'll get chewy. These sweet rolls stay fresh for about 3-4 days in the fridge. If you freeze them, they can last for up to 2-3 months. Look for signs of spoilage, like an off smell or mold. If the rolls feel hard or dry, they are past their prime. Always check before you enjoy your treats! You can use several fruits if you lack cranberries. Here are some options: - Chopped cherries - Raisins - Dried blueberries - Fresh or frozen raspberries These fruits add a sweet or tart touch. They keep the flavor bright. To check for doneness, look for these signs: - Golden brown tops - Rolls spring back when lightly pressed - An internal temperature of 190°F (88°C) If your rolls are golden and springy, they are ready! Yes, you can prep the dough ahead of time. Here’s how: - Make the dough and let it rise. - Punch it down and cover it. - Refrigerate for up to 24 hours. When ready, let it warm up before shaping. This saves time on baking day. If your dough does not rise, here are some tips: - Check your yeast: It must be fresh and active. - Ensure warmth: Place dough in a warm spot. - Avoid drafts: Cover with a towel to keep warm. If your dough does not rise, it may need more heat or fresh yeast. In summary, we covered a simple recipe for delicious rolls. You learned about the key ingredients, steps to prepare the dough, and tips for perfect flavor. We also explored variations for different tastes and dietary needs. Finally, proper storage and reheat methods ensure your rolls stay fresh. Enjoy making these tasty treats that suit any occasion!

Cranberry Orange Sweet Rolls Fluffy and Delicious Treat

Imagine the smell of warm, fluffy rolls filled with tart cranberries and sweet orange zest wafting through your kitchen. These

- Chicken and Vegetables - 2 pounds boneless, skinless chicken thighs - 1 can (15 oz) black beans, rinsed and drained - 1 cup corn kernels (fresh or frozen) - 1 cup diced bell peppers (any color) - 1 cup diced onions The chicken thighs form the base of this dish. They cook well in a slow cooker and stay juicy. The black beans add protein and fiber, making your meal hearty. Corn gives a sweet crunch. Bell peppers and onions add color and flavor. - Seasonings and Sauces - 2 teaspoons ground cumin - 1 teaspoon chili powder - Salt and pepper to taste - 1 can (10 oz) enchilada sauce (red or green based on preference) Cumin and chili powder give the enchiladas warmth and depth. Salt and pepper enhance all the flavors. The enchilada sauce ties everything together, making it saucy and delicious. - Tortillas and Cheese - 6-8 whole wheat tortillas - 2 cups shredded cheese (cheddar or Mexican blend) - Fresh cilantro, for garnish - Sour cream, for serving (optional) Whole wheat tortillas are a healthy choice. They hold the filling well. The cheese melts beautifully, adding rich creaminess. Cilantro adds a fresh pop, and sour cream balances the spice, if you like it. {{ingredient_image_1}} Seasoning and Layering Start by placing 2 pounds of boneless, skinless chicken thighs in your slow cooker. Season them with salt, pepper, ground cumin, and chili powder. I like to sprinkle about 2 teaspoons of cumin and 1 teaspoon of chili powder for a nice kick. Next, add a can of black beans, rinsed and drained, and 1 cup of corn kernels. Then, toss in 1 cup of diced bell peppers and 1 cup of diced onions. Finally, pour half of the enchilada sauce over this mixture. Stir gently to blend all the flavors well. Cooking in the Slow Cooker Cover your slow cooker and set it to low heat for 6 to 7 hours. If you're in a hurry, you can switch it to high heat for 3 to 4 hours. When the cooking time is up, check that the chicken is tender. It should shred easily with a fork. Remove the chicken, shred it, and mix it back with the other ingredients. Preparing the Tortillas Before rolling the enchiladas, warm the whole wheat tortillas in the microwave for about 20 seconds. This makes them soft and easy to roll without tearing. Rolling and Placing in the Slow Cooker Take a tortilla and spoon a generous amount of the chicken mixture into the center. Add a small sprinkle of cheese on top before rolling it up tightly. Place each rolled enchilada seam-side down in the slow cooker. Once all are in, pour the remaining enchilada sauce over them and sprinkle the rest of the cheese on top. Heating and Melting the Cheese Cover the slow cooker again and let it cook on low for another 30 minutes. This gives time for everything to heat through and the cheese to melt beautifully. Garnishing and Serving Suggestions When ready, take off the lid and garnish with fresh cilantro. For an extra touch, you can serve it with sour cream on the side. Enjoy these enchiladas on a large platter, drizzled with more enchilada sauce and topped with lime wedges for a zesty flavor! Using Fresh Ingredients Fresh ingredients make a big difference. Use fresh chicken thighs for tenderness. Choose ripe bell peppers for sweetness. Fresh corn adds a crisp bite. Fresh cilantro gives a bright finish. Using fresh items boosts overall flavor and makes your dish pop. Ideal Seasoning Levels Seasoning is key. Use salt and pepper to enhance taste. Ground cumin adds warmth, while chili powder brings some heat. Adjust these to your liking. Start with less, then add more if needed. Taste as you go to find your perfect balance. Slow vs. High Cooking Methods You can cook on low or high. Low heat takes 6-7 hours, which makes the chicken very tender. High heat cooks in 3-4 hours, but the chicken may not be as soft. Choose the method that fits your schedule. Ensuring Tender Chicken To ensure tender chicken, check the cooking time. The chicken should shred easily with a fork. If it’s not tender, cook it longer. You want it to be juicy and easy to pull apart. Plating Suggestions Serve enchiladas on a large platter. Drizzle extra enchilada sauce on top. Sprinkle chopped cilantro for color. This makes your dish look inviting and tasty. A good presentation adds to the meal experience. Accompaniments to Enhance the Dish Serve with lime wedges for a zesty kick. Sour cream adds creaminess and balances the heat. You can also add a side of rice or salad. These sides round out your meal and make it more satisfying. Pro Tips Use Fresh Ingredients: For the best flavor, opt for fresh bell peppers and corn whenever possible. Fresh ingredients can elevate the dish significantly. Customize Your Heat: Adjust the spice level by using a spicier enchilada sauce or adding jalapeños to the chicken mixture for those who enjoy a kick. Layer the Cheese: For extra cheesy enchiladas, sprinkle cheese between the layers of tortillas and on top. This creates a deliciously gooey texture. Make Ahead: Prepare the filling a day in advance and store it in the fridge. This allows the flavors to meld together and makes assembly quicker on the day of serving. {{image_2}} You can swap chicken for different meats. Try ground turkey or beef for a twist. Shredded pork adds a rich flavor too. If you prefer a lighter option, use chicken breast instead of thighs. This change will keep the dish leaner while still tasty. For a meat-free meal, replace chicken with more beans or lentils. Use black beans or kidney beans for protein. You can also add extra corn or bell peppers. This makes for a colorful and hearty filling. Don't forget to add some diced zucchini or mushrooms for texture. The type of enchilada sauce can change the taste. Use green sauce for a tangy kick. If you like it spicy, try a chipotle sauce. You can even mix sauces for a unique flavor blend. Experiment with homemade sauces for extra freshness. Toppings add fun and flavor. Try sliced jalapeños for heat. Fresh avocado slices or guacamole bring creaminess. For a crunchy bite, add crushed tortilla chips on top. Serve with sour cream and fresh cilantro for a bright finish. Each topping makes your enchiladas even more special. - Storing Leftovers: After enjoying your enchiladas, let them cool. Place them in an airtight container. They can stay in the fridge for up to four days. - Freezing Instructions: You can freeze the enchiladas too. Wrap them tightly in plastic wrap, then in foil. They will last for about three months in the freezer. - Best Methods for Reheating: The best way to reheat enchiladas is in the oven. Preheat your oven to 350°F (175°C). Place the enchiladas in a baking dish, cover with foil, and heat for about 20 minutes. - Maintaining Flavor and Texture: To keep the enchiladas moist, add a splash of enchilada sauce before reheating. This helps maintain flavor and keeps them from drying out. Yes, you can use chicken breast or thighs. I prefer thighs because they stay moist and tender. Chicken breast can work too, but it may dry out if overcooked. For the best results, choose chicken thighs if you want juicy enchiladas. You can store leftovers in the fridge for up to four days. Place them in an airtight container to keep them fresh. For longer storage, freeze the enchiladas for up to three months. Just remember to let them cool before freezing to maintain quality. Yes, you can prep the filling a day in advance. Cook the chicken and mix it with the veggies and sauce. Store it in the fridge. When ready, fill the tortillas and cook them in the slow cooker. This makes meal prep easy and quick on busy days. In this post, I shared a simple recipe for delicious enchiladas. We discussed the main ingredients, including chicken, veggies, and tortillas. You learned how to prepare the chicken mixture and assemble the dish in your slow cooker. For best flavor, fresh ingredients and the right seasonings are key. I also offered tips on storage and reheating for leftovers. These enchiladas are easy to customize. Feel free to try different proteins or sauces. Enjoy making this dish and impressing others with your cooking skills!

Savory Slow Cooker Chicken Enchiladas Simple Meal

Craving a warm, savory dish that cooks while you relax? Look no further! These Slow Cooker Chicken Enchiladas are your

Older posts
Newer posts
← Previous Page1 … Page9 Page10 Page11 … Page115 Next →

dsad

© 2025 flavorsprint • Built with GeneratePress

Our Policies

  • Copyright Policy
  • Cookie Policy
  • GDPR Policy
  • Privacy Policy
  • Disclaimer
  • Terms Of Use

More Information

  • Home
  • About
  • Contact
  • Appetizers
  • Dessert
  • Dinner
  • Drinks
©2025, flavorsprint About Back To Top