No-Bake Chocolate Peanut Butter Oat Bars Delight

WANT TO SAVE THIS RECIPE?

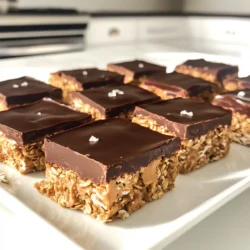
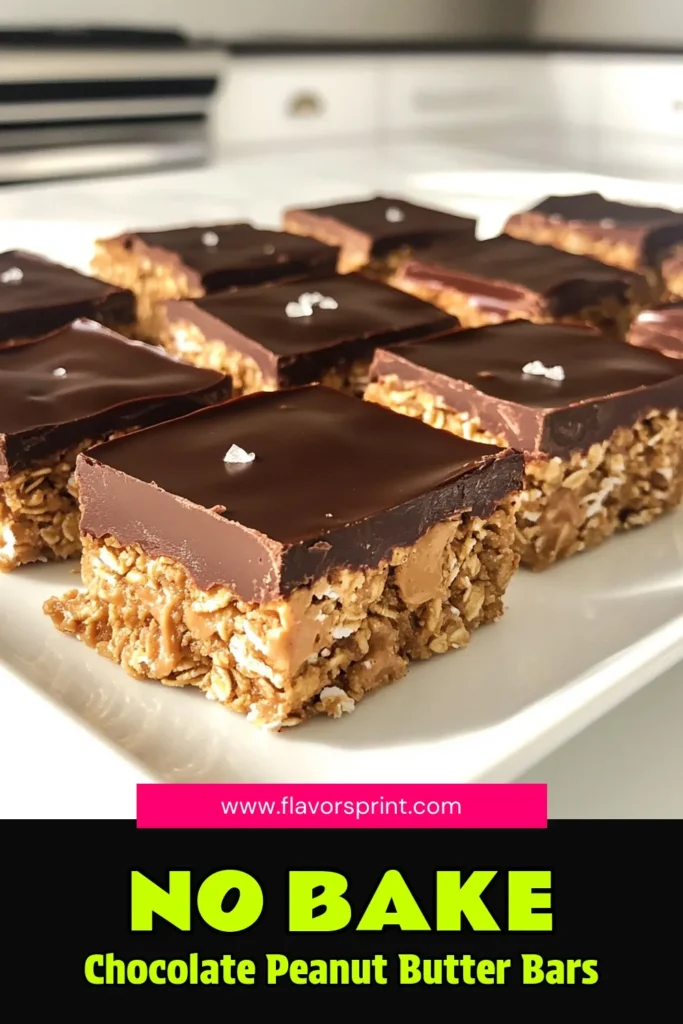
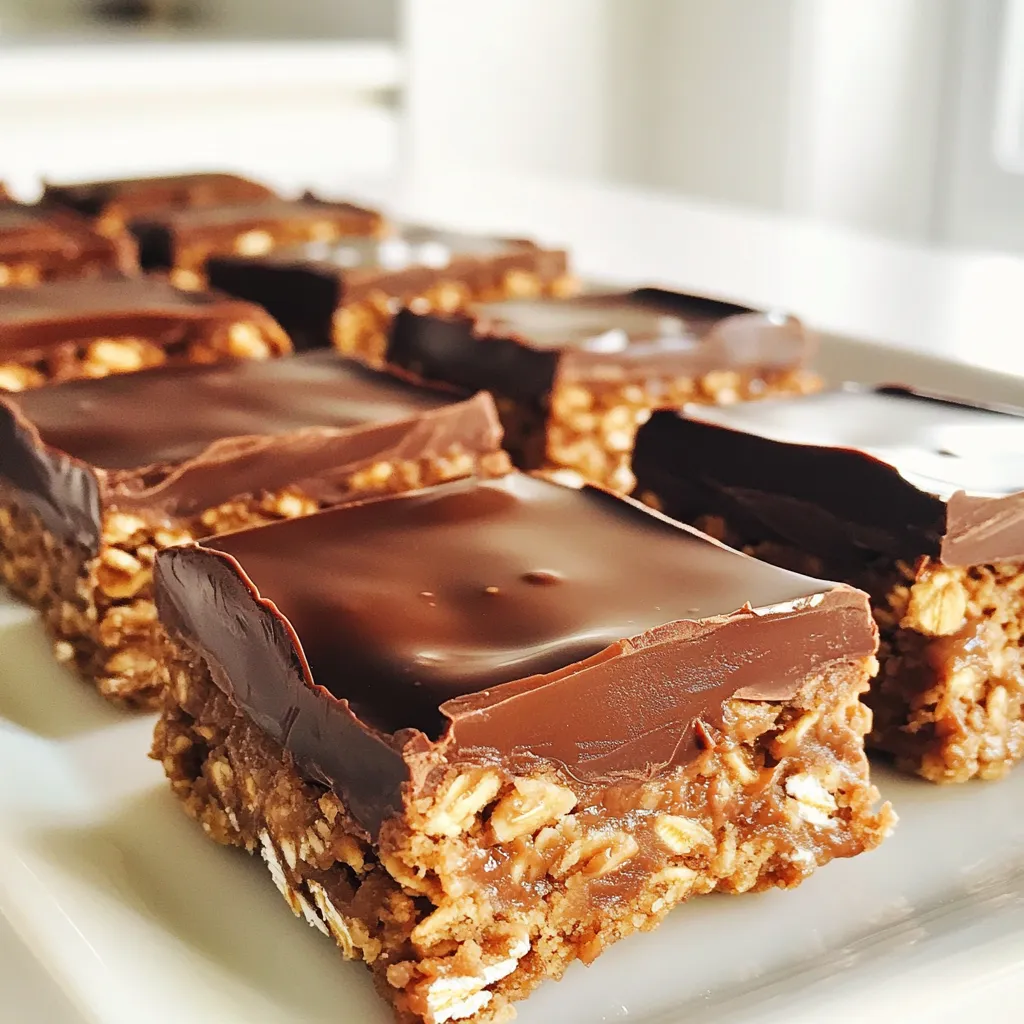
Are you craving a sweet treat that’s easy to make and no oven needed? Look no further! My No-Bake Chocolate Peanut Butter Oat Bars combine rich chocolate and creamy peanut butter for a tasty snack. With just a few simple ingredients, you’ll whip up delicious bars perfect for any time of day. Ready to indulge guilt-free? Let’s dive into this delightful recipe!

Ingredients

Here’s what you need for No-Bake Chocolate Peanut Butter Oat Bars:

– 2 cups rolled oats

– 1 cup peanut butter (creamy or crunchy)

– 1/2 cup honey or maple syrup

– 1/2 cup dark chocolate chips

– 1/4 cup unsweetened cocoa powder

– 1 teaspoon vanilla extract

– 1/4 teaspoon salt

– Optional: 1/2 cup chopped nuts (almonds, walnuts) or dried fruit (cranberries, raisins)

These ingredients make a perfect blend of flavors. The oats give great texture. Peanut butter adds creaminess, while honey or maple syrup brings sweetness. Dark chocolate chips and cocoa powder create that rich chocolate taste. The vanilla and salt enhance all these flavors.

I often add chopped nuts or dried fruit. They bring extra crunch or chewiness. You can choose what you like. Mixing these ingredients together is the key. It makes a base that holds the bars together.

Make sure to gather everything before you start. This way, you will have a smooth cooking experience. Each ingredient plays a key role in making these bars delicious and satisfying.

Step-by-Step Instructions

Preparation of Dry Ingredients

In a large mixing bowl, I combine the rolled oats, cocoa powder, and salt. I stir until everything is even. This mix gives the bars a hearty texture and rich taste.

Mixing Wet Ingredients

Next, I blend peanut butter, honey, and vanilla extract in another bowl. I mix until the texture is smooth. This mixture adds sweetness and creaminess to our bars.

Combining and Pressing Mixture

Now, I pour the peanut butter mix into the oat mix. I stir thoroughly until all ingredients blend well. If I want, I fold in nuts or dried fruit for extra flavor. Then, I line an 8×8 inch baking dish with parchment paper. I leave some overhang for easy removal. I transfer the mixture to the dish and press it down firmly. This creates a solid layer.

Melting Chocolate

In a microwave-safe bowl, I melt the dark chocolate chips. I do this in 30-second intervals, stirring in between. Once smooth, I pour the melted chocolate over the pressed oat mixture. I spread it evenly to cover the top.

Chilling Process

Finally, I refrigerate the dish for at least 2 hours. This helps the bars set properly. After chilling, I lift the bars out using the parchment overhang. I slice them into squares or bars. Enjoy your tasty no-bake treats!

Tips & Tricks

Perfecting the Texture

To get the best bars, mix your oats, cocoa powder, and salt well. This step ensures the flavors blend nicely. When you combine the wet and dry ingredients, stir until everything is evenly mixed. You want every bite to taste rich and chocolatey. If the mix feels too dry, add a little more peanut butter or honey.

Easier Removal from Dish

Using parchment paper makes removing the bars easy. Line your baking dish with parchment, leaving some paper hanging over the edges. This overhang acts like a handle. When your bars are set, just pull on the overhang to lift them out. No mess, no hassle!

Presentation Tips

Make your bars look fancy with a simple touch. Drizzle melted chocolate on top for a glossy finish. You can also sprinkle sea salt for a nice contrast. Arrange the bars on a platter for a great display. These little tricks make your treats look as good as they taste!

Variations

Nutty Twists

You can make these bars even more exciting. Adding chopped almonds or walnuts gives them a great crunch. The nuts also add healthy fats and protein. You can mix them in when you combine the wet and dry ingredients. This simple step makes a big difference in flavor and texture.

Fruity Additions

Want to make your bars chewy and fruity? Try adding raisins or dried cranberries. They add a nice sweetness and extra texture. You can mix them in with the nuts or just add them alone. This change can bring a burst of flavor to your chocolate peanut butter oat bars.

Alternative Sweeteners

If you want to change the sweetness, you can use agave syrup or brown sugar. These options give your bars a different taste. Agave syrup is a great choice for a lighter sweetness. Brown sugar adds a rich, caramel-like flavor. Just swap them in for honey, and you’re all set!

Storage Info

Best Storage Practices

Store your no-bake chocolate peanut butter oat bars in an airtight container. This keeps them fresh. The fridge is the best place for these bars. They stay tasty and safe to eat. You can stack them up, but separate layers with parchment paper. This prevents sticking.

Freezing for Later

You can freeze these bars for later enjoyment. To freeze, cut them into squares first. Wrap each piece in plastic wrap. Then, place them in a freezer-safe bag or container. When you want to eat one, just take it out. Let it thaw in the fridge for a few hours. It will taste great!

Shelf Life

These bars last about one week in the fridge. They stay fresh and delicious. If you freeze them, they can last for up to three months. Always check for signs of spoilage before eating. If they look or smell off, it’s best to toss them out. Enjoy your tasty treat!

FAQs

Can I substitute peanut butter with another nut butter?

Yes, you can swap peanut butter for almond butter or cashew butter. Each nut butter gives a unique taste. Almond butter has a nutty flavor, while cashew butter is creamier. These options still work well with oats and chocolate.

How can I make these bars vegan?

To make these bars vegan, replace honey with maple syrup or agave nectar. Use vegan chocolate chips instead of regular ones. Check that your nut butter does not contain any dairy. With these swaps, you can enjoy a plant-based treat.

What can I use instead of cocoa powder?

If you want a different flavor, try carob powder or chocolate protein powder. Carob has a sweet and earthy taste. Chocolate protein powder will add a protein boost. Both options keep the bars delicious and fun.

Are these bars gluten-free?

Yes, these bars can be gluten-free if you use certified gluten-free oats. Regular oats may contain gluten due to cross-contamination. Always check labels to ensure your oats are safe for a gluten-free diet. Enjoy these bars without worry!

These energy bars are easy to make with just a few ingredients. You combine dry and wet elements, then chill the mixture to set. Don’t forget to try variations like adding nuts or fruits for extra flavor. Remember, store them properly to keep them fresh. With these tips, you’ll make delicious bars that everyone will love. Keep experimenting and enjoy your tasty snacks!

Here’s what you need for No-Bake Chocolate Peanut Butter Oat Bars: - 2 cups rolled oats - 1 cup peanut butter (creamy or crunchy) - 1/2 cup honey or maple syrup - 1/2 cup dark chocolate chips - 1/4 cup unsweetened cocoa powder - 1 teaspoon vanilla extract - 1/4 teaspoon salt - Optional: 1/2 cup chopped nuts (almonds, walnuts) or dried fruit (cranberries, raisins) These ingredients make a perfect blend of flavors. The oats give great texture. Peanut butter adds creaminess, while honey or maple syrup brings sweetness. Dark chocolate chips and cocoa powder create that rich chocolate taste. The vanilla and salt enhance all these flavors. I often add chopped nuts or dried fruit. They bring extra crunch or chewiness. You can choose what you like. Mixing these ingredients together is the key. It makes a base that holds the bars together. Make sure to gather everything before you start. This way, you will have a smooth cooking experience. Each ingredient plays a key role in making these bars delicious and satisfying. In a large mixing bowl, I combine the rolled oats, cocoa powder, and salt. I stir until everything is even. This mix gives the bars a hearty texture and rich taste. Next, I blend peanut butter, honey, and vanilla extract in another bowl. I mix until the texture is smooth. This mixture adds sweetness and creaminess to our bars. Now, I pour the peanut butter mix into the oat mix. I stir thoroughly until all ingredients blend well. If I want, I fold in nuts or dried fruit for extra flavor. Then, I line an 8x8 inch baking dish with parchment paper. I leave some overhang for easy removal. I transfer the mixture to the dish and press it down firmly. This creates a solid layer. In a microwave-safe bowl, I melt the dark chocolate chips. I do this in 30-second intervals, stirring in between. Once smooth, I pour the melted chocolate over the pressed oat mixture. I spread it evenly to cover the top. Finally, I refrigerate the dish for at least 2 hours. This helps the bars set properly. After chilling, I lift the bars out using the parchment overhang. I slice them into squares or bars. Enjoy your tasty no-bake treats! To get the best bars, mix your oats, cocoa powder, and salt well. This step ensures the flavors blend nicely. When you combine the wet and dry ingredients, stir until everything is evenly mixed. You want every bite to taste rich and chocolatey. If the mix feels too dry, add a little more peanut butter or honey. Using parchment paper makes removing the bars easy. Line your baking dish with parchment, leaving some paper hanging over the edges. This overhang acts like a handle. When your bars are set, just pull on the overhang to lift them out. No mess, no hassle! Make your bars look fancy with a simple touch. Drizzle melted chocolate on top for a glossy finish. You can also sprinkle sea salt for a nice contrast. Arrange the bars on a platter for a great display. These little tricks make your treats look as good as they taste! {{image_2}} You can make these bars even more exciting. Adding chopped almonds or walnuts gives them a great crunch. The nuts also add healthy fats and protein. You can mix them in when you combine the wet and dry ingredients. This simple step makes a big difference in flavor and texture. Want to make your bars chewy and fruity? Try adding raisins or dried cranberries. They add a nice sweetness and extra texture. You can mix them in with the nuts or just add them alone. This change can bring a burst of flavor to your chocolate peanut butter oat bars. If you want to change the sweetness, you can use agave syrup or brown sugar. These options give your bars a different taste. Agave syrup is a great choice for a lighter sweetness. Brown sugar adds a rich, caramel-like flavor. Just swap them in for honey, and you’re all set! Store your no-bake chocolate peanut butter oat bars in an airtight container. This keeps them fresh. The fridge is the best place for these bars. They stay tasty and safe to eat. You can stack them up, but separate layers with parchment paper. This prevents sticking. You can freeze these bars for later enjoyment. To freeze, cut them into squares first. Wrap each piece in plastic wrap. Then, place them in a freezer-safe bag or container. When you want to eat one, just take it out. Let it thaw in the fridge for a few hours. It will taste great! These bars last about one week in the fridge. They stay fresh and delicious. If you freeze them, they can last for up to three months. Always check for signs of spoilage before eating. If they look or smell off, it's best to toss them out. Enjoy your tasty treat! Yes, you can swap peanut butter for almond butter or cashew butter. Each nut butter gives a unique taste. Almond butter has a nutty flavor, while cashew butter is creamier. These options still work well with oats and chocolate. To make these bars vegan, replace honey with maple syrup or agave nectar. Use vegan chocolate chips instead of regular ones. Check that your nut butter does not contain any dairy. With these swaps, you can enjoy a plant-based treat. If you want a different flavor, try carob powder or chocolate protein powder. Carob has a sweet and earthy taste. Chocolate protein powder will add a protein boost. Both options keep the bars delicious and fun. Yes, these bars can be gluten-free if you use certified gluten-free oats. Regular oats may contain gluten due to cross-contamination. Always check labels to ensure your oats are safe for a gluten-free diet. Enjoy these bars without worry! These energy bars are easy to make with just a few ingredients. You combine dry and wet elements, then chill the mixture to set. Don’t forget to try variations like adding nuts or fruits for extra flavor. Remember, store them properly to keep them fresh. With these tips, you'll make delicious bars that everyone will love. Keep experimenting and enjoy your tasty snacks!

No-Bake Chocolate Peanut Butter Oat Bars

Indulge in these delicious No-Bake Chocolate Peanut Butter Oat Bars! With creamy peanut butter, rolled oats, and a rich chocolate topping, these treats are the perfect quick dessert. Easy to make and totally satisfying, they’re a hit for all ages. Ready in just 15 minutes plus chilling time, you'll want to make this recipe again and again. Click through for the full recipe and start your tasty adventure today! #NoBakeDesserts #ChocolatePeanutButter #HealthySnacks #SweetTreats

Ingredients
  

2 cups rolled oats

1 cup peanut butter (creamy or crunchy)

1/2 cup honey or maple syrup

1/2 cup dark chocolate chips

1/4 cup unsweetened cocoa powder

1 teaspoon vanilla extract

1/4 teaspoon salt

Optional: 1/2 cup chopped nuts (almonds, walnuts) or dried fruit (cranberries, raisins)

Instructions
 

In a large mixing bowl, combine the rolled oats, cocoa powder, and salt. Stir until evenly mixed.

    In a separate bowl, mix the peanut butter, honey (or maple syrup), and vanilla extract until smooth.

      Pour the peanut butter mixture into the oats mixture and stir thoroughly until all the ingredients are well combined. If using, fold in the chopped nuts or dried fruit at this point.

        Line an 8x8 inch square baking dish with parchment paper, leaving some overhang for easy removal.

          Transfer the mixture to the prepared baking dish and press it down firmly with your hands or a spatula to create an even layer.

            In a microwave-safe bowl, melt the dark chocolate chips in 30-second intervals, stirring between each, until smooth.

              Pour the melted chocolate over the pressed oat mixture, spreading it evenly to cover the top.

                Refrigerate for at least 2 hours or until set.

                  Once set, lift the bars out of the dish using the parchment overhang and slice them into squares or bars.

                    Prep Time: 15 minutes | Total Time: 2 hours 15 minutes | Servings: 12

                      - Presentation Tips: Arrange the bars on a platter, drizzled with additional melted chocolate or topped with a sprinkle of sea salt for an extra touch of elegance.

                        WANT TO SAVE THIS RECIPE?

                        Leave a Comment

                        Recipe Rating