Looking for a treat that’s rich, creamy, and easy to whip up? No-Bake Mocha Cheesecake Jars are your new go-to dessert! You’ll love how quick this no-bake treat is, with simple layers of smooth cream cheese, fresh coffee, and a crunchy crust. Perfect for gatherings or just a sweet snack at home, these jars are fun to make and even better to eat. Let’s dive into this delicious recipe!
Ingredients
Cream Cheese & Sweeteners
For this dessert, you need 8 oz of cream cheese, softened. This gives the cheesecake its smooth base. You also need 1 cup of powdered sugar. This adds just the right sweetness to balance the flavors.
Heavy Cream
Next, grab 1 cup of heavy whipping cream. This is key for a light and fluffy texture. When whipped, it helps the cheesecake feel rich and creamy without baking.
Brewed Coffee & Flavorings
Use 1/2 cup of brewed coffee, cooled. This adds a deep mocha flavor to the cheesecake. Don’t forget to add 2 tablespoons of cocoa powder. It enhances the chocolate taste. Lastly, 1 tablespoon of vanilla extract brings warmth and depth to your dessert.
Chocolate Cookie Crust
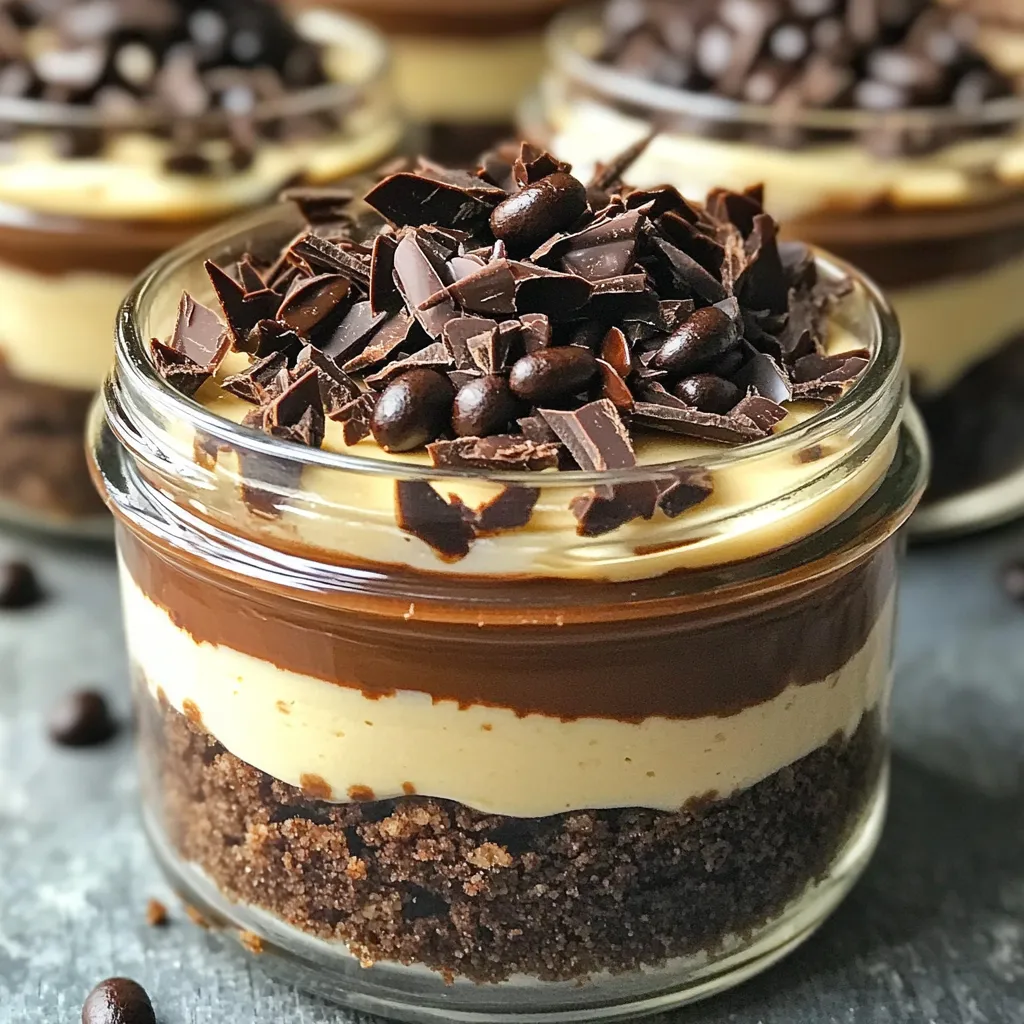
For the crust, you need 1 cup of chocolate cookie crumbs. You can use Oreos or any chocolate wafers you like. Mix these crumbs with 1/4 cup of melted butter. This helps bind the crust together for a crunchy layer.
Garnishes
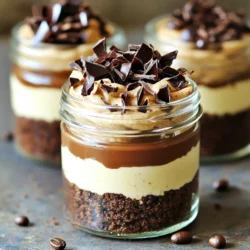
To make your jars look special, use chocolate shavings and coffee beans for garnish. These add a nice touch and look great on top of the cheesecake. They also hint at the rich flavors inside.
Step-by-Step Instructions
Preparing the Cream Cheese Mixture
To start, grab a mixing bowl. Add 8 ounces of softened cream cheese and 1 cup of powdered sugar. Use an electric mixer and beat this mix until it is smooth and creamy. This step is key, as it sets the base for your cheesecake.
Whipping the Cream
Next, take another bowl and pour in 1 cup of heavy whipping cream. Whip the cream until stiff peaks form. This means when you lift the beaters, the cream holds its shape well. Now, gently fold the whipped cream into the cream cheese mixture. This adds lightness and creaminess to your dessert.
Combining the Flavors
In this step, stir in 1/2 cup of cooled brewed coffee, 2 tablespoons of cocoa powder, and 1 tablespoon of vanilla extract. Mix until everything is fully combined. This is where the mocha flavor comes alive, giving depth to your cheesecake.
Assembling the Layers
Now, it’s time to layer your dessert. In a separate bowl, mix 1 cup of chocolate cookie crumbs with 1/4 cup of melted butter. This mixture forms the crust. In small jars or glasses, start with a layer of cookie crumbs. Then, add a layer of the mocha cheesecake filling. Repeat this until the jars are full, ending with the cheesecake layer on top.
Chilling the Cheesecake Jars
Cover your jars with lids or plastic wrap and place them in the fridge. Chill them for at least 4 hours, or overnight if you can wait. This chilling time helps the flavors meld together and allows the cheesecake to set properly. Before serving, you can garnish with chocolate shavings and a few coffee beans for a lovely touch.
Tips & Tricks
Ensuring the Perfect Texture
To get a smooth and creamy cheesecake, beat the cream cheese well. Use a mixer for the best results. Start with softened cream cheese. It should feel soft to the touch. If it is cold, it will not mix well. Mix until there are no lumps. This step is key for a great texture that melts in your mouth.
Best Practices for Whipping Cream
When you whip cream, start with cold heavy cream. Cold cream whips faster and better. Use a clean bowl and beaters to avoid any unwanted flavors. Whip until you see stiff peaks. This means the cream holds its shape well. Fold the whipped cream gently into the cream cheese mixture. This keeps it light and airy.
Chilling Time Recommendations
Chilling is important for the best flavor and texture. After you layer the jars, cover them well. Place them in the fridge for at least 4 hours. If you can wait, chill them overnight. This helps the flavors blend and the cheesecake to set. A longer chill time makes for a richer taste. Enjoy your dessert even more!
Variations
Flavor Combinations
You can mix up the flavors in your no-bake mocha cheesecake jars. Try using different types of coffee. For instance, a caramel latte can add a sweet twist. You can also swap cocoa powder for melted chocolate for a richer taste. If you love fruit, add a layer of raspberry or strawberry puree. This adds a fresh taste and bright color.
Substitutions for Ingredients
If you need to change some ingredients, it’s easy. Use Greek yogurt instead of cream cheese for a lighter option. For a sweetener, you can pick honey or agave syrup instead of powdered sugar. If you want a non-dairy version, choose coconut cream in place of heavy cream. You can even use gluten-free cookie crumbs if you need to avoid gluten.
Serving Suggestions
Serve these jars in fun ways to impress your guests. You can add a dollop of whipped cream on top before serving. Sprinkle some extra cocoa powder or crushed cookies for a touch of crunch. For a fancy touch, use chocolate shavings and coffee beans. You can also serve these jars with a side of fresh fruit. This adds color and a nice contrast to the rich cheesecake.
Storage Info
Proper Storage Techniques
To keep your no-bake mocha cheesecake jars fresh, store them in the fridge. Use an airtight container or cover each jar with plastic wrap. This helps prevent any odors from other foods. Make sure the jars are sealed well to keep everything fresh.
Freezing Instructions
You can freeze these cheesecake jars if you want to keep them longer. Just make sure to cover them tightly. Use freezer-safe containers to avoid freezer burn. When ready to eat, thaw them in the fridge overnight. Do not refreeze once they have thawed.
Shelf Life
These cheesecake jars stay fresh in the fridge for about 4 to 5 days. After that, the texture and taste may change. If you freeze them, they can last for up to 2 months. Always check for any changes in smell or appearance before eating.
FAQs
Can I make this recipe dairy-free?
Yes, you can make this recipe dairy-free. Use vegan cream cheese and coconut cream instead of heavy cream. Be sure to check labels for dairy-free ingredients. This way, you can still enjoy a rich, creamy dessert without dairy.
How long do these cheesecake jars last in the fridge?
These cheesecake jars last about 3 to 5 days in the fridge. Store them covered to keep them fresh. If you want to enjoy them later, it’s best to eat them within this time frame for the best taste.
Can I use instant coffee instead of brewed coffee?
Yes, you can use instant coffee. Mix 2 teaspoons of instant coffee with 1/2 cup of hot water. Stir until dissolved, then cool it before adding to your cheesecake mixture. This method works well for a quick coffee flavor boost.
What can I use instead of chocolate cookie crumbs?
You can use graham cracker crumbs or vanilla wafers if you prefer. Both options add a nice texture. If you want a healthier choice, try crushed nuts mixed with a bit of melted butter.
This blog post covered a simple cheesecake jar recipe, with key ingredients like cream cheese, heavy cream, and brewed coffee. I shared step-by-step instructions to create delicious layers, tips for the perfect texture, and variations to suit your taste. Proper storage helps keep your treat fresh and tasty. Remember, you can mix in different flavors and substitutes to make it your own. Enjoy your cheesecake jars and share them with friends for smiles all around.